seh isd200/300 as a .print client gateway
TRANSCRIPT

White Paper
SEH ISD200/300 as a .print Client GatewayExample for practice
Why .print and Client Gateway?
Example Configuration
Installation� Printer and ISD200/300� Clients� Terminal server
Configuration� Network� ISD200/300� Terminal server� Installing SSL/TLS certificates � .print AutoConnect� .print Connected Gateway� Test print
A .print Client Gateway can greatly simplify the intro-duction of ThinPrint .print because it can receive print jobs for an entire group of clients and printers, decom-press and decrypt them, and then distribute them con-ventionally in a local network – like a local print server. Then the .print Client is only necessary on the “local print server” for this remote LAN. Otherwise, the .print client must be installed on each end device.
The following example helps you install a .print Cli-ent Gateway using SEH’s Intelligent Spooling Device ISD200/300 print server as a test scenario. Once you get a feel for the functionality, you can install it accord-ing to your system's individual requirements.
An ISD200/300 has an embedded .print Client. It can address network printers via Standard TCP/IP (RAW sockets printing).
Example configuration with ISD200/300 as .print Client Gateway
© CopyrightThis document is the intellectual property of ThinPrint AG. This document may be copied in whole or in part, provided this Copyright notice is included in every copy.
® Registered Trade Marks All hardware and software names mentioned in this document are the registered trademarks of their respective company or should be regarded as such.
Email: [email protected]: www.thinprint.com
Issued: October 2, 2009 (v15)
ThinPrint AGAlt-Moabit 91 a/b10559 BerlinGermany/Alemania
ThinPrint Pty. Ltd.L 10, 275 Alfred StreetNorth Sydney/NSW/2060Australia
ThinPrint, Inc.20006 Detroit Road, Suite 303Cleveland, OH 44116USA/EEUU
ThinPrint, Inc.7600 Grandview Avenue, Suite 200Denver, Colorado 80002USA/EEUU

Contents
SEH ISD300 White Paper 3
© T
hinP
rint
AG
20
09
Foreword ...................................................................................................................... 4
Why .print and Client Gateway? ........................................................................ 5
Example configuration ............................................................................................ 6
Installation .................................................................................................................. 7
Safety warning ............................................................................................................... 7
Printer and ISD200/300 ................................................................................................. 7
Clients .......................................................................................................................... 7
Terminal server .............................................................................................................. 7
Configuration .............................................................................................................. 7
Network ........................................................................................................................ 7
Client Gateway ISD200/300 ........................................................................................... 8
Installing SSL/TLS certificates ................................................................................... 16
Terminal server ............................................................................................................ 23
Creating printers ...................................................................................................... 23SSL/TLS encryption ................................................................................................. 25Installing SSL/TLS certificates ................................................................................... 26
Test print .................................................................................................................... 27
Additional configuration options ....................................................................... 27
.print AutoConnect ....................................................................................................... 27
.print Connected Gateway ............................................................................................. 28
Appendix .................................................................................................................... 29
Additional sources ........................................................................................................ 29

Foreword
4 White Paper SEH ISD300
© ThinPrint A
G 2
00
9
ForewordThe .print Client Gateway can greatly simplify the introduction of ThinPrint .print because it can receive print jobs for an entire group of clients and printers, decom-press and decrypt them, and then distribute them conventionally in a local network – like a local print server. Then the .print Client is only necessary on the “local print server” or .print Client Gateway for this remote LAN. Otherwise, the .print client must be installed on each end device: rich clients, printers, print servers, thin clients, etc. This could mean that with thin clients, for example, a BIOS update is necessary. Even mixed environments pose no problem: The .print client is installed onto all devices where simple installation is possible, and all others are served by a Client gateway.
Any machine with .print Client installed can be used as a Client Gateway (e.g., a Windows or a Linux workstation). Thin clients or print boxes with embedded .print Clients can also be sued. The following example helps you install a .print Client Gate-way using SEH’s Intelligent Spooling Device ISD200/300 as a test scenario. Once you get a feel for the functionality, you can install it according to your system's indi-vidual requirements.
An ISD200/300 has an embedded .print Client. It can address several dozen printers:
� One local printer (via USB) and / or � As many network printers (via TCP/IP) as allowed by the computing power of
the ISD200/300 and print volume
See also www.seh.de.
Tip! There are some alternatives for .print Client Gateways: for example here, you can configure Win32 clients, Linux clients, or external print servers. If, however, you also want to keep printer drivers off of your servers (Driver Free Printing), you must use Win32 clients as .print Client Gateway.

Why .print and Client Gateway?
SEH ISD300 White Paper 5
© T
hinP
rint
AG
20
09
Why .print and Client Gateway?
General ThinPrint .print.print Client Gateway with ISD200/300
Use • Bandwidth control and print data compression, especially for server based environments
• Pint data encryption• Driver Free Printing
Not necessary to install .print Client on every client machine; it's embedded in the ISD200/300.
Function .print Server component pro-vides bandwidth control, print data compression, streaming, and encryption, then sends print data to the .print Client compo-nent.
Receipt, decompression, and decryption of print data, trans-mission to local printer(s) and/or network printers
.print components to be installed
• .print Engine• .print Client• .print AutoConnect• .print Connection Service
if necessary• .print Virtual Channel Gateway
if necessary
• .print Engine onto the terminal server(s), the virtual desktops and/or dedicated print server
• [.print Client (TCP/IP) is embedded in the ISD200/300; AutoConnect and Connection Service sup-port included]
.print licenses • .print Application Server Engine and/or .print Server Engine
• .print Desktop Engine (for vir-tual desktops)
• .print Connected Gateway if necessary
Windows:• without dedicated print
server/s: .print Application Server Engine license
• with dedicated print server/s: .print Server Engine licenseon each print server and .print Application Server Engine license on each terminal server
• one .print Connected Gateway license if necessary

Example configuration
6 White Paper SEH ISD300
© ThinPrint A
G 2
00
9
Example configurationBy way of example, we will assume an environment with a Windows terminal server. The components necessary for this example are:
� At least one PC (as terminal client)� 1 Intelligent Spooling Device SEH ISD300 with locally connected printer� 2 network printers with their own network card
(without integrated .print Client)� 1 terminal server, .print Engine and .print AutoConnect installed
Tips 1. .print Client Gateway works exclusively with the protocol TCP/IP. 2. The following .print (demo) license is necessary for this example configuration:
.print Application Server Engine3. This example illustrates ISD300 configuration without and with SSL encryption.
Other .print features are similarly described in the following manuals (Page 29):
Illus. 1
.print feature(supported by ISD300)
Manual Chapter
.print AutoConnect .print Server Engine (for dedicated print servers)
Running .print AutoCon-nect on a central print server
.print Connection Service .print Connected Gate-way
Local print server
Illus. 1 Example configuration

Installation
SEH ISD300 White Paper 7
© T
hinP
rint
AG
20
09
InstallationSafety warning
All ThinPrint products are pure software solutions. For safety warnings for your hard-ware, please consult the technical documentation provided by the respective manu-facturer and supplier of each hardware device and component – particularly the user manual for the SEH ISD200/300 (Page 29).
Printer and ISD200/300
– Connect the HP DeskJet 420 directly to the USB port of the IDD300 (Illus. 1).– Connect the ISD200/300 and the network cards of both network printers to the
network.
Clients
– Install 32-bit Windows and a RDP or ICA client onto a PC (Illus. 1).
Terminal server
– Install the .print Engine onto a Microsoft or Citrix terminal server (see Illus. 1 and the “.print Application Server Engine” manual, Page 29).
ConfigurationNetwork
– Assign all devices IP addresses within the same subnet; in this example:
• for the ISD200/300 192.168.130.211• for the Lexmark network printer 192.168.130.200• for the OKI network printer 192.168.130.123• for the terminal server 192.168.130.209
Here, the printer HP DeskJet 420 is connected to the ISD200/300 on its USB port.

Configuration
8 White Paper SEH ISD300
© ThinPrint A
G 2
00
9
Client Gateway ISD200/300
1. Boot the ISD200/300 with its power button at the front panel. If after a moment, the ISD200/300 screen displays an IP address from your network (e.g., 192.168.128.2), then proceed with Step 3. If no IP address is dis-played (0.0.0.0) or one that is not reachable from your computer, then con-tinue with Step 2.
2. Manually assign the ISD200/300 its IP address using the navigation keys and the display on the front. Proceed as follows:
3. Open the ISD200/300 homepage with a web browser1; use the IP address from the ISD200/300 screen as URL (e.g. 192.168.128.2 or 192.168.130.211; Illus. 2).
Display Action
ISDXXXXXX 0.0.0.0
• Press
IP SetupCancel
• Confirm with
IP ConfigurationDHCP
• Select MANUAL with
IP ConfigurationManual
• Confirm with
IP Address:000.000.000.000
• Enter the IP address 192.168.130.211. Navi-gate with within the IP address to the individual numbers and change the values with
• When the cursor is at the last digit,
confirm with
Netmask:255.255.255.000
• If necessary, change the net mask with the same cursor functions.
• When the cursor is at the last digit, confirm with
Gateway: 000.000.000.000
• Enter the standard gateway’s IP address.• Confirm with
Apply Back
• Confirm with
Tip! If no IP address (0.0.0.0) appears on the ISD200/300 after booting, check its network connection as a precaution.
1 Internet Explorer version 4.0 and later; Netscape Navigator version 4.01 and later
Configuration
SEH ISD300 White Paper 9
© T
hinP
rint
AG
20
09
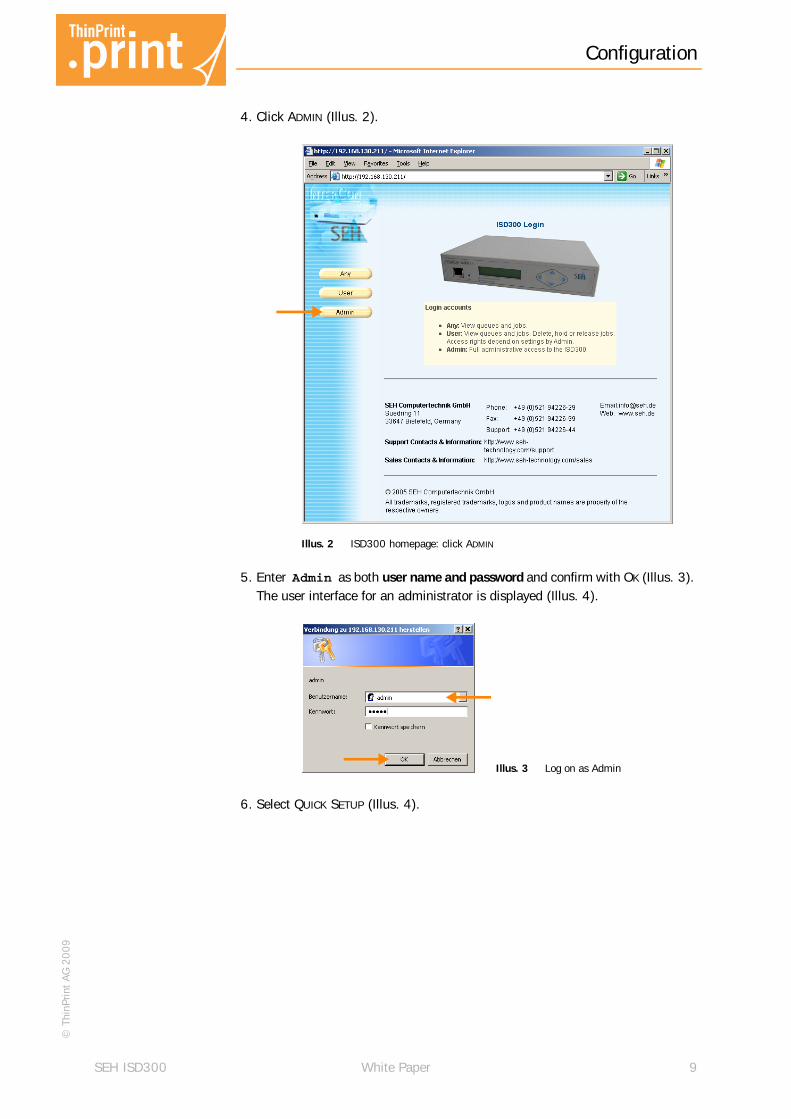
4. Click ADMIN (Illus. 2).Illus. 2
5. Enter Admin as both user name and password and confirm with OK (Illus. 3). The user interface for an administrator is displayed (Illus. 4).
Illus. 3
6. Select QUICK SETUP (Illus. 4).
Illus. 2 ISD300 homepage: click ADMIN
Illus. 3 Log on as Admin

Configuration
10 White Paper SEH ISD300
© ThinPrint A
G 2
00
9
Illus. 4
7. If necessary, enter host name, date, and time, and confirm with NEXT (Illus. 5).Confirm with OK if the message “Host name changed – click Ok to refresh” then appears.
Illus. 5
8. If DHCP has been enabled, change the IP address, disable DHCP, and confirm with NEXT (Illus. 6).
Illus. 6
9. Enter a first and last IP address for the printer search (max. 255 IP addresses) and confirm with NEXT (Illus. 7).
Illus. 4 User interface for administrator: select QUICK SETUP
Illus. 5 Check host name, date, and time and confirm with NEXT
Illus. 6 Change IP address if necessary and disable DHCP

Configuration
SEH ISD300 White Paper 11
© T
hinP
rint
AG
20
09
Illus. 7
10. Confirm the message with the number of found printers with OK. A list of found printers is displayed (Illus. 8).
Illus. 8
11. Enter for each desired printer a name for its printer queue under QUEUE NAME2; in this example, LexT630. Click INSTALL and confirm the following message with OK (Illus. 9).The second network printer (Illus. 1) was not automatically detected here; it will be created manually below.
Illus. 9
12. The queue name then appears without input field (Illus. 10). Click FINISH SETUP and again confirm the following message with OK.
2 The queue names must begin with a letter; other than letters and numbers, hyphens - and underscores _ are allowed; max. 32 characters (Windows 9x: 15 characters).
Illus. 7 Enter first and last addresses for printer search
Illus. 8 Enter printer queue name(s) and confirm with INSTALL
Illus. 9 Printer queue created for Lexmark T630

Configuration
12 White Paper SEH ISD300
© ThinPrint A
G 2
00
9
Illus. 10
13. You are returned to the main menu. You now see the queue of network printer Lexmark T630 (Illus. 11).
14. To add the other network printer and the local printer connected to USB, select CREATE QUEUE (Illus. 11)).
Illus. 11
15. Enter anything as queue name for the second network printer2; in our example: OkiC5510. Click NEXT (Illus. 12).
Illus. 12
Illus. 10 Confirm queue(s) for network printer(s) with FINISH SETUP
Illus. 11 Add remaining queues with CREATE QUEUE
Illus. 12 Specify queue name and confirm with NEXT
Configuration
SEH ISD300 White Paper 13
© T
hinP
rint
AG
20
09
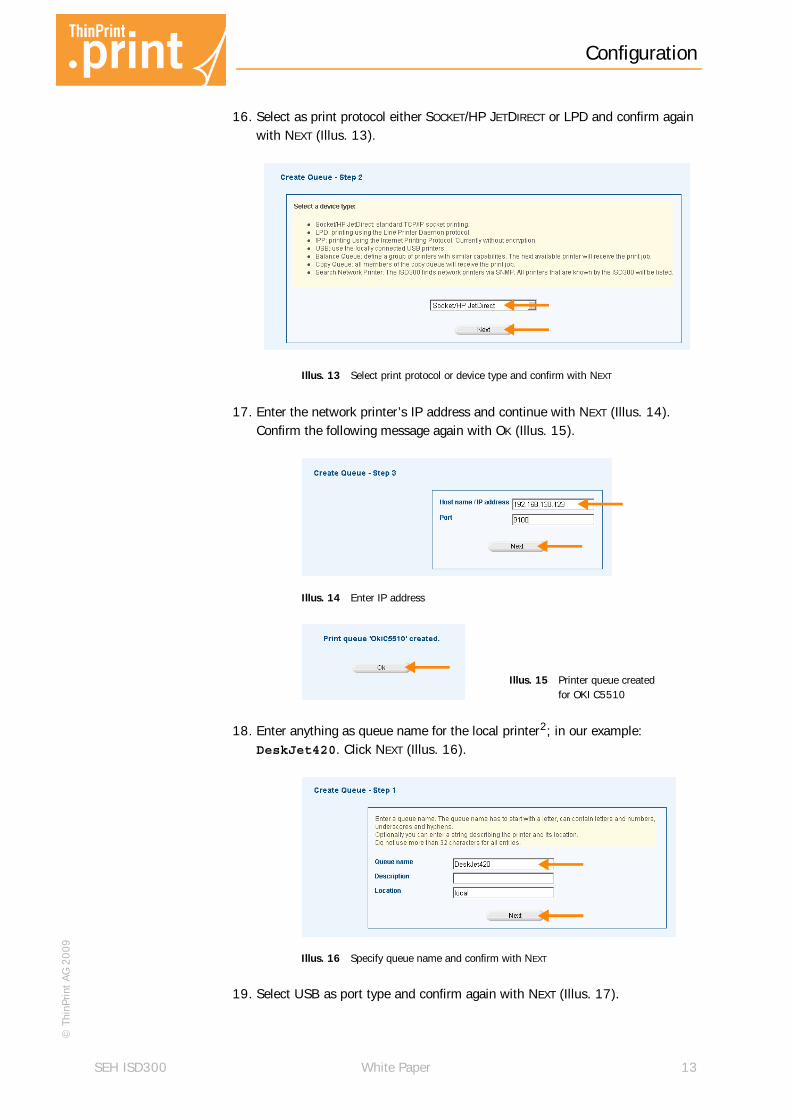
16. Select as print protocol either SOCKET/HP JETDIRECT or LPD and confirm again with NEXT (Illus. 13).
Illus. 13
17. Enter the network printer’s IP address and continue with NEXT (Illus. 14). Confirm the following message again with OK (Illus. 15).
Illus. 14
Illus. 15
18. Enter anything as queue name for the local printer2; in our example: DeskJet420. Click NEXT (Illus. 16).
Illus. 16
19. Select USB as port type and confirm again with NEXT (Illus. 17).
Illus. 13 Select print protocol or device type and confirm with NEXT
Illus. 14 Enter IP address
Illus. 15 Printer queue created for OKI C5510
Illus. 16 Specify queue name and confirm with NEXT

Configuration
14 White Paper SEH ISD300
© ThinPrint A
G 2
00
9
Illus. 17
20. If the printer is not connected or not turned on, the ISD200/300 cannot detect it automatically. In this case, select the USB port manually and confirm with NEXT (Illus. 18). Confirm the following message again with OK (Illus. 19), and then select QUEUES from the menu (Illus. 20).
Illus. 18
Illus. 19
Illus. 20
21. You receive the menu shown in Illus. 21. From here, you can manage the cre-ated printer queues. Now the ThinPrint software must be enabled: the .print Cli-ent. Select THINPRINT from the menu.
Illus. 17 Select USB as port type for the ISD300 and confirm with NEXT
Illus. 18 Select USB interface of the ISD300 and confirm with NEXT
Illus. 19 Printer queue created for HP DeskJet 420
Illus. 20 Click QUEUES

Configuration
SEH ISD300 White Paper 15
© T
hinP
rint
AG
20
09
Illus. 21
22. Assign any printer ID for each printer queue (the printer ID is necessary for Thin-Print to address the printers); in our example:
ID Printer 1 HP DeskJet 4202 Lexmark T6303 OKI C5510
Confirm with SET (Illus. 22) and again confirm the message with OK (Illus. 23).Illus. 22
Illus. 23
Illus. 21 Managing created printer queues
Illus. 22 Assign a ThinPrint printer ID for each printer
Illus. 23 .print Client is set up and active

Configuration
16 White Paper SEH ISD300
© ThinPrint A
G 2
00
9
Installing SSL/TLS certificatesRequesting a
certificate– If you want to print with encryption, then select MAINTENANCE from the left side
of the main window and then CERTIFICATE (Illus. 24).Illus. 24
– Delete an existing certificate by clicking DELETE if applicable.– Select CREATE A CERTIFICATE REQUEST (Illus. 25).Illus. 25
– Fill in at least the mandatory fields, which are marked with an asterisk (*). You can also specify here how long the client certificate is to be valid. Next, click CREATE (Illus. 25).
Illus. 24 ISD300 web page: select CERTIFICATE
Illus. 25 ISD300 web page: select CERTIFICATE A CERTIFICATE REQUEST

Configuration
SEH ISD300 White Paper 17
© T
hinP
rint
AG
20
09
Illus. 26
You will receive a messages stating that the request is created (Illus. 26). After clicking OK, the window in Illus. 27 appears with the certificate request. Here, you can see the private key of the client certificate, with which the certificate request will be made for the certificate server.
– Copy the key (circled) and paste it into a text file.Illus. 27
– Save the text file (e.g., an .rtf file) on any computer. From there, open the web page of the certificate server in the browser (Internet Explorer) by entering after the server IP address or host name, enter “/CERTSRV”, for example, HTTP://192.168.128.51/CERTSRV.
Illus. 26 Certificate request ready
Illus. 27 ISD300 web page: certificate request

Configuration
18 White Paper SEH ISD300
© ThinPrint A
G 2
00
9
Illus. 28
– Once the website is open, request the client certificate by selecting REQUEST A CERTIFICATE (Illus. 28)3.
Illus. 29
– A window opens like the one shown in Illus. 29. Click ADVANCED CERTIFICATE REQUEST.
Illus. 30
3 If the specified link is inactive, change the security settings in your browser (enable scripting, save web page as a trusted site).
Illus. 28 Website Certificate Services: Request a certificate
Illus. 29 Certificates server website: submit an advanced certificate request
Illus. 30 Certificate server web page: submitting a Base64 certificate request

Configuration
SEH ISD300 White Paper 19
© T
hinP
rint
AG
20
09
– For the ISD200/300 client certificate, you require a certificate that is coded with Base64. Therefore, select the lower link, as in Illus. 30. A window opens, in which you can enter your saved request (Illus. 31).
Illus. 31
– In the top text field (Illus. 31, circled area), either with copy&paste or by upload with the link below the text field, enter the contents of your text file (e.g., .rtf file). Then click SUBMIT. You will receive the message that the certificate has been requested (Illus. 32).
Illus. 32
You will receive a message confirming that the certificate request was successful (Illus. 32). You do not have to wait two days; you only have to wait until the certifi-cation server administrator has issued the certificates (as described in next para-graph).
Certification server:issuing the client
certificate
As administrator, you can see on the server which clients have requested a certifi-cate. You have the choice of issuing or denying the requested certificates. To do so,
Illus. 31 Certificate server web page: entering a Base64 certificate request
Illus. 32 Certification server website: certificate successfully requested

Configuration
20 White Paper SEH ISD300
© ThinPrint A
G 2
00
9
go to the CONTROL PANEL under ADMINISTRATIVE TOOLS to the CERTIFICATION AUTHORITY folder. Under PENDING REQUESTS, you will find the certificate requests (Illus. 33).
Illus. 33
– Choose the certificate and right click to select ALL TASKS� ISSUE (Illus. 33). You have now created the client certificate and signed it with the server’s root cer-tificate. The client certificate disappears from the PENDING REQUESTS folder and is now found under ISSUED CERTIFICATES (Illus. 34).
Illus. 34
Importing andinstalling
a client certificatefor the
ISD200/300
From the client machine, you can now get the certificate issued by the root certifica-tion authority from the certification server’s website:
– Open the same browser with which you submitted the certificate request (Illus. 28) and enter the server website again (example: HTTP://192.168.128.51/CERTSRV).
Illus. 33 Server certification authority: issuing requested certificates from the PENDING REQUESTS folder
Illus. 34 Server certification authority: issued certificate in ISSUED CERTIFICATES folder

Configuration
SEH ISD300 White Paper 21
© T
hinP
rint
AG
20
09
Illus. 35
– This time, select: VIEW THE STATUS OF A PENDING CERTIFICATE REQUEST on the website (Illus. 35).
Illus. 36
– You will be given a list of certificates that have been issued by the server (Illus. 36). Select your certificate.
Illus. 37
Illus. 35 Certification server website: selecting an issued certificate
Illus. 36 Certification server website: selecting an issued certificate
Illus. 37 Certification server website: install issued certificate

Configuration
22 White Paper SEH ISD300
© ThinPrint A
G 2
00
9
– You will receive a message confirming that the certificate was issued. Select the Base64 option as shown in Illus. 37and then click DOWNLOAD CERTIFICATE.
– You may receive a security warning asking if you really want to download the file. Check the information and click SAVE to download the client certificate. Select a path where the certificate is to be saved in .cer format; e.g., on the desktop (Illus. 38).
Illus. 38
– Open the ISD200/300 web page again and select the .cer certificate that you just saved (Illus. 19) at the bottom by certificate file (Illus. 20).
Illus. 39
Illus. 38 Downloading the certificate (.cer file): save file locally
Illus. 39 ISD300 web page: importing the certificate

Configuration
SEH ISD300 White Paper 23
© T
hinP
rint
AG
20
09
– Once you have entered the path to the certificate as in Illus. 39, click LOAD. You will receive a message confirming that the client certificate has been success-fully installed (Illus. 40).
Illus. 40
– To complete configuration, simply close the web browser.
Terminal server
Creating printers– Create printer objects on the terminal server for all printers connected to the
ISD200/300. Install the relevant printer drivers. Associate these printer objects with a ThinPrint Port.
– Next, rename the printer objects in the following format:
printer_name#IP_address_ISD:printer_ID
In our example, this creates the three printers connected to the ISD200/300 (Illus. 41):
• HP DeskJet 420#192.168.130.211:1
• Lexmark T630#192.168.130.211:2
• OKI C5510#192.168.130.211:3
Illus. 40 ISD300 web page: certificate successfully installed

Configuration
24 White Paper SEH ISD300
© ThinPrint A
G 2
00
9
Illus. 41
The IP address is the .print Client Gateway’s (ISD200/300). The printer ID (at the end) is specified in the ISD200/300 (Illus. 22). The printer name (left of the # ) is unimportant for addressing print data; it only serves to distinguish the printers.
– Start ThinPrint Port configuration in the Microsoft Management Console (MMC). In .print version 6.5 and later you can use the program group .PRINT ENGINE in START menu (Illus. 42).
Illus. 42
– Check in ThinPrint Port configuration to ensure that all printer objects are asso-ciated with a ThinPrint Port and that the correct protocol and desired band-width are set (Illus. 43).
Done! The printer objects in Illus. 41 can now be accessed by all terminal server users. (These permissions can of course be modified over the printer object’s permis-sions).
Illus. 43
Illus. 41 Printers folder on the terminal server
Illus. 42 Starting configuration of ThinPrint Ports with MMC (version 6.5 only)
Illus. 43 ThinPrint port configuration on the terminal server

Configuration
SEH ISD300 White Paper 25
© T
hinP
rint
AG
20
09
SSL/TLS encryption23. To print both with and without encryption, add a new ThinPrint port by clicking
the relevant icon (Illus. 43).24. Enter a suitable port name (Illus. 44).
Illus. 44
25. Double click the new entry in the ThinPrint Port management. The menu in Illus. 45 appears.
Illus. 45
26. Select USE ENCRYPTION and confirm with OK.27. Open the printers folder and in the properties of the OKI printer, select the new
“SSL:” ThinPrint port as port.28. Return to MMC and refresh the view with the F5 key (Illus. 46). The OKI printer
is now connected to the ThinPrint port that sends SSL-encrypted print data.
Illus. 44 MMC: adding a new ThinPrint port
Illus. 45 MMC: enabling SSL encryption

Configuration
26 White Paper SEH ISD300
© ThinPrint A
G 2
00
9
Illus. 46
Installing SSL/TLS certificates1. Import two SSL certificates to the Windows certificate store:
• A server certificate• A root certificateProceed as described in the chapter on “SSL encryption” in the “.print Applica-tion Server Engine” user manual (Page 29).
2. To determine which of the installed certificates is used by .print Engine, open MMC again (Illus. 46) and select ALL TASKS� ENCRYPTION SETTINGS from the .print Engine context menu (Illus. 47).
3. Enter the names of the server and root certificates (Illus. 48) and confirm with OK.
Illus. 47
Illus. 48
Illus. 46 MMC: new ThinPrint port with “reconnected” printer
Illus. 47 MMC: select encryption settings
Illus. 48 MMC: enter the names of the certifi-cates

Additional configuration options
SEH ISD300 White Paper 27
© T
hinP
rint
AG
20
09
Test print
Now test your .print Client Gateway installation. Print from a terminal session to each printer (or directly from the server).
How does print data find its way to the correct printer? All print data is sent to the ISD200/300 – the .print Client Gateway. After decom-pressing and decrypting it, the ISD200/300 forwards print data to the printer. Which printer receives what print job is decided by the printer ID (Illus. 22 and 41):
Additional configuration options.print AutoConnect
The section on “Creating printers” (Page 23) describes how you can manually create printers that print with ThinPrint .print to the ISD200/300. The process of creating printers on a server can be automated with a component of the .print Engine – this component is called .print AutoConnect.
In the ThinPrint configuration of the ISD200/300, you only need to specify the printer IDs and, to further simplify things, possibly assign a class name for each printer (Illus. 49).
Illus. 49
More information can be found in the white paper, “.print AutoConnect and .print Vir-tual Channel Gateway” as well as in the .print Engine user manuals (Page 29).
Printer Printer ID in the ISD200/300
HP DesktJet 420 1
Lexmark T630 2
OKI C5510 3
Illus. 49 Assign printer IDs and class names

Additional configuration options
28 White Paper SEH ISD300
© ThinPrint A
G 2
00
9
.print Connected Gateway
Unlike the usual direction of communication, the Connected Gateway also allows connections from a remote location to the central server and therefore enables the ISD200/300 to be addressed via TCP/IP, even in masked networks4. The .print Con-nected Gateway also stabilizes the transmission of print data, even during connection breaks of up to 90 seconds5. It is a separate product; on the server, it includes the .print Connection Service. On the client side, a .print Client version 6.2 or later is assumed, such as is integrated in the ISD200/300.
In the ThinPrint configuration of the ISD200/300, you must select CONNECTION SERVICE from the menu (Illus. 50).
Illus. 50
Illus. 51 shows the client-side configuration of the Connection Service. The service must be enabled here (arrow). Furthermore, the following input is required:
4 = Networks with Network Address Translation (NAT), which is mainly supported by routers5 To bridge longer connection breaks, it is recommended to use the additional product, .print
Queue Manager.
Connection Server IP address of the servers on which the .print Con-nection Service is running
Port TCP port for communication with the .print Con-nection Service (default: 4001)
Client ID Client ID for distinguishing between the .print Cli-ents that are using the Connection Service – must be assigned on the server unambiguously for each client
Keep alive Interval connection retries (default: 60 s; should not be changed!)
Illus. 50 ThinPrint printer IDs assigned for each printer queue

Appendix
SEH ISD300 White Paper 29
© T
hinP
rint
AG
20
09
Illus. 51
More information can be found in the .print Connected Gateway user manual (see below).
AppendixAdditional sources
Further information about ThinPrint .print can be downloaded from our website.
Manuals The following SEH manuals are available at www.seh.de/� SUPPORT� MANU-ALS� INTELLIGENT SPOOLING DEVICE (ISD)� ISD300� CHOOSE:
� ISD300 User Manual� ISD300 Quick Installation
The following manuals (amongst others) are available at www.thinprint.com/� PRODUCTS� OVERVIEW� <product name>:
� .print Application Server Engine� .print Server Engine (for dedicated print servers)� .print Engine for VMware View� .print Connected Gateway� .print Queue Manager� .print Host Integration Service� .print Client user manuals
Authentication key Value used for authentication –similar to a pass-word; if not previously specified on the server, it is irrelevant at the first logon but cannot be changed thereafter
Connection retry Wait time for connection retries if the .print Con-nection Service cannot be reached (default: 300 s)
Illus. 51 Configuring Connection Service

Appendix
30 White Paper SEH ISD300
© ThinPrint A
G 2
00
9
White papers The following white papers (amongst others) are available at www.thinprint.com/� SUPPORT� WHITE PAPER DOWNLOAD:
� Creating certificates for printing with .print� .print AutoConnect and .print Virtual Channel Gateway� Licensing� Windows machine as a .print Client Gateway� SEH TPG60 as a .print Client Gateway� Intermate 101 as a .print Client Gateway