seeded region growing (imagej plugin) index -...
TRANSCRIPT

Seeded Region Growing (ImageJ Plugin)
Author: Sacha JarekDownload: http://sourceforge.net/projects/ij-plugins/files/ij-plugins_toolkit/
The main documentation for this plugin can be found at:
http://ij-plugins.sourceforge.net/libraries/toolkit/javadoc/net/sf/ij_plugins/im3d/grow/SRG.html
To help you to get started I copy the following two paragraph as a citation:
„Seeded region growing (SRG) algorithm based on article by Rolf Adams and Leanne Bischof, "Seeded Region Growing", IEEE Transactions on Pattern Analysis and Machine Intelligence, vol. 16, no. 6, June 1994.
The algorithm assumes that seeds for objects and the background be provided. Seeds are used to compute initial mean gray level for each region. The condition of growth is difference of a gray level of a candidate pixel and mean grey level intensity of a neighboring region. At each step of the algorithm a candidate with a smallest difference to some neighboring region is added to that region and all neighboring points of that that are not yet assigned to any region are added to candidate list.“
The following example shall explain, how to use this plugin.
IndexSeeded Region Growing (ImageJ Plugin)............................................................................................1
The problem.....................................................................................................................................1Seeded region growing....................................................................................................................1The solution.....................................................................................................................................3Step-by-step walk through: Preparation of the label mask..............................................................3Step-by-step walk through: Seeded region growing........................................................................8
Just another detail for dental segmentation...............................................................................11
The problem
We use microcomputed tomography data of teeth for further analysis of dental research topics. We need to segment the different tissues: dentin, enamel, pulp. In addition we want to separate them from the background.
For a basis explanation of “segmentation” please follow this link to Wikipedia: http://en.wikipedia.org/wiki/Segmentation_%28image_processing%29
In general, segmentation is the process of segmenting an image into different regions with similar properties. All pixels with comparable properties are assigned the same value, which is then called a “label”.
Seeded region growing
One of many different approaches to segment an image is “seeded region growing”. The user identifies different regions in an image. These identification tags are called a seed mark. The

algorithm starts at the seed marks and increases iteratively the size of the seed mark area. While the region expands, the algorithm has to decide which pixels are incorporated into the given seed mark region and which not. This decision is based on a similarity measure. The result is dependent on the choice of seeds, too.
In my dental example I want to identify dentin and enamel, therefore I have to mark dentin and enamel (and background) as seed marks. Doing this in 500 – 1000 slices interactively is boring, stupid and time consuming. Therefore we try to determine the seed marks as automatically as possible.
The following image sequence visualizes the process of seeded region growing. Starting from the grey value image, we identify seed marks for the background, dentin and enamel.
The SRG algorithm increases the seed mark areas and thus segments the image.

The solution
Dentin and enamel different grey values, the grey level of the pulp is close to the background. Enamel and dentin are segmented with a very conservative (narrow, not containing all greylevels) threshold to make separate stacks for background, dentin and enamel.
Then the masks are combined according to the projects needs. The thresholded images contain usually "0" for background and "255" for foreground. If you divide the thresholded images by 255 -> now the masked pixels have a value of 1. Multiply the corresponding stack for example with 2 for dentin and 3 for enamel. Note: the values are arbitrarily selected. But I try to keep them the same value for all my projects. The background, dentin and enamel stacks are combined into a new stack (= resulting "mask") with ImageJ > Process > ImageCalculator and "xor".
The new stack is called "label mask".
Step-by-step walk through: Preparation of the label mask
Import the 3D data into ImageJ and start to segment the different tissues based on different grey levels
Image > Adjust > Threshold
The Threshold windows shows three nicely separated peaks, which means that it should be rather easy to segment the data based on grey values only.

The preview windows shows, that based on the grey values only we will segment a artefact as dentin, too. This artefact is the thin line around the enamel shell of the tooth in the following image. Due to the 3D reconstruction the one or two outer pixels of a microCT object with a steep grey value gradient between two adjecent structures have a grey value which is not really representing the tissue quality.
As soon as we have decided about the right thresholds we apply these values to the stack.
You can see, that the background and the dentin area are segmented adequately, but the thin line must be eliminated before we can proceed.

This kind of artifact can be removed with one or more “binary erosion” steps: Process > Binary > Erode
Now the background has the value 0 and the white forground has the value 255. For my label mask I want to assign the value 2 to the forground. I can achive this for example by subtracting 253 from every data point (Process > Math > Subtract). I can make it even more complicated by dividing by 255 and multiply then by 2 (Process > Math > Divide, Process > Math > Multiply).
The image will be dark afterwards but you can check the outcome of your work with Image > Adjust > Brightness/Contrast.

Move the slider “Maximum” to the left and you will see the shape in your image again. You will not change the image values. It is just the display of the data which is affected with the brightness adjustment.
Save this mask for further processing. Give it a different name, however (File > Save As)
Repeat the same sequence for the other grey values you want to segment, in our case: enamel and background. Take care to subtract different values from 255 for the different tissues.
So far it was not too complicated. To segement the pulp, too, is more complex, however, because we cannot easily differentiate the background and the pulp based on grey values only.

But we are lucky again, because we can erode away the “pulp” in our image stack. You will have to repeat the “Process > Binary > Erode” sequence several times. Check in the stack that you did not miss any points.
Of course, as it is common in image analysis, there are other alternatives to achive our goal, too. You can mark the pulp as a region of interest and use “Image > Clear Outside” to get a similar result. However, the last approach cannot be used in as macro and it is more complex close to the apex of the tooth root.The next step combines the different masks into on label mask for all tissues. I use the image calculator for this purpose and use the XOR concatenation.

The resulting stack contains the seeding points for the background (value =1), dentin (value = 2) and enamel (value = 3) and can be used in the SRG plugin of Sacha Jarek.
Step-by-step walk through: Seeded region growing
You can find the plugin for seeded region growing in “Plugins > Segmentation > Seeded Region Growing”

It is quite easy to use this plugin. Select the grey value stack as “Image” and the mask which we created above as “Seeds”. Under “Stack Treatment” you can decide whether you want to apply the SRG to the “Current slice only”, “All slices independent” and “3D volume”.
I usually use “3D volume”. Especially when you have only a few seed points it is necessary to use “3D volume”. In this case the seed points are extended to the neighboring slices and the SRG results

in a real 3D segmentation.
As soon as the result is displayed you should adjust brightness so that you can check the quality of the seeded region growing.
The plugin works really nice for my data. It is also very quick. However, one problem has to be mentioned. For 3D data you cannot have enough RAM for your segmentation. The example stack which is used for this tutorial had a size of 270 x 233 pixels and 340 slices. During the SRG the RAM used went up to 5 GB. For this reason I use for real SRG segmentation tasks at work a computer with 24 GB RAM (Ubuntu 10.04).
I is a good idea to monitor memory usage during your first experiments with SRG.
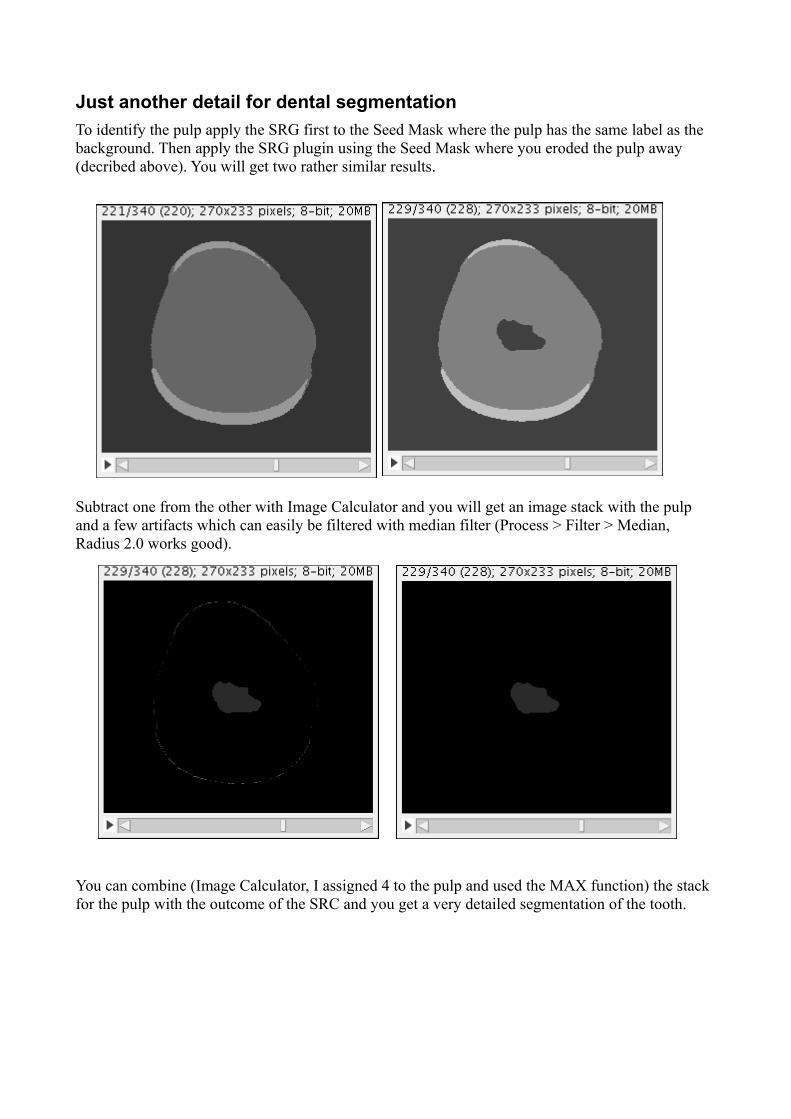
Just another detail for dental segmentation
To identify the pulp apply the SRG first to the Seed Mask where the pulp has the same label as the background. Then apply the SRG plugin using the Seed Mask where you eroded the pulp away (decribed above). You will get two rather similar results.
Subtract one from the other with Image Calculator and you will get an image stack with the pulp and a few artifacts which can easily be filtered with median filter (Process > Filter > Median, Radius 2.0 works good).
You can combine (Image Calculator, I assigned 4 to the pulp and used the MAX function) the stack for the pulp with the outcome of the SRC and you get a very detailed segmentation of the tooth.

Hint:
If you use the ImageJ plugin from Sacha Jarek 3D IO, then you can export the result for example in the MetaImage file format and use the ITK/VTK tools for further evaluation, too. In this example the data are visualized in ITK SNAP.
By the way, ITK Snap ( www. itksnap .org ) has a very good implementation of seeded region growing, too.