secure rdp connection to on premise servers using … rdp connection to on premise servers using ......
TRANSCRIPT

Secure RDP Connection to on premise servers using
Azure Multi-Factor authentication
(Step by Step guide)
Http://AzureDummies.com
In this guide we will go through how to implement and secure RDP connection to the
servers using Azure Multifactor authentication.
One of my customers have a server which contains a highly secure data and only
around 6 users have a remote desktop access to that server, the customer need to add
more security layer for accessing this server.
I suggest the customer to use Azure MFA, since it will add a highly secure layer to the
remote desktop access to the server in addition to the low cost of this service.
so let’s start the technical steps to do that, remember that we need to integrate remote
desktop protocol access (RDP) with Azure MFA.
First of all let’s summarize the requirements to implement this scenario:
1- we need an azure account (Azure Tenant) to configure and install the Azure setup, if
you don’t have account you can sign up for one month as trial, for more info follow this
link :https://azure.microsoft.com/en-us/pricing/free-trial/
2- integrate RPD protocol with Azure MFA is not supported in windows 2012 R2 (until
the date of this article), which means if you need to integrate RPD with Azure MFA you
need to install windows 2012 and earlier such as windows 2008 R2.
3- To secure the remote desktop protocol (RDP) with Azure Multifactor, you must install
the Azure MFA server in the same RDP server, in other word assume you have a server
called “SRV1”, then you should install the MFA setup in the “SRV1” server, if you look
back to point #2 you can conclude that you cannot secure the RDP for windows 2012
R2 (until the date of this article).
This deployment called MFA standalone server since all deployment will be on premise and no
integration will be done between local AD and Azure AD.
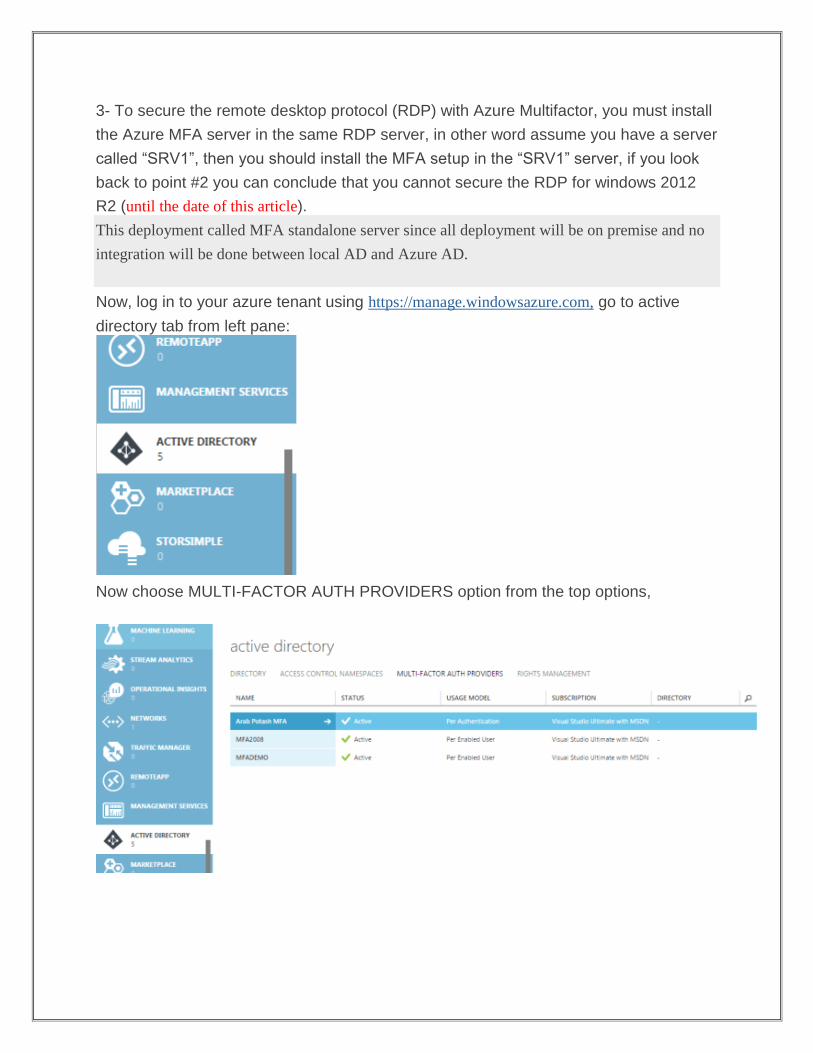
Now, log in to your azure tenant using https://manage.windowsazure.com, go to active
directory tab from left pane:
Now choose MULTI-FACTOR AUTH PROVIDERS option from the top options,

Click New:
MULTI-FACTOR AUTH PROVIDERS used to install the MFA server setup files, also the
provider will be responsible for the usage calculations and you can customize your setup from
the provide such as fraud alerts.
Now choose App Services -> Active Directory -> MULTI-FACTOR AUTH PROVIDERS –
Quick Create.
Name: choose any meaning full name for your provider.
Usage Model: you have two options here, per user enabled and per authentication, this
option cannot be changed later, if you need to change it later you must create new
provider, the difference between the two model is how Microsoft will charge you, if you
choose per enabled user then you will be charged for how many users using MFA
regardless of how many actual authentication occurs, if you choose per authentication
you will be charged every time the users try to authenticate using Azure MFA.

Directory: choose Don’t link a directory since we will install the stand alone MFA server
without integration with Azure AD.
After you fill the required information, click create:
after less than minute a new provider will be available in your tenant as shown below:

Click in the provider just created, then click in the MANAGE button in the bottom of the
portal page:
The MFA Management page will appear, click in Downloads button as below:
in the download server page, it’s list the supported OS versions for MFA server
including windows 2012 R2 and this is not what I said before, be smart I mentioned that

the RPD feature is not supported in windows 2012 R2 but there is a lot of features that
work in windows 2012 R2, now click in Generate Activation Credentials button to generate
the credential which will be used to register your server in MFA provider during the
setup.
Email and password credential will be generated, these credential valid to be used
within 10 minutes, if you take more than 10 min to start the setup you can re generate a
new credentials.

Now click the download text to start the downloading of the MFA setup:
After the download complete, copy the setup file to the server you need to secure the
RDP on it and double click on the setup to start the installation.
Now after the download of MFA completed, double click in the setup file, choose the installation
path and click Next:

wait a seconds for the installation to complete:
once the installation finish clicks Finish:
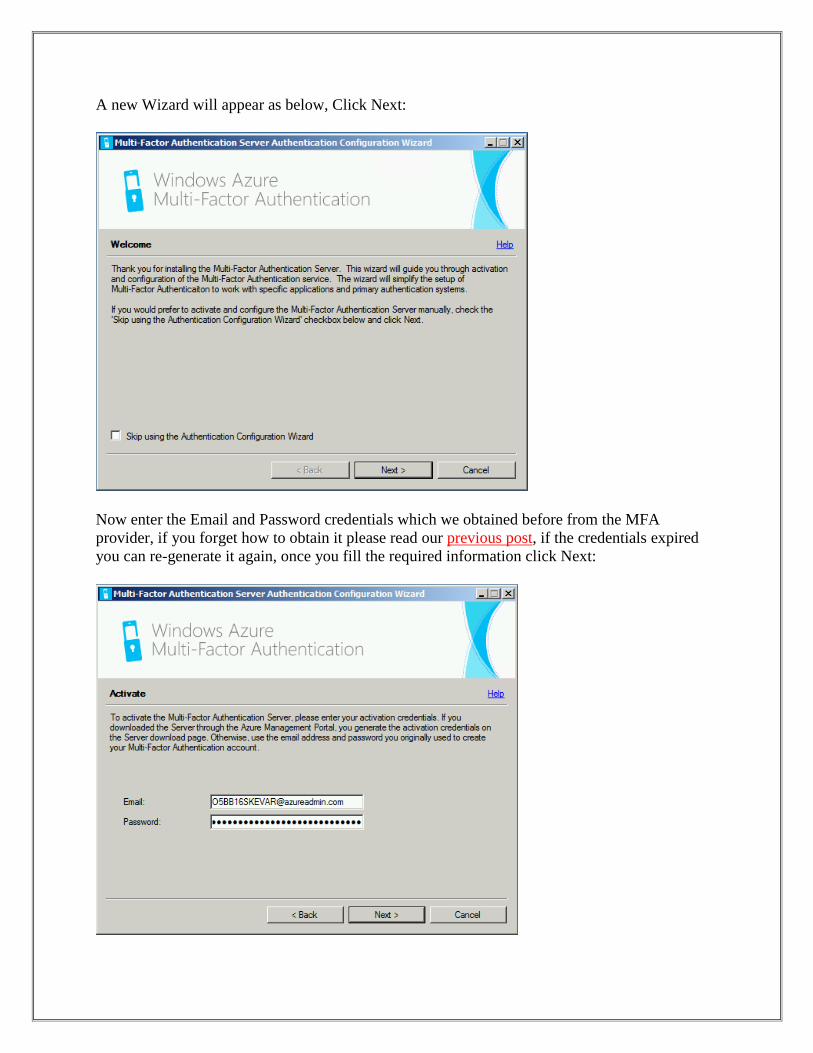
A new Wizard will appear as below, Click Next:
Now enter the Email and Password credentials which we obtained before from the MFA
provider, if you forget how to obtain it please read our previous post, if the credentials expired
you can re-generate it again, once you fill the required information click Next:

Now, MFA server will try to communicate with Azure MFA Provider as below:
Ops, we received an error message as shown below ” Unable to communicate with the Multi-
factor Authentication POP, The Multi-factor Authentication server could not be activated …
etc“, this error is normal if you use an proxy to access internet, in this case you must verify three
things if you use a proxy server:
1- Your proxy is set correctly in the server (in IE browser).
2- Run CMD as administrator, write the following command:
netsh winhttp import proxy source=ie 3- MFA server must be able to communicate on port 443 outbound to the following:
https://pfd.phonefactor.net
https://pfd2.phonefactor.net
https://css.phonefactor.net
If outbound firewalls are restricted on port 443, the following IP address ranges will need to be
opened:
IP Subnet Netmask IP Range
134.170.116.0/25 255.255.255.128 134.170.116.1 – 134.170.116.126
134.170.165.0/25 255.255.255.128 134.170.165.1 – 134.170.165.126
70.37.154.128/25 255.255.255.128 70.37.154.129 – 70.37.154.254

If you are not using Azure Multi-Factor Authentication Event Confirmation features and if users
are not authenticating with the Multi-Factor Auth mobile apps from devices on the corporate
network the IP ranges can be reduced to the following:
IP Subnet Netmask IP Range
134.170.116.72/29 255.255.255.248 134.170.116.72 – 134.170.116.79
134.170.165.72/29 255.255.255.248 134.170.165.72 – 134.170.165.79
70.37.154.200/29 255.255.255.248 70.37.154.201 – 70.37.154.206

After we set a proxy rules, I tried another time to activate the MFA as below:
finally, its verified successfully, Now the wizard will ask you to create new MFA group or
choose existing one, since it’s first MFA server to be deployed, give any meaningful name for
the new group as below, also note that the group used to manage more than MFA servers and
enable replication between the servers if there is a need, Click Next:

Uncheck enable replication between servers option and click Next:
Now, you can select what application need to integrate it with Azure MFA, the last option is
remote desktop, you can select it and click Next, but in our demo we will click cancel to
configure the remote desktop from the MFA console, click Cancel.

Now, go to star menu and click on Multi-Factor Authentication Server icon:
Azure MFA server is loading as below:

After a while the console appear, this is the MFA server console that you can manage the MFA
setup, in the status option it display that the server Secure-Server.demo.lab is online which is the
same server we need to secure the RDP connection on it and the MFA server at the same time:
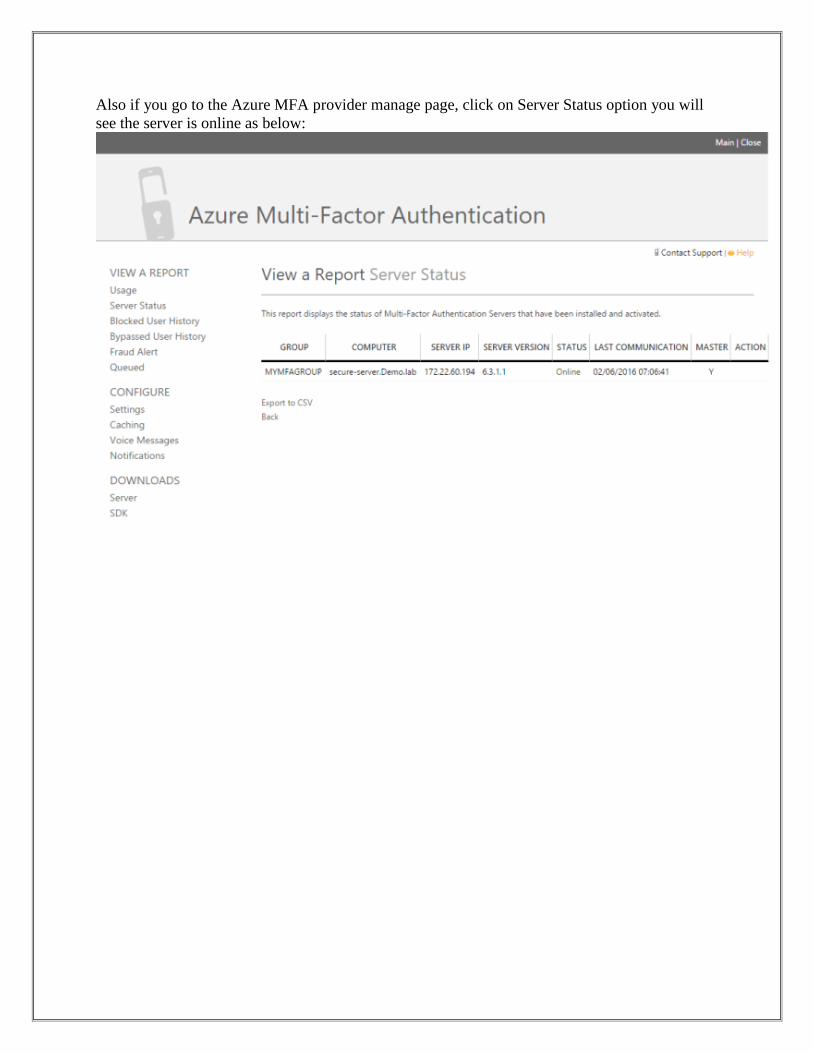
Also if you go to the Azure MFA provider manage page, click on Server Status option you will
see the server is online as below:

Now back to the MFA server console, go to windows authentication, check “Enable Windows
Authentication” option as below, then click Add button:
Choose the server name and terminal services as an application option, check the “Enable”
option, now if you will apply all users in AD to use MFA check the “Require Multi-Factor
Authentication user match” option, if not leave it uncheck as below, click OK:

The MFA is configured to secure the RDP in that server, it mentioned that the server need to be
restarted to take the effect, click OK and wait before restart to continue the configuration:
As shown below, the server appear in the console:

Now go to Users icon to add the users you need to apply MFA authentication on them, click in
Import from Active Directory button as below:

choose the users you need and click Import as below:
The users successfully imported as below, click OK:
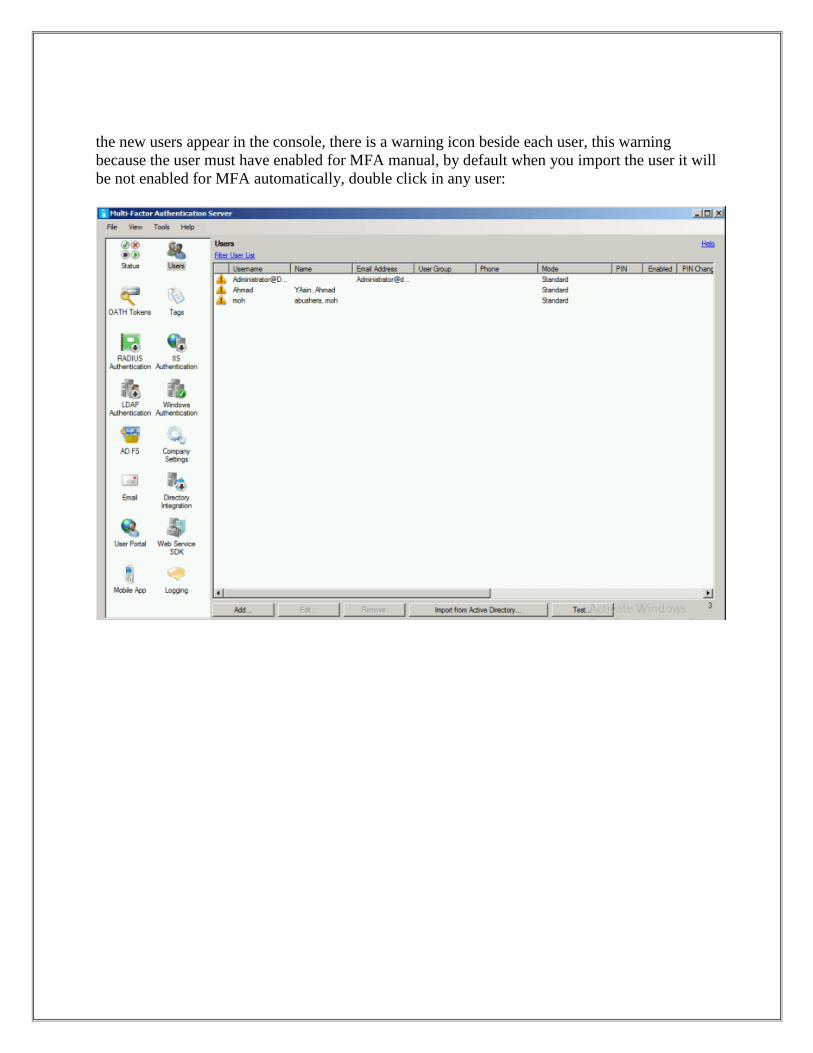
the new users appear in the console, there is a warning icon beside each user, this warning
because the user must have enabled for MFA manual, by default when you import the user it will
be not enabled for MFA automatically, double click in any user:

fill the required information as below:
-Country Code.
-Phone.
– choose MFA to be phone call, Text Message or mobile app … etc. we will choose for this
demo a phone call option.
-check the enabled option.
Finally, Click Apply:

note after we check the enable option the warning icon disappear, do the same for all users you
need:

after I prepared all users, the users appear in the console without the warning icon, to test the
configuration choose any user and click the test button:
provide the password and click test:
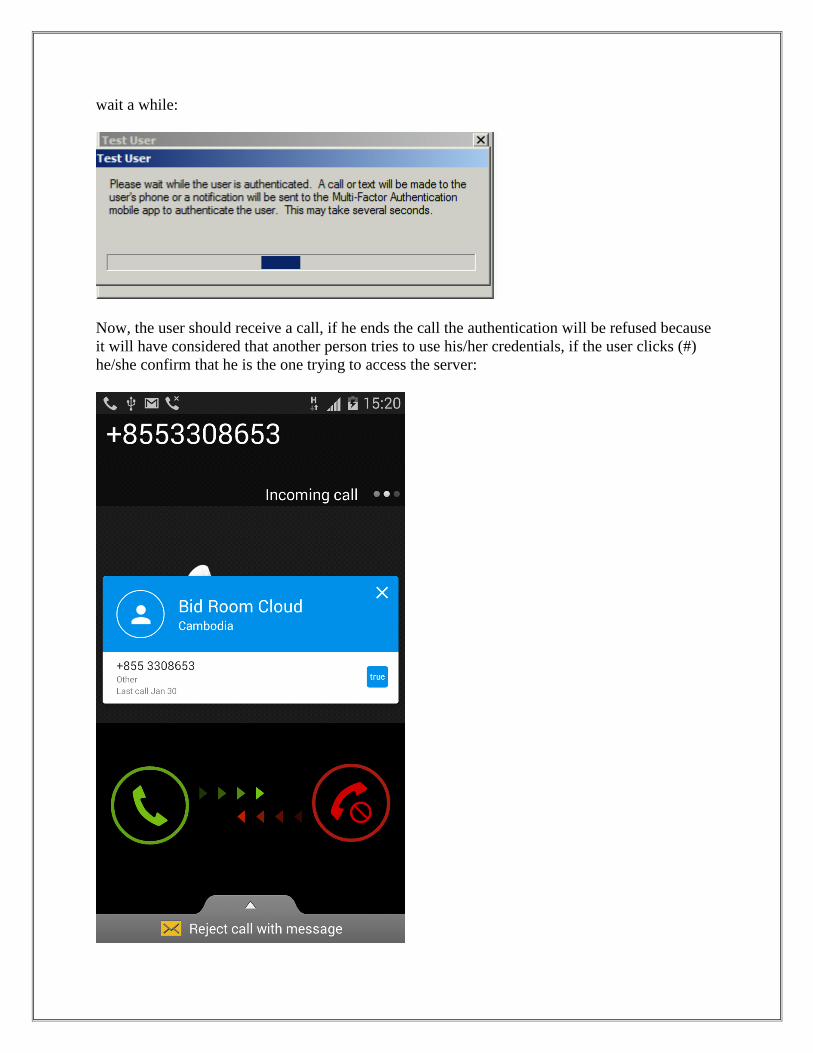
wait a while:
Now, the user should receive a call, if he ends the call the authentication will be refused because
it will have considered that another person tries to use his/her credentials, if the user clicks (#)
he/she confirm that he is the one trying to access the server:
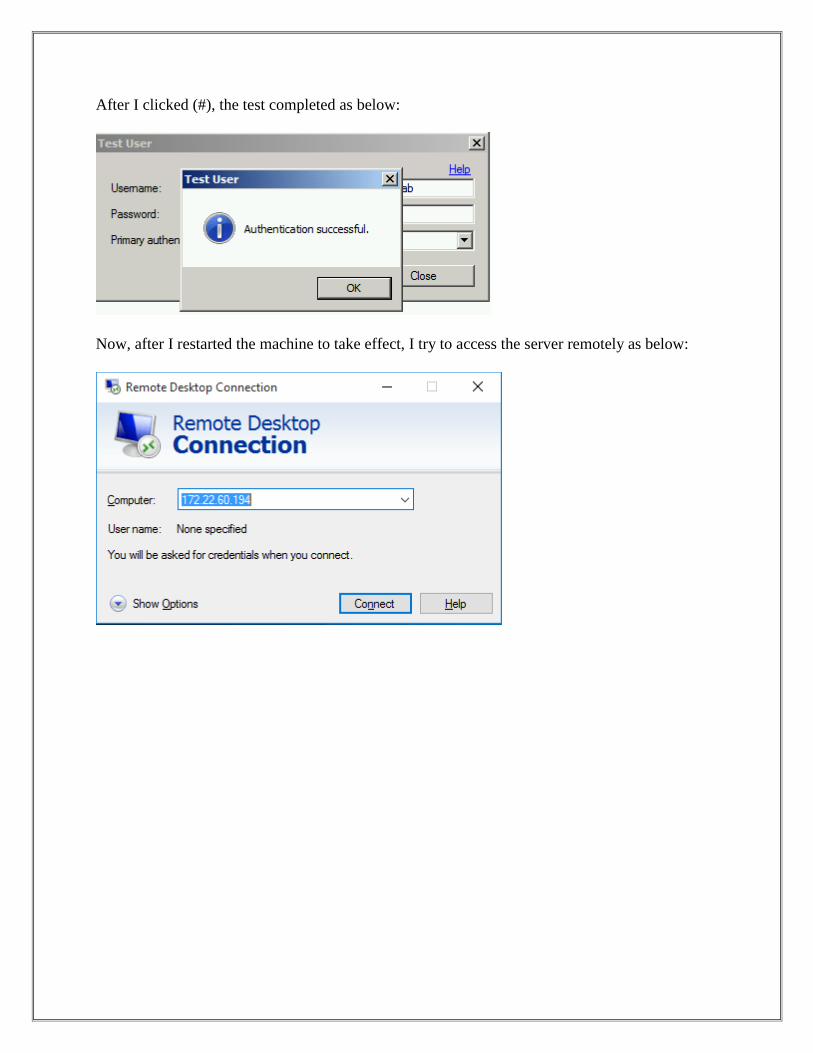
After I clicked (#), the test completed as below:
Now, after I restarted the machine to take effect, I try to access the server remotely as below:

I tried to login with the administrator user:
Now the welcome page start:

during the login and within the welcome page I received a call from Microsoft MFA, I answered
the call and end it direct:
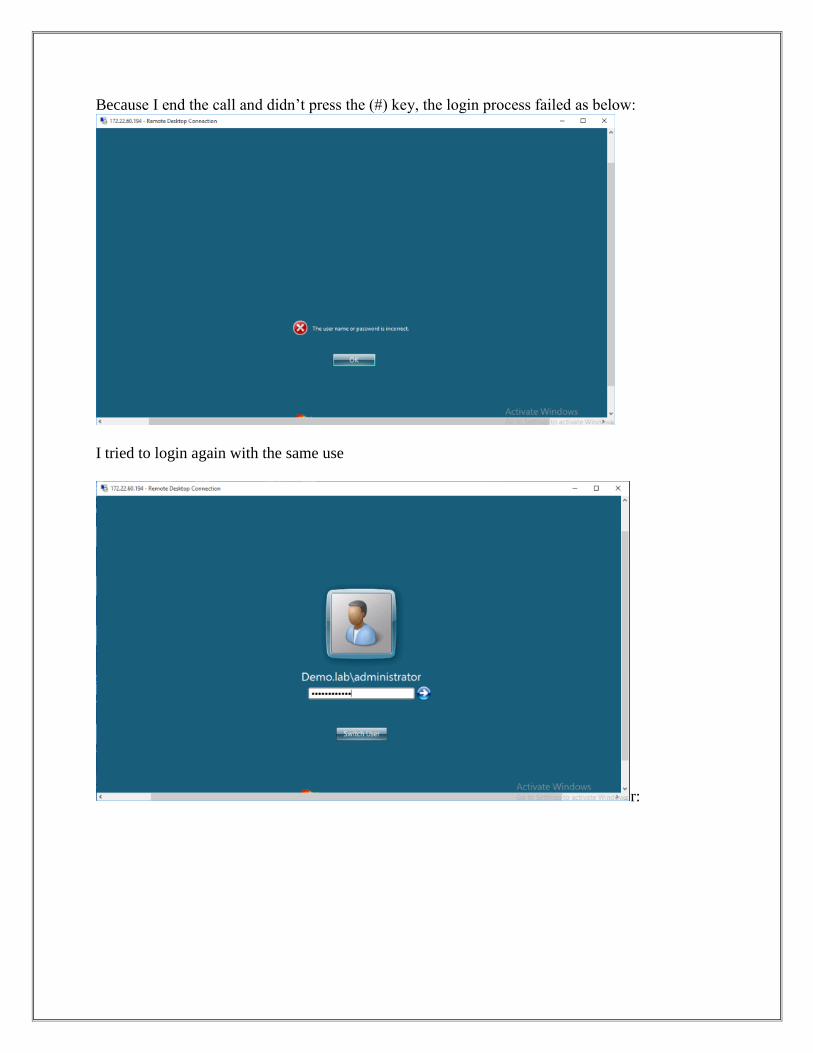
Because I end the call and didn’t press the (#) key, the login process failed as below:
I tried to login again with the same use
r:

I received another call from Microsoft MFA, but this time I press (#) key:
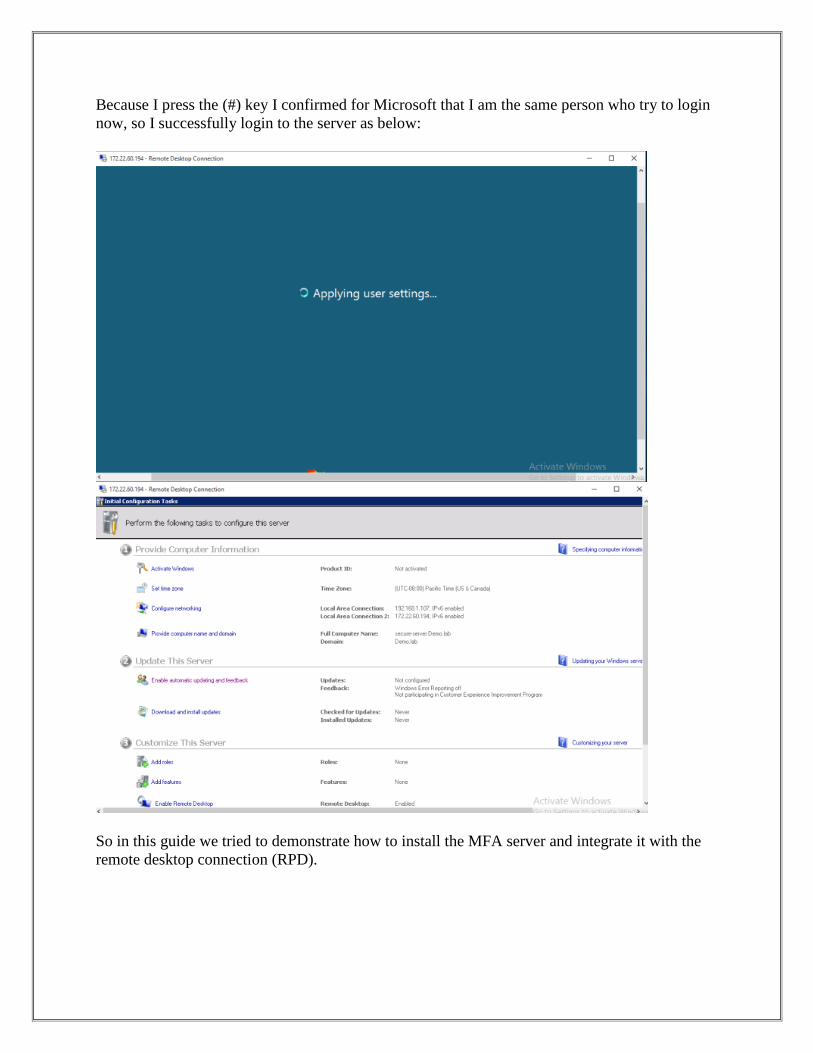
Because I press the (#) key I confirmed for Microsoft that I am the same person who try to login
now, so I successfully login to the server as below:
So in this guide we tried to demonstrate how to install the MFA server and integrate it with the
remote desktop connection (RPD).

For More customization for Azure MFA and more Azure and office 365 articles and guides
kindly visit: http://azuredummies.com
About Author …
Ahmad Yasin (MCSA office 365, MCSE: Messaging, Azure Certified)
Ahmad Yasin in a Microsoft Cloud Engineer and the Owner & publisher of AzureDummies
blog. He also holds many certificates in office 365 and windows azure including Developing
Microsoft Azure Solutions, Implementing Microsoft Azure Infrastructure Solutions and MCSA
office 365.
Ahmad is currently working in Specialized Technical Services Company (STS).
Find Ahmad at Facebook and LinkedIn