section battle drills - freewebs.com · come on the “micks” section commander second in command...
TRANSCRIPT

Come on the “Micks”
Section Battle Drills
Charlie & Delta Fire Teams
The SIX Section Battle Drills
1. PREPARATION FOR BATTLE 2. REACTION TO “EFFECTIVE”
ENEMY FIRE 3. LOCATING THE ENEMY 4. SUPPRESSING THE ENEMY 5. THE ATTACK 6. RE - ORGANISATION

Come on the “Micks”
Experience has shown the need for a well understood method of tackling minor tactical problems The section attack is broken down into 6 section battle
drills Each is a logical sequence of action to enable us to
overcome minor opposition
All cadets should know these 6 Section Battle Drills
“When understood” all cadets should know the sequence of a section attack
Only when known will a section attack be successful
Fire Teams
C = CHARLIE & D = DELTA
FIRE TEAMS
MADE UP OF 2 TEAMS OF 4 MEN
THIS INCLUDES

Come on the “Micks”
Section Commander
SECOND IN COMMAND
4 X RIFLEMEN
2 X LSWs
Section Battle Drill 1
Preparation for Battle
Weapons: check that weapons are clean and serviceable Personal camouflage: break up the outline of the shoulders and equipment using local foliage typical to the area to be used
Ammunition: check that ammo is clean and the magazine works properly
Orders: Section Commander will give his orders for the advance
Reference and anticipatory points: On the advance to contact the Section Commander will look out for :

Come on the “Micks”
New reference points for Fire Control Order's Pick 2 or 3 within 400 meters within wide arcs to his front
Describe as the section advance Each cadet will acknowledge by hand signal Positions where section can take cover upon coming under effective enemy fire
These are call “anticipatory orders” E.G: if we come under effective fire “D” fire team take up supporting fire position under the group of trees, “C” fire team move into the ditch on the left
Unnecessary shouting should be avoided, it only alerts the enemy

Come on the “Micks”
FFOORRMMAATTIIOONNSS OONN TTHHEE AADDVVAANNCCEE
Sect.Comd
3X
2X
C FIRE TEAM
2 I/C
6X LSW
8X
D FIRE TEAM
EN
AXIS LSW

Come on the “Micks”
Section Battle Drill 2
Reaction to Effective Enemy Fire
WOODS
RIVER
Enemy Position’s
SMALLHILL
1 2 sc 3 1 2 ^ 3
AXIS
Effective Enemy Fire
C D
Section must move on regardless of sounds or events directed at others around them
Effective enemy fire is fire which would cause the section heavy casualties

Come on the “Micks”
Once fired on, the Section Commander must shout “Take Cover”
Do “not” drop where you are Increase speed and get to cover Make yourself a difficult target Don’t move any more than 10 meters at a time
When diving for cover he must: Crawl into new fire position Be able to observe the enemy position Move so that you can hear the Section Commander
Reaction to Effective Enemy Fire
If the enemy is spotted return fire on to enemy position without waiting for Section Commander’s order
When contact is made, no one should be idle Everyone should be doing one of the following
Observing Firing if the enemy is seen Moving to a new position to observe Moving to a new fire position Do not bunch up to less than 4 meters apart

Come on the “Micks”
Sights, FFiirree
Dash, Down,
Crawl, Observe

Come on the “Micks”
Section Battle Drill 3
Locating the Enemy
WOODS
RIVER
SMALLHILL
AXIS
Effective Enemy Fire
Locate the Enemy
C D UUssiinngg FFiirree CCoonnttrrooll OOrrddeerrss

Come on the “Micks”
Locating the Enemy
Location is usually difficult Failure may cause you to take casualties and stop you moving
It will lead to loss of momentum and halt the platoon advance
There are 3 stages in this drill: Look in the area the thump came, the time between the crack and thump gives a clue to the range (1 second = 600m)
Look for movement Smoke from weapons Anything unusual If nothing seen after 30secs it will be difficult to spot the enemy this way
Fire The Section Commander will order 2 riflemen to fire at likely enemy positions
The remainder will watch their arcs for enemy movement and reaction
If no answering fire to this a different method should be employed

Come on the “Micks”
Movement If still no reaction the Section Commander will order 2 riflemen to move about 10 meters to new cover
If no reaction the first time the Section Commander will repeat this move
A cadet dashing 10 meters is a difficult target to hit If still no enemy reaction the Section Commander will order the section to move
One fire team should be left in a supporting fire position for the time being
Target Indication
All cadets should know how to use all methods of target indication to indicate the enemy position

Come on the “Micks”
Section Battle Drill 4
Suppressing the Enemy or Winning the Fire Fight
WOODS
C D
AXIS
1 2 sc 3
1 2 ^ 3
RIVER
SMALLHILL
Enemy Position

Come on the “Micks”
Suppressing Fire As soon as the Section Commander Controls volume of fire by fire control orders
Section Commander starts battle estimate whilst suppressing the enemy
The initiative must be retained by keeping a steady stream of fire on the enemy position
knows the enemies position he must: Ensure sufficient volume fire is brought down on the enemy to stop them tying his section down
Shout “STOP” to regain control
OBJ
WOODS
DC
1 2 sc 3
WOODS
RIVER
ISSUE Quick Battle Orders before moving
1 2 ^ 3
Suppressing Fire
Battle Estimate

Come on the “Micks”
Section Battle Drill 5
The Attack
“LEFT”-“RIGHT”or FRONTAL ATTACK
Issue Quick Battle Orders (QBO)
Tell “D Fire Team” what to do. e.g. Delta Prepare to give supporting fire Tell “C Fire Team” what to do. e.g. Charlie prepare to go “Left Flanking”, peel off from the right
Quick Battle Orders
how Fire Team where Point of Fire is located e.g. Drop of LSW +1
to Suppress en. Position
Section Commander +1 move forward to enemy position
S
Drop of Section Commander as close cover man

Come on the “Micks”
Grenadier (bomber) Drops in grenade
Shoots up trench Occupy trench area
V
ENEMY
Fire Support
V V
SectionComd
Team
LSW One Stage Attack
Assault
LSW 2I/C

Come on the “Micks”
The Attack When attack goes in Delta Fire Team must switch fire
away from enemy position Ensure fire is switched at last minute Enemy must be suppressed until bomber is upon them
WOODS
DC1 2 sc 3
Point of Fire
Line of Advance
TTHHEE AATTTTAACCKK
WOODS
RIVER
Q B O issued 1 2 ^ 3
ng FireSuppressi
Coverman & Bomber
Bomber Drop of Coverman
Peel Off
Come on the “Micks”
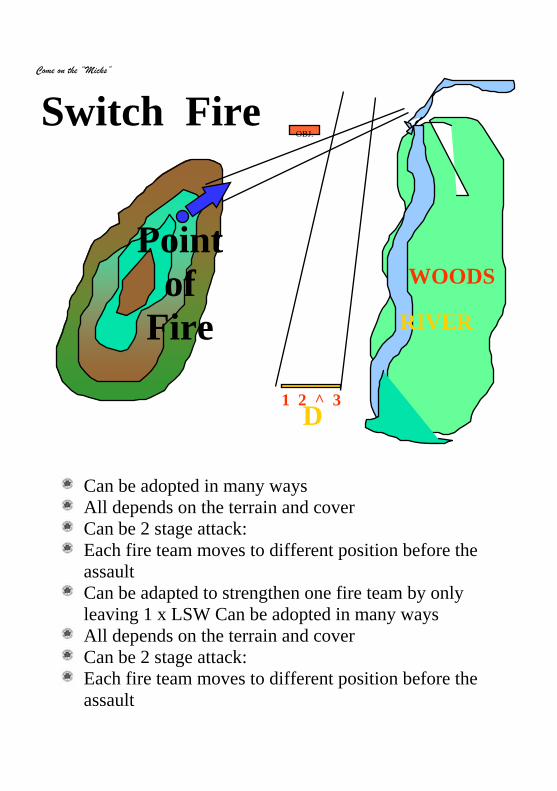
Point of
Fire
OBJ.
WOODS
D
WOODS
RIVER
1 2 ^ 3
Switch Fire
Can be adopted in many ways All depends on the terrain and cover Can be 2 stage attack: ferent position before the Each fire team moves to difassault
Can be adapted to strengthen one fire team by only leaving 1 x LSW Can be adopted in many ways
All depends on the terrain and cover Can be 2 stage attack: Each fire team moves to different position before the assault

Come on the “Micks”
Can be adopted in many ways All depends on the terrain and cover Can be 2 stage attack: Each fire team moves to different position before the assault
Can be adapted to strengthen one fire team by only leaving 1 x LSW Can be adopted in many ways
All depends on the terrain and cover Can be 2 stage attack: Each fire team moves to different position before the assault
Can be adapted to strengthen one fire team by only leaving 1 x LSW
Movement during the Attack Only move 10m at a time Running and crawling are tiring only use for surprise by unexpected approach
Can be used on final assault Move quickly when fire starts Don’t stop for cover When small space have to be crossed whole group moves before enemy spots them
All must be aggressive and determined to overcome the
enemy

Come on the “Micks”
/C Duties) The Advance (2 I
The Section Commander will lead C fire team into thattack
e
2I/C and D fire team must be given clear orders ents Act on his own initiative keeping an eye on all ev Watch out for a quick change of plan All movement must be covered at all times Delta must move when Charlie is in position to cover them
2 I/C must be on the ball: Watching C fire team and their movements Listening for orders from Section Commander Vary fire slow to rapid as required nserved as much as possible Ensure ammo is co nsure fire is maintained even if LSW has stoppage
T
E
he Assault and Fighting Through the Objective
On arrival at the FAP (Final Assault Position) Section Commander gives orders for assault e team Regain strict control of fir Must be done very quickly

Come on the “Micks”
Assault must go in as quickly as possible under supporting fire
Section Commander gives silent order to start the assault Fire team breaks down into pairs for fire and manoeuvrein boun
ds of 5 to 10 meters
As assault goes in Delta Fire Team will fire as long as
heir fire across the possible on to the position the switch tposition
When Charlie Fire Team arrives on the objective thisknown
is as: fighting through the
objective Fire & Manoeuvre will be needed to overcome
individual enemy positions
Section Battle Drill 6
Re-Organisation Give out arcs of fire to each cadet Detail and post sentries Check on casualties and ammunition Redistribute ammunition Dig shell scrapes Escort prisoners to rear

Come on the “Micks”
WOODS
D1 2 ^ 3
2 ^ Wait until Called forward
AXIS
RIVER
Occupied position
SC
Direction of En. Threat
RECALL D FIRE TEAM
Rejoin Ch sible arlie Fire Team as quickly as pos Take up all round defence Cover all arcs Check and refill magazines

Come on the
D pares to take
on next objective
C Fire Team prepare to give Covering fire
“Micks”
Fire Team” pre
LSW
2 IC
LSW
1
2 7
8
Re-Organisation
SC
Enemy Position
All Round Defence