section 2
TRANSCRIPT

21
2. COMPOSITION
THE CAMERA - A TOOL FOR SELECTIVE VISION
The camera is a tool for looking at things in a special way.
It's a window on the world which you control. Your viewer--the
person who will look at the pictures you take--will see only what
you decide to show him. This selectivity is the basis of all
cameraworko
--
THE CAMERA IS SELECTIVE. YOU DECIDE WHAT THE VIEWER WILL SEE
Say you're shooting a program about a high school. The de
cisions you as a cameraperson make will shape the reality of the
school as perceived by your viewer. Leave Student A out of your
frame and for your viewer he will never exist. Include B, C, and
D in a number of shots and they become important persons. Show E
studying by himself and he becomes a loner. By choosing what to
shoot and how to shoot it, you create your own selective version
of the high school. How close your version comes to reality depends
on your camera skills and how you use them.

22
USE A TRIPOD
To appreciate a good composition, the viewer must first see it
without distractions. One of the most common distractions is camera
jiggle caused by shaky handholding of the camera.
Shaky pictures are okay if you're shooting an earthquake, or if
you're in the middle of a prison riot or some other precarious
situation. Most of the time, though, shaky pictures are just plain
annoying to the viewer. They make it harder for him to see what's
happening and they remind him of the camera; they destroy the
illusion that's he's seeing the real thing.
In editing scenes together, the only thing more distracting
than a shaky shot of a building inserted between two nice steady
shots is two different shaky shots one after the other, with one
shaking up and down and the other shaking side to side. Where they
come together, it looks like the cut was made with a chain saw.
So use a tripod whenever possible. A good tripod, preferably
with a fluid head, will give you a steady frame, make your camera
moves smoother, and keep your arms and the rest of your body from
getting tired so quickly.
It's not that much trouble to use a tripod. With practice,
most people can set up and level a tripod in less than 30 seconds.
But, if you don't have a tripod, or you're someplace where a tripod
would get in the way, or you're just moving too fast to bother with
it, you can still try for tripod-like support. Use a monopod or a
shoulder brace. Lean against a wall, a chair, or your assistant.
Try for at least three points of support for the camera. With a
well-balanced news camera, these would be your shoulder, your hand
on the grip, and the side of your head. If you can brace the elbow
of your camera-supporting arm against your side, so much the better.

23
RULE OF THIRDS
I II II I
-----~----¥-----I I: I
-----~----*-----I II I
I !The rule of thirds is an old, old theory about composition
that still works pretty well. It won't compose the picture for
you, but it'll at least give you someplace to start.
The idea is to mentally divide the frame into thirds horizon
tally and vertically. Then you place your elements along the lines,
preferably with the center of interest at one of the four points
where the lines crosso
Here are some examples of compositions improved by using the
rule of thirds:
WITHOUT RULE OF THIRDS WITH RULE OF THIRDS

\
WITHOUT RULE OF THIRDS
WITHOUT RULE OF THIRDS
WITH RULE OF THIRDS
WITH RULE OF THIRDS
24
-
oo
WITHOUT RULE OF THIRDS WITH RULE OF THIRDS

25
WITHOUT RULE OF THIRDS WITH RULE OF THIRDS(Eyes on top l/3 line)
In paintings, still photos and feature films, you'll see
many interesting and good compositions that don't comply with the
rule of thirds. But remember, such compositions, being more com-
plicated, require more t1me from the viewer to comprehend. His
eye will roam around more before he sees what you want him to see o
If you can afford to leave an unusual composition on the screen
15 or 20 seconds or more, it can work--often quite nicelyo But be
sure you know what you're doing and why. For most documentary film\
and TV work, the rule of thirds is a good safe beto

26
BALANCE - LEADING LOOKS
One of the most common errors among camerapersons everywhere
is the failure to leave enough space in front of people's faces
when they're looking to one side or the other.
A shot like this,
is annoying to look at. Psychologically, the viewer perceives the
man as boxed in, with no place to go. By moving the frame just a
little, like this,
you get a more comfortable composition. You've allowed for the
compositional weight of the look.
People aren't the only things that have looks. Almost every
thing has a look. Some examples follow on the next page.

27
LEADING LOOKS - CONTINUED
UNBALANCED
UNBALANCED
UNBALANCED
BALANCED
BALANCED
BALANCED

28
BALANCE - MASSES
Sometimes you see a scene with a large object on one side and
nothing significant on the other side. Even though it doesn't look
all that bad, you still feel a little uneasy about ito That's be
cause it's off balance in terms of mass o This is most pleasantly
corrected by placing a smaller object at some distance away within
the frame. Visual leverage then balances the two nicely, like this:
o o D
UNBALANCED BALANCED
Of course you can balance out with another object the same
size in the frame, but it usually ends up kind of static and un
exciting:
00BALANCED

29
Remember, when we're balancing masses we're not concerned
with the true size of things o All that matters is how big they
look through the camera. Objects closer to the camera will always
appear larger; those farther away will appear smaller. Depending
on the camera angle, a house in the distance can balance out a
man in the foreground:
Some other examples:

30
BALANCE - COLORS
The most important thing to know about colors is that bright
ones attract the viewer's eye. How often have you seen a TV inter-
view on location somewhere and found yourself watching, not the in-
terview, but some guy in a red shirt in the background? Your eye
just naturally goes to white or brightly colored areas in the frame.
Once you know this fact, you can use it to help your pictures.
First off, try to arrange your frame so that the brightest
area is also the area you want the viewer to look at first. Con
sider the following example, where we want the viewer to look at
the man:
,\ I I I'
- RED ,.III\'~~~~~
NO GOOD
EYE GOES TO THE WALL INSTEAD OFTHE MAN
BETTER
EYE GOES TO THE MAN
When you do include a bright object or area in your frame, re
member that its brightness gives it extra weight in the composition-
weight you have to balance out, either with another bright area, or
with a larger mass.

31
OFF-BALANCE
Although the masses of the flower and the pot balance out, the
brightness of the flower pUlls the composition to the left.
BALANCED
The brightness of the pot now balances out the brightness of the
flower.

BALANCED
Here the brightness of the flower is balanced out by placing a
larger mass on the other side of the frame.
32
33
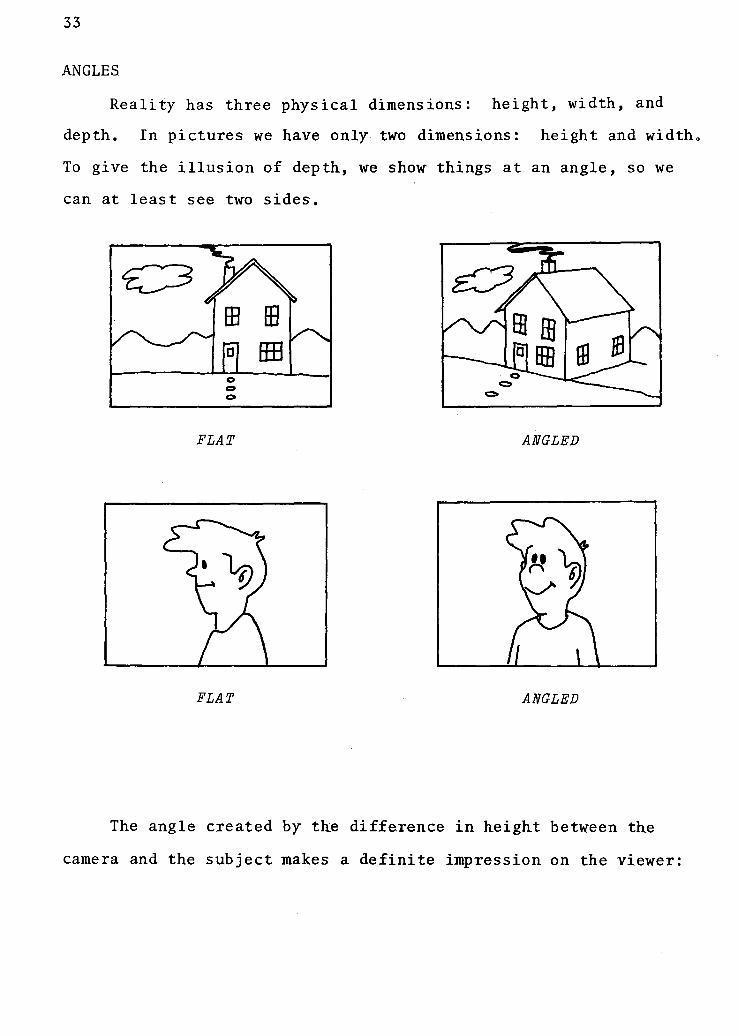
ANGLES
Reality has three physical dimensions: height, width, and
depth. In pictures we have only two dimensions: height and width.
To give the illusion of depth, we show things at an angle, so we
can at least see two sides.
FLAT
FLAT
ANGLED
ANGLED
The angle created by the difference in height between the
camera and the subject makes a definite impression on the viewer:

34
................
When the camera and the subject are at the sane height, it gives
the feeling that the viewer and the subject are of equal value •
..........
When the camera is higher than the subject, it gives the feeling
that the subject is inferior, smaller, less important.
When the camera is lower than the subject, it gives the feeling
that the subject is superior, larger, more important.
By raising or lowering your camera, you can subtly influence
how your viewer will perceive your subject. This is used to great
effect in horror films and political TV commercials.
35
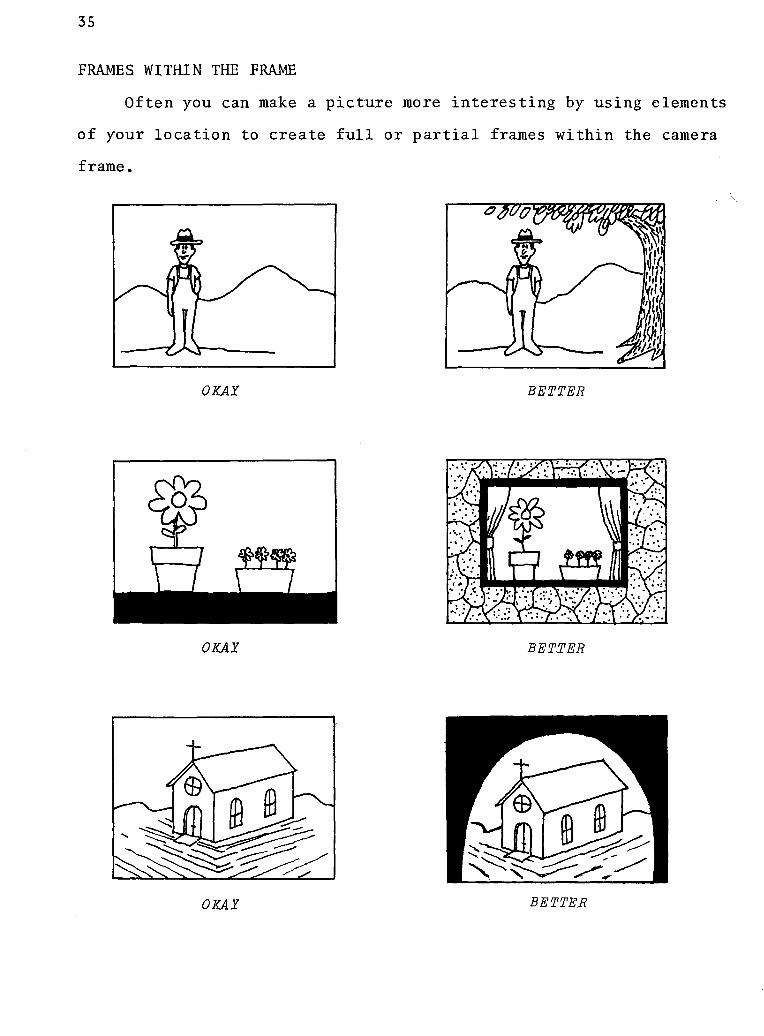
FRAMES WITH! N THE FRAME
Often you can make a picture more interesting by using elements
of your location to create full or partial frames within the camera
frame.
OKAY
OKAY
OKAY
BETTER
BETTER
BETTER

36
This type of framing can also be used to hide or obstruct
unwanted elements. For example, a cut tree branch held near the
camera can cover up ~n ugly sky or a billboard in the background.
NO Go.OD
BETTER
,

37
LEADING LINES
A nice way to direct the ~iewer's eye to your subject is
through the use of leading lines. Here are some examples:
Viewer's eye is drawn here
\l I
NOT VERY GOOD
Viewer's eye is drawn here
NOT VERY GOOD
From this angle, the path
leads away from the house.
BETTER
Lines of fence now lead
to man.
BETTER
From this angle, the path
leads toward the house.

Viewer's eye is drawn here
NOT VERY GOOD
The lines lead away from
the flower on the table.
BETTER
All lines now lead to the
flower on the table
38

39
BACKGROUNDS
The best background is the one that stays where itbelongs-
in the background. Unfortunately, some types of backgrounds push
forward and call attention away from your foreground subjects.
Let's look at some of the more common 'distracting backgrounds and
ways to avoid them:
PROBLEM: Door frames, windQw frames, trees, poles, etc., that
grow out of people's heads.
SOLUTION: Move the camera, the subject, or both.
PROBLEM: Backgrounds that are too visually busy, so full of de
tails and colors similar to those of the subject that the subject be
comes buried in the background.
SOLUTION #1: Move the camera, the subject, or both.
SOLUTION #2: Move the camera far enough back from the subject

40
so you can use a telephoto focal length. This will give you a
more shallow depth of field, throwing the background out of focus
while leaving the subject sharp.
PROBLEM: Unusual or persistent movements in the background.
SOLUTION: Move the camera, the subject, or both.
One quick way to remove a distracting background element from
your frame is to move closer to your subject, drop the camera to a
lower level, and shoot up:
--
A LOWER CAMERA ANGLE REMOVES DISPRACTING ELEMENTS
""" "-"""""-
---~1?~r-----

41
Another way to eliminate a distracting element in the back
ground is to place either the subject or another object in the
foreground to block the camera's view of the distracting element.
--o--------co---------From above
SOLUTION #1
From above
o
--~- /-- /-- /- 0 ///
///
/,
The camera is moved around so that the man's body hides the sign in
the background.
SOLUTION #2
... -0---
---~U D_---------
From above
-
A plant placed between the camera and the sign hides the sign.

42
IN SEARCH OF A GOOD COMPOSITION
A common mistake made by camerapersons everywhere is to arrive
at a location, set up the camera in the first clear space that looks
pretty good, and go from there. If you do this, you're short-changing
yourself.
Sure, go ahead and set the camera down. But then take a quick
walk around. As you walk, go up on your toes, squat down, lean from
side to side. Find your best angle for framing, background, color,
and balance. The whole operation could take less than a minute, and
it's well worth your time. If you have trouble visualizing shots,
carry the camera around with you and look through it to find your
angle.
Remember, you don't have to accept the location exactly as you
see it. If you've got a couple minutes, you can rearrange furniture,
remove distracting elements, add interesting ones--do all kinds of
things to improve your composition.
Look, then look again, as critically as you can o The human eye
has a tendency to cancel out unimportant details, but the camera sees
and records everything equally. Think back to that "perfect" shot
of a wilderness sunset you took on vacation, only to discover when
you picked up the prints that you had telephone wires running across
the frame. When you learn to see the wires before you take the pic
ture, then you can call yourself a cameraperson.