section 1 basic science of the electromagnetic...
TRANSCRIPT

Basic Science of the Electromagnetic Spectrum
SECTION 1
A resource for teachers of students in Years 9–10 Window to the Universe The Square Kilometre Array
1
Rationale
This lesson is used to identify prior knowledge of waves, introduce the language of wave description and relate the movement of waves to energy transfer.
Lesson 1 Introduction to wavesTime required: 75 minutes
Equipment list
DVD player plus data projector or similar AV projection device
DVD or video showing extreme sea wave motion eg excerpts from “The Perfect Storm” to show the crests and troughs of ocean waves at sea. (rated PG)
OHP or PowerPoint facility attached to data projector
Slinky springs to demonstrate transverse wave motion
Masking tape and coloured wool, ribbon or string
Stop watch – 1 per slinky spring
Metre ruler – 1 per slinky spring
Scissors – 1 pair per slinky spring
List of references
<http://resources.sargentwelch.com/lesson-plans/making-waves/> Part of the lesson description below has been adapted from this site.
Google “Tsunami: The Big Wave” for some further ideas for demonstrations and lessons about energy transmission in water.
Outcomes Students should be able to:
▸ relate wave motion to energy transfer.
▸ appropriately use the following terms related to describing wave motion:
▹ Crest
▹ Trough
▹ Velocity
▹ Frequency
▹ Wavelength
▸ distinguish between transverse and longitudinal waves.
Prior knowledge, understandings and skills required ▸ Students will need to have some conceptual understanding of energy and its
various forms.
▸ Students should be able to work in groups and use brainstorming strategies.

Window to the Universe The Square Kilometre Array A resource for teachers of students in Years 9–10
2
This unit of work begins by building the background information that students will need to understand the purposes and benefits of the proposed Square Kilometre Array (SKA) as well as the Australian Pathfinder (ASKAP) that will be a next generation radio telescope incorporating novel receiver technologies and leading-edge ICT systems.
Background informationIntroducing a new concept in science also includes introducing the language and symbolic jargon that accompanies the concept. For this reason, the introductory lesson begins with a guided activity.
1. Language of waves:
a. Ask students, in groups, to brainstorm all the words that they know to describe waves.
b. Ask students to group words which seem to have similar purposes in describing waves.
c. Bring the class together and form a class summary of words that can be used to describe waves. You may need to introduce terms that students would not normally use such as:
▹ Frequency
▹ Wavelength
▹ Amplitude
The lesson then provides some context to introduce the concept that energy is transmitted by wave motion without actual transfer of particles.
2. Use a short excerpt from a video or similar to show the moving of water waves in the deep sea – students will have a better idea of what is actually moving if there is a boat bobbing up and down on the waves. Alternatively, use a cork floating on a fish tank to demonstrate the concept of a wave moving through water.
3. After this introduction, the slinky springs can be used to demonstrate a number of features of wave motion as well as distinguish between longitudinal (compression) waves and transverse waves.
4. Finally, introduce the wave diagram with symbols that can be used to describe features of a transverse wave and assist students to draw and label the diagram.

A resource for teachers of students in Years 9–10 Window to the Universe The Square Kilometre Array
3
Student handout Introduction to wave motion
1. Words about wavesa. Write down all the words that you know that can be used to describe waves.
������������������������������������������������������������������������
������������������������������������������������������������������������
b. Now group the words: for example are there words to describe how high the wave is or how fast the wave is?
������������������������������������������������������������������������
������������������������������������������������������������������������
c. Use a dictionary to find the meaning of the following words used to describe waves.
▹ Wavelength ������������������������������������������������������������
▹ Frequency �������������������������������������������������������������
▹ Amplitude �������������������������������������������������������������
2. Slinky springs and waves – investigating wave motion
Investigation 1
Your group will need
Slinky spring Coloured string Scissors Metre rule
Purpose: to make observations about energy wavesa. Stretch the slinky spring about 1.5 metres between two of you so that your hands are
touching the floor and the slinky spring is laying sideways stretched out on the floor.
b. Tie pieces of coloured string at 10 cm intervals along the spring.
c. While one person holds one end still, the other person moves the spring sideways.
These waves are transverse waves. You will notice that the movement goes along the spring but the coils of the spring move sideways as the energy wave passes.
slinky spring

Window to the Universe The Square Kilometre Array A resource for teachers of students in Years 9–10
4
Repeat the exercise so that you can answer the following questions:
▸ What observations allowed you to conclude that the wave was moving along the spring?
������������������������������������������������������������������������
▸ What happened when the wave hit the end of the spring?
������������������������������������������������������������������������
▸ Watch the pieces of string carefully as the wave passes. Do they travel with the wave, or do they just jiggle back and forth? Does mass or energy get transferred in wave motion?
������������������������������������������������������������������������
▸ Did the wave slow down or keep moving at the same speed?
������������������������������������������������������������������������
▸ If it slowed down, suggest a reason why.
������������������������������������������������������������������������
d. Once the spring is still again, hold one end and make a wave by pushing and pulling the spring.
You will notice that, as the movement goes along the spring, this time the coils of the spring move backwards and forwards as the energy wave passes. These waves are longitudinal(compressional) waves. Repeat the exercise and take note of all observations you make as the spring moves.
Summary notes1. Compare the movement of the spring when a transverse wave passes through to the
movement that occurs when a longitudinal (compression) wave passes through.
������������������������������������������������������������������������
������������������������������������������������������������������������
������������������������������������������������������������������������
2. Make a full list of the observations that you made.
������������������������������������������������������������������������
������������������������������������������������������������������������
������������������������������������������������������������������������
������������������������������������������������������������������������
������������������������������������������������������������������������
������������������������������������������������������������������������
slinky spring

A resource for teachers of students in Years 9–10 Window to the Universe The Square Kilometre Array
5
Q Is there a relationship between the time it takes a wave to travel along the spring and the amplitude of the wave?
Investigation 2
Your group will need
Slinky spring Coloured string Scissors
Masking tape Stop watch Metre rule
a. Stretch the slinky spring about 1.5 m between two of you so that your hands are
touching the floor and the slinky spring is laying sideways stretched out on the floor.
b. Mark the floor with masking tape where the ends of the spring are.
c. Practice making transverse waves with different amplitudes from one length of the
spring to the other.
d.From the centre of the masking tape on the floor, mark 10 cm intervals going in one
direction perpendicular to the length of the spring.
e. Measure the amount of time it takes for the wave to travel down the slinky and back
making a 10 cm wave.
f. Repeat the last step three times to get three results to average.
g. Then increase the amplitude to 20 cm and time three trials.
h.Continue to increase the intervals until 60 cm, timing three trials and averaging each set
of results.
From your results, what is the answer to the question 1?
���������������������������������������������������������������������������
���������������������������������������������������������������������������
���������������������������������������������������������������������������
Investigation 3
Your group will need
Slinky spring Metre rule Stop watch
a. Stretch the slinky spring 2.0 m between two students.
b. Start a transverse wave in the slinky spring and measure the time it takes for one wave
to travel the length of the spring, repeat measurements twice more for accuracy.
c. Record your data in a data table.
1

Window to the Universe The Square Kilometre Array A resource for teachers of students in Years 9–10
6
d.Next stretch the slinky spring 2.5 m between the students and time a transverse wave three times.
e. Continue until you have stretched the spring to 5.0 m.
f. Calculate the speed of the transverse wave by using speed = distance wave travelled/time it took for wave to travel.
g. Graph length vs. speed (check with your teacher if you are not sure which values to put on the X and Y axes of the graph).
From your results, what is the answer to the question 2?
���������������������������������������������������������������������������
���������������������������������������������������������������������������
���������������������������������������������������������������������������
3. The Wave Diagram From all the information you have collected in this lesson, label the following diagram.
N
A
O
V
Y
X
Mλ
λ
What is the relationship between tension of the spring and the time it takes
for a wave to pass along the spring?
(Warning: take care not to overstretch
the spring).
Q2

A resource for teachers of students in Years 9–10 Window to the Universe The Square Kilometre Array
7
Lesson 2Electromagnetic spectrum; description and detectionTime required: 50 minutes
Equipment list
Radio or television Internet access or library access
List of references
If you have not used the jigsaw teaching activity before,
<www.jigsaw.org/overview.htm> has a good description of the strategy.
Outcomes
Students should be able to:
▸ state the common properties of the electromagnetic spectrum;
▸ use wave property terminology to describe the differences in properties of the various forms of radiation making up the electromagnetic spectrum;
▸ identify the origins of each form of radiation; and
▸ state uses for each form of radiation.
Prior knowledge, understandings and skills required
Students need to be:
▸ familiar with the terms used to describe energy waves;
▸ able to work efficiently in groups; and
▸ able to collaborate with other groups in a jig-saw activity.
Activity
1. Introduction:
a. Take a radio or television to the class and ask the students to choose their favourite station and switch it on and listen for a minute or so.
b. Repeat this exercise with one more student.
c. Ask students why / how each station can be picked up separately?
d.Students should start to answer with words such as frequency, wavelength etc.
Rationale
This lesson will introduce students to the electromagnetic spectrum. An understanding of the range and properties of the waves of the electromagnetic spectrum is essential for students if they are to develop an appreciation of the information that can be detected from the Universe.
Window to the Universe The Square Kilometre Array A resource for teachers of students in Years 9–10
8
2. Do a quick review of characteristics of waves with the students.
3. Introduce the idea that by varying these characteristics a spectrum of waves can be mapped out which we use everyday in our lives.
4. Divide the students into 7 groups and, if necessary, explain the system used in a Jig-saw activity.
5. Give out the task card for each type of wave including frequency, wavelength and its uses and ask the students to collect information on the card provided.
6. Each group is required to share the information collected with other groups.
7. Once the information has been shared, the students complete the table by listing the types of radiation, in order of increasing frequency, i.e. from lowest frequency to highest frequency.
Assessment During a brief Q&A session, students should be able to identify the different types of electromagnetic waves and describe their different properties and uses.

A resource for teachers of students in Years 9–10 Window to the Universe The Square Kilometre Array
9
Student task cardsRun these cards off prior to the lesson and hand one card to each group.
Your task is to find out about Radio Waves.
▸ How they are generated (made)
▸ Wavelength
▸ Frequency
▸ Uses
Your task is to find out about Microwaves.
▸ How they are generated (made)
▸ Wavelength
▸ Frequency
▸ Uses
Your task is to find out about Infra-Red Waves.
▸ How they are generated (made)
▸ Wavelength
▸ Frequency
▸ Uses
Your task is to find out about Light (Visible) Waves.
▸ How they are generated (made)
▸ Wavelength
▸ Frequency
▸ Uses
Your task is to find out about Ultra-violet Waves.
▸ How they are generated (made)
▸ Wavelength
▸ Frequency
▸ Uses
Your task is to find out about X-rays.
▸ How they are generated (made)
▸ Wavelength
▸ Frequency
▸ Uses
Your task is to find out about Gamma Rays.
▸ How they are generated (made)
▸ Wavelength
▸ Frequency
▸ Uses
Your task is to find out about RadioWaves
Your task is to find out about Infra-RedWaves
Your task is to find out about Ultra-violetWaves
Your task is to find out about GammaRays
Your task is to find out about Microwaves
Your task is to find out about Light(Visible)Waves
Your task is to find out about X-rays

Window to the Universe The Square Kilometre Array A resource for teachers of students in Years 9–10
10
Student handout
Typeofradiation Howitisgenerated Frequency Wavelength Uses
Radio waves

A resource for teachers of students in Years 9–10 Window to the Universe The Square Kilometre Array
11
Summary diagram for distribution at end of lesson
Y N Y N
Radio Microwave Infrared Visible Ultraviolet X-ray Gamma ray 103 10-2 10-5 10-8 10-9 10-10 10-22
1 K 100 K 10,000 K 10,000,000 K -272 oC -173 oC 9,727 oC 10,000,000 oC
104 108 1012 1015 1016 1018 1021
Buildings Humans Flies Needle Point Protozoans Molecules Atoms Atomic Nuclei
Penetrates Earth’s atmosphere?
Radiation typeWavelength (m)
Approximate scale of wavelength
Frequency (Hz)
Temperature of objects at which this radiation is the most intense wavelength emitted
Window to the Universe The Square Kilometre Array A resource for teachers of students in Years 9–10
12
Lesson 3Optics – ReflectionTime required: 75 minutes
Equipment list
Per group of students:
12V power pack
Ruler Hodson Light Box with 1 slit card attached and mirrors (concave, convex and plane)
Protractor
List of references
The following websites may be helpful in providing background and additional information:
Davidson, M.W. 2003, Online activity guidebook for teachers, Centre for Integrated Research and Learning <www.micro.magnet.fsu.edu/optics/activities/teachers/index.html>.
Henderson, T 2007, The Physics Classroom Tutorial, Glenbrook South High School Glenview Illinois <www.glenbrook.k12.il.us/gbssci/phys/Class/refln/reflntoc.html>.
The Nuffield Foundation 2004, Classroom management in semi-darkness, The Nuffield Foundation 2004, <www.practicalphysics.org/go/Guidance�9.html?topic�id=2&collection�id=101>.
The Nuffield Foundation 2007, Reflection of light, The Nuffield Foundation 2004, <www.practicalphysics.org/go/Collection�101.html?topic�id=2&collection�id=101>.
The Nuffield Foundation 2007, Teaching ray optics, The Nuffield Foundation 2004, <www.practicalphysics.org/go/Guidance�111.html?topic�id=$parameters.topic�id&collection�id=%24parameters.collection�id>.
Outcomes
Students should be able to:
▸ identify a problem and independently produce an investigation plan;
▸ undertake a first-hand investigation safely and confidently;
▸ select and use appropriate forms of communication to present information to an audience; and
▸ identify trends in data to draw conclusions.
Rationale
Students will have knowledge and personal experience about the reflection of light through their use of mirrors in everyday life.
This lesson seeks to extend and formalise the student’s own knowledge and experiences about reflection in a practical and meaningful way.
Since the principle of reflection forms the basis of how many modern day telescopes function, it stands to reason that students develop an understanding of this principle and its application in the “real world”.
A resource for teachers of students in Years 9–10 Window to the Universe The Square Kilometre Array
13
Prior knowledge, understandings and skills required ▸ The electromagnetic spectrum and wave properties of light as presented earlier in
the unit.
▸ Personal knowledge and experience about reflection of light through everyday use of mirrors.
▸ Students will require the skills in being able to manipulate the scientific equipment used in this lesson.
Activity 1. Initial “think, pair, share” activity to ascertain student’s understanding of the
term ‘reflection’.
2. Practical activity – using the Hodson light box, 1 slit card and associated mirrors. Students then place the plane, concave and convex mirror in the path of the light in turn, and trace the location of the mirrors and the path of the light. Use of the 3 slit card may be useful for the concave and convex mirrors so that the incident rays are always parallel. It will make the convergence of the reflected rays using the convex mirror more obvious. Alternately, the students can use the single slit card for all experiments but give the instruction that the incident rays for the concave and convex mirrors are parallel to each other.
3. Students then independently answer the follow-up questions. These can then be discussed as a class.
ExtensionThe websites above have links to various online activities for students to explore the reflection of light in more depth, including the “Law of Reflection”. Students could explore these sites and activities.
Java applet to explain step by step the reflection and refraction of light waves by Huygens’ Principle. <www.walter-fendt.de/ph14e/huygenspr.htm>.
Students could visit the following website for a more in depth explanation of the reflection and refraction of electromagnetic waves. This site was written specifically for the NSW stage 6 physics syllabus.
Emery, B. 2002, The World Communicates, Catholic Schools Diocese of Maitland Newcastle, viewed 12 January 2009, <http://webs.mn.catholic.edu.au/physics/emery/prelim�communication.htm#emreflection>.
Students could experiment with the reflection of light by using the curved surface of a silver spoon. This would show students the properties of light and images as it reflects off a concave and convex surface.
Student handoutOptics – Reflection student handout page 15.
Window to the Universe The Square Kilometre Array A resource for teachers of students in Years 9–10
14
Assessment
▸ Students are able to manipulate equipment to produce situations where the reflection of light can be observed and recorded.
▸ Students’ diagrams and written responses are clear and concise.
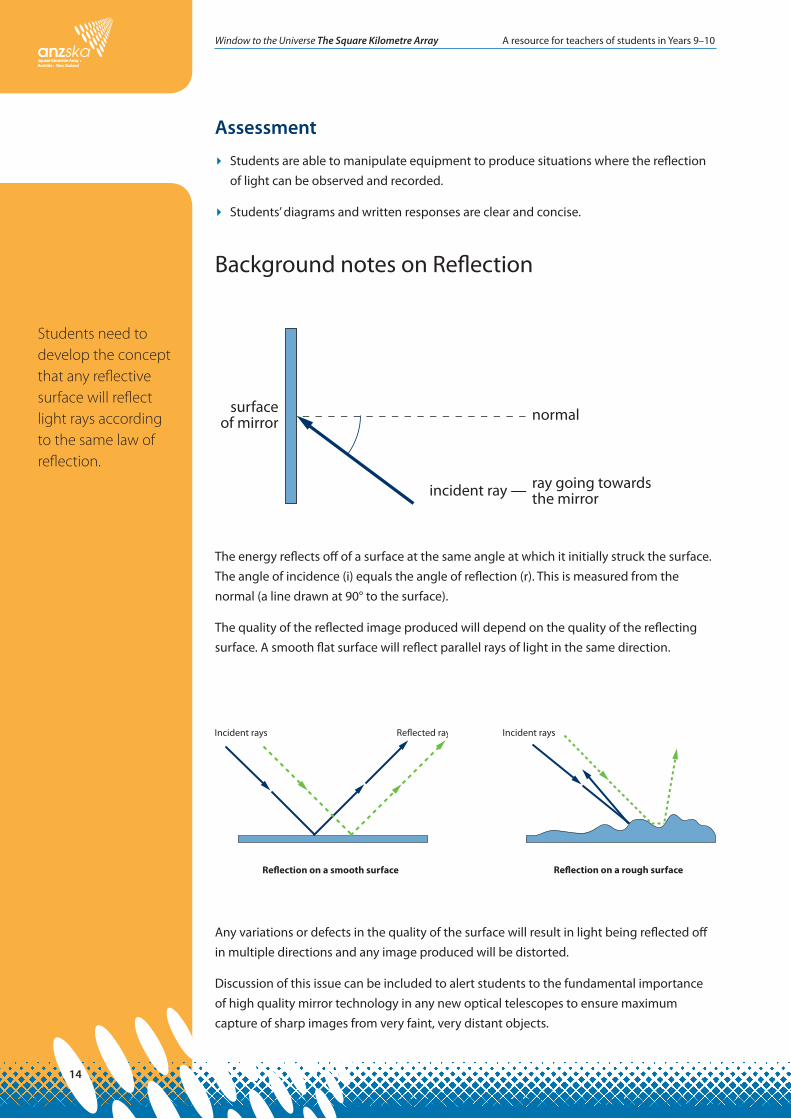
Background notes on Reflection
incident ray — ray going towards the mirror
normalsurface of mirror
The energy reflects off of a surface at the same angle at which it initially struck the surface. The angle of incidence (i) equals the angle of reflection (r). This is measured from the normal (a line drawn at 90° to the surface).
The quality of the reflected image produced will depend on the quality of the reflecting surface. A smooth flat surface will reflect parallel rays of light in the same direction.
Re�ection on a smooth surface
Incident rays Re�ected rays
Re�ection on a rough surface
Incident rays
Any variations or defects in the quality of the surface will result in light being reflected off in multiple directions and any image produced will be distorted.
Discussion of this issue can be included to alert students to the fundamental importance of high quality mirror technology in any new optical telescopes to ensure maximum capture of sharp images from very faint, very distant objects.
Students need to develop the concept that any reflective surface will reflect light rays according to the same law of reflection.

A resource for teachers of students in Years 9–10 Window to the Universe The Square Kilometre Array
15
Student handoutOptics – ReflectionThink: Write a definition for ‘reflection’.
���������������������������������������������������������������������������
���������������������������������������������������������������������������
Pair: Write down the definition for ‘reflection’ that your neighbour has written.
���������������������������������������������������������������������������
���������������������������������������������������������������������������
Share: Write down a different definition than the two above that someone else in the class has written.
���������������������������������������������������������������������������
���������������������������������������������������������������������������
Dictionary definition: Write down a definition from a dictionary.
���������������������������������������������������������������������������
���������������������������������������������������������������������������
Important information ▸ When drawing rays of light, mark with an ‘x’ a couple of places along the ray, then use
your ruler to join the ‘x’s.
▸ The normal is a line drawn at right-angles to the surface of the mirror at the point where the ray of light hits the mirror.
▸ All angles are measured from the normal.
▸ The arrow on the ray shows the direction of the ray (towards or away from the mirror).
i – Angle of incidence r – Angle of re�ection
Normal
Re�ection
Light
Incident ray
Mirror
Re�ected rayri

Window to the Universe The Square Kilometre Array A resource for teachers of students in Years 9–10
16
Practical activity – Reflection of lightYou are to write up complete experimental records for the following tasks.
Tasks
▸ You are to set up the equipment provided to measure the angle of reflection for three different angles of incidence using a plane mirror.
▸ Identify any trends in data that you see.
▸ Repeat the previous task using the concave and convex mirrors instead of the plane mirror.
▸ Do you see the same trend in data with these mirrors as with the plane mirror?
Follow-up questions
1. Identify at least two uses in everyday life for each of the three types of mirrors investigated above.
2. Telescopes use mirrors. What type of mirror is utilised in modern day telescopes? Why?
���������������������������������������������������������������������������
���������������������������������������������������������������������������
���������������������������������������������������������������������������
3. What is the advantage of using a large rather than a small mirror for a telescope?
���������������������������������������������������������������������������
���������������������������������������������������������������������������
���������������������������������������������������������������������������
Typeofmirror Use1 Use2
Plane
Concave
Convex
A resource for teachers of students in Years 9–10 Window to the Universe The Square Kilometre Array
17
Lesson 4Optics – RefractionTime required: 75 minutes
Equipment listPer group of students::
▸ 12V Laboratory transformer/power pack.
▸ Hodson Light Box and lenses (concave, convex, semi-circular prism and glass triangular prism).
▸ 1 and 3 slit card.
▸ Concave and convex lenses if available (similar in size to a magnifying glass lens).
▸ Coloured filter (eg red) for light box and diffraction grating (see point 5 under “Activity” below).
▸ LASER pointer (low power <1mW for safety reasons) and diffraction grating (see point 5 under “Activity” below). NB: If you are going to use a LASER, then it is highly recommended that you read the “Laser pointer hazard” website below.
▸ Access to the internet or reference books can assist further discussion activities.
List of references The following websites may be helpful in providing background and additional information:
Davidson, M.W. 2006, Diffraction of light, National High Magnetic Field Laboratory, <www.molecularexpressions.com/primer/java/diffraction/basicdiffraction/index.html>.
Davidson, M.W. 2006, Light diffraction through a periodic grating, National High Magnetic Field Laboratory, <www.micro.magnet.fsu.edu/primer/java/imageformation/gratingdiffraction/index.html>.
Davidson, M.W. 2003, Online activity guidebook for teachers, National High Magnetic Field Laboratory, <www.micro.magnet.fsu.edu/optics/activities/teachers/index.html>.
The Nuffield Foundation 2004, Classroom management in semi-darkness, The Nuffield Foundation 2004, <www.practicalphysics.org/go/Guidance�9.html?topic�id=2&collection�id=101>.
The Nuffield Foundation 2007, Refraction of light, The Nuffield Foundation 2004, <www.practicalphysics.org/go/Collection�102.html?topic�id=2&collection�id=102>.
The Nuffield Foundation 2007, Teaching ray optics, The Nuffield Foundation 2004, <www.practicalphysics.org/go/Guidance�111.html?topic�id=$parameters.topic�id&collection�id=%24parameters.collection�id>.
Charles Sturt University 2009, Laser pointer hazard, Charles Sturt University, <www.csu.edu.au/acad�sec/committees/radiation/faq/laser�pointer�hazard.htm>.
2009, Diffraction grating, Wikipedia, <www.en.wikipedia.org/wiki/Diffraction�grating>.
Rationale Students have now completed the lesson on the reflection of light and discussed how it can be used in everyday life and telescopes. Another property of light that is widely used in technology and everyday devices is refraction.
Refraction is not as widely used in modern day large telescopes as the primary method of collecting and focusing light, as is reflection. However, it still plays a critical role in astronomy and telescope technology.
Many students would have experience with using refraction through their experience with microscopes, magnifying glasses, cameras etc. This lesson sets out to formalise student understanding and experience with refraction, dispersion and diffraction of light, its applications and limitations.

Window to the Universe The Square Kilometre Array A resource for teachers of students in Years 9–10
18
Outcomes At the completion of this activity, students should be able to:
▸ Identify the media interface as the point of refraction of a light ray;
▸ Describe the effect of concave and convex lenses on the path of light rays;
▸ Describe the effect of a prism on refracting light and thus dispersing white light into its spectrum of colours;
▸ Distinguish between the terms refraction, dispersion and diffraction and describe the effect of each on light rays;
▸ Undertake a first-hand investigation safely and confidently; and
▸ Select and use appropriate forms of communication to present information to an audience.
Prior knowledge, understandings and skills required ▸ The electromagnetic spectrum and wave properties of light as presented earlier in
the unit.
▸ Some students will have personal experience about the refraction of light and dispersion through everyday life.
▸ Students will require the skills to manipulate the scientific equipment used in this lesson.
Activity 1. Initially a variation of the “think, pair, share” activity to ascertain student’s understanding
of the term ‘refraction’.
2. Practical activity – using the Hodson light box, 3 slit card and associated lenses, students manipulate the light box to produce three parallel beams of light. Students then place the concave lens, convex lens and semi-circular prism in the path of the light in turn, and trace the location of the lens and the path of the light.
3. Students independently answer the discussion questions. These can then be discussed as a class.
4. Finally, a conclusion needs to be drawn about the investigation. This will be dependent on the school, class and students. Typically, it should relate to the ‘aim’ and the students’ results and discussions.

A resource for teachers of students in Years 9–10 Window to the Universe The Square Kilometre Array
19
Extension5. To show the dispersion of white light into a spectrum of its component colours (red,
orange, yellow, green, blue, indigo and violet) students will need the light box, single slit card and glass triangular prism. Shine the single beam of light on to the paper, place the prism in the path of the light and rotate the prism until a spectrum appears. Have students trace the incoming (incident) ray of light, prism and the spectrum.
6. To show the diffraction of light, one of the following options could be used:
a. Set up the Hodson light box with a coloured filter (eg red) and single slit card. Place a diffraction grating in the path of the beam of light and observe.
b. Point a LASER pointer toward the ceiling and turn on to show students the monochromatic and collimated light. Place diffraction grating in the path of the light and observe the pattern produced on the ceiling.
Further extension possibilitiesThe websites listed on page 17 have links to various online activities for students to explore the refraction of light in more depth, including “Snell’s Law”. Students could explore these sites and activities.
Java applet to explain step by step the reflection and refraction of light waves by Huygens’ Principle. <www.walter-fendt.de/ph14e/huygenspr.htm>.
Students could visit the following website for a more in depth explanation of the reflection and refraction of electromagnetic waves. This site was written specifically for the NSW stage 6 physics syllabus.
Emery, B. 2002, The World Communicates, Catholic Schools Diocese of Maitland Newcastle, viewed 12 January 2009, <http://webs.mn.catholic.edu.au/physics/emery/prelim�communication.htm#emreflection>.
Students could experiment with convex and concave lenses (magnifying glass size) to determine how an image is formed using each lens.
Students could research how large modern telescopes use adaptive optics and active optics to help overcome the effects of the atmosphere on light from distant objects. (Suggested for gifted and talented students, or students who have a keen interest in physics and/or astronomy.)
Assessment ▸ Students are able to manipulate equipment to produce situations where the refraction
of light can be observed and recorded.
▸ Students’ diagrams and written responses are clear and concise.
▸ Final Q&A with full class elicits responses indicating that students can distinguish between the terms used in this lesson.

Window to the Universe The Square Kilometre Array A resource for teachers of students in Years 9–10
20
Background information on Refraction
Refraction
Light Normal
Glass
i – Angle of incidencer – Angle of reection
r
i
Refraction of light through a glass block
As the light enters the glass block it slows down and bends towards the normal, as glass is a denser medium than air. It then travels through the block in a straight line. As it exits the block, it is once again bent, this time away from the normal as it speeds up in the less dense medium of air and then continues to travel in a straight line.
The shape of a biconvex lens allows for the effect of refraction at two media boundaries to be utilised for focusing the light from a distant object such as a star.
The dispersion of white light into its colours is also evidence of the relationship between wavelength/frequency and refraction at media boundaries. This phenomenon can then be further discussed when considering the use of lenses in telescopes and the problems of chromatic aberration.
Light
biconconvexlens
f i
Fi
Students need to develop the concept that any transparent medium will refract light rays according to the density of the medium. Refraction is said to occur when the light ray crosses the interface between two media.
A resource for teachers of students in Years 9–10 Window to the Universe The Square Kilometre Array
21
Student handoutOptics – RefractionThink: You have seen how the reflection of light occurs and where this is used in everyday situations. Another property of light is refraction. What is the dictionary definition of refraction?
���������������������������������������������������������������������������
���������������������������������������������������������������������������
Pair: Where do you think you might have seen refraction occurring?
���������������������������������������������������������������������������
���������������������������������������������������������������������������
Share: Write a definition for ‘refraction’ that you will remember.
���������������������������������������������������������������������������
���������������������������������������������������������������������������
���������������������������������������������������������������������������
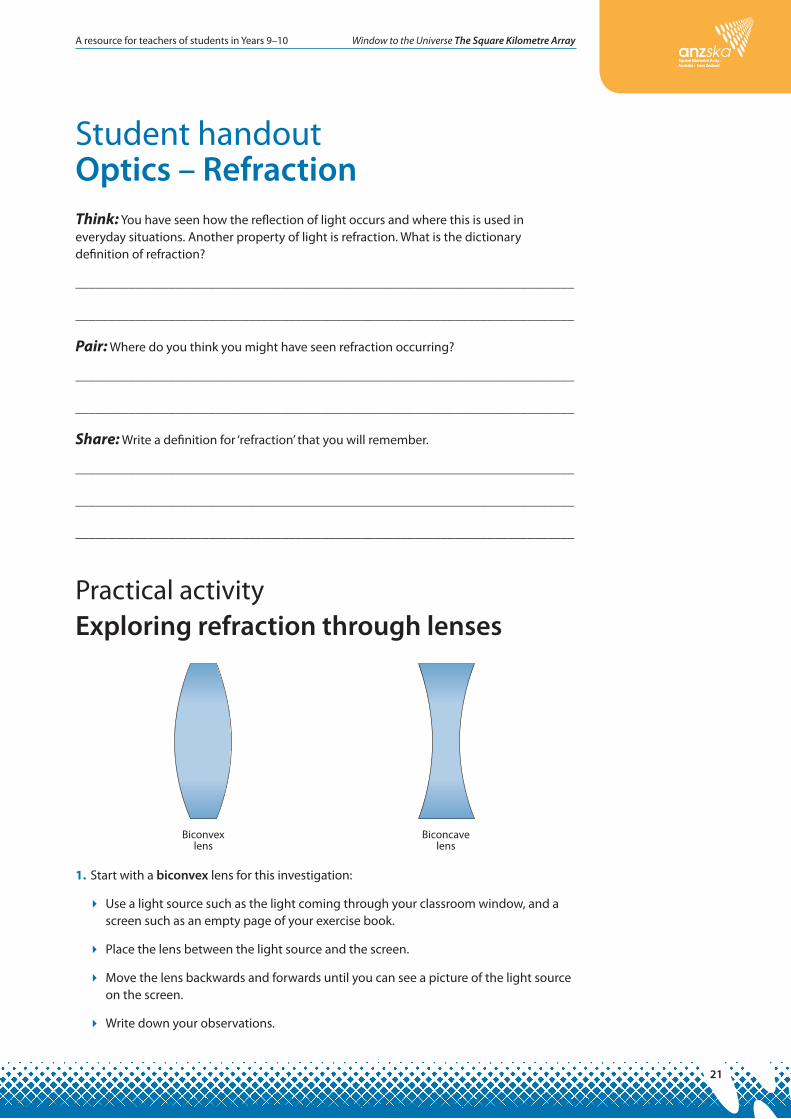
Practical activityExploring refraction through lenses
Biconvex
lensBiconcave
lens
1. Start with a biconvex lens for this investigation:
▸ Use a light source such as the light coming through your classroom window, and a screen such as an empty page of your exercise book.
▸ Place the lens between the light source and the screen.
▸ Move the lens backwards and forwards until you can see a picture of the light source on the screen.
▸ Write down your observations.
Window to the Universe The Square Kilometre Array A resource for teachers of students in Years 9–10
22
▸ What happens if you use a thicker or thinner convex lens?
▸ What happens if you use a biconcave lens?
2. Set up the ray box so that you have three parallel rays of light exiting the box.
▸ Now place a biconvex lens in the path of the parallel rays and slide it along the path of the rays. What happens? Use a ruler and pencil to draw and label a diagram showing the path of rays through the lens.
▸ Now repeat the investigation with a biconcave lens. What differences can you see? Again draw and label a diagram to show the path of the rays through the lens.
▸ Leave your ray box set up for the next investigation.
Discussion1. Use your dictionary to find the meanings of
a. Converging ������������������������������������������������������������
b. Diverging ��������������������������������������������������������������
Now complete the following sentences:
A biconvex lens is a �������������� lens as it �����������������������������light rays.
A biconcave lens is a ������������� lens as it �����������������������������light rays.
2. The rays of light coming from very distant objects are very faint and need to be gathered together so that they can be seen better. Which type of lens would be best to do this in a telescope? �����������������������
Explain your answer ���������������������������������������������������������
���������������������������������������������������������������������������
���������������������������������������������������������������������������
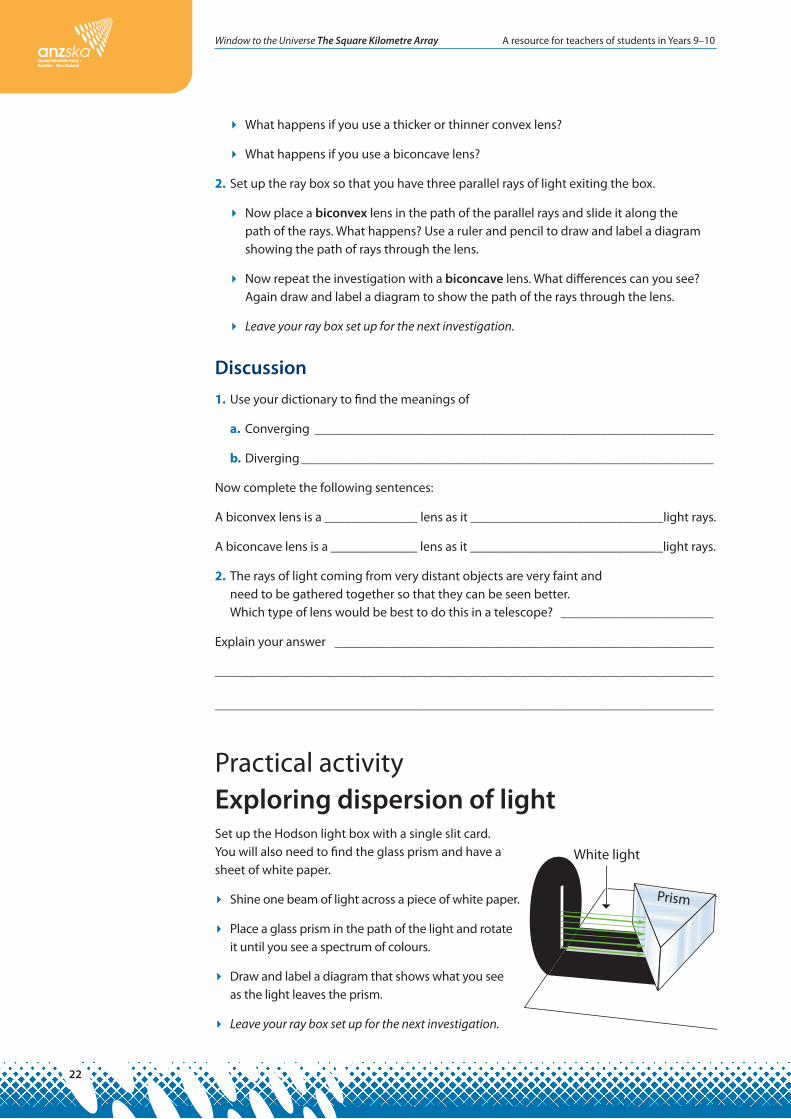
Practical activityExploring dispersion of lightSet up the Hodson light box with a single slit card. You will also need to find the glass prism and have a sheet of white paper.
▸ Shine one beam of light across a piece of white paper.
▸ Place a glass prism in the path of the light and rotate it until you see a spectrum of colours.
▸ Draw and label a diagram that shows what you see as the light leaves the prism.
▸ Leave your ray box set up for the next investigation.
White light
Prism
A resource for teachers of students in Years 9–10 Window to the Universe The Square Kilometre Array
23
Discussion1. Where have you seen this effect before? Suggest a reason why this may be happening.
2. Why does this happen? You may wish to research the answer to this question. A place to start is <www.science.hq.nasa.gov/kids/imagers/ems/visible.html>.
3. Predict how this effect may affect the light gathered through a telescope lens. If you want to learn more, here is a place to start. <http://csep10.phys.utk.edu/astr162/lect/light/refracting.html>.
Practical activity Exploring diffraction of lightYou will need to set up the ray box with a coloured filter (eg red) and the single slit card. Have a piece of white paper ready and find a card with several slits (a diffraction grating) in the light box kit.
▸ Before you start using the ray box, do this simple investigation. Hold two pencils parallel to one and other and about 0.5 cm apart. Place them just in front of your eye and look at a fluorescent light (perhaps one on the ceiling of your classroom?). Gradually bring the pencils together until they are nearly touching. What do you see? Do the sides of the pencils look straight? Can you see anything between the two pencils?
▸ Now investigate this phenomenon with the ray box. Take the card with several slits and place it in front of the coloured beam of light.
▸ What do you see? What is happening to the light?
▸ Draw and label a diagram to illustrate the effect produced.
▸ You can get the same effect with the grooves of a compact disc, which can act as a grating and produce iridescent reflections. Bird feathers may produce the same result too!
Discussion1. Have you seen this effect before anywhere? What could cause such an effect?
������������������������������������������������������������������������
������������������������������������������������������������������������
2. Why does this effect happen? If you need help answering this question, a good place to start research is <http://library.thinkquest.org/27356/p�diffraction.htm>.
������������������������������������������������������������������������
������������������������������������������������������������������������
3. How may this effect hinder or help astronomers? The following page is a good place to start your research. <http://hyperphysics.phy-astr.gsu.edu/hbase/phyopt/grating.html>.
������������������������������������������������������������������������
������������������������������������������������������������������������

Window to the Universe The Square Kilometre Array A resource for teachers of students in Years 9–10
24
Lesson 5Investigating microwaves Time required: 50 minutes
Equipment list
Microwave kit consisting of transmitter, receiver, single diode probe, aluminium reflection plates and a wax triangular prism
2 Powerpacks
Cardboard (project size)
Milliammeter
Electrical leads
Metre rule
Please read the instructions on how to use the microwave kit before use. Most importantly (depending on the model you have) read what settings are required on the power packs to provide power to the transmitter and receiver.
List of references <www.science.hq.nasa.gov/kids/imagers/ems/micro.html> has information on microwaves suitable for lower ability Year 9–10 students.
<http://teacher.pas.rochester.edu/PHY�LABS/E&M�Waves/E&M�Waves.html> has some more complex investigations using formulae for interference patterns and the nature of wave motion.
Outcomes Students should be able to:
▸ relate the properties of reflection and refraction to microwaves;
▸ determine if the law of reflection applies to microwaves; and
▸ identify that microwaves have common properties with visible light.
Rationale
The purpose of this lesson is to demonstrate that microwaves which can be detected by radio telescopes, demonstrate the same properties as light.

A resource for teachers of students in Years 9–10 Window to the Universe The Square Kilometre Array
25
Prior knowledge, understandings and skills required Students should have completed the previous activities on reflection and refraction.
Activity Students will set up the microwave apparatus to make measurements to determine if the law of reflection applies to microwaves.
Students will also set up the equipment to observe the refraction of microwaves.
ExtensionInterference activity.
Activity for measuring the wavelength of microwaves.
Assessment Measure the angle of incidence and the angle of reflection to determine if the law of reflection can be applied to microwaves.
Window to the Universe The Square Kilometre Array A resource for teachers of students in Years 9–10
26
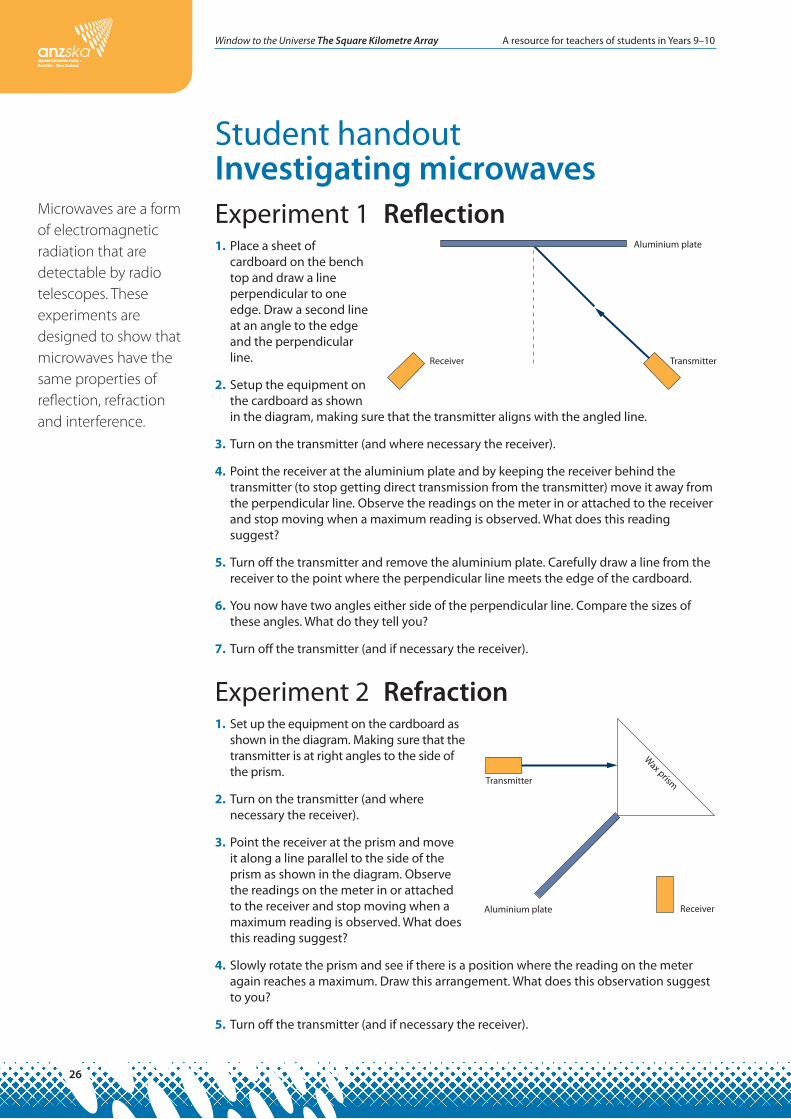
Experiment 1 Reflection1. Place a sheet of
cardboard on the bench top and draw a line perpendicular to one edge. Draw a second line at an angle to the edge and the perpendicular line.
2. Setup the equipment on the cardboard as shown in the diagram, making sure that the transmitter aligns with the angled line.
3. Turn on the transmitter (and where necessary the receiver).
4. Point the receiver at the aluminium plate and by keeping the receiver behind the transmitter (to stop getting direct transmission from the transmitter) move it away from the perpendicular line. Observe the readings on the meter in or attached to the receiver and stop moving when a maximum reading is observed. What does this reading suggest?
5. Turn off the transmitter and remove the aluminium plate. Carefully draw a line from the receiver to the point where the perpendicular line meets the edge of the cardboard.
6. You now have two angles either side of the perpendicular line. Compare the sizes of these angles. What do they tell you?
7. Turn off the transmitter (and if necessary the receiver).
Experiment 2 Refraction1. Set up the equipment on the cardboard as
shown in the diagram. Making sure that the transmitter is at right angles to the side of the prism.
2. Turn on the transmitter (and where necessary the receiver).
3. Point the receiver at the prism and move it along a line parallel to the side of the prism as shown in the diagram. Observe the readings on the meter in or attached to the receiver and stop moving when a maximum reading is observed. What does this reading suggest?
4. Slowly rotate the prism and see if there is a position where the reading on the meter again reaches a maximum. Draw this arrangement. What does this observation suggest to you?
5. Turn off the transmitter (and if necessary the receiver).
Student handout Investigating microwaves
Aluminium plate
TransmitterReceiver
Aluminium plate
Wax prismTransmitter
Receiver
Microwaves are a form of electromagnetic radiation that are detectable by radio telescopes. These experiments are designed to show that microwaves have the same properties of reflection, refraction and interference.
A resource for teachers of students in Years 9–10 Window to the Universe The Square Kilometre Array
27
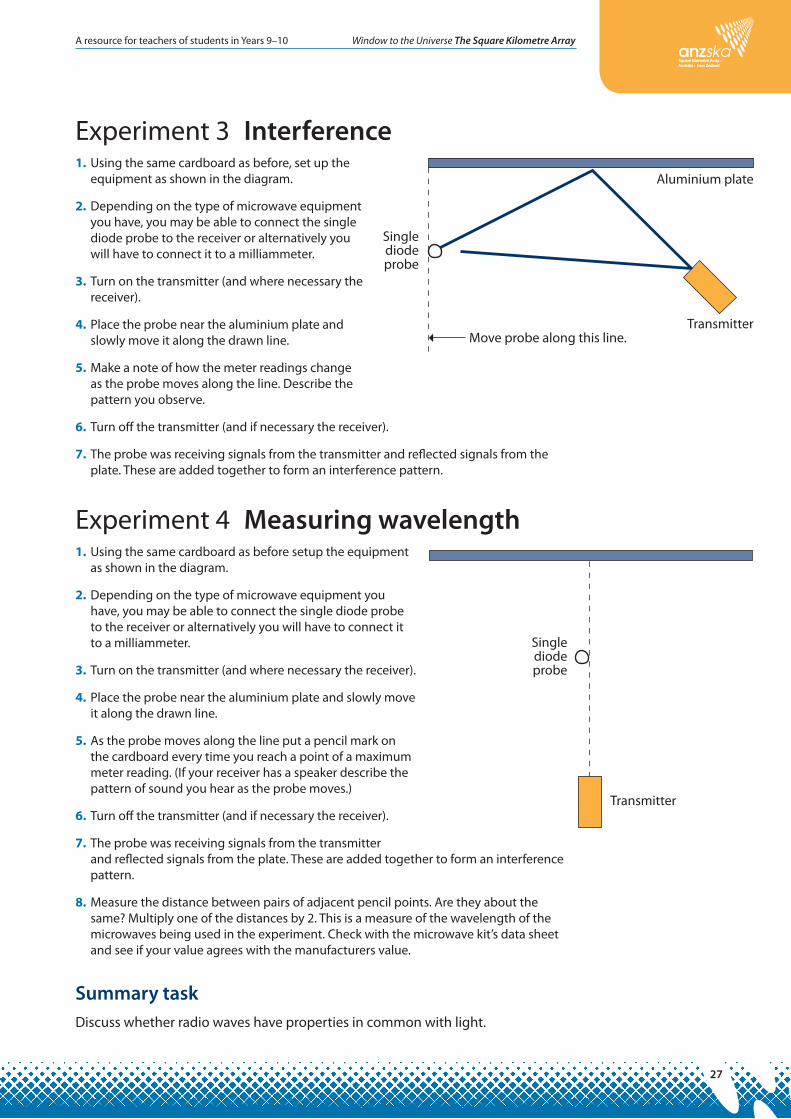
Experiment 3 Interference1. Using the same cardboard as before, set up the
equipment as shown in the diagram.
2. Depending on the type of microwave equipment you have, you may be able to connect the single diode probe to the receiver or alternatively you will have to connect it to a milliammeter.
3. Turn on the transmitter (and where necessary the receiver).
4. Place the probe near the aluminium plate and slowly move it along the drawn line.
5. Make a note of how the meter readings change as the probe moves along the line. Describe the pattern you observe.
6. Turn off the transmitter (and if necessary the receiver).
7. The probe was receiving signals from the transmitter and reflected signals from the plate. These are added together to form an interference pattern.
Experiment 4 Measuring wavelength1. Using the same cardboard as before setup the equipment
as shown in the diagram.
2. Depending on the type of microwave equipment you have, you may be able to connect the single diode probe to the receiver or alternatively you will have to connect it to a milliammeter.
3. Turn on the transmitter (and where necessary the receiver).
4. Place the probe near the aluminium plate and slowly move it along the drawn line.
5. As the probe moves along the line put a pencil mark on the cardboard every time you reach a point of a maximum meter reading. (If your receiver has a speaker describe the pattern of sound you hear as the probe moves.)
6. Turn off the transmitter (and if necessary the receiver).
7. The probe was receiving signals from the transmitter and reflected signals from the plate. These are added together to form an interference pattern.
8. Measure the distance between pairs of adjacent pencil points. Are they about the same? Multiply one of the distances by 2. This is a measure of the wavelength of the microwaves being used in the experiment. Check with the microwave kit’s data sheet and see if your value agrees with the manufacturers value.
Summary taskDiscuss whether radio waves have properties in common with light.
Aluminium plate
Move probe along this line.Transmitter
Singlediodeprobe
Aluminium plate
Transmitter
Singlediodeprobe