seams and stitching problems and causes
DESCRIPTION
Seams and Stitching Problems and CausesTRANSCRIPT

Seam Types

Introduction to Seams A seam can be defined as : the application of a series of stitches or stitch types to one or several layers of material.
8 classes of seams are defined in the ISO classification. Seams are described as :
flat superimposed lapped bound ornamental
A seam is load bearing and should be similar in physical properties to the material being sewn.
Flat Seams
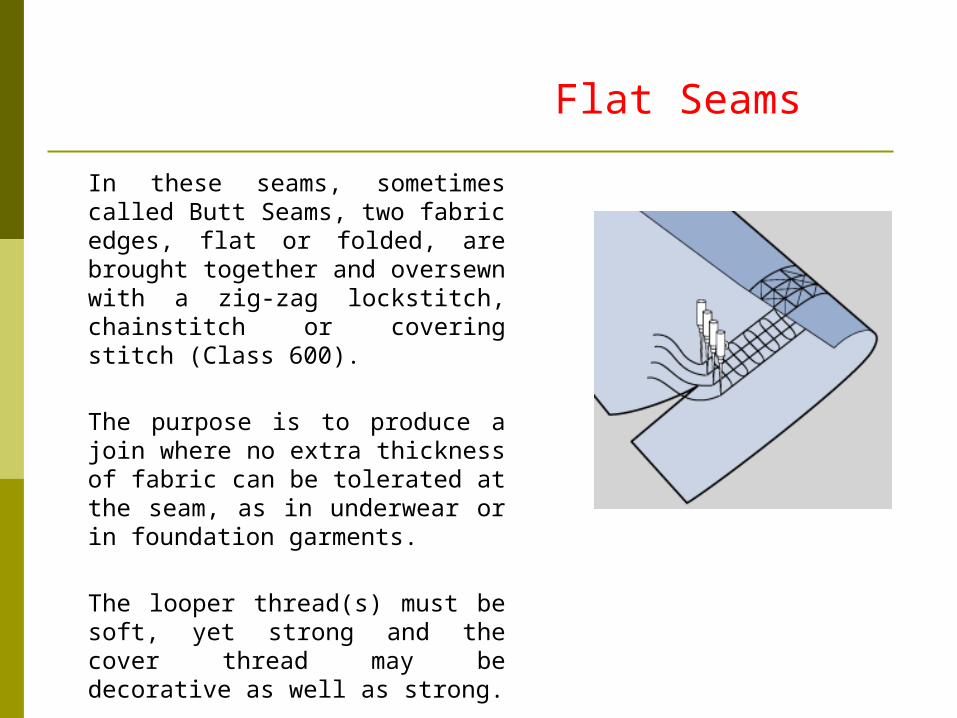
In these seams, sometimes called Butt Seams, two fabric edges, flat or folded, are brought together and oversewn with a zig-zag lockstitch, chainstitch or covering stitch (Class 600).
The purpose is to produce a join where no extra thickness of fabric can be tolerated at the seam, as in underwear or in foundation garments.
The looper thread(s) must be soft, yet strong and the cover thread may be decorative as well as strong.

Superimposed Seams
These generally start with two or more pieces of material superimposed over each other and joined near an edge, with one or more rows of stitches. There are various types of seams within the SS class.
A superimposed seam can be sewn with a stitch 301 or 401 to create a simple seam. The same seam type can also be sewn with stitch class 500 (Overedge stitch) or Combination stitches (i.e. stitch class 516) to create neat load bearing seams for lingerie, shirts, etc.

Lapped Seams
• Two or more plies of material are lapped (i.e. with edges overlapped, plain, or folded) and joined with one or more rows of stitches.• French seaming involves 2 stitching operations with an intervening folding operation - a flat, folded seam with only one row of stitching visible on the top surface, commonly used for rainwear.

Lapped Seams
• The Lap Felled type, involves only one stitching operation - a strong seam with fabric edges protected from fraying. • Commonly used for making up jeans or similar garments.
Bound Seams
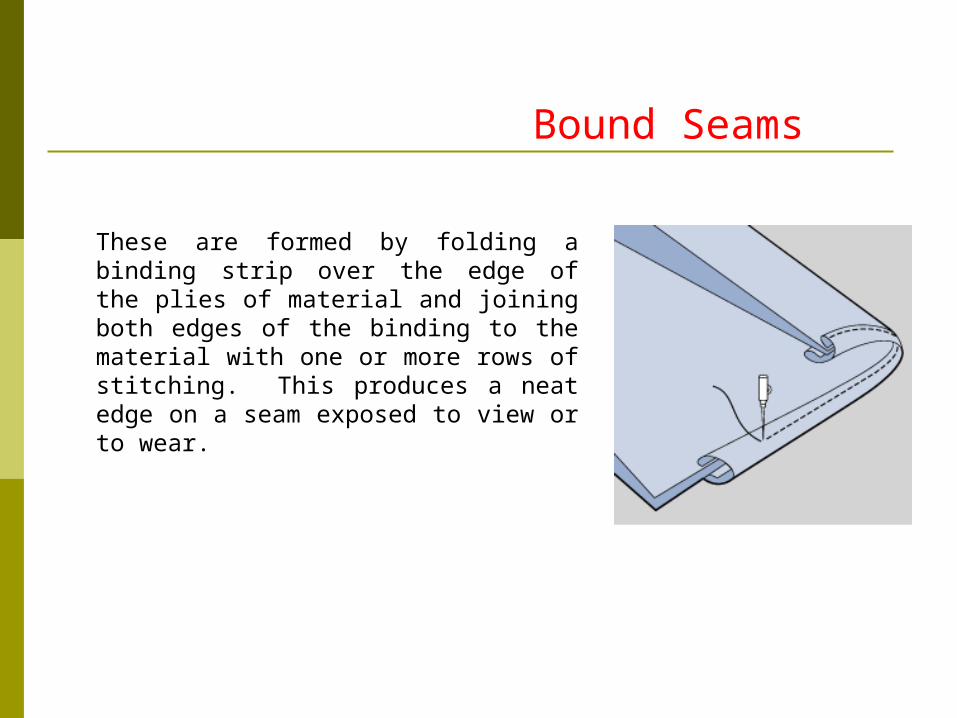
These are formed by folding a binding strip over the edge of the plies of material and joining both edges of the binding to the material with one or more rows of stitching. This produces a neat edge on a seam exposed to view or to wear.
Ornamental Seams
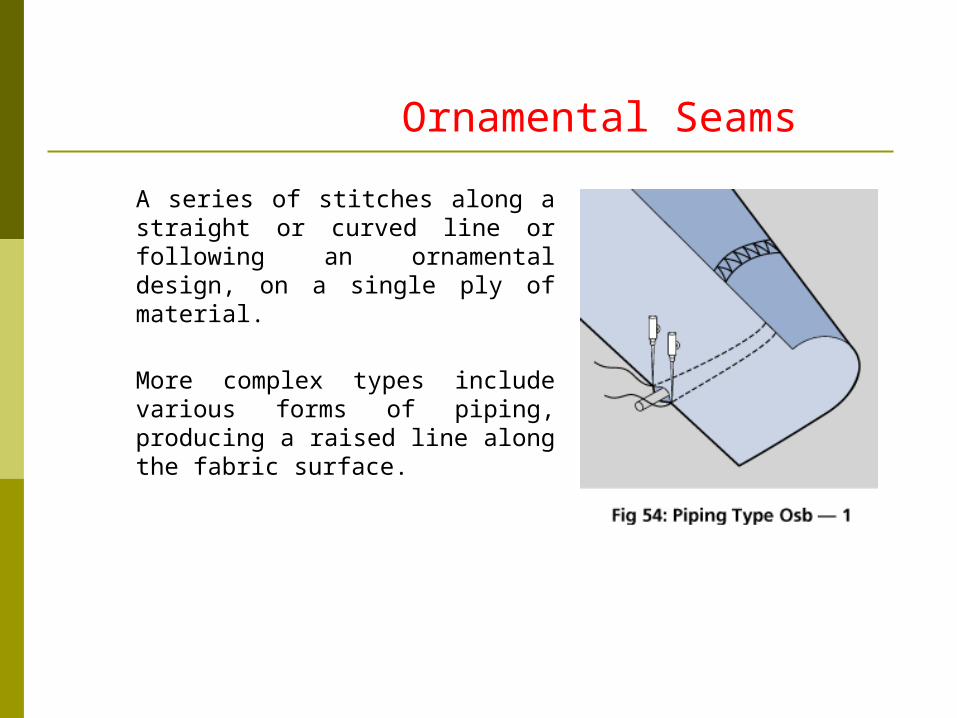
A series of stitches along a straight or curved line or following an ornamental design, on a single ply of material.
More complex types include various forms of piping, producing a raised line along the fabric surface.

Edge Finishing Stitching
Finishing the edge of a single ply of material by folding it or covering it with a stitch.
The simplest of these operations is Serging, Type 6.01.01, in which a cut edge of a single ply is reinforced by overedge stitching to neaten and prevent fraying Includes other popular methods of producing a neat edge like hemming and Blind Stitch hemming.

Quality issues & Solutions
Seam quality issues
1. Puckering2. Seam grin3. Seam slippage4. Skipped stitches5. Unbalanced stitches6. Uneven SPI

Skipped Stitches
Causes SolutionsFailure of hook, looper, or needle to enterthe thread loop at correct time
Check machines clearances and timing.Check needle is inserted and aligned correctly Use needle with deeper scarf.
Thread loop failure Change needle size/styleCheck thread take-up and check loop formation
Flagging of fabric due to poor presser footcontrol or too large a throat plate hole
Adjust presser foot pressureChange throatplate to match needle
Needle deflections or bent needles Use a reinforced needleCheck needle clearance and reset needle guard
Incorrect sewing tension in needle or under thread
Adjust thread tension
Poor loop formationCheck loop formationVerify thread selectionCheck thread twist and thickness

Staggered Stitches
Causes Solutions
Needle vibrating or deflecting Increase needle sizeUse reinforced needle
Incorrect or blunt needle point Change needle
Incorrect needle-to-thread size relationship Change needle thread size to appropriate size
Feed dog sways Tighten feed dog
Poor fabric control and presser foot bounce Adjust presser foot pressureChange feed mechanism

Unbalanced or Variable Stitches
SolutionsCauses
Incorrect sewing tensionsAdjust top or bottom thread tension as necessary for balanced stitches
Incorrect threading Check for correct thread path
Needle thread snagging on bobbin case orpositioning finger
Polish bobbin case and thread contact surfacesReset positioning fingerChange throatplate to match needle
Variable thread tensionCheck for correct thread pathMake sure check spring is properly setCheck thread lube consistency

Variable Stitch Density
SolutionsCauses
Poor fabric feed controlIncrease presser foot pressureChange to a more positive feed mechanism

Seam Grin
When two pieces of fabric are pulled at right angles to the seam, a gap is revealed between the two pieces of fabric revealing the thread in this gap.
Corrective actions
Increase stitching tensions Use a higher stitch rating

Seam SlippageA fabric related issue. Happens mainly in 2 types of fabrics :
fabrics with low no. of warp & weft yarns. fabrics where C.F. yarns are used in the weave.
The fabric on either side of the seam distorts as the fabric yarns slide away resulting in a permanent gap.
Corrective Actions Increase seam allowance Use a higher stitch density Opt for a lapped fell seam
Seam Pucker
Tension pucker Feed pucker Shrinkage pucker Inherent pucker Fabric flagging

Tension Pucker
Caused by high thread tension during sewing.
More pronounced when synthetic threads are used.
These threads on account of high stretch properties elongate more during sewing.
After sewing the threads recover from the stretched state pulling the fabric with it.
Remedy:Thread tensions have to be kept as low as possible.

Feed Pucker
Encountered when sewing very fine fabrics.
The plies of fabric tend to slip over each other resulting in uneven feed leading to pucker.
Remedy : Opting for advanced types of feed systems like compound or unison feed.
Puller feed is more cost effective.

Shrinkage Pucker Wash pucker - during the wash process the thread in the seam
shrinks, pulling the fabric with it. More so when using cotton threads.
Ironing pucker - normally happens when synthetic threads are used. The heat destabilizes the molecular structure of the thread causing it to contract.
Remedy Choosing threads with low shrinkage properties.

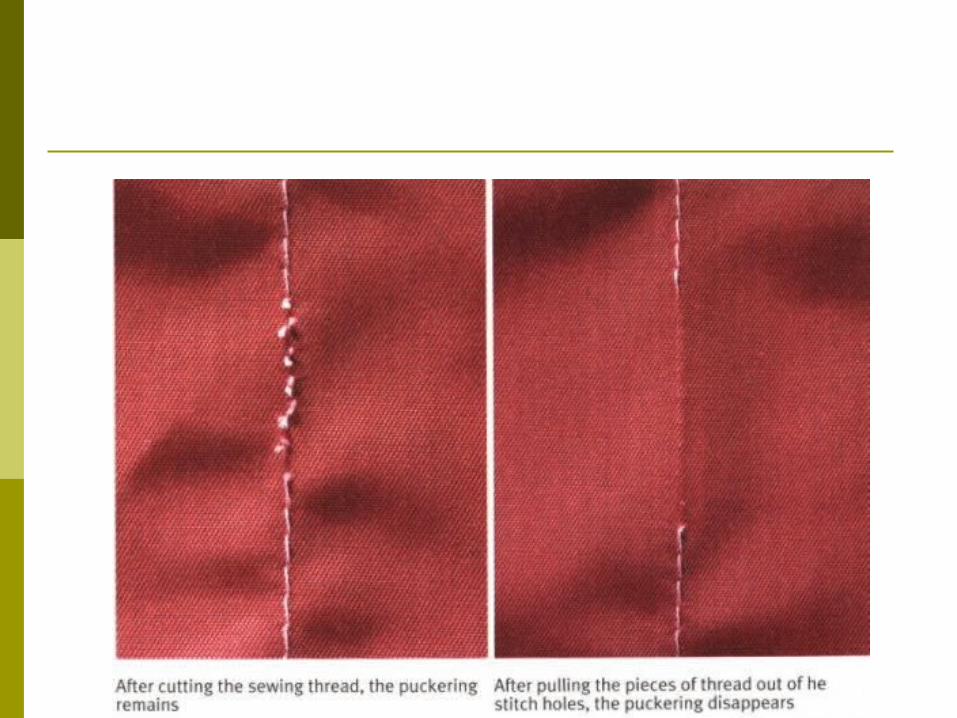
Inherent Pucker
Normally seen when sewing densely woven materials.
This occurs because the needle forcibly displaces the warp & weft ends of the dense weave to a significant extent.
These displaced ends are pushed upwards to the surface of the fabric and appear as pucker.
This is also know as 'STRUCTURAL JAMMING'
Remedy Opting for finer needles & threads Opt for a chain stitch in place of a lock stitch
Reduce stitch density Biased stitching
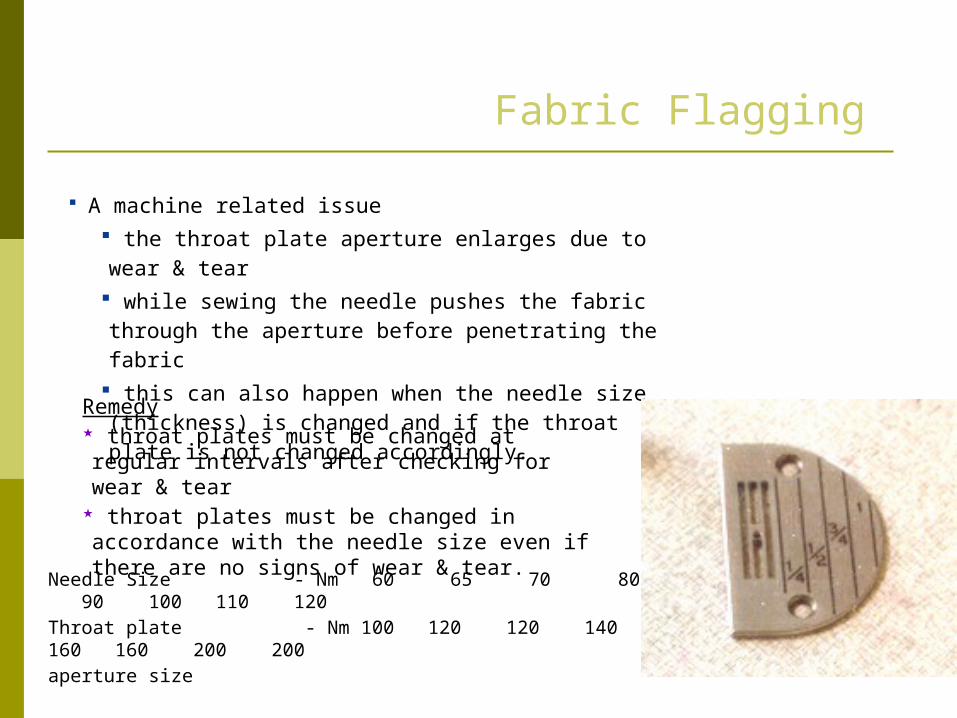
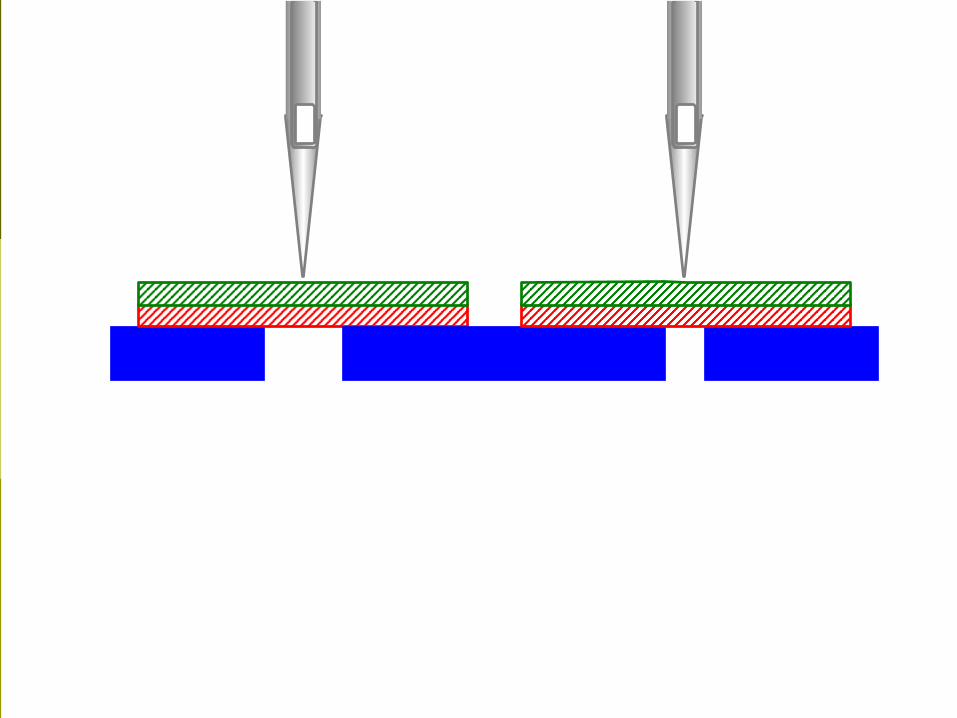
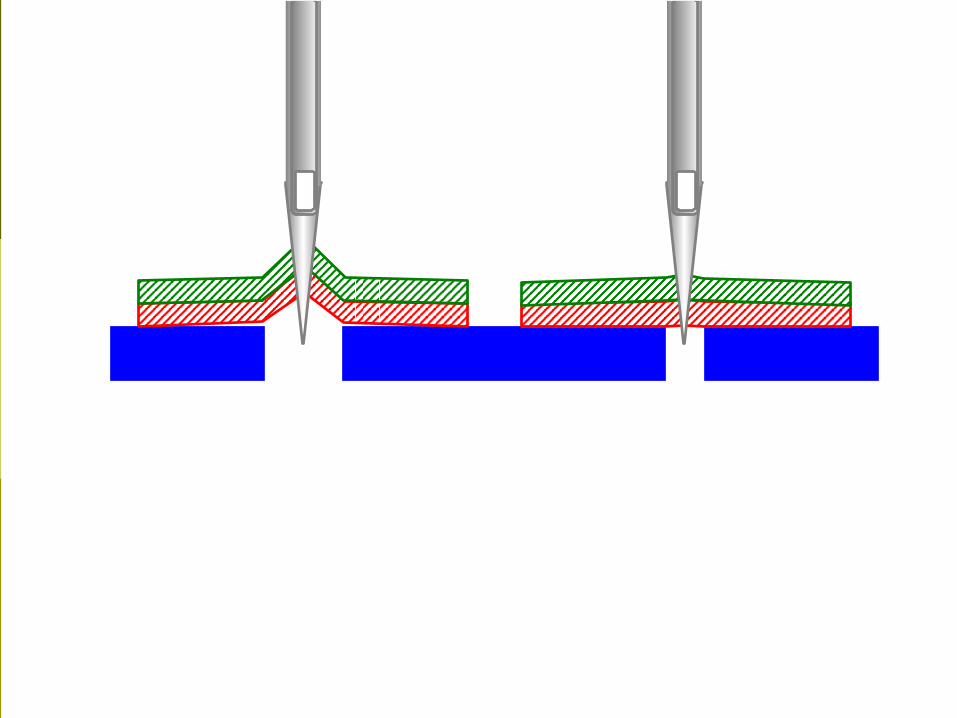
Fabric Flagging
A machine related issue
the throat plate aperture enlarges due to wear & tear
while sewing the needle pushes the fabric through the aperture before penetrating the fabric
this can also happen when the needle size (thickness) is changed and if the throat plate is not changed accordingly.
Remedy throat plates must be changed at regular intervals after checking for wear & tear
throat plates must be changed in accordance with the needle size even if there are no signs of wear & tear.
Needle Size - Nm 60 65 70 80 90 100 110 120Throat plate - Nm 100 120 120 140 160 160 200 200aperture size


Garment / Seam properties
A garment is made up using a series of different seams. Therefore, a thread should be chosen for specific seams to ensure maximum benefits.
Seam Engineering
Seam appearanceƒ Is the seam attractive, consistent, and neat?
Seam strengthƒ Have the correct seam type and thread selections been made for the item being sewn?
Seam stretchƒ Does the seam allow stretch especially in high elongation fabrics viz : knits, lycra blends
Seam durabilityƒ Do the properties of the seam, thread, and fabric lend themselve to the desired length of use for the item sewn?

Seam Strength
Critical factors : Thread strength Stitch type Stitch rating Seam type Fabric type Needle size & point
Seam strength = SPI X STS X 1.5 - lockstitch
SPI X STS X 1.7 - chainstitch
e.g.
for a seam with a density of 16 spi & a thread with a 1100 gms STS
seam strength for lockstitch = 16 X 1100 X 1.5 = 26,400 gms. = 26. 4 kgs
seam strength for chainstitch = 16 X 1100 X 1.7 = 29,920 gms. = 29. 9 kgs
The seam is sewn at right angles to the direction of load.

Seam Strength
Stitch Typeƒ The lockstitch is the most common stitch used, but the most easily damaged.
ƒ Chain and overedge stitches offer more extensibility, which leads to more resistance to stress.
Stitch Densityƒ Seam strength is usually proportional to stitch density.ƒ Increasing stitches per inch gives a stronger seam up to a point. Sometimes it is more economical to use a stronger thread.
Seam Type
ƒ A lap felled seam is the strongest of all seam types because the fabric is lapped upon itself and shares the stress load along with the thread. However, the lap felled seam makes a bulky seam.
ƒ A butt seam is designed to maintain a flat profile, but in this type seam the thread bears the entire load of stress in the seam.

Seam Stretch
Critical factors Thread extensibility Stitch type Stitch rating Fabric Type
Seam stretch is expressed as a % .
The seam is sewn parallel to the direction of load.

Seam Durability
Defined as the ability of a seam to withstand abrasion during :
Distress garment washes like stone, sand, golf ball etc. Normal machine wash Day to day wear & tear of a garment
Durability factor for various substrates : Rayon : 1 Cotton: 3 SSP : 12 Core spun : 30 CF Nylon : 150

THANK YOU