se-5l engl.11 05 - copybook · between panels 2-3, 3-4 and 4-5 complete ring ... very pressure...
TRANSCRIPT
Spekon GmbH Manual Issue 1 Rescue parachute 11-2005 SE-5L
QD 200/0000-003-019 11/05
Manual Rescue parachute
SE-5L © Sächsische Spezialkonfektion GmbH Tel.: ++49 (0)3586 456-0 Nordstraße 40 Fax: ++49 (0)3586 456-167 D-02782 Seifhennersdorf e-mail: [email protected] GERMANY http:// www.spekon.com

Spekon GmbH Manual Issue 1 Rescue parachute 11-2005 SE-5L
QD 200/0000-003-019 11/05 2 von 16
Index Index........................................................................................................................... 2 Description.................................................................................................................. 3
Technical data......................................................................................................... 3 Variants................................................................................................................... 3 Comments............................................................................................................... 3 Completion.............................................................................................................. 4
Opening and operation ............................................................................................... 4 Description of the canopy ........................................................................................... 4
Parachute................................................................................................................ 4 Pilot Chute .............................................................................................................. 4 Pack Sack / Container............................................................................................. 5 Rig........................................................................................................................... 5 Opening device ....................................................................................................... 5
Maintenance / Inspection............................................................................................ 6 Packing tools .............................................................................................................. 7
Inspection................................................................................................................ 7 Steps prior to packing ............................................................................................. 7 Folding the canopy.................................................................................................. 8 Packing the strap ends............................................................................................ 8 Looping the lines..................................................................................................... 9 Placing the canopy inside the deployment bag ....................................................... 9 Packing the bridle and closing the deployment bag ................................................ 9
Storage, maintenance and repair ............................................................................. 10 Storage ................................................................................................................. 10 Maintenance ......................................................................................................... 10 Repair ................................................................................................................... 11 Inspection.............................................................................................................. 11
Parts and components.............................................................................................. 11 Terminology .......................................................................................................... 11
Figure part ................................................................................................................ 12
Spekon GmbH Manual Issue 1 Rescue parachute 11-2005 SE-5L
QD 200/0000-003-019 11/05 3 von 16
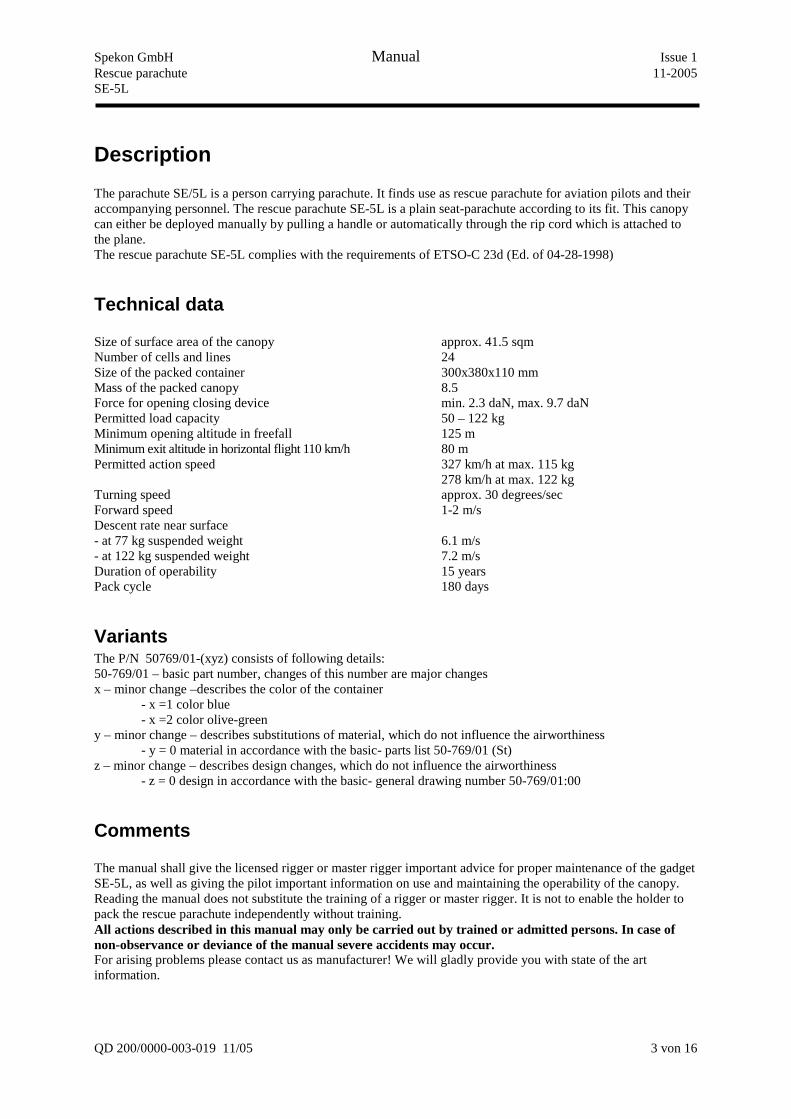
Description The parachute SE/5L is a person carrying parachute. It finds use as rescue parachute for aviation pilots and their accompanying personnel. The rescue parachute SE-5L is a plain seat-parachute according to its fit. This canopy can either be deployed manually by pulling a handle or automatically through the rip cord which is attached to the plane. The rescue parachute SE-5L complies with the requirements of ETSO-C 23d (Ed. of 04-28-1998)
Technical data Size of surface area of the canopy approx. 41.5 sqm Number of cells and lines 24 Size of the packed container 300x380x110 mm Mass of the packed canopy 8.5 Force for opening closing device min. 2.3 daN, max. 9.7 daN Permitted load capacity 50 – 122 kg Minimum opening altitude in freefall 125 m Minimum exit altitude in horizontal flight 110 km/h 80 m Permitted action speed 327 km/h at max. 115 kg 278 km/h at max. 122 kg Turning speed approx. 30 degrees/sec Forward speed 1-2 m/s Descent rate near surface - at 77 kg suspended weight 6.1 m/s - at 122 kg suspended weight 7.2 m/s Duration of operability 15 years Pack cycle 180 days
Variants The P/N 50769/01-(xyz) consists of following details: 50-769/01 – basic part number, changes of this number are major changes x – minor change –describes the color of the container - x =1 color blue - x =2 color olive-green y – minor change – describes substitutions of material, which do not influence the airworthiness - y = 0 material in accordance with the basic- parts list 50-769/01 (St) z – minor change – describes design changes, which do not influence the airworthiness - z = 0 design in accordance with the basic- general drawing number 50-769/01:00
Comments The manual shall give the licensed rigger or master rigger important advice for proper maintenance of the gadget SE-5L, as well as giving the pilot important information on use and maintaining the operability of the canopy. Reading the manual does not substitute the training of a rigger or master rigger. It is not to enable the holder to pack the rescue parachute independently without training. All actions described in this manual may only be carried out by trained or admitted persons. In case of non-observance or deviance of the manual severe accidents may occur. For arising problems please contact us as manufacturer! We will gladly provide you with state of the art information.
Spekon GmbH Manual Issue 1 Rescue parachute 11-2005 SE-5L
QD 200/0000-003-019 11/05 4 von 16
Completion All parts and components delivered by us are manufactured and tested according to a quality management existing in our enterprise. Nevertheless maintenance staff or the rigger is obliged to check all utilized components for their ground readiness and compatibility prior to completion. The assembly and the packing of the main canopy have to be carried out in accordance with the manufacturer instructions. Your SPEKON team
Opening and operation The opening of the pack sack occurs according to the specific situation of use either manually by pulling the opening handle or automatically through the rip cord that is attached to the plane by a karabiner hook. After opening of the pin-closing loop-latch at the pack sack the spring loaded pilot chute will be catapulted out of the container and will catch air. The pilot chute will pull the main parachute out of the container. After complete deployment and stretching of the parachute system the canopy will open and the deceleration will begin. The jumper can now steer the canopy partially by pulling the rear risers. The canopy will perform a right hand turn upon pulling the right rear riser, a left hand turn pulling the left rear riser. Refrain from hard steering below 50m since that may cause the canopy to react like a pendulum and lead to increased risk of injury.
Description of the canopy
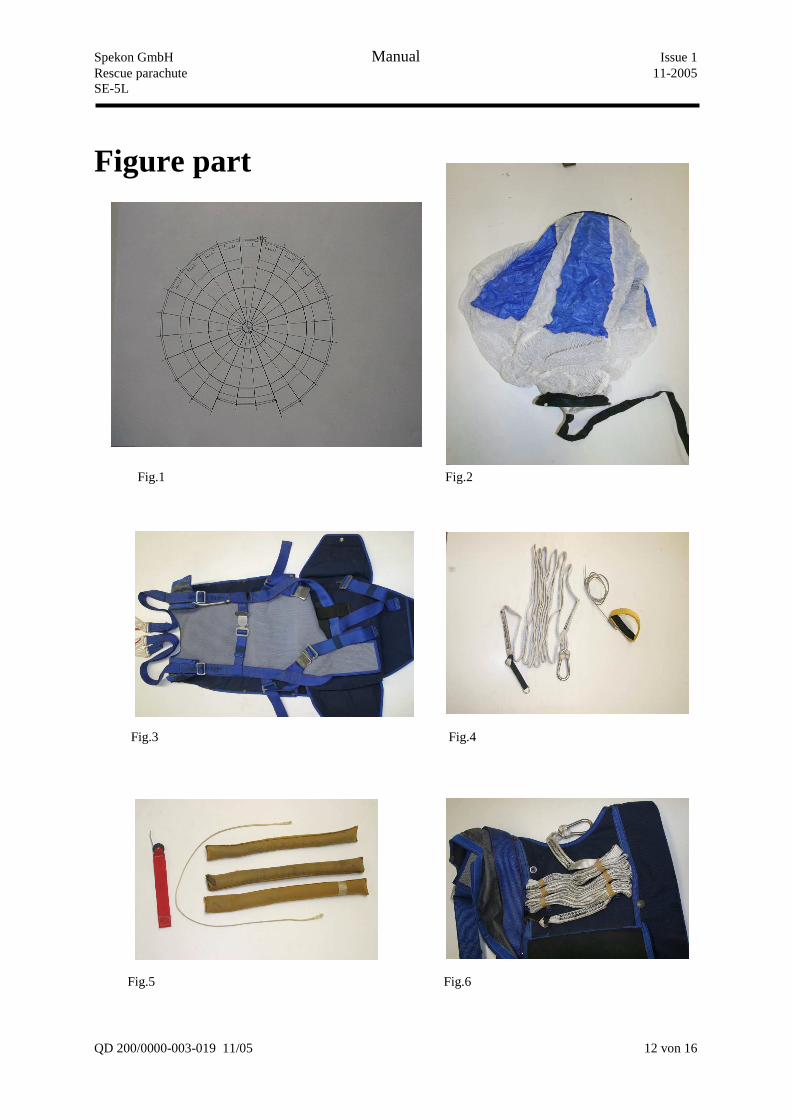
Parachute The parachute (fig. 1) is a round canopy in a single cone version It consists of 24 panels and is made of PAS-material of varied air permeability, with higher air tightness in the peak- and basis area. The size (surface area) of the canopy is approximately 41.5 m². At the panels # 24, 1 and 2 there is a steering opening included in the base through which the canopy gets a forward momentum and becomes controllable. Top and bottom side of the parachute (peak and basis) are reinforced by tapes. Every third panel seam is reinforced by a longitudinal band. Between panels 2-3, 3-4 and 4-5 complete ring reinforcement is applied. At the base of the canopy air pockets are added at panels 9-17 to support deployment. To the left and the right next to line no. 12 two holding strips are attached to the basis. You are required to shortly embrace the base of the canopy during the opening sequence to counteract unsteadiness. The peak opening measures approximately 550 mm in diameter and is tied with six peak lines. The lines connect the parachute with the rig. The length of the lines from the base of the canopy to the connector links measures 4.75 m, lines 1 and 24 measure 5.40 m.
Pilot Chute The pilot chute contains of an eight piece cap, the outside and the inside cone, the cone base spring, the lid and loop and a bridle (fig. 2). The cap is made out of an F 111 nylon fabric with low air permeability, the fabric of the cone parts are of high air permeability. Cap and cone parts are reinforced with binding. Inside the pilot chute sits the spring. The peak region is reinforced and equipped with a grommet to fix the pilot chute inside the packed rig. At the bottom part of the pilot chute three line loops are attached to be fixed to the bridle by a figure eight.
Spekon GmbH Manual Issue 1 Rescue parachute 11-2005 SE-5L
QD 200/0000-003-019 11/05 5 von 16
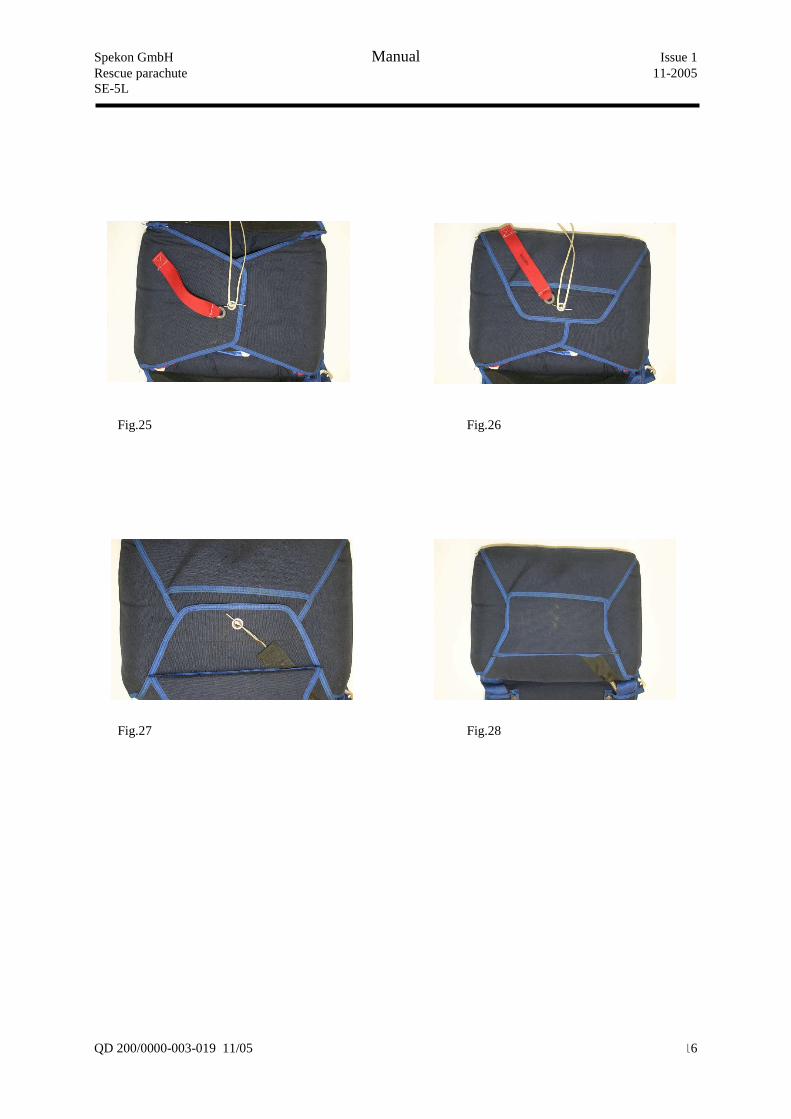
Pack Sack / Container The pack sack (fig 28) is fabricated as classic six flap container with a central one pin system. It is firmly attached to the rig with two reverse belts at the seat belt. The deployment cable is routed through a cable housing to the closing point. The closing point is covered by a plastic reinforced covering flap. The recess in the plastic reinforcement protects the pin. Inside the container there are two bands at the side of the bottom area to fixate the risers and eleven loops for flat rubber stows for the lines of the canopy. The loop attachment, which is reinforced by a washer, is located in the center of the container bottom. Changing the loop is made easier by a side opening between bottom reinforcement and container part.
Rig The rig (fig. 3) connects the canopy to the user. It distributes the opening shock evenly to the body if fitted correctly. The rig consists of the following main parts:
- Main lift webbing strap - Back strap - Leg strap - Two part chest strap - Chest and leg padding - Rig locking - Handle pocket
The ends of both main lift webbing straps provide the connection to the lines of the canopy through the connecting fitting. At the bottom end the main straps are made into seat belts. At the pack sack the main straps are routed through the side flaps of the container. The main lift webbing can be adjusted to five sizes with the buckles at shoulder level, with “1” corresponding with size “Small” and “5” to XXL. The back straps are firmly connected to the back padding. The ends are sewn to the main lift webbing, connected to the main strap through an adjustable cross belt. Closing and adjusting points can be found at the chest and the leg straps. Side release buckles are used for latches. A pocket for the deployment handle is sewn to the left main lift webbing at chest height. On the inside of the back padding there is a pocket for the repack papers and the type label. The back padding consists of special fire retardant distance interlaced yarns that are very pressure resistant and through the special material and weave combination are very breathable. Hence the padding eliminates heat accumulation and keeps transpiration moisture from the body.
Opening device With the SE-5L the opening device consists of a manually used deployment cord and a deployment line for automatic activation (fig. 4). The deployment line is equipped with a snap hook to hook in with the plane. At the bottom end a ring belt is knotted in through which the deployment cord needs to be routed.
Spekon GmbH Manual Issue 1 Rescue parachute 11-2005 SE-5L
QD 200/0000-003-019 11/05 6 von 16
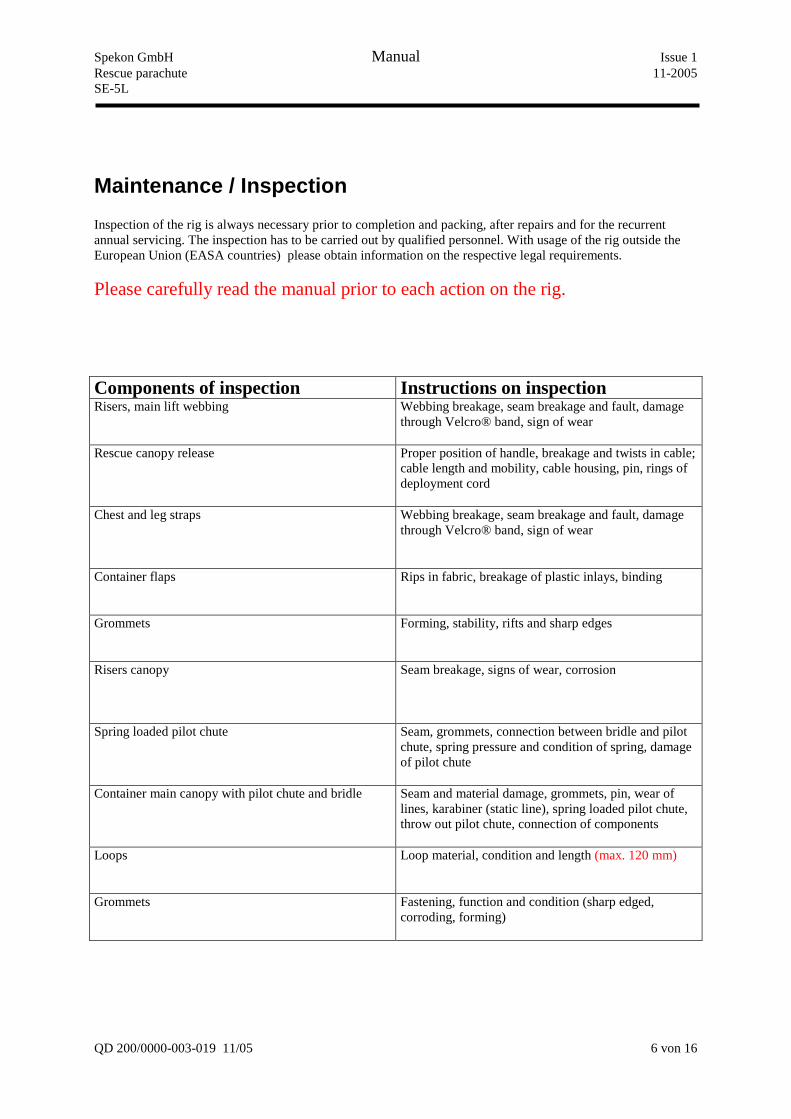
Maintenance / Inspection Inspection of the rig is always necessary prior to completion and packing, after repairs and for the recurrent annual servicing. The inspection has to be carried out by qualified personnel. With usage of the rig outside the European Union (EASA countries) please obtain information on the respective legal requirements.
Please carefully read the manual prior to each action on the rig.
Components of inspection Instructions on inspection Risers, main lift webbing
Webbing breakage, seam breakage and fault, damage through Velcro® band, sign of wear
Rescue canopy release
Proper position of handle, breakage and twists in cable; cable length and mobility, cable housing, pin, rings of deployment cord
Chest and leg straps
Webbing breakage, seam breakage and fault, damage through Velcro® band, sign of wear
Container flaps
Rips in fabric, breakage of plastic inlays, binding
Grommets
Forming, stability, rifts and sharp edges
Risers canopy
Seam breakage, signs of wear, corrosion
Spring loaded pilot chute
Seam, grommets, connection between bridle and pilot chute, spring pressure and condition of spring, damage of pilot chute
Container main canopy with pilot chute and bridle
Seam and material damage, grommets, pin, wear of lines, karabiner (static line), spring loaded pilot chute, throw out pilot chute, connection of components
Loops
Loop material, condition and length (max. 120 mm)
Grommets
Fastening, function and condition (sharp edged, corroding, forming)
Spekon GmbH Manual Issue 1 Rescue parachute 11-2005 SE-5L
QD 200/0000-003-019 11/05 7 von 16
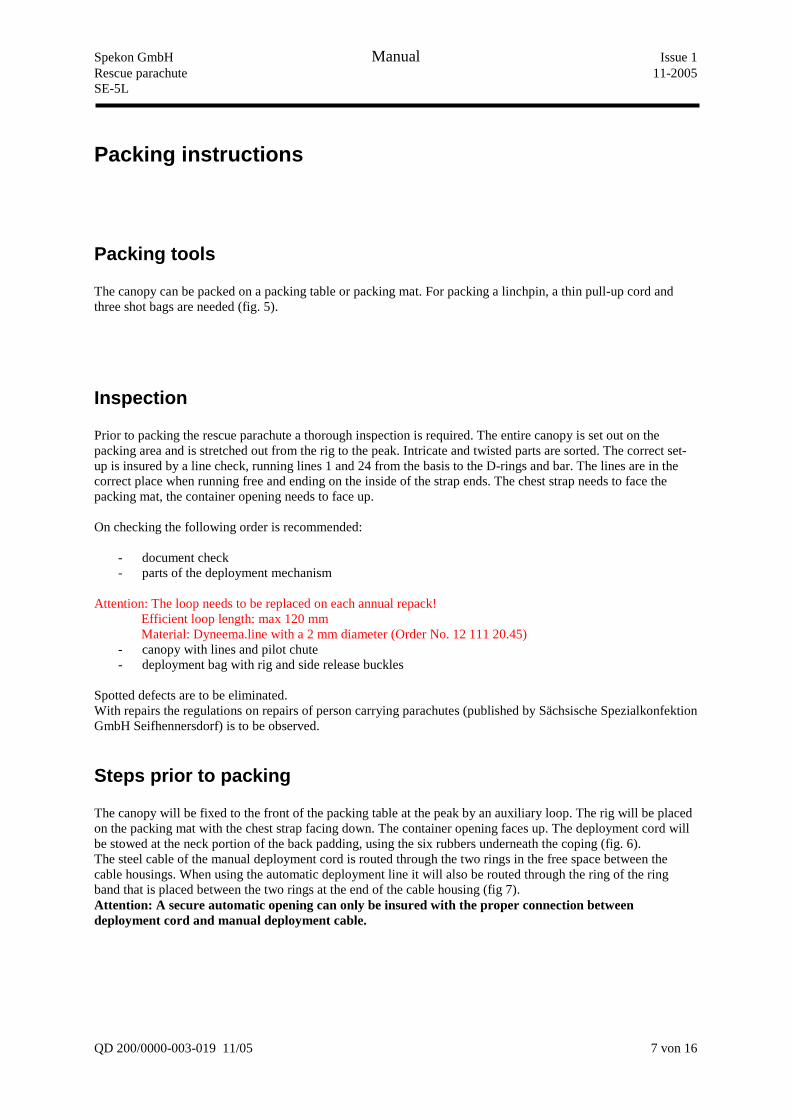
Packing instructions
Packing tools The canopy can be packed on a packing table or packing mat. For packing a linchpin, a thin pull-up cord and three shot bags are needed (fig. 5).
Inspection Prior to packing the rescue parachute a thorough inspection is required. The entire canopy is set out on the packing area and is stretched out from the rig to the peak. Intricate and twisted parts are sorted. The correct set-up is insured by a line check, running lines 1 and 24 from the basis to the D-rings and bar. The lines are in the correct place when running free and ending on the inside of the strap ends. The chest strap needs to face the packing mat, the container opening needs to face up. On checking the following order is recommended:
- document check - parts of the deployment mechanism
Attention: The loop needs to be replaced on each annual repack! Efficient loop length: max 120 mm Material: Dyneema.line with a 2 mm diameter (Order No. 12 111 20.45)
- canopy with lines and pilot chute - deployment bag with rig and side release buckles
Spotted defects are to be eliminated. With repairs the regulations on repairs of person carrying parachutes (published by Sächsische Spezialkonfektion GmbH Seifhennersdorf) is to be observed.
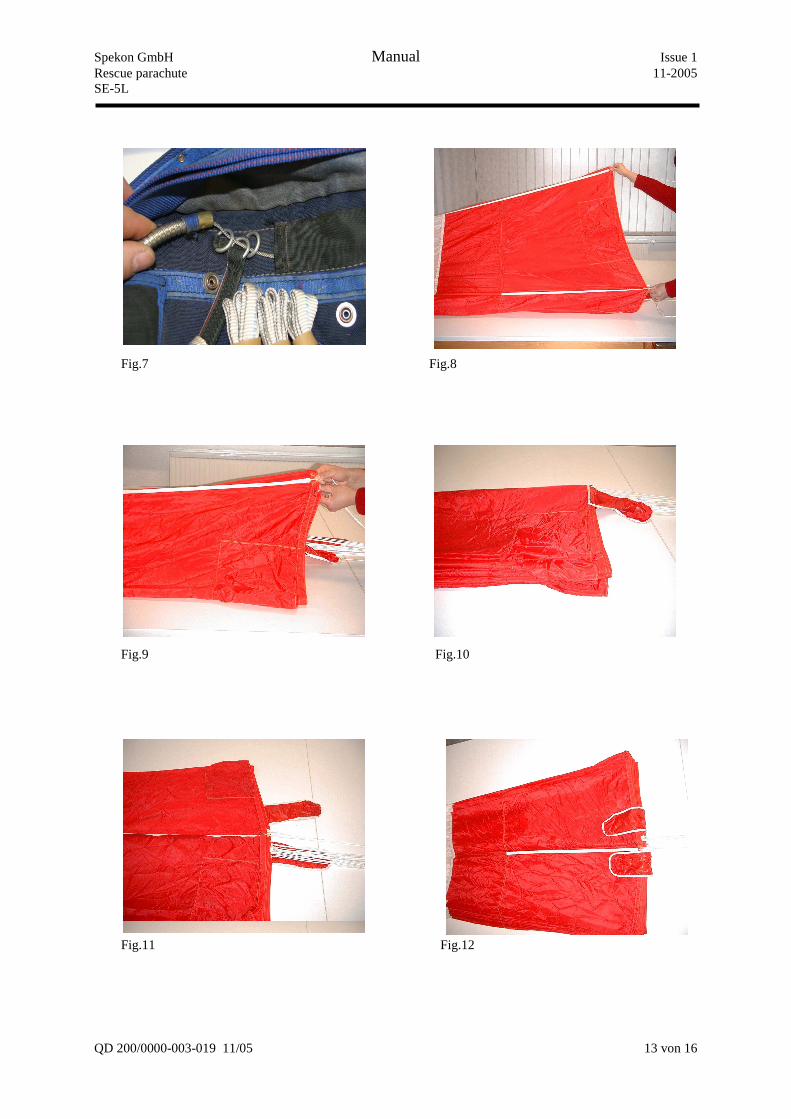
Steps prior to packing The canopy will be fixed to the front of the packing table at the peak by an auxiliary loop. The rig will be placed on the packing mat with the chest strap facing down. The container opening faces up. The deployment cord will be stowed at the neck portion of the back padding, using the six rubbers underneath the coping (fig. 6). The steel cable of the manual deployment cord is routed through the two rings in the free space between the cable housings. When using the automatic deployment line it will also be routed through the ring of the ring band that is placed between the two rings at the end of the cable housing (fig 7). Attention: A secure automatic opening can only be insured with the proper connection between deployment cord and manual deployment cable.
Spekon GmbH Manual Issue 1 Rescue parachute 11-2005 SE-5L
QD 200/0000-003-019 11/05 8 von 16
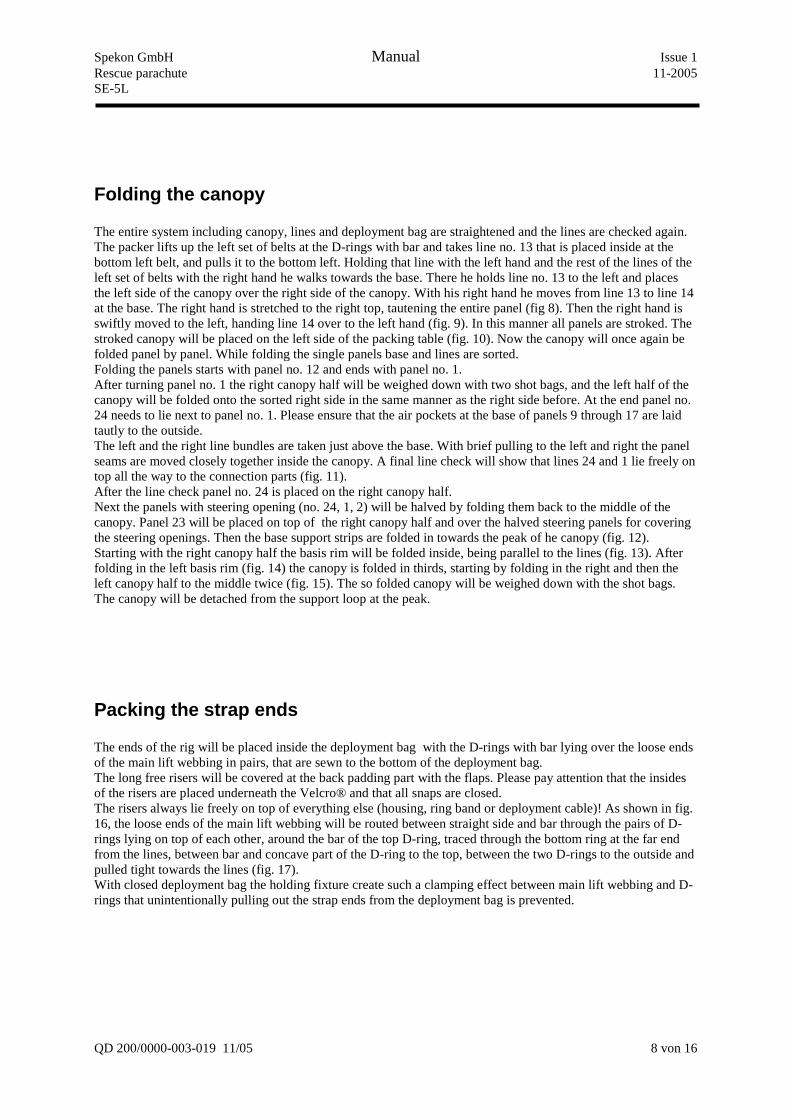
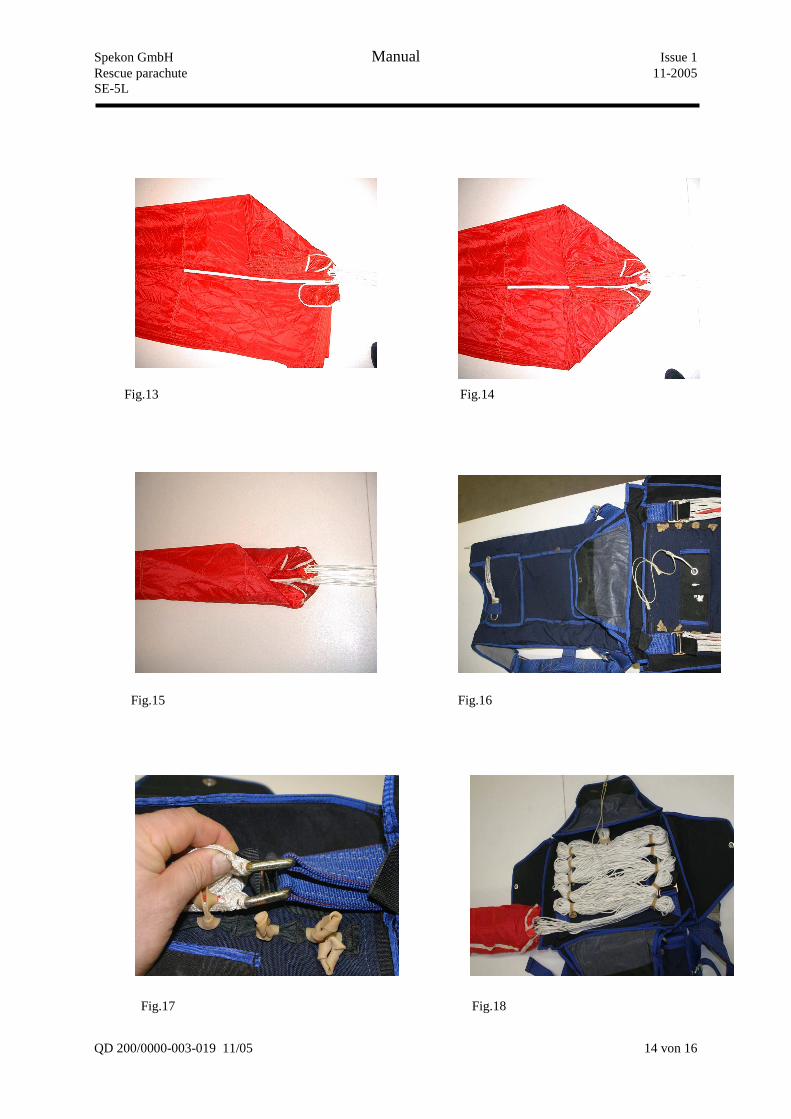
Folding the canopy The entire system including canopy, lines and deployment bag are straightened and the lines are checked again. The packer lifts up the left set of belts at the D-rings with bar and takes line no. 13 that is placed inside at the bottom left belt, and pulls it to the bottom left. Holding that line with the left hand and the rest of the lines of the left set of belts with the right hand he walks towards the base. There he holds line no. 13 to the left and places the left side of the canopy over the right side of the canopy. With his right hand he moves from line 13 to line 14 at the base. The right hand is stretched to the right top, tautening the entire panel (fig 8). Then the right hand is swiftly moved to the left, handing line 14 over to the left hand (fig. 9). In this manner all panels are stroked. The stroked canopy will be placed on the left side of the packing table (fig. 10). Now the canopy will once again be folded panel by panel. While folding the single panels base and lines are sorted. Folding the panels starts with panel no. 12 and ends with panel no. 1. After turning panel no. 1 the right canopy half will be weighed down with two shot bags, and the left half of the canopy will be folded onto the sorted right side in the same manner as the right side before. At the end panel no. 24 needs to lie next to panel no. 1. Please ensure that the air pockets at the base of panels 9 through 17 are laid tautly to the outside. The left and the right line bundles are taken just above the base. With brief pulling to the left and right the panel seams are moved closely together inside the canopy. A final line check will show that lines 24 and 1 lie freely on top all the way to the connection parts (fig. 11). After the line check panel no. 24 is placed on the right canopy half. Next the panels with steering opening (no. 24, 1, 2) will be halved by folding them back to the middle of the canopy. Panel 23 will be placed on top of the right canopy half and over the halved steering panels for covering the steering openings. Then the base support strips are folded in towards the peak of he canopy (fig. 12). Starting with the right canopy half the basis rim will be folded inside, being parallel to the lines (fig. 13). After folding in the left basis rim (fig. 14) the canopy is folded in thirds, starting by folding in the right and then the left canopy half to the middle twice (fig. 15). The so folded canopy will be weighed down with the shot bags. The canopy will be detached from the support loop at the peak.
Packing the strap ends The ends of the rig will be placed inside the deployment bag with the D-rings with bar lying over the loose ends of the main lift webbing in pairs, that are sewn to the bottom of the deployment bag. The long free risers will be covered at the back padding part with the flaps. Please pay attention that the insides of the risers are placed underneath the Velcro® and that all snaps are closed. The risers always lie freely on top of everything else (housing, ring band or deployment cable)! As shown in fig. 16, the loose ends of the main lift webbing will be routed between straight side and bar through the pairs of D-rings lying on top of each other, around the bar of the top D-ring, traced through the bottom ring at the far end from the lines, between bar and concave part of the D-ring to the top, between the two D-rings to the outside and pulled tight towards the lines (fig. 17). With closed deployment bag the holding fixture create such a clamping effect between main lift webbing and D-rings that unintentionally pulling out the strap ends from the deployment bag is prevented.
Spekon GmbH Manual Issue 1 Rescue parachute 11-2005 SE-5L
QD 200/0000-003-019 11/05 9 von 16
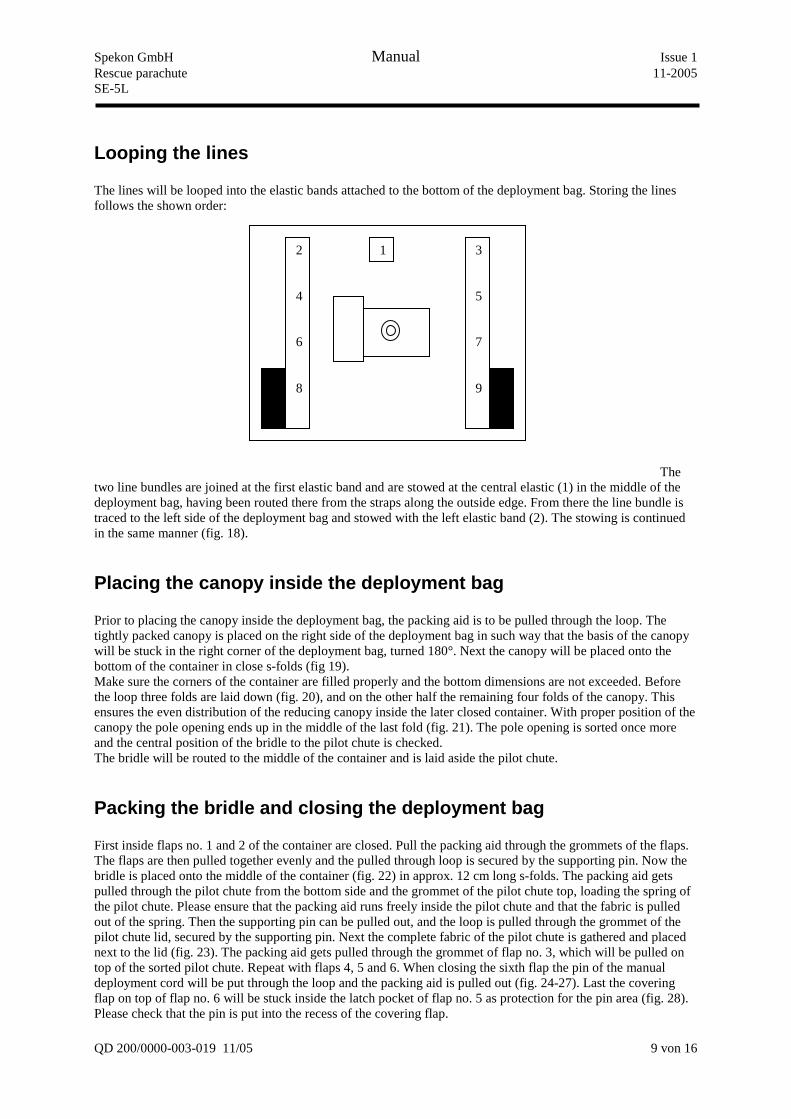
Looping the lines The lines will be looped into the elastic bands attached to the bottom of the deployment bag. Storing the lines follows the shown order:
The two line bundles are joined at the first elastic band and are stowed at the central elastic (1) in the middle of the deployment bag, having been routed there from the straps along the outside edge. From there the line bundle is traced to the left side of the deployment bag and stowed with the left elastic band (2). The stowing is continued in the same manner (fig. 18).
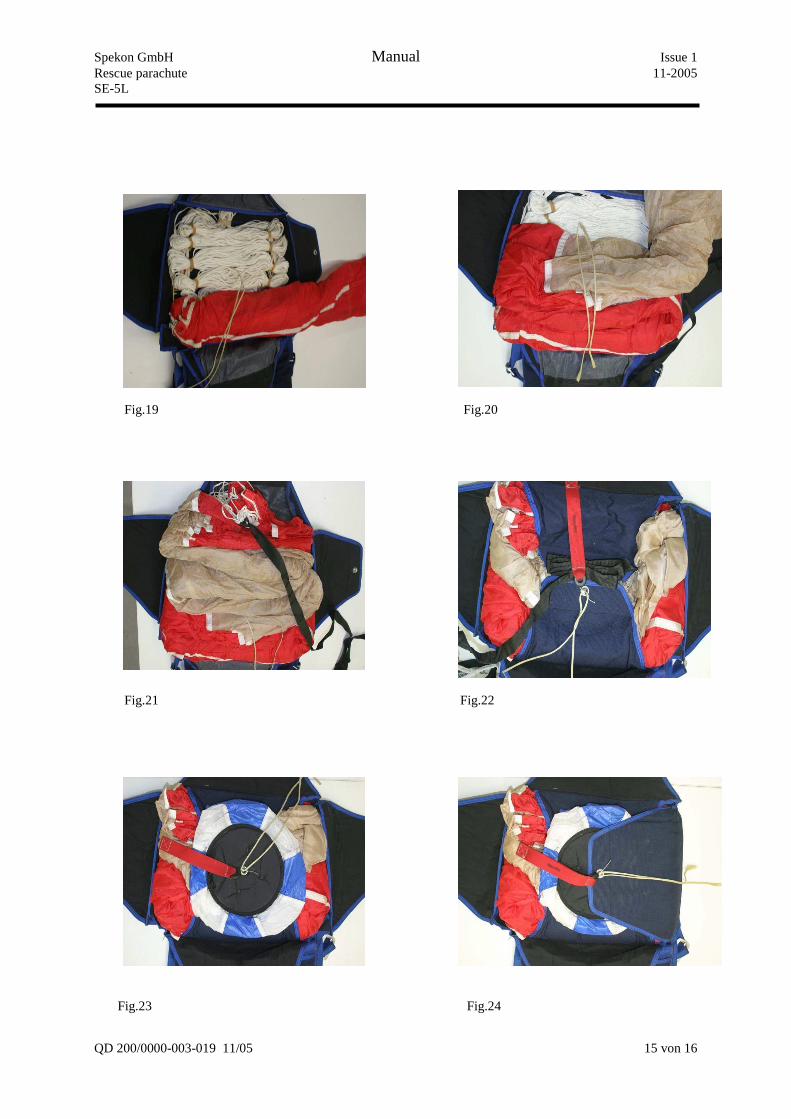
Placing the canopy inside the deployment bag Prior to placing the canopy inside the deployment bag, the packing aid is to be pulled through the loop. The tightly packed canopy is placed on the right side of the deployment bag in such way that the basis of the canopy will be stuck in the right corner of the deployment bag, turned 180°. Next the canopy will be placed onto the bottom of the container in close s-folds (fig 19). Make sure the corners of the container are filled properly and the bottom dimensions are not exceeded. Before the loop three folds are laid down (fig. 20), and on the other half the remaining four folds of the canopy. This ensures the even distribution of the reducing canopy inside the later closed container. With proper position of the canopy the pole opening ends up in the middle of the last fold (fig. 21). The pole opening is sorted once more and the central position of the bridle to the pilot chute is checked. The bridle will be routed to the middle of the container and is laid aside the pilot chute.
Packing the bridle and closing the deployment bag First inside flaps no. 1 and 2 of the container are closed. Pull the packing aid through the grommets of the flaps. The flaps are then pulled together evenly and the pulled through loop is secured by the supporting pin. Now the bridle is placed onto the middle of the container (fig. 22) in approx. 12 cm long s-folds. The packing aid gets pulled through the pilot chute from the bottom side and the grommet of the pilot chute top, loading the spring of the pilot chute. Please ensure that the packing aid runs freely inside the pilot chute and that the fabric is pulled out of the spring. Then the supporting pin can be pulled out, and the loop is pulled through the grommet of the pilot chute lid, secured by the supporting pin. Next the complete fabric of the pilot chute is gathered and placed next to the lid (fig. 23). The packing aid gets pulled through the grommet of flap no. 3, which will be pulled on top of the sorted pilot chute. Repeat with flaps 4, 5 and 6. When closing the sixth flap the pin of the manual deployment cord will be put through the loop and the packing aid is pulled out (fig. 24-27). Last the covering flap on top of flap no. 6 will be stuck inside the latch pocket of flap no. 5 as protection for the pin area (fig. 28). Please check that the pin is put into the recess of the covering flap.
2 4 6 8
3 5 7 9
1
Spekon GmbH Manual Issue 1 Rescue parachute 11-2005 SE-5L
QD 200/0000-003-019 11/05 10 von 16
Storage, maintenance and repair
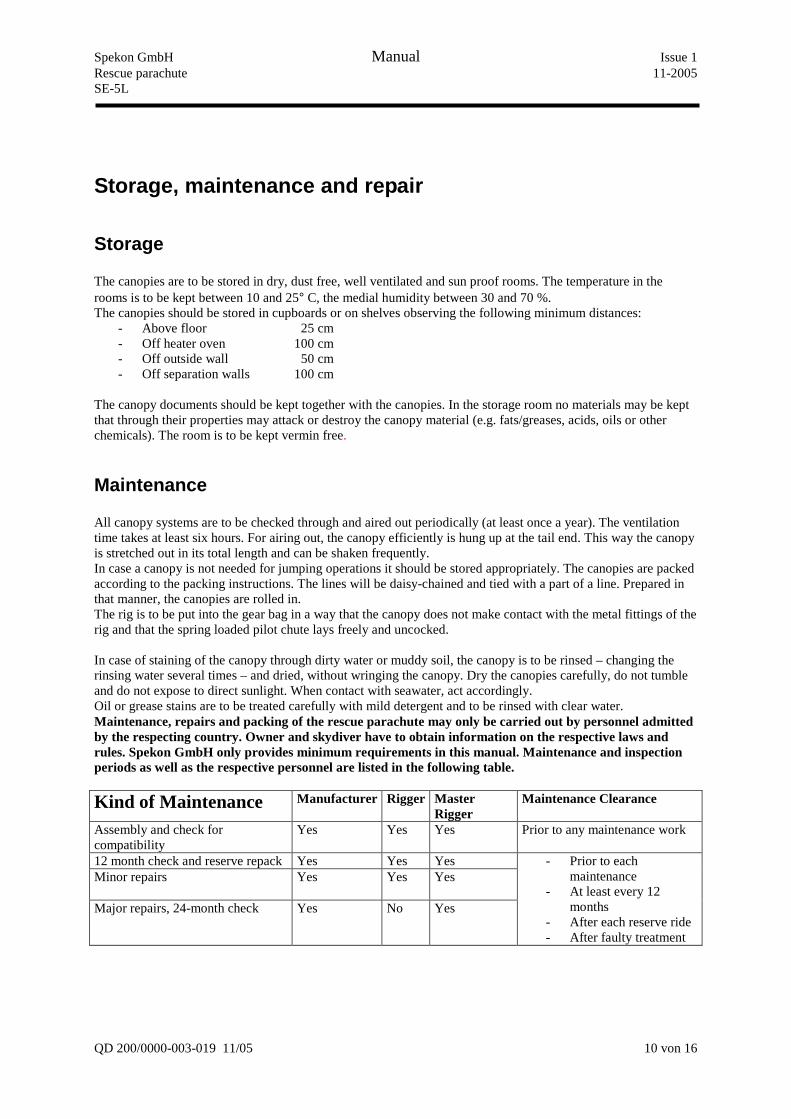
Storage The canopies are to be stored in dry, dust free, well ventilated and sun proof rooms. The temperature in the rooms is to be kept between 10 and 25° C, the medial humidity between 30 and 70 %. The canopies should be stored in cupboards or on shelves observing the following minimum distances:
- Above floor 25 cm - Off heater oven 100 cm - Off outside wall 50 cm - Off separation walls 100 cm
The canopy documents should be kept together with the canopies. In the storage room no materials may be kept that through their properties may attack or destroy the canopy material (e.g. fats/greases, acids, oils or other chemicals). The room is to be kept vermin free.
Maintenance All canopy systems are to be checked through and aired out periodically (at least once a year). The ventilation time takes at least six hours. For airing out, the canopy efficiently is hung up at the tail end. This way the canopy is stretched out in its total length and can be shaken frequently. In case a canopy is not needed for jumping operations it should be stored appropriately. The canopies are packed according to the packing instructions. The lines will be daisy-chained and tied with a part of a line. Prepared in that manner, the canopies are rolled in. The rig is to be put into the gear bag in a way that the canopy does not make contact with the metal fittings of the rig and that the spring loaded pilot chute lays freely and uncocked. In case of staining of the canopy through dirty water or muddy soil, the canopy is to be rinsed – changing the rinsing water several times – and dried, without wringing the canopy. Dry the canopies carefully, do not tumble and do not expose to direct sunlight. When contact with seawater, act accordingly. Oil or grease stains are to be treated carefully with mild detergent and to be rinsed with clear water. Maintenance, repairs and packing of the rescue parachute may only be carried out by personnel admitted by the respecting country. Owner and skydiver have to obtain information on the respective laws and rules. Spekon GmbH only provides minimum requirements in this manual. Maintenance and inspection periods as well as the respective personnel are listed in the following table.
Kind of Maintenance Manufacturer Rigger Master Rigger
Maintenance Clearance
Assembly and check for compatibility
Yes Yes Yes Prior to any maintenance work
12 month check and reserve repack Yes Yes Yes Minor repairs
Yes Yes Yes
Major repairs, 24-month check Yes No Yes
- Prior to each maintenance
- At least every 12 months
- After each reserve ride - After faulty treatment
Spekon GmbH Manual Issue 1 Rescue parachute 11-2005 SE-5L
QD 200/0000-003-019 11/05 11 von 16
Repair With gear-related repairs the “Manual on Repairs of Canopies for Use by Man”, publisher: Saechsische Spezialkonfektion GmbH Seifhennersdorf, is binding.
Inspection All components of the rescue parachute are to be inspected periodically. The inspection may be carried out by the manufacturer, an acknowledged aeronautic enterprise or a rigger or packer admitted for air sporting equipment. Minor repairs are change of components without need for sewing on supporting parts, and repairs on non-supporting parts, such as tapes, Velcro® patches, tabs and comparable parts. All other repairs are considered and treated as major repairs. This includes especially replacement of parts and panels of canopy material, and lines attached to the canopy, as well as the replacement of parts of metal fittings and repairs on the carrying material system of the rig. Major repairs are to be documented and require a revision by a master rigger.
Parts and components
Terminology Handle Line Spring loaded pilot chute Gear bag flat Elastics Loops Packing log Manual SE-5L
Spekon GmbH Manual Issue 1 Rescue parachute 11-2005 SE-5L
QD 200/0000-003-019 11/05 12 von 16
Figure part Fig.1 Fig.2 Fig.3 Fig.4 Fig.5 Fig.6
Spekon GmbH Manual Issue 1 Rescue parachute 11-2005 SE-5L
QD 200/0000-003-019 11/05 13 von 16
Fig.7 Fig.8 Fig.9 Fig.10 Fig.11 Fig.12
Spekon GmbH Manual Issue 1 Rescue parachute 11-2005 SE-5L
QD 200/0000-003-019 11/05 14 von 16
Fig.13 Fig.14 Fig.15 Fig.16 Fig.17 Fig.18
Spekon GmbH Manual Issue 1 Rescue parachute 11-2005 SE-5L
QD 200/0000-003-019 11/05 15 von 16
Fig.19 Fig.20 Fig.21 Fig.22 Fig.23 Fig.24
Spekon GmbH Manual Issue 1 Rescue parachute 11-2005 SE-5L
QD 200/0000-003-019 11/05 16 von 16
Fig.25 Fig.26 Fig.27 Fig.28