scs4 manual eng web - stanton - dj · pdf file5 important safety instructions caution to...
TRANSCRIPT

USER MANUAL

3
Table of contentsIMPORTANT SAFETY INSTRUCTIONS ........................................................................................4BLOCK DIAGRAM ..........................................................................................................................6DJ GLOSSARY ...............................................................................................................................7WELCOME ......................................................................................................................................9FEATURES ...................................................................................................................................101. STARTING UP ..........................................................................................................................112. UNIT OVERVIEW ......................................................................................................................13
DECK A (LEFT SIDE) ...............................................................................................................13DECK B (RIGHT SIDE) .............................................................................................................13DECK CONTROLS ...................................................................................................................14MIXER CONTROLS .................................................................................................................17FRONT AND REAR PANELS ..................................................................................................20
3. PERFORMING YOUR FIRST MIX OF 2 SONGS .....................................................................224. PLAYBACK/ PERFORMANCE CONTROLS ...........................................................................24
4.1 Play Controls ......................................................................................................................244.2 Loop Controls .....................................................................................................................264.3 Platter Controls ...................................................................................................................274.4 Pitch Controls .....................................................................................................................294.5 EFFECT Controls ...............................................................................................................304.6 Mix Controls .......................................................................................................................324.7 Headphone (Cue) & Master Volume Controls .....................................................................344.8 Microphone Controls ..........................................................................................................354.9 Recording Controls .............................................................................................................35
5. MAIN SYSTEM SCREENS/ CONTROLS .................................................................................365.1 Startup & Shutdown ............................................................................................................365.2 STATUS BAR ......................................................................................................................375.3 Home Screen ......................................................................................................................385.4 Waveform Screen ................................................................................................................395.5. How to Browse Your Music Library ....................................................................................415.6 Sorting Options ....................................................................................................................415.7 Search Display ....................................................................................................................435.8 Search Results Display .......................................................................................................445.9 Track Info Display ................................................................................................................455.10 Active Playlist Display .......................................................................................................465.11 Playlist Load Display .........................................................................................................48
6. SYSTEM SETTINGS .................................................................................................................496.1 Main System Display ...........................................................................................................496.2 Audio Settings Display ........................................................................................................516.3 Platter Settings Display .......................................................................................................526.4 CrossFader Settings Display ...............................................................................................536.5 Display Settings Display ......................................................................................................546.6 Video & Demonstration Mode...............................................................................................556.7 Device Settings ...................................................................................................................566.8 MIDI Controller Mode ..........................................................................................................57
7. KEYBOARD SHORTCUTS .......................................................................................................588. TROUBLESHOOTING ..............................................................................................................599. TECHNICAL SPECIFICATION .................................................................................................6110. WARRANTY ............................................................................................................................63

4
IMPORTANT SAFETY INSTRUCTIONSCAUTION: THE LIGHTNING FLASH WITH AN ARROWHEAD SYMBOL WITHIN AN EQUILATERAL TRIANGLE IS INTENDED TO ALERT THE USER TO THE PRESENCE OF UN-INSULATED DANGEROUS VOLTAGE WITHIN THE UNITS ENCLOSURE THAT MAY BE OF SUFFICIENT MAGNITUDE TO CONSTITUTE A RISK OF ELECTRIC SHOCK TO PERSONS.
WARNING: THE EXCLAMATION POINT WITHIN AN EQUILATERAL TRIANGLE IS INTENDED TO ALERT THE USER TO THE PRESENCE OF IMPORTANT OPERATING AND MAINTENANCE (SERVICING) INSTRUCTIONS IN THE LITERATURE ACCOMPANYING THE PRODUCT.
NOTE: THE HAND WITHIN AN EQUILATERAL TRIANGLE IS INTENDED TO ALERT THE USER TO SPECIFIC GUIDANCE AND INFORMATION REGARDING THE OPERATION OF THE UNIT, ND SHOULD BE READ FULLY BEFORE USING THE UNIT FOR THE FIRST TIME.
CAUTION: TO REDUCE THE RISKS OF FIRE OR ELECTRIC SHOCK DO NOT REMOVE ANY COVERS, OR OPEN THE UNIT. THERE ARE NO USER-SERVICABLE PARTS INSIDE. ALL SERVICING SHOULD BE REFERRED TO QUALIFIED SERVICE ENGINEERS.
WARNING: READ AND FOLLOW ALL THE SAFETY AND OPERATING INSTRUCTIONS BEFORE CONNECTING OR USING THIS UNIT. RETAIN THIS USER MANUAL FOR FUTURE REFERENCE. ALL WARNINGS ON THE UNIT AND ITS PACKAGING SHOULD BE READ AND FOLLOWED.
WARNING: This product contains a chemical known to the State of California to cause cancer and birth defects or other reproductive harm.
CAUTION: To reduce the risks of fire or electric shock do not expose this product to rain or moisture. Do not use this product near water; for example, near a bath tub, washbowl, kitchen sink, laundry tub, in a wet basement or near a swimming pool. Unplug the unit from the wall outlet before cleaning. Never use thinner, cleaning fluids, solvents or chemically impregnated cloths. For cleaning always use a soft dry cloth. Unplug this product during lightning storms or when unused for long periods of time.
CAUTION: The unit should be installed so that its location or position does not interfere with its proper ventilation. For example, it should not be situated on a bed, sofa, rug or similar surface that may block the ventilation openings; or placed in a built-in installation, such as a bookcase or cabinet, that may impede the flow of air through its ventilation openings. The unit should be situated from heat sources such as radiators, heat registers, stoves or other devices (including amplifiers) that produce heat. No naked flame sources, such as lighted candles, should be placed on, or near the unit.
WARNING: Do not place this unit on an unstable surface, cart, stand or tripod, bracket or table. The unit may fall, causing serious injury to a child or adult and serious damage to the unit. Use only with a cart, stand, tripod, bracket or table recommended by the manufacturer or sold with the unit. Any mounting of the device on a wall or ceiling should follow the manufacturer’s instructions and should use a mounting accessory recommended by the manufacturer. An appliance and cart combination should be moved with care. Quick stops, excessive force and uneven surfaces may cause the appliance and cart combination to overturn. Use only with the cart, stand, tripod, bracket, or table specified by the manufacturer, or sold with the apparatus. When a cart is used, use caution when moving the cart/apparatus combination to avoid injury from tip-over.
NOTE: Should the unit become damaged beyond repair, or reaches the end of its life, please consult the regulations regarding disposal of electronic products in your region.
NOTE: S tanton Magnetics cannot be held responsible for damage, and, or including data loss caused by improper use of the unit and or the applications provided for use with the unit.
5
IMPORTANT SAFETY INSTRUCTIONSCAUTION TO PREVENT ELECTRIC SHOCK, MATCH WIDE BLADE OF PLUG TO WIDE SLOT FULLY INSERT.
ENGLISH: The apparatus shall be connected to a Mains socket outlet with a protective earthing connection.GERMAN: Das Gerät ist eine Wandsteckdose mit einem Erdungsleiter angeschlossen werden.FRENCH: L’appareil doit être connecté à une prise secteur avec connexion à la terre.SPANISH: El aparato estará conectado a una toma de red eléctrica con una conexión a tierra.ITALIAN: L’apparecchio deve essere collegato a una presa di rete con una connessione a terra protettiva.
1. The unit and power supply should only be connected to a power supply outlet only of the voltage and frequency marked on its casing.
2. Protect the power cable from being walked on or pinched particularly at plugs, convenience receptacles, and the point where they exit from the apparatus.
3. Do not defeat the safety purpose of the polarized or grounding-type plug. A polarized plug has two blades with one wider than the other. A grounding type plug has two blades and a third grounding prong. The wide blade or the third prong is provided for your safety. If the provided plug does not fit into your outlet, consult a qualified electrician for replacement of the obsolete outlet.
4. If the mains plug supplying this product incorporates a fuse then it should only be replaced with a fuse of identical or lower rupture value.
5. Never use a damaged or frayed power cable; this can introduce serious risk of exposing lethal voltages.6. The power supply cable of the unit should be unplugged from the wall outlet when it is to be unused for
a long period of time.7. Only use attachments/accessories specified by the manufacturer.
DO NOT ATTEMPT SERVICING OF THIS UNIT YOURSELF. REFER SERVICING TO QUALIFIED SERVICE PERSONNEL.
Upon completion of any servicing or repairs, request the assurance that only Factory Authorized Replacement Parts with the same characteristics as the original parts have been used, and that the routine safety checks have been performed to guarantee that the equipment is in safe operating condition.
REPLACEMENT WITH UNAUTHORIZED PARTS MAY RESULT IN FIRE, ELECTRIC SHOCK OR OTHER HAZARDS.
ATTENTION POUR …VITER LES CHOC ELECTRIQUES, INTRODUIRE LA LAME LA PLUS LARGE DE LA FICHE DANS LA BORNE
CORRESPONDANTE DE LA PRISE ET POUSSER JUSQUíAU FOND.
This unit should be serviced by qualified service personnel when:
The power cord or the plug has been damagedObjects have fallen, or liquid has been spilled into the unitThe unit has been exposed to rain or liquids of any kindThe unit does not appear to operate normally or exhibits a marked change in performanceThe device has been dropped or the enclosure damaged.
REGULATORY CERTIFICATIONStanton Magnetics declare under our sole responsibility that this product, to which this declaration relates, is in conformity with the following standards:
The Declarations of Conformity can be obtained from 382 Ave. de la Couronne, B-1050 BrusslesAuthorized European representative: Phone: +3226450500 Fax: +326450505
6
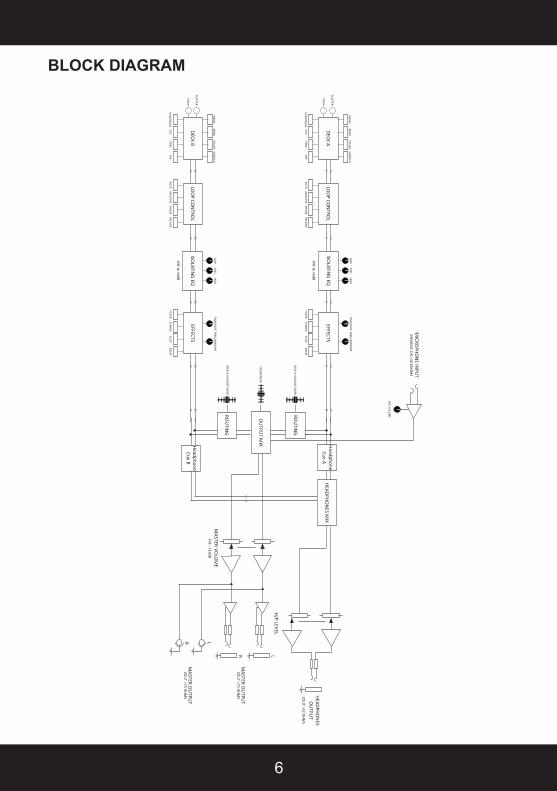
BLOCK DIAGRAM
MASTER O
UTPU
T
MASTER O
UTPU
T
HEADPHON
ESO
UTPU
T
-INF - +10dB
ZOU
T >75 OHM
S
ZOU
T >75 OHM
S
H/P LEVEL
MASTER VO
LUM
E
ZOU
T >32 OHM
S
DYNAM
IC ZIN >10 KO
HMS
MICRO
PHON
E INPU
T
LR
LR
ISOLATIN
G EQ
ROU
TING
HeadphoneCue B
OU
TPUT M
IX
HEADPHON
ES MIX
LOO
P CON
TROL
LOO
P CON
TROL
DECK A
DECK B
-INF to +6dB
-INF to +6dB
PLATTER
PLATTER
PITCH
PITCH
LOW
LOW
MID
MID
HIGH
HIGH
DECK A VOLU
ME FADER
CROSSFADER
AUTO
AUTO
PLAY/PAUSE
PLAY/PAUSE
MU
LTIPLY
MU
LTIPLY
CUE
CUE
TOU
CH
TOU
CH
+BEND
+BEND
-BEND
-BEND
SCRATCH
SCRATCH
DIVIDE
DIVIDE
SYNC
SYNC
RELOO
P
RELOO
P
TAP
TAP
MIC VO
LUM
E
EFFECTS
EFFECTS
TIME/RATE
TIME/RATE
FREQ/AM
OU
NT
FREQ/AM
OU
NT
FILTER
FILTER
FLANGE
FLANGE
SLICE
SLICE
DELAY
DELAY
ISOLATIN
G EQ
ROU
TING
DECK B VOLU
ME FADER
HeadphoneCue A
7
DJ GLOSSARYBeat Matching:A mixing technique where two programs with similar beat structure are mixed together in tempo, creating a seamless transition between the two songs.
BPM:An abbreviation of Beat Per Minute (the number of steady even pulses in music occurring in one minute and therefore defining the tempo).
Beat Grid:The Grey Lines on top of your song’s Waveform that display the individual beats of your song.
Channel:A path the signal takes through the unit via the two EQ/Fader sections.
Crossfade:Fading in one track while fading out another.
Crossfader: A transitional slide control on a mixer for fading in one channel while fading out another, using only a signal control.
Cue:A point in a song that you want to start from, which you select and listen to before using your Crossfader or Line Fader to increase the volume of the audio so your audience can hear the music. Cueing is usually done on the first beat of a song, when beat matching.
db (Decibel):A unit of measurement of audio volume, in relation to a specified reference point such as 0db, which is an agreed upon standard based on the threshold of hearing of the average person.
DSP Effects (FX):Electronic filtering or modification of an audio signal to change the sound. In the case of SCS.4DJ this processing is done by a DIGITAL SIGNAL PROCESSOR (DSP)
Equalization (EQ): The process of boosting or cutting audio signals at a specific frequency, to help one song mix sonically with another.
Line Fader:A control used to adjust the volume of an input or output channel on a mixer.
Headphones:Miniature speakers worn on the head that allow you to hear the audio output, used by DJs to assist in cueing songs.
LED (Light Emitting Diode): An electronic light which is illuminated to show the status of a signal or feature. These can be bi-color, meaning they light two different colors depending on function.

8
Loop:A seamless repeat of an audio sample or musical segment.
MIDI Controller:A hardware device used to control software via MIDI protocol (messaging). MIDI stands for Musical Instrument Digital Interface usually found in keyboards & drum machines. One of the many use cases for MIDI controllers are for controlling software applications which run on an external computer (not required to use SCS.4DJ, but available should you wish to use).
MixerA unit designed to blend together two or more sound sources.
Mixing:The process of blending two songs by synchronizing the BPMs (speed/tempo) and using the Volume Faders/Crossfader to balance the volume between the two.
Monitor:To carefully listen to and study a recording or mix so as to make adjustments. This can be listening to the Master Output (what is coming out of your speakers) or the Cue Bus (Pre-Listen Cue, the signal coming from your decks before you move your faders for the audience to hear a signal).
Platter/ Jog Wheel: A circular disc designed to emulate the functions of a Vinyl record disc on a turntable, allowing you to “grab” the audio to “scratch”.
Scratch:A turntable mix technique that involves rocking the record back and forth by hand with the phono cartridge in the playing position, creating a variety of rhythmic sound patterns.
Synchronization (Sync):In the case of the SCS4.DJ, pressing the SYNC button so that the beats and BPM’s of a song are matched and in perfect unison.
Waveform:The visual representation of the volume and individual frequencies of your music.
USB:The input/output type for storage or computer connection on your SCS4.DJ. Stands for Universal Serial Bus and is an interface standard for communication between a computer and external peripherals over an inexpensive cable (USB Cable) using two way transmissions.
USB Hub:A device that lets you plug one USB cable into your unit, and provides multiple USB inputs for expansion.

9
WELCOME
Congratulations on choosing the SCS.4DJ, the most advanced DJ Mix Station on the planet. From professional to novice, bedroom to dance floor, Stanton’s SCS.4DJ is your complete DJ solution. SCS.4DJ is a compact, road-worthy DJ rig that gives you the power of traditional analog and computer based DJ setups in a single unit.
MIXING MADE SIMPLEThe Stanton SCS.4DJ is the first truly integrated DJ system offering advanced one-button automatic synchronization. The embedded computer system assists your mixing by automatically synchronizing the tracks at the push of a button. This advanced digital mix engine also allows the SCS.4DJ to be placed into “Auto-DJ” mode, where the unit will automatically mix the music in your playlist based on your chosen style of mixing.
MIX AND DJ FROM YOUR DIGITAL MEDIA LIBRARYDJ directly from your digital media library located on your USB memory stick, hard drive or smart phone. SCS.4DJ supports most unprotected file formats including WAV, MP3 and AAC files. The layout is instantly familiar to the experienced DJ, and logical enough for any novice to grasp. As a mobile DJ, SCS.4DJ gives you the the portability, durability and flexibility you need to perform night after night, with an intuitive yet simple surface, easy access USB ports, and a rugged chassis.
BECOME MORE CREATIVESCS.4DJ’s powerful one-button sync engine and built in tempo and beat grid calculations let you spend less time keeping things synchronized, giving you more time to be creative. The beat synchronized features including FX and Auto Loops will give you professional sounding mixes from your first mix out of the box.
RECORD CAPABILITYPress the Record button and SCS.4DJ will record your performance to any mass storage device, which can be shared between friends or used to produce a CD for distribution.

10
FEATURES
• Auto Sync control in the embedded computer system instantly beat matches one deck to the other with incredible accuracy.
• Dual high-resolution touch-sensitive weighted platters with cue, scratch and pitch bend control.
• Multicolor 4.3 inch high resolution LCD with dual waveform display makes visual beatmatching easy.
• Record your mixes directly to WAV files for sharing, replaying and producing/publishing performances.
• Auto Loop mode automatically creates a beat synchronized loop to keep the mix going longer.
• Four USB ports, two within a compartment large enough for hard drives, media players and other mass storage devices.
---------------------------
Unpacking
Please check that you have received the following items:(1) SCS.4DJ unit(1) Power supply (12 VDC)(1) SCS.4DJ Quick Start Guide(1) SCS.4DJ User Manual
Let’s get started by hooking up the SCS.4DJ.
11
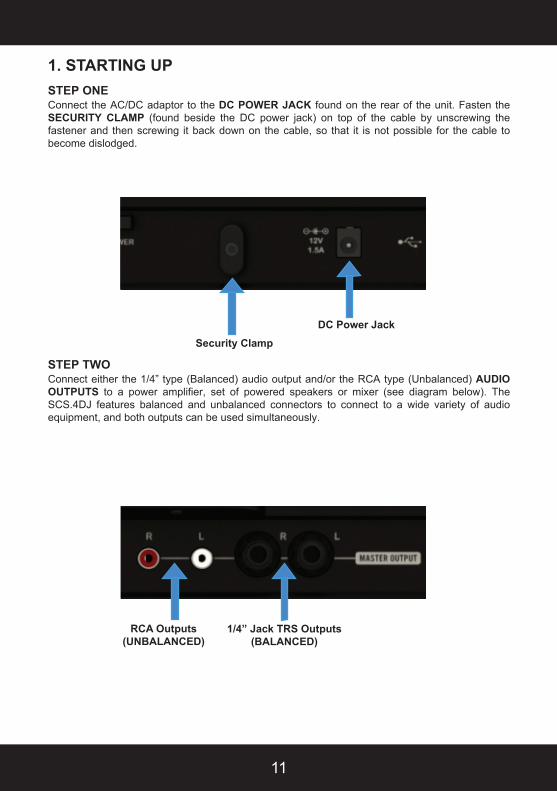
STEP ONEConnect the AC/DC adaptor to the DC POWER JACK found on the rear of the unit. Fasten the SECURITY CLAMP (found beside the DC power jack) on top of the cable by unscrewing the fastener and then screwing it back down on the cable, so that it is not possible for the cable to become dislodged.
STEP TWOConnect either the 1/4” type (Balanced) audio output and/or the RCA type (Unbalanced) AUDIO OUTPUTS to a power amplifier, set of powered speakers or mixer (see diagram below). The SCS.4DJ features balanced and unbalanced connectors to connect to a wide variety of audio equipment, and both outputs can be used simultaneously.
1. STARTING UP
DC Power Jack
Security Clamp
1/4” Jack TRS Outputs(BALANCED)
RCA Outputs(UNBALANCED)
12
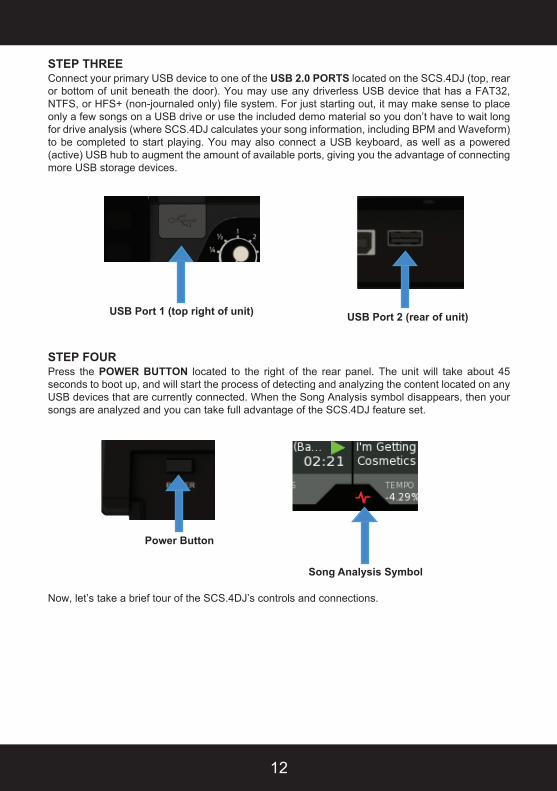
STEP THREEConnect your primary USB device to one of the USB 2.0 PORTS located on the SCS.4DJ (top, rear or bottom of unit beneath the door). You may use any driverless USB device that has a FAT32, NTFS, or HFS+ (non-journaled only) file system. For just starting out, it may make sense to place only a few songs on a USB drive or use the included demo material so you don’t have to wait long for drive analysis (where SCS.4DJ calculates your song information, including BPM and Waveform) to be completed to start playing. You may also connect a USB keyboard, as well as a powered (active) USB hub to augment the amount of available ports, giving you the advantage of connecting more USB storage devices.
STEP FOURPress the POWER BUTTON located to the right of the rear panel. The unit will take about 45 seconds to boot up, and will start the process of detecting and analyzing the content located on any USB devices that are currently connected. When the Song Analysis symbol disappears, then your songs are analyzed and you can take full advantage of the SCS.4DJ feature set.
Now, let’s take a brief tour of the SCS.4DJ’s controls and connections.
USB Port 2 (rear of unit)USB Port 1 (top right of unit)
Power Button
Song Analysis Symbol
13
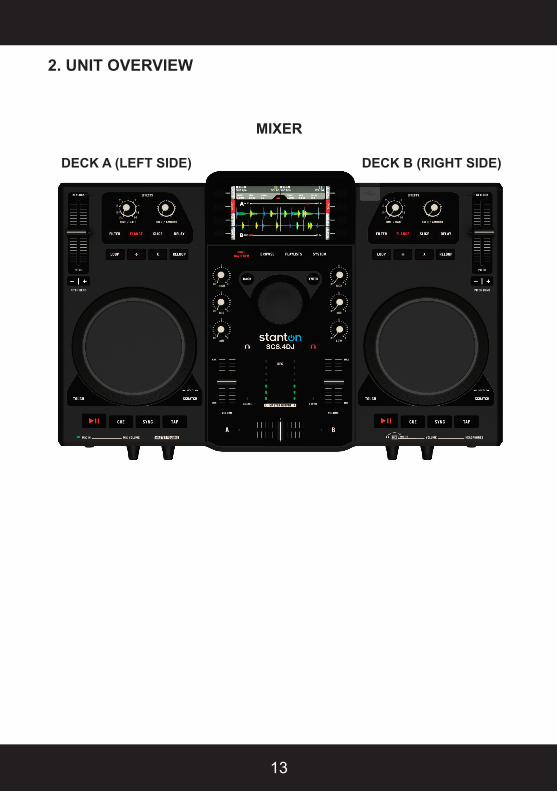
2. UNIT OVERVIEW
DECK A (LEFT SIDE) DECK B (RIGHT SIDE)
MIXER

14
DECK CONTROLS
1
2 3
4
56
7
8
9
10
11

15
1. USB CONNECTOR (type A) (RIGHT SIDE OF UNIT ONLY)This connector is used to attach the USB (1.1 or 2.0) mass storage device containing your song library. Suitable mass storage devices include: external hard drives, flash drives, portable digital music players, memory card readers, and USB hubs.
2. PLAY/PAUSE BUTTONPress to play the song at the current location, and again to pause at the current location.
3. CUE BUTTONThe CUE Button lets you practice your mixes in advance by playing sections of the audio without having to engage full playback with the PLAY/PAUSE button. During normal playback, pressing this button immediately moves the play position of the track to the last set cue point and pauses playback when released. Pressing CUE again will engage the CUE PLAY function, which plays the track from the cue point until you release the CUE button. If you press PLAY/ PAUSE at any time other than the currently stored cue point, pressing CUE will reset the cue point to the new position.
4. PLATTER (JOG WHEEL)The touch-sensitive top portion of the PLATTER (JOG WHEEL) is made to feel and function like a real vinyl turntable and, the outer non-slip PLATTER bump ring for pitch bending provides ultimate in response control. The PLATTER has multiple functions:
a. When playing or paused in SCRATCH mode, the PLATTER can be used as a frame search control, allowing you quickly search through a song. Holding down the SCRATCH button, the wheel is used for high-speed FAST FORWARD/REWIND SEARCH.
b. Without the SCRATCH button engaged, the PLATTER works as a pitch bend, similar to a “push” or a “drag” on a turntable. Turning the PLATTER counterclockwise temporarily slows down the playback speed according to the speed, velocity, and duration of the platter rotation. Turning the PLATTER clockwise temporarily speeds up the playback speed. Pitch will return to the current setting when the wheel stops.
c. When in SCRATCH mode, the PLATTER acts just like a vinyl turntable, moving the song position forward or back in response to your movements. The outer non-slip PLATTER bump ring still performs the pitch bend function.
d. TOUCH REWIND mode is similar to SCRATCH mode, except playback returns to the Cue point anytime the top portion of the platter (which is touch-sensitive) is touched. The outer non-slip PLATTER bump ring still performs the pitch bend function.
5. SCRATCH BUTTONEnables the touch sensitive PLATTER to respond like a turntable and allow the “Scratching” of your audio. Most Hip Hop/Scratch DJ’s will want this button the majority of the time. During normal play mode, touching the platter will pause playback, and moving the platter forward or backward will create scratch sounds. Holding down the scratch button and moving the PLATTER engages the Fast-Forward/Rewind function of the player.
6. TOUCH REWIND BUTTONThis function enables you to touch the PLATTER non-rubberized center section to quickly return to your set CUE POINT instantly, enabling rapid return to a CUE POINT for scratch effects (as the TOUCH REWIND button also turns on the SCRATCH BUTTON). Touching and releasing the jog wheel once will return playback to the last marked CUE POINT, letting you quickly return to a cue point or rapidly trigger a sample/song portion.

16
7. PITCH CONTROL SLIDERThe main speed control for your music. This slide, when pushed towards the bottom of the unit (+), increases the tempo of playback. When the slide is pushed towards the top of the unit (-), the tempo of playback is decreased. Pitch Range is selectable in ranges of +/-5% to +25/-100% from the ‘SYSTEM’ menu.
8. PITCH BEND BUTTONS (- / + BUTTONS)Used to temporarily decrease or increase the playback speed. Pitch will return to the current setting when released.
9. SYNC BUTTONThe main control of the internal SYNC engine, allowing for one-touch beat matching of your playing songs. During playback, pressing this button will change the speed and beat position of the selected track to match that of the track playing on the opposing deck. This overrides the PITCH CONTROL SLIDER(#5). When the PITCH CONTROL SLIDER is moved again it’s operation depends on the value of the Soft Takeover (if the PITCH CONTROL SLIDER(#5) responds immediately to your movement or after you have moved past the virtual pitch setting) setting in the SCS.4DJ Settings menu. If the setting is On (Soft Takeover enabled – default value), Pitch value will not change until the PITCH SLIDER is moved to match the virtual value of the Pitch set by the SYNC engine.
The AUTO LED at the midpoint of the PITCH CONTROL SLIDE indicates when the two are not synchronized, ie: if PITCH CONTROL SLIDE and VIRTUAL PITCH POSITION (the pitch position chosen by the SYNC engine, regardless of PITCH CONTROL SLIDE position) are not the same. The LCD Display also has an arrow displayed next to the TEMPO value indicating which way to move the PITCH CONTROL SLIDE. If the setting is OFF, (No Soft Takeover) then any movements of the PITCH CONTROL SLIDE will become effective immediately.
10. DSP EFFECT SELECTION/CONTROLSDual effect processors, one for each deck, and both can be used at the same time. This section controls the four on board audio effects FILTER, FLANGER, SLICE and DELAY. Using the two EFFECT CONTROL knobs, you can individually adjust two effect parameters depending on what effect you are in.
11. TAP BUTTONTap along with the music to enter manual BPM values for use with DSP EFFECTS or SYNC ENGINE. This is used to manually enter BPMs when the Auto BPM function is unable to lock on a beat. You must tap at least four times to enter a new BPM value.

17
MIXER CONTROLS
1
3
5
6
7
8
9
2 2
4 5
6
8

18
1. LCD DISPLAYThis is the main window to every part of your mixing journey. The full color, 4.3’’ LCD displays information such as track/waveform, parameter adjustments and search information. Contrast is adjustable in the onscreen SYSTEM menu.
2. MENU “SOFT” BUTTONSThere are 8 total “soft’ function buttons. The 4 physical buttons on each side of the display change their function depending on what menu you are located in (hence “soft” buttons), and control functions such as search, song loading, song sorting, etc.
3. SYSTEM BUTTONSThere are 4 buttons located at bottom of the LCD DISPLAY, and each changes the functionality of and information on the LCD DISPLAY based on the selected function. The 4 functions are:
HOME/WAVEFORM: The main performance screen. Press this button to switch between the HOME view and the WAVEFORM view.
The WAVEFORM view shows colored waveforms for both decks as well as beat locations and CUE and LOOP locators.
The HOME view shows your album art, a beatkeeper for keeping your decks aligned as well as a small version of the waveform for each deck with current play position in the waveform indicated.
Pressing the HOME/WAVEFORM button after being in a different display will return you to whichever view (HOME or WAVEFORM) was displayed last.
BROWSE: The main browse menu. From this menu you can view the songs on your MASS STORAGE DEVICES, select songs to load in your playlists, and choose the songs to play on decks A and B.
PLAYLISTS: The main preparation menu. From this menu you can prepare song lists, load, save and delete playlists.
SYSTEM: The system customization menu. From this menu, you can customize the controls of your unit, change pitch range, etc.
4. NAVIGATION WHEEL/ ENTER & BACK BUTTONSThese are the main Menu navigation controls. You can scroll between songs, search for songs and name playlists using the virtual keyboard, go forward/back in menus, and change system parameters.

19
5. EQ CONTROLSUse the High, Mid and Low knobs to modify the frequency content of your music. The EQ controls provide a complete frequency kill (volume at zero for each frequency band) on the LOW (BASS), MEDIUM (MID-RANGE)and HIGH (TREBLE) frequency bands, as well as a 6db boost.
6. CHANNEL FADERSThe CHANNEL FADERS for each deck are used to control audio volume. Use these in conjunction with the EQ CONTROLS on each channel to match song volume and tonal quality of each song.
7. CROSSFADERThe CROSSFADER is used to fade audio between channels A and B for mixing transitions. The CROSSFADER has a user-selectable Crossfader-Curve (speed at which program volume changes through crossfader travel) from the ‘System’ menu.
8. HEADPHONE (CUE) BUTTONSUse the HEADPHONE buttons to listen to decks A or B cue (before CHANNEL FADER and CROSSFADER) preview. Use the CUE VOLUME control (located on the front of the unit) to control cue volume.
9. RECORD BUTTONUse the RECORD button to record your performances on to the MSD (Mass Storage Device) of your choice. The .WAV file saved can then be transferred to your computer for sharing, saving your performances and broadcast.
HearChannel A
HearChannel B

20
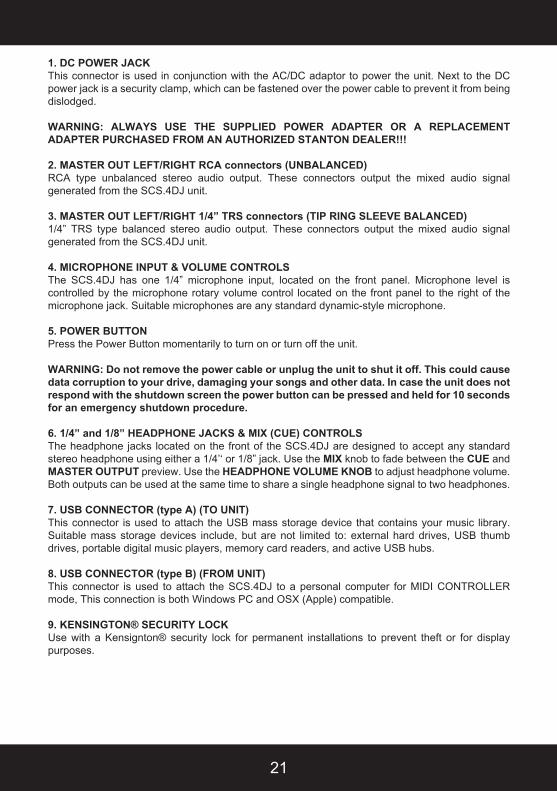
FRONT AND REAR PANELS
91
35
6
78
4
2
21
1. DC POWER JACKThis connector is used in conjunction with the AC/DC adaptor to power the unit. Next to the DC power jack is a security clamp, which can be fastened over the power cable to prevent it from being dislodged.
WARNING: ALWAYS USE THE SUPPLIED POWER ADAPTER OR A REPLACEMENT ADAPTER PURCHASED FROM AN AUTHORIZED STANTON DEALER!!!
2. MASTER OUT LEFT/RIGHT RCA connectors (UNBALANCED)RCA type unbalanced stereo audio output. These connectors output the mixed audio signal generated from the SCS.4DJ unit.
3. MASTER OUT LEFT/RIGHT 1/4” TRS connectors (TIP RING SLEEVE BALANCED)1/4” TRS type balanced stereo audio output. These connectors output the mixed audio signal generated from the SCS.4DJ unit.
4. MICROPHONE INPUT & VOLUME CONTROLSThe SCS.4DJ has one 1/4” microphone input, located on the front panel. Microphone level is controlled by the microphone rotary volume control located on the front panel to the right of the microphone jack. Suitable microphones are any standard dynamic-style microphone.
5. POWER BUTTONPress the Power Button momentarily to turn on or turn off the unit.
WARNING: Do not remove the power cable or unplug the unit to shut it off. This could cause data corruption to your drive, damaging your songs and other data. In case the unit does not respond with the shutdown screen the power button can be pressed and held for 10 seconds for an emergency shutdown procedure.
6. 1/4” and 1/8” HEADPHONE JACKS & MIX (CUE) CONTROLSThe headphone jacks located on the front of the SCS.4DJ are designed to accept any standard stereo headphone using either a 1/4’‘ or 1/8” jack. Use the MIX knob to fade between the CUE and MASTER OUTPUT preview. Use the HEADPHONE VOLUME KNOB to adjust headphone volume. Both outputs can be used at the same time to share a single headphone signal to two headphones.
7. USB CONNECTOR (type A) (TO UNIT)This connector is used to attach the USB mass storage device that contains your music library. Suitable mass storage devices include, but are not limited to: external hard drives, USB thumb drives, portable digital music players, memory card readers, and active USB hubs.
8. USB CONNECTOR (type B) (FROM UNIT)This connector is used to attach the SCS.4DJ to a personal computer for MIDI CONTROLLER mode, This connection is both Windows PC and OSX (Apple) compatible.
9. KENSINGTON® SECURITY LOCK Use with a Kensignton® security lock for permanent installations to prevent theft or for display purposes.

22
3. PERFORMING YOUR FIRST MIX OF 2 SONGSNow let’s perform our first DJ mix of two songs by synchronizing the BPM’s (Beats Per Minute) and use the Crossfader to do a volume fade between the two songs. Before you start, make sure your EQ knobs are set in the middle, your EFFECTS are turned off, LOOPS are not engaged and your CROSSFADER is set to one side.
STEP ONEWait for the connected USB Mass Storage Device to finish analyzing. Depending on size of collection, this can take a while, so it might be best to load a drive with a few songs to start out with until you get the hang of things. We have also included demo content on the unit to test with for your convenience. Songs are analyzed at 1/5 real time, so a large collection may take a day or two to finish analyzing.Next, press the BROWSE button to go into the BROWSE screen. Load the selected songs to your playback decks (virtual turntables) by using the NAVIGATION WHEEL to select your songs, then press the LOAD A soft button, located on the bottom of the screen for your selected songs. Press BROWSE again and repeat for side B (Note: by default, your unit will go to the HOME screen upon song load. Press the BROWSE button again to re-enter your song library.)
BROWSE
NAVIGATION WHEEL

23
STEP TWONow that you have your two songs loaded, use the PLAY button on each deck to start playback of your songs (leaving your CROSSFADER on one side):
Press the SYNC button on one deck to automatically beat-match the song playing on that deck to the song playing on the other deck using SCS.4DJ’s powerful synchronization engine to perfectly align the speed and beats of the songs.
STEP THREEMove the CROSSFADER to the middle to hear both songs, and move from one side to the other to fade between your two playback tracks. Use your two CHANNEL FADERs to further adjust volume levels. As long as the SYNC engine is engaged and you have not moved the position of your pitch sliders, your songs should remain aligned. If your tracks drift out of alignment just hit the SYNC button again! (This can happen if a song’s tempo is not fixed and varies over time)
STEP FOURUse your EQ’s to tailor your mix by boosting the bass, etc. Finally, return the BROWSE screen from STEP ONE and start again to load new songs and mix further songs together. Congratulations, you have just completed your first mix!!!
Now let’s learn more detail about the individual performance controls and menus that your new SCS.4DJ offers, and how to use their functionality.

24
PLAY/PAUSE BUTTONStarts/Pauses playback of a track.
CUE BUTTONDuring normal playback, pressing this button immediately returns the track to the last set cue point (either one you have set, or the point at which audio starts, found by your SCS.4DJ’s AUTO-CUE engine) and pauses playback when released. Holding the CUE button down will engage CUE PLAYBACK, which plays the track from the cue point until you release the CUE button. If the PLAY button is pressed while holding the CUE button down, then playback will continue even after the CUE button has been released. If no CUE POINT has been created, pressing the CUE BUTTON will bring the playback point to the start of the track, or to the AUTO CUE point as selected by the SCS.4DJ
CREATING A CUE POINT
1) With a track currently playing, press the PLAY/PAUSE button and playback will pause at the current position. Although the track has been stopped, a new CUE POINT has not been created.
2) Press CUE to create a CUE POINT at your current location in the track. Pressing and holding the CUE button again will start playback from the current position until you let go of the CUE button. If you want to change your CUE POINT position, you can use the touch-sensitive top section of the PLATTER in SCRATCH mode while the CUE BUTTON is NOT held down to move the audio to the point that you want, followed by pressing the CUE button again to set the new CUE POINT. The CUE POINT will be a RED LINE, while GREY LINES are the current BEAT GRID, which is the internal SYNC ENGINE’s reference to your current song’s beats.
3) With the track playing, press the CUE button and the music will immediately stop and playback will return to the last CUE POINT you have set. From here, you can press PLAY/PAUSE to resume playback, or hold down the CUE BUTTON again to engage CUE PLAY.
4. PLAYBACK/ PERFORMANCE CONTROLS4.1 Play Controls
RED LINE SHOWS CURRENT CUE
POINT POSITION
GREY LINESSHOW BEAT GRID, USED FOR SYNC
ENGINE

25
4) If you wish to continue playback while holding the CUE button, pressing the PLAY button will disengaged the CUE button and start the SCS.4DJ to play in normal play mode. Both buttons can then be released.
5) If you wish to create a new CUE POINT, press the PLAY/PAUSE button again at the location you wish to create the CUE POINT at, and press the CUE BUTTON once again. A new CUE POINT will be set.
SYNC ButtonPressing the SYNC button on a deck changes the Pitch to match the BPM of the opposite deck and lines up the playback position of the BEAT GRID (shown in the diagram on page 28) of the song on the other deck. As the tracks play forward, this button can be used again to synchronize the tracks back together if they fall off beat for any reason.
To use the SYNC button it is necessary that both tracks have BPM values associated with them (greater than zero). This value normally comes from when your SCS.4DJ analyzed your tracks, but can also come from a tapped BPM value or a BPM value stored with the track data if analysis has not yet occurred.
If the BPM of the two tracks differs too greatly, or the current pitch slider range for the deck is less than the needed pitch value change, the pitch is changed to the maximum value allowed by the pitch slider, and the play position of the slave deck is jumped to beat align momentarily with that of the master deck. If either track is not analyzed or the BPM has been tapped or edited or the deck on which SYNC is pressed is not playing, the pitch of the deck will be changed but the playback position will not jump to be beat aligned.
The SCS.4DJ’s sync engine can match BPM’s based on half or double-timed BPM’s, making it so that you can mix tracks with a far-apart BPM value (ie: mixing an 80bpm track with a 160bpm track).
TAP ButtonThe TAP Button provides a method to correct the automatically generated BPM value.
While the song is playing, Tap the TAP button in time with beats of the music. Multiple taps will set the BPM value to the rhythm. The tapped BPM value is the average value of the values tapped in. You must tap the TAP button at least four times to set a new BPM. If you wish to defeat the manually tapped BPM value, press and hold the TAP button for 2 seconds to reset the detection to SCS.4DJ’s AutoBPM value. The new tapped BPM value is then displayed on the screen.
Please keep in mind that the BEAT GRID is not altered with the tapped BPM so the beat grid will be out of sync with the new tapped BPM, which can have an adverse effect on the SYNC engine should SYNC be used. While the TAP function does allow for functions such as SYNC to function before a song is analyzed, LOOP still needs the full song analysis to be completed for the function to work.

26
4.2 Loop Controls
Loop Buttons
The LOOP BUTTONS help create a seamless loop of audio from within the playing program material; this can be anything from a small section of audio like a vocal sample to a beat loop. With SCS.4DJ’s advanced beat-sync engine, this loop will always be perfectly on-beat, with no stuttering or gaps of silence.
The LOOP playing is displayed on the WAVEFORM screen with a light-blue or green shaded block over the currently playing loop section, showing you both the start and end points of your loop. The loop start and end points will “snap” (lock) to the closest beat if you enable the SNAP control, located on a soft button on your LCD. With SNAP engaged, you can be sure that your timing is rarely off.
The available loop controls are:
LoopThis button is pressed to engage a beat synced loop. Pressing the AUTO buttona second time will exit the loop. The default length of the auto loop can be selected in the SYSTEM Menu. Six different loop lengths are available: 1, 2, 4, 8 and 16 bars.
Divide (÷) When a loop is active this button changes the end point of the loop to dividethe loop length in half. Use this button to cut down the audio loop to your desired length.
Multiply (x)When a loop is active this button changes the end point of the loop to double the loop length.
ReloopThis button jumps the playing track to the start point of the last loop. If the deck is playing the deck will loop. If the deck is paused the deck will stay paused. The last loop created will be remembered until the track is unloaded from the deck.
NOTE: If you are playing with the loop controls, it is very easy to accidently rest your hand on or touch the PLATTER, which can stop or pitch-bend audio playback. Please be careful not to be touching the platter while you are using the loop controls so you do not alter audio playback in a way you may not want! As such, you may want to keep the SCRATCH and TOUCH buttons off when you are looping.

27
4.3 Platter Controls
Platter (Jog Wheel)The high resolution touch-sensitive PLATTER is used for scratching, seeking and pitch bend, and responds like a real vinyl turntable. (Note-this wheel is sometimes known as a “Jog” wheel, for its ability to “nudge” the audio forward or back) The top of the wheel is touch sensitive so that the “turntable” can be slowed down when touched and sped up when released, The outer non-slip PLATTER bump ring is not touch-sensitive, and is used for PITCH BEND.
Scratch ButtonPressing the Scratch Button switches the jog wheel operation between Vinyl mode and Normal mode. In Normal mode the Scratch button is not lit. In this mode the entire PLATTER is used for pitch bend (speeding up or slowing down a song temporarily to get it to be aligned with the song playing on the opposite deck).
In SCRATCH mode the SCRATCH button is lit red. This allows you to move the platter back and forth and “grab” the audio, just like a vinyl record. The outer non-slip PLATTER bump ring is still used for pitch bend. If the deck is playing, the top section of the jog wheel is used for scratching, while touching only the outer rubberized portion of the PLATTER will not stop audio but instead engage a pitch bend.

28
To stop the track from playing, simply place your finger on the top of wheel. To scratch, move your finger to rotate the jog wheel to create the feel of scratching on vinyl. Making a fast motion in either direction on the scratch surface will cause the song to backspin or forward spin in the desired direction. More velocity will cause a faster spin in either direction and the track will slow back down to the original speed similar to that of a vinyl record.
If the SCRATCH BUTTON is held down then the top section of the jog wheel functions as a HIGH SPEED FAST-FORWARD/REWIND. This can be used to quickly find a point in a song or seek backwards to the beginning or end of a song.
Touch ButtonPressing the Touch Button toggles the jog wheel operation between touch rewind mode and normal operation. When touch rewind is in on the TOUCH and SCRATCH buttons will both lit red, otherwise it will be off. The touch rewind mode overrides the setting of the Scratch Button.
When touch rewind is on, tapping or touching the top of the jog wheel causes a jump to the main CUE point. On release of the jog wheel, audio continues to play from wherever the scratch ended. The outer rim of the jog wheel remains as pitch bend. When touch rewind is turned off, whatever mode you were in last (PITCH BEND or SCRATCH) is the mode you return to (ie: if SCRATCH was off, then SCRATCH will turn off again).

29
4.4 Pitch Controls
PITCH BEND BUTTONSUsed to temporarily decrease or increase the playback speed plus or minus 2%. Pitch will return to the current pitch slider setting when released.
PITCH SLIDERThe high resolution PITCH SLIDERS can be set for four different pitch ranges. The PITCH SLIDER RANGE is selected in the SYSTEM menu under AUDIO SETTINGS, with selectable ranges of +/-5%, +/-10%, +/-25%, +25% -100%.
The pitch slider range alters the amount of pitch change that can be performed by the slider, and acts to control the maximum range of pitch adjustment that can be made by the SYNC or AUTO-DJ functions.
AUTO LEDWhen the SYNC button is used, this turns off your PITCH SLIDER, and the SCS.4DJ’s SYNC ENGINE takes over. The AUTO LED provides a visual indicator of when this is happening. This LED has two operating states when ON, depending on the setting in the SYSTEM MENU:
- Soft Takeover: LED is lit until the PITCH SLIDER is moved past the VIRTUAL pitch setting.
- Direct Physical Takeover: LED turns off when PITCH SLIDER is moved, PITCH will instantly jump to the current physical position.
When the PITCH SLIDER is moved to match the VIRTUAL POSITION (when SOFT TAKEOVER is on) or simply moved at all (when Direct Physical Takeover is on), the AUTO LED will then turn OFF. This also means that the SYNC ENGINE is no longer in control of your mix, so your mix might be thrown off.
KEYLOCK LEDKEYLOCK allows you to move the PITCH SLIDER up and down to change playback speed without altering the key of the song. The KEYLOCK LED illuminates when the corresponding KEYLOCK BUTTON is used in either the your HOME or WAVES screen. When the KEYLOCK function is turned off, the LED will not be illuminated.

30
4.5 EFFECT Controls
EFFECTS CONTROLSSCS.4DJ has dual EFFECTS processors (Deck A & B), with each capable of processing audio on an single deck. The four available EFFECTS are FILTER, FLANGE, SLICE and DELAY. Each button turns the selected effect on or off, or instantly switches to a different EFFECT while turning the last one off. When one of the EFFECT BUTTONs is pressed, an LED turns on and the effect is ACTIVE.
Each of the EFFECTS onboard SCS.4DJ automatically sync to the beat of your music, and the LCD panel displays your changes in real time, making it easy to remember your “perfect” settings. The TIME/RATE controls allow you to adjust your EFFECTS time in relation to the beat, with 16, 8, 4, 2, 1, ½, ¼, 1/8, 1/16 beat multipliers available. The FREQ/AMOUNT knob controls the amount of the effect in relation to the original audio, the frequency of the filter cutoff, and the “chaos” of the SLICE effect.
The Effect Knobs change the following parameters per effect:
Effect TIME/RATE FREQ/AMOUNT
Filter Rate (SPEED) Cutoff (Lowpass/Highpass)/ResonanceFlange Rate (SPEED) Depth (Delay and Feedback)Slice Rate (LENGTH) Chaos (Increased amount and styles of slicing/”glitching”)Delay Rate (SPEED) Regen (Feedback)
The available EFFECTS on SCS.4DJ are:
FILTERA FILTER is a kind of EQ, letting only high or low frequencies through. The FILTER moves based on the BPM of the playing track, and can be used as a transition effect between songs in place of the EQ controls. In FILTER, the TIME/RATE controls the rate of the LFO (low-frequency oscillator) on cutoff frequency set by the FREQ/AMOUNT knob. The FREQ/AMOUNT control is a combination high-pass (lets only treble through) and low-pass (lets only bass through) filter. When the FREQ/AMOUNT knob is towards the left it acts as a low pass filter. When the FREQ/AMOUNT knob is towards the right it acts as a high pass filter. Resonance changes away from the center position of the knob depending on the cutoff frequency.

31
FLANGEThe FLANGE creates an extremely short delay of the audio, creating an effect similar to a jet taking off. This classic effect can also be done by manually playing two copies of the same record at the same speed and nudging one to be slightly out of sync. In FLANGE, the TIME/RATE controls the LFO (Low Frequency Oscillator, a type of modulation that creates a “wavy” sound in this case), time as well as the speed of the flange. FREQ/AMOUNT controls the amount of delay and feedback.
SLICEThe SLICE effect is a sample-based effect, creating a rhythmic re-sequencing of the audio (aka glitch or stutter) of your audio. This can be anything from simple repeating beats (similar to a drummer playing extra beats for a drum fill, or a skipping CD), to full-blown audio chaos!
The SLICE effect is different from the other effects in that the audio playback continues to move under the SLICE effect, even though you will only hear a portion of the audio around the point at which you engaged the SLICE effect, and if SLICE is on when you press the PLAY/PAUSE button, audio will continue until you turn SLICE off. When SLICE is disengaged, the song position will be at the position it would have been had you not engaged the effect.
The TIME/RATE knob controls the time length of the individual slices as well as the number of different slices played. The FREQ/AMOUNT knob increases both the number of effects (Repeat, Reverse, Normal Playback for set length of time, like a loop) applied to the slices as well how often the effects occur, with total random effects at the maximum setting. At the maximum settings, a full random re-sequencing of your audio is occurring, while at the lowest settings, a repeatable and unchanging audio loop occurs.
One note, the SLICE effect can be used as a tempo-synced sampler effect-you can take a loop of audio by setting the TIME/RATE knob to the desired beat length, and then the FREQ/AMOUNT knob to .01 (all the way to the left). This will create a perfect loop that can be remixed on the fly!
DELAYThe DELAY effect plays back portions of the original signal, slightly behind the original (similar to yelling in a cave). On the shortest settings, the DELAY sounds similar to a quick echo. On the longest settings, the DELAY can sound like a concert hall echo applied to the playing audio. In Delay, the TIME/RATE changes the length of the delay, and FREQ/AMOUNT controls the amount of feedback/repeats on the delay.

32
4.6 Mix Controls

33
EQ KnobsThe EQ KNOB allow you to boost or kill the HIGH (treble), MID (midrange) and LOW (bass) frequencies of your music. Three EQ knobs with central detent allow you to boost or kill (cut to silent) each of the bands. Turning each EQ KNOB the left side, the EQ’s provide a full frequency kill. Turning each EQ KNOB to the right, the EQ’s provide a 6dB boost.
Deck Clip MetersThese are two bi-color LEDs that display the audio levels for each deck. The LED is off when audio is less than -30db, green when audio is between -30db and -9db, yellow when audio is between -9db and -3db, and red when audio is above -3db.
Master Output Volume MetersThese are two LED ladder meters that display the audio levels for master output jacks.
Microphone LEDThe MICROPHONE INPUT has an LED that displays the microphone input level. The LED is off when audio is lower than -30db, green when audio is between -30db and -9db, yellow when audio is between -9db and -3db, and red when audio is above -3db.
Channel fadersThese control the output level of the Deck A and Deck B pre-cross fader, post auto-gain. Since SCS.4DJ uses a digital mix engine, the life of all faders/knobs/switches is extended long past that of typical DJ mixer faders, and will provide you with years of worry-free performance.
Cross FaderThis fader controls the relative mix between Deck A and Deck B. Since SCS.4DJ uses a digital mix engine, the life of all faders/knobs/switches extended far beyond that of a typical DJ mixer crossfader, and will provide years of worry-free performance. The crossfader curve (speed at which volume comes in on each side) can be adjusted in the SYSTEM menu.
Fader Position LED’sWhen in AUTO-DJ mode, These LEDs blink while the AUTO DJ is moving the VIRTUALCROSSFADER POSITION and turn steady on when the crossfade is complete.
NOTE: Crossfader has no Soft Takeover function when in AUTO DJ mode-if you make a movement, the virtual position will instantly jump to whatever physical position you have moved the crossfader to.

34
4.7 Headphone (Cue) & Master Volume Controls
CUE Select (Headphone Symbol Buttons)These buttons select which deck (A or B) will be fed into the CUE side of the HEADPHONE MIX control. Use this control to pre-listen to your decks before you move the volume/crossfader controls to allow the audience to hear your performance. As well, this allows you to hear what activating any of your FX will sound like before turning up the volume of a song.
MIXWhen the knob is turned fully to the LEFT side, this will allow you to hear your selected CUE source through your headphones (Channel A or B). When this knob is turned to the RIGHT, the MASTER OUTPUT will be fed to your headphones. When the knob is in the MIDDLE, both sources will be heard at the same time.
PLEASE NOTE: When the SPLIT CUE option is selected in the SYSTEM MENU, the MASTER OUTPUT is routed to the right side of your headphones, and the CUE SELECT to the right side. The cue mix knob acts as a fader controlling the relative volume of the left earpiece and the right earpiece.
Headphone VolumeThis knob controls the volume of your HEADPHONE output.
Master VolumeThis knob controls the volume of your SCS.4DJ to your main 1/4” and RCA outputs on the rear of your unit.

35
4.8 Microphone Controls
4.9 Recording Controls
MIC VolumeThis knob controls the volume of your MICROPHONE output.
Record ButtonThe RECORD BUTTON is used to record a CD quality (16bit/44.1khz).WAV file on your Mass Storage Device. To engage recording, press the RECORD BUTTON once. To end recording, press the RECORD BUTTON again.
If there is more than one mass storage device attached, then a pop-up menu with a list allows you to select which device to save your recording to. You can also hit the BACK button to exit without recording. The RECORD button will flash when the device is close to full and recording will automatically turn off if the device is full. To end your recording, press the RECORD button again.
When a recording session is complete the session will appear in the Browse menu with a name containing the SCS.4DJ system name you have selected, the time of day and date.
NOTE: SCS.4DJ will record on the selected Mass Storage Device until you turn off recording or run out of space. If you run out of space, you can press the RECORD button, and if you have another Mass Storage Device connected, you may select your other device and continue recording.

36
5.1 Startup & Shutdown
-StartupUpon power up, your SCS.4DJ automatically scans any connected mass storage devices and, if there is currently a previously created database, scans for changes to your library. If a device has not been previously used with the SCS.4DJ system, or updated using a computer, the tracks on your device will be automatically analyzed in the background, allowing you to play songs with basic pitch and performance controls (though you will lose controls like looping or accurate sync until your song is analyzed).
5. MAIN SYSTEM SCREENS/ CONTROLS
-ShutdownTo ensure that your connected Mass-Storage devices are not damaged, please make sure to shut down your SCS.4DJ properly by pressing the POWER BUTTON momentarily or using the shut-down option in the SYSTEM MENU. Once your SCS.4DJ has been powered down, you may safely remove any connected devices.
WARNING: Do not remove the power cable or unplug the unit to shut it off. This could cause data corruption to your drive, damaging your songs and other data. In case the unit does not respond with a shutdown screen, the power button can be pressed and held for 10 seconds for an emergency shutdown procedure.

37
The STATUS BAR is your main location for playback information, and is found at the TOP of all screens on your SCS.4DJ. On each deck, from left to right, the following is displayed:
- Song Name- Artist Name- If the song is PLAYING or PAUSED- Time Elapsed (or remaining if you have changed this in the SYSTEM MENU). - PITCH SLIDER percentage, - BPM - FX Parameter Value
As well, upon boot, the STATUS BAR will also show a circle upon drive scan/ database build and an analysis symbol to show that your SCS.4DJ is processing your songs, Please note that screen operation may be slowed down while the Drive Scan process is happening.
The STATUS BAR keeps you in touch with what is happening with your SCS.4DJ system, no matter what screen you are located in!
5.2 STATUS BAR
Drive Analysis Symbol
Drive Scan Symbol
38
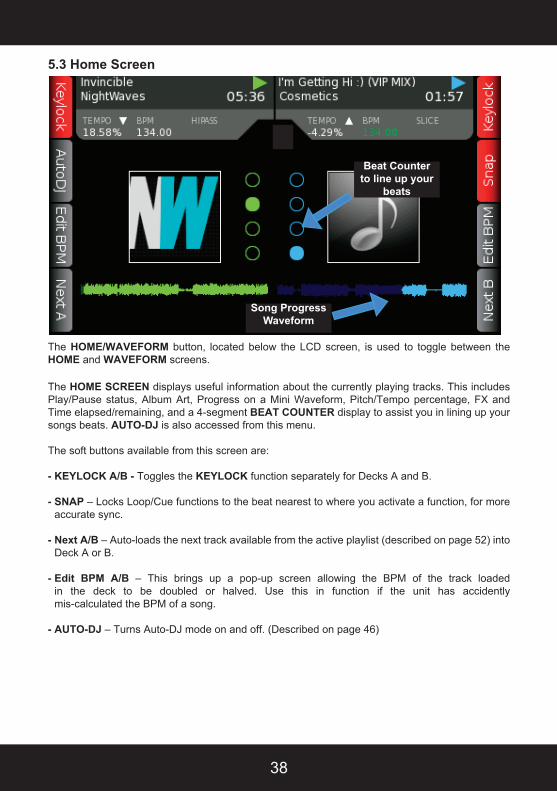
5.3 Home Screen
The HOME/WAVEFORM button, located below the LCD screen, is used to toggle between the HOME and WAVEFORM screens.
The HOME SCREEN displays useful information about the currently playing tracks. This includes Play/Pause status, Album Art, Progress on a Mini Waveform, Pitch/Tempo percentage, FX and Time elapsed/remaining, and a 4-segment BEAT COUNTER display to assist you in lining up your songs beats. AUTO-DJ is also accessed from this menu.
The soft buttons available from this screen are:
- KEYLOCK A/B - Toggles the KEYLOCK function separately for Decks A and B.
- SNAP – Locks Loop/Cue functions to the beat nearest to where you activate a function, for more accurate sync.
- Next A/B – Auto-loads the next track available from the active playlist (described on page 52) into Deck A or B.
- Edit BPM A/B – This brings up a pop-up screen allowing the BPM of the track loaded in the deck to be doubled or halved. Use this in function if the unit has accidently mis-calculated the BPM of a song.
- AUTO-DJ – Turns Auto-DJ mode on and off. (Described on page 46)
Song Progress Waveform
Beat Counter to line up your
beats

39
5.4 Waveform Screen
The waveform display is accessed by using the HOME/WAVEFORM button to switch between the WAVEFORM and HOME display. The WAVEFORM SCREEN shows the waveforms of the tracks loaded in each deck. The TOP WAVEFORM is for DECK A, the BOTTOM WAVEFORM is for DECK B. If the track has not been analyzed, the WAVEFORM area for the song will be EMPTY. The waveform of a track is multi-color with color associated with frequency and brightness with amplitude to give you a quick visual reference to aid in mixing. Waveform colors are based on EQ frequency, with orange to yellow for bass frequencies, midrange in green and high frequencies in blue.
A red vertical line with a red triangle on top occurs for the current active CUE POINT. An additional center line in the middle of the waveform shows the current playback position in each track. When the pitch of the deck is adjusted from it’s native value, the waveform will stretch or compress, to give you a quick visual aid when referencing the amount of your speed change. This also helps you to keep the beats of the two decks aligned.
The SYSTEM MENU also provides the option of switching to the HOME/WAVEFORM display automatically when a track is loaded to a deck. This can be useful if you wish to load more than one track on your decks before switching to the HOME/WAVEFORM screen.
Current Cue Point
Current Play Position
Song Progress Bar

40
The buttons available in the WAVEFORM DISPLAY mode are as follows:
- KEYLOCK A/B - Toggles the KEYLOCK function on Decks A and B.
- SNAP – Locks Loop/Cue functions to the beat nearest to where you activate a function, for more accurate sync.
- Next A/B – Auto-loads the next track available from the active playlist into Deck A or B.
- ZOOM - Toggles between a close up and wide overview of the track WAVEFORM.
- Edit BPM A/B – This brings up a pop-up screen allowing the BPM of the track loaded in the deck to be doubled or halved. Use this in function if the unit has accidently mis-calculated the BPM of a song.
The Auto-DJ mode of SCS.4DJ is incredibly powerful, and allows you to step away from the decks for a break, to engage the audience, or to plan ahead for the rest of your set. SCS.4DJ offers six different Auto DJ fade times selectable in the SYSTEM MENU. These fade times are altered by whatever you have set your current CROSSFADER CURVE to in the SYSTEM MENU as well (meaning that you hear more or less of the next song more quickly when the song is fading in).
When Auto-DJ is active, you will see a small headphone icon on your information bar, letting you know that Auto-DJ is in control. Auto-DJ mode may be started or stopped at any time. If a track is already loaded to a deck and playing, the Auto-DJ will take over immediately and load subsequent tracks from the Active playlist and auto-crossfade for you. If a track is loaded but not playing, pressing PLAY on the loaded track will start off the Auto-DJ. If no tracks are loaded but there are songs in the Active playlist, pressing play will automatically load the first song in the Active playlist and start to play it.
More about SCS.4DJ’s AUTO-DJ Mode:
AUTO DJ SYMBOL

41
The main way to browse your music library is through the BROWSE screen. The BROWSE screen is accessed by pressing the BROWSE BUTTON located under the LCD SCREEN, and is your main overview of song content stored on your Mass Storage Devices. Content from all Mass Storage Devices is grouped within this screen, so you never have to switch between connected drives to look for songs. Four columns of information are displayed, with the type of information being dependant upon your chosen sorting option (described in the section below).
5.6 Sorting Options
Upon entering your library, the TITLES sorting option is the default sort. This display shows a list of all of the tracks available in the current collection in alphabetical order. There are also columns displaying the Artist , BPM, and duration of the tracks. On the right side, there is a vertical scroll bar to show your position within your library.
The following button choices are available:
- Sort – brings up a pop-up menu where you can choose your SORTING OPTIONS: Title, Album, Artist, BPM, Duration, Comments, Genre and Sessions. Selecting the same sort option twice in a row will reverse the sort order (ie: BPM will go from High to Low or from Low to High)
5.5. How to Browse Your Music Library

42
(SORT SOFT BUTTONS CONTINUED)
- A – Jumps the highlighted line back one letter alphabetically in the list
- Z – Jumps the highlighted line forward one letter alphabetically in the list
- Navigation Wheel Motion- scrolls between the available songs in your library / playlist
- ToPlaylst – adds the highlighted track to the end of the active playlist
- Load A/B– load the selected track into deck A or B
- Enter – brings up a track info window that displays more information about the currently highlighted track. Pressing BACK returns you to the BROWSE SCREEN. The track info screen can also be scrolled through using the Navigation Wheel to see the detailed information for adjacent tracks.
- Search – takes you to the Search display section
The following choices are available for SORT: - Artists Sort - Sorts by ARTIST name in alphabetical order. In this sort option, the A and Z tabs
moves up and down the list by ONE LETTER increments by ARTIST NAME.
- Genres Sort - Sorts by GENRES in alphabetical order. In this sort option, the A and Z tabs moves up and down the list by ONE LETTER increments by GENRE.
- BPM Sort - Sorts by BPM. In this sort option, the A and Z tabs become +10/-10 tabs, and moves up and down the list in TEN BPM increments.
- Album Sort - Sorts by ALBUM. In this sort option, the A and Z tabs moves up and down the list by ONE LETTER increments by ALBUM NAME.
- Comments Sort - Sorts by the COMMENTS field in your ID3 tags. In this sort option, the A and Z tabs move up and down the list by ONE LETTER increments by the first letter in the COMMENT FIELD.
- Time Sort - Sorts by TIME. In this sort option, The A Z buttons become >> << buttons which move in increments of one page of data.
- Sessions Sort - Sorts by the recorded SESSIONS on your Mass Storage Device. In this sort option, the A and Z tabs turn to PAGE UP/PAGE DOWN tabs.

43
5.7 Search Display
On the top right corner of your BROWSE and PLAYLISTS screens is a SEARCH soft-button. SCS.4DJ has a powerful search function that allows you to quickly find songs by entering in the word you remember from ANY field (title/artist/comments/etc), and brings up the results in a sortable list. There are two ways to enter in characters here:
1. Use the NAVIGATION WHEEL to select letters and confirm your choice with the ENTER button. Use the BACK button to delete the last letter.
2. Connect a USB Keyboard to your unit and type. To delete your last letter, use the Backspace key. Use the Enter key to start your search.
The Search display has two soft keys:
- Go - starts the search for the entered string
- Exit Search - exits Search mode and returns you to the screen you were in prior to SEARCH.
All searches are global searches that search for the word(s) or characters in any of the searchable fields. The searchable fields are: Title, Artist, Album, Genre, Comments, Duration, and BPM. A maximum of TEN LETTERS may be entered as a search word or phrase. Only the beginning of each word in an ID3 tag is searched, When the search is complete the display will change to the Search Tracks result screen.

44
After you have pressed the GO key, the SEARCH RESULTS display is shown. From here, you can select your track to load, add a song to a playlist, sort your search results, or edit your search to narrow down your choices.
The following button choices are available:
- Sort – Brings up a pop-up menu that allows the list to be sorted by Title, BPM, Time or the Comments field of the song ID3 tag.
- <- -> (Page Up/Down Arrows)– Pages up and down your search results in 10-song increments.
- Load A/B– load the selected track into either deck A or B
- Navigation wheel - changes the currently selected song
- Search – Press SEARCH again to exit the SEARCH menu
- Edit – Use to refine your SEARCH results by changing the letters/numbers searched for.
- ToPlaylst - adds your song to the ACTIVE PLAYLIST
5.8 Search Results Display

45
5.9 Track Info Display
With a song highlighted in the BROWSE or PLAYLIST screen, press ENTER to view track information. The Track info display provides extra information about the track based on track analysis and ID3 tags. The BPM field is color coded to show if the track has been analyzed, or where the BPM readout comes from, with the following colors:
a. Red N/A – no tag id, not analyzedb. Red – tag id, not analyzedc. Purple – not analyzed – tappedd. White – analyzede. Blue – analyzed and edited i.e. BPM * 2 or BPM / 2 or tapped
Information displayed in this view includes:
- Title – The title of the song- Artist – the song artist(s)- Album – the name of the album from which the song appears- Genre – the genre of the song- BPM – the track BPM.- Track # - as it appears on the album- Release Date (year) – the year the song was released- Play time – track length- Bitrate – the bitrate of the MP3 compression- Device – the device containing the song- Comments - any information in the ‘Comments’ ID3 field
To exit the SONG INFORMATION screen, press the BACK button at any time.

46
5.10 Active Playlist Display
To enter the ACTIVE PLAYLIST screen, press the PLAYLIST button at any time. The ACTIVE PLAYLIST contains the list of songs in your currently loaded playlist, songs you have played during the course of your session, or songs you have loaded into the playlist. If you have not selected and loaded a playlist, this display contains any songs that have been previously loaded on to DECK A or B. As you play songs, or use the ToPlayLst button within the browse menu, this list will grow, allowing you to build playlists on the fly, or save your “set” for later use.
When songs have been played, they will be grayed out, indicating to you that you have already played the song sometime during your session. Playlists can be edited or saved from within this menu, using the controls listed on the next page.

47
Editing your Active (Current) Playlist
Editing your Active (currently loaded) playlist is easy. To enable you to edit your playlist, the following buttons are available from within the playlist display:
- Shuffle – shuffles the order of the tracks in the list. If a song has been grayed out, then it has already been played or is playing currently, and will not be added to the shuffle.
- Save – brings up a pop-up menu that allows the current active playlist to be saved as a playlist. From here, you can choose the location to save your playlist in. This playlist can be opened later from applications such as iTunes or Winamp for further editing.
- Delete - provides a pop-up menu with choices to remove the currently selected track or remove all tracks from the active playlist. Use this option if you need to quickly edit your playlist to start from scratch.
- Move – moves the position of the currently selected track within the active playlist. To move a track, use the scroll wheel to select the new location, and press the MOVE button a second time to drop the track in the newly selected position. If you try to move a song that has already been played a copy of this song will be moved to the new location.
- Load A/B– load the selected track into deck A/B
- Navigation wheel – Scrolls within the Active Playlist. If the Move button has been pressed, the scroll wheel moves the currently selected track within the playlist. If a fast scroll motion is used, a letter/number display will pop up, allowing you to jump by large numbers of songs quickly.
- Enter button – brings up the track info display, showing more information about the currently highlighted track.
- Playlists – takes you to a list of playlists available on the Mass Storage Device. These can be playlists created on SCS.4DJ or created within applications such as iTunes or Winamp. This section is described on the next page.
- Search – takes you to the Search display.

48
5.11 Playlist Load Display
The PLAYLIST LOAD display can be accessed from the PLAYLIST display by pressing the PLAYLISTS SOFT BUTTON in the upper left-hand corner when within the PLAYLIST menu. From here you can access the playlists on your storage devices.
The following button choices are available:
- ToPlaylst – Loads currently highlighted playlist to the bottom of the active playlist
- Replace – Performs the same function as the delete all in the active playlist and then loads the currently highlighted playlist to the active playlist effectively making the selected playlist the current active playlist
- Navigation wheel - changes the currently selected list item
- Enter button (Physical button next to navigation wheel). – Changes the display to the Playlist Browse Display described in the previous section.
- Sort – Brings up a pop-up menu that allows the list to be sorted by Title, Date or Device.
- << - >> - takes you up and down the playlist display in 10-playlist increments
- Search – takes you to the search display
- Active Playlist – takes you back to your current playlist
NOTE: The SCS.4DJ search engine does not search for Playlists; to find a playlist please use the Playlist Load screen and sort to locate your playlist.

49
6. SYSTEM SETTINGS6.1 Main System Display
The main SYSTEM MENU screen contains a left pane and a right pane. The left pane lists the eight main categories of settings. The right pane lists the different settings items in the currently highlighted main category. The Enter Button selects the submenu. When a submenu is selected the contents of the right pane moves over to the left pane.
Once you have entered the right pane, you can view detailed information explaining the highlighted setting, as well as the available setting choices and the current setting value. Pressing Enter moves the right pane menu to the main focus, allowing you to edit.
The ENTER BUTTON sets the new setting choice and moves the focus back to the left pane. The BACK BUTTON moves back through the menu settings, much like the back key of a web browser. All settings are also saved through powering on and off your SCS.4DJ, so you do not have to change back settings when turning on the unit again.
On the four corners of this screen are main control tabs for quick access to important system settings. They are:
- Power – shuts down the system safely.
- Lock – locks SCS.4DJ’s controls, with the exception of MASTER, MICROPHONE and HEADPHONE volume controls. To unlock, press BACK and ENTER buttons together. This function is so you can leave your SCS.4DJ unattended without worry.
Note: make sure that you look at the positions of your knobs and sliders when you return to unlock the system and return them to the last position if they have been changed, as if there have been changes the value will jump when unlocked!!!

50
Eject – This will safely eject the device from SCS.4DJ without any fear of drive corruption, which could result in loss of music, song analysis files and other data on your drive.
Factory Reset – This resets all internal settings of your SCS.4DJ to the original factory conditions.
The main system categories are:
- Audio Settings
- Platter Settings
- SCS.4DJ Settings
- Display Settings
- Devices
- Modes of Operation
- Midi Controller
51
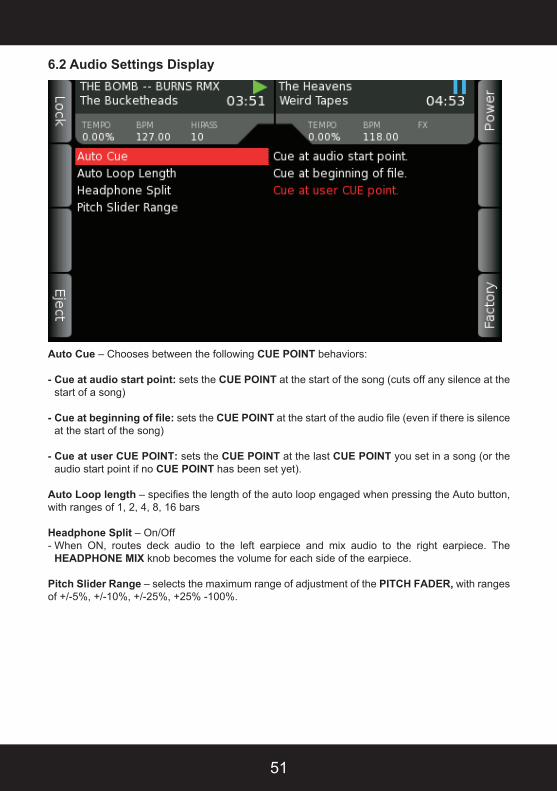
6.2 Audio Settings Display
Auto Cue – Chooses between the following CUE POINT behaviors:
- Cue at audio start point: sets the CUE POINT at the start of the song (cuts off any silence at the start of a song)
- Cue at beginning of file: sets the CUE POINT at the start of the audio file (even if there is silence at the start of the song)
- Cue at user CUE POINT: sets the CUE POINT at the last CUE POINT you set in a song (or the audio start point if no CUE POINT has been set yet).
Auto Loop length – specifies the length of the auto loop engaged when pressing the Auto button, with ranges of 1, 2, 4, 8, 16 bars
Headphone Split – On/Off- When ON, routes deck audio to the left earpiece and mix audio to the right earpiece. The
HEADPHONE MIX knob becomes the volume for each side of the earpiece.
Pitch Slider Range – selects the maximum range of adjustment of the PITCH FADER, with ranges of +/-5%, +/-10%, +/-25%, +25% -100%.

52
6.3 Platter Settings Display
Start Up Speed – slow, medium, fast, none, the time it takes audio to ramp up to full speed when the Play button is pressed
Brake Speed – slow, medium, fast, none, the time it takes for audio to ramp down to zero when the Pause button is pressed
Release Speed – slow, medium, fast, none. The time it takes audio to ramp up to full speed when the finger releases from the platter. This control can be used to more accurately simulate the feel of releasing a vinyl record after scratching.

53
6.4 CrossFader Settings Display
Crossfader Curve Select – chooses between the following Crossfader volume curves
- Constant Power- Consistent volume fade through length of Crossfader- Linear- Gradual Build- Transition- Small Volume dip in middle of Crossfader- Slow Fade- Slow, gradual fade- Fast Cut- Sharp cut, typically used for scratching or to rapidly cut audio on/off
CrossFader Reverse – Swaps sides of your crossfader to reverse, with your B deck on the A side, and the A deck on the B side. Typically used for certain techniques in scratching.
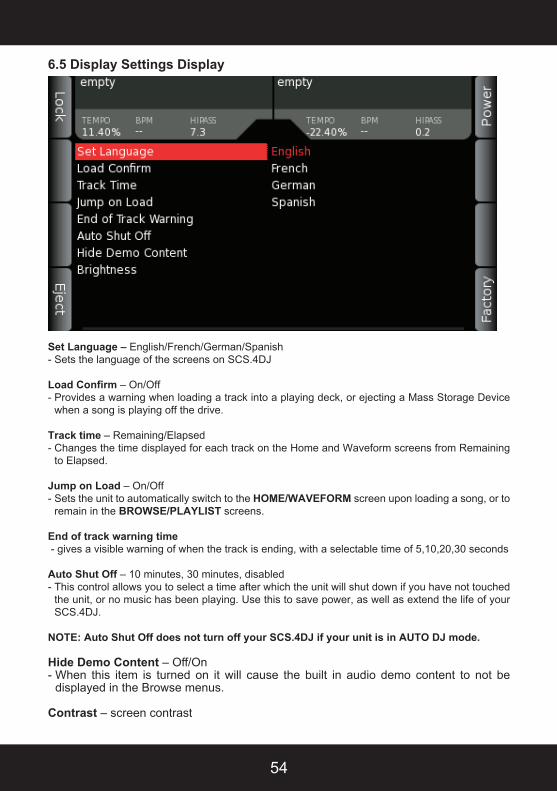
54
6.5 Display Settings Display
Set Language – English/French/German/Spanish- Sets the language of the screens on SCS.4DJ
Load Confirm – On/Off- Provides a warning when loading a track into a playing deck, or ejecting a Mass Storage Device
when a song is playing off the drive.
Track time – Remaining/Elapsed- Changes the time displayed for each track on the Home and Waveform screens from Remaining
to Elapsed.
Jump on Load – On/Off- Sets the unit to automatically switch to the HOME/WAVEFORM screen upon loading a song, or to
remain in the BROWSE/PLAYLIST screens.
End of track warning time - gives a visible warning of when the track is ending, with a selectable time of 5,10,20,30 seconds
Auto Shut Off – 10 minutes, 30 minutes, disabled- This control allows you to select a time after which the unit will shut down if you have not touched
the unit, or no music has been playing. Use this to save power, as well as extend the life of your SCS.4DJ.
NOTE: Auto Shut Off does not turn off your SCS.4DJ if your unit is in AUTO DJ mode.
Hide Demo Content – Off/On- When this item is turned on it will cause the built in audio demo content to not be
displayed in the Browse menus.
Contrast – screen contrast

55
6.6 Video Mode & Demonstration Mode
The Video Player Menu displays a list of the videos detected by the system. Only videos with the extension .avi will be listed. The list of available videos includes both the built-in demo videos as well as any .avi files that you may have on attached storage devices. Use the scroll wheel to select your desired video. There are two soft keys available in this display: EXIT and PLAY. Pressing EXIT or the BACK button will return you to the previous screen. Pressing PLAY will play the selected video. To exit the video and return to the DJ application press the lower right hand SOFT BUTTON. The PLAY/PAUSE buttons may be used to start and stop the video. The CUE buttons may be used to return to the beginning of the video. When a video is played it is automatically selected as the default video used in the Demo mode.
Demonstration Mode When you power on the SCS.4DJ unit for the first time it will ask you to select your language. Following this you will see a screen announcing that a video demonstration will be shown. After a count down of 10 seconds the demonstration video will be played automatically. If you do not wish to see the video and do not want the demo video to display at power-up again, follow the on-screen instructions to turn off DEMO MODE completely. To re-enable DEMO MODE, you must perform a
FACTORY RESET.

56
6.7 Device Settings
Eject – This will safely eject the selected device from SCS.4DJ without any fear of drive corruption, which could result in loss of music, song analysis files and other data on your drive.
Unplayable Songs – Provides a list of songs that could not be analyzed or played by SCS.4DJ. This can be due to corruption or DRM (Digital Rights Management)
Clean Database – If you are having issues with your song database (database is not updating, etc) when new songs are loaded on the drive, this option will delete the current database so your SCS.4DJ can start fresh.

57
6.8 MIDI Controller Mode
MIDI CONTROLLER MODE
SCS.4DJ is not only a powerful all-in-one solution, but also acts as a highly functional MIDI controller, compatible with a wide range of DJ applications such as Native Instruments Traktor™, Atomix Virtual DJ™ and Mixvibes Cross™.
SCS.4DJ sends NOTE ON messages when buttons are pressed, Note off messages when buttons are released, and Control Change messages when sliders or knobs are moved. The LEDs on SCS.4DJ can be controlled by host applications by sending Note on messages for individual LEDs and Control Change messages for controlling the LEDs in VU meters.
MIDI note number and Control Change message numbers can be edited offline on your computer. Please visit www.stantondj.com/scs4dj.htm for details.
MIDI Channel – Allows you to set the channel upon which your SCS4.DJ sends/receives MIDI commands from 1-16. Use the Navigation wheel to change the channel number. MIDI Mode – Highlight this item and press ENTER to enter MIDI Controller Mode. Note that this will shut down the SCS.4DJ playback functionality. When a host computer is attached MIDI messages will be sent to the host computer and messages from the host computer to illuminate LEDs will be honoured.
For a complete list of MIDI commands available for SCS.4DJ, please visit
www.stantondj.com/scs4dj.htm

58
7. KEYBOARD SHORTCUTS
USB Keyboard Support
A USB Keyboard can be connected to your SCS.4DJ for even more control! From within your SEARCH screen, you can use a USB keyboard to type in characters for fast searching. As well, the following controls are available for playback:
F1 – Play A
F2 – Auto DJ
F3 – Sync A
F4 – Load A
F5 – Home
F6 – Browse
F7 – Playlist
F8 – Search
F9 – Play B
F11 – Sync B
F12 – Load B
Page Up, Page Down – shifts current list up or down one page
Home, End – jumps to beginning or last page of list
Up / Down arrow Keys – same as encoder knob for single stepping
Left / Right arrow keys – same as back and enter keys
Backspace –Same as BACK button
Enter – Same as ENTER key

59
8. TROUBLESHOOTING
1. My Mass Storage Device isn’t showing up
SCS.4DJ supports a majority of USB-based Mass Storage Devices (hard drives, iPod’s/iPhone’s, Thumb Drives). However, SCS.4DJ does not support the following device types:
1.HFS+ Journaled Format Drives2.Windows 7 Phones
While many drives can be powered by the USB-bus present on the SCS.4DJ, there are drives that require an external power source. Be sure to externally power any USB drive that has an external power supply.
2. I don’t see a waveform on screen/ I don’t see a BPM reading/ I can’t use automatic looping or syncing
SCS.4DJ analyzes all files to prepare them for performance. This is a very extensive analysis, and does take time (around 1/5th of the time it takes your song to play from start to finish). While you will get basic playback functionality during this time, some of the more advanced features won’t be available until the analysis is finished. If you need to perform before then, you can use the TAP TEMPO function to get a BPM readout to start performing now.
3. My drive won’t finish analyzing
If a drive is unplugged or your SCS.4DJ is powered down improperly, this can corrupt the files on your drive, causing analysis to fail. Please connect your drive to your unit and use the “Clean Database” function, located in the ‘DEVICES’ menu under the ‘SYSTEM’ button. This will cause your unit to start fresh. Also note, there is a 20,000 song limit per drive, so, if you have a collection larger than 20,000 songs any songs after the first 20,000 will be unavailable.
4. The Platters won’t “scratch” properly
SCS.4DJ does a calibration every time the unit is turned on for the platters to ensure the most accurate performance possible. If the platters were held down during startup, this can cause performance to be degraded due to an improper calibration. Please re-boot your unit to calibrate again, this time not touching the platters.
5. My Mass Storage Device is taking way too long to finish analyzing
As stated before, your SCS.4DJ does VERY extensive calculations to determine BPM, waveforms, etc. As such, analyzing on your SCS.4DJ can take a long time depending on the size of your collection. (1/5th real time)
6. I’m seeing the wrong BPM value for my music
SCS.4DJ has a powerful analysis engine, but sometimes the song’s BPM is off. 90% of the time this has been because of the engine seeing the song as half/double the tempo it actually is. From the HOME/WAVEFORM screen, you can edit your BPM with the EDIT BPM soft button. This should correct your issue, the beat grid of the song is not edited, however the new BPM value is used by

60
the auto SYNC engine. If it is still wrong, you can use the TAP BPM button to get the correct BPM, though please note that the SCS.4DJ will still use the BEAT GRID from the initial analysis.
7. I don’t see my entire collection in the browse list?
There are a few reasons that you may not see your entire collection in the browse list. If some of your tracks are not playable by the SCS.4DJ (ie: files in data formats that SCS.4DJ does not support) they will not appear in your browse list. If you look under the SYSTEM menu -> Devices -> Unplayable Songs, a list of your tracks that can not be played due to incorrect format or data corruption in the file are listed. If you have inserted a large device for the first time it can take a long time to find and display all of the songs in your collection. The scanning icon will display in the center of the status header when your songs are being discovered. The scanning icon will display when the first page of your browse list is available but your browse list is not yet completely available. This icon will go away when the full collection is available for browsing.
Also note, there is a 20,000 song limit per drive, so, if you have a collection larger than 20,000 songs, only your first 20,000 songs will be available.
8. It is very difficult to turn the storage compartment locking tabs on the bottom of the unit (when removing the bottom cover)
Especially when SCS.4DJ systems are new, those locking tabs can be hard to turn with just your fingers. On the top of each locking tab is a slot in which the edge of a coin can be placed to make turning them easier.
9. I locked my system and I can’t unlock it
Press the BACK and ENTER buttons together to unlock your system.
10. AUTO-DJ mode isn’t playing my entire playlist
AUTO-DJ mode will skip over any songs you have played so far. If you want a song to play again, you must re-load it in your playlist. If your playlist contains songs that are not resident on your currently attached storage devices SCS.4DJ will skip over them.
11. The LED by the PITCH FADER isn’t lighting up when the PITCH FADER is in the middle
The LED by the PITCH FADER lights up when SYNC is turned on and the PITCH FADER position is not the same as the physical position, not when the PITCH FADER is at zero.
12. SCS.4DJ is not remembering my CUE POINTS
Please make sure that your SCS.4DJ is set to “Cue at user CUE point” from within the AUDIO SETTINGS menu, called up using the SYSTEM button.
13. My problem isn’t covered here
Please go to www.stantondj.com/scs4dj.htm for all of the latest troubleshooting updates and information.

61
9. TECHNICAL SPECIFICATION
USB CompatibilitySCS.4DJ is compatible with all USB 2.0 specifications and standards.
USB Mass Storage DevicesSCS.4DJ is class compliant with all standard USB mass storage devices.
USB Power RequirementsThe SCS.4DJ built in USB hub has four USB slave ports. USB devices can be attached to these ports in any position and in any order. SCS.4DJ will support the USB hub standards. The SCS.4DJ can provide 500 ma of current to each USB slave port. USB hubs and USB HDDs attached to the SCS.4DJ hub only need be powered if they require more than 500 mA of current. The SCS.4DJ itself must be plugged into an AC outlet.

62
Mic Preamp: Equivalent Input Noise: < -112 dBu A-weighted, measured Sensitivity @ clip: -14 dBu (trim at max)
Supported file types:MP3, MP4, AAC, M4A, WAV, AIFF
Mic Input to Line Output:SNR 20Hz-22kHz: > 99dB A-weightedTHD+N @1kHz, 20Hz-22kHz BW: < 0.007%Frequency Response: 20Hz – 20kHz +/- 3 dB, +/-0.25dB 100Hz to 15kHzSampling: 24-bit, 44.1kHz
Digital Playback:Frequency Response: 20Hz – 20kHz +/- 2 dB, +/-0.25dB 100Hz to 15kHzSignal/Noise Ratio: >106 dB A-weighted THD+N @1kHz, 20Hz-22kHz BW: 0.005%Max Output Level: +14.5 dBuCrosstalk (left to right): < -90dB @ 1kHzSampling: 24-bit, 44.1kHz
Headphone Amp:Frequency Response: 20Hz – 20kHz +/- 3 dB, +/-0.25dB 100Hz to 15kHzSignal/Noise Ratio: >90 dB A-weighted
Fader Kill: -85 dB
Mic Input: 1/4” TRS
Master Outputs: RCA unbalanced, ¼” pseudo balanced
Headphone Output: ¼ ”, 1/8”
Power: Supplied AdapterPower Into 33 Ohms: 180mW RMS @ 0dBFSPower Into 150 Ohms: 40mW RMS @ 0dBFSMinimum Safe Load: 16 Ohms
Dimensions & Weight17.4” x 11.4” x 2.9” / 442mm x 291mm x 73mmWeight: 5.0lbs / 2.2 kgs
63
10. WARRANTYThank you for choosing Stanton!
Your satisfaction is extremely important to us. We proudly stand behind the quality of our work and appreciate that you put your trust in us. Registering your product will help us guarantee that you are kept up to date on our latest advances.
Warranty Service in the United States:
Please contact Stanton Tech Support BEFORE sending your product. In some cases, our Tech Support team can resolve your problem immediately, avoiding down time due to shipping delays. However, if Tech Support determines that a repair is needed; please call us at +1 954.316.1500 (Option 3) to obtain a Return Authorization Number (RA#) PRIOR to shipping your product to us.
Warranty Service outside the United States:
To initiate a warranty repair, please contact the authorized Stanton dealer from whom you purchased your product, and follow the dealer’s return policy.
Save your shipping boxes and all packaging materials!
For the fastest and safest product return to Stanton, please use the original shipping carton and packaging materials. Stanton cannot be responsiblefor any damages incurred during the shipping process due to poor or inadequatepacking. Please remember to insure your shipment!
Stanton Warranty
Through Stanton’s authorized dealers around the World, Stanton, or one of Stanton’s authorized distributors outside the U.S., will, without charge, repair or replace, at the sole discretion of the entity responsible for making the repair or providing the replacement, any Stanton merchandise proved defective in material or workmanship for a period of one (1) year following the date of original purchase. Exceptions to this warranty areas noted below:
The warranty for mechanical parts which are subject to wear and tear are limited to either the earlier of thirty (30) days following the date of original purchase or for 10,000 cycles for switches.
Stanton will warrant all replacement parts and repairs for ninety (90) days from the date of original shipment. Repairs made necessary by reason of misuse, alteration, normal wear, or accident are not covered under this warranty.

64
Returns
Authorized Stanton dealers are only authorized to sell and distribute merchandise within a specific country. All goods requiring warranty repair or replacement must be returned (freight prepaid if not hand-delivered) to the authorized Stanton dealer from whom the merchandise was purchased and in the same country where the merchandise was purchased. For purposes of purchases made via the Internet, the merchandise must be returned to the authorized Stanton dealer in the country where the authorized Stanton dealer which sold the merchandise to purchaser is located and not the authorized Stanton dealer in the country where the purchaser is located or the country in which the merchandise was received. Any returns to a non-authorized dealer or to an authorized Stanton dealer not in the same country as the merchandise was intended to be sold or as set forth above will void this warranty.
To initiate a warranty repair, you must contact the authorized Stanton dealer from whom you purchased the merchandise, and follow such authorized Stanton dealer’s return policy.
Stanton assumes no risk and shall be subject to no liability for damages or loss resulting from the specific use or application made of the merchandise. Stanton’s liability for any claim, whether based on breach of contract, negligence, infringement of any rights of any party, or product liability, and relating to the merchandise shall not exceed the price received by Stanton from your purchase of such merchandise. In no event will Stanton be liable for any special, incidental or consequential damages (including loss of use, loss of profit and claims of third parties) however caused, whether by the negligence of Stanton or otherwise. To the extent permitted by law and except as otherwise provided above, Stanton disclaims any express or implied warranties of merchantability or fitness for a particular purpose.
The above warranty provides you with specific legal rights. You may also have additional rights, which are subject to variation from state to state and country to country.
If there is a dispute regarding the warranty of merchandise that does not fall under the warranty conditions stated above, please include a written explanation with the merchandise when returned pursuant to the terms and conditions set forth herein.
