scratch challenge #3 - loudoun county public schools€¦ · scratch challenge #3 •objective:...
TRANSCRIPT
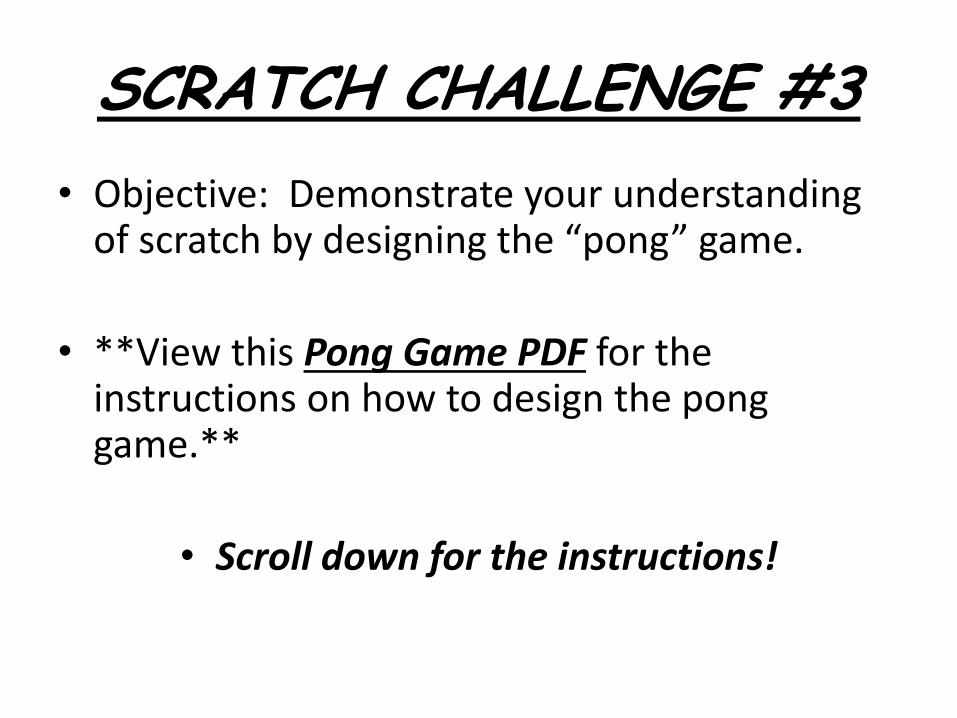
SCRATCH CHALLENGE #3
• Objective: Demonstrate your understanding of scratch by designing the “pong” game.
• **View this Pong Game PDF for the instructions on how to design the pong game.**
• Scroll down for the instructions!
Do you have?Points
Possible
Points
Earne
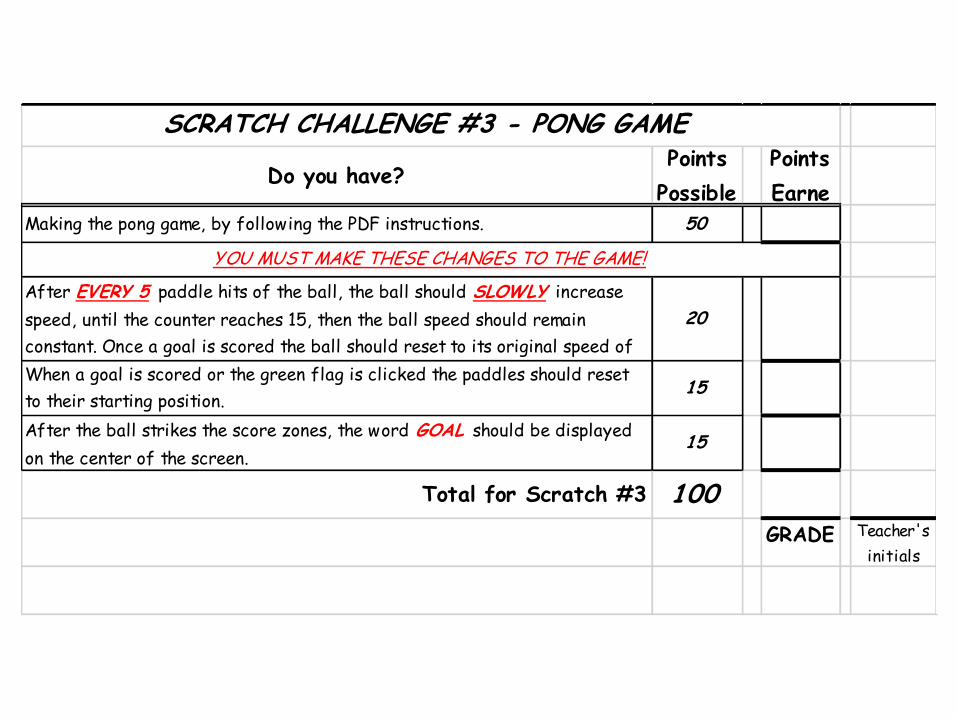
Making the pong game, by following the PDF instructions. 50
After EVERY 5 paddle hits of the ball, the ball should SLOWLY increase
speed, until the counter reaches 15, then the ball speed should remain
constant. Once a goal is scored the ball should reset to its original speed of
3.
20
When a goal is scored or the green flag is clicked the paddles should reset
to their starting position. 15
After the ball strikes the score zones, the word GOAL should be displayed
on the center of the screen.15
Total for Scratch #3 100
GRADE Teacher's
initials
YOU MUST MAKE THESE CHANGES TO THE GAME!
SCRATCH CHALLENGE #3 - PONG GAME

Stage 1• Stage 1 will help you to create your
background image, score zones, paddles (bats) and ball.

Getting Started – Open SCRATCH
1. Save As.
2. H Drive.
3. SCRATCH PROJECTS.
4. File name = Pong
QUICK QUESTION:Why are you saving your file BEFORE
you have changed anything?
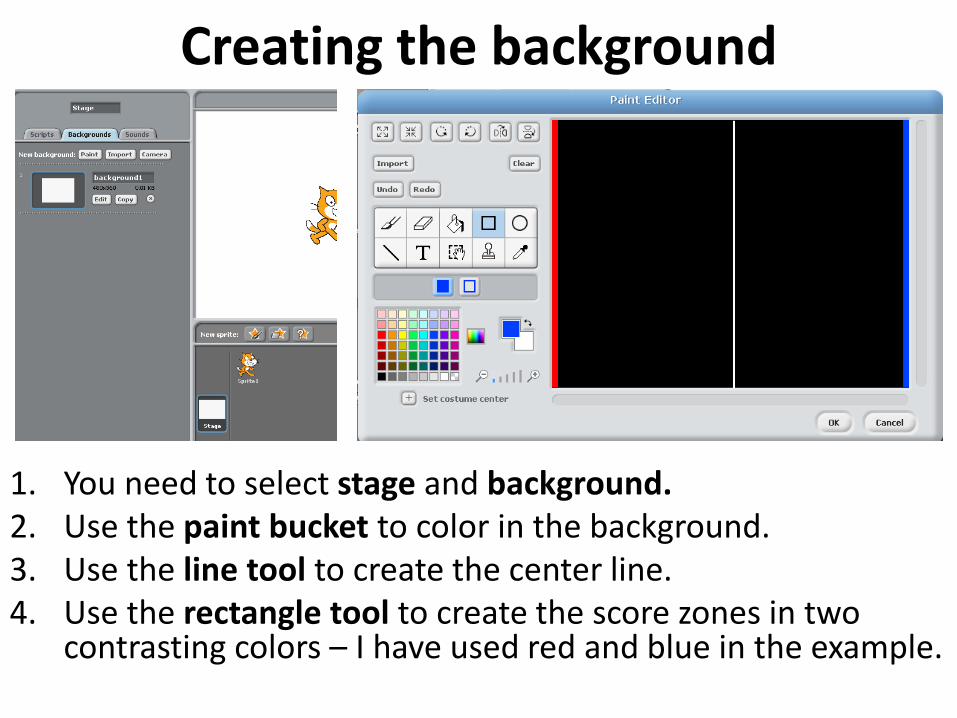
Creating the background
1. You need to select stage and background.2. Use the paint bucket to color in the background.3. Use the line tool to create the center line.4. Use the rectangle tool to create the score zones in two
contrasting colors – I have used red and blue in the example.
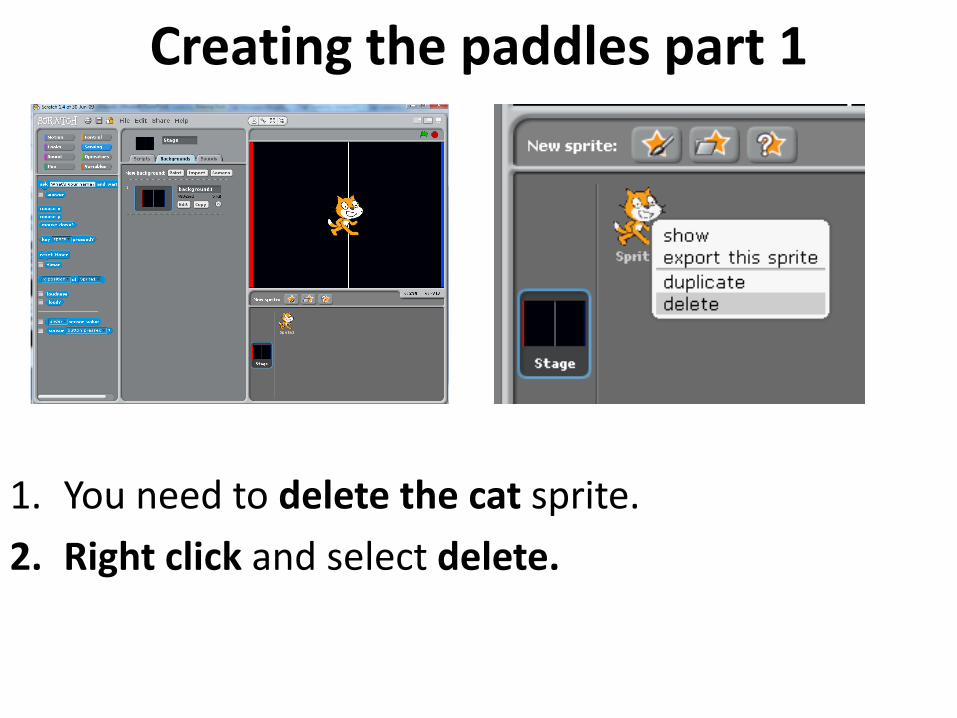
Creating the paddles part 1
1. You need to delete the cat sprite.
2. Right click and select delete.
Creating the paddles part 2
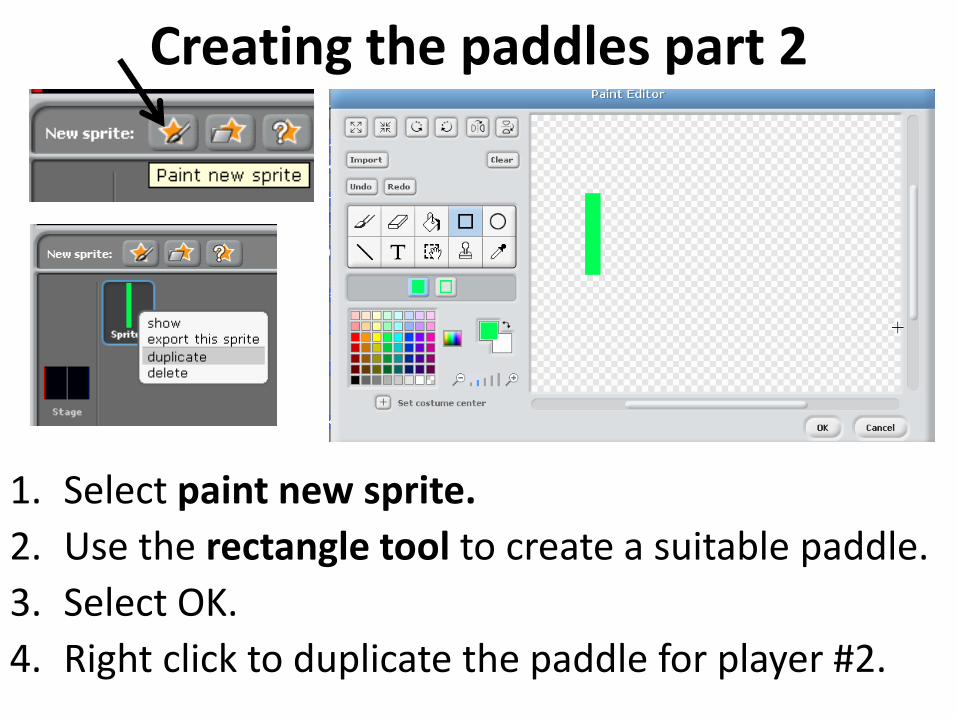
1. Select paint new sprite.
2. Use the rectangle tool to create a suitable paddle.
3. Select OK.
4. Right click to duplicate the paddle for player #2.

Creating the ball part 1
1. Select “Chose new sprite from file”.
2. Select the “Things” folder.
3. Search for an appropriate ball sprite to use.
4. Press OK.
Creating the ball part 2
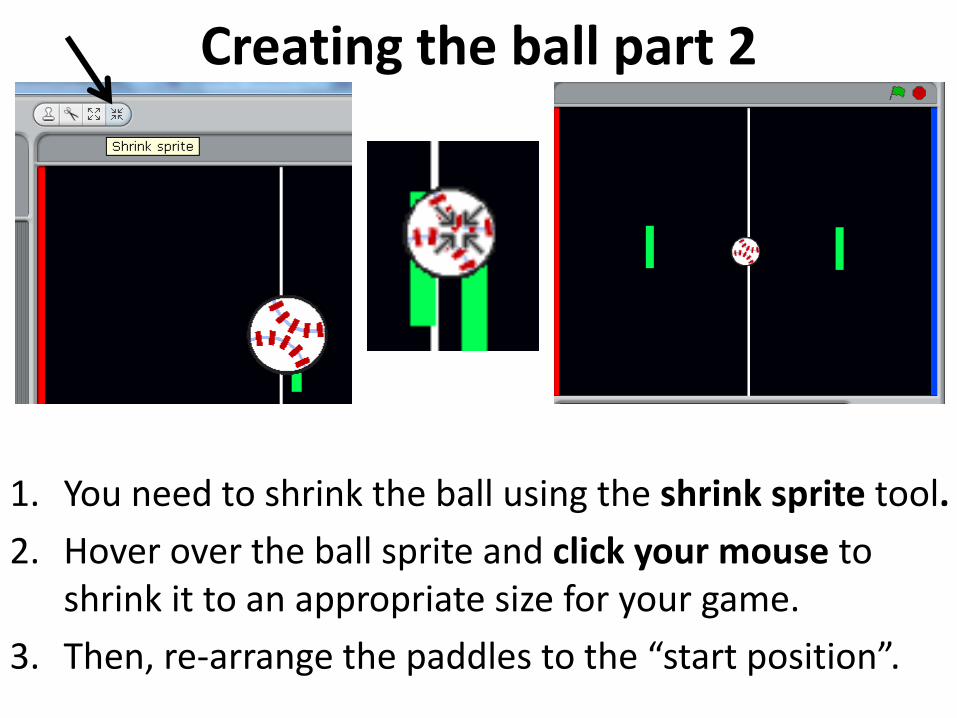
1. You need to shrink the ball using the shrink sprite tool.
2. Hover over the ball sprite and click your mouse to shrink it to an appropriate size for your game.
3. Then, re-arrange the paddles to the “start position”.
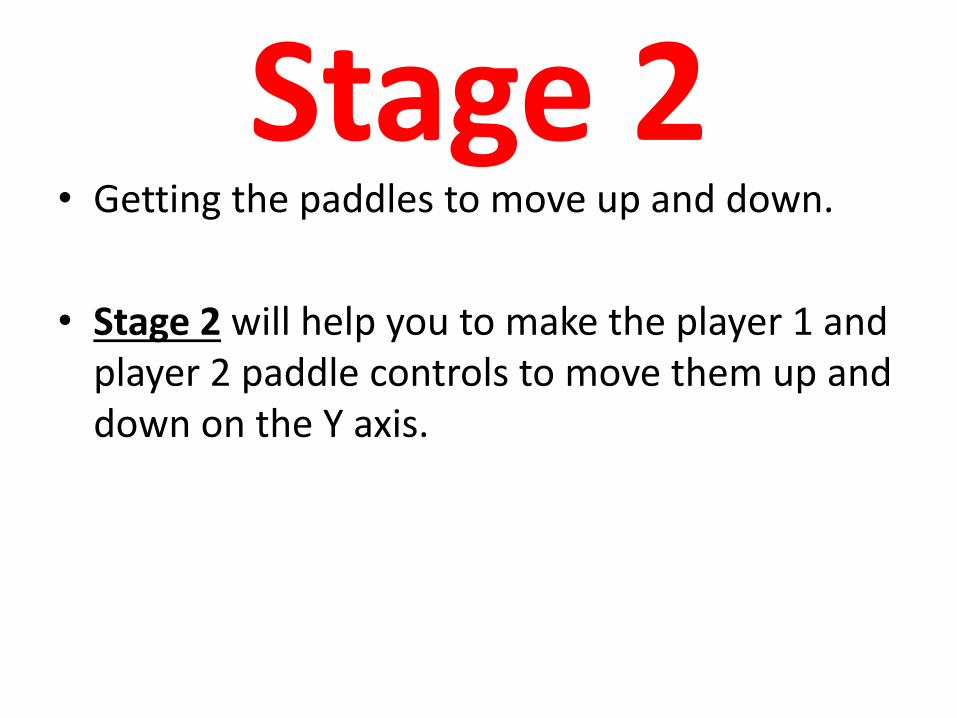
Stage 2• Getting the paddles to move up and down.
• Stage 2 will help you to make the player 1 and player 2 paddle controls to move them up and down on the Y axis.
Making the paddles move – Player #1
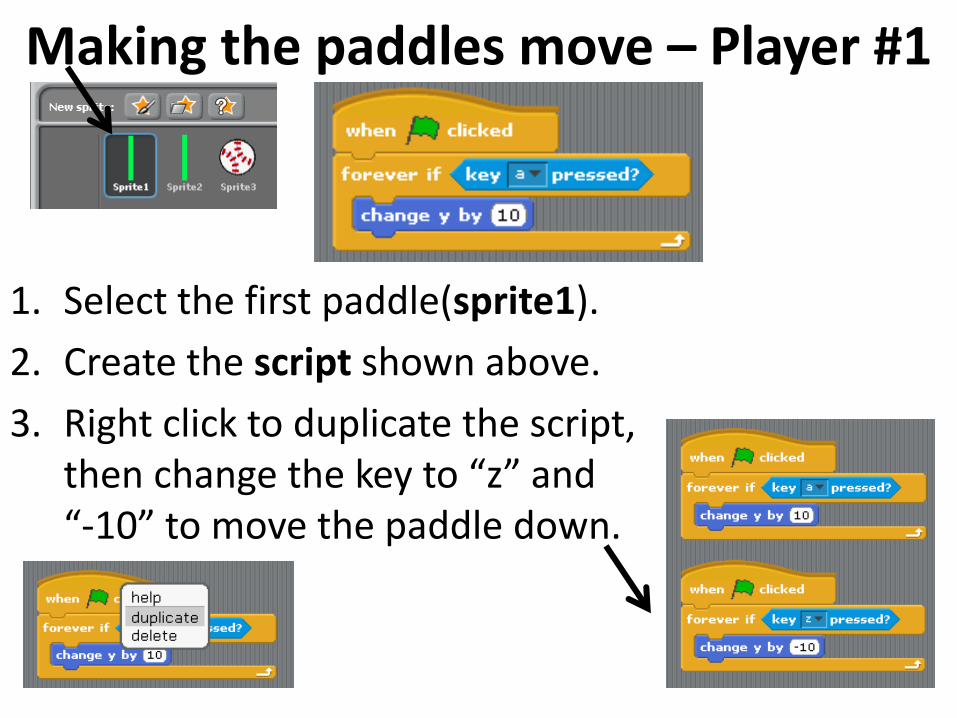
1. Select the first paddle(sprite1).
2. Create the script shown above.
3. Right click to duplicate the script, then change the key to “z” and “-10” to move the paddle down.
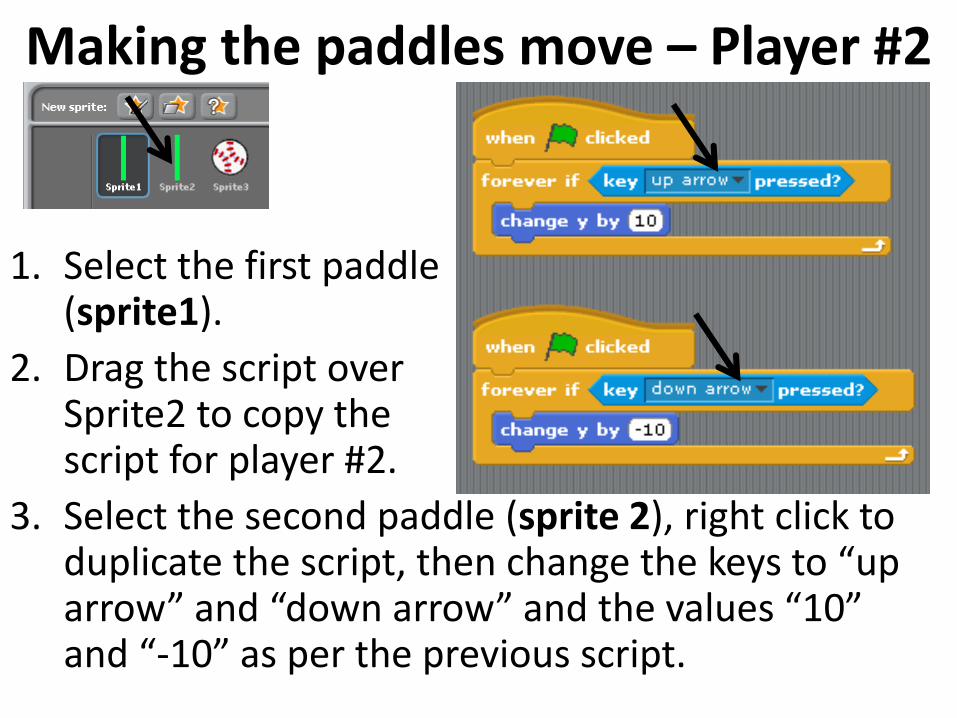
1. Select the first paddle(sprite1).
2. Drag the script over Sprite2 to copy the script for player #2.
3. Select the second paddle (sprite 2), right click to duplicate the script, then change the keys to “up arrow” and “down arrow” and the values “10” and “-10” as per the previous script.
Making the paddles move – Player #2
Stage 3• Getting the ball to move in a “fairly random”
manner.
• Stage 3 will help you to make the ball bounce off the sides of the game area with a simple script.

Making the ball move
1. Select the ball (sprite3).
2. Create the script shown above.
3. Test the ball uses random directions by starting and stopping the game 2-3 times.
Stage 4• Playing the game.
• Stage 4 will help you bounce the ball off the paddles so that the game can be played.
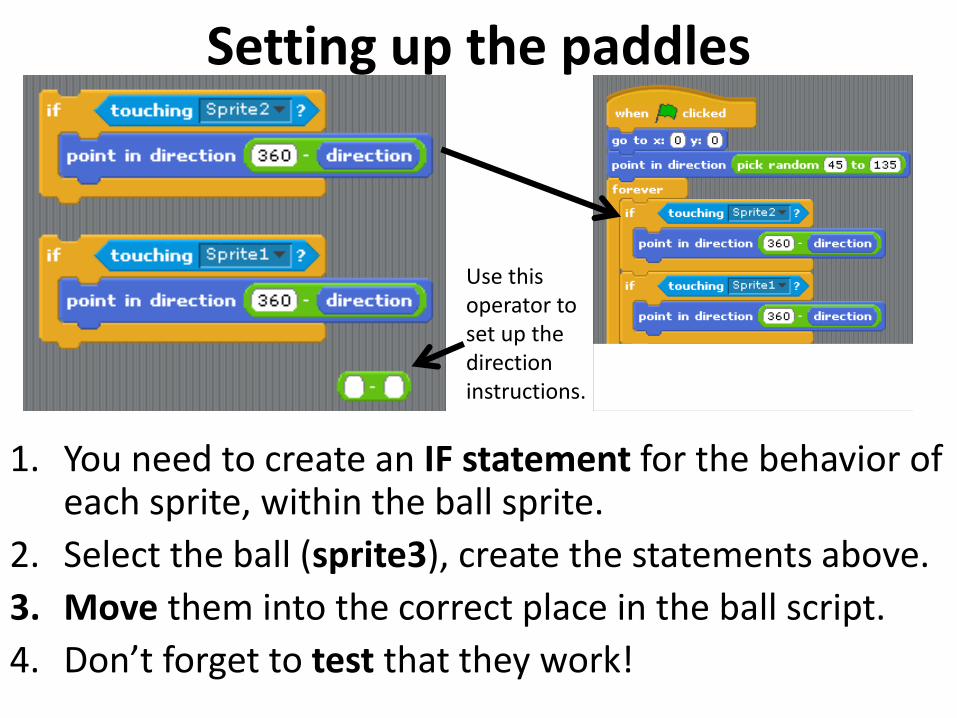
Setting up the paddles
1. You need to create an IF statement for the behavior of each sprite, within the ball sprite.
2. Select the ball (sprite3), create the statements above.
3. Move them into the correct place in the ball script.
4. Don’t forget to test that they work!
Use this operator to set up the direction instructions.
Stage 5• The score board(s).
• Stage 5 will help you create scores for your game, using the red and blue score zones that you set up at the very start.
• Remember blue = player 1 and red = player 2.
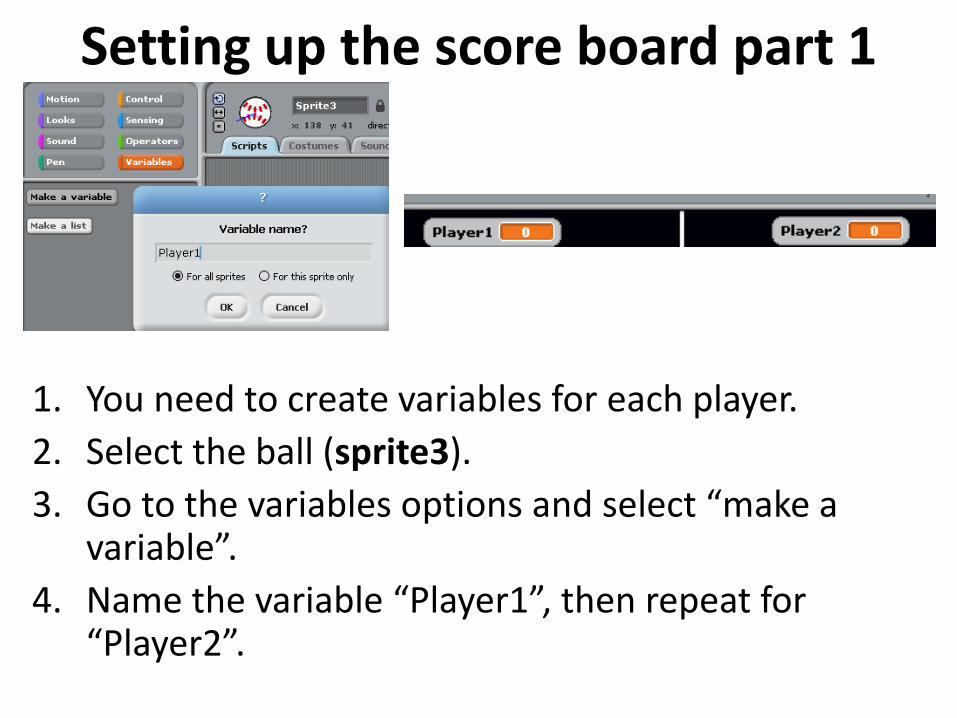
Setting up the score board part 1
1. You need to create variables for each player.
2. Select the ball (sprite3).
3. Go to the variables options and select “make a variable”.
4. Name the variable “Player1”, then repeat for “Player2”.
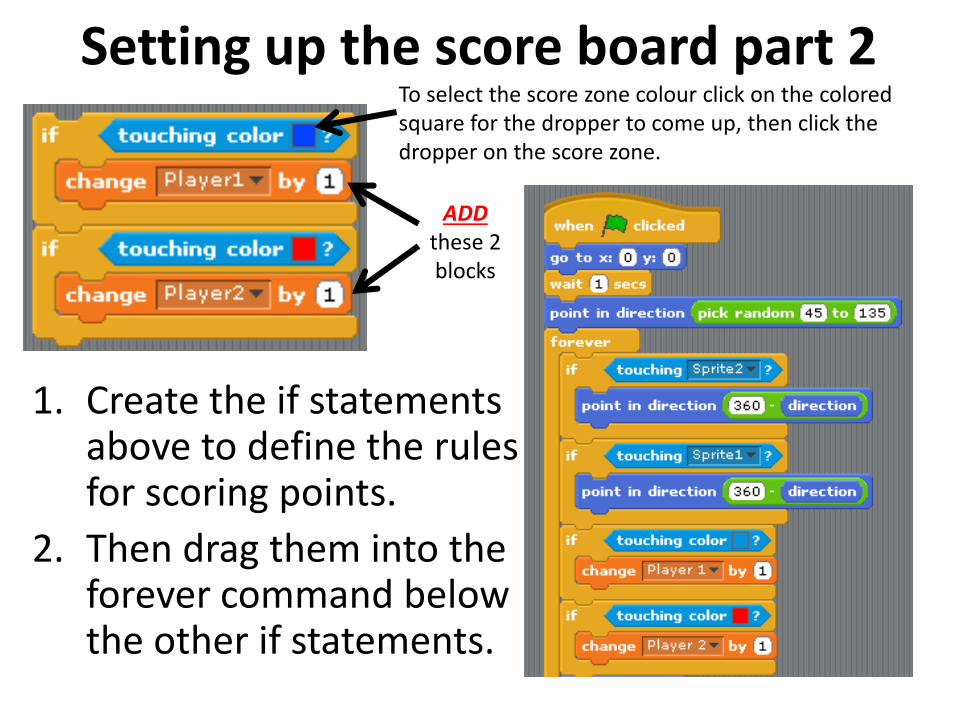
Setting up the score board part 2
1. Create the if statements above to define the rules for scoring points.
2. Then drag them into the forever command below the other if statements.
To select the score zone colour click on the coloredsquare for the dropper to come up, then click the dropper on the score zone.
ADDthese 2 blocks
Stage 6• Stage 6 will help you refine the scoring system
and the starting position for the ball to make the game more accurate
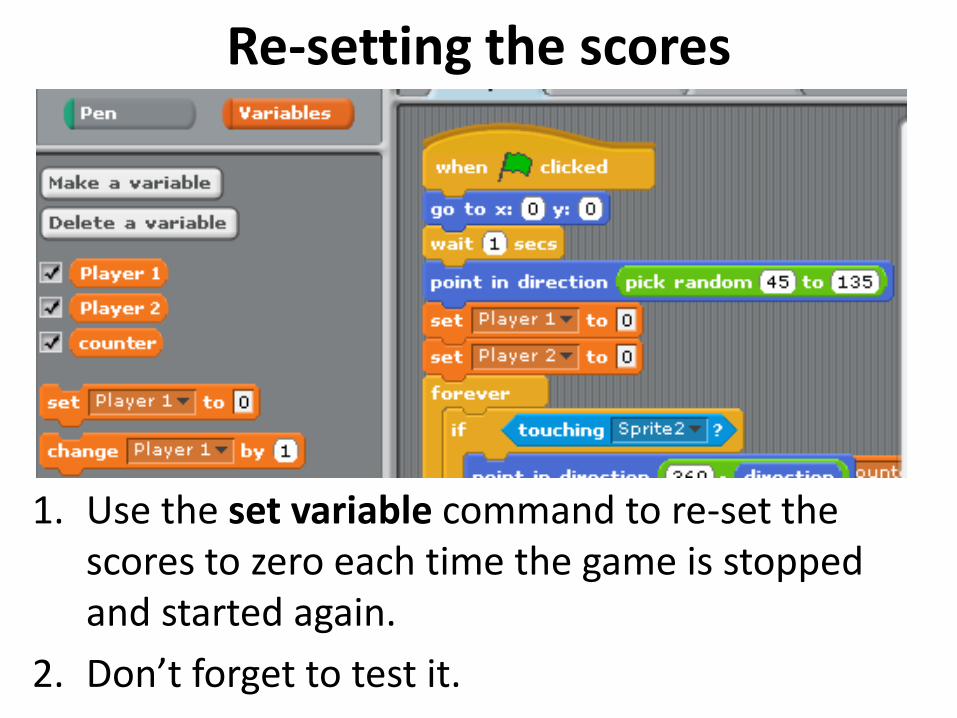
Re-setting the scores
1. Use the set variable command to re-set the scores to zero each time the game is stopped and started again.
2. Don’t forget to test it.

Re-positioning the ball
1. After a point has been scored the ball should be returned to the centre of the screen.
2. Use the go to motion script adjustments above to create this.
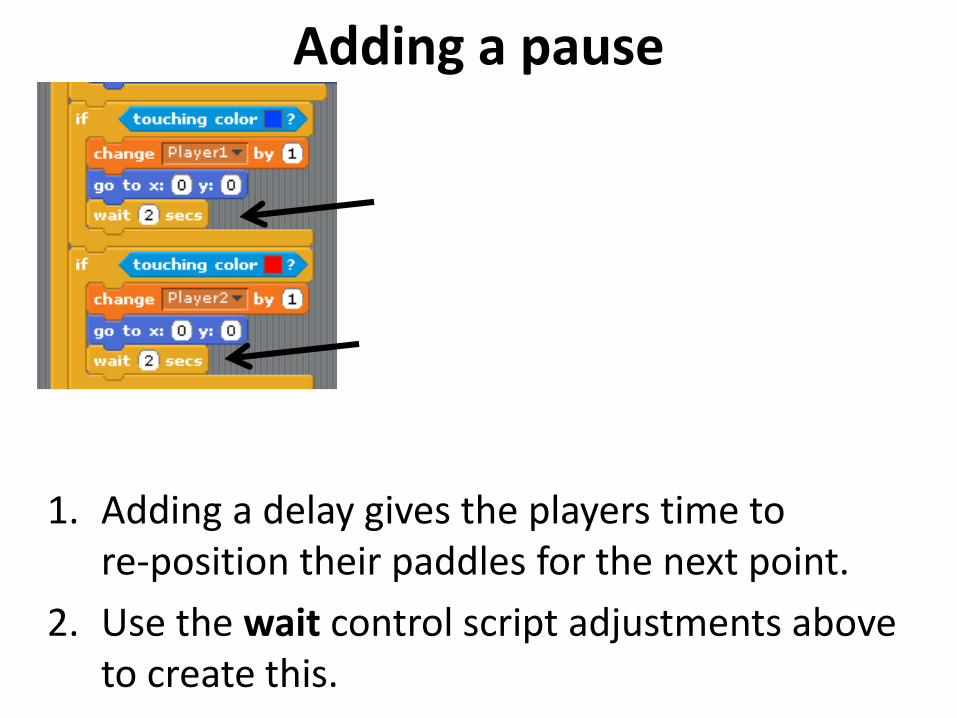
Adding a pause
1. Adding a delay gives the players time to re-position their paddles for the next point.
2. Use the wait control script adjustments above to create this.
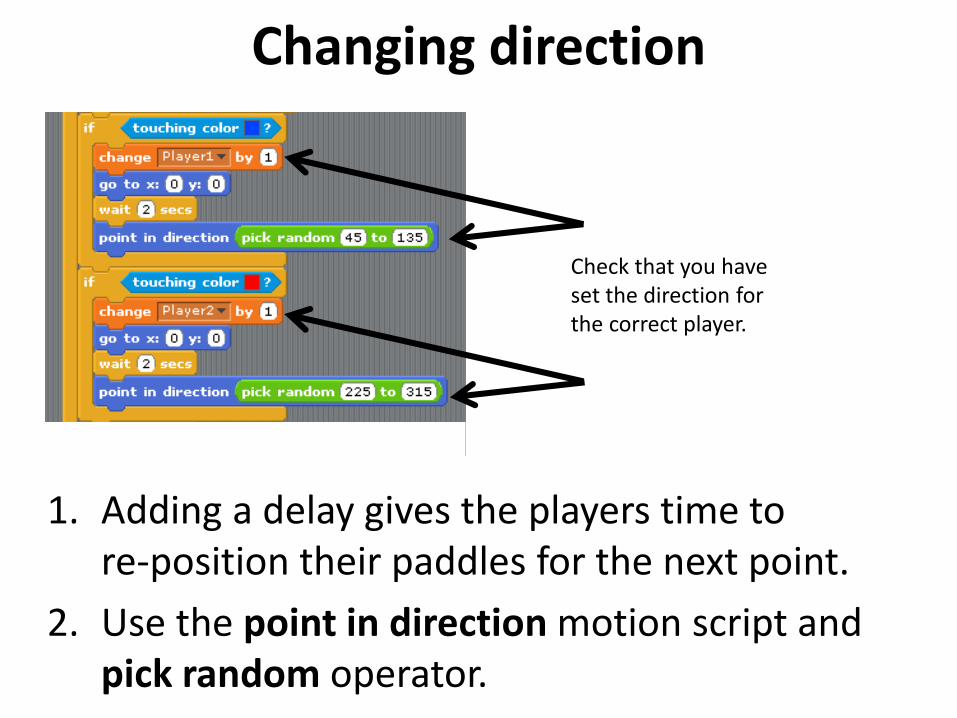
Changing direction
1. Adding a delay gives the players time to re-position their paddles for the next point.
2. Use the point in direction motion script and pick random operator.
Check that you have set the direction for the correct player.
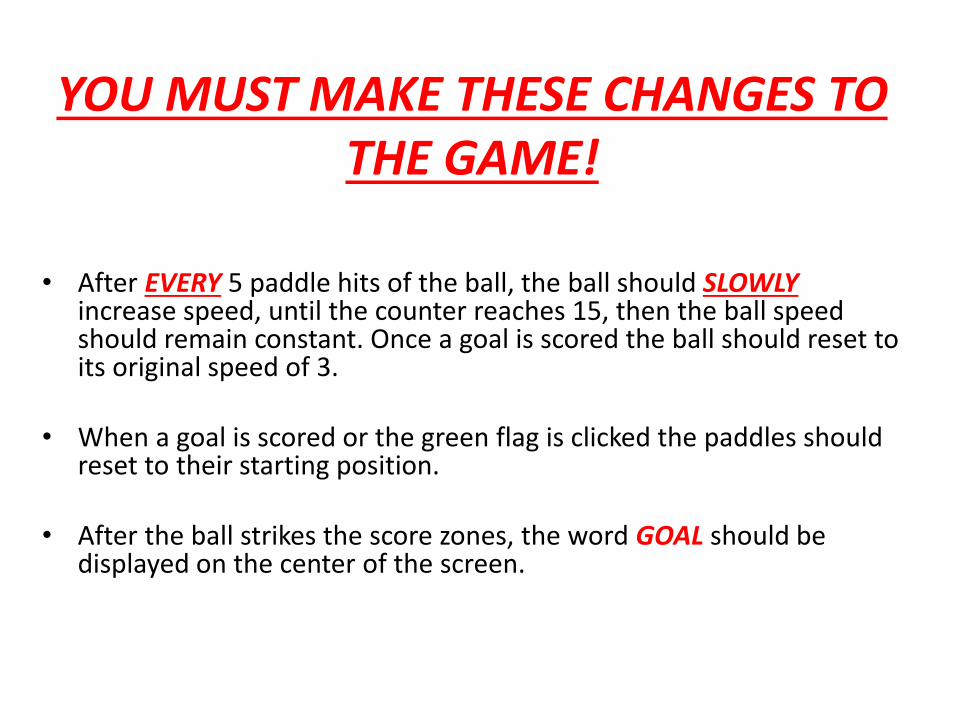
YOU MUST MAKE THESE CHANGES TO THE GAME!
• After EVERY 5 paddle hits of the ball, the ball should SLOWLYincrease speed, until the counter reaches 15, then the ball speed should remain constant. Once a goal is scored the ball should reset to its original speed of 3.
• When a goal is scored or the green flag is clicked the paddles should reset to their starting position.
• After the ball strikes the score zones, the word GOAL should be displayed on the center of the screen.
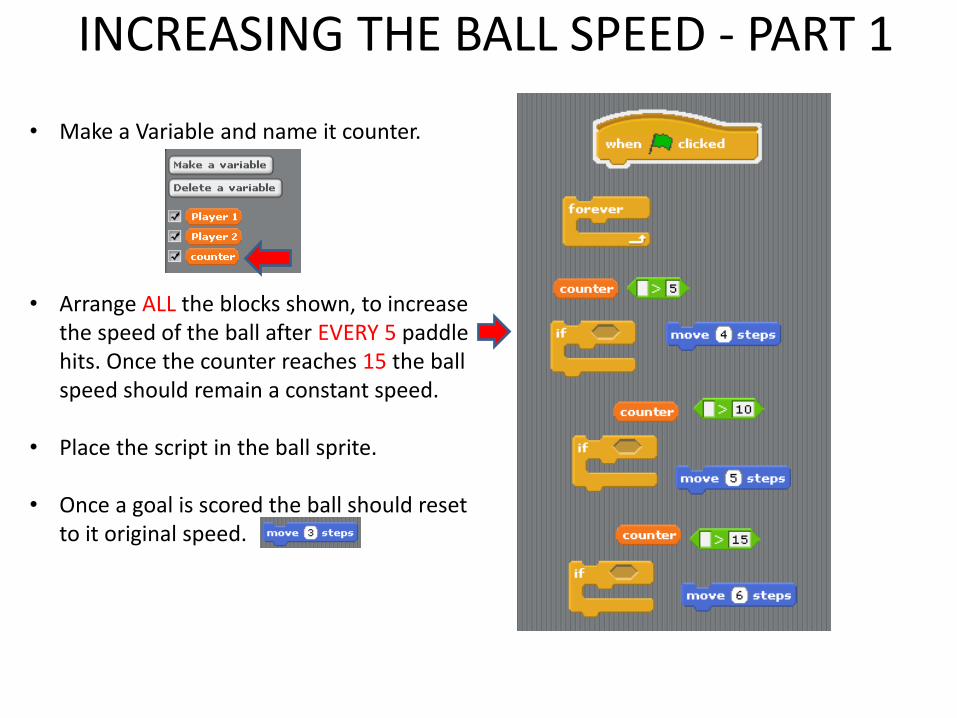
INCREASING THE BALL SPEED - PART 1
• Make a Variable and name it counter.
• Arrange ALL the blocks shown, to increase the speed of the ball after EVERY 5 paddle hits. Once the counter reaches 15 the ball speed should remain a constant speed.
• Place the script in the ball sprite.
• Once a goal is scored the ball should reset to it original speed.
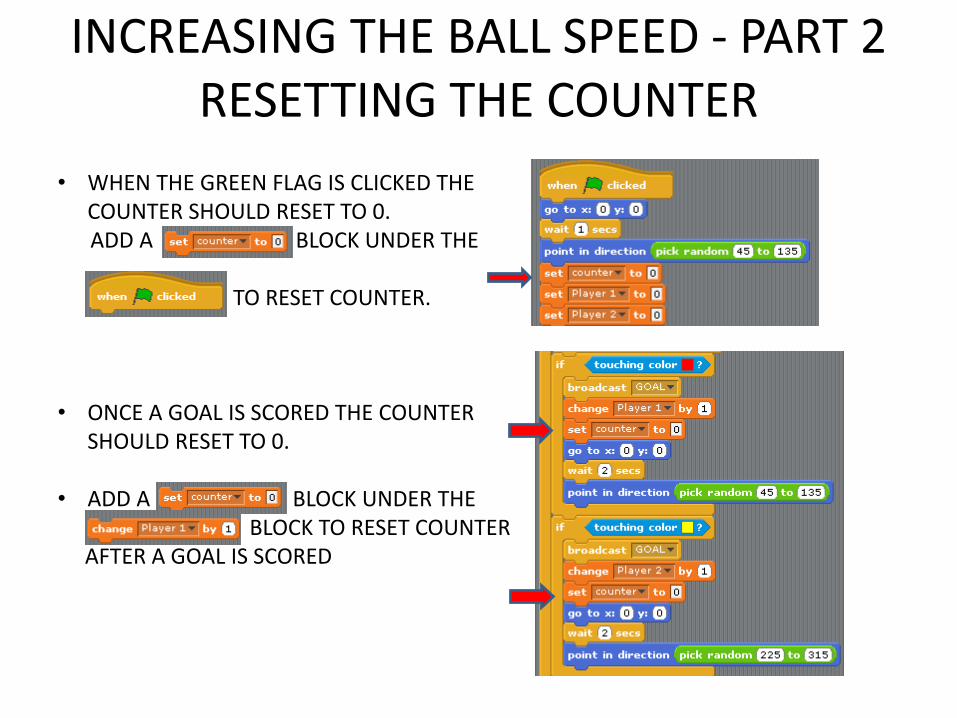
INCREASING THE BALL SPEED - PART 2RESETTING THE COUNTER
• WHEN THE GREEN FLAG IS CLICKED THE COUNTER SHOULD RESET TO 0.ADD A BLOCK UNDER THE
TO RESET COUNTER.
• ONCE A GOAL IS SCORED THE COUNTER SHOULD RESET TO 0.
• ADD A BLOCK UNDER THEBLOCK TO RESET COUNTER
AFTER A GOAL IS SCORED
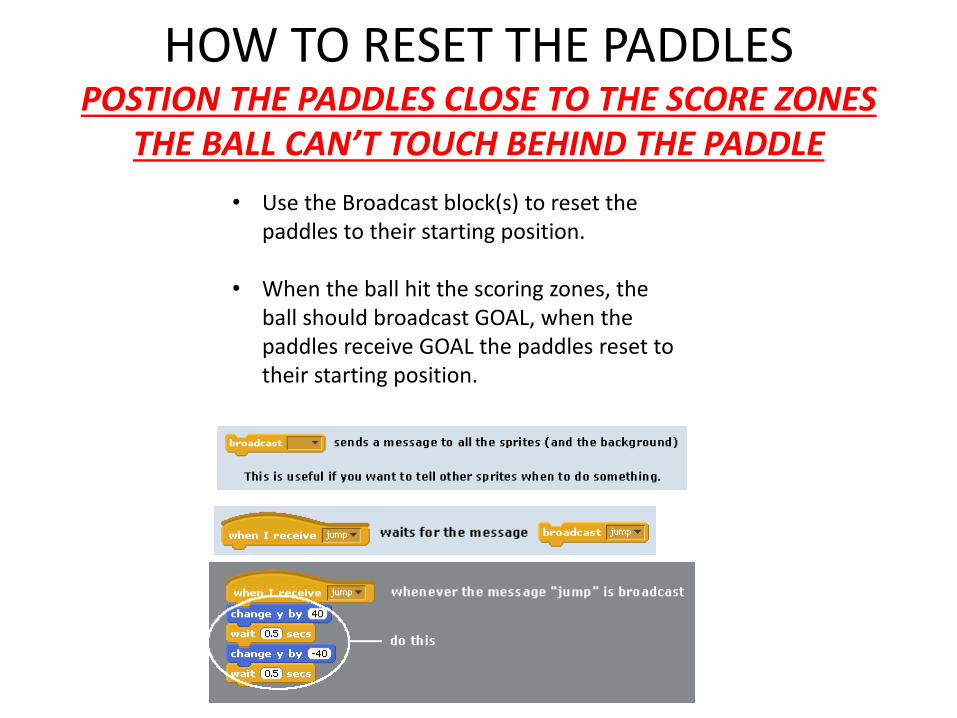
HOW TO RESET THE PADDLESPOSTION THE PADDLES CLOSE TO THE SCORE ZONES
THE BALL CAN’T TOUCH BEHIND THE PADDLE
• Use the Broadcast block(s) to reset the paddles to their starting position.
• When the ball hit the scoring zones, the ball should broadcast GOAL, when the paddles receive GOAL the paddles reset to their starting position.
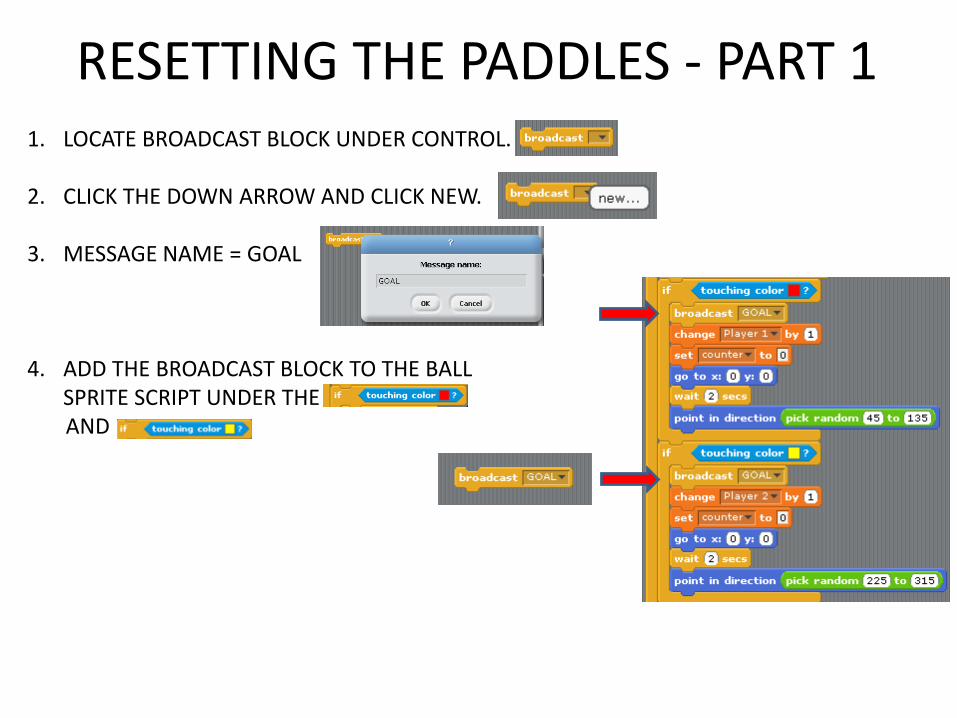
RESETTING THE PADDLES - PART 11. LOCATE BROADCAST BLOCK UNDER CONTROL.
2. CLICK THE DOWN ARROW AND CLICK NEW.
3. MESSAGE NAME = GOAL
4. ADD THE BROADCAST BLOCK TO THE BALL SPRITE SCRIPT UNDER THEAND

RESETTING THE PADDLES - PART 2
1. LOCATE THE WHEN I RECEIVE BLOCK UNDER CONTROL.
2. CLICK THE DROP DOWN ARROW FROM THE WHEN I RECEIVE BLOCK AND SELECT GOAL.
3. PLACE THE WHEN I RECEIVE BLOCK IN BOTH PADDLE 1 SPRITE and PADDLE 2 SPRITE SCRIPT.
4. ADD A BLOCK UNDER THE WHEN I RECEIVE BLOCK. SET THE X: and Y: COORDINATES TO THE STARTING POSITION OF THE PADDLE.STARTING POSITION = CLOSE TO SCORE ZONES
5. PLACE THE BLOCK IN BOTH PADDLE 1 SPRITE and PADDLE 2 SPRITE SCRIPT.
6. ADD A BLOCK UNDER THE SET THE X: and Y: COORDINATES
TO THE STARTING POSITION OF THE PADDLE. STARTING POSITION = CLOSE TO SCORE ZONES.
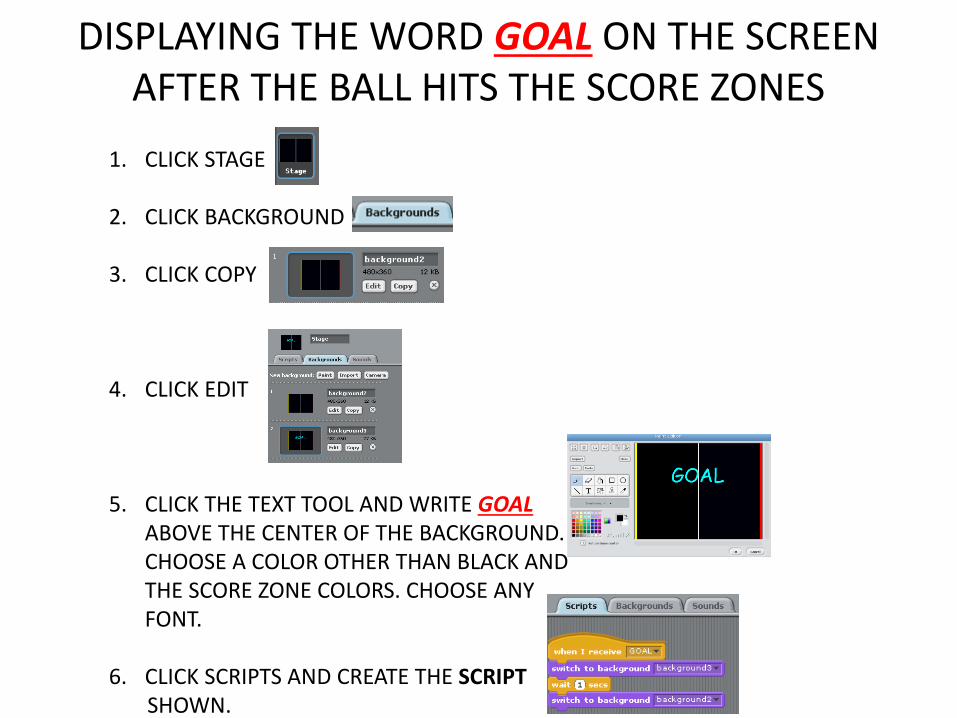
DISPLAYING THE WORD GOAL ON THE SCREEN AFTER THE BALL HITS THE SCORE ZONES
1. CLICK STAGE
2. CLICK BACKGROUND
3. CLICK COPY
4. CLICK EDIT
5. CLICK THE TEXT TOOL AND WRITE GOALABOVE THE CENTER OF THE BACKGROUND. CHOOSE A COLOR OTHER THAN BLACK AND THE SCORE ZONE COLORS. CHOOSE ANY FONT.
6. CLICK SCRIPTS AND CREATE THE SCRIPTSHOWN.