scrappy snails trail - patchwork sampler
TRANSCRIPT
Scrappy Snail’s Trail Finished size: 72” x 96”
Fabric Requirements: Lights: 3 to 3½ yards Darks: 4¼ to 4¾ yards 1st & 3rd borders: 1 yard 2nd border: 1 yard Binding: ¾ yard Note: I used lots of fat quarters from my stash for the quilt center and pieced border.
Cutting: This block is half light and half dark. You’ll cut the same number of pieces from light and dark fabric. I cut from lots of different fabrics and made my blocks completely scrappy but you could also use just two fabrics with a background. Keep all pieces separate so you don’t get them mixed up. After cutting these pieces for the quilt center, put the remaining fabric aside for the pieced border.
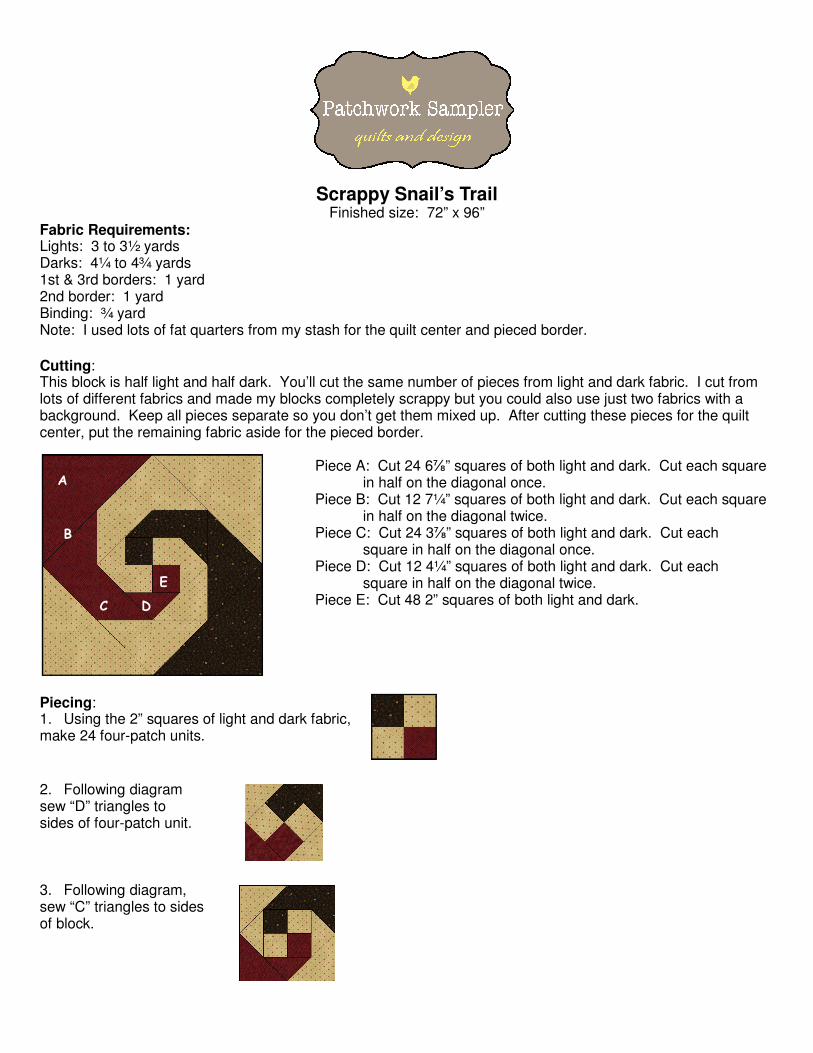
Piece A: Cut 24 6⅞” squares of both light and dark. Cut each square in half on the diagonal once. Piece B: Cut 12 7¼” squares of both light and dark. Cut each square in half on the diagonal twice. Piece C: Cut 24 3⅞” squares of both light and dark. Cut each square in half on the diagonal once. Piece D: Cut 12 4¼” squares of both light and dark. Cut each square in half on the diagonal twice. Piece E: Cut 48 2” squares of both light and dark.
Piecing: 1. Using the 2” squares of light and dark fabric, make 24 four-patch units.
2. Following diagram sew “D” triangles to sides of four-patch unit. 3. Following diagram, sew “C” triangles to sides of block.
A
B
C D
E

4. Following diagram sew “B” triangles to sides of block. 5. Following diagram sew “A” triangles to sides of block. Make a total of 24 blocks.
Follow diagram below and sew blocks together as shown. Then sew borders as shown at right.
Borders: Cut 14 2” strips for first and third borders. Cut 7 3½” strips for second border. Piece 2” strips together. Measure length of quilt and cut two borders this measurement. Sew to sides of quilt. Press toward border strips. Measure width of quilt and cut two bor-ders this measurement. Sew to top and bottom of quilt. Repeat for the second border, using the 3½” strips. Repeat again for the third border using the remaining 2” strips. Your top will now look like the diagram below.

Pieced border: From dark fabrics, cut 208 2” squares and 104 3½” squares From light fabrics, cut 208 2” squares Using the 2” squares, make 104 four-patch units as shown: Use these four-patch units and the 3½” squares to make double four-patch units. Make 52 blocks.
Fol-
lowing dia-gram below, sew 14 dou-
ble four-patch
units together for side borders (make 2). Following diagram below, sew 12 double four-patch units together for side borders (make 2).
Follow the setting diagram below and sew side borders to quilt. Press toward third border. Sew top and bottom borders to quilt. Press toward third border. Quilt, bind and enjoy your new quilt! © 2013 Rhonda Roberts, Patchwork Sampler Please use my patterns to make quilts for yourself, friends, family, charity or to sell. Please don’t copy pattern to sell or distribute to others