scomis encryption service - frequently asked questions
TRANSCRIPT

ScoMIS Encryption Service Primary School Installation Guide
Document Version v1.1 ScoMIS Encryption Service - Primary School Installation Guide - Page 1 of 22
Introduction
This guide explains how to install the ScoMIS Encryption Service Software onto a
laptop computer. There are three stages to the installation which should be
completed in order.
The installation has been designed to be completed by the main laptop user, for
example the teacher. ScoMIS has made the installation process clear and simple
with on screen prompts and check boxes to ensure you are made aware of the
important information and steps.
Installation Summary
The first step involves backing up data on the laptop onto removable storage or the
school network. This is important because if the hard drive inside your laptop has a
mechanical defect the encryption process may cause it to fail. The second stage
involves a CHKDSK which is a windows utility to check the health of the hard drive
and finally the actual encryption installation itself. Although the steps should be
completed in order they do not have to be done immediately after one another. You
could backup the data at school one day; run CHKDSK a couple of days later at home
before finally installing the encryption software in school a few days later (bear in
mind any work done between backup and installation would be at risk).
Contents
Chapter 1 – Backing Up Your Data ................................................................................2 Chapter 2 – Running a CHKDSK .....................................................................................3 Chapter 3 – Installing the Encryption Software............................................................5 Chapter 4 – Getting help and support for problems ..................................................18 Chapter 6 – The ScoMIS Encryption Maintenance Utility ..........................................20 Appendix A – Removing / re-installing the encryption software ................................21 Appendix B – How the encryption software works .....................................................22

ScoMIS Encryption Service Primary School Installation Guide
Document Version v1.1 ScoMIS Encryption Service - Primary School Installation Guide - Page 2 of 22
Chapter 1 – Backing Up Your Data
The encryption software installation is a major change to your laptop, all data is
rewritten during encryption so can be at risk in the event that something goes wrong
with the installation. It is therefore vital that you take a backup of all of your data
before moving onto step 2 and 3.
Before backing up your data check with the person responsible for ICT in your school
for advice on how you should carry it out. Each school will have a different setup in
regards to their users, network & server configuration so unfortunately we can’t
provide definitive instructions in this guide.
General Guidance on Backup:
• Your backup needs to be on an external device such as the school network
drive, a CD-R/DVD-R or removable USB device.
o It is no good simply copying your data to a folder on the laptop itself as
this will be lost if there is a problem during the encryption installation
• To backup your data you can either use the windows utility, simply copy your
files and folders onto the backup location or use a third party backup utility.
o To launch the backup utility in Windows XP go to: Start > All Programs >
Accessories > System Tools > “Backup”
o To launch the backup utility in Windows Vista go to: Start > Control
Panel > System and Maintenance > “Backup and Restore Centre”
o To launch the backup utility in Windows 7 go to: Start > Control Panel >
System and Security > “Backup and Restore”
• After backing up you should test that you can restore a file to prove that your
backup worked successfully.
Important:
• If you backup your data onto a removable media such as a CD-R/DVD-R or USB
device ensure that it is kept in a secure location such as the school safe.
• Never keep the backup media with the laptop in transit, for example in the
laptop carry case

ScoMIS Encryption Service Primary School Installation Guide
Document Version v1.1 ScoMIS Encryption Service - Primary School Installation Guide - Page 3 of 22
Chapter 2 – Running a CHKDSK
Before installing the software for the ScoMIS Encryption Service installation we need
to run a process to check that the Hard Disk inside your laptop is mechanically
healthy.
• Depending on the size of your Hard Disk and speed of your laptop this can
take anything from 30 minutes to 3 hours.
• It can be set to start and left to run providing the computer is plugged into the
mains as the battery is likely to run out otherwise.
• You do not need an internet connection so it can be run at home.
• Once started it cannot safely be interrupted so please bear this in mind
when choosing when to run this process.
• Close any applications you have open before starting this process.
Log into windows as normal
Click Start > “Run”
Enter "cmd" in lower case
without the quotes
Click “OK”
In the black window type
CHKDSK C: /R
Hit “Enter”
Type “y” and hit “Enter”

ScoMIS Encryption Service Primary School Installation Guide
Document Version v1.1 ScoMIS Encryption Service - Primary School Installation Guide - Page 4 of 22
You should see a confirmation
that the process has been set
to run with the computer’s
next start.
Restart Windows
Before Windows loads you
will see the following screen
as the CHKDSK process runs
Depending on the speed and
size of the hard disk inside
your computer it may take up
to three hours to complete
After it has finished Windows
will load normally
You are now ready to move onto the next stage of installation

ScoMIS Encryption Service Primary School Installation Guide
Document Version v1.1 ScoMIS Encryption Service - Primary School Installation Guide - Page 5 of 22
Chapter 3 – Installing the Encryption Software
This is the third and final part of the ScoMIS Encryption Service installation. Before
proceeding you should have completed the preceding steps:
1. You have completed step One and backed up your data
2. You have completed step Two and run the CHKDSK procedure
Before we begin you should also have:
1. Been given the installation password
2. Been given the ScoMISEncryptionService.exe network location
3. Arranged enough time to complete the installation which takes approximately
30 minutes and must not be interrupted
4. Connected your laptop to the mains power supply
5. Connected your laptop to the internet, either at home or on the school
network either with a network cable or through Wi-Fi
Launch the
ScoMISEncryptionServiceSetup.exe
(to do this double click the icon)
Choose to “Run” on any file security
warnings you receive

ScoMIS Encryption Service Primary School Installation Guide
Document Version v1.1 ScoMIS Encryption Service - Primary School Installation Guide - Page 6 of 22
Wait for the setup process to be extracted
Click Next
Click Install

ScoMIS Encryption Service Primary School Installation Guide
Document Version v1.1 ScoMIS Encryption Service - Primary School Installation Guide - Page 7 of 22
Click Finish
Enter your school’s 7 digit DfES/DCSF
number
Enter the password that was emailed to your
school
Click Continue
Read and understand the backup and
CHKDSK confirmation
If you are unsure please refer to the previous
chapters for instructions

ScoMIS Encryption Service Primary School Installation Guide
Document Version v1.1 ScoMIS Encryption Service - Primary School Installation Guide - Page 8 of 22
1) Once you are confident that the device
has been backed up, tick the box.
2) Once you are confident that the CHKDSK
has been run or you accept responsibility
that your data may be lost, tick the box.
3) Check that your laptop is plugged into a
power supply; do not rely on the laptop’s
battery alone. Then put a tick in the box.
If you are unable to confidently tick these
boxes then click the abandon button.
Otherwise Click Continue
Wait whilst your laptop makes some checks
until you see the ‘Installation Confirmation
Screen’
Once your laptop has passed its check you
will be given an option.
If you do not have time to complete the
installation which should take approximately
20 minutes then ‘Quit without installing’
Otherwise click ‘Continue with Encryption
Installation’.

ScoMIS Encryption Service Primary School Installation Guide
Document Version v1.1 ScoMIS Encryption Service - Primary School Installation Guide - Page 9 of 22
After the setup status completes you will
receive a warning as it is important to follow
the installation through to the end.
DO NOT shut down your computer. DO NOT
disconnect from the internet or terminate
the process in anyway.
Please note that the process will involve
restarting your computer on two occasions.
You will need to create/assign a user of the
ScoMIS Encryption Service.
If you are not already a user of the ScoMIS
Encryption Service ensure the option ‘New
User’ is selected.
Then click next.

ScoMIS Encryption Service Primary School Installation Guide
Document Version v1.1 ScoMIS Encryption Service - Primary School Installation Guide - Page 10 of 22
Enter your first name and your surname into
the appropriate boxes
(has to be lower case).
Look at the preference boxes – please note if
somebody else has the same name as you
and already has an account in our database
it will be necessary for the software to assign
a numeric suffix to your user name.
You will be informed of your user name on
a later screen.
Click “Create and assign user”.
Click Yes to confirm – this is the last chance
to correct any spelling mistakes in your name
You will then be shown your new username.
MAKE A NOTE OF YOUR USERNAME

ScoMIS Encryption Service Primary School Installation Guide
Document Version v1.1 ScoMIS Encryption Service - Primary School Installation Guide - Page 11 of 22
Then put a tick in the box to show that you
have noted your username
click ok.
You are now required to answer 3 questions.
Do not write these down.
Choose questions that you can easily
remember as you will need to answer them
if calling the Service Desk to get your
password reset
To select a question to answer click on the
questions.
You will be presented with a box to type
your answer in.
Type your answer and then click save.
Repeat this step until you have answered 3
different questions

ScoMIS Encryption Service Primary School Installation Guide
Document Version v1.1 ScoMIS Encryption Service - Primary School Installation Guide - Page 12 of 22
You will then be informed that you have
answered sufficient questions.
Click on Save and Continue
When your profile has been updated click ok
Once the user has been assigned it will show
the user name.
Click ok
If you are the only user of this laptop click
‘Proceed with installation’.
Note: additional users can be added later
after the installation has finished

ScoMIS Encryption Service Primary School Installation Guide
Document Version v1.1 ScoMIS Encryption Service - Primary School Installation Guide - Page 13 of 22
The machine will restart in 30 seconds.
To restart faster click ‘Restart Now’
You will see Windows shutting down and
restarting in the normal manner
Sign into your laptop with your usual
windows username and password and click
ok.
This is not the username you have just been
given).
Wait for the installation to begin settings
synchronization or to start faster click ‘Start
Now’

ScoMIS Encryption Service Primary School Installation Guide
Document Version v1.1 ScoMIS Encryption Service - Primary School Installation Guide - Page 14 of 22
Depending on the speed of your connection
the initial synchronization may take up to 15
minutes
Read the instructions on the screen.
You will be given your initial password of
12345 which you will later be forced to
change when first logging in
Once you have read and understood all the
information and accept responsibility to
keep your data secure, put a tick in the box
and click ok.
Your machine will restart in 30 seconds or to
restart faster click Restart Now.
ScoMIS Encryption Service Primary School Installation Guide
Document Version v1.1 ScoMIS Encryption Service - Primary School Installation Guide - Page 15 of 22
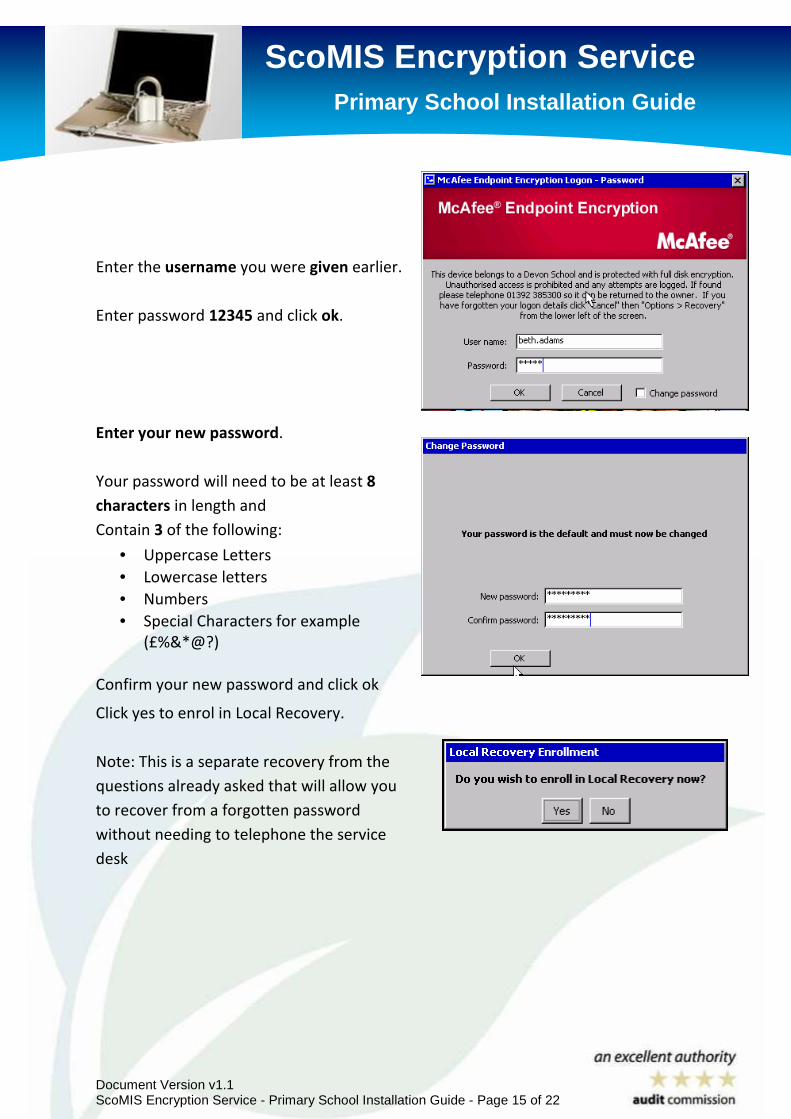
Enter the username you were given earlier.
Enter password 12345 and click ok.
Enter your new password.
Your password will need to be at least 8
characters in length and
Contain 3 of the following:
• Uppercase Letters
• Lowercase letters
• Numbers
• Special Characters for example
(£%&*@?)
Confirm your new password and click ok
Click yes to enrol in Local Recovery.
Note: This is a separate recovery from the
questions already asked that will allow you
to recover from a forgotten password
without needing to telephone the service
desk

ScoMIS Encryption Service Primary School Installation Guide
Document Version v1.1 ScoMIS Encryption Service - Primary School Installation Guide - Page 16 of 22
It will ask you to answer 3 questions.
Use the drop down arrow to select your
question then type your answer.
Click Next.
Then use the drop down menu to select
another question.
You can use the same questions that you
used earlier in the installation if you choose
to.
Any questions that you have already
answered will show in the list
When you have answered 3 questions you
will see a message to tell you have
completed the local recovery. Click Finish.

ScoMIS Encryption Service Primary School Installation Guide
Document Version v1.1 ScoMIS Encryption Service - Primary School Installation Guide - Page 17 of 22
Windows will now start.
Enter your windows username and
password and click enter.
The encryption software is now active and
will capture your windows username and
password so that you do not have to enter it
again. This SSO (Single Sign On) function is
explained in detail in one of the appendix
chapters at the end of this guide
Restart windows for the final time, log in
with your new username and password then
you will see how the encryption software
automatically logs you into windows
Congratulations, the encryption software is now fully installed and protecting your device.
• The actual encryption is completely transparent to your day to day use of Applications
and Windows
• You can view the status of the installation by doing a right click on the Encryption Icon
in the system tray in the lower right hand side of your screen by the time. The
encryption icon is the one with the padlock
• The initial encryption takes a number of hours to complete and during this time you
will notice your laptop feels slower than normal
• Once complete the status screen will show green, all the data on your hard drive is
now completely encrypted and secure in the event of loss or theft
• The encryption will run unobtrusively in the background and should have a negligible
performance impact for your day to day use

ScoMIS Encryption Service Primary School Installation Guide
Document Version v1.1 ScoMIS Encryption Service - Primary School Installation Guide - Page 18 of 22
Chapter 4 – Getting help and support for problems
If you are having problems logging onto your laptop; for example if you have
forgotten your password:
1. First attempt local recovery following the onscreen instructions in the pre-
boot login screen.
2. If successful this will let you choose a new password and enable you to log
back onto your laptop.
If you have problems with local recovery please telephone the ScoMIS Service Desk
on 01392 385300. We will go through a short recovery process and reset your
password after completing an identity check based on the questions set during your
account creation. If you forget your security questions we will still be able to reset
your password but only by us calling the main school number to confirm your
identity.
The ScoMIS Service Desk is open from 8am until 6pm during school term time (8am
to 5pm Fridays) and 9am until 5pm during school holidays.
For non urgent issues or queries please check the next chapter which covers
common questions and answers and the ScoMIS website which will be kept up to
date with FAQ’s and the latest version of this guide.
If your query is not answered in our user guide or website you should log a call with
ScoMIS. You can either telephone on 01392 385300 or send us an email
[email protected] to log a call.
We also welcome feedback on the documentation provided for encryption service. If
you have any suggestions for improvements please send us an email to
[email protected] – please note this is a feedback address and should not be
used to log issues or calls for assistance

ScoMIS Encryption Service Primary School Installation Guide
Document Version v1.1 ScoMIS Encryption Service - Primary School Installation Guide - Page 19 of 22
Chapter 5 – Answers to common questions / FAQ’s
• How do I know that my device is encrypted?
o If the encryption software is installed onto your device you will see the
McAfee login screen before Windows loads
• How long does the initial encryption process take?
o Depending on the speed and size of your hard drive the initial
encryption process may take a number of hours
o You can shutdown and restart during this time, the encryption will take
up where it left off each time Windows is started
o During the initial encryption your laptop may feel sluggish as all data on
the hard disk is rewritten
• Will I notice the encryption software once it has been installed?
o Once installed the encryption is transparent to Windows and your
applications.
o Remember only the laptop’s internal hard drive is encrypted so you
shouldn’t copy sensitive information onto removable media unless it is
for backup purposes and kept in a secure location
• How do I remove or reinstall the encryption software?
o See Appendix A in this guide
• What happens if my device hardware is upgraded?
o Added RAM will not effect encryption however upgrading the hard disk
will mean that you need to contact ScoMIS for advice
• I want an easier to remember password?
o All devices and users on the ScoMIS Encryption Service must adhere to
the DCC Password policy.
o A strong and hard to guess password does not necessarily need to be
hard to remember for example you could use a line from a favourite
song: Never4getWhereYou’veComeHereFrom
o Alternatively try generating one with the memorable password
generator > http://www.safepasswd.com/
• Where can I find out more information?
o Check http://faq.scomis.org/categories/services/encryption
o Log a call with the ScoMIS Service Desk for any other queries

ScoMIS Encryption Service Primary School Installation Guide
Document Version v1.1 ScoMIS Encryption Service - Primary School Installation Guide - Page 20 of 22
Chapter 6 – The ScoMIS Encryption Maintenance Utility
ScoMIS have included a maintenance utility to allow you to carry out the following
tasks:
• User Maintenance
o New user - create a new user and assign to the machine
o Existing user – assign an existing user to the machine
o Group – assign multiple existing users to the machine, you may choose
to add all users to all devices if they are regularly shared for example
• Reassign device
o Allows you to update the device description in our database
• View DCC Password Rules
o Used when creating a new user so that you can explain the password
policy before they attempt log on for the first time
• Force Synchronisation
o Should be run after making any changes using the functions above, this
pulls down the settings to the device from the central database
To launch the utility go to:
Start > All Programs > “ScoMIS Encryption Maintenance Utility”
Notes:
• A “new user” means one that doesn’t already have a login for the encryption
service, if they use another encrypted device use the “existing user” option to
allow them access to the device in question
• The user maintenance functions are protected and require you to enter the
schools unique installation key, if this has been lost or forgotten please log a
call with the ScoMIS Service Desk
• Depending on your windows security settings you may need administrator
rights to run this application
• If you have any problems or see any errors using this application please note
them down or take a screen shot and log a call with the ScoMIS Service Desk

ScoMIS Encryption Service Primary School Installation Guide
Document Version v1.1 ScoMIS Encryption Service - Primary School Installation Guide - Page 21 of 22
Appendix A – Removing / re-installing the encryption software
Once installed the encryption software cannot be removed by the end user or
school. To remove the software you will need to log a call with the ScoMIS Service
Desk.
If the encryption software needs to be re-installed for example following a repair
after hardware failure please log a call with the ScoMIS Service Desk. We will need
to manually delete the old device from our database to avoid the school being
charged for a duplicate device.
Common reasons for removing the software may include
• A laptop is due to be replaced – the encryption software should be removed
so it can be installed onto the replacement device without the school incurring
a duplicate charge
• The security profile of the laptop has changed – Our advice is to encrypt all
teacher and administration laptops. If a laptop changes role to be used in the
curriculum, by pupils or supply teachers for example the encryption software
should be removed
Common reasons for re-installing the software may include
• Windows has become corrupted – you will need to re-install the encryption
software after re-installing the Windows operating system
• Hardware Failure – if the laptop hard drive fails you will need to re-install the
encryption software after the fault has been rectified
Please Note: It is possible to reinstall the Windows operating system by using the
installation CD or running a recovery mechanism such as a ghost reload. This will
mean there is no encryption on the hard drive however the original data will
remain encrypted and still be secure.

ScoMIS Encryption Service Primary School Installation Guide
Document Version v1.1 ScoMIS Encryption Service - Primary School Installation Guide - Page 22 of 22
Appendix B – How the encryption software works
On protected devices for example Laptops or PCs, the client side of Endpoint Encryption, in simple
terms, takes control of the user’s hard disk away from the operating system. Endpoint Encryption’s
driver encrypts every piece of data written to the disk, and decrypts every piece of information read
off the disk. If any application managed to break through the Endpoint Encryption barrier and read
the disk directly, it would find only encrypted data, even in the Windows swap file and temporary
file areas.
Even if a Data Recovery agency tries to retrieve information from a Endpoint Encryption-protected
hard drive, without access to the Endpoint Encryption System via the passwords or recovery
information there is no way of accessing this data – total security.
Endpoint Encryption installs a mini-operating system on the user’s hard drive, this is what the user
sees when they turn on the PC. Endpoint Encryption looks and feels like Microsoft Windows, with
mouse and keyboard support, moveable windows etc. This Endpoint Encryption OS is completely
contained and does not need to access any other files or programs on the hard disk, and is
responsible for allowing the user to authenticate with their password.
Once the user has entered the correct authentication information, the Endpoint Encryption
operating system starts the crypt driver in memory, and boots the protected machine’s original
operating system. From this point on the machine will look and behave as if Endpoint Encryption was
not installed. The security is invisible to the user, and because the only readable data on the hard
disk is the Endpoint Encryption operating system, and the encryption key for the hard drive is itself
protected with the user’s authentication key, the only possible way to defeat Endpoint Encryption is
to either guess the hard disk encryption key (a one in 2256 chance with the AES256 algorithm), or to
guess the user’s password.
Every time an Endpoint Encryption protected device boots, and after a set period of time, Endpoint
Encryption tries to contact its "Object Directory". This is a central store of configuration information
for both machines and users, and is managed by Endpoint Encryption Administrators. The Object
Directory could be on the user’s local hard disk (if the user is working completely stand-alone), or
could be in some remote location and accessed over TCP/IP via a secure Endpoint Encryption Server
(in the case of a centrally managed enterprise).
The Endpoint Encryption protected machine queries the directory for any updates to its
configuration, and if needed downloads and applies them. Typical updates could be a new user
assigned to the machine by an administrator, a change in password policy, or an upgrade to the
Endpoint Encryption operating system or a new file specified by the administrator. At the same time
Endpoint Encryption uploads details like the latest audit information, any user password changes,
and security breaches to the Object Directory. In this way, transparent synchronization of the
enterprise becomes possible.