science in the kitchen member manual 2016 - province of … · · 2017-05-31skill builder 12:...
TRANSCRIPT

Table of Contents
Introduction 1
Project Summary 2
Skill Builder 1: The PEOE Inquiry Technique - Chocolate Chip Cookies
4
Skill Builder 2: Solid, Liquid, Gas - Butter & Ice Cream
7
Skill Builder 3: Microorganisms - Yogurt 9
Skill Builder 4: Coagulation - Cheese 11
Skill Builder 5: Fermentation - Friendship Bread
13
Skill Builder 6: Carbonation - Root Beer Float & Ginger Ale
15
Skill Builder 7: Density Dressing - Salad Dressing
17
Skill Builder 8: Density Dessert - Impossible Pie & Chocolate Flan Cake
20
Skill Builder 9: Explore Senses - Mock Apple Pie
23
Skill Builder 10: Incorporation of Air - Meringue Cookies & Chocolate Fluff
25
Skill Builder 11: pH - Green Eggs 27
Skill Builder 12: Crystallization - Rock Candy
30
Skill Builder 13: Caramelization - Caramel Corn & Sponge Toffee
32
Skill Builder 14: Polymers & Gelatin - Gelatin Pinwheels & Fruit Gummies
35
Showcase Challenge 37
Portfolio Page 39
Introduction Science is all around us. Science affects how ingredients interact and can determine our culinary success. Discovering Science in the Kitchen is suitable for members with some knowledge of working in the kitchen. This project consists of 14 Skill Builders; members complete Skill Builder 1 and five Skill Builders of their choice. You can even take this project again next year to try the other experiments.
Learning is 3D!
To help you get the most out of your learning, each project meeting has the following parts: Dream it! Plan for success Do it! Hands on learning Dig it! What did you learn?
4-H Hands-on Science Series
Discovering Science in the Kitchen
Meet Andy! Andy is an apron that has taste tested a lot of good food. Andy will help you cook your way through this 4-H project. Andy has important tips to keep in mind and great fun facts and trivia for you.
‐ Draft 2016‐
Do It
Dig It
Dream It
More Eats! This More Eats! box will appear throughout
the manual. Check out the website link ideas wherever you see More Eats! These links will lead you to fun online content to
help you with your 4-H project.
2
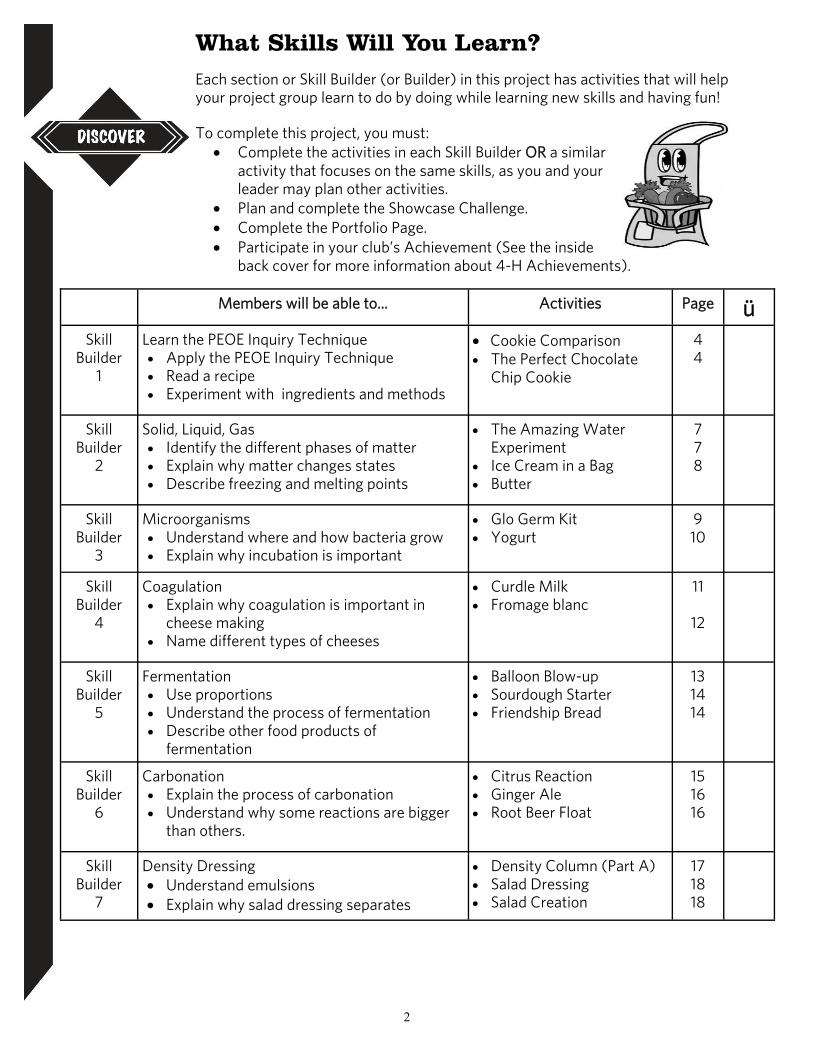
Each section or Skill Builder (or Builder) in this project has activities that will help your project group learn to do by doing while learning new skills and having fun!
What Skills Will You Learn?
To complete this project, you must: Complete the activities in each Skill Builder OR a similar
activity that focuses on the same skills, as you and your leader may plan other activities.
Plan and complete the Showcase Challenge. Complete the Portfolio Page. Participate in your club’s Achievement (See the inside
back cover for more information about 4-H Achievements).
Members will be able to... Activities Page ü Skill
Builder 1
Learn the PEOE Inquiry Technique Apply the PEOE Inquiry Technique Read a recipe Experiment with ingredients and methods
Cookie Comparison The Perfect Chocolate
Chip Cookie
4 4
Skill Builder
2
Solid, Liquid, Gas Identify the different phases of matter Explain why matter changes states Describe freezing and melting points
The Amazing Water Experiment
Ice Cream in a Bag Butter
7 7 8
Skill Builder
3
Microorganisms Understand where and how bacteria grow Explain why incubation is important
Glo Germ Kit Yogurt
9 10
Skill Builder
4
Coagulation Explain why coagulation is important in
cheese making Name different types of cheeses
Curdle Milk Fromage blanc
11
12
Skill Builder
5
Fermentation Use proportions Understand the process of fermentation Describe other food products of
fermentation
Balloon Blow-up Sourdough Starter Friendship Bread
13 14 14
Skill Builder
6
Carbonation Explain the process of carbonation Understand why some reactions are bigger
than others.
Citrus Reaction Ginger Ale Root Beer Float
15 16 16
Skill Builder
7
Density Dressing Understand emulsions Explain why salad dressing separates
Density Column (Part A) Salad Dressing Salad Creation
17 18 18

3
Skill Builder
9
Explore Senses Identify human senses Explain how we taste food
Flavour Cover-up Mock Apple Pie
23 24
Skill Builder
10
Incorporation of Air Describe how air is incorporated into foods Explain the effects of air in baking
Meringue Mix Up Meringue Cookies Chocolate fluff
25 26 26
Skill Builder
11
pH Name acidic and basic foods Explain how acidity and alkalinity are
measured Demonstrate how red cabbage juice is a pH
indicator
Red Cabbage Juice pH Scale
Red Cabbage Juice pH Test
Green Eggs
27
28 29
Skill Builder
12
Crystallization Define crystallization Explain why rock candy grows
Saturation Rock Candy
30 31
Skill Builder
13
Caramelization Understand what affects the colour of
caramel Explain how baking soda makes caramel
become light and foamy
Caramelization Word Search
Sponge Toffee Caramel Corn
32
33 33
Skill Builder
14
Gelatin and Polymers Understand where gelatin comes from Explain how polymers are formed
Slime Gelatin Pinwheels Fruit Gummies
34 36 36
When you successfully complete your builders, you will showcase what you have learned.
Showcase &
Portfolio
Explain success in using the skills listed above
Showcase Challenge My Portfolio Page
37 39
Members will be able to... Activities Page ü Skill
Builder 8
Density Dessert Explain why density is important in this
recipe Describe why people find these recipes
appealing
Density Column (Part B) Impossible Pie Magic Chocolate Flan
Cake
20 21 22

4
Skill Builder 1: The PEOE Inquiry Technique
SKILLS CHECKLIST
Apply the PEOE Inquiry Technique Experiment with ingredients and
methods
Dream it! Describe the characteristics of a poor and a delicious chocolate chip cookie.
Andy Says….
Understanding science is the key to successful baking. Everyone loves chocolate chip cookies. Many factors will affect how tasty your chocolate chip cookies are.
Important words
Watch for these important words throughout this Skill Builder: Characteristics, Experiment,
Predict, Observe
Do it! The Perfect Chocolate Chip Cookie
Baking often seems like an art. Actually a lot of chemistry is involved. Bakers use the PEOE tech-nique to improve their end product. A good scientist makes predictions of what will happen when they change the recipe. Taking a moment to think about what may happen and to explain what can help a chef avoid disaster can lead to delicious dishes. It is also important that you observe the product as it is baking and once it is finished. A chef must explain what went wrong in an unsuccessful attempt or identify a secret ingredient or method when a wonderful product results. A basic chocolate chip cookie recipe is included on the following page. Use this chocolate chip cookie recipe 3 different times, making a change in an ingredient or method each trial. Record all differences between recipes on the chart below the recipe. It is important that you note your methods and are precise in your measurements. Once you find your delicious cookie recipe you will want to make them again. It is important that you record your revised recipe carefully so you can make them again.
Poor Chocolate Chip Cookie Delicious Chocolate Chip Cookie

5
1 tsp (5 mL) baking soda 1/2 cup (125 mL) butter 1 tsp (5 mL) vanilla extract 1 egg
Chocolate Chip Cookies
Ingredients 1 cup (250 mL) all-purpose flour 1/4 tsp (1 mL) salt 1/4 cup (50 mL) granulated sugar 1/2 cup (125 mL) light brown sugar 1/2 cup (125 mL) chocolate chips
Directions 1. Heat oven to 350°F (180°C). 2. Cream butter, sugars, egg, and vanilla together until light in texture. 3. Combine flour, baking soda, and salt. Add to creamed mixture; mix well. 4. Stir in chocolate chips. 5. Drop by spoonfuls onto greased baking sheet. 6. Bake in centre of preheated oven for 9 to 14 minutes or until light golden. Cool 10 minutes, then
transfer to racks and cool completely.
Your leader will describe the purpose of each ingredient and the effects of increasing or decreasing that ingredient. You may also wish to view the following video to better understand the science behind cookies by visiting https://www.youtube.com/watch?v=n6wpNhyreDE. Some variations may include:
- amount of flour - amount of sugar - amount of baking powder/soda - egg white, egg yolk, or both - type of sugar - number of chocolate chips - mixing method - type of pan - cooking time - cooking temperature - temperature of butter - temperature of dough
Cookie Trial 1 2 3
Changes to the Ingredients or Method
Predict
Explain
Observe
Explain
Rating /10

6
Andy’s Fun Fact
Chocolate chip cookies were first created in the 1930’s by Ruth Wakefield who ran the Toll House restaurant in Whitman, Massachusetts. It grew to be the most popular dessert in the USA.
Fun Fact
Dig it!
Why is science important to bakers and chefs? Did you bake perfect chocolate chip cookies? What ingredient or method had the greatest effect on the success of the cookies? Include a picture of your cookies.
More Eats! Manitoba's Food Development Centre in Portage la Prairie is a one stop shop for food research and product development. They are an internationally recognized centre of excellence that brings new and innovative products to market. The Food Development Centre helps anyone with a great idea with access to world-class expertise, pilot plant facilities and research. Clients range from first
-time entrepreneurs to global corporations. Check them out at https://www.gov.mb.ca/agriculture/food-and-ag-processing/food-commercialization/food-development-centre/

7
Skill Builder 2: Solid, Liquid, Gas
Dream it! What items in this room are a solid, a liquid or a gas? Water can be all three. In this activity you will explore how this occurs.
The Amazing Water Experiment!
Do it!
Ice Cream in a Bag
Ingredients and Materials (Yields: 3-4 servings) 1/2 cup (125 mL) sugar 1 cup (250 mL) half and half cream 1 cup (250 mL) whole milk 1/2 tsp (2.5 mL) vanilla extract 1/2 cup (125 mL) coarse salt Enough ice to fill large Zip lock bag half full 1 large Zip lock bag 1 medium Zip lock bag mittens
The cream freezes because ___________________________________ ___________________________________ ___________________________________.
Important Words
Watch for these important words throughout this Skill Builder: Solid, Liquid, Gas
Freezing Point
Andy Says….
Food can be solid or liquid. Some foods such as milk can be converted into solid butter or ice cream. These treats are the result of changes in solids, liquids, and gases.
SKILLS CHECKLIST
Identify the different phases of matter Explain why matter changes states Describe freezing and melting points
Directions 1. Mix sugar, half and half cream, milk, and vanilla
in medium Zip lock bag. 2. Tightly seal the bag and tape over the opening
with duct tape. 3. Fill the large Zip lock bag half full with ice. Add
salt. 4. Place the small bag in the ice mixture inside the
large bag so that it is surrounded by ice. Tightly seal the large bag.
5. Wearing mittens, shake the bag vigorously for 5 minutes.
6. Remove the small bag and enjoy!
Ingredients Zip lock bag ice cubes antacid tablets
Directions 1. Place a handful of ice cubes in the zip lock bag and seal it. 2. Using your hands or other methods melt the ice to a liquid state. How
long did this take? 3. Add 2 antacid tablets to the bag and seal it. Observe what happens.
What does the gas do? 4. Continue to add antacid tablets to the bag. See how many you can add
until the bag explodes. What would happen if you used warm water instead of cold.

8
Butter Ingredients and Materials
1/4 cup (60 mL) heavy whipping cream Small clear container with a lid 1/4 tsp (1 mL) salt
predict that I will need to shake the cream for ____ minutes to make butter. I shook the cream for ______ minutes.
The butter becomes solid because ______________________________________________________.
Directions 1. Allow the cream to warm to room temperature (5 hours). 2. Add cream to container. There should be an air space in the
container. Seal the lid tightly. 3. Shake vigorously for several minutes. 4. When a hardened ball forms, pour off the liquid buttermilk. 5. Keep shaking until no more liquid separates. 6. Add salt. 7. Enjoy on a slice of bread or crackers. Be sure to taste the
buttermilk as well.
Andy Says…
Butter was first manufactured over 4 000 years ago. Today, the Notre Dame Creamery in Notre Dame de Lourdes, Manitoba makes and sells butter to Manitobans. http://www.notredamecreamery.com/
Andy Says….
Unsalted butter is used in baking as it is easier to add salt than it is to estimate the amount of salt in the butter. Salted butter is used in cooking and contributes as a small amount of seasoning. Salted butter also has a slightly longer shelf life.
Fun
Dig It!
How does temperature affect the movement of particles? How are ice cream and butter similar? How are the processes of making butter and ice cream different?
More Eats! Cornell Creme handcrafts delicious artisan ice cream using milk and cream straight from their family farm Cornell Dairy near Anola, Manitoba. It is the first Manitoba dairy producer-processor in Manitoba. Their flavours include: natural vanilla bean, raspberry white chocolate,
lemon meringue, velvety chocolate truffle, malty ale pail and strawberry. Visit their website at http://cornellcreme.com/

9
Skill Builder 3: Microorganisms
Dream it! Microorganisms are living things such as bacteria, fungi and algae. Our bodies are full of bacteria. The bacteria in our bodies weighs approximately 4 pounds. A bacteria called Probiotic lives in our intestines and helps us to digest our food. Foods that we eat with “good” bacteria include such things as yogurt and blue cheese. Can you think of any others? Some bacteria such as Listeria, E coli, Salmonella and Clostridium can cause food borne illnesses. When handling food the first step is washing your hands. Dirty hands are a big part of how “bad” bacteria spreads and makes people sick. Explore the best way to wash your hands before cooking by borrowing the Glow Germ kit from your local MAFRD office or contact 204-726-6613.
Important Words
Watch for these important words in this Skill
Builder: Microorganism, Incubation,
Culture, Probiotic
SKILLS CHECKLIST
Understand where and how bacteria grow
Explain why incubation is important
Andy Says….
Creepy, crawly microorganisms can be disgusting and some are harmful to our health. You wouldn’t eat moldy bread. Some bacteria are the key ingredients to the nutrition of our foods.
Andy Says…
Probiotic bacteria, such as Lactobacilli acidophilus, live in the intestines and improve digestion. They can provide antimicrobial action against Listeria, Salmonella, E. coli and other harmful bacteria.
GLO-GERM KIT – This resource demonstrates the presence of germs and shows effective hand washing and food handling techniques using either oil or powder and an ultra violet light .
How well do you wash your hands? What parts do you miss? How long should you wash your hands before working with food?
This Builder will take in a row to complete!
2 Days

10
Andy Says…
The word ‘yogurt’ comes from the Turkish word ‘yoğurt’ meaning ‘to thicken’. The oldest yogurts were produced almost 4500 years ago by wild bacteria. Ancient Indian records refer to yogurt and honey as ‘the food of the gods’.
Andy Says…
Greek yogurt, also called strained yogurt or yogurt cheese, has been strained to remove its whey (liquid). Straining also removes some of the sugar. Greek yogurt is thicker in consistency and sour in comparison to regular yogurt.
Do it! Yogurt
Ingredients and Materials (Yield: 8 cups) 8 cups (2 L) whole milk 1/4 cup (60 mL) plain yogurt
(without sugar) Large glass jar with a lid
Observe what happens while the jar is in the oven. Record your observations. _______________________ _____________________________________________ _____________________________________________ _____________________________________________.
Dig it! What are some features of microorganisms?
Why is incubation of the bacterial culture important in yogurt making? How is Greek yogurt different than regular yogurt?
Directions 1. Warm whole milk in saucepan until
baby bottle warm. 2. Add yogurt and stir. 3. Pour into large glass jar and put on lid. 4. Place in unheated oven with light on
for 16-24 hours. 5. Strain through layers of cheesecloth or
a thin cotton dish towel until desired consistency is reached (4 hours to make Greek yogurt).
6. Sweeten with jam, honey, or fruit.
More Eats! For more yogurt recipes go to www.allrecipes.com

11
Important Words
Watch out for these important words in this
Skill Builder: Protein, Coagulate
Andy Says…. Cheese can make anything taste better. There are hundreds of cheeses to choose from around the world. Cheese is made by changing a liquid to a thickened mass.
SKILLS CHECKLIST
Explain why coagulation is important in cheese making
Name different types of cheeses
Skill Builder 4: Coagulation
More Eats!
Visit the Dairy Farmers of Manitoba website for more ideas and recipes. https://www.milk.mb.ca/dairy-recipes/
Dream it! In scientific terms, adding an acid to cause proteins to tangle into curds is called coagulation. In the kitchen, it is often called curdling. Adding an acid to milk will result in curds and whey. Curdling is a good thing when making cheese. It is considered a bad thing when making sauces and custards. Curdle Milk Ingredients 1 1/2 cup (375 mL) whole or 2% milk vinegar lemon juice orange juice apple juice mineral water 5 microwavable small bowls
Directions 1. Put 1/4 cup ((60 mL) milk in each bowl 2. In 1st bowl add 1 tsp (5 mL) of vinegar, in 2nd add 1
tsp (5 mL) of lemon juice, in 3rd add 1 tsp (5mL) of orange juice, in 4th add 1tsp (5mL)of apple juice and in the 5th add 1 tsp (5mL) of mineral water.
3. Stir each bowl and observe what happens. 4. What was most successful ? What was the least? 5. Heat the Lemon juice bowl for a few seconds in the
microwave to warm up the milk. What do you observe?
Andy Says… Bothwell Cheese is made in New Bothwell Manitoba. Everyday the cheese plant produces 15,000 kg of cheese. Bothwell Cheese make more than two dozen varieties using locally sourced ingredients and processes. They even sell cheese curds named Squeak’rs!
This Builder will take
to complete!
5 HOURS

12
Dig it!
What is coagulation? What causes the milk to curdle? What part of milk is retained in cheese? Was your cheese making activity successful? What would you change next time?
Directions 1. Heat milk and salt until steaming (about 170°F or 75°C). 2. Remove from heat. Add buttermilk. Add lemon juice by
the teaspoon until milk curdles. 3. Stir very briefly to combine. Let curdled milk stand 2
hours. 4. Pour into strainer lined with 4 layers of cheesecloth.
Scrape down sides and let stand 2 hours. 5. Tie cheesecloth into a pouch and hang from wooden
spoon across pot until excess liquid has drained. 6. Use immediately or refrigerate up to 2 weeks.
Andy Says…
A ‘cheesemonger’ is a tradesperson who specializes in cheese and butter.
From Farming History...
What colour is your favourite type of cheese? Cheese used to appear in different colours depending on the time of year it was produced. In spring and summer, cattle feed on fresh grass. The beta-carotene and vitamin D they consumed resulted in a more desirable yellow cheese. In the fall and winter, cattle fed on hay and pale white-yellow cheeses were produced. Now, most cheeses are coloured with dyes.
‘Fromage’ is the French word for ‘cheese’. ‘Blanc’ means ‘white’.
Do it! Fromage blanc
Ingredients 4 cups (1 L) whole milk 1 cup (250 mL) active
culture buttermilk 6 tsp (30 mL) lemon juice
or vinegar 3/4 tsp (4 mL) salt Cheesecloth
Predict what would happen if the milk was not heated to the correct temperature. __________________________________________________________________________________________________________________________________________________________________

13
Skill Builder 5: Fermentation
Dream it! Balloon Blow‐up
SKILLS CHECKLIST
Use proportions Understand the process of fermentation Describe other food products of fermenta-
Andy Says…. Let’s get started making Friendship bread using a sourdough starter. Yeast participate in the fermentation process to provide biological leavening.
Important Words
Watch for these important words in this Skill
Builder: Starter, Sourdough, Proportion
Andy’s Fun Fact . . .
A sourdough starter is also referred to as a mother, pre-ferment, levain, chief, chef, or head. The starter is composed of flour, water, yeast, and Lactobacilli bacteria.
Fun Fact
Directions 1. Fill in the prediction table. 2. Dissolve the sugar and yeast into the 2 cups
of room temperature water (21oC). 3. Pour half of the solution into each of the pop
bottles. 4. Quickly stretch a balloon over the top of
each bottle. 5. Place each bottle into a large glass container. 6. Pour the ice water into one container and the
warm water into the other. 7. Record your balloon observations in the
results table.
Ingredients/Supplies 1 package of dry yeast 50 ml sugar 2 cups each of room temperature, warm and ice water 2 balloons 2 small plastic pop bottles funnel 3 large glass containers liquid measuring cup mixing spoon food thermometer watch
Prediction Table
I predict that the warm / room temperature / cold (circle one) water will make the balloon ___________ than the warm / room temperature / cold (circle one) water will.
Results Table
Time Ice Water Warm Water
5 minutes
10 minutes
30 minutes
This Builder will take 10 days to complete.

14
Do it! Friendship Bread Starter Ingredients and supplies 1 package of active dry yeast 1/4 cup warm water (43oC - 49oC) 1 cup (250 mL) white sugar 1 cup (250 mL) all purpose flour 1 cup (250 mL) milk Gallon zip lock bag
Directions 1. Dissolve yeast in water, let stand 10 minutes. 2. Combine sifted flour and sugar together. Mix well so
flour is not lumpy. 3. Slowly stir in milk and yeast mixture. Mix well. Put starter in a gallon zip lock bag (Do not refrigerate). Watch the starter very closely at first and let the air out of the bag as needed. It will bubble and ferment a lot the first day. This is day 1. Mark the date on the bag. Follow instruction for the next 9 days. Day 2 Let air out and mash the ingredients in the bag. Day 3 Let air out and mash the ingredients in the bag. Day 4 Let air out and mash the ingredients in the bag. Day 5 Let air out and mash the ingredients in the bag. Day 6 Add to the bag: 1 cup (250 mL) each of flour, sugar and milk. Mash the ingredients in the bag. Day 7 Let air out and mash the ingredients in the bag. Day 8 Let air out and mash the ingredients in the bag. Day 9 Let air out and mash the ingredients in the bag. Day 10 Follow the Day 10 directions Check out the video athttps://www.youtube.com/watch?v=iy8Jpc78Xoc
Day 10 Directions: 1. Pour the entire bag into a
non-metal bowl. 2. Add 1 1/2 cup (375 mL) each of
flour, sugar and milk 3. Measure out equal portions of 1
cup (250 mL) each into 4-7 1-gallon zip lock bags.
4. Keep two bags for yourself . Bake a loaf of friendship bread with one. With the second bag begin the 10 steps over again starting on day 1. You can keep starter for many years doing this. Every 10 days you will be baking bread.
5. Give the other bags to friends along with the 10 starter steps and a recipe to make Friendship Bread.
Friendship Bread Ingredients 1 cup (250 mL) starter 1/4 ( 60 mL) cup oil 2 tsp (10 mL) vanilla 4 eggs 2 cups (500 mL) flour 1 tsp (5 mL) baking soda 1 tsp (5 mL) baking powder 102 gram package instant vanilla pudding Topping 1/4 cup (60 mL) brown sugar 4 tsp (20 mL) cinna-mon
Directions 1. Add all ingredients to starter.
Mix well 2. Mix together brown sugar and cinnamon. 1. Grease 2 loaf pans. 2. Pour 1/4 of batter into each
pan. 3. Sprinkle 1/4 of topping in each
loaf. 4. Add remaining batter and
sprinkle remaining topping. 5. Swirl knife through batter to
give a marbled effect. 6. Bake 1 hour in 325 °F oven or
until baked through.
Dig it! Why are bacteria important in the production of food? Name some other foods that are produced by fermentation? What other foods could you make with your starter? Try it!
More Eats More recipes can be found at http://
www.friendshipbreadkitchen.com

15
Directions 1. Cut the fruit into manageable pieces for squeezing. 2. Use your sense of smell before you begin experimenting.
Compare this observation to the final product. 3. Squeeze your fruits into small separate containers. Label
each container. 4. Add 1/2 teaspoons (2.5 mL) of baking soda to each juice.
Stir. Continue adding baking soda 1/2 tsp (2.5 mL) at a time to the juices until the reaction stops.
5. Also try adding baking soda to a slice of unsqueezed fruit for comparison.
Skill Builder 6: Carbonation
Andy Says….
Our ancestors made their own soda drinks at home. In this Skill Builder, you will learn about the ingredients and processes involved in making a fizzy drink.
SKILLS CHECKLIST
Explain the process of carbonation Understand why some reactions
are bigger than others.
Dream It! Carbonation is the process of dissolving carbon dioxide, a molecule consisting of one carbon and two oxygen atoms, in a liquid. Generally this solution forms under high pressure. When the pressure is released, some carbon dioxide is released too. You can observe this when opening a can of soft drink. Check out the video How It’s Made Soft Drinks at https://www.youtube.com/watch?v=Mb9IDNOsHhE.
Citrus Reaction
Ingredients Lemon Orange Lime Grapefruit Baking soda
I predict _______________________________ because __________________________________. ____________________________________happened because ____________________________.
Important Words
Look for these important words in this Skill Builder:
Carbon Dioxide, Citrus Fruit, Reaction
Using all of your senses is a great way to make scientific observations. Do not drink/eat anything during this experiment.
This Builder will take
to complete!
5 HOURS

16
Directions 1. Fill a 2 L pop bottle with 1.5 L of room temperature water. 2. Add lemon juice, dry active yeast, a small amount of
grated ginger root, and white sugar. 3. Screw the lid on tight and shake vigorously for 30
seconds. 4. Let sit for 4 hours.
Dig it!
How does carbon dioxide form in carbonated beverages? Why does foam form on top of a root beer float? What will happen to the reaction if you use a greater volume of ingredients?
Do It!
Ginger Ale
Ingredients 6 cups (1.5 L) water 3 tbsp (45 mL) lemon juice 2 tbsp (30 mL) dry active yeast Grated ginger root 1 cup (250 mL) white sugar I predict _______________________________ because __________________________________. ____________________________________happened because ____________________________. Root Beer Float
Ingredients Vanilla ice cream Root beer (or any other soft drink such as
Ginger Ale above) Try adding the ice cream and root beer in reverse order. Is the amount of carbon dioxide produced affected? Why?
Andy’s Fun Fact!
Root beer floats were created many years ago when a shortage of ice cubes arose. Vanilla ice cream was substituted to chill the root
beer and the delicious beverage was formed.
Directions 1. Spoon a scoop or two of vanilla ice cream into a tall
glass. 2. Slowly pour root beer into the glass,
allowing the foam to rise and recede before adding more root beer.
3. Serve with straws and spoons.
More Eats!
Check out the How It’s Made Soft Drink video at https://www.youtube.com/watch?v=_oqyTKmIpxk

17
Skill Builder 7: Density Dressing
Dream it! Density refers to how much each litre of a substance weighs. Liquids may form layers as a result of differences in density between the two substances. Substances that are less dense will float on top of liquids that are more dense. An emulsion forms as two normally insoluble (unmixable) liquids are mixed together through stirring or shaking. Over time, emulsions will separate to their individual components.
Density Column (Part A) Look at the list of ingredients below to make a prediction: I predict that __________________is the most dense substance and ___________________ is the least dense substance. Ingredients Honey Corn Syrup Milk Liquid Dish Detergent Water (may be coloured) Vegetable Oil Rubbing Alcohol (may be
coloured)
Following this activity, complete the sentence: I observed that __________________ is the most dense substance and __________________ is the least dense substance.
SKILLS CHECKLIST
Understand emulsions Explain why salad dressing separates
Important Words
Watch for these important words in this Skill
Builder: Emulsion, Separation, Soluble
Andy Says….
Have you ever wondered why some objects float and others sink when placed in a liquid? The solubility of a substance indicates whether it will dissolve and mix with another substance.
Directions 1. First, record your prediction of densities in the space above. 2. Add 1/4 cup (60 mL) of each liquid to a tall cylindrical glass
container in the following order: honey, corn syrup, milk, liquid dish detergent, water, vegetable oil, and rubbing alcohol.
3. Observe what happens as you add each liquid. 4. Record your results in the space below.
If you have chosen to complete Skill Builder 8: Density Dessert, you may complete the Dream It! section on page 25 as a continuation of this activity. Do not drink/eat anything during this experiment.

18
Do it!
Salad Dressing
Ingredients ● 1/4 cup (60 mL) canola oil ● 2 tbsp (30 mL) lemon juice ● 2 tbsp (30 mL) honey ● 1 tsp (5 mL) Dijon mustard ● 2 tsp (10 mL) oregano
Salad Creation
Make your own healthy salad to enjoy with your dressing. Record the list of the ingredients you chose to include. Suggested Ingredients: Lettuce Spinach Cucumber Broccoli Cauliflower Mushrooms Peppers Tomatoes Carrots Celery Cranberries Nuts Sesame Seeds Sunflower Seeds Chick Peas Croutons Other
Directions 1. Place canola oil, lemon juice, and honey
in a small bowl or jar with lid. Note the layers formed by these ingredients.
2. Add Dijon mustard and oregano. 3. Whisk or shake together. 4. Serve immediately or store in the
refrigerator for up to three days. Yield: 1/2 cup (125 mL)
More Eats!
Visit www.CanolaEatWell.com for more recipes using canola oil.
My Salad Creation: ____________________ ____________________ ____________________ ____________________ ____________________ ____________________ ____________________ ____________________ ____________________ ____________________ ____________________ ____________________
I like this... I don’t like this... Next time I will change...

19
Dig it!
What is an emulsion? What happens when an emulsion sits undisturbed for a long period of time? Which ingredients in a bottle of separated salad dressing are the most dense? Least dense?
Andy Says…
Buy Manitoba www.buymanitobafoods.ca Manitoba Food is any food or beverage made entirely from ingredients sourced in Manitoba or composed of more than 85% of main ingredients from Manitoba. All the processing and packaging activities must be done in Manitoba. Manitoba Made Food – Any food product or beverage processed and packaged entirely in Manitoba. When the main ingredients are available in Manitoba in sufficient quantities they must be used.
More Eats!
To learn about how Canola oil is produced from the field to the store shelf check out this link
http://canolagrowers.com/types/educational/#.Vh6v-XiEjrc

20
Skill Builder 8: Density Dessert
Dream it! Density refers to how much each litre of a substance weighs. Liquids may form layers as a result of differences in density between the two substances. Substances that are less dense will float on top of liquids that are more dense.
Density Column (Part B)
Ingredients Honey Corn Syrup Milk Liquid Dish Detergent Water (may be coloured) Vegetable Oil Rubbing Alcohol (may be
coloured) Ping Pong Ball Soda Cap Beads Cherry Tomato Dice Popcorn
Kernel Metal Nut/
Bolt
SKILLS CHECKLIST
Explain why density is important in these recipes
Describe why people find these recipes appealing
Important Words
Watch for these important words in this
Skill Builder: Mass, Volume, Density
Andy Says….
Density refers to how much mass a substance has within a specific volume. Substances that are more dense will support substances that are less dense.
Directions 1. Add 1/4 cup (60 mL) of each liquid to a tall cylindrical glass
container in the following order: honey, corn syrup, milk, liquid dish detergent, water, vegetable oil, and rubbing alcohol.
2. Observe what happens as you add each liquid. 3. On the following page, make a prediction of where each
object will come to rest when dropped into the Density Column.
4. Slowly add the objects in your predicted order of most dense (heaviest) to least dense.
5. Compare the outcome with your predictions.
Object Predicted Position Actual Position
Ping Pong Ball
Soda Cap
Beads
Cherry Tomato
Dice
Metal Nut/Bolt
Popcorn Kernel

21
Impossible Pie Ingredients 2 cups (500 mL) milk 1 cup (250 mL) flaked coconut 4 eggs 1 tsp (5 mL) vanilla extract 1/2 cup (125 mL) all-purpose flour 6 tbsp (90 mL) margarine 3/4 cup (180 mL) white sugar 1/4 tsp (1 mL) ground nutmeg
Record your observations of what happened as this dessert baked. Be sure to use terms relating to density.
_________________________________________________________________________________
_________________________________________________________________________________
_________________________________________________________________________________
Directions 1. Place milk, coconut, eggs, vanilla extract,
flour, margarine, and sugar in a blender. Mix well.
2. Pour into greased and floured 10” pie plate. 3. Sprinkle nutmeg on top. 4. Bake at 350°F (175°C) for 45 minutes.
Andy Says…
For something refreshing, colourful and fun Google non-alcoholic layered drinks and give one a try.
Buy Manitoba.
Do it! You may decide to make one of these desserts or both!
More Eats! When it comes to food & health... what's YOUR opinion? The Manitoba Consumer Monitor (MCM) Food Panel is an online survey that asks questions about your opinions, preferences and experiences with food and health. The research findings will be shared with food growers, processors, developers and governments. Each survey takes only 15 minutes to complete, and will guarantee a strong, healthier future for Manitobans. To see what they are finding out go to http://www.mcmfoodpanel.ca/

22
Dig it!
Why is it important for you as a baker to know about the effects of density? Explain how you will describe the process of making these desserts to a friend. What would you change if you made these desserts again?
Directions 1. Preheat the oven to 350°F (175°C). Grease a 12 cup
non-stick bundt pan, taking care to grease all of the nooks and crannies. Pour the caramel sauce into the bottom of the pan.
2. In a medium bowl, prepare cake mix according to package directions using the water, oil and eggs. Pour the chocolate batter evenly over the caramel topping.
3. Add all the flan ingredients to a blender and process until smooth.
4. Slowly and carefully pour the flan mixture over the cake batter.
5. Coat a piece of foil with non-stick cooking spray. Cover pan coated side down, tightly with the foil.
6. Place the filled cake pan in a large roasting pan. Place the roasting pan in oven and carefully pour warm water into the roasting pan until it reaches halfway up the sides of the bundt pan.
7. Bake two hours or until toothpick in centre still has a few moist crumbs.
8. Remove the bundt pan from the roasting pan and place it on a wire rack . Cool 15 minutes. Remove foil and invert onto a serving plate. Cool 1 hour at room temperature. Chill 4 hours or overnight.
9. Serve with caramel sauce.
Magic Chocolate Flan Cake
Ingredients Cake: ● No-stick cooking spray ● 1/2 cup (125 mL) caramel sauce or topping ● 1 box devil’s food chocolate cake mix ● 1 cup (250 mL) water ● 1/2 cup (125 mL) vegetable oil ● 3 large eggs Flan: 1 package of cream cheese room
temperature 4 large eggs, room temperature 1 can sweetened condensed milk 1 can evaporated milk 1 tsp (5 mL) vanilla extract
Record your observations of what happened as this dessert baked. Be sure to use terms relating to density.
_________________________________________________________________________________
_________________________________________________________________________________
_________________________________________________________________________________

23
Skill Builder 9: Explore Senses
Dream it! Your nose and mouth work together to deliver signals that your brain translates into the flavour of a food. Chefs and food scientists think about how one flavour in a dish is affected by other flavours. Finding the right balance is the key. Salt and sugar are often used to change the flavour of a dish. Flavour Cover-up Ingredients Tonic water salt 4 drinking glasses
SKILLS CHECKLIST
Identify human senses Explain how we taste food
Andy Says….
We enjoy our food by how it tastes. Flavour is a complex mixture of taste, smell, texture and temperature. In this builder you will explore the science of how our senses and the flavour of food work together.
Important Words
Watch for these important words in this Skill Builder: Flavour, Texture, Gustation
Directions 1. Fill 4 glasses with the same amount of tonic water. 2. Line the glasses up and number them 1 through 4. 3. Put a pinch of salt in glass # 2, half a teaspoon of
salt in glass #3, and a whole teaspoon of salt in #4. 4. Take sip or two of the unsalted tonic water in glass
#1. Does it taste bitter? 5. Take sips of the other glasses of tonic water, and
fill in the chart of how the bitter flavour changes as the amount of salt increases.
6. Try tasting from the glasses in reverse order start-ing at #4. Does it taste any different?
7. Next time you have a grapefruit, sprinkle salt on it instead of sugar. You will be surprised by the result!
Andy Says… Processed foods often contain more salt than you’d think from tasting them. The salt is used to cover the bitter flavour
of ingredients like preservatives that are used in processing.
Results Table On a scale of 1-5 with 5 being very bitter and 1 being not bitter
record your number for each glass
Tonic water
Tonic water and pinch of salt
Tonic water and 1/2 tsp (2.5 mL) of salt
Tonic water and 1 tsp (5 mL) of salt
First taste test Second taste test

24
Do it!
Mock Apple Pie
Ingredients Filling 2 cups (500 mL) water 3/4 cup (180 mL) granulated
sugar 2 tsp (10 mL) cream of tartar 30 Ritz Crackers, whole 1 pie crust, box or make your own 1 tbsp (15 mL) lemon juice 1 tsp (5 mL) ground cinnamon Topping 25 Ritz Crackers, crushed 1/2 cup (125 mL) packed brown
sugar 1/2 tsp (2.5 mL) ground cinnamon 1/3 (80 mL) cup non-hydrogenated
margarine, melted 2 cups (500 mL) whipped topping
Directions 1. Preheat oven to 400°F (205°C). 2. Filling: Mix water, granulated sugar, and cream of
tartar in a large saucepan. Bring to boil on medium-high heat. Add crackers; simmer on medium-low heat for 5 minutes, stirring occasionally.
3. Line a 9” pie plate with crust as directed on package; fill with cracker mixture. Sprinkle with lemon juice and cinnamon.
4. Topping: Combine all remaining ingredients except whipped topping; sprinkle over filling.
5. Bake 15 minutes. Reduce oven temperature to 350°F (175°C); bake 20 minutes or until golden brown. Cool. Serve topped with whipped topping.
More Eats!
To try some new tastes check out Great Tastes of Manitoba at http://greattastesmb.ca/
Dig it!
Did you fool anyone with your Mock Apple Pie? What would you change if you made this pie again? How else can taste be affected by ingredients or cooking methods?
Andy Says…
Some people are ‘Supertasters’. They have abnormally high numbers of taste receptors so flavours seem much stronger to them. Non-tasters are people who have a lower number of taste buds and foods taste bland to them. The average person has 5000 taste buds. Chickens have 24, and catfish have almost 300,000, some on the outside of their bodies.
Recipe from www.kraftcanada.com

25
Skill Builder 10: Incorporation of Air
Dream it! When air is added into foods it creates a light and fluffy end result. This is usually done by beating, whipping, folding or temperature. Meringue Mix Up Place the following steps to make meringue in order. _____Crack eggs. _____The beating process with add air to the whites causing them to increase in volume. _____Bake at 325°F (165°C). Air bubbles expand, steam evaporates, and proteins form stronger bonds. _____Separate egg white from yolk. Keep whites and discard yolks. _____Slowly add sugar while you continue to beat the eggs. Proteins will form a new, stronger arrangement. _____Beat egg whites to physically denature (untangle) the proteins. _____Enjoy the puffy, sugar-protein mesh of meringue.
SKILLS CHECKLIST
Describe how air is incorporated into foods
Explain the effects of air in baking
Andy Says….
Air is an important ingredient, but it is never listed in a recipe. Our baking methods allow us to add air to a mixture with delicious results!
Important Words
Watch for these important words in this Skill
Builder: Denature, Meringue, Expand
Andy Says…
Beating the egg whites to make meringue can cause them to swell up to 8 times the volume of unbeaten eggs.
Think of some foods that contain air. List 4.
________________________________________________

26
Do it! Meringue Cookies
Ingredients 2 egg whites 1 pinch salt 1/4 cup (60 mL) white sugar 1 tsp (5 mL) vanilla extract 1 cup (250 mL) semi-sweet chocolate chips Yield: 3 dozen cookies Separate a small portion of meringue and continue beating. Record what happens. _____________________________________ Which cookie baking method was the most successful? ______________________________________________________________________
Dig it!
Was your first attempt at making meringue successful? What tips do you have for someone who has never made meringue? What is your favourite way to enjoy meringue?
Directions 1. Preheat oven to 325°F (170°C). 2. Beat egg whites with salt until foamy. 3. Slowly add sugar, one tablespoon at a time,
beating after each addition until the meringue stands in stiff peaks. Remove a small portion of meringue to experiment by overbeating.
4. Gently stir in vanilla and fold in chocolate chips.
5. Drop by teaspoonfuls on two lined baking sheets and place on sheet in preheated oven.
6. Bake half of your cookies for 2 minutes. Remove from the oven.
7. Bake half of the cookies for 2 minutes. Leave them in the oven and turn the oven off. Let cool in the oven for 2 to 3 hours. Remove.
8. Store in a cookie tin lined with paper towel.
Chocolate Fluff Ingredients 2 cups (500 mL) chocolate chips 1 cup (250 mL) heavy whipping cream
Directions 1. In a mixing bowl add chocolate chips and set aside. 2. In a sauce pan over medium heat, heat whipping cream to a
simmer and remove from heat. 3. Pour heated whipping cream over chocolate chips and allow to set for 2-3 minutes 4. Whisk together the chocolate and the whipping cream until smooth. 5. Refrigerate for 1 hour. 6. Remove from refrigerator and using a hand mixer beat until light and fluffy 7. Cover and refrigerate for 1 hour before serving
This Builder will take Hours to complete!
3

27
Skill Builder 11: pH
Dream it! Substances all around us are acidic, neutral, or basic (alkaline). Acids taste sour and bases taste bitter and feel slippery. Strong acids and strong bases can be very dangerous as they can burn your skin or mouth. It is important to use caution when handling these substances. pH stands for the “power of Hydrogen”. A substance with a lot of hydrogen atoms is very acidic. A substance with few hydrogen atoms is very basic. The pH scale ranges from 1 to 14. 1-6 represent acidic substances, 7 is neutral, and 8-14 represent bases.
Red Cabbage Juice pH Scale
Red cabbage juice can act as a pH indicator, a substance that changes colour depending on the pH of the liquid to which it is added. Colour the scale below and indicate with arrows which end of the scale is the most acidic and which end of the scale is the most basic.
SKILLS CHECKLIST
Name acidic and basic foods Explain how acidity and alkalinity are
measured Demonstrate how cabbage juice is a pH
indicator
Andy Says….
Do you enjoy sour foods? In this Skill Builder, sour foods will create the red portion of the rainbow of colour in this chemistry lesson.
Important Words
Watch for these important words in this Skill
Builder: pH, pH Indicator, Acid, Base, Alkaline
Colour Pink Dark Red Violet Blue Blue-Green Green-Yellow
Approximate pH
1-2 3-4 5-7 8 9-10 11-12
Andy Says…
Red cabbage leaves contain pigments, coloured particles, called flavins. They have a pH of approximately 7 and will cause water to be coloured red, purple, or blue depending on how your water has been treated.
28
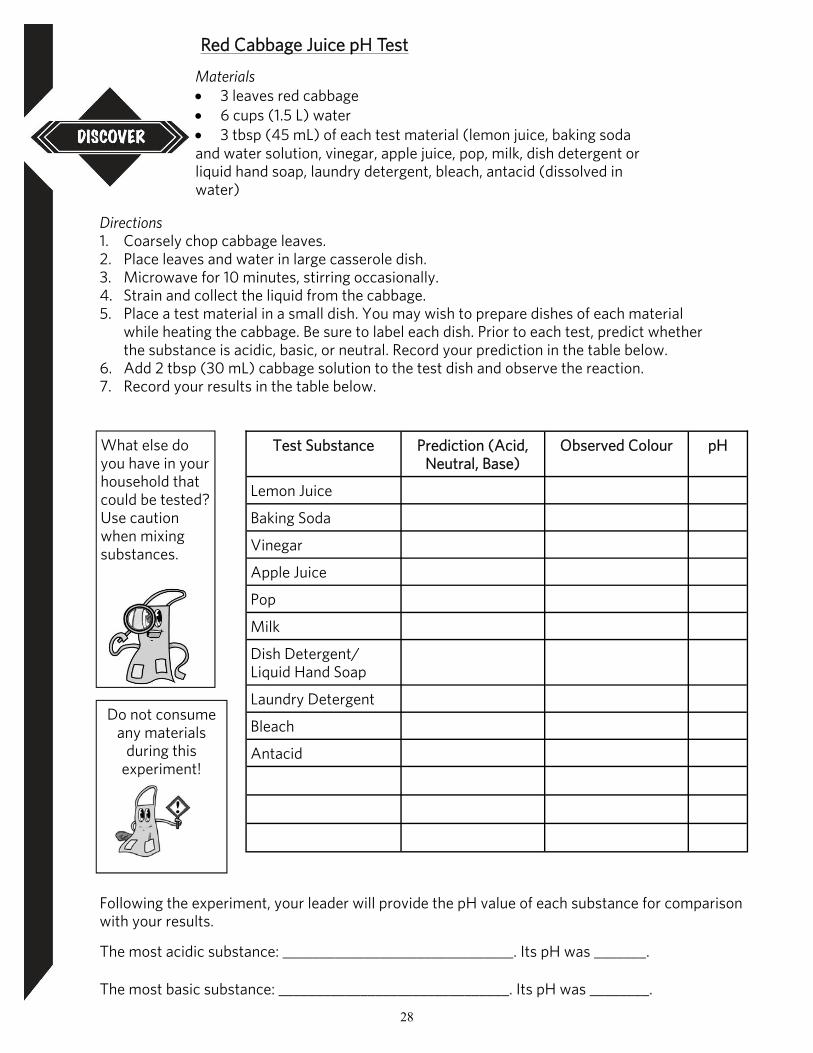
Red Cabbage Juice pH Test
Materials 3 leaves red cabbage 6 cups (1.5 L) water 3 tbsp (45 mL) of each test material (lemon juice, baking soda and water solution, vinegar, apple juice, pop, milk, dish detergent or liquid hand soap, laundry detergent, bleach, antacid (dissolved in water)
Following the experiment, your leader will provide the pH value of each substance for comparison with your results.
The most acidic substance: _______________________________. Its pH was _______. The most basic substance: _______________________________. Its pH was ________.
Directions 1. Coarsely chop cabbage leaves. 2. Place leaves and water in large casserole dish. 3. Microwave for 10 minutes, stirring occasionally. 4. Strain and collect the liquid from the cabbage. 5. Place a test material in a small dish. You may wish to prepare dishes of each material
while heating the cabbage. Be sure to label each dish. Prior to each test, predict whether the substance is acidic, basic, or neutral. Record your prediction in the table below.
6. Add 2 tbsp (30 mL) cabbage solution to the test dish and observe the reaction. 7. Record your results in the table below.
Test Substance Prediction (Acid, Neutral, Base)
Observed Colour pH
Lemon Juice
Baking Soda
Vinegar
Apple Juice
Pop
Milk
Dish Detergent/ Liquid Hand Soap
Laundry Detergent
Bleach
Antacid
What else do you have in your household that could be tested? Use caution when mixing substances.
Do not consume any materials
during this experiment!

29
Do it! Green Eggs and Ham Ingredients 1 egg 1 tbsp (15 mL) red cabbage juice pH indicator
solution 1 or 2 slices breakfast ham
Is the egg white acidic or basic? _____________ The eggs looked _____________________________. The eggs tasted _____________________________.
Dig it! Why is it important that you, as a scientist, record observations accurately?
Did you accurately identify the pH levels of your test substances? Does the appearance of a food affect how it tastes?
Directions 1. Crack the egg and
separate the white from the yolk. Keep both parts as you will need them later.
2. Mix cabbage juice into the egg white. 3. Pour the white into the pan. Add the
yolk. Cook. 4. Fry ham over high heat with a small
amount of oil. 5. Enjoy! Yield: 1 serving
“Try them, try them, and you may! Try them and you may, I say.” -Dr. Seuss, Green Eggs and Ham
More Eats Manitoba Egg Farmers (MEF) represents nearly 170 regulated egg and pullet farmers. Egg farmers are the primary caregivers of 2.3 million hens in Manitoba that produce about 57
million dozen eggs each year. This represents 11% of Canada’s egg supply. www.mbegg.mb.ca

30
Skill Builder 12: Crystallization
Dream it! Many substances can be dissolved in liquids. Salt can be dissolved in a glass of water. When a small amount of salt is dissolved, we call it an unsaturated solution. When the maximum amount of salt is dissolved, the solution is saturated. If a solution contains more salt that what can normally be dissolved, the solution is supersaturated. Saturation Ingredients and Materials Water Salt Drinking Glasses
Types of Solutions include: Unsaturated, Saturated, Supersaturated What happened when salt was added to the cooled hot water solution? ______________________ ________________________________________________________________________________.
SKILLS CHECKLIST
Define crystallization Explain why rock candy grows
Andy Says….
I love eating these rocks. They are delicious. Do you know what kind of rock grows? Rock Candy!
Important Words
Watch for these important words in this Skill Builder: Crystal, Precipitate,
Solution
Directions 1. Measure 1 cup (250 mL) of cold water and pour it into a glass. 2. Add salt by the teaspoon (5 mL) to the cup (250 mL) of cold
water. Stir after each addition to dissolve the salt. Continue adding salt until it will no longer dissolve.
3. Record the amount of salt added to the water and the type of solution produced in the table below.
4. Measure 1 cup (250 mL) of hot water and pour it into a glass. 5. Repeat steps 2 and 3. 6. Allow the glass of hot water to cool. Once cool, add a few grains
of salt and record what happens.
Cold Water Hot Water Cooled Hot Water
Amount of Salt Added
Type of Solution

31
Do it! Rock Candy
Ingredients and Materials
Long Stick or Pencil Cotton String Lifesaver Candy Glass Jar 1 cup (250 mL) water 3 cups (750 mL) white or brown sugar Colouring (optional) Flavouring (optional)
Dig it! What is a saturated solution?
Why does crystallization occur? Why does rock candy grow?
Directions 1. Twist and tie a piece of cotton string around the center of the stick. The string should be long
enough so that when the stick is placed across the top of the glass jar the string will hang just short of the bottom. Tie a Lifesaver candy at the bottom end .
2. Wet the string and roll it in sugar. 3. Lay the stick over the top of the glass jar so the string hangs down inside the jar but doesn’t
touch the bottom. 4. In a pot, boil the water. When boiling, remove from heat and let settle. 5. Add sugar by the half cup (125 mL) and stir. Continue adding sugar until it starts collecting at
the bottom of the pot and will not dissolve. 6. If you want to add flavouring or colour, stir it in now. 7. Pour the sugar syrup solution into the glass until it is about 2.5 cm from the top. 8. Place the pencil over the jar and allow the string to dangle into the solution. Be sure the string
does not touch the bottom or sides. 9. Place the glass in a place where it can sit undisturbed. After a day you should start to see
crystal growth forming on the string. 10. Leave the string in the solution until the crystals have completely stopped growing. 11. Remove the string from the glass and allow to dry before eating. Yield: 1 rock candy treat
Andy Says... The rock candy crystals will grow molecule by molecule. The final product will be made of about a quadrillion molecules attached to the string.
This Builder will take Days to complete!
3‐7
Andy Says… Whatever your choice of snack, remember to floss and brush your teeth after eating!

32
Skill Builder 13: Caramelization
Dream it! Caramelization is a process of converting sugar to a new, flavourful compound. Sugar is heated to 338F (170) C). If too high a temperature is applied the sugar will burn.
Find the following words in the puzzle: Aroma Baking Soda Boil Brown Caramelization Colour Corn Syrup Flavour Foam Hard Crack Melt Nutty Sugar Sweet Temperature Texture Volume
SKILLS CHECKLIST
Understand what affects the colour of caramel
Explain how baking soda makes caramel become light and foamy
Important Words
Watch for these important words in this Skill
Builder: Caramel, Foam, Hard Crack Stage
Andy Says….
Candy making, including the process of caramelization, is highly temperature specific. Pay close attention to the thermometer during these activities.
Andy Says…
As sugar is heated, water evaporates from the pot as steam. If sugar is heated to a very high temperature, above that of hard-crack and caramel, the sugar will burn. It will taste bitter because the sugars are destroyed.

33
Do it!
Caramel Corn Ingredients 1 cup (250 mL) margarine 2 cups (500 mL) brown sugar 1/2 cup (125 mL) corn syrup 1 tsp (5 mL) salt 1/2 tsp (2.5 mL) baking soda 1 tsp (5 mL) vanilla 6 quarts (6 L) of popcorn Yield: Two 4 L pails
Sponge Toffee Ingredients 2 1/2 cups (625mL) granulated sugar 2/3 cup (150 mL) white corn syrup 1/3 cup (75 mL) water 2 tsp (10 mL) vanilla 4 tsp (18 mL) baking soda
Directions 1. Pop popcorn. 2. Combine margarine, brown sugar, corn
syrup, and salt in a heavy pot. 3. Bring to a boil, stirring constantly. 4. Turn heat down. Boil 5 minutes without
stirring. 5. Add baking soda and vanilla. Stir to mix. 6. Pour over popcorn. Stir to spread evenly. 7. Bake in two 9x13 cake pans at 250 F (120
C) for 1 hour stirring every 15 minutes. 8. Remove from oven, pour into large bowls,
and stir as it cools to break apart. 9. Store in covered containers.
I like this... I don’t like this... Next time I will change...
Directions 1. In 3 L saucepan, stir together sugar, corn syrup,
water, and vanilla over medium heat just until sugar dissolves.
2. Bring to a boil; cook, without stirring but brushing down side of pan occasionally with pastry brush dipped in cold water, until candy thermometer reaches hard-crack stage of 300°F (149°C), or when 1 tsp (5mL) hot syrup dropped into cold water forms hard brittle threads, about 10 minutes.
3. Remove from heat. Whisk in baking soda. CAUTION: Stand back, holding face a distance away from the pot.
4. Pour into greased foil-lined 9x13 metal cake pan. Let cool in pan on rack without disturbing, about 2 hours.
5. Break in 1 1/2” (4cm) pieces. 6. Make ahead and store layered between wax paper in
airtight container for up to 1 month.
I like this... I don’t like this... Next time I will change...
Andy Says… CAUTION: When whisking the baking soda into the caramel in step 3 Stand back, holding face a distance away from the
pot.

34
Andy Says…
Whatever your choice of snack, remember to floss and brush your teeth after eating!
Dig it!
What changes do you observe as sugar becomes caramel? What happens if the sugar is heated to a higher temperature than stated in the recipe? What effect does the addition of baking soda have on a mixture?
More Eats!
For more caramel recipes go to www.allrecipes.com

35
Skill Builder 14: Polymers & Gelatin
Dream it! Polymers are formed as long strands of molecules link together in winding chains. In the slime experiment the Borax links the polyvinyl acetate in the glue to form a long stretchy polymer. Slime
Ingredients 1/2 cup (125 mL) white glue 1 1/2 cup (375 mL) water
(divided) 1 tsp (5mL) borax Food colouring (optional) Try squeezing, bouncing, and stretching your slime. Write two sentences to report your observations. _________________________________________________________________________________
_________________________________________________________________________________
_________________________________________________________________________________
SKILLS CHECKLIST
Understand where gelatin comes from Explain how polymers are formed
Andy Says….
Polymers are very long chains of monomers. Poly- means many. Mono- refers to one single unit or molecule.
Important Words
Watch out for these important words in this Skill
Builder: Polymer, Gelatin, Colloid Suspension, Dissolution
Directions 1. Mix glue and 1/2 cup (125 mL) water. Add food colouring if
desired. 2. In another bowl, mix borax and 1 cup (250 mL) water. 3. Add the glue mixture to the borax mixture, stirring slowly. 4. Stir as much as possible. Then, knead with your hands until it
becomes less sticky.
Do not eat your slime. These are chemicals, not food.
Andy Says…
Gelatin is a polymer that comes from boiled animal bones and connective tissues. Gelatin is used in jams, jellies, and marshmallows. The collagen protein in the bones joins together to form a gel.

36
Do it! Fruit Gummies
Ingredients 2 cups (500 mL) fruit juice (divided) 1 oz (30 mL) gelatin Gelatin Pinwheels
Time Required: 1 hour
Ingredients 1 package fruit flavoured gelatin 1/2 cup (125 mL) warm water 1 cup (250 mL) miniature marshmallows Yield: 16 pinwheels
Dig it! What is a polymer?
How did your Gelatin Pinwheels and Fruit Gummies turn out? What would you do differently? What other dishes could you create using polymers and gelatin?
Directions 1. Spray an 8” square pan with cooking spray. Wipe
away most of the spray with a paper towel. 2. Stir gelatin and water in medium microwavable
bowl. 3. Microwave on High for 1 1/2 minutes; stir until
gelatin is completely dissolved. 4. Stir in marshmallows. 5. Microwave on High for 30 seconds until
marshmallows are partially melted. 6. Stir with whisk until marshmallows are
completely melted. 7. Pour into pan. 8. Refrigerate 45 minutes or until set. 9. Run sharp knife around edge of pan to loosen
gelatin layer. Starting at one edge, roll up gelatin layer tightly.
10. Cut into 1/2 inch (2.5 cm) slices using thread or dental floss (cinnamon bun method).
11. Refrigerate and cover until served.
Directions 1. Spray a 9” square pan with cooking spray. Wipe
away most of the spray with a paper towel. 2. Pour 1 1/2 cups (375 mL) juice in small sauce pan.
Heat over medium heat until it reaches a gentle boil.
3. In another bowl, pour 1/2 cup (125 mL) juice and gelatin. Let bloom for 5 minutes.
4. Add gelatin to heated juice and stir until fully dissolved.
5. Take a small taste of the juice mixture to test its sweetness. You may choose to add honey.
6. Pour into 9x9 metal baking pan. 7. Chill for 1-2 8. Slice into squares of desired size. 9. Store in refrigerator for up to 3 to 4 days.

37
Now that you have finished this project, it is time to think about how you will share your experiences and knowledge with others. You may put your new skills to work by helping at a community event or at your club Achievement or teaching others about your topic. The goal of the Showcase Challenge is to help highlight your new skills and help you understand how you can use them. It can be an opportunity to receive feedback from others on your project. So go back through your manual and find some highlights of your learning (what you are proud of) and think about how you will “showcase” it.
Showcase Challenge Bringing it all together!
Demonstrate something you made or learned about
Make a poster or display
Act out a play Make a video or slideshow
Create a game Compose a song
Use your new skills to help with the Club Achievement plans
Or come up with your own idea. It is up to you and your leader!
Dream It!
Here are some Showcase Challenge Suggestions:
My Showcase Challenge Plan My showcase idea: _______________________________________________________________
________________________________________________________________________________
What materials and resources do I need? _____________________________________________
________________________________________________________________________________
Who do I need to help me? _________________________________________________________
________________________________________________________________________________
When do I need to have things done by? _____________________________________________
________________________________________________________________________________

38
Do It! Insert or attach your finished product or a photo of you sharing your skills in your Showcase Challenge.
Dig It! Now that you have showcased your project skills; How did your Showcase Challenge go?
What would you do differently next time?
How will you use your new skills in the future? (in different situations?)

39
Name: __________________ Date: _____________ Year in 4-H: ____ Club: _____________ Hours Spent on 4-H: ___(Project and Other 4-H Activities)
Discovering Science in the Kitchen Project Skills Chart To be completed by the leader and the member based on observations and
conversations throughout the project.
Skill Builder
Members will be able to… Each Skill Builder had a Skills Checklist which
identified the skill you will learn.
We know this because… Identify activities completed and record
observations and information from discussions about activities.
1
Apply the PEOE Inquiry Technique Read a recipe Experiment with ingredients and
methods
2
Identify the different phases of matter Explain why matter changes states Describe freezing and melting points
3
Understand where and how bacteria grow
Explain why incubation is important
4
Explain why coagulation is important in cheese making
Name different types of cheeses
5
Use proportions Understand the process of fermentation Describe other food products of
fermentation
6
Explain the process of carbonation Understand why some reactions are
bigger than others.
7
Understand emulsions Explain why salad dressing separates
8
Explain why density is important in this recipe
Describe why people find these recipes appealing
My 4-H Portfolio Page

40
Showcase Challenge
Explain success in using the skills listed above
Additional Comments/Activities:
Leader Point of Praise!
I am most impressed by… I acknowledge that the member has completed the 4-H project requirements. Leader’s Signature: _______________________________
Discovering Science in the Kitchen Project Skills Chart To be completed by the leader and the member based on observations and conversations throughout the project.
Skill Builder
Members will be able to… Each Skill Builder had a Skills Checklist which
identified the skill you will learn.
We know this because… Identify activities completed and record
observations and information from discussions about activities.
9
Identify human senses Explain how we taste food
10
Describe how air is incorporated into foods
Explain the effects of air in baking
11
Name acidic and basic foods Explain how acidity and alkalinity are
measured Demonstrate how red cabbage juice is a
pH indicator
12
Define crystallization Explain why rock candy grows
13
Understand what affects the colour of caramel
Explain how baking soda makes caramel becomes light and foamy
14
Understand where gelatin comes from Explain how polymers are formed

41
Member Point of Pride!
What I learned… What I need to improve on… What I want others to notice… Member’s Signature: _______________________________
Above and Beyond! In addition to project skills, 4-H also increases skills in meeting management, communications,
leadership, community involvement through participation in club, area, or provincial 4-H events or activities. List below any activities you participated in this year in 4-H.
(Some examples include Executive Positions Held, Workshops, Communication, Community Service, Rally, Bonspiels, Conferences, Judging, Camps, Trips, Awards, Representation to Area or Provincial Councils, etc)
_____________________________________ _______________________________________
_____________________________________ _______________________________________
_____________________________________ _______________________________________
_____________________________________ _______________________________________
_____________________________________ _______________________________________
_____________________________________ _______________________________________
**Feel Free to add additional pages that include awards, certificates, new clippings, photos or other items that describe your 4-H involvement.
Point of Praise! Another’s perspective on your achievements in 4-H. (community professionals, 4-H club head leaders, friends of 4-H)
I am most impressed by… I believe that you have learned… In the future I encourage you to… Signature: _______________________________

42
4-H Achievement
4-H Achievement is… a 4-H club celebration when members have completed their projects. Achievements are planned by the club to give recognition to members and leaders for their accomplishments in their 4-H projects and club activities.
A 4-H Achievement can take many different formats: from choosing a theme, to member project displays, to members using their new skills for the event (entertainment, food, decorating, photographer, etc.), to members presenting their project to the whole group, the options are endless and open to the creativity of the members and leaders in each club! Clubs may also plan their Achievement to promote 4-H to the community or to recognize sponsors and others who have helped the club. Members and leaders - be sure to check your project books for the project completion requirements, so you will be ready for your club’s Achievement celebration!
For more information about 4-H and the many 4-H opportunities available please visit
http://www.gov.mb.ca/agriculture/4-h/
If you have any questions, comments or suggestions for this or other 4-H projects contact:
Manitoba 4-H Projects Manitoba Agriculture 1129 Queens Avenue Brandon, MB R7A 1L9
Email: [email protected]
Phone: 204-726-6613
Fax: 204-726-6260
This manual is for educational use only and is not intended as professional advice.

43
4-H Motto
“Learn To Do By Doing” 4-H Pledge
I pledge, My HEAD to clearer thinking, My HEART to greater loyalty, My HANDS to larger service, My HEALTH to better living, For my club, my community, and my country.
What is 4-H?
4-H is an international youth organization involving more than 7 million members in 80 countries around the world. In Canada, 4-H began in 1913 in Roland, Manitoba as a community-based organization dedicated to growth and development of rural youth. Today’s 4-H program reaches both farm and non-farm youth across Canada. The motto of “Learn To Do By Doing” is embodied in the program, as 4-H focuses on skill development as well as personal development of life skills such as communications, leadership and citizenship.
Manitoba 4‐H project material is developed by
Manitoba Agriculture
This manual is available in alternate format upon request