school tools manual technology and maintenance
TRANSCRIPT

1
School Tools Manual
TECHNOLOGY
and MAINTENANCE

2
Introduction Welcome to School Tools from Bacallao Enterprises, Inc. This is a fully functioning helpdesk system designed to be operated via your web browser. You can use School Tools on the Internet, a completely hosted solution. School Tools will help you manage and control your helpdesk operation, without forcing you to change the way you work. Simple to use: No extensive training is required. Our customers tell us that one of the major reasons they chose School Tools is they found it very easy to understand and learn how to use the system. Adapts to your needs: Easily configured to reflect the way that you work. Easy to set up: No need for an expensive on-site visit from us to install School Tools. Just connect to your site on our web server and begin the easy setup steps. Extensive Reporting: Supplied with many reports. If you need further reports, you can request the report from our support staff. Integrates with our other School Tools applications: Technology, Maintenance and Transportation modules share the same database. Technology and Maintenance Modules
• Enables requesters to submit technology or maintenance requests and check status online
• Works with easy-to-navigate 100% web-based architecture • Features enhanced routing with programmable logic for automating assignment of
requests • Centrally tracks and manages all customer requests • Increases productivity by 10-12% • Typical paybacks on investment is less than 3 months • Records important historical information
Transportation Module
• Enables requesters to submit requests reserve a bus or other school vehicle for a ball game, field trip, or other school activity.
• Tracks bus driver information: Driver Demographics, Driver Certification, License Information, etc.
• Tracks vehicle information: Vehicle Type, Passenger Capacity, Maintenance Information, Purchase Date, Manufacturer, etc.
• Route information: Route Description, Route Type, Route Mileage, etc. • Automated Texas Education Agency Reports

3
• GPS Module – Coming Soon (This module will require the purchase of hardware and a monthly service charge.)
Data Center Operations When you utilize Schooltools, web native applications, your data is hosted in a secure data center by Datadrive.net on powerful servers where all servers and system maintenance issues are addressed easily and quickly for you. Your data and applications are managed in a secure and reliable environment that most educational institutions cannot typically provide for themselves. Advanced technology is used to protect and secure your data at our data center, providing you with 99.9% (or better) system availability and uptime. Reliability Features
• High performance multi-processor database server • High performance web server
• Redundant internal server power supplies
• Redundant, hot swappable hard drive array (RAID 5)
• Redundant OC-3 connections to top tier Internet providers (ATT, Qwest, Sprint , Global
Crossing and Verio)
• Redundant backup power systems including 2 diesel generators and battery backup
• Application built to scale to multiple servers and databases
• Redundant server and application monitoring on five-minute intervals
• Daily tape and NAS backups of all system data
• Hourly NAS backups of appended data (data that has changed)
• Security Features
• Physical security monitoring
• Network security monitoring
• Application security by unique username and password

4
Initial Setup (MUST BE SETUP BY ADMIN USER)
This section will give you quick and easy setup steps.
1. Access the School Tools
Point your browser to the address provided: http://tools.datadrive.net
2. Log in
You will be prompted for a user name and password, then click the LOGIN button.
To Log Out of the administration module, click on the LOG OUT link from any module.
Home Page

5
3. Application Setup
Click on the SETTINGS tab from the top menu items.
Complete the following for the modules purchased:
• Logo File: You can upload your organization logo. Logo should be 90 X 90 pixels and in gif format. File must be uploaded from the root and must not have a space in the name. (Example: c:\logo.gif)
• Mail Group for Tech: Individual or group email address that will get notified when Technology ticket is entered.

6
• Mail Group for Maintenance: Individual or group email address that will get notified when Maintenance request is entered.
• Mail Group for Calendars: Not currently available • Mail Group for Fix Asset: Not currently available • Mail Group for Transportation: Individual or group email address that will get
notified when Transportation request is entered. • Domain Name: Enter your organization domain name
(example: schooldomain.net) • Web Site URL: Enter your organization web site
(example: http://www.schooldomain.net) • Web Mail URL: Enter your organization web mail site
(example: http://mail.schooldomain.net)

7
• Home Page Editor: Use this tool to create/edit the Home Page of your Support Page.
When finished click on the UPDATE VALUES button. You must contact our database administrator if you change the LOGO. The database administrator must restart the service for changes to be applied. Send a notification email to: [email protected]
4. Add Users
Click on USER MANAGER from the menu on the right.

8
Complete the following:
• Name: Enter first name of user • Last Name: Enter last name of user • Email Address: Enter the email address of the user • Password: Assign the user a password • Account Disabled: Must be set to NO for user to access the application • Phone: Enter phone number of user • Extension: Enter phone extension of user • Campus: Campus/Site that the user is assigned. Users assigned to the Central
Office site have access to all locations. • User Role: Assign the user access to Technology, Maintenance, or DBA by
selecting YES or NO. We recommend only one DBA account. The Admin account has access to the SYSTEM section.

9
When finished click on the ADD NEW USER button.
5. Users Manager
Click on USER MANAGER from the menu on the right to display all users.

10
To change the setting of a user, click on the USER NAME link in the FULL NAME column.
Make the necessary changes and then click on UPDATE USER. Use the DELETE USER link to delete the user from the database. A confirmation window will appear; click on OK to delete the user.

11
6. Add Locations
Click on the LOCATIONS link from the menu on the right to add the district/campus sites. Click on ADD CAMPUS/LOCATIONS:

12
• Location/Campus: Name of site • Central Office: YES or NO. The most common site for YES would be the
Administration Office. All users assigned to a site that is linked to Central Office have access to all locations.
When finished click on the ADD CAMPUS button.
7. Locations Manager Click on the LOCATIONS link from the menu on the right to edit the district/campus sites and change the email notification.

13
Location/Campus: Click on Campus name to edit or delete the location
Tech Notification: Click on NOTIFY to add or delete email notification. You can use individual or group email notifications. You can add more than one address if necessary.

14
If Tech Notification is left blank the application setup Mail Group for Tech is the default notification address. If an individual email or group email is added, the email address on the APPLICATION SETUP page will be notified as well.
• Maint Notification: Click on NOTIFY to add or delete email notification. You can use individual or group email notifications. You can add more than one address if necessary.

15
If Maint Notification is left blank the application setup Mail Group for Maintenance is the default notification address. If an individual email or group email is added, the email address on the APPLICATION SETUP page will be notified as well.
8. Scroll Text Click on SCROLL TEXT from the menu on the right to display to add scrolling text to the home page. You can add organization announcements and other information to communicate with users.
Add your information in the settings box. Use the TOOLS links to format the text. When finished click on UPDATE at the bottom of the page.

16
9. Client Access
Click on CLIENT ACCESS LIST from the menu on the right to display all registered users. Every user that has logged in and created a user profile will be listed.
To view the user profile, click on the user email address.

17

18
10. Web Log
Click on APPLICATION LOG from the menu on the right to display information about users that have used the system.
The information displayed: User name (email address), Date and Time that ticket was entered, IP Address of the computer that ticket was entered from, Proxy IP and Proxy Name if user entered ticket via a proxy server, Session ID and Ticket Number. The Date, Time, and IP Address information could be provided to an internet provider to help detect misuse of the system.
Links
Speed Test – Click on the speed test link to open a new window to test your internet speed.

19
The following link is included: http://www.speakeasy.net/speedtest/ Mail Relay Test – This site is a great tool for resolving email issues and abuse. http://www.abuse.net/relay.html
DNS Test – This site is a useful tool for testing DNS and Email issues. http://www.dnsreport.com DNS Stuff – This site is a useful tool for testing DNS issues. http://www.dnsstuff.com

20
Application Manual – Use this link to view, download or print the School Tools Administrator Manual. The manual is in PDF format.
Mail To Support – Use this link to send a message to the School Tools support staff. Your computer will launch the default email program.
School Tools Support Toll Free Phone Number
Other Modules
Lunch Program – Coming Soon Fixed Asset Inventory – Coming Soon Off-site Backup Services – Coming Soon

21
Technology Module Administration To access the technology ticket system click on the TECHNOLOGY tab on the top menu bar.
This will take you to the Technology Work Order Status of the entered tickets. Technology technicians only see tickets of the campuses/locations that they are assigned. Technicians that have been assigned to the central office location will see all entered tickets. To quickly access a ticket, click on QUICK LOOKUP.
Enter the ticket number and click on GO.
All tickets can be printed with the ticket number. A common practice would be: the technician prints the ticket(s), takes the printout(s) to the location(s), fixes the problem, makes notes on the ticket printout, brings the printout back to the office to enter the ticket in the system (or give the ticket printout to a data entry person to enter the ticket details) The easiest way to access the ticket would be with the QUICK LOOKUP feature. The print out also has a bar code at the top of the ticket. From the QUICK LOOKUP page you can use a USB Bar Code Scanner to access the ticket by scanning the bar code at the top of the printed ticket.

22
TECHNOLOGY SETTINGS 1. Objects
Click on Objects from the settings menu on the right to add technology objects.
The objects are what the users select from a drop down menu when describing their problem. Some examples would be: Email, CD Rom, Internet, Application, Program Installation, Printer, etc. To setup an object, click on NEW OBJECT.

23
Enter your object in the Tech Object box and click on ADD OBJECT.
To list all technology objects click on OBJECTS from the settings menu on the right.

24
To edit or delete the object, click on the object name on the left.
A new window will appear. Change the object name and click on UPDATE OBJECT. Click on DELETE OBJECT if you want to delete the object. Click on OK to the delete confirmation message.
The objects are displayed with two fields to the right of the object: ADD NOTIFICATION and LIST NOTIFICATION. Click on LIST NOTIFICATION to display the email address of who gets notified when a ticket for this object is entered.

25
The default is the address that was entered in the APPLICATION SETUP page. You can change this address by clicking on LIST NOTIFICATION, then click on EMAIL ADDRESS. To delete the email notification, click on the RED X.
Change the email address and click on UPDATE EMAIL.
To add another email address, click on ADD NOTIFICATION.

26
Enter the email address in the support email field and click on ADD.
Some organizations may want all tickets to go to a support group email. However, if your organization wants all PRINTER objects to go to the person that is responsible for PRINTER repair the system can be configured this way.
2. Links
This is where you can add links to websites that you want to display to your users. The links are displayed on the support site home page from the RESOURCE link. To add links click on ADD LINKS.

27
Enter the web address in the FULL URL field in the following format: http://www.domain.net In the NAME field, enter what the user will see displayed to click on to access the link. In the MORE DETAILS section add detailed information that explains the website, and then click on ADD LINK.
To display current links click on LINKS in the settings section on the right side menu.

28
To edit the link, click on the link in the EDIT URL column.
Make the appropriate changes and click on UPDATE LINK. To delete the link, click on DELETE LINK.

29
To verify the link, click on the link in the VERIFY LINK section.
3. Systems
To add systems to the database, click on SYSTEMS.

30
Next, click on NEW SYSTEM.
You have the ability to add your critical systems such as servers, routers, switches, UPS, etc. Simply add the appropriate fields and click on ADD SYSTEM.

31
None of the fields are required. Use only the fields that you deem necessary. To add services to the server click on SYSTEMS and then click on the SERVICES link in the SYSTEM column.

32
You can add IP Address, Ports Used, Service, and Application. (Example: IP Address – 10.44.0.165; Ports – 21, 25, 80, 8080; Service – FTP, Mail, WWW; and Application – Exchange Mail Server, WSFTP, and Apache Web Server) To add the services click on ADD IP.
To edit or remove a system, click on the SERVER NAME link in the SYSTEM column.

33
XX
Make the necessary changes and the click on UPDATE RECORD. To remove the system, click on DELETE SYSTEM.
XX To edit a system service, click on SYSTEMS and then click on the SERVER NAME link in the SYSTEM column.

34
Then click on the IP ADDRESS in the IP column.
Make the necessary changes and then click on UPDATE IP. To remove the service, click on DELETE IP.

35
To run a report of all systems in the database, click on SYSTEMS REPORT.
To print the report press CTRL – P, or right-click anywhere on the report and select PRINT.

36

37
To print labels for your systems click on SYSTEMS LABELS.
This will open a new window and give you three choices: OPEN, SAVE, or CANCEL.
OPEN will open the labels in the window. SAVE will allow you to save the label file to your computer. The default name is LABELS.RTF. CANCEL will close the system labels window. Four fields are created on the label: SYSTEM, LOCATION, SERVICE TAG, and IP. The systems label will print on an AVERY 5161 label.

38
4. Help Online
To add documentation that will help users with common support issues click on NEW TECHNOLOGY HELP.
Select the CATEGORY, add the HEADER (users will click on this when accessing the help), add the documentation in the HELP field. Next, add the CONTACT HELP. This field can be a name, email address, and/or phone number. When finished click on ADD HELP ONLINE.

39
To add a new CATEGORY click on NEW TECHNOLOGY HELP.
Next, click on NEW HELP OBJECT.
Next, click on ADD TECH HELP CATEGORY.

40
Enter the new object and click on ADD TECH HELP OBJECT.
To display the new CATEGORY, click on UPDATE.
You can also delete a CATEGORY from this window by clicking on NEW HELP OBJECT
Next, click on DEL to the right of the object.

41
To edit the help online, click on HELP ONLINE.
Next, click on the link in the CATEGORY column.
Make the necessary changes and then click on UPDATE TECH HELP. You can click on DELETE TECH HELP to delete the help online record.

42
5. Technology Contacts
To add technology contacts to the system click on NEW CONTACT.

43
Enter all of the appropriate information and click on ADD CONTACT. There are 3 text boxes that can be used to enter service contract information, notes about prior purchases, etc.

44
To access the contacts click on CONTACTS.
To view the details for the contact, click on the link in the COMPANY column.
To print the contact information, click on the PRINT PREVIEW at the top of the view contact page.

45
XX To edit the details for the contact, click on the CONTACTS link
Next, click on the EDIT link to the right of the company name.
Make the appropriate changes and then click on the UPDATE CONTACT link.

46
To delete a contact, click on the CONTACTS link.

47
Next, click on the link in the COMPANY column.
Click on the DELETE CONTACT link.
A confirmation box will appear – Click on OK to permanently delete the contact.

48
6. Data Backup
To archive your data at the beginning of a new school year, click on the DATA BACKUP link.
Example: To archive data prior to August 15, 2006 select the following: Date – Use the following format: mm/dd/yyyy In the next box select LT. This represents Less Than. Make this selection since you want to archive data prior to the 15th of August. ET is Equal To and GT is Greater Than. Set – In the set field select ARCHIVE. Then click on UPDATE TICKET.

49
The data will be downloaded to an excel spreadsheet. Select SAVE
Name the file and select the desired location to save the file.
You are now ready to start the new school year with no tickets viewable from the previous year. You can also activate all data in the system. There may be times that you want to view all of your past data. This can be accomplished by clicking on the DATA BACKUP link.

50
Example: To activate all data prior to August 15, 2006 select the following: Date – Use the following format: mm/dd/yyyy In the next box select LT. This represents less than. Make this selection since you want to activate data prior to the 15th of August. ET is Equal To and GT is Greater Than. Set – In the set field select ACTIVATE. Then click on UPDATE TICKET.
The data will be downloaded to an excel spreadsheet. Select SAVE

51
Name the file and select the desired location to save the file.
7. File Manager To upload files for users, click on the FILE MANAGER link.
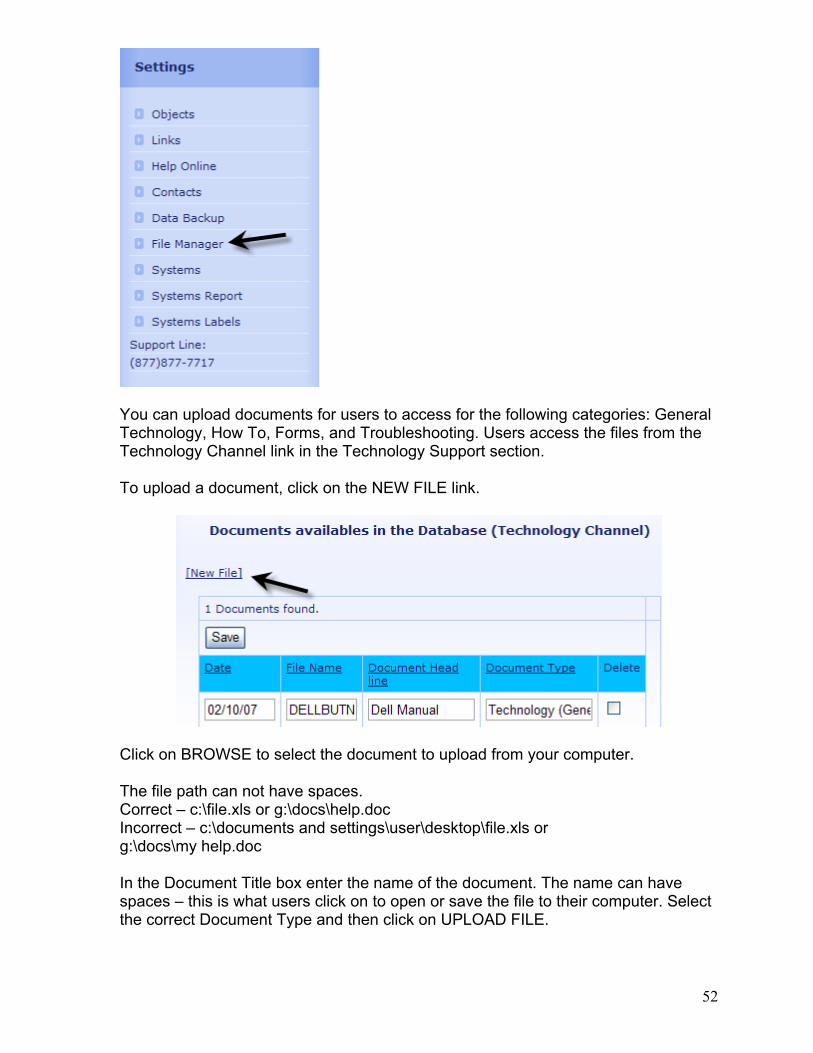
52
You can upload documents for users to access for the following categories: General Technology, How To, Forms, and Troubleshooting. Users access the files from the Technology Channel link in the Technology Support section. To upload a document, click on the NEW FILE link.
Click on BROWSE to select the document to upload from your computer. The file path can not have spaces. Correct – c:\file.xls or g:\docs\help.doc Incorrect – c:\documents and settings\user\desktop\file.xls or g:\docs\my help.doc In the Document Title box enter the name of the document. The name can have spaces – this is what users click on to open or save the file to their computer. Select the correct Document Type and then click on UPLOAD FILE.

53
If the file uploads successfully a page will appear that reads, “Technology File Was Successfully Submitted”.
To view files that have been uploaded, click on FILE MANAGER.
You can change the file name by making the change in the FILE NAME column and then clicking on SAVE. You can change the document name by making the change in the DOCUMENT HEAD LINE column and then clicking on SAVE. You can delete an uploaded file by clicking the box in the DELETE column and then click on SAVE.

54
Technology Work Order Status To access the Technology Work Order Status screen, click on TECHNOLOGY STATUS in the Technology section on the right menu bar.
Users assigned to the Campus/Location that is linked to the Central Office see all tickets for the district/account. Other users only see the Campus/Location to which they are assigned. On the Technology Work Order Status screen the first field to the far left is the Ticket Number link. Click on the Ticket Number link to view and edit the ticket.

55
The following items appear in the new window: • Print – Use this link to print the ticket.
• Update Ticket – Use this link to update ticket when changes or additions are
made to the ticket.
• Notify – Use this link to send an email notification to the user about updates to
the ticket. The following fields are emailed to the user: Ticket Number, Ticket Date, Ticket Object, Support Assisted By, Ticket Status, Ticket Comments, and
Ticket Details. • Add File – Use this link to add a file related to the ticket.
Example: A print screen of the error message from the user’s computer saved as a word document. Browse to the file (no spaces in the path), enter comments about the file, and click on SUBMIT.
Reminder – Users can also upload files that relate to their ticket. I’m sure this will be a training issue, but there certainly may be times that a user could create a print screen and upload the file for your review prior to you deploying a technician.
• Client Profile – In the Reported By section. To change the user profile click on the email address.

56
You can add and or change the following fields: IP Address, Operating System, Room, and two Note fields.
Click on UPDATE CLIENT to save the information and then close window. You can delete the user from the database by clicking on DELETE CLIENT FROM DB. The Notes1 field could be reserved for the technology staff.
• Object Problem – This is what the user selected as the problem. If the wrong object was selected make the correct change.
• Problem Description – This is the data the user entered to describe the problem.
Make the correct changes if you need to change the description. This information is viewable to all users and is emailed back to the user when the NOTIFY link is used.

57
• Internal Notes – This field is for only the technicians. There may be times that you need to make notes about the ticket that are not viewable by the end user.
• Support By – You can enter up to 3 technicians that supported the ticket. Select
the technician by using the drop down arrow to the right of Support Level 1, Escalation Level 2 and Escalation Level 3.
• Order Status – This shows the status of the ticket. All new tickets are
automatically assigned NEW TICKET. Most technicians change the status to ACKNOWLEDGE until they can schedule a time to work on the ticket. Other choices are: On Bench, In Progress, Parts Ordered, Scheduled and Closed.
• Comments – The technician will enter comments about the technology ticket.
This field is viewable by the user in the status column on the Support Status page and is sent to the user when you use the NOTIFY link.
• Date Fixed – Enter the date the ticket was fixed. The data field will auto-format.
• Hours Worked – Enter 0 through infinity. • Minutes Worked – Select 0, 15, 30 or 45. 15 minute increments only.
• Update Ticket – Click on this link to update the changes made to the ticket.
• Attachment Name – Attached files are located at the bottom of the window.

58
Click on the File Name link to view the file. There can be multiple files attached to a ticket. Files can be submitted by the technician and/or the user.
On the Technology Work Order Status screen the second field to the left is the Print Ticket link. Click on the PRT link to open a new window that will allow you to print the ticket.
OR
Print the ticket by clicking on the printer icon and then selecting the printer of your choice.
On the Technology Work Order Status screen the third field to the left is the Delete Ticket link. Click on the RED X link to delete the ticket.

59
A delete confirmation window appears. To permanently delete the ticket, click on OK.
The remaining fields on the Technology Work Order Status screen are: Date/Time Ticket was entered, Reported by/Location of the Ticket, Object Problem, and Status.
New Ticket To enter a new ticket, click on the NEW TICKET link from the menu on the right.

60
This feature is used when users report a problem, but have not entered a ticket. If you want a record of all support issues, use this link to enter tickets not previously entered. Fill out the information and click on SUBMIT SUPPORT REQUEST.
Reports
To run reports, click on TECHNOLOGY REPORTS from the technology menu on the right.

61
Campus Locations
Tickets by Location
This report gives ticket count by campus/location; and a count of the top 10 objects reported.

62

63
Support by Date
Select Date Range and click on GET REPORT
This report gives ticket information by campus/location for the date range selected.

64
Details Support by Locations
This report gives the object count by location.

65
Time Distribution
Support
This report gives ticket count by user; the ticket count by the day of the week; and a circle graph of ticket count by the week day. This report does not include NEW TICKETS.

66

67
Support Details
This report will give you incidents supported by your technicians and can be created by user selected date range. You can run the report for all technicians or for specific technicians.
The report includes the following information: Technician that supported the ticket, Campus/Location, Reported by, Date, and Object.
Tickets Not Closed
Ticket Not Closed

68
This report shows all tickets that are not closed. From the report you can go to the ticket status screen by clicking on the TICKET NUMBER in the far left column.
Tickets Not Closed – By Campus/Location
This report shows all tickets that are not closed – by campus. To view a printable version, click on the PRINTABLE REPORT link. From the report you can go to the ticket status screen by clicking on the TICKET NUMBER in the far left column.

69

70

71
Maintenance Module Administration To access the maintenance ticket system, click on MAINTENANCE tab on the top menu bar.
This will take you to the Maintenance Work Order Status of the entered tickets. Maintenance technicians only see tickets of the campuses/locations that they are assigned. Technicians that have been assigned to the central office location will see all entered tickets. To quickly access a ticket, click on TICKET LOOKUP.
Enter the ticket number and click on GO.
All tickets can be printed with the ticket number. A common practice would be: the technician prints the ticket(s), takes the printout(s) to the location(s), fixes the problem, makes notes on the ticket printout, brings the printout back to the office to enter the ticket details in the system (or give the ticket printout to a data entry person to enter the ticket details) The easiest way to access the ticket would be with the QUICK LOOKUP feature. The print out also has a bar code at the top of the ticket. From the TICKET LOOKUP page you can use a USB Bar Code Scanner to access the ticket by scanning the bar code at the top of the printed ticket.

72
To setup or change the maintenance ticket system click on the items in the SETTINGS section. 1. Objects
The objects are what the users select from a drop down menu when describing their problem. Some examples would be: HVAC, Electrical, Pest Control, Lights, Plumbing, Other, etc.
To setup an object, click on NEW OBJECT.
Enter your object in the Maintenance Object box and click on ADD OBJECT.
To list all maintenance objects, click on OBJECTS from the menu on the right.

73
To edit or delete the object, click on the object name on the left.
A new window will appear. Change the object name and click on UPDATE OBJECT. Click on DELETE OBJECT if you want to delete the object. Click on OK to the delete confirmation message.
The objects are displayed with two fields to the right of the object: ADD NOTIFICATIONS and LIST NOTIFICATIONS. Click on LIST NOTIFICATIONS to display the email address of who gets notified when a ticket for this object is entered.

74
The default is the address that was entered in the APPLICATION SETUP page. You can change this address by clicking on LIST NOTIFICATIONS, then click on the email address in the EMAIL TO NOTIFY column.
Change the email address and click on UPDATE EMAIL. To delete the notification email, click on the RED X.
To add another email address, click on the ADD NOTIFICATIONS link.
Next, enter the email address in the SUPPORT EMAIL field and click on ADD.

75
Some organizations may want all tickets to go to a support group email. However, if your organization wants all HVAC objects to go to the person that is responsible for HVAC repair the system can be configured this way.
2. Links
This is where you can add links to websites that you want to display to your users. The links are displayed on the support site home page from the RESOURCE link.
To add links click on ADD LINKS.
Enter the web address in the FULL URL field in the following format: http://www.domain.net In the NAME field, enter what the user will see displayed to click on to access the link. In the MORE DETAILS section add detailed information that explains the website, and then click on ADD LINK.

76
To display current links, click on LINKS.
To edit the link, click on the link in the EDIT URL section.
Make the appropriate changes and click on UPDATE LINK. To delete the link, click on DELETE LINK.

77
To verify the link, click on the link in the VERIFY LINK section.
3. Equipment Inventory
To add inventory items to the database, click on ITEM TYPE.

78
Add the item to the Inventory Object Type field and click on ADD INV TYPE. Examples would be Compressors, Tools, Janitorial Equipment, Etc.
To add an Equipment Inventory Item, click on ADD ITEM.
Enter the following fields: • Item – Item name • Item Type – Select from list • Item Description – Description of the inventory item • Location – Location or Campus where inventory item is located • Serial – Serial number of the inventory item • Guaranty Expiration Date – Date the guaranty expires for the inventory item • Service Phone Number – Phone number for service information • BIN – Bank Identification Number (Where the item is located) • Manufacturer – Manufacturer of the inventory item • Purchase Date – Date the inventory item was purchased • Purchase Price – Purchase price of the inventory item

79
• Depreciation Schedule – Yes or No to calculate a depreciation schedule for the inventory item
• Depreciation Factor % - If Yes is selected in Depreciation Schedule field, select the depreciation factor % from the drop down list
• Notes – Add notes to the inventory item • Printable – If you want the inventory item included in the inventory item printout
select YES. If not, select No. (An example of No might be an obsolete item.) • Budget Code – Enter the budget code that the inventory item was purchased
from.
Click on ADD ITEM TO INVENTORY to save the item to the database.

80
To list the inventory items, click on ITEM LIST.

81
This will display all items in the inventory. The list is displayed with the following information: Description, Manufacturer, Location and Guaranty Phone Number. The list is in alpha order. You can reverse the order by selecting DESCENDING in the Order By section at the top of the screen, then click on GO.
Next, click on the Description link to the far left.
This will take you to the detail screen. Make the appropriate changes and click on UPDATE ITEM at the bottom of the screen. To delete the item, click on DELETE ITEM. When the delete confirmation window appears, click on OK.

82
To view or print a complete inventory item list, click on ITEM REPORT.
To print labels for your systems, click on LABELS.
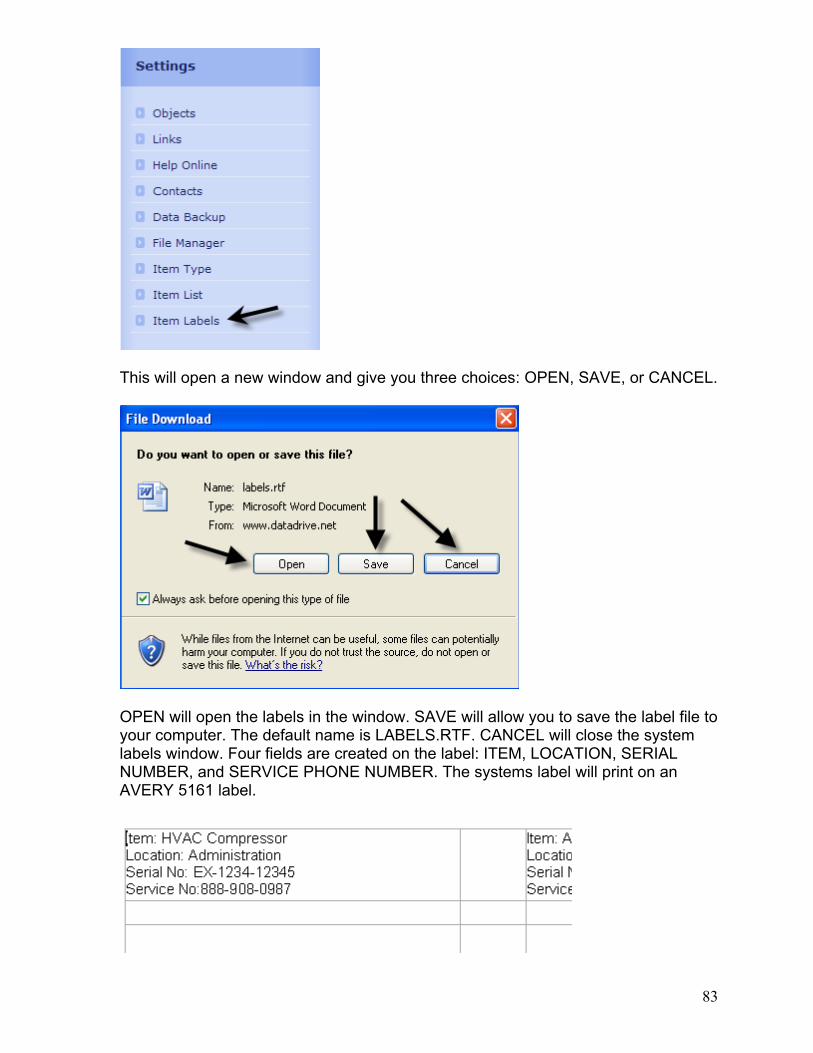
83
This will open a new window and give you three choices: OPEN, SAVE, or CANCEL.
OPEN will open the labels in the window. SAVE will allow you to save the label file to your computer. The default name is LABELS.RTF. CANCEL will close the system labels window. Four fields are created on the label: ITEM, LOCATION, SERIAL NUMBER, and SERVICE PHONE NUMBER. The systems label will print on an AVERY 5161 label.

84
4. Help Online
To add documentation that will help users with common support issues, click on HELP ONLINE.
Next, click on NEW OBJECT.
Select the CATEGORY, add the HEADER (users will click on this when accessing the help), add the documentation in the HELP field. Next, add the CONTACT HELP. This field can be a name, email address, and/or phone number. When finished click on ADD HELP ONLINE.

85
To add a new CATEGORY, click on NEW OBJECT.
Next, click on NEW HELP OBJECT.
Click on ADD MAINT HELP CATEGORY

86
Next, enter the new object and click on ADD MAINT HELP OBJECT.
To display the new CATEGORY, click on UPDATE.
You can also delete a CATEGORY by clicking on NEW HELP OBJECT, then click on the object.
Next, click on DELETE HELP CATEGORY. To edit the category, click on UPDATE HELP CATEGORY.

87
To edit the help online, click on HELP ONLINE.
Next, click on the help link in the CATEGORY column.
Make the necessary changes and then click on UPDATE MAINT HELP. You can click on DELETE MAINT HELP to delete the help online record.

88
5. Maintenance Contacts
To add maintenance contacts to the system, click on CONTACTS.

89
Enter all of the appropriate information and click on ADD CONTACT.
There are 3 text boxes that can be used to enter service contract information, notes about prior purchases, etc. To access the contacts, click on CONTACTS.

90
To view the details for the contact, click on the link in the COMPANY column.
To print the contact information, click on the PRINT PREVIEW at the top of the view contact page.
XX To edit the details for the contact, click on the CONTACTS link.

91
Next, click on the EDIT link to the right of the company name.
Make the appropriate changes and then click on the UPDATE CONTACT link. The contact can be deleted by clicking on the DELETE CONTACT link. A confirmation box will appear – Click on OK to permanently delete the contact.

92
6. File Manager
To archive your data at the beginning of a new school year, click on the BACKUP SERVICES link.

93
Example: To archive data prior to August 15, 2006 select the following: Date – Use the following format: mm/dd/yyyy In the next box select LT. This represents Less Than. Make this selection since you want to archive data prior to the 15th of August. ET is Equal To and GT is Greater Than. Set – In the set field select ARCHIVE. Then click on UPDATE TICKET.
The data will be downloaded to an excel spreadsheet. Select SAVE

94
Name the file and select the desired location to save the file.
You are now ready to start the new school year with no tickets viewable from the previous year. You can also activate all data in the system. There may be times that you want to view all of your past data. This can be accomplished by clicking on the BACKUP SERVICES link.

95
Example: To activate all data prior to August 15, 2006 select the following: Date – Use the following format: mm/dd/yyyy In the next box select LT. This represents less than. Make this selection since you want to activate data prior to the 15th of August. ET is Equal To and GT is Greater Than. Set – In the set field select ACTIVATE. Then click on UPDATE TICKET.
The data will be downloaded to an excel spreadsheet. Select SAVE

96
Name the file and select the desired location to save the file.
You can upload documents for users to access for the following categories: General Maintenance, How To, Forms, and Troubleshooting. Users access the files from the Technology Channel link in the Technology Support section. To upload a document, click on the FILE MANAGER link.

97
You can upload documents for users to access for the following categories: General Maintenance, How To, Forms, and Troubleshooting. Users access the files from the Maintenance Channel link in the Maintenance Support section. To upload a document, click on the NEW FILE link.
Click on BROWSE to select the document to upload from your computer. The file path can not have spaces. Correct – c:\file.xls or g:\docs\help.doc Incorrect – c:\documents and settings\user\desktop\file.xls or g:\docs\my help.doc In the Document Title box enter the name of the document. The name can have spaces – this is what users click on to open or save the file to their computer. Select the correct Document Type and then click on UPLOAD FILE.

98
To view files that have been uploaded, click on FILE MANAGER.
You can change the file name by making the change in the FILE NAME column and then clicking on SAVE. You can change the document name by making the change in the DOCUMENT HEAD LINE column and then clicking on SAVE. You can delete an uploaded file by clicking the box in the DELETE column and then click on SAVE.
Maintenance Work Order Status
To access the Maintenance Work Order Status screen, click on TICKET STATUS in the Maintenance Module section.

99
Users assigned to the Campus/Location that is linked to the Central Office see all tickets for the district/account. Other users only see the Campus/Location to which they are assigned. On the Maintenance Work Order Status screen the first field to the far left is the Ticket Number link.
Click on the Ticket Number link to see view and edit the ticket. The following items appear in the new window: • Print – Use this link to print the ticket.
• Update Ticket – Use this link to update ticket when changes or additions are
made to the ticket. • Notify – Use this link to send an email notification to the user about updates to
the ticket. The following fields are emailed to the user: Ticket Number, Ticket

100
Date, Ticket Object, Support Assisted By, Ticket Status, Ticket Comments, and
Ticket Details. • Add File – Use this link to add a file related to the ticket.
This field may not be applicable to maintenance support, but it is available.
• Client Profile – In the Reported By section. To edit the client profile, click on the
user email address. You can add and or change the following fields: IP Address, Operating System, Room, and two Note
fields.
Click on UPDATE CLIENT to save the information and then close window. You can delete the user from the database by clicking on DELETE CLIENT FROM DB. The Notes2 field could be reserved for the maintenance staff.
• Object Problem – This is what the user selected as the problem. If the wrong
object was selected make the correct change. • Problem Description – This is the data the user entered to describe the problem.
Make the correct changes if you need to change the description. This information

101
is viewable to all users and is emailed back to the user when the NOTIFY link is
used. • Internal Notes – This field is for only the technicians. There may be times that
you need to make notes about the ticket that are not for the end user.
• Support By – You can enter up to 3 technicians that supported the ticket. Select
the technician by using the drop down arrow to the right of Technician 1,
Technician 2 and Technician 3. • Order Status – This shows the status of the ticket. All new tickets are
automatically assigned NEW TICKET. Most technicians change the status to ACKNOWLEDGE until they can schedule a time to work on the ticket. Other choices are: On Hold, In Progress, Parts Ordered, Scheduled and Closed.
• Comments – The technician will enter comments about the maintenance ticket.
This field is viewable by the user in the status column on the Work Order Status page and is sent to the user when you use the NOTIFY link.
• Date Fixed – Enter the date the maintenance was completed. The field will auto-
format.
• Hours Worked – Enter 0 through infinity. • Minutes Worked – Select 0, 15, 30 or 45. 15 minute increments only.
• Update Ticket – Click on this link to update the changes made to the ticket.
• Attachment Name – At the bottom of the window were attached files are located,
click on the File Name link. There can be multiple files attached to a ticket that were submitted by the technician and/or the user.
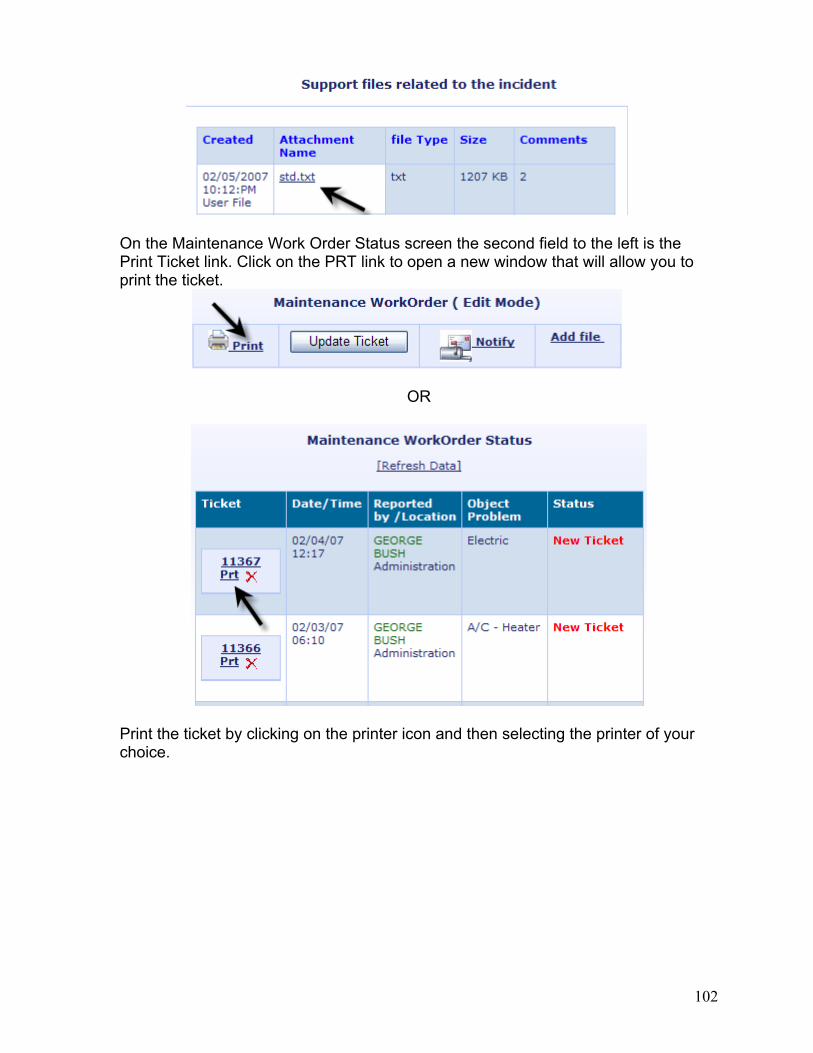
102
On the Maintenance Work Order Status screen the second field to the left is the Print Ticket link. Click on the PRT link to open a new window that will allow you to print the ticket.
OR
Print the ticket by clicking on the printer icon and then selecting the printer of your choice.

103
On the Maintenance Work Order Status screen the third field to the left is the Delete Ticket link.
Click on the RED X link. A delete confirmation window appears. To permanently delete the ticket, click on OK.
The remaining fields on the Maintenance Work Order Status screen are: Date/Time Ticket was entered, Reported by/Location of the Ticket, Object Problem, and Status.

104
Reports
To run reports, click on MAINTENANCE REPORTS from the maintenance menu.
Campus Locations
Tickets by Location
This report gives ticket count by campus/location; and a count of the top 10 objects reported.

105

106
Support by Date
This report gives the object count by date.
Details Support by Location
This report gives the object count by location.

107
Time Distribution
Support
This report gives ticket count by user; the ticket count by the day of the week; and a circle graph of ticket count by the week day. This report does not include NEW TICKETS.

108

109
Support Details
This report will give you incidents supported by your technicians and can be created by user selected date range. You can run the report for all technicians or for specific technicians.
The report includes the following information: Technician that supported the ticket, Campus/Location, Reported by, Date, and Object.
Tickets Not Closed
Ticket Not Closed

110
This report shows all tickets that are not closed. From the report you can go to the ticket status screen by clicking on the TICKET NUMBER in the far left column.
Tickets Not Closed – By Campus/Location
This report shows all tickets that are not closed – by location. From the report you can go to the ticket status screen by clicking on the TICKET NUMBER in the far left column.