save our snowman - dayton regional stem center
TRANSCRIPT
Page 1 of 43www.daytonregionalstemcenter.org
Draft: Friday, December 8, 2017
STEM Curriculum Planning Guide
This instructional design guide serves as the template for the design and development of STEM units of instruction at the Dayton Regional STEM Center in Dayton, Ohio. The guide is anchored to the STEM Education Quality Framework also developed at the Dayton Regional STEM Center.
STEM Unit Title S.O.S (Save Our Snowman)
Economic ClusterAdvanced Manufacturing & Materials Environmental Engineering
Targeted Grades K-1
STEM Disciplines Science Technology Engineering Math
Non-STEM Disciplines
English Language Arts
The electronic template is copyrighted to Dayton Regional STEM Center. No permission has been granted for template reproduction. However, lesson contents may be reproduced and attributed to Dayton Regional STEM Center free of charge.
Page 2 of 43Draft: Friday, December 8, 2017
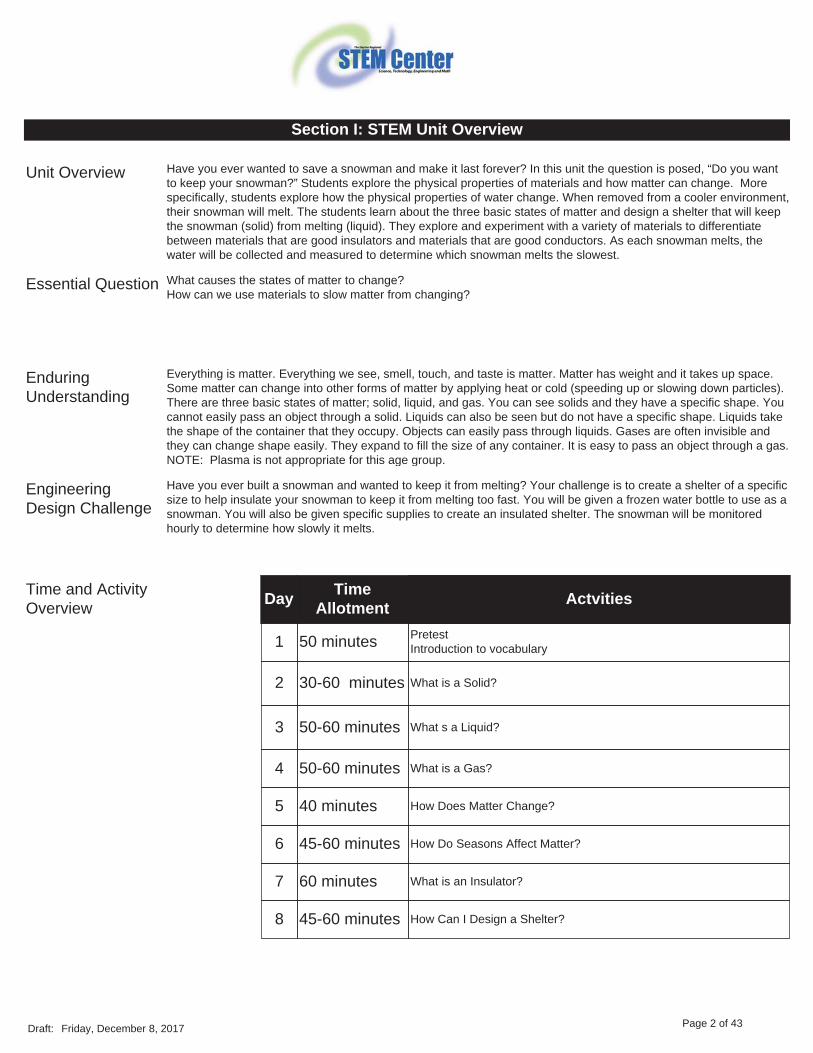
Section I: STEM Unit Overview
Unit Overview Have you ever wanted to save a snowman and make it last forever? In this unit the question is posed, “Do you want to keep your snowman?” Students explore the physical properties of materials and how matter can change. More specifically, students explore how the physical properties of water change. When removed from a cooler environment, their snowman will melt. The students learn about the three basic states of matter and design a shelter that will keep the snowman (solid) from melting (liquid). They explore and experiment with a variety of materials to differentiate between materials that are good insulators and materials that are good conductors. As each snowman melts, the water will be collected and measured to determine which snowman melts the slowest.
Essential Question What causes the states of matter to change? How can we use materials to slow matter from changing?
Enduring Understanding
Everything is matter. Everything we see, smell, touch, and taste is matter. Matter has weight and it takes up space. Some matter can change into other forms of matter by applying heat or cold (speeding up or slowing down particles). There are three basic states of matter; solid, liquid, and gas. You can see solids and they have a specific shape. You cannot easily pass an object through a solid. Liquids can also be seen but do not have a specific shape. Liquids take the shape of the container that they occupy. Objects can easily pass through liquids. Gases are often invisible and they can change shape easily. They expand to fill the size of any container. It is easy to pass an object through a gas. NOTE: Plasma is not appropriate for this age group.
Engineering Design Challenge
Have you ever built a snowman and wanted to keep it from melting? Your challenge is to create a shelter of a specific size to help insulate your snowman to keep it from melting too fast. You will be given a frozen water bottle to use as a snowman. You will also be given specific supplies to create an insulated shelter. The snowman will be monitored hourly to determine how slowly it melts.
Time and Activity Overview Day Time
Allotment Actvities
1 50 minutes Pretest Introduction to vocabulary
2 30-60 minutes What is a Solid?
3 50-60 minutes What s a Liquid?
4 50-60 minutes What is a Gas?
5 40 minutes How Does Matter Change?
6 45-60 minutes How Do Seasons Affect Matter?
7 60 minutes What is an Insulator?
8 45-60 minutes How Can I Design a Shelter?

Page 3 of 43Draft: Friday, December 8, 2017
9
30-40 minutes for introduction and set-up, monitoring throughout the day in 1 hour increments
How Can I Test My Shelter Design?
10
30-40 minutes for redesign, monitoring throughout the day in 1 hour increments
How Can I Redesign My Shelter?
11 60 minutes How Can I Show My Results?
12 45-60 minutes Post Test What Did I Learn?

Page 4 of 43Draft: Friday, December 8, 2017
Academic Content Standards
Pre-requisite Knowledge & Skill
* Teachers should preview the vocabulary with students before starting the lessons . * This is an introductory unit on states of matter and allows for students of every skill level and prior experiences.
Add Standard Mathematics
Grade/Conceptual Category Kindergarten
Domain Counting and Cardinality
Cluster Know number names and the count sequence.
Standards K.CC.7 Compare two numbers between 1 and 10 presented as written numerals.
Add Standard Mathematics
Grade/Conceptual Category Kindergarten
Domain Measurement and Data
Cluster Describe and compare measurable attributes.
StandardsK.MD.1 Describe measurable attributes of objects, such as length or weight. K.MD.2 Directly compare two objects with a measurable attribute in common, to see which object has “more of”/”less of” the attribute, and describe the difference.

Page 5 of 43Draft: Friday, December 8, 2017
Add Standard Mathematics
Grade/Conceptual Category Grade 1
Domain Measurement and Data
Cluster Represent and interpret data.
Standards 1.MD.4 Organize, represent and interpret data with up to three categories; ask and answer questions about the total number of data points, how many in each category, and how many more or less are in one category than in another.
Add Standard English Language Arts
Grade Kindergarten
Strand Reading: Literature
Topic Key Ideas and Details
Standard K.RL.1 With prompting and support, ask and answer questions about key details in a text. K.RL.2 With prompting and support, retell familiar stories, including key details.
Add Standard English Language Arts
Grade Kindergarten
Strand Reading: Literature
Topic Craft and Structure
Standard K.RL.6 With prompting and support, name the author and illustrator of a story and define the role of each in telling the story.

Page 6 of 43Draft: Friday, December 8, 2017
Add Standard English Language Arts
Grade Kindergarten
Strand Writing
Topic Text Types and Purposes
Standard K.W.3 Use a combination of drawing, dictating, and writing to narrate a single event or several loosely linked events, tell about the events in the order in which they occurred, and provide a reaction to what happened.
Add Standard English Language Arts
Grade Kindergarten
Strand Speaking and Listening
Topic Presentation and Knowledge and Ideas
Standard K.SL.4 Describe familiar people, things, and events and, with prompting and support, provide additional detail. K.SL.6 Speak audibly and express thoughts, feelings, and ideas clearly.
Add Standard English Language Arts
Grade Grade 1
Strand Reading: Literature
Topic Key Ideas and Details
Standard 1.RL.1 Ask and answer questions about key details in a text.

Page 7 of 43Draft: Friday, December 8, 2017
Add Standard English Language Arts
Grade Grade 1
Strand Writing
Topic Text Types and Purposes
Standard 1.W.3 Write narratives in which they recount two or more appropriately sequenced events, including some details regarding what happened, use temporal words to signal event order, and provide some sense of closure.
Add Standard English Language Arts
Grade Grade 1
Strand Speaking and Listening
Topic Presentation of Knowledge and Ideas
Standard 1.SL.4 Describe people, places, things, and events with relevant details, expressing ideas and feelings clearly. 1.SL.6 Produce complete sentences when appropriate to task and situation.
Add Standard Social Studies
Grade Grade 1
Theme A Child's Place in Time and Space
Strand (pk-8 only) Geography
TopicHuman Systems: Human systems represent the settlement ans structures created by people on Earth's surface. The growth, distribution and movements of people are driving forces behind human physical events. Geographers study patterns in cultures and the changes that result from human processes, migrations and the diffusion of new cultural traits.
Content Standard 7. Humans depend on and impact the physical environment in order to supply food, clothing and shelter.

Page 8 of 43Draft: Friday, December 8, 2017
Add Standard Science
Grade Kindergarten
Theme Earth and Space Science
Topic Daily and Seasonal Changes
Content Standard K.ESS.1 Weather changes are long-term and short-term.
Add Standard Science
Grade Kindergarten
Theme Physical Science
Topic Properties of Everyday Objects and Materials
Content Standard K.PS.1 Objects and materials can be sorted and described by their properties.
Add Standard Science
Grade Grade 1
Theme Earth and Space Science
Topic Sun, Energy and Weather
Content Standard 1.ESS.1 The sun is the principal source of energy. 1.ESS.2 The physical properties of water change.
Add Standard Science
Grade Grade 1
Theme Physical Science
Topic Motion and Materials
Content Standard 1.PS.1 Properties of objects and materials can change.
Page 9 of 43Draft: Friday, December 8, 2017
Add Standard Science
Strand
Course Content
Content Elaboration
Add Standard Fine Arts
Enduring Understanding
Progress Points
Grade Level
Content Statement

Page 10 of 43Draft: Friday, December 8, 2017
Assessment Plan
What evidence will show that students have acquired the enduring understandings for this STEM unit?
Performance Task, Projects
Shelter Prototype Design Proposal
Quizzes, Tests, Academic Prompts
Pre/Post Test Engineering Journal Checklist of Materials
Other Evidence (e.g. observations, work samples, student artifacts, etc.)
Teacher Observation Charts / Graphs Presentation
Student Self- Assessment
Code of Cooperation Reflection

Page 11 of 43Draft: Friday, December 8, 2017
Technology Integration ADISC Technology Integration Model*
Type of Integration Application(s) in this STEM Unit
A
Technology tools and resources that support students and teachers in adjusting, adapting, or augmenting teaching and learning to meet the needs of individual learners or groups of learners.
http://www.abcya.com/states_of_matter.htm (possible center idea for Day 7) Videos: Solids YouTube video https://www.youtube.com/watch?v=C33WdI64FiY Video: “What’s My Property?” https://www.youtube.com/watch?v=nlSemv2fLN8 Matter Chatter Video- https://www.youtube.com/watch?v=C33WdI64FiY “4 Seasons” video at the following link: https://www.youtube.com/watch?v=_0zKV6j1MDg.
D
Technology tools and resources that support students and teachers in dealing effectively with data, including data management, manipulation, and display.
Digital Camera (use time lapse feature) iPad Chatterpix App
I
Technology tools and resources that support students and teachers in conducting inquiry, including the effective use of Internet research methods.
Timer Hot Plate or Electric Tea Kettle Graduated Cylinder Beaker
S
Technology tools and resources that support students and teachers in simulating real world phenomena including the modeling of physical, social, economic, and mathematical relationships.
Clock Timer Hot Plate or Electric Tea Kettle
C
Technology tools and resources that support students and teachers in communicating and collaborating including the effective use of multimedia tools and online collaboration.
Chatterpix App iPad Digital Camera
*The ADISC Model was developed by James Rowley PhD, Executive Director of the Institute for Technology-Enhanced Learning at the University of Dayton

Page 12 of 43Draft: Friday, December 8, 2017
Career Connections Career Description
Careers in the construction and environmental efficiency areas can be broadly categorized into some of the following disciplines: civil engineer, structural engineer, architect, project engineer, materials engineer, meteorologist, and many more.
ARCHITECT Architects are professionals who plan, design, and oversee the construction of buildings. To practice architecture means to provide services in connection with the design and construction of buildings and the space within the site surrounding the buildings that have as their principal purpose human occupancy or use. Architects would work very closely with civil engineers to ensure their designs can be built safely and efficiently.
CIVIL ENGINEER Civil engineering is a professional engineering discipline that deals with the design, construction, and maintenance of the physical and naturally built environment, including works like roads, bridges, canals, dams, and buildings. There are many engineering fields of specialization that fall under the broad category of civil engineering.
MATERIAL ENGINEER Material engineers work to develop new materials that may be better insulators and therefore more energy efficient. They may develop lighter and stronger materials to be used in building construction. A materials engineer may work as a part of a team developing a more energy efficient window construction. A materials engineer could also work for a company like Igloo developing new materials to keep food colder longer.
METEOROLOGIST Meteorologists are those professionals involved in the interdisciplinary scientific study of the atmosphere. Meteorologists study our earth’s atmosphere: temperature, air pressure, water vapor, and the gradients and interactions of each variable, and how they change over time. They are the scientists that help to predict weather conditions we may experience in the coming weeks ahead.
PROJECT ENGINEER Project engineers would lead a team of both professional and skilled trades members to build the structures designed by the architects and engineers. A project engineer would direct the on-site activity. They would be responsible for keeping the project on a timeline, verifying all safety procedures are being followed, and tracking the performance to a budget.
STRUCTURAL ENGINEER Structural engineers, a subset of civil engineering, must ensure their designs satisfy given design criteria, predicated on safety (i.e. structures must not collapse without due warning) or serviceability and performance (i.e. building sway must not cause discomfort to the occupants). Structural engineers must apply the concepts of physics and their understanding of how different materials will perform when used in construction.

Page 13 of 43Draft: Friday, December 8, 2017

Page 14 of 43Draft: Friday, December 8, 2017
Section II: STEM Lesson Plan
Title of Lesson Day 1: What is Matter?
Time Required 50 minutes
Materials WHOLE CLASS Computer with projection capabilities Vocabulary Powerpoint (separate upload) Picture of molecules in solid, liquid, gas (Appendix C) "Snowman in Paradise" book by Michael Roberts "Summer" video: https://www.youtube.com/watch?v=rnEB2F_v_cE PER STUDENT Matter Pre/Post Test (Appendix A) “What is Matter?” page in the Engineering Journal (Appendix B)
Objectives Students will be able to define matter as everything around them. Students will be able to give one example for each state of matter.
Instructional Process
1. Students take Matter Pre-Test. 2. Begin by playing the song and/or video clip from Frozen with Olaf singing "Summer" https://www.youtube.com/watch?v=rnEB2F_v_cE 3. Ask students: Why is this video funny? What is the problem in the video? What would really happen to Olaf in the summer? 4. Refer to the book "Snowman in Paradise" by Michael Roberts. Ask students: Why don’t we see snowmen in summer? Is there a place on earth where snowmen could live all year long? Where would a snowman vacation? 5. Introduce matter. Definition - Matter is EVERYTHING around you; Matter has atoms inside that move. Matter has 3 main states: solid, liquid and gas. NOTE: Plasma is not appropriate at this grade level. 6. Create 3 sections on the board (or chart paper). List all the matter around the room (Break the matter into the 3 groups without noting the 3 different states). After they list examples of matter, see if the students can tell the difference in the columns. Show the students the pictures of solid, liquid and gas molecules. 7. Demonstrate the movement of molecules with students. SOLID: Have the students stand and shake their bodies slightly while in a tight group. Explain to them that this is similar to how a solid would move. Solids move but we do not see it and do not change shape. LIQUID: Have students walk around each other slowly, a little more spread out than in the solid demonstration. Explain to them that this is a similar to how a liquid would move. Liquids can move and can change shape. GAS: Have the students carefully run around the room. Explain to them that this is how a gas would move. Gases spread throughout the container.

Page 15 of 43Draft: Friday, December 8, 2017
8. Complete "What is Matter?" in Engineering Journal. 9. Discuss what an engineer is. Why are we writing in an Engineering Journal?
Differentiation Kinesthetic learners benefit from movement during the action of the three states of matter. Visual learners benefit from visuals on the board and from the video.
Assessments Are students able to list solids, liquids, and gases? Can students describe at least one difference between states of matter? Students will complete a the “What is Matter?” page in the Engineering Journal.

Page 16 of 43Draft: Friday, December 8, 2017
Section II: STEM Lesson Plan
Title of Lesson Day 2 – What is a Solid?
Time Required 30 – 60 minutes
Materials WHOLE CLASS Computer with projection capabilities Chart Paper Markers Picture Book: "What is a Solid" by Jennifer Boothroyd ¼ cup heavy whipping cream Salt Small container with lid (canning jar) Vocabulary Powerpoint Solids YouTube video - https://www.youtube.com/watch?v=C33WdI64FiY PER STUDENT Magazines to cut pictures out of Glue “Solids” poem in Engineering Journal (Appendix B) “What is a Solid?” page in Engineering Journal (Appendix B)
Objectives Students will be able to identify and describe a solid by its properties.
Instructional Process
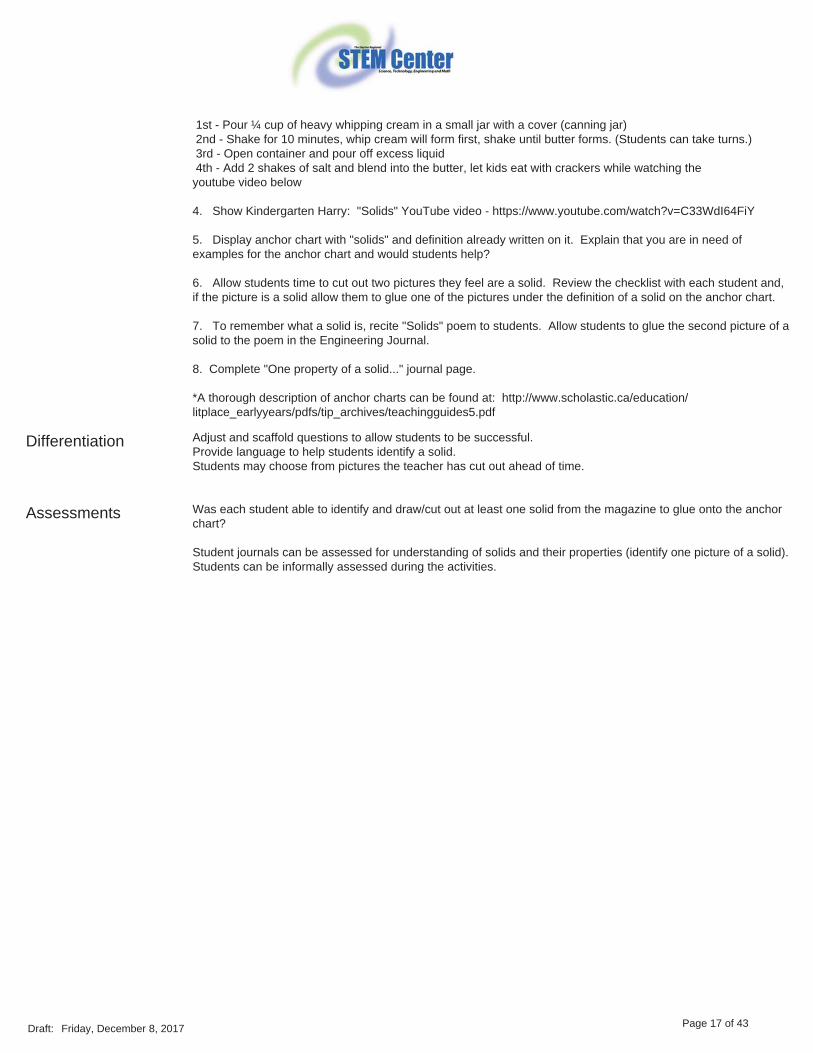
PRIOR TO THE LESSON: Begin creating an anchor chart* by writing the title "Solids" at the top of the chart paper. Under the title, write the definition for a solid (see Vocabulary Powerpoint). Leave room for the properties of solids checklist that will be added together with students later in the lesson. 1. Print vocabulary and/or display the following words: solid, matter, freeze, melt. Teachers can review words each day using the Vocabulary Powerpoint (separate upload). 2. Read the picture book : "What is a Solid" by Jennifer Boothroyd. While reading, create a solids checklist on the "Solids" anchor chart paper that students will be able to go through as they decide what pictures from the magazine are a solid. Example of properties of a solid checklist : Does not change shape Does not change size Stays in one place Feels hard Examples are a desk and a chair (draw or have a picture example) 3. Show students the whipping cream and review what they have already learned about matter and solids. Ask the students if there is anything they could do to change the cream into something solid. Explain that sometimes, even simple physical actions can cause dramatic results. For example, shaking milk or cream for a while will produce butter. Why? The shaking damages the membranes of fat globules and that allows the liquid fat to flow together into a continuous mass.
Page 17 of 43Draft: Friday, December 8, 2017
1st - Pour ¼ cup of heavy whipping cream in a small jar with a cover (canning jar) 2nd - Shake for 10 minutes, whip cream will form first, shake until butter forms. (Students can take turns.) 3rd - Open container and pour off excess liquid 4th - Add 2 shakes of salt and blend into the butter, let kids eat with crackers while watching the youtube video below 4. Show Kindergarten Harry: "Solids" YouTube video - https://www.youtube.com/watch?v=C33WdI64FiY 5. Display anchor chart with "solids" and definition already written on it. Explain that you are in need of examples for the anchor chart and would students help? 6. Allow students time to cut out two pictures they feel are a solid. Review the checklist with each student and, if the picture is a solid allow them to glue one of the pictures under the definition of a solid on the anchor chart. 7. To remember what a solid is, recite "Solids" poem to students. Allow students to glue the second picture of a solid to the poem in the Engineering Journal. 8. Complete "One property of a solid..." journal page. *A thorough description of anchor charts can be found at: http://www.scholastic.ca/education/litplace_earlyyears/pdfs/tip_archives/teachingguides5.pdf
Differentiation Adjust and scaffold questions to allow students to be successful. Provide language to help students identify a solid. Students may choose from pictures the teacher has cut out ahead of time.
Assessments Was each student able to identify and draw/cut out at least one solid from the magazine to glue onto the anchor chart? Student journals can be assessed for understanding of solids and their properties (identify one picture of a solid). Students can be informally assessed during the activities.

Page 18 of 43Draft: Friday, December 8, 2017
Section II: STEM Lesson Plan
Title of Lesson Day 3 – What is a Liquid?
Time Required 50-60 minutes
Materials WHOLE CLASS Computer with projection capabilities Chart Paper Markers 3 bottles of water Food coloring to color the water (optional) 1 clear vase 1 clear plastic half-gallon milk jug (emptied) 1 clear glass "What Is a Liquid?" by Jennifer Boothroyd Video: “What’s My Property?” https://www.youtube.com/watch?v=nlSemv2fLN8 PER SMALL GROUP Materials for vocabulary and sorting activity: 1 brown paper bag (1 per group, filled with the below items) Objects to put inside the brown paper bag: Duct Tape (to keep plastic bags shut) 1 plastic double zip freezer bag filled with water 1 plastic double zip freezer bag filled with pudding 1 plastic double zip freezer bag filled with milk A few solid objects of your choice, i.e..: a wooden block, a pencil, a crayon, a paper clip, a matchbox car… PER STUDENT “Liquids” poem in Engineering Journal (Appendix B) "What is a liquid?" page in Engineering Journal (Appendix B)
Objectives Students will be able to identify and describe a liquid by its properties. Students will be able to sort objects by their properties.
Instructional Process
PRIOR TO THE LESSON: Begin creating an anchor chart* by writing the title "Liquids" at the top of the chart paper. Under the title, write the definition for a liquid (see Vocabulary Powerpoint in separate upload). Leave room for the properties of liquids and the magazine pictures that will be added with students later in the lesson. Set up experiment from pg. 18 in the What is a Liquid? book. Pour 1 bottle of water into the vase, pour 1 water bottle into the empty milk jug, pour 1 water bottle into the glass. Hide water bottles from student’s sight. Leave experiment aside for use for after story. 1. Briefly review yesterday’s lesson on solids using the anchor chart. Allow time for the students to recall the
Page 19 of 43Draft: Friday, December 8, 2017
properties of solids. 2. Introduce the second type of matter: liquid. Provide time for the students to tell what they already know about liquids. 3. Read the story "What Is a Liquid?" by Jennifer Boothroyd- stop on page 17. While reading the story, point out the properties and descriptions of liquids (flows easily, takes shape of container, etc.). Turn to page 18 and point to the experiment you set up prior to lesson. 4. Echo read the poem "Liquids" together. Students will look through magazine pictures and find examples of liquids to add to the poem in their Engineering Journals. Students can draw pictures if magazine pictures are not available. 5. Point to the vase, milk jug and glass filled with water. Ask the students which container they believe contains the most water. Allow time for responses and reasoning as to their thinking. Pull out the water bottles that originally held the water. Pour the water back into each water bottle to demonstrate that each container held the same amount of water, explain to the students that liquids take the shape of their containers and that the shape and size of a container may make it look like it holds more or less liquid. 6. When you have finished the experiment, ask students to recall properties of liquids and record answers on anchor chart. Display anchor chart with the liquids definition already written on it. Words and phrases to be included but not limited to: does not keep it’s shape, takes the shape it’s container, turns to gas when heated (particles speed up), turns to solid when cooled (particles slow down), molecules are close together but free to move around (which allows a liquid to change it’s shape), flows, can be poured 7. Quickly compare and contrast solids vs. liquids. After, explain to the class their next assignment. They will be in a small group and will each take a turn. The first student will put their hand in the brown paper bag and hold one object in their hand BUT NOT PULL IT OUT. They will take a minute to feel the object and use descriptive words to help their peers decide if the object is a solid or a liquid. Once the group has decided, the student will pull out his/her object so the group can see if their guess was correct. They will then sort the objects into two groups: solids and liquids. 8. Complete "One property of a liquid..." page in students' Engineering Journals. *A thorough description of anchor charts can be found at: http://www.scholastic.ca/education/litplace_earlyyears/pdfs/tip_archives/teachingguides5.pdf
Differentiation Adjust and scaffold questions to allow students to be successful. Provide language to help students identify a liquid or a solid. Provide visuals to help sort liquids and solids. Allow students to pull the object out of the bag to decide whether or not it is a liquid or a solid.
Assessments Was each student able to identify, sort, and describe at least one solid and one liquid from the brown paper bag? Student journals can be assessed for understanding of liquids and their properties (identify one picture of a liquid). Students can be informally assessed during the activities.

Page 20 of 43Draft: Friday, December 8, 2017
Section II: STEM Lesson Plan
Title of Lesson Day: 4: What is a Gas?
Time Required 50-60 minutes
Materials WHOLE CLASS Chart Paper Markers Picture book: "What is a Gas?" by Jennifer Boothroyd or "Gases in My World" by Joanne Randolph "States of Matter: Gases" - Weekly Reader Early Learning Library (challenge book) 1 Paper or plastic cup 1 Tissue 1 Container of water big enough for the cup to fit into Electric powered fan 1 Streamer (about one meter long) Clear plastic tape PER STUDENT “Gases” poem in Engineering Journal (Appendix B) “What is a gas?” page in Engineering Journal (Appendix B) Magazines for students to cut out pictures of gases
Objectives Students will be able give one example of a gas. Students will be able to describe the properties of a gas.
Instructional Process
PRIOR TO THE LESSON: Begin creating an anchor chart* by writing the title "Gases" at the top of the chart paper. Under the title, write the definition for a gas (see Vocabulary Powerpoint). Leave room for the properties of gases and the magazine pictures that will be added with students later in the lesson. 1. Review what has already been discussed about solids and liquids. 2. The 3rd state of matter is called? Have the students share what they already know about gases. 3. Read the book "What is a Gas?" by Jennifer Boothroyd or "Gases in My World" by Joanne Randolph. While the book is read aloud, record properties of a gas and examples of gases in an anchor chart. Possible properties to record: hard to see, can feel some, does not have its own shape, can be put into a container, fills the whole container and it takes the shape of the container, cooling a gas can change it to a liquid Examples: air, steam, breath, carbon dioxide (bubbles in soda), helium, neon gas in neon signs 4. Have the students become gas molecules. Gas molecules are very far apart and they move quickly in all directions. Record in their journal what the molecules look like in a gas. 5. Echo read the poem “Gases” together. Students will look through magazine pictures and find examples of gases to add to the poem. Students can draw pictures to represent gases if magazine pictures are not available.

Page 21 of 43Draft: Friday, December 8, 2017
6. Say: "I am going to prove to you that a gas takes up space even though you can’t see it." Show students the container of water, a cup, and a tissue. Ask students if they think the tissue will get wet if it is put in the cup. Turn the cup upside down, and stick it under the water. Have the students turn and talk to their neighbor and predict what will happen. How many think the tissue will be dry? How many think the tissue will be wet? Complete the demonstration. Ask the students why the tissue stayed dry? 7. Show students a fan, tape, and some streamers. Ask: "How can we show that air is around us?" 8. Students will record two examples of a gas in their journal, and they will also write at least one property of a gas. *A thorough description of anchor charts can be found at: http://www.scholastic.ca/education/litplace_earlyyears/pdfs/tip_archives/teachingguides5.pdf
Differentiation Have advanced or high achieving students explain in their journal why the tissue did not get wet. Have pictures of solids, liquids, and gases already cut out so students can select from choices. Have advanced or high achieving students read the Weekly Reader book and have them find the definitions of pressure, volume, compress, and condense. Have them explain the water cycle to the class.
Assessments Student journals can be assessed for understanding of gases and their properties (identify one picture of a gas). Students can be informally assessed during the activities.

Page 22 of 43Draft: Friday, December 8, 2017
Section II: STEM Lesson Plan
Title of Lesson Day 5: How Does Matter Change?
Time Required 40 minutes
Materials WHOLE CLASS Computer with projection capabilities "Solid, Liquid, and Gas Song" http://www.sciencekids.co.nz/videos/chemistry/solidliquidgassong.html Hot Plate Beaker Glass Plate Ice 1 cup whole milk 1 teaspoon vanilla 1 tablespoon sugar 1 small plastic freezer bag 1 large plastic freezer bag 12 ice cubes 2 tablespoons rock salt Cups Spoons Mittens or Gloves PER STUENT "How Does Matter Change?" page in Engineering Journal (Appendix B)
Objectives Students will be able to explain the difference between heating and cooling.
Instructional Process
PRIOR TO THE LESSON: Set up the materials for each demonstration (Steps 3 and 5). For the second demonstration, have bags of ingredients pre-made if performing the experiment as a whole class. 1. Review the three basic states of matter. 2. Explain that today they will see how matter can change from one state to another state by heating (speeding up particles) or cooling (slowing down particles) the matter. 3. Perform a demonstration showing a solid turning to a liquid and then to a gas . Heat some ice in a glass beaker to melting. Then place a clear glass plate over the beaker to show the water vapor/droplets collect. 4. Explain that this is the same type of process that happens after it rains. The sun creates heat, which speeds up particles, and dries up the water. The water is then turned into a gas by evaporation. 5. Perform the second demonstration showing how a liquid can change to a solid. Each student could perform this experiment if desired. Put the milk, vanilla, and sugar into the small plastic bag. Seal the bag well. Place the ice cubes in the large plastic bag. Sprinkle the salt on the ice. Place the small bag in the large bag. Seal the bag

Page 23 of 43Draft: Friday, December 8, 2017
well. 4. Put on some music and shake the bag for 10 minutes. The bag should be shaken gently (can even be rolled on the ground) to prevent the bags from breaking. 5. Scoop out and eat. 6. Complete "How does matter change..." page in students' Engineering Journals. From the book "Change it! Solids, liquids, gases, and you," written by Adrienne Mason, illustrated by Claudia Davilla
Differentiation Adjust and scaffold questions to allow students to be successful. Visuals of each process are provided.
Assessments Students will write to explain the difference between heating and cooling in their journal for the day. Heating causes particles of matter to speed up, while cooling causes particles to slow down.

Page 24 of 43Draft: Friday, December 8, 2017
Section II: STEM Lesson Plan
Title of Lesson Day 6: How Do Seasons Affect Matter?
Time Required 45-60 minutes
Materials WHOLE CLASS Computer with projection capabilities "4 Seasons in a Year" (song for kids about the four seasons in a year) https://www.youtube.com/watch? v=_0zKV6j1MDg Chart Paper Markers PER STUDENT “How do seasons affect matter?” page in Engineering Journal (Appendix B) PER SMALL GROUP Snowman Directions for Teacher (Appendix D) Small (8oz) water bottle, with lid (1 per team + 1 for the control) Water (if bottles are empty), 8oz per bottle 1 Liquid measuring cup (if bottles are empty) 1 Permanent Marker Liquid Food Coloring (5+ drops per bottle) Decorating Supplies (if desired)
Objectives Students will describe one type of weather for each of the four seasons. Students will identify the sun as the source of energy that warms earth’s land, water, and air. Students will identify clothing appropriate for each of the four seasons.
Instructional Process
PRIOR TO THE LESSON: Fold the chart paper into four sections. Set up an anchor chart* with the title, "Seasons." Students will help create the remainder of the chart during the lesson. Read the "Snowman Directions for Teacher" (Appendix D). 1. Review heating and cooling concepts and the vocabulary from lesson 5. 2. Lead a discussion with the following questions: What causes land, water, and air to change temperature? Is the temperature always the same? Why? What causes this change? 3. Watch the “4 Seasons” video at the following link: https://www.youtube.com/watch?v=_0zKV6j1MDg. 4. Ask the following questions and record responses in an anchor chart: What are the names of the four seasons? What is the weather like in each season? How should you dress in each season? 5. Introduce the design challenge to students. They will be designing a shelter for their snowman. Have them imagine that their snowman will be around for all four seasons. On the “Seasons” page in the Engineering Journal, instruct students to draw one weather feature (rain, sun, falling leaves, snowflakes) and appropriate clothing (umbrella/rainboots, swimsuit, hat/gloves) for a snowman.
Page 25 of 43Draft: Friday, December 8, 2017
6. Finally, show students the water bottles that will become their snowmen for the project. Add a face to each snowman with a permanent marker. Let students name their snowman. Teacher follows directions for making the snowmen so they are ready for Day 9. *A thorough description of anchor charts can be found at: http://www.scholastic.ca/education/litplace_earlyyears/pdfs/tip_archives/teachingguides5.pdf
Differentiation Auditory and visual learners will benefit from the “4 Seasons” song and video. Students with motor skill difficulties can choose weather themed stickers instead of drawing weather elements in their journals. Students with higher-leveled skills can add greater detail to the journal page and/or write sentences to describe the seasons. These students can also write their own story to accompany the flip book.
Assessments Students’ drawings of one weather element and appropriate clothing on each season’s page of the journal.
Page 26 of 43Draft: Friday, December 8, 2017
Section II: STEM Lesson Plan
Title of Lesson Day 7: What is an Insulator?
Time Required 60 minutes
Materials WHOLE CLASS Book "The Mitten" by Jan Brett Vocabulary PowerPoint (separate upload) PER STUDENT “What is an insulator: Material Selection” page in Engineering Journal (Appendix B) "What is an insulator: Draw a plan for your shelter" page in Engineering Journal (Appendix B) MATERIALS FOR SORTING AND CENTER EXPLORATION Cotton balls Foil Construction paper Bubble wrap Pipe cleaners Felt Wax Paper Popsicle Sticks Cardboard Straws Fabric Scraps Transparency Paper Play-Doh Tissue Paper Styrofoam Plates Baking Trays/Plastic Tubs Ice cubes Tape (packing, masking, etc.) Materials Selection Sheet (Appendix E) Materials Sorting sheet and picture cards (Appendix F)
Objectives Students will sort materials by physical properties. Students will explore materials and describe them as insulators or conductors.
Instructional Process
1. Prior to the lesson: Set up Material Exploration Centers. There are 5 Centers for this lesson: CENTER 1: Material Exploration and Selection. MATERIALS: cotton balls, foil, construction paper, bubble wrap, pipe cleaners, baking trays/plastic tubs with ice inside, Material Selection sheet. OVERVIEW: Students will explore with materials on the ice to select the best insulating materials. Have students place the material over the ice and touch the material with their hands. Have students compare how much heat the ice is absorbing through each material ("Cold" is the absence of heat). Have the group decide which two materials they want to select and circle on the Material Selection sheet for the design challenge.

Page 27 of 43Draft: Friday, December 8, 2017
CENTER 2: Material Exploration and Selection. MATERIALS: felt, wax paper, Popsicle sticks, cardboard, straws, baking trays/plastic tubs with ice inside, Material Selection sheet. OVERVIEW: Students will explore with materials and ice to select the best insulating materials. Have students place the material over the ice and touch the material with their hands. Have students compare how much heat the ice is absorbing through each material. Have the group decide which two materials they want to select and circle on the Material Selection sheet for the design challenge. CENTER 3: Material Exploration and Selection. MATERIALS: fabric scraps, transparency paper, Play-Doh, tissue paper, Styrofoam plates, baking trays/plastic tubs with ice inside, Material Selection sheet. OVERVIEW: Students will explore with materials on the ice to select the best insulating materials. Have students place the material over the ice and touch the material with their hands. Have students compare how much heat the ice is absorbing through each material. Have the group decide which two materials they want to select and circle on the Material Selection sheet for the design challenge, Material Selection sheet. CENTER 4: Material Sort MATERIALS: Material sorting sheet and picture cards (1 sheet and set of pictures for the group to share). OVERVIEW: Students will work cooperatively and take turns selecting a picture card, determining the material it is made of, and placing the picture card in the correct category on the sorting mat. CENTER 5: Computers. MATERIALS: computers, the website http://www.abcya.com/states_of_matter.htm OVERVIEW: Students will explore the states of matter and play an interactive game as they sort materials/objects by their state of matter 2. Review the design challenge with students. 3. Introduce the materials students will be exploring and selecting for the design challenge. 4. Ask students “How could we sort these materials into groups?” Generate a discussion with students and ask guiding questions to guide students towards thinking about the different types of materials (paper, cloth, metal, plastic, etc…) 5. Ask students “How can we sort these materials by what they are made of?” Allow students to select materials and sort them into categories. Generate a discussion about the physical properties of each group of materials. Are the materials soft? Hard? Bendable? 6. Read aloud "The Mitten" by Jan Brett. 7. After reading, ask students “Why did the animals in the story want to be inside the mitten?”. Generate a discussion about insulators and conductors. Explain that some materials can be used to keep hot objects hot and cold objects cold, these are called insulators. Share the vocabulary cards for insulator and conductor with students. 8. Explain to students what a material engineer is/does, and that today they will be material engineers. Material engineers work to develop new materials that may be better insulators and therefore more energy efficient. They may develop lighter and stronger materials to be used in building construction. A materials engineer may work as a part of a team developing a more energy efficient window construction. A materials engineer could also work for a company like Igloo developing new materials to keep food colder longer. 9. Introduce the design planning sheet. Explain that today students will work together in their groups to explore materials, describe materials as insulators or conductors, and select the insulating materials they are going use for the design challenge. 10. Introduce the center areas to students. Have students explore in each center area for three to five minutes, then allow two minutes for the groups to discuss and select materials on their planning sheet. 11. Complete "Draw a plan for your shelter" page in Engineering Journal.

Page 28 of 43Draft: Friday, December 8, 2017
Differentiation Adjust and scaffold questions to allow students to be successful. Students will work in heterogeneous groups. Students who struggle can be paired with a peer within their group for guidance.
Assessments Teacher observes students sorting picture cards correctly on the Material Sorting Sheet.

Page 29 of 43Draft: Friday, December 8, 2017
Section II: STEM Lesson Plan
Title of Lesson Day 8: How Can I Design a Shelter?
Time Required 45-60 minutes
Materials WHOLE CLASS Cotton balls (bag of 100) Aluminum Foil (one roll) Construction Paper (one pack) Bubble Wrap (one roll, or scraps collected from used packaging) Pipe Cleaners (approximately 50; 10 per group) Felt (1 yard or less) Wax Paper (one roll) Popsicle sticks (approx. 50) Cardboard (scraps from old boxes) Straws (approx. 50) Fabric Scraps Transparency Paper (5-10 sheets) Play-doh (about 5 small tubs) Tissue Paper (10-20 sheets) Styrofoam Plates (10-15) Tape - Packing/Masking (one roll per team) Engineering Design Process Graphic (Appendix G) Design Team Roles (Appendix I) Code of Cooperation Poster (Appendix J) "What's an Engineer? Crash Course Kids #12.1" video: https://www.youtube.com/watch?v=owHF9iLyxic "Home" by Carson Ellis (optional) PER STUDENT "How can I design a shelter?" page in Engineering Journal (Appendix B)
Objectives Students will use the design process to construct a shelter that keeps their snowman from melting.
Instructional Process
1. Review the design process using Engineering Design Process graphic (Appendix E). This can be copied for each student or created as a larger poster to hang in the room. Place a clip or magnet on the “step” in the engineering process students will be working through today. Move this clip each day as students move through different steps in the process. 2. Review the design challenge and directions. Hold a brief discussion about shelters. What types of shelters do we see in our community? What are different types of shelters used around the world? An optional resource is the book, "Home" by Carson Ellis. 3. Make a connection for students between types of shelters and the shapes of these shelters (triangle/pyramid, square/cube, semicircle/hemisphere, etc). Explain that most shelters begin with a frame to support the insulating materials. Model for students how to construct a frame for their snowman shelter using pipe cleaners and straws. A pyramid shape is easiest for students to construct, however some students may be able to construct a cube. Teams should choose the shape of their shelter's frame and construct it before adding insulators.

Page 30 of 43Draft: Friday, December 8, 2017
4. Assign students to design teams and explain students’ roles within the group. Reference the career connections cited earlier in this document and/or watch the following, "What's an Engineer? " video to explain what engineers do: https://www.youtube.com/watch?v=owHF9iLyxic. 5. Introduce the Code of Cooperation. Give each team a copy of the Code of Cooperation. Discuss each expectation, and have each student sign the Code for his/her team. Use these each day as a visual reminder for students. NOTE: The evaluation form will be used at the end of the unit for students to assess their group cooperation. 6. Students construct the frame for their shelter. The Materials Engineer gathers the materials for the frame. The Project Engineer directs the architects in how to build the frame. 7. Once the frame is secure, teams may begin adding insulation. Have students refer to the materials sorting sheet in their Engineering Journal, gathering the best insulators determined in yesterday's activity. 8. As students are building, walk around the room asking students probing questions and redirecting students as needed. Why did you choose this particular material/insulator? How will this shelter keep your snowman from melting? Explain why you decided to build your shelter this way. 9. Students draw and label a picture of the prototype built today and write one or more sentences to describe it in their journals. 10. Let a spokesperson from each group share their design with the group. Students will run their first test of the design on Day 9.
Differentiation Students will work in heterogeneous groups. Teacher will ask a range of questions during the building process. Teacher may give additional parameters or requirements for the shelter such as a specific size.
Assessments Students will be informally assessed as the teacher circulates the room during the construction of shelters. Students will also be assessed on their drawing and sentences in their journals.
Page 31 of 43Draft: Friday, December 8, 2017
Section II: STEM Lesson Plan
Title of Lesson Day 9: How Can I Test My Shelter Design?
Time Required 30-40 minutes for introduction and set-up, monitoring and recording throughout the day in 1 hour increments 20-30 minutes for Test Platform construction by teacher
Materials TEACHER: Building a Snowman Shelter Test Platform(s) (Appendix L) WHOLE CLASS: Teacher-made Chart to graph class data PER GROUP: Water Bottle Snowman (from Day 6) Insulated Shelters (from Day 8) Graduated Cylinder (preferred) or Beaker (used to collect and transfer water) Funnel Clock or Timer PER STUDENT "How can I test my shelter design?" pages in Engineering Journal (Appendix B) Design Challenge Rubric (Appendix H)
Objectives Students will use the Engineering Design Process to test an insulated shelter for their snowman. Students will directly compare two graduated cylinders of water, to see which has more/less water and describe the difference. Students will organize, represent and interpret data. Students will ask answer questions about the total number of data points, how many in each category, and how many more or less are in one category than in another.
Instructional Process
PRIOR TO LESSON: *Place water bottle snowman (from Day 7) in freezer at least 1 day before this lesson. *Construct shelter testing platforms several days before lesson, making sure there are enough foundations for all groups to test at the same time. See Appendix J for detailed instructions and a list of materials for each platform. NOTE: This experiment should be started early in the day, as measurements will be taken hourly throughout the day. Students will need to collect several data points for graphing. 1. Review the design process using graphic (Appendix E from Day 8). Place a clip or magnet on the “test step” in the engineering process to model what step students will be working through today. 2. Review the design challenge and directions. 3. Introduce the snowman shelter testing platforms to students. Set up a control with an extra water bottle to model how the platforms work and how data will be collected. a. Place the platform and snowman in the location it will remain through the duration of the experiment. Place a graduated cylinder or beaker, under each pie pan to collect and measure the water as it drips through the holes in the center of the pan (Many beakers aren't graduated, but provide a larger collection opening than graduated cylinders. If a beaker is used for collection, water can be transfered to a graduated cylinder for measurement). Place a snowman in each pie pan with the opening of the water bottle pointing downward and
Page 32 of 43Draft: Friday, December 8, 2017
resting in the opening of the pie pan. Cover the snowman with a shelter. Set a timer or watch the clock in consistent intervals (1 hour is suggested) to monitor and record how fast the snowmen are melting. b. Show students the journal page for day 9. Explain that throughout the day they will be collecting data about how much water has melted and collected in the graduated cylinder/beaker (to the nearest whole number) and recording the data on the graph provided on the journal page for Day 9. 4. Have each group set up their snowman and shelter on a platform at the same time while you set up the control snowman on a platform without a shelter. Set a timer or watch the clock for a consistent interval (1 hour is suggested). 5. Have students record their baseline data on the journal page for Day 9. 6. When the timer signals, or when the clock reaches the predetermined time, allow groups to observe the and measure (to the nearest whole number) the amount of water collected from their snowman. Have students compare the amount of water collected in their graduated cylinder/beaker to the amount of water collected from the control. Ask students “Which has more/less water? How do you know?”. 7. Have students record their data for the first interval on their graph. 8. Repeat steps 6, 7, and 8 after each predetermined interval throughout the day. 9. After the data has been collected for the last time, have students share the final amount of water that was collected from their group’s snowman in the graduated cylinder/beaker. Graph each group’s data on a chart. Ask questions about the data: “How much did team ___ have?” “Which team had the least amount of water collected?” “Which team had the greatest amount of water collected?” “Did any teams have an equal amount of water collected?” “How much more/less did one teams have than another?” “Which team(s) had a better design for their shelter? How do you know?” "How could team ___ redesign their shelter to have better results?" 10. Complete "How can I test my shelter design" Engineering Journal page.
Differentiation Adjust and scaffold questions to allow students to be successful. Students will work in heterogeneous groups. Students who struggle can be paired with a peer within their group for guidance.
Assessments Students will be informally assessed by the teacher as they answer questions about the data and graphs.

Page 33 of 43Draft: Friday, December 8, 2017
Section II: STEM Lesson Plan
Title of Lesson Day 10: How Can I Redesign My Shelter?
Time Required 30-40 minutes for redesign, monitoring throughout the day in 1 hour increments
Materials TEACHER: Building a Snowman Shelter Test Platform(s) (Appendix L) WHOLE CLASS: Teacher-made Chart to graph class data PER GROUP: Water Bottle Snowman (from Day 7) Insulated Shelters (from Day 8) Shelter Test Platform(s) (from Day 9) Graduated Cylinder (preferred) or Beaker (used to collect and transfer water) Clock or Timer PER STUDENT "How can I redesign my shelter?" pages in Engineering Journal (Appendix B) Design Challenge Rubric (Appendix H)
Objectives Students will use the design process to construct a shelter that keeps their snowman from melting. Students will use the engineering design process to test an insulated shelter for their snowman. Students will directly compare 2 graduated cylinders of water, to see which has more/less water and describe the difference. Students will organize, represent and interpret data. Students will ask answer questions about the total number of data points, how many in each category, and how many more or less are in one category than in another.
Instructional Process
1. Review the Engineering Design Process. Ask students to identify where they are in the process. Discuss the iterative nature of the design process. 2. Review previous day’s graph. Discuss designs that had the least amount of water loss. What were those shelters constructed from? How were they built? What materials did students use? 3. Allow students to redesign their shelter based upon yesterday’s test. 4. Students test their redesigned shelter constructed in Day 9. Follow the steps 3-9 from Day 9. 5. Complete "How can I redesign my shelter?" Engineering Journal page.
Differentiation Adjust and scaffold questions to allow students to be successful. Students will work in heterogeneous groups. Students who struggle can be paired with a peer within their group for guidance.

Page 34 of 43Draft: Friday, December 8, 2017
Assessments Students will be informally assessed by the teacher as they answer questions about the data and graphs. Teachers will use the Design Challenge Rubric (Appendix H)

Page 35 of 43Draft: Friday, December 8, 2017
Section II: STEM Lesson Plan
Title of Lesson Day 11: How Can I Share My Results?
Time Required 30 – 60 minutes
Materials WHOLE CLASS iPad, or other device that supports the ChatterPix App ChatterPix App (FREE) downloaded onto ipad or iphone Here is a youtube video on how to use ChatterPix https://www.youtube.com/watch?v=_Iom-DiDIc8 States of Matter Anchor Chart – filled in Graph pre-made on chart paper for students to vote PER STUDENT Picture of snowman and of shelter Picture of each student (used to vote for favorite design on class chart) "ChatterPix Information Sheet" for Day 11 in Engineering Journal (Appendix B) "What is my favorite shelter design?" page for Day 11 in Engineering Journal (Appendix B)
Objectives Students will be able to present what they have learned about the engineering design process. Students will be able to present their design of the snowman shelter and results of the test.
Instructional Process
1. Inform students that they will be creating a ChatterPix movie to present information learned during the snowman project. 2. Allow students time to complete the ChatterPix Information sheet in the Engineering Journal. 3. Model for students how to use ChatterPix to make their movie. 4. Students use ipads to take a picture of their snowman with the insulated shelter on the Chatterpix App. 5. Students will get 10 minutes to create a Chatterpix presentation about their engineering project, using the ChatterPix page in the Engineering Journal. 6. When all groups are finished with their Chatterpix, have the class view all of the videos. 7. Students complete the "What is my favorite shelter design?" page for Day 11 in Engineering Journal by naming their favorite choice of shelter design and why. 8. Students vote for their favorite design by placing their photo on the appropriate column of the pre-made classroom chart. 9. Review the data on the classroom graph and discuss results with students.
Differentiation Adjust and scaffold questions to allow students to be successful. Students can create their own graph from scratch or fill out individual teacher created graphs.

Page 36 of 43Draft: Friday, December 8, 2017
Assessments Was each student able to present their design to the class using ChatterPix? Was each student able to create their individual graphs to show the results of favorite shelter design?

Page 37 of 43Draft: Friday, December 8, 2017
Section II: STEM Lesson Plan
Title of Lesson Day 12: What Did I Learn?
Time Required 30-40 minutes
Materials WHOLE CLASS Anchor Charts made throughout the unit Code of Cooperation (Appendix J) PER STUDENT Matter Post-Test (Appendix A) Engineering Journal (Appendix B) Colored dot stickers Team Evaluation (Appendix K)
Objectives The student will demonstrate knowledge of matter learned during the unit.
Instructional Process
1. Post all of the anchor charts created during the unit. Give each child one colored dot sticker. Instruct students to place one sticker on the chart displaying a fact they can best explain to another person. 2. Review which chart had the most stickers. Allow one student to review each chart for classmates. 3. Students take the Matter Post-Test (Appendix A) 4. Students complete the evaluation for their team's cooperation (Appendix K)
Differentiation Adjust and scaffold questions to allow students to be successful.
Assessments Matter Post-Test Code of Cooperation Team Evaluation

Page 38 of 43Draft: Friday, December 8, 2017
Section III: Unit Resources
Materials and Resource Master List
PRINTABLES - Matter pre/post test (Appendix A) Engineering Journal (Appendix B) Molecules Picture (Appendix C) Snowman Directions for Teachers (Appendix D) Vocabulary Cards (separate upload) Materials Selection Sheet (Appendix E) Materials Sorting Sheet and Picture Cards (Appendix F) Engineering Design Process Graphic (Appendix G) Design Team Roles (Appendix I) Design Challenge Rubric (Appendix H) Building a Snowman Shelter Test Platform(s) (Appendix J) INVESTIGATION - Anchor Chart Magazines - to cut Heavy Whipping Cream Canning Jar Salt Crackers Solid Objects (your choice) Streamers/Crepe Paper Large Container Electric Fan Plastic Cups Tissue Markers Chart Paper Brown Bags Duct Tape Double Zip Bags Water Milk Pudding 3 Bottles Water 1 Clear Vase ½ Gallon Milk Jug Food Coloring Hot Plate Beaker Glass Plate Ice Vanilla Sugar Small and Large Plastic Freezer Bags Spoons Cups Cotton Balls Foil Construction Paper Bubble Wrap Pipe Cleaners Felt Craft Sticks Cardboards Straws Fabric Scraps Transparency Paper
Page 39 of 43Draft: Friday, December 8, 2017
Play-Doh Tissue Paper Styrofoam Plates Baking Trays/Plastic Tubs Tape - Packing/Masking Ice Cubes Aluminum Foil Wax Paper Straws Graduated Cylinder (preferred) or Beaker (used to collect and transfer water) Funnel Clock or Timer Colored Dot Stickers Water Bottle (8 oz.) 1 per team Liquid Measuring Cup Food Coloring Markers DIGITAL RESOURCES - (per team/class depending on teacher/student access - smart device with chatterpix app) vocabulary powerpoint “Summer” video clip “Solids” YouTube video “What’s my Property?” YouTube video “Matter Chatter” YouTube Video “Solid, Liquid, Gas song” - Science kids video “4 Seasons in a Year” YouTube video “What’s an Engineer? “ Crash Course Kids - YouTube video TEXT RESOURCES - “Snowman in Paradise”by Michael Roberts “What is a Solid?” by Jennifer Boothroy “What is a Liquid?” by Jennifer Boothroy “What is a Gas?” by Jennifer Boothroy “The Mitten” by Jan Brett
Key Vocabulary ALTOGETHER is the total, everything A CIRCUMFERENCE is the outer edge of a circle CONDENSATON is turning a gas to a liquid by slowing down its particles A CONDUCTOR is a material that transmits energy in the form heat or electricity A CONTROL is a standard of comparison for checking the results of an experiment The DIAMETER is the line through the center of the circle EVAPORATION is turning a liquid to a gas by speeding up its particles An EXPERIMENT is a scientific test done to make a discovery, test a hypothesis, or demonstrate a known fact FEWER - a small number FREEZING is turning a liquid to a solid by slowing down its particles GAS is an air-like substance which expands to fill any space available

Page 40 of 43Draft: Friday, December 8, 2017
GREATER THAN- a larger amount of An INSULATOR is a material or substance used to prevent the loss of heat LESS THAN - not as much A LIQUID flows freely but has no fixed shape MATTER is everything around you! It takes up space, has mass, and has atoms that move. MELTING is turning a solid to a liquid by speeding up its particles MORE - many or much A PARTICLE is a very tiny piece of matter, smaller than a grain of sand. The PERIMETER is the outside border of any shape. A PROPERTY is an attribute, quality, or characteristic of something A SHELTER is a place giving temporary protection from bad weather or danger A SOLID is firm and stable in shape STATES OF MATTER are solid, liquid, and gas
Technical Brief Matter can exist in three physical states; solid, liquid, and gas. Ice is an example of solid water. When heated it melts at a definite temperature to form liquid water. When heat causes the temperature of the water to rise to a certain point, the water boils, producing steam, a gas. Removal of heat reverses these processes. Through all these changes, the chemical composition of water remains the same. All solids have form. They also have hardness and rigidity; or the ability to oppose a change of shape. Solids can have a wide variation of properties. They may be brittle, possess great tensile strength, exhibit malleability or ductility, and many others. The atoms in almost all solids are arranged in regular patterns, called crystals. Liquids have no shape of their own. But they have the ability to flow. They take the shape of any container into which they are placed. All gases have almost identical physical behavior. Gases have low density compared to solids and liquids. An equal volume of a gas will weigh much less than that same volume of solid or liquid. Blow up a balloon with air and then fill a balloon with water to the same size. Which one is heavier? Gases exert pressure in all directions. Gases are compressible. When gases are heated they expand greatly. All states of matter will be observed in this lesson plan. The Engineering Design Challenge will deal with the transition of solid water, ice, to liquid water. As the temperature rises an ice cube will melt. For a summer time outing drinks and perishable items are placed in a cooler packed with ice. If the cooler is very efficient, the food will stay cold for a long time. The opposite of this event might be trying to stay warm in a house in the winter. The furnace is turned on to provide heat to the inside. Keeping the heat inside a home as long as possible is important. Both of the above examples require an efficient insulator to keep the ice from melting or the heat from escaping. Insulation is the restriction of heat, sound, or electricity within a specific area. The challenge for this lesson will deal only with heat. Scientists and engineers are continually studying and developing new materials/construction techniques that are energy efficient, better insulators. Heat flows from a warm area to a cooler one by means of conduction, convection, and radiation. Insulation stops this natural heat movement. Conduction is the movement of heat through a material. When heat travels by conduction, it moves through the material without carrying any of the material with it. An example of this would be to place a copper rod into a fire. The end of the rod outside the heat source quickly becomes hot. None of the rods material moved; but, the heat traveled through the rod from atom to atom.
Page 41 of 43Draft: Friday, December 8, 2017
Convection is the transfer of heat by the movement of a heated material. For example, a hot stove heats the air around it by conduction. This heated air expands and begins to rise and move away from the heat source. Cooler air replaces the hot air next to the stove and the process repeats itself. This movement of heated air away from a hot object and the flow of cooler air towards the hot object is called a convection current. In conduction and convection moving particles transmit the heat. But heat can also travel through empty space which has no particles. In any object, the moving particles create waves of radiant energy. These waves are called infrared rays. Much energy from the sun travels through space to the earth. These rays warm the earth’s surface. Insulation is a way to control the movement of heat by keeping it in or out of a place. The Engineering Design Challenge will be directed toward keeping heat out of a shelter which the student will design, construct, and test. Certain materials such as wood and plastic (polymers) make good insulators against the movement of heat by conduction. An example of this is the plastic handle on a frying pan. The movement of heat through the air by convection can be controlled by blocking the space between a hot and cold area with “dead air”. For example, the layer of air between a storm window and the regular window acts as an insulator. Surfaces that reflect infrared rays can insulate heat travelling by radiation. For example, shiny metal roofs reflect the sun’s rays. Materials used for insulation can include fiberglass, metal foils, wood, rock wool fibers, certain types of fire retardant paper shreds, cellular polymers like expanded polypropylene, polyurethane, and expanded polystyrene, and rigid insulation boards are just a few examples. Scientists and engineers are working to develop new materials and construction techniques that are more energy efficient. Many of these approaches today are based upon using renewable material sources to create the insulator. Reference: The World Book Encyclopedia, copyright 1988
Safety and Disposal
It is recommended that: Students work with sharp objects only with adult supervision If possible use plastic beakers/containers to collect melting snowman instead of glass beakers Most materials used in this unit are reusable. However, should something need to be disposed of, it is recommended that items be recycled or disposed of in appropriate waste receptacles.
References ABCYa.com, LLC. (2016, April 25). States of Matter. Retrieved from ABCYa.com: http://www.abcya.com/ states_of_matter.htm Boothroyd, J. (2007). What is a Gas? Minneapolis: Lerner Publications Group. Boothroyd, J. (2007). What is a Liquid? Minneapolis: Lerner Publications Group. Boothroyd, J. (2007). What is a Solid? Minneapolis: Lerner Publications Group. Brett, J. (1989). The Mitten. New York: G. P. Putnam's Sons. Crash Course Kids. (2015, May 26). What's an Engineer? Crash Course Kids #12.1 . Retrieved from YouTube: Crash Course Kids: https://www.youtube.com/watch?v=owHF9iLyxic Crash Course Kids. (2015, November 19). What's My Property: Crash Course Kids #35.2. Retrieved from YouTube: Crash Course Kids: https://www.youtube.com/watch?v=nlSemv2fLN8 Crash Course Kids. (2015, November 19). What's My Property: Crash Course Kids #35.2 . Retrieved from

Page 42 of 43Draft: Friday, December 8, 2017
YouTube: Crash Course Kids : https://www.youtube.com/watch?v=nlSemv2fLN8 Disney UK. (2013, November 13). Frozen "In Summer" Song - Sing-a-long with Olaf - Official | HD. Retrieved from YouTube: Disney UK: https://www.youtube.com/watch?v=rnEB2F_v_cE Ellis, C. (2015). Home. Somerville, MA: Candlewick. Kindergarten, H. (2014, February 26). 4 Seasons in a Year. Retrieved from YouTube: Harry Kindergarten Music: https://www.youtube.com/watch?v=_0zKV6j1MDg Kindergarten, H. (2014, June 12). Matter Chatter. Retrieved April 26, 2016, from Harry Kindergarten Music: https://youtu.be/C33WdI64FiY Mason, A. (2006). Change it! Solids, liquids, gases, and you. Tonawanda: Kids Can Press Ltd. Matter. (1988). In The World Book Encyclopedia (Vol. 13, pp. 310-312). World Book. Mezzanotte, J. (2007). States of Matter Gases. Milwaukee: Weekly Reader Early Learning Library . ParticleMen. (2010, March 12). Solid Liquid Gas - They Might Be Giants - official video . Retrieved from YouTube: ParticleMen: https://youtu.be/btGu9FWSPtc Randolph, J. (2006). Gases in My World. New York: The Rosen Publishing Group, Inc. Roberts, M. (2004). Snowman in Paradise. San fransisco: Chronicle Books, LLC. Scholastic. (2010, January 22). What Is an Anchor Chart? Retrieved from Scholastic: http://www.scholastic.ca/ education/litplace_earlyyears/pdfs/tip_archives/teachingguides5.pdf WeGoTechTeam. (2014, December 5). How to use Chatterpix - WeGo Tech . Retrieved from YouTube: WeGoTechTeam: https://www.youtube.com/watch?v=_Iom-DiDIc8
Curriculum Developers
Stephanie Beiting, Contributing Author Colleen Biers, Contributing Author and Editor Kristina Dobberstein, Contributing Author Jim Hartings, Contributing Author Tammy Luttrell, Contributing Author Jessica Leslie, Contributing Author Carly Monfort, Editor Dee Van Brackel, Contributing Author Amanda Wilson, Contributing Author

Page 43 of 43Draft: Friday, December 8, 2017
Section IV: Appendices Appendix A: Matter Pre/Post Test Appendix B: Engineering Journal Appendix C: Pictures of Solid, Liquid, Gas Molecules Appendix D: Snowman Directions to TEACHER Appendix E: Materials Selection Sheet (Day 7) Appendix F: Materials Sorting Sheet and Picture Cards (Day 7) Appendix G: Engineering Design Process Appendix H: Engineering Design Challenge Rubric Appendix I: Group Roles Appendix J: Code of Cooperation Appendix K: Team Evaluation Appendix L: Building a Snowman Shelter Test Platform