satin guest book set
TRANSCRIPT

Satin Guest Book Set
Satin Guest Book SetMake a beautiful satin guest book and matching pen set, and personalize it with embroidery. Coordinate the color changes with the wedding colors to create a unique, sophisticated look.
Guest books and pen holders can be found at most craft stores, or by shopping online.
The guest book used in these instructions is 10 x 7 1/2 inches, and the amount of fabric listed in the supplies covers this size book. Be sure to purchase enough fabric to cover the size of your book, plus a 1 1/2 inch allowance on all sides.
Supplies needed:
** Guest book** Pen holder with pen** 12 x 24 inch piece of satin (for outside cover)** 12 x 24 piece of satin (for inside cover)** 10 x 7 1/2 inch piece cotton batting -- 1/8 inch thick (and a small piece for pen holder)** Two pieces 8 1/2 x 11 inch cardstock (and a small piece for pen holder)** Medium-weight cut-away stabilizer** Temporary spray adhesive
file:///F|/Source/ELProjects/html/pr1331.html (1 of 21)3/20/2007 10:25:34 AM

Satin Guest Book Set
** All-purpose permanent spray adhesive** Hot glue** Masking tape** Air-erase pen** Small piece of foam board** Self-healing pad** Craft knife
Designs Used:
** Roses and Vines Bridal Border - Small or Large ** Roses and Vines Bridal Accent
Lay the satin for the outside of the cover right side up. Lay the book on top of the fabric with the outside cover down.
Remove the pages if possible.
With an air-erase pen, trace the edges of the book onto the fabric.
file:///F|/Source/ELProjects/html/pr1331.html (2 of 21)3/20/2007 10:25:34 AM

Satin Guest Book Set
Remove the book and mark an allowance of 3/4 inch around the entire outer edge of the shape. Draw lines connecting the marks and angle the ends at each corner as shown.
Lay the book back inside the shape, aligning it with the right half. Mark the top and bottom of the spine onto the fabric. These marks indicate the edge of the embroidered area.
file:///F|/Source/ELProjects/html/pr1331.html (3 of 21)3/20/2007 10:25:34 AM

Satin Guest Book Set
Remove the book again. At both the top and the bottom, measure between the corner and the mark indicating the edge of the embroidered area. Divide by two, and mark the center.
Lay a strip of masking tape between the two center marks. Measure between the two marks and divide by two to find the center of the embroidered area. Mark the center onto the tape.
Lay strips of tape extending horizontally from the center mark.
Print templates of the designs at full size. Poke a hole in the center of the design template, and align it with the center mark on the tape. Mark the horizontal and vertical axis points on the tape.
file:///F|/Source/ELProjects/html/pr1331.html (4 of 21)3/20/2007 10:25:34 AM

Satin Guest Book Set
Remove the template and draw lines on the tape connecting the horizontal and vertical axis points.
Spray a piece of cut-away stabilizer with temporary adhesive and smooth the fabric on top.
Align the marks on the hoop with the lines on the tape and hoop the fabric and the stabilizer.
For tips when embroidering on satin, please see these free instructions and video:Embroidering on Satin
file:///F|/Source/ELProjects/html/pr1331.html (5 of 21)3/20/2007 10:25:34 AM

Satin Guest Book Set
Attach the hoop to the machine, load the design, align the needle directly over the center point on the tape, remove the tape and embroider the design.
After the first design has finished sewing, position and mark the other designs as you did the first one, and embroider the remaining designs.
To perfectly align the border designs, position each template and then measure equally, on each end of the template, from the horizontal axis line on the template with the inner line on the fabric.
When all the designs have finished stitching, carefully trim away the excess stabilizer, leaving about 1/4 inch around each design.
file:///F|/Source/ELProjects/html/pr1331.html (6 of 21)3/20/2007 10:25:34 AM

Satin Guest Book Set
Cut out the shape following the outer allowance lines.
To make sure that the existing surface of the book does not show through the fabric, we are covering ours with printer paper.
Measure the front and back cover, and cut the paper to fit.
file:///F|/Source/ELProjects/html/pr1331.html (7 of 21)3/20/2007 10:25:34 AM

Satin Guest Book Set
Spray the paper with permanent adhesive. Smooth one piece on the front cover and one on the back.
We are adding a thin layer of cotton batting under the front cover (embroidered cover). This gives the front cover some extra dimension and prevents the areas around the embroidery from having a "ridge" look when smoothed onto the cover.
Lay the book, with the front cover down, onto the batting and trace the shape.
file:///F|/Source/ELProjects/html/pr1331.html (8 of 21)3/20/2007 10:25:34 AM

Satin Guest Book Set
Cut out the shape from the batting. Spray the front cover with permanent adhesive.
Align and smooth the batting onto the front cover.
file:///F|/Source/ELProjects/html/pr1331.html (9 of 21)3/20/2007 10:25:34 AM

Satin Guest Book Set
Spray the outside of the front and back cover with permanent adhesive.
Lay the embroidered satin piece wrong side up. Carefully align the book with the satin and press into place -- be sure to place the front cover on the same side as the embroidery.
file:///F|/Source/ELProjects/html/pr1331.html (10 of 21)3/20/2007 10:25:34 AM
Satin Guest Book Set
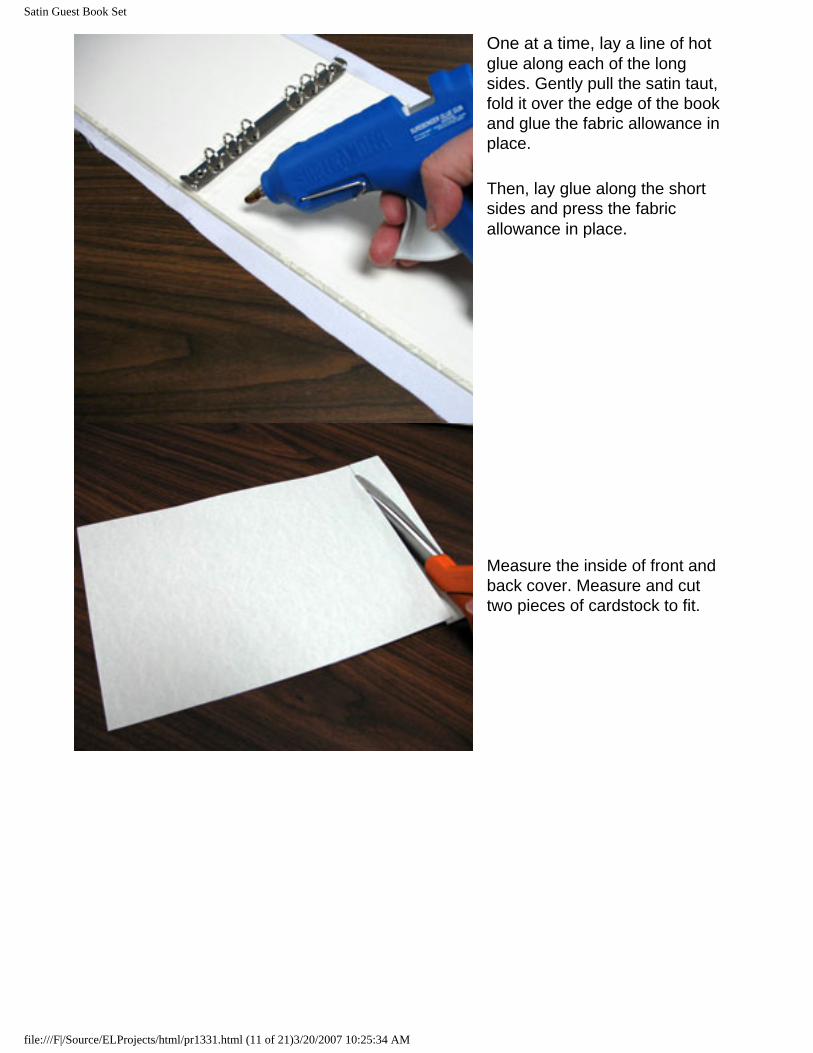
One at a time, lay a line of hot glue along each of the long sides. Gently pull the satin taut, fold it over the edge of the book and glue the fabric allowance in place.
Then, lay glue along the short sides and press the fabric allowance in place.
Measure the inside of front and back cover. Measure and cut two pieces of cardstock to fit.
file:///F|/Source/ELProjects/html/pr1331.html (11 of 21)3/20/2007 10:25:34 AM

Satin Guest Book Set
Spray the cardstock pieces with permanent adhesive.
Lay the satin for the inside of the cover, wrong side up. Smooth the cardstock onto the wrong side of the satin. Cut about a 1 inch allowance on all sides.
file:///F|/Source/ELProjects/html/pr1331.html (12 of 21)3/20/2007 10:25:34 AM

Satin Guest Book Set
Spray the fabric allowances with permanent adhesive.
Fold the long sides over and press into place.
file:///F|/Source/ELProjects/html/pr1331.html (13 of 21)3/20/2007 10:25:34 AM

Satin Guest Book Set
Then fold in the short sides. Trim the excess fabric on the corners.
Make two pieces of satin-covered cardstock.
Spray the wrong side of each piece of satin-covered cardstock with permanent adhesive.
file:///F|/Source/ELProjects/html/pr1331.html (14 of 21)3/20/2007 10:25:34 AM

Satin Guest Book Set
Place the linings on the inside of the front and back cover and smooth into place.
You may want to reinforce each of the corners with a dab of hot glue.
Add the pages and the book is complete.
Now we will make a matching base for a pen holder.
To determine the size of the base, set the pen holder and a paper template of the design on top of the foam board. Measure and mark about 1 inch around the holder and the template.
file:///F|/Source/ELProjects/html/pr1331.html (15 of 21)3/20/2007 10:25:34 AM

Satin Guest Book Set
Cut out the shape on a self-healing mat using a craft knife.
Lay the foam board on the satin and cut about a 1 inch allowance around the shape.
file:///F|/Source/ELProjects/html/pr1331.html (16 of 21)3/20/2007 10:25:34 AM

Satin Guest Book Set
Center the satin, right side up, on top of the foam board. Reposition the holder and the template on top of the satin.
Lay a strip of masking tape under the template. Poke a hole in the center of the template and mark the center onto the tape.
Lay strips of tape extending vertically from the center point. Align the template with the center point and mark the horizontal and vertical axis points.
Remove the template and draw lines connecting the horizontal and vertical axis points.
file:///F|/Source/ELProjects/html/pr1331.html (17 of 21)3/20/2007 10:25:34 AM

Satin Guest Book Set
Spray a piece of cut-away stabilizer with temporary adhesive and hoop it with the satin.
Attach the hoop to the machine, align the needle directly over the center point on the tape, remove the tape and embroider the design.
When the design has finished, carefully trim away the excess stabilizer.
file:///F|/Source/ELProjects/html/pr1331.html (18 of 21)3/20/2007 10:25:34 AM

Satin Guest Book Set
Cut a piece of cotton batting to be the same size as the foam board.
Spray the foam board with permanent adhesive, and align and smooth the batting on top.
Then spray the batting with adhesive, and align the embroidered satin on top and smooth in place.
file:///F|/Source/ELProjects/html/pr1331.html (19 of 21)3/20/2007 10:25:34 AM

Satin Guest Book Set
Flip the board over and add lines of hot glue to the long sides. Gently pull the fabric allowances and press in place.
Attach the fabric allowances on the short ends as you did before.
You can finish the bottom by cutting a piece of cardstock a bit smaller than the bottom of the board and hot gluing it in place.
.
file:///F|/Source/ELProjects/html/pr1331.html (20 of 21)3/20/2007 10:25:34 AM

Satin Guest Book Set
Spray the base of the holder with permanent adhesive and press it into place above the embroidery.
It's a perfect pair!
Click here for a printable version of these project instructions.
You’ll need to have Adobe Acrobat Reader installed on your computer. If you don't have it, you can download a free copy by clicking on the icon below.
file:///F|/Source/ELProjects/html/pr1331.html (21 of 21)3/20/2007 10:25:34 AM