sas enterprise case management 3 · sas enterprise case management creates auditable records for...
TRANSCRIPT
SAS® Enterprise Case Management 3.1 Administrator's Guide
SAS® Documentation
The correct bibliographic citation for this manual is as follows: SAS Institute, Inc. 2012. SAS® Enterprise Case Management 3.1: Administrator's Guide. Cary, NC : SAS Institute Inc.
SAS® Enterprise Case Management 3.1: Administrator's Guide
Copyright © 2012, SAS Institute Inc., Cary, NC, USA
All rights reserved. Produced in the United States of America.
For a hardcopy book: No part of this publication may be reproduced, stored in a retrieval system, or transmitted, in any form or by any means, electronic, mechanical, photocopying, or otherwise, without the prior written permission of the publisher, SAS Institute Inc.
For a Web download or e-book:Your use of this publication shall be governed by the terms established by the vendor at the time you acquire this publication.
The scanning, uploading, and distribution of this book via the Internet or any other means without the permission of the publisher is illegal and punishable by law. Please purchase only authorized electronic editions and do not participate in or encourage electronic piracy of copyrighted materials. Your support of others' rights is appreciated.
U.S. Government Restricted Rights Notice: Use, duplication, or disclosure of this software and related documentation by the U.S. government is subject to the Agreement with SAS Institute and the restrictions set forth in FAR 52.227–19 Commercial Computer Software-Restricted Rights (June 1987).
SAS Institute Inc., SAS Campus Drive, Cary, North Carolina 27513.
1st electronic book, February 2012
SAS® Publishing provides a complete selection of books and electronic products to help customers use SAS software to its fullest potential. For more information about our e-books, e-learning products, CDs, and hard-copy books, visit the SAS Publishing Web site at support.sas.com/publishing or call 1-800-727-3228.
SAS® and all other SAS Institute Inc. product or service names are registered trademarks or trademarks of SAS Institute Inc. in the USA and other countries. ® indicates USA registration.
Other brand and product names are registered trademarks or trademarks of their respective companies.

Contents
About this Book . . . . . . . . . . . . . . . . . . . . . . . . . . . . . . . . . . . . . . . . . . . . . . . . . . . . . . . . vii
Chapter 1 • Introduction to SAS Enterprise Case Management 3.1 . . . . . . . . . . . . . . . . . . . . . . . 1What Is Enterprise Case Management . . . . . . . . . . . . . . . . . . . . . . . . . . . . . . . . . . . . . . . 1More Information . . . . . . . . . . . . . . . . . . . . . . . . . . . . . . . . . . . . . . . . . . . . . . . . . . . . . . . 1
Chapter 2 • Pre-installation Requirements and Tasks . . . . . . . . . . . . . . . . . . . . . . . . . . . . . . . . . 3Basic Pre-installation Steps for SAS Enterprise Case Management . . . . . . . . . . . . . . . . 4Pre-installation: Database Information . . . . . . . . . . . . . . . . . . . . . . . . . . . . . . . . . . . . . . . 6Pre-installation: JDBC Drivers . . . . . . . . . . . . . . . . . . . . . . . . . . . . . . . . . . . . . . . . . . . . . 8Pre-installation: Oracle Database . . . . . . . . . . . . . . . . . . . . . . . . . . . . . . . . . . . . . . . . . . . 8Pre-installation: SQLServer Database . . . . . . . . . . . . . . . . . . . . . . . . . . . . . . . . . . . . . . . 9Pre-installation: PostgreSQL Database . . . . . . . . . . . . . . . . . . . . . . . . . . . . . . . . . . . . . . 10Sample Database Creation Scripts . . . . . . . . . . . . . . . . . . . . . . . . . . . . . . . . . . . . . . . . . 12
Chapter 3 • Installing SAS Enterprise Case Management . . . . . . . . . . . . . . . . . . . . . . . . . . . . . 13Selecting a Single-Tier or Multi-Tier Installation . . . . . . . . . . . . . . . . . . . . . . . . . . . . . 13SAS Deployment Wizard Tasks . . . . . . . . . . . . . . . . . . . . . . . . . . . . . . . . . . . . . . . . . . . 14Installed SAS Products . . . . . . . . . . . . . . . . . . . . . . . . . . . . . . . . . . . . . . . . . . . . . . . . . . 14Disabling Anonymous Web Access . . . . . . . . . . . . . . . . . . . . . . . . . . . . . . . . . . . . . . . . 15Specifying DBMS Credentials . . . . . . . . . . . . . . . . . . . . . . . . . . . . . . . . . . . . . . . . . . . . 15Reviewing the Instructions.html File . . . . . . . . . . . . . . . . . . . . . . . . . . . . . . . . . . . . . . . 27Default File Locations . . . . . . . . . . . . . . . . . . . . . . . . . . . . . . . . . . . . . . . . . . . . . . . . . . 28Updating the SAS SID File . . . . . . . . . . . . . . . . . . . . . . . . . . . . . . . . . . . . . . . . . . . . . . . 29Apply All SAS Hotfix Updates . . . . . . . . . . . . . . . . . . . . . . . . . . . . . . . . . . . . . . . . . . . 29
Chapter 4 • Post-installation Requirements and Tasks . . . . . . . . . . . . . . . . . . . . . . . . . . . . . . . 31Post-installation Overview . . . . . . . . . . . . . . . . . . . . . . . . . . . . . . . . . . . . . . . . . . . . . . . 32Clustering Support . . . . . . . . . . . . . . . . . . . . . . . . . . . . . . . . . . . . . . . . . . . . . . . . . . . . . 32Customizing Your SAS Enterprise Case Management Installation . . . . . . . . . . . . . . . . 32Defining Users, Groups, and Roles . . . . . . . . . . . . . . . . . . . . . . . . . . . . . . . . . . . . . . . . 34Uploading Definitions and Properties . . . . . . . . . . . . . . . . . . . . . . . . . . . . . . . . . . . . . . 40Capabilities in SAS Enterprise Case Management . . . . . . . . . . . . . . . . . . . . . . . . . . . . . 43Subscriptions and Notifications . . . . . . . . . . . . . . . . . . . . . . . . . . . . . . . . . . . . . . . . . . . 49Notifications and the SAS Information Delivery Portal . . . . . . . . . . . . . . . . . . . . . . . . . 56Configuring the Web Service . . . . . . . . . . . . . . . . . . . . . . . . . . . . . . . . . . . . . . . . . . . . . 59Deploy SAS Spelling Correction . . . . . . . . . . . . . . . . . . . . . . . . . . . . . . . . . . . . . . . . . . 60Deploying Case Network Analysis Graph Functionality in an
HTTPS Web Environment . . . . . . . . . . . . . . . . . . . . . . . . . . . . . . . . . . . . . . . . . . . . 63
Chapter 5 • Customizing SAS Enterprise Case Management . . . . . . . . . . . . . . . . . . . . . . . . . . . 65Introduction to Customizing . . . . . . . . . . . . . . . . . . . . . . . . . . . . . . . . . . . . . . . . . . . . . . 66User-Defined Fields . . . . . . . . . . . . . . . . . . . . . . . . . . . . . . . . . . . . . . . . . . . . . . . . . . . . 69User-Defined Generic Data Tables . . . . . . . . . . . . . . . . . . . . . . . . . . . . . . . . . . . . . . . . . 72User Interface Definitions . . . . . . . . . . . . . . . . . . . . . . . . . . . . . . . . . . . . . . . . . . . . . . . . 73Configurations . . . . . . . . . . . . . . . . . . . . . . . . . . . . . . . . . . . . . . . . . . . . . . . . . . . . . . . . 74Data Security . . . . . . . . . . . . . . . . . . . . . . . . . . . . . . . . . . . . . . . . . . . . . . . . . . . . . . . . . 79Resource Bundles . . . . . . . . . . . . . . . . . . . . . . . . . . . . . . . . . . . . . . . . . . . . . . . . . . . . . . 79Workflows . . . . . . . . . . . . . . . . . . . . . . . . . . . . . . . . . . . . . . . . . . . . . . . . . . . . . . . . . . . 80
Reference Tables . . . . . . . . . . . . . . . . . . . . . . . . . . . . . . . . . . . . . . . . . . . . . . . . . . . . . . 85Search Panels . . . . . . . . . . . . . . . . . . . . . . . . . . . . . . . . . . . . . . . . . . . . . . . . . . . . . . . . . 90
Chapter 6 • Using the Custom Page Builder . . . . . . . . . . . . . . . . . . . . . . . . . . . . . . . . . . . . . . . . 97Overview of the Custom Page Builder . . . . . . . . . . . . . . . . . . . . . . . . . . . . . . . . . . . . . . 97Customizable User Interfaces . . . . . . . . . . . . . . . . . . . . . . . . . . . . . . . . . . . . . . . . . . . . . 98Assigning the Custom Page Builder Permission . . . . . . . . . . . . . . . . . . . . . . . . . . . . . . 99Working with User Interface Definitions . . . . . . . . . . . . . . . . . . . . . . . . . . . . . . . . . . . . 99Valid XML Elements and Descriptions for User Interface Definitions . . . . . . . . . . . . 100Custom Page Builder: Creating Custom Help . . . . . . . . . . . . . . . . . . . . . . . . . . . . . . . 108Expressions and Functions . . . . . . . . . . . . . . . . . . . . . . . . . . . . . . . . . . . . . . . . . . . . . . 109Customization Examples . . . . . . . . . . . . . . . . . . . . . . . . . . . . . . . . . . . . . . . . . . . . . . . 109Custom Page Builder Components . . . . . . . . . . . . . . . . . . . . . . . . . . . . . . . . . . . . . . . . 118
Chapter 7 • Regulatory Reports and E-Filing . . . . . . . . . . . . . . . . . . . . . . . . . . . . . . . . . . . . . . . 123Introduction . . . . . . . . . . . . . . . . . . . . . . . . . . . . . . . . . . . . . . . . . . . . . . . . . . . . . . . . . . 124E-Filing Process . . . . . . . . . . . . . . . . . . . . . . . . . . . . . . . . . . . . . . . . . . . . . . . . . . . . . . 124Configuring E-Filing . . . . . . . . . . . . . . . . . . . . . . . . . . . . . . . . . . . . . . . . . . . . . . . . . . 125Regulatory Report Form Configuration . . . . . . . . . . . . . . . . . . . . . . . . . . . . . . . . . . . . 128Support of Multiple Versions of Report Forms . . . . . . . . . . . . . . . . . . . . . . . . . . . . . . 134FINCEN . . . . . . . . . . . . . . . . . . . . . . . . . . . . . . . . . . . . . . . . . . . . . . . . . . . . . . . . . . . . 135SAR-DI . . . . . . . . . . . . . . . . . . . . . . . . . . . . . . . . . . . . . . . . . . . . . . . . . . . . . . . . . . . . . 136CTR . . . . . . . . . . . . . . . . . . . . . . . . . . . . . . . . . . . . . . . . . . . . . . . . . . . . . . . . . . . . . . . . 137
Chapter 8 • Related Items . . . . . . . . . . . . . . . . . . . . . . . . . . . . . . . . . . . . . . . . . . . . . . . . . . . . . . . 141Overview . . . . . . . . . . . . . . . . . . . . . . . . . . . . . . . . . . . . . . . . . . . . . . . . . . . . . . . . . . . . 141Configuring Match Criteria . . . . . . . . . . . . . . . . . . . . . . . . . . . . . . . . . . . . . . . . . . . . . 141
Chapter 9 • Financial Items . . . . . . . . . . . . . . . . . . . . . . . . . . . . . . . . . . . . . . . . . . . . . . . . . . . . . 145Overview . . . . . . . . . . . . . . . . . . . . . . . . . . . . . . . . . . . . . . . . . . . . . . . . . . . . . . . . . . . . 145Defining Financial Item Types in a Reference Table . . . . . . . . . . . . . . . . . . . . . . . . . . 145Defining the UDF for Financial Transactions . . . . . . . . . . . . . . . . . . . . . . . . . . . . . . . 146Defining the UDF for Financial Summaries . . . . . . . . . . . . . . . . . . . . . . . . . . . . . . . . . 146Adding a FinancialItemsTable Component to a Case or Incident User Interface . . . . 146Defining the Financial Items User Interface . . . . . . . . . . . . . . . . . . . . . . . . . . . . . . . . . 146Customizing a SAS Stored Process to Compute Financial Summaries . . . . . . . . . . . . 147
Chapter 10 • Case Network Analysis . . . . . . . . . . . . . . . . . . . . . . . . . . . . . . . . . . . . . . . . . . . . . 149Overview . . . . . . . . . . . . . . . . . . . . . . . . . . . . . . . . . . . . . . . . . . . . . . . . . . . . . . . . . . . . 149Case Network Analysis Process . . . . . . . . . . . . . . . . . . . . . . . . . . . . . . . . . . . . . . . . . . 149Configuring Link Criteria . . . . . . . . . . . . . . . . . . . . . . . . . . . . . . . . . . . . . . . . . . . . . . . 150Configuring the Data Source . . . . . . . . . . . . . . . . . . . . . . . . . . . . . . . . . . . . . . . . . . . . 152Configuring Displayed Data Fields . . . . . . . . . . . . . . . . . . . . . . . . . . . . . . . . . . . . . . . 152Configuring Display Labels . . . . . . . . . . . . . . . . . . . . . . . . . . . . . . . . . . . . . . . . . . . . . 153Case Network Analysis Logic . . . . . . . . . . . . . . . . . . . . . . . . . . . . . . . . . . . . . . . . . . . 154
Chapter 11 • Configuring Subject Search . . . . . . . . . . . . . . . . . . . . . . . . . . . . . . . . . . . . . . . . . . 155Overview . . . . . . . . . . . . . . . . . . . . . . . . . . . . . . . . . . . . . . . . . . . . . . . . . . . . . . . . . . . . 155Subject Search Process . . . . . . . . . . . . . . . . . . . . . . . . . . . . . . . . . . . . . . . . . . . . . . . . . 155Configuring Match Criteria for Subject Search . . . . . . . . . . . . . . . . . . . . . . . . . . . . . . 155Subject Search Logic . . . . . . . . . . . . . . . . . . . . . . . . . . . . . . . . . . . . . . . . . . . . . . . . . . 156
Chapter 12 • Report Mart . . . . . . . . . . . . . . . . . . . . . . . . . . . . . . . . . . . . . . . . . . . . . . . . . . . . . . . 159SAS Enterprise Case Management Report Mart . . . . . . . . . . . . . . . . . . . . . . . . . . . . . 159
Chapter 13 • Internationalization . . . . . . . . . . . . . . . . . . . . . . . . . . . . . . . . . . . . . . . . . . . . . . . . . 163
iv Contents

Overview . . . . . . . . . . . . . . . . . . . . . . . . . . . . . . . . . . . . . . . . . . . . . . . . . . . . . . . . . . . . 163Specify the Database Character Encoding . . . . . . . . . . . . . . . . . . . . . . . . . . . . . . . . . . 163SAS Session Encoding Consideration and DBCS Support . . . . . . . . . . . . . . . . . . . . . 164Default Encoding for Databases Supported by SAS Enterprise Case Management . . 165Restricting the Maximum Length of VARCHAR Fields . . . . . . . . . . . . . . . . . . . . . . . 165Naming Conventions for Locales . . . . . . . . . . . . . . . . . . . . . . . . . . . . . . . . . . . . . . . . . 166Create and Use Custom Translated Messages . . . . . . . . . . . . . . . . . . . . . . . . . . . . . . . 166Localizing Custom Table Labels and Column Labels . . . . . . . . . . . . . . . . . . . . . . . . . 167Localizing Reference Tables . . . . . . . . . . . . . . . . . . . . . . . . . . . . . . . . . . . . . . . . . . . . 167Localizing Workflow Activities and Statuses . . . . . . . . . . . . . . . . . . . . . . . . . . . . . . . 168
Chapter 14 • Adding Custom SAS Code . . . . . . . . . . . . . . . . . . . . . . . . . . . . . . . . . . . . . . . . . . . 169Adding Custom SAS Code . . . . . . . . . . . . . . . . . . . . . . . . . . . . . . . . . . . . . . . . . . . . . . 169
Chapter 15 • Event Logging . . . . . . . . . . . . . . . . . . . . . . . . . . . . . . . . . . . . . . . . . . . . . . . . . . . . . 171Overview . . . . . . . . . . . . . . . . . . . . . . . . . . . . . . . . . . . . . . . . . . . . . . . . . . . . . . . . . . . . 171Currently Supported Events . . . . . . . . . . . . . . . . . . . . . . . . . . . . . . . . . . . . . . . . . . . . . 171Creating a Batch Load Event . . . . . . . . . . . . . . . . . . . . . . . . . . . . . . . . . . . . . . . . . . . . 174
Chapter 16 • Additional Tasks . . . . . . . . . . . . . . . . . . . . . . . . . . . . . . . . . . . . . . . . . . . . . . . . . . . 177Case Routing Configurations for SAS Enterprise Case
Management: Regional Manager Setup . . . . . . . . . . . . . . . . . . . . . . . . . . . . . . . . . 177Setting Up Data Management Jobs . . . . . . . . . . . . . . . . . . . . . . . . . . . . . . . . . . . . . . . . 182SAS Enterprise Case Management – Backup Requirements . . . . . . . . . . . . . . . . . . . . 182
Appendix 1 • SAS Enterprise Case Management Web Service . . . . . . . . . . . . . . . . . . . . . . . . 185Introduction . . . . . . . . . . . . . . . . . . . . . . . . . . . . . . . . . . . . . . . . . . . . . . . . . . . . . . . . . . 185A Sample Request . . . . . . . . . . . . . . . . . . . . . . . . . . . . . . . . . . . . . . . . . . . . . . . . . . . . . 185
Appendix 2 • Troubleshooting . . . . . . . . . . . . . . . . . . . . . . . . . . . . . . . . . . . . . . . . . . . . . . . . . . . 187Workflow Status Updates . . . . . . . . . . . . . . . . . . . . . . . . . . . . . . . . . . . . . . . . . . . . . . . 188Database Error Warnings and SAS Deployment Wizard . . . . . . . . . . . . . . . . . . . . . . . 188Post-installation Database Steps Required after Unsuccessful
SAS Deployment Wizard Database Installation . . . . . . . . . . . . . . . . . . . . . . . . . . . 188Empty or Missing Date Fields After a Save . . . . . . . . . . . . . . . . . . . . . . . . . . . . . . . . . 190Case Network Graph Stops Working . . . . . . . . . . . . . . . . . . . . . . . . . . . . . . . . . . . . . . 190Case Network Analysis Web Service Not Created . . . . . . . . . . . . . . . . . . . . . . . . . . . . 190Special Characters Are Missing in Case Network Analysis and Report Mart . . . . . . . 192Specifying the Version Number for SAS Enterprise Case Management . . . . . . . . . . . 193DBMS JAR File and Multiple Machine Installations . . . . . . . . . . . . . . . . . . . . . . . . . . 193Assigning the Primary Owner to a Case . . . . . . . . . . . . . . . . . . . . . . . . . . . . . . . . . . . . 193Adding the Custom Column Type VARCHAR . . . . . . . . . . . . . . . . . . . . . . . . . . . . . . 193Adding Comments to an Entity . . . . . . . . . . . . . . . . . . . . . . . . . . . . . . . . . . . . . . . . . . 194Locking and Unlocking an Entity . . . . . . . . . . . . . . . . . . . . . . . . . . . . . . . . . . . . . . . . . 194Using the Search Functionality in SAS Enterprise Case Management . . . . . . . . . . . . 194Session Time-Out Warning Message . . . . . . . . . . . . . . . . . . . . . . . . . . . . . . . . . . . . . . 195Financial Items Warning Message . . . . . . . . . . . . . . . . . . . . . . . . . . . . . . . . . . . . . . . . 195E-File Cannot Be Generated . . . . . . . . . . . . . . . . . . . . . . . . . . . . . . . . . . . . . . . . . . . . . 196Transaction Sequential Number Is Not Assigned After an E-File Is Generated . . . . . 196Incorrect or Missing Translations . . . . . . . . . . . . . . . . . . . . . . . . . . . . . . . . . . . . . . . . . 196Updating Configuration Information in a Cluster . . . . . . . . . . . . . . . . . . . . . . . . . . . . 197Field Definition Changes and Search Page Errors . . . . . . . . . . . . . . . . . . . . . . . . . . . . 197Uploading Large Attachments . . . . . . . . . . . . . . . . . . . . . . . . . . . . . . . . . . . . . . . . . . . 197Receiving the ORA-12520 Error Message . . . . . . . . . . . . . . . . . . . . . . . . . . . . . . . . . . 197
Appendix 3 • SASMSG and %SMD2DS . . . . . . . . . . . . . . . . . . . . . . . . . . . . . . . . . . . . . . . . . . . . 199
Contents v

How Does SAS Enterprise Case Management Use %SMD2DS and SASMSG? . . . . 199About the SASMSG Function . . . . . . . . . . . . . . . . . . . . . . . . . . . . . . . . . . . . . . . . . . . 199Formatting . . . . . . . . . . . . . . . . . . . . . . . . . . . . . . . . . . . . . . . . . . . . . . . . . . . . . . . . . . . 200Open Code Macro Statements . . . . . . . . . . . . . . . . . . . . . . . . . . . . . . . . . . . . . . . . . . . 200The %SMD2DS Macro . . . . . . . . . . . . . . . . . . . . . . . . . . . . . . . . . . . . . . . . . . . . . . . . . 200Example: Add a Message and Its Translation to Be Used by SASMSG . . . . . . . . . . . 201Example: Message Substitutions . . . . . . . . . . . . . . . . . . . . . . . . . . . . . . . . . . . . . . . . . 202
Index . . . . . . . . . . . . . . . . . . . . . . . . . . . . . . . . . . . . . . . . . . . . . . . . . . . . . . . . 203
vi Contents

About this Book
Audience
This documentation is intended primarily for those users who are responsible for the installation and configuration of SAS Enterprise Case Management. A secondary audience includes those users who are responsible for managing data, creating workflows and user interfaces, and overseeing case management. Examples of such users include systems administrators, database administrators, and high-level case management personnel who are interested in implementing a specific configuration of SAS Enterprise Case Management in order to meet specific organizational case management goals. Therefore, the scope of this documentation is limited primarily to the administrative tasks that these users are likely to perform. Moreover, this documentation assumes familiarity with the technical terminology and concepts that are required to perform these tasks. For information about the functionality of the SAS Enterprise Case Management user interface, see the SAS Enterprise Case Management: User's Guide.
vii

viii About this Book

Chapter 1
Introduction to SAS Enterprise Case Management 3.1
What Is Enterprise Case Management . . . . . . . . . . . . . . . . . . . . . . . . . . . . . . . . . . . . . 1
More Information . . . . . . . . . . . . . . . . . . . . . . . . . . . . . . . . . . . . . . . . . . . . . . . . . . . . . . 1
What Is Enterprise Case ManagementCase management is a business process that involves coordinating, researching, and tracking information about incidents that might pose a risk to an organization. Case management can span organizations and include various business users.
Because financial and banking institutions are required to report suspicious financial activity, case management includes the process of electronically filing regulatory reports with government agencies.
By providing a structured environment for defining and managing workflows, SAS Enterprise Case Management enables business users to streamline processes and conduct more efficient, effective, and consistent investigations. Customized workflows can be created for various types of cases and reports. Workflows are classified by type, category, and subcategory, and automatically route cases or reports to the appropriate individuals or groups, as defined by your organization. Workflows can require users to complete specific actions before moving a case or report to the next step in the business process.
SAS Enterprise Case Management creates auditable records for management, examiners, and regulatory agencies. Each audit record contains user identification, a time stamp, and the dates when actions were performed.
More InformationFor information about support fixes, see the SAS Notes that are available on the SAS Technical Support Web site. Search for available SAS Notes for SAS Enterprise Case Management at http://support.sas.com.
For information about the hardware, software, and database requirements of SAS Enterprise Case Management, and for links to other sources of related information, see http://support.sas.com/resources/sysreq/index.html.
1
2 Chapter 1 • Introduction to SAS Enterprise Case Management 3.1

Chapter 2
Pre-installation Requirements and Tasks
Basic Pre-installation Steps for SAS Enterprise Case Management . . . . . . . . . . . . . 4Completing Pre-installation Tasks . . . . . . . . . . . . . . . . . . . . . . . . . . . . . . . . . . . . . . . 4Installing the Java Development Kit . . . . . . . . . . . . . . . . . . . . . . . . . . . . . . . . . . . . . . 4Installing a Web Application Server . . . . . . . . . . . . . . . . . . . . . . . . . . . . . . . . . . . . . . 4Verifying Your Operating System Requirements . . . . . . . . . . . . . . . . . . . . . . . . . . . . 4Creating the SAS Enterprise Case Management User Accounts . . . . . . . . . . . . . . . . 4Obtaining a Deployment Plan and SID File . . . . . . . . . . . . . . . . . . . . . . . . . . . . . . . . 5Download Your Software with the SAS Download Manager . . . . . . . . . . . . . . . . . . 5
Pre-installation: Database Information . . . . . . . . . . . . . . . . . . . . . . . . . . . . . . . . . . . . 6Determining the Required Database Information . . . . . . . . . . . . . . . . . . . . . . . . . . . . 6Shared Services Database Requirement . . . . . . . . . . . . . . . . . . . . . . . . . . . . . . . . . . . 7
Pre-installation: JDBC Drivers . . . . . . . . . . . . . . . . . . . . . . . . . . . . . . . . . . . . . . . . . . . 8
Pre-installation: Oracle Database . . . . . . . . . . . . . . . . . . . . . . . . . . . . . . . . . . . . . . . . . 8Installing the Oracle Database . . . . . . . . . . . . . . . . . . . . . . . . . . . . . . . . . . . . . . . . . . 8Create the Oracle User for Enterprise Case Management . . . . . . . . . . . . . . . . . . . . . 8Installing SAS Access for Oracle . . . . . . . . . . . . . . . . . . . . . . . . . . . . . . . . . . . . . . . . 9Test Access to the Database . . . . . . . . . . . . . . . . . . . . . . . . . . . . . . . . . . . . . . . . . . . . 9
Pre-installation: SQLServer Database . . . . . . . . . . . . . . . . . . . . . . . . . . . . . . . . . . . . . 9Installing the SQLServer Database . . . . . . . . . . . . . . . . . . . . . . . . . . . . . . . . . . . . . . . 9Create the SQLServer User for Enterprise Case Management . . . . . . . . . . . . . . . . . . 9Installing SAS Access for ODBC or SAS Access for SQLServer . . . . . . . . . . . . . . . 9Configuring the SQLServer ODBC Connection . . . . . . . . . . . . . . . . . . . . . . . . . . . . 9Test Access to the Database . . . . . . . . . . . . . . . . . . . . . . . . . . . . . . . . . . . . . . . . . . . 10
Pre-installation: PostgreSQL Database . . . . . . . . . . . . . . . . . . . . . . . . . . . . . . . . . . . 10Installing the PostgreSQL Database . . . . . . . . . . . . . . . . . . . . . . . . . . . . . . . . . . . . . 10Configuring the PostgreSQL Database for a Multi-Tier Installation . . . . . . . . . . . . 11Creating the PostgreSQL User for SAS Enterprise Case Management . . . . . . . . . . 11Install SAS Access for ODBC . . . . . . . . . . . . . . . . . . . . . . . . . . . . . . . . . . . . . . . . . 11Configuring the PostgreSQL ODBC Connection . . . . . . . . . . . . . . . . . . . . . . . . . . . 11Test Access to the Database . . . . . . . . . . . . . . . . . . . . . . . . . . . . . . . . . . . . . . . . . . . 12
Sample Database Creation Scripts . . . . . . . . . . . . . . . . . . . . . . . . . . . . . . . . . . . . . . . 12
3

Basic Pre-installation Steps for SAS Enterprise Case Management
Completing Pre-installation TasksBefore you begin to install the SAS Intelligence Platform and SAS Enterprise Case Management, you must complete a set of pre-installation tasks. You must install various third-party components, verify your operating system requirements, create the needed user accounts, address database requirements, and obtain your SAS software. Specifically, you must complete the following tasks:
Installing the Java Development KitSAS Enterprise Case Management requires the installation of the Sun Java Development Kit. For further information, see http://support.sas.com/resources/thirdpartysupport/v93/index.html.
Installing a Web Application ServerSAS Enterprise Case Management requires a Web application server. You must install this third-party software before installing SAS Enterprise Case Management. For more information about Web application servers, see http://support.sas.com/resources/thirdpartysupport/v93/index.html.
CAUTION:Do not use Oracle WebLogic 9.2 as the Web application server for SAS Enterprise Case Management.
Verifying Your Operating System RequirementsBefore you install SAS Enterprise Case Management, make sure that you meet the minimum system requirements that are described in the system requirements documentation. System requirements are unique for each operating system. Items that are addressed as system requirements include software requirements, hardware requirements, space requirements, specific product requirements, and graphics hardware and software compatibility.
Some specific items that you should check include the following settings:
• Set the screen resolution for SAS Enterprise Case Management no lower than 1024 x 768.
• Set your browser's pop-up blocker to allow pop-ups for your applications.
For more requirements information, see “SAS System Requirements” at http://support.sas.com/resources/sysreq/index.html.
Creating the SAS Enterprise Case Management User AccountsAs a pre-installation task, you must have two operating system accounts, one for installing and configuring the SAS software and one for running the spawned servers.
4 Chapter 2 • Pre-installation Requirements and Tasks

For details about these user accounts, refer to the pre-installation checklist or the SAS Intelligence Platform: Installation and Configuration Guide for your deployment. You will also need at least one operating system account to serve as an administrator for SAS Enterprise Case Management. Details about preparing a user account are discussed in Chapter 4, “Post-installation Requirements and Tasks,” on page 31. You can use an existing account if one already exists. A SAS Enterprise Case Management administrative user is specific to SAS Enterprise Case Management. This user must have a valid host operating system account, and as a post-installation task, you must associate that account with a metadata user in SAS Management Console. Product administrators have access to perform any action on any data in SAS Enterprise Case Management.
The SAS Spawned Servers account (sassrv) needs to be separate, but from the same user group, as the installation user. In a Windows environment, it must be included in the administrator's group to ensure stored processes can write to the SAS Enterprise Case Management config directories. Refer to SAS Intelligence Platform: Installation and Configuration Guide for guidance in setting up the SAS Spawned Servers account (sassrv).
It is often necessary to change the name of the administrative user from admin to match an existing user name in your environment. For example, if you configure your Web application server so that the SAS Enterprise Case Management Web application authenticates users against an LDAP server, then you must change the name of the administrative user to the user name found in the LDAP user directory. That user can then log on as the administrator in SAS Enterprise Case Management. Be aware that a SAS Enterprise Case Management product administrator account is not the same as a general administrator account, such as the SAS Administrator (sasadm@saspw).
See “Setting Up Users, Groups, and Ports” in the SAS Intelligence Platform: Installation and Configuration Guide.
Note: SAS Enterprise Case Management uses both regular user accounts and a product administrative user account. You can create regular user accounts for SAS Enterprise Case Management as a post-installation task. For more information, see http://support.sas.com/documentation/.
Obtaining a Deployment Plan and SID FileBefore you can install your SAS software, you must obtain a deployment plan and SID file. The deployment plan is a summary of the software that is installed and configured during your installation. A deployment plan file, named plan.xml, contains information about what software should be installed and configured on each machine in your environment. This plan serves as input to the SAS installation and configuration tools. A deployment plan can be a custom plan for your specific software installation or it can be a standard, predefined deployment plan that describes a common configuration. The SID file is used by the SAS system to install and license SAS software. It is a control file that contains license information that is required in order to install SAS. For more information about deployment plans and the SID file, see “SAS Deployment Wizard Options” and “About Deployment Plans” in the SAS Intelligence Platform: Installation and Configuration Guide.
Download Your Software with the SAS Download ManagerDownload the software that is listed in your SAS Software Order with the SAS Download Manager. You can then use the SAS Deployment Wizard to install your software.
Basic Pre-installation Steps for SAS Enterprise Case Management 5

Pre-installation: Database Information
Determining the Required Database InformationDuring the installation and configuration of SAS Enterprise Case Management, the SAS Deployment Wizard requires information about the database that SAS Enterprise Case Management uses. The following table provides information that you must have to complete the steps in the SAS Deployment Wizard.
Table 2.1 Database Information
Property Description
Database Type Specifies the database vendor to use with SAS Enterprise Case Management. SAS Enterprise Case Management supports the Oracle, SQL Server, and PostgreSQL databases.
User name or Schema Specifies the user name for the database used with your SAS Enterprise Case Management installation.
Note: The schema user requires adequate permissions to create all objects required for the schema initialization. For Oracle, these include sequences, tables, indexes and views.
Password Specifies a valid password for the user name associated with the database account.
Port Specifies the port used by the database. The default ports for the databases supported by SAS Enterprise Case Management are as follows:
• Oracle:1521
• SQLServer:1433
• PostgreSQL:5432
Host Name Specifies the host name of the machine where the database is installed.
6 Chapter 2 • Pre-installation Requirements and Tasks
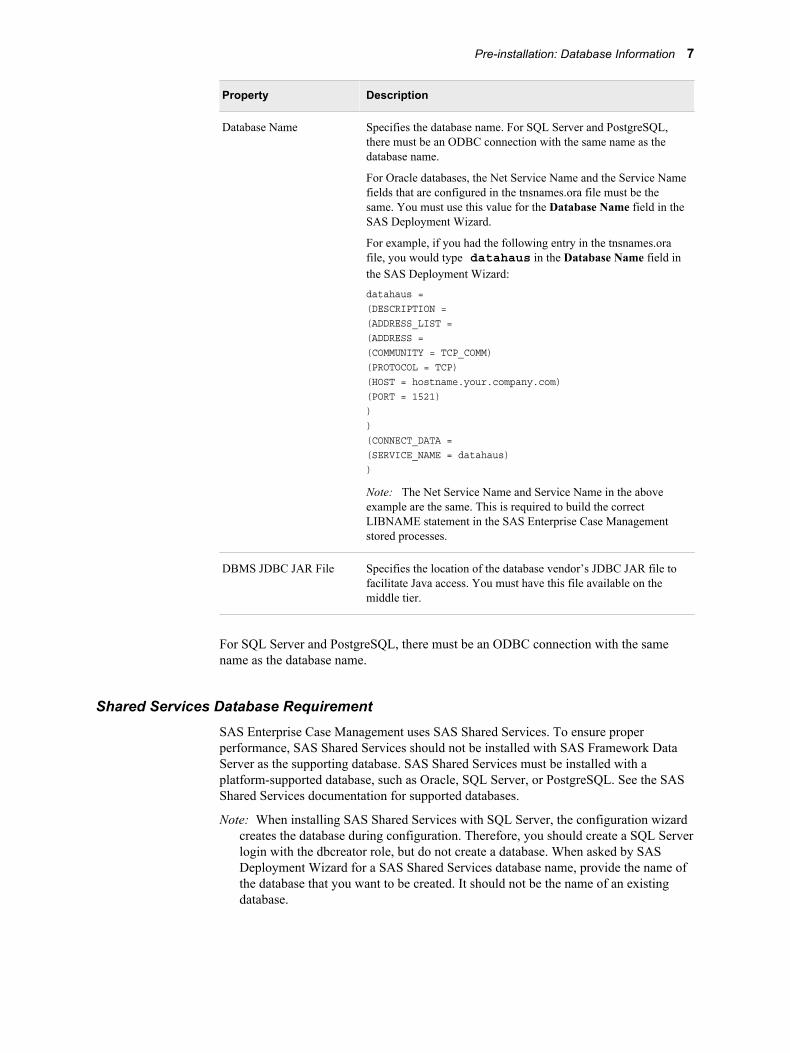
Property Description
Database Name Specifies the database name. For SQL Server and PostgreSQL, there must be an ODBC connection with the same name as the database name.
For Oracle databases, the Net Service Name and the Service Name fields that are configured in the tnsnames.ora file must be the same. You must use this value for the Database Name field in the SAS Deployment Wizard.
For example, if you had the following entry in the tnsnames.ora file, you would type datahaus in the Database Name field in the SAS Deployment Wizard:datahaus =(DESCRIPTION =(ADDRESS_LIST =(ADDRESS =(COMMUNITY = TCP_COMM)(PROTOCOL = TCP)(HOST = hostname.your.company.com)(PORT = 1521)))(CONNECT_DATA =(SERVICE_NAME = datahaus))
Note: The Net Service Name and Service Name in the above example are the same. This is required to build the correct LIBNAME statement in the SAS Enterprise Case Management stored processes.
DBMS JDBC JAR File Specifies the location of the database vendor’s JDBC JAR file to facilitate Java access. You must have this file available on the middle tier.
For SQL Server and PostgreSQL, there must be an ODBC connection with the same name as the database name.
Shared Services Database RequirementSAS Enterprise Case Management uses SAS Shared Services. To ensure proper performance, SAS Shared Services should not be installed with SAS Framework Data Server as the supporting database. SAS Shared Services must be installed with a platform-supported database, such as Oracle, SQL Server, or PostgreSQL. See the SAS Shared Services documentation for supported databases.
Note: When installing SAS Shared Services with SQL Server, the configuration wizard creates the database during configuration. Therefore, you should create a SQL Server login with the dbcreator role, but do not create a database. When asked by SAS Deployment Wizard for a SAS Shared Services database name, provide the name of the database that you want to be created. It should not be the name of an existing database.
Pre-installation: Database Information 7

Pre-installation: JDBC DriversNote: The following JDBC drivers must be placed in a separate directory without any
other files to ensure proper installation and configuration of SAS Enterprise Case Management.
• Oracle 10g: SAS Enterprise Case Management uses the ojdbc6.jar file. To use Oracle10g, you need to use an Oracle version 11 JDBC driver.
• Oracle 11g: SAS Enterprise Case Management uses the ojdbc6.jar file. You can download a copy of the Oracle driver from http://www.oracle.com/technology/software/tech/java/sqlj_jdbc/index.html. Select the latest Oracle 11.2x driver. The JDBC driver version must match the database version.
• PostgreSQL 9.0: SAS Enterprise Case Management uses the postgresql-9.0-801.jdbc4.jar PostgreSQL driver. It is located in the jdbc subdirectory of your PostgreSQL installation.
• SQLServer 2008: SAS Enterprise Case Management uses the sqljbc4.jar Microsoft SQL Server JDBC Driver SQL Server Native Client 10.0. Visit the official Microsoft Web site to download this driver.
Pre-installation: Oracle Database
Installing the Oracle DatabaseSAS Enterprise Case Management requires a database and a Web application server. You must install this third-party software before installing SAS Enterprise Case Management. Currently, the Oracle database is supported by SAS Enterprise Case Management.
Create the Oracle User for Enterprise Case ManagementSAS Enterprise Case Management will store transactional data in the Oracle database. Before installing SAS Enterprise Case Management, create a user in Oracle with the following privileges:
• CREATE SESSION
• CREATE SEQUENCE
• CREATE TABLE
• CREATE VIEW
In addition, that user will need adequate table space quota for its default and temporary table spaces.
Note: The schema user requires adequate permissions to create all objects required for the schema initialization. For Oracle, these include sequences, tables, indexes and views.
8 Chapter 2 • Pre-installation Requirements and Tasks
Installing SAS Access for OracleSAS Enterprise Case Management supports the Oracle database. As a post-installation task, you must run several SAS scripts provided by SAS Enterprise Case Management. These database scripts assume that the SAS environment can already access the Oracle database.
Test Access to the DatabaseTo test SAS access to the Oracle database, after SAS Enterprise Case Management is installed but not configured, open an interactive SAS session and try to create a libref, for example:
libname ecmtest oracle path='casemgmt' user='ecmdata' password='ecmdata' ;
Pre-installation: SQLServer Database
Installing the SQLServer DatabaseSAS Enterprise Case Management requires a database and a Web application server. You must install this third-party software before installing SAS Enterprise Case Management. SQLServer is one of the databases supported by SAS Enterprise Case Management.
Create the SQLServer User for Enterprise Case ManagementSAS Enterprise Case Management stores transactional data in the SQLServer database. Before installing SAS Enterprise Case Management, create a user in SQLServer with access to the target database. Create a schema and make the new user the owner of the schema. Set that as the default schema for the user for that database.
Installing SAS Access for ODBC or SAS Access for SQLServerSAS Enterprise Case Management supports the SQLServer database. As a post-installation task, you must run several SAS scripts provided by SAS Enterprise Case Management. These database scripts assume that the SAS environment can already access the SQLServer database.
Configuring the SQLServer ODBC ConnectionIf you are using SAS Access for ODBC in Windows, you need to create a System DSN (Data Source Name).
1. From the Windows Start menu, select Settings ð Control Panel ð Administrative Tools ð Data Sources (ODBC). The ODBC Data Source Administrator window appears.
2. Select the System DSN tab and then click Add. The Create New Data Source window appears.
Pre-installation: SQLServer Database 9
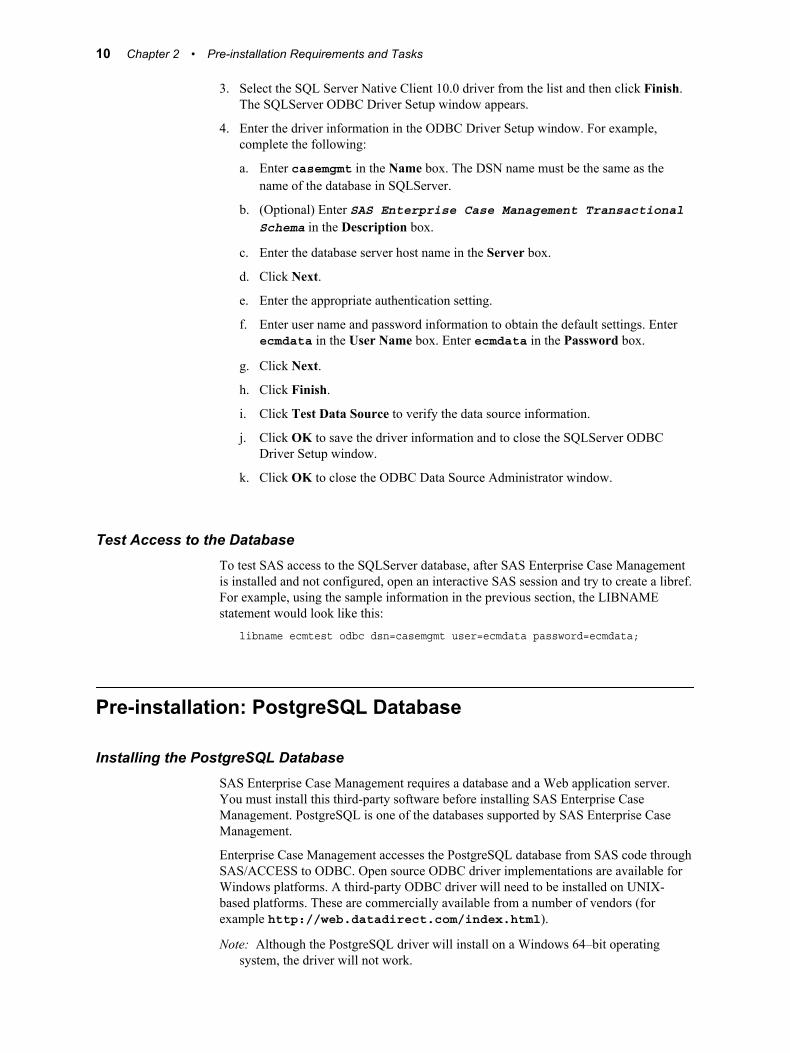
3. Select the SQL Server Native Client 10.0 driver from the list and then click Finish. The SQLServer ODBC Driver Setup window appears.
4. Enter the driver information in the ODBC Driver Setup window. For example, complete the following:
a. Enter casemgmt in the Name box. The DSN name must be the same as the name of the database in SQLServer.
b. (Optional) Enter SAS Enterprise Case Management Transactional Schema in the Description box.
c. Enter the database server host name in the Server box.
d. Click Next.
e. Enter the appropriate authentication setting.
f. Enter user name and password information to obtain the default settings. Enter ecmdata in the User Name box. Enter ecmdata in the Password box.
g. Click Next.
h. Click Finish.
i. Click Test Data Source to verify the data source information.
j. Click OK to save the driver information and to close the SQLServer ODBC Driver Setup window.
k. Click OK to close the ODBC Data Source Administrator window.
Test Access to the DatabaseTo test SAS access to the SQLServer database, after SAS Enterprise Case Management is installed and not configured, open an interactive SAS session and try to create a libref. For example, using the sample information in the previous section, the LIBNAME statement would look like this:
libname ecmtest odbc dsn=casemgmt user=ecmdata password=ecmdata;
Pre-installation: PostgreSQL Database
Installing the PostgreSQL DatabaseSAS Enterprise Case Management requires a database and a Web application server. You must install this third-party software before installing SAS Enterprise Case Management. PostgreSQL is one of the databases supported by SAS Enterprise Case Management.
Enterprise Case Management accesses the PostgreSQL database from SAS code through SAS/ACCESS to ODBC. Open source ODBC driver implementations are available for Windows platforms. A third-party ODBC driver will need to be installed on UNIX-based platforms. These are commercially available from a number of vendors (for example http://web.datadirect.com/index.html).
Note: Although the PostgreSQL driver will install on a Windows 64–bit operating system, the driver will not work.
10 Chapter 2 • Pre-installation Requirements and Tasks

Configuring the PostgreSQL Database for a Multi-Tier InstallationFor security reasons, PostgreSQL does not listen on all available IP addresses on the server machine initially. In order to access the server over the network, you must enable listening on the address first.
For PostgreSQL servers version 8.0 and later, this is controlled using the listen_address parameter in the postgresql.conf file. Here, you can enter a list of IP addresses the server should listen on, or simply use * to listen on all available IP addresses.
Creating the PostgreSQL User for SAS Enterprise Case Management
SAS Enterprise Case Management will store transactional data in the PostgreSQL database. Before installing SAS Enterprise Case Management, create a user in PostgreSQL and then create a database owned by that user.
Install SAS Access for ODBCSAS Enterprise Case Management supports the PostgreSQL database. As a post-installation task, you must run several SAS scripts provided by SAS Enterprise Case Management. These database scripts assume that the SAS environment can already access the PostgreSQL database.
Configuring the PostgreSQL ODBC ConnectionIf you are using SAS Access for ODBC in Windows, you need to create a System DSN (Data Source Name).
1. From the Windows Start menu, select Settings ð Control Panel ð Administrative Tools ð Data Sources (ODBC). The ODBC Data Source Administrator window appears.
2. Select the System DSN tab and then click Add. The Create New Data Source window appears.
3. Select the PostgreSQL ANSI driver from the list and then click Finish. The SQLServer ODBC Driver Setup window appears.
4. Enter the driver information in the ODBC Driver Setup window. For example, complete the following:
a. Enter casemgmt in the Data Source box. The Data Source name must be the same as the name of the database name in PostgreSQL.
b. (Optional) Enter SAS Enterprise Case Management Transactional Schemain the Description box.
c. Enter casemgmt in the Database box.
d. Enter the database server host name in the Server box.
e. Enter ecmdata in the User Name box.
f. Enter ecmdata in the Password box.
g. Click Test to verify the data source information.
Pre-installation: PostgreSQL Database 11

h. Click Save to save the driver information and to close the PostgreSQL ANSI ODBC Driver Setup window.
i. Click OK to close the ODBC Data Source Administrator window.
Note: If you are using the Data Direct 6.0 PostgreSQL Wire Protocol Driver, select Fetch TSWTZ as Timestamp when defining your ODBC connection.
Test Access to the DatabaseTo test SAS access to the PostgreSQL database, after SAS Enterprise Case Management is installed and not configured, open an interactive SAS session and try to create a libref. For example, using the sample information in the previous section, the LIBNAME statement would look like this:
libname ecmtest odbc dsn=casemgmt user=ecmdata password=ecmdata;
Sample Database Creation ScriptsSample scripts are provided for creating users, schemas (where needed in PostgreSQL and MS SQL server), and databases. The scripts are in one of the following locations, depending on the platform:
• Windows platforms: SAS_HOME\SAS\SASFoundation\9.3\casemgmtmva\sasmisc\sample\dbscript
• UNIX platforms: SAS_HOME/SASFoundation/9.3/misc/casemgmtmva/sample/dbscript
Documentation for running the scripts is provided within the script files in the form of comments.
12 Chapter 2 • Pre-installation Requirements and Tasks

Chapter 3
Installing SAS Enterprise Case Management
Selecting a Single-Tier or Multi-Tier Installation . . . . . . . . . . . . . . . . . . . . . . . . . . . 13
SAS Deployment Wizard Tasks . . . . . . . . . . . . . . . . . . . . . . . . . . . . . . . . . . . . . . . . . 14
Installed SAS Products . . . . . . . . . . . . . . . . . . . . . . . . . . . . . . . . . . . . . . . . . . . . . . . . . 14
Disabling Anonymous Web Access . . . . . . . . . . . . . . . . . . . . . . . . . . . . . . . . . . . . . . . 15
Specifying DBMS Credentials . . . . . . . . . . . . . . . . . . . . . . . . . . . . . . . . . . . . . . . . . . . 15Oracle Database . . . . . . . . . . . . . . . . . . . . . . . . . . . . . . . . . . . . . . . . . . . . . . . . . . . . 16PostgreSQL Database . . . . . . . . . . . . . . . . . . . . . . . . . . . . . . . . . . . . . . . . . . . . . . . . 19SQLServer Database . . . . . . . . . . . . . . . . . . . . . . . . . . . . . . . . . . . . . . . . . . . . . . . . . 23
Reviewing the Instructions.html File . . . . . . . . . . . . . . . . . . . . . . . . . . . . . . . . . . . . . 27
Default File Locations . . . . . . . . . . . . . . . . . . . . . . . . . . . . . . . . . . . . . . . . . . . . . . . . . . 28
Updating the SAS SID File . . . . . . . . . . . . . . . . . . . . . . . . . . . . . . . . . . . . . . . . . . . . . . 29
Apply All SAS Hotfix Updates . . . . . . . . . . . . . . . . . . . . . . . . . . . . . . . . . . . . . . . . . . . 29
Selecting a Single-Tier or Multi-Tier InstallationYou can install SAS Enterprise Case Management on one or several machines. This choice is determined at the time you order SAS Enterprise Case Management and is detailed in the order detail plan (plan.xml) file. You must first install SAS Enterprise Case Management on the server-tier machine. You can then install SAS Enterprise Case Management on other additional machines that are part of a middle tier in your configuration. For guidelines on installing SAS on multiple machines, see “Installation Order Rules for Multiple Machine Deployments” in the SAS Intelligence Platform: Installation and Configuration Guide.
The server tier consists of a set of SAS servers that are installed as a part of the SAS Intelligence Platform. These servers host (and can be used to load) the reporting data. In addition, they execute SAS analytical and reporting processes. The SAS Workspace Server, SAS Stored Process Server, and SAS Metadata Server enable this capability.
The middle tier hosts the Web application, which is deployed on a Java Web application server. The Web application sends data to and receives data from the Web browsers on the client tier. It then organizes the data for storage on the data tier and for use on the server tier.
The client tier is also part of the SAS Enterprise Case Management configuration. On the client tier, users collect and load data and perform day-to-day operational risk tasks via
13
the Web application. In addition, although reports are configured on the server tier, they are visible in the user interface to users who have access only to the machines on the client tier.
SAS Deployment Wizard TasksThe SAS Deployment Wizard is used to install and configure the SAS software and related products that are included in your deployment plan file. When you execute the SAS Deployment Wizard, you select the deployment type that you are performing. You can choose to install and configure the software in the same instance, or you can configure the software at a later point. The latter is recommended because it gives you the opportunity to test the SAS license and the database connection in SAS before the configuration step.
Depending on your specific deployment plan and the SAS products that you are installing, the SAS Deployment Wizard can prompt you to perform a variety of tasks, including the following items:
• specify your order plan and SAS software products that you are installing and configuring
• specify third-party products that you have installed, such as JBOSS or the Java Development Kit
• specify any required machine information
• specify server information for any SAS servers that you are installing
• specify user account information
• specify the database that you are installing
• install the server tier for SAS Enterprise Case Management on the server machine in your configuration
• install the middle tier for SAS Enterprise Case Management on other machines in your configuration
For further information, see “Preparing to Install and to Configure” in the SAS Intelligence Platform: Installation and Configuration Guide. In addition, see the SAS Deployment Wizard User’s Guide at http://support.sas.com/documentation/installcenter/.
Installed SAS ProductsSAS Enterprise Case Management installation includes the installation of various SAS products. During installation, the SAS Deployment Wizard prompts you for the installation and possibly the configuration of each of these SAS products. Some of the products that are installed as part of the SAS Enterprise Case Management installation include the following:
• SAS Foundation 9.3
• SAS Management Console
• SAS Shared Services
14 Chapter 3 • Installing SAS Enterprise Case Management
• SAS Framework Data Server
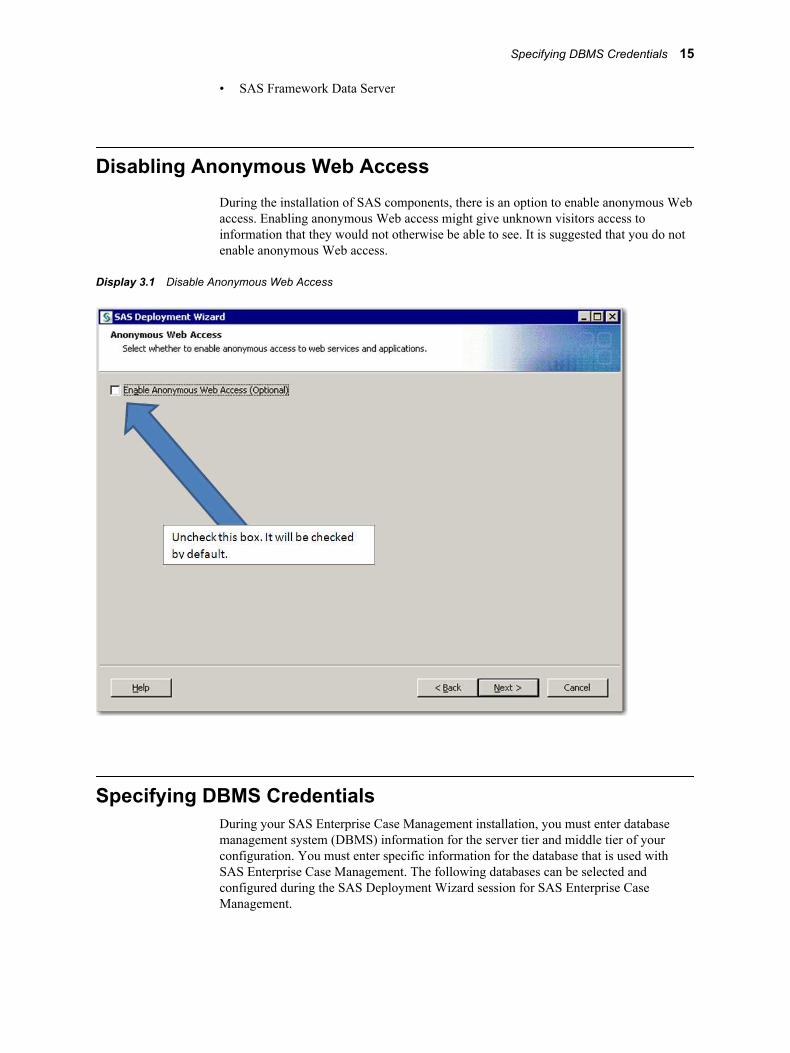
Disabling Anonymous Web AccessDuring the installation of SAS components, there is an option to enable anonymous Web access. Enabling anonymous Web access might give unknown visitors access to information that they would not otherwise be able to see. It is suggested that you do not enable anonymous Web access.
Display 3.1 Disable Anonymous Web Access
Specifying DBMS CredentialsDuring your SAS Enterprise Case Management installation, you must enter database management system (DBMS) information for the server tier and middle tier of your configuration. You must enter specific information for the database that is used with SAS Enterprise Case Management. The following databases can be selected and configured during the SAS Deployment Wizard session for SAS Enterprise Case Management.
Specifying DBMS Credentials 15

Oracle DatabaseThe following page prompts you for the connection information for the Oracle database server.
Display 3.2 SAS Enterprise Case Management Server-Tier Configuration – Database Connection Information
You must enter information for the following text boxes:
Host Namespecifies the host name of the machine that the database is installed on.
Portspecifies the port used by the database.
Database Namespecifies the database name.
Bypass Database Initializationwhen selected, specifies to bypass the initialization of the database.
The following page prompts you for the connection information for JDBC on the server.
16 Chapter 3 • Installing SAS Enterprise Case Management

Display 3.3 SAS Enterprise Case Management Server-Tier Configuration – JDBC Connection Information
You must enter information for the following text boxes:
Usernamespecifies the user name for the Oracle database.
Passwordspecifies a valid password for the user name that is associated with the Oracle database.
Confirm Passwordconfirms the password for the user name for the Oracle database.
Path to JDBC Jar filespecifies the path to the JDBC JAR file that is provided by the database vendor. This file facilitates Java access and must be available on this host in order for configuration to occur.
The following page prompts you for SAS Social Network Analysis middle-tier information.
Specifying DBMS Credentials 17
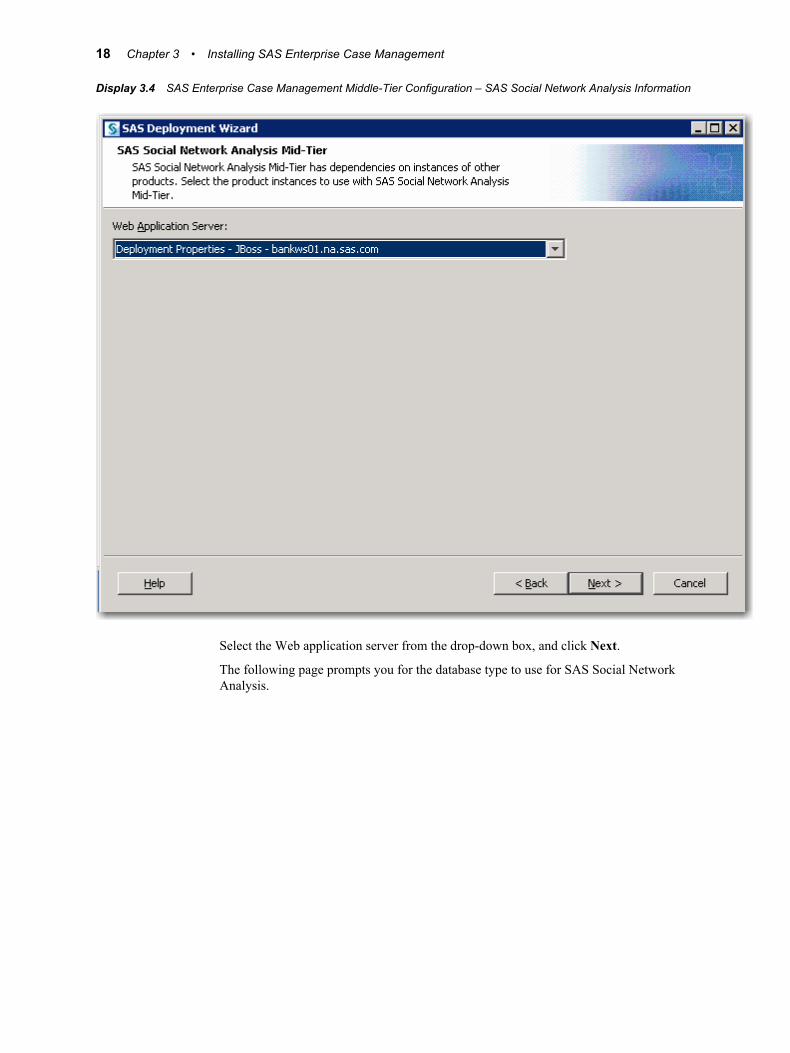
Display 3.4 SAS Enterprise Case Management Middle-Tier Configuration – SAS Social Network Analysis Information
Select the Web application server from the drop-down box, and click Next.
The following page prompts you for the database type to use for SAS Social Network Analysis.
18 Chapter 3 • Installing SAS Enterprise Case Management

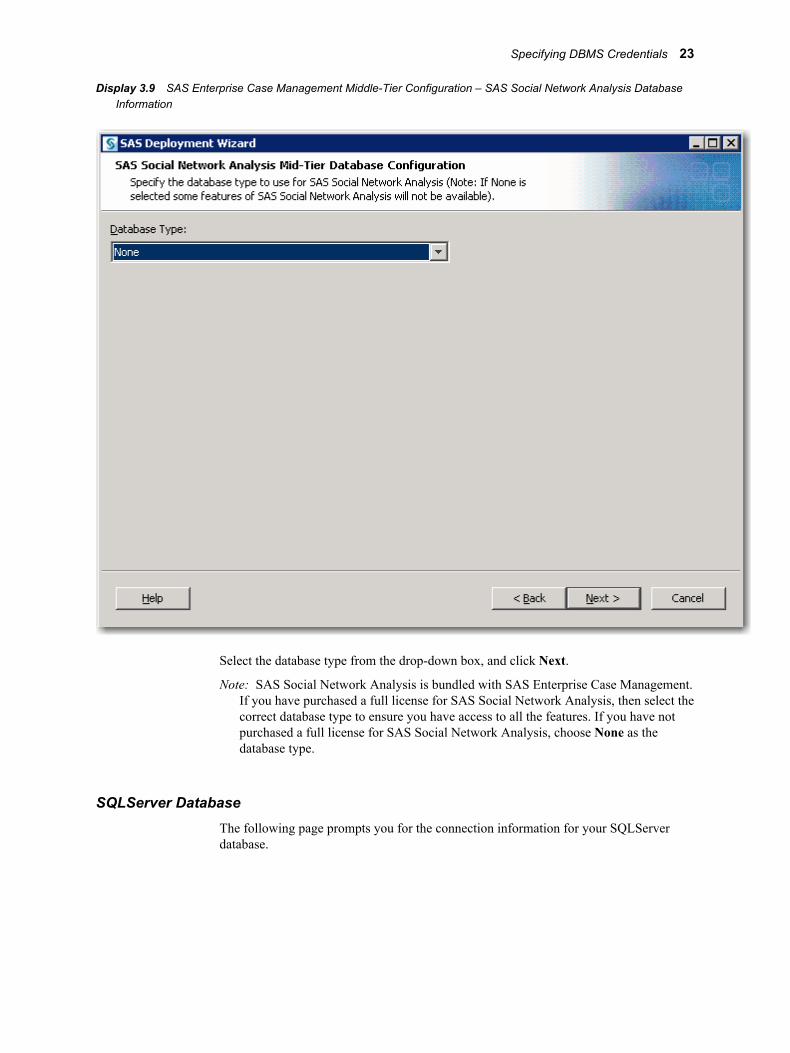
Display 3.5 SAS Enterprise Case Management Middle-Tier Configuration – SAS Social Network Analysis Database Information
Select the database type from the drop-down box, and click Next.
Note: SAS Social Network Analysis is bundled with SAS Enterprise Case Management. If you have purchased a full license for SAS Social Network Analysis, then select the correct database type to ensure you have access to all of the features. If you have not purchased a full license for SAS Social Network Analysis, choose None as the database type.
PostgreSQL DatabaseThe following page prompts you for the connection information for your PostgreSQL database.
Specifying DBMS Credentials 19

Display 3.6 SAS Enterprise Case Management Server-Tier Configuration – Database Connection Information
You must enter information for the following text boxes:
Host Namespecifies the host name of the machine that the database is installed on.
Portspecifies the port used by the database.
Database Namespecifies the database name.
Bypass Database Initializationwhen selected, specifies to bypass the initialization of the database.
The following page prompts you for the connection information for JDBC on the server.
20 Chapter 3 • Installing SAS Enterprise Case Management

Display 3.7 SAS Enterprise Case Management Server-Tier Configuration – JDBC Connection Information
You must enter information for the following text boxes:
Usernamespecifies the user name for the PostgreSQL database.
Passwordspecifies a valid password for the user name that is associated with the PostgreSQL database.
Confirm Passwordconfirms the password for the user name for the PostgreSQL database.
Path to JDBC Jar filespecifies the path to the JDBC JAR file that is provided by the database vendor. This file facilitates Java access and must be available on this host in order for configuration to occur.
The following page prompts you for SAS Social Network Analysis middle-tier information.
Specifying DBMS Credentials 21

Display 3.8 SAS Enterprise Case Management Middle-Tier Configuration – SAS Social Network Analysis Information
Select the Web application server from the drop-down box, and click Next.
The following page prompts you for the database type to use for SAS Social Network Analysis.
22 Chapter 3 • Installing SAS Enterprise Case Management
Display 3.9 SAS Enterprise Case Management Middle-Tier Configuration – SAS Social Network Analysis Database Information
Select the database type from the drop-down box, and click Next.
Note: SAS Social Network Analysis is bundled with SAS Enterprise Case Management. If you have purchased a full license for SAS Social Network Analysis, then select the correct database type to ensure you have access to all the features. If you have not purchased a full license for SAS Social Network Analysis, choose None as the database type.
SQLServer DatabaseThe following page prompts you for the connection information for your SQLServer database.
Specifying DBMS Credentials 23

Display 3.10 SAS Enterprise Case Management Server-Tier Configuration – Database Connection Information
You must enter information for the following text boxes:
Host Namespecifies the host name of the machine that the database is installed on.
Portspecifies the port used by the database.
Database Namespecifies the database name.
Bypass Database Initializationwhen selected, specifies to bypass the initialization of the database.
The following page prompts you for the connection information for JDBC on the server.
24 Chapter 3 • Installing SAS Enterprise Case Management

Display 3.11 SAS Enterprise Case Management Server-Tier Configuration – JDBC Connection Information
You must enter information for the following text boxes:
Usernamespecifies the user name for the SQLServer database.
Passwordspecifies a valid password for the user name that is associated with the SQLServer database.
Confirm Passwordconfirms the password for the user name for the SQLServer database.
Path to JDBC Jar filespecifies the path to the JDBC JAR file that is provided by the database vendor. This file facilitates Java access and must be available on this host in order for configuration to occur.
The following page prompts you for SAS Social Network Analysis middle-tier information.
Specifying DBMS Credentials 25

Display 3.12 SAS Enterprise Case Management Middle-Tier Configuration – SAS Social Network Analysis Information
Select the Web application server from the drop-down box, and click Next.
The following page prompts you for the database type to use for SAS Social Network Analysis.
26 Chapter 3 • Installing SAS Enterprise Case Management

Display 3.13 SAS Enterprise Case Management Middle-Tier Configuration – SAS Social Network Analysis Database Information
Select the database type from the drop-down box, and click Next.
Note: SAS Social Network Analysis is bundled with SAS Enterprise Case Management. If you have purchased a full license for SAS Social Network Analysis, then select the correct database type to ensure you have access to all the features. If you have not purchased a full license for SAS Social Network Analysis, choose None as the database type.
Reviewing the Instructions.html FileAfter you have installed and configured your SAS software, the SAS Deployment Wizard writes an instructions file called Instructions.html to the Documents directory in your SAS configuration directory. The Instructions.html file contains additional information and details for configuring your installation. You can review this file for any additional steps to your installation.
Reviewing the Instructions.html File 27

Default File LocationsThe following table shows the default locations of the directories and files that are installed with SAS Enterprise Case Management.
Table 3.1 Default File Locations
Directory/File Windows Path UNIX Path
SAS_HOME C:\Program Files\SAS <install-dir>/SAS93
!SASROOT C:\Program Files\SAS\SAS Foundation\9.3
<install-dir>/SAS/SASFoundation/9.3
SAS_CONFIG C:\SAS\Config\Lev<num> <install-dir>/SAS/Config/Lev<num>
SAS Enterprise Case Management Server <casemgmtmva>
SAS_CONFIG\Applications\SASCaseManagementServerCfg\3.1
SAS_CONFIG/Applications/SASCaseManagementServerCfg/3.1
SAS Enterprise Case Management Middle-Tier Staging Directory
SAS_CONFIG\Web\Staging SAS_CONFIG/Web/Staging
SAS Enterprise Case Management Stored Processes
SAS_CONFIG\Applications\SASCaseManagementServerCfg\3.1\sasstp
SAS_CONFIG/Applications/SASCaseManagementServerCfg/3.1/sasstp
SAS Enterprise Case Management Macro Definitions
!SASROOT\casemgmtmva\ucmacros and SAS_CONFIG\Applications\SASCaseManagementServerCfg\3.1\ucmacros
!SASROOT/ucmacros/casemgmtmva and SAS_CONFIG/Applications/SASCaseManagementServerCfg/3.1/ucmacros
SAS Deployment Wizard Summary
SAS_CONFIG\Documents\DeploymentSummary.html
SAS_CONFIG/Documents/DeploymentSummary.html
Configuration Logs SAS_CONFIG\Logs\Configure SAS_CONFIG/Logs/Configure
SAS Enterprise Case Management Middle-Tier Web Log
SAS_CONFIG\Web\Logs\SASEntCaseManagement3.1.log
SAS_CONFIG/Web/Logs/SASEntCaseManagement3.1.log
28 Chapter 3 • Installing SAS Enterprise Case Management
Updating the SAS SID FileThe SAS installation data (SID) file will need to be updated at the appropriate SAS renewal period. The correct method to update an SID for Enterprise Case Management is to use the SAS Deployment Manager to apply the SID. Updating the SID file using the SAS License and Renewal feature for Base SAS installation will not update the system correctly. The SNA graph will not display and the SNA application log files will log a license error.
Apply All SAS Hotfix UpdatesAfter completing the post-installation steps, apply any hotfixes required for all SAS components listed in your order. The SAS 9.3 hotfix download is found at: http://ftp.sas.com/techsup/download/hotfix/HF2/93_all_hosts.html.
Apply All SAS Hotfix Updates 29

30 Chapter 3 • Installing SAS Enterprise Case Management
Chapter 4
Post-installation Requirements and Tasks
Post-installation Overview . . . . . . . . . . . . . . . . . . . . . . . . . . . . . . . . . . . . . . . . . . . . . . 32
Clustering Support . . . . . . . . . . . . . . . . . . . . . . . . . . . . . . . . . . . . . . . . . . . . . . . . . . . . 32
Customizing Your SAS Enterprise Case Management Installation . . . . . . . . . . . . 32Setting User Permission to the E-File Directory . . . . . . . . . . . . . . . . . . . . . . . . . . . 32Loading the SAS Enterprise Case Management Configuration Tables . . . . . . . . . . 32Deploying SAS Enterprise Case Management Using WebLogic 10.3 . . . . . . . . . . . 33
Defining Users, Groups, and Roles . . . . . . . . . . . . . . . . . . . . . . . . . . . . . . . . . . . . . . . 34Overview . . . . . . . . . . . . . . . . . . . . . . . . . . . . . . . . . . . . . . . . . . . . . . . . . . . . . . . . . . 34Defining Users in SAS Management Console . . . . . . . . . . . . . . . . . . . . . . . . . . . . . 38Defining Groups in SAS Management Console . . . . . . . . . . . . . . . . . . . . . . . . . . . . 39Defining an Administrative User in the SAS Metadata Repository . . . . . . . . . . . . . 39Defining Roles for SAS Enterprise Case Management Access . . . . . . . . . . . . . . . . 40
Uploading Definitions and Properties . . . . . . . . . . . . . . . . . . . . . . . . . . . . . . . . . . . . . 40Uploading Workflow Definitions . . . . . . . . . . . . . . . . . . . . . . . . . . . . . . . . . . . . . . . 40Uploading User Interface Definitions . . . . . . . . . . . . . . . . . . . . . . . . . . . . . . . . . . . . 41Uploading Custom Properties . . . . . . . . . . . . . . . . . . . . . . . . . . . . . . . . . . . . . . . . . . 42Clearing the Cache . . . . . . . . . . . . . . . . . . . . . . . . . . . . . . . . . . . . . . . . . . . . . . . . . . 42
Capabilities in SAS Enterprise Case Management . . . . . . . . . . . . . . . . . . . . . . . . . . 43Associating Capabilities . . . . . . . . . . . . . . . . . . . . . . . . . . . . . . . . . . . . . . . . . . . . . . 43SAS Enterprise Case Management Capabilities – User Interface Impact . . . . . . . . 46
Subscriptions and Notifications . . . . . . . . . . . . . . . . . . . . . . . . . . . . . . . . . . . . . . . . . . 49Introduction to Subscriptions and Notifications . . . . . . . . . . . . . . . . . . . . . . . . . . . . 49Event Alert Notifications . . . . . . . . . . . . . . . . . . . . . . . . . . . . . . . . . . . . . . . . . . . . . 50Case Report Notifications . . . . . . . . . . . . . . . . . . . . . . . . . . . . . . . . . . . . . . . . . . . . . 54Task List Notifications . . . . . . . . . . . . . . . . . . . . . . . . . . . . . . . . . . . . . . . . . . . . . . . 54Adjusting the Reminder Interval for the Task List . . . . . . . . . . . . . . . . . . . . . . . . . . 55
Notifications and the SAS Information Delivery Portal . . . . . . . . . . . . . . . . . . . . . . 56Configuring the SAS Information Delivery Portal for SAS
Enterprise Case Management . . . . . . . . . . . . . . . . . . . . . . . . . . . . . . . . . . . . . . . . 56What to Expect from the Portal . . . . . . . . . . . . . . . . . . . . . . . . . . . . . . . . . . . . . . . . 57Controlling Alert Notifications from the SAS Preferences Manager . . . . . . . . . . . . 57
Configuring the Web Service . . . . . . . . . . . . . . . . . . . . . . . . . . . . . . . . . . . . . . . . . . . . 59
Deploy SAS Spelling Correction . . . . . . . . . . . . . . . . . . . . . . . . . . . . . . . . . . . . . . . . . 60Installation . . . . . . . . . . . . . . . . . . . . . . . . . . . . . . . . . . . . . . . . . . . . . . . . . . . . . . . . 60Configuration of SAS Spelling Correction . . . . . . . . . . . . . . . . . . . . . . . . . . . . . . . . 62
31
Deploying Case Network Analysis Graph Functionality in an HTTPS Web Environment . . . . . . . . . . . . . . . . . . . . . . . . . . . . . . . . . . . . . . . . . . . . . . 63
Post-installation OverviewAt the end of the installation process, the SAS Deployment Wizard produces an HTML document named Instructions.html. If your server tier and middle tier are hosted on separate machines, you will have an Instructions.html file for each machine. To complete your installation, you will need the information that is provided in Instructions.html and the information specific to SAS Enterprise Case Management that is documented in this chapter.
Clustering SupportYou can deploy SAS Enterprise Case Management in a cluster, providing fault tolerance and scalability. SAS Enterprise Case Management has the same limitations as the SAS Intelligence Platform, whereby each user's session must be tied to a single server. For more information about how to configure SAS Web applications in a cluster, see the SAS Intelligence Platform: Middle-Tier Administration Guide at http://support.sas.com/documentation/onlinedoc/intellplatform.
Customizing Your SAS Enterprise Case Management Installation
Setting User Permission to the E-File DirectoryThe SAS Enterprise Case Management stored process generates e-files for regulatory reporting. The network account defined as the SAS Spawned Servers account should have Write permission to the SAS_CONFIG/Applications/SASCaseManagementServerCfg/3.1/Source/efiles directory.
Loading the SAS Enterprise Case Management Configuration Tables
After you have completed your installation, you should customize your SAS Enterprise Case Management installation. To populate the SAS Enterprise Case Management configuration tables, you should provide your own data. For example, the following SAS files contain sample data:
• load_post_install_data.sas
• loadrr_config_fincen_base.sas
• loadrr_config_fincen_sardi.sas
• loadrr_config_fincen_ctr.sas
32 Chapter 4 • Post-installation Requirements and Tasks

Note: The load_post_install_data.sas file must be executed before load_fincen_sar_di_data.sas is executed.
To execute these sample files, follow these steps:
1. From the SAS Enterprise Case Management configuration directory (/Lev1/Applications/SASCaseManagementServerCfg/3.1/Source/control), start a SAS session and open the ecm_autoexec.sas file in the session.
2. Select Run to execute this file in an interactive SAS session.
3. Enter %ecm_db_connect; in the program editor, and click Run to execute the macro. Verify that the SAS Enterprise Case Management tables were created in ecm_db. If SAS is terminated when executing this macro, you are not a valid SAS Enterprise Case Management user. You should either log on with the installer ID or add yourself as a SAS Enterprise Case Management user. The instructions for defining a SAS Enterprise Case Management user is discussed in “Defining Users in SAS Management Console” on page 38.
4. From the following directory, depending on your platform, open the load_post_install_data.sas file in SAS:
• Windows platforms: !SASROOT\casemgmtmva\sasmisc\sample\config
• UNIX platforms: !SASROOT/misc/casemgmtmva/sample/config
5. Select Run to execute this file in SAS.
6. From the directory used in step 4, open the loadrr_config_fincen_base.sas file in SAS.
7. Select Run to execute this file in SAS.
8. Repeat steps 6 and 7 for loadrr_config_fincen_sardi.sas and load_rr_config_fincen_ctr.sas.
Note: The samples must be executed in the specified order.
Deploying SAS Enterprise Case Management Using WebLogic 10.3If you are deploying SAS Enterprise Case Management with the Web application server WebLogic 10.3, you should make additional changes after the SAS Deployment Wizard has completed. The following steps apply if you are installing WebLogic 10.3:
1. From the home page of the WebLogic Administrative Console, under Domain Structure, select Services ð Messaging ð JMS Modules.
2. Select sasJmsSystemResource.
3. Select SASQueueConnectionFactory.
4. Select the Transactions tab.
5. Check the XA Connection Factory Enabled box.
To apply the JDBC connection workaround, follow these steps:
1. Under Domain Structure, select Services ð JDBC ð Data Sources.
2. Select SharedServices.
3. Select the Connection Pool tab. Enter the following values:
• Maximum capacity: 1
Customizing Your SAS Enterprise Case Management Installation 33

• Capacity increment: 1
• Statement Cache Size: 0
4. Save the changes to the JDBC connection. Activate the changes.
5. Restart the Web application server.
Defining Users, Groups, and Roles
OverviewYou must configure users, groups, and roles to use SAS Enterprise Case Management. The deployment process created several groups and roles for SAS Enterprise Case Management that you can use to get started.
UsersEvery user who needs to log on to the SAS Enterprise Case Management Web application must be defined in the SAS Metadata Repository and be associated with one or more groups and one or more roles that have one or more capabilities within SAS Enterprise Case Management. Every SAS Enterprise Case Management user should be a member of the Enterprise Case Management Users group.
GroupsA group is a group of users classified by common traits or common data access levels. Groups are typically used for giving users access to data. Groups can also be used within workflows to allow a restricted set of users to perform an activity. The Enterprise Case Management Users group is pre-loaded during installation. It enables members to access SAS Enterprise Case Management. You must define all other groups.
RolesA role provides a grouping functionality. Roles determine what a user can do within the application. Roles can also be used within workflows to allow a restricted set of users to perform an activity. The Case Management: Advanced role is pre-loaded during installation. It provides all capabilities in SAS Enterprise Case Management. You must define all other roles.
Groups, roles, and users are defined with the User Manager function in SAS Management Console, as shown in the following display.
34 Chapter 4 • Post-installation Requirements and Tasks

Display 4.1 User Manager – SAS Management Console
Note: For specific information about defining users, groups, and roles, see the SAS Management Console: Guide to Users and Permissions.
Groups and roles can be used as drop-down lists when configured as reference tables on the search panel, as shown in the following display. Preparation of reference tables and search panels are discussed in Customizing SAS Enterprise Case Management on page 66.
Defining Users, Groups, and Roles 35
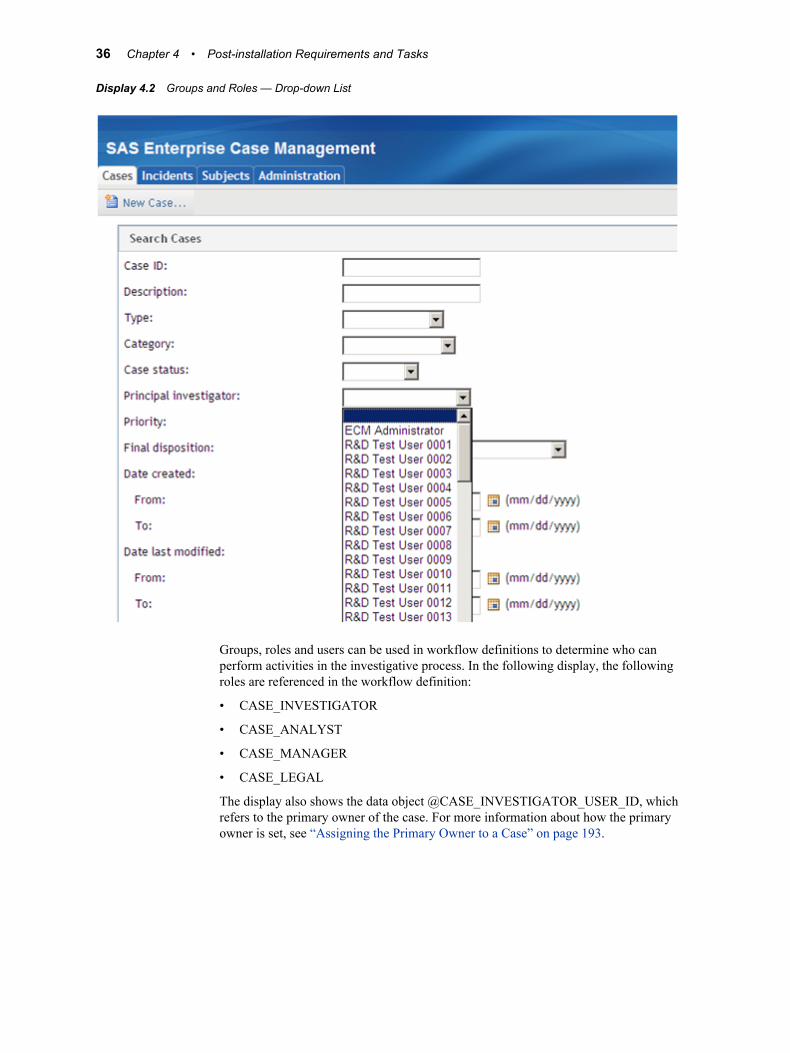
Display 4.2 Groups and Roles — Drop-down List
Groups, roles and users can be used in workflow definitions to determine who can perform activities in the investigative process. In the following display, the following roles are referenced in the workflow definition:
• CASE_INVESTIGATOR
• CASE_ANALYST
• CASE_MANAGER
• CASE_LEGAL
The display also shows the data object @CASE_INVESTIGATOR_USER_ID, which refers to the primary owner of the case. For more information about how the primary owner is set, see “Assigning the Primary Owner to a Case” on page 193.
36 Chapter 4 • Post-installation Requirements and Tasks

Display 4.3 Roles – Workflow Definition
Capabilities can be associated with roles in the SAS Management Console as shown in the following display.
Defining Users, Groups, and Roles 37
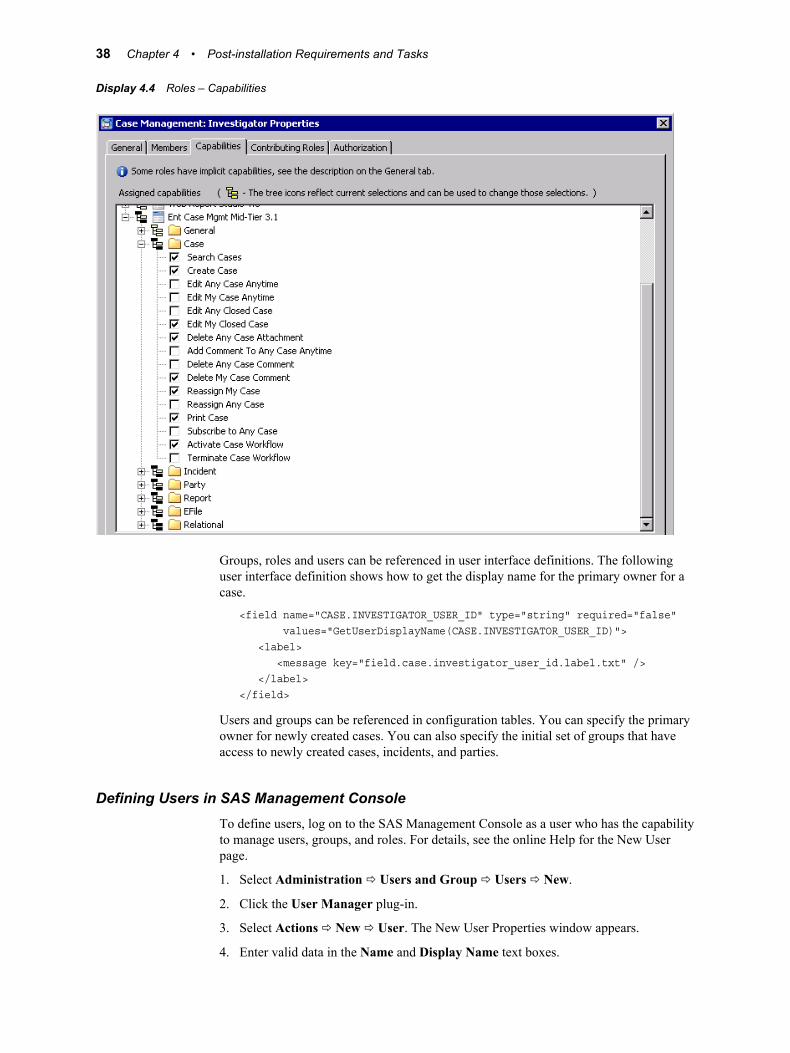
Display 4.4 Roles – Capabilities
Groups, roles and users can be referenced in user interface definitions. The following user interface definition shows how to get the display name for the primary owner for a case.
<field name="CASE.INVESTIGATOR_USER_ID" type="string" required="false" values="GetUserDisplayName(CASE.INVESTIGATOR_USER_ID)"> <label> <message key="field.case.investigator_user_id.label.txt" /> </label></field>
Users and groups can be referenced in configuration tables. You can specify the primary owner for newly created cases. You can also specify the initial set of groups that have access to newly created cases, incidents, and parties.
Defining Users in SAS Management ConsoleTo define users, log on to the SAS Management Console as a user who has the capability to manage users, groups, and roles. For details, see the online Help for the New User page.
1. Select Administration ð Users and Group ð Users ð New.
2. Click the User Manager plug-in.
3. Select Actions ð New ð User. The New User Properties window appears.
4. Enter valid data in the Name and Display Name text boxes.
38 Chapter 4 • Post-installation Requirements and Tasks
5. Select the Groups and Roles tab.
6. Click the Accounts tab.
7. Click New. The New Login Properties dialog box appears.
8. Define logon information for the user.
9. Click OK. For more information, see the online Help in SAS Management Console or SAS Management Console: Guide to Users and Permissions.
Defining Groups in SAS Management ConsoleA SAS Enterprise Case Management group is defined by default during installation. If necessary, you can add users to this group to access SAS Enterprise Case Management. To create additional groups in SAS Management Console, complete these steps:
1. Log on to SAS Management Console as sasadm or as a user who has the capability to manage users, groups, and roles.
2. Click the User Manager plug-in.
3. Select Actions ð New ð Group. The New Group Properties window appears.
4. Enter valid data in the Name and Display Name text boxes.
5. Select the Members tab.
6. From the Available Identities list, select users that you want to be members of the group and move them to the Current Members list. Note that you can define users later if they are not yet defined.
7. Click OK.
For more information, see the online Help in SAS Management Console or SAS Management Console: Guide to Users and Permissions.
Defining an Administrative User in the SAS Metadata RepositoryThere is no limit to the number of users that can administer SAS Enterprise Case Management. However, there must be least one. The following steps describe creating users in SAS metadata to act as SAS Enterprise Case Management administrators.
A SAS Enterprise Case Management installer user account, SASInstall, is automatically created during configuration. However, to complete the rest of the setup through the SAS Enterprise Case Management Web application, the installer needs to have administrative privileges. In SAS Management Console:
1. Select the User Manager tab.
2. Right-click SASInstall, and select Properties.
3. If you want to create a new user instead of using SASInstall, select New User and enter the required information for the user, including adding a user account on the Accounts tab.
4. Make the user a member of the Enterprise Case Management Users group on the Groups and Roles tab.
5. Make the user a member of a role (or a group that is a member of a role) that has administrative capabilities for SAS Enterprise Case Management.
Defining Users, Groups, and Roles 39

Defining Roles for SAS Enterprise Case Management AccessRoles in SAS Enterprise Case Management are activity based. Roles are granted to users and are cumulative. For example, if a user is assigned to more than one role, then the capabilities will always honor the grant. If role 1 grants a user a specific capability but role 2 does not, the user will still have the capability. The Advanced role is provided with your SAS Enterprise Case Management installation by default.
Note: A user can be associated with a maximum of 22 roles and groups.
1. Log on to SAS Management Console as sasadm or as a user who has the capability to manage users, groups, and roles.
2. Click the User Manager plug-in.
3. Select Actions ð New ð Role. The New Role Properties window appears.
4. Enter valid data in the Name and Display Name text boxes.
5. Select the Members tab.
6. From the Available Identities list, select users that you want to assign to the role and move them to the Current Members list. Note that you can define users later if they are not yet defined.
7. Select the Capabilities tab. All of the capabilities from all of the installed applications are displayed.
8. You can select a capability or capabilities.
9. Click OK. For more information, see the online Help in SAS Management Console or SAS Management Console: Guide to Users and Permissions.
Uploading Definitions and Properties
Uploading Workflow DefinitionsAfter you have set up and populated your database, you must upload your workflow definitions. You can provide your own workflow definitions or use the samples. Samples of the workflow definitions can be found from one of the following paths:
• Windows platforms: !SASROOT\casemgmtmva\sasmisc\sample\workflow
• UNIX platforms: !SASROOT/misc/casemgmtmva/sample/workflow
To use these samples, follow these steps:
1. Start the Windows Workflow Studio Client by selecting All Programs ð SAS ð SAS Workflow Studio 1.2. For UNIX, you must copy the workflow to a directory that is accessible by SAS Workflow Studio.
Note: SAS Workflow Studio will likely be located in C:\Program Files\SASHome\SASWorkflowStudio\1.2.
2. Log on to the workflow engine by selecting Server ð Logon. Connect to the Web server running the BI Web services using http://<hostname>:<portnumber>. This is an application that is part of the Web Infrastructure Platform (WIP), which by default is usually running on server 1, if there are multiple Web servers running the
40 Chapter 4 • Post-installation Requirements and Tasks

SAS middle-tier Web applications (for example, http://hostname.sas.com:8080). Use a SAS Enterprise Case Management administrator user that you created earlier to connect.
3. In the File menu, open all of the XML files from the sample directory.
4. Complete the following steps for the SERVER_URL data object when you create new workflows or when you upload the sample workflows.
a. In the process tree list of the workflow that you are working on, expand Data Objects.
b. Right-click SERVER_URL and select Edit to edit the data object. Follow the comment in the description to specify the host name and port number of the SAS Enterprise Case Management Web application (for example, http://hostname.sas.com:8780) in Properties Value.
c. Upload the edited workflow process template by choosing Server ð Save to Repository.
d. Click Activate at the bottom of the dialog box if you would also like to activate the current version in workflow.
Note: If you do not click Activate for a workflow that is being uploaded for the first time, you will receive an error telling you that an invalid workflow has been configured when you open cases that are configured to use that workflow.
5. Select the Upload option for each workflow definition file.
Uploading User Interface DefinitionsAfter you have uploaded your workflow definitions, you must upload the user interface definitions from one of the following paths:
• Windows platforms: !SASROOT\casemgmtmva\sasmisc\install\uidef
• UNIX platforms: !SASROOT/misc/casemgmtmva/install/uidef
First, upload the user interface definitions for the standard object creation dialog boxes by performing the following steps:
1. Log on to SAS Enterprise Case Management as the admin user.
2. Select Clear Cache on the Administration tab to ensure that the application has the latest configuration data.
3. Select UI Definitions on the Administration tab.
4. Upload the needed user interface definitions. You must upload each file individually.
After uploading the object creation dialog boxes, upload user interface definitions for each entity type. Sample user interface definition files are provided from one of the following paths:
• Windows platforms: !SASROOT\casemgmtmva\sasmisc\sample\uidef
• UNIX platforms: !SASROOT/misc/casemgmtmva/sample/uidef
To upload the samples, follow these steps:
1. Select UI Definitions on the Administration tab.
2. Upload the needed user interface definitions. You must upload each file individually.
Uploading Definitions and Properties 41
Uploading Custom PropertiesAfter you have uploaded your user interface definitions, you can upload your custom property definitions in SAS Enterprise Case Management from one of the following paths:
• Windows platforms: !SASROOT\casemgmtmva\sasmisc\sample\properties
• UNIX platforms: !SASROOT/misc/casemgmtmva/sample/properties
For example, the following file that contains sample custom properties can be executed. To use this sample, follow these steps:
1. Log on to SAS Enterprise Case Management as the admin user.
2. Select Custom Property Files on the Administration tab.
3. Upload the needed custom property definitions. You must upload the files individually.
4. After all the custom properties files have been uploaded, click Refresh Report Mart Labels on the Administration tab.
Note: Report mart labels should be refreshed any time changes are made to the table or column label translations in any of the custom properties files or any time a new language is added to the ECM_LOCALE table. Report mart labels are generated only for the locales in the ECM_LOCALE table.
Clearing the CacheSAS Enterprise Case Management caches various configuration data in memory for better performance. The following configurations are cached in memory:
• all user-defined field definitions
• all static and user-defined reference table values
• all user display names defined in the SAS Metadata Repository
• all search panel configurations
• all custom resource bundle properties
• all properties defined in the SAS Metadata Repository for SAS Enterprise Case Management
If any of the above configurations are changed, then the administrator should go to the Administration tab in the SAS Enterprise Case Management Web application and select the Clear Cache menu option to clear cached data.
Note: If the SAS Enterprise Case Management Web application is deployed on multiple servers, then the clear cache action needs to be performed on all servers in the cluster.
42 Chapter 4 • Post-installation Requirements and Tasks
Capabilities in SAS Enterprise Case Management
Associating CapabilitiesSAS Enterprise Case Management provides various functional capabilities that are applicable to cases, incidents, parties, reports, and e-files. The following tables show the different capabilities.
Note: All the capabilities listed apply to the Advanced role in SAS Enterprise Case Management.
Table 4.1 SAS Enterprise Case Management – Case Capabilities
Case Capability Description
Search Cases Enables users to search for cases. Users must have the Search Cases capability for any of the subsequent capabilities to take effect.
Create Case Enables users to create a case.
Edit Any Case Anytime Enables users to edit any case anytime.
Edit My Case Anytime Enables users to edit their own cases anytime.
Edit Any Closed Case Enables users to edit any closed case.
Edit My Closed Case Enables users to edit their own closed cases.
Add Comment To Any Case Anytime
Enables users to add a comment to any case anytime.
Delete Any Case Attachment Enables users to delete any case attachment.
Delete Any Case Comment Enables users to delete any case comment.
Delete My Case Comment Enables users to delete any case comment that they created.
Reassign Any Case Enables users to set the primary owner for any case and unlock any case.
Reassign My Case Enables users to reassign any case that they own.
Subscribe to Any Case Enables users to subscribe to any case for alerting when the case is modified.
Print Case Enables users to preview or generate a printable case report.
Activate Case Workflow Enables users to activate a particular workflow for the case.
Terminate Case Workflow Enables users to terminate a workflow associated with the case.
Capabilities in SAS Enterprise Case Management 43

Table 4.2 SAS Enterprise Case Management – Incident Capabilities
Incident Capabilities Description
Search Incidents Enables users to search for incidents. Users must have the Search Incidents capability for any of the subsequent capabilities to take effect.
Create Incident Enables users to create an incident.
Edit Incident Enables users to edit an incident.
Delete Any Incident Attachment
Enables users to delete any incident attachment.
Add Comment to Any Incident
Enables users to add a comment to any incident.
Delete Any Incident Comment
Enables users to delete any incident comment.
Delete My Incident Comment Enables users to delete any incident comment that they created.
Subscribe to Any Incident Enables users to subscribe to any incident for alerting when the incident is modified.
Table 4.3 SAS Enterprise Case Management – Party Capabilities
Party Capability Description
Search Parties Enables users to search for parties. Users must have the Search Parties capability for any of the subsequent capabilities to take effect.
Create Party Enables users to create a party or subject.
Edit Party Enables users to edit a party or subject.
Delete Any Party Attachment Enables users to delete any party or subject attachment.
Add Comment To Any Party Enables users to add a comment to any party or subject.
Delete Any Party Comment Enables users to delete any party or subject comment.
Delete My Party Comment Enables users to delete any party or subject comment that they created.
Subscribe to Any Subject Enables users to subscribe to any party or subject for alerting when the party or subject is modified.
44 Chapter 4 • Post-installation Requirements and Tasks

Table 4.4 SAS Enterprise Case Management – E-Filing Capabilities
E-File Capability Description
Search E-Files Enables users to search for e-files. Users must have the Search E-Files capability for any of the subsequent capabilities to take effect.
Create E-File Enables users to create an e-file or subject.
Edit E-File Enables users to edit an e-file or subject.
Delete Any E-File Attachment Enables users to delete any e-file or subject attachment.
Add Attachment to E-File Enables users to add an attachment to any e-file.
Add Comment To Any E-File Enables users to add a comment to any e-file or subject.
Delete Any E-File Comment Enables users to delete any e-file or subject comment.
Delete My E-File Comment Enables users to delete any e-file or subject comment that they created.
Subscribe to Any E-File Enables users to subscribe to any e-file or subject for alerting when the e-file or subject is modified.
Table 4.5 SAS Enterprise Case Management – Report Capabilities
Report Capability Description
Search Reports Enables users to search for reports. Users must have the Search Reports capability for any of the subsequent capabilities to take effect.
Create Report Enables users to create a report.
Edit Report Enables users to edit any report.
Add Comment To Any Report Enables users to add a comment to a report.
Delete Any Report Attachment Enables users to delete any report attachment.
Delete Any Report Comment Enables users to delete any report comment.
Delete My Report Comment Enables users to delete any report comment that they created.
Subscribe to Any Report Enables users to subscribe to any report for alerting when the report is modified.
Capabilities in SAS Enterprise Case Management 45

Report Capability Description
Add Attachment to Report Enables users to add an attachment to a report.
Activate Report Workflow Enables user to activate a particular workflow for the report.
Terminate Report Workflow Enables the user to terminate a workflow associated with the report.
Table 4.6 SAS Enterprise Case Management – Relational Capabilities
Relational Capability Description
Add Incident To Case Enables users to add an incident to a case.
Table 4.7 SAS Enterprise Case Management – General Capabilities
General Capability Description
Administration Enables users to perform any administrative task within the Administration tab.
SAS Enterprise Case Management Capabilities – User Interface Impact
Case Capability User Interface Impact
Search Cases The Cases application tab is visible.
Create Case The New Case action is visible on the cases search panel toolbar.
Edit Any Case Anytime The Edit menu action is always enabled.
Edit My Case Anytime The Edit menu action is always enabled for any case that the user owns.
Edit Any Closed Case The Edit menu action is always enabled for any closed case.
Edit My Closed Case The Edit menu action is always enabled for any closed case that the user owns.
Delete Any Case Attachment The Delete Attachment action icon is visible for all attachments on any case the user can edit.
46 Chapter 4 • Post-installation Requirements and Tasks

Case Capability User Interface Impact
Delete Any Case Comment The Delete Comment action icon is visible for all comments on any case the user can edit or add a comment to.
Delete My Case Comment The Delete Comment action icon is visible for all comments created by the user on any case the user can edit or add a comment to.
Add Comment To Any Case Anytime The Comment input fields and button are always visible. Without this capability, the Comment input fields and button are visible only on cases the user can edit.
Reassign Any Case The Set Primary Owner and Unlock menu actions for a case are always enabled.
Reassign My Case The Reassign Case menu action is enabled for cases that the user owns.
Print Case Enables users to preview or generate a printable case report.
Activate Case Workflow Enables users to activate a particular workflow for the case.
Terminate Case Workflow Enables users to terminate a workflow associated with the case.
Incident Capability User Interface Impact
Search Incidents The Incidents application tab is visible.
Create Incident The New Incident action is visible on the incident search panel toolbar.
Edit Incident The Edit menu action is always enabled.
Delete Any Incident Attachment The Delete Attachment action icon is visible for all attachments on any incident the user can edit.
Add Comment To Any Incident The Comment input fields and button are always visible. Without this capability, the Comment input fields and button are visible only on incidents the user can edit.
Delete Any Incident Comment The Delete Comment action icon is visible for all comments on any incident the user can edit or add a comment to.
Delete My Incident Comment The Delete Comment action icon is visible for all comments created by the user on any incident the user can edit or add a comment to.
Capabilities in SAS Enterprise Case Management 47

Party Capability User Interface Impact
Search Parties The Subjects application tab is visible.
Create Party The New Subject action is visible on the party search panel toolbar.
Edit Party The Edit menu action is always enabled.
Delete Any Party Attachment The Delete Attachment action icon is visible for all attachments on any party the user can edit.
Add Comment To Any Party The Comment input fields and button are always visible. Without this capability, the Comment input fields and button are visible only on parties the user can edit.
Delete Any Party Comment The Delete Comment action icon is visible for all comments on any party the user can edit or add a comment to.
Delete My Party Comment The Delete Comment action icon is visible for all comments created by the user on any party the user can edit or add a comment to.
Report Capability User Interface Impact
Search Reports The Reports application tab is visible.
Create Reports The Add Report action is visible on the table of reports in a case or incident.
Edit Reports The Edit menu action is always enabled.
Delete Any Report Attachment The Delete Attachment action icon is visible for all attachments on any report the user can edit.
Delete Any Report Comment The Delete Comment action icon is visible for all comments on any report the user can edit or add a comment to.
Delete My Report Attachment The Delete Comment action icon is visible for all comments created by the user on any report the user can edit or add a comment to.
Add Comment To Any Report Anytime The Comment input fields and button are always visible. Without this capability, the Comment input fields and button are visible only on reports the user can edit.
Activate Report Workflow Enables users to activate a particular workflow for the report.
48 Chapter 4 • Post-installation Requirements and Tasks

Report Capability User Interface Impact
Terminate Report Workflow Enables users to terminate a workflow associated with the report.
Relational Capability User Interface Impact
Add Incident To Case The Related Cases menu action (on incident search panel) and toolbar action (on incident detail panel) are always enabled for unassigned incidents.
General Capability User Interface Impact
Administration The Administration application tab is visible.
You should consider the following specific details about capabilities and workflows and their impact on the SAS Enterprise Case Management user interface:
• If a user is able to work on a workflow activity as defined in the associated workflow for a case, then that case can be edited, regardless of the user’s capabilities.
• Attachments can be added only to cases, incidents, or parties that can be edited. In addition, you can add only attachments that are 50 MB or less in size.
• Security access and restrictions within the case, incident, and party detail panels are controlled from within the user interface definitions.
Subscriptions and Notifications
Introduction to Subscriptions and NotificationsSeveral features in SAS Enterprise Case Management can be used to send notifications that are similar to Microsoft Outlook’s task reminders.
• Users can subscribe to entities.
• Users can generate case reports offline and be notified whether these reports were generated successfully.
• Users can set reminders for tasks in the Task List component.
By default, SAS Enterprise Case Management is installed with templates for plain-text formatted e-mail, HTML formatted e-mail, and SMS messaging. The templates reside on the content server under the path /sasdav/Templates/notifications/en.
A utility included with the SAS installation can be found under SAS_CONFIG/Web/Utilities/DAVTree.bat. You can browse the content server by using this utility and opening the following URL: http://localhost:8080/SASContentServer/repository/default. Use your SAS Administrator user name and password to log on.
Subscriptions and Notifications 49

You can modify the templates in place or add templates for additional languages using the DAVTree tool. To modify a template, right-click it and select Edit. After you have finished with your modifications, click Save. Since templates are cached in the content server, restart Remote Services, SAS Server 1, and SAS Server 8 when you have finished modifying the template. Keep in mind that template names must remain the same.
The following sections outline the features that can send notifications and describe the templates.
Note: Special characters such as < > and & will be encoded in plain text and SMS notifications.
Event Alert NotificationsFrom the Search pop-up menu on the case, incident, party, report, or e-file and the menu bar on the case, incident, party, report, or e-file itself, a user has the option to subscribe to the entity to be alerted of changes. Any saved change to the entity triggers an alert notification using one of three templates. The success template names for case notifications are as follows:
• SAS_Solutions_ECM_Subscriber_Case.html (for HTML formatted e-mail)
• SAS_Solutions_ECM_Subscriber_Case.txt (for plain-text formatted e-mail)
• SAS_Solutions_ECM_Subscriber_Case.sms (for text messaging)
• SAS_Solutions_ECM_Subscriber_Case_Attachment.html
• SAS_Solutions_ECM_Subscriber_Case_Attachment.txt
• SAS_Solutions_ECM_Subscriber_Case_Attachment.sms
• SAS_Solutions_ECM_Subscriber_Case_Comment.html
• SAS_Solutions_ECM_Subscriber_Case_Comment.txt
• SAS_Solutions_ECM_Subscriber_Case_Comment.sms
• SAS_Solutions_ECM_Subscriber_Case_Link.html
• SAS_Solutions_ECM_Subscriber_Case_Link.txt
• SAS_Solutions_ECM_Subscriber_Case_Link.sms
• SAS_Solutions_ECM_Subscriber_Case_Reassign.html
• SAS_Solutions_ECM_Subscriber_Case_Reassign.txt
• SAS_Solutions_ECM_Subscriber_Case_Reassign.sms
• SAS_Solutions_ECM_Subscriber_Case_Save.html
• SAS_Solutions_ECM_Subscriber_Case_Save.txt
• SAS_Solutions_ECM_Subscriber_Case_Save.sms
• SAS_Solutions_ECM_Subscriber_Case_Unlock.html
• SAS_Solutions_ECM_Subscriber_Case_Unlock.txt
• SAS_Solutions_ECM_Subscriber_Case_Unlock.sms
• SAS_Solutions_ECM_Subscriber_Case_Workflow.html
• SAS_Solutions_ECM_Subscriber_Case_Workflow.txt
• SAS_Solutions_ECM_Subscriber_Case_Workflow.sms
50 Chapter 4 • Post-installation Requirements and Tasks

The following template properties can be used:
Property Value
%CASE_ID <CASE_ID>
%CASE_LINK A link to the case that generated the alert.
%CASE_DETAILS A short description of the event.
The success template names for incident notifications are as follows:
• SAS_Solutions_ECM_Subscriber_Incident.html (for HTML formatted e-mail)
• SAS_Solutions_ECM_Subscriber_Incident.txt (for plain-text formatted e-mail)
• SAS_Solutions_ECM_Subscriber_Incident.sms (for text messaging)
• SAS_Solutions_ECM_Subscriber_Incident_Attachment.html
• SAS_Solutions_ECM_Subscriber_Incident_Attachment.txt
• SAS_Solutions_ECM_Subscriber_Incident_Attachment.sms
• SAS_Solutions_ECM_Subscriber_Incident_Comment.html
• SAS_Solutions_ECM_Subscriber_Incident_Comment.txt
• SAS_Solutions_ECM_Subscriber_Incident_Comment.sms
• SAS_Solutions_ECM_Subscriber_Incident_Link.html
• SAS_Solutions_ECM_Subscriber_Incident_Link.txt
• SAS_Solutions_ECM_Subscriber_Incident_Link.sms
• SAS_Solutions_ECM_Subscriber_Incident_Save.html
• SAS_Solutions_ECM_Subscriber_Incident_Save.txt
• SAS_Solutions_ECM_Subscriber_Incident_Save.sms
The following template properties can be used:
Property Value
%INCIDENT_ID <INCIDENT_ID>
%INCIDENT_LINK A link to the incident that generated the alert.
%INCIDENT_DETAILS A short description of the event.
The success template names for party or subject notifications are as follows:
• SAS_Solutions_ECM_Subscriber_Subject.html (for HTML formatted e-mail)
• SAS_Solutions_ECM_Subscriber_Subject.txt (for plain-text formatted e-mail)
• SAS_Solutions_ECM_Subscriber_Subject.sms (for text messaging)
• SAS_Solutions_ECM_Subscriber_Subject_Attachment.html
• SAS_Solutions_ECM_Subscriber_Subject_Attachment.txt
Subscriptions and Notifications 51

• SAS_Solutions_ECM_Subscriber_Subject_Attachment.sms
• SAS_Solutions_ECM_Subscriber_Subject_Comment.html
• SAS_Solutions_ECM_Subscriber_Subject_Comment.txt
• SAS_Solutions_ECM_Subscriber_Subject_Comment.sms
• SAS_Solutions_ECM_Subscriber_Subject_Link.html
• SAS_Solutions_ECM_Subscriber_Subject_Link.txt
• SAS_Solutions_ECM_Subscriber_Subject_Link.sms
• SAS_Solutions_ECM_Subscriber_Subject_Save.html
• SAS_Solutions_ECM_Subscriber_Subject_Save.txt
• SAS_Solutions_ECM_Subscriber_Subject_Save.sms
• SAS_Solutions_ECM_Subscriber_Subject_Unlock.html
• SAS_Solutions_ECM_Subscriber_Subject_Unlock.txt
• SAS_Solutions_ECM_Subscriber_Subject_Unlock.sms
The following template properties can be used:
Property Value
%SUBJECT_ID <SUBJECT_ID>
%SUBJECT_LINK A link to the subject that generated the alert.
%SUBJECT_DETAILS A short description of the event.
The success template names for e-file notifications are as follows:
• SAS_Solutions_ECM_Subscriber_EFile_Attachment.html (for HTML formatted e-mail)
• SAS_Solutions_ECM_Subscriber_EFile_Attachment.txt (for plain-text formatted e-mail)
• SAS_Solutions_ECM_Subscriber_EFile_Attachment.sms (for text messaging)
• SAS_Solutions_ECM_Subscriber_EFile_Comment.html
• SAS_Solutions_ECM_Subscriber_EFile_Comment.txt
• SAS_Solutions_ECM_Subscriber_EFile_Comment.sms
• SAS_Solutions_ECM_Subscriber_EFile_Link.html
• SAS_Solutions_ECM_Subscriber_EFile_Link.txt
• SAS_Solutions_ECM_Subscriber_EFile_Link.sms
• SAS_Solutions_ECM_Subscriber_EFile_Save.html
• SAS_Solutions_ECM_Subscriber_EFile_Save.txt
• SAS_Solutions_ECM_Subscriber_EFile_Save.sms
• SAS_Solutions_ECM_Subscriber_EFile_Unlock.html
• SAS_Solutions_ECM_Subscriber_EFile_Unlock.txt
• SAS_Solutions_ECM_Subscriber_EFile_Unlock.sms
52 Chapter 4 • Post-installation Requirements and Tasks

The following template properties can be used:
Property Value
%EFILE_ID <EFILE_ID>
%EFILE_LINK A link to the e-file that generated the alert.
%EFILE_DETAILS A short description of the event.
The success template names for report notifications are as follows:
• SAS_Solutions_ECM_Subscriber_Report_Attachment.html (for HTML formatted e-mail)
• SAS_Solutions_ECM_Subscriber_Report_Attachment.txt (for plain-text formatted e-mail)
• SAS_Solutions_ECM_Subscriber_Report_Attachment.sms (for text messaging)
• SAS_Solutions_ECM_Subscriber_Report_Comment.html
• SAS_Solutions_ECM_Subscriber_Report_Comment.txt
• SAS_Solutions_ECM_Subscriber_Report_Comment.sms
• SAS_Solutions_ECM_Subscriber_Report_Link.html
• SAS_Solutions_ECM_Subscriber_Report_Link.txt
• SAS_Solutions_ECM_Subscriber_Report_Link.sms
• SAS_Solutions_ECM_Subscriber_Report_Save.html
• SAS_Solutions_ECM_Subscriber_Report_Save.txt
• SAS_Solutions_ECM_Subscriber_Report_Save.sms
• SAS_Solutions_ECM_Subscriber_Report_Unlock.html
• SAS_Solutions_ECM_Subscriber_Report_Unlock.txt
• SAS_Solutions_ECM_Subscriber_Report_Unlock.sms
• SAS_Solutions_ECM_Subscriber_Report_Workflow.html
• SAS_Solutions_ECM_Subscriber_Report_Workflow.txt
• SAS_Solutions_ECM_Subscriber_Report_Workflow.sms
The following template properties can be modified:
Property Value
%RR_ID <RR_ID>
%RR_LINK A link to the report that generated the alert.
%RR_DETAILS A short description of the event.
Subscriptions and Notifications 53

Case Report NotificationsFrom a case’s Print menu, a user has the option to generate a case report offline. This action triggers one of two notifications: either the case report was generated successfully, or it failed. The success template names are as follows:
• SAS_Solutions_ECM_Subscriber_CaseReport.html (for HTML formatted e-mail)
• SAS_Solutions_ECM_Subscriber_CaseReport.txt (for plain-text formatted e-mail)
• SAS_Solutions_ECM_Subscriber_CaseReport.sms (for text messaging)
The failure template names are as follows:
• SAS_Solutions_ECM_Subscriber_CaseReport_Error.html (for HTML formatted e-mail)
• SAS_Solutions_ECM_Subscriber_CaseReport_Error.txt (for plain-text formatted e-mail)
• SAS_Solutions_ECM_Subscriber_CaseReport_Error.sms (for text messaging)
The following template properties can be modified:
Property Value
%CASE_ID <CASE_ID>
%REPORT_LINK A link to the Generated Reports page for that user. Currently this property is supported only in the success template.
Task List NotificationsThe Case panel can be configured to use the Task List component, which allows users to set reminders for tasks. The template names for reminders are as follows:
• SAS_Solutions_ECM_ToDo_Reminder.html (for HTML formatted e-mail)
• SAS_Solutions_ECM_ToDo_Reminder.txt (for plain-text formatted e-mail)
• SAS_Solutions_ECM_ToDo_Reminder.sms (for text messaging)
The following template properties can be used within the e-mail to insert pertinent information:
Property Value
%OBJ CASE-<CASE_ID>
%TASK Task Description
%DUE_DATE Task Due Date
%OBJ_LINK A link back to the case. Currently this property is supported only in the HTML template.
54 Chapter 4 • Post-installation Requirements and Tasks

Adjusting the Reminder Interval for the Task ListSAS Enterprise Case Management is installed with a metadata property for the reminder timer interval that is set to 15 minutes by default. This means the reminder scheduler will wake up every 15 minutes to determine whether there are any alerts or reminders that need to be sent. This property is also configurable, but it is recommended to remain at 15-minute intervals. If you decide to modify this property, it is also recommended to set this property in multiples of 15, preferably 15, 30, or 60. Keep in mind that the Task List only allows for reminder times at a minimum of 15 minutes. Therefore, setting this interval at odd numbers will cause any alerts or reminders to be sent later than expected. You can find the reminder.scheduler.interval.time setting in SAS Management Console under the Advanced tab of the SAS Enterprise Case Management Application Management section.
The following display shows the Task List reminder interval setting.
Subscriptions and Notifications 55
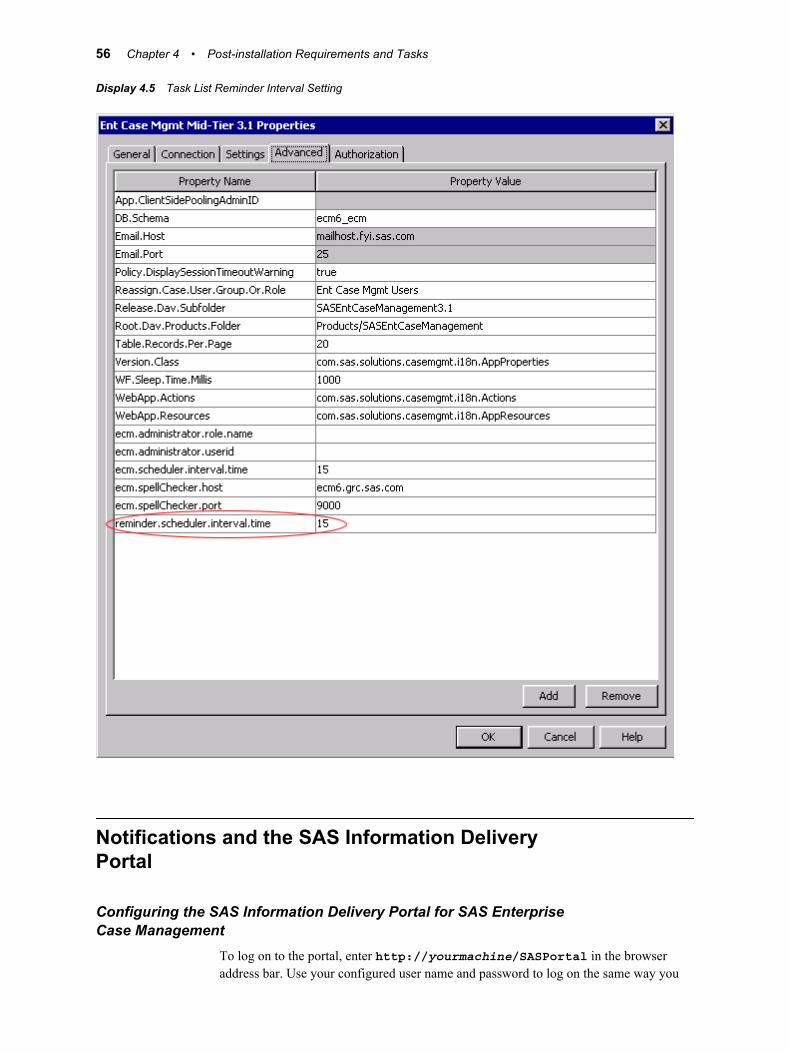
Display 4.5 Task List Reminder Interval Setting
Notifications and the SAS Information Delivery Portal
Configuring the SAS Information Delivery Portal for SAS Enterprise Case Management
To log on to the portal, enter http://yourmachine/SASPortal in the browser address bar. Use your configured user name and password to log on the same way you
56 Chapter 4 • Post-installation Requirements and Tasks

would for SAS Enterprise Case Management. To add the Alerts portlet to your portal, complete the following steps:
1. Click Customize on the top banner, and select Add Page if you do not already have a page specified.
2. Fill in the required name information and any other optional information. Click Add, and then click Done. You will now be in your new Tab area with the name that you selected.
3. Click Options and select Edit Page Content.
4. Click Add Portlets.
5. Select the Alerts portlet type if not already selected. Enter the required name and any other information. Click Add, and then click Done. Click OK. You will now see your Alerts portlet within your newly created Tab page.
What to Expect from the PortalSAS Enterprise Case Management alerts are displayed in this portlet with the task name and the date that the alert was sent. You can delete any alerts that you want to remove. Click a task name to open the case that the alert was created from.
Controlling Alert Notifications from the SAS Preferences ManagerThe SAS Preferences Manager is a Web application that provides a central facility for SAS application users to manage their preferences and settings. To open the SAS Preferences Manager, click Options ð Preferences at the top right corner of the application window. Use the Portal section to configure options for notifications of both e-mail and alerts. By default, alert notifications will be set to Portlet only. To receive e-mail, you must select an option that includes e-mail alerts, and the user that you created in metadata must have a valid e-mail address.
For more information about using the SAS Preferences Manager, see the SAS Intelligence Platform: Web Application Administration Guide available at http://support.sas.com.
The following display shows the Preferences dialog box.
Notifications and the SAS Information Delivery Portal 57
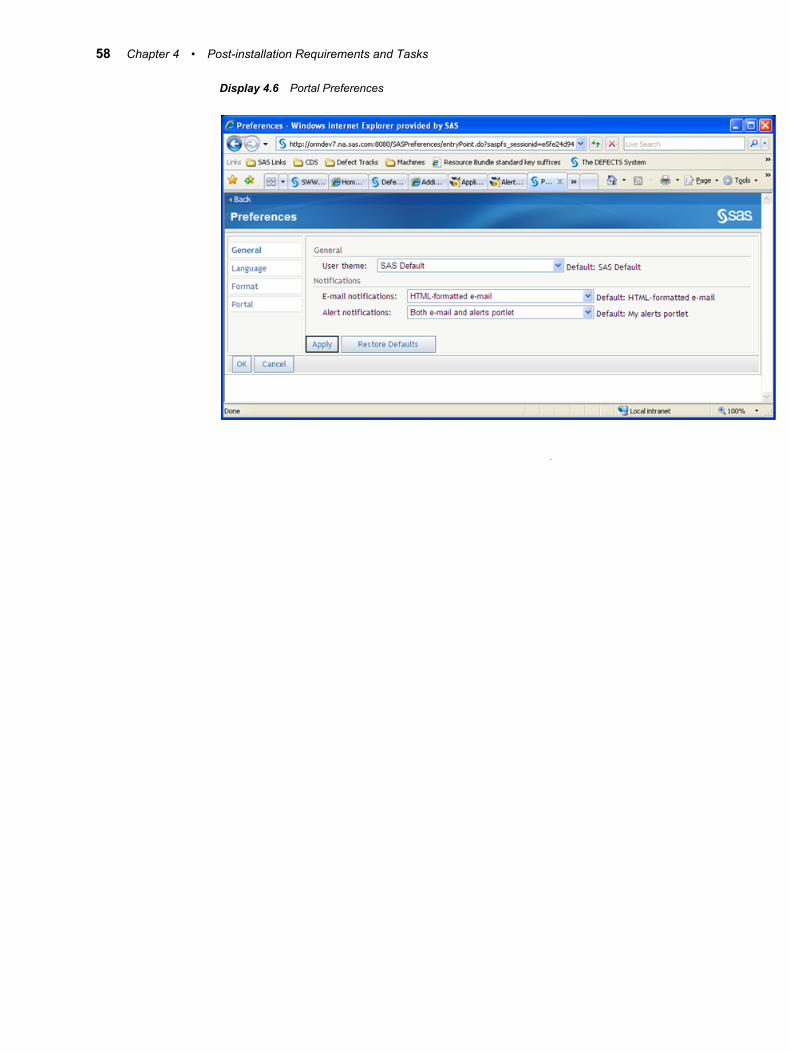
Display 4.6 Portal Preferences
58 Chapter 4 • Post-installation Requirements and Tasks

Configuring the Web ServiceAs shown in the following display, configure the Web service to accept warnings:
Display 4.7 Configuring the Web Service
By default, the SAS Web service is configured to accept stored process results only when the SAS stored process is completed with no errors (for example, completion code=0). To allow warnings in SAS code, the BI Web service for Java 9.3 properties should be changed as follows:
1. Use the Plug-ins tab of SAS Management Console to navigate to Application Management ð Configuration Manager ð SAS Application Infrastructure.
2. Right-click BI Web Service for Java 9.3 and select Properties. Click the Settings tab.
3. On the left pane, select Application ð General Configuration.
4. On the right pane, enter 0-4 for Acceptable SYSCC list as shown in Display 4.7 on page 59 . Click OK.
5. You can now exit SAS Management Console. Restart SAS Remote Services and the Web server on the middle-tier machine.
Configuring the Web Service 59

For more information about this setting, see “Configuring SAS BI Web Services for Java” in the SAS Intelligence Platform: Web Application Administration Guide available at http://support.sas.com/documentation/onlinedoc/intellplatform.
Deploy SAS Spelling CorrectionSAS Spelling Correction provides the spell-checking capability in SAS Enterprise Case Management. It includes basic spelling correction functionality in which misspelled words are identified and possible corrections are offered. No grammatical suggestions are made. To take advantage of this functionality, perform the following installation instructions:
Installation1. Locate the spelling-server.zip file in the third_party folder of the SAS Software
Depot, found specifically in the SAS_ Spelling_Correction\1_2\Portable_Entities directory.
2. Extract the SAS Spelling Correction files to one of the following directories:
Windows (32– and 64–bit)
$:\Program Files\SASSpellingServer
Linux (32– and 64–bit)
/opt/SASSpellingServer
SAX /opt/SASSpellingServer
S64 /opt/SASSpellingServer
HP-UX (ia64) /opt/SASSpellingServer
AIX64/R64 /opt/SASSpellingServer
The structure of the extracted volume is as follows:
Windows (32–bit) $:\Program Files\SASSpellingServer\TeragramSpellingServer\bin \win32_vc6\_spelling_server.exe
Windows (64–bit) $:\Program Files\SASSpellingServer\TeragramSpellingServer\bin \win64_icl_mt\_spelling_server.exe
Linux (32–bit) /opt/SASSpellingServer/TeragramSpellingServer/bin/linux32/_spelling_server
60 Chapter 4 • Post-installation Requirements and Tasks

Linux (64–bit) /opt/SASSpellingServer/TeragramSpellingServer/bin/linux64/_spelling_server
SAX /opt/SASSpellingServer/TeragramSpellingServer/bin/sunos_x86_64/_spelling_server
S64 /opt/SASSpellingServer/TeragramSpellingServer/bin/sunos64/_spelling_server
HP-UX (ia64) /opt/SASSpellingServer/TeragramSpellingServer/bin/hpux_ia64/_spelling_server
AIX64 / R64 /opt/SASSpellingServer/TeragramSpellingServer/bin/aix64/_spelling_server
3. Run the following:
Note: SAS Spelling Correction must be invoked from the spelling-server directory. The script is a simple command line program. It does not spawn a separate server process. The script continues to run until you manually stop it by pressing CTRL+C.
Windows (32–bit) In the $:\Program Files\SASSpellingServer\TeragramSpellingServer directory, run the following command: bin\win32_vc6\_spelling_server.exe --port 9000 --spelling-config data\spelling.config --http-admin-port 8123.
Windows (64–bit) In the $:\Program Files\SASSpellingServer\TeragramSpellingServer directory, run the following command: bin\win64_icl_mt\_spelling_server.exe --port 9000 --spelling-config data\spelling.config --http-admin-port 8123.
Linux (32–bit) In the /opt/SASSpellingServer/TeragramSpellingServer directory, run the following command: bin/linux32/_spelling_server --port 9000 --spelling-config data/spelling.config --http-admin-port 8123.
Linux (64–bit) In the /opt/SASSpellingServer/TeragramSpellingServer directory, run the following command: bin/linux64/_spelling_server --port 9000 --spelling-config data/spelling.config --http-admin-port 8123.
Deploy SAS Spelling Correction 61

SAX In the /opt/SASSpellingServer/TeragramSpellingServer directory, run the following command: bin/sunos_x86_64/_spelling_server --port 9000 --spelling-config data/spelling.config --http-admin-port 8123.
S64 In the /opt/SASSpellingServer/TeragramSpellingServer directory, run the following command: bin/sunos64/_spelling_server --port 9000 --spelling-config data/spelling.config --http-admin-port 8123.
HP-UX (ia64) In the /opt/SASSpellingServer/TeragramSpellingServer directory, run the following command: bin/hpux_ia64/_spelling_server --port 9000 --spelling-config data/spelling.config --http-admin-port 8123.
AIX64 / R64 In the /opt/SASSpellingServer/TeragramSpellingServer directory, run the following command: bin/aix64/_spelling_server --port 9000 --spelling-config data/spelling.config --http-admin-port 8123.
Note: Ports 9000 and 8123 are used for illustration.
Configuration of SAS Spelling Correction1. Open SAS Management Console.
2. On the Plug-ins tab, navigate to Application Management ð Configuration Manager ð SAS Application Infrastructure.
3. Right-click Ent Case Mgmt Mid-Tier 3.1 and select Properties.
4. On the Advanced tab, enter your environment’s property values for ecm.spellChecker.host and ecm.spellChecker.port. Set the host and port based on where the script in step 3 of the installation steps was run and what port number was chosen.
Note: Property Name is case-sensitive.
62 Chapter 4 • Post-installation Requirements and Tasks
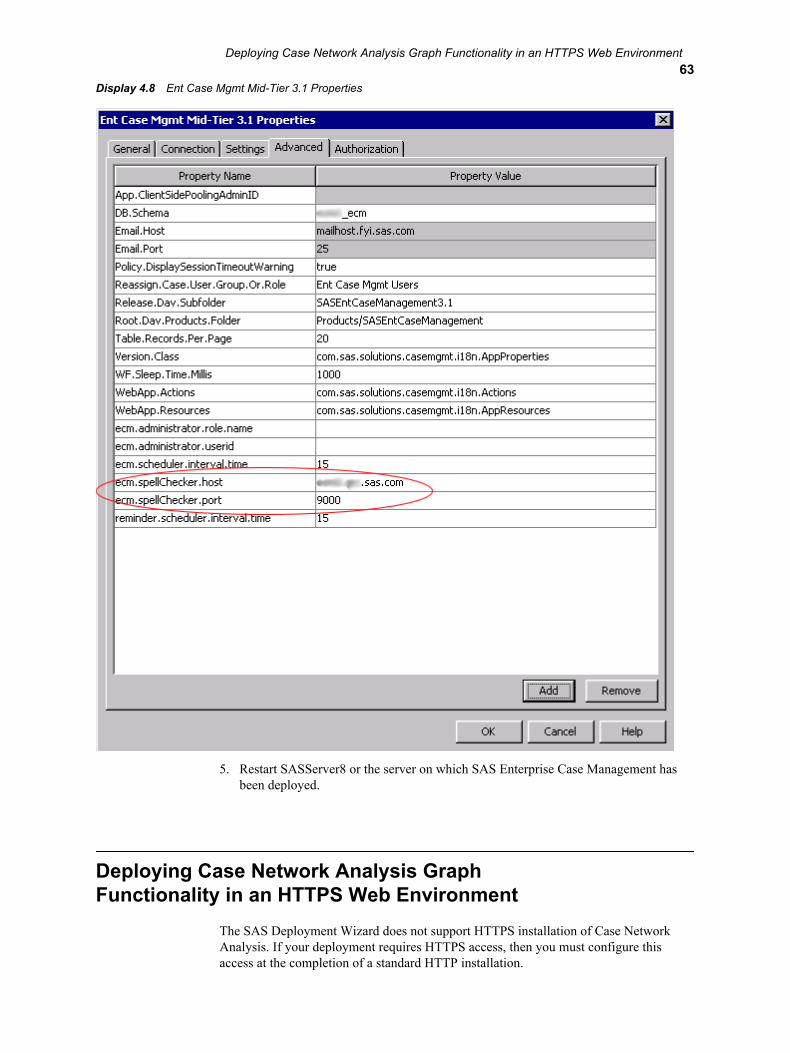
Display 4.8 Ent Case Mgmt Mid-Tier 3.1 Properties
5. Restart SASServer8 or the server on which SAS Enterprise Case Management has been deployed.
Deploying Case Network Analysis Graph Functionality in an HTTPS Web Environment
The SAS Deployment Wizard does not support HTTPS installation of Case Network Analysis. If your deployment requires HTTPS access, then you must configure this access at the completion of a standard HTTP installation.
Deploying Case Network Analysis Graph Functionality in an HTTPS Web Environment63
Here are the high-level steps to complete the process for post-installation configuration of Case Network Analysis for HTTPS access.
1. Update the services-config.xml file to reflect the secure channel definition.
2. Update the remoting-config.xml file to reflect use of the secure channel definition as the default operation.
After the configuration files are updated with the secure channel definition information, the SAS Social Network Analysis Server can be accessed through a secure URL.
Here are the detailed steps for configuring the solution for secure access.
The files that require updating are located in the following directory.
Windows<ServerHome>\deploy_sas\sas.socialnetworkanalysis2.3.ear\sas.sso.snaserver.war\WEB-INF\flex
UNIX<ServerHome>/deploy_sas/sas.socialnetworkanalysis2.3.ear/sas.sso.snaserver.war/WEB-INF\flex
1. Locate the services-config.xml file in the directory specified.
2. Define the secure channel-definition element (with a my-secure-amf ID) to resemble the following, including the class reference.
<channel-definition id="my-secure-amf"class="mx.messaging.channels.SecureAMFChannel"> <endpoint url="https://{server.name}:{server.port}/SASSNA/messagebroker/amf"class="flex.messaging.endpoints.SecureAMFEndpoint"/></channel-definition>
3. Locate the remoting-config.xml file in the directory specified.
4. Update the default-channels element to reflect the use of secure access, as indicated in the following example.
<default-channels> <channel ref="my-secure-amf"/></default-channels>
64 Chapter 4 • Post-installation Requirements and Tasks

Chapter 5
Customizing SAS Enterprise Case Management
Introduction to Customizing . . . . . . . . . . . . . . . . . . . . . . . . . . . . . . . . . . . . . . . . . . . . 66User Interface Definitions . . . . . . . . . . . . . . . . . . . . . . . . . . . . . . . . . . . . . . . . . . . . . 66Workflows . . . . . . . . . . . . . . . . . . . . . . . . . . . . . . . . . . . . . . . . . . . . . . . . . . . . . . . . 67Reference Tables . . . . . . . . . . . . . . . . . . . . . . . . . . . . . . . . . . . . . . . . . . . . . . . . . . . 68Customizable Search Panels . . . . . . . . . . . . . . . . . . . . . . . . . . . . . . . . . . . . . . . . . . . 69
User-Defined Fields . . . . . . . . . . . . . . . . . . . . . . . . . . . . . . . . . . . . . . . . . . . . . . . . . . . 69User-Defined Field Tables . . . . . . . . . . . . . . . . . . . . . . . . . . . . . . . . . . . . . . . . . . . . 69Configuring User-Defined Fields in the Database . . . . . . . . . . . . . . . . . . . . . . . . . . 70User-Defined Fields: Example . . . . . . . . . . . . . . . . . . . . . . . . . . . . . . . . . . . . . . . . . 71
User-Defined Generic Data Tables . . . . . . . . . . . . . . . . . . . . . . . . . . . . . . . . . . . . . . . 72
User Interface Definitions . . . . . . . . . . . . . . . . . . . . . . . . . . . . . . . . . . . . . . . . . . . . . . 73User Interface Definition Files . . . . . . . . . . . . . . . . . . . . . . . . . . . . . . . . . . . . . . . . . 73Updating User Interface Definitions . . . . . . . . . . . . . . . . . . . . . . . . . . . . . . . . . . . . . 73Required User Interface Definition Files . . . . . . . . . . . . . . . . . . . . . . . . . . . . . . . . . 73
Configurations . . . . . . . . . . . . . . . . . . . . . . . . . . . . . . . . . . . . . . . . . . . . . . . . . . . . . . . . 74Case Configurations . . . . . . . . . . . . . . . . . . . . . . . . . . . . . . . . . . . . . . . . . . . . . . . . . 74Incident Configurations . . . . . . . . . . . . . . . . . . . . . . . . . . . . . . . . . . . . . . . . . . . . . . 75Party Configurations . . . . . . . . . . . . . . . . . . . . . . . . . . . . . . . . . . . . . . . . . . . . . . . . . 76Report Configurations . . . . . . . . . . . . . . . . . . . . . . . . . . . . . . . . . . . . . . . . . . . . . . . 77E-File Configurations . . . . . . . . . . . . . . . . . . . . . . . . . . . . . . . . . . . . . . . . . . . . . . . . 78
Data Security . . . . . . . . . . . . . . . . . . . . . . . . . . . . . . . . . . . . . . . . . . . . . . . . . . . . . . . . . 79Data Security: Record Level . . . . . . . . . . . . . . . . . . . . . . . . . . . . . . . . . . . . . . . . . . . 79Data Security: Field Level . . . . . . . . . . . . . . . . . . . . . . . . . . . . . . . . . . . . . . . . . . . . 79
Resource Bundles . . . . . . . . . . . . . . . . . . . . . . . . . . . . . . . . . . . . . . . . . . . . . . . . . . . . . 79Custom Resource Bundles . . . . . . . . . . . . . . . . . . . . . . . . . . . . . . . . . . . . . . . . . . . . 79
Workflows . . . . . . . . . . . . . . . . . . . . . . . . . . . . . . . . . . . . . . . . . . . . . . . . . . . . . . . . . . . 80Defining Workflows . . . . . . . . . . . . . . . . . . . . . . . . . . . . . . . . . . . . . . . . . . . . . . . . . 80Data Objects . . . . . . . . . . . . . . . . . . . . . . . . . . . . . . . . . . . . . . . . . . . . . . . . . . . . . . . 81Data Object Types Supported in SAS Workflow Studio . . . . . . . . . . . . . . . . . . . . . 82Adding Data Objects . . . . . . . . . . . . . . . . . . . . . . . . . . . . . . . . . . . . . . . . . . . . . . . . . 83Defining Actors . . . . . . . . . . . . . . . . . . . . . . . . . . . . . . . . . . . . . . . . . . . . . . . . . . . . 83Defining Static Actors . . . . . . . . . . . . . . . . . . . . . . . . . . . . . . . . . . . . . . . . . . . . . . . 83Dynamically Determined Actors . . . . . . . . . . . . . . . . . . . . . . . . . . . . . . . . . . . . . . . 83Statuses . . . . . . . . . . . . . . . . . . . . . . . . . . . . . . . . . . . . . . . . . . . . . . . . . . . . . . . . . . . 83Synchronizing Workflow Values . . . . . . . . . . . . . . . . . . . . . . . . . . . . . . . . . . . . . . . 83Versioning . . . . . . . . . . . . . . . . . . . . . . . . . . . . . . . . . . . . . . . . . . . . . . . . . . . . . . . . . 85
Reference Tables . . . . . . . . . . . . . . . . . . . . . . . . . . . . . . . . . . . . . . . . . . . . . . . . . . . . . . 85
65

Defining Reference Tables . . . . . . . . . . . . . . . . . . . . . . . . . . . . . . . . . . . . . . . . . . . . 85Configuring Reference Tables in the Database . . . . . . . . . . . . . . . . . . . . . . . . . . . . 85Defining Static Reference Tables . . . . . . . . . . . . . . . . . . . . . . . . . . . . . . . . . . . . . . . 86Adding User-Defined Reference Tables . . . . . . . . . . . . . . . . . . . . . . . . . . . . . . . . . . 88Rules and Conventions for Database Fields and Reference Table Values . . . . . . . . 89
Search Panels . . . . . . . . . . . . . . . . . . . . . . . . . . . . . . . . . . . . . . . . . . . . . . . . . . . . . . . . 90Search Criteria . . . . . . . . . . . . . . . . . . . . . . . . . . . . . . . . . . . . . . . . . . . . . . . . . . . . . 90User-Specified Configurations . . . . . . . . . . . . . . . . . . . . . . . . . . . . . . . . . . . . . . . . . 90Searchable Fields . . . . . . . . . . . . . . . . . . . . . . . . . . . . . . . . . . . . . . . . . . . . . . . . . . . 90Field Labels . . . . . . . . . . . . . . . . . . . . . . . . . . . . . . . . . . . . . . . . . . . . . . . . . . . . . . . 91User Interface Controls . . . . . . . . . . . . . . . . . . . . . . . . . . . . . . . . . . . . . . . . . . . . . . . 92Search Filters . . . . . . . . . . . . . . . . . . . . . . . . . . . . . . . . . . . . . . . . . . . . . . . . . . . . . . 92User-Specified Configurations . . . . . . . . . . . . . . . . . . . . . . . . . . . . . . . . . . . . . . . . . 93Filterable Fields . . . . . . . . . . . . . . . . . . . . . . . . . . . . . . . . . . . . . . . . . . . . . . . . . . . . 93Field Labels . . . . . . . . . . . . . . . . . . . . . . . . . . . . . . . . . . . . . . . . . . . . . . . . . . . . . . . 93Search Results . . . . . . . . . . . . . . . . . . . . . . . . . . . . . . . . . . . . . . . . . . . . . . . . . . . . . . 93User-Specified Configurations . . . . . . . . . . . . . . . . . . . . . . . . . . . . . . . . . . . . . . . . . 94Displayable Fields . . . . . . . . . . . . . . . . . . . . . . . . . . . . . . . . . . . . . . . . . . . . . . . . . . 94Column Header Labels . . . . . . . . . . . . . . . . . . . . . . . . . . . . . . . . . . . . . . . . . . . . . . . 94SAS Metadata Repository Properties . . . . . . . . . . . . . . . . . . . . . . . . . . . . . . . . . . . . 95
Introduction to Customizing
User Interface DefinitionsUser interface definitions are used to define customizable windows within the SAS Enterprise Case Management user interface. The following display shows a customizable window that is defined using a user interface definition.
Display 5.1 Customized Window
66 Chapter 5 • Customizing SAS Enterprise Case Management
XML is used to describe user interface definitions. The following XML code is defined in the user interface definition used to render the previous example.
<section id="caseInfo"> <label><message key="section.case.information.header.txt" /></label> <tab-section id="viewCaseTab"> <tab id="caseTab"> <label><message key="tab.case.details.header.txt" /></label> <field name="CASE.CASE_ID" type="string" readonly="true"> <label> <message key="field.case.case_id.label.txt" /> </label> </field> <field name="CASE.CASE_ID" type="hidden"/> <field name="CASE.CASE_DESC" type="textarea" length="40" required="false"> <label> <message key="field.case.case_desc.label.txt" /> </label> </field> <field name="CASE.INVESTIGATOR_USER_ID" type="string" required="false" values="GetUserDisplayName(CASE.INVESTIGATOR_USER_ID)"> <label> <message key="field.case.investigator_user_id.label.txt" /> </label> </field> <field name="CASE.SOURCE_SYSTEM_CD" type="dropdown" readonly="true" values="GetLabelValues('RT_SOURCE_SYSTEM')"> <label> <message key="field.case.source_system_cd.label.txt" /> </label> </field> <field name="CASE.CASE_TYPE_CD" type="dropdown" required="false" readonly="true" values="GetLabelValues('RT_CASE_TYPE')"> <label> <message key="field.case.case_type_cd.label.txt" /> </label> </field>
WorkflowsWorkflows are used to manage the investigative process. Workflow definitions define what activities are involved in the investigative process and which users can perform the activities. The workflow services used within SAS Enterprise Case Management support the following:
• automation of SAS processes
• routing of activities based on events, data, timers, groups, and/or roles
• e-mail notifications
• visual process designer
• concurrent activities
• decision gateways that allow conditional branching
Introduction to Customizing 67
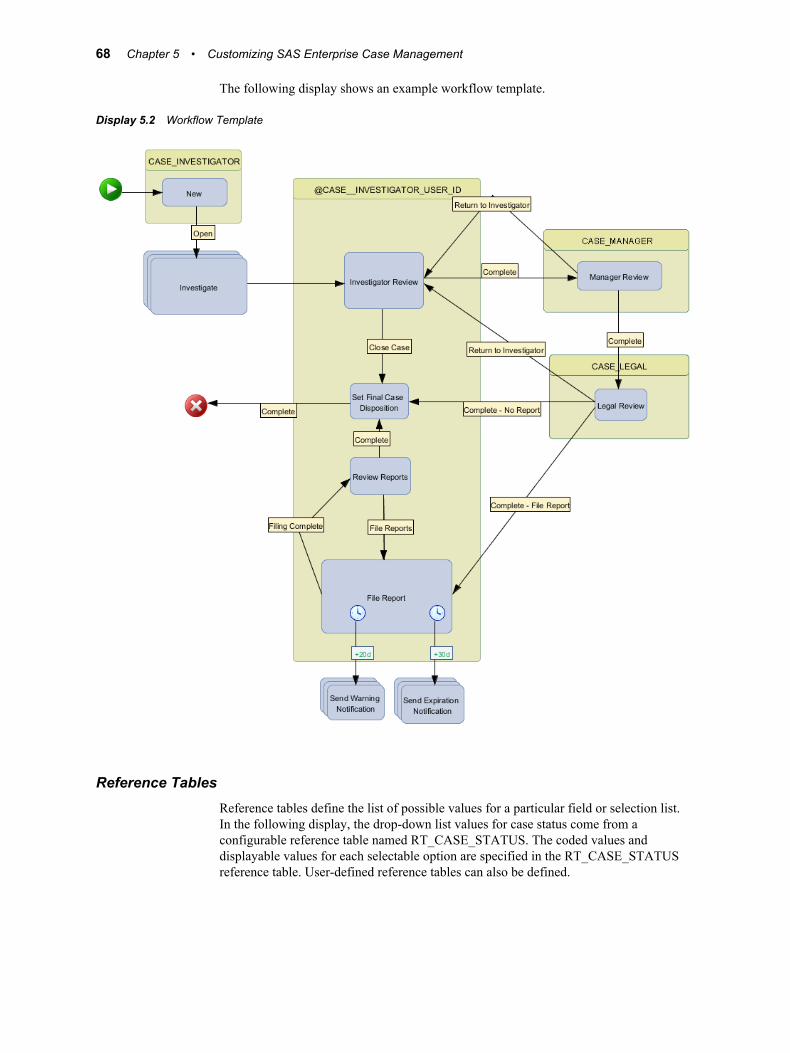
The following display shows an example workflow template.
Display 5.2 Workflow Template
Reference TablesReference tables define the list of possible values for a particular field or selection list. In the following display, the drop-down list values for case status come from a configurable reference table named RT_CASE_STATUS. The coded values and displayable values for each selectable option are specified in the RT_CASE_STATUS reference table. User-defined reference tables can also be defined.
68 Chapter 5 • Customizing SAS Enterprise Case Management
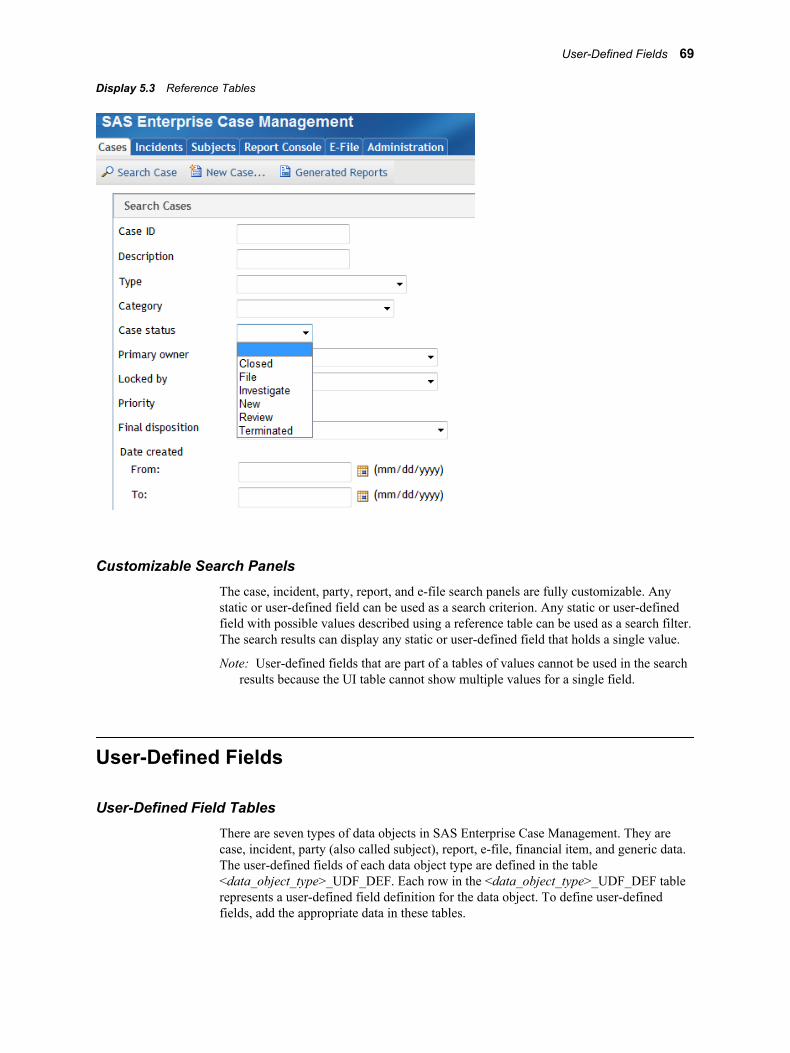
Display 5.3 Reference Tables
Customizable Search PanelsThe case, incident, party, report, and e-file search panels are fully customizable. Any static or user-defined field can be used as a search criterion. Any static or user-defined field with possible values described using a reference table can be used as a search filter. The search results can display any static or user-defined field that holds a single value.
Note: User-defined fields that are part of a tables of values cannot be used in the search results because the UI table cannot show multiple values for a single field.
User-Defined Fields
User-Defined Field TablesThere are seven types of data objects in SAS Enterprise Case Management. They are case, incident, party (also called subject), report, e-file, financial item, and generic data. The user-defined fields of each data object type are defined in the table <data_object_type>_UDF_DEF. Each row in the <data_object_type>_UDF_DEF table represents a user-defined field definition for the data object. To define user-defined fields, add the appropriate data in these tables.
User-Defined Fields 69

Configuring User-Defined Fields in the DatabaseThe structure for all seven tables (CASE_UDF_DEF, INCIDENT_UDF_DEF, PARTY_UDF_DEF, RR_UDF_DEF, EFILE_UDF_DEF, FINANCIAL_ITEM_UDF_DEF, and GENERIC_DATA_UDF_DEF) is identical. Each contains the following columns:
• UDF_TABLE_NM
• UDF_NM
• UDF_TYPE_NM
• UDF_DESC
• MAX_CHAR_CNT
User-defined field names must have the following characteristics:
• The length must be 3 to 30 characters.
• The first two characters must be “X_”.
• The characters following “X_” can be any combination of uppercase letters, numbers, and underscores.
UDF_TABLE_NMcontains the name of the user-defined field’s table. If a user-defined field contains one value, then this name will be the same as the data object name CASE, INCIDENT, PARTY, RR, or EFILE. UDF_TABLE_NM and UDF_NM together make up the unique key for a user-defined field. If a user-defined field can have more than one value, then this name must have the following characteristics:
• The length must be 3 to 30 characters.
• The first two characters must be “X_” .
• The characters following “X_” can be any combination of uppercase letters, numbers, and underscores.
• The name must be unique with respect to all other static and user-defined table names.
UDF_NMcontains the name of the user-defined field. UDF_TABLE_NM and UDF_NM together make up the unique key for a user-defined field. User-defined field names must have the following characteristics:
• The length must be 3 to 30 characters.
• The first two characters must be “X_”.
• The characters following “X_” can be any combination of uppercase letters, numbers, and underscores.
UDF_TYPE_NMcontains the data type name for the user-defined field.
Table 5.1 User-Defined Field Data Types
Data Type Description Java Type
VARCHAR Character string String
70 Chapter 5 • Customizing SAS Enterprise Case Management

Data Type Description Java Type
BIGINT Whole number Long
DOUBLE Double precision number Double
BOOLEAN Boolean (true/false) Boolean
DATE Date Date
TIMESTAMP Date and time Timestamp
LNGVARCHAR Character string more than 4000 characters
CLOG for Oracle; VARCHAR(MAX) for SQLServer; TEXT for PostgresSQL
Note: UDF fields with a type of BIGINT are stored in double precision floating point columns in the database. Therefore, they have only 53 bits of precision, not the full precision of a Long Java type.
UDF_DESCcontains a description of the user-defined field.
MAX_CHAR_CNTcontains the maximum number of characters for user-defined fields with a VARCHAR data type.
If an invalid value is loaded into the UDF_DEF tables, an error message is logged and that field is ignored by the application. Common errors include the following:
• including invalid characters in UDF_TABLE_NM or UDF_NM
• defining a UDF_TABLE_NM or UDF_NM longer than 30 characters
• not including a MAX_CHAR_CNT for a VARCHAR column
• defining a MAX_CHAR_CNT as < 0 or > 1000
User-Defined Fields: ExampleIn the following example configuration table, each case can have a loss amount specified. Because there is only one value for the loss amount field for each case, UDF_TABLE_NM is CASE. There can be zero or more accounts associated with a case. We also need to store whether each account is closed or not. Therefore, we create a user-defined table called X_ACCOUNT, which contains two user-defined fields: X_ACCOUNT_ID and X_CLOSED_FLG. We also need to track all suspicious activities related to the case; there could be more than one of these activities. We therefore create user-defined table X_SUSPCIOUS_ACTIVITY, which contains one user-defined field: X_SUSPCIOUS_ACTIVITY_CD.
UDF_TABLE_NM UDF_NM UDF_TYPE_NM MAX_CHAR
CASE X_LOSS_AMT DOUBLE
X_ACCOUNT X_ACCOUNT_ID VARCHAR 32
User-Defined Fields 71

UDF_TABLE_NM UDF_NM UDF_TYPE_NM MAX_CHAR
X_ACCOUNT X_CLOSED_FLG BOOLEAN
X_SUSPICIOUS_
ACTIVITY
X_SUSPICIOUS_
ACTIVITY_CD
VARCHAR 3
User-Defined Generic Data TablesGeneric data look-up functions can be defined in a custom user interface (UI). Generic data tables are tables that are not directly linked to a particular case, incident, party, report, e-file, or financial item. All data fields in generic data tables are defined in the GENERIC_DATA_UDF_DEF table as user-defined fields, and they follow the same name-value pair structure as in other ECM tables.
One major difference between generic data tables and the other SAS Enterprise Case Management tables is that generic data does not have a live table. That means there is no data table for storing the most current records. To get a list of current data, records in GENERIC_DATA_UDF_<data type>_VALUE should be filtered by empty VALID_TO_DTTM. To verify that the data is loaded properly in generic data tables, see the step for placing a generic data table in a rectangular structure in “Adding Custom SAS Code” on page 169.
To facilitate FINCEN reporting, the sample code for defining financial institution and branch look-up tables is shipped with the solution. It can also be found in loadrr_config_fincen_base.sas in the following locations:
Platform Path
Windows !SASROOT\casemgmtmva\sasmisc\sample\config
UNIX !SASROOT/misc/casemgmtmva/sample/config
The sample UI definitions rr-fincen-sardi-01.xml and rr-fincen-ctr-01.xml are examples of how a report form can be defined for SAR and CTR reporting. This file is located in the following locations:
Platform Path
Windows !SASROOT\casemgmtmva\sasmisc\sample\uidef
UNIX !SASROOT/misc/casemgmtmva/sample/uidef
Note: The UDF fields X_INSTITUTION_OPEN_DT and X_INSTITUTION_CLOSE_DT of X_INSTITUTION and X_BRANCH_OPEN_DT and X_BRANCH_CLOSE_DT of X_BRANCH are the open and close dates of the institution and branch. These fields are used in rr-fincen-sardi-01.xml and rr-fincen-ctr-01.xml to filter active institutions and branches based on the case creation date.
72 Chapter 5 • Customizing SAS Enterprise Case Management

User Interface Definitions
User Interface Definition FilesUser interface definition files specify the form and content of panels presented in SAS Enterprise Case Management, the data that is captured, and how that data is validated. The sample user interface definition files for all panels that make use of the Custom Page Builder are located in one of the following directories, depending on your platform:
• Windows platforms: SAS_HOME\SASFoundation\9.3\casemgmtmva\sasmisc\sample\uidef
• UNIX platforms: SAS_HOME/SASFoundation/9.3/misc/casemgmtmva/sample/uidef
Updating User Interface DefinitionsOver time, changes will need to be made to user interface definitions. Customers must decide whether they should update a user interface definition or create a new version of the user interface definition. For minor changes that don’t cause existing cases, incidents, parties, reports, or e-files to become invalid, it is permissible to update an existing user interface definition. For major changes that might cause existing entities to become invalid, it is recommended that customers create a new version of the user interface definition (by giving it a new unique name). This version is used only for new records. Existing records continue to use the older version of the user interface definition. User interface definitions must be uploaded from the Administration tab.
Required User Interface Definition FilesWhen you create a new case, incident, subject, report, e-file, or financial item in SAS Enterprise Case Management, the system requires some basic information to determine which user interface definition to use to capture the new entity. To provide that information, the following user interface definitions need to be updated:
Windows platforms:
• !SASROOT/casemgmtmva/sasmisc/install/uidef/newCase-uidef.xml
• !SASROOT/casemgmtmva/sasmisc/install/uidef/newIncident-uidef.xml
• !SASROOT/casemgmtmva/sasmisc/install/uidef/newParty-uidef.xml
• !SASROOT/casemgmtmva/sasmisc/install/uidef/newReport-uidef.xml
• !SASROOT/casemgmtmva/sasmisc/install/uidef/newEFile-uidef.xml
• !SASROOT/casemgmtmva/sasmisc/install/uidef/newFinancialItem-ui def.xml
UNIX platforms:
User Interface Definitions 73

• !SASROOT/misc/casemgmtmva/install/uidef/newCase-uidef.xml
• !SASROOT/misc/casemgmtmva/install/uidef/newIncident-uidef.xml
• !SASROOT/misc/casemgmtmva/install/uidef/newParty-uidef.xml
• !SASROOT/misc/casemgmtmva/install/uidef/newReport-uidef.xml
• !SASROOT/misc/casemgmtmva/install/uidef/newEFile-uidef.xml
• !SASROOT/misc/casemgmtmva/install/uidef/newFinancialItem-ui def.xml
Users cannot create any of the entities in the system without these files. The files can be customized. However, it is important to note that none of the fields defined in these files should be removed. An example of a customization is to mark one of the existing fields as required. Another example would be to override the default generated ID for the entity.
Configurations
Case ConfigurationsThe CASE_CONFIG and CASE_CONFIG_X_USER_GROUP tables are used to store information about how cases are associated with the following:
• user interface definition. This is used to render the case detail panel.
• workflow definition. This is used to create a workflow instance to manage the investigative process for the case.
• case owner. If specified, the case will be initially assigned to the specified user. Otherwise, the case will be initially unassigned.
• user groups. Each row in the CASE_CONFIG_X_USER_GROUP table specifies one user group that is associated with a case configuration. Any user in any of the associated user groups will have access to the case.
The CASE_CONFIG table must be configured to handle every possible type of case created in SAS Enterprise Case Management at the customer site. The CASE_CONFIG table contains the following columns:
CASE_CONFIG_SEQ_NOcontains the sequence number of the case configuration. Case configurations are processed in order until a matching configuration is found.
CASE_TYPE_CD, CASE_CATEGORY_CD and CASE_SUBCATEGORY_CDare used to determine whether the newly created case matches this configuration. CASE_TYPE_CD is required. CASE_CATEGORY_CD and CASE_SUBCATEGORY_CD can be null. If null, these columns are not factored in when determining whether the newly created case matches this configuration.
UI_DEF_FILE_NMcontains the filename of the user interface definition if the newly created case matches this configuration.
INVESTIGATE_WORKFLOW_DEF_NMcontains the name of the investigation workflow definition if the newly created case matches this configuration.
74 Chapter 5 • Customizing SAS Enterprise Case Management
REOPEN_WORKFLOW_DEF_NMis not used in this release of SAS Enterprise Case Management and should be left null.
INVESTIGATOR_USER_IDis the user ID of the user whom the case is initially assigned to. If null, the case will be initially unassigned.
The CASE_CONFIG_X_USER_GROUP table contains the following columns:
CASE_CONFIG_SEQ_NOcontains the sequence number of the case configuration. This column maps to the corresponding configuration in the CASE_CONFIG table.
USER_GROUP_NMcontains the name of a user group defined in the SAS Metadata Repository that has access to newly created cases that match this configuration. A user has to be in only one of the user groups from one of the CASE_CONFIG_X_USER_GROUP rows to access a case.
If a new case type, category, or subcategory is added to the system, then the reference tables must be updated so that items are available in the drop-down lists when creating a new case. If a new case type is added, then a corresponding reference table value should be added to RT_CASE_TYPE. If a new case category is added, then a corresponding reference table value should be added to RT_CASE_CATEGORY. If a new case subcategory is added, then a corresponding reference table value should be added to RT_CASE_SUBCATEGORY.
Incident ConfigurationsThe INCIDENT_CONFIG and INCIDENT_CONFIG_X_USER_GROUP tables are used to store information about how incidents are associated with the following:
• user interface definition. This is used to render the incident detail panel.
• user groups. One or more user groups can be associated with an incident. Any user in the associated user groups will have access to the incident.
The INCIDENT_CONFIG table must be configured to handle every possible type of incident created in SAS Enterprise Case Management. The INCIDENT_CONFIG table contains the following columns:
INCIDENT_CONFIG_SEQ_NOcontains the sequence number of the incident configuration. Incident configurations are processed in order until a matching configuration is found.
INCIDENT_TYPE_CD, INCIDENT_CATEGORY_CD and INCIDENT_SUBCATEGORY_CD
are used to determine whether the newly created incident matches this configuration. INCIDENT_TYPE_CD is required. INCIDENT_CATEGORY_CD and INCIDENT_SUBCATEGORY_CD can be null. If null, these columns are not factored in when determining whether the newly created incident matches this configuration.
UI_DEF_FILE_NMcontains the filename of the user interface definition, if the newly created incident matches this configuration.
The INCIDENT_CONFIG_X_USER_GROUP table contains the following columns:
Configurations 75

INCIDENT_CONFIG_SEQ_NOcontains the sequence number of the incident configuration. This column maps to the corresponding configuration in the INCIDENT_CONFIG table.
USER_GROUP_NMcontains the name of a user group defined in the SAS Metadata Repository that has access to newly created incidents that match this configuration.
If a new incident type, category, or subcategory is added to the system, then the reference tables must be updated so that items are available in the drop-down lists when creating a new incident. If a new incident type is added, then a corresponding reference table value should be added to RT_INCIDENT_TYPE. If a new incident category is added, then a corresponding reference table value should be added to RT_INCIDENT_CATEGORY. If a new incident subcategory is added, then a corresponding reference table value should be added to RT_INCIDENT_SUBCATEGORY.
Party ConfigurationsThe PARTY_CONFIG and PARTY_CONFIG_X_USER_GROUP tables are used to store information about how parties are associated with the following:
• user interface definition. This is used to render the party detail panel.
• user groups. One or more user groups can be associated with a party. Any user in the associated user groups will have access to the party.
The PARTY_CONFIG table must be configured to handle every possible type of party created in SAS Enterprise Case Management. The PARTY_CONFIG table contains the following columns:
PARTY_CONFIG_SEQ_NOcontains the sequence number of the party configuration. Party configurations are processed in order until a matching configuration is found.
PARTY_TYPE_CD, PARTY_CATEGORY_CD and PARTY_SUBCATEGORY_CDare used to determine whether the newly created party matches this configuration. PARTY_TYPE_CD is required. PARTY_CATEGORY_CD and PARTY_SUBCATEGORY_CD can be null. If null, these columns are not factored in when determining whether the newly created party matches this configuration.
UI_DEF_FILE_NMcontains the filename of the user interface definition if the newly created party matches this configuration.
The PARTY_CONFIG_X_USER_GROUP table contains the following columns:
PARTY_CONFIG_SEQ_NOcontains the sequence number of the party configuration. This column maps to the corresponding configuration in the PARTY_CONFIG table.
USER_GROUP_NMcontains the name of a user group defined in the SAS Metadata Repository that has access to newly created parties that match this configuration.
If a new party type, category, or subcategory is added to the system, then the reference tables must be updated so that items are available in the drop-down lists when creating a new party. If a new party type is added, then a corresponding reference table value should be added to RT_PARTY_TYPE. If a new party category is added, then a corresponding reference table value should be added to RT_PARTY_CATEGORY. If a
76 Chapter 5 • Customizing SAS Enterprise Case Management
new party subcategory is added, then a corresponding reference table value should be added to RT_PARTY_SUBCATEGORY.
Report ConfigurationsThe RR_CONFIG and RR_CONFIG_X_USER_GROUP tables are used to store information about how reports are associated with the following:
• user interface definition. This is used to render the report detail panel.
• workflow definition. This is used to create a workflow instance to manage the investigative process for the report.
• user groups. One or more user groups can be associated with a report. Any user in the associated user groups has access to the report.
The RR_CONFIG table must be configured to handle every possible type of report created in SAS Enterprise Case Management. The RR_CONFIG table contains the following columns:
RR_CONFIG_SEQ_NOcontains the sequence number of the report configuration. Report configurations are processed in order until a matching configuration is found.
RR_TYPE_CD, RR_CATEGORY_CD and RR_SUBCATEGORY_CDare used to determine whether the newly created report matches this configuration. RR_TYPE_CD is required. RR_CATEGORY_CD and RR_SUBCATEGORY_CD can be null. If null, these columns are not factored in when determining whether the newly created report matches this configuration.
UI_DEF_FILE_NMcontains the filename of the user interface definition if the newly created report matches this configuration.
FORM_AGENCY_CD and FORM_TYPE_CDare the identifiers of a regulatory form defined in FORM_CONFIG. It is used to retrieve the most current government form.
EFILE_CONFIG_SEQ_NOis the identifier of an e-file configuration record in EFILE_CONFIG. It is used to define which e-file type, category, and subcategory combination should be used for filing the report.
WORKFLOW_DEF_NMcontains the name of the workflow definition if the newly created report matches this configuration.
The RR_CONFIG_X_USER_GROUP table contains the following columns:
RR_CONFIG_SEQ_NOcontains the sequence number of the report configuration. This column maps to the corresponding configuration in the RR_CONFIG table.
USER_GROUP_NMcontains the name of a user group defined in the SAS Metadata Repository that has access to newly created reports that match this configuration.
If a new report type, category, or subcategory is added to the system, then the reference tables must be updated so that items are available in the drop-down lists when creating a new report. If a new report type is added, then a corresponding reference table value should be added to RT_RR_TYPE. If a new report category is added, then a corresponding reference table value should be added to RT_RR_CATEGORY. If a new
Configurations 77

report subcategory is added, then a corresponding reference table value should be added to RT_RR_SUBCATEGORY.
E-File ConfigurationsThe EFILE_CONFIG and EFILE_CONFIG_X_USER_GROUP tables are used to store information about how e-files are associated with the following:
• user interface definition. This is used to render the e-file detail panel.
• user groups. One or more user groups can be associated with an e-file. Any user in the associated user groups have access to the e-file.
The EFILE_CONFIG table must be configured to handle every possible type of e-file created in SAS Enterprise Case Management. The EFILE_CONFIG table contains the following columns:
EFILE_CONFIG_SEQ_NOcontains the sequence number of the e-file configuration. E-file configurations are processed in order until a matching configuration is found.
EFILE_TYPE_CD, EFILE_CATEGORY_CD and EFILE_SUBCATEGORY_CDare used to determine whether the newly created e-file matches this configuration. EFILE_TYPE_CD is required. EFILE_CATEGORY_CD and EFILE_SUBCATEGORY_CD can be null. If null, these columns are not factored in when determining whether the newly created e-file matches this configuration.
UI_DEF_FILE_NMcontains the filename of the user interface definition if the newly created e-file matches this configuration.
FORM_AGENCY_CD and FORM_TYPE_CDare the identifiers of a regulatory form defined in FORM_CONFIG. It is used to retrieve the most current government form.
The EFILE_CONFIG_X_USER_GROUP table contains the following columns:
EFILE_CONFIG_SEQ_NOcontains the sequence number of the e-file configuration. This column maps to the corresponding configuration in the EFILE_CONFIG table.
USER_GROUP_NMcontains the name of a user group defined in the SAS Metadata Repository that has access to newly created e-file reports that match this configuration.
If a new e-file type, category, or subcategory is added to the system, then the reference tables must be updated so that items are available in the drop-down lists when creating a new report. If a new report type is added, then a corresponding reference table value should be added to RT_EFILE_TYPE. If a new report category is added, then a corresponding reference table value should be added to RT_EFILE_CATEGORY. If a new report subcategory is added, then a corresponding reference table value should be added to RT_EFILE_SUBCATEGORY.
78 Chapter 5 • Customizing SAS Enterprise Case Management

Data Security
Data Security: Record LevelThe initial user groups that have access to a case are determined and configured during case creation. The initial user groups are stored in the CASE_X_USER_GROUP table, which associates a case to one or more user groups defined in the SAS Metadata Repository. Any user in the associated groups, or the owner of the case, has access to the case. This means that editing the case is allowed unless the Edit Case capability was not granted to the user. Similarly INCIDENT_X_USER_GROUP, PARTY_X_USER_GROUP, RR_X_USER_GROUP, and EFILE_X_USER_GROUP store the incident, party, report, and e-file user group association.
If a user does not have access to an entity, the entity is not visible to the user in the system unless the user is looking at the entity within the context of its parents. For example, if a user is in group A, that user has access to only A-type cases and incidents. However, if there is an A-type case with a B-type incident, then the user is able to view, but not edit, the B-type incident if the user is assigned to that case.
If the type, category, or subcategory of an entity is changed, the permissions for the entity are redetermined and stored in <ENTITY>_X_USER_GROUP. Therefore, the permissions for an entity can change after creation.
Currently, there is not a way to modify user groups associated with an entity within SAS Enterprise Case Management without changing the type, category, and subcategory of the entity. This can be done only by an administrator who can modify the appropriate database tables directly.
Data Security: Field LevelField-level security within the entity detail panels is controlled by the user interface definitions. Field-level security on the entity search panels is controlled by the search panel configuration, which is performed at the user level.
Resource Bundles
Custom Resource BundlesCustom resource bundles are necessary for creating labels for user-defined fields in the customizable data model. When a user-defined field is created, the field can be referenced in the user interface definition file. A label can also be shown for that field. The label tag in the user interface definition has a message tag with a key attribute. The key is a reference to a property in the resource bundle.
For example, X_BRANCH_ID has been defined as a user-defined field for a case. To define a label for the field, the following entry is made in the custom resource bundle file:
field.case.x_branch_id.label.txt=Branch ID:
Resource Bundles 79
To reference this property, the following can be added to the user interface definition file:
<label><message key="field.case.x_branch_id.label.txt" /></label>
Customers can also override resource bundle properties defined in SAS Enterprise Case Management using the custom resource bundle. For example, you can change the label for a party full name as follows:
• field.party.party_full_nm.label.txt=Person/Organization name:
• field.party.party_full_nm.header.txt=Person/Organization Name
Note: The property ending in label.txt is used for text next to input fields. The property ending in header.txt is used as the heading of a column when fields are used in a table.
The following files contain all of the properties used in SAS Enterprise Case Management:
• com.sas.solutions.casemgmt.i18n.AppResources.properties
• com.sas.solutions.casemgmt.i18n.Actions.properties
• com.sas.solutions.casemgmt.i18n.WebServiceResources.properties
• com.sas.solutions.cpb.i18n.CPBResources.properties
The properties in all of these files can be overridden, except for the actions resource bundle (com.sas.solutions.casemgmt.i18n.Actions.properties.) If customers want to override a property in this file, they have to modify the actual file in the SAS Enterprise Case Management JAR file.
The naming convention for the custom resource bundle files is as follows:
• custom.properties
• custom _<locale>.properties
For example, a file for the Canada-French locale would be named custom_ca_FR.properties.
Note: When a table is empty, the following message is displayed: No results found. You can customize this message by changing the value of the table.default.no.rows.message.txt property as follows:
table.default.no.rows.message.txt = <Empty table message.>
Workflows
Defining WorkflowsEach case within SAS Enterprise Case Management can be associated with a workflow instance (also known as a process instance) that is used to manage the investigative process. Workflow templates (also known as process templates) need to be defined using SAS Workflow Studio before workflow instances can be created for a case. See the SAS Workflow Studio: User's Guide for step-by-step instructions on defining workflow definitions.
80 Chapter 5 • Customizing SAS Enterprise Case Management

Data ObjectsThe following root process-level data object is required in all workflow definitions for use in SAS Enterprise Case Management:
CASE__CASE_RK• Set Type = Short Text
• Set Value = 0
• When the workflow instance is created, the case key of the associated case is set as the value for this data object.
The following optional root process-level data object can be used to automatically open the case when it is first edited in SAS Enterprise Case Management:
AUTO_OPEN_STATUS• Set Type = Short Text
• Set Value = the name of the status to automatically apply when the case is first edited
If other static or user-defined case fields are needed within the workflow definition as input to decision gateways and policies, they can be added as root process-level data objects using the following naming convention:
<TableName>__<FieldName>
Here are some examples:
• CASE__REGULATORY_RPT_RQD_FLG (static case field)
• CASE__X_LOSS_AMT (single-valued user-defined case field)
• X_SUSPICIOUS_ACTIVITY__X_SUSPICIOUS_ACTIVITY_CD (multi-valued user-defined case field)
The following table describes how data object values are set for the different case field data types:
Table 5.2 Data Object Values
Data Type Data Object Value Description
VARCHAR Raw value
BIGINT Numerical value
DOUBLE Numerical value
BOOLEAN String value – true or false
DATE Formatted string value – yyyy.MM.dd
TIMESTAMP Formatted string value – yyyy.MM.dd HH:mm:ss
Multi-valued field Comma delimited string of the above formatted values
Workflows 81

All root process-level data objects that map to case fields (static and user-defined) in the SAS Enterprise Case Management database are set to the current value in the database every time the case is saved. Incident fields and party fields cannot be used as data objects even though they might be associated with a case.
The following optional data object adds a delay between when an activity is started (such as saving a case or report) and when the UI refreshes.
SLEEP_TIME_MILLIS• Set Type = Number
• Set Value = the length of the delay, in milliseconds
This data object can be added to both activities and to root-level processes. When defined, this value overrides the application-wide default workflow transition wait time. SAS Enterprise Case Management waits the given number of milliseconds after any case or report save. Any save to a case or report can trigger one or more policies to execute, and those policies might update the case or report. To guarantee that all policies are completed before the user edits the object again, this value might need to be tuned for your environment. If this data object is defined with a negative value, it is ignored.
When an activity executes, the workflow checks whether this data object is defined for the activity. If it is, its value is used as the wait time. If this data object is not defined for the activity, then the root process is checked for the data object. If it is defined there, that data object’s value is used as the wait time for the activity. If the data object is defined at neither the activity nor root process-level, a wait time is retrieved by looking up the WF.Sleep.Time.Millis property in the metadata. (See “SAS Metadata Repository Properties” on page 95 for more information.)
Data Object Types Supported in SAS Workflow StudioWhile designing custom workflow templates, keep in mind that the following list of data object types are no longer used in SAS 9.3:
• Check Box
• Database Object
• File
• Organizational Role
• Picklist
• User
The following data objects are supported in SAS Workflow Studio in SAS 9.3:
• Date
• Number
• Short Text
• Long Text
• URL
• XML Object
• ItemList
82 Chapter 5 • Customizing SAS Enterprise Case Management
For more information about data object types, see the SAS Workflow Studio: User's Guide at http://support.sas.com/documentation/onlinedoc/workflow/.
Adding Data ObjectsFor information about adding data objects, see the SAS Workflow Studio: User's Guide at http://support.sas.com/documentation/onlinedoc/workflow/.
Defining ActorsFor information about defining actors, see the SAS Workflow Studio: User's Guide at http://support.sas.com/documentation/onlinedoc/workflow/.
Defining Static ActorsFor information about defining static actors, see the SAS Workflow Studio: User's Guide at http://support.sas.com/documentation/onlinedoc/workflow/.
Dynamically Determined ActorsFor information about dynamically determined actors, see the SAS Workflow Studio: User's Guide at http://support.sas.com/documentation/onlinedoc/workflow/.
StatusesFor information about statuses, see the SAS Workflow Studio: User's Guide at http://support.sas.com/documentation/onlinedoc/workflow/.
Synchronizing Workflow ValuesThe workflow definition can be configured to notify SAS Enterprise Case Management when certain events happen within the workflow. This ensures that the solution state is synchronized with the workflow. This is accomplished by using workflow policies, specifically the HttpRequest policy. This policy can be configured to invoke an HTTP URL in SAS Enterprise Case Management to send notifications of relevant data changes, such as status and operand values.
To set up a synchronization notification, go to the relevant triggering activity and right-click Policies to add a new policy. You can also edit existing policies from here, as shown in the following display.
Workflows 83
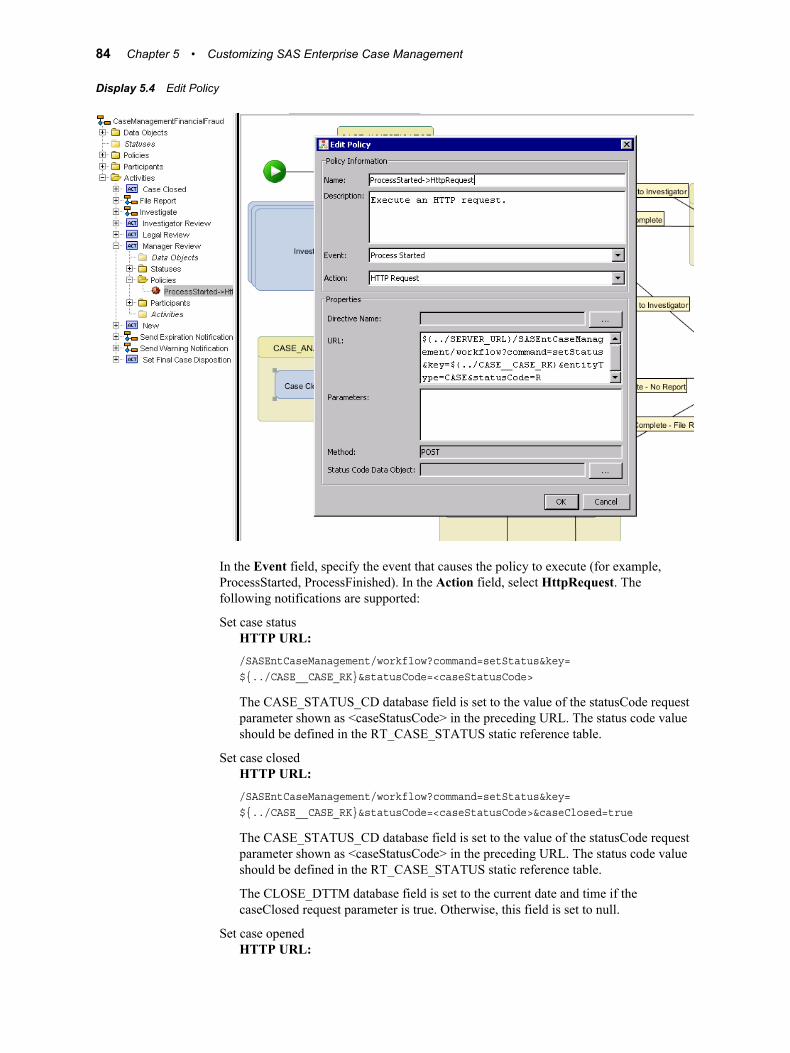
Display 5.4 Edit Policy
In the Event field, specify the event that causes the policy to execute (for example, ProcessStarted, ProcessFinished). In the Action field, select HttpRequest. The following notifications are supported:
Set case statusHTTP URL:/SASEntCaseManagement/workflow?command=setStatus&key=${../CASE__CASE_RK}&statusCode=<caseStatusCode>
The CASE_STATUS_CD database field is set to the value of the statusCode request parameter shown as <caseStatusCode> in the preceding URL. The status code value should be defined in the RT_CASE_STATUS static reference table.
Set case closedHTTP URL:/SASEntCaseManagement/workflow?command=setStatus&key=${../CASE__CASE_RK}&statusCode=<caseStatusCode>&caseClosed=true
The CASE_STATUS_CD database field is set to the value of the statusCode request parameter shown as <caseStatusCode> in the preceding URL. The status code value should be defined in the RT_CASE_STATUS static reference table.
The CLOSE_DTTM database field is set to the current date and time if the caseClosed request parameter is true. Otherwise, this field is set to null.
Set case openedHTTP URL:
84 Chapter 5 • Customizing SAS Enterprise Case Management

/SASEntCaseManagement/workflow?command=setOpened&key=${../CASE__CASE_RK}
The OPEN_DTTM database field is set to the current date and time.
Set case reopenedHTTP URL:/SASEntCaseManagement/workflow?command=setReopened&key=${../CASE__CASE_RK}
The REOPEN_DTTM case database field is set to the current date and time.
HTTP Method should always equal POST. HTTP User and HTTP Password should always be left blank. If the host name and port are not included in the HTTP URL, the HTTP request is sent to the SAS Enterprise Case Management Web application running on the same server as the workflow services on the SAS platform. For more information, see the SAS Workflow Studio: User's Guide at http://support.sas.com/documentation/onlinedoc/workflow/.
VersioningFor information about versioning, see the SAS Workflow Studio: User's Guide at http://support.sas.com/documentation/onlinedoc/workflow/.
Reference Tables
Defining Reference TablesReference tables define the list of possible values for a particular field or selection list. Each row in the REF_TABLE_VALUE table represents a possible value for a static or user-defined reference table. To define user-defined reference tables or add possible values for static reference tables, add the appropriate data in this table.
Configuring Reference Tables in the DatabaseThe REF_TABLE_VALUE table contains the following columns:
REF_TABLE_NMcontains the name of the static or user-defined reference table. Reference table names must have the following characteristics:
• The length must be 3 to 30 characters.
• The first three characters must be “RT_” for static reference tables.
• The first two characters must be “X_” for user-defined reference tables.
• The characters following the above prefix can be any combination of upper case letters, numbers, and underscores.
• The name must be unique with respect to all other static and user-defined table names.
VALUE_CDcontains the coded value. REF_TABLE_NM and VALUE_CD together make up the unique key for a reference table possible value.
Reference Tables 85

VALUE_DESCcontains the displayable value.
PARENT_REF_TABLE_NMoptionally contains the name of the parent reference table used for cascading prompts.
PARENT_VALUE_CDoptionally contains the name of the parent coded value used for cascading prompts.
DISPLAY_ORDER_NOcontains a number that determines the display order of the reference table value in the user interface. If two or more reference table values have the same display order, then they will be ordered alphabetically by the VALUE_DESC column.
Defining Static Reference TablesThe following static reference tables must be defined in the REF_TABLE_VALUE table. These reference tables are considered static because the SAS Enterprise Case Management application has hardcoded references to these reference tables. All other reference tables are considered user-defined.
RT_EVENT_TYPEcontains event types for audit. This reference table is preloaded during the installation. The possible values should not be modified for this reference table.
RT_CASE_STATUScontains case statuses. This reference table is not preloaded during the installation. Customers must add all possible case statuses.
RT_CASE_TYPEcontains case types for case classification. This reference table is not preloaded during the installation. Customers must add all possible case types.
RT_CASE_CATEGORYcontains case categories for case classification. This reference table is not preloaded during the installation. Customers must add all possible case categories if this reference table is needed.
RT_CASE_SUBCATEGORYcontains case subcategories for case classification. This reference table is not preloaded during the installation. Customers must add all possible case subcategories if this reference table is needed.
RT_INCIDENT_TYPEcontains incident types for incident classification. This reference table is not preloaded during the installation. Customers must add all possible incident types.
RT_INCIDENT_CATEGORYcontains incident categories for incident classification. This reference table is not preloaded during the installation. Customers must add all possible incident categories if this reference table is needed.
RT_INCIDENT_SUBCATEGORYcontains incident subcategories for incident classification. This reference table is not preloaded during the installation. Customers must add all possible incident subcategories if this reference table is needed.
RT_PARTY_TYPEcontains party types for party classification. This reference table is not preloaded during the installation. Customers must add all possible party types.
86 Chapter 5 • Customizing SAS Enterprise Case Management
RT_PARTY_CATEGORYcontains party categories for party classification. This reference table is not preloaded during the installation. Customers must add all possible party categories if this reference table is needed.
RT_PARTY_SUBCATEGORYcontains party subcategories for party classification. This reference table is not preloaded during the installation. Customers must add all possible party subcategories if this reference table is needed.
RT_EFILE_TYPEcontains e-file types for e-file classification. This reference table is not preloaded during the installation. Customers must add all possible e-file types.
RT_EFILE_CATEGORYcontains e-file categories for e-file classification. This reference table is not preloaded during the installation. Customers must add all possible e-file categories if this reference table is needed.
RT_EFILE_SUBCATEGORYcontains e-file subcategories for e-file classification. This reference table is not preloaded during the installation. Customers must add all possible e-file subcategories if this reference table is needed.
RT_EFILE_STATUScontains e-file statuses. This reference table is not preloaded during the installation. Customers must add all possible e-file statuses.
RT_RR_TYPEcontains e-file types for e-file classification. This reference table is not preloaded during the installation. Customers must add all possible e-file types.
RT_RR_CATEGORYcontains regulatory report categories for regulatory report classification. This reference table is not preloaded during the installation. Customers must add all possible regulatory report categories if this reference table is needed.
RT_RR_SUBCATEGORYcontains regulatory report subcategories for regulatory report classification. This reference table is not preloaded during the installation. Customers must add all possible regulatory report subcategories if this reference table is needed.
RT_RR_STATUScontains regulatory report statuses. This reference table is not preloaded during the installation. Customers must add all possible regulatory report statuses.
RT_RR_READYcontains report-ready code that represents the life cycle of a report. This reference table is preloaded during the installation.
RT_SOURCE_SYSTEMcontains source system code. It is preloaded with SASECM for SAS Enterprise Case Management.
SNA_CONFIG_MASTERcontains labels for Case Network Analysis match criteria defined in the SNA_CONFIG_MASTER table. It is preloaded with NATIONAL_ID.
Reference Tables 87

Table 5.3 Example Static Reference Tables
REF_TABLE_NM VALUE_CD VALUE_DESC PARENT_TABLE PARENT_VAL
RT_CASE_TYPE ML Money Laundering
RT_CASE_TYPE FF Financial Fraud
RT_CASE_CATEGORY CF Check Fraud RT_CASE_TYPE FF
RT_CASE_CATEGORY CK Check Kiting RT_CASE_TYPE FF
RT_CASE_CATEGORY CCF Credit Card Fraud RT_CASE_TYPE FF
RT_CASE_CATEGORY DCF Debit Card Fraud RT_CASE_TYPE FF
RT_CASE_STATUS N New
RT_CASE_STATUS I Investigate
RT_CASE_STATUS R Review
RT_CASE_STATUS F File
Adding User-Defined Reference TablesUser-defined reference tables are not preloaded during the installation. Customers must add all user-defined reference table values to REF_TABLE_VALUE.
Table 5.4 Example User-Defined Reference Tables
REF_TABLE_NM VALUE_CD VALUE_DESC PARENT_TABLE PARENT_VAL
X_COUNTRY USA United States
X_COUNTRY MEX Mexico
X_COUNTRY CAN Canada
X_STATE_PROVINCE AL Alabama X_COUNTRY USA
X_STATE_PROVINCE AK Alaska X_COUNTRY USA
X_STATE_PROVINCE AB Alberta X_COUNTRY CAN
X_STATE_PROVINCE ON Ontario X_COUNTRY CAN
X_NATIONAL_ID_TYPE SSN Social Security Number
X_NATIONAL_ID_TYPE EIN Employer ID Number
88 Chapter 5 • Customizing SAS Enterprise Case Management
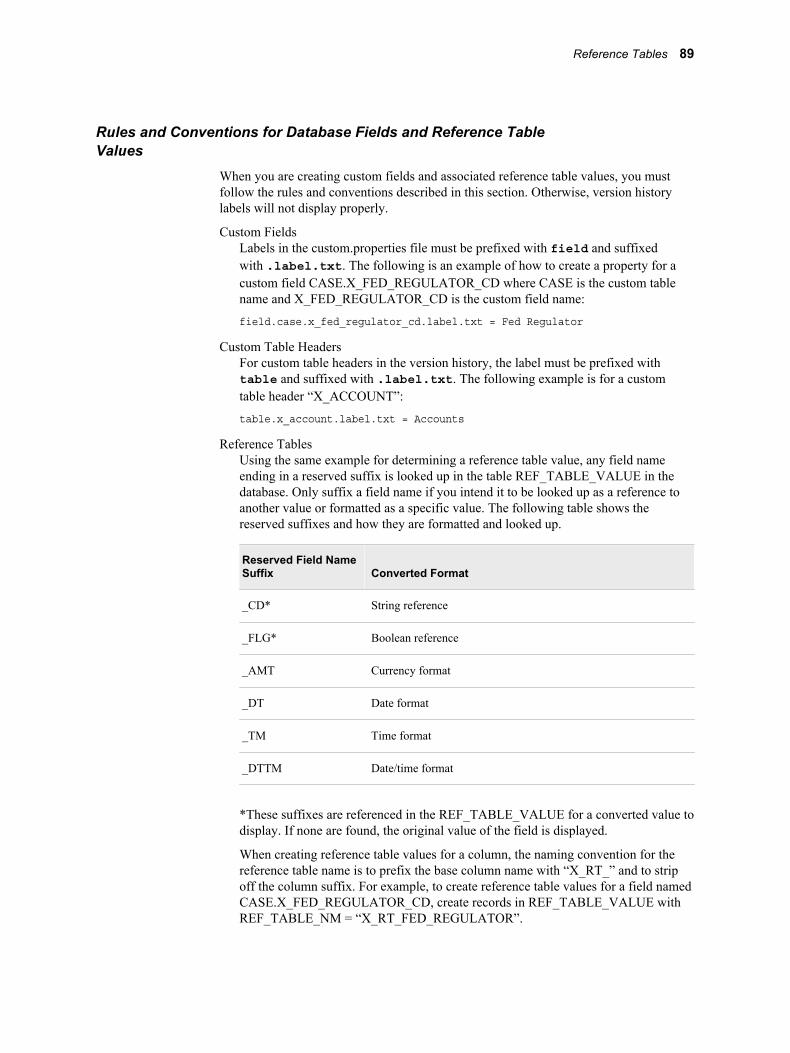
Rules and Conventions for Database Fields and Reference Table Values
When you are creating custom fields and associated reference table values, you must follow the rules and conventions described in this section. Otherwise, version history labels will not display properly.
Custom FieldsLabels in the custom.properties file must be prefixed with field and suffixed with .label.txt. The following is an example of how to create a property for a custom field CASE.X_FED_REGULATOR_CD where CASE is the custom table name and X_FED_REGULATOR_CD is the custom field name:
field.case.x_fed_regulator_cd.label.txt = Fed Regulator
Custom Table HeadersFor custom table headers in the version history, the label must be prefixed with table and suffixed with .label.txt. The following example is for a custom table header “X_ACCOUNT”:
table.x_account.label.txt = Accounts
Reference TablesUsing the same example for determining a reference table value, any field name ending in a reserved suffix is looked up in the table REF_TABLE_VALUE in the database. Only suffix a field name if you intend it to be looked up as a reference to another value or formatted as a specific value. The following table shows the reserved suffixes and how they are formatted and looked up.
Reserved Field Name Suffix Converted Format
_CD* String reference
_FLG* Boolean reference
_AMT Currency format
_DT Date format
_TM Time format
_DTTM Date/time format
*These suffixes are referenced in the REF_TABLE_VALUE for a converted value to display. If none are found, the original value of the field is displayed.
When creating reference table values for a column, the naming convention for the reference table name is to prefix the base column name with “X_RT_” and to strip off the column suffix. For example, to create reference table values for a field named CASE.X_FED_REGULATOR_CD, create records in REF_TABLE_VALUE with REF_TABLE_NM = “X_RT_FED_REGULATOR”.
Reference Tables 89

Search Panels
Search CriteriaFields that appear as search criteria on the case search panel are configured in the CASE_SEARCH_CRITERIA_FIELD table. Fields that appear as search criteria on the incident search panel are configured in the INCIDENT_SEARCH_CRITERIA_FIELD table. Fields that appear as search criteria on the party search panel are configured in the PARTY_SEARCH_CRITERIA_FIELD table. Fields that appear as search criteria on the report search panel are configured in the RR_SEARCH_CRITERIA_FIELD table. Fields that appear as search criteria on the e-file search panel are configured in the EFILE_SEARCH_CRITERIA_FIELD table. The structure for all five tables is the same, and each table contains the following columns:
Note: Searches on LONGVARCHAR fields are not supported.
USER_IDcontains the user ID of the user this configuration applies to. The value equals “*” for the default configuration for all users.
TABLE_NMcontains the table name of the search criteria field.
FIELD_NMcontains the name of the search criteria field.
DISPLAY_ORDER_NOcontains the search criteria display order. If the value is greater than 100, then the search criteria appear in a second column within the search criteria section.
REF_TABLE_NMoptionally contains the reference table name used to populate a drop-down list of possible values to search for.
User-Specified ConfigurationsDefault configurations are installed with the product for case, incident, party, report, and e-file search criteria. The default configurations only reference static fields (no user-defined fields). Customers can change the default configurations by modifying the previous database tables directly. Customers can also define user-specific search criteria configurations by setting the USER_ID column value appropriately. If there is no user-specific configuration for the user, the default configuration is used.
Searchable FieldsAny static or user-defined field on any business object (case, incident, party, report, or e-file) table can be used as search criteria. Customers can reference fields in associated business object tables as search criteria. For example, the customer can specify PARTY.PARTY_FULL_NM in the CASE_SEARCH_CRITERIA_FIELD table to allow users to search for cases by party full name. The search looks for all cases that have one or more parties associated with the case with full name equal to the specified party full name.
90 Chapter 5 • Customizing SAS Enterprise Case Management
The following special field can be used as search criteria within the CASE_SEARCH_CRITERIA_FIELD table:
TEMP.WORK_LIST_CASE_FLGreturns all cases that the currently logged-on user can work on as defined in the workflow instances associated with the cases.
The following special field can be used as search criteria within the INCIDENT_SEARCH_CRITERIA_FIELD table:
TEMP.UNASSIGNED_INCIDENT_FLGreturns all unassigned incidents (incidents not associated with a case).
The following special field can be used as search criteria within the RR_SEARCH_CRITERIA_FIELD table:
TEMP.WORK_LIST_REPORT_FLGreturns all reports that the currently logged-on user can work on as defined in the workflow instances associated with the reports.
The following special fields can be used as search criteria within the RR_SEARCH_CRITERIA_FIELD and EFILE_SEARCH_CRITERIA_FIELD tables:
FORM_CONFIG.FORM_AGENCY_CDreturns all reports or e-files whose form configuration matches the value given for the form configuration agency.
FORM_CONFIG.FORM_TYPE_CDreturns all reports or e-files whose form configuration matches the value given for the form configuration type.
FORM_CONFIG.FORM_COUNTRY_CDreturns all reports or e-files whose form configuration matches the value given for the form configuration country code.
The following special fields can be used as search criteria within all of the search criteria field tables:
TEMP.ENTITY_SUBSCRIPTION_FLGreturns all the objects of the type being searched for that the currently logged in user has a subscription to.
Note: It is not necessary to enter wildcards (*) when entering search criteria. The search returns results that include all instances of the search criteria. For example: Entering 2009 in the Case ID field returns all cases that contain 2009 in their Case ID. You do not have to enter a wildcard with 2009.
Field LabelsThe labels for all static search criteria shipped in the default configuration are specified in the SAS Enterprise Case Management resource bundle file (com.sas.solutions.casemgmt.i18n.AppResources.properties). All other labels must be specified in the custom resource bundle file. The naming convention for search criteria field resource bundle keys is as follows:
• field.<lowerCaseTableName>.<lowerCaseFieldName>.label.txt
• Here is an example:
• field.party.party_full_nm.label.txt=Subject name:
Search Panels 91
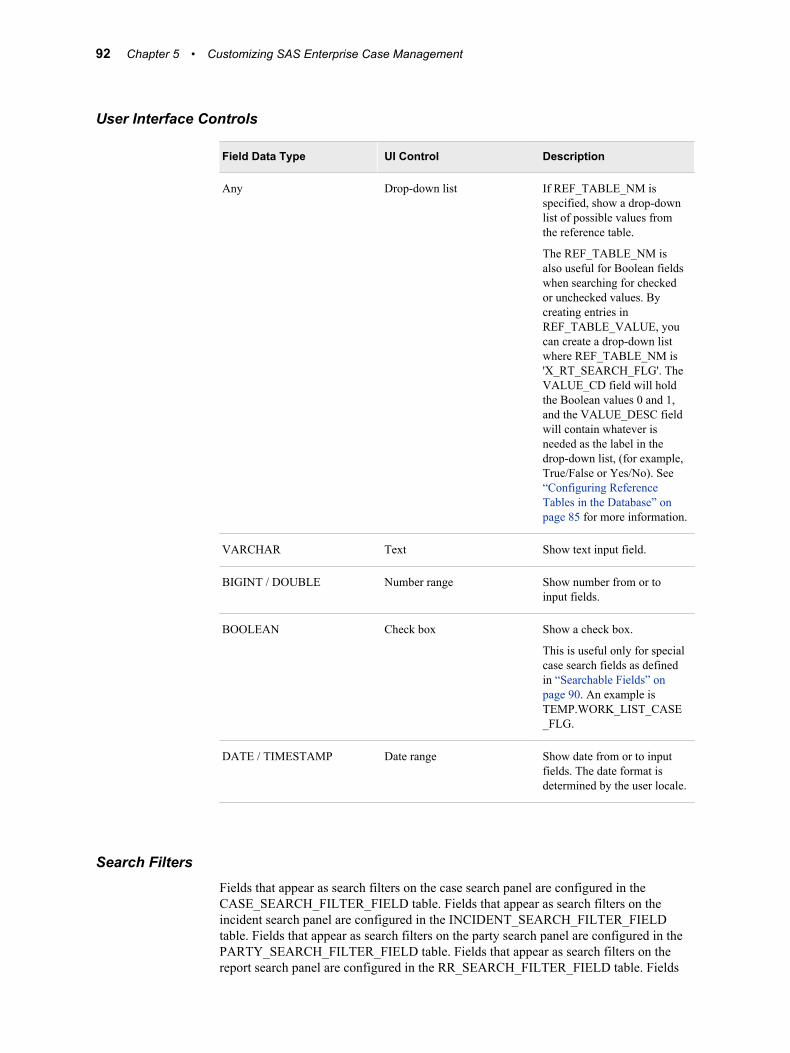
User Interface Controls
Field Data Type UI Control Description
Any Drop-down list If REF_TABLE_NM is specified, show a drop-down list of possible values from the reference table.
The REF_TABLE_NM is also useful for Boolean fields when searching for checked or unchecked values. By creating entries in REF_TABLE_VALUE, you can create a drop-down list where REF_TABLE_NM is 'X_RT_SEARCH_FLG'. The VALUE_CD field will hold the Boolean values 0 and 1, and the VALUE_DESC field will contain whatever is needed as the label in the drop-down list, (for example, True/False or Yes/No). See “Configuring Reference Tables in the Database” on page 85 for more information.
VARCHAR Text Show text input field.
BIGINT / DOUBLE Number range Show number from or to input fields.
BOOLEAN Check box Show a check box.
This is useful only for special case search fields as defined in “Searchable Fields” on page 90. An example is TEMP.WORK_LIST_CASE_FLG.
DATE / TIMESTAMP Date range Show date from or to input fields. The date format is determined by the user locale.
Search FiltersFields that appear as search filters on the case search panel are configured in the CASE_SEARCH_FILTER_FIELD table. Fields that appear as search filters on the incident search panel are configured in the INCIDENT_SEARCH_FILTER_FIELD table. Fields that appear as search filters on the party search panel are configured in the PARTY_SEARCH_FILTER_FIELD table. Fields that appear as search filters on the report search panel are configured in the RR_SEARCH_FILTER_FIELD table. Fields
92 Chapter 5 • Customizing SAS Enterprise Case Management

that appear as search filters on the e-file search panel are configured in the EFILE_SEARCH_FILTER_FIELD table. The structure for all of the tables is the same, and each contains the following columns:
USER_IDcontains the user ID of the user this configuration applies to. The value equals “*” for the default configuration for all users.
TABLE_NMcontains the table name of the search filter field.
FIELD_NMcontains the name of the search filter field.
DISPLAY_ORDER_NOcontains the search filter display order.
REF_TABLE_NMoptionally contains the reference table name used to populate a drop-down list of possible values to filter by.
User-Specified ConfigurationsDefault configurations are installed with the product for case, incident, party, report, and e-file search filters. The default configurations only reference static fields (no user-defined fields). Customers can change the default configurations by modifying the previous database tables directly. Customers can also define user-specific search filter configurations by setting the USER_ID column value appropriately. If there is no user-specific configuration for the user, the default configuration is used.
Filterable FieldsAny static or user-defined field on any business object (case, incident, party, report, and e-file) table that can be used in conjunction with a reference table can be used as a search filter. Customers can reference fields in associated business object tables as search filters. For example, the customer can specify PARTY.PARTY_TYPE in the CASE_SEARCH_FILTER_FIELD table to allow users to filter cases by party type. The search looks for all cases that have one or more parties associated with the case with the specified party type.
Field LabelsThe labels for all static search filters shipped in the default configuration are specified in the SAS Enterprise Case Management resource bundle file (com.sas.solutions.casemgmt.i18n.AppResources.properties). All other labels must be specified in the custom resource bundle file. The naming convention for search filter field resource bundle keys is the same as specified for search criteria.
Search ResultsFields that appear as search results on the case search panel are configured in the CASE_SEARCH_RESULT_FIELD table. Fields that appear as search results on the incident search panel are configured in the INCIDENT_SEARCH_RESULT_FIELD table. Fields that appear as search results on the party search panel are configured in the PARTY_SEARCH_RESULT_FIELD table. Fields that appear as search results on the report search panel are configured in the RR_SEARCH_RESULT_FIELD table. Fields
Search Panels 93
that appear as search results on the e-file search panel are configured in the EFILE_SEARCH_RESULT_FIELD table. The structure for all three tables is the same, and each contains the following columns:
USER_IDcontains the user ID of the user this configuration applies to. The value equals “*” for the default configuration for all users.
TABLE_NMcontains the table name of the search result field.
FIELD_NMcontains the name of the search result field.
DISPLAY_ORDER_NOcontains the search result column display order.
REF_TABLE_NMoptionally contains the reference table name used to render coded values as displayable values.
User-Specified ConfigurationsDefault configurations are installed with the product for case, incident, party, report, and e-file search results. The default configurations only reference static fields (no user-defined fields). Customers can change the default configurations by modifying the previous database tables directly. Customers can also define user-specific search result configurations by setting the USER_ID column value appropriately. If there is no user-specific configuration for the user, the default configuration is used.
Displayable FieldsAny static or user-defined field in the business object (case, incident, party, report, or e-file) that contains one value can be shown in the search result table. You cannot show fields in associated business object (case, incident, party, report, or e-file) tables as search results. The following derived field can be shown in the incident search result table:
INCIDENT.CASE_IDshows the ID of the associated case or is blank if the incident is unassigned.
Column Header LabelsThe labels for all static search result column headers shipped in the default configuration are specified in the SAS Enterprise Case Management resource bundle file (com.sas.solutions.casemgmt.i18n.AppResources.properties). All other labels must be specified in the custom resource bundle file. The naming convention for search result field resource bundle keys is as follows:
• field.<lowerCaseTableName>.<lowerCaseFieldName>.header.txt
• Here is an example:
• field.party.party_full_nm.header.txt=Subject Name
94 Chapter 5 • Customizing SAS Enterprise Case Management

SAS Metadata Repository PropertiesThe following SAS Enterprise Case Management properties in the SAS Metadata Repository can be manually set from the SAS Management Console.
Property Name Description
DB.Schema The name of the database schema that contains the SAS Enterprise Case Management tables. The initial value is prompted for during the installation.
Reassign.Case.User.Group.Or.Role The name of the group or role defined in the SAS Metadata Repository. This name is used to populate the drop-down list of users to set as primary owner. The initial value is “Ent Case Mgmt Users”, which contains all SAS Enterprise Case Management users.
Table.Records.Per.Page The number of records to show per page within tables that support pagination. The initial value is 20.
WF.Sleep.Time.Millis The default workflow transition wait time. SAS Enterprise Case Management waits the given number of milliseconds after any case or report save when a workflow is updated. This helps ensure that any policies executed as a result of the workflow transition complete before the user edits the object again. The initial value is 1000.
Note: It is not recommended to set the WF.Sleep.Time.Millis property to a value of less than 1000 milliseconds.
Search Panels 95
96 Chapter 5 • Customizing SAS Enterprise Case Management

Chapter 6
Using the Custom Page Builder
Overview of the Custom Page Builder . . . . . . . . . . . . . . . . . . . . . . . . . . . . . . . . . . . . 97
Customizable User Interfaces . . . . . . . . . . . . . . . . . . . . . . . . . . . . . . . . . . . . . . . . . . . 98
Assigning the Custom Page Builder Permission . . . . . . . . . . . . . . . . . . . . . . . . . . . . 99
Working with User Interface Definitions . . . . . . . . . . . . . . . . . . . . . . . . . . . . . . . . . . 99View User Interface Definitions . . . . . . . . . . . . . . . . . . . . . . . . . . . . . . . . . . . . . . . . 99Edit the User Interface Definition . . . . . . . . . . . . . . . . . . . . . . . . . . . . . . . . . . . . . . . 99Upload the User Interface Definition . . . . . . . . . . . . . . . . . . . . . . . . . . . . . . . . . . . . 99Delete the User Interface Definition . . . . . . . . . . . . . . . . . . . . . . . . . . . . . . . . . . . . 100
Valid XML Elements and Descriptions for User Interface Definitions . . . . . . . . . 100
Custom Page Builder: Creating Custom Help . . . . . . . . . . . . . . . . . . . . . . . . . . . . . 108
Expressions and Functions . . . . . . . . . . . . . . . . . . . . . . . . . . . . . . . . . . . . . . . . . . . . . 109About Expressions and Functions . . . . . . . . . . . . . . . . . . . . . . . . . . . . . . . . . . . . . 109
Customization Examples . . . . . . . . . . . . . . . . . . . . . . . . . . . . . . . . . . . . . . . . . . . . . . 109How to Customize the User Interface Definition Files . . . . . . . . . . . . . . . . . . . . . 109About Required and Non-Required Fields . . . . . . . . . . . . . . . . . . . . . . . . . . . . . . . 110Customize Error Messages . . . . . . . . . . . . . . . . . . . . . . . . . . . . . . . . . . . . . . . . . . . 111Example: Hiding a Required Field . . . . . . . . . . . . . . . . . . . . . . . . . . . . . . . . . . . . . 111Example: Specifying a Read-Only Field . . . . . . . . . . . . . . . . . . . . . . . . . . . . . . . . 111Example: Specifying the Number of Decimal Digits . . . . . . . . . . . . . . . . . . . . . . . 111Example: Validating Dates . . . . . . . . . . . . . . . . . . . . . . . . . . . . . . . . . . . . . . . . . . . 111Example: Specifying Drop-Down Lists and Radio Buttons . . . . . . . . . . . . . . . . . . 112Example: Specifying a Text Area and a Text Field . . . . . . . . . . . . . . . . . . . . . . . . 112Dynamic Conditional Logic in User Interface Definition Files . . . . . . . . . . . . . . . 112Example: Creating a Custom Function . . . . . . . . . . . . . . . . . . . . . . . . . . . . . . . . . . 114Creating a Custom Component . . . . . . . . . . . . . . . . . . . . . . . . . . . . . . . . . . . . . . . . 115
Custom Page Builder Components . . . . . . . . . . . . . . . . . . . . . . . . . . . . . . . . . . . . . . 118Overview . . . . . . . . . . . . . . . . . . . . . . . . . . . . . . . . . . . . . . . . . . . . . . . . . . . . . . . . . 118Static Component Field Formatters . . . . . . . . . . . . . . . . . . . . . . . . . . . . . . . . . . . . 119Custom Action . . . . . . . . . . . . . . . . . . . . . . . . . . . . . . . . . . . . . . . . . . . . . . . . . . . . 119
Overview of the Custom Page BuilderUser interface (UI) definition files specify the form and content of pages presented in SAS Enterprise Case Management, the data that is captured, and how data is validated.
97

UI definition files must be uploaded from the Administration tab within SAS Enterprise Case Management.
Using the Custom Page Builder, you can make fields either mandatory or optional. You can display or hide fields depending on the entries selected for other fields. In addition, default values and validations can be freely defined.
The following panels can be customized:
• case detail panel
• incident detail panel
• party (or subject) detail panel
• e-file detail panel
• report detail panel
In addition, the Custom Page Builder enables you to do the following:
• specify the order of fields on a panel
• group fields into sections, subsections, and tabs
• override the default labels for fields
• specify property keys to use strings from custom.properties (or other properties files)
• hide or show fields, sections, subsections, and tab-sections
• specify whether a field is Read-Only or can be edited
• configure the number of decimal digits visible for numeric fields
• specify the default value for any field
• specify custom validation expressions that must be passed before the user is able to continue through a workflow
• specify the maximum and minimum values allowed in date and number fields
• control field rendering for certain fields:
• For single-select list fields, you can choose between a drop-down list and radio buttons.
• For string fields, you can choose between a text field and a text area, and also control the size of the text field or the text area.
Note: You can also apply the above list to auxiliary (aux) fields.
Certain fields are required by design, and you can specify optional fields as required fields. Although you cannot specify required fields as optional, you can hide these fields. For more information see “Example: Hiding a Required Field” on page 111.
Customizable User InterfacesYou can customize the following subsets of user interfaces with the Custom Page Builder for the following subject areas:
• Create/Edit Case
• Create/Edit Incident
• Create/Edit Subject
98 Chapter 6 • Using the Custom Page Builder

• Create/Edit Reports
• Create/Edit E-Files
• Add/Edit Row of User-Defined Table
Assigning the Custom Page Builder PermissionTo load and update user interfaces using the Custom Page Builder, you must assign a global capability to an existing or new role. Then you must assign the user to that role. Use SAS Management Console to specify the role and to assign the user to the role. See SAS Management Console: Guide to Users and Permissions for more information.
Working with User Interface Definitions
View User Interface DefinitionsTo view user interface definitions, select the Administration tab and select the user interface definition that you want to view.
Edit the User Interface DefinitionTo edit a user interface definition:
1. Select the Administration tab.
2. Click Download User Interface Definition from the pop-up menu.
3. Edit the file with a text editor or with your favorite XML editor.
Note: You can validate the structure of the file against the uiDefinition.dtd file. The file can be found at SAS_HOME/SASFoundation/9.3/misc/casemgmtmva/sample/uidef/uiDefinition.dtd for UNIX platforms, or SAS_HOME\SASFoundation\9.3\casemgmtmva\sasmisc\sample\uidef\uiDefinition.dtd for Windows platforms.
4. Upload the changes. For more information, see “Upload the User Interface Definition” on page 99.
Note: You do not need to restart the server after uploading the user interface definition.
Upload the User Interface DefinitionTo upload a user interface definition:
1. Select the Administration tab.
2. Click Upload User Interface Definition. The Upload User Interface Definition File window appears.
3. Type the path to the file, or click Browse to navigate to it.
4. Enter a description. This step is optional.
Working with User Interface Definitions 99
5. Click OK. Any warnings or errors found in the user interface definition file are displayed.
6. When you are satisfied with the results, click Upload User Interface Definition.
Note: You do not need to restart the server after uploading the user interface definition.
Delete the User Interface DefinitionDeleting a user interface definition removes the file from the system. This is an unrecoverable operation. To delete a user interface definition:
1. Select the Administration tab.
2. For the corresponding user interface definition that you want to delete, click the action menu, and then click Delete.
Valid XML Elements and Descriptions for User Interface Definitions
A user interface definition file is an XML document consisting of a top-level <ui-definition> element with attributes and child elements that describe the form and content of the pages, their validations, derived fields, and conditional logic. The user interface definition files must be written in valid XML that conforms to the structure described in the document type definition (DTD) uiDefinition.dtd. For more information about where to locate a copy of this file, see “Edit the User Interface Definition” on page 99.
Note: For information about XML, including how to handle special characters, see http://www.w3.org/TR/REC-xml/.
The following table describes the XML format used in the user interface definition files:
Table 6.1 XML Format
Element Description
<ui-definition>
The top-level element that describes the panels in the UI definition.
Attributes:
• id — A unique identifier for this user interface definition (user-defined). This must be a valid XML name.
• type — Indicates the type of object that this UI definition is used for. Valid values include Case, Incident, and Party.
Child Elements:
• A <title> element. The title appears on the administration page, but it is not visible to the end user (for example, the user who is editing an issue).
• One or more <panel> elements.
100 Chapter 6 • Using the Custom Page Builder

Element Description
<function> Declares a custom function.
Attributes:
• name — The name that is used to reference the custom function. Custom function names must begin with “C_” (or “c_”).
• qualified-class-name — The fully qualified class name.
For more information about creating custom functions, see “Example: Creating a Custom Function” on page 114.
<component> Declares a custom component.
Attributes:
• name — The name that is used to reference the custom function. Custom function names must begin with “C_” (or “c_”).
• qualified-class-name — The fully qualified class name.
<panel> Describes the appearance and behavior of a single panel.
Attributes:
• ID — The panel ID. This must be a valid XML name and a valid SAS name.
Child elements:
• An optional <title> element providing the panel title.
• An optional <initialize> section that describes any initialization that must be performed before the panel is rendered.
• Any number of <field> elements.
• An optional <finalize> section that describes any validations or computations that must be performed when the user clicks Save.
• Zero or more <action-group> elements.
<initialize> An optional section that contains code that is executed before the panel appears.
Child elements:
• Zero or more <set> elements that set variables to some computed value.
• Zero or more panel-level <validation> elements that are performed before the panel is rendered.
<finalize> An optional section that contains code that is executed when the panel is considered complete (usually when the user clicks Save).
Child elements:
• Zero or more <set> elements that compute derived fields. These fields are evaluated when the user clicks Save.
• Zero or more panel-level <validation> elements that are checked when the user clicks Save.
Valid XML Elements and Descriptions for User Interface Definitions 101

Element Description
<set> Evaluates an expression and stores its value in the memory hash table.
Attributes:
• name — The variable name that corresponds to a field. If the name is not specified, this is treated like a function call having no return value.
• value — An expression that is evaluated with the resulting value stored in the named variable in the memory hash table.
102 Chapter 6 • Using the Custom Page Builder

Element Description
<field> Describes a prompt for user input.
Attributes:
• name — The name of the field. This should be one of the names associated with the type of user interface definition that you are editing.
• type — The GUI component that is used for the input control. The following are valid values: string, number, Boolean, drop-down, check box, radio, date, text area, hidden, read-only, component.
• component-name (optional) — The name of a fixed panel component. Applicable only if type=“component”. Ignored otherwise.
• length (optional) — The width of the input control on the panel (not necessarily the field length in the database).
• rows (optional) — Applies to text area type only. Indicates the number of rows in the text area.
• max-length (optional) — The maximum length of the input content allowed in the text input.
• decimal-digits (optional) — Limits the number of digits in number format.
• min (optional) — Minimum value for dates and numbers.
• max (optional) — Maximum value for dates and numbers.
• minSelectableDate (optional) — Minimum selectable date. This attribute affects only the date chooser and not validation.
• maxSelectableDate (optional) — Maximum selectable date. This attribute affects only the date chooser and not validation.
• default (optional) — An expression whose value is used as the default value for the field. This value is used only when creating a new object.
• values (optional) — An expression whose value is a list of items used to populate a drop-down list, check box, or radio button group. Each item in the list is a label and value pair, where label is the displayed value, and value is the internally used value. Using the values attribute with a check box displays a group of check boxes to be multi-selected.
Note: Although multiple values for a string, number, Boolean, or text area type field are permissible, a result will not be set if used, since these field types can handle only a single value.
• align (optional) — The alignment of the input field’s label. Valid values are top, left, and inline. The default is left.
• required (optional) — An expression that is evaluated by the expression handler to determine whether the user must complete the field before saving. Default is false.
• visible (optional) — An expression that is evaluated by the expression handler to determine whether the field is visible. Default is true.
Valid XML Elements and Descriptions for User Interface Definitions 103

Element Description
<field> Describes a prompt for user input.
Attributes:
• readonly (optional) — An expression that is evaluated by the expression handler to determine whether the field is Read-Only. Default is false. You can also specify neverBeenSaved.
• escape-xml (optional) — By default, any XML character in a Read-Only field is escaped. Specifying false keeps the characters from being escaped. Default is true. Only valid for Read-Only fields.
Child elements:
• A <label> element that specifies the label and prompt for this input field.
• Zero or more <validation> elements, which are evaluated when the user clicks Save.
• Zero or more <param> elements, which are applicable only if type=“component”.
• An optional <on_change> element, which describes any dynamic actions to be executed when the field value changes.
• An optional <true_label> element, which is applicable only if type=“boolean”.
• An optional <false_label> element, which is applicable only if type=“boolean”.
<label> The label or prompt displayed for a field. If styled input is required (for example, multiple lines with bullets), you can specify this element as a CDATAsection with embedded HTML.
Attributes:
• separator-visible — By default, a separator (colon) is added to the label. Specifying false suppresses the separator.
Child elements:
• Zero or more <message> elements.
<param> A parameter passed to a fixed panel component.
Attributes:
• name — The parameter name. The name is required when the parameter is for a field, but should be empty when the parameter is for a message.
• value — An expression that is evaluated, with the result used as the parameter value. If no value is specified, the content of the element is used.
Note: The entire <param> statement, including the attributes and values, must be on one line.
104 Chapter 6 • Using the Custom Page Builder

Element Description
<validation> A test that is performed at the panel, section, or field level. The test is evaluated by the expression handler (usually, when the user clicks Save), and if it is false, the error message is displayed and the user remains on the same panel.
Attributes:
• test — An expression that is evaluated by the expression handler using the current contents of the memory hash table (which will include the values from the database and everything the user has entered up to this point). For example, if the input field was a month number in a field named MONTH, the expression might be test=“month ge 1and month le 12”.
Child elements:
• An <errmsg> element that describes the message to display if the test fails.
<errmsg> An error message that displays if a validation fails.
Child elements:
• Zero or more <message> elements.
<section> Describes the appearance and behavior of a section of other elements.
Attributes
• id — The section ID. This must be a valid XML name (also a valid SAS name).
• required (optional) — An expression that is evaluated by the expression handler to determine whether the section should display the required indicator. Default is false.
• visible (optional) — An expression that is evaluated by the expression handler to determine whether the section is visible. Default is true.
• expanded (optional) — An expression that is evaluated by the expression handler to determine whether the section is expanded by default. Default is true.
Child elements:
• An optional <label> element providing the section label and title.
• Zero or more <field> elements.
• Zero or more <section> elements.
• Zero or more <if> elements.
• Zero or more <validation> elements, which are evaluated when the user clicks Save.
• Zero or more <action-group> elements.
Valid XML Elements and Descriptions for User Interface Definitions 105
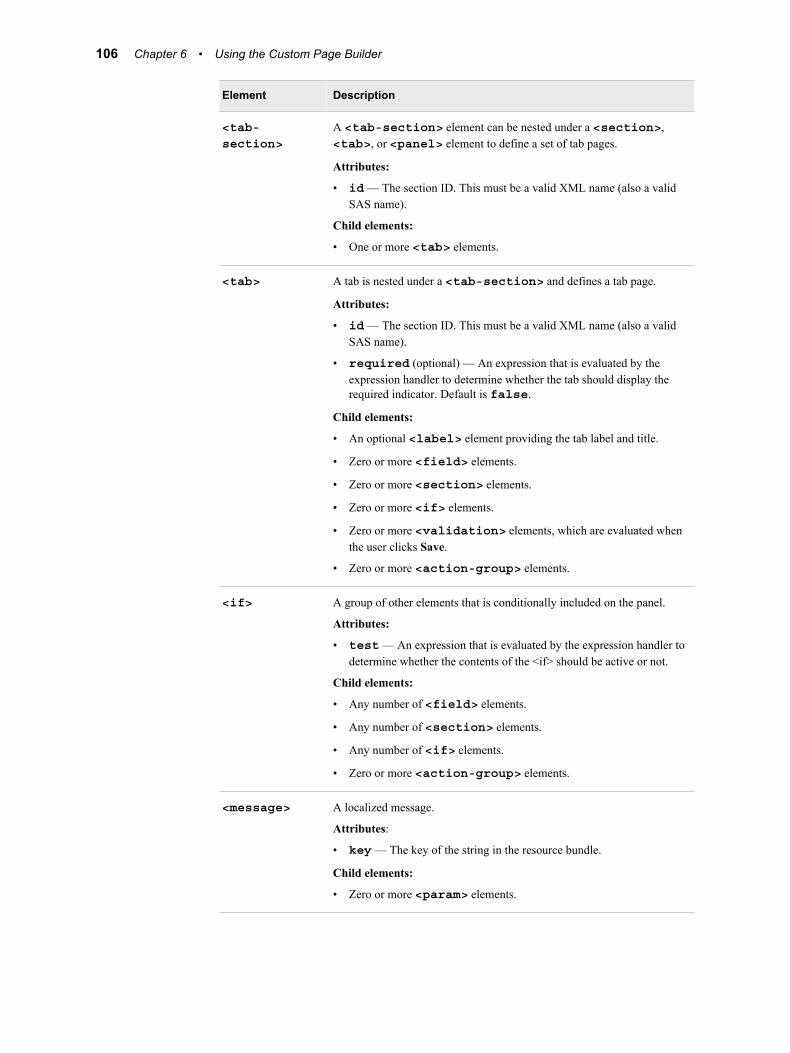
Element Description
<tab-section>
A <tab-section> element can be nested under a <section>, <tab>, or <panel> element to define a set of tab pages.
Attributes:
• id — The section ID. This must be a valid XML name (also a valid SAS name).
Child elements:
• One or more <tab> elements.
<tab> A tab is nested under a <tab-section> and defines a tab page.
Attributes:
• id — The section ID. This must be a valid XML name (also a valid SAS name).
• required (optional) — An expression that is evaluated by the expression handler to determine whether the tab should display the required indicator. Default is false.
Child elements:
• An optional <label> element providing the tab label and title.
• Zero or more <field> elements.
• Zero or more <section> elements.
• Zero or more <if> elements.
• Zero or more <validation> elements, which are evaluated when the user clicks Save.
• Zero or more <action-group> elements.
<if> A group of other elements that is conditionally included on the panel.
Attributes:
• test — An expression that is evaluated by the expression handler to determine whether the contents of the <if> should be active or not.
Child elements:
• Any number of <field> elements.
• Any number of <section> elements.
• Any number of <if> elements.
• Zero or more <action-group> elements.
<message> A localized message.
Attributes:
• key — The key of the string in the resource bundle.
Child elements:
• Zero or more <param> elements.
106 Chapter 6 • Using the Custom Page Builder
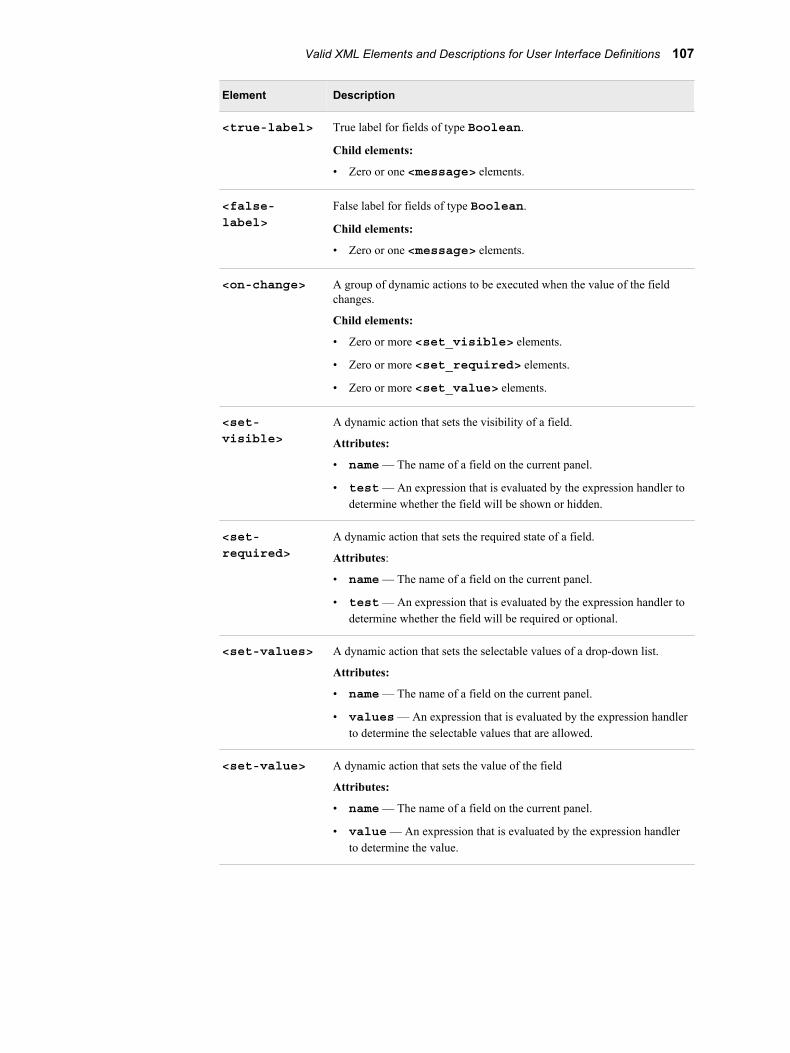
Element Description
<true-label> True label for fields of type Boolean.
Child elements:
• Zero or one <message> elements.
<false-label>
False label for fields of type Boolean.
Child elements:
• Zero or one <message> elements.
<on-change> A group of dynamic actions to be executed when the value of the field changes.
Child elements:
• Zero or more <set_visible> elements.
• Zero or more <set_required> elements.
• Zero or more <set_value> elements.
<set-visible>
A dynamic action that sets the visibility of a field.
Attributes:
• name — The name of a field on the current panel.
• test — An expression that is evaluated by the expression handler to determine whether the field will be shown or hidden.
<set-required>
A dynamic action that sets the required state of a field.
Attributes:
• name — The name of a field on the current panel.
• test — An expression that is evaluated by the expression handler to determine whether the field will be required or optional.
<set-values> A dynamic action that sets the selectable values of a drop-down list.
Attributes:
• name — The name of a field on the current panel.
• values — An expression that is evaluated by the expression handler to determine the selectable values that are allowed.
<set-value> A dynamic action that sets the value of the field
Attributes:
• name — The name of a field on the current panel.
• value — An expression that is evaluated by the expression handler to determine the value.
Valid XML Elements and Descriptions for User Interface Definitions 107
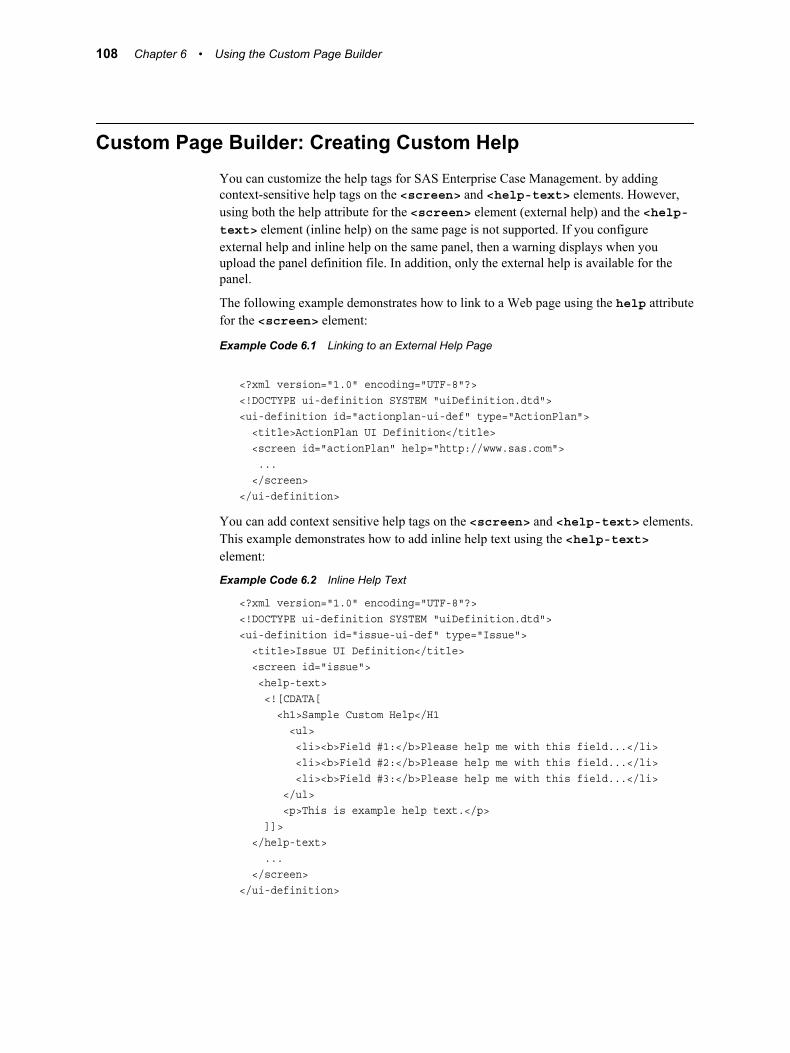
Custom Page Builder: Creating Custom HelpYou can customize the help tags for SAS Enterprise Case Management. by adding context-sensitive help tags on the <screen> and <help-text> elements. However, using both the help attribute for the <screen> element (external help) and the <help-text> element (inline help) on the same page is not supported. If you configure external help and inline help on the same panel, then a warning displays when you upload the panel definition file. In addition, only the external help is available for the panel.
The following example demonstrates how to link to a Web page using the help attribute for the <screen> element:
Example Code 6.1 Linking to an External Help Page
<?xml version="1.0" encoding="UTF-8"?><!DOCTYPE ui-definition SYSTEM "uiDefinition.dtd"><ui-definition id="actionplan-ui-def" type="ActionPlan"> <title>ActionPlan UI Definition</title> <screen id="actionPlan" help="http://www.sas.com"> ... </screen></ui-definition>
You can add context sensitive help tags on the <screen> and <help-text> elements. This example demonstrates how to add inline help text using the <help-text> element:
Example Code 6.2 Inline Help Text
<?xml version="1.0" encoding="UTF-8"?><!DOCTYPE ui-definition SYSTEM "uiDefinition.dtd"><ui-definition id="issue-ui-def" type="Issue"> <title>Issue UI Definition</title> <screen id="issue"> <help-text> <![CDATA[ <h1>Sample Custom Help</H1 <ul> <li><b>Field #1:</b>Please help me with this field...</li> <li><b>Field #2:</b>Please help me with this field...</li> <li><b>Field #3:</b>Please help me with this field...</li> </ul> <p>This is example help text.</p> ]]> </help-text> ... </screen></ui-definition>
108 Chapter 6 • Using the Custom Page Builder
Expressions and Functions
About Expressions and FunctionsAn expression is any valid set of literals, variables, operators, and functions that evaluates to a single value. Quite a few element attributes support expressions, including the following examples:
• the test attribute of <validation> and <if> elements
• the value attribute of <set> elements and dynamic actions
• the visible and required attributes of <field> and <section> elements
Expressions can reference any valid field defined in the specific UI definition type. These fields include the fields of the primary object (for example, the Action Plan that is being edited) in addition to fields for any useful secondary objects (for example, the parent Issue of the Action Plan that is being edited). Temporary and derived fields are also supported. Expressions can use these fields in combination with the usual arithmetic operators (add, subtract, multiply, divide), relational operators (for example, a > b, c = 10, d <= 20), and logical operators (for example, a and b or c and d and not e). The use of expressions and operators enables you to express business rules directly in the user interface definition files.
In addition to arithmetic, relational, and logical operators, there is a set of functions that you can use in the expressions. Some of these functions could be used for field validation (for example, empty(), validNumber(), validDate()). Also, you might use functions to construct derived fields (for example, concat(), length(), if()). Finally, you might use functions to access data sources (for example, getCodeTableLabelValues(), getCodeEnumerationLabelValues(), or getAuxOptionLabelValues()).
For more information about expressions and functions, see the Custom Page Builder documentation found on the Administration tab of SAS Enterprise Case Management.
Customization Examples
How to Customize the User Interface Definition FilesThe following steps provide a high-level overview of the customization process for user interface definition files:
1. Log on to SAS Enterprise Case Management and download the user interface definition that you want to edit. For more information, see “Working with User Interface Definitions” on page 99.
2. Edit the user interface definition file by adding allowable XML elements to the file. For example, to add a new field to a panel, you add the<field> element. There are several customization examples provided in this chapter. For more information about supported XML elements, see “Valid XML Elements and Descriptions for User Interface Definitions” on page 100.
Note: You do not need to change the application source code or the database. By default, almost every panel provides six numeric, alphanumeric, Boolean,
Customization Examples 109
currency, date, and drop-down fields. You can enable and label those fields as required. For more information about required fields, see “About Required and Non-Required Fields” on page 110.
3. Enter validation code to validate user entries in the user interface definition files.
4. Upload any values that you added to the user interface definition files (for example, an additional value in a drop-down list).
5. To use the new field or structure in the user interface definition files, upload the changed version of the user interface definition file. For more information, see “Upload the User Interface Definition” on page 99.
6. To make the new field available to users of the SAS reporting tools, you must give it a meaningful name that you can use within the target reports and the list of fields available to be included in reports. You can do this by using SAS Information Map Studio. In SAS Information Map Studio, you must select the referring field from the list of available fields in the database and give it a name. For more information, see the Help for SAS Information Map Studio, accessible within the product.
About Required and Non-Required FieldsCertain fields are required by design, and you can specify optional fields as required fields. Although you cannot specify required fields as optional, you can hide these fields. For more information, see “Example: Hiding a Required Field” on page 111. When you set a field as required, the system automatically checks whether the user has provided data. If a drop-down list is used, then the system checks whether the user made a selection. If the user does not provide the data, or if the user does not select a value from the drop-down list, then the system automatically displays an error message when the user tries to save the information. You can customize the text for error messages. For more information, see “Customize Error Messages” on page 111. If any fields within a section are required, then the section heading is marked as required. For example:
<section id="details"> <label><message key="application.details.txt"/></label> <field name="issueShortDesc" type="string" required="true"> <label><message key="issue.field.issueShortDesc .displayName.txt"/></label> </field>
<field name="issueId" type="string" required="true"> <label><message key="issue.field.issueId.displayName.txt"/> </label> </field></section>
Note: If you specify that a non-required field is required in a user interface definition file, the existing data loaders do not check the newly required field to ensure that there is information entered for it. For example, if you use the Issues data loader and you specify that a field on an issue is now required, then the data loader will load that field without any values because it does not know that you changed a non-required field to be required.
110 Chapter 6 • Using the Custom Page Builder

Customize Error MessagesSAS Enterprise Case Management provides you with customMessages.properties files for each supported language. You can customize error messages by adding the error messages from the server.properties file to the customMessages.properties file. For example:
errors.required.fmt.txt="{0}" is required.
Example: Hiding a Required FieldYou can hide fields that are required by the database design by using the visible and default attributes on the <field> element. For example, to hide the Issue ID field:
<field name="issueId" type="string" required="true" default="toString(issueRk)" visible="false"> <label><message key="issue.field.issueId.displayName.txt"/> </label></field>
In this example, the Issue ID field requires a unique value for each object. Note that you can also use functions on the default attribute. For example:
default="concat(’ABC-’, issueRk)"
Example: Specifying a Read-Only FieldUse the readonly="true" attribute to specify that a field is Read-Only. The default value of the readonly attribute is false. The following example demonstrates how to specify a Read-Only field:
<field name="sourceSystemCd" type="dropdown" required="true" default="’MON’" readonly="true"> <label><message key="issue.field.sourceSystemCd .displayName.txt"/></label></field>
Example: Specifying the Number of Decimal DigitsTo specify the number of decimal digits that should be used when formatting a number, use the decimal-digits attribute on the <field> element. The following example demonstrates how to specify 2 decimal digits on the Loss Amount field:
<field name="auxNum1" type="number" decimal-digits="2" required="true"> <label>Loss Amount</label></field>
Example: Validating DatesTo validate date entries, use the type attribute to specify that the input control is a date. Then use the min or max attributes with a function on the <field> element for determining the date. The following example demonstrates how to specify that the minimum value entered for a date must be today’s date:
Customization Examples 111

<field name="targetDt" type="date" min="today()"> <label><message key="issueEx.field.targetDt.displayName.txt"/> </label></field>
Example: Specifying Drop-Down Lists and Radio ButtonsTo specify whether a drop-down list or radio buttons are used for single-select fields, use the type attribute on the <field> element. The following example demonstrates how to specify a drop-down list:
<field name="issuePriorityTypeCd" type="dropdown" required="true"> <label><message key="issue.field.issuePriorityTypeCd.displayName.txt"/> </label></field>
The following example demonstrates how to specify radio buttons:
<field name="issuePriorityTypeCd" type="radio" required="true"> <label><message key="issue.field.issuePriorityTypeCd.displayName.txt"/> </label></field>
Example: Specifying a Text Area and a Text FieldTo specify whether a string field appears as a text area, use the type attribute on the <field> element. Using type="textarea" creates a text area on your form. In addition, you can specify the number of rows contained in a text area by using the rows attribute. The following example demonstrates how to specify a text area with 6 rows:
<field name="issueDesc" type="textarea" rows="6" required="true"> <label><message key="issue.field.issueDesc.displayName.txt"/></label></field>
You can also use the type attribute to specify that a string field appears as a text field with a specified length for the field. Using the type="string" attribute creates a text field on your form. Using the length attribute specifies the length of the text field. The following example demonstrates how to specify a text field that is 32 characters long:
<field name="referenceNo" type="string" length="32" required="true"> <label><message key="issue.field.referenceNo.displayName.txt"/></label></field>
Dynamic Conditional Logic in User Interface Definition FilesYou can perform the following types of dynamic actions when a field value changes:
• set-visible — shows or hides another field or section.
This example demonstrates how to define conditional logic within a page. In this example, the Name of Spouse text field appears only if Y is selected in the Married drop-down list.
Example: Using the set-visible action
<field name="auxOptionCd1" type="dropdown" values="getAuxOptionLabelValues(’issue’, ’auxOptionCd1’)"> <label>Married</label> <on-change>
112 Chapter 6 • Using the Custom Page Builder

<set-visible name="auxStr1" test="auxOptionCd1 = ’Y’"/> </on-change></field>
<field name="auxStr1" type="string" visible="auxOptionCd1 = ’Y’"> <label>Name of Spouse</label></field>
Note: The value that is specified for the test attribute of the <set-visible> element will most likely be the same as the value that is specified for the visible attribute of the target <field> element.
• set-required — makes another field required or optional.
This example demonstrates how to define conditional logic within a page. It specifies that the Justification field is required if the value entered for the Loss Amount is greater than 1 million.
Example: Using the set-required action
<field name="auxNum1" type="number" decimal-digits="2" required="true"> <label>Loss Amount</label> <on-change> <set-required name="auxStr2" test="auxNum1 > 1000000"/> </on-change></field>
<field name="auxStr2" type="textarea" required="auxNum1 > 1000000"> <label>Justification</label></field>
Note: The value that is specified for the test attribute of the <set-required> element will most likely be the same as the value that is specified for the required attribute of the target <field> element.
• set-values — updates the selectable values of a drop-down list. Although radio buttons currently allow <set-values> in the DTD, this feature is not currently implemented. It is planned for a future release.
Example: Using the set-values action
<initialize> <!-- create a filter expression to be used in the filterLabelValue ()function --> <set name="TEMP.myFilterExpr" value="’if(auxNum2 > 1000000, value = "high", true)’"/></initialize>:<field name="auxNum2" type="number" decimal-digits="2" required="true"> <label>Loss Amount</label> <on-change> <set-values name="auxOptionCd2" values="filterLabelValues(getAuxOptionLabelValues (’risk’, ’auxOptionCd2’), TEMP.myFilterExpr)"/> </on-change></field>
<field name="auxOptionCd2" type="dropdown" required="true" values="filterLabelValues(getAuxOptionLabelValues (’risk’, ’auxOptionCd2’),TEMP.myFilterExpr)">
Customization Examples 113
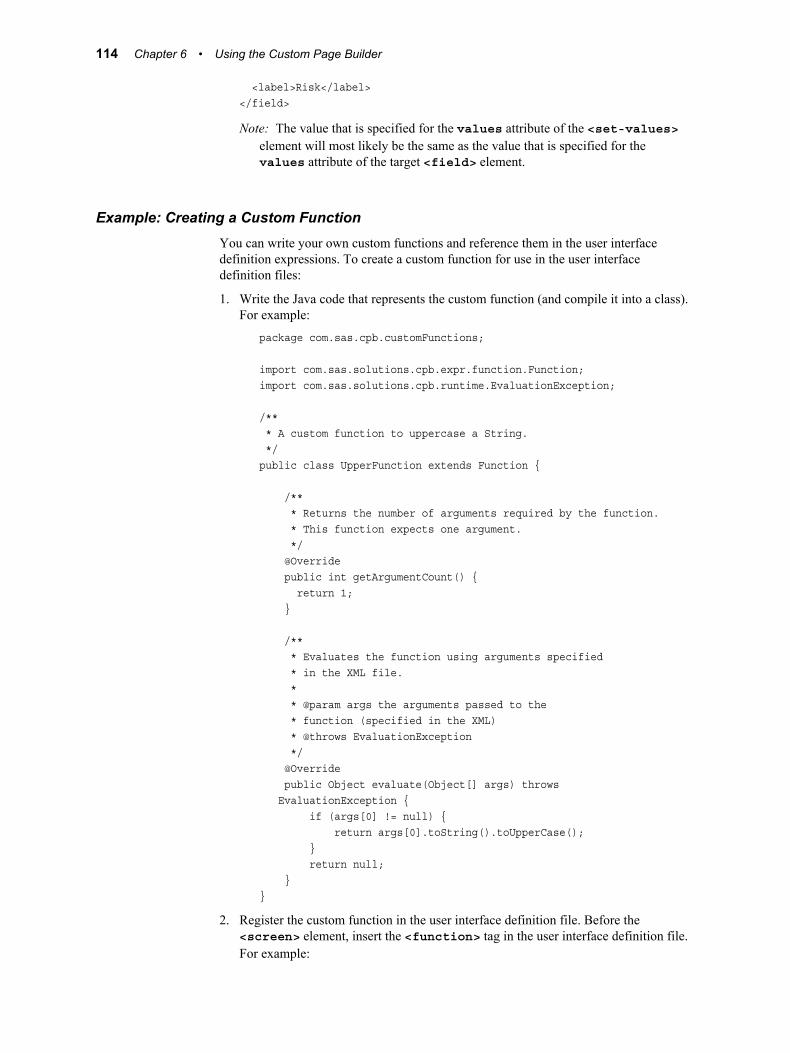
<label>Risk</label></field>
Note: The value that is specified for the values attribute of the <set-values> element will most likely be the same as the value that is specified for the values attribute of the target <field> element.
Example: Creating a Custom FunctionYou can write your own custom functions and reference them in the user interface definition expressions. To create a custom function for use in the user interface definition files:
1. Write the Java code that represents the custom function (and compile it into a class). For example:
package com.sas.cpb.customFunctions;
import com.sas.solutions.cpb.expr.function.Function;import com.sas.solutions.cpb.runtime.EvaluationException;
/** * A custom function to uppercase a String. */public class UpperFunction extends Function {
/** * Returns the number of arguments required by the function. * This function expects one argument. */ @Override public int getArgumentCount() { return 1; }
/** * Evaluates the function using arguments specified * in the XML file. * * @param args the arguments passed to the * function (specified in the XML) * @throws EvaluationException */ @Override public Object evaluate(Object[] args) throws EvaluationException { if (args[0] != null) { return args[0].toString().toUpperCase(); } return null; }}
2. Register the custom function in the user interface definition file. Before the <screen> element, insert the <function> tag in the user interface definition file. For example:
114 Chapter 6 • Using the Custom Page Builder

<function name="C_upper" qualified-class-name="com.sas.cpb.customFunctions .UpperFunction"/>
Note: You must prefix the custom function names with “C_” to prevent naming conflicts with the Custom Page Builder standard components.
Creating a Custom ComponentYou can create your own custom components for use in the panel definition. Components are graphical widgets that appear on the panel (for example, the color chooser). A custom component is one that you can write to supplement the components that are provided in SAS Enterprise Case Management.
Follow these steps to create a custom component:
1. Write the Java code that represents the custom component. For example:
package com.sas.cpb.customComponents;
import java.io.IOException;import java.util.Locale;import java.util.Map;import java.util.ResourceBundle;
import javax.servlet.ServletException;import javax.servlet.http.HttpServletRequest;import javax.servlet.jsp.JspException;import javax.servlet.jsp.JspWriter;import javax.servlet.jsp.PageContext;
import org.apache.commons.logging.Log;import org.apache.commons.logging.LogFactory;
import com.sas.solutions.cpb.runtime.EvaluationException;import com.sas.solutions.cpb.runtime.UIContext;import com.sas.solutions.cpb.runtime.component.CustomComponent;import com.sas.solutions.cpb.screendefs.Field;import com.sas.solutions.cpb.server.ApplicationProperties;import com.sas.solutions.cpb.util.FieldUtil;import com.sas.solutions.cpb.web.runtime.FieldRenderContext;import com.sas.solutions.cpb.web.util.HTMLUtil;import com.sas.solutions.cpb.web.util.RequestUtil;
/*** An example custom component to allow the user* to choose a color (and store it* in the UI context as a String in the form "#RRGGBB").*/public class ColorChooserComponent extends com.sas.solutions.cpb.runtime.component. CustomComponent {
private static final Log log = LogFactory.getFactory().getInstance (ColorChooserComponent.class);
/** * Renders the HTML for this component.
Customization Examples 115
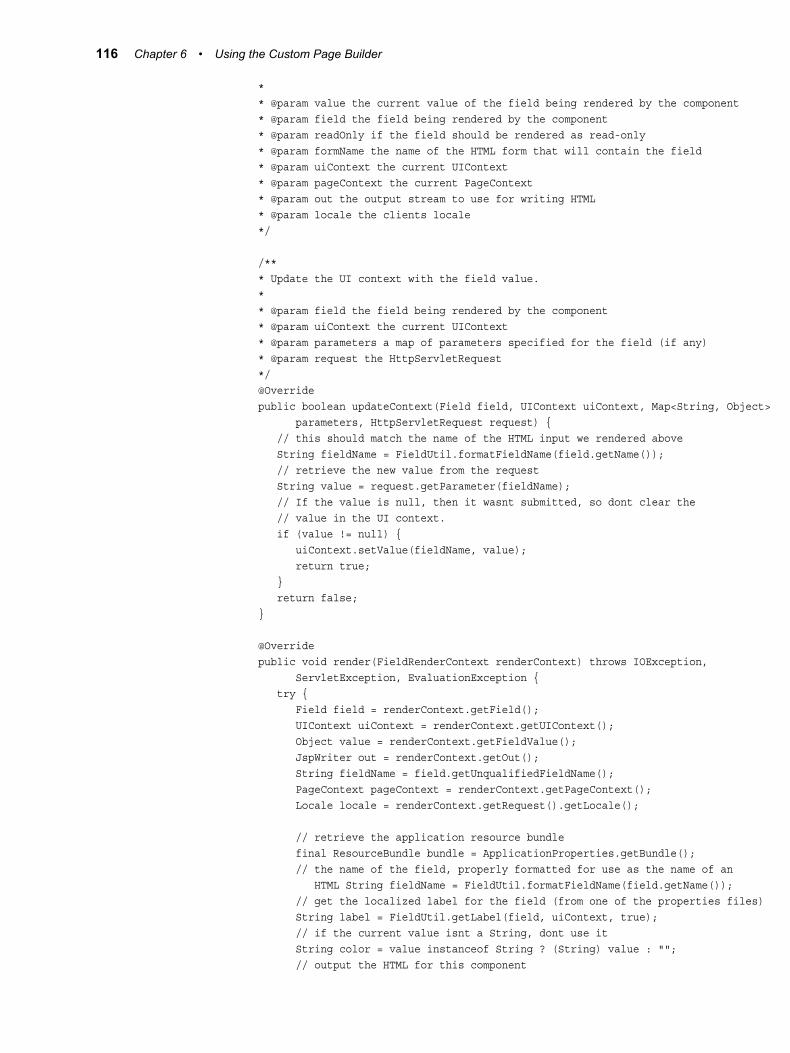
* * @param value the current value of the field being rendered by the component * @param field the field being rendered by the component * @param readOnly if the field should be rendered as read-only * @param formName the name of the HTML form that will contain the field * @param uiContext the current UIContext * @param pageContext the current PageContext * @param out the output stream to use for writing HTML * @param locale the clients locale */
/** * Update the UI context with the field value. * * @param field the field being rendered by the component * @param uiContext the current UIContext * @param parameters a map of parameters specified for the field (if any) * @param request the HttpServletRequest */ @Override public boolean updateContext(Field field, UIContext uiContext, Map<String, Object> parameters, HttpServletRequest request) { // this should match the name of the HTML input we rendered above String fieldName = FieldUtil.formatFieldName(field.getName()); // retrieve the new value from the request String value = request.getParameter(fieldName); // If the value is null, then it wasnt submitted, so dont clear the // value in the UI context. if (value != null) { uiContext.setValue(fieldName, value); return true; } return false; }
@Override public void render(FieldRenderContext renderContext) throws IOException, ServletException, EvaluationException { try { Field field = renderContext.getField(); UIContext uiContext = renderContext.getUIContext(); Object value = renderContext.getFieldValue(); JspWriter out = renderContext.getOut(); String fieldName = field.getUnqualifiedFieldName(); PageContext pageContext = renderContext.getPageContext(); Locale locale = renderContext.getRequest().getLocale();
// retrieve the application resource bundle final ResourceBundle bundle = ApplicationProperties.getBundle(); // the name of the field, properly formatted for use as the name of an HTML String fieldName = FieldUtil.formatFieldName(field.getName()); // get the localized label for the field (from one of the properties files) String label = FieldUtil.getLabel(field, uiContext, true); // if the current value isnt a String, dont use it String color = value instanceof String ? (String) value : ""; // output the HTML for this component
116 Chapter 6 • Using the Custom Page Builder

out.println("<div class=\"section\" style=\"padding:5px\">"); out.println("<div id=\"colorPicker" + fieldName + "\" ></div>"); out.println("<script type=\"text/javascript\">"); out.println("function colorClicked(td) {"); out.println(" var color = td.getAttribute(clr);"); out.println(" elementById(\"" + fieldName + "\").value = color;"); out.println(" elementById(\"colorBox" + fieldName + "\").style.background = color;"); out.println("}"); out.println("var colorCodes = [FF, CC, 99, 66, 33, 00]; "); out.println("var codeCount = colorCodes.length;"); out.println("var html = \"<table>\";"); out.println("for (var i = 0; i < codeCount; i++) {"); out.println(" html += \"<tr>\";"); out.println(" for (var j = 0; j < codeCount; j++) {"); out.println(" for (var k = 0; k < codeCount; k++) {"); out.println(" var color = \"#\" + colorCodes[i] + colorCodes[j] + colorCodes[k];"); out.println(" html += \"<td style=cursor:default; background: " + "\" + color + \" onclick=colorClicked(this)" + " clr=\" + color + \"> </td>\";"); out.println(" }"); out.println(" } "); out.println(" html += \"</tr>\";"); out.println("}"); out.println("html += \"</table>\";"); out.println("elementById(\"colorPicker" + fieldName + "\").innerHTML = html;"); out.println("</script>"); out.println("<br/>"); // output the required and error indicators HTMLUtil.writeFieldIndicators(fieldName, FieldUtil.isRequired(field, uiContext), false, // this field will never be confidential RequestUtil.isFieldValueInvalid(fieldName, pageContext), locale, out); // output the label out.println("<span class=\"fieldlabel\">" + label + "</span>"); // display the previously selected color String boxImgUrl = bundle.getString("application.colorbox.image"); out.print("<img align=\"absmiddle\" src=\"" + boxImgUrl + "\" id=\"colorBox" + fieldName + "\" style=\"background:" + color + "; vertical-align: top;border: 0px solid black\" />" + " "); // output an HTML input so that it will be submitted with the form out.println("<input id=\"" + fieldName + "\" type=\"text\" name=\"" + fieldName + "\" value=\"" + color + "\" />"); out.println("</div>"); } catch (EvaluationException e) { log.error("Error rendering component.", e); } catch (JspException e) { // TODO Add your JSP catch errors here e.printStackTrace(); }
Customization Examples 117

}}
2. Compile the Java file and place the resulting class somewhere in the application server’s classpath.
3. Register the custom component in the panel definition file. Before the <screen> element, insert the <component> tag in the panel definition file. For example:
<component name="c_colorPicker"qualified-class-name="com.sas.cpb.customComponents.ColorChooserComponent" />
Note: You must prefix the custom component names with “c_” to prevent naming conflicts with the Custom Page Builder standard components.
4. Reference the custom component in a <field> element. For example:
<field name="auxStr3" type="component" component-name="c_colorPicker"><label>Choose a color</label></field>
Custom Page Builder Components
OverviewA collection of built-in components is provided for SAS Enterprise Case Management. These components can be added to user interface (UI) definition XML files. UI definition XML files are used to define the layout of fields for viewing or editing cases, incidents, and parties.
Components have the ability to listen to Save events, so they can provide their own additional functionality after the save of a panel has occurred. Here is an example of how to implement the post-save processing:
@Override public void handleEvent( Field field, UIContext uiContext, HttpServletRequest request, RuntimeEvent event) throws EvaluationException { switch (event) { case SAVE: // Perform post save work here. postSave(field, uiContext, request); break; } }
For more information about components, see the Custom Page Builder documentation found on the Administration tab of SAS Enterprise Case Management.
Note: The name= field should be unique for each component when the same component is used multiple times in the UI definition.
118 Chapter 6 • Using the Custom Page Builder

Static Component Field FormattersThe term “field” within the context of a Custom Page Builder component is different from a stand-alone field. Only a field within a static component can currently use formatters. Stand-alone “field” types cannot use formatters as defined in this section.
In cases where you can specify a formatter, the following names can be used:
• Boolean
• check box (Read-Only view)
• currency
• date
• datetime
• decimal
• generic
• hyperlink
• integer
• party
• user_name
• any valid reference table name (for example: X_RT_PRIORITY)
Custom ActionThe <action-group> element is rendered as a tool bar. It contains <action> elements. The <action> element enables you to provide links and buttons on a panel. For a list of the attributes that you can use with the <action> element, see “Valid XML Elements and Descriptions for User Interface Definitions” on page 100 . The <action-group> element does not support attributes. You can nest <action> elements and conditional logic within <action-group> elements. You can nest the <action-group> element under <screen>, <section>, and <tab> elements.
Note: Custom action functionality is available on the main-level Custom Page Builder window. However, it is not available on windows spawned from the GenericEntityTable component.
Element Description
<action-group> A group of actions.
Attributes:None
Child elements:Zero or more <action> elements
Custom Page Builder Components 119

Element Description
<action> Attributes:
URLspecifies the landing URL after a submit.
id(optional) specifies the ID field.
sas-sso(optional) specifies a Boolean field that indicates whether to do SAS single sign-on automatically.
output-destination(optional) specifies the output format, either window or inline. The default is window. A value of window specifies showing the result page in a pop-up window. A value of inline specifies no change in the structure of the current page, and no pop-up window. The output-destination could be a field replacement javascript call. The value ignore specifies a server side trigger, with no UI change.
trigger(optional) specifies the trigger action, The trigger action is currently labeled as “support save”.
fail-on-error failed(optional) specifies the Boolean field that enables you to decide whether to continue running other trigger actions if there is an error in the action execution.
visible(optional) specifies whether the action is visible.
enabled(optional) specifies whether the action is enabled.
content-type(optional) specifies the response content type for a backend action. This attribute currently supports text and HTML.
Child elements:
• An optional <label> element. This element provides the window label or title.
• An optional <param> element. This element provides parameters for the URL.
• An optional <url> element. This element is used if an attribute URL is not specified. It provides a more convenient way to specify a URL.
120 Chapter 6 • Using the Custom Page Builder

The following example demonstrates how to trigger the Save action on a panel.
Example Code 6.3 Save Trigger
<action-group> <action url="’http://yourserver.com:8080/SASStoredProcess/do’" sas-sso="true">
<!-- Configure the behavior of the execution --> <param name="_action" value="'form,properties,execute,nobanner,newwindow'"/>
<!-- Path to the stored process to execute --> <param name="_program" value="'/Samples/SAS Enterprise Case Management/Stored Process/stored_process_name"/>
<!-- All other parameters are used to initialize the prompts --> <param name="favoriteColor" value=""/> </action>
<!-- The Save action --> <action url="'http://www.google.com/search'" output-destination="inline" trigger="save"> <param name="q" value="'flower'"/> </action></action-group>
The following example demonstrates how to use a value from a drop-down list with a custom action.
Example Code 6.4 Using a Value from a Drop-Down List with a Custom Action
<field name="sourceSystemCd" type="dropdown" default="ECM" visible="false"/> <action-group> <action url="'http://www.google.com/search'"enabled="true"> <label>google search source system code</label> <param name="q"><eval>sourceSystemCd</eval></param> </action></action-group>
Custom Page Builder Components 121

122 Chapter 6 • Using the Custom Page Builder
Chapter 7
Regulatory Reports and E-Filing
Introduction . . . . . . . . . . . . . . . . . . . . . . . . . . . . . . . . . . . . . . . . . . . . . . . . . . . . . . . . . 124
E-Filing Process . . . . . . . . . . . . . . . . . . . . . . . . . . . . . . . . . . . . . . . . . . . . . . . . . . . . . 124
Configuring E-Filing . . . . . . . . . . . . . . . . . . . . . . . . . . . . . . . . . . . . . . . . . . . . . . . . . 125Steps . . . . . . . . . . . . . . . . . . . . . . . . . . . . . . . . . . . . . . . . . . . . . . . . . . . . . . . . . . . . 125Configuring User-Defined Fields . . . . . . . . . . . . . . . . . . . . . . . . . . . . . . . . . . . . . . 125Configuring the UI Definition of the Report Container . . . . . . . . . . . . . . . . . . . . . 126Configure the Report UI Definition . . . . . . . . . . . . . . . . . . . . . . . . . . . . . . . . . . . . 126Configure the Report Workflow Definition . . . . . . . . . . . . . . . . . . . . . . . . . . . . . . 128Configure the E-File UI Definition . . . . . . . . . . . . . . . . . . . . . . . . . . . . . . . . . . . . . 128Enable Report Update in the E-File Stored Process . . . . . . . . . . . . . . . . . . . . . . . . 128
Regulatory Report Form Configuration . . . . . . . . . . . . . . . . . . . . . . . . . . . . . . . . . 128Steps . . . . . . . . . . . . . . . . . . . . . . . . . . . . . . . . . . . . . . . . . . . . . . . . . . . . . . . . . . . . 128Define the Regulatory Report Form in FORM_CONFIG . . . . . . . . . . . . . . . . . . . 129Define the SAS Macro to Generate the Regulatory Report
Form for Regulatory Report Preview . . . . . . . . . . . . . . . . . . . . . . . . . . . . . . . . . 130Define the SAS Macro to Transform Regulatory Report Data
into Regulatory Report Form Data . . . . . . . . . . . . . . . . . . . . . . . . . . . . . . . . . . . 130Define the Regulatory Report Form Layout . . . . . . . . . . . . . . . . . . . . . . . . . . . . . . 131Define the Regulatory Report Form Section Configuration
Data in FORM_PREVIEW_SECTION_CONFIG . . . . . . . . . . . . . . . . . . . . . . . 131Define the Regulatory Report Form Field Configuration Data
in FORM_PREVIEW_FIELD_CONFIG . . . . . . . . . . . . . . . . . . . . . . . . . . . . . . 131Define the SAS Macro to Format Source Data for Form Preview . . . . . . . . . . . . . 132Define the SAS Macro to Generate the E-File . . . . . . . . . . . . . . . . . . . . . . . . . . . . 132Define the SAS Macro to Transform Regulatory Report Data
into E-File-Ready Data . . . . . . . . . . . . . . . . . . . . . . . . . . . . . . . . . . . . . . . . . . . . 133Define the E-File Record Configuration Data in
FORM_EFILE_RECORD_CONFIG . . . . . . . . . . . . . . . . . . . . . . . . . . . . . . . . . 133Define the E-File Field Configuration Data in FORM_EFILE_FIELD_CONFIG 133
Support of Multiple Versions of Report Forms . . . . . . . . . . . . . . . . . . . . . . . . . . . . 134
FINCEN . . . . . . . . . . . . . . . . . . . . . . . . . . . . . . . . . . . . . . . . . . . . . . . . . . . . . . . . . . . . 135
SAR-DI . . . . . . . . . . . . . . . . . . . . . . . . . . . . . . . . . . . . . . . . . . . . . . . . . . . . . . . . . . . . . 136SAR-DI Files . . . . . . . . . . . . . . . . . . . . . . . . . . . . . . . . . . . . . . . . . . . . . . . . . . . . . 136SAR-DI Report UI . . . . . . . . . . . . . . . . . . . . . . . . . . . . . . . . . . . . . . . . . . . . . . . . . 137
CTR . . . . . . . . . . . . . . . . . . . . . . . . . . . . . . . . . . . . . . . . . . . . . . . . . . . . . . . . . . . . . . . 137CTR Files . . . . . . . . . . . . . . . . . . . . . . . . . . . . . . . . . . . . . . . . . . . . . . . . . . . . . . . . 137CTR Report UI . . . . . . . . . . . . . . . . . . . . . . . . . . . . . . . . . . . . . . . . . . . . . . . . . . . . 138
123
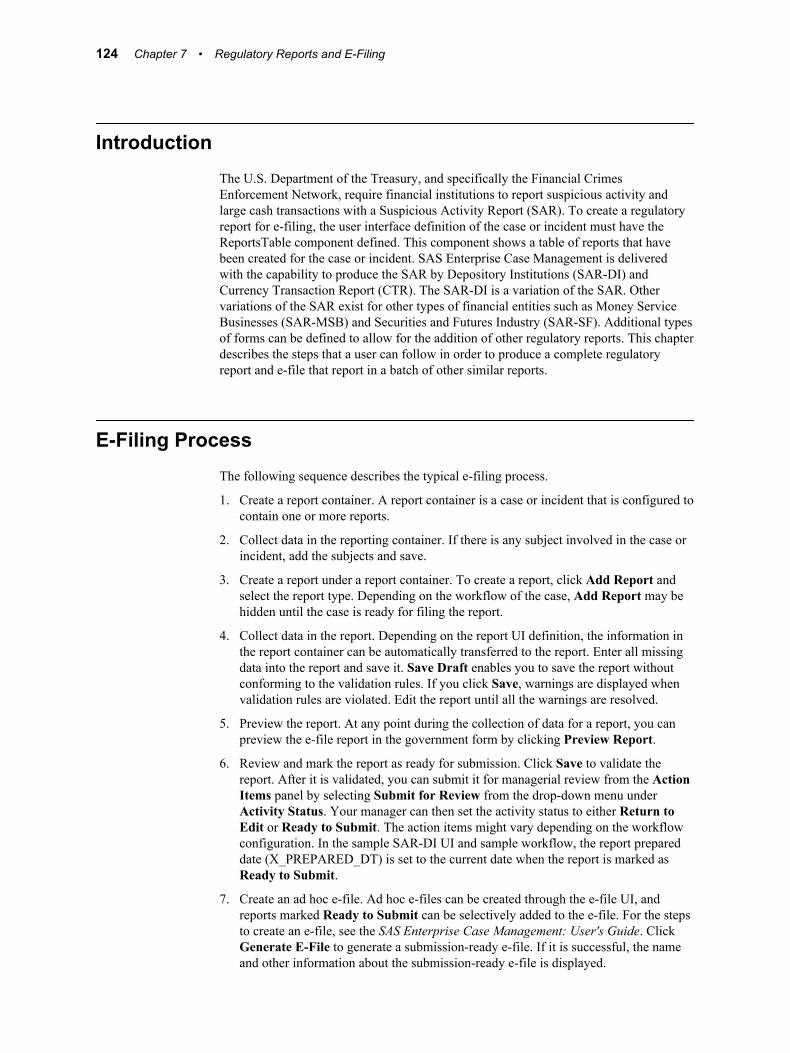
IntroductionThe U.S. Department of the Treasury, and specifically the Financial Crimes Enforcement Network, require financial institutions to report suspicious activity and large cash transactions with a Suspicious Activity Report (SAR). To create a regulatory report for e-filing, the user interface definition of the case or incident must have the ReportsTable component defined. This component shows a table of reports that have been created for the case or incident. SAS Enterprise Case Management is delivered with the capability to produce the SAR by Depository Institutions (SAR-DI) and Currency Transaction Report (CTR). The SAR-DI is a variation of the SAR. Other variations of the SAR exist for other types of financial entities such as Money Service Businesses (SAR-MSB) and Securities and Futures Industry (SAR-SF). Additional types of forms can be defined to allow for the addition of other regulatory reports. This chapter describes the steps that a user can follow in order to produce a complete regulatory report and e-file that report in a batch of other similar reports.
E-Filing ProcessThe following sequence describes the typical e-filing process.
1. Create a report container. A report container is a case or incident that is configured to contain one or more reports.
2. Collect data in the reporting container. If there is any subject involved in the case or incident, add the subjects and save.
3. Create a report under a report container. To create a report, click Add Report and select the report type. Depending on the workflow of the case, Add Report may be hidden until the case is ready for filing the report.
4. Collect data in the report. Depending on the report UI definition, the information in the report container can be automatically transferred to the report. Enter all missing data into the report and save it. Save Draft enables you to save the report without conforming to the validation rules. If you click Save, warnings are displayed when validation rules are violated. Edit the report until all the warnings are resolved.
5. Preview the report. At any point during the collection of data for a report, you can preview the e-file report in the government form by clicking Preview Report.
6. Review and mark the report as ready for submission. Click Save to validate the report. After it is validated, you can submit it for managerial review from the Action Items panel by selecting Submit for Review from the drop-down menu under Activity Status. Your manager can then set the activity status to either Return to Edit or Ready to Submit. The action items might vary depending on the workflow configuration. In the sample SAR-DI UI and sample workflow, the report prepared date (X_PREPARED_DT) is set to the current date when the report is marked as Ready to Submit.
7. Create an ad hoc e-file. Ad hoc e-files can be created through the e-file UI, and reports marked Ready to Submit can be selectively added to the e-file. For the steps to create an e-file, see the SAS Enterprise Case Management: User's Guide. Click Generate E-File to generate a submission-ready e-file. If it is successful, the name and other information about the submission-ready e-file is displayed.
124 Chapter 7 • Regulatory Reports and E-Filing
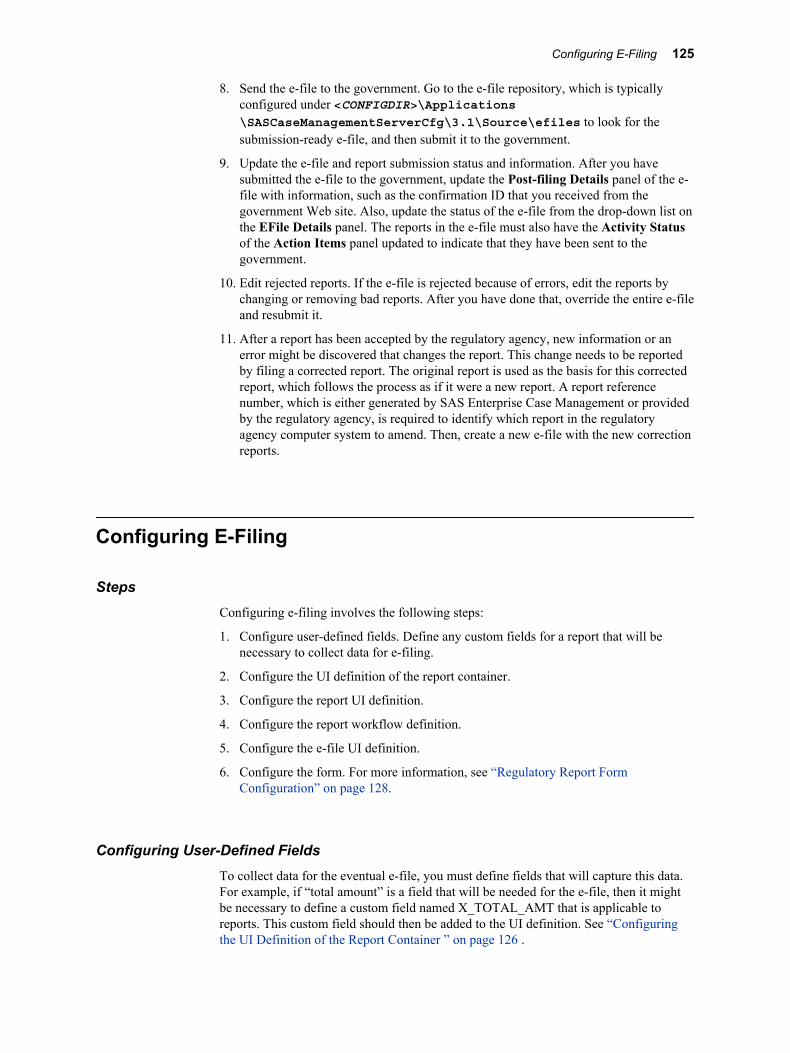
8. Send the e-file to the government. Go to the e-file repository, which is typically configured under <CONFIGDIR>\Applications\SASCaseManagementServerCfg\3.1\Source\efiles to look for the submission-ready e-file, and then submit it to the government.
9. Update the e-file and report submission status and information. After you have submitted the e-file to the government, update the Post-filing Details panel of the e-file with information, such as the confirmation ID that you received from the government Web site. Also, update the status of the e-file from the drop-down list on the EFile Details panel. The reports in the e-file must also have the Activity Status of the Action Items panel updated to indicate that they have been sent to the government.
10. Edit rejected reports. If the e-file is rejected because of errors, edit the reports by changing or removing bad reports. After you have done that, override the entire e-file and resubmit it.
11. After a report has been accepted by the regulatory agency, new information or an error might be discovered that changes the report. This change needs to be reported by filing a corrected report. The original report is used as the basis for this corrected report, which follows the process as if it were a new report. A report reference number, which is either generated by SAS Enterprise Case Management or provided by the regulatory agency, is required to identify which report in the regulatory agency computer system to amend. Then, create a new e-file with the new correction reports.
Configuring E-Filing
StepsConfiguring e-filing involves the following steps:
1. Configure user-defined fields. Define any custom fields for a report that will be necessary to collect data for e-filing.
2. Configure the UI definition of the report container.
3. Configure the report UI definition.
4. Configure the report workflow definition.
5. Configure the e-file UI definition.
6. Configure the form. For more information, see “Regulatory Report Form Configuration” on page 128.
Configuring User-Defined FieldsTo collect data for the eventual e-file, you must define fields that will capture this data. For example, if “total amount” is a field that will be needed for the e-file, then it might be necessary to define a custom field named X_TOTAL_AMT that is applicable to reports. This custom field should then be added to the UI definition. See “Configuring the UI Definition of the Report Container ” on page 126 .
Configuring E-Filing 125

After the custom field is defined and added to the UI definition, values collected for this field will be stored with the report. Refer to the following for sample SAR-DI custom fields and the lookup tables that are useful for the SAR-DI report UI definition, depending on your platform:
• Windows platforms: !SASROOT\casemgmtmva\sasmisc\sample\config\loadrr_config_fincen_base.sas and !SASROOT\casemgmtmva\sasmisc\sample\config\loadrr_config_fincen_sardi.sas
• UNIX platforms: !SASROOT/misc/casemgmtmva/sample/config/loadrr_config_fincen_base.sas and !SASROOT/misc/casemgmtmva/sample/config/loadrr_config_fincen_sardi.sas
For similar CTR samples, refer to the following, depending on your platform:
• Windows platforms: !SASROOT\casemgmtmva\sasmisc\sample\config\loadrr_config_fincen_ctr.sas
• UNIX platforms: !SASROOT/misc/casemgmtmva/sample/config/loadrr_config_fincen_ctr.sas
Configuring the UI Definition of the Report ContainerCases or incidents that can contain reports must be configured to use a UI definition that contains a ReportsTable component. The button for adding a report can be conditionally enabled or disabled based on the evaluation of an expression. This is accomplished by adding a readonly parameter to the ReportsTable component. The following are examples of how to set the readonly parameter based on workflow activity.
<tab id="regulatoryReportTab"> <label><message key="reporting.header.txt" /></label> <field type="component" required="false" component-name="ReportsTable" readonly="!isWorkableActivity('File Report')"> <param name="objectName" value="'RR'" /> <param name="field" value="'RR_ID'" /> <param name="field" value="'RR_DESC'" /> <param name="field" value="'RR_STATUS_CD:RT_RR_STATUS'" /> <param name="field" value="'CREATE_DTTM'" /> </field> </tab>
For more information about ReportsTable definitions, refer to the Custom Page Builder documentation found on the Administration tab of SAS Enterprise Case Management.
Configure the Report UI DefinitionReport UI definitions can gather any user-defined values that are needed, but should have a section that displays or gathers any information needed for the RR_LIVE table entry. They should also contain a History tab section.
The following is a sample report data section:
<tab id="reportTab"> <label><message key="tab.report.details.header.txt" /></label> <column-layout> <column width="50%"> <field name="RR.RR_ID" type="hidden"/> <field name="RR.PARENT_OBJECT_NM" type="hidden"/>
126 Chapter 7 • Regulatory Reports and E-Filing

<field name="RR.RR_DESC" type="string"> <label><message key="field.rr.rr_desc.label.txt" /></label> </field> <field name="RR.RR_STATUS_CD" type="dropdown" readonly="true" values="GetLabelValues('RT_RR_STATUS')"> <label><message key="field.rr.rr_status_cd.label.txt" /></label> </field> <field name="RR.RR_TYPE_CD" type="dropdown" readonly="true" values="GetLabelValues('RT_RR_TYPE')"> <label><message key="field.rr.rr_type_cd.label.txt" /></label> </field> <field name="RR.RR_CATEGORY_CD" type="dropdown" readonly="true" values="GetLabelValues('RT_RR_CATEGORY')"> <label><message key="field.rr.rr_category_cd.label.txt" /></label> </field> <field name="RR.RR_SUBCATEGORY_CD" type="dropdown" readonly="true" values="GetLabelValues('RT_RR_SUBCATEGORY')"> <label><message key="field.rr.rr_subcategory_cd.label.txt" /></label> </field> <field name="RR.CORRECTION_FLG" type="boolean" default="false"> <label><message key="field.rr.x_correct_prior_rpt_flg.label.txt" /> </label> </field> <field name="RR.RR_AGENCY_REF_ID" type="string" readonly="true"> <label><message key="field.rr.rr_agency_ref_id.label.txt" /></label> </field> <field name="RR.X_PREPARED_DT" type="date" readonly ="true"> <label><message key="field.rr.x_prepared_dt.label.txt" /></label> </field> <if test="RR.PARENT_OBJECT_NM = 'CASE'"> <field type="component" name="RR.PARENT_OBJECT_RK"component-name="ReportParentLink"> <label><message key="field.rr.parent_case.label.txt" /></label> </field> </if> <if test="RR.PARENT_OBJECT_NM = 'INCIDENT'"> <field type="component" name="RR.PARENT_OBJECT_RK"component-name="ReportParentLink"> <label><message key="field.rr.parent_incident.label.txt" /></label> </field> </if> </column> </column-layout></tab>
The following is a sample History tab section:
<tab id="historyTab"> <label><message key="tab.report.report.history.header.txt" /></label> <field type="component" component-name="ReportEventTable" /></tab>
For more information about creating UI definitions, see “Overview of the Custom Page Builder” on page 97.
Configuring E-Filing 127
Configure the Report Workflow DefinitionWorkflow can be used to move the report from stage to stage until it is ready to be included in an e-file. After the data for the report has been collected, review and use the workflow component to mark the report as ready for managerial review by selecting Submit for Review from the drop-down menu under Activity Status. Your manager can then set the activity status to either Return to Edit or Ready to Submit.
Configure the E-File UI DefinitionE-files that contain reports must be configured to use a UI definition that contains the EFileReportTable component. This component allows for the updating of the report status. The UI definition also contains the Generate E-file button.
Enable Report Update in the E-File Stored ProcessBased on certain regulatory requirements, during the e-file generation process the ECM Web service might be called to update the reports under the e-file with e-file-related information, such as transaction sequence number and signature date. With only the e-file default transmitter role, the user is not able to update any report. To resolve this issue, choose one of the following two options:
• Add the Edit Report capability to the e-file transmitter role and save the transmitter’s user account and password to the SAS Metadata Server.
• Override the %ECM_WS_SOAP macro to provide a user and password that has the capability to edit reports and e-files. For more information, see “SAS Enterprise Case Management Web Service” on page 185.
Regulatory Report Form Configuration
StepsAs described earlier in this chapter, regulatory report forms must be defined before any regulatory reporting to the government can be done. The complete regulatory report form configuration involves two major setup processes:
1. paper report generation for regulatory report preview
2. electronic file generation for batch e-file submission
ECM 3.1 is shipped with two forms as samples: FINCEN/SAR-DI and FINCEN/CTR. In summary, these are the basic steps for setting up a regulatory report form:
Note: All sample code referenced is based on the March 2011 FINCEN reports.
1. Define the regulatory report form configuration data in FORM_CONFIG.
2. Define the SAS macro to generate the regulatory report form for regulatory report PREVIEW.
3. Define the SAS program to transform the regulatory report data into regulatory report form data.
128 Chapter 7 • Regulatory Reports and E-Filing

4. Define the regulatory report form template.
5. Define the regulatory report form section configuration data in FORM_PREVIEW_SECTION_CONFIG.
6. Define the regulatory report form field configuration data in FORM_PREVIEW_FIELD_CONFIG.
7. Define the SAS macro to format source data for form preview.
8. Define the program to generate the e-file
9. Define the SAS macro to transform the regulatory report data into regulatory report e-file-ready data.
10. Define the e-file record configuration in FORM_EFILE_RECORD_CONFIG.
11. Define e-file field configuration in FORM_EFILE_FIELD_CONFIG.
Define the Regulatory Report Form in FORM_CONFIGA record in FORM_CONFIG is required for each regulatory report form. FORM_CONFIG contains the following columns:
FORM_CONFIG_RKis the unique numeric number to identify the form.
FORM_AGENCY_CDis the unique code to define the government agency that published the form.
FORM_TYPE_CDis the unique code to define the government form published by the agency defined in FORM_AGENCY_CD.
Note: FORM_AGENCY_CD and FORM_TYPE_CD must be unique within the effective date range.
FORM_COUNTRY_CDis the three-character country code of the form.
EFFECTIVE_FROM_DTTMis the start date and time when the form is in use. This field is used for documentation purposes only. It is not used to determine whether the form is effective or not.
EFFECTIVE_TO_DTTMis the end date and time when the form is in use. Use NULL to indicate that the form is the one currently in use.
Note: There can be only one record for FORM_AGENCY_CD and FORM_TYPE_CD with NULL as the EFFECTIVE_TO_DTTM.
FORM_DESCis the form description.
PREVIEW_MIME_TYPE_CDis the standard mimetype of the preview report.
PREVIEW_FILE_PREFIXis the common prefix of all preview templates. For more information, see “Define the Regulatory Report Form Layout” on page 131.
Regulatory Report Form Configuration 129

PREVIEW_DRIVER_PGM_NMis the SAS macro to be called by the ECMRR_PREVIEW stored process. For more information, see “Define the SAS Macro to Generate the Regulatory Report Form for Regulatory Report Preview” on page 130.
PREVIEW_PREPROCESS_PGM_NMis the SAS macro to be called by PREVIEW_DRIVER_PGM_NM for transforming the regulatory report data into form-ready data. For more information, see “Define the SAS Macro to Generate the Regulatory Report Form for Regulatory Report Preview” on page 130.
EFILE_FILE_PREFIXis the name of the output folder that will be used to keep the output e-files.
EFILE_DRIVER_PGM_NMis the SAS macro to be called by ECMRR_EFILE_DRIVER for transforming the regulatory report data into e-file-ready data. For more information, see “Define the SAS Macro to Generate the E-File” on page 132.
EFILE_MAX_RR_CNTis the maximum number of reports that can be added to an e-file without reaching the e-file size limit.
CREATE_USER_IDis the ID of the user who added the record.
CREATE_DTTMis the date and time when the record was added.
UPDATE_USER_IDis the ID of the user who updated the record.
UPDATE_DTTMis the date and time when the record was updated.
DELETE_FLGis the flag indicating whether the record is active.
Define the SAS Macro to Generate the Regulatory Report Form for Regulatory Report Preview
This macro is the driver program that is called by the ECMRR_PREVIEW stored process. The two input parameters are FORM_CONFIG_RK and RR_RK. The output file must be _WEBOUT and a correct mime type must be set. The program should be written in a generic way so that it takes advantage of the information defined in Steps 3 through 6. See ecmrr_prvw_fincen_driver.sas for reference.
Define the SAS Macro to Transform Regulatory Report Data into Regulatory Report Form Data
The purpose of the program is to transform the regulatory report data into a format that is ready to be used for step 5. This works closely with the definition of the mapping defined in “Define the Regulatory Report Form Section Configuration Data in FORM_PREVIEW_SECTION_CONFIG”. See ecmrr_prvw_fincen_sardi.sas for reference.
Note: You must use a valid folder name.
130 Chapter 7 • Regulatory Reports and E-Filing

Define the Regulatory Report Form LayoutDefine the regulatory report form template that controls the layout of the preview report. The form template should contain form field definitions that can be substituted with the actual regulatory report data values. For example, define a PDF form with PDF form fields, or define an HTML form with special field tags. Make sure that the file extension of the form template matches the mime type of the final output. For example, use .pdf for application/pdf. Then, save the template in <CONFIGDIR>/Applications/SASCaseManagementServerCfg/3.1/Source/form_template and specify the file name of the template without the file extension in FORM_CONFIG.PREVIEW_FILE_PREFIX.
For the output involving multiple form templates, define one template for each output section and create with a common file prefix for all the form templates. Then specify only the common file prefix in FORM_CONFIG.PREVIEW_FILE_PREFIX. The file suffix of the form template is defined in FORM_PREVIEW_SECTION_CONFIG.SECTION_FILE_SUFFIX.
Define the Regulatory Report Form Section Configuration Data in FORM_PREVIEW_SECTION_CONFIG
FORM_PREVIEW_SECTION_CONFIG controls the sections of the output file. There should be one record for each regulatory report form template defined in “Define the Regulatory Report Form Layout”. FORM_PREVIEW_SECTION_CONFIG contains the following columns:
FORM_CONFIG_RKis a form key defined in FORM_CONFIG.
FORM_PREVIEW_SECTION_SEQ_NOis the sequence number to uniquely identify the form templates of a form.
FORM_PREVIEW_SECTION_IDis the ID to uniquely identify each form template.
SECTION_DESCis the form template description.
SECTION_ORDER_NOis the order in which the form templates are placed into the final output.
SECTION_FILE_SUFFIXis the suffix of the file name of the form template.
SOURCE_TABLE_NMis the name of the source table to be used to populate the form template. This source table should be a SAS table generated by the program defined in “Define the SAS Macro to Transform Regulatory Report Data into Regulatory Report Form Data” on page 130.
Define the Regulatory Report Form Field Configuration Data in FORM_PREVIEW_FIELD_CONFIG
FORM_PREVIEW_FIELD_CONFIG defines the mapping of the source data fields in FORM_PREVIEW_SECTION_CONFIG.SOURCE_TABLE_NM to the form fields in the form template defined in “Define the SAS Macro to Transform Regulatory Report
Regulatory Report Form Configuration 131
Data into Regulatory Report Form Data” on page 130. There should be one record for each form field in the form template. FORM_PREVIEW_FIELD_CONFIG contains the following columns:
FORM_CONFIG_RKis defined in FORM_PREVIEW_SECTION_CONFIG.
FORM_PREVIEW_SECTION_SEQ_NOis defined in FORM_PREVIEW_SECTION_CONFIG.
FORM_PREVIEW_FIELD_SEQ_NOis the unique sequence number to identify the form fields in the form template.
SOURCE_FIELD_NMis the name of the field in FORM_PREVIEW_SECTION_CONFIG.SOURCE_TABLE_NM to be used for populating the form fields.
SOURCE_FIELD_NUM_FLGindicates whether the source field or the result of the source field expression is numeric or not.
SOURCE_FIELD_EXPis the expression to transform the source field.
TARGET_FIELD_NMis the name of the form field defined in the form template.
TARGET_FIELD_TYPE_CDis the code for each type of form field. A macro program should be written for each TARGET_FIELD_TYPE_CD to transform the data value into the appropriate output format.
TARGET_FIELD_TYPE_PARM_LISTis the list of ‘|’ separated parameters to be passed to the macros defined in “Define the SAS Macro to Format Source Data for Form Preview”.
Define the SAS Macro to Format Source Data for Form PreviewA SAS macro should be written for each unique FORM_PREVIEW_FIELD_CONFIG.TARGET_FIELD_TYPE_CD. The list of parameters should be P1, P2, P3, and so on, depending on the number of parameters defined in FORM_PREVIEW_FIELD_CONFIG.TARGET_FIELD_PARM_LIST. The name of the macro depends on how the driver program is written. For example, in ECMRR_PRVW_FINCEN, the macro name is %ECMRR_FDF_<target_field_type_cd> because ECMRR_PRVW_FINCEN is generating fdf data for the PDF file. %ECMRR_FDF_PGM_GEN should be run whenever FORM_PREVIEW_FIELD_CONFIG is updated.
Define the SAS Macro to Generate the E-FileThis is the driver program that is called by the ECMRR_EFILE stored process. The input parameter is EFILE_RK. The output file must be saved in the folder defined in FORM_CONFIG.EFILE_FILE_NM_PREFIX. The program should be written in a generic way that takes advantage of the information defined in Steps 10 and 11. See ecmrr_efile_fincen_driver.sas for reference.
132 Chapter 7 • Regulatory Reports and E-Filing

Define the SAS Macro to Transform Regulatory Report Data into E-File-Ready Data
The purpose of the program is to transform the regulatory report data into a format that is ready to be used for Step 8. See ecmrr_efile_fincen_sardi.sas for reference.
Define the E-File Record Configuration Data in FORM_EFILE_RECORD_CONFIG
FORM_EFILE_RECORD_CONFIG controls the records of the output file. There should be one record for each record type defined by the government agency. FORM_EFILE_RECORD_CONFIG contains the following columns:
FORM_CONFIG_RKis the form key defined in FORM_CONFIG.
FORM_EFILE_RECORD_SEQ_NOis the sequence number to uniquely identify the record type of an e-file.
FORM_EFILE_RECORD_IDis the ID to be used to uniquely identify the record type of an e-file.
FORM_EFILE_RECORD_DESCis the e-file record description.
RECORD_SORT_ORDER_NOis the order in which the records are placed into the e-file.
RECORD_LENGTH_NOis the e-file record length.
SOURCE_TABLE_NMis the name of the source table to be used to populate the e-file record.
PAGE_BY_FIELD_NMis the name of the field for grouping the depending records together. For FINCEN, the page types are batch, institution, branch, and regulatory report. The fields to identify the page types are Z_<page_type>_SEQ_NO.
Define the E-File Field Configuration Data in FORM_EFILE_FIELD_CONFIG
FORM_EFILE_FIELD_CONFIG defines the mapping of the source data fields in FORM_EFILE_RECORD_CONFIG.SOURCE_TABLE_NM to the target fields in the e-file. FORM_EFILE_FIELD_CONFIG contains the following columns:
FORM_CONFIG_RKis defined in FORM_PREVIEW_SECTION_CONFIG.
FORM_EFILE_RECORD_SEQ_NOis defined in FORM_EFILE_RECORD_CONFIG.
FORM_EFILE_FIELD_SEQ_NOis the unique sequence number to identify the data fields in the e-file.
TARGET_FIELD_START_POS_NOis the start position of the e-file field published by the government agency.
Regulatory Report Form Configuration 133
TARGET_FIELD_END_POS_NOis the end position of the e-file field published by the government agency.
TARGET_FIELD_NMis the name of the e-file field published by the government agency.
TARGET_FIELD_LENGTHis the length of the e-file field published by the government agency.
TARGET_FIELD_DESCis the description of the e-file field published by the government agency.
SOURCE_FIELD_NMis the name of the field in FORM_EFILE_RECORD_CONFIG.SOURCE_TABLE_NM to be used for populating the form fields.
SOURCE_FIELD_NUM_FLGindicates whether the source field or the result of the source field expression is numeric or not.
SOURCE_FIELD_EXPis the expression to transform source fields.
SAS_FORMAT_NMis the name of the SAS format to be used to write the source field or the result of the source field expression. If the field is missing, the default format is used. That means BEST for numeric fields and $ for character fields. The SAS formats used for FINCEN are defined in SAS macro ecmrr_fincen_sas_format.sas.
Support of Multiple Versions of Report FormsSometimes the government makes changes to the form submission requirements. If the changes involve more vigorous validation, the UI definitions should be updated and no new form is required. However, if the changes involve a new preview form or a new e-file layout, a new form should be created with the same FORM_AGENCY_CD and FORM_TYPE_CD.
SAS Enterprise Case Management looks up the FORM_CONFIG table by FORM_AGENCY_CD, FORM_TYPE_CD and EFFECTIVE_TO_DTTM to assign FORM_CONFIG_RK to a newly created report or e-file. All existing reports and e-files have the original FORM_CONFIG_RK. That means SAS Enterprise Case Management continues to generate PREVIEW reports and e-files following the old standard. To avoid mixing reports with different FORM_CONFIG_RK in the same e-file, it is a best practice to finish processing all outstanding reports before starting a new version of the government form.
To add new fields to a report form:
1. Edit the form template. Use an appropriate editor to add new form fields in the template. For a PDF template, Adobe Acrobat Pro software can be used. The template can be found in <CONFIGDIR>\Applications\SASCaseManagementServerCfg\3.1\Source\form_template.
2. Add records to the FORM_PREVIEW_FIELD_CONFIG table to define the mappings of the source data fields to the new preview form fields.
3. Run %ECMRR_FDF_PGM_GEN.
134 Chapter 7 • Regulatory Reports and E-Filing
4. Review or edit the macro for transforming regulatory report source data into regulatory report form data (for example, %ECMRR_PRVW_FINCEN_SARDI_DATA for SARDI) to make sure that the required source fields are derived properly.
5. Edit FORM_EFILE_FIELD_CONFIG to define the new mappings of the source fields to the e-file fields.
6. Review or edit the macro for transforming regulatory report source data into regulatory report e-file data (for example, %ECMRR_EFILE_FINCEN_SARDI_DATA for SARDI) to make sure that the required source fields are derived properly.
7. Run %ECMRR_EFILE_PGM_GEN (FORM_CONFIG_RK=<form_config_rk>) with the correct FORM_CONFIG_RK.
FINCENAs described in the previous sections, SAS Enterprise Case Management is highly configurable to support different regulatory reports. Sample user-defined fields, UI forms, workflows, and SAS macros for FINCEN, SAR-DI, and CTR are shipped in the solution. The following is a summary of the sample files that are common in most FINCEN reports.
File Location
ecmrr_config_fincen_data.sas Windows: !SASROOT\casemgmtmva\sasmisc\sample\config\
UNIX: !SASROOT/misc/casemgmtmva/sample/config
ecmrr_prvw_fincen_*.sas Windows: !SASROOT\casemgmtmva\ucmacros
UNIX: !SASROOT/ucmacros/casemgmtmva
ecmrr_fincen_*.sas Windows: !SASROOT\casemgmtmva\ucmacros
UNIX: !SASROOT/ucmacros/casemgmtmva
ecmrr_efile_fincen_*.sas Windows: !SASROOT\casemgmtmva\ucmacros
UNIX: !SASROOT/ucmacros/casemgmtmva
case-rr-fincen-01.xml Windows: !SASROOT\casemgmtmva\sasmisc\sample\uidef
UNIX: !SASROOT/misc/casemgmtmva/sample/uidef
FINCEN 135

efile-fincen-01.xml Windows: !SASROOT\casemgmtmva\sasmisc\sample\uidef
UNIX: !SASROOT/misc/casemgmtmva/sample/uidef
fincenREPORT.xml Windows: <SASCONFIG>\Lev1\Applications\SASCaseManagementServerCfg\3.1\Source\form_template
UNIX: !SASROOT/misc/casemgmtmva/sample/workflow
SAR-DIThis section provides a summary of the sample files specifically for SAR-DI and instructions for using the UI interface.
SAR-DI FilesThe following files are needed to process the SAR-DI:
File Location
ecmrr_config_fincen_sardi.sas Windows: !SASROOT\casemgmtmva\sasmisc\sample\config\
UNIX: !SASROOT/misc/casemgmtmva/sample/config
ecmrr_prvw_fincen_sardi_*.sas Windows: !SASROOT\casemgmtmva\ucmacros
UNIX: !SASROOT/ucmacros/casemgmtmva
ecmrr_efile_finen_sardi_*.sas Windows: !SASROOT\casemgmtmva\ucmacros
UNIX: !SASROOT/ucmacros/casemgmtmva
rr-fincen-sardi-01.xml Windows: !SASROOT\casemgmtmva\sasmisc\sample\uidef
UNIX: !SASROOT/misc/casemgmtmva/sample/uidef
f9022-47_sardi_*.pdf <SASCONFIG>\Lev1\Applications\SASCaseManagementServerCfg\3.1\Source\form_template
f922-47_sardi_*.csv <SASCONFIG>\Lev1\Applications\SASCaseManagementServerCfg\3.1\Source\form_template
136 Chapter 7 • Regulatory Reports and E-Filing

SAR-DI Report UISAS Enterprise Case Management is used to enter data into several objects required by the SAR-DI form.
SAR-DI requires institution and branch detail information to be reported. Defined in the sample rr-fincen-sardi-01.xml, institution and branch data is available in look-up tables. See “User-Defined Generic Data Tables ” on page 72 for a description of the definition of these tables.
Only the financial institutions and branches that were opened after the report container creation date are available for selection. To see the list of institutions, always save the new report container at least once. When an institution is selected, the institution detail is populated to the report. If a branch is involved, set Branch is involved to Yes to reveal all the branch fields.
Due to the potential length of the branch list, rr-fincen-sardi-01.xml uses the type-ahead feature for branch selection. That means you can type the first few digits of the branch code to shorten the list of available branches. When a branch is selected, the branch and contact information is populated. If necessary, change the contact information.
Note: Branch code is used only for branch look-up. It is not used for e-filing. A sequential number is assigned to each branch and contact combination as branch code when an e-file is generated.
To add suspects to a report, click Add Suspect. A list of subjects associated with the report container is displayed at the top of the suspect UI. If the suspect is a subject of the case or incident, select the subject. All the subject information will be populated to the suspect UI. Enter the missing information or correct the populated content, and click OK.
Note: Suspect information entered in the suspect UI is saved in the report only. It does not affect the subject of the report container. If the suspect is not a subject of the report container, enter the suspect information.
Enter the other information and save the report. For required fields with unknown data, use XX.
CTRThe following is a summary of the sample files specifically for CTR and instructions for using the UI interface.
CTR FilesThe following files are needed to process the CTR:
File Location
ecmrr_config_fincen_ctr.sas Windows: !SASROOT\casemgmtmva\sasmisc\sample\config\
UNIX: !SASROOT/misc/casemgmtmva/sample/config
CTR 137

ecmrr_prvw_fincen_ctr_*.sas Windows: !SASROOT\casemgmtmva\ucmacros
UNIX: !SASROOT/ucmacros/casemgmtmva
ecmrr_efile_finen_ctr_*.sas Windows: !SASROOT\casemgmtmva\ucmacros
UNIX: !SASROOT/ucmacros/casemgmtmva
rr-fincen-ctr-01.xml Windows: !SASROOT\casemgmtmva\sasmisc\sample\uidef
UNIX: !SASROOT/misc/casemgmtmva/sample/uidef
fin104_ctr_*.pdf Windows: <SASCONFIG>\Lev1\Applications\SASCaseManagementServerCfg\3.1\Source\form_template
UNIX: <SASCONFIG>\Lev1\Applications\SASCaseManagementServerCfg\3.1\Source\form_template
fin104_ctr_*.csv Windows: <SASCONFIG>\Lev1\Applications\SASCaseManagementServerCfg\3.1\Source\form_template
UNIX: <SASCONFIG>\Lev1\Applications\SASCaseManagementServerCfg\3.1\Source\form_template
CTR Report UISAS Enterprise Case Management is used to enter data into several objects required by the CTR form.
Similar to SAR-DI, CTR requires institution and branch detail information to be reported. Defined in the sample rr-fincen-ctr-01.xml, institution and branch data is available in look-up tables. See “User-Defined Generic Data Tables ” on page 72 for a description of the definition of these tables.
Only the financial institutions and branches that were opened after the report container creation date are available for selection. To see the list of institutions, always save the new report container at least once. When an institution is selected, the institution detail is populated to the report.
Due to the potential length of the branch list, rr-fincen-ctr-01.xml uses the type-ahead feature for branch selection. That means you can type the first few digits of the branch
138 Chapter 7 • Regulatory Reports and E-Filing
code to shorten the list of available branches. When a branch is selected, the branch detail is populated.
Note: Branch code is used only for branch look-up. It is not used for e-filing. A sequential number is assigned to each branch and contact combination as branch code when an e-file is generated.
To add a transaction owner or transactor, click Add Person. To add an account, click Add Account. Enter the other information, and save the report.
CTR 139

140 Chapter 7 • Regulatory Reports and E-Filing

Chapter 8
Related Items
Overview . . . . . . . . . . . . . . . . . . . . . . . . . . . . . . . . . . . . . . . . . . . . . . . . . . . . . . . . . . . 141
Configuring Match Criteria . . . . . . . . . . . . . . . . . . . . . . . . . . . . . . . . . . . . . . . . . . . . 141
OverviewThis chapter describes how to configure the match criteria that determine which cases and incidents are related to unassigned incidents (incidents not associated with a case). For a description of the process that users follow to find related items, see “Finding Items Related to Unassigned Incidents” in the SAS Enterprise Case Management: User's Guide.
By default, one match criterion (NATIONAL_ID) is defined. You can define additional match criteria when you configure SAS Enterprise Case Management.
Configuring Match CriteriaThe match criteria for related items are defined in ECM_DB.RELATED_ITEM_CONFIG. The following table describes the columns for configuring related items:
Table 8.1 Related Item Configuration Match Criteria
Column Description
RELATED_ITEM_RK Unique key of the matching criterion.
RELATED_ITEM_ID 32-character field to name the matching criterion.
RELATED_ITEM_DESC 100-character fields to describe the matching criterion.
RELATED_PARTY_FIELD_NM Name of the subject field that will be used to match the subjects. It can be any character field in PARTY_LIVE or defined in PARTY_UDF_DEF.
141
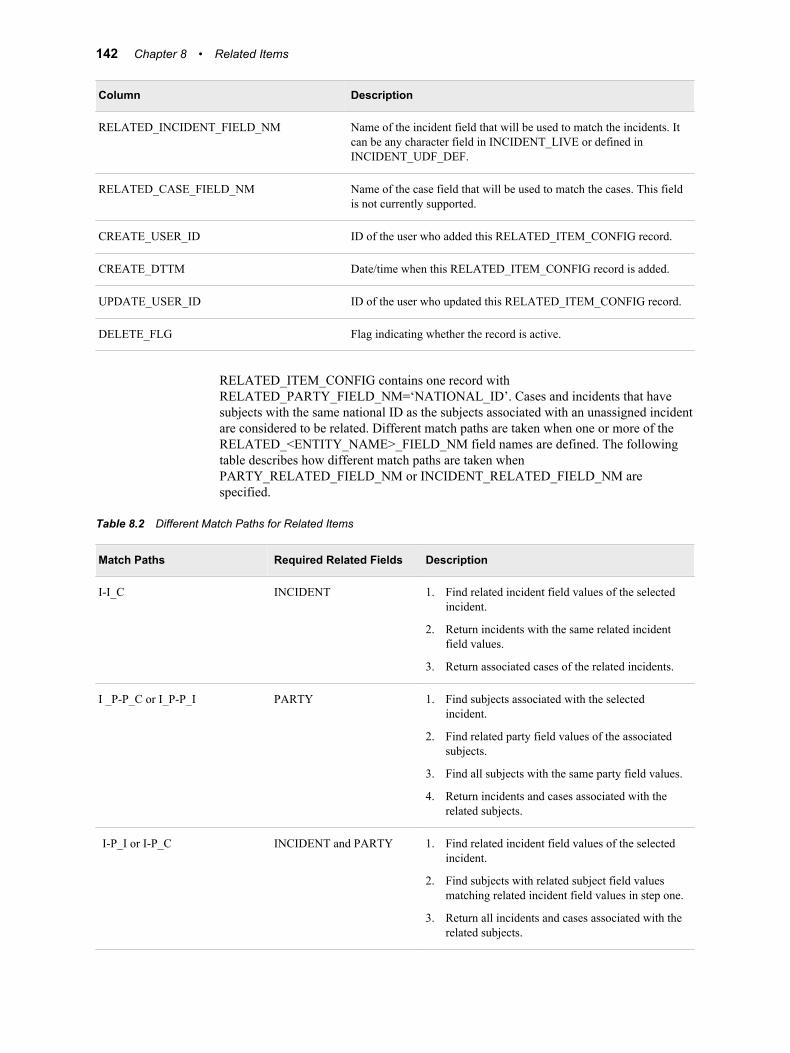
Column Description
RELATED_INCIDENT_FIELD_NM Name of the incident field that will be used to match the incidents. It can be any character field in INCIDENT_LIVE or defined in INCIDENT_UDF_DEF.
RELATED_CASE_FIELD_NM Name of the case field that will be used to match the cases. This field is not currently supported.
CREATE_USER_ID ID of the user who added this RELATED_ITEM_CONFIG record.
CREATE_DTTM Date/time when this RELATED_ITEM_CONFIG record is added.
UPDATE_USER_ID ID of the user who updated this RELATED_ITEM_CONFIG record.
DELETE_FLG Flag indicating whether the record is active.
RELATED_ITEM_CONFIG contains one record with RELATED_PARTY_FIELD_NM=‘NATIONAL_ID’. Cases and incidents that have subjects with the same national ID as the subjects associated with an unassigned incident are considered to be related. Different match paths are taken when one or more of the RELATED_<ENTITY_NAME>_FIELD_NM field names are defined. The following table describes how different match paths are taken when PARTY_RELATED_FIELD_NM or INCIDENT_RELATED_FIELD_NM are specified.
Table 8.2 Different Match Paths for Related Items
Match Paths Required Related Fields Description
I-I_C INCIDENT 1. Find related incident field values of the selected incident.
2. Return incidents with the same related incident field values.
3. Return associated cases of the related incidents.
I _P-P_C or I_P-P_I PARTY 1. Find subjects associated with the selected incident.
2. Find related party field values of the associated subjects.
3. Find all subjects with the same party field values.
4. Return incidents and cases associated with the related subjects.
I-P_I or I-P_C INCIDENT and PARTY 1. Find related incident field values of the selected incident.
2. Find subjects with related subject field values matching related incident field values in step one.
3. Return all incidents and cases associated with the related subjects.
142 Chapter 8 • Related Items

Match Paths Required Related Fields Description
I_P-P_I-I or I_P-P_I-C INCIDENT and PARTY 1. Find subjects associated with the selected incident.
2. Find related party field values of the associated parties.
3. Return incidents with the related incident field values matching related party field values in step two.
4. Return cases associated with the related incidents.
The underscores (_) and hyphens (-) in the match paths represent direct associations and indirect relationships, respectively. I, P, and C in the match paths represent incident, party, and case. If multiple records are defined in RELATED_ITEM_CONFIG, they are handled as an OR condition. In other words, the overall result is a union of the results from each criterion. The following examples show how you can configure a related item to define three match criteria.
Criterion 1: Subject full name matchRelate the subjects who have the same full name as any subject of the selected incident. The subject full name is the core field PARTY_FULL_NM in PARTY_LIVE.
Criterion 2: Account number of incident matchRelate all the incidents that contain transactions with the same account number as that of the selected incident. The account number is defined in INCIDENT_UDF_DEF as UDF_TABLE_NM=X_TRANSACTION and UDF_NM=X_TRANSACTION_ACCT_NO.
Criterion 3: Driver license number of incident and driver license number of subject match
Relate all the incidents that contain transactions with the same driver license number as that of the selected incident. Also relate all the subjects that contain the same driver’s license number as the driver license number of transactions of the selected incident. The subject driver license is defined in PARTY_UDF_DEF as UDF_TABLE_NM=PARTY and UDF_NM=X_DRIVER_LICENSE_ID. The driver license number of an incident is defined in INCIDENT_UDF_DEF as UDF_TABLE_NM=X_TRANSACTION and UDF_NM=X_TRANSACTION_DL.
The following table shows how the RELATED_ITEM_CONFIG might look:
Table 8.3 RELATED_ITEM_CONFIG
RELATED_ITEM_RK RELATED_ITEM_ID
RELATED_ITEM_DESC
RELATED_PARTY_FIELD_NM
RELATED_INCIDENT_FIELD_NM
1 FULL_NAME Subject full name PARTY_FULL_NM
2 ACCT_NO Incident account number
X_TRANSACTION_ ACCT_NO
3 DRIVER_LICENSE Subject and incident driver license
X_DRIVER_ LICENSE_ID
X_ACCOUNT_DL
Configuring Match Criteria 143
Note that the UDF_TABLE_NM is not included in the definition. All UDF fields with the same UDF_NM are used for matching. If that is not what you want, the field should be renamed.
144 Chapter 8 • Related Items

Chapter 9
Financial Items
Overview . . . . . . . . . . . . . . . . . . . . . . . . . . . . . . . . . . . . . . . . . . . . . . . . . . . . . . . . . . . 145
Defining Financial Item Types in a Reference Table . . . . . . . . . . . . . . . . . . . . . . . 145
Defining the UDF for Financial Transactions . . . . . . . . . . . . . . . . . . . . . . . . . . . . . 146
Defining the UDF for Financial Summaries . . . . . . . . . . . . . . . . . . . . . . . . . . . . . . . 146
Adding a FinancialItemsTable Component to a Case or Incident User Interface . . . . . . . . . . . . . . . . . . . . . . . . . . . . . . . . . . . . . . . . . . . . . . . . 146
Defining the Financial Items User Interface . . . . . . . . . . . . . . . . . . . . . . . . . . . . . . 146
Customizing a SAS Stored Process to Compute Financial Summaries . . . . . . . . . 147
OverviewA financial item is a dollar amount associated with a financial item type. SAS Enterprise Case Management displays the list of financial items within a case or incident and aggregates these amounts into financial summaries. This chapter discusses the steps needed to configure SAS Enterprise Case Management to support this feature.
Defining Financial Item Types in a Reference Table
All financial items are classified by the financial item types. Only the financial items with the same financial item type can be aggregated from transactional level to case or incident level. Financial item type can also affect the UI used for data entry. Therefore, it is critical that the right financial item types are defined up front.
Financial item types are specified in REF_TABLE_VALUE with REF_TABLE_VALUE=‘RT_FINANCIAL_ITEM_TYPE’. The program Load_post_install_data.sas provides an example for defining financial item type.
145

Defining the UDF for Financial TransactionsFINANCIAL_ITEM_* tables store the financial items at the transactional level. The core fields are included in FINANCIAL_ITEM_LIVE. New user-defined fields can be defined in FINANCIAL_ITEM_UDF_DEF.
Defining the UDF for Financial SummariesFinancial summaries aggregated from financial transactions should be stored with a case or an incident. Therefore, the numeric user-defined fields specific for total financial amount should be defined in CASE_UDF_DEF or INCIDENT_UDF_DEF, or both.
Adding a FinancialItemsTable Component to a Case or Incident User Interface
For adding the FinancialItemsTable component to a case or incident, see the Custom Page Builder documentation found on the Administration tab of SAS Enterprise Case Management.
Defining the Financial Items User InterfaceSample UI definitions included with SAS Enterprise Case Management include fi-gen-01.xml and fi-sa-01.xml. These UI definitions are used when a user adds a financial item type to a case or incident. The FINANCIAL_ITEM_CONFIG table needs to be configured for each financial item type that you want to add to the system. The fi-gen-01.xml sample is a generic sample that includes base information for each financial item that is added to the database. You can choose to use the samples provided or configure your own files and associate them to the appropriate types. To configure your own, complete the following steps:
1. Enter the appropriate information in the FINANCIAL_ITEM_CONFIG table.
2. Enter the appropriate user-defined fields that will be referenced in the customized financial items UI definition type.
3. Enter the corresponding financial item types in the REF_TABLE_VALUE table.
146 Chapter 9 • Financial Items
Customizing a SAS Stored Process to Compute Financial Summaries
Financial summaries are computed by the ECM_FINANCIAL_SUMMARY_CALC stored process. The Web UI passes the financial transactions as an XML file to the stored process, and the stored process returns the summaries as name-value pairs. For each name-value pair, the name is the name of the field in the UI definition that will be updated. The value must be either a numeric value or “.” (the SAS missing value indicator). “.” is interpreted as 0.0 in the summary. ECM_FINANCIAL_SUMMARY_CALC handles mainly the input and output formatting. The actual computation is done in the %ECM_FIN_SUM_DRIVER macro. This macro first sums up all the numeric columns and creates a table with the total of each financial item type. It then calls the %ECM_FIN_SUM_CUSTOM macro for more complex computation.
To customize the computation, copy ecm_fin_sum_custom.sas from one of the following locations:
• Windows: !SASROOT\casemgmtmva\ucmacros
• UNIX: !SASROOT/ucmacros/casemgmtmva
Paste it to SAS_CONFIG/Applications/SASCaseManagementServerCfg/3.1/Source/ucmacros with the same name. Then modify the section marked with ‘Start custom code’ and ‘End custom code’ in the new macro. All columns created in this macro are passed back to the Web UI as name-value pairs. If the results are not populated properly on the screen, there might be a mismatch of column names in the macro and field names in the case or incident UI.
Customizing a SAS Stored Process to Compute Financial Summaries 147

148 Chapter 9 • Financial Items

Chapter 10
Case Network Analysis
Overview . . . . . . . . . . . . . . . . . . . . . . . . . . . . . . . . . . . . . . . . . . . . . . . . . . . . . . . . . . . 149
Case Network Analysis Process . . . . . . . . . . . . . . . . . . . . . . . . . . . . . . . . . . . . . . . . . 149
Configuring Link Criteria . . . . . . . . . . . . . . . . . . . . . . . . . . . . . . . . . . . . . . . . . . . . . 150
Configuring the Data Source . . . . . . . . . . . . . . . . . . . . . . . . . . . . . . . . . . . . . . . . . . . 152
Configuring Displayed Data Fields . . . . . . . . . . . . . . . . . . . . . . . . . . . . . . . . . . . . . . 152
Configuring Display Labels . . . . . . . . . . . . . . . . . . . . . . . . . . . . . . . . . . . . . . . . . . . . 153
Case Network Analysis Logic . . . . . . . . . . . . . . . . . . . . . . . . . . . . . . . . . . . . . . . . . . 154
OverviewThe Case Network Analysis graph provides a shallow analysis of the parties in the database, looking for parties that are related by demographic data such as national IDs, names, birth dates, and addresses. The Case Network Analysis component enables an investigator to identify a network of related parties and the cases, incidents, and reports that the parties have been involved in. The business motivation is to provide an investigator with a way of stepping back from an individual case and seeing broader patterns of behavior for a single party or a set of closely related parties.
The Case Network Analysis component enables users to generate a graph of a single selected party. After the initial graph has been rendered, an investigator can dynamically explore the network of parties, cases, incidents, and reports by expanding a node in the graph and “walking” to the other objects linked to that one.
This chapter discusses the configuration process for the Case Network Analysis component as well as how to configure the link criteria of the graph and the data fields to be displayed in the graph. Finally, it discusses the logic behind the analysis.
Note: The Case Network Analysis functionality is not available when running with WebSphere Application Server 7 Network Deployment.
Case Network Analysis ProcessThe following steps show the process for defining the Case Network Analysis component:
149

1. The SAS Enterprise Case Management administrator defines the link criteria for Case Network Analysis.
2. The SAS Enterprise Case Management administrator defines the data fields to be displayed in the graph.
3. The user logs on to the SAS Enterprise Case Management Web application to access the Case Network Analysis Web component. Refer to the SAS Enterprise Case Management: User's Guide for instructions on how to do this.
4. The Case Network Analysis Web component passes the surrogate key of the party to the SAS stored process getSocialNetwork.
5. The SAS stored process getSocialNetwork references the link criteria defined in step 1 and returns a list of nodes and links to the Case Network Analysis Web component. The list also contains the node attributes such as node label and tooltips. The content of the tooltip is the concatenation of the data field values of the node. The list of the data fields and other displayed content is configurable and is discussed in “Configuring Displayed Data Fields ” on page 152.
6. The Case Network Analysis Web component displays a Case Network Analysis graph with the resulting nodes and links.
7. If a Case Network Analysis graph is displayed, the user can refer to the SAS Enterprise Case Management: User's Guide to dynamically explore the graph. As the user explores the Case Network Analysis graph, there are two actions that will involve the SAS stored process to get more information from the database.
Show detailsOn any node, the user can double-click or select Detail from the node drop-down menu. The Case Network Analysis Web component passes the node key, note type, and user ID to the SAS stored process getSocialNetworkNodeDetail. getSocialNetworkNodeDetail then returns the node details, based on the user permission and the node type. The Case Network Analysis Web component renders the node details in name-value pairs. Root node details are displayed on the bottom pane and leaf node details are displayed on the right pane. The list of detail fields is configurable and is discussed in “Configuring Displayed Data Fields ” on page 152.
Expand the Case Network Analysis graphUsers can expand the current Case Network Analysis graph by selecting a non-root party to run a new Case Network Analysis. To do that, the user can click on the plus sign (+) of the new party of interest. The Case Network Analysis Web component then passes the surrogate key of the new party to the SAS stored process growSocialNetworkNode. growSocialNetworkNode uses the same logic used by getSocialNetwork to return a list of nodes and links. The Case Network Analysis Web component renders the results by attaching the new nodes and links to the existing Case Network Analysis graph.
Note: The + is always available for the leaf party node, regardless of whether the node can be further expanded or not.
Configuring Link CriteriaTwo tables are used to configure Case Network Analysis link criteria: SNA_CONFIG_MASTER and SNA_CONFIG_DETAIL. SNA_CONFIG_MASTER is the master table for configuring the Case Network Analysis link criteria. Parties are
150 Chapter 10 • Case Network Analysis

considered as linked when one or many of these criteria are met. SNA_CONFIG_DETAIL is the detail definition of SNA_CONFIG_MASTER. It contains one or many records of each SNA_CONFIG_MASTER record. A SNA_CONFIG_MASTER link criterion is considered as met when all of its associated SNA_CONFIG_DETAIL link criteria are met.
The SNA_CONFIG_MASTER table contains the following columns:
SNA_CONFIG_RKis the unique key of the link criterion.
SNA_CONFIG_IDis the 32-character field to name the link criterion.
SNA_CONFIG_DESCis the 100-character field to describe the link criterion.
CREATE_USER_IDis the ID of the user who added the SNA_CONFIG_MASTER record.
CREATE_DTTMis the date and time when the SNA_CONFIG_MASTER record was added.
UPDATE_USER_IDis the ID of the user who updated the SNA_CONFIG_MASTER record.
DELETE_FLGis the flag indicating whether the record is active.
The SNA_CONFIG_DETAIL table contains the following columns:
SNA_CONFIG_RKis the unique key of the link criterion.
SNA_CONFIG_SEQ_NOis the secondary key to uniquely identify a SNA_CONFIG_DETAIL record.
FROM_PARTY_FIELD_EXPis the expression to be used to define FROM_PARTY_FIELD_NM. If blank, FROM_PARTY_FIELD_NM is used for linking parties.
FROM_PARTY_FIELD_NMis the name of the party field for linking parties. This is the 'link from' field.
FROM_PARTY_TABLE_NMis the name of the table where FROM_PARTY_FIELD_NM is found.
TO_PARTY_FIELD_EXPis the expression used to define TO_PARTY_FIELD_NM. If blank, TO_PARTY_FIELD_NM is used for linking parties.
TO_PARTY_FIELD_NMis the name of the party field for linking parties. This is the 'link to' field.
TO_PARTY_TABLE_NMis the name of the table where TO_PARTY_FIELD_NM is found.
The expression defined in FROM_PARTY_FIELD_EXP or TO_PARTY_FIELD_EXP must be a valid SAS expression. If you have very complicated logic, you might consider using PROC FCMP to create some user-defined functions. In SAS Enterprise Case Management, there is one record in SNA_CONFIG_MASTER and two associated records in SNA_CONFIG_DETAIL. The definition is for linking the parties when both the NATIONAL_ID_TYPE_CD and NATIONAL_ID fields match. Additional definitions can be found in the following locations:
Configuring Link Criteria 151

Platform Directory Path
Windows !SASROOT\SASFoundation\9.3\casemgmtmva\sasmisc\sample\config\load_post_install_data.sas.
UNIX !SASROOT/SASFoundation/9.3/misc/casemgmtmva/sample/config/load_post_install_data.sas.
Configuring the Data SourceCase Network Analysis involves the matching of subject data to the entire subject database. If your site has too many subjects, the browser may time out before the analysis is complete. To work around this performance problem, SAS Enterprise Case Management can be configured to use the report mart (such as tables in ECM_RPT) for subject matches. This is done by setting the global macro variable ECM_SNA_MATCH_LIB, which is defined in ecm_global_mvar.sas, to ‘ECM_RPT’. This eliminates the need for transforming the live data into an analysis-ready format. This option affects the data source for matching the subject only, in order to speed up the match process. All labels and case, incident, subject, and report associations are still obtained from the live tables. Also, all derived fields that are defined in SNA_CONFIG_DETAIL, as described in “Configuring Link Criteria ” on page 150, have to be added to the report mart. If they do not exist in the report mart, the SNA match criteria should be disabled by setting DELETE_FLG=’1’.
Configuring Displayed Data FieldsThe SAS macro %ECM_SNA_GET_DETAIL_NODE_VARS defines the list of data fields to be used for node labels, node tooltips, and node details.
The following macro variables define the fields to be used as node labels in the graph:
• CASE_LABEL_VAR
• PARTY_LABEL_VAR
• INCIDENT_LABEL_VAR
• RR_LABEL_VAR
When the user has Write permission to the party, case, incident, and report record in the rest of the SAS Enterprise Case Management system, <node_type>_LABEL_VAR is used. If the user has only Read permission, <node_type>_ID is used. For information about how the user group permissions work, see “Configurations” on page 74, and refer to the appropriate subsection. The node label is limited to one field in <node type>_LIVE or user-defined fields in ECM_DB.<node type>_UDF_DEF. UDF_TABLE_NM equals <node_type>.
The following macro variables define the list of data fields to be included in the Detail tab. The order of the field list here is used for the initial display of the fields in the Node Detail tab. Users can change the fields to alphabetical order by clicking the column headings.
152 Chapter 10 • Case Network Analysis

• PARTY_VAR_LIST_FULL
• INCIDENT_VAR_LIST_FULL
• CASE_VAR_LIST_FULL
• RR_VAR_LIST_FULL
• PARTY_VAR_LIST_SHORT
• INCIDENT_VAR_LIST_SHORT
• CASE_VAR_LIST_SHORT
• RR_VAR_LIST_SHORT
When the user has Write permission to the party, case, incident, or report record in the rest of the SAS Enterprise Case Management system, <node_type>_VAR_LIST_FULL is used. If the user has only Read permission, <node_type>_VAR_LIST_SHORT is used.
The following macro variables define the lists of data fields to be included in the party, incident, case, or report tooltips, respectively:
• PARTY_TOOLTIP_VAR_LIST
• INCIDENT_TOOLTIP_VAR_LIST
• CASE_TOOLTIP_VAR_LIST
• RR_TOOLTIP_VAR_LIST
Tooltip fields are limited to the ECM_DB.PARTY_LIVE, ECM_DB.INCIDENT_LIVE, ECM_DB.CASE_LIVE, or ECM_DB.RR_LIVE tables respectively. Unlike other displayed fields, user permission is not checked for tooltip content. Make sure that non-sensitive data fields are used in the tooltips.
Configuring Display LabelsThree types of labels are used in Case Network Analysis.
• Data column labels are defined in the custom.properties file and the content is populated into ECM_DB.FULL_ECM_COLUMN_LABEL_VIEW. These labels are used in the Node Detail tab.
• Match labels are defined in ECM_DB.FULL_REF_LABEL_TRANS with REF_TABLE_NAME=”SNA_CONFIG_MASTER”. Match labels are displayed as subject-to-subject link labels in the graph.
• Detail tab headers and column headings are defined in sashelp.entcm with key=GEN_<various types>_LABEL (for example, GEN_FIELD_LABEL and GEN_CASE_LABEL).
For information about updating the labels, see Chapter 13, “Internationalization,” on page 163.
Configuring Display Labels 153

Case Network Analysis Logic%ECM_SNA_DRIVER is the driver program for obtaining the nodes and links of the Case Network Analysis graph. The following process is used for the logic behind the analysis.
1. Include only the active link criteria in SNA_CONFIG_MASTER.
2. Include all parties for matching. To include only the parties that are associated with one or more cases or incidents, change the macro variable ASSOCIATED_PARTY_ONLY_YN in ECM_SNA_DRIVER from N to Y.
3. Transform the party data in step 2 into rectangle structure to include all core and UDF fields into one record.
4. Create views of the party data with derived fields defined in SNA_CONFIG_DETAIL.
5. For each active link criterion defined in SNA_CONFIG_MASTER, find the parties who are related to the root party by matching all data fields (that is, FROM_PARTY_FIELD_NM and TO_PARTY_FIELD_NM) defined in SNA_CONFIG_DETAIL.
6. Combine all the related parties found in step 5 to form the combined list of related parties.
7. Combine the list of associated cases of the related parties in step 6 with the list of associated cases of the related parties’ associated incidents in step 6 to form the final list of case nodes.
8. Combine the list of the associated incidents of the cases in step 7 with the list of associated incidents of the related parties in step 5 to form the final list of incident nodes.
9. Obtain the list of associated parties of the cases and incidents in steps 7 and 8 and add this list of associated parties to the related parties list in step 6 to form the final list of party nodes.
10. Construct the links of the nodes based on their relationships found in steps 6, 7, 8, 9, and 10.
154 Chapter 10 • Case Network Analysis
Chapter 11
Configuring Subject Search
Overview . . . . . . . . . . . . . . . . . . . . . . . . . . . . . . . . . . . . . . . . . . . . . . . . . . . . . . . . . . . 155
Subject Search Process . . . . . . . . . . . . . . . . . . . . . . . . . . . . . . . . . . . . . . . . . . . . . . . . 155
Configuring Match Criteria for Subject Search . . . . . . . . . . . . . . . . . . . . . . . . . . . 155
Subject Search Logic . . . . . . . . . . . . . . . . . . . . . . . . . . . . . . . . . . . . . . . . . . . . . . . . . 156
OverviewThis chapter describes how to configure and use the Subject Search component. Then it explains in detail how to configure the match criteria of the graph and the data fields to be displayed in the graph. Finally, it discusses the logic behind the search.
Subject Search Process1. An administrator defines the match criteria for Subject Search.
2. A user passes an XML file with the subject information to the SAS Enterprise Case Management Subject Search Web service.
3. SAS Enterprise Case Management Subject Search Web service calls the ecm_subject_search stored process and reports the match results.
Configuring Match Criteria for Subject SearchThere are two tables for configuring Subject Search match criteria. SUBJSRCH_CONFIG_MASTER is the master table for configuring the Subject Search match criteria. Subjects are considered as matched when one or many of these criteria are met. SUBJSRCH_CONFIG_DETAIL is the detail definition of SUBJSRCH_CONFIG_MASTER. It contains one or many records of each SUBJSRCH_CONFIG_MASTER record. A SUBJSRCH_CONFIG_MASTER match criterion is considered as met when all of its associated SUBJSRCH_CONFIG_DETAIL match criteria are met.
155

For details about SUBJSRCH_CONFIG_MASTER and SUBJSRCH_CONFIG_DETAIL, see the SAS Enterprise Case Management: Data Dictionary.
The expressions defined in FROM_PARTY_FIELD_EXP and TO_PARTY_FIELD_EXP must be valid SAS expressions. If you have very complicated logic, you might consider using PROC FCMP to create user-defined functions.
By default, there is one record in SUBJSRCH_CONFIG_MASTER and two associated records in SUBJSRCH_CONFIG_DETAIL. The definition is for matching subjects when both the NATIONAL_ID_TYPE_CD and NATIONAL_ID fields match. Additional definitions can be found in !SASROOT\casemgmtmva\sasmisc\sample\config\load_post_install_data.sas for Windows platforms or !SASROOT/misc/casemgmtmva/sample/config/load_post_install_data.sas for UNIX platforms. Eight matching criteria are defined in the sample.
Subject Search Configuration ID Matched fields Description
P_ADDRESS PARTY.X_PRIMARY_ADDRESS_1_TXT+PARTY.X_PRIMARY_ ADDRESS_2_TXT, PARTY.X_PRIMARY_CITY_NM PARTY.X_PRIMARY_POSTAL_CD
Match by primary address. A SAS expression is used to concatenate two street address lines into one.
PASSPORT_ID PARTY.X_PASSPORT_ID Match by passport ID.
DRIVER_ID PARTY.X_DRIVER_LICENSE_ID Match by driver license ID.
HOME_PHONE PARTY.X_HOME_PHONE_NO Match by home phone number.
WORK_PHONE PARTY.X_WORK_PHONE_NO Match by work phone number.
CELL_PHONE PARTY.X_CELL_PHONE_NO Match by cell phone number.
EMAIL X_PARTY_EMAIL.X_PARTY_EMAIL Match by any e-mail addresses that party has.
L_NM_B_DT PARTY.X_LAST_NM PARTY_X_BIRTH_DT
Match by party last name and birth date.
Subject Search LogicThe driver program %ECM_SUBJSRCH_DRIVER obtains the matches of subject search. Below is the summary of the logic behind it.
1. Include only the active match criteria in SUBJSRCH_CONFIG_MASTER.
2. Transform the party data in step 2 into rectangle structure to include all core and UDF fields into one record.
156 Chapter 11 • Configuring Subject Search

3. Create views of the party data with derived fields defined in SUBJSRCH_CONFIG_DETAIL.
4. For each active match criteria defined in SUBJSRCH_CONFIG_MASTER, find the parties who are related to the input parties by matching all data fields (for example, FROM_PARTY_FIELD_NM and TO_PARTY_FIELD_NM) defined in SUBJSRCH_CONFIG_DETAIL.
5. Return the list of parties and the SUBJSRCH_CONFIG_ID for each input party. If no match is found, return only the SEARCH_RK.
6. If the program aborts for any reason, return keyword ABORT.
Subject Search Logic 157

158 Chapter 11 • Configuring Subject Search

Chapter 12
Report Mart
SAS Enterprise Case Management Report Mart . . . . . . . . . . . . . . . . . . . . . . . . . . 159
SAS Enterprise Case Management Report MartTo facilitate user-defined columns and user-defined reference tables, much of the data for SAS Enterprise Case Management and configuration data is stored in “tall skinny” data tables. SAS Enterprise Case Management provides a facility to pivot “tall skinny” data tables into “short wide” data tables for easier reporting. The ECM_RPT library stores the normalized pivoted data. It also keeps the data that is specific for generating SAR e-files in batch.
Data tables in the ECM_RPT library can be created (or re-created) by running %ECM_REPORTING_DRIVER with ecm_autoexec.sas under SAS_CONFIG/Applications/SASCaseManagementServerCfg/3.1/Source. The data tables in this library contain only the current revision of each record (no historical revisions). You can run the %ECM_REPORTING_DRIVER macro nightly or whenever you need to run reports against this library.
%ECM_REPORTING_DRIVER is the driver program for six major macro calls. Calls in %ECM_PIVOT_DATATYPE create pivoted data tables for cases, parties, incidents, generic data, reports, and financial items respectively. %ECM_PIVOT_REF creates user-defined reference tables. A PROC COPY call copies all the ECM relationship tables from ECM_DB to ECM_RPT.
Note: In PROC COPY, the table names in the SELECT statement must be uppercase to facilitate the search of SQLServer tables.
Here is a summary of the derived tables in the ECM_RPT library that are generated by %ECM_REPORTING_DRIVER.
Table 12.1 Derived Tables in the ECM_RPT Library
Table Description
CASE_PIVOT This is a derived case table with user-defined columns added.
PARTY_PIVOT This is a derived party table with user-defined columns added .
159

Table Description
INCIDENT_PIVOT This is a derived incident table with user-defined columns added.
FINANCIAL_ITEM_PIVOT This is a derived financial item table with user-defined columns added.
RR_PIVOT This is a derived regulatory report table with user-defined columns added.
CASE_X_PARTY This is a direct copy of ECM_DB.CASE_X_PARTY.
CASE_X_USER_GROUP This is a direct copy of ECM_DB.CASE_X_USER_GROUP.
INCIDENT_X_PARTY This is a direct copy of ECM_DB.INCIDENT_X_PARTY.
INCIDENT_X_USER_GROUP This is a direct copy of ECM_DB.INCIDENT_X_USER_GROUP.
PARTY_X_USER_GROUP This is a direct copy of ECM_DB.PARTY_X_USER_GROUP.
<C/I/P/G/F/R>_X_ These are derived tables for all user-defined columns that can have more than one value selected or specified.
• C = case
• I = incident
• P = party
• G = generic data
• F = financial item
• R = reports
For example, e-mail addresses of subjects will be P_X_PARTY_EMAIL.
X_RT_ These are derived tables for all user-defined reference tables, such as X_RT_ID_TYPE. Derived tables for all in-product reference tables include the following:
• RT_CASE_CATEGORY
• RT_CASE_STATUS
• RT_CASE_TYPE
• RT_PARTY_CATEGORY
• RT_PARTY_TYPE
• RT_INCIDENT_CATEGORY
• RT_INCIDENT_TYPE
• RT_SOURCE_SYSTEM
160 Chapter 12 • Report Mart

SAS has a limit of 32,767 characters for column width. Since the LNGVARCHAR UDF field can be longer than 32,767 characters, the pivot macro reads the <data_object>_UDF_LGCHAR_VIEW instead of <data_object>_UDF_LGCHAR_VALUE to get the field values. In the view, the LNGVARCHAR UDF field is broken into two 32,760–character fields to accommodate UTF-8 codes. The field value columns are called UDF_VALUE_1 and UDF_VALUE_2. In the resulting table, the field names are suffixed with ‘_1’ and ‘_2’. For example, in the sample SAR UDF definition, there is an LNGVARCHAR field called X_ACTIVITY_DESC_LONG_TXT. It is broken into X_ACTIVITY_DESC_LONG_TXT_1 and X_ACTIVITY_DESC_LONG_TXT_2 in the ECM_RPT.RR_PIVOT table.
SAS Enterprise Case Management Report Mart 161

162 Chapter 12 • Report Mart
Chapter 13
Internationalization
Overview . . . . . . . . . . . . . . . . . . . . . . . . . . . . . . . . . . . . . . . . . . . . . . . . . . . . . . . . . . . 163
Specify the Database Character Encoding . . . . . . . . . . . . . . . . . . . . . . . . . . . . . . . . 163
SAS Session Encoding Consideration and DBCS Support . . . . . . . . . . . . . . . . . . . 164
Default Encoding for Databases Supported by SAS Enterprise Case Management . . . . . . . . . . . . . . . . . . . . . . . . . . . . . . . . . . . . . . . . . . 165
Restricting the Maximum Length of VARCHAR Fields . . . . . . . . . . . . . . . . . . . . 165
Naming Conventions for Locales . . . . . . . . . . . . . . . . . . . . . . . . . . . . . . . . . . . . . . . 166
Create and Use Custom Translated Messages . . . . . . . . . . . . . . . . . . . . . . . . . . . . . 166
Localizing Custom Table Labels and Column Labels . . . . . . . . . . . . . . . . . . . . . . . 167
Localizing Reference Tables . . . . . . . . . . . . . . . . . . . . . . . . . . . . . . . . . . . . . . . . . . . 167
Localizing Workflow Activities and Statuses . . . . . . . . . . . . . . . . . . . . . . . . . . . . . . 168
OverviewThe default language used in SAS Enterprise Case Management is English. This chapter discusses the processes related to configuring SAS Enterprise Case Management for use with other languages.
Specify the Database Character EncodingThis section applies only if you are using SAS Enterprise Case Management with an Oracle or PostgreSQL database. If you are using a Microsoft SQL Server database, the database will automatically use a UTF-16 encoding for all string data.
Before you install SAS Enterprise Case Management, you must decide which database character encoding to use for your environment. Determining an appropriate encoding to use for your SAS Enterprise Case Management database is dependent upon the following:
• the languages that the application needs to support now.
• the languages that the application needs to support in the future.
163

• consideration of the performance implications associated with choosing a database character set. For example, a single-byte character set provides better performance when compared with multi-byte character sets. Single-byte character sets also tend to take up less space in your environment. However, they offer only restricted multilingual support.
The character set that you choose affects what type of encoding scheme is used. For example:
Scenario 1If you need to support English, French, and Portuguese languages, then single-byte, 8-bit encoding schemes are appropriate because they define up to 256 characters and can often support a group of related languages. One example is the ISO 8859-1 character set, which supports many Western European languages. For Oracle databases, you could also use the WE8ISO8859P1 character set. When you use a character set that supports a group of languages, your database has restricted multilingual support.
Scenario 2If you need to support double-byte character languages (for example, Japanese, Chinese, or Korean), then you can use legacy ANSI-based double-byte character set (DBCS) encodings such as shift-jis, gbk, krc, or big5. By using these encodings, you can use one DBCS language and English (for example, Japanese and English).
Scenario 3If you need to accommodate data for multiple DBCS languages (for example, Japanese and Korean), DBCS languages with European languages (for example, Chinese with French), or Western and Central European languages (for example, German and Polish), then you must use Unicode (UTF-8) encoding. If you are using an Oracle database, then you can also use the AL32UTF8 character set, which is based on the Unicode UTF-8 character set.
SAS Session Encoding Consideration and DBCS Support
If your database encoding supports multiple DBCS languages, then you must also use UTF-8 for the SAS session encoding. For example, if you use SAS to produce reports that contain data for multiple languages, then you must specify UTF-8 for the SAS session encoding. If you need to support one double-byte language and English, then you must also use a DBCS encoding for the SAS session encoding.
Although DBCS encoding is supported in SAS, SAS tables are still ASCII based. That means any column defined in SAS tables needs to be doubled in length. For example, if X_BRANCH_ADDRESS_TXT is defined as follows in ECM_DB.CASE_UDF_DEF, the field length of X_BRANCH_ADDRESS_TXT in the SAS table should be 200.
UDF_TABLE_NM='CASE'UDF_NM= 'X_BRANCH_ADDRESS_TXT'UDF_TYPE_NM= 'VARCHAR'UDF_DESC= 'Branch address where activity occurred'MAX_CHAR_CNT= 100
This requirement affects the creation of the SAS Enterprise Case Management report mart and stored processes that process data in SAS tables. SAS Enterprise Case Management 3.1 does not handle this situation properly. As a result, data can be truncated in the ECM_RPT tables and in the Case Network Analysis node detail UI. To
164 Chapter 13 • Internationalization
work around this limitation, a proper length multiplier has to be set. The global macro variable ecm_charMultiplier is defined for this purpose. Refer to the comment in the ecm_global_mvar macro to set its correct value.
Default Encoding for Databases Supported by SAS Enterprise Case Management
The !SASROOT\casemgmtmva\sasmisc\sample\dbscript directory, for Windows platforms, contains database-specific subdirectories that include scripts for the following databases:
Note: For UNIX platforms, the directory is !SASROOT/misc/casemgmtmva/sample/dbscript.
• Oracle
• PostgreSQL
• SQLServer
Within these database-specific directories, database scripts are provided that enable you to create and initialize your SAS Enterprise Case Management database. The Oracle and SQL Server scripts create the schema instead of the database, so an encoding is not specified in these scripts. By default, the PostgreSQL scripts use UTF-8 encoding. If you are using PostgreSQL on Windows for double-byte character languages, such as Japanese, Chinese, or Korean, then you might need to update the character set encoding value that is used in the PrepareDatabase script. For example, to specify a character set encoding to use the extended UNIX code for the Korean language, you can customize the PostgreSQL scripts as follows:
1. Open the PrepareDatabase script in a text editor. This file is located in one of the following directories, depending on your platform:
• Windows: !SASROOT\casemgmtmva\sasmisc\sample\dbscript\PostgreSQL
• UNIX: !SASROOT/misc/casemgmtmva/sample/dbscript/PostgreSQL
2. Change the -E UNICODE option to -E EUC_KR.
Restricting the Maximum Length of VARCHAR Fields
If you are using a multi-byte character set encoding, it is recommended that you restrict the maximum length of any VARCHAR fields in your Custom Page Builder UI definition files to 1000 characters. The recommended maximum field length that you should set for the VARCHAR fields property is as follows:
Restricting the Maximum Length of VARCHAR Fields 165
Database Maximum Field Length for VARCHAR fields property
Oracle If your Oracle database is using AL32UTF8 encoding, then the CHAR data type can hold up to 4 bytes. The SAS Enterprise Case Management tables use the VARCHAR2 data type. SAS Enterprise Case Management specifies the number of characters, and then Oracle handles how to translate the number of bytes. However, Oracle has a maximum limit of 4000 bytes on the VARCHAR data type. Therefore, it is recommended that you restrict VARCHAR field lengths to 1000. If you are using English or other single-byte character sets (for example, WE8ISO8859P1), then you can extend the size to 4000.
PostgreSQL 4000 characters.
SQL Server 1000 characters.
Naming Conventions for LocalesWhen the translation of an object is loaded, the locale that is associated with that translation must follow the standard Java naming convention for locales. The naming convention for locales requires that the language code must be a lowercase two-letter code from the ISO 639 specification and that the country code must be an uppercase two-letter code from ISO 3166. For example, fr is the language code for French; en is the language code for English. For more information, see the following Web site: http://java.sun.com/developer/technicalArticles/J2SE/locale.
The macro variables LOCALE_SAS and LOCALE_DEF in SAS_CONFIG/Applications/SASCaseManagementServerCfg/3.1/Source/control/
ecm_autoexec.sas are used to define the SAS session locale and the default locale when text in the SAS session locale is not available. These macro variables are initialized as follows:
%let locale_sas=%SYSFUNC(getpxlocale()) ;
%let locale_default=%substr(&locale_sas,1,2);
If you want to set the SAS session locale to German, change
‘%let locale_sas=%SYSFUNC(getpxlocale()) ; ‘
to
‘ %let locale_sas=de_DE ;’
Create and Use Custom Translated MessagesAll SAS macros and stored processes in SAS Enterprise Case Management make use of the SASMSG function to retrieve translated log messages based on the locale of the server. To localize these strings, you can use the %SMD2DS macro to add messages that can be used by the SASMSG function. For the syntax of the %SMD2SD and SASMSG functions, see Appendix 3, “SASMSG and %SMD2DS,” on page 199. The message file that SAS Enterprise Case Management uses is sashelp.entcm.
166 Chapter 13 • Internationalization

To set the locale of the ECM SAS server, change the value of the LOCALE_SAS macro variable to the desired locale in SAS_CONFIG\Applications\SASCaseManagementServerCfg\3.1\Source\control
\ecm_autoexec.sas.
For example:
%let locale_sas=DE; /* for German */
Restart the SAS object spawner to put this into effect.
Localizing Custom Table Labels and Column Labels
SAS Enterprise Case Management stores table labels and columns labels in the case management database to guarantee consistent terminology across the Web application and SAS code. The data stored in the label translation tables is generated by a batch process that reads the application's standard Java resource bundles and the custom resource bundles, and then stores the appropriate data in the label translation tables.
Labels for table and column names are determined by a translation key naming convention. In most cases, labels can be defined for a standard or custom table or column by naming the translation key table.tableNm.label.txt or field.tableNm.columnNm.label.txt, respectively. For example, table.x_party_alias.label.txt provides the label for the X_PARTY_ALIAS user-defined table and field.x_party_alias.x_alias_nm.label.txt provides the label for the X_PARTY_ALIAS_NM column in that table.
There is also support for differentiating the labels based on the entity type. For example, if a situation arises where tables and columns with the same name need to have different labels or translations for cases and incidents, then the naming convention is extendable to include the entity name in the key name. For example, if both case and incident tables define a custom table named TAGS with a field named TAG_NM, they can have different table labels by defining table.case.tags.label.txt = Case Tags and table.incident.tags.label.txt = Incident Tags.
Anytime a custom resource bundle is uploaded with a new translation for one of the table or column labels, the values in the label translation tables need to be recomputed. To recompute those tables, an application administrator should perform the following steps:
1. Log on to SAS Enterprise Case Management.
2. Click the Administration tab.
3. Click Refresh Report Mart Labels.
For more information about custom resource bundles, see “Custom Resource Bundles” on page 79.
Localizing Reference TablesREF_TABLE_VALUE is the main table for defining code description in the default locale. The following tables are for supporting multiple languages.
Localizing Reference Tables 167

REF_TABLE_TRANSholds the translations for all the codes in REF_TABLE_TRANS.
ECM_LOCALEholds the list of supported locales along with instructions for which locale to use if there is no translation for that locale.
FULL_REF_TABLE_TRANS is a view that corresponds to a cross product of the REF_TABLE_VALUE table and the ECM_LOCALE table. Each row would hold the proper translation for that supported locale. The following is an example of a SAS program to set the priority look-up table in German:
proc sql;
insert into ecm_db.ecm_locale values ('de','def'); delete from ecm_db.ref_table_trans where ref_table_nm='X_RT_PRIORITY' and locale='de';
insert into ecm_db.ref_table_trans values ('X_RT_PRIORITY', 'H', 'de', ' hoch'); insert into ecm_db.ref_table_trans values ('X_RT_PRIORITY', 'M', 'de', ' mittler'); insert into ecm_db.ref_table_trans values ('X_RT_PRIORITY', 'L', 'de',’ niedrig’);
Localizing Workflow Activities and StatusesIn SAS Enterprise Case Management, the names of workflow activities and statuses can be localized by performing the following steps:
1. From the New Data Object dialog box, or the Edit dialog box of an existing object,
click next to either the Data Object Label or Description field.
2. Specify the resource bundle key in the Localization Key field, and click OK.
3. Include translations for that key in the appropriate custom properties files and upload the modified custom properties file to the server (for example, ecm.sample.workflow.status.open.txt = Open).
If a key is specified in the workflow, but no translation is found, the name of the activity or status will be used.
168 Chapter 13 • Internationalization

Chapter 14
Adding Custom SAS Code
Adding Custom SAS Code . . . . . . . . . . . . . . . . . . . . . . . . . . . . . . . . . . . . . . . . . . . . . 169
Adding Custom SAS CodeAn existing SAS macro can be overridden by adding a SAS macro program in SAS_CONFIG/Lev1/Applications/SASCaseManagementServerCfg/3.1/Source/ucmacros with the same filename. You can also add a new macro and save it in the same location. Here are some tips for writing your own code.
1. The following statement should be added to the beginning of the program if it is not being called by any calling program.
%inc ‘SAS_CONFIG/lev1/Applications/SASCaseManagementServerCfg/3.1/Source/control/ecm_autoexec.sas’;%ecm_db_connect;
To run %ECM_DB_CONNECT, you have to be a valid SAS Enterprise Case Management user. If you are the programmer testing the program in SAS Display Manager, make sure you log on to the SAS server machine with a valid user ID. Also, if the macro might potentially be executed in SAS Enterprise Guide, which sends SAS code to the SAS Workspace Server, you might want to override the %ECM_DB_CONNECT macro to prevent it from aborting SAS when the user cannot connect to the database because the abort statement will abort the SAS Workspace Server. This can be done by commenting out the following code:
/*%if (%sysfunc(libref(ecm_db))) %then %do; %put %sysfunc(sysmsg()); %if ^&SYSDMS %then %do; %abort cancel 4; %end; %else %do; %abort return; %end;%end; */
169

2. The %ECM_PIVOT_DATATYPE_SUBSET macro can be used to convert the ECM data from its native format into rectangular structure. For example, if you want to retrieve case records with all the core and UDF fields for CASE_TYPE=‘FIN’ , you can use the following code:
data case_subset; set ecm_db.case_live (keep=case_rk); where case_type=’FIN’; run;%ecm_create_label_fmt; %ecm_pivot_datatype(in_lib=ecm_db,out_lib=work,datatype=CASE, subset_dsn=case_subset,include_lgchr_YN=N,table_wh=”CASE”);
The output tables are WORK.CASE_PIVOT for the case table and WORK.C_X_<UDF_TABLE_NM> for the case subtables. <UDF_TABLE_NM> is the value of the UDF_TABLE_NM column defined in CASE_UDF_DEF. These tables contain only the most current data. Therefore, the value of the DATA_OBJECT_RK column without VALID_FROM_DTTM can be used to join the tables.
3. To place a generic data table in rectangular structure, use the following code:
%let table_nm=X_BRANCH ; /* specific generic table name */%ecm_pivot_datatype(datatype=GENERIC_DATA,in_lib=ECM_DB,out_lib=WORK, table_wh=”&table_nm”);
The output table is WORK.G_X_BRANCH.
170 Chapter 14 • Adding Custom SAS Code

Chapter 15
Event Logging
Overview . . . . . . . . . . . . . . . . . . . . . . . . . . . . . . . . . . . . . . . . . . . . . . . . . . . . . . . . . . . 171
Currently Supported Events . . . . . . . . . . . . . . . . . . . . . . . . . . . . . . . . . . . . . . . . . . . 171
Creating a Batch Load Event . . . . . . . . . . . . . . . . . . . . . . . . . . . . . . . . . . . . . . . . . . 174
OverviewSAS Enterprise Case Management enables you to log events for entities. The event logs provide a history of activities performed for audit purposes. All events include a timestamp that indicates when the event happened and who performed the event unless otherwise noted. This chapter describes the events that are logged for entities.
Currently Supported EventsAll events include a timestamp that indicates when the event happened and the user who performed the event unless otherwise noted.
Event Type Event Description
Save entity event A save entity event is logged when an entity is saved. The version number of the saved record is saved in the description column.
Load entity event A load entity event is logged when an entity is loaded into the system from an ETL (extract, transform and load) process or Web service call. For information on saving load events in an ETL process, see “Creating a Batch Load Event” on page 174 .
Lock entity event A lock entity event is logged when a user locks an entity. The user who locked the entity is saved in the description column.
Unlock entity event An unlock entity event is logged when a user unlocks an entity. The user who unlocked the entity is saved in the description column.
171

Event Type Event Description
Status change event A status change event is logged when a user changes the status of a workflow activity from the Edit Case page. The original status and the new status are stored in the description column.
New status event A new status event is logged when the status of a case has changed as a result of a change within the associated workflow. The Created By column is blank because these events are triggered from the associated workflow and might not necessarily be caused by a user action (for example, a status change could result from an expired timer). If the new status event immediately follows a status change event, you can deduce that the new status was caused by the status change user action.
Assign case owner event An assign case owner event is logged when a case is assigned to a new owner. The user who now owns the case is saved in the description column.
Assign report owner event An assign report owner event is logged when a report is assigned to a new owner. The user who now owns the report is saved in the description column.
Add comment event An add comment event is logged when a comment is added to an entity. The comment subject is saved in the description column.
Edit comment event An edit comment event is logged when an existing comment has been edited. The comment subject is saved in the description column.
Delete comment event A delete comment event is logged when a comment is deleted from an entity. The comment subject is saved in the description column.
Add attachment event An add attachment event is logged when an attachment is added to an entity. The attachment file name is saved in the description column.
Delete attachment event A delete attachment event is logged when an attachment is deleted from an entity. The attachment file name is saved in the description column.
Add incident event An add incident event is logged when an incident is added to a case. The key for the incident is saved with the event, and the ID and source system code of the incident is shown in the description.
Delete incident event A delete incident event is logged when an incident is removed from a case. The key for the incident is saved with the event, and the ID and source system code of the incident is shown in the description.
172 Chapter 15 • Event Logging
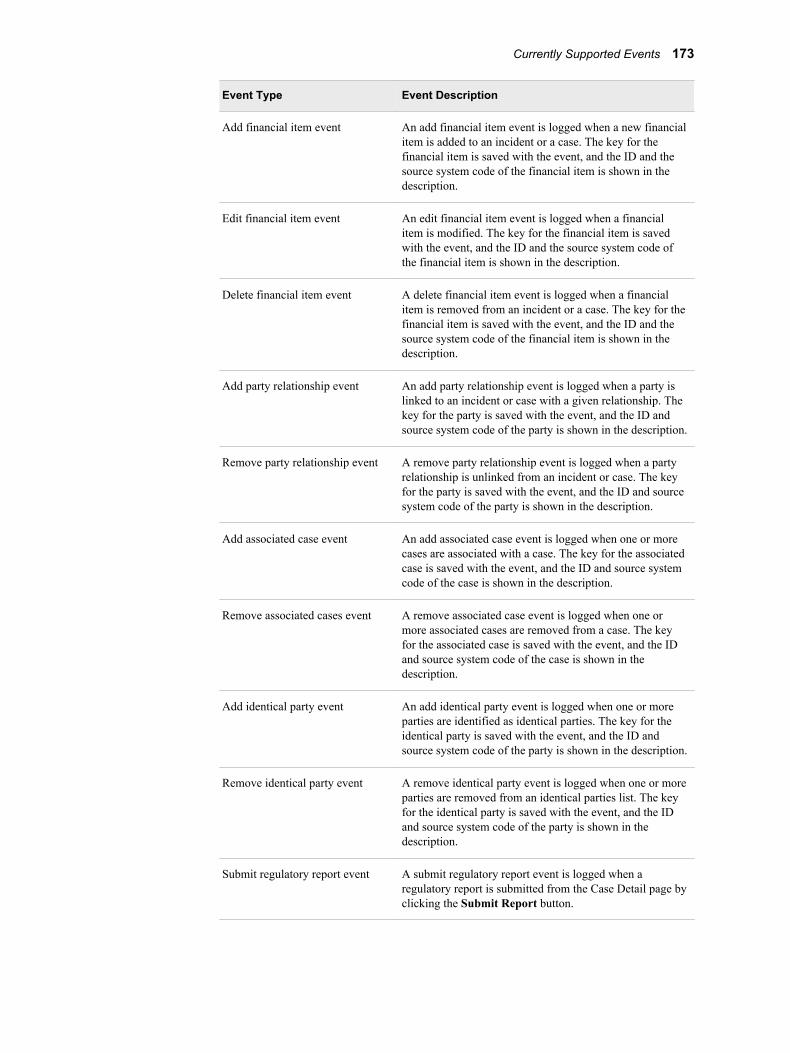
Event Type Event Description
Add financial item event An add financial item event is logged when a new financial item is added to an incident or a case. The key for the financial item is saved with the event, and the ID and the source system code of the financial item is shown in the description.
Edit financial item event An edit financial item event is logged when a financial item is modified. The key for the financial item is saved with the event, and the ID and the source system code of the financial item is shown in the description.
Delete financial item event A delete financial item event is logged when a financial item is removed from an incident or a case. The key for the financial item is saved with the event, and the ID and the source system code of the financial item is shown in the description.
Add party relationship event An add party relationship event is logged when a party is linked to an incident or case with a given relationship. The key for the party is saved with the event, and the ID and source system code of the party is shown in the description.
Remove party relationship event A remove party relationship event is logged when a party relationship is unlinked from an incident or case. The key for the party is saved with the event, and the ID and source system code of the party is shown in the description.
Add associated case event An add associated case event is logged when one or more cases are associated with a case. The key for the associated case is saved with the event, and the ID and source system code of the case is shown in the description.
Remove associated cases event A remove associated case event is logged when one or more associated cases are removed from a case. The key for the associated case is saved with the event, and the ID and source system code of the case is shown in the description.
Add identical party event An add identical party event is logged when one or more parties are identified as identical parties. The key for the identical party is saved with the event, and the ID and source system code of the party is shown in the description.
Remove identical party event A remove identical party event is logged when one or more parties are removed from an identical parties list. The key for the identical party is saved with the event, and the ID and source system code of the party is shown in the description.
Submit regulatory report event A submit regulatory report event is logged when a regulatory report is submitted from the Case Detail page by clicking the Submit Report button.
Currently Supported Events 173

Event Type Event Description
Add report event An add report event is logged when a report is added to a case or incident. The key for the report is saved with the event, and the ID and source system code is shown in the description.
Activate case workflow event An activate case workflow event is logged when a workflow is activated for the case.
Terminate case workflow event A terminate case workflow event is logged when workflow is terminated from the case.
Activate report workflow event An activate report workflow event is logged when a workflow is activated for the report.
Terminate report workflow event A terminate report workflow event is logged when workflow is terminated from the report.
Creating a Batch Load EventLoad events are logged when an entity is loaded into the system from an extract, transform and load (ETL) process or Web service call. ETL processes must manually add this event when loading an entity. The following SAS program provides an example of how to insert an ETL load event for a case.
/********** SETUP LIBNAME **********/%let DB_SERVICE = …;%let DB_SCHEMA = …;%let DB_USER = …;%let DB_PASSWORD = …;libname ecm_db oraclepath="&DB_SERVICE" user="&DB_USER" password="&DB_PASSWORD" schema="&DB_SCHEMA";/********** GET NEXT CASE KEY AND NEXT CASE EVENT KEY **********/proc sql noprint;connect to oracle (path="&DB_SERVICE" user="&DB_USER" password="&DB_PASSWORD" connection=global);select * into :CASE_KEY from connection to oracle(select &DB_SCHEMA..case_rk_seq.nextval from dual);select * into :CASE_EVENT_KEY from connection to oracle(select &DB_SCHEMA..event_rk_seq.nextval from dual);disconnect from oracle;quit;%let CASE_KEY = %trim(&CASE_KEY);%let CASE_EVENT_KEY = %trim(&CASE_EVENT_KEY);/********** GET CURRENT DATE/TIME **********/%let CURRENT_DATETIME = %sysfunc(datetime(), datetime);%let CURRENT_DATETIME_SQL = "&CURRENT_DATETIME"dt;/********** INSERT CASE **********/…/********** COPY TO CASE_VERSION TABLE **********/
174 Chapter 15 • Event Logging

…/********** INSERT USER DEFINED FIELD VALUES **********/…/********** INSERT GROUP PERMISSIONS **********/…/********** INSERT ETL CASE EVENT **********/proc sql noprint;insert into ecm_db.case_event values (&CASE_EVENT_KEY,&CASE_KEY,'LOADEN','event.etl.load.txt',null,
In the preceding example, you use sequences to get the next record key (CASE_RK_SEQ, INCIDENT_RK_SEQ, PARTY_RK_SEQ, RR_RK_SEQ, or EFILE_RK_SEQ) and event key (EVENT_RK_SEQ). LOADEN is the event-type code for load events. event.etl.load.txt is the resource bundle property key defined in AppResources.properties for the ETL load event description. Null is the user ID (you can load an actual user ID instead of null). The final value in the insert statement is the timestamp indicating when the event took place. For Web service loads, the load event is automatically created if the source system of the loaded record is not SASECM.
Creating a Batch Load Event 175

176 Chapter 15 • Event Logging

Chapter 16
Additional Tasks
Case Routing Configurations for SAS Enterprise Case Management: Regional Manager Setup . . . . . . . . . . . . . . . . . . . . . . . . . . . . . . . . . . 177
Add the Region Case User-Defined Field . . . . . . . . . . . . . . . . . . . . . . . . . . . . . . . 177Create the Region User-Defined Reference Table . . . . . . . . . . . . . . . . . . . . . . . . . 177Create a Group in SAS Management Console for Each Region . . . . . . . . . . . . . . 178Create the Regional Manager Group Case User-Defined Field . . . . . . . . . . . . . . . 178Add the Region User-Defined Field to the User Interface Definition . . . . . . . . . . 178Derive the Regional Manager Group Name from Region . . . . . . . . . . . . . . . . . . . 179Use the Regional Manager Group Field in the Workflow . . . . . . . . . . . . . . . . . . . 179Add a Root-Level Set Process Participant Policy to the Workflow . . . . . . . . . . . . 180Upload the User Interface Definition and Workflow . . . . . . . . . . . . . . . . . . . . . . . 181Test Your New Configuration . . . . . . . . . . . . . . . . . . . . . . . . . . . . . . . . . . . . . . . . 181
Setting Up Data Management Jobs . . . . . . . . . . . . . . . . . . . . . . . . . . . . . . . . . . . . . . 182
SAS Enterprise Case Management – Backup Requirements . . . . . . . . . . . . . . . . . 182
Case Routing Configurations for SAS Enterprise Case Management: Regional Manager Setup
This chapter describes how to configure SAS Enterprise Case Management to support routing the review capability of cases to regional managers, based on region.
Add the Region Case User-Defined FieldThis field is used to store the region code.
insert into ecm_db.case_udf_def values ( 'CASE', 'X_REGION_CD', 'VARCHAR', 'Region code', 3);
Create the Region User-Defined Reference TableThis reference table contains all possible regions.
insert into ecm_db.ref_table_value values ( 'X_RT_REGION', 'N', 'North', null, null, 0);insert into ecm_db.ref_table_value values ( 'X_RT_REGION', 'S', 'South', null, null, 0);insert into ecm_db.ref_table_value values ( 'X_RT_REGION', 'E', 'East', null, null, 0);
177
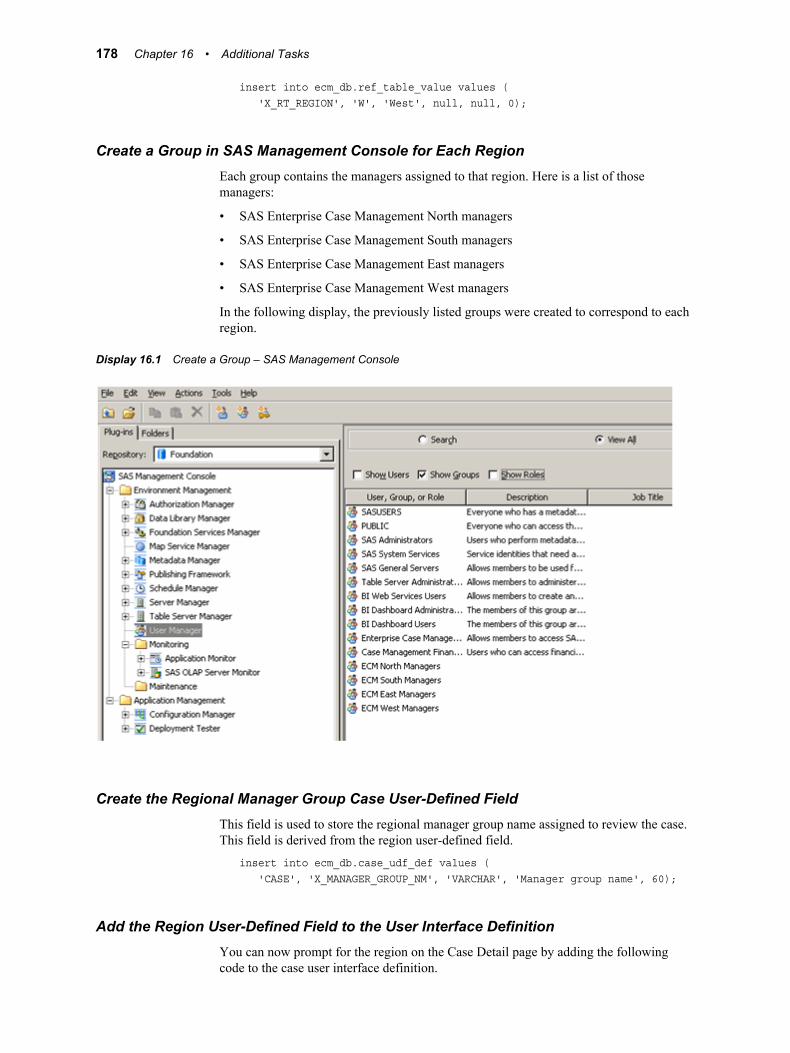
insert into ecm_db.ref_table_value values ( 'X_RT_REGION', 'W', 'West', null, null, 0);
Create a Group in SAS Management Console for Each RegionEach group contains the managers assigned to that region. Here is a list of those managers:
• SAS Enterprise Case Management North managers
• SAS Enterprise Case Management South managers
• SAS Enterprise Case Management East managers
• SAS Enterprise Case Management West managers
In the following display, the previously listed groups were created to correspond to each region.
Display 16.1 Create a Group – SAS Management Console
Create the Regional Manager Group Case User-Defined FieldThis field is used to store the regional manager group name assigned to review the case. This field is derived from the region user-defined field.
insert into ecm_db.case_udf_def values ( 'CASE', 'X_MANAGER_GROUP_NM', 'VARCHAR', 'Manager group name', 60);
Add the Region User-Defined Field to the User Interface DefinitionYou can now prompt for the region on the Case Detail page by adding the following code to the case user interface definition.
178 Chapter 16 • Additional Tasks
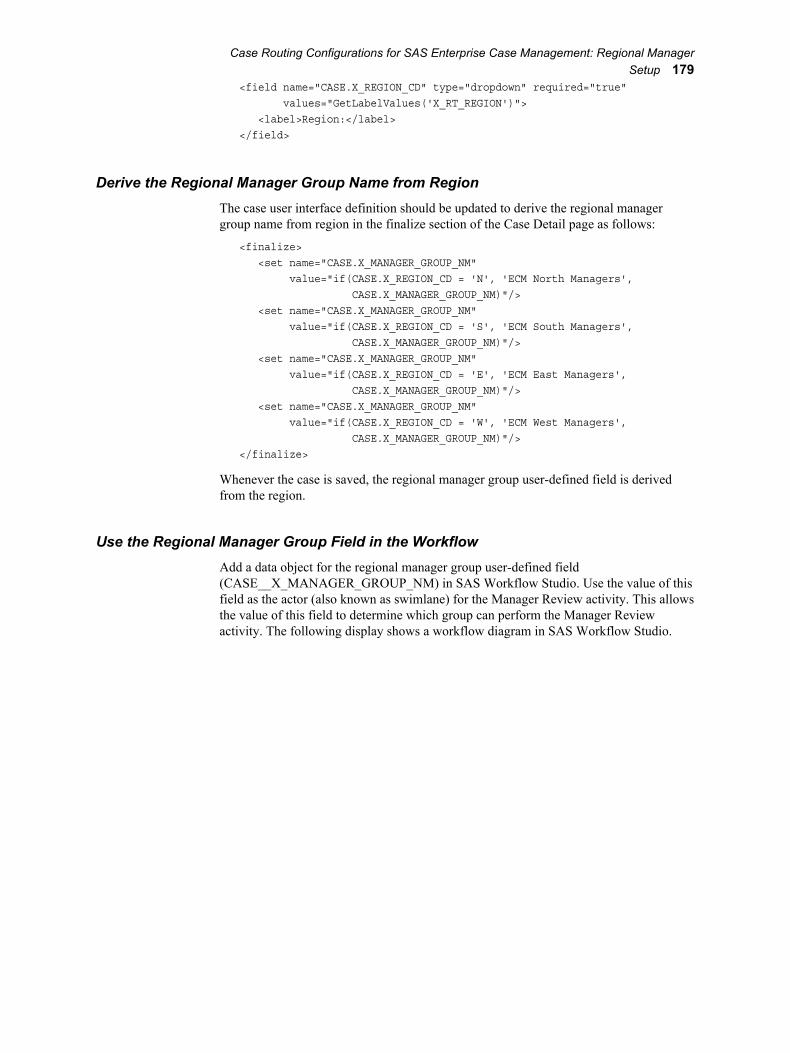
<field name="CASE.X_REGION_CD" type="dropdown" required="true" values="GetLabelValues('X_RT_REGION')"> <label>Region:</label></field>
Derive the Regional Manager Group Name from RegionThe case user interface definition should be updated to derive the regional manager group name from region in the finalize section of the Case Detail page as follows:
<finalize> <set name="CASE.X_MANAGER_GROUP_NM" value="if(CASE.X_REGION_CD = 'N', 'ECM North Managers', CASE.X_MANAGER_GROUP_NM)"/> <set name="CASE.X_MANAGER_GROUP_NM" value="if(CASE.X_REGION_CD = 'S', 'ECM South Managers', CASE.X_MANAGER_GROUP_NM)"/> <set name="CASE.X_MANAGER_GROUP_NM" value="if(CASE.X_REGION_CD = 'E', 'ECM East Managers', CASE.X_MANAGER_GROUP_NM)"/> <set name="CASE.X_MANAGER_GROUP_NM" value="if(CASE.X_REGION_CD = 'W', 'ECM West Managers', CASE.X_MANAGER_GROUP_NM)"/></finalize>
Whenever the case is saved, the regional manager group user-defined field is derived from the region.
Use the Regional Manager Group Field in the WorkflowAdd a data object for the regional manager group user-defined field (CASE__X_MANAGER_GROUP_NM) in SAS Workflow Studio. Use the value of this field as the actor (also known as swimlane) for the Manager Review activity. This allows the value of this field to determine which group can perform the Manager Review activity. The following display shows a workflow diagram in SAS Workflow Studio.
Case Routing Configurations for SAS Enterprise Case Management: Regional Manager Setup 179

Display 16.2 SAS Workflow Studio
In addition, the Use a data object to set the name value check box must be selected on the Edit Swimlane dialog box. The following figure shows the Edit Swimlane dialog box in SAS Workflow Studio.
Display 16.3 Edit Swimlane Dialog Box
Add a Root-Level Set Process Participant Policy to the WorkflowThe Set Process Participant policy allows the access control entries to be updated for the Manager Review activity whenever the CASE__X_MANAGER_GROUP_NM data
180 Chapter 16 • Additional Tasks
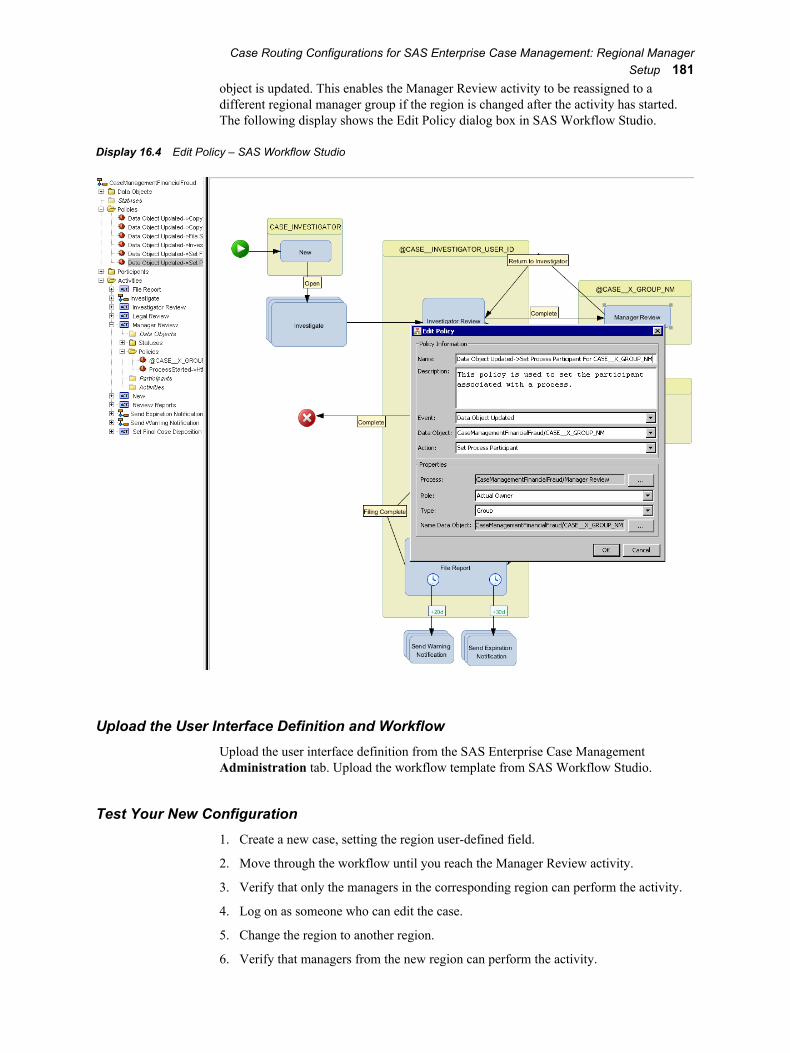
object is updated. This enables the Manager Review activity to be reassigned to a different regional manager group if the region is changed after the activity has started. The following display shows the Edit Policy dialog box in SAS Workflow Studio.
Display 16.4 Edit Policy – SAS Workflow Studio
Upload the User Interface Definition and WorkflowUpload the user interface definition from the SAS Enterprise Case Management Administration tab. Upload the workflow template from SAS Workflow Studio.
Test Your New Configuration1. Create a new case, setting the region user-defined field.
2. Move through the workflow until you reach the Manager Review activity.
3. Verify that only the managers in the corresponding region can perform the activity.
4. Log on as someone who can edit the case.
5. Change the region to another region.
6. Verify that managers from the new region can perform the activity.
Case Routing Configurations for SAS Enterprise Case Management: Regional Manager Setup 181

Setting Up Data Management JobsIt is recommended that programs for refreshing the SAS Enterprise Case Management report mart should be set up to run regularly as batch jobs. There are many ways to set up scripts to run SAS programs in batch. This section provides a simple example for Windows.
1. Create a directory where the job script and SAS batch code will be stored. For example:
SAS_CONFIG\Lev1\Applications\SASCaseManagementServerCfg\3.1\Source\jobs
2. Create a SAS program to call the SAS Enterprise Case Management macro (for example, ecm_reporting_driver_job.sas). Add the following line to the program.
%ecm_reporting_driver;
3. Create a Windows command file to call SAS (for example, ecm_job_generate_batch_efile.cmd). Use the following statement as a reference and define the content of the command file with your site information.
"!SASROOT\SASFoundation\9.3\sas.exe" –config "SAS_CONFIG\Lev1\SASApp\WorkspaceServer\sasv9.cfg"-autoexec "SAS_CONFIG\Lev1\Applications\SASCaseManagementServerCfg\3.1\Source\control\autoexec.sas" -SYSIN"SAS_CONFIG\Lev1\Applications\SASCaseManagementServerCfg\3.1\Source \jobs\ ecm_reporting_driver_job.sas" -log"SAS_CONFIG\Lev1\Applications\SASCaseManagementServerCfg\3.1\Source\jobs\ ecm_reporting_driver_job .log" -nodms
Note:
• !SASROOT should be the path where SAS is installed.
• SAS_CONFIG should be the path where SAS Enterprise Case Management is configured.
• Make sure that there are no line breaks in the command program.
SAS Enterprise Case Management – Backup Requirements
To ensure the integrity of the SAS Enterprise Case Management system, you should establish a formal, regularly scheduled backup process. It is important to back up all of the following items at the same time so that related information will be synchronized if a restore becomes necessary:
SAS MetadataSAS Metadata contains ECM server and middle-tier configuration information, user or group capabilities, and more. The instructions for backing up all SAS metadata can be found in the topic “Backing up and Restoring Your System” in the SAS 9.3 Intelligence Platform: System Administration Guide.
182 Chapter 16 • Additional Tasks

SAS Content ServerAll UI definition files, custom properties files, and attachments to cases or incidents are stored in the SAS Content Server in !SASROOT/Lev1/AppData/SASContentServer. Instructions for backing up the SAS Content Server can be found at the following location:
http://support.sas.com/documentation/cdl/en/bisag/60945/
HTML/default/a003133703.htm#a003266477
SAS Shared Service DatabaseSAS Enterprise Case Management uses SAS Shared Services to manage workflows, attachments, alerts, and more. The database associated with SAS Shared Services should be backed up regularly.
SAS Enterprise Case Management DatabaseThe SAS Enterprise Case Management database contains all cases, incidents, subjects records, reports, e-files, reference tables, and configuration data of various SAS Enterprise Case Management components. This database should be backed up regularly.
SAS Enterprise Case Management Configuration Directory!SASROOT\Lev1\Applications\SASCaseManagementServerCfg\3.1 contains SAR e-file data and any custom code defined at your site. The complete directory should be backed up regularly.
SAS Enterprise Case Management – Backup Requirements 183

184 Chapter 16 • Additional Tasks

Appendix 1
SAS Enterprise Case Management Web Service
Introduction . . . . . . . . . . . . . . . . . . . . . . . . . . . . . . . . . . . . . . . . . . . . . . . . . . . . . . . . . 185
A Sample Request . . . . . . . . . . . . . . . . . . . . . . . . . . . . . . . . . . . . . . . . . . . . . . . . . . . . 185
IntroductionSAS Enterprise Case Management provides a Web service to allow external systems to load data into the system. The Web service accepts these types of requests:
Configuration requestsRetrieve the list of type, category, and subcategory configurations for one or more entity types. The results can be filtered by which types of entities the caller can create. A configuration request can also return the list of user-defined fields and the localized label for each field.
Search requestsSearch for subjects in the system based on a configurable set of criteria and return any matching subjects along with the list of matching criteria.
Lookup requestsRetrieve one or more objects in the system by ID and source system code and return all the standard and user-defined fields associated with the objects that are found. The request can also return a list of all the entities related to the one returned.
Create requestsCreate new entities and link them together. Existing objects can be updated as well. This request can load live or historic data. A create request can be run in test mode, which processes the request — running all data validation checks — but does not save the results in the database.
The Web service uses the Simple Object Access Protocol (SOAP). Authentication is required and all requests are processed with the visibility and capabilities of the authenticated user.
A Sample RequestThe following code shows a simple example of how to call the Web service from within SAS using PROC SOAP.
185

filename infref "!SASROOT\casemgmtmva\sasmisc\sample\webservice\ping-request.xml";filename outfref "c:\temp\ping-response.xml";
%ecm_ws_get_url;
proc soap IN=infref OUT=outfref SRSURL="&ecm_ws_srsurl" URL="&ecm_ws_url" wssusername="THE USERNAME" wsspassword="THE PASSWORD"SOAPACTION="http://sas.com/solutions/casemgmt/webservice/ CaseManagementServiceInterface/create";run;
PROC SOAP automatically handles the authentication. The SRSURL points PROC SOAP at the service registry, which it uses to find the SAS Security Token Service. PROC SOAP passes the WSUSERNAME and WSPASSWORD to the Security Token Service to authenticate the user. PROC SOAP submits the request to the Web service only after authentication succeeds. If you prefer not to hardcode the password in the PROC SOAP call, you can replace the WSSUSERNAME and WSPASSWORD parameters with WSSAUTHDOMAIN='DefaultAuth'. In that case, the IDs and passwords of the users who run the code must be registered in the SAS metadata server, and they have to be members of the Ent Case Mgmt Users group.
Additional sample files can be found in !SASROOT\casemgmtmva\sasmisc\sample\webservice for Windows platforms or !SASROOT/misc/casemgmtmva/sample/webservice for UNIX platforms. The WSDL is available from the SAS Enterprise Case Management Web application found at http://<host>:<port>/SASEntCaseManagement/service/
CaseManagementService.wsdl.
186 Appendix 1 • SAS Enterprise Case Management Web Service

Appendix 2
Troubleshooting
Workflow Status Updates . . . . . . . . . . . . . . . . . . . . . . . . . . . . . . . . . . . . . . . . . . . . . 188
Database Error Warnings and SAS Deployment Wizard . . . . . . . . . . . . . . . . . . . 188
Post-installation Database Steps Required after Unsuccessful SAS Deployment Wizard Database Installation . . . . . . . . . . . . . . . . . . . . . . . . . . . 188
Empty or Missing Date Fields After a Save . . . . . . . . . . . . . . . . . . . . . . . . . . . . . . . 190
Case Network Graph Stops Working . . . . . . . . . . . . . . . . . . . . . . . . . . . . . . . . . . . . 190
Case Network Analysis Web Service Not Created . . . . . . . . . . . . . . . . . . . . . . . . . 190
Special Characters Are Missing in Case Network Analysis and Report Mart . . . 192
Specifying the Version Number for SAS Enterprise Case Management . . . . . . . 193
DBMS JAR File and Multiple Machine Installations . . . . . . . . . . . . . . . . . . . . . . . 193
Assigning the Primary Owner to a Case . . . . . . . . . . . . . . . . . . . . . . . . . . . . . . . . . . 193
Adding the Custom Column Type VARCHAR . . . . . . . . . . . . . . . . . . . . . . . . . . . . 193
Adding Comments to an Entity . . . . . . . . . . . . . . . . . . . . . . . . . . . . . . . . . . . . . . . . . 194
Locking and Unlocking an Entity . . . . . . . . . . . . . . . . . . . . . . . . . . . . . . . . . . . . . . . 194
Using the Search Functionality in SAS Enterprise Case Management . . . . . . . . . 194
Session Time-Out Warning Message . . . . . . . . . . . . . . . . . . . . . . . . . . . . . . . . . . . . 195
Financial Items Warning Message . . . . . . . . . . . . . . . . . . . . . . . . . . . . . . . . . . . . . . 195
E-File Cannot Be Generated . . . . . . . . . . . . . . . . . . . . . . . . . . . . . . . . . . . . . . . . . . . 196
Transaction Sequential Number Is Not Assigned After an E-File Is Generated . 196
Incorrect or Missing Translations . . . . . . . . . . . . . . . . . . . . . . . . . . . . . . . . . . . . . . . 196
Updating Configuration Information in a Cluster . . . . . . . . . . . . . . . . . . . . . . . . . 197
Field Definition Changes and Search Page Errors . . . . . . . . . . . . . . . . . . . . . . . . . 197
Uploading Large Attachments . . . . . . . . . . . . . . . . . . . . . . . . . . . . . . . . . . . . . . . . . . 197
Receiving the ORA-12520 Error Message . . . . . . . . . . . . . . . . . . . . . . . . . . . . . . . . 197
187

Workflow Status UpdatesAfter you select and open a case in SAS Enterprise Case Management, you can update the activity status for that case on the Action Items panel. In the Activity Status column, select the needed activity status for an activity. Then, when you select Save Case and Action Items, the activity status changes are saved. The time that the activity status was changed is then listed in the Completed Date column.
Note: The time that is displayed in the Completed Date column is the SAS Enterprise Case Management server time.
Database Error Warnings and SAS Deployment Wizard
When you are using the SAS Deployment Wizard to install SAS Enterprise Case Management, you might encounter possible warnings when configuring your database. If a yellow check is listed during the configure step in the SAS Deployment Wizard, a warning was encountered during your configuration. This is most likely a database error and is received for any of the following reasons:
• The database doesn't exist.
• The user name (schema) does not exist on the database.
• The user name and database exist but the tables have already been created.
In addition, if you receive the warning message SAS Enterprise Case Management Server-Tier Configuration Failed to Deploy
Successfully because of an invalid database connection, you should be aware that on some platforms, SAS programs will fail if the relational database version does not match the default SAS/ACCESS configuration. On UNIX platforms, SAS/ACCESS needs to be configured to the correct version of the relational database. You should use SAS_HOME/SASFoundation/9.3/sassetup for this purpose.
Note: Errors have been reported when Oracle schema users don't have the authority to create views. In this case, the sequences, tables, and indexes are created, but the views are not. Resolving this problem might require manually dropping and recreating the files using the scripts in SAS_CONFIG/Lev1/Applications/SASCaseManagementServerCfg/N.N/Source/sasmisc/inst all/
Oracle.
Post-installation Database Steps Required after Unsuccessful SAS Deployment Wizard Database Installation
Note: In steps 1 and 2, specify your applicable database.
188 Appendix 2 • Troubleshooting
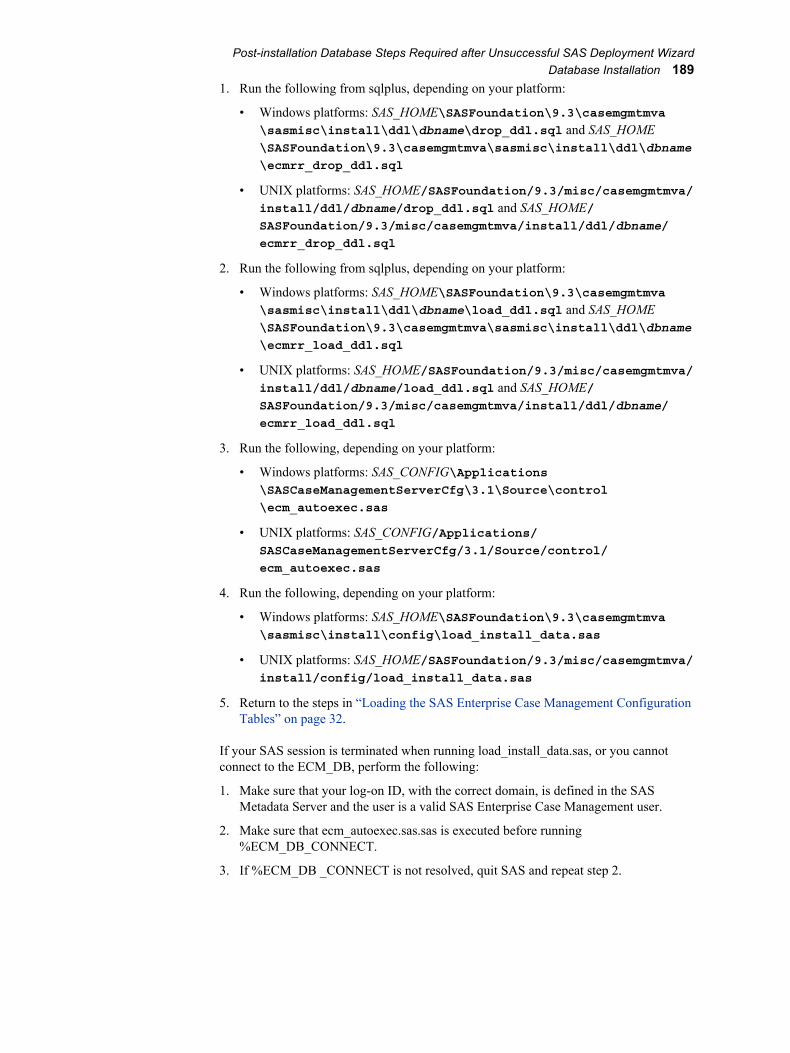
1. Run the following from sqlplus, depending on your platform:
• Windows platforms: SAS_HOME\SASFoundation\9.3\casemgmtmva\sasmisc\install\ddl\dbname\drop_ddl.sql and SAS_HOME\SASFoundation\9.3\casemgmtmva\sasmisc\install\ddl\dbname
\ecmrr_drop_ddl.sql
• UNIX platforms: SAS_HOME/SASFoundation/9.3/misc/casemgmtmva/install/ddl/dbname/drop_ddl.sql and SAS_HOME/SASFoundation/9.3/misc/casemgmtmva/install/ddl/dbname/
ecmrr_drop_ddl.sql
2. Run the following from sqlplus, depending on your platform:
• Windows platforms: SAS_HOME\SASFoundation\9.3\casemgmtmva\sasmisc\install\ddl\dbname\load_ddl.sql and SAS_HOME\SASFoundation\9.3\casemgmtmva\sasmisc\install\ddl\dbname
\ecmrr_load_ddl.sql
• UNIX platforms: SAS_HOME/SASFoundation/9.3/misc/casemgmtmva/install/ddl/dbname/load_ddl.sql and SAS_HOME/SASFoundation/9.3/misc/casemgmtmva/install/ddl/dbname/
ecmrr_load_ddl.sql
3. Run the following, depending on your platform:
• Windows platforms: SAS_CONFIG\Applications\SASCaseManagementServerCfg\3.1\Source\control
\ecm_autoexec.sas
• UNIX platforms: SAS_CONFIG/Applications/SASCaseManagementServerCfg/3.1/Source/control/
ecm_autoexec.sas
4. Run the following, depending on your platform:
• Windows platforms: SAS_HOME\SASFoundation\9.3\casemgmtmva\sasmisc\install\config\load_install_data.sas
• UNIX platforms: SAS_HOME/SASFoundation/9.3/misc/casemgmtmva/install/config/load_install_data.sas
5. Return to the steps in “Loading the SAS Enterprise Case Management Configuration Tables” on page 32.
If your SAS session is terminated when running load_install_data.sas, or you cannot connect to the ECM_DB, perform the following:
1. Make sure that your log-on ID, with the correct domain, is defined in the SAS Metadata Server and the user is a valid SAS Enterprise Case Management user.
2. Make sure that ecm_autoexec.sas.sas is executed before running %ECM_DB_CONNECT.
3. If %ECM_DB _CONNECT is not resolved, quit SAS and repeat step 2.
Post-installation Database Steps Required after Unsuccessful SAS Deployment Wizard Database Installation 189

Empty or Missing Date Fields After a SaveSAS Enterprise Case Management can have javascript errors and lose data under certain situations. The problem is IBM WebSphere-specific and only appears if the system is under heavy load and either debug logging is enabled or many error e-mails are being issued. To resolve this issue, reconfigure the WebSphere server that Enterprise Case Management is installed in, typically SAServer8, to disable request and response pooling. Consult your WebSphere documentation for instructions on how to make that change.
Case Network Graph Stops WorkingIf a valid entity table name other than “PARTY” is entered in the UDF_TABLE_NM column of the PARTY_UDF_DEF table, the case network will stop working. An example of a valid entity name is “CASE.” If you customize this table and column, you need to comply with the following proper naming conventions:
• The length must be 3–30 characters.
• The first two characters must be “X_” .
• The characters following “X_” can be any combination of uppercase letters, numbers, and underscores.
• The name must be unique with respect to all other static and user-defined table names.
Case Network Analysis Web Service Not CreatedAfter SAS Enterprise Case Management is installed and configured, the SAS stored processes getSocialNetwork, getSocialNetworkNodeDetails, and growSocialNetworkNodes should be registered as a Web service so that the Case Network Analysis Web component can use them. The registration can be verified by looking at the list of registered Web services. You can see the list by browsing to http://WebApplicationServerHostName:SASServer1PortNumber/
SASBIWS/services/ECMSocialNetworkAnalysis.wsdl. Look for a link called “ECMSocialNetworkAnalysis.” If the link is there, the Web service has been correctly registered. If the ECMSocialNetworkAnalysis Web service has not been registered, follow these steps:
1. In SAS Management Console, use the Folders tab to navigate to the folder that was just imported to the system/applications/SAS Enterprise Case Management/Ent Case mgmt Configuration 3.1/Application SAS
code folder.
2. Select the Application SAS code folder. The Stored Process icons appear in the right pane.
3. Hold down the CTRL key and click to select the following stored process icons:
190 Appendix 2 • Troubleshooting

• getSocialNetwork
• getSocialNetworkNodeDetails
• growSocialNetworkNode
4. Right-click one of the selected icons and select Deploy As Web Service. The Deploy As Web Service wizard starts.
5. On the Web Service Information page, confirm the following:
• Use the default value for Web Service Maker URL.
• Use ECMSocialNetworkAnalysis for New Web Service Name.
• Select Next.
Note: The choice of credentials to use does not matter.
6. On the Web Service Keywords and Namespace page, provide the following value for the Namespace field: http://sas.com/sso/fraud/sna.
7. Select Next.
8. Confirm the settings and then select Finish. Open the following page in a Web browser and view the available services:
http://WebApplicationServerHostName:WebServerPortNumber/
SASBIWS/services/ECMSocialNetworkAnalysis.wsdl
The new Web service ECMSocialNetworkAnalysis is listed. If you click on it, you can see its WSDL, which is similar to the following.
Case Network Analysis Web Service Not Created 191
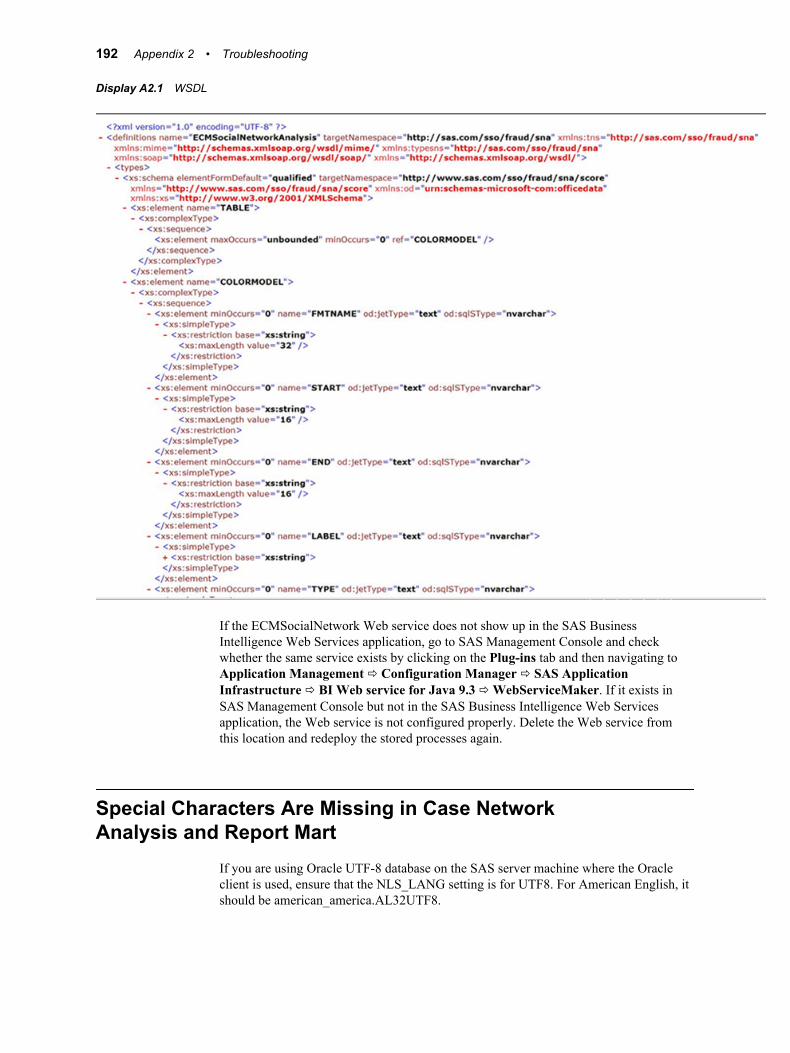
Display A2.1 WSDL
If the ECMSocialNetwork Web service does not show up in the SAS Business Intelligence Web Services application, go to SAS Management Console and check whether the same service exists by clicking on the Plug-ins tab and then navigating to Application Management ð Configuration Manager ð SAS Application Infrastructure ð BI Web service for Java 9.3 ð WebServiceMaker. If it exists in SAS Management Console but not in the SAS Business Intelligence Web Services application, the Web service is not configured properly. Delete the Web service from this location and redeploy the stored processes again.
Special Characters Are Missing in Case Network Analysis and Report Mart
If you are using Oracle UTF-8 database on the SAS server machine where the Oracle client is used, ensure that the NLS_LANG setting is for UTF8. For American English, it should be american_america.AL32UTF8.
192 Appendix 2 • Troubleshooting

Specifying the Version Number for SAS Enterprise Case Management
If the SAS Enterprise Case Management version number is not specified in the SAS Enterprise Case Management database, the SAS Enterprise Case Management Web application will not execute correctly when you attempt to log on.
DBMS JAR File and Multiple Machine InstallationsIn a multiple-machine installation, the SAS Deployment Wizard prompts you for the name of the DBMS JAR file that is used on the middle tier. However, this file might not be available on the middle tier because the DBMS JAR file is installed on the server machine. If that is the case, you need to transfer this file to the middle-tier machine before the middle-tier installation.
Note: The JDBC JAR files should be copied to a secure location where they will be kept for the life of the application.
Assigning the Primary Owner to a CaseWhen a case is created in SAS Enterprise Case Management, a user is assigned as the Primary Owner of the case. The Primary Owner is determined by settings for CASE_CONFIG. If there is a Primary Owner configured in CASE_CONFIG for the case type, category, and subcategory, then that user will be designated as the Primary Owner. SAS Enterprise Case Management automatically sets the Primary Owner for a case if there is not a Primary Owner configured for the case and the Primary Owner is not assigned through the UI definition when a case is created. In this scenario, the first person to edit the case after it has been saved automatically becomes the Primary Owner.
You can also assign the Primary Owner to a case if you are currently the Primary Owner. On the Cases tab of the SAS Enterprise Case Management window, select the Actions menu for a case. Select Set Primary Owner. The Set Primary Owner dialog box appears. You can now select an owner from the New Owner drop-down list. Select OK to save the change.
Adding the Custom Column Type VARCHARWhen adding a custom column of type VARCHAR, make sure the max_char_cnt is a number greater than 0, preferably the maximum possible size for your custom column.
Adding the Custom Column Type VARCHAR 193

Adding Comments to an EntityComments added to an entity in SAS Enterprise Case Management have a limit of 10,000 characters.
Locking and Unlocking an EntityIn SAS Enterprise Case Management, you can lock a case for restricted use or unlock a case to enable another user to edit. You can access the Lock and Unlock options for a case from the case Actions menu. If you do not have access to these options for a case, they will be inactive.
To lock a case, select Lock from the Actions menu. Locking a case disables the Edit and Unlock options for that case for other users. You can, however, view the case. If you try to edit a case that is locked, and you do not have access to the case, a message appears, stating that the case is locked by another user. If a case is already locked by you or another user, the Lock option is disabled.
If you have access to a locked case, you can unlock the case. To unlock a case, select Unlock from the Actions menu. When you unlock a case, a message will state that the case is unlocked. The Unlock option is disabled if the case is already unlocked or you do not have access to unlock it.
Another way to lock a case is to edit a case. You can select the Edit option for a case from the Actions menu, or you can select the case from the Case ID column in the case Results panel. This automatically locks the case and opens the case for editing. If the case is locked by another user, the Edit option is disabled in the Actions menu.
A case can have other cases associated with it. An associated case is identified by the Case ID on the Associated Cases tab on the Cases Information panel. If the case is unlocked, clicking on the linked Case ID locks the case and opens the case for editing.
Using the Search Functionality in SAS Enterprise Case Management
When working in SAS Enterprise Case Management, you might need to search for existing entities. The Search panel for entities contains three options that enable you to modify the search criteria and results that are displayed. You can select from the available search fields and then select one of the following options:
SearchThe Search option enables you to search for existing cases, incidents, or subjects based on the search fields that are selected. It is possible that one or more search fields are selected by default. Enter the search criteria needed in the available search fields. Select Search. Any existing records that match the search criteria are displayed in the Results panel.
194 Appendix 2 • Troubleshooting
ClearThe Clear option clears all search field selections and any records that are displayed in the Results panel. This includes any search fields that have been selected by default. Select Clear. All search fields and search records are cleared.
ResetThe Reset option resets the search fields to their initial value. This option can be used to reset the search fields to their initial value before a search is performed. Fields that are selected by default and records that are displayed in the Results panel are not affected by the Reset option. Select Reset. Any search fields that were changed before a search is executed are reset to their initial value.
Note: If the Clear option is used, the Reset option does not reset any fields that were select by default. Those fields remain cleared.
Session Time-Out Warning MessageWhen you are working in SAS Enterprise Case Management, your session can expire. A Session Timed Out dialog box is shown if a time-out period has elapsed with no user activity. The default time-out period is five minutes before the actual session time-out occurs. In the Session Timed Out dialog box, click Log On to log on again. The following display shows the Session Timed Out dialog box:
Instructions for setting the session time-out depend on the type of Web application server that you are using. You should refer to documentation for your Web application server for instructions on setting the session time-out value.
Financial Items Warning MessageThe following warning message appears in the log if there are financial items associated with a case, but the UI definition is not configured to display financial items:
Warning: A case that is not configured with financial items may have had financial items copied from an associated incident. These financial items must be configured to be visible. Refer to the SAS Enterprise Case Management Administrator's Guide for details.
You can ignore this message if the case does not need to show financial items. There is an association being saved between the case and the financial items that can be displayed at any time. For information about how to display financial items associated with cases,
Financial Items Warning Message 195

see the FinancialItemsTable component in the Custom Page Builder documentation, found on the Administration tab of SAS Enterprise Case Management.
E-File Cannot Be GeneratedIf you receive an error when clicking Generate E-file on the E-File page of the UI, you might not be set up to run PROC SOAP in SAS stored processes. Check the stored process log. You should see an error message similar to the following:
- ERROR: ERROR: No logins found.- NOTE: PROCEDURE SOAP used (Total process time):- real time 0.00 seconds- cpu time 0.00 seconds- - NOTE: {END: ECMRR_EFILE_FINCEN_DRIVER}- ERROR: : Stored process is aborted because return code > 4 in macro {ecmrr_efile_fincen_driver}. See SAS error message above.
To fix this problem, provide the necessary login information as shown in “A Sample Request” on page 185. The macro for calling PROC SOAP is ecm_ws_soap.sas.
You can also disable running PROC SOAP by setting ECM_RUN_SOAP=N in the %ECM_GLOBAL MARV macro. In that case, the transaction sequence number and the signature date (EFILE_RR_SEQ_NO and X_SIGNATURE_DT) of the reports under the e-files are not updated. EFILE_RR_SEQ_NO is useful for mapping the document number referenced in the FINCEN response files to the SAS Enterprise Case Management reports.
Transaction Sequential Number Is Not Assigned After an E-File Is Generated
If an e-file is generated successfully and the transaction sequence numbers of the reports under the e-file are not updated, the user might not have permission to update reports. To fix this, see “Enable Report Update in the E-File Stored Process” on page 128.
Incorrect or Missing TranslationsYou might experience either of the following scenarios:
• A new custom resource bundle has been loaded, and the report mart labels have been refreshed, but the application is not showing the latest translations.
• New values have been loaded into the REF_TABLE_TRANS table, but the values are not being displayed in the application drop-down menus.
If so, consider the following possible causes:
• The custom resource bundle is not following Java naming conventions for the language and country that it supports. See “Custom Resource Bundles” on page 79 for more information on the file naming convention.
196 Appendix 2 • Troubleshooting

• The ECM_LOCALE table does not have an entry for the specified locale. This table is used only for translations stored in the database, such as reference table translations as well as table and column label translations.
• The application has cached values of the old translations. In this case, go to the Administration tab and click Clear Cache.
Updating Configuration Information in a ClusterSAS Enterprise Case Management supports deployment in a cluster. However, each server in the cluster maintains its own cache of the application's configuration information. If the configuration is modified, either by uploading new UI definition files, uploading new custom messages, or by modifying one or more of the SAS Enterprise Case Management configuration tables in the database, then each node in the cluster will need to clear its cache of configuration information. This can be accomplished either by clicking Clear Cache on the Administration tab or by re-starting each server that SAS Enterprise Case Management is deployed to.
Field Definition Changes and Search Page ErrorsSAS Enterprise Case Management can have errors on the search page if the type of a user-defined field changes after data has been loaded for that field. For example, suppose a field is originally created with UDF_TYPE_NM = 'VARCHAR' and records are created for that field. If the UDF_TYPE_NM field definition record is then changed to 'DATE', the search page will show an error when those records are part of the returned results. This is because the existing string values cannot be properly converted to date values.
The recommended solution is to avoid the problem by never updating the UDF_TYPE_NM of a field definition that has existing values. If you need to change the type of data being stored for a field, create a new field with the proper configuration. If this problem is happening in your environment, contact technical support for help with cleaning up the obsolete data.
Uploading Large AttachmentsYou might receive an error message in your browser when attempting to upload large files as attachments. Many browsers have a limit to the size of files that they will upload, such as 2GB. If you have a large file that needs to be added as an attachment, use the Web service to work around this limitation.
Receiving the ORA-12520 Error MessageIf you receive the following error message in load_install_data.log under <SASCONFIG>\Lev1\Applications\SASCaseManagementServerCfg\3.1\Source
\sasmisc\install, then Oracle might not be configured correctly:
Receiving the ORA-12520 Error Message 197

ORA-12520: TNS:listener could not find available handler for
requested type of server
The default process parameter value might be too low. To resolve this issue, increase it and then rerun the failed statements in load_install_data.sas with ecm_autoexec.sas in SAS Display Manager.
198 Appendix 2 • Troubleshooting

Appendix 3
SASMSG and %SMD2DS
How Does SAS Enterprise Case Management Use %SMD2DS and SASMSG? . 199
About the SASMSG Function . . . . . . . . . . . . . . . . . . . . . . . . . . . . . . . . . . . . . . . . . . 199
Formatting . . . . . . . . . . . . . . . . . . . . . . . . . . . . . . . . . . . . . . . . . . . . . . . . . . . . . . . . . . 200
Open Code Macro Statements . . . . . . . . . . . . . . . . . . . . . . . . . . . . . . . . . . . . . . . . . . 200
The %SMD2DS Macro . . . . . . . . . . . . . . . . . . . . . . . . . . . . . . . . . . . . . . . . . . . . . . . 200
Example: Add a Message and Its Translation to Be Used by SASMSG . . . . . . . . 201
Example: Message Substitutions . . . . . . . . . . . . . . . . . . . . . . . . . . . . . . . . . . . . . . . . 202
How Does SAS Enterprise Case Management Use %SMD2DS and SASMSG?
SAS Enterprise Case Management uses the SASMSG function to retrieve translated strings based on the locale of the client. For user-defined reports, it is also possible to use the %SMD2DS macro to add messages that can be used by the SASMSG function.
About the SASMSG FunctionThe SASMSG function returns a message from a specified data set. The message that is returned is based on the current locale of the client and a specified key. SASMSG uses the following syntax:
SASMSG("BASENAME", "KEY", <<"QUOTE"|"DQUOTE"|"NOQUOTE"> <, "substitution 1", ..., "substitution 7">>)
BASENAME is the name of the data set where the message is located, and KEY is the message key. If a key name is specified for a key that does not exist, the key name is returned.
Other parameters include an option to indicate the type of quotes added to the message text and strings that are used as substitutions. The default quoting option that is used is DQUOTE.
The SAS message data set must be a 7-bit ASCII data set. Any character that cannot be represented in the 7-bit ASCII encoding is represented in the Unicode escape format,
199

\uxxxx, where xxxx is the base-10 numeric representation for the Unicode value of the character.
The message that is returned is based on the LOCALE system option. The LOCALE option has a value of the form ll_RR, where ll represents the 2-letter language code and RR represents the 2-letter region code. The function does the following:
• If a match is not found, then the function searches for a match with the language only.
• If the pair LOCALE/KEY still is not found, then the function defaults to use the English language (en).
• If the KEY does not exist for English (en), then the KEY name is returned.
FormattingString substitution is allowed using the format code %S. A maximum of seven string substitutions are allowed.
In some cases, the translation of a message to a language other than English might require that you change the order of the string substitutions.
To change the order of string substitutions, insert an argument number specification, #nn, within a formatted string. nn is the number of the argument in the substitution list. For example, the following substitution returns a message of "My cat. Your dog."
msg = sasmsg("nls.mymsg","IN_CD_LOG","noquote","cat","dog") ;IN_CD_LOGINFO = My %#1s. Your %#2s
However, if you change the order of the arguments as follows, then the message that is returned is "My dog. Your cat."
IN_CD_LOGINFO = My %#2s. Your %#1s
Open Code Macro StatementsYou can use SASMSG in the Open Code Macro with the %SYSFUNC macro function.
Note: Arguments that are passed to a function called by the %SYSFUNC macro must not be in quotes. However, arguments that are passed to SASMSG outside of the %SYSFUNC macro must be quoted.
When the SASMSG function is used with the %SYSFUNC macro function, the returned string is wrapped with the %NRBQUOTE function.
The %SMD2DS MacroThe %SMD2DS macro is available in the autocall library. You can use it to create SAS message data sets from .smd files. This macro uses the following syntax:
%SMD2DS(DIR=,BASENAME=,LOCALE=,LIB=)
The arguments used in this macro are defined as follows:
200 Appendix 3 • SASMSG and %SMD2DS

DIRis the directory where the .smd files are located.
BASENAMEis the base name of the file to process.
LOCALE(optional) is the list of included locales separated by a blank. basename.smd is the default file that is processed.
LIB(optional) is the library where the data set will be created. The default library is WORK.
Note that the parameters DIR and BASENAME are required.
Example: Add a Message and Its Translation to Be Used by SASMSG
This example demonstrates how you can create an English and German version of the same message for SASMSG to use.
To create customized translated messages for SASMSG:
1. Create the new directory C:\MyORMsmd.
2. In the new directory, create a file and name it new_msg.smd. This file defines the English translations with the following line:
my_new_sasmsg1 = Process start time
3. In the new directory, create a file and name it new_msg_de.smd. This file defines the German translations with the following line:
my_new_sasmsg1 = Startzeit f\u00fcr Prozess
4. Start SAS and submit the following code:
/* The libname statement contains the installation specific path. *//* Change this path as necessary. */libname ormhelp 'C:\Program Files\SAS\SASFoundation\9.3\ormonitormva\sashelp'; %smd2ds(DIR=C:\MyORMsmd, BASENAME=new_msg, LIB=ormhelp, LOCALE=de);
5. Use SASMSG and the option LOCALE= to verify that you can use the new messages:
options locale=English;%put %sysfunc(sasmsg(sashelp.new_msg, my_new_sasmsg1, NOQUOTE)) ;
options locale=German;%put %sysfunc(sasmsg(sashelp.new_msg, my_new_sasmsg1, NOQUOTE)) ;run;
For English, the following string is returned:
Process start time
For German, the following string is returned:
Startzeit für Prozess
Example: Add a Message and Its Translation to Be Used by SASMSG 201

Example: Message SubstitutionsThis example demonstrates how to use message substitutions.
To use message substitutions:
1. Add a new message in the new_msg.smd file, as follows:
new_msg_with_parms = This is the first substitution %#1s and this is the second %#2s
2. Pass the following parameters to the new message:
options locale=English;%let parm1=Test1;%let parm2=Test2;data _null_;a= sasmsg("sashelp.new_msg", "new_msg_with_parms", "NOQUOTE", "&parm1", "&parm2");put a=;run;
The following string is returned:
This is the first parameter Test1 and this is the second Test2
202 Appendix 3 • SASMSG and %SMD2DS

Index
Special Characters<help-text> 108%SMD2DS macro 199, 200
Aactors
defining 83defining static actors 83dynamically determined 83
Administrative User accountdefining 39
alert notificationscontrolling from SAS Preferences
Manager 57alerts 56anonymous Web access
disabling 15
Bbackup requirements 182batch jobs 182batch load events 174
Ccache, clearing 42capabilities 43
associating 43associating with roles 37case capabilities 43general 46incident capabilities 44party capabilities 44relational 46user interface impact 46
case capabilities 43user interface and 46
case configurations 74case management 1
case networkgraph stops working 190
case network analysis 149configuring display labels 153configuring displayed data fields 152configuring link criteria 150logic 154process for defining 149Web service not created 190
case report notifications 54case routing
configurations for regional manager setup 177
case routing configurationtesting 181
case UI definitionse-filing 126
case user interfaceadding FinancialItemsTable component
to 146cases
adding comments to 194assigning primary owner to 193locking and unlocking 194
character encoding 163clearing the cache 42client tier 13code
adding custom SAS code 169column header labels
search panels 94column labels
localizing custom labels 167columns
custom type VARCHAR 193comments
adding to cases 194components, custom 115configuration directory
backing up 183configuration tables
203

loading 32users and groups referenced in 38
configurationscase configurations 74case routing for regional manager setup
177customizing 74display labels 153displayed data fields 152e-filing 125incident configurations 75link criteria for case network analysis
150match criteria 141match criteria for subject search 155party configurations 76PostgreSQL database, for multi-tier
installation 11PostgreSQL ODBC connection 11reference tables in database 85SAS Information Delivery Portal 56SAS Spelling Correction 62SQLServer ODBC connection 9testing case routing configuration 181user-defined fields in database 70user-specified, for search panels 90, 93,
94Web service 59
create requests 185Custom Action component 119custom column type VARCHAR 193custom components 115custom functions 114custom help 108Custom Page Builder 97
assigning permissions 99components 118custom help 108customizable user interfaces 98examples 109expressions and functions 109static component field formatters 119user interface definitions 99valid XML elements and descriptions
for user interface definitions 100custom properties
uploading 42custom resource bundles 79custom SAS code
adding 169custom table and column labels
localizing 167custom translated messages 166
examples 201, 202formatting 200message substitutions 202
customizable search panels 69customizable user interfaces 98customizing 66
configurations 74customizable search panels 69data security 79error messages 111reference tables 68, 85resource bundles 79search panels 90stored processes, to compute financial
summaries 147user interface definition files 109user interface definitions 66, 73user-defined fields 69user-defined generic data tables 72workflows 67, 80
customizing installation 32
Ddata column labels 153data fields, displayed
configuring 152data management jobs
setting up 182data objects 81
adding 83types supported in SAS Workflow
Studio 82using regional manager group field in
workflow 179data security
customizing 79field level 79record level 79
data tablescustomizing user-defined generic tables
72database character encoding 163database creation scripts 12databases
backing up 183configuring reference tables in 85configuring user-defined fields in 70default encoding for supported
databases 165error warnings and SAS Deployment
Wizard 188pre-installation database information 6SAS Shared Services requirement 7steps required after unsuccessful SAS
Deployment Wizard database installation 188
datesvalidating 111
204 Index
DBCS encoding 164DBMS credentials 15DBMS jar file 193decimal digits
specifying number of 111default file locations 28definitions
uploading 40deployment 14
with WebLogic 10.3 33deployment plan 5detail tab headers 153display labels
configuring 153displayable fields
search panels 94displayed data fields
configuring 152downloading software 5drop-down lists
groups and roles as 35specifying 112
dynamic conditional logicin user interface definition files 112
dynamically determined actors 83
Ee-files
generating 182e-filing 124
case UI definitions 126configuring 125process 124user-defined fields 125
encoding 163default encoding for supported
databases 165restricting maximum length of
VARCHAR fields 165SAS session encoding and DBCS
support 164enterprise case management 1error messages
customizing 111error warnings
databases and SAS Deployment Wizard188
ETL processescreating batch load events 174
event alert notifications 50event logging 171
creating batch load events 174currently supported events 171
expressions 109
Ffield labels 93
search panels 91field-level data security 79fields
customizing user-defined fields 69displayable 94filterable 93hiding required fields 111required and non-required 110restricting maximum length of
VARCHAR fields 165searchable 90specifying read-only fields 111
file locations, default 28filters
filterable fields 93search filters 92
financial items 145adding FinancialItemsTable component
to case or incident user interface146
defining item types in reference tables145
defining UDF for financial summaries146
defining UDF for financial transactions146
defining user interface 146warning message 195
financial summariescustomizing stored precesses to
compute 147defining UDF for 146
financial transactionsdefining UDF for 146
FinancialItemsTable componentadding to case or incident user interface
146functions 109
custom 114
Ggeneral capabilities 46
user interface and 49generic data tables, user-defined
customizing 72groups 34
as drop-down lists 35creating, for each region 178defining 34defining in SAS Management Console
39in workflow definitions 36referenced in configuration tables 38
Index 205

referenced in user interface definitions38
Hhelp, custom 108hiding required fields 111HttpRequest policy 83
Iincident capabilities 44
user interface and 47incident configurations 75incident user interface
adding FinancialItemsTable component to 146
installation 13See also post-installationSee also pre-installationcustomizing 32DBMS jar file and multiple machine
installations 193default file locations 28disabling anonymous Web access 15installed SAS products 14Java Development Kit 4reviewing Instructions.html file 27SAS Deployment Wizard tasks 14SAS Spelling Correction 60selecting single- or multi-tier 13specifying DBMS credentials 15updating SAS SID file 29Web application server 4
Instructions.html file 27internationalization 163
creating and using custom translated messages 166
default encoding for supported databases 165
localizing custom table and column labels 167
localizing reference tables 167localizing workflow activities and
statuses 168naming conventions for locales 166restricting maximum length of
VARCHAR fields 165SAS session encoding and DBCS
support 164specifying database character encoding
163
Jjar file 193
Java Development Kitinstalling 4
JDBC drivers 8jobs
setting up data management jobs 182
Llabels
column header labels 94configuring display labels 153creating, for user-defined fields 79field labels 93localizing custom table and column
labels 167languages
See internationalizationlicense error 29link criteria
for case network analysis 150load events
creating batch load events 174loading configuration tables 32locales
naming conventions for 166localizing
custom table and column labels 167reference tables 167workflow activities and statuses 168
locking cases 194logging events
See event logginglookup requests 185
Mmatch criteria
configuring 141configuring for subject search 155
match labels 153message substitutions 202messages
creating and using custom translated messages 166
middle tier 13multi-tier installation 13
configuring PostgreSQL database for11
multiple machine installatinosDBMS jar file and 193
Nnaming conventions
for locales 166notifications 49, 56
206 Index

HttpRequest policy 83
OODBC
configuring PostgreSQL ODBC connection 11
configuring SQLServer connection 9installing SAS access for 11
Open Code Macro statements 200operating system requirements
verifying 4Oracle
specifying DBMS credentials 16Oracle database
creating Oracle users 8installing 8installing SAS access for Oracle 9pre-installation 8
Pparty capabilities 44
user interface and 48party configurations 76permissions
Custom Page Builder 99setting user permission to report mart
directory 32post-installation 32
database steps required after unsuccessful SAS Deployment Wizard installation 188
PostgreSQLconfiguring ODBC connection 11specifying DBMS credentials 19testing database access 12
PostgreSQL databaseconfiguring for multi-tier installation
11creating users 11installing 10installing SAS access for ODBC 11pre-installation 10
pre-installation 4database information 6installing PostgreSQL database 10JDBC drivers 8Oracle database 8sample database creation scripts 12SQLServer database 9
process instanceSee workflow instance
process templatesSee workflow definitions
properties
uploading 40uploading custom properties 42
Rradio buttons
specifying 112read-only fields 111record-level data security 79reference tables
adding user-defined tables 88configuring in database 85customizing 85customizing and 68defining 85defining financial item types in 145defining static tables 86localizing 167rules and conventions for database
fields and values 89region case user-defined field 177region user-defined field
adding to user interface definition 178region user-defined reference table 177regional manager group case user-defined
field 178regional manager group field
using in workflow 179regional manager group name
deriving from region 179regional managers
case routing configurations 177regions
deriving regional manager group name from 179
related items 141configuring match criteria 141
relational capabilities 46user interface and 49
renewal 29report mart 159
refreshing 182report mart directory
setting user permission to 32resource bundles
customizing 79roles 34
See also actorsas drop-down lists 35associating capabilities with 37defining 34, 40in workflow definitions 36referenced in user interface definitions
38routing the review capability of cases
regional manager setup 177
Index 207

SSAR reports 124SAR-DI (Suspicious Activity Report by
Depository Institutions) 124files 136reports 136UI 137
SAS codeadding custom code 169
SAS Content Serverbacking up 183
SAS Deployment Wizard 14database error warnings and 188database steps required after
unsuccessful database installation188
SAS Download Manager 5SAS Enterprise Case Management
backing up configuration directory 183backing up database 183installation 13version number 193
SAS Information Delivery Portalconfiguring 56notifications and 56
SAS Management Consolecreating a group for each region 178defining 39defining users 38User Manager 34
SAS Metadatabacking up 182
SAS Metadata Repositorysearch panel properties 95
SAS Preferences Managercontrolling alert notifications from 57
SAS session encoding 164SAS Shared Services
backing up database 183database requirement 7
SAS SID fileupdating 29
SAS Spelling Correction 60SAS Workflow Studio
data object types supported 82uploading user interface definition and
workflow 181SASMSG function 199
example 201scripts
sample database creation scripts 12search criteria 90
wildcards and 91search filters 92Search function 194search panels 92
column header labels 94customizable 69customizing 90displayable fields 94field labels 91, 93filterable fields 93SAS Metadata Repository properties 95search criteria 90search filters 92search results 93searchable fields 90user interface controls 92user-specified configurations 90, 93, 94
search requests 185search results 93searchable fields
for search panels 90searches
See subject searchsecurity
See data securityserver tier 13session time-out warning message 195Set Process Participant policy
adding to workflow 180SID file 5
updating 29single-tier installation 13software, downloading 5spell checking 60SQLServer
specifying DBMS credentials 23SQLServer database
configuring ODBC connection 9creating users 9installating 9installing SAS access for ODBC 9installing SAS access for SQLServer 9pre-installation 9testing database access 10
static actorsdefining 83
static component field formatters 119static reference tables
defining 86status
localizing workflow statuses 168workflow status updates 188workflows 83
stored processescustomizing to compute financial
summaries 147subject search 155
configuring match criteria for 155logic 156process 155
208 Index
subscriptions 49Suspicious Activity Report
See SAR reportsSuspicious Activity Report by Depository
Institutions (SAR-DI)See SAR-DI (Suspicious Activity
Report by Depository Institutions)swimlanes
See also actorsusing regional manager group field in
workflow 179
Ttable labels
localizing custom labels 167task list
alerts 56notifications 54reminder timer interval 55
task reminders 49testing
access to PostgreSQL database 12case routing configuration 181SQLServer database access 10
text areaspecifying 112
text fieldsspecifying 112
time-out warning message 195translated messages
creating and using custom messages166
translationsincorrect or missing 196
troubleshootingadding comments to cases 194adding custom column type VARCHAR
193assigning primary owner to cases 193case network analysis Web service not
created 190case network graph stops working 190database error warnings and SAS
Deployment Wizard 188DBMS jar file and multiple machine
installations 193financial items warning message 195incorrect or missing translations 196locking and unlocking cases 194Search function 194session time-out warning message 195unsuccessful SAS Deployment Wizard
database installation 188version number 193workflow status updates 188
UUDF
defining for financial summaries 146defining for financial transactions 146
UI definition filesSee user interface definition files
unlocking cases 194uploading
custom properties 42definitions and properties 40user interface definitions 41workflow definitions 40
user accountscreating 4
user interfaceadding FinancialItemsTable component
to case or incident user interface146
capabilities and 46defining financial items user interface
146user interface controls 92user interface definition files 73, 97
customizing 109dynamic conditional logic in 112required 73
user interface definitionsadding regioin user-defined field to 178customizing 66, 73deleting 100editing 99groups, roles, and users referenced in
38updating 73uploading 41, 99, 181valid XML elements and descriptions
for 100viewing 99
user interfaces, customizable 98User Manager
SAS Management Console 34user permission
setting to report mart directory 32user-defined field tables 69user-defined fields
configuring in database 70customizing 69data types 70e-filing 125example 71
user-defined generic data tablescustomizing 72
user-defined reference tablesadding 88
user-specified configurationssearch panels 94
Index 209

users 34creating Oracle users 8creating PostgreSQL users 11creating SQLServer users 9defining 34defining in SAS Management Console
38in workflow definitions 36referenced in configuration tables 38referenced in user interface definitions
38
Vvalidating dates 111VARCHAR custom column type 193VARCHAR fields
restricting maximum length of 165version number 193
Wwarning messages
financial items 195session time-out 195
Web access, anonymous 15Web application server
installing 4Web service 185
configuring 59not created for case network analysis
190
sample request 185WebLogic 10.3
deploying SAS Enterprise Case Management using 33
wildcards 91workflow definitions 80
groups, roles, and users in 36uploading 40, 181
workflow instance 80workflow templates
modifying 85workflows
adding set process participant policy to180
customizing 80customizing and 67data object 81defining 80defining actors 83HttpRequest policy 83localizing activities and statuses 168status 83status updates 188using regional manager group field in
179
XXML elements and descriptions
for user interface definitions 100
210 Index