sas 9.3 intelligence platform: security administration guide
TRANSCRIPT
SAS® 9.3Intelligence PlatformSecurity Administration Guide
SAS® Documentation
The correct bibliographic citation for this manual is as follows: SAS Institute Inc. 2011. SAS® 9.3 Intelligence Platform: Security AdministrationGuide. Cary, NC: SAS Institute Inc.
SAS® 9.3 Intelligence Platform: Security Administration Guide
Copyright © 2011, SAS Institute Inc., Cary, NC, USA
All rights reserved. Produced in the United States of America.
For a hardcopy book: No part of this publication may be reproduced, stored in a retrieval system, or transmitted, in any form or by any means,electronic, mechanical, photocopying, or otherwise, without the prior written permission of the publisher, SAS Institute Inc.
For a Web download or e-book:Your use of this publication shall be governed by the terms established by the vendor at the time you acquire thispublication.
The scanning, uploading, and distribution of this book via the Internet or any other means without the permission of the publisher is illegal andpunishable by law. Please purchase only authorized electronic editions and do not participate in or encourage electronic piracy of copyrightedmaterials. Your support of others' rights is appreciated.
U.S. Government Restricted Rights Notice: Use, duplication, or disclosure of this software and related documentation by the U.S. government issubject to the Agreement with SAS Institute and the restrictions set forth in FAR 52.227–19 Commercial Computer Software-Restricted Rights(June 1987).
SAS Institute Inc., SAS Campus Drive, Cary, North Carolina 27513.
1st electronic book, July 20112nd electronic book, October 20113rd electronic book, August 2012
SAS® Publishing provides a complete selection of books and electronic products to help customers use SAS software to its fullest potential. Formore information about our e-books, e-learning products, CDs, and hard-copy books, visit the SAS Publishing Web site atsupport.sas.com/publishing or call 1-800-727-3228.
SAS® and all other SAS Institute Inc. product or service names are registered trademarks or trademarks of SAS Institute Inc. in the USA and othercountries. ® indicates USA registration.
Other brand and product names are registered trademarks or trademarks of their respective companies.

Contents
About This Document . . . . . . . . . . . . . . . . . . . . . . . . . . . . . . . . . . . . . . . . . . . . . . . . . . . viiWhat's New in Security Administration in SAS 9.3 . . . . . . . . . . . . . . . . . . . . . . . . . . . . . ixAccessibility . . . . . . . . . . . . . . . . . . . . . . . . . . . . . . . . . . . . . . . . . . . . . . . . . . . . . . . . . . xiiiRecommended Reading . . . . . . . . . . . . . . . . . . . . . . . . . . . . . . . . . . . . . . . . . . . . . . . . . . xv
PART 1 Fundamentals 1
Chapter 1 • Security Overview . . . . . . . . . . . . . . . . . . . . . . . . . . . . . . . . . . . . . . . . . . . . . . . . . . . . . 3Introduction to Security Features . . . . . . . . . . . . . . . . . . . . . . . . . . . . . . . . . . . . . . . . . . . 3Support for Encryption . . . . . . . . . . . . . . . . . . . . . . . . . . . . . . . . . . . . . . . . . . . . . . . . . . . 3Support for Single Sign-On . . . . . . . . . . . . . . . . . . . . . . . . . . . . . . . . . . . . . . . . . . . . . . . 4Auditing of Security Events . . . . . . . . . . . . . . . . . . . . . . . . . . . . . . . . . . . . . . . . . . . . . . . 4Metadata-Based Authorization . . . . . . . . . . . . . . . . . . . . . . . . . . . . . . . . . . . . . . . . . . . . . 5Support for Authorization Reporting . . . . . . . . . . . . . . . . . . . . . . . . . . . . . . . . . . . . . . . . 6Role-Based Access to Application Features . . . . . . . . . . . . . . . . . . . . . . . . . . . . . . . . . . . 6
Chapter 2 • User Administration . . . . . . . . . . . . . . . . . . . . . . . . . . . . . . . . . . . . . . . . . . . . . . . . . . . . 9About User Administration . . . . . . . . . . . . . . . . . . . . . . . . . . . . . . . . . . . . . . . . . . . . . . . . 9Users . . . . . . . . . . . . . . . . . . . . . . . . . . . . . . . . . . . . . . . . . . . . . . . . . . . . . . . . . . . . . . . . 11Groups . . . . . . . . . . . . . . . . . . . . . . . . . . . . . . . . . . . . . . . . . . . . . . . . . . . . . . . . . . . . . . . 12Roles . . . . . . . . . . . . . . . . . . . . . . . . . . . . . . . . . . . . . . . . . . . . . . . . . . . . . . . . . . . . . . . . 13Passwords . . . . . . . . . . . . . . . . . . . . . . . . . . . . . . . . . . . . . . . . . . . . . . . . . . . . . . . . . . . . 15Identity Hierarchy . . . . . . . . . . . . . . . . . . . . . . . . . . . . . . . . . . . . . . . . . . . . . . . . . . . . . . 17External Identities . . . . . . . . . . . . . . . . . . . . . . . . . . . . . . . . . . . . . . . . . . . . . . . . . . . . . . 18Windows Privileges . . . . . . . . . . . . . . . . . . . . . . . . . . . . . . . . . . . . . . . . . . . . . . . . . . . . 18Windows User ID Formats . . . . . . . . . . . . . . . . . . . . . . . . . . . . . . . . . . . . . . . . . . . . . . . 20Uniqueness Requirements . . . . . . . . . . . . . . . . . . . . . . . . . . . . . . . . . . . . . . . . . . . . . . . 22
Chapter 3 • Access Management . . . . . . . . . . . . . . . . . . . . . . . . . . . . . . . . . . . . . . . . . . . . . . . . . . 25About Access Management . . . . . . . . . . . . . . . . . . . . . . . . . . . . . . . . . . . . . . . . . . . . . . 25Basics of Metadata Authorization . . . . . . . . . . . . . . . . . . . . . . . . . . . . . . . . . . . . . . . . . 27WriteMetadata and WriteMemberMetadata . . . . . . . . . . . . . . . . . . . . . . . . . . . . . . . . . . 29Review: Key Points about Authorization . . . . . . . . . . . . . . . . . . . . . . . . . . . . . . . . . . . . 29
Chapter 4 • Selected Tasks . . . . . . . . . . . . . . . . . . . . . . . . . . . . . . . . . . . . . . . . . . . . . . . . . . . . . . . 31About Security Task Instructions . . . . . . . . . . . . . . . . . . . . . . . . . . . . . . . . . . . . . . . . . . 31Create Metadata User Definitions . . . . . . . . . . . . . . . . . . . . . . . . . . . . . . . . . . . . . . . . . 31Update a Managed Password . . . . . . . . . . . . . . . . . . . . . . . . . . . . . . . . . . . . . . . . . . . . . 33Unlock an Internal Account . . . . . . . . . . . . . . . . . . . . . . . . . . . . . . . . . . . . . . . . . . . . . . 36Adjust Initial Access . . . . . . . . . . . . . . . . . . . . . . . . . . . . . . . . . . . . . . . . . . . . . . . . . . . . 37
PART 2 Authorization 39
Chapter 5 • Authorization Model . . . . . . . . . . . . . . . . . . . . . . . . . . . . . . . . . . . . . . . . . . . . . . . . . . . 41Authorization Overview . . . . . . . . . . . . . . . . . . . . . . . . . . . . . . . . . . . . . . . . . . . . . . . . . 41

Three Levels of Granularity . . . . . . . . . . . . . . . . . . . . . . . . . . . . . . . . . . . . . . . . . . . . . . 42Two Relationship Networks . . . . . . . . . . . . . . . . . . . . . . . . . . . . . . . . . . . . . . . . . . . . . . 42Object Inheritance . . . . . . . . . . . . . . . . . . . . . . . . . . . . . . . . . . . . . . . . . . . . . . . . . . . . . . 44Permissions by Object Type . . . . . . . . . . . . . . . . . . . . . . . . . . . . . . . . . . . . . . . . . . . . . . 46Permissions by Task . . . . . . . . . . . . . . . . . . . . . . . . . . . . . . . . . . . . . . . . . . . . . . . . . . . . 50Types of Access Controls . . . . . . . . . . . . . . . . . . . . . . . . . . . . . . . . . . . . . . . . . . . . . . . . 54Authorization Decisions . . . . . . . . . . . . . . . . . . . . . . . . . . . . . . . . . . . . . . . . . . . . . . . . . 55Fine-Grained Controls for Data . . . . . . . . . . . . . . . . . . . . . . . . . . . . . . . . . . . . . . . . . . . 56Use and Enforcement of Each Permission . . . . . . . . . . . . . . . . . . . . . . . . . . . . . . . . . . . 62
Chapter 6 • Permissions on Folders . . . . . . . . . . . . . . . . . . . . . . . . . . . . . . . . . . . . . . . . . . . . . . . . 63Baseline ACTs . . . . . . . . . . . . . . . . . . . . . . . . . . . . . . . . . . . . . . . . . . . . . . . . . . . . . . . . 63Example: Business Unit Separation . . . . . . . . . . . . . . . . . . . . . . . . . . . . . . . . . . . . . . . . 65Variation 1: Regional Separation, Designated Content Creators . . . . . . . . . . . . . . . . . . 66Variation 2: Functional Separation . . . . . . . . . . . . . . . . . . . . . . . . . . . . . . . . . . . . . . . . . 69Key Points about the Baseline ACT Approach . . . . . . . . . . . . . . . . . . . . . . . . . . . . . . . 71Further Considerations for Permissions on Folders . . . . . . . . . . . . . . . . . . . . . . . . . . . . 72
Chapter 7 • Permissions on Servers . . . . . . . . . . . . . . . . . . . . . . . . . . . . . . . . . . . . . . . . . . . . . . . . 75Protect Server Definitions . . . . . . . . . . . . . . . . . . . . . . . . . . . . . . . . . . . . . . . . . . . . . . . . 75Hide Server Definitions . . . . . . . . . . . . . . . . . . . . . . . . . . . . . . . . . . . . . . . . . . . . . . . . . 78
Chapter 8 • Security Report Macros . . . . . . . . . . . . . . . . . . . . . . . . . . . . . . . . . . . . . . . . . . . . . . . . 83Overview of Authorization Reporting . . . . . . . . . . . . . . . . . . . . . . . . . . . . . . . . . . . . . . 83Authorization Data Sets . . . . . . . . . . . . . . . . . . . . . . . . . . . . . . . . . . . . . . . . . . . . . . . . . 84Additional Resources for Building Authorization Data Sets . . . . . . . . . . . . . . . . . . . . . 87Dictionary . . . . . . . . . . . . . . . . . . . . . . . . . . . . . . . . . . . . . . . . . . . . . . . . . . . . . . . . . . . . 89
PART 3 Authentication 93
Chapter 9 • Authentication Model . . . . . . . . . . . . . . . . . . . . . . . . . . . . . . . . . . . . . . . . . . . . . . . . . . 95Introduction to the Authentication Model . . . . . . . . . . . . . . . . . . . . . . . . . . . . . . . . . . . 95Authentication to the Metadata Server . . . . . . . . . . . . . . . . . . . . . . . . . . . . . . . . . . . . . . 96Authentication to Data Servers and Processing Servers . . . . . . . . . . . . . . . . . . . . . . . . . 98Mixed Providers . . . . . . . . . . . . . . . . . . . . . . . . . . . . . . . . . . . . . . . . . . . . . . . . . . . . . . . 99Credential Gaps . . . . . . . . . . . . . . . . . . . . . . . . . . . . . . . . . . . . . . . . . . . . . . . . . . . . . . 101How Logins Are Used . . . . . . . . . . . . . . . . . . . . . . . . . . . . . . . . . . . . . . . . . . . . . . . . . 103Authentication Domains . . . . . . . . . . . . . . . . . . . . . . . . . . . . . . . . . . . . . . . . . . . . . . . . 105PUBLIC Access and Anonymous Access . . . . . . . . . . . . . . . . . . . . . . . . . . . . . . . . . . 106
Chapter 10 • Authentication Mechanisms . . . . . . . . . . . . . . . . . . . . . . . . . . . . . . . . . . . . . . . . . . 109Introduction to Authentication Mechanisms . . . . . . . . . . . . . . . . . . . . . . . . . . . . . . . . 109Credential Management . . . . . . . . . . . . . . . . . . . . . . . . . . . . . . . . . . . . . . . . . . . . . . . . 110Direct LDAP Authentication . . . . . . . . . . . . . . . . . . . . . . . . . . . . . . . . . . . . . . . . . . . . 112Host Authentication . . . . . . . . . . . . . . . . . . . . . . . . . . . . . . . . . . . . . . . . . . . . . . . . . . . 113Integrated Windows Authentication . . . . . . . . . . . . . . . . . . . . . . . . . . . . . . . . . . . . . . . 115Pluggable Authentication Modules (PAM) . . . . . . . . . . . . . . . . . . . . . . . . . . . . . . . . . 117SAS Internal Authentication . . . . . . . . . . . . . . . . . . . . . . . . . . . . . . . . . . . . . . . . . . . . . 118SAS Token Authentication . . . . . . . . . . . . . . . . . . . . . . . . . . . . . . . . . . . . . . . . . . . . . . 120Trusted Peer Connections . . . . . . . . . . . . . . . . . . . . . . . . . . . . . . . . . . . . . . . . . . . . . . . 121Trusted User Connections . . . . . . . . . . . . . . . . . . . . . . . . . . . . . . . . . . . . . . . . . . . . . . . 123Web Authentication . . . . . . . . . . . . . . . . . . . . . . . . . . . . . . . . . . . . . . . . . . . . . . . . . . . 123Summary of Methods for LDAP Integration . . . . . . . . . . . . . . . . . . . . . . . . . . . . . . . . 126Summary for Single Sign-On . . . . . . . . . . . . . . . . . . . . . . . . . . . . . . . . . . . . . . . . . . . . 127
iv Contents

Summary by Server Type . . . . . . . . . . . . . . . . . . . . . . . . . . . . . . . . . . . . . . . . . . . . . . . 128
Chapter 11 • Authentication Tasks . . . . . . . . . . . . . . . . . . . . . . . . . . . . . . . . . . . . . . . . . . . . . . . . 131How to Facilitate Authentication . . . . . . . . . . . . . . . . . . . . . . . . . . . . . . . . . . . . . . . . . 131How to Configure SAS Token Authentication . . . . . . . . . . . . . . . . . . . . . . . . . . . . . . . 133How to Configure Web Authentication . . . . . . . . . . . . . . . . . . . . . . . . . . . . . . . . . . . . 134How to Configure Direct LDAP Authentication . . . . . . . . . . . . . . . . . . . . . . . . . . . . . 135How to Configure Integrated Windows Authentication . . . . . . . . . . . . . . . . . . . . . . . . 138How to Store Passwords for the Workspace Server . . . . . . . . . . . . . . . . . . . . . . . . . . . 144How to Store Passwords for a Third-Party Server . . . . . . . . . . . . . . . . . . . . . . . . . . . . 145How to Change Internal Account Policies . . . . . . . . . . . . . . . . . . . . . . . . . . . . . . . . . . 146How to Reduce Exposure of the SASTRUST Password . . . . . . . . . . . . . . . . . . . . . . . 149About the Workspace Server's Options Tab . . . . . . . . . . . . . . . . . . . . . . . . . . . . . . . . . 151
Chapter 12 • Server Configuration, Data Retrieval, and Risk . . . . . . . . . . . . . . . . . . . . . . . . . . . 153About This Chapter . . . . . . . . . . . . . . . . . . . . . . . . . . . . . . . . . . . . . . . . . . . . . . . . . . . . 153Identity Passing . . . . . . . . . . . . . . . . . . . . . . . . . . . . . . . . . . . . . . . . . . . . . . . . . . . . . . . 154Launch Credentials . . . . . . . . . . . . . . . . . . . . . . . . . . . . . . . . . . . . . . . . . . . . . . . . . . . . 155Host Access to SAS Tables . . . . . . . . . . . . . . . . . . . . . . . . . . . . . . . . . . . . . . . . . . . . . 159Choices in Workspace Server Pooling . . . . . . . . . . . . . . . . . . . . . . . . . . . . . . . . . . . . . 164
PART 4 Encryption 169
Chapter 13 • Encryption Model . . . . . . . . . . . . . . . . . . . . . . . . . . . . . . . . . . . . . . . . . . . . . . . . . . . 171Encryption Strength and Coverage . . . . . . . . . . . . . . . . . . . . . . . . . . . . . . . . . . . . . . . . 171Default Settings for On-Disk Encryption . . . . . . . . . . . . . . . . . . . . . . . . . . . . . . . . . . . 172Default Settings for Over-the-Wire Encryption . . . . . . . . . . . . . . . . . . . . . . . . . . . . . . 172About SAS/SECURE . . . . . . . . . . . . . . . . . . . . . . . . . . . . . . . . . . . . . . . . . . . . . . . . . . 173
Chapter 14 • Encryption Tasks . . . . . . . . . . . . . . . . . . . . . . . . . . . . . . . . . . . . . . . . . . . . . . . . . . . 177How to Change Over-the-Wire Encryption Settings for SAS Servers . . . . . . . . . . . . . 177How to Increase Encryption Strength for Passwords at Rest . . . . . . . . . . . . . . . . . . . . 179How to Increase Encryption Strength for Outbound Passwords in Transit . . . . . . . . . 180How to Configure SSL between the Metadata Server and an LDAP Server . . . . . . . . 182
PART 5 Appendix 185
Appendix 1 • User Import Macros . . . . . . . . . . . . . . . . . . . . . . . . . . . . . . . . . . . . . . . . . . . . . . . . . 187Overview of User Bulk Load and Synchronization . . . . . . . . . . . . . . . . . . . . . . . . . . . 187Canonical Tables . . . . . . . . . . . . . . . . . . . . . . . . . . . . . . . . . . . . . . . . . . . . . . . . . . . . . 190User Bulk Load . . . . . . . . . . . . . . . . . . . . . . . . . . . . . . . . . . . . . . . . . . . . . . . . . . . . . . . 192User Synchronization . . . . . . . . . . . . . . . . . . . . . . . . . . . . . . . . . . . . . . . . . . . . . . . . . . 193Sample Code for User Synchronization . . . . . . . . . . . . . . . . . . . . . . . . . . . . . . . . . . . . 195Sample Code for Generic Bulk Load . . . . . . . . . . . . . . . . . . . . . . . . . . . . . . . . . . . . . . 196About the Sample Code for UNIX /etc/passwd . . . . . . . . . . . . . . . . . . . . . . . . . . . . . . 199About the Sample Code for Active Directory . . . . . . . . . . . . . . . . . . . . . . . . . . . . . . . 200Location of the User Bulk Load and Synchronization Macros . . . . . . . . . . . . . . . . . . 202Dictionary . . . . . . . . . . . . . . . . . . . . . . . . . . . . . . . . . . . . . . . . . . . . . . . . . . . . . . . . . . . 202
Appendix 2 • Checklists . . . . . . . . . . . . . . . . . . . . . . . . . . . . . . . . . . . . . . . . . . . . . . . . . . . . . . . . . 209Checklist for a More Secure Deployment . . . . . . . . . . . . . . . . . . . . . . . . . . . . . . . . . . 209
Contents v

Distribution of Selected Privileges . . . . . . . . . . . . . . . . . . . . . . . . . . . . . . . . . . . . . . . . 211Permission Patterns of Selected ACTs . . . . . . . . . . . . . . . . . . . . . . . . . . . . . . . . . . . . . 212Who's Who in the SAS Metadata . . . . . . . . . . . . . . . . . . . . . . . . . . . . . . . . . . . . . . . . . 213
Glossary . . . . . . . . . . . . . . . . . . . . . . . . . . . . . . . . . . . . . . . . . . . . . . . . . . . . . 215Index . . . . . . . . . . . . . . . . . . . . . . . . . . . . . . . . . . . . . . . . . . . . . . . . . . . . . . . . 219
vi Contents

About This Document
Audience
This document helps SAS administrators understand and use suite-wide security featuresof the SAS Intelligence Platform.
This document is organized as follows:
• The first part, Fundamentals, contains the essential information for all securityadministrators:
• a brief overview of security features
• an orientation to managing SAS metadata identities (users, groups, and roles)
• an orientation to the SAS metadata authorization layer (permissions)
• instructions for a few security-related tasks
• The rest of the document contains reference information and instructions forspecialized configurations.
Requirements
PrerequisitesThis document assumes the following conditions:
• You are familiar with the operating systems in your environment.
• You have completed all installation, deployment, and (if applicable) migration tasks.
• You are familiar with the concepts and terminology that are introduced in SASIntelligence Platform: Overview.
Related DocumentsHere is a list of related topics that are outside the scope of this book:
• Security features that are provided by the middle tier are documented in SASIntelligence Platform: Middle-Tier Administration Guide.
• Security features that are unique to a particular client are documented in theadministrative guide for that client. For example, details about a client’s roles and
vii

capabilities are documented as application-specific features. See SAS IntelligencePlatform: Desktop Application Adminstration Guide, SAS Intelligence Platform:Web Application Administration Guide, or the administrative documentation for yoursolution.
• Comprehensive information about encryption is in a separate document. SeeEncryption in SAS.
• Comprehensive information about each implementation of fine-grained access todata is included in documentation for the implementation’s underlying technology.See “Fine-Grained Controls for Data” on page 56.
• For assistance in using a particular interface to perform security-related tasks, see thedocumentation for that interface.
viii About This Document

What's New in SecurityAdministration in SAS 9.3
Overview
New and enhanced features in the following areas increase security and manageability:
• auditing
• authentication
• authorization
• encryption
• user administration
• documentation
Auditing
• You can create audit records for additions, deletions, and updates to public objects(in the Audit.Meta.Updates.PublicObjects category). See Chapter 9, “AdministeringLogging for SAS Servers,” in SAS Intelligence Platform: System AdministrationGuide.
• You can create audit records for additions, deletions, and updates to a user's contactinformation and external identity value (in the Audit.Meta.Security.UserAdmcategory. See Chapter 9, “Administering Logging for SAS Servers,” in SASIntelligence Platform: System Administration Guide.
Authentication
• In Integrated Windows authentication (IWA), support is extended to include serverson UNIX. You can use IWA from Windows desktop clients to servers on Windowsand UNIX. See “Integrated Windows Authentication” on page 115.
• In Integrated Windows authentication, the default service principal name (SPN) nolonger includes a port value. The format is SAS/machine, where machine is the hostmachine’s fully qualified domain name. For example,SAS/A12345.company.com. See “How to Configure Integrated WindowsAuthentication” on page 138.
ix

• User IDs that include unrecognized @domain qualifiers are sent to the -primpdprovider, if that option is specified. Previously, such IDs were sent to the host,regardless of whether -primpd was specified. The -primpd option is a SASsystem option (PRIMARYPROVIDERDOMAIN). This minor change affectsspecialized configurations in which the metadata server directly uses LDAP as anauthentication provider. See “How to Configure Direct LDAP Authentication” onpage 135.
• User IDs that include down-level domain qualifiers are examined to determinewhether SAS recognizes the qualifier as an -authpd domain. If the qualifier isrecognized, the submitted credentials are sent to the associated provider. Previously,such IDs were automatically sent to the host (or to the -primpd provider, if thatoption is specified). The -authpd option is a SAS system option(AUTHPROVIDERDOMAIN). This minor change affects specialized configurationsin which the metadata server directly uses LDAP as an authentication provider. Insuch configurations, users can successfully log on even if they submit their user IDsin down-level format. For example, if -authpd ADIR:USA is specified in themetadata server start command, someone who logs on as USA\joe is nowauthenticated directly against Active Directory, regardless of whether -primpd isset. See “How to Configure Direct LDAP Authentication” on page 135.
• In the initial configuration for a new deployment, the SAS Stored Process WebApplication doesn’t accept PUBLIC-only users. See “PUBLIC Access andAnonymous Access” on page 106.
Authorization
• You can use a new type of public object, the OLAP shared dimension, to helpcentralize access control. You define and secure a shared dimension once, and theninclude it in multiple cubes. Each shared dimension inherits effective permissionsfrom its parent folder (not from the cubes that include it). See “Object Inheritance”on page 44 and “Working with SAS OLAP Shared Dimensions” on page 54.
• In metadata promotion, you can import and export access control templates (ACTs).See “Promotion Details for Specific Object Types” in Chapter 21 of SAS IntelligencePlatform: System Administration Guide.
• In SAS Management Console, you can find ACTs by searching or by navigating onthe Folders tab.
• In authorization reporting, if you use the MEMBERTYPES option and don't specifyto include folders, folders are not included. See “Overview of AuthorizationReporting” on page 83.
• In authorization reporting, new options enable you to specify whether to includecolumns (when a table is returned) and cube components (when a cube is returned).See INCLUDETABLECOMPONENTS and INCLUDECUBECOMPONENTS in“%MDSECDS” on page 89.
• In the authorization display for a SAS Application Server, the CheckInMetadatapermission is listed. This helps to clarify the ability of change-managed users toassociate objects (such as library definitions) to the server. Change management is anoptional feature that is supported for only SAS Data Integration Studio. See the SASIntelligence Platform: Desktop Application Adminstration Guide.
x Security Administration

Encryption
• In direct LDAP authentication, you can use LDAPS for direct connections betweenthe metadata server and the LDAP server. This new feature is applicable in aspecialized configuration in which the metadata server directly uses LDAP as anauthentication provider. See “How to Configure SSL between the Metadata Serverand an LDAP Server” on page 182.
• In Secure Sockets Layer (SSL) configuration, you can exchange OpenSSL libraries.See Chapter 5, “Installing and Configuring SSL under UNIX,” in Encryption in SAS.
• If you have SAS/SECURE, you can use SHA-256 hashing for SAS internal accountpasswords that are stored in the SAS metadata. New deployments that includeSAS/SECURE use SHA-256 by default. A new metadata server option enables youto alter the default. See “HashPasswords="SHA256 | MD5"” on page 147.
• If you have SAS/SECURE, you can force it to use only services that are part of theFederal Information Processing Standard (FIPS) 140-2 specification. This featurecan be enabled during installation, and is configured through a new SAS systemoption (ENCRYPTFIPS). See “SAS/SECURE FIPS 140-2 Compliant Installationand Configuration” in Chapter 1 of Encryption in SAS.
User Administration
• In interfaces such as SAS Management Console and SAS Personal Login Manager,when you connect to a 9.3 metadata server, the Logins table displays a blank cell ifno password is stored. When you connect to a 9.2 metadata server, empty passwordvalues are still displayed as eight asterisks.
• In metadata promotion, you can import and export users, groups, roles, andauthentication domains. See “Promotion Details for Specific Object Types” inChapter 21 of SAS Intelligence Platform: System Administration Guide.
• In SAS Management Console, you can find users, groups, and roles by searching orby navigating on the Folders tab.
• In user bulk load and synchronization, the Active Directory sample code includes acheck to prevent a synchronization that would delete all identities. See “About theSample Code for Active Directory” on page 200.
Documentation Changes
• Documentation for OLAP member-level permissions is exclusively in SAS OLAPServer: User's Guide.
• Documentation for BI row-level permissions has moved to a new guide, SAS Guideto BI Row-Level Permissions.
Documentation Changes xi

xii Security Administration

Accessibility
For information about accessibility for a SAS product, see the online Help for thatproduct or send e-mail to [email protected].
xiii

xiv Accessibility
Recommended Reading
Here is the recommended reading list for this title:
• SAS Guide to BI Row-Level Permissions
• SAS Intelligence Platform: Application Server Administration Guide
• SAS Intelligence Platform: Data Administration Guide
• SAS Intelligence Platform: Desktop Application Adminstration Guide
• SAS Intelligence Platform: Middle-Tier Administration Guide
• SAS Intelligence Platform: Overview
• SAS Intelligence Platform: System Administration Guide
• SAS Intelligence Platform: Web Application Administration Guide
• SAS Management Console: Guide to Users and Permissions
• SAS offers instructor-led training and self-paced e-learning courses to help youadminister the SAS Intelligence Platform. For more information about the coursesavailable, see support.sas.com/admintraining.
For a complete list of SAS publications, go to support.sas.com/bookstore. If you havequestions about which titles you need, please contact a SAS Publishing SalesRepresentative:
SAS Publishing SalesSAS Campus DriveCary, NC 27513-2414Phone: 1-800-727-3228Fax: 1-919-677-8166E-mail: [email protected] address: support.sas.com/bookstore
xv

xvi Recommended Reading

Part 1
Fundamentals
Chapter 1Security Overview . . . . . . . . . . . . . . . . . . . . . . . . . . . . . . . . . . . . . . . . . . . . . . . . 3
Chapter 2User Administration . . . . . . . . . . . . . . . . . . . . . . . . . . . . . . . . . . . . . . . . . . . . . . 9
Chapter 3Access Management . . . . . . . . . . . . . . . . . . . . . . . . . . . . . . . . . . . . . . . . . . . . . 25
Chapter 4Selected Tasks . . . . . . . . . . . . . . . . . . . . . . . . . . . . . . . . . . . . . . . . . . . . . . . . . . 31
1

2

Chapter 1
Security Overview
Introduction to Security Features . . . . . . . . . . . . . . . . . . . . . . . . . . . . . . . . . . . . . . . . . 3
Support for Encryption . . . . . . . . . . . . . . . . . . . . . . . . . . . . . . . . . . . . . . . . . . . . . . . . . 3
Support for Single Sign-On . . . . . . . . . . . . . . . . . . . . . . . . . . . . . . . . . . . . . . . . . . . . . . 4
Auditing of Security Events . . . . . . . . . . . . . . . . . . . . . . . . . . . . . . . . . . . . . . . . . . . . . . 4
Metadata-Based Authorization . . . . . . . . . . . . . . . . . . . . . . . . . . . . . . . . . . . . . . . . . . . 5
Support for Authorization Reporting . . . . . . . . . . . . . . . . . . . . . . . . . . . . . . . . . . . . . . 6
Role-Based Access to Application Features . . . . . . . . . . . . . . . . . . . . . . . . . . . . . . . . . 6
Introduction to Security FeaturesThe SAS Intelligence Platform provides the following security features:
• support for encryption
• support for single sign-on
• auditing of security events
• proprietary, metadata-based authorization
• support for authorization reporting
• role-based availability of application features
The platform cooperates with systems such as the host environment, the Web realm, andthird-party databases. To coordinate identity information, at least one user ID (such as ahost, Active Directory, LDAP, or Web account ID) is stored in the SAS metadata foreach registered user.
Support for EncryptionThe platform offers encryption features that help protect information on disk and intransit. Here is an overview of encryption support:
• Passwords in configuration files and the metadata are encrypted or encoded. Mostother metadata is not encrypted.
3

• Passwords in transit to and from SAS servers are encrypted or encoded. You canchoose to encrypt all such traffic, instead of encrypting only credentials.
See Also• “Encryption Model” on page 171
• “Encryption Tasks” on page 177
• Encryption in SAS
Support for Single Sign-OnThe platform supports single sign-on (SSO) as follows:
• To bypass the initial logon prompt when launching a desktop application, useIntegrated Windows authentication.
• To bypass the initial logon prompt when launching a Web application, configureWeb authentication.
• To avoid secondary logon prompts when accessing data servers and processingservers, use a combination SAS token authentication, Integrated Windowsauthentication, and credential management.
Note: As a convenience for users who don’t use SSO when they log on, you can permitusers to save their logon credentials on the client side. In the default configurationfor a new deployment, this feature is enabled. See “Client-Side Storage ofPasswords” on page 15.
See Also• “Authentication Model” on page 95
• “Authentication Mechanisms” on page 109
Auditing of Security EventsSecurity-related events are logged as part of a system-wide logging facility. Thefollowing table describes security-related log categories.
Table 1.1 Selected Security-Related Log Categories
Category Events Captured
Audit.Authentication Authentication events, client connection information.
Audit.Meta.Security.AccCtrlAdm Changes to explicit controls, ACTs, application of ACTsto objects, and passwords (on objects such as Tables,Connections, and ProtectedPassthrus). Includesadditions, deletions, modifications, and failed attemptsto perform these actions.
4 Chapter 1 • Security Overview

Category Events Captured
Audit.Meta.Security.GrpAdm Changes to memberships (for groups or roles). Includesadding members, removing members, and failedattempts to perform these actions.
Audit.Meta.Security.UserAdm Changes to users, groups, roles, logins, internalaccounts, and authentication domains. Includesadditions, deletions, modifications, and failed attemptsto perform these actions.
Audit.Meta.Updates.PublicObjects Add, update, delete, and change management events onpublic objects.
For more information, see Chapter 9, “Administering Logging for SAS Servers,” in SASIntelligence Platform: System Administration Guide.
T I P For a collection of utilities to support auditing and reporting against thegenerated logs, search for "Audit and Performance Measurement" atsupport.sas.com.
Metadata-Based AuthorizationThe platform provides a proprietary, metadata-based authorization layer thatsupplements protections from the host environment and other systems. You can use thislayer to manage access to almost any metadata object (for example, reports, datadefinitions, information maps, jobs, stored processes, and server definitions).
Across authorization layers, protections are cumulative. In order to perform a task, a usermust have sufficient access in all applicable layers.
In the metadata layer, the following permissions are always enforced:
• the ReadMetadata permission (RM), which controls the ability to see an object
• the WriteMetadata permission (WM), which controls the ability to update or deletean object
Other permissions are specialized and affect only certain types of objects.
CAUTION:In the metadata authorization layer, not all permissions are enforced for allitems. It is essential to understand which actions are controlled by each permission.
CAUTION:Some clients enable power users to create and run SAS programs that accessdata directly, bypassing metadata-layer controls. It is essential to managephysical layer access in addition to metadata-layer controls. For example, use hostoperating system protections to limit access to any sensitive SAS data sets.
For more information, see “Authorization Model” on page 41.
Metadata-Based Authorization 5

Support for Authorization ReportingAuthorization reporting creates a snapshot of metadata-layer access controls. SASprovides the %MDSECDS autocall macro to enable you to easily build data sets ofpermissions information. You can use those data sets as a data source for security reportsthat you create. You can also identify changes in settings by comparing data sets that aregenerated at different times.
For more information, see Chapter 8, “Security Report Macros,” on page 83.
Role-Based Access to Application FeaturesWhile permissions affect access to individual objects, roles control the availability ofapplication features (such as certain buttons, plug-ins, and menu items). For example,role memberships determine who can see the Server Manager plug-in (in SASManagement Console), compare data (in SAS Enterprise Guide), or directly open aninformation map (in SAS Web Report Studio).
Here are some key points:
• In general, roles do not protect data or metadata. Roles just control which features ina particular application are available to which users.
• An application feature that is under role-based management is called a capability.Each role provides multiple capabilities. A user or group can be in multiple roles.
• Not all applications have roles. Not all application features are under rolemanagement. Each application that supports roles provides a fixed set of capabilities.You can't convert a feature that isn't a capability into a capability.
T I P If you add custom tasks or develop custom plug-ins, you can register thosefeatures as capabilities.
• Capabilities are additive. There are no capabilities that limit what a user can do.
• Capabilities can be categorized as follows:
explicit capabilitiescan be incrementally added to or removed from any role (other than theunrestricted role, which always provides all explicit capabilities). Most roleshave explicit capabilities.
implicit capabilitiesare permanently bound to a certain role. The metadata server's roles provideimplicit capabilities. For example, the user administration role provides thecapability to add users, but there is no explicit Create Users capability.
contributed capabilitiesare implicit or explicit capabilities that are assigned through role aggregation. Ifyou designate one role as a contributing role for another role, all of the first role'scapabilities become contributed capabilities for the second role.
• You can't assign permissions to a role. You can’t assign capabilities to a group.
• A user can't temporarily assume or relinquish a role. All of a user's roles are active atall times.
6 Chapter 1 • Security Overview

T I P You can give an administrator two user definitions. This enables theadministrator to function as a regular user some of the time.
• For details about a particular application's capabilities and roles, see theadministrative documentation for that application.
For more information, see “Roles” on page 13.
Role-Based Access to Application Features 7

8 Chapter 1 • Security Overview

Chapter 2
User Administration
About User Administration . . . . . . . . . . . . . . . . . . . . . . . . . . . . . . . . . . . . . . . . . . . . . . 9Introduction . . . . . . . . . . . . . . . . . . . . . . . . . . . . . . . . . . . . . . . . . . . . . . . . . . . . . . . . . 9Who Can Manage Users, Groups, and Roles? . . . . . . . . . . . . . . . . . . . . . . . . . . . . . 10Where is User Administration Performed? . . . . . . . . . . . . . . . . . . . . . . . . . . . . . . . . 10
Users . . . . . . . . . . . . . . . . . . . . . . . . . . . . . . . . . . . . . . . . . . . . . . . . . . . . . . . . . . . . . . . . 11
Groups . . . . . . . . . . . . . . . . . . . . . . . . . . . . . . . . . . . . . . . . . . . . . . . . . . . . . . . . . . . . . . 12
Roles . . . . . . . . . . . . . . . . . . . . . . . . . . . . . . . . . . . . . . . . . . . . . . . . . . . . . . . . . . . . . . . . 13Role Definitions . . . . . . . . . . . . . . . . . . . . . . . . . . . . . . . . . . . . . . . . . . . . . . . . . . . . 13Main Administrative Roles . . . . . . . . . . . . . . . . . . . . . . . . . . . . . . . . . . . . . . . . . . . . 14Differences between Roles and Groups . . . . . . . . . . . . . . . . . . . . . . . . . . . . . . . . . . 15Availability of Application Features in a New Deployment . . . . . . . . . . . . . . . . . . 15
Passwords . . . . . . . . . . . . . . . . . . . . . . . . . . . . . . . . . . . . . . . . . . . . . . . . . . . . . . . . . . . 15Password Policies . . . . . . . . . . . . . . . . . . . . . . . . . . . . . . . . . . . . . . . . . . . . . . . . . . . 15Client-Side Storage of Passwords . . . . . . . . . . . . . . . . . . . . . . . . . . . . . . . . . . . . . . . 15External Login Passwords . . . . . . . . . . . . . . . . . . . . . . . . . . . . . . . . . . . . . . . . . . . . 16Internal Account Passwords . . . . . . . . . . . . . . . . . . . . . . . . . . . . . . . . . . . . . . . . . . . 16Managed Passwords . . . . . . . . . . . . . . . . . . . . . . . . . . . . . . . . . . . . . . . . . . . . . . . . . 16
Identity Hierarchy . . . . . . . . . . . . . . . . . . . . . . . . . . . . . . . . . . . . . . . . . . . . . . . . . . . . 17
External Identities . . . . . . . . . . . . . . . . . . . . . . . . . . . . . . . . . . . . . . . . . . . . . . . . . . . . 18
Windows Privileges . . . . . . . . . . . . . . . . . . . . . . . . . . . . . . . . . . . . . . . . . . . . . . . . . . . . 18Access This Computer from the Network . . . . . . . . . . . . . . . . . . . . . . . . . . . . . . . . 18Log on as a Batch Job . . . . . . . . . . . . . . . . . . . . . . . . . . . . . . . . . . . . . . . . . . . . . . . . 19Trusted for Delegation . . . . . . . . . . . . . . . . . . . . . . . . . . . . . . . . . . . . . . . . . . . . . . . 19
Windows User ID Formats . . . . . . . . . . . . . . . . . . . . . . . . . . . . . . . . . . . . . . . . . . . . . 20
Uniqueness Requirements . . . . . . . . . . . . . . . . . . . . . . . . . . . . . . . . . . . . . . . . . . . . . . 22
About User Administration
IntroductionIn order to make access distinctions and track user activity, a security system must knowwho is making each request. In the platform, the primary user administration task is tostore each user's external account ID in the SAS metadata. SAS uses its copy of theseIDs to establish a unique SAS identity for each connecting user. All of a user's metadata-
9
layer memberships, permissions, and capabilities are ultimately tied to the user's SASidentity.
Note: It is not necessary to store passwords in the SAS metadata for the purpose ofidentifying a user. SAS identity is determined by examining stored user IDs, not byexamining stored passwords.
Note: For some service identities and metadata administrators, you can use a SASinternal account instead of a stored SAS copy of an external account ID.
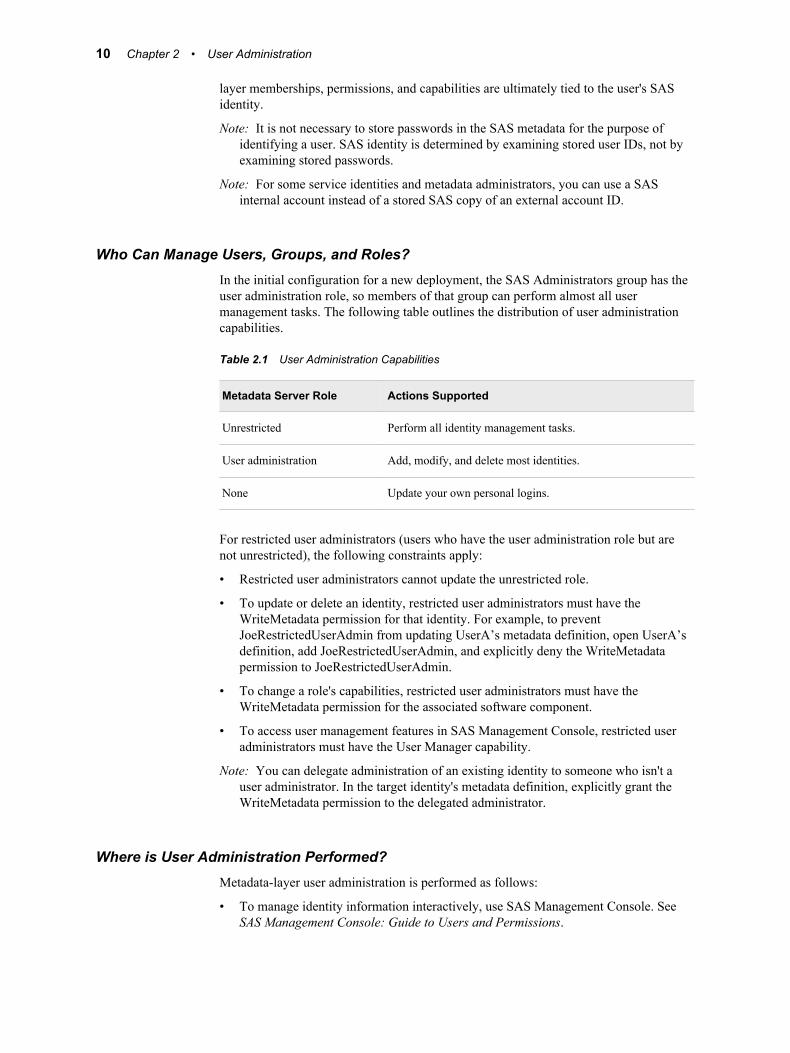
Who Can Manage Users, Groups, and Roles?In the initial configuration for a new deployment, the SAS Administrators group has theuser administration role, so members of that group can perform almost all usermanagement tasks. The following table outlines the distribution of user administrationcapabilities.
Table 2.1 User Administration Capabilities
Metadata Server Role Actions Supported
Unrestricted Perform all identity management tasks.
User administration Add, modify, and delete most identities.
None Update your own personal logins.
For restricted user administrators (users who have the user administration role but arenot unrestricted), the following constraints apply:
• Restricted user administrators cannot update the unrestricted role.
• To update or delete an identity, restricted user administrators must have theWriteMetadata permission for that identity. For example, to preventJoeRestrictedUserAdmin from updating UserA’s metadata definition, open UserA’sdefinition, add JoeRestrictedUserAdmin, and explicitly deny the WriteMetadatapermission to JoeRestrictedUserAdmin.
• To change a role's capabilities, restricted user administrators must have theWriteMetadata permission for the associated software component.
• To access user management features in SAS Management Console, restricted useradministrators must have the User Manager capability.
Note: You can delegate administration of an existing identity to someone who isn't auser administrator. In the target identity's metadata definition, explicitly grant theWriteMetadata permission to the delegated administrator.
Where is User Administration Performed?Metadata-layer user administration is performed as follows:
• To manage identity information interactively, use SAS Management Console. SeeSAS Management Console: Guide to Users and Permissions.
10 Chapter 2 • User Administration
• To import identity information in bulk from an external user store (such as ActiveDirectory) to the SAS metadata, write SAS code. See Appendix 1, “User ImportMacros,” on page 187.
• To copy identity metadata from one SAS repository to another, use the metadatapromotion tools. See Chapter 18, “Promotion Tools Overview,” in SAS IntelligencePlatform: System Administration Guide.
• To audit changes to metadata identity definitions, use theAudit.Meta.Security.GrpAdm and Audit.Meta.Security.UserAdm log categories. See“Auditing of Security Events” on page 4.
See Also• “How SAS Identity Is Determined” on page 96
• “PUBLIC Access and Anonymous Access” on page 106
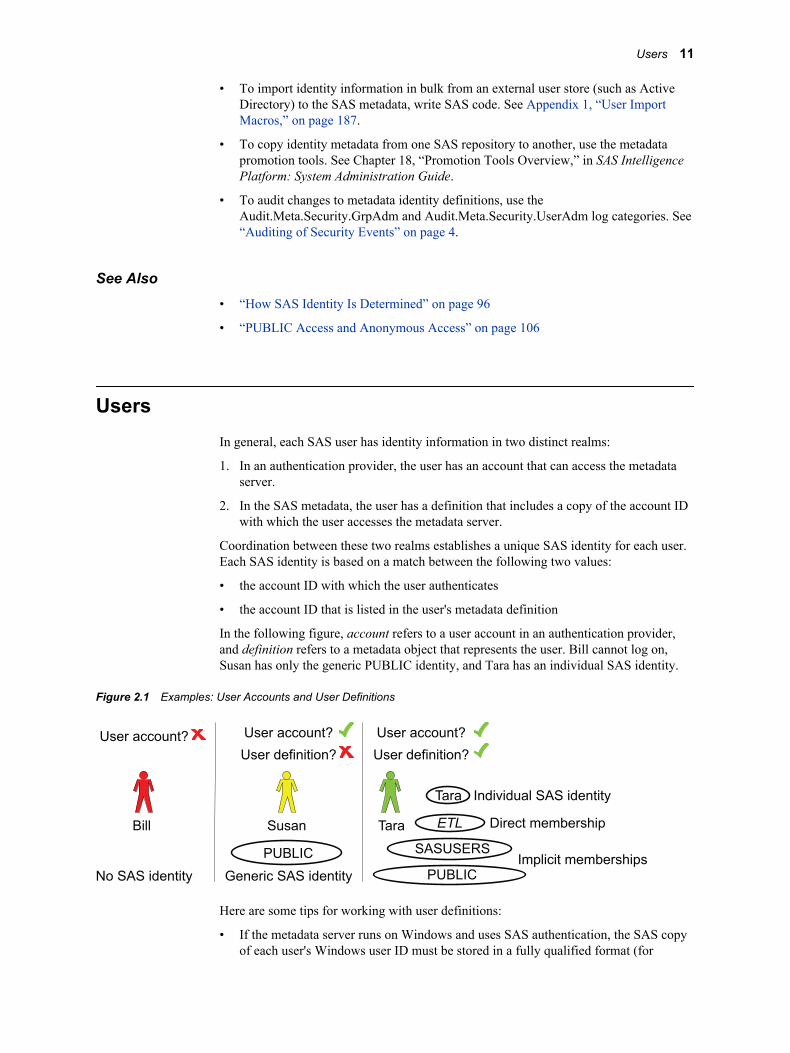
UsersIn general, each SAS user has identity information in two distinct realms:
1. In an authentication provider, the user has an account that can access the metadataserver.
2. In the SAS metadata, the user has a definition that includes a copy of the account IDwith which the user accesses the metadata server.
Coordination between these two realms establishes a unique SAS identity for each user.Each SAS identity is based on a match between the following two values:
• the account ID with which the user authenticates
• the account ID that is listed in the user's metadata definition
In the following figure, account refers to a user account in an authentication provider,and definition refers to a metadata object that represents the user. Bill cannot log on,Susan has only the generic PUBLIC identity, and Tara has an individual SAS identity.
Figure 2.1 Examples: User Accounts and User Definitions
User account?
Bill Susan
PUBLIC SASUSERS
PUBLIC
Tara
Tara
ETL
User account? User account?
Individual SAS identity
Direct membership
Implicit memberships
User definition? User definition?
No SAS identity Generic SAS identity
Here are some tips for working with user definitions:
• If the metadata server runs on Windows and uses SAS authentication, the SAS copyof each user's Windows user ID must be stored in a fully qualified format (for
Users 11

example, WindowsDomain\user-ID, MachineName\user-ID, or [email protected]).
• If you find that a user has only the PUBLIC identity even though the user has a userdefinition, the user's stored account ID might be missing, not accurately entered, ornot in the correct format. Passwords and authentication domain assignments arenever the cause of this problem. The match is based only on the account ID.
• Regular users (non-administrators) can maintain their own logins, but cannot makeother changes to their definitions.
• Permission settings on a user definition do not determine what that user can do.Those settings can affect the ability of other identities to update or delete the userdefinition itself. Special rules automatically protect user, group, and role definitions.
See Also• “About User Administration” on page 9
• “Create Metadata User Definitions” on page 31
GroupsGroups are primarily used in access controls, because it is more efficient to assignpermissions to groups than to individual users. You can also use a group to populate arole or to make a shared credential available to multiple users. The following figureillustrates how the users in the previous topic might participate in a group structure:
Figure 2.2 Example: Users in a Group Structure
PUBLIC
Bill Susan Tara
ReportUsers
SAS Administrators
SASUSERS
ETL
The preceding figure introduces three important predefined groups.
Table 2.2 PUBLIC, SASUSERS, SAS Administrators Groups
Group Description
PUBLIC Automatically includes everyone who can access the metadata server, either directly orthrough a trust relationship. A user who does not have an individual identity has only thePUBLIC group identity.
12 Chapter 2 • User Administration

Group Description
SASUSERS Automatically includes those members of the PUBLIC group who have an individualidentity. All members of the SASUSERS group are also members of the PUBLIC group.
SAS Administrators A standard group for metadata administrators. In a standard configuration, membership inthis group provides broad access and most administrative capabilities, but does not provideunrestricted status.
Here are some tips for working with group definitions:
• You can create a nested group structure by making one group a member of anothergroup.
• Most groups don't have logins (stored credentials). A group login makes a sharedexternal account available to all members of the group. Such outbound loginstypically provide access to a third-party database server and should include both auser ID and a password (as well as an authentication domain).
• Permission settings on a group definition do not determine what that group can do.Those settings can affect the ability of other identities to update or delete the groupdefinition itself. Special rules automatically protect user, group, and role definitions.
See Also• “Identity Hierarchy” on page 17
• “Differences between Roles and Groups” on page 15
Roles
Role DefinitionsRoles control the availability of application features such as certain menu items, plug-ins, and buttons. In the initial configuration, registered users have almost all non-administrative capabilities. In many cases, this is appropriate and sufficient. However,you can choose to alter the initial configuration by using either or both of the followingtechniques:
• To increase or reduce the availability of a role, change the assignment of members tothe role.
• To redistribute capabilities, change the assignment of capabilities to roles, or createadditional roles.
Here are some tips for working with roles:
• Before you make changes, make sure you have a complete and current backup.
• Capability assignments can be redundant across roles. To prevent someone fromhaving a capability, you must make sure they aren't in any role that provides thatcapability.
• Never change the name of a predefined role.
Roles 13

• There are no negative capabilities (capabilities that limit what someone can do). Youcannot deny a capability to anyone.
• Some roles have implicit capabilities (capabilities that are bound to the role and arenot displayed in the user interface). For example, members of the Metadata Server:User Administration role can create new users, but there is no explicit CreateUsers capability.
• Contributing role relationships are monolithic. You cannot deselect a contributedcapability. These relationships are also dynamic. A change to the capabilities of onerole affects any roles to which the first role contributes its capabilities.
• Permission settings on a role definition do not determine what that role can do.Those settings can affect the ability of other identities to update or delete the roledefinition itself. Special rules automatically protect user, group, and role definitions.
Main Administrative Roles
Table 2.3 Introduction to Selected Administrative Roles
Role Capabilities
Metadata Server:
Unrestricted
Members have all explicit capabilities, all metadata server capabilities, and cannot be deniedany permissions in the metadata layer. Unrestricted users can use only those logins that areassigned to them (or to groups to which they belong).
Metadata Server:
User Administration
Members can create, update, and delete users, groups, roles (other than the unrestricted role),internal accounts, logins, and authentication domains. Restricted user administrators cannotupdate identities for which they have an explicit or ACT denial of WriteMetadata.
Metadata Server:
Operation
Members can administer the metadata server (monitor, stop, pause, resume, quiesce) and itsrepositories (add, initialize, register, unregister, delete). Only someone who has an external userID that is listed in the adminUsers.txt file with a preceding asterisk can delete, unregister, add,or initialize a foundation repository. Only an unrestricted user can analyze and repair metadataor perform tasks when the metadata server is paused for administration.
Management Console:
Advanced
In SAS Management Console, members can see all of the plug-ins that are under role-basedmanagement (in the initial configuration).
Note: The metadata server's adminUsers.txt file provides many of the same privilegesthat it did in previous releases. However, we recommend that you use roles instead,except as specified in documentation for a particular task.
Note: The method that most applications use to retrieve credentials supports normal useof stored credentials, regardless of role memberships. However, if someone who hasuser administration capabilities makes a raw metadata request for logins, no usablepasswords are returned.
CAUTION:If the identity that the object spawner uses to retrieve server launch credentialsfrom the metadata has the user administration role (or the unrestricted role),the spawner will not operate properly. Do not give user administration capabilitiesto the identity that the object spawner uses to retrieve server launch credentials fromthe metadata. In a typical configuration, the spawner uses the SAS Trusted User toretrieve server launch credentials (through a raw metadata request).
14 Chapter 2 • User Administration
Differences between Roles and GroupsRoles and groups serve distinct purposes. You cannot assign permissions to a role orcapabilities to a group. Here are some additional distinctions:
• The identity hierarchy is relevant for groups, but not for roles. If you are a memberof a role, you have all of that role's capabilities, regardless of whether you are adirect member of that role and what your other memberships are.
• You can deny a permission to a group, but you cannot deny a capability to a role.Each role either provides or doesn't provide each capability. No role takescapabilities away from its members.
• A group's permissions are not displayed as part of a group definition, but a role'scapabilities are displayed as part of a role definition.
• A group can be a member of another group, but a role cannot be a member ofanother role. Instead, one role can contribute its capabilities to another role.
Availability of Application Features in a New DeploymentIn general, the initial configuration provides appropriate access to application features.Most nonadministrative capabilities are available to either PUBLIC (everyone who canaccess the metadata server) or SASUSERS (those members of PUBLIC who have awell-formed user definition). To ensure appropriate availability of features for yourapplications, see the administrative documentation for each application.
Passwords
Password PoliciesEach authentication provider sets password policies for accounts in that provider. Forexample, the password expiration policy for a host account is determined by that host.
For the SAS internal authentication provider, you can set server-level policies (in themetadata server’s omaconfig.xml file) and per-account policies (in a user’s metadatadefinition). See “How to Change Internal Account Policies” on page 146.
Client-Side Storage of PasswordsIn the initial configuration, users can choose to store their credentials in their client-sideconnection profiles. This prepopulates the logon dialog box in desktop applications.
For most desktop applications, the SASSEC_LOCAL_PW_SAVE= option controls theavailability of a check box that enables users to choose whether to store credentialslocally. To prevent users from creating a local copy of their credentials, setSASSEC_LOCAL_PW_SAVE="N" (or ="0" or ="F") in the metadata server'somaconfig.xml file and restart the server.
Note: A change to the SASSEC_LOCAL_PW_SAVE= setting takes effect after themetadata server is restarted. Each client uses the previous setting for its firstconnection, discovers the revised metadata server setting, and conforms to thatrevised setting for subsequent connections. If you change the setting to disallow
Passwords 15

saved credentials, and credentials are already present in a user's connection profile,those credentials must be manually removed.
Note: For a few solutions rich clients (for example, SAS Model Manager, SASEnterprise Miner, and SAS Forecast Studio), the ability to store credentials in client-side connection profiles is instead controlled by thePolicy.AllowClientPasswordStorage property. This property is available on thePlug-ins tab in SAS Management Console (under Application Management ðConfiguration Manager ð SAS Application Infrastructure ð Settings ðPolicies) as the property Allow client password storage.
External Login PasswordsIn most cases, the SAS copy of an external account includes only a user ID. For thesecases, no password updates in metadata are necessary.
For any external passwords that are stored in the SAS metadata, updates are driven bychanges that first occur in the external authentication provider. For example, if a copy ofthe password for an Oracle account or a host account is stored in a group login, you mustmaintain that copy so that it always matches the actual password. Any change to theactual password (in Oracle) must be followed by a corresponding update to the SAScopy of the password (in the group login in the SAS metadata).
You can update stored passwords in SAS Management Console. If you own logins thatinclude passwords, you can also update those passwords in SAS Personal LoginManager. For example, to update the SAS copy of an external password in SASManagement Console, navigate to the owning user or group definition, select theAccounts tab, select a login, and click Edit.
Internal Account PasswordsEvery SAS internal account has a password. By initial policy, these passwords don'texpire.
To update a SAS internal password in SAS Management Console, navigate to theowning user definition, select the Accounts tab, and click Update (at the bottom of thetab). If you have your own SAS internal account, you can also update your internalpassword in SAS Personal Login Manager.
T I P If repeated attempts to log on with an internal account fail, that account might belocked. See “Unlock an Internal Account” on page 36.
Managed PasswordsPasswords for a few service accounts require special coordination because thesepasswords are included in configuration files. To update these passwords, use the SASDeployment Manager.
See Also• “SAS Internal Authentication” on page 118
• “Update a Managed Password” on page 33
16 Chapter 2 • User Administration

Identity HierarchyThe identity hierarchy can affect authorization decisions and login priority (in credentialretrieval from the SAS metadata). The identity hierarchy is not relevant for roles.
The identity hierarchy establishes the following precedence ranking:
1. the user's individual identity, based on the user's authenticated ID.
2. a group that has the user as a direct member. This is a first-level group membershipfor the user.
3. a group that has another user group as a direct member. For example, assume that theuser belongs to a group named ETL_Advanced, and that group is a member ofanother group called ETL_Basic. In that case, the ETL_Basic group is a second-levelgroup for that user. If you have additional levels of nesting, each successive level hasless precedence.
4. the SASUSERS implicit group, which includes everyone who has an individualidentity.
5. the PUBLIC implicit group, which includes everyone who can access the metadataserver (regardless of whether they have an individual identity or not).
The following table provides examples of the hierarchy:
Table 2.4 Examples of Identity Hierarchies
Scenario User's Identity Hierarchy
User has no individual identity. Primary identity: PUBLIC
User has an identity and no explicit group memberships. Primary identity: self
First-level memberships: SASUSERS
Second-level memberships: PUBLIC
User is a direct member of GroupA and GroupB.
GroupA is a member of the Report Users group.
Primary identity: self
First-level memberships: GroupA, GroupB
Second-level memberships: Report Users
Third-level memberships: SASUSERS
Fourth-level memberships: PUBLIC
T I P To avoid introducing unnecessary complexity, don't make PUBLIC orSASUSERS a member of another group. For example, if you make PUBLIC amember of GroupA, then a user who is an indirect member of GroupA (through hisautomatic membership in PUBLIC) has GroupA as his lowest precedencemembership. This contradicts the usual expectation that every user's lowestprecedence membership is PUBLIC. It is not a problem for PUBLIC or SASUSERSto be a member of a role.
Identity Hierarchy 17

See Also• “Two Relationship Networks” on page 42
• “Authorization Decisions” on page 55
External IdentitiesAn external identity is a synchronization key that facilitates coordination betweenidentity entries in the metadata and identity entries in your authentication provider. Ifyou use batch processes to coordinate metadata identity information with yourauthentication provider, external identities are set up and used as follows:
1. In your authentication provider, you select a field to use for the mapping. Thisshould be a field that contains a unique and unchanging value for each user, group,and role that you want to manage with batch processes. Typically, this is an identifiersuch as employee number.
2. When you perform an initial import from your authentication provider into themetadata, the keyid values in the canonical tables become external identity values inthe metadata. Each imported identity has at least one external identity value.
3. During the synchronization process, external identity values that are extracted fromthe metadata are used as the keyid in the target tables. Because these values alsoexist in the extraction from your authentication provider, external identity values canbe used to match corresponding entries in the two sets of tables.
Note: If you need to incorporate manually created identities into a batch synchronizationprocess, manage each identity’s external identity value from the General propertiesof its metadata definition.
See AlsoAppendix 1, “User Import Macros,” on page 187
Windows Privileges
Access This Computer from the Network
Table 2.5 Access This Computer from the Network
Description This privilege is required in order to connect to SAS servers.
To Whom Give this privilege to all users who access SAS servers on Windows.
How Typically, this right is already granted to the Windows group Everyone. To confirm, check theWindows local policy settings.
18 Chapter 2 • User Administration

Log on as a Batch Job
Table 2.6 Log on as a Batch Job
Description This privilege is required in order to run a stored process server or any type of workspace server.
To Whom On the Windows computer that hosts the SAS object spawner, give this privilege to the accounts underwhich workspace servers and stored process servers run:
• any service account under which one of these servers run
• all puddle logins for any client-side pooled workspace servers
• any user accounts under which a standard workspace server runs (users who authenticate byIntegrated Windows authentication or SAS token authentication don't need this privilege)
How Modify the local security policy. For example, on Windows XP, this right is managed from theWindows control panel under Administrative Tools ð Local Security Policy ð User RightsAssignment ð Log on as a batch job. If you have an operating system group (such as SAS ServerUsers) that has this right, you just add users and service account identities to that group.
Trusted for Delegation
Table 2.7 Trusted for Delegation
Description This privilege enables a process to allow each user's credentials to be sent to further machines forauthentication (for example, to access a UNC path). The privilege is needed if the workspace server isaccessed through Integrated Windows authentication and provides access to network resources.
Note: With Integrated Windows authentication, the workspace server does not receive the requestinguser's credentials, so the workspace server cannot provide credentials for downstream servers. Instead,the spawner account must be trusted to delegate each requesting user's identity as necessary.
To Whom If the workspace server runs on Windows, give this privilege to the account under which the objectspawner runs. By default, the spawner runs as a service under the local system account, so thecomputer account for spawner's host needs the privilege.
If the workspace server runs on UNIX, give this privilege to the service principal account that isreferenced in the relevant keytab (the keytab is based on service principal names that correspond to aparticular service principal account). For more information, see the chapter "Configuring IntegratedWindows Authentication" in Configuration Guide for SAS Foundation for UNIX Environments athttp://support.sas.com/documentation/installcenter ).
Windows Privileges 19

How As a Windows domain administrator, under Start ð Control Panel ð Administrative Tools ðActive Directory Users and Computers, access the properties dialog box for the relevant account andgrant the privilege.
If your spawner runs on Windows under the local system account, select the spawner host machine inActive Directory under Computers. On the Delegation tab (or the General tab), select the Trust thiscomputer for delegation check box.
If your spawner runs on Windows under a domain account, select that account in Active Directoryunder Users. On the Delegation tab (or the Accounts tab), select the Account is trusted fordelegation check box.
If your spawner runs on UNIX, select the appropriate service principle account in Active Directoryunder Users. On the Delegation tab (or the Accounts tab), select the Account is trusted fordelegation check box.
Note: In most cases, an object spawner on Windows runs as a service under the localsystem account. If the spawner instead runs under some other account, that accountmust be a Windows administrator on the spawner's host and have the Windows userrights Adjust memory quotas for a process and Replace a process level token.These user rights assignments are part of the local security policy for the Windowscomputer that hosts the spawner.
See Also• “Host Authentication” on page 113
• “Integrated Windows Authentication” on page 115
Windows User ID FormatsIn most cases, users can launch SAS applications using the same ID and password asthey use in the rest of your computing environment. However, when you create a SAScopy of a Windows user ID, you must store the user ID in the appropriate format. Inmost cases, you must use a particular qualified format (for example, WindowsDomain\user, MachineName\user, or [email protected]). With certain authenticationconfigurations, a different format is required. Failure to appropriately qualify a storeduser ID causes the user to have only the PUBLIC identity.
If your site accepts Windows IDs in disparate formats, you must coordinate the format ofthe copies with the format in which users submit their IDs. This table describes thecommon forms for an Active Directory user ID:
Table 2.8 Overview: Forms of an Active Directory User ID
Form Basic Syntax Examples
Short user joe
UPN user@UPNsuffix [email protected] [email protected]
Down-level down-level-domain-name\user orionsports\joe or sales\joe or mymachine\joe
20 Chapter 2 • User Administration

Form Basic Syntax Examples
Kerberos user@realm [email protected]
Note: User Principal Name (UPN) is an Active Directory concept. Down-level domainis a Windows NT concept. The realm in a Kerberos name is usually a Windowsdomain. A Kerberos name can include an instance (in the format user/instance@realm). Additional site-specific variations might occur.
In the platform, follow these guidelines for Windows user IDs:
• If users log on interactively, they can usually use the short form. Here are someexceptions:
• The user has multiple accounts with the same user ID in different down-leveldomains (for example, machine\joe, domain1\joe, and domain2\joe).
• The site has configured direct use of LDAP and has not specified -primpd (thePRIMARYPROVIDERDOMAIN system option).
• If users log on interactively, they can also use one other site-supported form (eitherthe UPN form or the down-level form). Use one of these approaches:
• In the metadata, store each user ID in UPN form. Tell users not to use the down-level form when they log on.
• In the metadata, store each user ID in down-level form. Tell users to not use theUPN form when they log on.
• If users log on to SAS desktop applications through Integrated Windowsauthentication, their user IDs should usually be stored in down-level form. Ingeneral, that is the form in which SAS obtains user IDs after Kerberos authenticationoccurs.
Note: If you prefer to store user IDs in the native Kerberos form, add the settingSASUSEKERBNAME true as a Windows system environment variable on theserver host. For example, on the Windows desktop, right-click My Computer,select Properties, select the Advanced tab, click the Environment Variablesbutton, add the setting under System variables, and reboot the machine. Thissetting affects only connections that use Integrated Windows authentication. Ifyou use this setting, you might want to make sure that the Integrated Windowsauthentication process always chooses the Kerberos protocol.
• If users log on to SAS Web applications through Integrated Windows authentication(which occurs only if you configure Web authentication and have set up IntegratedWindows authentication with your Web provider), the form of the returned user IDmight differ. See the documentation for your Web application server.
Note: In the status bar of some applications, a currently connected Windows user ID isalways displayed in the format user@VALUE, regardless of how the user logged onor how the user's ID is stored in the metadata. For example, if you log on as Joe andyour stored user ID is WIN\joe, the status bar displays your authenticated ID asjoe@WIN.
See Also• “Direct LDAP Authentication” on page 112
• “How SAS Identity Is Determined” on page 96
• “Integrated Windows Authentication” on page 115
Windows User ID Formats 21

• “Authentication to the Metadata Server” on page 96
Uniqueness RequirementsThe metadata server enforces the following identity-related constraints:
• You cannot create a user definition that has the same name as an existing userdefinition. The display names don't have to be unique.
T I P We recommend that you avoid using spaces or special characters in the nameof a user, group, or role. Not all components support spaces and specialcharacters in identity names.
• You cannot create a group or role definition that has the same name as an existinggroup or role definition. The display names don't have to be unique.
• You cannot assign the same external account ID to two different identities. All of thelogins that include a particular ID must be owned by the same identity. Thisrequirement enables the metadata server to resolve each ID to a single identity.
• This requirement is case-insensitive. For example, you cannot assign a login withan ID of smith to one user and a login with an ID of SMITH to another user.
• This requirement applies to the fully qualified form of the ID. For example, youcan assign a login with an ID of winDEV\brown to one user and a login with anID of winPROD\brown to another user. In this example, winDEV and winPRODare Windows domain names, which are incorporated into the fully qualified formof an external account ID.
• This requirement cannot be mitigated by associating the logins with differentSAS authentication domains. For example, assume that one user has a login withan ID of smith that is associated with a SAS authentication domain namedDefaultAuth. In that case, you cannot give any other user a login with the IDsmith, even if you plan to assign the login to a different SAS authenticationdomain.
T I P To enable multiple users to share an account, store the credentials for thataccount in a login as part of a group definition. Then add the users who willshare the account as members of that group definition.
• If you give a user two logins that contain the same ID, the logins must be associatedwith different authentication domains. Within an authentication domain, each IDmust be unique. For example, if you give the person Tara O'Toole two logins thatboth have an ID of tara, then you cannot associate both of those logins with theOraAuth authentication domain.
Note: Like the previous requirement, this requirement is case-insensitive and isapplied to the fully qualified form of the external account ID.
• A user can have multiple locations, e-mail addresses, and telephone numbers.However, each user can have only one item of a given type. For example, a user canhave one home e-mail address and one work e-mail address, but not two work e-mailaddresses.
See Also• “Create Metadata User Definitions” on page 31
22 Chapter 2 • User Administration
• “How SAS Identity Is Determined” on page 96
Uniqueness Requirements 23

24 Chapter 2 • User Administration

Chapter 3
Access Management
About Access Management . . . . . . . . . . . . . . . . . . . . . . . . . . . . . . . . . . . . . . . . . . . . . 25Introduction . . . . . . . . . . . . . . . . . . . . . . . . . . . . . . . . . . . . . . . . . . . . . . . . . . . . . . . . 25Who Can Set Permissions? . . . . . . . . . . . . . . . . . . . . . . . . . . . . . . . . . . . . . . . . . . . . 26Where is Access Management Performed? . . . . . . . . . . . . . . . . . . . . . . . . . . . . . . . 26
Basics of Metadata Authorization . . . . . . . . . . . . . . . . . . . . . . . . . . . . . . . . . . . . . . . . 27Where Permissions Are Set . . . . . . . . . . . . . . . . . . . . . . . . . . . . . . . . . . . . . . . . . . . 27Who Permissions Are Assigned To . . . . . . . . . . . . . . . . . . . . . . . . . . . . . . . . . . . . . 27How Permissions Are Set . . . . . . . . . . . . . . . . . . . . . . . . . . . . . . . . . . . . . . . . . . . . . 27How Permissions Differ from Capabilities . . . . . . . . . . . . . . . . . . . . . . . . . . . . . . . . 28
WriteMetadata and WriteMemberMetadata . . . . . . . . . . . . . . . . . . . . . . . . . . . . . . 29
Review: Key Points about Authorization . . . . . . . . . . . . . . . . . . . . . . . . . . . . . . . . . . 29
About Access Management
IntroductionThe platform provides a proprietary, metadata-based authorization layer thatsupplements protections from the host environment and other systems. You can use themetadata authorization layer to manage access to almost any metadata object (forexample, reports, data definitions, information maps, jobs, stored processes, and serverdefinitions).
Across authorization layers, protections are cumulative. In order to perform a task, a usermust have sufficient access in all applicable layers.
In the metadata layer, the following permissions are always enforced:
• the ReadMetadata permission (RM), which controls the ability to see an object
• the WriteMetadata permission (WM), which controls the ability to update or deletean object
Other permissions are specialized and affect only certain types of objects.
CAUTION:In the metadata authorization layer, not all permissions are enforced for allitems. It is essential to understand which actions are controlled by each permission.
25

CAUTION:Some clients enable power users to create and run SAS programs that accessdata directly, bypassing metadata-layer controls. It is essential to managephysical layer access in addition to metadata-layer controls. For example, use hostoperating system protections to limit access to any sensitive SAS data sets.
For more information, see “Authorization Model” on page 41.
Who Can Set Permissions?
Table 3.1 Requirements for Setting Permissions
Task Requirements
Set permissions on an item WriteMetadata for the item
Change the permission pattern on an ACT WriteMetadata for the ACT
Designate a different repository ACT WriteMetadata for the ACT
Note: In SAS Management Console, you can't see the Authorization Manager or anyAuthorization tabs unless you have the Authorization Manager capability.
Where is Access Management Performed?Metadata-layer access management is performed as follows:
• To manage access interactively, use SAS Management Console (a desktopapplication). See SAS Management Console: Guide to Users and Permissions.
• To programmatically define or query authorization settings, use the DATA stepfunctions for metadata security administration. See SAS Language Interfaces toMetadata.
• To audit changes to access controls, use the Audit.Meta.Security.AccCtrlAdm logcategory. See “Auditing of Security Events” on page 4.
• To extract authorization information from the SAS metadata into SAS data sets, usethe %MDSECDS macro. See Chapter 8, “Security Report Macros,” on page 83.
• To copy metadata access controls from one SAS repository to another, use themetadata promotion tools. See Chapter 18, “Promotion Tools Overview,” in SASIntelligence Platform: System Administration Guide.
See Also“Host Access to SAS Tables” on page 159
26 Chapter 3 • Access Management
Basics of Metadata Authorization
Where Permissions Are SetEffective access to an object is displayed in the authorization properties section of theobject's metadata definition. You can set permissions on individual content objects (suchas reports) and on containers (such as folders). For simplicity, try to set permissions oncontainers, instead of on individual content objects, whenever possible.
T I P The metadata authorization model is object-centric, not identity-centric. Toexamine a user's permissions, do not begin by finding their user definition. Instead,begin by navigating to the object that you want to examine.
Who Permissions Are Assigned ToYou can assign permissions to individual users and to groups. For simplicity, try toavoid assigning permissions to individual users.
The main authorization list includes only those users and groups that participate inaccess controls that could affect the object. The list usually includes at least thefollowing groups:
PUBLICautomatically includes everyone who can access the metadata server.
SASUSERSautomatically includes everyone who is registered in the metadata (SASUSERS is asubset of PUBLIC).
SAS Administratorsshould include only metadata administrators that require broad access.
SAS System Servicesshould include only the service identity (or, identities) that require broad access.
Anyone who isn't listed in the basic authorization properties display has the access oftheir closest listed group, as determined by group memberships and identity precedence.Here are some examples:
• The closest (and only) listed group for an unregistered user is PUBLIC.
• The closest listed group for a registered user is often SASUSERS.
• The closest listed group for an administrator is usually SAS Administrators.
How Permissions Are SetUse a combination of the following techniques to manage access:
direct controlsYou can assign grants and denials directly on a target object. There are two types ofdirect controls:
explicit controlsare individual grants and denials.
Basics of Metadata Authorization 27

access control template (ACT) controlsare grants and denials within a predefined pattern.
T I P For simplicity, try to avoid setting unnecessary (redundant) direct controls.
object inheritanceYou can assign grants and denials on a parent object, and rely on inherited settings toprotect each child object. For example, a report inherits effective permissions fromits parent folder. In the metadata layer, access control inheritance happensautomatically and can't be turned off. All objects have inherited settings. Mostobjects have inherited settings only.
The following table summarizes the three types of access controls:
Table 3.2 Direct Access Controls and Indirect Settings
Term Significance
Direct control:explicit
An access control is explicit for a particular identity if the control is setdirectly on the target object and assigned directly to that identity. Forexample, if an individual access control on ReportA grants theReadMetadata permission to UserA, then we say that UserA has a directcontrol on ReportA (specifically, an explicit grant of the ReadMetadatapermission). Explicit controls are sometimes referred to as ACEs (accesscontrol entries).
Direct control: ACT An access control is a direct ACT control for an identity if the controlcomes from an ACT that is directly applied to the target object, with apattern that directly assigns a grant or denial to that identity. For example,if the DemoACT is directly applied to FolderA, and the DemoACT’spermission pattern explicitly grants the ReadMetadata permission toGroupA, then we say that GroupA has a direct control on FolderA(specifically, an ACT-based grant of the ReadMetadata permission).
Indirect setting An indirect setting comes from someone else (a group that has an explicitor ACT setting), from somewhere else (a parent object, the repositoryACT), or from a special status (such as unrestricted). For theWriteMemberMetadata permission, indirect means that the settingmirrors the WriteMetadata setting.
Note: The authorization model includes two distinct relationshipnetworks: object inheritance (for example, a folder and its contents) andidentity precedence (for example, a group and its members). A settingthat is derived through either of these hierarchies is called an indirectsetting.
How Permissions Differ from CapabilitiesHaving a certain capability is not an alternative to meeting permission requirements.Permission requirements and capability requirements are cumulative. For example, evenif you are in the Enterprise Guide: OLAP role, you can't access data in a cube forwhich you don't have the Read and ReadMetadata permissions.
Use roles and permissions in conjunction with one another. You can use permissions toconstrain the scope of a role. For example, to allow someone to create reports but addthem to only one folder, give the person the Web Report Studio: Report Creation role,but grant them the WriteMemberMetadata permission on only that one folder.
28 Chapter 3 • Access Management

See Also• “Identity Hierarchy” on page 17
• “Object Inheritance” on page 44
• “Authorization Decisions” on page 55
• “Use and Enforcement of Each Permission” on page 62
WriteMetadata and WriteMemberMetadataYou can use the WriteMetadata (WM) and WriteMemberMetadata (WMM) permissionsto enable someone to interact with a folder's contents, but not update or delete the folderitself. On the folder, grant WMM and deny WM.
The following list explains the difference between these two permissions.
WriteMetadata (WM)provides general control for additions, deletions, and updates. For example, to edit areport, you need WM for the report. To delete a report, you need WM for the report(and WMM for the report's parent folder). For containers other than folders (such asrepositories, libraries, and schemas), WM also affects adding and deleting childobjects. For example, to add an object anywhere in a repository, you need WM at therepository level. For folders, adding and deleting child objects is controlled byWMM, not WM.
WriteMemberMetadata (WMM)provides specialized control for adding and removing objects in a folder. You needWMM on a folder in order to add an object to the folder or delete an object from thefolder. For example, to save a report to a folder, you need WMM for the folder. Toremove a report from a folder, you need WMM for the folder (and WM for thereport).
T I P We recommend that anyone who has a grant of WM is not denied WMM.
T I P If WMM is not directly set on a folder, the WMM setting mirrors the WMsetting. WMM is never inherited from a parent object.
See Also“WriteMetadata and WriteMemberMetadata” in Chapter 5 of SAS Management Console:Guide to Users and Permissions
Review: Key Points about AuthorizationIn order to effectively use the metadata authorization layer, you must understand thefollowing points:
• Metadata layer permissions supplement protections from the host environment andother systems. Across authorization layers, protections are cumulative. In order toperform a task, a user must have sufficient access in all applicable layers.
Review: Key Points about Authorization 29

• The displayed effective permissions are a calculation of the net impact of allapplicable permission settings in the metadata layer. However, the display doesn'treflect access in other layers such as the operating system.
• Setting permissions is an object-centric activity. To define permissions for someone,do not begin by finding that person's user definition. Instead, begin by navigating toan object that you want to protect or make available.
• Explicit and ACT controls on an object (such as a report) always have priority overcontrols on the object's parent (such as a folder). For example, if a report has anexplicit denial for PUBLIC and the report's folder has an explicit grant for you, theresult is a denial for you. The direct denial for PUBLIC blocks access to the report(for all restricted users), unless you offset the direct denial by adding direct grants onthe report.
• In a user definition, the displayed permission settings have no effect on what the usercan see or do. Those controls determine who can update or delete the user definitionitself.
• Only the ReadMetadata and WriteMetadata permissions are universally relevant andenforced.
• The authorization layer that SAS provides supports very specific settings. Forexample, on ReportA, grant the ReadMetadata permission to UserA. However, forsimplicity, it is preferable to set permissions at a less granular level wheneverpossible. The recommended approach is to create a folder structure and setpermissions so that each folder offers appropriate group-level access to its contents.For example, on FolderA, grant the ReadMetadata permission to GroupA.
• After you add a broad denial, review the impact that this has on everyone else. Forexample, if the only setting on an object is an explicit PUBLIC denial, that denialblocks access for everyone (other than unrestricted users). To offset the denial, addone or more selective explicit (or ACT) grants.
• Before you deny the ReadMetadata permission on a folder, consider the navigationalconsequences. Without ReadMetadata permission on a folder, you can't browse toobjects beneath that folder. Users need a clear path of grants of ReadMetadatapermission in order to browse to the content that they use.
See Also• “Adjust Initial Access” on page 37
• “Use and Enforcement of Each Permission” on page 62
30 Chapter 3 • Access Management

Chapter 4
Selected Tasks
About Security Task Instructions . . . . . . . . . . . . . . . . . . . . . . . . . . . . . . . . . . . . . . . . 31
Create Metadata User Definitions . . . . . . . . . . . . . . . . . . . . . . . . . . . . . . . . . . . . . . . . 31Add Regular Users . . . . . . . . . . . . . . . . . . . . . . . . . . . . . . . . . . . . . . . . . . . . . . . . . . 31Add Administrators . . . . . . . . . . . . . . . . . . . . . . . . . . . . . . . . . . . . . . . . . . . . . . . . . 32Add Dual Users . . . . . . . . . . . . . . . . . . . . . . . . . . . . . . . . . . . . . . . . . . . . . . . . . . . . . 32
Update a Managed Password . . . . . . . . . . . . . . . . . . . . . . . . . . . . . . . . . . . . . . . . . . . 33
Unlock an Internal Account . . . . . . . . . . . . . . . . . . . . . . . . . . . . . . . . . . . . . . . . . . . . . 36
Adjust Initial Access . . . . . . . . . . . . . . . . . . . . . . . . . . . . . . . . . . . . . . . . . . . . . . . . . . . 37
About Security Task InstructionsThis chapter provides instructions for a few general security tasks.
For specialized configurations, see “Encryption Tasks” on page 177 and“Authentication Tasks” on page 131.
For other user management and access management tasks, see SAS ManagementConsole: Guide to Users and Permissions.
Create Metadata User Definitions
Add Regular UsersFor accountability, we recommend that you create an individual SAS identity for eachperson who uses the SAS environment. This enables you to make access distinctions andaudit individual actions in the metadata layer. This also provides a personal folder foreach user. To create a SAS identity for someone, store a copy of the person’s user ID inthe SAS metadata.
Each user should have at least the following attributes:
• a name that is unique among users within the metadata server.
• a login that includes the user's external account ID. This might be any type ofaccount that is known to the metadata server's host (an LDAP, Active Directory,host, or other type of account).
31

Note: For a Windows account, specify the user ID in an appropriate format. See“Windows User ID Formats” on page 20.
Note: If your site uses Web authentication, you might assign logins to a differentauthentication domain.
Here are some details and tips:
• If the workspace server is on Windows, give anyone who accesses that server usingcredential-based host authentication the Windows privilege Log on as a batch job.
• As an alternative to adding users interactively, you can batch import users from aprovider such as LDAP into the SAS metadata.
• The metadata server maintains its own copy of each ID, but doesn't keep copies ofpasswords for identification purposes.
• Registered users automatically belong to PUBLIC (everyone who can access themetadata server) and SASUSERS (those members of PUBLIC who have a well-formed user definition).
• A user who doesn't have a well-formed definition has only the PUBLIC identity. Inthe standard configuration, a PUBLIC-only user can't access any resources. Not allapplications allow a PUBLIC-only user to log on.
• Authorization settings within a user definition do not determine what that user cando. Those settings affect the ability of other users to update or delete that userdefinition.
Add AdministratorsFor accountability, we recommend that you establish individual metadata administratorsrather than sharing the unrestricted SAS Administrator account.
Each administrator should have at least the following attributes:
• a name that is unique among users within the metadata server
• either a login (as explained in the preceding topic) or an internal account
• membership in the SAS Administrators group
Here are some details:
• If you log on with an internal account, you must include the @saspw suffix in theuser ID that you submit (for example, sasadm@saspw).
• We recommend that you use an administrative identity only to perform tasks thatrequire a high level of privilege.
• The advantage of using an internal account is that this facilitates creation of a dualuser, because this approach leaves the user's external account available for use in asecond user definition. A disadvantage of using an internal account is that such anaccount can't launch a standard workspace server. These administrators are promptedfor host credentials if they attempt to validate or use that server.
Add Dual UsersTo enable someone to alternately function as an administrator and as a non-administrator, create two user definitions for that person as follows:
32 Chapter 4 • Selected Tasks

• One definition is based on an internal account and is a member of the SASAdministrators group.
• The other definition is based on an external account and is not a member of the SASAdministrators group.
Here are some tips for working with a dual user:
• The only way to make someone a dual user is to give that person two userdefinitions, each based on a different account. You can't create a dual user by addinga login to a definition that already has an internal account or by adding two logins toone definition.
• A dual user should use a dedicated client-side connection profile for their internalaccount. In that profile, the user should leave the Authentication Domain fieldblank. This optimizes credential reuse.
• A dual user should log on with their internal account when they need administrativeprivileges and with their external account the rest of the time.
See Also• “Users” on page 11
• Appendix 1, “User Import Macros,” on page 187
• “Windows Privileges” on page 18
• “Windows User ID Formats” on page 20
• “Identify or Create User Accounts” on page 131
• “Logins for Users Who Participate in Web Authentication” on page 134
Update a Managed PasswordPasswords for a few service accounts require special coordination because thesepasswords are included in configuration files. To update these passwords, use the SASDeployment Manager. Here are some key points about using the SAS DeploymentManager to update passwords:
• The utility updates both configuration files and metadata. You can update multiplepasswords in a single pass.
• You must run the utility on each machine that hosts affected components. If youhave servers on multiple machines, run the utility on each host, beginning with themetadata server machine.
• It might be necessary to update the same password on multiple hosts. For example, ifyou update the password for the SAS Trusted User on the metadata server's host, youmust also do the same update on the middle-tier machine.
• Be sure to supply the same new password for an account on all machines on whichyou update that account.
• If you enter a plaintext password into the utility, the utility encodes that passwordusing SAS proprietary encoding (SAS002).
• Passwords for any service accounts that you introduce in SAS Management Consolearen't managed by this tool. For example, if you designate a new login as the launch
Update a Managed Password 33

credential for a server, that launch credential isn't automatically added to the list ofaccounts that the SAS Deployment Manager can update. Server launch credentialsaren't added to a configuration file, so you can update any such passwords from theowning identity's Accounts tab in SAS Management Console.
• You can automate running the deployment manager when you need to perform thesame configuration action on many machines in your deployment. The deploymentmanager uses the same record and playback mechanism as the SAS DeploymentWizard to perform a non-interactive, silent configuration.
CAUTION:If you choose to use the deployment manager's record and playbackmechanism to update passwords, passwords are written to the responsefile. For greater security, delete the response file (or remove the passwords fromthe response file) when you are finished. A response file is present only if youuse the record and playback mechanism, instead of completing the task manuallyas documented in the preceding steps.
• Each run of this utility generates an UpdatePasswords.html file that documents theupdates that the utility performed and provides instructions for any required post-update activities.
To update a password with SAS Deployment Manager:
1. (Optional) If you are updating the password for an internal account, review theserver-level password policies for internal accounts. Also, check each internalaccount's properties to determine whether any more (or less) stringent requirementsapply.
Note: In particular, make sure that the account is not subject to a forced passwordchange after the password is reset (either set the password to never expire orchange the server-level policy for pre-expired passwords).
Note: By default policy, internal passwords must be at least six characters and don'thave to include mixed case or numbers. The five most recent passwords for anaccount can't be reused for that account.
2. (Optional) If you have licensed SAS/SECURE and you want to use strongerencryption than SAS002 (SASProprietary), use the PWENCODE procedure toprepare an AES-encrypted version of each new password. For example:
proc pwencode in='PWsassrv1' method=sas003;run;
The encrypted password is written to your SAS log. When you use method=sas003,the first part of the password is {sas003}.
3. Stop all SAS servers and services. Make any necessary adjustments to the state ofyour third-party Web components, as explained in the following table:
34 Chapter 4 • Selected Tasks

Table 4.1 State of Web Components for a Password Update
Product Component State
WebSphere dmgr (the IBM deploymentmanager server)
Running
nodeagent (the IBMmanaged node server)
Running
Web application servers (forexample, SASServer1)
It doesn't matter
WebLogic Node manager Running
ManagedWebLogic server Stopped
JBoss Web application servers (forexample, SASServer1)
Stopped
4. If you are updating the password for an external account (for example, sassrv),change that password in your external authentication provider (for example, in thehost operating system).
5. Restart the metadata server. Do not restart other servers or services.
6. On the metadata server's host, navigate to your equivalent of SAS-installation-directory/SASDeploymentManager/9.3/ and launch sasdm.exe (Windows),sasdm.sh (UNIX), or sasdm.rexx (z/OS).
Note: On Windows, you must be a Windows administrator of the current machine inorder to update managed passwords.
7. In the SAS Deployment Manager, select the update passwords task, select aconfiguration directory on the current machine, and log on as an unrestricted user(for example, sasadm@saspw).
8. Perform the update. If you need detailed assistance with the user interface, see theHelp within the utility.
9. If you have servers on multiple machines, repeat steps 6–8 on each server host asapplicable for the accounts that you are updating. Remember that you might have toupdate the same account on multiple hosts.
Note: Not all accounts are used on all hosts. If the accounts that you are updatingaren't on a particular host, proceed to the next host.
10. Restart all servers and services, and complete any additional post-update tasks asspecified in the generated UpdatePasswords.html file.
Note: Because of dependencies, it is important to start servers and services in aparticular order. In particular, you should start the metadata server first and startRemote Services (the SAS Services Application) before you start the Webservers. For a complete discussion, see the chapter "Operating Your Servers" inSAS Intelligence Platform: System Administration Guide.
Update a Managed Password 35

Unlock an Internal AccountBy initial policy, making three consecutive unsuccessful attempts to log on with a SASinternal account causes that account to be locked for one hour. This topic explains howto unlock the account immediately, so that you don't have to wait until the accountlockout period has passed.
The preferred approach is to locate another user who has user administration capabilities.That user can unlock the internal account by completing these steps:
1. Log on to SAS Management Console as someone who is unrestricted or who hasuser administration capabilities.
2. On the Plug-ins tab, select User Manager.
3. In the display pane, clear the Show Groups and Show Roles check boxes. Right-click the user definition of the person whose SAS internal account is locked out andselect Properties.
4. Select the Accounts tab. A message box asks whether you want to unlock theaccount. Click Yes.
5. In the user's Properties dialog box, click OK. The account is now unlocked.
Note: It isn't necessary to reset the user's internal password as part of unlocking theuser's internal account.
If there is no other administrator available and you have the necessary host access, youcan use this approach as a last resort:
1. Edit the metadata server's adminUsers.txt file to create a new unrestricted user.
a. Navigate to your equivalent ofSAS/Lev1/SASMeta/MetadataServer/adminUsers.txt. Open the filewith a text editor.
b. Add a user ID for an account that is known to the metadata server's host. Includea preceding asterisk (for example, *WIN\winID or *unixID).
c. Stop and restart the metadata server to make the change take effect.
CAUTION:Stopping the metadata server stops other components.
2. Log on to SAS Management Console using the user ID that you added to theadminUsers.txt file. In the status bar at the bottom of the application window, noticethat you are unrestricted. Unlock the locked account (see the preceding instructionlist).
3. To verify that the account is unlocked, log on to SAS Management Console using theaccount.
4. Open the adminUsers.txt file, remove the entry that you added, and stop and restartthe metadata server.
Here are some additional tips:
• If you choose to change the password for the original SAS Administrator, you mightneed to update the deployment.
• You can customize the account lockout policy.
36 Chapter 4 • Selected Tasks

• We recommend that you establish individual metadata administrators rather thansharing the predefined SAS Administrator account.
See Also• “SAS Internal Authentication” on page 118
• “How to Change Internal Account Policies” on page 146
Adjust Initial AccessThe initial configuration in a new deployment provides sufficient access to data andresources, with the following exceptions:
• Only unrestricted users can access data through information maps, reports that arebased on information maps, the metadata LIBNAME engine, or the OLAP server. Inthe initial configuration, the only grants of the Read permission are in each user'spersonal content area (My Folder).
• Only unrestricted users and members of the SAS Administrators group can registercubes.
To ensure appropriate access to resources and data:
1. Log on to SAS Management Console as an administrator (for example,sasadm@saspw).
2. (Optional) Verify that all registered users have at least the minimum requiredrepository-level access.
a. On the Plug-ins tab, under Authorization Manager, expand the Access ControlTemplates node.
b. Right-click the repository ACT (Default ACT) and select Properties.
c. On the Permission Pattern tab, select SASUSERS. Verify that theReadMetadata and WriteMetadata permissions are granted.
3. (Optional) Verify that all registered users have basic access to the folder tree.
a. On the Folders tab, right-click the root folder ( SAS Folders) and selectProperties.
b. On the folder's Authorization tab, select SASUSERS. Verify that theReadMetadata permission is granted.
4. Provide metadata layer access to data (this is a broad approach).
a. On the Authorization tab for the root folder ( SAS Folders), selectSASUSERS.
Note: To access this tab, select the Folders tab, right-click the root folder, andselect Properties.
b. Grant the Read permission. This enables registered users to perform tasks such asquerying cubes, accessing data through information maps, and viewing thecontents of tables.
Adjust Initial Access 37

If you want to manage access to data more narrowly, set grants of the Readpermission on specific folders for specific users. Users need the Read permission asfollows:
• Users need Read permission on an information map in order to access datathrough that information map. For example, if Joe is denied Read permission onan information map, he can't view reports that are based on that information map.
• Users always need Read permission on OLAP data in order to access that data.
• Users sometimes need Read permission on relational data in order to access thatdata. Read permission is required when data is accessed using the metadataLIBNAME engine.
5. If users who aren't in the SAS Administrators group will register cubes, grant thoseusers the WriteMetadata permission on the OLAP schema.
a. On the Folders tab, expand the Shared Data folder and select the SASApp -OLAP Schema folder.
b. In the right panel, right-click the schema and select Properties.
c. On the Authorization tab, select or add an identity and grant WriteMetadatapermission to that identity. For example, to allow all registered users to addcubes, assign the grant of WriteMetadata permission to SASUSERS.
6. Verify that physical-layer access is available. Here are the general requirements:
• A user who accesses SAS data sets from a standard workspace server needs hostlayer (Read) access to those files.
• A user who performs tasks that involve writing to a host directory needs hostlayer (Write) access to that directory.
• Server launch credentials need host (Read) access to any SAS data that the serverretrieves. Initially, the SAS Spawned Servers account (sassrv) is the launchcredential for the stored process server and the pooled workspace server.
7. In the initial configuration, the Server Manager capability is available to only theSAS Administrators group. This prevents other users from accessing serverdefinitions under that plug-in. For greater security, use permissions to protect serverdefinitions. See “Protect Server Definitions” on page 75.
8. In a new deployment, access to most resources and data is undifferentiated. Allregistered nonadministrators have identical metadata-layer access to content, data,and application features. Everyone who uses a stored process server or pooledworkspace server has identical host-layer access to any SAS data that serverretrieves. In a migrated deployment, access to most resources and data mirrors accessin the original environment. To manage access to objects such as reports, storedprocesses, information maps, and data definitions, create custom folders that reflectthe distinctions that you want to make. See “Permissions on Folders” on page 63.
9. To fully protect SAS data sets, you must also address host access. See “Host Accessto SAS Tables” on page 159.
See Also“Permissions by Object Type” on page 46
38 Chapter 4 • Selected Tasks

Part 2
Authorization
Chapter 5Authorization Model . . . . . . . . . . . . . . . . . . . . . . . . . . . . . . . . . . . . . . . . . . . . . 41
Chapter 6Permissions on Folders . . . . . . . . . . . . . . . . . . . . . . . . . . . . . . . . . . . . . . . . . . 63
Chapter 7Permissions on Servers . . . . . . . . . . . . . . . . . . . . . . . . . . . . . . . . . . . . . . . . . 75
Chapter 8Security Report Macros . . . . . . . . . . . . . . . . . . . . . . . . . . . . . . . . . . . . . . . . . . 83
39

40

Chapter 5
Authorization Model
Authorization Overview . . . . . . . . . . . . . . . . . . . . . . . . . . . . . . . . . . . . . . . . . . . . . . . . 41
Three Levels of Granularity . . . . . . . . . . . . . . . . . . . . . . . . . . . . . . . . . . . . . . . . . . . . 42
Two Relationship Networks . . . . . . . . . . . . . . . . . . . . . . . . . . . . . . . . . . . . . . . . . . . . . 42
Object Inheritance . . . . . . . . . . . . . . . . . . . . . . . . . . . . . . . . . . . . . . . . . . . . . . . . . . . . 44
Permissions by Object Type . . . . . . . . . . . . . . . . . . . . . . . . . . . . . . . . . . . . . . . . . . . . 46Introduction . . . . . . . . . . . . . . . . . . . . . . . . . . . . . . . . . . . . . . . . . . . . . . . . . . . . . . . . 46Permission Tips for Selected Content and Data Objects . . . . . . . . . . . . . . . . . . . . . 47Permission Tips for Selected System and Administrative Objects . . . . . . . . . . . . . 50
Permissions by Task . . . . . . . . . . . . . . . . . . . . . . . . . . . . . . . . . . . . . . . . . . . . . . . . . . . 50Introduction . . . . . . . . . . . . . . . . . . . . . . . . . . . . . . . . . . . . . . . . . . . . . . . . . . . . . . . . 50Working with Folders . . . . . . . . . . . . . . . . . . . . . . . . . . . . . . . . . . . . . . . . . . . . . . . . 51Working with Reports . . . . . . . . . . . . . . . . . . . . . . . . . . . . . . . . . . . . . . . . . . . . . . . . 51Working with Information Maps . . . . . . . . . . . . . . . . . . . . . . . . . . . . . . . . . . . . . . . 52Working with Stored Processes . . . . . . . . . . . . . . . . . . . . . . . . . . . . . . . . . . . . . . . . 52Working with Publishing Channels . . . . . . . . . . . . . . . . . . . . . . . . . . . . . . . . . . . . . 52Working with Tables . . . . . . . . . . . . . . . . . . . . . . . . . . . . . . . . . . . . . . . . . . . . . . . . 53Working with SAS OLAP Cubes . . . . . . . . . . . . . . . . . . . . . . . . . . . . . . . . . . . . . . . 53Working with SAS OLAP Shared Dimensions . . . . . . . . . . . . . . . . . . . . . . . . . . . . 54
Types of Access Controls . . . . . . . . . . . . . . . . . . . . . . . . . . . . . . . . . . . . . . . . . . . . . . . 54
Authorization Decisions . . . . . . . . . . . . . . . . . . . . . . . . . . . . . . . . . . . . . . . . . . . . . . . . 55Access Control Evaluation Process . . . . . . . . . . . . . . . . . . . . . . . . . . . . . . . . . . . . . 55Precedence Principles and Examples . . . . . . . . . . . . . . . . . . . . . . . . . . . . . . . . . . . . 56
Fine-Grained Controls for Data . . . . . . . . . . . . . . . . . . . . . . . . . . . . . . . . . . . . . . . . . 56What Are Fine-Grained Controls? . . . . . . . . . . . . . . . . . . . . . . . . . . . . . . . . . . . . . . 56What Implementations are Available? . . . . . . . . . . . . . . . . . . . . . . . . . . . . . . . . . . . 57About Identity-Driven Properties . . . . . . . . . . . . . . . . . . . . . . . . . . . . . . . . . . . . . . . 58Batch Reporting Considerations . . . . . . . . . . . . . . . . . . . . . . . . . . . . . . . . . . . . . . . . 60Permission Precedence Considerations . . . . . . . . . . . . . . . . . . . . . . . . . . . . . . . . . . 60
Use and Enforcement of Each Permission . . . . . . . . . . . . . . . . . . . . . . . . . . . . . . . . . 62
Authorization OverviewThe platform provides a proprietary, metadata-based authorization layer thatsupplements protections from the host environment and other systems. You can use the
41

metadata authorization layer to manage access to almost any metadata object (forexample, reports, data definitions, information maps, jobs, stored processes, and serverdefinitions).
Across authorization layers, protections are cumulative. In order to perform a task, a usermust have sufficient access in all applicable layers.
In the metadata layer, the following permissions are always enforced:
• the ReadMetadata permission (RM), which controls the ability to see an object
• the WriteMetadata permission (WM), which controls the ability to update or deletean object
Other permissions are specialized and affect only certain types of objects.
CAUTION:In the metadata authorization layer, not all permissions are enforced for allitems. It is essential to understand which actions are controlled by each permission.
CAUTION:Some clients enable power users to create and run SAS programs that accessdata directly, bypassing metadata-layer controls. It is essential to managephysical layer access in addition to metadata-layer controls. For example, use hostoperating system protections to limit access to any sensitive SAS data sets.
For more information, see “Host Access to SAS Tables” on page 159.
Three Levels of GranularityYou can set permissions at the following levels of granularity:
• Repository-level controls function as a gateway and as a parent-of-last-resort.Repository-level controls are managed from the permission pattern of the repositoryACT (Default ACT). All registered users should have ReadMetadata andWriteMetadata permissions in the foundation repository ACT’s permission pattern.
• Object-level controls manage access to a specific object such as a report, aninformation map, a stored process, a table, a column, a cube, or a folder. You candefine resource-level controls individually (as explicit settings) or in patterns (byapplying access control templates).
• Fine-grained controls affect access to subsets of data within a resource. To establishfine-grained controls, you add constraints called permission conditions to explicitgrants of the Read permission.
Two Relationship NetworksPermission settings are conveyed across two distinct relationship networks:
• In object inheritance, permissions that you set on one object can affect many otherobjects. For example, a report inherits permissions from the folder in which thereport is located. This network is a simple folder tree, with exceptions such as thefollowing:
42 Chapter 5 • Authorization Model

• The root folder isn't the ultimate parent. This folder inherits from the repository(through the permission pattern of the repository ACT).
• The root folder isn't a universal parent. Some system resources (such asapplication servers, identities, and ACTs) are not in the folder tree. For theseitems, the repository ACT is the immediate and only parent.
• Inheritance within a table or cube follows the data structure. For example, neithertable columns nor cube dimensions have folders as immediate parents. Instead, acolumn inherits from its parent table and a dimension inherits from its parentcube.
• Inheritance does not flow through specialty folders such as favorites folders,virtual folders, or search folders.
• In the identity relationships network, permissions that you assign to one identity canaffect many other identities. For example, if you grant a group access to a report, thatgrant applies to everyone who is a member of the group. This relationship network isgoverned by a precedence order that starts with a primary (usually individual)identity, can incorporate multiple levels of nested group memberships, and ends withimplicit memberships in SASUSERS and then PUBLIC.
The following figures depict the relative priority and specificity of access controls withineach of these networks. From top to bottom, the elements in each figure are ordered asfollows:
• from highest precedence (hardest to override) to lowest precedence (easiest tooverride)
• from narrowest impact (most specific) to broadest impact (least specific)
Figure 5.1 Priority and Specificity in Object Inheritance
Repository-Level Controls (Default ACT)
Access Control Templates
(ACTs)
Explicit Controls
(ACEs)
direct controls
lower
precedence
higher
precedence
broader
impact
narrower
impact
Controls on Parent Objects
Two Relationship Networks 43

Figure 5.2 Priority and Specificity in Identity Hierarchy
lower
precedence
higher
precedence
broader
impact
narrower
impactUser
Indirect Memberships
Direct Memberships
PUBLIC (everyone that can log on)
SASUSERS (registered users)
implicit memberships
Object InheritanceIn the metadata layer, parent objects convey their effective permissions to child objects.Children inherit the net effect of their parents' access controls, not the access controlsthemselves. The following figures depict inheritance paths in a foundation repository.The arrows in the first figure flow from child to parent (for example, a table inheritseffective permissions from its parent folder). The arrows in the second figure flow fromparent to child (for example, a folder conveys its effective permissions to the items thatit contains).
Figure 5.3 Inheritance Paths (Separated View)
BI Content OLAP DataRelational Data
Table Library
Report Information
MapStored
Process
Root
Folder
Repository
ACT
Parent
Folder
Column
System Objects
User
Group
Role
Server
Application
Server
Logical
Server
ACT
Connection
OLAPSchema Cube
Measure
Dimension
HierarchyLevel
Shared Dimension
HierarchyLevel
44 Chapter 5 • Authorization Model

Figure 5.4 Inheritance Paths (Integrated View)
Report
Information Map
Stored Process
Root Folder
Table
Library
Column
Cube
OLAP Schema
Measure
Dimension
Hierarchy
Level
ServerApplication
Server
Logical
Server
User, Group, Role
ACT
Parent Folder
Repository ACT
Connection
Shared Dimension
Hierarchy
Level
Here are some details about the preceding figures:
• The depicted folder structure is arbitrary and intended only to show the securityrelationships between different types of objects.
• Not all object types are depicted.
T I P In SAS Management Console, you can trace an object’s inheritance byclicking Advanced on the object's Authorization tab. This feature is available toonly unrestricted users.
• The root folder represents the top of the folder tree for the foundation repository (theSAS Folders node).
• The root folder inherits settings from the permission pattern of the repository ACT(which is usually named Default ACT).
Object Inheritance 45

• Any custom repositories are represented as folders (immediate children of thefoundation root folder). Although these folders inherit permissions from both thefoundation root folder and the repository ACT of the custom repository, access toobjects within the custom repository branch should be managed from the folder sidewhenever possible.
• In some clients, your My Folder is displayed directly below the root folder. Thisis just a shortcut for accessing your personal content area. This folder is not animmediate child of the root folder.
• In general, specialized folders (such as search folders, favorites folders, and virtualfolders) don't convey permissions to the objects that they contain. An exception isthat a favorites folder does convey permissions to any child favorites folders(favorites groups) that it contains.
• The figures show users, groups, and roles inheriting repository-level permissions. Insome clients, the authorization information for a user, group, or role reflects specialrules that protect identity definitions.
See Also• “Identity Hierarchy” on page 17
• “Authorization Decisions” on page 55
Permissions by Object Type
IntroductionThe following figure depicts common objects and uses arrows to indicate objects whosepermission settings are most likely to need an adjustment. Here are some details aboutthe figure:
• Most of the up arrows indicate a need to extend the ability to read data. In theinterest of a more secure initial deployment, Read access to data is not granted bydefault.
• Each down arrow indicates a need to limit the ability to modify or delete a systemobject. Other system items are protected by default.
• MLE refers to the metadata LIBNAME engine. The MLE items are listed tohighlight the elevated permission requirements that apply when data is accessedthrough this engine.
• The intent of the figure is to highlight the adjustments that are most commonlyneeded. In general, it is preferable to set permissions on a parent (such as a folder)rather than on each individual object (such as a report).
46 Chapter 5 • Authorization Model

Figure 5.5 Common Access Adjustments by Object Type
Folder
Information map
Report
Stored process
Publication channel
BI Content
Dashboard
MLE library
MLE table
OLAP schema
Cube
Data
Folder
Other library
Other table
Legend:
Repository
Application
Logical
Server
Servers
User
Group
Role
Identities
User-defined
System
ACTs
Repository
Predefined
Reduce access to improve security. Increase access to make fully available.
The following tables provide object-specific instructions and tips. The purpose of thetables is to highlight special requirements for common items.
T I P For any change-managed areas or resources, change-managed users should haveCheckInMetadata (CM) permission (instead of WM or WMM). See “Setting upChange Management” in Chapter 5 of SAS Intelligence Platform: DesktopApplication Adminstration Guide.
Permission Tips for Selected Content and Data Objects
Table 5.1 Permissions Tips: Selected Content and Data Objects
Root folder
The root folder (the SAS Folders node) is an important point of control for narrowing WM. Unlike otherfolders, the root folder does not have the WriteMemberMetadata permission in its permission list. This isbecause the root folder is a software component object, not a true folder. The root folder can contain onlyother folders.
Permissions by Object Type 47

Folder
For folders, follow these guidelines:
• Provide users with a clear path of grants of ReadMetadata permission to all of the content that theyaccess. This is a navigational requirement. To browse past a folder, you need ReadMetadatapermission for that folder.
• To enable users to contribute objects to a folder, grant them WriteMemberMetadata permission on thatfolder.
• On a folder, grant WriteMetadata permission only to users who should be able to delete, move, orrename that folder.
• Don't assume that every permission that is listed for a folder is relevant for every object in that folder.
• If you deny ReadMetadata permission on a folder, make sure that you don't prevent the SAS TrustedUser from having that permission on all cubes and schemas within that folder. One approach is to givethe SAS System Services group a grant of ReadMetadata permission on the folder. This preservesnecessary access for this privileged service identity.
See “Permissions on Folders” on page 63.
Informationmap
To access any data through an information map, you need Read permission on that information map. Youcan manage Read permission globally or selectively. For example:
• A broad approach is to grant Read permission to SASUSERS in the repository ACT's permissionpattern, or on the top folder.
• A narrow approach is to grant Read permission to smaller groups on specific subfolders or evenspecific information maps.
Report
If a user can't run a report, check these things:
• Does the user have Read permission for the underlying information map?
• Does the user have Read permission for any underlying OLAP cube?
• Does the user have Read permission for any underlying relational data that is accessed via the MLE?
• Does the SAS Trusted User have ReadMetadata permission for any underlying cube?
• Does the account that retrieves any underlying SAS data have physical access to that data?
It is especially important to manage ReadMetadata permission to pregenerated reports, because thosereports can contain embedded data. Any user who views a pregenerated report sees the same data,regardless of his or her permissions to the underlying tables or cubes.
Storedprocess
To run a stored process, you need ReadMetadata permission on the stored process. If you can see a storedprocess but can't run it, you might lack the necessary grant of Read permission for the underlying data. Toregister a stored process, you need WriteMetadata permission for the target application server.
The method that you use to make a stored process available can affect data retrieval and security. Forexample, in the standard configuration, a stored process that is assigned to a workspace server andembedded in an information map retrieves SAS data under the pooled workspace server's host identity.However, if a user opens that same stored process directly (for example, as a report in SAS Web ReportStudio), the host identity of the requesting user (or group) retrieves the data.
Channel
In a new deployment, only the SAS Administrators group can add channels, subscribers, and content. Toenable all registered users to publish content to a particular channel, navigate on the Folders tab toSystem ð Publishing ð Channels and grant Write and WriteMetadata permissions to SASUSERS onthat channel (WM is required only if a channel has an archive persistent store).
To enable all registered users to add channels or subscribers, grant WriteMemberMetadata permission onthe relevant parent folder (for example, on the System ð Publishing ð Subscribers ð ContentSubscribers folder).
48 Chapter 5 • Authorization Model

Dashboard
See “Implementing Security for SAS BI Dashboard” in Chapter 14 of SAS Intelligence Platform: WebApplication Administration Guide. Dashboards and their related items (indicators, data models, andranges) have a specialized authorization model.
Schema
To associate an OLAP schema with an application server, you need WriteMetadata permission for theschema and the server. To add cubes to a schema, you need WriteMetadata permission for the schema andWriteMemberMetadata permission for the target folder.
The SAS Trusted User must have ReadMetadata permission for all OLAP schemas and cubes. This accessis usually granted through the SAS System Services group.
Cube
To register cubes, you need WriteMetadata permission for the OLAP schema and WriteMemberMetadatapermission for the target folder. To associate a cube with a schema, you need WriteMetadata permissionfor the cube and the schema.
Read permission is enforced for cubes. Grant Read permission broadly (as described for informationmaps), or add narrower grants of Read permission on folders or individual cubes.
The SAS Trusted User must have ReadMetadata permission for all OLAP schemas and cubes. This accessis granted through the SAS System Services group.
Cubecomponent
For cube components, Read permission is enforced. If you lack access to a measure that participates in acalculated measure, you can get unintended results.
There are also navigational requirements for Read permission on cube components. If a user does nothave Read permission to a hierarchy, the user can't navigate to the top levels within the hierarchy. If auser does not have Read permission to a particular level in a hierarchy, the user can't navigate to the nextlevel.
Shareddimension
To set permissions on a shared dimension, navigate to it directly under its parent folder. You cannot setpermissions on a shared dimension that you accessed by navigating within a cube.
You cannot delete a shared dimension that is in use (that is included in one or more cubes).
Library
To associate a library with an application server, you need WriteMetadata permission for the server (butnot for the library). For a library that is accessed via the metadata LIBNAME engine (MLE), you need theCreate permission in order to add tables and the Delete permission in order to delete tables.
Table
To associate a table with a library, you need WriteMetadata permission for the table and the library. For atable that is accessed via the MLE, you need Read permission in order to access data. The Create, Delete,and Write permissions affect your ability to add, update, or delete data. You can grant these permissionsbroadly (as described in the information map row) or narrowly (for example, to a small group of users ona particular table.
Column
The MLE doesn't support column-level access distinctions for the Read permission. Column-level accessdistinctions for the ReadMetadata permission are supported.
Permissions by Object Type 49

Permission Tips for Selected System and Administrative Objects
Table 5.2 Permissions Tips: Selected System and Administrative Objects
Repository
On a foundation repository, all participating users should have repository-level ReadMetadata andWriteMetadata permissions. Other predefined entries in the permission pattern of the repository ACT(Default ACT) provide necessary administrative and service access.
Applicationserver
To monitor or operate servers other than the metadata server, you need the Administer permission on theserver. (The metadata server requires the Metadata Server: Operation role instead of the Administerpermission.)
To associate a stored process, OLAP schema, or library with an application server, you needWriteMetadata permission for that application server. Certain service identities need ReadMetadatapermission to all server definitions. See “Permissions on Servers” on page 75.
Logicalserver
To use a logical server, you need ReadMetadata permission for at least one of that server's connections.This is called server access security. Certain service identities need ReadMetadata permission to logicalserver definitions. See “Hide Server Definitions” on page 78.
Identity
User administration capabilities (from the Metadata Server: User Administration role) enable you tocreate, update, and delete users, groups, and roles. You can delegate management of an identity tosomeone who doesn't have user administration capabilities by adding explicit or ACT grants ofWriteMetadata permission in the identity's authorization properties. An identity's authorization propertieshave no effect on what that identity can do.
ACT
To create an ACT, you need repository-level WriteMetadata permission. Each predefined ACT isprotected by direct access controls. ACTs that you create aren't automatically protected. It is essential toadd protections (direct controls in the ACT’s authorization properties) to any ACTs that you create.
See Also• “Permissions by Task” on page 50
• “Use and Enforcement of Each Permission” on page 62
Permissions by Task
IntroductionThe following tables show required metadata layer permissions for selected tasks. Foreach task, a user must have the specified access to the specified metadata objects.
T I P For any change-managed areas or resources change-managed users should haveCheckInMetadata (CM) permission (instead of WM or WMM). See “Setting upChange Management” in Chapter 5 of SAS Intelligence Platform: DesktopApplication Adminstration Guide.
50 Chapter 5 • Authorization Model

Working with Folders
Table 5.3 Working with Folders
Task Repository Parent Folder Folder Item
Add a folder RM, WM RM, WMM* - -
Delete a folder RM RM, WMM* RM, WM -
Rename a folder RM RM RM, WM -
Set folder permissions RM RM RM, WM -
Add an item to a folder RM, WM RM RM, WMM -
Delete an item from a folder RM RM RM, WMM RM, WM
Copy/export items RM RM RM RM
Paste/import items RM, WM RM RM, WMM -
*If the parent folder is the root folder , you need RM, WM on the root folder.
Working with Reports
Table 5.4 Working with Reports
Task RepositoryParentFolder Report
StoredProcess*
InformationMap* Data
Create and save a new report RM, WM RM,WMM
- RM RM, R RM, R**
Delete a report RM RM,WMM
RM, WM - - -
View or refresh a report RM RM RM RM RM, R RM, R**
View a batch report RM RM RM - - -
Edit or rename a report RM RM RM, WM - - -
Set report permissions RM RM RM, WM - - -
* This is not a required element for a report.** The Read permission is required for data that is accessed through the metadata LIBNAME engine or the OLAP server.
Permissions by Task 51
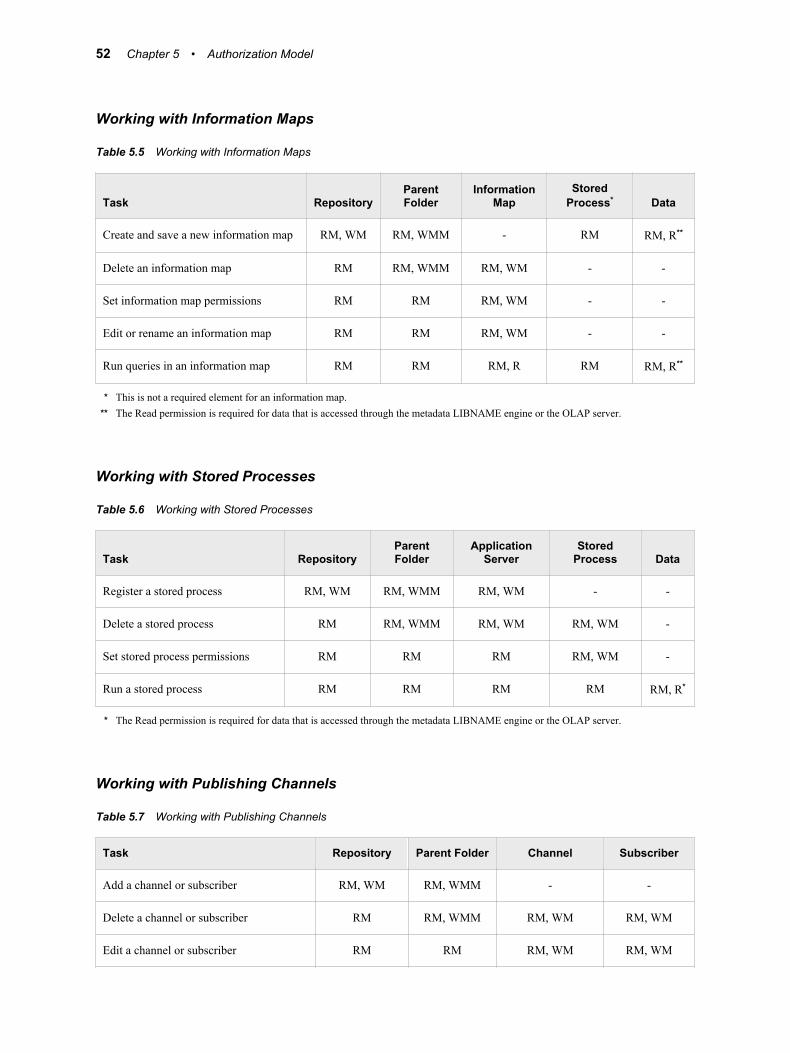
Working with Information Maps
Table 5.5 Working with Information Maps
Task RepositoryParentFolder
InformationMap
StoredProcess* Data
Create and save a new information map RM, WM RM, WMM - RM RM, R**
Delete an information map RM RM, WMM RM, WM - -
Set information map permissions RM RM RM, WM - -
Edit or rename an information map RM RM RM, WM - -
Run queries in an information map RM RM RM, R RM RM, R**
* This is not a required element for an information map.** The Read permission is required for data that is accessed through the metadata LIBNAME engine or the OLAP server.
Working with Stored Processes
Table 5.6 Working with Stored Processes
Task RepositoryParentFolder
ApplicationServer
StoredProcess Data
Register a stored process RM, WM RM, WMM RM, WM - -
Delete a stored process RM RM, WMM RM, WM RM, WM -
Set stored process permissions RM RM RM RM, WM -
Run a stored process RM RM RM RM RM, R*
* The Read permission is required for data that is accessed through the metadata LIBNAME engine or the OLAP server.
Working with Publishing Channels
Table 5.7 Working with Publishing Channels
Task Repository Parent Folder Channel Subscriber
Add a channel or subscriber RM, WM RM, WMM - -
Delete a channel or subscriber RM RM, WMM RM, WM RM, WM
Edit a channel or subscriber RM RM RM, WM RM, WM
52 Chapter 5 • Authorization Model

Task Repository Parent Folder Channel Subscriber
Publish content to a channel RM, WM* RM RM, W, WM* RM**
* WM is required if the channel has an archive persistent store.** Content is published to only those subscribers for whom you have RM.
Working with Tables
Table 5.8 Working with Tables
Task Repository Server* LibraryParentFolder Table Column
Register a table RM, WM RM RM, WM RM, WMM - -
Delete a table RM RM RM, WM RM, WMM RM, WM -
Set table permissions RM - RM RM RM, WM -
Access table data RM RM RM RM RM, R** RM
Register a library RM, WM RM, WM - RM, WMM - -
* SAS Application Server** The Read permission is required for data that is accessed through the metadata LIBNAME engine.
Working with SAS OLAP Cubes
Table 5.9 Working with SAS OLAP Cubes
Task Repository Server* SchemaParentFolder Cube
SourceData
Register a cube RM, WM RM RM, WM RM, WMM - RM, R**
Delete a cube RM RM RM, WM RM, WMM RM, WM -
Rebuild a cube RM RM RM RM RM, WM RM, R**
Refresh a cube RM RM RM RM RM, R RM, R**
Access cube data RM RM RM RM RM, R -
Register a schema RM, WM RM, WM - RM, WMM - -
Set cube permissions RM - RM RM RM, WM -
Permissions by Task 53

Task Repository Server* SchemaParentFolder Cube
SourceData
Use the OLAP Server Monitor RM A - - - -
* SAS Application Server** The Read permission is required for data that is accessed through the metadata LIBNAME engine.
Working with SAS OLAP Shared Dimensions
Table 5.10 Working with SAS OLAP Shared Dimensions
Task Repository Server* SchemaParentFolder Cube
SharedDimension
SourceData
Register a shareddimension
RM, WM RM RM, WM RM,WMM
- - RM, R**
Delete a shareddimension***
RM RM RM, WM RM,WMM
- RM, WM -
Rebuild a shareddimension
RM RM RM RM - RM, WM RM, R**
Use a shareddimension
RM RM RM RM RM, R RM -
* SAS Application Server** The Read permission is required for data that is accessed through the metadata LIBNAME engine.
*** You cannot delete a shared dimension that has any associations to any cubes.
See Also• “Permissions by Object Type” on page 46
• “Use and Enforcement of Each Permission” on page 62
Types of Access Controlsexplicit controls
A user has an explicit control on an object if the user is directly and individuallygranted or denied a permission on the object. Explicit settings have the highestprecedence. However, managing a large number of explicit controls for individualusers can be cumbersome. For greater efficiency, we recommend that you set explicitcontrols for groups, use ACTs, and rely on inheritance.
ACT settingsA user has an ACT setting on an object if an ACT that is applied to the object has apermission pattern that explicitly grants or denies the relevant permission to the user.Each ACT adds its pattern of grants and denials to the settings for each object towhich the ACT is applied.
54 Chapter 5 • Authorization Model

indirect settingsOne way that a user can have an indirect setting on an object is if the user belongs toa group that has an explicit or ACT setting on the object. Another way that a user canhave an indirect setting on an object is through access control inheritance. Inheritedsettings come from a parent object (such as a folder). Inherited settings matter only ifthere are no relevant direct controls on the target object. The term “indirect settings”is also used to refer to a WriteMemberMetadata setting that mirrors theWriteMetadata setting, and to grants that come from a user being unrestricted.
permission conditionsPermission conditions constrain explicit grants of the Read permission on OLAPdimensions (limiting access to members) or information maps (limiting access torows).
Authorization Decisions
Access Control Evaluation ProcessThe relative precedence of each access control is based on where it set, who it isassigned to, and how it is set. The following list summarizes how the metadata serverevaluates all relevant access controls to reach an authorization decision:
1. Direct controls (permissions that are set directly on the target object) are examined.
• Any conflicts that arise from group membership are resolved by the identityhierarchy. For example, an explicit control that is assigned to a user overrides aconflicting explicit control that is assigned to a group to which the user belongs.
• If there is a conflict between an explicit control and an ACT setting at the samelevel in the identity hierarchy, then the explicit control takes precedence.
• If there is a conflict between two explicit controls (or two ACT settings) at thesame level in the identity precedence hierarchy, then the outcome is a denial.
• If one or more permission conditions have been defined, then the condition thatis assigned at the highest level of identity precedence is applied. Other conditionsthat also apply to a user because of group memberships do not provideadditional, cumulative access (unless there are multiple tied groups at the highestlevel of identity precedence).
• If there are no relevant direct controls, then the evaluation process continues.
2. The step 1 evaluation process is applied to the immediate parent of the target object.For example, the immediate parent of a report is its folder. If no direct controls arefound, each successive parent object is examined in turn.
Note: In the unusual circumstance in which an object has more than one immediateparent, a grant from any inheritance path is sufficient to provide access.
3. If no direct controls are found on the object or on any of its parent objects, thepermission pattern of the repository ACT (Default ACT) is examined. The repositoryACT serves as the inheritance parent of last resort.
• If the repository ACT grants or denies the requested permission, then that grantor denial is determinative.
• If the repository ACT neither grants nor denies the permission, then thepermission is denied.
Authorization Decisions 55

• If there is no repository ACT, then the permission is granted. You should alwayshave a designated repository ACT.
Precedence Principles and ExamplesThe following table summarizes the principles of the authorization decision process for auser (Joe) who is looking for an object (LibraryA or ObjectA):
Table 5.11 Precedence Principles for Authorization
Principle Example* Outcome
Settings on an object have priorityover settings on the object's parents.
LibraryA has an explicit denial for PUBLIC. LibraryA's parentfolder has an explicit grant for Joe.
Joe can't seeLibraryA.
Conflicting settings on an object areresolved by identity precedence.
LibraryA has an explicit denial for GroupA and an explicitgrant for GroupAA. Joe is a direct member of GroupA.GroupA is a direct member of GroupAA.
Joe can't seeLibraryA.
In an identity precedence tie, explicitsettings have priority over ACTsettings.
LibraryA has an ACT denial for GroupA and an explicit grantfor GroupB. Joe is a direct member of both GroupA andGroupB.
Joe can seeLibraryA.
In an identity precedence tie that isn'tresolved by the preceding row, theoutcome is a denial.
LibraryA has an explicit denial for GroupA and an explicitgrant for GroupB. Joe is a direct member of both GroupA andGroupB.
Joe can't seeLibraryA.
A grant from any inheritance path canprovide access.
ObjectA has no explicit or ACT settings, one immediate parentthat conveys a grant, and another immediate parent thatconveys a denial.**
Joe can seeObjectA.
* The settings described in this column are the only explicit or ACT settings for ReadMetadata permission on LibraryA (or ObjectA).** Having more than one immediate parent is not a common circumstance.
See Also• “Object Inheritance” on page 44
• “Identity Hierarchy” on page 17
• Table 5.14 on page 61
Fine-Grained Controls for Data
What Are Fine-Grained Controls?Business requirements often specify that different users should see different portions, orslices, of data. In some cases, the requirement is driven by the sensitive nature of data.For example, company policy might state that each salesperson should be able to accessonly his or her own salary information. In other cases, the requirement is intended toprevent information overload. For example, each regional sales team within a national
56 Chapter 5 • Authorization Model

organization might be interested in only the sales trend information for their region.Fine-grained access distinctions are frequently based on each user's place in anorganizational structure such as a management hierarchy or a product matrix. Thevisibility of data can depend on a simple, site-specific condition such as a user's securityclearance level, or on a more complex condition that consists of multiple filters.
You use fine-grained controls to specify who can access particular rows within a table orparticular members within a cube dimension. These controls often subset data by a usercharacteristic such as employee ID or organizational unit. For example, a table thatcontains patient medical information might be protected by row-level permissions thatenable each doctor to see only those rows that contain data about that doctor's patients.
Unlike other access controls, fine-grained controls are based on filters and rely on targetdata that is modeled to work with those filters. When fine-grained controls are used,there are three possible authorization decision outcomes for a user request to view data:
GrantThe requesting user can access all data.
DenyThe requesting user can't access any data.
Conditional GrantThe requesting user can access only the data that meets specified filtering conditions.
What Implementations are Available?Each of the following components offers an implementation of fine-grained controls:
Information Maps (BI Row-Level Permissions)provide filtering for SAS data sets and third-party relational data accessed through aninformation map. You define and assign the filters in SAS Information Map Studioor with the INFOMAPS procedure.
This feature is practical for use with large, dimensionally modeled data marts. BIrow-level permissions do not require a specific data model. BI row-level permissionscan limit access to data within fact tables without incurring the performance cost ofdirectly filtering those tables. This is accomplished by ensuring that access to a facttable is always subject to an inner join with a filtered dimension (the filtering criteriais usually some type of identity information). This feature enables you to definegranular access to third-party data without requiring you to maintain individual useraccounts within those database systems.
CAUTION:Not all SAS clients require that users go through information maps in orderto access data. Comprehensive security that incorporates BI row-levelpermissions requires a specialized configuration that is supported only bySAS Web Report Studio.
See SAS Guide to BI Row-Level Permissions.
SAS OLAP Serverprovides filtering for SAS OLAP data using MDX expressions. You define andassign the filters in SAS Management Console, SAS OLAP Cube Studio, or SASData Integration Studio. See SAS OLAP Server: User's Guide.
SAS Scalable Performance Data Serverenables you to define database views that filter rows based on the user ID of theconnecting client. This functionality is provided by the @SPDSUSR system variable.The metadata-based identity-driven properties are not available in this
Fine-Grained Controls for Data 57

implementation. See the SAS Scalable Performance Data Server: Administrator’sGuide.
The following table compares the implementations:
Table 5.12 Comparison of Fine-Grained Control Implementations
Implementation SecureGraphical Filter
Creation Authorization UIMetadata-Aware
Identity-Driven
OLAP member-level
SPD Server row-level
BI row-level
About Identity-Driven Properties
Overview of Identity-Driven PropertiesIt is often necessary to make per-person access distinctions for the rows in a table or themembers in a dimension. You can make a separate filter for each user (such as wherename="joe"). However, if you have more than a few users, this approach quicklybecomes cumbersome. The more efficient alternative is to create a dynamic filter (suchas where name="&name;") that can discover and insert the correct, user-specificvalue into the WHERE expression each time access is requested.
To create a dynamic filter, use an identity-driven property as the value against whichvalues in the target data are compared. This list explains how the substitution works:
1. Each identity-driven property corresponds to a characteristic (such as name, user ID,or external identity).
2. Each user's values for these characteristics (such as joe, WinXP\joe, or 607189)are stored in the metadata.
3. The identity-driven property is aware of the user ID with which a client authenticatedand can locate information that is stored in the metadata for that user ID.
4. Each time it receives a request, the identity-driven property substitutes a user-specific value into the filter expression.
Note: This discussion is not applicable to the SPD Server, which has its ownimplementation of identity-based filtering.
These are the most useful identity-driven properties:
SAS.Useridreturns an authenticated user ID, normalized to the uppercase format USERID orUSERID@DOMAIN.
SAS.ExternalIdentityreturns a site-specific value (for example, employee ID). This property is oftenuseful because its values are likely to match user information in your data. Anidentity can have more than one external identity value. However, only the first valueis returned. Unlike the values for other identity-driven properties, values for this
58 Chapter 5 • Authorization Model

property are not always populated in the metadata. See “External Identities” on page18.
SAS.IdentityGroupsreturns a list of the groups and roles that this identity belongs to (directly, indirectly,or implicitly). The list contains the group and role names, as displayed in the Namefield on the General tab for each group or role.
SAS.PersonNamereturns a user name, as displayed in the Name field in the user's general properties.
These identity-driven properties are also supported:
SAS.IdentityGroupNamereturns a group name, as displayed in the Name field in the group's generalproperties. If a user logs on with an ID that is stored in a login on a group definition,then the name of the group that owns that login is returned. If a user logs on with auser ID that is not stored in the metadata, then the PUBLIC group is returned.
This property is useful only in the unusual circumstance where a user logs on withthe user ID that is defined for a group login. In almost all cases, a user logs on with auser ID that is defined for an individual user definition. Not all applications allow agroup to log on. This property is not supported if client-side pooling is used.
SAS.IdentityNamereturns a user name or group name, as displayed in the Name field in the generalproperties for the user or group. This property is a generalization ofSAS.PersonName and SAS.IdentityGroupName.
Note: In certain circumstances, a connecting identity might not have a value for theidentity-driven property that you are using. This can happen with theExternalIdentity property (sometimes), the IdentityGroupName property (almostalways), or the PersonName property (rarely). When a connecting user doesn't have avalue for the property that a query uses, an empty string is returned or the query fails.
Examples of Identity-Driven PropertiesFor example, to enable each user to see only his or her own salary information, youcould give the PUBLIC group a filter that is based on the SAS.PersonName property. Atrun time, the SAS.PersonName value that is associated with the connected user ID issubstituted into the filter. In this way, the query is modified as appropriate for eachrequesting client.
This table contains examples of filters that are based on identity properties, showingrepresentations of both the generic form and how each filter would be modified whenexecuted by a user named Harry Highpoint. Harry is a member of the ETL andExecutives groups. The example assumes that the customer has an employee informationtable named EmpInfo which includes Name, Category, WinID, Department, and EmpIDcolumns.
Table 5.13 Examples of Filters That Use Identity-Driven Properties
As Defined (Generic Form) As Executed (Resolved Form)
Where EmpInfo.WinID=&SAS.Userid; Where EmpInfo.WinID="HIGH@WIN"
Where EmpInfo.EmpID=&SAS.ExternalIdentity; Where EmpInfo.EmpID="123–456–789"
Where EmpInfo.Department IN &SAS.IdentityGroups; Where EmpInfo.Department IN('ETL','Executives','PUBLIC','SASUSERS')
Fine-Grained Controls for Data 59

As Defined (Generic Form) As Executed (Resolved Form)
Where EmpInfo.Name=&SAS.IdentityName; Where EmpInfo.Name="Harry Highpoint"
Where EmpInfo.Name=&SAS.PersonName; Where EmpInfo.Name="Harry Highpoint"
Where EmpInfo.Category=&SAS.IdentityGroupName; Where EmpInfo.Category=' '*
* Because the user does not log on with a user ID that is stored as part of a group definition, the user has no value for this property. Thiseither returns an empty string (in BI row-level permissions) or causes the query to fail (in other implementations).
Batch Reporting ConsiderationsWhen you use fine-grained controls, it is essential to understand that only dynamicallygenerated reports display data based on the access that is defined for the requesting user.Static reports display data based on the access that is defined for the user ID that wasused to generate the report. For example:
• Manually refreshed reports contain cached data (which can be updated by a useraction in the report viewer).
• Pre-generated reports reflect the access of the user ID that was used to generate thereport. Identity-specific access distinctions are preserved for pre-generated reportsonly if you define a separate report job for each user ID.
Permission Precedence ConsiderationsNote: This discussion applies to only OLAP member-level permissions and
authorization-based prefilters. It is not applicable to the SPD Server or to generalprefilters in information maps.
Fine-grained controls are assigned to users or groups in the authorization properties ofthe target dimension or information map. These filters are available only to constrain anexplicit grant of the Read permission. These filters are incorporated into the accesscontrol evaluation process as permission conditions.
A permission condition is applied only if it is on the setting that is closest to therequesting user. Other conditions that are relevant because of further-removed groupmemberships don't provide additional, cumulative access. If there is an identityprecedence tie between multiple groups at the highest level of identity precedence, thosetied conditions are combined in a Boolean OR expression. If the identity precedence tieincludes an unconditional grant, access is not limited by any conditions. The followingtable provides examples:
60 Chapter 5 • Authorization Model

Table 5.14 Precedence for Permission Conditions
Principle Scenario Outcome and Explanation
If there are multiple permissionconditions that apply to a userbecause of the user's groupmemberships, then the highestprecedence identity controls theoutcome.
A filter on InformationMapA limitsRead permission for GroupA.
Another filter on InformationMapAlimits Read permission for theSASUSERS group.
The user is a member of both GroupAand SASUSERS.
The user can see only the rows thatGroupA is permitted to see. GroupA hashigher identity precedence thanSASUSERS, so the filters that areassigned to GroupA define the user'saccess.
If there are multiple permissionconditions at the highest level ofidentity precedence, then any datathat is allowed by any of the tiedconditions is returned.
A filter on DimensionA limits Readpermission for GroupA.
Another filter on DimensionA limitsRead permission for GroupB.
The user is a first level member ofboth GroupA and GroupB.
The user can see any member that ispermitted for either GroupA or GroupB.
The following example describes the impact of identity precedence when a manager usesan information map that includes both of the following filters for a SALARY table:
• A permission condition that is assigned to the SASUSERS group gives each useraccess to his or her own salary information.
• A permission condition that is assigned to a Managers group enables each managerto see the salaries of the employees that he or she manages.
When the manager accesses the SALARY table, the filter that is assigned to theManagers group is applied and the filter that is assigned to SASUSERS is ignored. Thisis because the manager's direct membership in the Managers group has higher identityprecedence than the manager's implicit membership in the SASUSERS group. To avoida situation in which managers can see their employees' salaries but each manager can'tsee his or her own salary, you can use either of these approaches:
• Assign the filters to two groups that have the same identity precedence. For example,if you assign the first filter to a general purpose user-defined group (rather than toSASUSERS), and you make each manager a direct member of that group, thenmanagers will have an identity precedence tie between that group and the Managersgroup. This situation causes the two filters to be combined for members of theManagers group, enabling those users to see any row that is permitted by either filter.
• Define the Managers filter in a way that encompasses all of the rows that themanagers should be able to see. In other words, combine (OR together) theSASUSERS filter and the Managers filter.
Fine-Grained Controls for Data 61

Use and Enforcement of Each PermissionTable 5.15 Use and Enforcement of Each Permission
Permission Actions Affected and Limitations on Enforcement
ReadMetadata (RM) View an object or navigate past a folder. For example, to see an information map you needRM for that information map. To see or traverse a folder you need RM for that folder.
WriteMetadata (WM) Edit, delete, change permissions for, or rename an object. For example, to edit a report youneed WM for the report. To delete a report you need WM for the report (and WMM forthe report's parent folder). For containers other than folders (such as repositories, libraries,and schemas), WM also affects adding and deleting child items. For example, to add anobject anywhere in a repository you need WM at the repository level. For folders, addingand deleting child items is controlled by WMM, not WM.
WriteMemberMetadata(WMM)
Add an object to a folder or delete an object from a folder. For example, to save a report toa folder you need WMM for the folder. To remove a report from a folder, you need WMMfor the folder (and WM for the report). To enable someone to interact with a folder'scontents but with not the folder itself, grant WMM and deny WM.*
CheckInMetadata (CM) Check in and check out items in a change-managed area. Applicable only in an optionalconfiguration for SAS Data Integration Studio.**
Read (R) Read data. For example, while you need RM for a cube in order to see that cube, you needR for the cube in order to run a query against it. Enforced for OLAP data, informationmaps, data that is accessed through the metadata LIBNAME engine, and dashboardobjects.
Write (W) Update data. For example, on a table, W controls updating the rows in the table. Enforcedfor data that is accessed through the metadata LIBNAME engine, for publishing channels,and for dashboard objects.
Create (C) Add data. For example, on a table, C controls adding rows to the table. Enforced for datathat is accessed through the metadata LIBNAME engine.
Delete (D) Delete data. For example, D on a library controls deletion of tables from the library.Enforced for data that is accessed through the metadata LIBNAME engine and fordashboard objects.
Administer (A) Monitor , stop, pause, resume, refresh, or quiesce a server or spawner. For the metadataserver, the ability to perform tasks other than monitoring is managed by the MetadataServer: Operation role, not by any permission.
* A folder's WMM settings mirror its WM settings unless the folder has explicit or ACT settings of WMM. A grant (or denial) of WMMon a folder becomes an inherited grant (or denial) of WM on the items and subfolders in that folder. WMM is not inherited from onefolder to another. WMM is not applicable to specialized folders (such as virtual folders, favorites folders, or search folders).
** For any change-managed areas or resources, change-managed users should have CM (instead of WM or WMM). See “Setting upChange Management” in Chapter 5 of SAS Intelligence Platform: Desktop Application Adminstration Guide.
Note: For information about the Insert, Update, Select, Create Table, Drop Table, andAlter Table permissions, and an additional use of the Delete permission, see the SASGuide to Metadata-Bound Libraries.
62 Chapter 5 • Authorization Model

Chapter 6
Permissions on Folders
Baseline ACTs . . . . . . . . . . . . . . . . . . . . . . . . . . . . . . . . . . . . . . . . . . . . . . . . . . . . . . . . 63
Example: Business Unit Separation . . . . . . . . . . . . . . . . . . . . . . . . . . . . . . . . . . . . . . 65
Variation 1: Regional Separation, Designated Content Creators . . . . . . . . . . . . . . 66
Variation 2: Functional Separation . . . . . . . . . . . . . . . . . . . . . . . . . . . . . . . . . . . . . . 69
Key Points about the Baseline ACT Approach . . . . . . . . . . . . . . . . . . . . . . . . . . . . . 71
Further Considerations for Permissions on Folders . . . . . . . . . . . . . . . . . . . . . . . . . 72Consolidation of ACTs . . . . . . . . . . . . . . . . . . . . . . . . . . . . . . . . . . . . . . . . . . . . . . . 72Separated Administration . . . . . . . . . . . . . . . . . . . . . . . . . . . . . . . . . . . . . . . . . . . . . 72End Users, Folders, and Permissions . . . . . . . . . . . . . . . . . . . . . . . . . . . . . . . . . . . . 72
Baseline ACTsOne approach to setting permissions on folders is to create a few general-use ACTs, andapply one or more of those ACTs to each folder that you need to secure. To grant accessback to a particular group, supplement the ACT settings by adding explicit controls onthe target folder. The examples in this chapter use three general-purpose ACTs. EachACT reduces a particular type of access down to a minimal level, so this chapter refersto these ACTs as baseline ACTs.
Hidegives SAS Administrators and service identities exclusive Read access to metadata(limits visibility).
Table 6.1 Example: Pattern for the Hide ACT
Group Permission Pattern
PUBLIC Deny ReadMetadata
SAS Administrators Grant ReadMetadata*
63
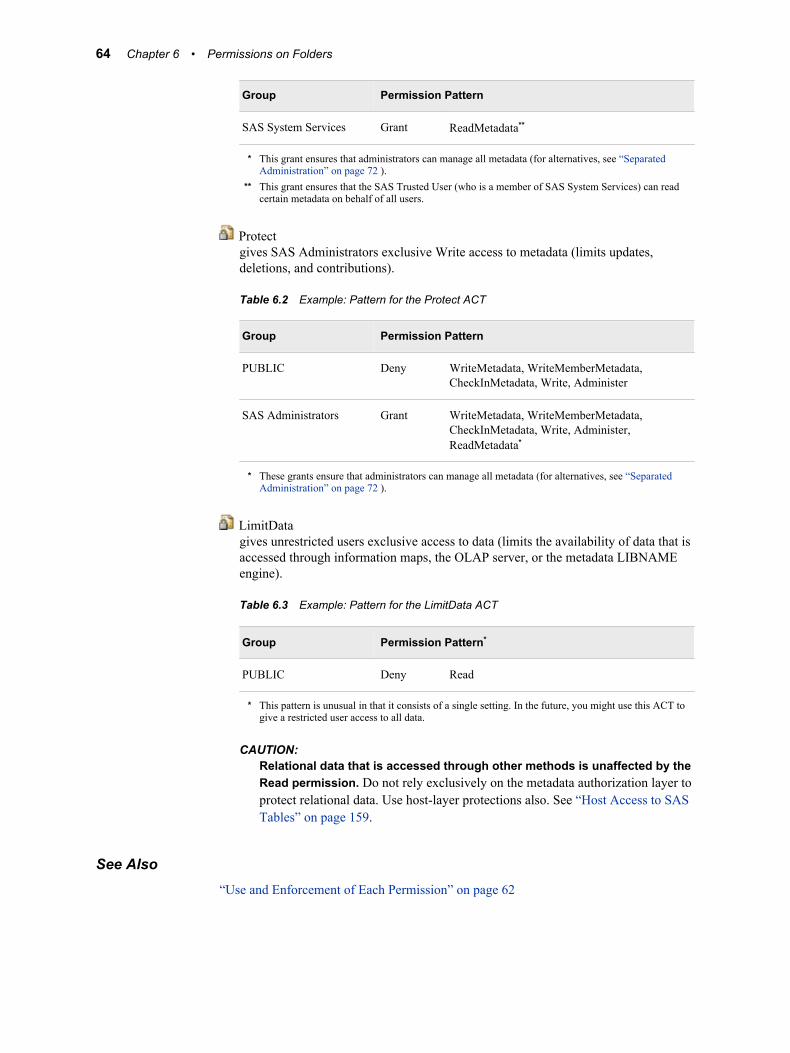
Group Permission Pattern
SAS System Services Grant ReadMetadata**
* This grant ensures that administrators can manage all metadata (for alternatives, see “SeparatedAdministration” on page 72 ).
** This grant ensures that the SAS Trusted User (who is a member of SAS System Services) can readcertain metadata on behalf of all users.
Protectgives SAS Administrators exclusive Write access to metadata (limits updates,deletions, and contributions).
Table 6.2 Example: Pattern for the Protect ACT
Group Permission Pattern
PUBLIC Deny WriteMetadata, WriteMemberMetadata,CheckInMetadata, Write, Administer
SAS Administrators Grant WriteMetadata, WriteMemberMetadata,CheckInMetadata, Write, Administer,ReadMetadata*
* These grants ensure that administrators can manage all metadata (for alternatives, see “SeparatedAdministration” on page 72 ).
LimitDatagives unrestricted users exclusive access to data (limits the availability of data that isaccessed through information maps, the OLAP server, or the metadata LIBNAMEengine).
Table 6.3 Example: Pattern for the LimitData ACT
Group Permission Pattern*
PUBLIC Deny Read
* This pattern is unusual in that it consists of a single setting. In the future, you might use this ACT togive a restricted user access to all data.
CAUTION:Relational data that is accessed through other methods is unaffected by theRead permission. Do not rely exclusively on the metadata authorization layer toprotect relational data. Use host-layer protections also. See “Host Access to SASTables” on page 159.
See Also“Use and Enforcement of Each Permission” on page 62
64 Chapter 6 • Permissions on Folders

Example: Business Unit SeparationThis example creates a secured custom branch with mutually exclusive access for twodivisions. In this example, the project level folders are for only organizational purposes(there are no access distinctions at the project level). The following figure depicts apartial group and folder structure.
Figure 6.1 Group and Folder Structure
PUBLIC
SASUSERS DemoBranch
DivisionA
Project1
Project2
DivisionB
Project1
Project2
GroupA can consume
and contribute.
GroupB can consume
and contribute.
SAS Folders
SAS Administrators
SAS System Services
GroupA
GroupB
The following table lists the protections for the first four folders in the branch:
Table 6.4 Mutually Exclusive Access
Folder
Direct Controls
ACTs Explicit Grants
DemoBranch Protect
LimitData
DivisionA Hide GroupA: +RM, +R
Project1 GroupA: +WMM
Project2 GroupA: +WMM
Here are some details about this example:
• ReadMetadata permission flows into the DemoBranch from its parent folder. In all ofthe examples in this chapter, the immediate parent to the DemoBranch is visible toall registered users (SASUSERS). This is a standard setting. Unless you apply theHide ACT to the top of your custom branch, the SASUSERS grant of ReadMetadatapermission flows into your branch.
• The ability to create, manage, and delete content is shut off at the top (by the ProtectACT on the DemoBranch). This constraint flows throughout the tree (except whereyou add supplemental grants of WriteMemberMetadata permission to specificfunctional groups on specific folders). Users don't add content or access data in theDemoBranch, so no supplemental grants are needed on that folder.
Example: Business Unit Separation 65

• Because you want to prevent members of GroupB from seeing the DivisionA branch,you apply the Hide ACT on that branch. You then add supplemental grants forGroupA to restore their access.
• On DivisionA's project folders, you apply the Protect ACT to override GroupA'sinherited grant of WriteMetadata permission (GroupA's grant ofWriteMemberMetadata permission on DivisionA becomes an inherited grant ofWriteMetadata permission on the immediate children of DivisionA). This preventsmembers of GroupA from renaming, deleting, or changing permissions on eachproject folder. You then add a supplemental grant of WriteMemberMetadatapermission so that members of GroupA can contribute content in the project folders.
• On DivisionA's project folders, you don't apply the Hide ACT, because theReadMetadata access that flows in from the DivisionA folder is appropriate. In thisexample, the requirement is that all members of GroupA should be able to accesscontent throughout the DivsionA branch.
• Notice that it isn't necessary to use separate folders for each type of object.
• Any content contributors who register cubes must have WriteMetadata permissionon the OLAP schema . By default, the schema is in the SAS Folders/SharedData/SASApp - OLAP Schema folder.
Variation 1: Regional Separation, DesignatedContent Creators
This example eliminates the project folders and introduces the following requirements:
• Regional employees see only content for their region.
• A central group of managers see all content.
• A central group of content creators creates all content.
The following figure depicts a partial group and folder structure.
Figure 6.2 Group and Folder Structure
DemoBranch
DivisionA
RegionA1
RegionA2
DivisionB
RegionB1
RegionB2
Managers and members of
each region can consume,
ContentCreators can
consume and contribute.
PUBLIC
SASUSERS
GroupA GroupB
SAS Folders
RegionA1
RegionA2
RegionB1
RegionB2
SAS Administrators
SAS System Services
ContentCreators
Managers
The following table lists the protections for the first four folders in the branch:
66 Chapter 6 • Permissions on Folders

Table 6.5 Subgroup Separation and Limited Contribution
Folder
Direct Controls
ACTs Explicit Grants
DemoBranch Protect
LimitData
DivisionA Hide GroupA: +RM
ContentCreators: +RM
Managers:+RM
RegionA1 Hide RegionA1: +RM, +R
ContentCreators: +RM, +R, +WMM
Managers:+RM, +R
RegionA2 Hide RegionA2: +RM, +R
ContentCreators: +RM, +R, +WMM
Managers:+RM, +R
Notice that you are repeating many of the same explicit settings on each region, and thatthis will be the case throughout the DemoBranch. For greater efficiency and morecentralized control, create a custom ACT (called RegionLevel) that provides thesupplemental grants for your content creators (RM, R, WMM) and your managers (RM,R). Remember to protect the ACT itself.
The following table lists the protections for the first four folders:
Table 6.6 Use a Supplemental ACT
Folder
Direct Controls
Baseline ACTs Supplemental Grants
DemoBranch Protect
LimitData
DivisionA Hide GroupA: +RM
ContentCreators: +RM
Managers:+RM
RegionA1 Hide RegionA1: +RM, +R
RegionLevel
Variation 1: Regional Separation, Designated Content Creators 67

Folder
Direct Controls
Baseline ACTs Supplemental Grants
RegionA2 Hide RegionA2: +RM, +R
RegionLevel
If you decide to offer content at the division level and you want that content to beavailable to only managers, you might make these changes:
• Create a DivisionLevel ACT with grants for Managers (RM, R) and ContentCreators(RM, R, WMM). Apply that ACT to each division folder.
Note: This is the same pattern that you use for the RegionLevel ACT, so you couldinstead simply use that ACT. In this example, you choose to create a separateACT because you anticipate that the requirements for division-level access andregion-level access might diverge in the future.
• Apply the Protect ACT on each region folder (to take away the inherited grant ofWriteMetadata permission that content contributors inherit from their division-levelgrant of WriteMemberMetadata permission).
Note: If you choose to not do this, members of the content creators group can delete,rename, or change permissions for the region folders.
The following table lists the protections for the first four folders in the branch:
Table 6.7 Accommodate Division-Level Content
Folder
Direct Controls
Baseline ACTs Supplemental Grants
DemoBranch Protect
LimitData
DivisionA Hide GroupA: +RM
DivisionLevel
RegionA1 Hide
Protect
RegionA1: +RM, +R
RegionLevel
RegionA2 Hide
Protect
RegionA2: +RM, +R
RegionLevel
68 Chapter 6 • Permissions on Folders

Variation 2: Functional SeparationThis example includes three custom groups that represent users who have specific jobresponsibilities (Data Admins, Map Creators, and Report Creators). Each division folderhas separate subfolders for different types of content (data definitions, information maps,report definitions, and stored processes). Supplemental Write access in each folder islimited to members of the appropriate functional groups as follows:
• Data administrators can work in each division's data definitions folder.
• Information map creators can work in each division's information maps folder.
• Report creators can work in each division's reports folder.
• Information map creators and report creators can work in each division's storedprocesses folder.
Note: Access for these functional groups is also limited by divisional affiliations. Forexample, only DivisionA's report creators (and SAS Administrators) can add, update,and delete items in DivisionA's reports folder.
The following figure depicts a partial group and folder structure.
Figure 6.3 Group and Folder Structure
PUBLIC
SASUSERS
GroupBMap Creators
Report Creators
DemoBranch
DivisionA
data definitions
information maps
DivisionB
reports
stored processes
Managers and
GroupA can
consume, specific
types of creators
that are in GroupA
can contribute.
GroupA
SAS Folders
Data Administrators
SAS Administrators SAS System Services Managers
The following table lists the protections for the first six folders:
Table 6.8 Functional Separation
Folder
Direct Controls
ACTs Explicit Grants
DemoBranch Protect
LimitData
DivisionA Hide Managers: +RM, +R
GroupA: +RM, +R
Variation 2: Functional Separation 69

Folder
Direct Controls
ACTs Explicit Grants
data definitions Protect* Data Admins: +WMM
information maps Protect* Map Creators: +WMM
reports Protect* Report Creators: +WMM
stored processes Protect* Map Creators: +WMM
Report Creators: +WMM
* You don't strictly need the Protect ACT here, because protections flow through from the DemoBranch folder (and aren't interrupted byany supplemental grants of WM or WMM on higher level folders). However, you do need the supplemental grants of WMM on thesefolders, so you might choose to also apply the Protect ACT here for clarity.
Here are some details about this example:
• On DivisionA, users who aren't in the Managers group, GroupA, or SASAdministrators are locked out. Such users can't see or traverse DivisionA or anyfolders in the DivisionA branch. Managers and members of GroupA havesupplemental grants of ReadMetadata and Read permissions on DivisionA; thesegrants flow through the entire DivisionA branch.
Note: In order to view a DivisionA report, you need ReadMetadata permission and(in most cases) Read permission to the report's underlying components (such asinformation maps, stored processes, and data).
• On each content type folder, one or more functional groups has a supplemental grantof WriteMemberMetadata permission. However, functional group access is alsoconstrained by division-level ReadMetadata access. For example, even though allreport creators have WriteMemberMetadata permission on the DivisionA reportsfolder, only those report creators who are members of GroupA can see the folder.
• Nothing in these settings prevents creation of a certain type of item. For example, amap creator can create a report and add that report to the map folder or the storedprocesses folder. Here are some techniques for increasing control:
• You can use roles to limit the ability to create reports in SAS Web Report Studio.
• You should limit the ability to register libraries, stored processes, and OLAPschemas by managing WriteMetadata permission on application servers.
• You can use the map accessibility check configuration option to limit thelocations from which SAS Web Report Studio will use relational maps.
• You might choose to put the supplemental grants of WriteMemberMetadatapermission in additional ACTs (such as MapCreators ACT, ReportCreators ACT)instead of using explicit settings on each folder. Using ACTs is more centralized,which is beneficial in accommodating later changes to the pattern. Of course, themore divisions you have, the more work it would be to update explicit settings, sothe more valuable it would be to centralize settings with ACTs.
• Consider how you would handle an exception requirement. For example, to let aparticular data administrator who isn't in GroupA contribute to the DivisionA datadefinitions folder, you might give that user a clear path of grants of ReadMetadata
70 Chapter 6 • Permissions on Folders

permission to the folder and supplemental grants of WriteMemberMetadata andRead permissions on the folder.
Key Points about the Baseline ACT Approach• In general, it isn't necessary to add protection to the predefined folders (such as the
root folder, each user's My Folder, and the System folder). These folders areprotected by default.
• The preceding examples don't add grants of ReadMetadata permission on theDemoBranch folder because that folder's parent (the SAS Folders node) is visible toall registered users. The grant of ReadMetadata permission to SASUSERS on theSAS Folders node flows into the DemoBranch.
• To hide a branch, apply the Hide ACT to the relevant folder and grant backReadMetadata permission to any groups who should have access. Remember that adenial of ReadMetadata permission on a folder prevents navigation to content andfolders that are below the hidden folder (and that this can't be mitigated by a grant ofReadMetadata permission on a lower-level folder or other item).
• To enable a group to contribute content to a particular folder, give that group a grantof WriteMemberMetadata permission on that folder and consider applying theProtect ACT to each immediate subfolder.
Note: This protects lower-level folders that inherit the contributing group'sWriteMemberMetadata permission grant (from the parent folder) as a grant ofWriteMetadata permission (on the child folder). If you don't protect a childfolder, the contributing group can rename, delete, or change permissions on thatfolder. To enable content contributions to the child folder, grantWriteMemberMetadata permission on that folder (and consider repeating thedenial of WriteMetadata permission on any subfolders that are below that folder).
Note: Any content contributors who register cubes must have WriteMetadatapermission on the OLAP schema. By default, the schema is in the SASFolders/Shared Data/ SASApp - OLAP Schema folder.
• If you want a group to access data through cubes, information maps, or the metadataLIBNAME engine, give that group a grant of Read permission on the folder thatcontains the relevant items. For any folder where you add a grant of Readpermission, determine whether you want that grant to flow through to the subfolders.Apply the LimitData ACT to any immediate subfolders where you want to preventdata access. The navigational requirement for a clear path of ReadMetadatapermission doesn't apply to the Read permission.
• The examples in this chapter ensure that content contributors have Read permissionto the resources that they use. If you have a content contributor who isn't also acontent consumer, you can choose to not provide Read permission. For example, ifyou give a user ReadMetadata permission but not Read permission to an informationmap, that user can still design the map (but can't perform tasks such as testingqueries).
• You might be able to save some time by using this technique:
1. Create one sub-branch (for example, the DivisionA branch in the precedingexamples). The folders should have appropriate permission settings but containno content.
Key Points about the Baseline ACT Approach 71

2. Copy that empty sub-branch to create the other branches (for example, to createthe DivisionB folders). Change the folder name on the copy and update thesettings as necessary. Often, you only have to remove and add a fewsupplemental grants.
Note: If this technique proves useful, consider keeping an empty template branchthat is visible only to administrators. You can use the template if you need to addmore branches later.
Further Considerations for Permissions onFolders
Consolidation of ACTsIn general, consolidation (using one pattern in all of the places where it is appropriate) isbeneficial, because it simplifies management. However, it might be appropriate tomaintain two ACTs that have the similar patterns in circumstances such as these:
• You anticipate that access requirements might diverge. For example, if you think youwill eventually separate folder administration from server administration, you mightcreate a SystemProtect ACT for items that aren't in the folder tree.
• You want to use a pattern that is similar to but not exactly the same as one of thepredefined ACTs. For example, the baseline Hide ACT is not very different from thepredefined Private User Folder ACT. We strongly recommend that you do notmodify or delete the predefined ACTs, because these ACTs are an integral part of theprotections that are set up for you during installation. The usage of each predefinedACT requires certain settings. Modifying the settings on a predefined ACT cancompromise the security that that ACT provides.
Note: The examples in this chapter don't demonstrate use of an ACT to protect otherACTs. Consider returning to each ACT's Authorization tab, removing the explicitcontrols, and instead applying an ACT such as the Protect ACT.
Separated AdministrationIf you need to separate administration privileges by department, the approach in thischapter is not granular enough. If you don't want the SAS Administrators group to haveuniversal access, consider creating parallel sets of baseline ACTs.
For example, to separate administration for an East region and a West region, you mightcreate ACTs such as Hide_East, Hide_West. In each baseline ACT pattern, you wouldreplace the SAS Administrators group with a narrower administrative group (forexample, East_Admins, West_Admins). The denials to PUBLIC and grants to the SASSystem Services group would not change. Any unrestricted users can still accesseverything.
End Users, Folders, and PermissionsProper use of the WriteMetadata and WriteMemberMetadata permissions protects afolder structure. Keep in mind that end users can affect access to content as follows:
72 Chapter 6 • Permissions on Folders

• A user who can update an item can add settings on that item. You can't prevent thisby limiting the availability of SAS Management Console because users can setpermissions in other applications (for example, SAS Information Map Studio, SASOLAP Cube Studio, SAS Data Integration Studio, SAS Enterprise Guide, and theSAS Add-In for Microsoft Office).
• A user who can contribute items to a folder can also add subfolders below thatfolder. You can't prevent this by limiting the availability of SAS ManagementConsole because users can add folders in other applications (for example, SASInformation Map Studio, SAS OLAP Cube Studio, SAS Data Integration Studio,SAS Enterprise Guide, and the SAS Add-In for Microsoft Office).
• If you give someone CheckInMetadata permission on a folder, that person canupdate or delete the folder (through change management activities), as well as checkin content to that folder. Change management is an optional feature that is availableonly for SAS Data Integration Studio.
Further Considerations for Permissions on Folders 73

74 Chapter 6 • Permissions on Folders

Chapter 7
Permissions on Servers
Protect Server Definitions . . . . . . . . . . . . . . . . . . . . . . . . . . . . . . . . . . . . . . . . . . . . . . 75Introduction . . . . . . . . . . . . . . . . . . . . . . . . . . . . . . . . . . . . . . . . . . . . . . . . . . . . . . . . 75Method . . . . . . . . . . . . . . . . . . . . . . . . . . . . . . . . . . . . . . . . . . . . . . . . . . . . . . . . . . . 75Instructions . . . . . . . . . . . . . . . . . . . . . . . . . . . . . . . . . . . . . . . . . . . . . . . . . . . . . . . . 76
Hide Server Definitions . . . . . . . . . . . . . . . . . . . . . . . . . . . . . . . . . . . . . . . . . . . . . . . . 78Introduction . . . . . . . . . . . . . . . . . . . . . . . . . . . . . . . . . . . . . . . . . . . . . . . . . . . . . . . . 78Method . . . . . . . . . . . . . . . . . . . . . . . . . . . . . . . . . . . . . . . . . . . . . . . . . . . . . . . . . . . 78Instructions . . . . . . . . . . . . . . . . . . . . . . . . . . . . . . . . . . . . . . . . . . . . . . . . . . . . . . . . 79
Protect Server Definitions
IntroductionIn a new deployment, all registered users can update and delete server definitions. Werecommend that you limit the ability to update or delete server metadata as follows:
• The SAS Administrators group should be able to administer, update, and delete allserver definitions.
• Users who assign libraries, stored processes, or an OLAP schema to an applicationserver must have WriteMetadata permission for that application server.
• No other users should be able to update or delete server definitions.
MethodTo avoid repeatedly adding the same explicit grants and denials to multiple pieces ofserver metadata, create and use an ACT. If you want to enable regular users to assignlibraries, stored processes, or an OLAP schema to a particular application server,supplement the ACT settings with an explicit grant of WriteMetadata permission on thatapplication server.
The following table depicts typical protections.
75

Table 7.1 Example: Protecting Server Definitions
Object
Direct Controls
ACTs Explicit Grants
SASApp Protect DataAdmins: +WM
Each logical server inside SASApp Protect (none)
SASMeta Protect (none)
Other immediate children of Server Manager Protect (none)
Note: The initial configuration in a new deployment limits access to the logicalworkspace server and the logical SAS DATA step batch server within SASMeta, soit is not necessary to add protections to those components.
InstructionsHere is one way to set the permissions:
1. Log on to SAS Management Console as a member of the SAS Administrators group(for example, sasadm@saspw). Select the Plug-ins tab.
2. (Optional) Examine the current settings.
a. Expand Server Manager, right-click the SASApp application server andselect Properties.
b. On the Authorization tab, select SASUSERS. Notice that this group (whichincludes all registered users) has both ReadMetadata and WriteMetadatapermissions. The application server inherits these grants from the standardrepository-level settings. Click OK to close the dialog box.
3. If you do not already have an ACT with the appropriate pattern, create a new ACT asfollows:
a. Expand Authorization Manager, right-click Access Control Templates, andselect New Access Control Template.
b. On the General tab, enter a name such as Protect.
c. On the Permission Pattern tab, define settings that you want to apply to allserver metadata.
Table 7.2 Example: Pattern for the Protect ACT
Group Permission Pattern
PUBLIC Deny WriteMetadata, WriteMemberMetadata,CheckInMetadata, Write, Administer
76 Chapter 7 • Permissions on Servers
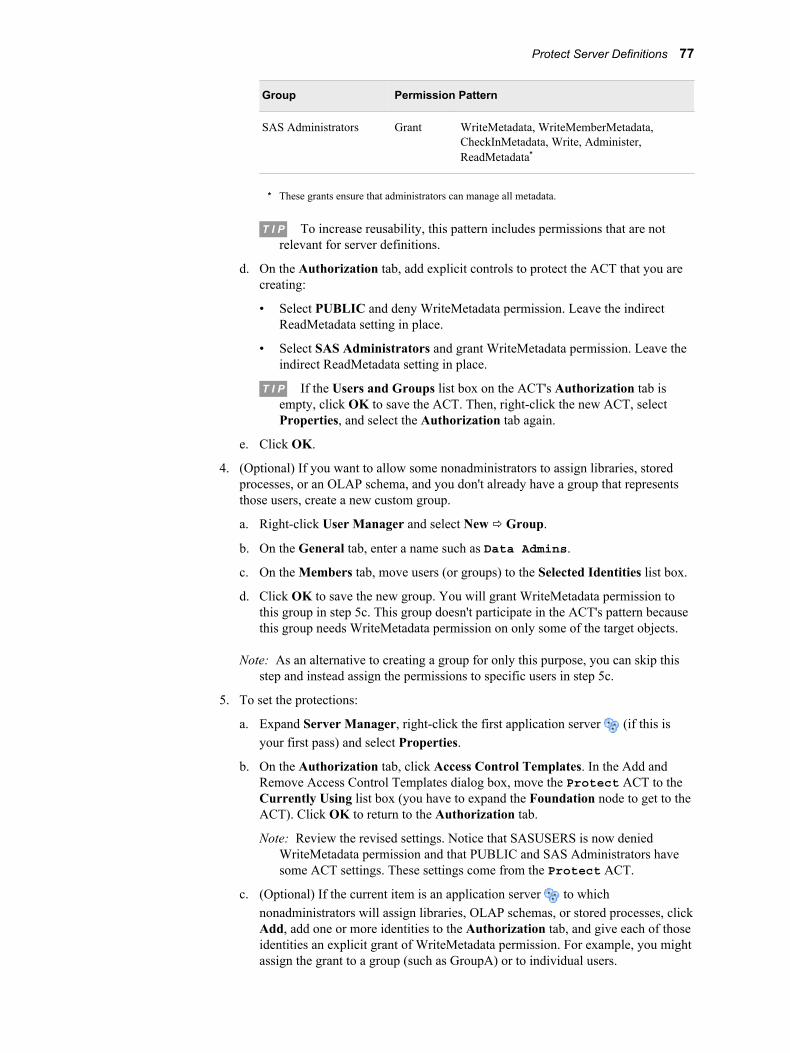
Group Permission Pattern
SAS Administrators Grant WriteMetadata, WriteMemberMetadata,CheckInMetadata, Write, Administer,ReadMetadata*
* These grants ensure that administrators can manage all metadata.
T I P To increase reusability, this pattern includes permissions that are notrelevant for server definitions.
d. On the Authorization tab, add explicit controls to protect the ACT that you arecreating:
• Select PUBLIC and deny WriteMetadata permission. Leave the indirectReadMetadata setting in place.
• Select SAS Administrators and grant WriteMetadata permission. Leave theindirect ReadMetadata setting in place.
T I P If the Users and Groups list box on the ACT's Authorization tab isempty, click OK to save the ACT. Then, right-click the new ACT, selectProperties, and select the Authorization tab again.
e. Click OK.
4. (Optional) If you want to allow some nonadministrators to assign libraries, storedprocesses, or an OLAP schema, and you don't already have a group that representsthose users, create a new custom group.
a. Right-click User Manager and select New ð Group.
b. On the General tab, enter a name such as Data Admins.
c. On the Members tab, move users (or groups) to the Selected Identities list box.
d. Click OK to save the new group. You will grant WriteMetadata permission tothis group in step 5c. This group doesn't participate in the ACT's pattern becausethis group needs WriteMetadata permission on only some of the target objects.
Note: As an alternative to creating a group for only this purpose, you can skip thisstep and instead assign the permissions to specific users in step 5c.
5. To set the protections:
a. Expand Server Manager, right-click the first application server (if this isyour first pass) and select Properties.
b. On the Authorization tab, click Access Control Templates. In the Add andRemove Access Control Templates dialog box, move the Protect ACT to theCurrently Using list box (you have to expand the Foundation node to get to theACT). Click OK to return to the Authorization tab.
Note: Review the revised settings. Notice that SASUSERS is now deniedWriteMetadata permission and that PUBLIC and SAS Administrators havesome ACT settings. These settings come from the Protect ACT.
c. (Optional) If the current item is an application server to whichnonadministrators will assign libraries, OLAP schemas, or stored processes, clickAdd, add one or more identities to the Authorization tab, and give each of thoseidentities an explicit grant of WriteMetadata permission. For example, you mightassign the grant to a group (such as GroupA) or to individual users.
Protect Server Definitions 77

T I P For any users that are under change management, grant CheckInMetadata(CM), instead of WriteMetadata (WM). See SAS Intelligence Platform:Desktop Application Adminstration Guide.
Note: Don't extend WriteMetadata access to the SASMeta application server,because that server should be used for only a few specialized administrativetasks.
d. Click OK to save the settings for this object.
e. Repeat steps 5a-d for every immediate child of Server Manager. Immediatechildren include objects such as other application servers, third-party servers, theshare server, the content server, and spawners.
f. Apply the Protect ACT to every logical server that is under an applicationserver where you added an explicit grant of WriteMetadata permission (forSASUSERS or a custom group such as Data Admins).
Note: This protects lower-level server metadata that would otherwise inherit thenonadministrator's WriteMetadata grant from the application server. This alsoprevents nonadministrators who have WriteMetadata permission on theapplication server from deleting that application server.
See Also“Use and Enforcement of Each Permission” on page 62
Hide Server Definitions
IntroductionIn a new deployment, all registered users can see and use server definitions. You mightchoose to limit the availability of certain servers in any of the following circumstances:
• You want to create different levels of host access to data.
• You want to direct power users to a server with settings that offer advanced options.
• You want to direct high priority users to a server on hardware that offers superiorperformance.
• You want to enable users in SAS Information Map Studio to use a standardworkspace server even when a logical pooled workspace server is present.
MethodIf you choose to limit the availability of a server, preserve access as follows:
• Make sure that the SAS System Services group has ReadMetadata permission forserver metadata. This enables the SAS Trusted User to see server definitions. This isnecessary because the object spawner uses the SAS Trusted User to discover andread all server metadata.
Note: Users should not be members of the SAS System Services group. This groupis for service identities. In the standard configuration, the only member of thisgroup is the SAS Trusted User.
78 Chapter 7 • Permissions on Servers
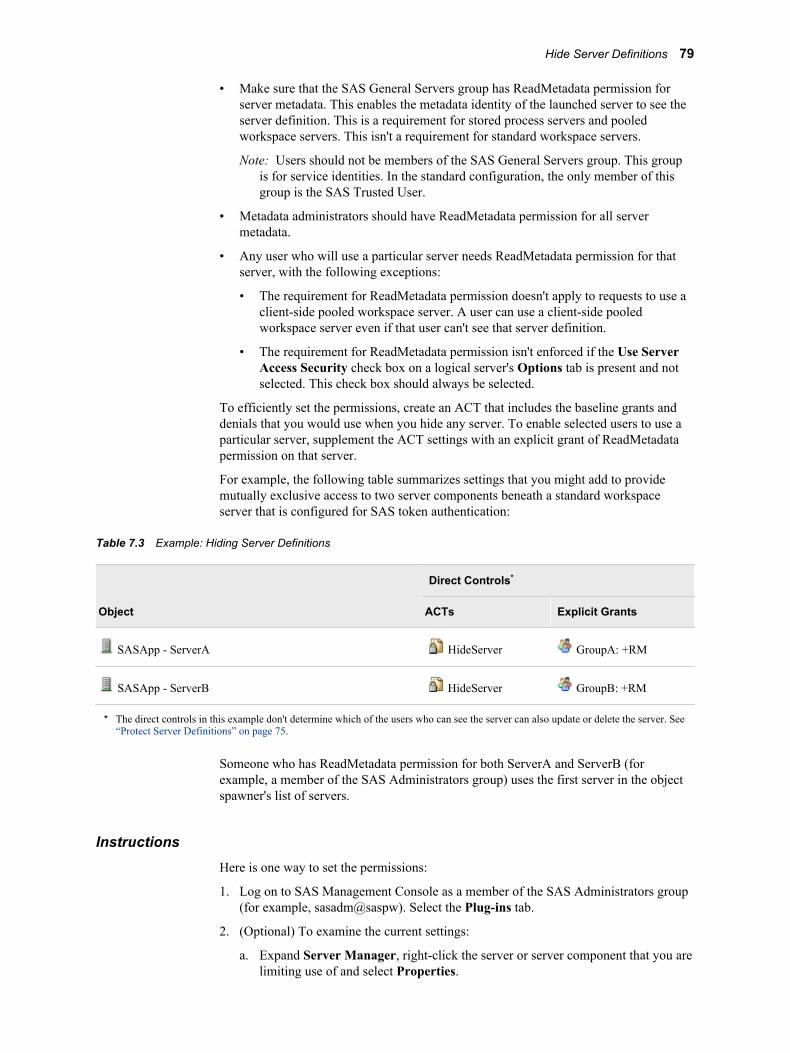
• Make sure that the SAS General Servers group has ReadMetadata permission forserver metadata. This enables the metadata identity of the launched server to see theserver definition. This is a requirement for stored process servers and pooledworkspace servers. This isn't a requirement for standard workspace servers.
Note: Users should not be members of the SAS General Servers group. This groupis for service identities. In the standard configuration, the only member of thisgroup is the SAS Trusted User.
• Metadata administrators should have ReadMetadata permission for all servermetadata.
• Any user who will use a particular server needs ReadMetadata permission for thatserver, with the following exceptions:
• The requirement for ReadMetadata permission doesn't apply to requests to use aclient-side pooled workspace server. A user can use a client-side pooledworkspace server even if that user can't see that server definition.
• The requirement for ReadMetadata permission isn't enforced if the Use ServerAccess Security check box on a logical server's Options tab is present and notselected. This check box should always be selected.
To efficiently set the permissions, create an ACT that includes the baseline grants anddenials that you would use when you hide any server. To enable selected users to use aparticular server, supplement the ACT settings with an explicit grant of ReadMetadatapermission on that server.
For example, the following table summarizes settings that you might add to providemutually exclusive access to two server components beneath a standard workspaceserver that is configured for SAS token authentication:
Table 7.3 Example: Hiding Server Definitions
Object
Direct Controls*
ACTs Explicit Grants
SASApp - ServerA HideServer GroupA: +RM
SASApp - ServerB HideServer GroupB: +RM
* The direct controls in this example don't determine which of the users who can see the server can also update or delete the server. See“Protect Server Definitions” on page 75.
Someone who has ReadMetadata permission for both ServerA and ServerB (forexample, a member of the SAS Administrators group) uses the first server in the objectspawner's list of servers.
InstructionsHere is one way to set the permissions:
1. Log on to SAS Management Console as a member of the SAS Administrators group(for example, sasadm@saspw). Select the Plug-ins tab.
2. (Optional) To examine the current settings:
a. Expand Server Manager, right-click the server or server component that you arelimiting use of and select Properties.
Hide Server Definitions 79

Note: The SASMeta application server should have limited availability, becauseit should be used only as instructed (in a few specialized administrativetasks).
b. On the Authorization tab, select SASUSERS. Notice that this group (whichincludes all registered users) has ReadMetadata permission. The applicationserver inherits the grant from the standard repository-level settings. Click OK toclose the dialog box.
3. To create the ACT:
a. Expand Authorization Manager, right-click Access Control Templates, andselect New Access Control Template.
b. On the General tab, enter a name such as HideServer.
c. On the Permission Pattern tab, define baseline settings for hiding servers.
Table 7.4 Example: Pattern for the HideServer ACT
Group Permission Pattern
PUBLIC Deny ReadMetadata
SAS Administrators Grant ReadMetadata*
SAS General Servers Grant ReadMetadata
SAS System Services Grant ReadMetadata**
* This grant ensures that administrators can manage all server metadata (for alternatives, see “Separated Administration” on page 72 ).
** This grant ensures that the SAS Trusted User (who is a member of SAS System Services) canread server metadata for the object spawner (on behalf of all users).
T I P This pattern, when applied to a standard workspace server, grants a littlemore access than is strictly necessary. For a standard workspace server, theSAS General Servers group doesn't need ReadMetadata permission. If youwant to avoid this, consider omitting the SAS General Servers group fromthis ACT and remembering to add an explicit grant for this group when youare hiding a stored process server or pooled workspace server.
d. On the Authorization tab, protect the ACT that you are creating. Either apply anACT or add explicit controls that deny WriteMetadata permission to PUBLICand grant WriteMetadata permission to the SAS Administrators group.
Note: If the Users and Groups list box on the ACT's Authorization tab isempty, click OK to save the ACT. Then, right-click the new ACT, selectProperties, and select the Authorization tab again.
e. Click OK.
4. (Optional) If you don't already have a group that represents the users who will usethe server, create a new custom group.
a. Right-click User Manager and select New ð Group.
b. On the General tab, enter a name such as GroupA.
c. On the Members tab, move users (or groups) to the Selected Identities list box.
80 Chapter 7 • Permissions on Servers

d. Click OK to save the new group. You will grant ReadMetadata permission tothis group in step 5c. This group doesn't participate in the general pattern becausethis group doesn't need ReadMetadata permission on all servers.
Note: As an alternative to creating a group for only this purpose, you can skip thisstep and instead assign the permissions directly to specific users in step 5c.
5. To set the permissions:
a. Under Server Manager, right-click the server that you are limiting use of andselect Properties.
b. On the Authorization tab, click Access Control Templates. In the Add andRemove Access Control Templates dialog box, move the HideServer ACT tothe Currently Using list box (you have to expand the Foundation node to get tothe ACT). Click OK to return to the Authorization tab.
Note: If the Currently Using list already includes another ACT (such as theProtect ACT), don't remove that assignment.
Note: Review the revised settings. Notice that SASUSERS is now deniedReadMetadata permission and that PUBLIC and SAS Administrators havesome ACT settings. These settings come from the HideServer ACT.
c. Click Add, add one or more identities to the Authorization tab, and give each ofthose identities an explicit grant of ReadMetadata permission. For example, youmight assign the grant to a group (such as GroupA) or to individual users.
d. Click OK.
6. If you are limiting use of a logical server or server component, ensure that the UseServer Access Security check box on the logical server's Options tab is selected. Ifthe check box is not selected, requirements for ReadMetadata permission for thatserver and its components are not enforced. This option affects only enforcement ofthe ReadMetadata permission.
See Also• “Host Access to SAS Tables” on page 159
• “Choices in Workspace Server Pooling” on page 164
Hide Server Definitions 81

82 Chapter 7 • Permissions on Servers

Chapter 8
Security Report Macros
Overview of Authorization Reporting . . . . . . . . . . . . . . . . . . . . . . . . . . . . . . . . . . . . 83
Authorization Data Sets . . . . . . . . . . . . . . . . . . . . . . . . . . . . . . . . . . . . . . . . . . . . . . . . 84
Additional Resources for Building Authorization Data Sets . . . . . . . . . . . . . . . . . . 87
Dictionary . . . . . . . . . . . . . . . . . . . . . . . . . . . . . . . . . . . . . . . . . . . . . . . . . . . . . . . . . . . 89%MDSECDS . . . . . . . . . . . . . . . . . . . . . . . . . . . . . . . . . . . . . . . . . . . . . . . . . . . . . . 89
Overview of Authorization ReportingAuthorization reporting creates a snapshot of metadata layer access control settings anduses that snapshot in these ways:
• as a data source for reports about current settings
• as a data point for comparing settings across time
The first task in security reporting is to extract, filter, and format authorization data for aspecified set of identities, permissions, and objects. SAS provides macros that help youperform this task. For example, the following code uses the main security report macro,%MDSECDS, to generate authorization data sets for a specified folder and its contents:
/* connect to the metadata server */options metaserver=machine-name metauser="sasadm@saspw" metapass="{sas002}3CD4EA1E35CA49324AOC4D63"; /* run the main report macro against a target folder */%mdsecds(folder="\demo");run;
The second task in security reporting is to build reports that run against the authorizationdata sets. For example, the following code prints some of the data from the precedingexample:
/* print the WriteMetadata information */proc print data=work.mdsecds_join noobs;var objname publictype identityname WriteMetadata;run;
The output looks like this:
83

Because the output is SAS data sets, you can create sophisticated reports by using SASreporting techniques such as these:
• create an information map that uses an authorization data set as its data source andthen use SAS Web Report Studio to create reports based on that information map.
• write SAS ODS (output display system) code that builds an HTML report against theauthorization data sets. For an example, see SAS-installation-directory\SASFoundation\9.3\core\sample\secrpt.sas (Windows) or SAS-installation-directory/SASFoundation/9.3/samples/base/secrpt.sas(UNIX).
For details, options, and examples, see “%MDSECDS” on page 89.
Authorization Data SetsFor reference, this topic documents the structure of the generated tables.
Table 8.1 work.mdsecds_join (the Primary Table for Reporting; Combines objs, permsw, pconds)
Column Name Column Contents
IdentityDispName The display name of this user or group (for example, SAS Demo User). If there is no displayname, this column contains the same value as the IdentityName column.
84 Chapter 8 • Security Report Macros

Column Name Column Contents
IdentityName The name of this user or group (for example, sasdemo).
IdentityType Person, IdentityGroup, or Role.
Location A container path for this object (for example, \Shared Data\Sales). The path usually consists offolder names but can also include names of other containers.
MetadataCreated The date when this object was created.
MetadataType The internal metadata type for this object.
MetadataUpdated The most recent date that this object was updated.
ObjId The metadata ID for this object (for example, A5HDAJSI.B900066J).
ObjName The name of this object (for example, Shoe Sales by Region).
ObjUri The uniform resource identifier for this object (for example, omsobj:PhysicalTable/A5XT9KUX.B80000001).
ParentObjId The metadata ID for this object's immediate parent.
Permissions A list of the permissions to inspect for this object. If the list is blank, then all permissions that areapplicable to this type of object are inspected.
(permissions) A separate column for each permission. Each cell in these columns contains a value that indicateswhether this permission is effectively granted or denied for this identity. The type of setting(explicit, ACT, or indirect) is also indicated. For example, Granted by ACT or DeniedExplicitly or Granted Indirectly.
PublicType The public metadata type for this object.
Table 8.2 work.mdsecds_objs (Contains Folder and Member Information)
Column Name Column Contents
Desc Description information for this object. For most objects, this information comes from theDescription field on the General tab in the object's properties dialog box.
Location A container path for this object. The path usually consists of folder names but can also includenames of other containers.
MetadataCreated The date when this object was created.
MetadataType The internal metadata type for this object.
MetadataUpdated The most recent date that this object was updated.
ObjId The metadata ID for this object.
ObjName The name of this object.
Authorization Data Sets 85

Column Name Column Contents
ObjUri The uniform resource identifier for this object.
ParentObjId The metadata ID for this object's immediate parent.
Permissions A list of the permissions to inspect for this object. If the list is blank, then all permissions that areapplicable to this type of object are inspected.
PublicType The public metadata type for this object.
Table 8.3 work.mdsecds _pconds (Contains Permission Condition Expressions)
Column Name Column Contents
Condition The expression that limits this grant.
IdentityName The name of this user or group.
IdentityType Person, IdentityGroup, or Role.
ObjUri The uniform resource identifier for this object.
Permission The name of this permission (for example, Read).
Table 8.4 work.mdsecds_permsw (Contains Permissions Data Transformed to Wide Format)
Column Name Column Contents
IdentityDispName The display name of this user or group (or the name if there is no display name).
IdentityName The name of this user or group.
IdentityType Person, IdentityGroup, or Role.
ObjName The name of this object.
ObjUri The uniform resource identifier for this object.
(permissions) A separate column for each permission. Each cell in these columns contains a value thatindicates whether this permission is effectively granted or denied for this identity. The type ofsetting (explicit, ACT, or indirect) is also indicated.
Table 8.5 work.mdsecds _permsl (Contains Permissions Data in Original Long Format)
Column Name Column Contents
Authorization A value that indicates where this permission is granted or denied for this identity. The type ofsetting (explicit, ACT, or indirect) is also indicated.
86 Chapter 8 • Security Report Macros

Column Name Column Contents
Conditionflg A value that indicates whether this permission setting is conditional. The value is either blank(no condition) or * (condition applies and is written to the pconds table).
IdentityDispName The display name of this user or group (or the name if there is no display name).
IdentityName The name of this user or group.
IdentityType Person, IdentityGroup, or Role.
ObjName The name of this object.
ObjUri The uniform resource identifier for this object.
Permission The name of this permission.
Additional Resources for Building AuthorizationData Sets
For reference, this topic documents the underlying security report macros.
You can choose to directly use the underlying report macros instead of using only%MDSECDS (which is the standard approach to building authorization data sets).However, the underlying macros don't offer any unique inclusion or exclusionparameters. The following figure introduces the underlying macros. In the figure, arrowdirection indicates input to and output from each underlying macro.
Additional Resources for Building Authorization Data Sets 87

Figure 8.1 Underlying Macros
Metadata Repository
work.mdsecds_objs
work.mdsecds_pcondswork.mdsecds_permsl
work.mdsecds_permsw
work.mdsecds_join
%MDSECGP
%MDSECTR
%MDSECVW
Which permissions?
Which identities?
Which folder?
Which objects?
%MDSECGO
1
4
3
2
The numbers in the preceding figure correspond to these activities:
1. %MDSECGO extracts information for a specified set of objects. You specify onefolder and indicate whether to include subdirectories. You can also provide a list ofobject types to include and filter the data set by attribute value.
Note: The same level of control is provided by using %MDSECDS on its own.
2. For every object in a specified data set, %MDSECGP gets effective permissionsettings for a specified set of identities and permissions.
Note: This is the point at which using the underlying macros creates an opportunityfor you to define a subset of the objs data set.
3. %MDSECTR transforms the extracted data set from a long format (a separate rowfor each permission) to a wide format (all permissions in the same row).
4. %MDSECVW creates a joined view or data set that can be used for reporting.
The following table introduces a few utility macros that can be useful in securityreporting:
88 Chapter 8 • Security Report Macros
Table 8.6 Utility Macros for Security Reporting
Utility Macro Description
%MDUTYPED Extracts information about top-level metadata objects or locatestemplates for a particular object type.
%MDUGFLDR Returns the object ID for a specified folder.
%DEFINEOBJTAB_SQL Defines the table into which %MDSECGO inserts rows.
The underlying macros and utility macros are in SAS-installation-directory\SASFoundation\9.3\core\sasmacro (Windows) or SAS-installation-directory/SASFoundation/9.3/sasautos (UNIX).
Dictionary
%MDSECDSGenerates authorization data sets. This is the top-level macro (it calls the underlying macros and should beused on its own).
Used by: Security reporting
Type: Stand-alone
Requirement: Connection to the metadata server
Syntax%MDSECDS(OUTDATA=data-set,<FOLDER="path">,<INCLUDESUBFOLDERS=YES | NO>,<INCLUDETABLECOMPONENTS=YES | NO>,<INCLUDECUBECOMPONENTS=YES | NO>,<INCLUDESECUREDTABLES=YES | NO>,<MEMBERTYPES="list">, <MEMBERFILTER="expression">,<PERMS="list">,<IDENTITYNAMES="list">, <IDENTITYTYPES="list">);
Optional ArgumentsOUTDATA
provides a base name for the output. By default, the base name is work.mdsecds.
FOLDERidentifies a starting point folder. By default, the starting point is the server root (theSAS Folders node). If you provide a path (such as "\Products\SASIntelligence Platform\Samples"), the starting point is the last folder in thepath. To avoid having to type a long pathname, copy the path from a child item'sgeneral properties into your code.
%MDSECDS 89

INCLUDESUBFOLDERScontrols whether the entire subtree is included. By default, all objects in the entiresubtree are included. If you specify NO, only the immediate contents of the startingpoint folder are included.
INCLUDETABLECOMPONENTScontrols whether table columns are included when a table is returned. By default,columns are included.
INCLUDECUBECOMPONENTScontrols whether cube hierarchies, levels, and dimensions are included when a cubeis returned. By default, these components are included.
INCLUDESECUREDTABLEScontrols whether secured table objects are included when a secured library object isreturned. By default, secured table objects are included.
MEMBERTYPESlimits by object type. By default, all public types are included. If you provide acomma-delimited list of types, only those types are included.
You must provide the public type name in its TypeName format. For example, if youaccess the Advanced tab in the properties dialog box for the Information Map(relational) object type, you will see that its TypeName isInformationMap.Relational.
T I P In SAS Management Console, all public types are displayed on the Folderstab under System ð Types.
Note: If you use this option, examine the output. The log doesn't display errors orwarnings for incorrectly specified types.
MEMBERFILTERlimits by metadata attribute value. By default, no filter is applied. If you provide anexpression, only objects that meet the criteria are included. The format for theexpression is @attribute-name comparison-operator 'value' (for example,@ID='A5HDAJSI.B90006Y5' or @Name=:'Salary').
Comparison operators for character data include = (equals), =: (begins with), ?(contains), and ne (not equals).
Metadata attributes are associated with an object's metadata type (not public type).Here are two common attributes:
ID is the object's metadata ID, which is displayed on the object'sInheritance tab.
Name is the object's name, which is displayed in the Name field on theobject's General tab.
To find additional attributes, determine the MetadataType of the object that you areinterested in. The type is displayed on the object's Inheritance tab. Then, in thereference documentation for the metadata model, look up that MetadataType to findthe names of its attributes.
PERMSspecifies which permissions to include. By default, all permissions that are supportedfor each object type are included for objects of that type. If you provide a comma-delimited list of permissions, only those permissions are included. Even if thepermissions in your user interface are translated, you must specify the English-language permission names (for example, ReadMetadata).
90 Chapter 8 • Security Report Macros

IDENTITYNAMESspecifies which identities to include. By default, only the named participants (theidentities that are listed in an object's authorization properties) are included. If youprovide a comma-delimited list of identity names, only those identities are included.List identities by their names, not their display names.
If you use this option, you must also use the IDENTITYTYPES option.
IDENTITYTYPESspecifies whether names in the IDENTITYNAMES list correspond to users or togroups. For example, the first name listed in the IDENTITYNAMES parameter mustmatch the first value in the IDENTITYTYPES list. Valid values in this list arePerson and IdentityGroup.
Examples
Example 1: Permissions for All Objects within a FolderThis code extracts information about permissions on the objects in the Sales folder butdoesn't include objects in subfolders:
%mdsecds(folder="\Shared Data\Sales", includesubfolders=no);
Example 2: Permissions for Two Object Types within a FolderBranchThis code extracts information about permissions on tables and schemas in the Salesfolder and its subfolders:
%mdsecds(folder="\Shared Data\Sales", membertypes="Library,OLAPSchema");
Example 3: ReadMetadata Permission for Libraries for a SpecifiedUserThis code extracts information that indicates which libraries a particular user (the SASDemo User) can see:
%mdsecds(identitynames="sasdemo", identitytypes="Person", membertypes="Library", perms="ReadMetadata");
Example 4: ReadMetadata Permission for Stored Processes for TwoSpecified UsersThis code extracts information that indicates which stored processes two users (the SASDemo User and Tara O'Toole) can see:
%mdsecds(identitynames="sasdemo,totoo", identitytypes="Person,Person", membertypes="StoredProcess", perms="ReadMetadata");
Example 5: WriteMetadata Permission for Reports for SpecifiedIdentitiesThis code extracts information that indicates which reports one user and one group (theSAS Demo User and PUBLIC) can modify:
%mdsecds(identitynames="sasdemo,PUBLIC", identitytypes="Person,IdentityGroup", membertypes="Report", perms="WriteMetadata");
%MDSECDS 91
Example 6: ReadMetadata Permission for a Subset of ReportsThis code extracts information that indicates who can view reports that include the word"Salary" in their names:
%mdsecds(membertypes="Report", perms="ReadMetadata", memberfilter="@Name ? 'Salary'");
Example 7: Permissions for an Object (Referenced by Object ID)This code extracts permission settings for an object that is referenced by its object ID:
%mdsecds(memberfilter="@ID='A5HDAJSI.B90006Y5'");
Note: Member filters are not applied to folders, so this example returns all folders (inaddition to the object that has the specified ID).
92 Chapter 8 • Security Report Macros

Part 3
Authentication
Chapter 9Authentication Model . . . . . . . . . . . . . . . . . . . . . . . . . . . . . . . . . . . . . . . . . . . . 95
Chapter 10Authentication Mechanisms . . . . . . . . . . . . . . . . . . . . . . . . . . . . . . . . . . . . 109
Chapter 11Authentication Tasks . . . . . . . . . . . . . . . . . . . . . . . . . . . . . . . . . . . . . . . . . . . 131
Chapter 12Server Configuration, Data Retrieval, and Risk . . . . . . . . . . . . . . . . . . 153
93

94
Chapter 9
Authentication Model
Introduction to the Authentication Model . . . . . . . . . . . . . . . . . . . . . . . . . . . . . . . . . 95
Authentication to the Metadata Server . . . . . . . . . . . . . . . . . . . . . . . . . . . . . . . . . . . 96How SAS Identity Is Determined . . . . . . . . . . . . . . . . . . . . . . . . . . . . . . . . . . . . . . . 96Authentication Process and Methods . . . . . . . . . . . . . . . . . . . . . . . . . . . . . . . . . . . . 96
Authentication to Data Servers and Processing Servers . . . . . . . . . . . . . . . . . . . . . . 98
Mixed Providers . . . . . . . . . . . . . . . . . . . . . . . . . . . . . . . . . . . . . . . . . . . . . . . . . . . . . . 99About Mixed Providers . . . . . . . . . . . . . . . . . . . . . . . . . . . . . . . . . . . . . . . . . . . . . . . 99Solution to Mixed Providers: Align Authentication . . . . . . . . . . . . . . . . . . . . . . . . 100Solution to Mixed Providers: Use SAS Token Authentication . . . . . . . . . . . . . . . 101Solution to Mixed Providers: Store User IDs and Passwords . . . . . . . . . . . . . . . . 101
Credential Gaps . . . . . . . . . . . . . . . . . . . . . . . . . . . . . . . . . . . . . . . . . . . . . . . . . . . . . 101
How Logins Are Used . . . . . . . . . . . . . . . . . . . . . . . . . . . . . . . . . . . . . . . . . . . . . . . . . 103
Authentication Domains . . . . . . . . . . . . . . . . . . . . . . . . . . . . . . . . . . . . . . . . . . . . . . . 105What is an Authentication Domain? . . . . . . . . . . . . . . . . . . . . . . . . . . . . . . . . . . . . 105How Many Authentication Domains Do I Need? . . . . . . . . . . . . . . . . . . . . . . . . . . 106
PUBLIC Access and Anonymous Access . . . . . . . . . . . . . . . . . . . . . . . . . . . . . . . . . 106About PUBLIC Access and Anonymous Access . . . . . . . . . . . . . . . . . . . . . . . . . . 106How to Enable PUBLIC Access . . . . . . . . . . . . . . . . . . . . . . . . . . . . . . . . . . . . . . . 107
Introduction to the Authentication ModelThere is no single mechanism that is applicable to all authentication events throughout atypical deployment. Each deployment uses some combination of authenticationprocesses, trust relationships, and single sign-on technologies. This helps to balance arange of goals such as the following:
• preserve individual identity
• minimize security exposures
• provide a unified user experience
• minimize set up and maintenance efforts
• provide access to disparate systems within an environment
• integrate into a wide variety of general computing environments
95

See Also“How to Facilitate Authentication” on page 131
Authentication to the Metadata Server
How SAS Identity Is DeterminedWhen a user launches a SAS client, the following process occurs:
1. In the verification phase, the system ensures that the user is who he or she claims tobe. For example, this credential-based host authentication method might be used:
a. The client prompts the user for an ID and password.
b. The user enters credentials that are known to the metadata server's host.
c. The client sends the credentials to the metadata server.
d. The metadata server passes the credentials to its host for authentication.
e. If the host determines that the user has a valid account, the host returns theauthenticated user ID to the metadata server.
2. In the SAS identity phase, the system resolves the authenticated user ID to aparticular SAS identity. In this phase, SAS examines its copies of user IDs in anattempt to find one that matches the authenticated user ID. One of the followingoutcomes occurs:
• A matching user ID is found, so a connection is established under the owningidentity. The owning identity is the user or group whose definition includes alogin with the matching user ID.
Note: The metadata server's integrity constraints ensure that there won't be morethan one owning identity. See “Uniqueness Requirements” on page 22.
Note: Not all applications allow a group identity to log on.
• No matching user ID is found, so a connection is established under the genericPUBLIC identity. In the metadata layer, the user is a PUBLIC-only user.
Note: The matching process expects the SAS copy of the user ID to be qualified(if it is a Windows user ID).
Note: Not all applications allow a PUBLIC-only user to log on. See “PUBLICAccess and Anonymous Access” on page 106.
Authentication Process and MethodsThe following figures introduce the metadata server's authentication process andmethods. In the following figures, notice these points:
• Only the verification phase varies; the SAS identity phase is always the same. Withany approach, you need a well-formed user definition for each user who isn't aPUBLIC-only identity.
• Except where internal accounts are used, the process always involves two sets ofidentity information, one in an external provider and another in the metadata.
The following figure depicts the basic process.
96 Chapter 9 • Authentication Model
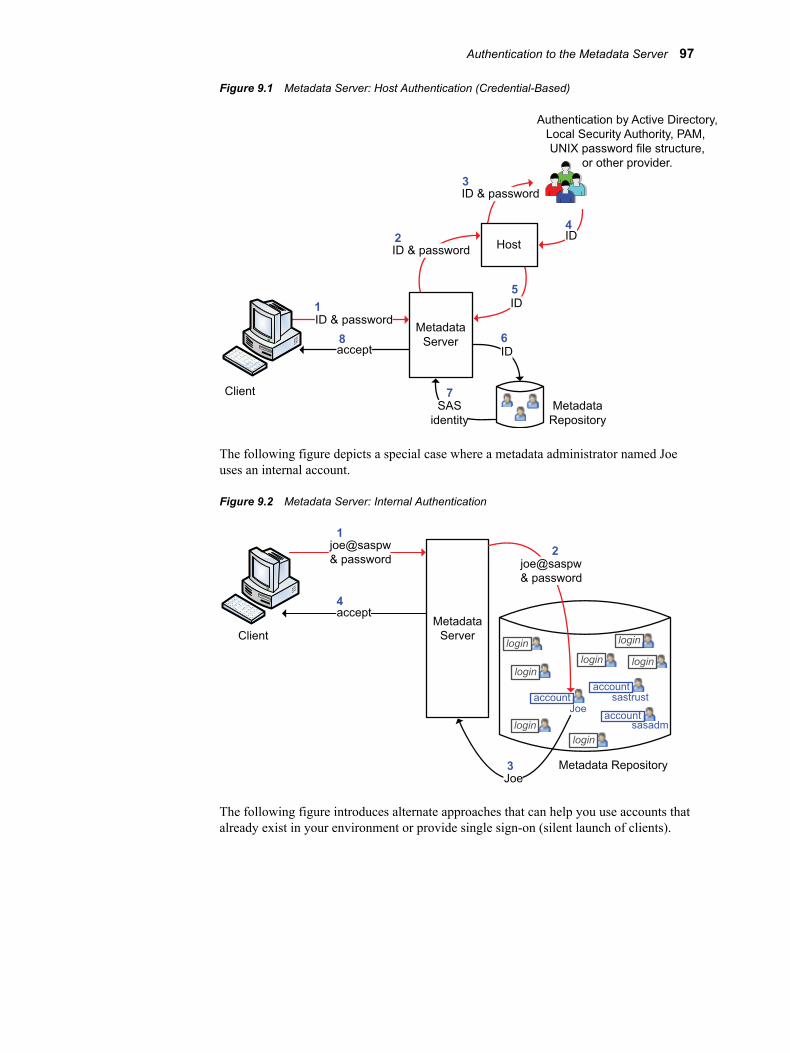
Figure 9.1 Metadata Server: Host Authentication (Credential-Based)
Client
accept
ID & password
ID & password
ID & password
SAS
identity
ID1
2
3
4
5
6
7
8
ID
ID
Metadata
Server
Host
Metadata
Repository
Authentication by Active Directory,
Local Security Authority, PAM,
UNIX password file structure,
or other provider.
The following figure depicts a special case where a metadata administrator named Joeuses an internal account.
Figure 9.2 Metadata Server: Internal Authentication
joe@saspw
& password joe@saspw
& password
accept
Client
JoeMetadata Repository
Metadata
Server
1
2
3
4
login
login
login
login
login
login
account
login
sastrust
sasadmaccount
accountJoe
The following figure introduces alternate approaches that can help you use accounts thatalready exist in your environment or provide single sign-on (silent launch of clients).
Authentication to the Metadata Server 97

Figure 9.3 Alternate Configurations
Integrated Windows Authentication
Web Authentication
Direct Use of LDAP or Active Directory
Windows authentication, trusted authority
request for an
authenticated token
authenticated
token
authenticated token
LDAP or
Active Directory
authentication
ID & password
ID & password
ID
ID
ID
ID
accept
accept
Client
Desktop Client on WindowsSAS
identity
SAS
identity
Metadata
Repository
Metadata
Server
Metadata
Server
Metadata
Repository
authenticated
token
1
2
3
4
5
6
7
8
1
2
3
4
5
6
3
logon prompt
trusted connection
ID
ID
SAS
identity
5Metadata
Server
MetadataRepository
6
7
8...
2
ID & password
1page request
Authentication Provider
WebApplication
Server
SA
S R
em
ote
Serv
ice
s
4
Authentication to Data Servers and ProcessingServers
A registered user who has a connection to the metadata server accesses the OLAP server,stored process server, and pooled workspace server seamlessly by SAS tokenauthentication. Authentication to following servers requires coordination:
98 Chapter 9 • Authentication Model

standard workspace serverTo provide seamless access, coordinate the workspace server with the metadataserver.
third-party data server (for example, Oracle)To provide access, select an approach from the following table.
Table 9.1 Authentication to a Third-Party Data Server
Goal Approach
Provide seamless access andpreserve individual identity to thetarget server.
Store individual user IDs and passwords in themetadata (each on the Accounts tab of a differentuser definition).
Provide seamless access. Store the user ID and password for one sharedaccount in the metadata (on the Accounts tab of agroup definition).
Provide seamless access with a fewdistinct access levels for resourcesin the target server.
Store a few shared user IDs and passwords in themetadata (each in the Accounts area of a differentgroup definition). Or, for a hybrid approach, use acombination of personal and group logins.
Preserve individual identity. No configuration is required. Users will be promptedfor credentials for the target server. Secondaryprompting is supported for desktop applications andSAS Web Report Studio.
Note: In general, requesting users can access only those servers for which they have theReadMetadata permission. An exception is client-side pooling, in which accessdepends on membership in a puddle group.
Note: This topic is about metadata-aware connections. Direct connections to a SASserver can't use SAS token authentication. Direct connections use client-suppliedcredentials or, in some cases, Integrated Windows authentication.
See Also• “Coordinate the Workspace Server” on page 132
• “How to Store Passwords for a Third-Party Server” on page 145
• “SAS Token Authentication” on page 120
• “Choices in Workspace Server Pooling” on page 164
Mixed Providers
About Mixed ProvidersIf the credentials with which users initially log on aren't also valid for the workspaceserver, access to the standard workspace server isn't seamless. For example, if you use anActive Directory account in an initial logon to a metadata server on Windows, and you
Mixed Providers 99

attempt to access a standard workspace server on UNIX, you might be prompted for auser ID and password that are valid for the UNIX host.
Note: In general, Web applications and SAS Information Map Studio use the pooledworkspace server, not the standard workspace server. So users who use only theseapplications might not be affected by a mixed provider situation.
In a mixed providers situation, achieving seamless access to the standard workspaceserver requires a trade-off between configuration effort, maintenance effort, and degreeof segregation for host access from that server to SAS data. The following table outlinesthe choices.
Table 9.2 Choices for Seamless Access in a Mixed Provider Scenario
Priority Recommendation
Preserve each user'sidentity.
Align authentication so that both servers do use the same provider.
Minimizeadministrative effort.
Convert the workspace server to use SAS token authentication.
The following topics provide details about each approach.
Solution to Mixed Providers: Align AuthenticationIf you can enable the metadata server and the standard workspace server to use the sameprovider, access to the workspace server is seamless. Here are some examples:
• If the metadata server is on Windows and the workspace server is on UNIX, youmight extend the UNIX host authentication process to recognize Windows accounts(using a technology such as PAM). With this approach, the Windows credentials thatusers supply in their initial logon to the metadata server can be reused forauthentication to the workspace server. User identity is preserved from theworkspace server to the host, you don't have to store user passwords in the metadata,and access is seamless.
Note: If you chose to use IWA in this scenario, you should configure both servers tosupport that authentication method. If you configure only the metadata server tosupport IWA, then access to the workspace server is not seamless, because thereare no cached credentials available for reuse.
Note: This approach usually requires that you store two logins for anyone whoaccesses the standard workspace server. One login contains the user's ID inqualified format (for example, WIN\myID) and the other login contains the sameID in short format (for example, myID). Both logins can be in DefaultAuth.Neither login has to include a password. An exception to this requirement is ifthe user names on UNIX are domain qualified (in that case, only the domainqualified user ID is stored in metadata).
• If the metadata server is on UNIX (or z/OS) and the workspace server is onWindows, an additional alternative is to configure direct LDAP, so the metadataserver itself recognizes Windows accounts.
Note: Direct LDAP isn't supported for the workspace server. The workspace servercan use only some form of host authentication or SAS token authentication.
100 Chapter 9 • Authentication Model

Solution to Mixed Providers: Use SAS Token AuthenticationIf you configure the workspace server to use SAS token authentication, access isseamless because the workspace server's host operating system is no longer used tovalidate users. Instead, users are validated by the metadata server through a single-useSAS identity token. If you need to provide a few distinct levels of host-layer access, youcan define a few servers, with each server using SAS token authentication and runningunder a distinct launch credential.
In a mixed providers situation, using SAS token authentication is preferable to using agroup login for these reasons:
• SAS token authentication enables the requesting user's SAS identity to be used formetadata layer evaluations such as library pre-assignment and permissions andauditing.
• SAS token authentication doesn't give users direct access to the server launchcredential.
• SAS token authentication involves less transmission of reusable credentials (theclient doesn't retrieve credentials from the metadata and send those credentials to theworkspace server).
Solution to Mixed Providers: Store User IDs and PasswordsNote: As explained in the preceding topic, storing credentials is not a first choice
solution to a mixed providers situation.
If you store user or group passwords for the workspace server's host, access is seamlessthrough credential retrieval. In this solution, you treat the workspace server as if it werea third-party server such as Oracle.
See Also• “How to Configure SAS Token Authentication” on page 133
• “Pluggable Authentication Modules (PAM)” on page 117
• “Direct LDAP Authentication” on page 112
• “How to Store Passwords for the Workspace Server” on page 144
Credential GapsA credential gap is a situation in which a user doesn't seamlessly access the workspaceserver for any of these reasons:
• Server configurations are incorrect, incomplete, or incompatible.
• The user's context doesn't include credentials that are known to the workspaceserver's host.
• The user's context doesn't pair credentials that are known to the workspace server'shost with the workspace server's authentication domain.
Credential Gaps 101

• The workspace server is on Windows, using credential-based authentication and theuser's host account doesn't have the Windows privilege Log on as a batch job.
The usual symptom of a credential gap is a prompt for a user ID and password after auser makes a request that requires a workspace server. A credential gap can beproblematic for these reasons:
• The prompts interrupt the user experience.
• Users have to know credentials that are valid for the workspace server's host andknow that those are the correct credentials to provide.
• Not all middle-tier services and Web applications prompt for credentials (and,without a prompt, the user request fails).
You can use the following list to help troubleshoot a credential gap.
Troubleshooting Credential Gaps
If the user initially logs on via Web authentication
The user's initial logon doesn't add a password to the user's context. Make sure that theWeb application uses some form of pooling. If the problem persists, considerconfiguring the workspace server to use SAS token authentication.
If the user initially logs on via Integrated Windows authentication
The user's initial logon doesn't add a password to the user's context. Configure theworkspace server for Integrated Windows authentication (IWA).
If the user logs on with a user ID that ends in @saspw
Tell the user that they get the prompt because they are using an internal account. Whenthe user gets the additional prompt, they must enter a user ID and password that areknown to the workspace server's host. The host account must correspond to a metadataidentity that has ReadMetadata permission for the server definition. On Windows, thehost account must have the Log on as a batch job privilege.
If the user's connection profile contains an @saspw user ID
The user's context doesn't pair the credentials from the user's initial logon with theDefaultAuth authentication domain. Tell the user to create a new connection profile withexternal credentials (and no value in the Authentication domain field) and try again. Toensure optimal credential reuse, users shouldn't use the same connection profile for bothinternal and external accounts.
If the user's connection profile has a value other than DefaultAuth for theauthentication domain
The user's context doesn't pair the credentials from the user's initial logon with theDefaultAuth authentication domain. Tell the user to either clear this field or enter thevalue DefaultAuth and try again.
If the user is in SAS Enterprise Guide and accessing a workspace server that is setto prompt
Verify the logical workspace server’s Options settings. If the setting is intentional, tellthe user to supply host credentials.
If the workspace server is not assigned to the correct authentication domain
102 Chapter 9 • Authentication Model

Credential reuse might be impaired. In most configurations, the workspace server shouldbe in DefaultAuth. To verify (and, if necessary, correct) the workspace server'sauthentication domain assignment, select the Plug-ins tab in SAS Management Console,navigate to the server , select its connection object , right-click, and selectProperties. The authentication domain assignment is on the Options tab.
See Also• “Windows Privileges” on page 18
• “Credential Management” on page 110
• “Integrated Windows Authentication” on page 115
How Logins Are UsedTable 9.3 Summary of How Logins Are Used
Purpose Login Properties*
To enable the metadata server to match an incoming user ID with a particular SAS identity(inbound use).
User ID
To enable clients to seamlessly obtain user credentials for disparate systems (outbound use). User ID, password,authentication domain
To designate one account as the preferred account for user access to a particular library andto make that account ID and password available to users. If you assign a login to a library, allusers who can see that login use that login to access that library. This is a specialized form ofoutbound use that is sometimes used for a DBMS library.
User ID, password,authentication domain
To designate one host account as the account under which a particular server runs and tomake that account's ID and password available to the spawner (service use).
User ID, password
* Indicates which properties are involved. Every login should be assigned to an authentication domain.
The following figure depicts examples of login use.
How Logins Are Used 103

Figure 9.4 Example: Use of Logins
Joe’s logins
OracleAuth
default login: ServiceOra
multiuser credential: sassrv
launch credential: sassrv
launch credential: sassrv
Metadata Server
Oracle DBMS
Oracle Libraries
Special Library
Stored Process Server
Pooled Workspace Server
Workspace Server
(standard using SAS token authentication)
ETL group’s logins
SASUSERS group’s logins
SAS General Servers group’s logins
ServiceOra | password
sassrv | password
ETLOra | password
Joe |
JoeOra | password
2
4
1
3
Here are some general points about the figure:
• The workspace server (using host authentication) isn't depicted because access to thatserver is not usually through stored credentials.
Note: If you choose to store passwords for the workspace server, the relationshipswould be comparable to the depiction of the Oracle DBMS, OracleAuthauthentication domain, and Oracle logins. For example, you might put theworkspace server in WorkspaceAuth and create individual and group logins inthat authentication domain.
• The OLAP server isn't depicted because it isn't accessed using logins.
• The gray shading for the depicted workspace server indicates that this is aspecialized configuration. By default the workspace server uses some form of hostauthentication, not SAS token authentication.
The numbers in the figure correspond to these uses:
1. Joe's first login is only for inbound use to determine his metadata identity. Hispassword is available (cached in the user context, not stored in the metadata) but isn'tused to determine his identity. This login should be in DefaultAuth, but thatrelationship isn't depicted because it isn't used in determining his metadata identity.
2. Joe's second login provides seamless access to Oracle using an individual account.This login includes a password and must be in the Oracle server's authenticationdomain. The ETL group's login is a shared login for the Oracle server. Joe won't usethis login because his personal Oracle login has a higher priority.
3. The SASUSERS login is a designated default login for the Special Library. Thislogin is visible to Joe (through his automatic membership in SASUSERS), so it isused when Joe accesses the Special Library. Assigning a login to a library overridesthe usual login priority evaluation (which is based on identity precedence).
104 Chapter 9 • Authentication Model

Note: In this example, the ServiceOra login must be in the OracleAuthauthentication domain. The list of available default logins for a library consists ofonly those logins that are in the associated server's authentication domain. Theshading for the Special Library indicates that this isn't a mainstream use. Mostlibraries don't have a designated login.
Note: In an alternate usage, the default library login is part of the user definition fora service identity that provides mediated access to the library.
4. The designated launch credential for each of the depicted processing servers is storedon the SAS General Servers group definition. In this example, the servers all use thesame credential. Logins that contain designated launch credentials are usually in theDefaultAuth authentication domain, because these processing servers are usually inDefaultAuth. However, those logins are directly paired with each server, not lookedup by authentication domain. Because the authentication domain assignment forthese logins isn't used, the figure doesn't depict that assignment.
See Also• “How SAS Identity Is Determined” on page 96
• “Credential Management” on page 110
• “Identity Hierarchy” on page 17
• “Criteria for a Designated Launch Credential” on page 156
Authentication Domains
What is an Authentication Domain?An authentication domain is a name that facilitates the matching of logins with theservers for which they are valid.
Note: This matching is not important when you launch a client, but it is important whenyou access certain secondary servers such as a third-party DBMS or, in someconfigurations, a standard workspace server.
Each user ID and password is valid within a specific scope. For example, the user ID andpassword that you use to log on to your computer at work are probably not the same asthe user ID and password that you use to log on to a personal computer at home. It isalso common for database servers and Web servers to have their own authenticationmechanisms, which require yet another, different, user ID and password.
An enterprise application that provides access to many different resources might requirethat a user have several sets of credentials. Each time a user requests access to aresource, the software must determine which credentials to use to provide access. Thesoftware could challenge the user with an interactive prompt for user ID and password,but that quickly becomes an annoyance that interrupts the user experience. The softwarecould randomly try different credentials until it finds a set that works, but authenticationattempts can be expensive in terms of performance. In the SAS Intelligence Platform, thesoftware attempts to use only the credentials that it expects to be valid for a particularresource or system.
The software’s knowledge of which credentials are likely to be valid is based entirely onauthentication domain assignments. For this reason, you must correctly assign an
Authentication Domains 105

authentication domain to each set of resources that uses a particular authenticationprovider, and also assign that same authentication domain to any stored credentials thatare valid for that provider.
How Many Authentication Domains Do I Need?In the simplest case, all logins and SAS servers are associated with one authenticationdomain (DefaultAuth). This list describes the most common reasons for using moreauthentication domains:
• If you use Web authentication, you might need a second authentication domain forthe logins that contain Web realm user IDs.
• If you have a third-party server (such as a DBMS server) that has its own userregistry, you need a separate authentication domain for that server and its logins.
• If both of the following criteria are met, you need a separate authentication domainfor the standard workspace server and its logins:
• The standard workspace server doesn't share an authentication provider with themetadata server (and can't be configured to do so).
• You want to provide seamless individualized access to the standard workspaceserver.
PUBLIC Access and Anonymous Access
About PUBLIC Access and Anonymous AccessIn general, only users who can authenticate and who have a well-formed user definitionshould use a SAS deployment. However, in order to accommodate scenarios where moregeneral access is desired, the following specialized configurations are supported:
• PUBLIC access enables unregistered users to participate if they can authenticate tothe metadata server (directly or through a trust mechanism). Unregistered users arereferred to as PUBLIC-only users because their only SAS identity is that of thePUBLIC group. A PUBLIC-only user has the logins, permissions, and capabilities ofthe PUBLIC group. A PUBLIC-only user can't belong to any other groups, or haveany personal logins, or have any specialized (individual) access controls. Not allapplications allow a PUBLIC-only user to log on.
• Anonymous access enables unregistered users to participate without authenticating tothe SAS environment. Anonymous access is an optional configuration that isavailable for only a few applications. Anonymous access is supported only with SASauthentication; anonymous access is not compatible with Web authentication.Anonymous access is supported as follows:
• For SAS BI Web Services and the SAS Stored Process Web Application, a userwho connects through anonymous access uses the SAS Anonymous Web Useridentity. This is a service identity that functions as a surrogate for users whoconnect without supplying credentials. See “Using the SAS Anonymous WebUser with SAS Authentication” in Chapter 3 of SAS Intelligence Platform:Middle-Tier Administration Guide.
• For the SAS Information Delivery Portal, a user who connects throughanonymous access uses the Unchallenged Access User identity. This is a service
106 Chapter 9 • Authentication Model

identity that functions as a surrogate for users who connect without supplyingcredentials. See “Enabling Unchallenged Portal Access” in Chapter 10 of SASIntelligence Platform: Web Application Administration Guide.
PUBLIC access and anonymous access differ in the following ways:
• In PUBLIC access, each participating user must authenticate. In anonymous access,participating connections don't require user authentication.
• In PUBLIC access, participating users share the PUBLIC group identity. Inanonymous access, participating connections share a designated service identity (thesurrogate identity is always a member of both the SASUSERS group and thePUBLIC group).
• You can choose to provide wide support for PUBLIC access. You can't extendsupport for anonymous access beyond the specific applications that can beconfigured to use it.
CAUTION:If you choose to offer PUBLIC or anonymous access, you risk users seeingmore data and content than you might expect. Carefully review and manageaccess control for the PUBLIC group. If you offer anonymous access, carefullyreview and manage access control for your surrogate service identity too.
How to Enable PUBLIC AccessYou can use the following instructions to set up a specialized configuration in whichunregistered users can participate from most SAS applications. However, not all SASapplications can be configured to accept PUBLIC-only users. For example, SASInformation Map Studio never accepts PUBLIC-only users.
To enable PUBLIC access, complete the following steps in SAS Management Console:
1. Provide the necessary repository-level access.
On the Plug-ins tab, under Authorization Manager ð Access Control Templates,right-click the repository ACT (Default ACT) and select Properties. On thePermission Pattern tab, grant the ReadMetadata and WriteMetadata permissions toPUBLIC.
Note: Even users who only consume content need both of these permissions at therepository level, because some applications write system information about useractivity, even during what appears to be a view-only transaction.
2. Provide Read access as needed.
On the Folders tab, give the PUBLIC group the Read permission for anyinformation maps, cubes, and MLE data that you want to make universally available.A good approach is to create a folder branch for such content, set the grant on the topfolder in that branch, and allow the grant to flow through the branch.
Note: Users also need ReadMetadata permission to folders and content objects. Ingeneral, it isn't necessary to set specific grants because this permission must flowthrough from the repository ACT into the public areas of the folder tree (fornavigational purposes).
Note: If you want to allow everyone (including unregistered users) to contributecontent to a particular folder, give the PUBLIC group a grant of theWriteMemberMetadata permission on that folder's Authorization tab.
3. Review role assignments for the PUBLIC group.
PUBLIC Access and Anonymous Access 107

On the Plug-ins tab, under User Manager, right-click the PUBLIC group and selectProperties. Review the PUBLIC group's role memberships. Often, no adjustmentsare necessary, because the initial role assignments give the PUBLIC group basiccapabilities.
4. Make sure that the PUBLIC group can use servers.
a. On the Plug-ins tab, under Server Manager, verify that the PUBLIC group hasthe ReadMetadata permission for any servers that the PUBLIC-only users willaccess.
b. If necessary, add one or more logins on the PUBLIC group's Accounts tab (forexample, to provide seamless access to a third-party DBMS).
c. If you have configured client-side pooling, verify that PUBLIC is a designatedpuddle group.
5. Configure middle tier properties applications to accept PUBLIC-only users.
On the Plug-ins tab, navigate to Application Management ð ConfigurationManager, and make changes as needed. Not all deployments include and use allcomponents.
T I P If you need additional information, see the administrative documentation foryour application. Not all deployments include and use all components. Not allmiddle-tier components have an applicable property.
a. For SAS Web Report Studio, set the Allow Public Users property to Yes (thisproperty is in the Application Configuration section of the Settings tab of theproperties dialog box for Web Report Studio).
b. For the SAS Stored Process Web application, set the App.PublicIdAllowedproperty to true (this property is on the Advanced tab of the properties dialogbox for the Stored Process Web App).
c. To make the changes take effect, restart the SAS Web Infrastructure ServicesApplication and then restart the affected Web applications.
108 Chapter 9 • Authentication Model

Chapter 10
Authentication Mechanisms
Introduction to Authentication Mechanisms . . . . . . . . . . . . . . . . . . . . . . . . . . . . . . 109
Credential Management . . . . . . . . . . . . . . . . . . . . . . . . . . . . . . . . . . . . . . . . . . . . . . . 110
Direct LDAP Authentication . . . . . . . . . . . . . . . . . . . . . . . . . . . . . . . . . . . . . . . . . . . 112
Host Authentication . . . . . . . . . . . . . . . . . . . . . . . . . . . . . . . . . . . . . . . . . . . . . . . . . . 113
Integrated Windows Authentication . . . . . . . . . . . . . . . . . . . . . . . . . . . . . . . . . . . . . 115
Pluggable Authentication Modules (PAM) . . . . . . . . . . . . . . . . . . . . . . . . . . . . . . . 117
SAS Internal Authentication . . . . . . . . . . . . . . . . . . . . . . . . . . . . . . . . . . . . . . . . . . . 118
SAS Token Authentication . . . . . . . . . . . . . . . . . . . . . . . . . . . . . . . . . . . . . . . . . . . . . 120
Trusted Peer Connections . . . . . . . . . . . . . . . . . . . . . . . . . . . . . . . . . . . . . . . . . . . . . 121
Trusted User Connections . . . . . . . . . . . . . . . . . . . . . . . . . . . . . . . . . . . . . . . . . . . . . 123
Web Authentication . . . . . . . . . . . . . . . . . . . . . . . . . . . . . . . . . . . . . . . . . . . . . . . . . . 123
Summary of Methods for LDAP Integration . . . . . . . . . . . . . . . . . . . . . . . . . . . . . . 126
Summary for Single Sign-On . . . . . . . . . . . . . . . . . . . . . . . . . . . . . . . . . . . . . . . . . . . 127
Summary by Server Type . . . . . . . . . . . . . . . . . . . . . . . . . . . . . . . . . . . . . . . . . . . . . 128
Introduction to Authentication MechanismsThis chapter describes the following features:
• Internal authentication mechanisms unify the SAS realm and provide a degree ofindependence from your general computing environment. The internal mechanismsare SAS internal authentication and SAS token authentication.
• External authentication mechanisms integrate SAS into your computingenvironment. External mechanisms include direct LDAP authentication, hostauthentication (credential-based), Integrated Windows authentication, and Webauthentication.
• Credential management provides single sign-on through reuse of cached credentialsor retrieval of stored passwords.
• Pluggable authentication modules (PAM) extend UNIX host authentication.
109

• Trust relationships facilitate communication to the metadata server by permitting oneprivileged account to connect on behalf of other users (trusted user) or by acceptingrequests that use a proprietary protocol (trusted peer).
Credential ManagementTable 10.1 Credential Management
Summary A supporting feature in which clients reuse cached credentials or retrieve stored credentials. Clients useauthentication domain assignments to determine which credentials are valid for which servers. The targetserver validates the client-supplied credentials against its authentication provider.
Scope From clients that are already connected to the metadata server to third-party servers, the ScalablePerformance Data Server, and, in some cases, the workspace server.
Benefits Provides access to servers using individual or shared accounts.
Limits • Involves passing user IDs and passwords across the network.
• Can involve maintaining SAS copies of external passwords.
Use Always available.
Credential management techniques populate an in-memory list of credentials for eachconnected user. Each list is called a user context and includes these entries:
• If the user interactively provides credentials when launching a SAS client, thosecredentials are added to the list, with these exceptions:
• If Web authentication is configured, the password from a user's interactive logonto a Web client isn't available to be added to the list.
• If the user logs on with Integrated Windows authentication (IWA), the user'spassword isn't available to be added to the list.
• If the user interactively provides credentials at any point in the session, thosecredentials are added to the list.
• If the user's metadata definition has logins that include passwords, those credentialsare added to the list.
• If the user belongs to any groups whose metadata definition has logins that includepasswords, those credentials are added to the list.
Note: Credentials from a user or group's metadata definition are not included in theinitial list that is created when a user logs on. Instead, such credentials are added tothe list dynamically (when and if they are needed in the course of the user's session).
The following table depicts an example of the contents of a user context:
Table 10.2 Example: Contents of a User Context
User ID Password Authentication Domain
myWinID ******** DefaultAuth
110 Chapter 10 • Authentication Mechanisms

User ID Password Authentication Domain
GroupDBMSid ******** DBMSauth
Notice that each entry is assigned to an authentication domain. This enables pairing ofcredentials with the servers for which they are valid. The entries are created as follows:
• The client creates the first entry by caching and inserting the user ID and passwordthat a user submits in an initial logon. This makes the user's DefaultAuth passwordavailable for reuse even though that password isn't stored in the metadata. The clientautomatically assigns the first entry to the DefaultAuth authentication domain exceptin these circumstances:
• The user's connection profile contains a user ID with an @saspw suffix.
Note: Notice that this circumstance describes the user ID in the user's connectionprofile, not the user ID that the user supplies in the logon dialog box.
• The Authentication domain field in the user's connection profile contains avalue other than DefaultAuth (and isn't empty).
• The user is accessing a Web client at a site that has configured Webauthentication (or has specified a different authentication domain in the Webconfiguration for some other reason).
• The client creates the second entry by retrieving information from the metadata (inthe preceding example, from a group that the user belongs to). Such logins are foroutbound use, so they must include a password and an appropriate authenticationdomain assignment.
When a user requests access to a server that requires credential-based authentication, theclient completes these steps:
1. Examine the server's metadata to determine which authentication domain the serverbelongs to.
Note: In SAS Management Console, this information is displayed on the Optionstab of each of the server's connection objects .
2. Examine the user's context to determine whether it includes any credentials that areassigned to the target server's authentication domain. The process is as follows:
• If the context includes a cached entry for the target authentication domain, thatentry is used.
• If the user context contains a retrieved entry for that authentication domain, thatentry is used. If there is more than one retrieved entry for an authenticationdomain, the entry that is closest to the user is used.
• If there is an identity precedence tie among retrieved entries (for example, if auser is a direct member of two groups and both groups have logins in the relevantauthentication domain), the same login is used consistently, but you can't controlwhich of the two logins is used.
• If the user context contains no entries in the target authentication domain,desktop clients will prompt the user for credentials. Web applications can'tprompt.
Note: SAS Web Report Studio has an interactive password management feature.
3. Present the credentials to the target server for authentication against its provider.
Credential Management 111

Here are some additional tips:
• Because the credentials that are added to a user context from an initial logon are notlikely to be valid for a third-party DBMS, you usually have to store credentials forsuch servers.
• Authentication domains have no effect on an initial logon. Authentication domainsaffect access to secondary servers that perform credential-based authentication.
• To prevent attempts to reuse internal credentials for the workspace server (whichdoesn't accept internal credentials), users who have an internal account should use adedicated connection profile for that account. In their internal connection profiles,users should leave the Authentication domain field blank (or specify an arbitraryvalue such as InternalAuth).
See Also• “How Logins Are Used” on page 103
• “Identity Hierarchy” on page 17
• “How to Store Passwords for a Third-Party Server” on page 145
Direct LDAP AuthenticationTable 10.3 Direct Use of LDAP Authentication
Summary The metadata server validates some users against an LDAP provider such as Active Directory. DirectLDAP enables the metadata server to recognize accounts that aren't known to its host; direct LDAP doesn'tmodify the host's behavior.
Scope • Primarily used for connections to the metadata server.
• Can also be used for direct connections from a data provider to the OLAP server.
Benefits Enables users to use their Windows accounts to authenticate to a metadata server that runs on UNIX.
Limits • Not an alternative to storing user IDs in the metadata (that requirement applies to all configurations).
• Not supported for workspace servers or stored process servers.
• Might involve appending a special qualifier to user IDs that are stored in the metadata.
Use Optional.
The following figure contrasts back-end use and direct use.
112 Chapter 10 • Authentication Mechanisms

Figure 10.1 Comparison of Back-End and Direct Use of LDAP
ID & password
LDAP or
Active Directory
authentication
LDAP or
Active Directory
authentication
Direct UseBack-End Use
accept
ClientSAS
identitySAS
identity
Metadata
Server
Metadata
Server
HostID
1
2
3
8
7
6
5
4
2
3
4
5
ID
IDID
IDID & password
ID & password
ID & password
Configuring the metadata server to directly use LDAP is one of several methods forintegration with LDAP, and it is not a first-choice alternative. See “Summary ofMethods for LDAP Integration” on page 126.
See Also• “How to Configure Direct LDAP Authentication” on page 135
• “How to Configure SSL between the Metadata Server and an LDAP Server” on page182
• “Pluggable Authentication Modules (PAM)” on page 117
Host AuthenticationTable 10.4 Host Authentication (Credential-Based)
Summary A client supplies an external user ID and password to a SAS server. The SAS server passes the credentialsto its host for authentication.
Note: Another form of host authentication, Integrated Windows authentication (IWA), is documentedseparately.
Scope • Primarily used for direct connections to the metadata server or OLAP server.
• Not used for metadata-aware connections to the OLAP server or stored process server.
• Sometimes used for connections to the workspace server.
Benefits No configuration is required. Can enable users to log on to SAS applications with the same credentials thatthey use in your general computing environment.
Host Authentication 113

Limits • On a workspace server on Windows, requires that users have the Windows privilege Log on as a batchjob.
• Involves passing user IDs and passwords across the network.
Use Always available.
The following figure shows one example of how this mechanism works:
Figure 10.2 Host Authentication (credential-based)
Client
accept
ID & password
ID & password
ID & password
ID1
2
3
4
5
6
ID
Target
Server
Host
Authentication by Active Directory,
Local Security Authority, PAM,
UNIX password file structure,
or other provider.
The numbers in the figure correspond to these actions:
1. The client obtains the user's ID and password (interactively or through credentialmanagement). The client sends those credentials to the target server.
2. The server passes the credentials to its host for authentication.
3. The host passes the credentials to its authentication provider.
4. After verifying that the user ID and password correspond to a valid account, thehost's authentication provider returns the user's ID to the host.
5. The host returns the user's ID to the SAS server.
6. The server accepts the client connection.
See Also• “Windows Privileges” on page 18
• “About the Workspace Server's Options Tab” on page 151
• “Integrated Windows Authentication” on page 115
• “Authentication to the Metadata Server” on page 96
• “Summary of Methods for LDAP Integration” on page 126
114 Chapter 10 • Authentication Mechanisms

Integrated Windows AuthenticationTable 10.5 Integrated Windows Authentication (IWA)
Summary Participating SAS servers accept users who have successfully authenticated to their Windows desktop.
Scope For Windows desktop clients and SAS servers on Windows and UNIX.
• Primarily used for connections to the metadata server and the standard workspace server.
• Also supported for direct connections to an OLAP server (for example, from a data provider).
Benefits • Bypasses the initial logon prompt.
• Accommodates logon mechanisms that are not password-based (such as smart cards or biometrics).
• No user credentials are transmitted.
• Users don't need the Log on as a batch job privilege. See “Windows Privileges” on page 18.
Limits • All participating clients and servers must authenticate against the same Windows domain (or againstdomains that trust one another).
• If you use IWA for the metadata server, there are no cached credentials from an initial logon. For thisreason, it is a good idea to configure IWA for the standard workspace server also, if possible (IWA is notsupported on z/OS).
• Web applications can’t participate in this implementation of IWA. However, if you configure Webauthentication, and your Web environment offers IWA, then your Web applications can use IWA. SASprovides instructions for configuring IWA for your Web application server at http://support.sas.com/thirdpartysupport.
• Desktop clients that run on UNIX (for example, SAS Management Console on UNIX) can’t participatein IWA.
• Analytics platform clients (for example, SAS Enterprise Miner) can’t participate in this implementationof IWA. Like other clients, analytics platform clients can authenticate to an IWA-configured server bysupplying credentials, instead of using IWA.
• If your SAS servers use DNS aliases, you must manually register those aliases in order to supportKerberos-based IWA connections. See “Using Custom SPNs” on page 142.
• Additional limits for servers on Windows:
• If you use IWA for a Windows workspace server that accesses Windows network resources (forexample, remote data access), the Kerberos protocol must be used and the object spawner accountmust have the trusted for delegation privilege. See “Windows Privileges” on page 18.
• Additional limits for servers on UNIX:
• In order to use IWA on UNIX, you must purchase, install, and configure an additional third-partyproduct (Quest Authentication Services 4.0).
• When you use IWA on UNIX, only Kerberos connections are supported (there is no support forNTLM on UNIX).
• If you use IWA for a UNIX workspace server that makes outbound Kerberos requests, the serviceprincipal account in Active Directory must have the trusted for delegation privilege. See “WindowsPrivileges” on page 18.
Use Optional.
The following figure is an abstraction of how this mechanism works.
Integrated Windows Authentication 115

Figure 10.3 Integrated Windows Authentication
Windows authentication, trusted authority
request for an
authenticated token
authenticated
token
authenticated token
Desktop Client on Windows
Target Server
authenticated
token
accept
1
2
3
4
6
5
accept
The numbers in the figure correspond to these actions:
1. The client asks Windows for a token that represents the user who is currently loggedon to the client computer. This step is initiated when a user launches a desktop clientor makes a request for a workspace server.
Note: The token represents the client who is running the SAS application. If you usethe Windows runas command to launch a SAS application, the token representsthe host account that you chose to use.
2. Windows provides the token to the client.
3. The client sends the Windows token to the target server. Notice that only the token issent; the user's password isn't available to the target server.
4. The target server sends the token back to Windows for verification.
5. Windows tells the target server that the token is valid.
6. The target server accepts the connection from the client. By default, the user'sauthenticated ID is returned to the target server as follows:
• If the target server is on Windows, the authenticated user ID is returned indomain qualified format (for example, WIN\joe).
• If the target server is on UNIX, the authentication user ID is returned in shortformat; the user ID is not qualified (for example, joe).
Note: The format in which the authenticated user ID is returned to the target servermust match the format in which that user ID is stored in the SAS metadata. See“Logins for Users Who Participate in IWA” on page 141.
See Also• “How SAS Identity Is Determined” on page 96
• “How to Configure Integrated Windows Authentication” on page 138
116 Chapter 10 • Authentication Mechanisms

Pluggable Authentication Modules (PAM)Table 10.6 PAM (Pluggable Authentication Modules)
Summary A supporting feature that extends UNIX host authentication to recognize an additional provider such asActive Directory. When a SAS server asks its UNIX host to validate a user's credentials, the host sends theuser's ID and password to the configured additional provider for verification.
PAM extends the host's authentication process to recognize an additional provider; PAM doesn't modify themetadata server's behavior.
Scope Affects all SAS servers that run on the UNIX host and rely on the host operating system to authenticateusers. Typically, the metadata server and the workspace server use host authentication.
Benefits Can be used to enable users to use their Windows accounts to authenticate to a metadata server orworkspace server that run on UNIX.
Limits Not an alternative to storing user IDs in the metadata (that requirement applies to all configurations).
Use Optional.
This mechanism is useful if both the metadata server and the workspace server are onUNIX and you want users to use Windows accounts to access these servers.
This mechanism can also be useful if one of these servers is on Windows, the other is onUNIX, and you want to avoid credential prompts for the workspace server. However, ifyou use PAM to resolve a mixed provider situation, users who access the workspaceserver must have two logins. One login should include the user's ID in its qualified form.The other login should include the same ID in short (unqualified) form. Both loginsshould be in the DefaultAuth authentication domain. Neither login should include apassword. For example, a user's logins might look like this:
DefaultAuth | WIN\joe | (no password)DefaultAuth | joe | (no password)
For configuration instructions, see Configuration Guide for SAS Foundation for UNIXEnvironments at http://support.sas.com/documentation/installcenter.
See Also• “Summary of Methods for LDAP Integration” on page 126
• “Direct LDAP Authentication” on page 112
• “Mixed Providers” on page 99
Pluggable Authentication Modules (PAM) 117
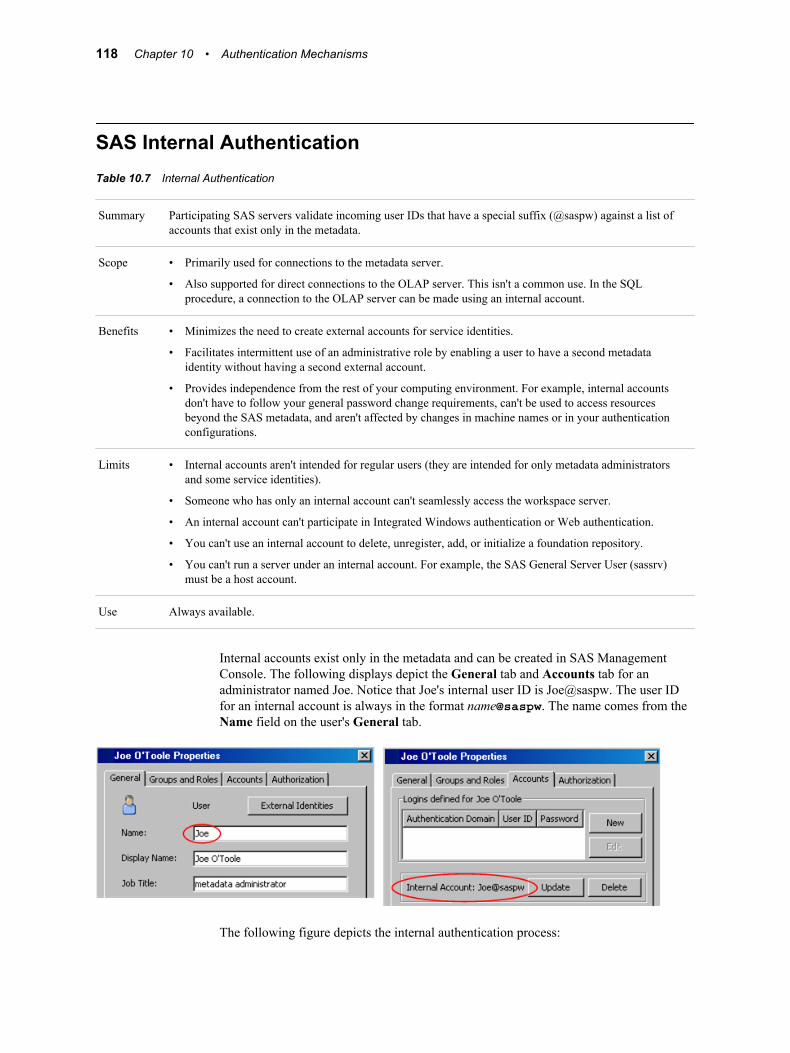
SAS Internal AuthenticationTable 10.7 Internal Authentication
Summary Participating SAS servers validate incoming user IDs that have a special suffix (@saspw) against a list ofaccounts that exist only in the metadata.
Scope • Primarily used for connections to the metadata server.
• Also supported for direct connections to the OLAP server. This isn't a common use. In the SQLprocedure, a connection to the OLAP server can be made using an internal account.
Benefits • Minimizes the need to create external accounts for service identities.
• Facilitates intermittent use of an administrative role by enabling a user to have a second metadataidentity without having a second external account.
• Provides independence from the rest of your computing environment. For example, internal accountsdon't have to follow your general password change requirements, can't be used to access resourcesbeyond the SAS metadata, and aren't affected by changes in machine names or in your authenticationconfigurations.
Limits • Internal accounts aren't intended for regular users (they are intended for only metadata administratorsand some service identities).
• Someone who has only an internal account can't seamlessly access the workspace server.
• An internal account can't participate in Integrated Windows authentication or Web authentication.
• You can't use an internal account to delete, unregister, add, or initialize a foundation repository.
• You can't run a server under an internal account. For example, the SAS General Server User (sassrv)must be a host account.
Use Always available.
Internal accounts exist only in the metadata and can be created in SAS ManagementConsole. The following displays depict the General tab and Accounts tab for anadministrator named Joe. Notice that Joe's internal user ID is Joe@saspw. The user IDfor an internal account is always in the format name@saspw. The name comes from theName field on the user's General tab.
The following figure depicts the internal authentication process:
118 Chapter 10 • Authentication Mechanisms

Figure 10.4 Internal Authentication
joe@saspw
& password joe@saspw
& password
accept
Client
JoeMetadata Repository
Metadata
Server
1
2
3
4
login
login
login
login
login
login
account
login
sastrust
sasadmaccount
accountJoe
The numbers in the preceding figure correspond to these actions:
1. At a logon prompt, Joe enters his internal credentials. The client sends thosecredentials to the metadata server for verification.
2. The metadata server recognizes that the ID is for an internal account (because the IDhas the @saspw suffix), so the metadata server checks the credentials against its listof internal accounts.
3. After validating the ID and password, the metadata server accepts the clientconnection. The connection is under the identity of the SAS user who owns theaccount.
Note: Joe can have logins in addition to his internal account, but he doesn't need alogin to establish his SAS identity.
Here are some tips for working with internal accounts:
• There are two distinct expiration settings. Don't confuse the account expiration datewith the password expiration period.
• If repeated attempts to log on with an internal account fail, make sure you areincluding the @saspw suffix in the user ID. Another cause of failure is the account islocked.
• If you have both an internal account and an external account, use a dedicatedconnection profile for your internal account. In that profile, leave the Authenticationdomain field blank. This ensures optimal credential reuse.
• If you don't have user administration capabilities, you can't see internal accounts,unless you are viewing your own definition and you happen to have an internalaccount.
Because internal accounts exist only in the metadata, they don't automatically follow thepolicies of other authentication providers. Here are the initial policies for internalaccounts:
• Accounts don't expire and aren't suspended due to inactivity.
• Passwords must be at least six characters, don't have to include numbers or mixedcase, and don't expire.
• The five most recent passwords can't be reused.
SAS Internal Authentication 119

• After three failed attempts to log on, an account is locked for one hour. Anadministrator can unlock the account by accessing the Accounts tab in the user'sdefinition in SAS Management Console.
• A forced password change occurs on first use and after a password is reset. Thispolicy applies only to accounts with passwords that periodically expire. By initialpolicy, passwords don't expire, so forced password changes don't occur.
You can set all of these policies globally (at the server-level). You can also selectivelyoverride many of these policies on a per-account basis.
See Also• “Authentication to the Metadata Server” on page 96
• “How to Change Internal Account Policies” on page 146
• “Unlock an Internal Account” on page 36
SAS Token AuthenticationTable 10.8 SAS Token Authentication
Summary The metadata server generates and validates a single-use identity token for each authentication event. Thishas the effect of causing participating SAS servers to accept users who are connected to the metadataserver.
Scope • Primarily used for metadata-aware connections to the stored process server, the server-side pooledworkspace server, the OLAP server, the content server, and (in a specialized configuration) the standardworkspace server.
• Also used by launched servers to connect back to the metadata server (for example, from the workspaceserver to the metadata server for library pre-assignment).
Benefits • Preserves client identity for metadata layer access control and auditing purposes.
• No individual external accounts are required, no user passwords are stored in the metadata, and noreusable credentials are transmitted.
Limits • On the workspace server, reduces granularity of host access.
• Supported only for metadata-aware connections (in which the client learns about the target server byreading the server's metadata definition).
Use Optional for the workspace server, otherwise mandatory within its scope.
The following figure is an abstraction of how this mechanism works.
120 Chapter 10 • Authentication Mechanisms
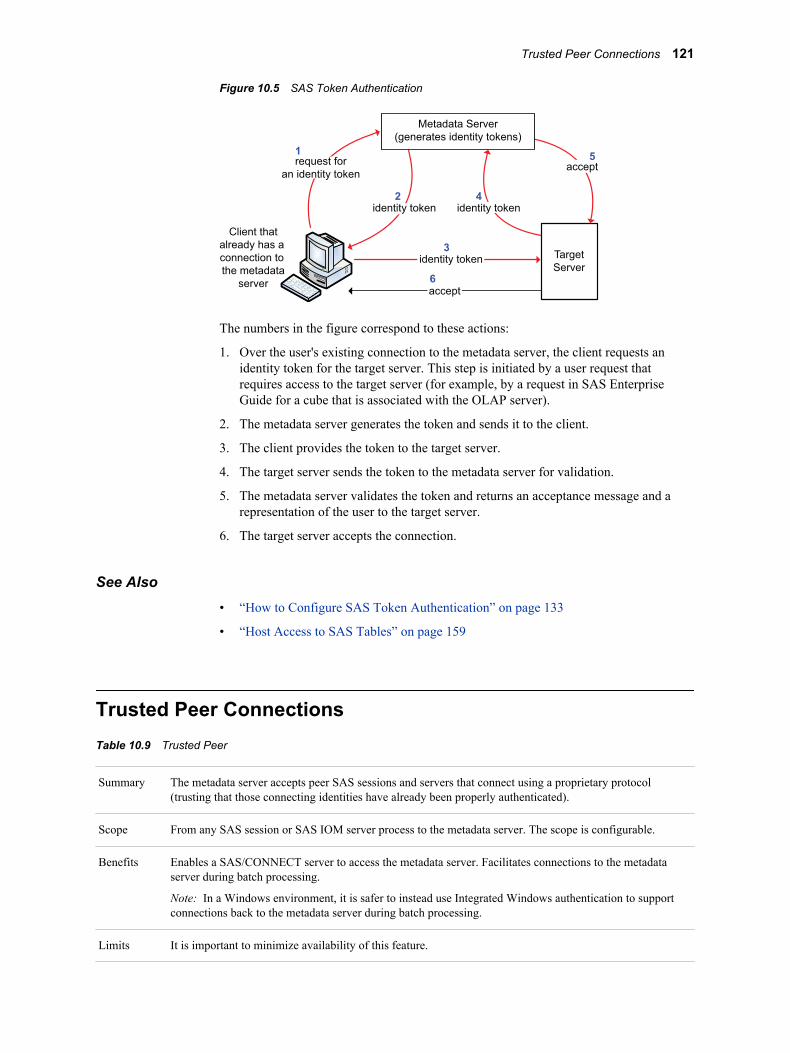
Figure 10.5 SAS Token Authentication
identity token
Client that
already has a
connection to
the metadata
server
request for
an identity token
Metadata Server
(generates identity tokens)
accept
accept
Target
Server
identity token
1
2
3
6
5
4
identity token
The numbers in the figure correspond to these actions:
1. Over the user's existing connection to the metadata server, the client requests anidentity token for the target server. This step is initiated by a user request thatrequires access to the target server (for example, by a request in SAS EnterpriseGuide for a cube that is associated with the OLAP server).
2. The metadata server generates the token and sends it to the client.
3. The client provides the token to the target server.
4. The target server sends the token to the metadata server for validation.
5. The metadata server validates the token and returns an acceptance message and arepresentation of the user to the target server.
6. The target server accepts the connection.
See Also• “How to Configure SAS Token Authentication” on page 133
• “Host Access to SAS Tables” on page 159
Trusted Peer ConnectionsTable 10.9 Trusted Peer
Summary The metadata server accepts peer SAS sessions and servers that connect using a proprietary protocol(trusting that those connecting identities have already been properly authenticated).
Scope From any SAS session or SAS IOM server process to the metadata server. The scope is configurable.
Benefits Enables a SAS/CONNECT server to access the metadata server. Facilitates connections to the metadataserver during batch processing.
Note: In a Windows environment, it is safer to instead use Integrated Windows authentication to supportconnections back to the metadata server during batch processing.
Limits It is important to minimize availability of this feature.
Trusted Peer Connections 121
Use Optional. If you use your operating system scheduler to run metadata backup jobs, make sure that trustedpeer connections from the host account that runs those jobs are allowed.
If the metadata server's start command includes the TRUSTSASPEER= option, thereferenced trustedPeers.xml file specifies which user IDs and machines are eligible toconnect to the metadata server using the trusted peer protocol.
By default, all user IDs and machines are eligible. The initial contents of thetrustedPeers.xml file are as follows:
<TrustedSASPeers>
<TrustedSASPeerClients> <client name="SAS" /> </TrustedSASPeerClients>
<TrustedSASPeerUsers> <user name="*" /> </TrustedSASPeerUsers>
<TrustedSASPeerMachines> <machine ip="*" /> </TrustedSASPeerMachines>
</TrustedSASPeers>
For greater security, we recommend that you target this mechanism so the metadataserver does not accept every connection that uses the proprietary protocol. You can useeither or both of these constraints:
• accept only specified user IDs
• accept only connections that originate from specified machines
You can define constraints in trustedPeers.xml as follows:
TrustedSASPeerClientslists eligible client types. SAS and java are the valid values. It is recommended thatyou reject connections from Java clients.
Typically, there is only one entry between the TrustedSASPeerClients tags:
<client name="SAS"/>
TrustedSASPeerUserslists eligible user IDs. To represent all users, use an asterisk (*). To represent allusers in a Windows domain, use the format *@domain. For Windows accounts,provide domain-qualified (or machine-qualified) IDs. For example, you might insertthese three entries between the TrustedSASPeerUsers tags:
<user name="*@winXP"/><user name="tara"/><user name="batchjobID"/>
TrustedSASPeerMachineslists eligible points of origin. Identify machines by IP address. You can use asterisks(*) as wildcards. For example, you might insert these three entries between theTrustedSASPeerMachines tags:
122 Chapter 10 • Authentication Mechanisms
<machine ip="1.2.3.4"/><machine ip="A:B:C:D:E:F:1.2.3.4"/><machine ip="*.*.8.9"/>
Note: Only connections that meet all specified criteria are accepted. If any of thesections are empty, no trusted peer connections are allowed.
Note: An additional constraint, TrustedSASDomains, is supported for backwardscompatibility but will be deprecated in a future release.
Note: The trustedPeers.xml file is in your equivalent ofSAS/Config/Lev1/SASMeta/MetadataServer/.
Trusted User ConnectionsTable 10.10 Trusted User
Summary The metadata server allows a privileged account to act on behalf of other users (trusting that those usershave already been properly authenticated).
Scope To the metadata server from the object spawner, the OLAP server, SAS Web applications (if Webauthentication is used), and batch report processes.
Benefits Supports the optional Web authentication configuration. Enables the OLAP server and the object spawnerto impersonate each requesting user on connections to the metadata server. Enables batch reportingprocesses to connect to the metadata server under their identities.
Limits It is important to protect this privileged account.
Use Required.
In a new deployment, the trustedUsers.txt file lists one account that serves as the trusteduser for the entire deployment.
CAUTION:Do not add regular users to the trustedUsers.txt file. The trusted user is aprivileged service identity that can act on behalf of all other users.
Note: The trustedUsers.txt file is in your equivalent ofSAS/Config/Lev1/SASMeta/MetadataServer/.
Web AuthenticationTable 10.11 Web Authentication
Summary The metadata server accepts users who are authenticated at the Web perimeter.
Scope From SAS Web applications to the metadata server.
Web Authentication 123

Benefits • Facilitates single sign-on from and across the Web realm.
• Enables SAS Web applications to use whatever authentication scheme you have set up in your Webenvironment. This can facilitate integration with J2EE servlet containers, products such as SiteMinder orTivoli Access Manager/WebSEAL, and Web servers.
• Can reduce the number of user accounts that you have to create in the metadata server's authenticationprovider, because users who use only Web applications no longer need accounts with the metadataserver's provider.
Limits • When you use Web authentication to access the metadata server, there are no cached credentials from aninitial logon. This prevents authentication from Web applications to the standard workspace serverthrough reuse of credentials.
• Prevents users from logging on to a SAS Web application with a SAS internal account.
• Not compatible with anonymous access. See “About PUBLIC Access and Anonymous Access” on page106.
Use Optional.
The following figure depicts the high-level choice in authentication method for SASWeb applications:
• SAS authentication (any form of authentication in which the metadata server isresponsible for requesting verification)
• Web authentication (any form of authentication in which verification occurs in theWeb realm and the metadata server trusts that verification)
124 Chapter 10 • Authentication Mechanisms

Figure 10.6 Examples of SAS Authentication and Web Authentication
3
logon prompt
trusted connection
ID
ID
SAS
identity
5
Metadata
Repository
6
7
8...
2
Authentication
Provider
ID & password
4
1page request
WebApplicationServer
3
logon prompt
WebApplicationServer
ID & password
ID
SAS
identity
4
Metadata
Server
Metadata
Server
Metadata
Repository
SA
S R
em
ote
Serv
ices
6
7
8...
2
ID & password
1page request
Authentication
Provider
SAS Authentication
Web Authentication
5
SA
S R
em
ote
Serv
ices
The preceding figures are simplified in order to highlight the differences between thetwo configurations. The following figure includes additional detail about Webauthentication.
Figure 10.7 Web Authentication: A Closer Look
logon prompt
1
3
Web Application Server
SAS Web Report Studio
SAS Information Delivery Portal
SAS BI Dashboard
trusted connection
ID
SAS
identity
8
Metadata
Server
MetadataRepository
SA
S R
em
ote
Serv
ice
s
2
SA
S A
uth
en
ticatio
n S
erv
ice
Authentication Provider
56ID & password
4
SA
S
Lo
gon
Man
ag
er
page request
JAAS Login Module Chain
SAS Trusted
Login Module
Third-Party
Login Module
trusted connection
9...
7
Web Authentication 125

In the preceding figure, a user who is not already authenticated at the Web perimetermakes a request to access SAS Web Report Studio. The numbers in the figurecorrespond to these activities:
1. In a Web browser, the user makes the request.
2. A SAS component within the Web application server (the Logon Managerapplication) prompts the user for credentials. This occurs because, in this example,the user has not already been authenticated at the Web perimeter.
3. The user supplies credentials to the Web container.
4. The Web container's Java Authentication and Authorization Service (JAAS) loginmodule chain directs the container to verify the credentials against its designatedauthentication provider. JAAS then passes the authenticated ID to the SAS trustedlogin module.
5. The SAS trusted login module uses a trusted user connection to authenticate to themetadata server and retrieve the user's SAS identity.
Note: This is actually a two phase process in which the module first asks themetadata server for a one-time-use password for the user and then establishes aconnection to the metadata server under the user's ID and the generated one-time-use password. The figure omits these details.
The metadata server looks up the user's ID in the metadata repository. As usual, thisstep doesn't involve password validation and isn't affected by authentication domainassignments. Only the user's ID is being matched (the authentication domainassignment in a login affects only credential reuse).
6. The user's authenticated ID and SAS identity is passed to the SAS Logon Managerand then to the SAS Authentication Service.
7. The authentication service passes the user's identity information to another SAScomponent (Remote Services), which runs in its own Java virtual machine (JVM),outside of the Web application server.
8. Remote Services initiates a second trusted user connection to the metadata server.The purpose of this connection is to obtain additional information for the user'scontext.
Note: As in step five, the trusted user connection is actually a two phase process.
9. The additional user context information is returned.
See Also“How to Configure Web Authentication” on page 134
Summary of Methods for LDAP IntegrationSAS supports the following methods for integration with LDAP:
host use of LDAPThe SAS server’s host uses an LDAP provider as a back-end authentication provider.From the perspective of the SAS server, this is host authentication. For example:
• Active Directory is the standard back-end authentication provider on Windows.
126 Chapter 10 • Authentication Mechanisms
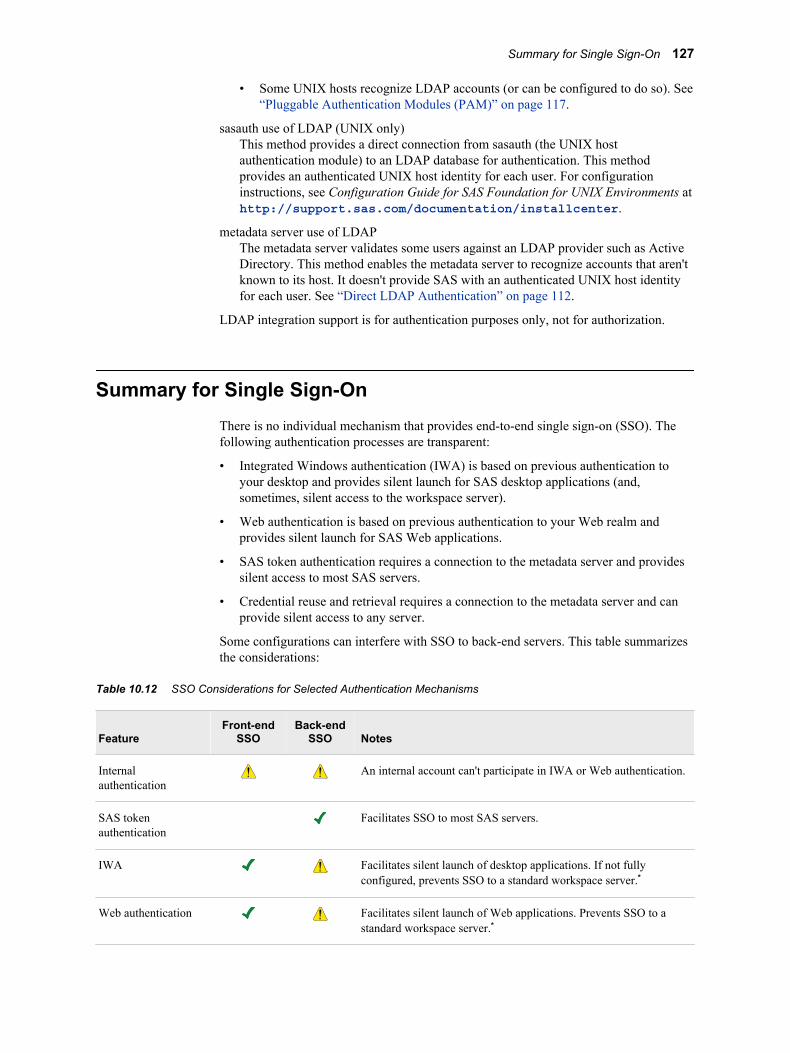
• Some UNIX hosts recognize LDAP accounts (or can be configured to do so). See“Pluggable Authentication Modules (PAM)” on page 117.
sasauth use of LDAP (UNIX only)This method provides a direct connection from sasauth (the UNIX hostauthentication module) to an LDAP database for authentication. This methodprovides an authenticated UNIX host identity for each user. For configurationinstructions, see Configuration Guide for SAS Foundation for UNIX Environments athttp://support.sas.com/documentation/installcenter.
metadata server use of LDAPThe metadata server validates some users against an LDAP provider such as ActiveDirectory. This method enables the metadata server to recognize accounts that aren'tknown to its host. It doesn't provide SAS with an authenticated UNIX host identityfor each user. See “Direct LDAP Authentication” on page 112.
LDAP integration support is for authentication purposes only, not for authorization.
Summary for Single Sign-OnThere is no individual mechanism that provides end-to-end single sign-on (SSO). Thefollowing authentication processes are transparent:
• Integrated Windows authentication (IWA) is based on previous authentication toyour desktop and provides silent launch for SAS desktop applications (and,sometimes, silent access to the workspace server).
• Web authentication is based on previous authentication to your Web realm andprovides silent launch for SAS Web applications.
• SAS token authentication requires a connection to the metadata server and providessilent access to most SAS servers.
• Credential reuse and retrieval requires a connection to the metadata server and canprovide silent access to any server.
Some configurations can interfere with SSO to back-end servers. This table summarizesthe considerations:
Table 10.12 SSO Considerations for Selected Authentication Mechanisms
FeatureFront-end
SSOBack-end
SSO Notes
Internalauthentication
An internal account can't participate in IWA or Web authentication.
SAS tokenauthentication
Facilitates SSO to most SAS servers.
IWA Facilitates silent launch of desktop applications. If not fullyconfigured, prevents SSO to a standard workspace server.*
Web authentication Facilitates silent launch of Web applications. Prevents SSO to astandard workspace server.*
Summary for Single Sign-On 127

FeatureFront-end
SSOBack-end
SSO Notes
Direct LDAPauthentication
Not compatible with silent launch. Prevents SSO to a standardworkspace server.*
PAM Can help unify authentication.
CredentialManagement
Facilitates SSO to third-party servers and (in some configurations)workspace servers.
* Unless the server is configured for SAS token authentication or accessed using stored credentials.
Summary by Server TypeThis table provides a high-level review of support for different authenticationmechanisms. In the table, the following symbols indicate the extent to which each servercan be accessed using each feature:
• Supported
• Supported for only direct connections (not metadata aware connections)
• Intended for only administrators and some service identities
• Used only for certain server-to-server communications
• Not supported
Table 10.13 Summary: How Servers Can Be Accessed
Mechanism
Server Type
Metadata Workspace OLAPStored Process orPooled Workspace
Client-Pooled
Workspace*
Host authentication (credentials)
Integrated Windows authentication
Web authentication
Direct LDAP authentication
Internal authentication
SAS token authentication
Trusted user
128 Chapter 10 • Authentication Mechanisms

Mechanism
Server Type
Metadata Workspace OLAPStored Process orPooled Workspace
Client-Pooled
Workspace*
Trusted peer
* For the client-pooled workspace server, user access depends on membership in a puddle group.
Summary by Server Type 129

130 Chapter 10 • Authentication Mechanisms

Chapter 11
Authentication Tasks
How to Facilitate Authentication . . . . . . . . . . . . . . . . . . . . . . . . . . . . . . . . . . . . . . . 131Identify or Create User Accounts . . . . . . . . . . . . . . . . . . . . . . . . . . . . . . . . . . . . . . 131Coordinate the Workspace Server . . . . . . . . . . . . . . . . . . . . . . . . . . . . . . . . . . . . . 132
How to Configure SAS Token Authentication . . . . . . . . . . . . . . . . . . . . . . . . . . . . . 133
How to Configure Web Authentication . . . . . . . . . . . . . . . . . . . . . . . . . . . . . . . . . . 134Overview of Configuring Web Authentication . . . . . . . . . . . . . . . . . . . . . . . . . . . 134Vendor-Specific Instructions for Web Authentication . . . . . . . . . . . . . . . . . . . . . . 134Logins for Users Who Participate in Web Authentication . . . . . . . . . . . . . . . . . . . 134
How to Configure Direct LDAP Authentication . . . . . . . . . . . . . . . . . . . . . . . . . . . 135
How to Configure Integrated Windows Authentication . . . . . . . . . . . . . . . . . . . . . 138Overview of Configuring IWA . . . . . . . . . . . . . . . . . . . . . . . . . . . . . . . . . . . . . . . . 138Instructions for Configuring IWA . . . . . . . . . . . . . . . . . . . . . . . . . . . . . . . . . . . . . 139Logins for Users Who Participate in IWA . . . . . . . . . . . . . . . . . . . . . . . . . . . . . . . 141Forcing Kerberos (Windows-Only) . . . . . . . . . . . . . . . . . . . . . . . . . . . . . . . . . . . . 141Using Custom SPNs . . . . . . . . . . . . . . . . . . . . . . . . . . . . . . . . . . . . . . . . . . . . . . . . 142About IWA to the OLAP Server . . . . . . . . . . . . . . . . . . . . . . . . . . . . . . . . . . . . . . 143About IWA from Web Applications . . . . . . . . . . . . . . . . . . . . . . . . . . . . . . . . . . . . 143Reference: Supported Protocols for IWA . . . . . . . . . . . . . . . . . . . . . . . . . . . . . . . . 143
How to Store Passwords for the Workspace Server . . . . . . . . . . . . . . . . . . . . . . . . 144
How to Store Passwords for a Third-Party Server . . . . . . . . . . . . . . . . . . . . . . . . . 145
How to Change Internal Account Policies . . . . . . . . . . . . . . . . . . . . . . . . . . . . . . . . 146Server-Level Policies . . . . . . . . . . . . . . . . . . . . . . . . . . . . . . . . . . . . . . . . . . . . . . . 146Per-Account Policies . . . . . . . . . . . . . . . . . . . . . . . . . . . . . . . . . . . . . . . . . . . . . . . 148
How to Reduce Exposure of the SASTRUST Password . . . . . . . . . . . . . . . . . . . . . 149
About the Workspace Server's Options Tab . . . . . . . . . . . . . . . . . . . . . . . . . . . . . . 151
How to Facilitate Authentication
Identify or Create User AccountsEach user must have an account that provides access to the metadata server, eitherdirectly or through a trust relationship. Determine which of the following situationsapplies to you and complete any tasks as indicated.
131
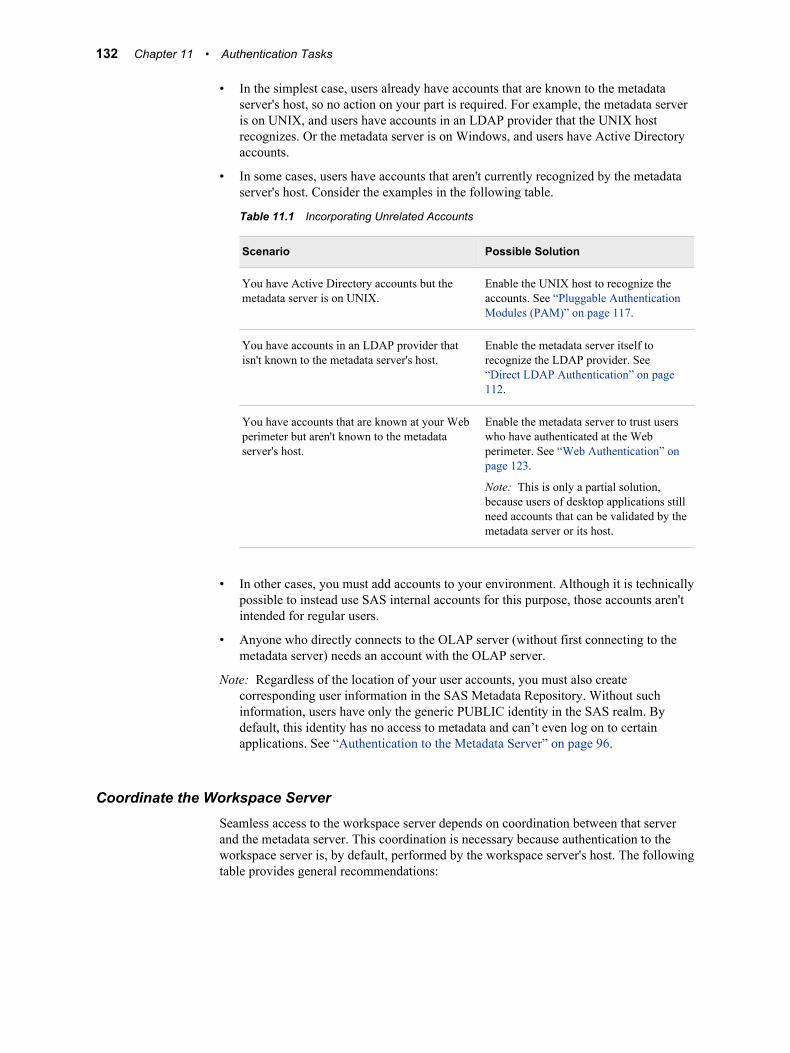
• In the simplest case, users already have accounts that are known to the metadataserver's host, so no action on your part is required. For example, the metadata serveris on UNIX, and users have accounts in an LDAP provider that the UNIX hostrecognizes. Or the metadata server is on Windows, and users have Active Directoryaccounts.
• In some cases, users have accounts that aren't currently recognized by the metadataserver's host. Consider the examples in the following table.
Table 11.1 Incorporating Unrelated Accounts
Scenario Possible Solution
You have Active Directory accounts but themetadata server is on UNIX.
Enable the UNIX host to recognize theaccounts. See “Pluggable AuthenticationModules (PAM)” on page 117.
You have accounts in an LDAP provider thatisn't known to the metadata server's host.
Enable the metadata server itself torecognize the LDAP provider. See“Direct LDAP Authentication” on page112.
You have accounts that are known at your Webperimeter but aren't known to the metadataserver's host.
Enable the metadata server to trust userswho have authenticated at the Webperimeter. See “Web Authentication” onpage 123.
Note: This is only a partial solution,because users of desktop applications stillneed accounts that can be validated by themetadata server or its host.
• In other cases, you must add accounts to your environment. Although it is technicallypossible to instead use SAS internal accounts for this purpose, those accounts aren'tintended for regular users.
• Anyone who directly connects to the OLAP server (without first connecting to themetadata server) needs an account with the OLAP server.
Note: Regardless of the location of your user accounts, you must also createcorresponding user information in the SAS Metadata Repository. Without suchinformation, users have only the generic PUBLIC identity in the SAS realm. Bydefault, this identity has no access to metadata and can’t even log on to certainapplications. See “Authentication to the Metadata Server” on page 96.
Coordinate the Workspace ServerSeamless access to the workspace server depends on coordination between that serverand the metadata server. This coordination is necessary because authentication to theworkspace server is, by default, performed by the workspace server's host. The followingtable provides general recommendations:
132 Chapter 11 • Authentication Tasks

Table 11.2 Coordinate the Workspace Server with the Metadata Server
Scenario Recommendation
The servers run onWindows or UNIX.
Use host authentication (either credential-based or Integrated Windows authentication). See“Host Authentication” on page 113 or “Integrated Windows Authentication” on page 115.
The servers run onz/OS.
Use credential-based host authentication for both servers.
The servers don'trecognize the sameaccounts.
To minimize requirements for and exposure of host credentials, SAS provides several alternateconfigurations. See “Mixed Providers” on page 99.
Note: Similar coordination isn't necessary for OLAP servers and stored process servers,because they use SAS token authentication (instead of host authentication) formetadata-aware connections.
How to Configure SAS Token AuthenticationNote: For metadata-aware connections to the stored process server, the pooled
workspace server, and the OLAP server, SAS token authentication is always usedand no configuration is involved. For the standard workspace server, configuringSAS token authentication is one of several solutions to a mixed provider situation.
To configure the standard workspace server to use SAS token authentication:
1. Log on to SAS Management Console as someone who has user administrationcapabilities (for example, sasadm@saspw).
2. On the Plug-ins tab, expand Server Manager and the application server (forexample, SASApp). Right-click the logical server (for example, SASApp -Logical Workspace Server) and select Properties.
3. On the Options tab, select SAS token authentication. Click OK to save this setting.
4. Expand the logical server , select the server , right-click, and selectProperties.
5. On the Options tab, from the Launch Credentials drop-down list, select a login andclick OK. The most basic choice is the SAS Spawned Servers account (the sassrvlogin).
6. To make the changes take effect, refresh the object spawner.
Note: If you need detailed instructions for this step, use the Help in SASManagement Console or see “Using SAS Management Console to Operate SASServers” in Chapter 5 of SAS Intelligence Platform: System AdministrationGuide.
7. To validate the configuration, select the logical workspace server , right-click,and select Validate.
Note: Metadata layer access from the server (for example, library pre-assignment,PROC OLAP code, and metadata LIBNAME engine use) will still be based on each
How to Configure SAS Token Authentication 133

requesting user's identity. However, all host access from the server will now be underthe designated launch credential.
See Also• “SAS Token Authentication” on page 120
• “Mixed Providers” on page 99
• “Criteria for a Designated Launch Credential” on page 156
• “Example: Multiple Levels of Host Access” on page 162
How to Configure Web Authentication
Overview of Configuring Web AuthenticationNote: Before you configure Web authentication, verify that this is an appropriate choice
in your environment. See “Web Authentication” on page 123 .
Configuring Web authentication consists of the following high-level tasks:
1. Make configuration changes to SAS components (for example, edit the SASlogin.config file to reference the web domain, add security information to the SASLogon Manager application, and adjust the classpath for the Remote Servicesapplication).
2. Make configuration changes to your Web environment (for example, add loginmodules and make SAS JAR files available).
3. Rebuild and redeploy the SAS Web applications. Update and restart the Webapplication server.
4. Verify or adjust user information in the SAS metadata so that each user whoparticipates in Web authentication has an appropriate login in his or her metadatadefinition.
Vendor-Specific Instructions for Web AuthenticationMany of the implementation details for Web authentication differ by product. For thisreason, instructions for setting up Web authentication in each Web application server areavailable in separate documents from the third-party software support pages at http://support.sas.com/resources/thirdpartysupport/index.html.
Logins for Users Who Participate in Web AuthenticationIf you choose to configure Web authentication, make sure that user metadata definitionsinclude logins as explained in this topic.
Someone who uses only Web applications should have a login in the web authenticationdomain. For example:
web | joe | (no password)
134 Chapter 11 • Authentication Tasks

Someone who uses both Web and desktop applications might need two logins. One logincontains the user's authenticated ID after logging on to a desktop application, and theother login contains the user's authenticated ID after logging on to a Web application.For example:
DefaultAuth | WIN\joe | (no password)web | joe | (no password)
In the preceding example, two logins are needed because the format of the authenticateduser ID differs in each context as follows:
• When Joe logs on to a desktop application (as joe), SAS obtains his user ID in down-level format (WIN\joe), and that string is matched to the user ID in Joe's DefaultAuthlogin.
• When Joe logs on to a Web application (as joe), SAS obtains his user ID in shortformat (joe), and that string is matched to the user ID in Joe's web login.
However, if the authenticated user ID is identical in both contexts, the web login is notneeded. If SAS obtains both authenticated user IDs as joe, the web login is not needed.In the following example, the metadata server is not authenticating against Windowsaccounts and the web login is not needed. When Joe logs on to a Web application, thepresence of his DefaultAuth login (which contains the correct user ID) is sufficient forthe metadata server to successfully determine his metadata identity.
DefaultAuth | joe | (no password)web | joe | (no password)
Note: If your Web environment uses Integrated Windows authentication, you must paycareful attention to the format in which SAS obtains user IDs from the Web realm. Ifyou find that users of Web applications have only the PUBLIC identity, it is likelythat the user ID in each web login is not in the same format as the user ID that SASobtains from the Web realm.
Note: This isn't a comprehensive discussion of logins; some users might have additionallogins for other purposes.
See Also• “How Logins Are Used” on page 103
• “Authentication to the Metadata Server” on page 96
• “Windows User ID Formats” on page 20
How to Configure Direct LDAP AuthenticationNote: Before you use these instructions, make sure that this is an appropriate choice in
your environment. See “Direct LDAP Authentication” on page 112.
To make a metadata server on UNIX directly recognize Active Directory accounts,locate the sasv9_usermods.cfg file that is in your equivalent ofSAS/Config/Lev1/SASMeta/MetadataServer and add lines such as these:
/* Environment variables that describe your AD server */-set AD_HOST myhost
How to Configure Direct LDAP Authentication 135
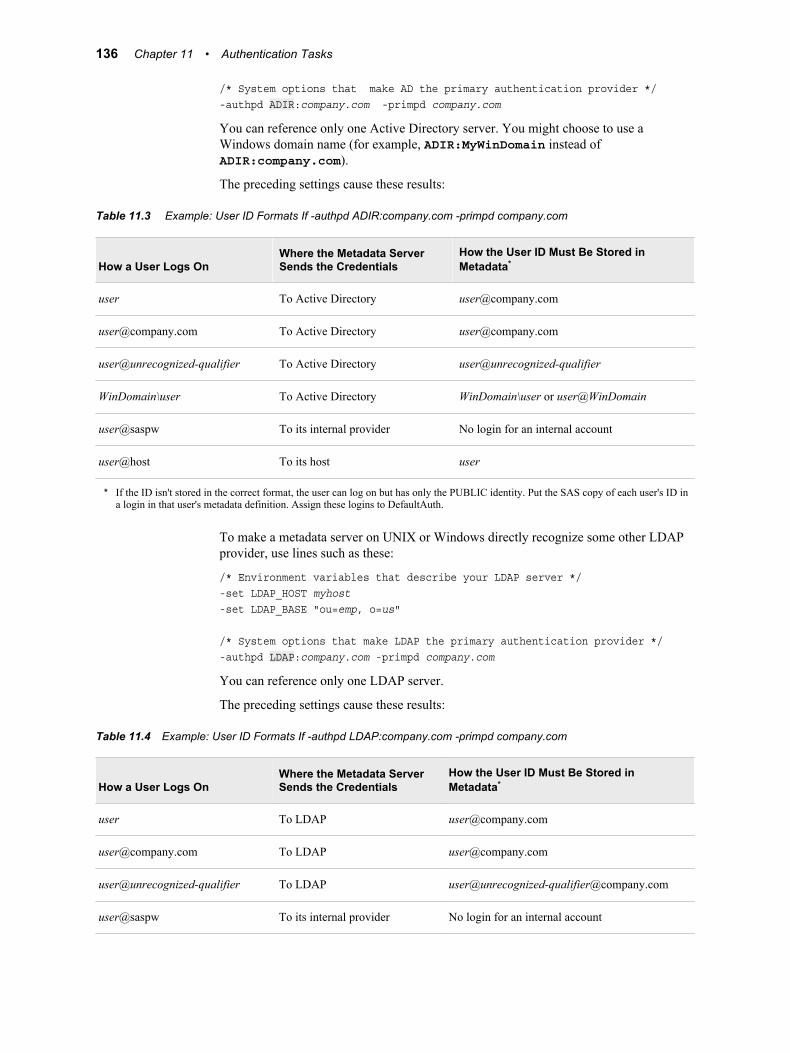
/* System options that make AD the primary authentication provider */-authpd ADIR:company.com -primpd company.com
You can reference only one Active Directory server. You might choose to use aWindows domain name (for example, ADIR:MyWinDomain instead ofADIR:company.com).
The preceding settings cause these results:
Table 11.3 Example: User ID Formats If -authpd ADIR:company.com -primpd company.com
How a User Logs OnWhere the Metadata ServerSends the Credentials
How the User ID Must Be Stored inMetadata*
user To Active Directory [email protected]
[email protected] To Active Directory [email protected]
user@unrecognized-qualifier To Active Directory user@unrecognized-qualifier
WinDomain\user To Active Directory WinDomain\user or user@WinDomain
user@saspw To its internal provider No login for an internal account
user@host To its host user
* If the ID isn't stored in the correct format, the user can log on but has only the PUBLIC identity. Put the SAS copy of each user's ID ina login in that user's metadata definition. Assign these logins to DefaultAuth.
To make a metadata server on UNIX or Windows directly recognize some other LDAPprovider, use lines such as these:
/* Environment variables that describe your LDAP server */-set LDAP_HOST myhost-set LDAP_BASE "ou=emp, o=us"
/* System options that make LDAP the primary authentication provider */-authpd LDAP:company.com -primpd company.com
You can reference only one LDAP server.
The preceding settings cause these results:
Table 11.4 Example: User ID Formats If -authpd LDAP:company.com -primpd company.com
How a User Logs OnWhere the Metadata ServerSends the Credentials
How the User ID Must Be Stored inMetadata*
user To LDAP [email protected]
[email protected] To LDAP [email protected]
user@unrecognized-qualifier To LDAP user@[email protected]
user@saspw To its internal provider No login for an internal account
136 Chapter 11 • Authentication Tasks

How a User Logs OnWhere the Metadata ServerSends the Credentials
How the User ID Must Be Stored inMetadata*
user@host To its host user
* If the ID isn't stored in the correct format, the user can log on but has only the PUBLIC identity. Put the SAS copy of each user's ID ina login in that user's metadata definition. Assign these logins to DefaultAuth.
Table 11.5 Reference: Environment Variables
AD_HOST The host name of the machine where Active Directory is running.
AD_PORT The port number for Active Directory. The default is 389.
AD_TLSMODE Enable Secure Socket Layer (SSL) encrypted communication between the metadata server andthe Active Directory server. Set this variable to 1 to activate (for example, -setAD_TLSMODE 1).*
LDAP_HOST The host name of the machine where LDAP is running.
LDAP_PORT The port number for LDAP. The default is 389.
LDAP_BASE The base DN to use. For example: o=People, dc=orion, dc=com.
LDAP_IDATTR (Optional) an alternative LDAP attribute that the SAS server can use to find your DN. Thedefault is uid.
LDAP_PRIV_DN The privileged DN that is allowed to search for users. For example, cn=useradmin.**
LDAP_PRIV_PW The password for LDAP_PRIV_DN. You can use the PWENCODE procedure to provide anencoded password.**
LDAP_TLSMODE Enable Secure Socket Layer (SSL) encrypted communication between the metadata server andthe LDAP server. Set this variable to 1 to activate (for example, -set LDAP_TLSMODE1).*
* Additional configuration is required. See “How to Configure SSL between the Metadata Server and an LDAP Server” on page 182.** Set this variable only if users connect with a user ID instead of a DN, and the LDAP server does not allow anonymous binds.
T I P For more information about setting environment variables, see the SAS systemoption SET= in the documentation for your host:
• SAS Companion for Windows
• SAS Companion for UNIX Environments
• SAS Companion for z/OS
.
Table 11.6 Reference: SAS System Options
AUTHPD Use this option to register and name your Active Directory provider or other LDAP provider. See“AUTHPROVIDERDOMAIN System Option” in SAS System Options: Reference.
How to Configure Direct LDAP Authentication 137
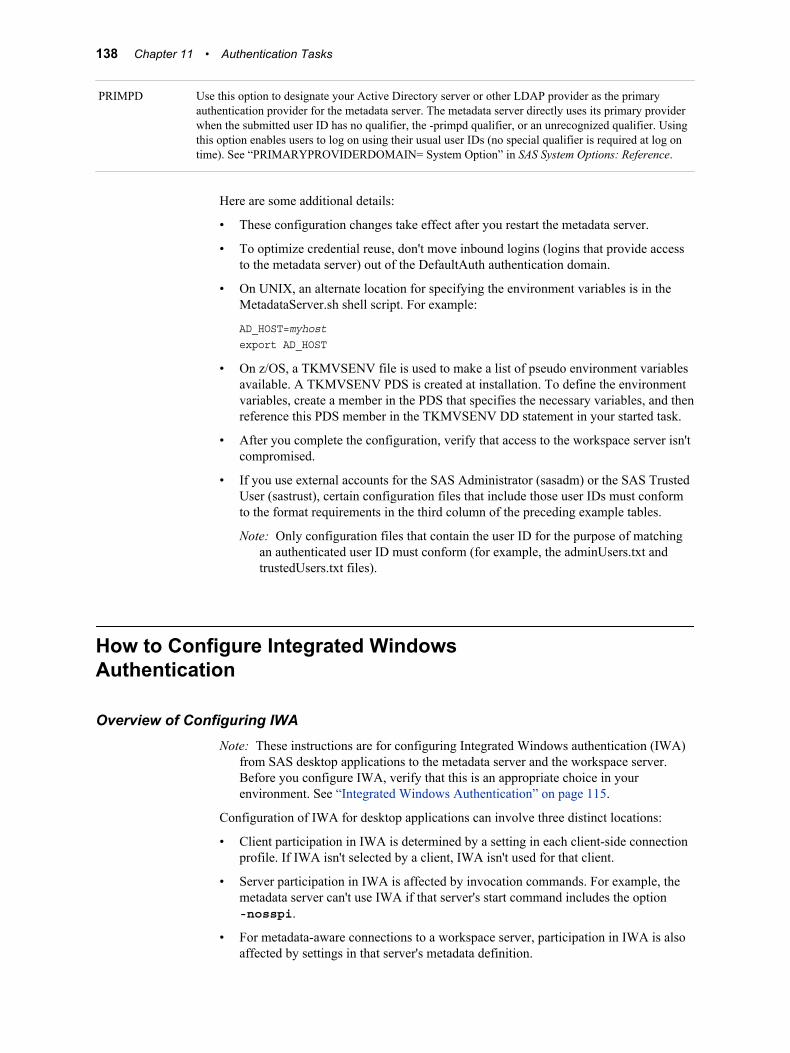
PRIMPD Use this option to designate your Active Directory server or other LDAP provider as the primaryauthentication provider for the metadata server. The metadata server directly uses its primary providerwhen the submitted user ID has no qualifier, the -primpd qualifier, or an unrecognized qualifier. Usingthis option enables users to log on using their usual user IDs (no special qualifier is required at log ontime). See “PRIMARYPROVIDERDOMAIN= System Option” in SAS System Options: Reference.
Here are some additional details:
• These configuration changes take effect after you restart the metadata server.
• To optimize credential reuse, don't move inbound logins (logins that provide accessto the metadata server) out of the DefaultAuth authentication domain.
• On UNIX, an alternate location for specifying the environment variables is in theMetadataServer.sh shell script. For example:
AD_HOST=myhostexport AD_HOST
• On z/OS, a TKMVSENV file is used to make a list of pseudo environment variablesavailable. A TKMVSENV PDS is created at installation. To define the environmentvariables, create a member in the PDS that specifies the necessary variables, and thenreference this PDS member in the TKMVSENV DD statement in your started task.
• After you complete the configuration, verify that access to the workspace server isn'tcompromised.
• If you use external accounts for the SAS Administrator (sasadm) or the SAS TrustedUser (sastrust), certain configuration files that include those user IDs must conformto the format requirements in the third column of the preceding example tables.
Note: Only configuration files that contain the user ID for the purpose of matchingan authenticated user ID must conform (for example, the adminUsers.txt andtrustedUsers.txt files).
How to Configure Integrated WindowsAuthentication
Overview of Configuring IWANote: These instructions are for configuring Integrated Windows authentication (IWA)
from SAS desktop applications to the metadata server and the workspace server.Before you configure IWA, verify that this is an appropriate choice in yourenvironment. See “Integrated Windows Authentication” on page 115.
Configuration of IWA for desktop applications can involve three distinct locations:
• Client participation in IWA is determined by a setting in each client-side connectionprofile. If IWA isn't selected by a client, IWA isn't used for that client.
• Server participation in IWA is affected by invocation commands. For example, themetadata server can't use IWA if that server's start command includes the option-nosspi.
• For metadata-aware connections to a workspace server, participation in IWA is alsoaffected by settings in that server's metadata definition.
138 Chapter 11 • Authentication Tasks

Instructions for Configuring IWA1. If the metadata server or workspace server runs on UNIX, complete the UNIX
prerequisite tasks. Before you can use IWA for a SAS server that runs on a UNIXhost, you must prepare and configure the UNIX environment. For example:
• You must acquire, install, and configure the required third-party software. In theinitial release of SAS 9.3, the only supported implementation of IWA on UNIXrequires Quest Authentication Services 4.0.1.23 (or later).
• The UNIX host must join the Active Directory domain and be represented inActive Directory as a computer object.
• You must create a service account and corresponding keytab file. ParticipatingSAS processes on UNIX must be able to read the keytab file. The keytab fileshould not be generally available.
• You must set certain environment variables.
These prerequisite tasks should be performed during the installation and initialconfiguration phases of your deployment. Some of the implementation details differby UNIX host. For these reasons, detailed instructions for preparing your UNIX hostto support IWA are in a separate document. See the chapter "Configuring IntegratedWindows Authentication" in Configuration Guide for SAS Foundation for UNIXEnvironments at http://support.sas.com/documentation/installcenter .
2. Verify an IWA connection to the metadata server.
a. Open a client-side connection profile in a Windows desktop application.
b. Select the check box that enables Integrated Windows authentication.
c. If the connection fails, verify the following:
• The metadata server's start-up command includes -sspi.
• The advanced IWA settings in your client-side connection profile areNegotiate for the security package, blank (no value) for the service principalname, and Kerberos,NTLM for the security package list.
• Your metadata user definition includes a login that contains your user ID inthe correct format. See “Logins for Users Who Participate in IWA” on page141.
• You are using a Windows desktop client (the SAS implementation of IWA isnot for Web applications).
• If the metadata server runs on UNIX, the prerequisite steps have beensuccessfully completed (see step 1 above).
d. After the connection succeeds, examine the metadata server log to confirm thatan IWA connection was used. If a credential-based connection occurred, makesure that your password is not cached in the client application.
3. Configure the workspace server’s metadata definition for IWA, and verify an IWAconnection to that server.
T I P If you use IWA for the metadata server, there are no cached credentials froman initial logon. For this reason, it is a good idea to configure IWA for thestandard workspace server also, if possible (IWA is not supported on z/OS).
How to Configure Integrated Windows Authentication 139

a. On the Plug-ins tab in SAS Management Console, expand Server Manager andthe application server (for example, SASApp). Right-click the logical server
(for example, SASApp - Logical Workspace Server) and select Properties.
b. On the Options tab, select the Host radio button (IWA is a form of hostauthentication).
• Select the Negotiate security package.
• Leave the Security package list as Kerberos,NTLM.
• Leave the Service principal name blank. In a standard configuration, clientsexpect (and know how to compose) the default SPN. Entering a value here(or on the client side) overrides this default process.
c. Log on to SAS Management Console using IWA. Right-click the LogicalWorkspace Server and select Validate.
d. If the connection fails, verify the following:
• The object spawner's start-up command includes -sspi.
• Your metadata user definition includes a login that contains your user ID inthe correct format. See “Logins for Users Who Participate in IWA” on page141.
• If the workspace server runs on UNIX, the prerequisite steps have beensuccessfully completed (see step 1 above).
e. After the connection succeeds, examine the object spawner log to verify that theconnection to the workspace server was made using IWA. If the spawner logindicates that credential-based authentication occurred (instead of IWA), theuser's context includes credentials for the workspace server's host. Make sure thatthe user does not have a cached or stored password for the workspace server’sauthentication domain.
Note: Even if IWA is configured, any available cached or stored credentials arepreferentially used.
4. If the workspace server is on Windows and needs to access Windows networkresources (such as UNC pathnames or IWA connections to databases):
• Edit the Security package list so that only Kerberos is specified.
• In Active Directory, make the object spawner account trusted for delegation. See“Windows Privileges” on page 18.
5. Notify users that they can select the IWA check box when they log on to desktopapplications such as SAS Information Map Studio, SAS Data Integration Studio,SAS OLAP Cube Studio, SAS Management Console, and SAS Enterprise Guide. Ingeneral, users shouldn't make changes to the advanced IWA settings in their client-side connection profiles.
T I P If your SAS servers use DNS aliases, you must manually register those aliases(as both SAS/DNSalias and SAS/DNSalias.fully.qualified) in order to supportKerberos-based IWA connections. See “Using Custom SPNs” on page 142.
See Also• Chapter 6, “Checking the Status of Servers,” in SAS Intelligence Platform: System
Administration Guide
• “Default Locations for Server Logs” in Chapter 24 of SAS Intelligence Platform:System Administration Guide
140 Chapter 11 • Authentication Tasks

• “Spawner Invocation Options” in Chapter 12 of SAS Intelligence Platform:Application Server Administration Guide
Logins for Users Who Participate in IWAIf you choose to configure IWA, make sure that user metadata definitions include loginswith properly formatted user IDs. The format of the stored user IDs must match theformat in which authenticated user IDs are returned to the target server. Failure to meetthis requirement causes the user to have only the generic PUBLIC identity (which, bydefault, can’t even log on to most applications).
In the standard configuration, the appropriate format varies as follows:
• If the target server is on Windows, the authenticated user ID is returned in qualifiedformat, so the stored user ID should be qualified (for example, WIN\joe [email protected]).
• If the target server is on UNIX, the authenticated user ID is returned in short format(it is not qualified), so the stored user ID should not be qualified (for example, joe orfred.smith).
If you need to align formats, use the SASUSEKERBNAME environment variable. Forexample, you might use this environment variable in either of the followingcircumstances:
• The metadata server is on Windows, the workspace server is on UNIX, both areusing IWA, and you don’t want to store two logins for each user.
• You need to distinguish between two different users, in two different Kerberosrealms, who happen to have the same sAMAccountName name (for example,[email protected] and [email protected]).
See “Windows User ID Formats” on page 20.
Forcing Kerberos (Windows-Only)If you choose to use the SAS implementation of Integrated Windows authentication(IWA), and you need to ensure that the Kerberos protocol is always used, complete thefollowing instructions. These instructions assume that you have already fully configuredIWA.
Note: You can't use Windows local accounts with this configuration, because thoseaccounts can't use Kerberos.
1. Specify -secpackagelist "Kerberos" in your equivalent of the followinglocations:
• SAS\Config\Lev1\SASMeta\MetadataServer\sasv9_usermods.cfg(for the metadata server)
• SAS\Config\Lev1\SASApp\OLAPServer\sasv9_usermods.cfg (if youneed to support direct IWA connections to an OLAP server on Windows)
• SAS\Config\Lev1\ObjectSpawner\ObjectSpawner.bat (if the objectspawner is on Windows). If the spawner runs as a service, complete these steps:
1. From the Windows Start menu, select Programs ð SAS ð SASConfiguration ð <Level> ð Object Spawner – Stop.
2. From the object spawner's configuration directory, enter the following:
ObjectSpawner.bat -remove
How to Configure Integrated Windows Authentication 141

3. Add the -secpackagelist "Kerberos" setting to the SetCMD_OPTIONS= line of ObjectSpawner.bat. Also, make sure that the -sspisetting is present.
4. To reinstall the spawner service, enter the following:
ObjectSpawner.bat -install
2. Make sure that the workspace server’s metadata definition includes only Kerberosin the Security package list field. This setting is located in SAS ManagementConsole, on the Plug-ins tab, under Server Manager. The setting is on the Optionstab of the logical workspace server definition.
Note: If the workspace server is on Windows and accesses network resources (suchas UNC pathnames or IWA connections to databases), you must also mark theaccount under which the spawner runs as trusted for delegation. See“Windows Privileges” on page 18.
3. Restart the metadata server.
T I P In general, it is not necessary to also change the default IWA setting in client-side connection profiles. If a server accepts only Kerberos, then clients with thedefault setting of Negotiate (and both Kerberos and NTLM in the security packagelist) use Kerberos. However, in some circumstances, the client's Windows systemchooses to initiate communication using NTLM and is unable to comply with theserver requirement by switching to Kerberos. For example, if the client and serverare on the same machine, the client chooses NTLM. In these circumstances, youmust adjust the client-side settings to specify only Kerberos.
T I P It is not necessary to force use of Kerberos on UNIX, because IWA on UNIXsupports only the Kerberos protocol.
Using Custom SPNsNote: The most common reason for using a custom SPN is to support SAS servers that
use DNS aliases. If your SAS servers are configured using DNS aliases, you mustmanually register those aliases (as both SAS/DNSalias andSAS/DNSalias.fully.qualified) in order to support Kerberos-based IWA connections.
If you need to use a service principal name (SPN) that differs from the standardgenerated SPN, review the following information.
In a standard configuration on Windows, SAS servers automatically register their SPNas SAS/machine (for example, SAS/machineA.na.company.com). Clients canconstruct the default SPN (because they know the format and machine name), so youdon't have to explicitly provide the SPN.
If you need to use a custom SPN on Windows:
1. Use the Microsoft tool setspn. For example: setspn -A customValue myServer.This code registers customValue as the SPN for all servers that run as services underthe Local System account on a machine that is named myServer. You must be aWindows domain administrator in order to use the setspn command.
2. Make sure that all client-side connection profiles and the logical workspace serverdefinition (if applicable) specify the new customValue in the SPN field.
On UNIX, the SPN that is used must be listed in the keytab file. In addition to runningsetspn to set a custom SPN, and making sure that client connection profiles use thatcustom SPN, you must generate a new keytab file that includes the new SPN. See the
142 Chapter 11 • Authentication Tasks

chapter "Configuring Integrated Windows Authentication" in Configuration Guide forSAS Foundation for UNIX Environments at http://support.sas.com/documentation/installcenter .
About IWA to the OLAP ServerIn the standard configuration, the OLAP server supports IWA for direct connections (forexample, from an open OLAP client that uses an OLE DB Provider for OLAP). Thissupport is similar to the metadata server’s support of IWA for direct connections fromSAS desktop clients. In both cases, client-side connection information must request thatIWA is used.
Note: In the platform, most connections to the OLAP server are metadata-aware, notdirect (the client first connects to the metadata server and then connects to the OLAPserver, rather than initially connecting to the OLAP server). Metadata-awareconnections to the OLAP server use SAS token authentication (they do not useIWA).
About IWA from Web ApplicationsThe SAS implementation of IWA is for desktop applications only. Web applications(such as SAS Web Report Studio) can use IWA if they are configured for Webauthentication and the Web application server supports IWA. See the instructions foryour Web application server at support.sas.com/resources/thirdpartysupport.
Reference: Supported Protocols for IWAIWA requires agreement between client and server about which security protocol to usewhen exchanging authentication packets. The following table provides details:
Table 11.7 Integrated Windows Authentication Settings
ServerSetting Associated Requirements
Negotiatesecuritypackage
• The client must select the Negotiate security package.
• The server must have a security package list. By default, servers have a security package list that offersthe Kerberos and NTLM protocols.
• At least one of the protocols in the server's security package list must be offered by the client.
• At least one of the protocols that are offered by both parties must actually be supported by both parties.The NTLM protocol is not supported on UNIX.
• The Kerberos protocol can be used only if the client knows the server's SPN, as explained in thefollowing row.
How to Configure Integrated Windows Authentication 143

ServerSetting Associated Requirements
Kerberossecuritypackage
• The client must select the Kerberos security package.
• Both client and server must actually support the Kerberos protocol.
• The client must know the server's service principal name (SPN). In a standard configuration, this istransparent. Clients expect (and know how to construct) a default SPN in the format SAS/machine (forexample, SAS/machineA.na.company.com), so you don't have to explicitly provide the SPN.
Note: For a server on UNIX, the machine value must be specified as a fully qualified domain name(FQDN). For a server on Windows, you can instead specify the machine’s NetBIOS name, but theFQDN is preferred (because a NetBIOS name is not guaranteed to be unique).
NTLMsecuritypackage
• The client must select the NTLM security package.
• Both client and server must actually support the NTLM protocol. The NTLM protocol is not supportedon UNIX.
How to Store Passwords for the WorkspaceServer
Note: This is one of several solutions to a mixed provider situation (and it is not apreferred approach). See “Mixed Providers” on page 99.
1. Log on to SAS Management Console as someone who has user administrationcapabilities (for example, sasadm@saspw).
2. On the Plug-ins tab, expand Server Manager, the application server (forexample, SASApp) and the logical server (for example, SASApp - LogicalWorkspace Server).
(Optional) Right-click the logical server, select Properties, and select the Optionstab. Make sure that the Authentication service is set to use Host with Username/Password. Click OK to close the dialog box and return to Server Manager.
3. Below the logical server , select the server (for example, SASApp -Workspace Server).
4. In the display panel, right-click the server's connection object and selectProperties.
5. On the Options tab, notice the value in the Authentication domain drop-down list.If the value is something other than DefaultAuth, proceed to step 6. Otherwise,complete these steps:
a. Next to the Authentication domain drop-down list, click New.
b. In the New Authentication Domain dialog box, enter a name such as UNIXAuthor WorkspaceAuth (you can use any name that is meaningful to you). ClickOK.
c. On the Options tab, make sure the new authentication domain is selected in theAuthentication domain drop-down list. Click OK.
6. Create a SAS copy of credentials that are known to the workspace server's hostoperating system. In most cases, you will store shared credentials in a group's
144 Chapter 11 • Authentication Tasks

metadata definition. You can also store a unique set of individual credentials in eachuser's metadata definition. Each login must be assigned to the workspace server'sauthentication domain. Each login must include both a user ID and a password.
For example, for a workspace server on UNIX:
UNIXAuth | myID | mypassword
For example, for a workspace server on Windows:
WINAuth | Win\myID | myWINpassword
If you store credentials for a workspace server that runs on Windows, give users theWindows privilege Log on as a batch job.
Note: If you don't store the passwords, users are prompted for such credentials whenthey make a request that requires access to the workspace server. Only desktopapplications and SAS Web Report Studio provide such secondary logon prompts.
Note: Do not instead leave the workspace server in DefaultAuth and move inboundlogins to some other authentication domain. Failure to follow this recommendationwon't affect the initial logon process, but it will interfere with access to theworkspace server. By default, all clients insert the credentials that a user submits atthe logon prompt into that user's context as a DefaultAuth entry. This cachedDefaultAuth entry has priority over any DefaultAuth credentials that are retrievedfrom logins in the metadata.
See Also• “Credential Management” on page 110
• “How Logins Are Used” on page 103
• “Windows Privileges” on page 18
How to Store Passwords for a Third-Party ServerNote: Use these instructions to provide seamless access to a third-party server that uses
a proprietary authentication provider (for example, Oracle). These instructionsassociate the database logins with a user or group, not directly with a databaselibrary.
1. Verify that the third-party server is registered in the metadata and is in its ownauthentication domain.
a. Select the third-party server's definition under Server Manager on the Plug-instab in SAS Management Console.
b. In the display panel, right-click the server's connection object and selectProperties. The server's authentication domain assignment is on the Options tab.
2. In the server's authentication provider, identify or create accounts. Use any of thefollowing approaches (here, Oracle is used as an example):
• Create an individual Oracle account for each user. This provides the greatestaccountability, but can also necessitate storing many Oracle user IDs andpasswords in the metadata.
How to Store Passwords for a Third-Party Server 145

• Create one Oracle account that all users will share. This greatly reduces the needto store Oracle user IDs and passwords, but also results in a loss of individualaccountability.
• Create a few Oracle accounts, each of which will be shared by several users. Thismiddle-of-the-road approach enables you to make some access distinctions inOracle and store only a few Oracle user IDs and passwords in the metadata.
3. In the metadata, store the user IDs and passwords for each account as follows (here,Oracle is used as an example):
• If you created individual accounts on the Oracle server, add an Oracle login toeach user definition.
• If you created one shared account on the Oracle server, identify or create a groupthat contains the users who will access the Oracle server. Give that group a loginthat includes the user ID and password for the Oracle shared account.
Note: If you want to provide access for all registered users, give the login to theSASUSERS group.
Note: If you want to provide access for all users (including users who do nothave an individual SAS identity), give the login to the PUBLIC group.
• If you created several shared accounts on the Oracle server, identify or create auser group in the metadata for each shared account. Give each group a login forthe Oracle server, and assign each user who connects to Oracle to one of thegroups.
Assign these logins to the third-party server's authentication domain. Store both anID and a password in each login.
For example, for an Oracle server:
OracleAuth | myORAid | myORApassword
Note: If you don't store the passwords, users of desktop applications are promptedfor such credentials when they make a request that requires access to the server.SAS Web Report Studio has an interactive password management feature. OtherWeb applications don't support interactive logons to secondary servers.
See Also• “Credential Management” on page 110
• “How Logins Are Used” on page 103
How to Change Internal Account Policies
Server-Level Policies
Initial Server-Level PoliciesHere are the initial server-level policies for internal accounts:
• Accounts don't expire and aren't suspended due to inactivity.
• Passwords must be at least six characters, don't have to include numbers or mixedcase, and don't expire.
146 Chapter 11 • Authentication Tasks

• The five most recent passwords can't be reused.
• After three failed attempts to log on, an account is locked for one hour. Anadministrator can unlock the account by accessing the Accounts tab in the user'sdefinition in SAS Management Console.
• A forced password change occurs on first use and after a password is reset. Thispolicy applies only to accounts with passwords that periodically expire. By initialpolicy, passwords don't expire, so forced password changes don't occur.
Syntax for the InternalAuthenticationPolicy ElementTo change the server-level policies, edit the InternalAuthenticationPolicyelement in the metadata server's omaconfig.xml file, and then restart that server.
Here is the syntax for each policy option:
Note: The following option names are case-sensitive.
Note: A value of T has aliases (1 or Y). A value of F has aliases (0 or N).
ChangeDelayInMinutes="number"specifies the number of minutes that must elapse between password changes. Appliesonly when you are resetting your own password.
DigitRequired="T | F"specifies whether passwords must include at least one digit. To enforce thisrequirement, specify T.
ExpirationDays="number"specifies the number of days after password is set that the password expires. A valueof 0 prevents passwords from expiring.
ExpirePasswordOnReset="T | F"specifies whether a forced password change occurs on first use and after anadministrative password reset. To disable this requirement, specify F.
HashPasswords="SHA256 | MD5"specifies how the internal account password is stored in the metadata.
SHA256 the SHA-256 hash function is used. SHA (secure hash algorithm) isFIPS (Federal Information Processing Standard) compliant. If youhave SAS/SECURE, this is the default.
MD5 MD5 hashing is used. MD5 (message digest algorithm 5) isappropriate for preventing accidental exposure of information. If youdon't have SAS/SECURE, this is the default.
CAUTION:Passwords that are stored in SHA-256 format become unusable andinaccessible if SAS/SECURE is unavailable. If you use SAS/SECURE, it isimportant to keep your SAS/SECURE license current. If you choose todiscontinue use of SAS/SECURE, you must revert all stored internal accountpasswords to MD5 format before you uninstall the software. To revertpasswords, set HashPasswords="MD5", restart the metadata server, andupdate the password in every internal account.
MinLength="number-of-characters"specifies the minimum length for passwords.
MixedCase="T | F"specifies whether passwords must include at least one upper case letter and at leastone lower case letter. To enforce this requirement, specify T.
How to Change Internal Account Policies 147

NumPriorPasswords="number"specifies the number of passwords that are maintained in each account's passwordhistory. A user can't reuse a password that is in the user's account history.
InactiveDaysToSuspension="number"specifies the number of days after which an unused account is suspended. A value of0 prevents suspensions due to inactivity.
LockoutDurationInMinutes="number"specifies the number of minutes for which an account is locked following excessivelogin failures.
NumFailuresForLockout="number"specifies the number of consecutive unsuccessful logon attempts that cause anaccount to be locked. We recommend that you do not specify 0, because doing socan make your system vulnerable to password guessing attacks.
Example of the InternalAuthenticationPolicy Element<OMAconfig>...<InternalAuthenticationPolicy ChangeDelayInMinutes="0" DigitRequired="F" ExpirationDays="0" MinLength="6" MixedCase="F" NumPriorPasswords="5" InactiveDaysToSuspension="0" LockoutDurationInMinutes="60" NumFailuresForLockout="3"/>...</OMAconfig>
Per-Account PoliciesTo override server-level policies on a per-account basis:
1. Log on to SAS Management Console as someone who has user administrationcapabilities.
2. On the Plug-ins tab, select User Manager (in the foundation repository).
3. In the display pane, clear the Show Groups and Show Roles check boxes. Right-click the user definition of the user whose SAS internal account policies you want tochange. Select Properties.
4. At the bottom of the user's Accounts tab, click Update.
5. Make changes in the Custom Settings box. Not all server-level settings can bemodified on a per-account basis.
Note: There are two distinct expiration settings. Don't confuse the accountexpiration date with the password expiration period.
Note: To minimize administrative maintenance effort for any predefined or serviceidentities that have internal accounts, don't add expiration dates to these accountsor expiration periods to these passwords.
The following table maps server-level policies to corresponding account-levelpolicies. Not all policies can be set at both levels.
Table 11.8 Internal Account Policy Mapping
Server-Level Policy Related Account Level Setting
ExpirationDays Set a custom password expiration period.
148 Chapter 11 • Authentication Tasks

Server-Level Policy Related Account Level Setting
LockoutDurationinMinutes Exempt from account lockout policy.
NumFailuresForLockout Exempt from account lockout policy.
NumPriorPasswords Exempt from password reuse policy.
T I P If you want to force a particular user to change his or her internal password afteryou create (or reset) the user's internal account, but you don't otherwise want thepassword to expire, set a custom password expiration period of 32767 days(approximately 89 years).
See Also“SAS Internal Authentication” on page 118
How to Reduce Exposure of the SASTRUSTPassword
Note: This is an advanced, optional configuration that can reduce the exposure of aprivileged service account. Consider using these instructions if the standardprotections (host protection of configuration files and encryption of the sastrustpassword in those files) is not sufficient for your environment. On hosts other thanWindows, these instructions might not provide a clear security benefit.
In the standard configuration, the OLAP server and the object spawner read the sastrustID and password from their configuration files during initialization. These componentsuse the sastrust credentials to connect to the metadata server and read the metadata thatthey use to perform their tasks. For example:
• The spawner uses the SAS Trusted User identity to read metadata about the serversthat it launches.
• The OLAP server uses the SAS Trusted User to discover schemas and cubes and toimpersonate each requesting user.
The primary reason to remove the sastrust credential from configuration files is toenhance security in a Windows environment. For sites that don't use Integrated Windowsauthentication, removing the sastrust credentials makes sense only if you prefer theexposure of using the trusted peer protocol to the exposure of storing the credentials intwo host-protected files.
Note: Another reason might be to avoid having to update the sastrust password in theconfiguration file. However, maintenance isn't usually a concern because sastrust isusually an internal account with a password that doesn't expire.
To remove the sastrust credentials from configuration files:
1. Locate the sasv9_meta.cfg file that is in your equivalent of SAS/Config/Lev1/.Make a backup copy of the file. In the original file, delete your version of these lines:
-metauser "sastrust@saspw"-metapass "{sas002}3CD4EA1E35CA49324AOC4D63"
How to Reduce Exposure of the SASTRUST Password 149

2. Locate the file metadataConfig.xml file that is in your equivalent ofSAS/Config/Lev1/ObjectSpawner. Make a backup copy of the file. In theoriginal file, delete your version of this entry:
<Login Name="Metadata Login" UserId="sastrust@saspw" Password="{sas002}3CD4EA1E35CA49324AOC4D63"/>
3. Determine which account (or accounts) are used for the connections and, onWindows, what format you should use for the account ID in the following steps. Forexample:
• On UNIX, the spawner and the OLAP server run under a designated account thatis identified during installation.
• On Windows, if these components run under the local system account, use theformat system@machine-name (if you are using trusted peer) or machine-name$@Windows-domain (if you are using IWA). Otherwise, use the usual Windowsqualified format (such as user-ID@Windows-domain).
4. To enable the spawner and the OLAP server to read the same metadata that sastrustreads, add a login such as this to the SAS Trusted User's Accounts tab in SASManagement Console:
DefaultAuth | connecting-account-ID | (no password)
If the components use different accounts, add one login for each account. Forexample:
DefaultAuth | myMachine$@myWinDomain | (no password)DefaultAuth | invoker | (no password)
You can ignore any messages about multiple logins within an authentication domain.
5. To make the connecting accounts trusted users, add their account IDs to yourequivalent of theSAS/Config/Lev1/SASMeta/MetadataServer/trustedUsers.txt file.Use the same format for the user ID that you used in step 3. For example, theupdated contents might look like this:
sastrust@saspwmyMachine$@myWinDomaininvoker
Note: The OLAP server uses its trusted user status to impersonate clients formetadata access control evaluations. The spawner uses its trusted user status todetermine which servers each requesting user is permitted to use.
6. Restart the metadata server. Verify that the spawner and the OLAP server can stillcontact the metadata server. In the metadata server log, you should see a separateconnection from each component. The connections will be either IWA (IntegratedWindows authentication) or trusted peer.
Note: If you expect IWA but instead see trusted peer, make sure the metadata serverhas -sspi in its invocation command. If you expect trusted peer but theconnection fails, make sure the metadata server has the trustsaspeer object serverparameter specified.
See Also• “Integrated Windows Authentication” on page 115
• “Trusted Peer Connections” on page 121
150 Chapter 11 • Authentication Tasks
• “Trusted User Connections” on page 123
About the Workspace Server's Options Tab
The following tips help you interpret the Options tab for a logical workspace server in SAS Management Console.
• Changes that you make on this tab take effect after you refresh the object spawner.
• Because the displayed settings are in the metadata, they can affect only metadata-aware connections.
• The Use Server Access Security check box should be selected. This enablesstandard access control enforcement for the ReadMetadata permission on the serverdefinitions.
Note: An exception is if the workspace server is configured for client-side pooling.In that case, the check box is disabled and cleared. Server access security is notsupported with client-side pooling.
• The Host with Username/Password setting specifies that credential-based hostauthentication is always used. The other security packages cause IWA to be used forclients that select IWA (unless cached or stored credentials are available).
• The Host with Username/Password setting doesn't eliminate prompting forcredentials. With this setting, all desktop applications prompt users to interactivelysupply credentials in any circumstance where credentials are needed and are nototherwise available.
• If you select SAS token authentication, you must also select a server launchcredential (on the Options tab of the server definition). Configuring a workspaceserver to use SAS token authentication can be useful in a multi-host environment.See “Mixed Providers” on page 99.
• The Host with Username/Password setting can cause SAS Enterprise Guide and theSAS Add-In for Microsoft Office to silently store user passwords in metadata. Thestorage occurs only if the workspace server is in its own authentication domain (forexample, ServerAuth) and users interactively provide credentials when they accessthat server. If both of these circumstances apply to your deployment, considerselecting Prompt instead of Host with Username/Password.
• The Prompt setting is similar to Host with Username/Password, but it forces SASEnterprise Guide and the SAS Add-In for Microsoft Office to prompt users.
See Also• “Integrated Windows Authentication” on page 115
• “SAS Token Authentication” on page 120
About the Workspace Server's Options Tab 151

152 Chapter 11 • Authentication Tasks

Chapter 12
Server Configuration, DataRetrieval, and Risk
About This Chapter . . . . . . . . . . . . . . . . . . . . . . . . . . . . . . . . . . . . . . . . . . . . . . . . . . 153
Identity Passing . . . . . . . . . . . . . . . . . . . . . . . . . . . . . . . . . . . . . . . . . . . . . . . . . . . . . . 154About Identity Passing . . . . . . . . . . . . . . . . . . . . . . . . . . . . . . . . . . . . . . . . . . . . . . 154How SAS Servers Preserve Identity . . . . . . . . . . . . . . . . . . . . . . . . . . . . . . . . . . . . 154
Launch Credentials . . . . . . . . . . . . . . . . . . . . . . . . . . . . . . . . . . . . . . . . . . . . . . . . . . 155About Launch Credentials . . . . . . . . . . . . . . . . . . . . . . . . . . . . . . . . . . . . . . . . . . . 155Criteria for a Designated Launch Credential . . . . . . . . . . . . . . . . . . . . . . . . . . . . . 156How to Create and Designate a New Launch Credential . . . . . . . . . . . . . . . . . . . . 158Who Can Launch a Standard Workspace Server? . . . . . . . . . . . . . . . . . . . . . . . . . 159
Host Access to SAS Tables . . . . . . . . . . . . . . . . . . . . . . . . . . . . . . . . . . . . . . . . . . . . . 159Direct Access versus Mediated Access . . . . . . . . . . . . . . . . . . . . . . . . . . . . . . . . . 159Managing the Risks of Mediated Host Access . . . . . . . . . . . . . . . . . . . . . . . . . . . . 161Example: Multiple Levels of Host Access . . . . . . . . . . . . . . . . . . . . . . . . . . . . . . . 162
Choices in Workspace Server Pooling . . . . . . . . . . . . . . . . . . . . . . . . . . . . . . . . . . . 164About Workspace Server Pooling . . . . . . . . . . . . . . . . . . . . . . . . . . . . . . . . . . . . . 164Benefits and Risks of Server-Side Pooling . . . . . . . . . . . . . . . . . . . . . . . . . . . . . . . 164Which Requests Are Eligible to Use Pooling? . . . . . . . . . . . . . . . . . . . . . . . . . . . . 166Which Eligible Requests Actually Use Pooling? . . . . . . . . . . . . . . . . . . . . . . . . . . 166Modifying the Initial Pooling Configuration . . . . . . . . . . . . . . . . . . . . . . . . . . . . . 168
About This ChapterThis chapter explains how SAS servers retrieve SAS data for requesting users. Forhigher security environments, especially sites that need to provide secure access to SAStables (data sets), this is essential information.
The central point of the chapter is that different servers retrieve SAS files from theoperating system under different host identities. If you understand the underlying factorsand relationships, you can make informed choices about data retrieval and risk. Thediscussion is organized as follows:
• “Identity Passing” on page 154 introduces the concept of preservation of useridentity and outlines the behavior of each type of server.
• “Launch Credentials” on page 155 explains how a server's host identity is specifiedand how you can assign a different account to a server.
• “Host Access to SAS Tables” on page 159 explains the risk of direct access thatbypasses metadata controls and the concept of mediated access.
153

• “Choices in Workspace Server Pooling” on page 164 describes benefits and risks ofserver configurations that are used when relational information maps are processed.
Identity Passing
About Identity PassingWhen a request is passed from one system to another, it is often preferable that therequesting user identity is passed along with the request. This provides individualizedaccess control evaluations and individual accountability in the receiving system. Hereare a few examples:
• When a stored process server is launched, it has to use some SAS identity to contactthe metadata server in order to discover any pre-assigned libraries.
• When a user opens a SAS folder that contains cubes, the OLAP server has to usesome SAS identity to contact the metadata server to determine which cubes to showto that user.
• When a workspace server fetches SAS data from the operating system, it has to usesome host identity to authenticate to the operating system and request the SAS dataset files.
In each example, the identity that is used affects the outcome (for example, whichlibraries are available, which cubes are visible, or which data files are returned).
How SAS Servers Preserve IdentityThe following table provides details about how SAS servers preserve identity.
Table 12.1 Preservation of User Identity
ServerSAS Identity for Metadata LayerEvaluations
Host Identity for Host LayerEvaluations
OLAP server The SAS Trusted User. However, useridentity is preserved because thisprivileged service identity impersonateseach requesting user.*
The server's host identity. This affectsdrilling to detail if the underlying datais in SAS tables.
Stored process server Each requesting user's SAS identity.The exception is for library pre-assignment, which happens under theserver identity.**
The server's host identity (the multi-user credential).
Workspace server (using any form ofhost authentication)
The SAS identity of the server. This isthe same as the SAS identity of therequesting user or group.
The server's host identity (the hostidentity of the requesting user orgroup).***
Workspace server (using SAS tokenauthentication)
Each requesting user's SAS identity. The server's host identity (the launchcredential).
Pooled workspace server Each requesting user's SAS identity. The server's host identity (the launchcredential).
154 Chapter 12 • Server Configuration, Data Retrieval, and Risk

ServerSAS Identity for Metadata LayerEvaluations
Host Identity for Host LayerEvaluations
Client-pooled workspace server The SAS identity of the server.However, SAS Web Report Studio pre-processes requests based on eachrequesting user's SAS identity.
The server's host identity (the puddlelogin).
* Except for retrieval of DBMS credentials, which happens under the SAS Trusted User's identity. This affects drilling to detail if theunderlying data is in a third-party DBMS.
** The requesting user isn't known at the time that library pre-assignment happens (during server initialization).*** Each server process instance is launched on-demand and runs under the host identity of the requesting user (or group, if authentication
is via stored group logins).
Note: You can directly specify which identity to use on a connection to the metadataserver (for example, with METAUSER and METAPASS). You can directly specifywhich identity to use on a connection to a host (for example, by providing explicitcredentials in your code).
In the preceding table, notice that although metadata layer evaluations are almost alwaysindividualized (for example, "Does Joe have metadata layer permission to see this storedprocess?"), physical layer evaluations are often generalized (for example, "Does thesassrv account have host layer permissions for this data?").
In particular, requests from metadata-aware clients for SAS data often aren't evaluatedunder the host identity of each requesting user. The host doesn't know the user's SASidentity, so the host can't evaluate the user's operating system permissions. Instead, thehost checks the permissions of the service account that is fetching the SAS data onbehalf of the requesting user. These service accounts are referred to as launchcredentials.
See Also• “Launch Credentials” on page 155
• “Host Access to SAS Tables” on page 159
• “Choices in Workspace Server Pooling” on page 164
Launch Credentials
About Launch CredentialsWorkspace servers and stored process servers use different process instances (SASsessions) for different requests. Each process instance is launched by a spawner under ahost account as follows:
• For the stored process server, the pooled workspace server, and a standardworkspace server that uses SAS token authentication, the spawner launches processinstances under a designated service account. That account is called a launchcredential (or, sometimes, a multi-user credential) and is specified as part of theserver's metadata definition. For example, in the initial configuration, the SASSpawned Servers account (sassrv) is the only designated launch credential.
Launch Credentials 155

• For a standard workspace server that uses host authentication, the spawner launchesa new process instance on-demand for each requesting user. The server's metadatadefinition doesn't include a designated launch credential. Instead, each requestinguser's personal host account is used to launch that user's process instances. Or, if theserver is accessed using group logins, a group account might be used. As a result,only users who can authenticate to the workspace server's host can get a workspaceserver.
The following figure depicts a deployment where the sassrv account is the launchcredential for all servers that run under a designated account. The last server in the figureis shaded because it depicts a specialized configuration and can't coexist within anapplication server that includes another standard workspace server.
Figure 12.1 Example: Launch Credentials for Processing Servers
Spawner
sassrv
Pooled
Workspace
Server
Stored
Process
Server
Workspace
Server
(standard)
Workspace Server
(standard using SAS token authentication)
sassrv sassrv<user>
Note: If you use client-side pooling, the puddle login is comparable to the launchcredential.
Criteria for a Designated Launch CredentialThe Launch credentials (or Multiuser credentials) setting is available on the Optionstab for a standard workspace server that uses SAS token authentication, the storedprocess server, and the pooled workspace server.
Display 12.1 Choosing a Launch Credential
Note: In the preceding display, the values within parentheses indicate the authenticationdomain of the credential. These values aren't part of the service account ID. Forexample, the selected account ID is WIN\sassrv, not WIN\sassrv(DefaultAuth).
You should carefully select each server's launch credential for these reasons:
• Not all of the choices are viable without additional configuration.
• Each server retrieves SAS data from the operating system under the host identity ofits designated launch credential. Anyone who can use a particular server canpotentially access all of the data that is available to that server's launch credential.
156 Chapter 12 • Server Configuration, Data Retrieval, and Risk

The following list explains the choices in the launch credential list:
(None)prevents proper functioning of the server. If the Multiuser credentials or Launchcredentials drop-down list is present and enabled on the Options tab for a server
, that server is not functional when (None) is selected.
Use spawner identitycan introduce the following complications:
• On Windows, using the spawner's host identity as a launch credential causeslaunched processes to run with restricted access. For example, even if thespawner runs under the local system account, the host identity of the launchedprocess isn't a member of Windows groups such as Administrators and PowerUsers. The downgrade is necessary in order to avoid security exposures. Thedowngrade can interfere with legitimate operation of the server.
Note: In the initial configuration, a spawner on Windows runs as a service underthe local system account. You can reconfigure the spawner to run under someother account.
• In the standard configuration, the spawner's SAS identity (PUBLIC) can't launcha pooled workspace server or a stored process server. As a PUBLIC-onlyidentity, the spawner lacks the necessary grant of the ReadMetadata permissionon the server definition.
Note: One solution is to create an individual SAS identity for the spawneraccount. For example, create a user definition named SPAWNER and storethe user ID of the spawner account as a login on the Accounts tab of that userdefinition. In the initial configuration, all registered users (SASUSERS) haveReadMetadata permission for server definitions. If you narrow access, youmight have to add a grant of ReadMetadata permission on the server'sAuthorization tab for the SPAWNER user.
Note: Ensure that the server's launch credential has any necessary host access to theSAS Web Report Studio query cache library (wrstemp) and distribution library(wrsdist). See Chapter 4, “Configuring SAS Web Report Studio,” in SASIntelligence Platform: Web Application Administration Guide.
A listed login (for example, WIN\sassrv) or a login that you access by selecting Morelogins
is the standard choice. In order to successfully function as a launch credential, alogin must meet all of the following criteria:
• The login that must be visible to the spawner. All of the logins on the Accountstab of the SAS General Servers group are visible to the spawner.
Note: The SAS Trusted User is a member of the SAS General Servers group.The spawner uses the SAS Trusted User to gather the metadata informationneeded to launch servers.
• The login must include the user ID and password for an account that is known toserver's host. It doesn't matter which authentication domain the login is in.
Note: If the server is on Windows, the user ID in the login must be in a qualifiedformat (for example, WIN\serviceID).
• The login must be owned by a SAS identity that has the ReadMetadatapermission for the server definition. In the standard configuration, thisrequirement is met because the SAS General Servers group, like all otherregistered identities, has ReadMetadata permission for all server definitions.
Launch Credentials 157

However, if you choose to limit ReadMetadata permission on a server definition,you must preserve access for the SAS General Servers group.
• The login must reference an account that has host layer access to any SAS datathat it retrieves.
• If the server is on Windows, the login must reference an account that has the Logon as a batch job privilege.
Note: The login should reference a service account. This login shouldn't correspondto a real person.
Note: Ensure that the server's launch credential has any necessary host access to theSAS Web Report Studio query cache and distribution libraries.
The preceding discussion assumes that your deployment uses the standard predefinedmetadata groups and users. You can choose to configure variations (for example, createa group other than the SAS General Servers group to hold logins for launch credentials).In general, such variations aren't recommended because they unnecessarily increasecomplexity and reduce consistency.
How to Create and Designate a New Launch Credential1. Identify or create the host account.
• If the server will retrieve SAS data, make sure the host account has appropriateaccess to those files.
• If the server is on Windows, assign the Windows privilege Log on as a batchjob to the account.
2. Log on to SAS Management Console as someone who has user administrationcapabilities (for example, sasadm@saspw). Other users can't add logins to a groupdefinition or see logins that they don't own.
3. In User Manager, create a login on the Accounts tab of the SAS General Serversgroup. This login must include both a user ID and a password.
Note: If the server is on Windows, the user ID in the login must be in a qualifiedformat (for example, WIN\serviceID).
Note: You can ignore any warnings about having multiple logins in the sameauthentication domain. These logins are directly associated with servers. Theselogins aren't looked up by authentication domain.
Note: You can't reuse a login that already exists on the Accounts tab for some otheruser or group. The metadata server's integrity constraints prevent you fromassigning the same user ID to two different SAS identities.
Note: You can use the same login as a launch credential for more than one server.
Note: Users should not be members of the SAS General Servers group. This groupis for service identities only. Users don't retrieve these credentials, so usersshouldn't have access to these logins. In a standard configuration, these logins areavailable only to the privileged service identity that the spawner uses to read allserver metadata (the SAS Trusted User).
4. In Server Manager, on the server's Options tab, select the login as the server'slaunch credential (or multiuser credential).
Note: The launch credential is designated at the level of the server component ,not at the level of the logical server .
158 Chapter 12 • Server Configuration, Data Retrieval, and Risk

Note: To locate a login that isn't displayed in the drop-down list, select the Morelogins entry. Although all logins are displayed in the secondary dialog box, anylogin that isn't visible to the SAS Trusted User isn't a viable choice.
5. To make the changes take effect, re-initialize the spawner.
a. Expand the object spawner , right-click the computer , and selectConnect.
b. Right-click the computer again and select Refresh Spawner. In the message box,click Yes.
c. Right-click the computer a third time and select Disconnect.
6. Validate the server.
Who Can Launch a Standard Workspace Server?In order to launch a standard workspace server that uses any form of host authentication,a user must have access to an individual or group account that meets all of the followingcriteria:
• The account must be known to the workspace server's host. An internal account(such as sasadm@saspw) doesn't meet this requirement.
• The account must have host-layer access to any SAS data that it retrieves.
• If the server is on Windows, and the user doesn't connect through IntegratedWindows authentication, the account must have the Log on as a batch job privilege.
• If the user supplies credentials interactively (for example, at a secondary logonprompt), the account must correspond to a SAS identity that has the ReadMetadatapermission for the workspace server definition. In the initial configuration, allregistered users meet this requirement, but a PUBLIC-only identity (someone whodoesn't have a well-formed user definition) doesn't meet this requirement.
Note: If the Use Server Access Security check box on the Options tab of thelogical server is cleared, this requirement doesn't apply.
See Also• “Identity Passing” on page 154
• “Host Access to SAS Tables” on page 159
• “Choices in Workspace Server Pooling” on page 164
• “Windows Privileges” on page 18
Host Access to SAS Tables
Direct Access versus Mediated AccessA SAS table (data set) is stored as a file in a host operating system. In general, a SAStable can be directly accessed and read by anyone who has the necessary host operatingsystem permissions to that file. You can use the SAS metadata authorization layer to
Host Access to SAS Tables 159

further constrain access. However, those additional constraints apply only when the userrequests that data in a metadata-aware context.
As a simple example, assume that you have registered a library and several tables in themetadata. In SAS Management Console, you deny userA the ReadMetadata permissionfor a table named Salary. This prevents userA from seeing the Salary table in metadata-aware applications. However, if userA has host access to the physical file that containsthe table data, userA can open that file in Base SAS and examine all of the data. Whenthe table is accessed directly, the metadata layer denial of ReadMetadata permission isn'tapplied. In the following figure, the first image illustrates the issue and introduces theconcept of mediated access.
Figure 12.2 Host Access to SAS Data
A user who has host access to SAS data
can bypass metadata layer controls.
To prevent bypass, limit host access
and provide only mediated access.
Metadata Layer Controls
Mediation
Privileged
Service Account
Metadata Layer Controls
SAS Data SAS Data
Host
Layer
Controls
With mediated access, a workspace server or stored process server retrieves SAS datafrom the host operating system using a service account called a launch credential. Theserver uses one account to retrieve data on behalf of each requesting user. Mediation isan integral part of a standard configuration as follows:
• Host access from the stored process server and the pooled workspace server isalways mediated.
• Host access from the standard workspace server is mediated if the server isconfigured to use SAS token authentication or if the server is providing client-sidepooling.
Mediation offers the following advantages:
• Mediation makes pooling of workspace servers possible. For Web applications, inparticular SAS Web Report Studio, some form of pooling (client-side or server-side)is strongly recommended for performance reasons. Both forms of pooling alwaysresult in mediated host access to SAS data.
160 Chapter 12 • Server Configuration, Data Retrieval, and Risk

• Mediation facilitates partial access to a SAS table through metadata-layer controls(for example, row-level or column-level access). Host-layer controls are at the filelevel. Such controls can grant or deny access to only an entire table.
• Mediation helps you avoid creating end-user accounts on back-end servers that hostSAS data.
CAUTION:Along with its advantages, mediation introduces some risk. If your deploymentincludes sensitive data in SAS tables, it is essential to review existing host-layercontrols and to understand the effects of mediated access.
Managing the Risks of Mediated Host AccessThe risks of mediated host access are as follows:
• Someone might obtain the service account ID and password and use thosecredentials to directly access the data.
• Someone might misuse the server in order to access data in a manner thatcircumvents metadata-layer controls.
The following table describes techniques for reducing risk. Keep in mind that there is noabsolute security and that you must balance security goals against other considerations.
Table 12.2 Alternatives for Reducing Mediation Risks
Modification Risk Reduction Notes
Use a different launch credential for eachserver. For example, configure the server-side pooled workspace server with its owndedicated launch credential.
Diversification reduces exposure for eachlaunch credential.
Recommended if youhave sensitive data inSAS tables.
Limit the availability of SAS InformationMap Studio by installing that applicationonly where it is needed.
Reduces opportunity to misuse that application. Recommended if youhave server-side pooling.
Limit the SAS folder locations from whichrelational information maps can be used.
Reduces opportunity to use a rogueinformation map, but affects only SAS WebReport Studio and SAS Web Report Viewer.
This measure is necessaryas one part of makingrow-level permissionsthat are defined ininformation maps fullysecure. See “Limit theAvailability of RelationalInformation Maps ThatImplement Row-LevelSecurity” in Chapter 5 ofSAS IntelligencePlatform: WebApplicationAdministration Guide.
Set up client-side pooling using aprotected, dedicated service account as thepuddle login.
Reduces opportunity to misuse the server bycreating a rogue application. A client-pooledworkspace server can be used from onlydesignated Web applications.
Host Access to SAS Tables 161
Modification Risk Reduction Notes
Delete the server-side pooled workspaceserver (and, for performance reasons, setup client-side pooling for SAS Web ReportStudio).
Eliminates opportunity to misuse that server (inSAS Information Map Studio or in a rogueapplication).
Set up a restricted deployment of SASWeb Report Studio with client-sidepooling.
Fully isolates the restricted client-side pool(with a dedicated pool administrator as well asa dedicated puddle login).
See Chapter 6, “SecureEnvironment for BI Row-Level Permissions,” inSAS Guide to BI Row-Level Permissions.
Example: Multiple Levels of Host AccessThe preceding figure depicts a simple case where there is only one level of host access.You can establish multiple levels of host access by setting up multiple servers, each withits own launch credential. This can involve a trade off of granularity ("how manydifferent levels of access will I establish?") against administrative effort ("how muchserver metadata will I create and manage?").
For example, the following instructions show how you can physically isolate sensitivedata that is accessed through a logical workspace server that uses SAS tokenauthentication.
1. In the operating system that hosts the SAS data:
a. Establish a separate file system directory for each level of access. This enablesyou to avoid setting host permissions on individual files. For example, toseparate HR tables, you might create an HR directory.
b. Create or identify one service account for each level of access. For example, toprovide physical protection for HR data, you might add an hrsrv account.
Note: For servers on Windows, each launch account must have the Windowsprivilege Log on as a batch job.
c. Set operating system permissions so that each account has appropriate access toyour SAS data. For example, deny the general use account (sassrv) physicalaccess to the HR data and grant the HR account (hrsrv) physical access to all data(including the HR data).
Note: If you want certain IT staff to be able to access the data directly using theirown accounts, preserve that access.
2. In SAS Management Console's User Manager, select the SAS General Serversgroup, right-click, and select the Accounts tab. For each service account that youcreated in step 1, click New and enter the service account credentials as an additionallogin for the SAS General Servers group. Include a password in each of these logins.For example, you might enter the HR login as follows:
DefaultAuth | WIN\hrsrv | password
Note: Each of these logins will be directly associated with a particular server,instead of being looked up by authentication domain. For this reason, it doesn'tmatter which authentication domain you use. You can ignore any warnings aboutthe SAS General Servers group having multiple logins in the same authenticationdomain.
162 Chapter 12 • Server Configuration, Data Retrieval, and Risk

Note: Users should not be members of the SAS General Servers group. This groupis for service identities only. Users don't retrieve these credentials, so usersshouldn't have access to these logins. In a standard configuration, these logins areavailable only to the privileged service identity (the SAS Trusted User) that thespawner uses to read all server metadata.
3. In Server Manager, select the logical workspace server , right-click, and selectProperties. On the Options tab, verify that the Use server access security checkbox and the SAS token authentication radio button are selected. Click Cancel.
4. Select the logical workspace server again, right-click, and select Add Server. Set upone additional server for each level of access. All of the servers can use the sameport. For example, you might add a server named Human Resources.
5. Beneath the logical workspace server, complete these steps for each server thatyou added:
a. Select the server, right-click, select Properties, and select the Options tab. In theLaunch credentials drop-down list, select one of the service accounts (use adifferent account for each server). For example, for the Human Resources server,you would first select More logins and then search for and select the login thatreferences the hrsrv account.
Note: In order to see this login in the list, you need user administrationcapabilities.
b. On the Authorization tab, use the ReadMetadata permission to control who canuse that server. Be sure to preserve necessary service access.
6. Under Server Manager, select the object spawner , right-click, and selectProperties. On the object spawner's Servers tab, add the new servers to the SelectedServers list.
7. To make the changes take effect:
a. Expand the object spawner , right-click the computer , and selectConnect.
b. Right-click the computer again and select Refresh Spawner. In the message box,click Yes.
c. Right-click the computer a third time and select Disconnect.
8. To validate, expand the logical workspace server and select a server . On eachconnection object in the display area, right-click and select Test Connection.Test the connections for every other sibling server that you added under thelogical workspace server.
If you want to also enable power users to access data using their own accounts, set up aseparate application server for those users. In that application server, add a logicalworkspace server that uses some form of host authentication. Even though regularusers wouldn't be able to authenticate (because they wouldn't have host accounts for theworkspace server machine), it is a good practice to limit ReadMetadata access to theadditional application server.
You can use a similar approach to set up multiple levels of host access for a storedprocess server or a server-pooled workspace server. For multiple levels of host accessfrom a client-pooled workspace server, set up multiple puddles. Always ensure that theserver's host identity meets all of the requirements for a launch credential.
Host Access to SAS Tables 163

See Also• “Launch Credentials” on page 155
• “Choices in Workspace Server Pooling” on page 164
• “Windows Privileges” on page 18
• SAS Guide to Metadata-Bound Libraries
Choices in Workspace Server Pooling
About Workspace Server PoolingThe primary purpose of pooling is to enhance performance by avoiding the time penaltythat is associated with launching all workspace servers on demand. In pooling, a set ofworkspace servers are made available to process certain types of query requests. Ingeneral, pooling is used when a relational information map is queried, processed,opened, or used indirectly (through a report).
The initial configuration in a new deployment conforms to the following generalrecommendations:
• Use server-side pooling. The initial configuration includes a logical pooledworkspace server.
• Use client-side pooling only if you have security requirements that aren't met byserver-side pooling. The initial configuration doesn't include client-side pooling.
Benefits and Risks of Server-Side PoolingServer-side pooling offers the following benefits:
• With server side-pooling, the spawner can request user-specific metadata-layeraccess evaluations, such as whether a user has permission to use a particular server.This isn't possible in client-side pooling because use of the pool administratorprevents the spawner from knowing who the requesting user is.
• With server-side pooling, you can track each request to a specific server instance.This level of auditing isn't possible in client-side pooling because use of the pooladministrator prevents the spawner from knowing who the requesting user is.
• With server-side pooling, testing of an information map in SAS Information MapStudio more closely approximates results in SAS Web Report Studio, because bothrequests can use the same server.
• With server-side pooling, allocation of server processes is managed across clients,using the spawner's load-balancing capabilities. Client-side pooling uses round-robinassignments on a per-application basis.
• A side effect of pooling is that the launched workspace servers run under adesignated service account. This side-effect is beneficial in avoiding credential gapsthat can occur when a desktop application requests a workspace server from amiddle-tier service. This benefit is not provided by client-side pooling, becauseclient-side pooling is supported only for Web applications.
Server-side pooling introduces the following risks:
164 Chapter 12 • Server Configuration, Data Retrieval, and Risk

• Someone might write a rogue application that bypasses metadata layer accesscontrols. This risk originates from the following difference in server control:
• In client-side pooling, the server is controlled by a designated Web application.Only that application can request a pooled workspace server, because only thatapplication can provide the pool administrator's credentials. No other applicationcan use (or exploit) the server.
• In server-side pooling, there is no pool administrator or alternate form ofapplication-based gatekeeping. Anyone who can use the server legitimately(from a SAS application) can also exploit that server by writing a rogueapplication that uses the server to fetch SAS tables. The security issue is thatretrieval from such an application bypasses metadata-layer controls that applywhen the same data is accessed in a legitimate manner. For example, a request inSAS Web Report Studio might be filtered by a metadata-layer permissioncondition that enables the user to see only certain rows in a data set.
Note: This exposure is also applicable to other SAS processing servers that providemediated access (standard workspace servers that use SAS token authentication,stored process servers). This exposure occurs in client-side pooling if a userobtains the pool administrator's credentials.
Note: To avoid a similar exposure, nobody is allowed to assign a stored process to aserver-side pooled workspace server.
• Someone might exploit the server-side pooled workspace server from within SASInformation Map Studio. In general, only information map creators who have hostaccess to the target data use this application. If someone else has SAS InformationMap Studio, that person could bypass metadata-layer controls when querying arelational information map from within that application.
Note: This is never a risk with client-side pooling, because client-side pooling isn'tavailable for desktop applications such as SAS Information Map Studio.
The following table summarizes the trade-offs. For completeness, the table includes acolumn for a standard workspace server that uses SAS token authentication and acolumn for a standard workspace server that uses either form of host authentication(credential-based or Integrated Windows authentication).
Table 12.3 Summary: Comparison of Workspace Server Configurations
Advantage
Pooled Not Pooled
Server-Side
Client-Side
SASToken Host
Performance and Compatibility:
Improves performance of Web applications.
Compatible with spawner-based load balancing.
Compatible with Web authentication.
Accommodates batch generation of scheduled reports.*
Fully compatible with Integrated Windows authentication.**
Choices in Workspace Server Pooling 165
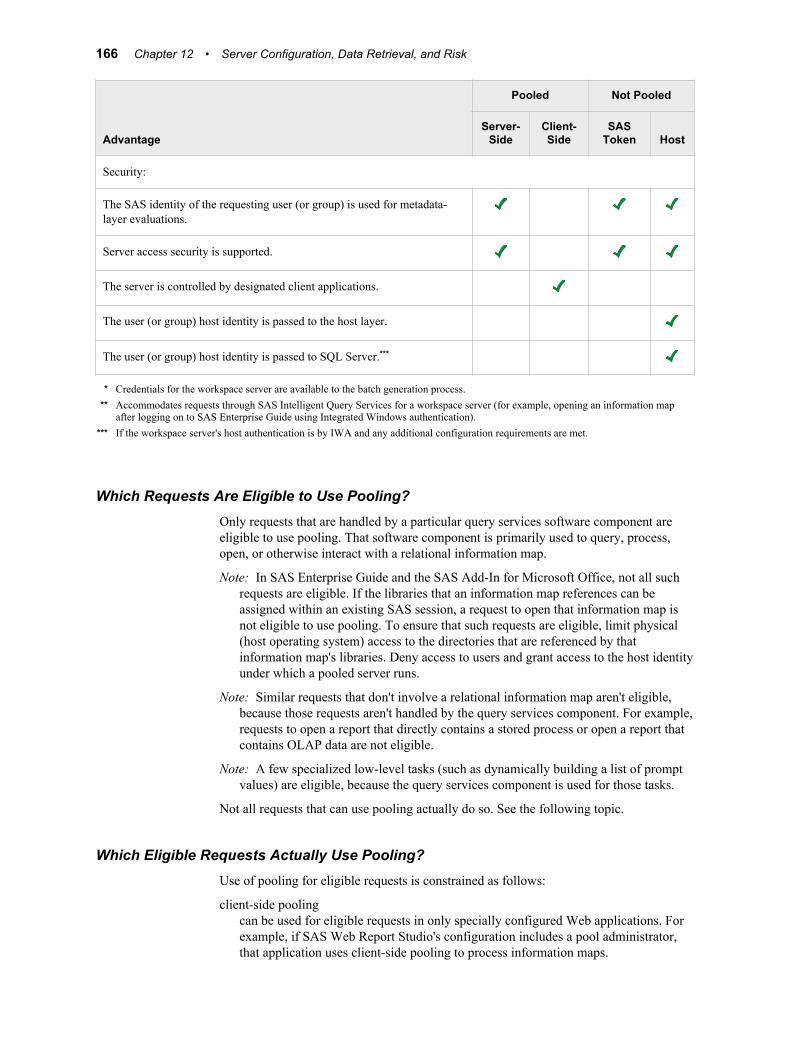
Advantage
Pooled Not Pooled
Server-Side
Client-Side
SASToken Host
Security:
The SAS identity of the requesting user (or group) is used for metadata-layer evaluations.
Server access security is supported.
The server is controlled by designated client applications.
The user (or group) host identity is passed to the host layer.
The user (or group) host identity is passed to SQL Server.***
* Credentials for the workspace server are available to the batch generation process.** Accommodates requests through SAS Intelligent Query Services for a workspace server (for example, opening an information map
after logging on to SAS Enterprise Guide using Integrated Windows authentication).*** If the workspace server's host authentication is by IWA and any additional configuration requirements are met.
Which Requests Are Eligible to Use Pooling?Only requests that are handled by a particular query services software component areeligible to use pooling. That software component is primarily used to query, process,open, or otherwise interact with a relational information map.
Note: In SAS Enterprise Guide and the SAS Add-In for Microsoft Office, not all suchrequests are eligible. If the libraries that an information map references can beassigned within an existing SAS session, a request to open that information map isnot eligible to use pooling. To ensure that such requests are eligible, limit physical(host operating system) access to the directories that are referenced by thatinformation map's libraries. Deny access to users and grant access to the host identityunder which a pooled server runs.
Note: Similar requests that don't involve a relational information map aren't eligible,because those requests aren't handled by the query services component. For example,requests to open a report that directly contains a stored process or open a report thatcontains OLAP data are not eligible.
Note: A few specialized low-level tasks (such as dynamically building a list of promptvalues) are eligible, because the query services component is used for those tasks.
Not all requests that can use pooling actually do so. See the following topic.
Which Eligible Requests Actually Use Pooling?Use of pooling for eligible requests is constrained as follows:
client-side poolingcan be used for eligible requests in only specially configured Web applications. Forexample, if SAS Web Report Studio's configuration includes a pool administrator,that application uses client-side pooling to process information maps.
166 Chapter 12 • Server Configuration, Data Retrieval, and Risk

server-side poolingcan be used for eligible requests in any application. For example, server-side poolingcan be used to process information maps from SAS Web Report Studio, SASInformation Map Studio, SAS Enterprise Guide, and the SAS Add-In for MicrosoftOffice. However, eligible requests don't use server-side pooling in the followingcircumstances:
• If a Web application has a configured pool administrator, requests from thatapplication don't use server-side pooling.
• If there is no logical pooled workspace server under a particular applicationserver , requests for resources that are assigned to that application server can'tuse server-side pooling.
• If a user doesn't have the ReadMetadata permission for the logical pooledworkspace server , requests made by that user can't use server-side pooling.
Note: If you chose to limit ReadMetadata permission for the server, be sure topreserve necessary access for service identities.
Note: If the Use Server Access Security check box on the logical server'sOptions tab is cleared, users don't need ReadMetadata permission. Thischeck box should always be selected.
The following figure summarizes the decision sequence that determines what type ofserver processes an eligible request. Most of the determinative factors can be controlledby an administrator.
Figure 12.3 Use of Pooling (Applies to Only Eligible Requests)
No
Yes Yes
No
Server-side
Pooling
Yes
Yes Yes Client-side
Pooling
Yes
No
Standard
No
Standard
No No
Standard Request is
denied
Does the originating
Web application have a
pool administrator?
Did the eligible
request originate in a
desktop application?
Is there a
logical pooled
workspace server?
Is client-side
pooling fully
configured?
Is the requesting
user in a
puddle group?
Does the requesting
user have RM for the
logical pooled server?
In the preceding figure, the bold (green) text and arrows mark the decision path in a newdeployment with the default configuration. In such a deployment, there are two logicalworkspace servers within the general-use application server (for example, SASapp):
• a server-side pooled workspace server (the Logical Pooled Workspace Server) thatis visible to all registered users.
• a standard workspace server (the Logical Workspace Server) that is not convertedto client-side pooling. There is no configured pool administrator, so client-sidepooling is not attempted.
Choices in Workspace Server Pooling 167

Modifying the Initial Pooling ConfigurationIf you are concerned about the risk that server-side pooling introduces, and that concernoutweighs the advantages of server-side pooling, consider these options:
• For a high security implementation of BI row-level permissions, you must use client-side pooling in a separate deployment of SAS Web Report Studio. You can continueto use server-side pooling in the original deployment.
• To prevent only Web applications from using server-side pooling, configure thoseapplications to use client-side pooling.
Note: In order to get the security benefit, you must set up client-side poolingcorrectly. For example, don't use the general SAS Spawned Servers credential(sassrv) as the puddle login.
• To enable information map creators to run queries under their own host identities(instead of under the launch credential of the server-side pooled workspace server),hide that server definition from those users. Someone who can't see the logicalpooled workspace server uses the standard workspace server instead.
Note: This is appropriate only if you have an information map creator who shouldn'tbe able to access all data that is available to the pooled workspace server. Thisdoesn't eliminate the risk of unauthorized use of SAS Information Map Studio bysomeone who legitimately uses the server-side pooled workspace server fromother applications.
• To completely eliminate use of server-side pooling, delete the logical pooledworkspace server. For performance reasons, we recommend that you also configureclient-side pooling for SAS Web Report Studio.
See Also• “Hide Server Definitions” on page 78
• “Host Access to SAS Tables” on page 159
• “Criteria for a Designated Launch Credential” on page 156
• Chapter 8, “Understanding Server Pooling,” in SAS Intelligence Platform:Application Server Administration Guide
168 Chapter 12 • Server Configuration, Data Retrieval, and Risk

Part 4
Encryption
Chapter 13Encryption Model . . . . . . . . . . . . . . . . . . . . . . . . . . . . . . . . . . . . . . . . . . . . . . . 171
Chapter 14Encryption Tasks . . . . . . . . . . . . . . . . . . . . . . . . . . . . . . . . . . . . . . . . . . . . . . . 177
169

170

Chapter 13
Encryption Model
Encryption Strength and Coverage . . . . . . . . . . . . . . . . . . . . . . . . . . . . . . . . . . . . . 171Two Classes of Encryption Strength . . . . . . . . . . . . . . . . . . . . . . . . . . . . . . . . . . . 171Two Contexts for Encryption Coverage . . . . . . . . . . . . . . . . . . . . . . . . . . . . . . . . . 171
Default Settings for On-Disk Encryption . . . . . . . . . . . . . . . . . . . . . . . . . . . . . . . . . 172
Default Settings for Over-the-Wire Encryption . . . . . . . . . . . . . . . . . . . . . . . . . . . 172
About SAS/SECURE . . . . . . . . . . . . . . . . . . . . . . . . . . . . . . . . . . . . . . . . . . . . . . . . . 173What Does SAS/SECURE Provide? . . . . . . . . . . . . . . . . . . . . . . . . . . . . . . . . . . . 173How Are SAS/SECURE Features Surfaced? . . . . . . . . . . . . . . . . . . . . . . . . . . . . . 174Licensing and Availability of SAS/SECURE . . . . . . . . . . . . . . . . . . . . . . . . . . . . . 175
Encryption Strength and Coverage
Two Classes of Encryption StrengthSAS offers two classes of encryption strength:
• If you have SAS/SECURE, you can use an industry-standard encryption algorithmsuch as AES. SAS/SECURE is an add-on product that is licensed separately andoffers maximum protection.
• If you don't have SAS/SECURE, you can use only the SASProprietary algorithm.SASProprietary encoding uses 32-bit keys and is appropriate for preventingaccidental exposure of information. SASProprietary is licensed with Base SASsoftware and is available in all deployments.
Two Contexts for Encryption CoverageSAS provides encryption in two contexts:
• On-disk encryption protects data at rest. The emphasis is on protection of passwords,both in configuration files and in the metadata repository.
• Over-the-wire encryption protects data while in transit. The emphasis is onprotection of credentials, but you can also choose to protect all traffic in transit.
171

See Also• “About SAS/SECURE” on page 173
• “Default Settings for On-Disk Encryption” on page 172
• “Default Settings for Over-the-Wire Encryption” on page 172
Default Settings for On-Disk EncryptionOn-disk encryption protects data at rest. The following table describes initial support:
Table 13.1 On-Disk Encryption and Encoding
Content and Context Algorithm Configuration
Login password on disk in themetadata
AES* Controlled by the STOREPASSWORDS option in themetadata server's omaconfig.xml file.
Internal account password on disk inthe metadata
SHA-256** Controlled by the HASHPASSWORDS option in themetadata server's omaconfig.xml file.
Password on disk in a configurationfile
SASProprietary If you have SAS/SECURE, you can upgrade to AES.
Most other metadata on disk None Not configurable.
SAS data sets on disk None To apply encryption, use the ENCRYPT= data set option.***
* If you don't have SAS/SECURE, SASProprietary is used.** If you don't have SAS/SECURE, MD5 is used.
*** The ENCRYPT= data set option uses a proprietary encryption algorithm that is not the same as the SASProprietary algorithm.
Note: Configuration files and metadata repository data sets should also be hostprotected.
See Also• “About SAS/SECURE” on page 173
• “Encryption Strength and Coverage” on page 171
• “Default Settings for Over-the-Wire Encryption” on page 172
• “How to Increase Encryption Strength for Passwords at Rest” on page 179
Default Settings for Over-the-Wire EncryptionOver-the-wire encryption protects data while in transit. The following table describesinitial support:
172 Chapter 13 • Encryption Model

Table 13.2 Over-the-Wire Encryption and Encoding
Content and Context Algorithm Configuration
Password in transit when a user logs on to a SASdesktop application
AES* NETENCRALG option in the metadata server'sinvocation command.
Password in transit when a user connects directlyto the OLAP server (for example, from a SASdata provider)
AES* NETENCRALG option in the server'sinvocation command.
Password in transit when a user connects to themetadata server from a Base SAS session
AES* NETENCRALG option in the server'sinvocation command. Can be affected by theMETAENCRYPTALG option in the clientsession.
Password in transit when a client retrieves a storedpassword from the metadata
SASProprietary RETURNPASSWORDS option in the metadataserver's omaconfig.xml file. If you haveSAS/SECURE, you can upgrade to AES.
Password in transit when a client sends apassword to the metadata for storage
SASProprietary Not configurable.
Other data in transit to and from SAS servers None CEL object server parameter.
Data (including passwords) in transit between aWeb browser and a Web application server
None See “Using Secure Sockets Layer (SSL) forWeb Applications ” in Chapter 3 of SASIntelligence Platform: Middle-TierAdministration Guide.
* If you don't have SAS/SECURE, SASProprietary is used.
See Also• “About SAS/SECURE” on page 173
• “Encryption Strength and Coverage” on page 171
• “Default Settings for On-Disk Encryption” on page 172
• “How to Change Over-the-Wire Encryption Settings for SAS Servers” on page 177
• “How to Increase Encryption Strength for Outbound Passwords in Transit” on page180
About SAS/SECURE
What Does SAS/SECURE Provide?SAS/SECURE makes industry-standard encryption algorithms available for use in theSAS Intelligence Platform as follows:
• SAS/SECURE enables you to provide stronger protection for data in transit than isprovided by SASProprietary encoding. This affects communications among SAS
About SAS/SECURE 173

servers and between SAS servers and SAS desktop clients. Here are the supportedalgorithms by host:
• On UNIX and z/OS, SAS/SECURE supports AES (Advanced EncryptionStandard), AES predecessors (DES and TDES), and the RC4 and RC2algorithms.
• On Windows, SAS/SECURE supports algorithms that are included in theMicrosoft Cryptographic API.
• SAS/SECURE enables you to provide stronger protection for stored login passwordsthan is provided by SASProprietary encoding. This affects both passwords that arestored in the metadata and passwords that are included in configuration files. Theonly supported industry-standard algorithm for stored passwords is AES (SAS003).
• SAS/SECURE enables you to provide stronger protection for stored internal accountpasswords (SHA-256 hashing instead of MD5).
• If you have SAS/SECURE, you can force it to use only services that are part of theFederal Information Processing Standard (FIPS) 140-2 specification. This featurecan be enabled during installation, and is configured through a new SAS systemoption (ENCRYPTFIPS). See “SAS/SECURE FIPS 140-2 Compliant Installationand Configuration” in Chapter 1 of Encryption in SAS.
Note: When ENCRYPTFIPS is on, SAS/SECURE uses only FIPS-validatedencryption algorithms. For example, in the current release, when ENCRYPTFIPSis on, the value for NETENCRYPTALGORITHM must be AES.
CAUTION:Passwords that are stored in SAS003 format (or with SHA-256 hashing) becomeunusable and inaccessible if SAS/SECURE is unavailable. If you useSAS/SECURE, it is important to keep your SAS/SECURE license current. If youchoose to discontinue use of SAS/SECURE, you must revert all stored passwords tothe less secure format before you uninstall the software. To revert login passwords,set STOREPASSWORDS="SAS002", restart the metadata server, and use SASManagement Console to re-enter passwords in any logins that need to includepasswords. To revert internal account passwords, set HashPasswords="MD5",restart the metadata server, and update the password in every internal account.
Note: In the SAS Intelligence Platform, SAS/SECURE provides only encryptionfeatures. Other security features (such as metadata authorization, single sign-on, anduse of SSL by SAS applications that run in a third-party Web application server) arenot related to SAS/SECURE.
How Are SAS/SECURE Features Surfaced?SAS/SECURE isn't an interactive software product (like SAS Management Console) ora product that has its own SAS language elements (like SAS/ACCESS). In the SASIntelligence Platform, SAS/SECURE features are surfaced as follows:
• In server invocation commands, the NETENCRALG option supports values otherthan SASProprietary only if you have SAS/SECURE.
• In SAS Management Console, server encryption algorithm values other thanSASProprietary are supported only if you have SAS/SECURE.
Note: All algorithms are listed regardless of whether you have SAS/SECURE. Donot select a value other than SASProprietary unless you have licensedSAS/SECURE. Use the same algorithm and level on all servers.
174 Chapter 13 • Encryption Model

• In the PWENCODE procedure, the METHOD option supports the SAS003 value(AES) only if you have SAS/SECURE.
• In the RETURNPASSWORDS and STOREPASSWORDS options in the metadataserver's omaconfig.xml file, the SAS003 value (AES) is supported only if you haveSAS/SECURE.
• In the HASHPASSWORDS option in the metadata server's omaconfig.xml file, theSHA256 value is supported only if you have SAS/SECURE.
Licensing and Availability of SAS/SECURELicensing and availability for SAS/SECURE is as follows:
• Although SAS/SECURE is automatically included in all deployment plan files thatinclude Base SAS, SAS/SECURE is not licensed as part of Base SAS.SAS/SECURE requires a separate license on each SAS server machine. Client-sidelicenses are not needed.
• Availability of SAS/SECURE is subject to import and export restrictions. Somecountries have import restrictions on products that contain encryption. The U.S. hasexport restrictions on products that contain encryption.
• SAS/SECURE is not supported on VMS.
See Also• “Encryption Tasks” on page 177
• Encryption in SAS
About SAS/SECURE 175

176 Chapter 13 • Encryption Model
Chapter 14
Encryption Tasks
How to Change Over-the-Wire Encryption Settings for SAS Servers . . . . . . . . . 177Automatic Configuration . . . . . . . . . . . . . . . . . . . . . . . . . . . . . . . . . . . . . . . . . . . . 177Instructions for Post-Installation Changes . . . . . . . . . . . . . . . . . . . . . . . . . . . . . . . 177Details about NETENCRALG and CEL . . . . . . . . . . . . . . . . . . . . . . . . . . . . . . . . 178
How to Increase Encryption Strength for Passwords at Rest . . . . . . . . . . . . . . . . 179
How to Increase Encryption Strength for Outbound Passwords in Transit . . . . . 180About Outbound Passwords and Over-the-Wire Encryption . . . . . . . . . . . . . . . . . 180Upgrade to RETURNPASSWORDS=SAS003 . . . . . . . . . . . . . . . . . . . . . . . . . . . 180RETURNPASSWORDS=SAS003 and Compatibility . . . . . . . . . . . . . . . . . . . . . . 181Accommodating Connections That Can't Use SAS003 Passwords . . . . . . . . . . . . 181
How to Configure SSL between the Metadata Server and an LDAP Server . . . . 182
How to Change Over-the-Wire EncryptionSettings for SAS Servers
Automatic ConfigurationWhen you install the metadata server, you select an encryption level (which trafficcontent is encrypted) and an encryption algorithm (how that traffic is encrypted). Thesettings that you select for the metadata server are applied to all SAS servers. SASclients usually don't specify encryption settings; they simply conform to therequirements of the servers.
CAUTION:In the SAS Deployment Wizard, all algorithms are listed regardless of whetheryou have SAS/SECURE. Do not select a value other than SASProprietary unlessyou have licensed SAS/SECURE on all SAS server machines.
Instructions for Post-Installation ChangesIf you need to change over-the-wire encryption settings after installation is complete, usethe following instructions.
1. Update server configuration files as follows:
a. In the operating system that hosts the metadata server, navigate to yourequivalent of SAS/Config/Lev1/SASMeta/MetadataServer/.
177

• To change the algorithm, add the NETENCRALG setting that you need to thesasv9_usermods.cfg file.
• To change the encryption level, copy the entire OBJECTSERVERPARMSline from the sasv9.cfg file into the sasv9_usermods.cfg file. Then edit theCEL value in the usermods version of the file.
For example, to encrypt all traffic with AES, add these lines:
-netencralg "AES"-objectserverparms "cel=everything {other-parameters}"
On z/OS, exclude the initial hyphens and add equal signs as follows:
netencralg="AES"objectserverparms="cel=everything {other-parameters}"
Note: Do not specify a NETENCRALG value other than SASProprietary unlessyou have licensed SAS/SECURE on all SAS server machines.
b. (Optional) If your deployment offers direct connections from clients to the OLAPserver, make the same updates to that server's configuration file.
Note: The OLAP server's configuration file is in your equivalent ofSAS/Config/Lev1/SASApp/OLAPServer/.
2. Update server metadata definitions as follows:
a. In SAS Management Console, under Server Manager, select the metadataserver's definition .
Note: To get to the server definition, you must expand the application servernode and the logical server node .
b. Right-click the first connection object , and select Properties.
c. In the Connection dialog box, select the Options tab and click AdvancedOptions. Adjust the settings as necessary.
d. In the Advanced Options dialog box, select the Encryption tab.
Note: Do not select a value other than SASProprietary unless you have licensedSAS/SECURE on all SAS server machines.
Repeat the preceding steps for each server that is launched by the object spawner(the stored process server, the workspace server, and the pooled workspace server).
3. Stop, restart, and validate the servers.
T I P Only those components that can conform to a server’s encryption requirementsare able to connect to that server. Additional configuration might be necessary tomake SAS/SECURE available to other components such as SAS Remote Services orthe SAS Framework Data Server, so that they can connect. SAS/SECURE isdocumented in Encryption in SAS.
Details about NETENCRALG and CELOn direct connections, encryption is governed by the server's invocation command. Hereare details and some examples:
Note: On z/OS, the following syntax examples are slightly different. See step 1a in thepreceding topic.
178 Chapter 14 • Encryption Tasks
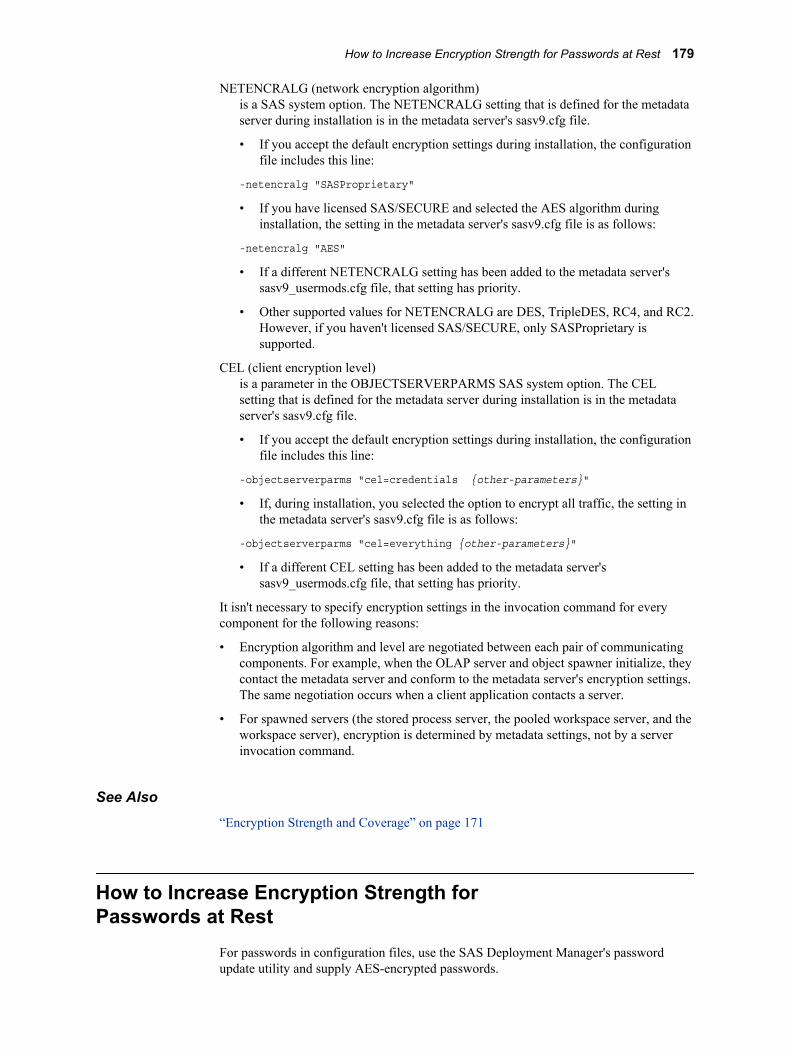
NETENCRALG (network encryption algorithm)is a SAS system option. The NETENCRALG setting that is defined for the metadataserver during installation is in the metadata server's sasv9.cfg file.
• If you accept the default encryption settings during installation, the configurationfile includes this line:
-netencralg "SASProprietary"
• If you have licensed SAS/SECURE and selected the AES algorithm duringinstallation, the setting in the metadata server's sasv9.cfg file is as follows:
-netencralg "AES"
• If a different NETENCRALG setting has been added to the metadata server'ssasv9_usermods.cfg file, that setting has priority.
• Other supported values for NETENCRALG are DES, TripleDES, RC4, and RC2.However, if you haven't licensed SAS/SECURE, only SASProprietary issupported.
CEL (client encryption level)is a parameter in the OBJECTSERVERPARMS SAS system option. The CELsetting that is defined for the metadata server during installation is in the metadataserver's sasv9.cfg file.
• If you accept the default encryption settings during installation, the configurationfile includes this line:
-objectserverparms "cel=credentials {other-parameters}"
• If, during installation, you selected the option to encrypt all traffic, the setting inthe metadata server's sasv9.cfg file is as follows:
-objectserverparms "cel=everything {other-parameters}"
• If a different CEL setting has been added to the metadata server'ssasv9_usermods.cfg file, that setting has priority.
It isn't necessary to specify encryption settings in the invocation command for everycomponent for the following reasons:
• Encryption algorithm and level are negotiated between each pair of communicatingcomponents. For example, when the OLAP server and object spawner initialize, theycontact the metadata server and conform to the metadata server's encryption settings.The same negotiation occurs when a client application contacts a server.
• For spawned servers (the stored process server, the pooled workspace server, and theworkspace server), encryption is determined by metadata settings, not by a serverinvocation command.
See Also“Encryption Strength and Coverage” on page 171
How to Increase Encryption Strength forPasswords at Rest
For passwords in configuration files, use the SAS Deployment Manager's passwordupdate utility and supply AES-encrypted passwords.
How to Increase Encryption Strength for Passwords at Rest 179

For login passwords in the metadata, AES encryption is used by default if you haveSAS/SECURE (so no configuration activity is necessary in order to maximizeprotection). For internal account passwords in the metadata, SHA-256 hashing is used bydefault (so no configuration activity is necessary in order to maximize protection).
Note: If the metadata server's omaconfig.xml file specifiesSTOREPASSWORDS="SAS002", passwords in metadata are stored inSASProprietary format (even if you have SAS/SECURE). The metadata server'somaconfig.xml file is located in your equivalent ofSAS/Config/Lev1/SASMeta/MetadataServer/.
CAUTION:Passwords that are stored in SAS003 format (or with SHA-256 hashing) becomeunusable and inaccessible if SAS/SECURE is unavailable. If you useSAS/SECURE, it is important to keep your SAS/SECURE license current. If youchoose to discontinue use of SAS/SECURE, you must revert all stored passwords tothe less secure format before you uninstall the software. To revert login passwords,set STOREPASSWORDS="SAS002", restart the metadata server, and use SASManagement Console to re-enter passwords in any logins that need to includepasswords. To revert internal account passwords, set HashPasswords="MD5",restart the metadata server, and update the password in every internal account.
See Also“Default Settings for On-Disk Encryption” on page 172
How to Increase Encryption Strength forOutbound Passwords in Transit
About Outbound Passwords and Over-the-Wire EncryptionA password is outbound when a client retrieves the password from the metadata in orderto provide seamless access to a server such as Oracle. The password is outbound fromthe perspective of the metadata server. Connections to third-party servers often useoutbound passwords. Most other connections don't use outbound passwords.
In the initial configuration, outbound passwords are transmitted in SAS002 format(SASProprietary encryption). If you have licensed SAS/SECURE, you can choose toincrease the encryption strength for outbound passwords to SAS003 (AES encryption).
Upgrade to RETURNPASSWORDS=SAS003To increase encryption strength for outbound passwords (if you have SAS/SECURE):
1. Edit the metadata server's omaconfig.xml file to change the initial setting,RETURNPASSWORDS="SAS002", to the more secure setting,RETURNPASSWORDS="SAS003". The metadata server's omaconfig.xml file islocated in your equivalent ofSAS/Config/Lev1/SASMeta/MetadataServer/.
2. Restart the metadata server.
180 Chapter 14 • Encryption Tasks
3. Verify that server connections continue to function as expected. If you encounterproblems, either review the following topics or revert toRETURNPASSWORDS="SAS002".
RETURNPASSWORDS=SAS003 and CompatibilityAlmost all connections are compatible with SAS003 passwords, because almost allconnections involve a SAS server and SAS servers can decode SAS003 passwords. Forexample, connections from SAS Information Map Studio to an Oracle server go througha workspace server. The workspace server decodes the outbound Oracle password.
However, a few specialized connections run directly from a Java client or .NET client toa third-party server. These clients can't decode SAS003 passwords. This is a deliberatelimitation that reduces security exposures. Of course, a third-party server can't decodeSAS003 passwords either. As a result, such connections fail if they attempt to use apassword that is in SAS003 format. Here are some specific types of connections thatcan't use a SAS003 password (the list isn't exhaustive):
• Connections from a Java client or .NET client to an Esri server.
Note: The Esri server uses host authentication. If possible, avoid the use ofoutbound passwords by locating this server on a machine that recognizes theaccounts with which users log on to SAS applications. This facilitates use ofcached credentials to access the Esri server.
• Connections from a Java client or .NET client to a nonstandard WebDAV server. Anonstandard WebDAV server is any server other than the SAS Content Server orXythos.
• Certain connections within the following solutions:
• SAS Profitability Management
• SAS Activity-Based Management
• SAS Merchandise Intelligence
• SAS Model Manager (in some configurations)
Accommodating Connections That Can't Use SAS003 PasswordsIf you have SAS/SECURE but your deployment requires connections that areincompatible with SAS003 passwords, choose either of the following approaches:
• Simply preserve the initial setting of RETURNPASSWORDS="SAS002".
Note: With the default settings for sites that have SAS/SECURE(STOREPASSWORDS="SAS003" and RETURNPASSWORDS="SAS002"),outbound passwords are stored in SAS003 format and downgraded to SAS002format before they are transmitted.
• Set RETURNPASSWORDS="SAS003", but also selectively force the outboundpasswords for the problematic connections to be transmitted in SAS002 format. Toforce a particular password to be transmitted in SAS002 format, store that passwordin that format. A password that is stored in SAS002 format is transmitted in thatformat even if RETURNPASSWORDS="SAS003", because the metadata serverdoesn't upgrade the encryption strength of a stored password when the password istransmitted.
To use this approach:
How to Increase Encryption Strength for Outbound Passwords in Transit 181

1. In the metadata server's omaconfig.xml file, setSTOREPASSWORDS="SAS002". Restart the metadata server.
2. In SAS Management Console, under User Manager, locate and select the loginthat contains the outbound password. The login is on the Accounts tab of a useror group definition.
3. Click Edit. In the Login Properties dialog box, enter and confirm the password.Click OK to close the Login Properties dialog box. Click OK again to close theuser or group properties dialog box.
Note: This stores the password in the metadata in SAS002 format.
4. Repeat steps 2 and 3 for any other problematic outbound passwords.
5. In the metadata server's omaconfig.xml file, setSTOREPASSWORDS="SAS003" and RETURNPASSWORDS="SAS003".Restart the metadata server.
6. Verify that server connections continue to function as expected.
Note: If you update the SAS002 passwords, you must repeat the process so that thenew password is stored in SAS002 format.
How to Configure SSL between the MetadataServer and an LDAP Server
Note: This is not a universally necessary task. The following instructions supportencryption of direct communication between the metadata server and an LDAPserver using the Secure Sockets Layer (SSL) protocol. This functionality applies toonly specialized configurations in which the metadata server directly uses an LDAPserver as an authentication provider.
1. On the LDAP server:
a. Make sure that a port is configured for SSL.
b. Examine the Client Certification setting and note its implications for your workin step 2e below.
• If the setting specifies that a client certificate is optional, step 2e below isoptional for you. This is the default setting on most LDAP servers.
• If the setting specifies that a client certificate is required, step 2e below ismandatory for you.
• If the setting specifies that a client certificate is not allowed, a clientcertificate will be ignored, so there is no reason for you to perform step 2ebelow.
2. On the metadata server:
a. If support is not already in place for direct LDAP, configure that support. See“How to Configure Direct LDAP Authentication” on page 135.
b. Make sure that the value that is specified in the LDAP_PORT (or AD_PORT)environment variable matches an SSL-configured port on the LDAP server.
c. In the same location where you set environment variables to configure themetadata server for direct LDAP, add the LDAP_TLSMODE (or
182 Chapter 14 • Encryption Tasks
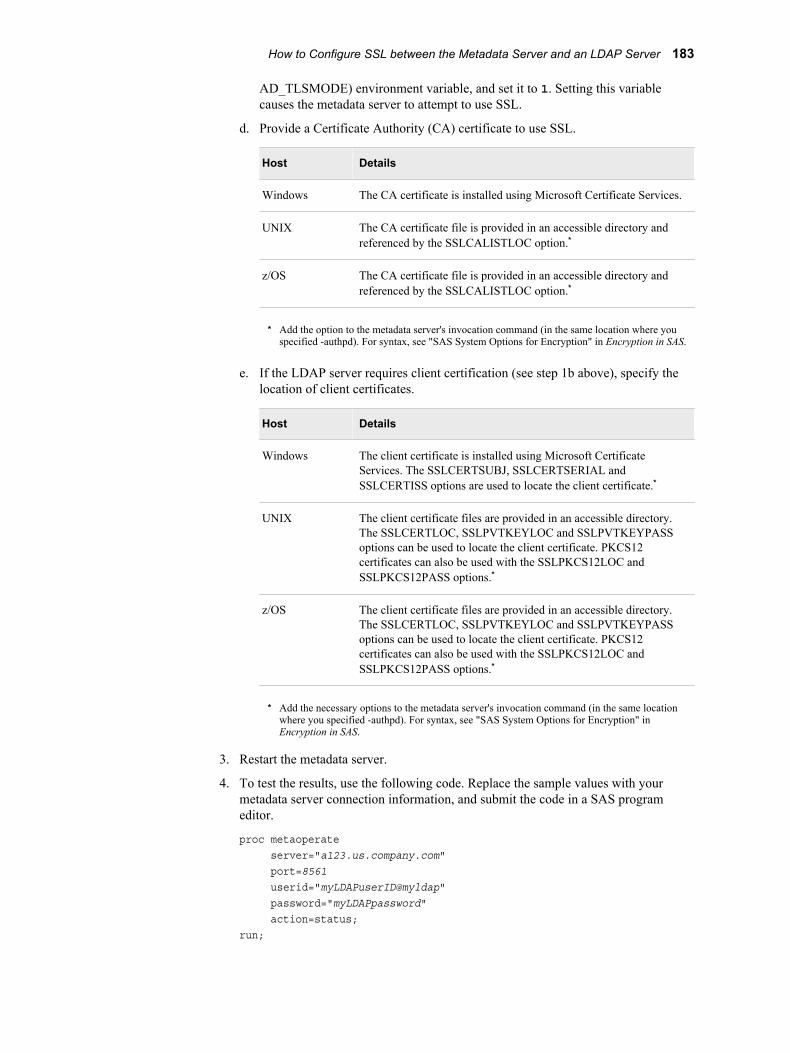
AD_TLSMODE) environment variable, and set it to 1. Setting this variablecauses the metadata server to attempt to use SSL.
d. Provide a Certificate Authority (CA) certificate to use SSL.
Host Details
Windows The CA certificate is installed using Microsoft Certificate Services.
UNIX The CA certificate file is provided in an accessible directory andreferenced by the SSLCALISTLOC option.*
z/OS The CA certificate file is provided in an accessible directory andreferenced by the SSLCALISTLOC option.*
* Add the option to the metadata server's invocation command (in the same location where youspecified -authpd). For syntax, see "SAS System Options for Encryption" in Encryption in SAS.
e. If the LDAP server requires client certification (see step 1b above), specify thelocation of client certificates.
Host Details
Windows The client certificate is installed using Microsoft CertificateServices. The SSLCERTSUBJ, SSLCERTSERIAL andSSLCERTISS options are used to locate the client certificate.*
UNIX The client certificate files are provided in an accessible directory.The SSLCERTLOC, SSLPVTKEYLOC and SSLPVTKEYPASSoptions can be used to locate the client certificate. PKCS12certificates can also be used with the SSLPKCS12LOC andSSLPKCS12PASS options.*
z/OS The client certificate files are provided in an accessible directory.The SSLCERTLOC, SSLPVTKEYLOC and SSLPVTKEYPASSoptions can be used to locate the client certificate. PKCS12certificates can also be used with the SSLPKCS12LOC andSSLPKCS12PASS options.*
* Add the necessary options to the metadata server's invocation command (in the same locationwhere you specified -authpd). For syntax, see "SAS System Options for Encryption" inEncryption in SAS.
3. Restart the metadata server.
4. To test the results, use the following code. Replace the sample values with yourmetadata server connection information, and submit the code in a SAS programeditor.
proc metaoperate server="a123.us.company.com" port=8561 userid="myLDAPuserID@myldap" password="myLDAPpassword" action=status;run;
How to Configure SSL between the Metadata Server and an LDAP Server 183

See AlsoEncryption in SAS
184 Chapter 14 • Encryption Tasks

Part 5
Appendix
Appendix 1User Import Macros . . . . . . . . . . . . . . . . . . . . . . . . . . . . . . . . . . . . . . . . . . . . . 187
Appendix 2Checklists . . . . . . . . . . . . . . . . . . . . . . . . . . . . . . . . . . . . . . . . . . . . . . . . . . . . . . 209
185

186
Appendix 1
User Import Macros
Overview of User Bulk Load and Synchronization . . . . . . . . . . . . . . . . . . . . . . . . . 187
Canonical Tables . . . . . . . . . . . . . . . . . . . . . . . . . . . . . . . . . . . . . . . . . . . . . . . . . . . . . 190
User Bulk Load . . . . . . . . . . . . . . . . . . . . . . . . . . . . . . . . . . . . . . . . . . . . . . . . . . . . . . 192Scope of the Import Process . . . . . . . . . . . . . . . . . . . . . . . . . . . . . . . . . . . . . . . . . . 192How to Import Identities . . . . . . . . . . . . . . . . . . . . . . . . . . . . . . . . . . . . . . . . . . . . . 193
User Synchronization . . . . . . . . . . . . . . . . . . . . . . . . . . . . . . . . . . . . . . . . . . . . . . . . . 193Scope of the Synchronization Process . . . . . . . . . . . . . . . . . . . . . . . . . . . . . . . . . . 193How to Synchronize Identities . . . . . . . . . . . . . . . . . . . . . . . . . . . . . . . . . . . . . . . . 194
Sample Code for User Synchronization . . . . . . . . . . . . . . . . . . . . . . . . . . . . . . . . . . 195
Sample Code for Generic Bulk Load . . . . . . . . . . . . . . . . . . . . . . . . . . . . . . . . . . . . 196
About the Sample Code for UNIX /etc/passwd . . . . . . . . . . . . . . . . . . . . . . . . . . . . 199
About the Sample Code for Active Directory . . . . . . . . . . . . . . . . . . . . . . . . . . . . . 200
Location of the User Bulk Load and Synchronization Macros . . . . . . . . . . . . . . . 202
Dictionary . . . . . . . . . . . . . . . . . . . . . . . . . . . . . . . . . . . . . . . . . . . . . . . . . . . . . . . . . . 202%MDUIMPC . . . . . . . . . . . . . . . . . . . . . . . . . . . . . . . . . . . . . . . . . . . . . . . . . . . . . 202%MDUIMPLB . . . . . . . . . . . . . . . . . . . . . . . . . . . . . . . . . . . . . . . . . . . . . . . . . . . . 203%MDUEXTR . . . . . . . . . . . . . . . . . . . . . . . . . . . . . . . . . . . . . . . . . . . . . . . . . . . . . 204%MDUCMP . . . . . . . . . . . . . . . . . . . . . . . . . . . . . . . . . . . . . . . . . . . . . . . . . . . . . . 205%MDUCHGV . . . . . . . . . . . . . . . . . . . . . . . . . . . . . . . . . . . . . . . . . . . . . . . . . . . . 207%MDUCHGLB . . . . . . . . . . . . . . . . . . . . . . . . . . . . . . . . . . . . . . . . . . . . . . . . . . . 208
Overview of User Bulk Load and SynchronizationIn order to make access distinctions and track user activity, the metadata server has toknow who is making each request. To enable the metadata server to make thisdetermination, each user's metadata definition includes that user's account ID from yourauthentication provider. The metadata server maintains its own copy of each ID. Themetadata server doesn't maintain copies of external passwords for identificationpurposes.
Note: For a few administrators, a SAS internal account can be used instead.
This chapter helps you use autocall macros and sample code that SAS provides to createyour own programs that bulk load and manage user information. The chapter emphasizes
187

coordination with an Active Directory server or UNIX /etc/passwd files but alsoprovides information to help you extrapolate to other providers.
The following figures introduce the batch processes for identity information. In thefigures, the MDU**** items are macros and the libraries contain SAS data sets.
The initial import extracts identity information from your authentication provider andloads that information into the metadata.
Figure A1.1 Initial Import (Bulk Load)
External Enterprise
Identity Source
SAS Metadata
Repository
Enterprise
Extract Library
(raw data)
Enterprise
Extract Library
source-specific
extraction code
source-specific
normalizing code
%MDUIMPC
(creates table
definitions for
canonical tables)
for example:
importad.sas
or
importpw.sas
%MDUIMPLB
(load)
The synchronization performs two extractions (one from your authentication providerand another from the SAS metadata) and then loads validated updates into the metadata.The numbers in the following figure correspond to these activities:
1. Extract information from your authentication provider.
2. Extract information from the SAS metadata.
3. Compare the two sets of tables and identify updates that need to be made to themetadata (excluding any exceptions metadata that you want to preserve).
4. Validate the changes to make sure that they won't violate the metadata server'sintegrity constraints.
5. Load the updates into the metadata.
188 Appendix 1 • User Import Macros

Note: Notice that the first part of the import process (the extraction from yourauthentication provider) is the same as the first part of the synchronization process.You will reuse your import extraction code in your synchronization program.
Figure A1.2 Periodic Synchronization
External Enterprise
Identity Source
SAS Metadata
Repository
Enterprise
Extract Library
(raw data)
Master
Library
Target
Library
source-specific
extraction code
source-specific
normalizing code
%MDUIMPC
(creates table
definitions for
canonical tables)
%MDUEXTR(extract)
12
3%MDUCMP(comparison)
4
%MDUCHGLB(load changes)
5
%MDUCHGV(integrity check)
Changes
Library
Exceptions List
Errors List
Meta
data
Update
s
The following two topics document the format of the data sets and explain howcorresponding identity entries are mapped between your authentication provider and theSAS metadata.
Overview of User Bulk Load and Synchronization 189

Canonical TablesThe following figure illustrates the names and structures for the tables in which identityinformation is stored during batch processing:
Figure A1.3 Table Structures and Relationships
grpmems
person idgrps
phone
location
logins
authdomain
keyid (foreign key)
keyid (primary key)keyid (primary key)
keyid (primary key)
grpkeyid (foreign key)
memkeyid (foreign key)emailAddr
emailType
namename
displayNamedisplayName
descriptiondescription
titlegrpType
keyid (foreign key)
keyid (foreign key)
locationName
locationType
address
city
postalcode
area
country
phoneNumber
phoneType
userid
authDomName
password
authDomKeyID (foreign key)
keyid (foreign key)
Here are some key points about the tables:
• You don't have to use all of the tables. For example, if you are not going to store e-mail addresses, you don't need an email table.
• For each table that you do use, all columns must be present. However, you don't haveto include data in every column. In the figure, the required columns for the primaryobjects are indicated with a star.
Note: Each user should have a login that includes a qualified user ID.
• The keyids in the person table (users), idgrps table (groups and roles), andauthdomain table (authentication domains) tie each of those primary objects to itsrelated information. In the metadata, the keyid value is stored as an external identity.For each keyid column, use a fixed, enterprise-wide identifier such as these:
• In the person table, consider using employee identification numbers.
• In the idgrps table, consider using group names (or LDAP Distinguished Names).
• In the authdomain table, consider using authentication domain names.
• All of the relationships between a primary object and its related data are zero-or-more relationships. For example, you can store no phone numbers, one phonenumber, or multiple phone numbers for each user.
• We recommend that you avoid using spaces or special characters in the name of auser, group, or role. Not all components support spaces and special characters inidentity names.
190 Appendix 1 • User Import Macros
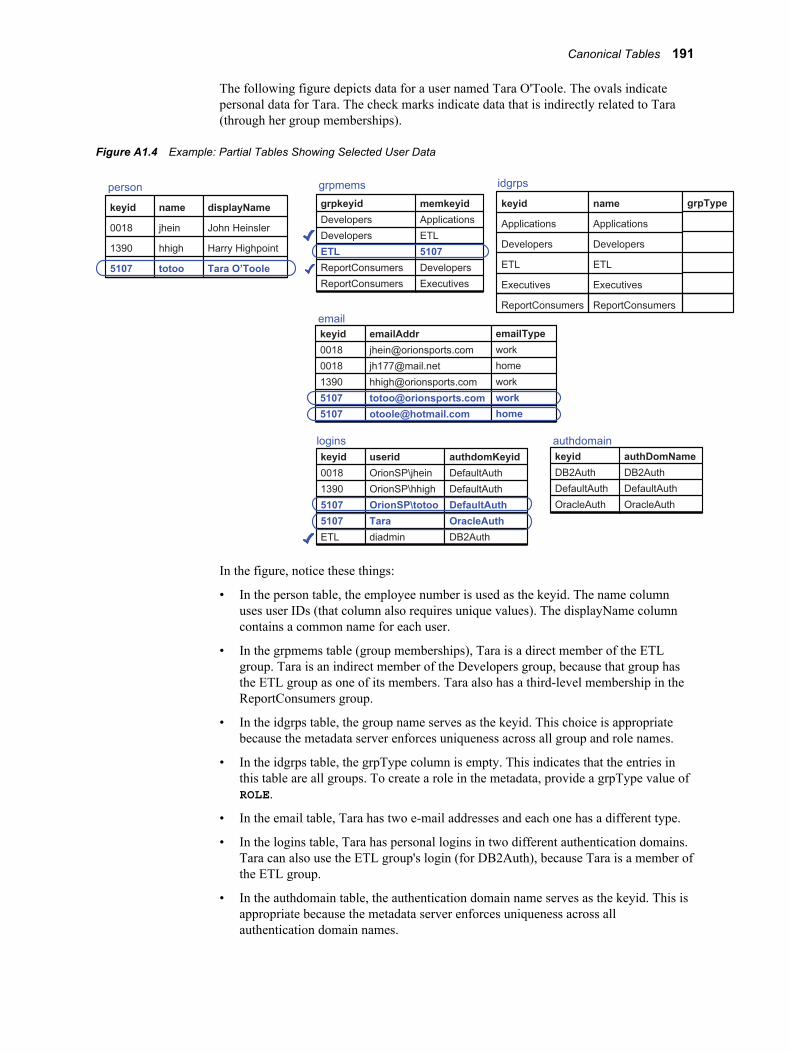
The following figure depicts data for a user named Tara O'Toole. The ovals indicatepersonal data for Tara. The check marks indicate data that is indirectly related to Tara(through her group memberships).
Figure A1.4 Example: Partial Tables Showing Selected User Data
keyid
Applications
Developers
ETL
Executives
ReportConsumers
name
Applications
Developers
ETL
Executives
ReportConsumers
idgrpsgrpmems
grpkeyid
Developers
Developers
ETL
ReportConsumers
ReportConsumers
memkeyid
Applications
ETL
5107
Developers
Executives
keyid
0018
1390
5107
name
jhein
hhigh
totoo
person
displayName
John Heinsler
Harry Highpoint
Tara O’Toole
keyid
0018
0018
1390
5107
5107
emailAddr
emailType
work
home
work
work
home
logins
keyid
0018
1390
5107
5107
ETL
userid
OrionSP\jhein
OrionSP\hhigh
OrionSP\totoo
Tara
diadmin
authdomKeyid
DefaultAuth
DefaultAuth
DefaultAuth
OracleAuth
DB2Auth
keyid
DB2Auth
DefaultAuth
OracleAuth
authDomName
DB2Auth
DefaultAuth
OracleAuth
authdomain
grpType
In the figure, notice these things:
• In the person table, the employee number is used as the keyid. The name columnuses user IDs (that column also requires unique values). The displayName columncontains a common name for each user.
• In the grpmems table (group memberships), Tara is a direct member of the ETLgroup. Tara is an indirect member of the Developers group, because that group hasthe ETL group as one of its members. Tara also has a third-level membership in theReportConsumers group.
• In the idgrps table, the group name serves as the keyid. This choice is appropriatebecause the metadata server enforces uniqueness across all group and role names.
• In the idgrps table, the grpType column is empty. This indicates that the entries inthis table are all groups. To create a role in the metadata, provide a grpType value ofROLE.
• In the email table, Tara has two e-mail addresses and each one has a different type.
• In the logins table, Tara has personal logins in two different authentication domains.Tara can also use the ETL group's login (for DB2Auth), because Tara is a member ofthe ETL group.
• In the authdomain table, the authentication domain name serves as the keyid. This isappropriate because the metadata server enforces uniqueness across allauthentication domain names.
Canonical Tables 191
User Bulk Load
Scope of the Import Process
Who Participates?In order to participate in the initial import process, an identity must meet both of thesecriteria:
• The identity must be included in the import tables. If your identity information isdistributed across several authentication providers or user registries, extractinformation from each source and then combine the resulting sets of tables into oneset of canonical tables.
To limit the import tables, you can perform these tasks:
• Define a starting point. For example, when you extract identity information fromActive Directory, you specify a Distinguished Name as the starting point. Onlyidentities that exist below that Distinguished Name in the Active Directoryhierarchy are extracted.
• Define filters. For example, when you extract identity information from ActiveDirectory, you can use a filter to extract entries only for people who are membersof a particular group.
• Make manual changes to the import tables.
• The identity must not already exist in the SAS environment. You can't import anidentity that has the same name as an identity that already exists in the metadata.
CAUTION:Do not delete existing SAS identities in order to include them in an initialimport. When you delete a SAS identity, you lose that identity's associations(such as access controls). Creating a new identity with the same name does notrestore those associations. You can incorporate a manually created identity intothe synchronization process. To do this, add an external identity on the General tabof that identity's metadata definition.
What Information Is Imported?The import process can add this information to the metadata:
• user, group, and role definitions with names, display names, descriptions, andmembership information
• job titles, contact information, and personal logins for users
Note: In most cases, passwords are not added to the metadata because they typicallycan't be extracted from an authentication provider. If passwords are present in theextracted data, they are loaded into the metadata. It usually isn't necessary toinclude passwords in logins.
Note: Synchronization can process logins for groups. The initial import process doesnot support these tasks.
• authentication domains
These constraints apply to the initial import:
192 Appendix 1 • User Import Macros

• When combined with information that already exists in the metadata, the input datamust meet uniqueness requirements. For example, you can't import an identity thathas the same name as an identity that already exists in the metadata.
• In order to import a user, group, or role, only a name and one external identity value(keyid) is required. However, each user should also have at least one login in order toestablish an individual SAS identity.
How to Import IdentitiesNote: It is a good practice to run a backup before you perform an import.
To import identity information:
1. Locate the sample code that best fits your external identity source.
• For import from Active Directory, see “About the Sample Code for ActiveDirectory” on page 200.
• For import from UNIX /etc/passwd files, see “About the Sample Code forUNIX /etc/passwd” on page 199.
• For other formats, the first step is to figure out how to extract the data from yourauthentication provider. If you have LDAP, you might be able to modify theActive Directory sample for your purposes. Otherwise, use the %MDUIMPCmacro to create empty canonical tables, and then use DATA steps to extract theinformation and insert it into those tables. See “Sample Code for UserSynchronization” on page 195.
2. Decide which attributes you want to add to the metadata. For each attribute, identifya corresponding field in your authentication provider.
3. In the SAS Program Editor, adapt the sample code. The comments in the samplecode provide essential details.
4. Submit the code and review the log.
5. In the User Manager plug-in in SAS Management Console, verify that new identitiesexist. On the General tab of an imported user, group, or role, select ExternalIdentities. You should see an external identity value that matches the identity's keyidin the import tables.
6. Save a copy of your import program for inclusion in your synchronization program.
User Synchronization
Scope of the Synchronization Process
Who Participates?By default, the synchronization process includes all identities that were originallyimported into the metadata (because by default only those identities have an externalidentity in the metadata). You can modify participation in these ways:
• To include an identity that was manually created, add an external identity on theGeneral tab of that user, group, or role definition.
User Synchronization 193

• To exclude an identity that has an external identity in the metadata, define anexception in the %MDUCMP macro.
What Information Is Updated?The synchronization process affects the metadata for participating identities as follows:
• Any identities that have been added to your authentication provider are added.
• Any new logins that have been added to your authentication provider are added. Ifpasswords are extracted from your authentication provider, those passwords areincluded in the new logins.
Note: It is typically not possible to extract passwords from an authenticationprovider.
Note: Most logins do not need to include a password.
• Any participating identities that are not found in your authentication provider aredeleted.
• By default, only logins that meet all of these criteria are deleted:
• The login belongs to a participating identity.
• The login does not exist in your authentication provider.
• The login is in an authentication domain that exists in your authenticationprovider.
Note: Logins in authentication domains that don't exist in your authenticationprovider are preserved by default.
• If the synchronization includes groups (or roles), memberships for participating SASidentities are updated to match the memberships in your authentication provider. Achange in the input grpType value (which determines whether an object is a group ora role) does not cause any update to the metadata.
• Locations, telephone numbers, and e-mail addresses for participating identities areupdated. Use exceptions to prevent updates to contact information that is addedinteractively.
• New authentication domains are added. By default, no authentication domains areremoved.
These constraints apply to updates:
• When combined with information that already exists in the metadata, the change datamust meet all of the metadata server's uniqueness requirements.
• In order to add a user, group, or role, only a name and one external identity value(keyid) is required. However, each user should also have at least one login in order toestablish an individual SAS identity.
How to Synchronize IdentitiesNote: It is a good practice to run a backup before you perform a synchronization (at
least until your program is proven).
To synchronize identity information:
1. If you want to include identities that weren't originally imported, use SASManagement Console to add a correct external identity value on the General tab ofeach such identity.
194 Appendix 1 • User Import Macros
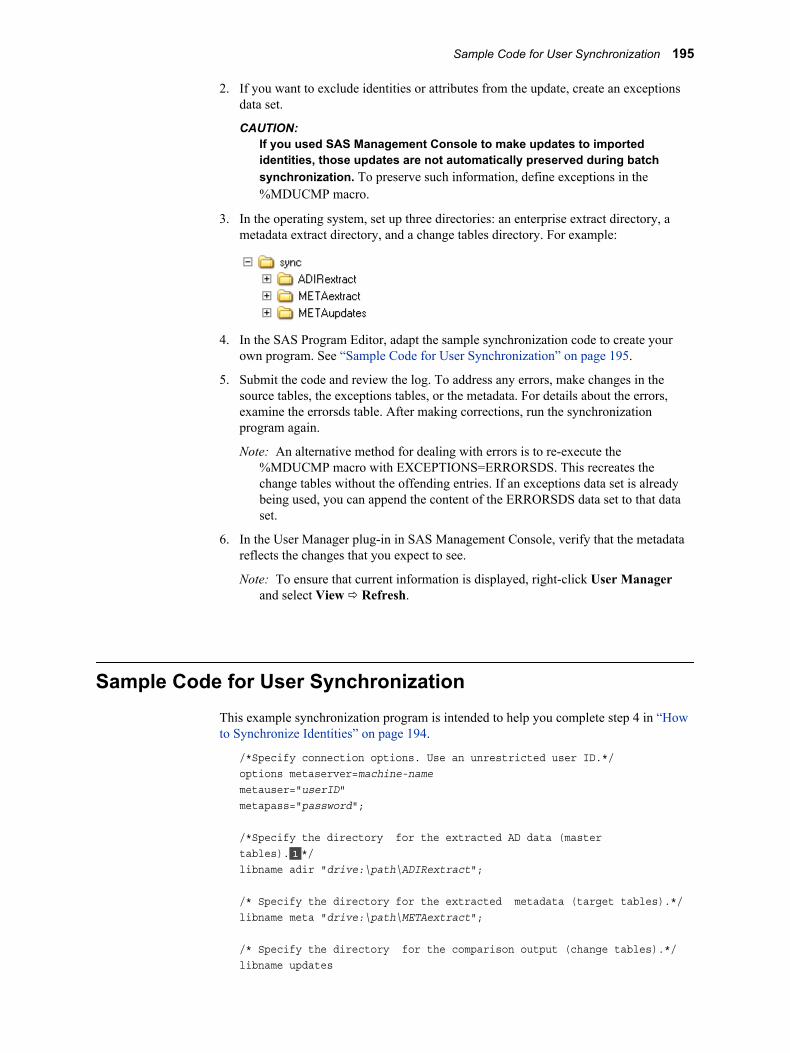
2. If you want to exclude identities or attributes from the update, create an exceptionsdata set.
CAUTION:If you used SAS Management Console to make updates to importedidentities, those updates are not automatically preserved during batchsynchronization. To preserve such information, define exceptions in the%MDUCMP macro.
3. In the operating system, set up three directories: an enterprise extract directory, ametadata extract directory, and a change tables directory. For example:
4. In the SAS Program Editor, adapt the sample synchronization code to create yourown program. See “Sample Code for User Synchronization” on page 195.
5. Submit the code and review the log. To address any errors, make changes in thesource tables, the exceptions tables, or the metadata. For details about the errors,examine the errorsds table. After making corrections, run the synchronizationprogram again.
Note: An alternative method for dealing with errors is to re-execute the%MDUCMP macro with EXCEPTIONS=ERRORSDS. This recreates thechange tables without the offending entries. If an exceptions data set is alreadybeing used, you can append the content of the ERRORSDS data set to that dataset.
6. In the User Manager plug-in in SAS Management Console, verify that the metadatareflects the changes that you expect to see.
Note: To ensure that current information is displayed, right-click User Managerand select View ð Refresh.
Sample Code for User SynchronizationThis example synchronization program is intended to help you complete step 4 in “Howto Synchronize Identities” on page 194.
/*Specify connection options. Use an unrestricted user ID.*/options metaserver=machine-namemetauser="userID"metapass="password";
/*Specify the directory for the extracted AD data (mastertables). 1 */libname adir "drive:\path\ADIRextract";
/* Specify the directory for the extracted metadata (target tables).*/libname meta "drive:\path\METAextract";
/* Specify the directory for the comparison output (change tables).*/libname updates
Sample Code for User Synchronization 195

"drive:\path\METAupdates";
/* Extract identity information from AD (master). 2 */%let _EXTRACTONLY = ; %include "drive:\path\myimportad.sas";
/* Extract identity information from the metadata (target).*/%mduextr(libref=meta);
/* Compare AD (master) to metadata (target). 3 */ %mducmp(master=adir, target=meta, change=updates);
/* Validate the change tables.*/%mduchgv(change=updates, target=meta, temp=work, errorsds=work.mduchgverrors);
/* Load the changes into the metadata. 4 */%mduchglb(change=updates);
The numbers in the preceding code correspond to these points:
1. The AD extract location should match the importlibref location in your importprogram. For example, if your original importad.sas put the normalized AD data inthe work library, you might revise importad.sas by replacing the line:
%let importlibref=work;
with these two lines:
libname adir "drive:\path\ADIRextract"; %let importlibref=adir;
2. This causes the importad.sas. program to only extract the data (and not perform theload).
3. If you need to exclude items from the comparison, add the EXCEPTIONS=datasetparameter here.
4. If you prefer to not load any changes if %MDUCHGV finds an integrity violation,replace the displayed line with this code:
%macro exec_mduchglb; %if (&MDUCHGV_ERRORS ^= 0) %then %do; %put ERROR: Validation errors detected by %nrstr(%mduchgv). Load not attempted.; %return; %end; %mduchglb(change=updates);%mend;
%exec_mduchglb;
Sample Code for Generic Bulk LoadThis code demonstrates one way to import generic identity information. This example isintended to illustrate the structure and relationships of the identity data, rather than tosuggest that you enter large quantities of data using this approach. The program usesmacro variables to define the tables and uses DATALINES statements to supply input
196 Appendix 1 • User Import Macros

data. The %MDUIMPLB macro creates XML from the tables and submits that XML (inblocks) to the metadata server.
/* Specify connection options. Use an unrestricted user ID. */options metaserver=machine-namemetauser="userID"metapass="password"; /* Initialize the macro variables that create canonical tables. */%mduimpc();
/* Create the person table. */data &persontbla ; %definepersoncols; infile datalines delimiter=',' missover; input keyid name description title; datalines; P001,Michelle Harrell,Mgr of Operations,Sr. MgrP002,Fred Granite,NE Region Acct. Rep.,Account Rep IIP003,Brian Davis,Accounting System Developer,Senior Programmer;
/* Create the phone table. */data &phonetbla ; %definephonecols; infile datalines delimiter=',' missover; input keyid phoneNumber phoneType; datalines; P001,x1532,OfficeP001,(919) 555-1212,HomeP003,x2312,Office;
/* Create the location table. */data &locationtbla ; %definelocationcols; infile datalines delimiter=',' missover; input keyid locationName locationType address city postalcode areacountry; datalines; P001,My Company,Office,123 Oak Ave,Clayton,20711,CA,USAP001,Michelle Harrell,Home,105 Seth Ct.,Apex,20765,CA,USAP002,Fred Granite,Home,2138 Pond St.,Greenlevel,20832,CA,USAP002,My Company,Office,123 Oak Ave,Clayton,20711,CA,USAP003,My Company,Office,123 Oak Ave,Clayton,20711,CA,USA;
/* Create the email table. */data &emailtbla ; %defineemailcols; infile datalines delimiter=',' missover; input keyid emailAddr emailtype; datalines; P001,[email protected],businessP001,[email protected],homeP002,[email protected],business
Sample Code for Generic Bulk Load 197
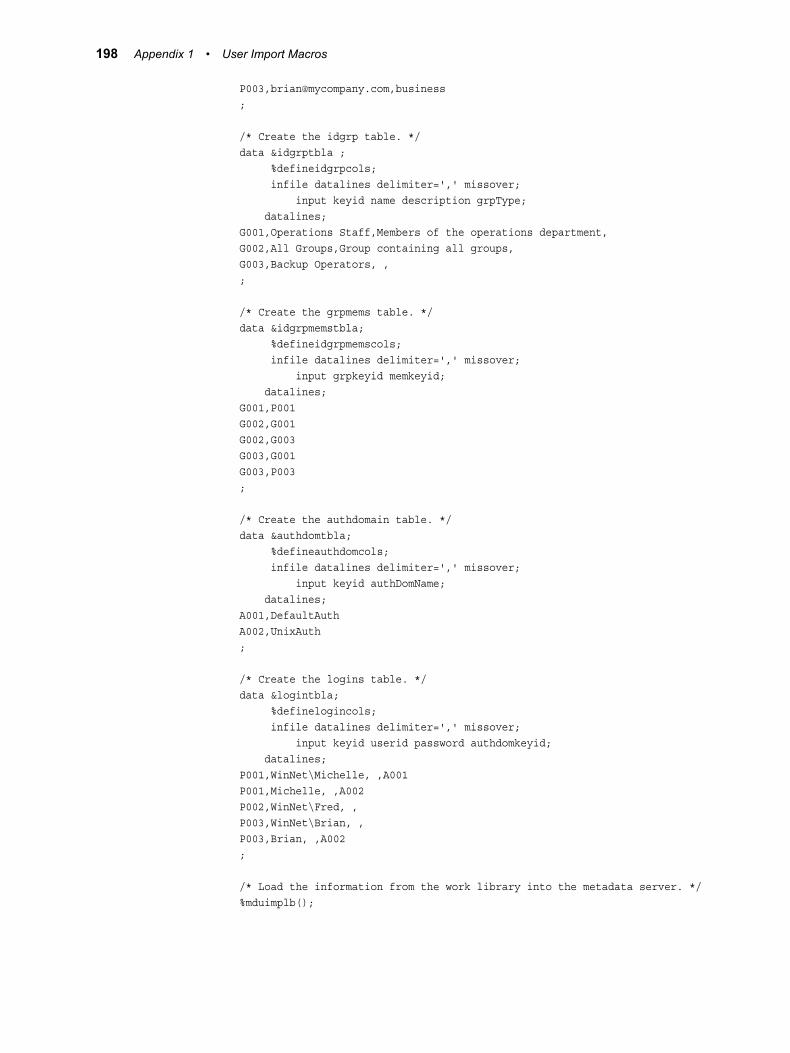
P003,[email protected],business; /* Create the idgrp table. */data &idgrptbla ; %defineidgrpcols; infile datalines delimiter=',' missover; input keyid name description grpType; datalines; G001,Operations Staff,Members of the operations department,G002,All Groups,Group containing all groups,G003,Backup Operators, ,; /* Create the grpmems table. */data &idgrpmemstbla; %defineidgrpmemscols; infile datalines delimiter=',' missover; input grpkeyid memkeyid; datalines; G001,P001G002,G001G002,G003G003,G001G003,P003; /* Create the authdomain table. */data &authdomtbla; %defineauthdomcols; infile datalines delimiter=',' missover; input keyid authDomName; datalines; A001,DefaultAuthA002,UnixAuth;
/* Create the logins table. */data &logintbla; %definelogincols; infile datalines delimiter=',' missover; input keyid userid password authdomkeyid; datalines; P001,WinNet\Michelle, ,A001P001,Michelle, ,A002P002,WinNet\Fred, ,P003,WinNet\Brian, ,P003,Brian, ,A002;
/* Load the information from the work library into the metadata server. */%mduimplb();
198 Appendix 1 • User Import Macros

About the Sample Code for UNIX /etc/passwdNote: This code is in SAS-installation-directory\SASFoundation\9.3\core
\sample\importpw.sas (Windows) or SAS-installation-directory/SASFoundation/9.3/samples/base/importpw.sas (UNIX). This topichighlights key points about the code.
This program expects user information in /etc/passwd files in this form:
user name : password : uid (numeric) : primary group id : <continued> gcos-field: home-directory : login-shell
The gcos-field item consists of additional comma-delimited fields in this form:
Person Name, Office, phone extension, misc, employeeid
For example:
user name : password : uid (numeric) : primary group id : <continued> Person Name, Office, phone extension, misc, employeeid:<continued>home-directory : login-shell
Here are details about this code:
• The colons delimit standard fields; the commas delimit items within the gcos-field (you can use any delimiter other than a colon).
• If your /etc/passwd file has a different format, modify the sample program toeither exclude information from the extraction or to extract it from the appropriatefields.
• If the employeeid field for an /etc/passwd entry is empty, that entry is droppedfrom the import.
• The values in the Person Name field should be unique. The program includes aDUPLICATEPERSONS macro variable that, when set to RECODE, changes aduplicate value in the Person Name field to the user ID value of the PW file entry.However, if the DUPLICATEPERSONS macro variable is set to any other value,users with duplicate names in the Person Name field are deleted.
The program expects group information in a /etc/groupfile. The standard format is asfollows:
groupname : password : gid (numeric) : comma-delimited list of users
Here are details about this file:
• Users are identified by user name (rather than by a numeric user ID).
• A group cannot be a member of another group.
• To exclude a user or group, enter an asterisk (*) in the password field. The importprogram drops entries that contain an asterisk in the password field.
The following table highlights selected variables:
About the Sample Code for UNIX /etc/passwd 199

Table A1.1 Selected Variables in a UNIX File Import
Variable Name Purpose Notes
UID Provides an externalidentity value for eachmetadata user and groupthat this program creates.
Use a field that contains a unique and unchanging value foreach entry in an /etc/passwd file and an /etc/groupfile. In the sample code, the uid field of the gcos-field is used. Ifthis field is empty for any records, those records are excludedfrom the import.
MetadataAuthDomain Enables all metadatalogins that this programcreates to be associatedwith an authenticationdomain.
Specify a SAS authentication domain name. The supplied valueis typically DefaultAuth.
UNIXEMAILDOMAIN Enables construction of ane-mail address for eachuser.
Specify the UNIX domain for the extracted identities. Thesupplied value is appended to extracted user IDs to yield e-mailaddresses in the form userid@supplied-value. If your e-mailaddresses follow a different convention, modify this part of thecode.
PWExtIDTAG Provides a label for allmetadata items that thisprogram creates. The labelindicates which objectswere created by thisprogram.
Specify a descriptive label that will be applied to all importedobjects to indicate where they came from. The default value isPasswd File Import. Do not quote this value. If youselect the External Identities button on an imported identity'sGeneral tab (in SAS Management Console), you will see thislabel in the Context column of the External Identities dialogbox.
About the Sample Code for Active DirectoryNote: This code is in SAS-installation-directory\SASFoundation\9.3\core
\sample\importad.sas (Windows) or SAS-installation-directory/SASFoundation/9.3/samples/base/importad.sas (UNIX). This topichighlights key points about the code.
Here are some tips for using the program:
• The code uses the SAS interface to LDAP (the LDAP CALL Routine interface) toextract information from Active Directory.
• The code references standard Active Directory schemas to identify user and groupattributes. If your site has extended the standard schema, you might need to makechanges in section 3 to reference additional or alternate attributes.
• The code uses filters to segment retrieval. It might be necessary to alter the filters insections 3 (user extraction) and 4 (group extraction) to better fit the contents of yourActive Directory server. If the number of records in a request exceeds ActiveDirectory's maximum query limit, only a subset of the requested records is returned.The Microsoft utility program LDIFDE can be useful in defining appropriate filters.
• If either or both of the data sets that are extracted from Active Directory are empty,execution of the code is canceled and an error message is provided. This reduces the
200 Appendix 1 • User Import Macros
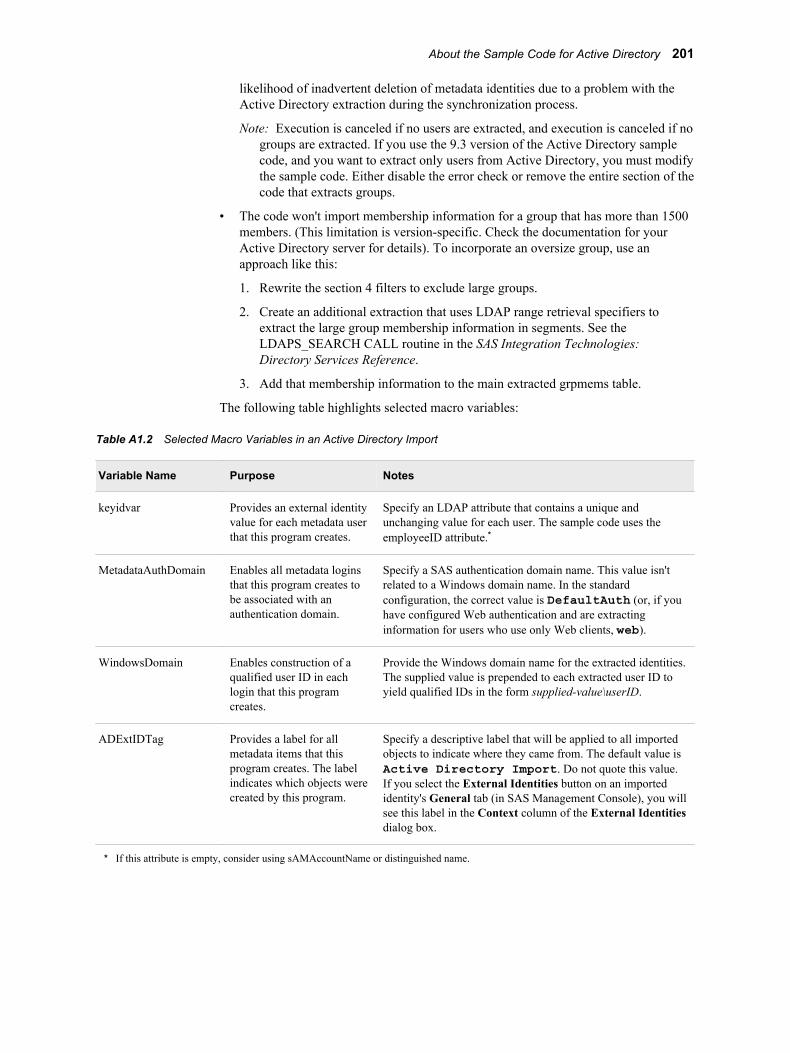
likelihood of inadvertent deletion of metadata identities due to a problem with theActive Directory extraction during the synchronization process.
Note: Execution is canceled if no users are extracted, and execution is canceled if nogroups are extracted. If you use the 9.3 version of the Active Directory samplecode, and you want to extract only users from Active Directory, you must modifythe sample code. Either disable the error check or remove the entire section of thecode that extracts groups.
• The code won't import membership information for a group that has more than 1500members. (This limitation is version-specific. Check the documentation for yourActive Directory server for details). To incorporate an oversize group, use anapproach like this:
1. Rewrite the section 4 filters to exclude large groups.
2. Create an additional extraction that uses LDAP range retrieval specifiers toextract the large group membership information in segments. See theLDAPS_SEARCH CALL routine in the SAS Integration Technologies:Directory Services Reference.
3. Add that membership information to the main extracted grpmems table.
The following table highlights selected macro variables:
Table A1.2 Selected Macro Variables in an Active Directory Import
Variable Name Purpose Notes
keyidvar Provides an external identityvalue for each metadata userthat this program creates.
Specify an LDAP attribute that contains a unique andunchanging value for each user. The sample code uses theemployeeID attribute.*
MetadataAuthDomain Enables all metadata loginsthat this program creates tobe associated with anauthentication domain.
Specify a SAS authentication domain name. This value isn'trelated to a Windows domain name. In the standardconfiguration, the correct value is DefaultAuth (or, if youhave configured Web authentication and are extractinginformation for users who use only Web clients, web).
WindowsDomain Enables construction of aqualified user ID in eachlogin that this programcreates.
Provide the Windows domain name for the extracted identities.The supplied value is prepended to each extracted user ID toyield qualified IDs in the form supplied-value\userID.
ADExtIDTag Provides a label for allmetadata items that thisprogram creates. The labelindicates which objects werecreated by this program.
Specify a descriptive label that will be applied to all importedobjects to indicate where they came from. The default value isActive Directory Import. Do not quote this value.If you select the External Identities button on an importedidentity's General tab (in SAS Management Console), you willsee this label in the Context column of the External Identitiesdialog box.
* If this attribute is empty, consider using sAMAccountName or distinguished name.
About the Sample Code for Active Directory 201

Location of the User Bulk Load andSynchronization Macros
The user import and synchronization macros are in SAS-installation-directory\SASFoundation\9.3\core\sasmacro (Windows) or SAS-installation-directory/SASFoundation/9.3/sasautos (UNIX). The following topics provide basicreference information that helps you use these macros to perform standard user importand synchronization tasks.
Dictionary
%MDUIMPCDefines a set of macro variables that create canonical tables and, optionally, creates empty tables forviews for CSV files.
Used by: User import, user synchronization
Syntax%MDUIMPC (<LIBREF=libref>, <MAKETABLE=0|1|2>, <INFILEREF=fileref>,<FILEHEADER=1|other_value>);
Optional ArgumentsLIBREF
specifies the output location for any canonical tables or views that are created (thedefault is Work). If you choose to not create tables or views, this parameter is notused.
MAKETABLEcontrols whether any tables or views are created.
0 specifies that no tables or views are created (this is the default).
1 specifies that empty canonical tables are created.
2 specifies that DATA step views of the CSV files in the fileref directory arecreated.
INFILEREFspecifies the location of the input CSV source files (used only whenMAKETABLE=2). The CSV input files must have names and contents that matchthe table names and structures of the canonical tables. On UNIX, the filenames mustbe lowercase.
FILEHEADERSindicates whether the CVS input files have a header line (used only whenMAKETABLE=2).
202 Appendix 1 • User Import Macros

1 indicates that the input files have header information in the firstrow.
other_value indicates that the data begins in the first row.
Details
Table A1.3 Tables and Macro Variables Created by %MDUIMPC
Table PurposeName/Keep List GlobalVariable
Column AttributesMacro
person Create users &persontbla; %definepersoncols
location Store addresses &locationtbla; %definelocationcols
phone Store phone numbers &phonetbla; %definephonecols
email Store e-mail addresses &emailtbla; %defineemailcols
idgrps Create groups and roles &idgrptbla; %defineidgrpcols
grpmems Store membership information &idgrpmemstbla; %defineidgrpmemscols
authdomain Create SAS authentication domains &authdomtbla; %defineauthdomcols
logins Create logins &logintbla; %definelogincols
%MDUIMPLBGenerates and submits blocks of XML to load identity information.
Used by: User import
Requirement: Connection to the metadata server
Syntax%MDUIMPLB (<LIBREF=libref>, <TEMP=libref>, <FAILEDOBJS=table_name>,<EXTIDTAG=context_value>, <BLKSIZE=#_of_records>);
Optional ArgumentsThis macro uses PROC METADATA to submit load requests.
LIBREFspecifies the location of the input data. The default is Work.
TEMPspecifies the location for temporary data sets during processing. The default is Work.
%MDUIMPLB 203

FAILEDOBJSis a table that contains the entire contents of all blocks that contain any problematicdata. The default is mduimplb_failedobjs.
This table is populated if integrity and completeness requirements aren't met or if ametadata server request failure occurs during processing.
EXTIDTAGindicates the origin of identity information. The default for this string isIdentityImport.
BLKSIZEspecifies the number of identities in a block. Each block of XML is generated andsubmitted to the metadata server independently. The default is 100.
Details
Table A1.4 FAILEDOBJS
Column Contents
tablename Name of an intermediate input table
chgtype A (add), U (update), or D (delete)
objtype Internal metadata object type
Name Name of a user, group or role
Objid Internal object ID
KeyId Key ID for an item
UserId User ID value in a login
AuthDomKeyId Key ID of an authentication domain
MemObjType* Internal metadata object type for a member
MemName* Person indicates a user, IdentityGroup indicates a group
MemObjID* Internal metadata object ID
MemKeyId* Key ID of a member
* This column is populated only if there is an error in membership information.
%MDUEXTRExtracts identity information from the metadata.
Used by: User synchronization
Requirement: Connection to the metadata server
204 Appendix 1 • User Import Macros

Syntax%MDUEXTR (LIBREF=SAS-library);
Required ArgumentThis macro uses PROC METADATA to submit extraction requests.
LIBREFspecifies the location to which the metadata is extracted.
%MDUCMPGenerates data sets that contain the changes that must be made to the metadata.
Used by: User synchronization
Syntax%MDUCMP (MASTER=libref, TARGET=libref, CHANGE=libref, EXCEPTIONS=<libref.>dataset,<EXTERNONLY=0|1>, <AUTHDOMCOMPARE=name|keyid>);
Required ArgumentsMASTER
specifies the location of the master tables (use the libref that you specify in%MDUIMPC).
TARGETspecifies the location of the target tables that contain information extracted from themetadata (use the libref that you specify in %MDUEXTR).
CHANGEspecifies the location for the change tables. These tables are created (xxx is the basename of each canonical table):
xxx_add contains users, groups, and roles to be added to thetarget tables to make them look like the master tables.
xxx_update contains users, groups, and roles to be modified in thetarget tables to make them look like the master tables.
xxx_delete contains users, groups, and roles to be deleted from thetarget tables to make them look like the master tables.
person_summary summarizes changes to users (Person objects).
idgrps_summary summarizes changes to groups and roles(IdentityGroup objects).
authdomain_summary summarizes changes to SAS authentication domains(AuthenticationDomain objects).
Optional ArgumentsEXCEPTIONS
specifies a data set that contains exception values.
%MDUCMP 205

EXTERNONLYdefines the scope of the comparison. Unless the master data set has an ObjectIdcolumn, this option has no effect. A typical master data set does not include anObjectId column. A master data set that is extracted from the SAS MetadataRepository (rather than from your authentication provider) does include an ObjectIdcolumn. Extraction of a master data set from the metadata repository happens in theidentity synchronization processes for some solutions.
1 specifies that only identities that have an external identity value are includedin the comparison. This is the default value.
0 specifies that all identities are included in the comparison.
If EXTERNONLY=1 but AUTHDOMCOMPARE=NAME, all authenticationdomains are compared. In other words, for authentication domainsAUTHDOMCOMPARE=NAME overrides EXTERNONLY=1.
AUTHDOMCOMPAREdefines how authentication domains are compared.
NAME compares all authentication domains by name. Prevents deletion andrenaming of all authentication domains. Prevents deletion of logins inauthentication domains that do not exist in the master data set. This isthe default.
KEYID compares by keyid. Can cause deletion of authentication domains thatwere originally imported but are not present in the master data set.Can cause renaming of authentication domains that were originallyimported but have a different name in the master data set. Does notprevent deletion of logins in authentication domains that do not existin the master data set. If you specifyAUTHDOMCOMPARE=KEYID, authentication domains and loginsthat are interactively created might be deleted (for a standardsynchronization, don't use AUTHDOMCOMPARE=KEYID).
DetailsThe exceptions data has these columns:
tablenamespecifies the name of the canonical table to which the exception applies. Valid valuesare person, logins, email, phone, location, idgrps, grpmems, andauthdomain.
filterspecifies a SAS WHERE clause expression (without the WHERE) to apply againstthe corresponding table. The WHERE clause consists of a canonical table columnname and an exception value.
For example, consider this exceptions data set:
phone PhoneType="manual Phone"email EmailType="manual Email"logins authDomKeyId="A002"logins userid="testid%"
Each line protects a set of objects in a particular target table, ensuring that thosemetadata objects are preserved.
206 Appendix 1 • User Import Macros

• The first entry excludes objects in the target phone table that have a PhoneType ofmanual Phone. In SAS Management Console, the PhoneType is displayed in theType field in the Phone Properties dialog box.
• The second entry excludes objects in the target email table that have the EmailTypevalue manual Email. In SAS Management Console, the EmailType is displayed inthe Type field in the Email Properties dialog box.
• The last entry excludes any objects in the target logins table which have a useridvalue that begins with testid.
Note: Logins that are in authentication domains that do not exist in the master tables arepreserved by default. It is not necessary to define exceptions for such logins.
%MDUCHGVChecks the change tables against the target tables to ensure that the updates do not introduce anyintegrity problems.
Used by: User synchronization
Syntax%MDUCHGV (TARGET=libref, CHANGE=libref, <TEMP=libref>, ERRORSDS=name);
Required ArgumentTARGET
specifies the location of the target canonical tables. This is typically the same librefthat you specify in the %MDUEXTR macro.
Optional ArgumentsCHANGE
specifies the location of the change tables (that were populated by the %MDUCMPmacro).
TEMPspecifies the location for temporary tables (the default is Work).
ERRORSDSidentifies a data set that contains information about any integrity problems. This dataset has these columns:
errcode specifies a numeric code for a particular error.
errmsg describes a particular error.
tablename specifies the name of the canonical table from which aparticular error item should be excepted if the ERRORSDSdata set is fed into the %MDUCMP macro as the exceptiondata set.
filter specifies a SAS WHERE clause that is used to remove allobjects related to a particular error from the change tables.
Keyid specifies the keyid value of the offending object.
%MDUCHGV 207

Name specifies the Name value of the object, if the offending objectis a Person or IdentityGroup.
userid specifies the userid value of the object, if the offending objectis a Login.
authDomKeyId specifies the keyid value of an authentication domain whenduplicate userid values are found in an authentication domain.
If any errors are detected, this macro sets the DUCHGV_ERRORS column to anonzero value and creates the ERRORSDS data set, which lists the errors that werefound.
%MDUCHGLBGenerates XML for loading identity updates.
Used by: User synchronization
Requirement: Connection to the metadata server
Syntax%MDUCHGLB (CHANGE=libref, TEMP=libref, <FAILEDOBJS=table_name>,<EXTIDTAG=context_value>, <BLKSIZE=#_of_records>);
Required ArgumentCHANGE
specifies the location of the change tables.
Optional ArgumentsTEMP
specifies the location for temporary tables. The default is Work.
FAILEDOBJSis a table that contains the entire contents of any blocks that weren't successfullyloaded into the metadata. An error within a block prevents loading of all of the datain that block. The default name for this table is mduchglb_failedobjs.
This table is populated if integrity or completeness requirements aren't met or if ametadata server request failure occurs during processing. To address errors, see“How to Synchronize Identities” on page 194.
EXTIDTAGIndicates the origin of identity information. The default for this string isIdentityImport.
BLKSIZEspecifies the number of added or updated objects in a block. Each block of XML isgenerated and submitted to the metadata server independently. The default is 100.
For Delete operations, BLKSIZE has no effect.
208 Appendix 1 • User Import Macros

Appendix 2
Checklists
Checklist for a More Secure Deployment . . . . . . . . . . . . . . . . . . . . . . . . . . . . . . . . . 209Introduction . . . . . . . . . . . . . . . . . . . . . . . . . . . . . . . . . . . . . . . . . . . . . . . . . . . . . . . 209General Measures . . . . . . . . . . . . . . . . . . . . . . . . . . . . . . . . . . . . . . . . . . . . . . . . . . 209Metadata Layer Measures . . . . . . . . . . . . . . . . . . . . . . . . . . . . . . . . . . . . . . . . . . . . 210Enhanced Protections for Passwords . . . . . . . . . . . . . . . . . . . . . . . . . . . . . . . . . . . 211
Distribution of Selected Privileges . . . . . . . . . . . . . . . . . . . . . . . . . . . . . . . . . . . . . . 211
Permission Patterns of Selected ACTs . . . . . . . . . . . . . . . . . . . . . . . . . . . . . . . . . . . 212
Who's Who in the SAS Metadata . . . . . . . . . . . . . . . . . . . . . . . . . . . . . . . . . . . . . . . 213
Checklist for a More Secure Deployment
IntroductionYou can use this appendix to verify that security issues are being addressed asappropriate for your environment and goals. Not all measures are relevant in alldeployments. It is a good practice to review your security configuration on a periodicbasis.
General Measures• Make sure that the configuration directories are protected by appropriate operating
system permissions. See “Recommended Operating System Protections for WindowsMachines” in Chapter 4 of SAS Intelligence Platform: System Administration Guide.
• Consider disabling concurrent logon sessions to the SAS middle tier. See “DisablingConcurrent Logon Sessions” in Chapter 8 of SAS Intelligence Platform: Middle-TierAdministration Guide.
• Consider reducing the HTTP Session time-out interval for the SAS Webapplications. See “Configuring the HTTP Session Time-out Interval” in Chapter 8 ofSAS Intelligence Platform: Middle-Tier Administration Guide.
• If your deployment includes sensitive data, review host access to SAS data andevaluate the workspace server pooling configuration. See “Server Configuration,Data Retrieval, and Risk” on page 153.
• If your deployment includes sensitive data, make sure that the SAS Web ReportStudio query cache library (wrstemp) and distribution library (wrsdist) are protected
209

by appropriate operating system permissions. See “Improving the Performance ofSAS Web Report Studio ” in Chapter 4 of SAS Intelligence Platform: WebApplication Administration Guide and “Verifying Permissions for the DistributionLibrary ” in Chapter 7 of SAS Intelligence Platform: Web Application AdministrationGuide.
• On Windows, minimize availability of the privilege Log on as batch job. See“Windows Privileges” on page 18.
• For industry-standard encryption, license SAS/SECURE. See “AboutSAS/SECURE” on page 173.
• If your deployment includes the SAS Anonymous Web user, determine whether it isnecessary and appropriate to keep that identity in place. See “PUBLIC Access andAnonymous Access” on page 106.
• Consider tracking changes to server logging levels. See “Audit Server Logging LevelChanges That Originate in Client Applications” in Chapter 9 of SAS IntelligencePlatform: System Administration Guide.
• Consider limiting the scope of trusted peer connections. See “Trusted PeerConnections” on page 121.
Metadata Layer Measures• Limit the WriteMetadata permission on servers. See “Protect Server Definitions” on
page 75.
• Limit the WriteMetadata permission on ACTs. In general, only the SASAdministrators group has a grant of the WriteMetadata permission on theAuthorization tab of an ACT.
• Limit the WriteMetadata permission on custom folders. To reduce the chance ofinadvertent or deliberate changes to a custom folder, grant WriteMemberMetadata(instead of WriteMetadata) to users who should contribute only content. See“WriteMetadata and WriteMemberMetadata” on page 29.
• Review the WriteMetadata permission on OLAP schemas and libraries. To preventsomeone from adding cubes to an OLAP schema or tables to a library, set denials ofthe WriteMetadata permission on the schema or library. Remember to preserveaccess for administrators as appropriate.
• Review the permission pattern of the predefined ACTs. See “Permission Patterns ofSelected ACTs” on page 212.
• Review who has privileged user status from metadata memberships. See“Distribution of Selected Privileges” on page 211.
• Review who has privileged user status from the adminUsers.txt file. See Table A2.2on page 211.
• Consider reducing WriteMetadata access to the user definitions for any unrestrictedusers. This prevents restricted user administrators from updating an unrestricteduser's definition and then logging on as that unrestricted user. To add this protection,access the Authorization tab of each unrestricted user and add an explicit denial ofthe WriteMetadata permission for PUBLIC.
• Consider tracking changes to metadata layer permissions and ACTs. See Chapter 8,“Security Report Macros,” on page 83 and “Auditing of Security Events” on page 4.
• Consider limiting the locations from which SAS Web Report Studio usesinformation maps. See “Limit the Availability of Relational Information Maps That
210 Appendix 2 • Checklists

Implement Row-Level Security” in Chapter 5 of SAS Intelligence Platform: WebApplication Administration Guide.
Enhanced Protections for Passwords• If you have SAS/SECURE, upgrade encryption strength for passwords in
configuration files (from SASProprietary to AES). See “How to Increase EncryptionStrength for Passwords at Rest” on page 179.
• If you have SAS/SECURE, upgrade encryption strength for outbound passwords intransit (from SASProprietary to AES). See “How to Increase Encryption Strength forOutbound Passwords in Transit” on page 180.
• Consider preventing users from saving their passwords in their desktop connectionprofiles. See “Client-Side Storage of Passwords” on page 15.
• Consider strengthening password policies for internal accounts. See “How to ChangeInternal Account Policies” on page 146.
• Consider removing the SAS Trusted User's password from some configuration files.See “How to Reduce Exposure of the SASTRUST Password” on page 149.
Distribution of Selected PrivilegesTable A2.1 Members of Selected Groups and Roles
Group or Role Usual Members (As Listed On the Members Tab)
SAS General Servers SAS Trusted User (no others)
SAS System Services SAS Trusted User (no others)
SAS Administrators SAS Administrator and other administrators
Metadata Server: Unrestricted SAS Administrator and possibly other administrators
Metadata Server: User Administration SAS Administrators
Table A2.2 User IDs in Configuration Files That Convey Privileged Status
File* Usual Listed User IDs
adminUsers.txt Only *sasadm@saspw (or one *alternateID)
trustedUsers.txt Only sastrust@saspw (or one alternateID)
* These files are located in your equivalent of SAS/Config/Lev1/SASMeta/MetadataServer/.
Distribution of Selected Privileges 211
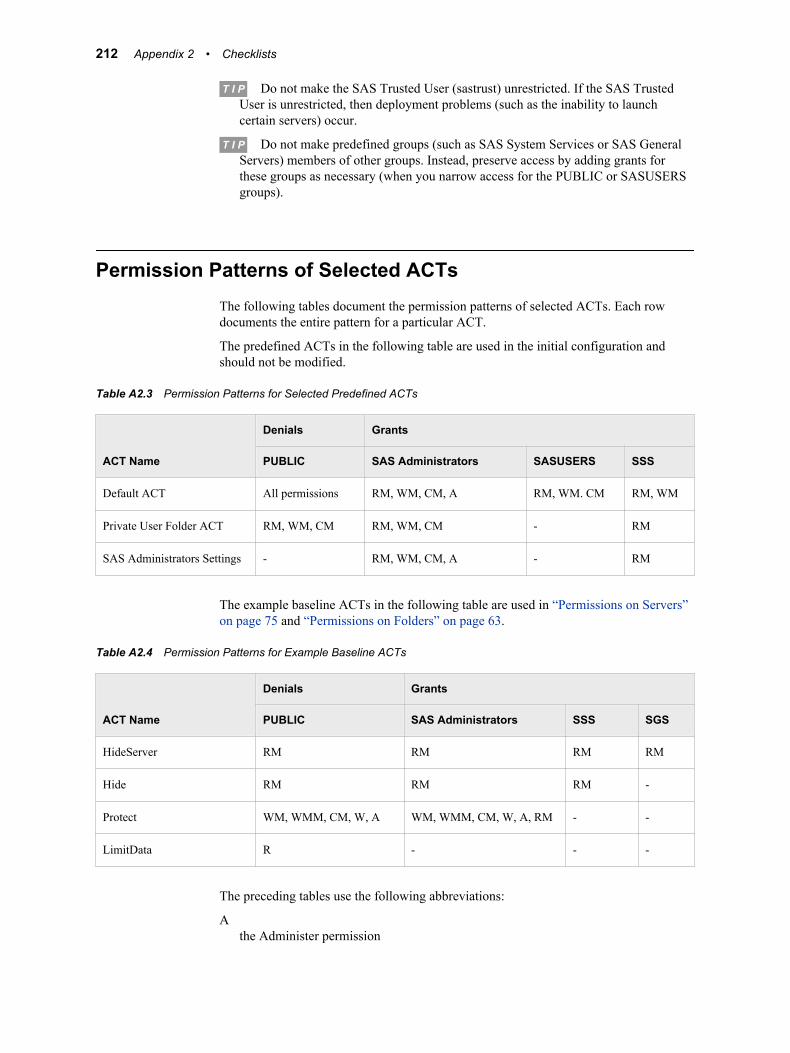
T I P Do not make the SAS Trusted User (sastrust) unrestricted. If the SAS TrustedUser is unrestricted, then deployment problems (such as the inability to launchcertain servers) occur.
T I P Do not make predefined groups (such as SAS System Services or SAS GeneralServers) members of other groups. Instead, preserve access by adding grants forthese groups as necessary (when you narrow access for the PUBLIC or SASUSERSgroups).
Permission Patterns of Selected ACTsThe following tables document the permission patterns of selected ACTs. Each rowdocuments the entire pattern for a particular ACT.
The predefined ACTs in the following table are used in the initial configuration andshould not be modified.
Table A2.3 Permission Patterns for Selected Predefined ACTs
ACT Name
Denials Grants
PUBLIC SAS Administrators SASUSERS SSS
Default ACT All permissions RM, WM, CM, A RM, WM. CM RM, WM
Private User Folder ACT RM, WM, CM RM, WM, CM - RM
SAS Administrators Settings - RM, WM, CM, A - RM
The example baseline ACTs in the following table are used in “Permissions on Servers”on page 75 and “Permissions on Folders” on page 63.
Table A2.4 Permission Patterns for Example Baseline ACTs
ACT Name
Denials Grants
PUBLIC SAS Administrators SSS SGS
HideServer RM RM RM RM
Hide RM RM RM -
Protect WM, WMM, CM, W, A WM, WMM, CM, W, A, RM - -
LimitData R - - -
The preceding tables use the following abbreviations:
Athe Administer permission
212 Appendix 2 • Checklists
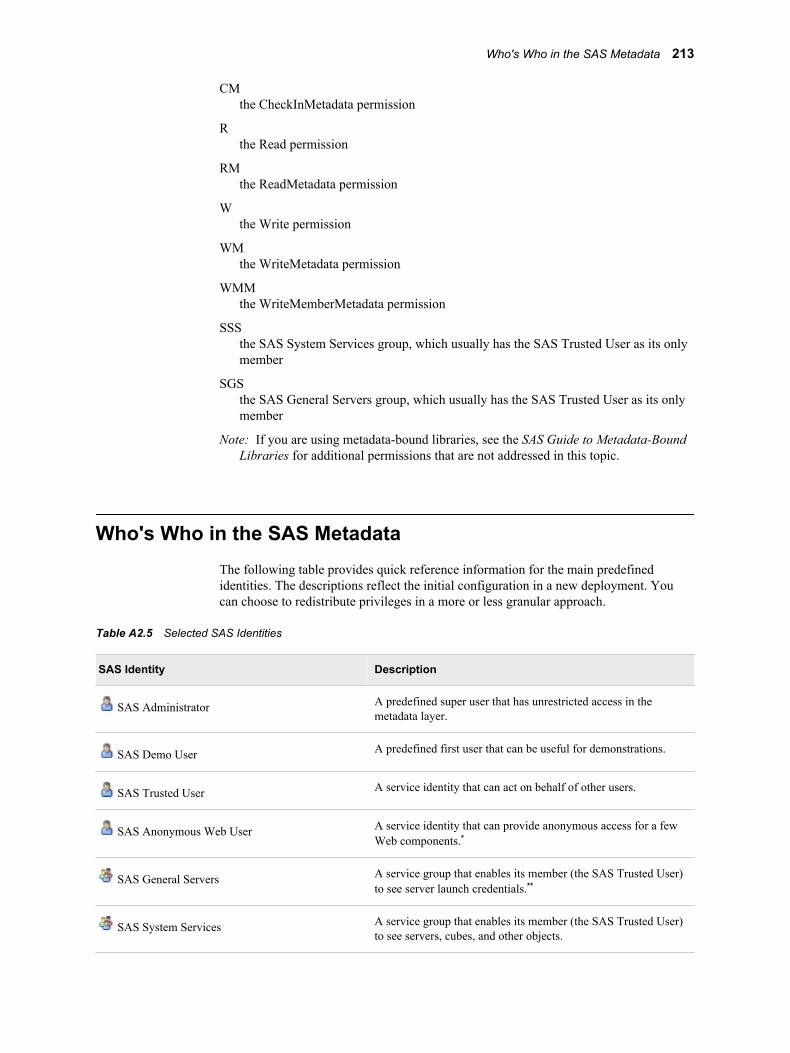
CMthe CheckInMetadata permission
Rthe Read permission
RMthe ReadMetadata permission
Wthe Write permission
WMthe WriteMetadata permission
WMMthe WriteMemberMetadata permission
SSSthe SAS System Services group, which usually has the SAS Trusted User as its onlymember
SGSthe SAS General Servers group, which usually has the SAS Trusted User as its onlymember
Note: If you are using metadata-bound libraries, see the SAS Guide to Metadata-BoundLibraries for additional permissions that are not addressed in this topic.
Who's Who in the SAS MetadataThe following table provides quick reference information for the main predefinedidentities. The descriptions reflect the initial configuration in a new deployment. Youcan choose to redistribute privileges in a more or less granular approach.
Table A2.5 Selected SAS Identities
SAS Identity Description
SAS Administrator A predefined super user that has unrestricted access in themetadata layer.
SAS Demo User A predefined first user that can be useful for demonstrations.
SAS Trusted User A service identity that can act on behalf of other users.
SAS Anonymous Web User A service identity that can provide anonymous access for a fewWeb components.*
SAS General Servers A service group that enables its member (the SAS Trusted User)to see server launch credentials.**
SAS System Services A service group that enables its member (the SAS Trusted User)to see servers, cubes, and other objects.
Who's Who in the SAS Metadata 213

SAS Identity Description
PUBLIC Everyone who can access the metadata server.
SASUSERS Everyone who has a well-formed user definition (a subset ofPUBLIC).
SAS Administrators General metadata administrators. Membership in this groupprovides broad access to metadata, but doesn't provideunrestricted access.
Metadata Server: Unrestricted A highly privileged role that provides unrestricted access in themetadata layer.
Metadata Server: User Administration A role that enables members to manage most users, groups, androles, but doesn't provide visibility for any plug-in.
Metadata Server: Operation A role that enables members to perform most serveradministration activities, but doesn't provide visibility for anyplug-in.
Management Console: Advanced A role that enables members to see all of the SAS ManagementConsole plug-ins that are under role management in the initialconfiguration.
Management Console: Content Management A role that enables members to see a subset of SAS ManagementConsole plug-ins.
* For only SAS BI Web Services and the SAS Stored Processes application. Not for other Web applications such as SAS Web ReportStudio. Anonymous access is an optional feature that is not compatible with Web authentication.
** Server launch credentials (for example, the SAS Spawned Servers account, sassrv) are stored in logins on the Accounts tab of the SASGeneral Servers group. This facilitates launching of stored process servers and pooled workspace servers.
See Also“Overview of Initial Roles, Groups, and Users” in Chapter 2 of SAS IntelligencePlatform: System Administration Guide
214 Appendix 2 • Checklists

Glossary
access control templatea reusable named authorization pattern that you can apply to multiple resources. Anaccess control template consists of a list of users and groups and indicates, for eachuser or group, whether permissions are granted or denied. Short form: ACT.
ACTSee access control template.
authenticationSee client authentication.
authentication domaina SAS internal category that pairs logins with the servers for which they are valid.For example, an Oracle server and the SAS copies of Oracle credentials might all beclassified as belonging to an OracleAuth authentication domain.
authentication providera software component that is used for identifying and authenticating users. Forexample, an LDAP server or the host operating system can provide authentication.
authorizationthe process of determining which users have which permissions for which resources.The outcome of the authorization process is an authorization decision that eitherpermits or denies a specific action on a specific resource, based on the requestinguser's identity and group memberships.
capabilityan application feature that is under role-based management. Typically, a capabilitycorresponds to a menu item or button. For example, a Report Creation capabilitymight correspond to a New Report menu item in a reporting application. Capabilitiesare assigned to roles.
client authenticationthe process of verifying the identity of a person or process for security purposes.
client-side poolinga configuration in which the client application maintains a collection of reusableworkspace server processes.
215
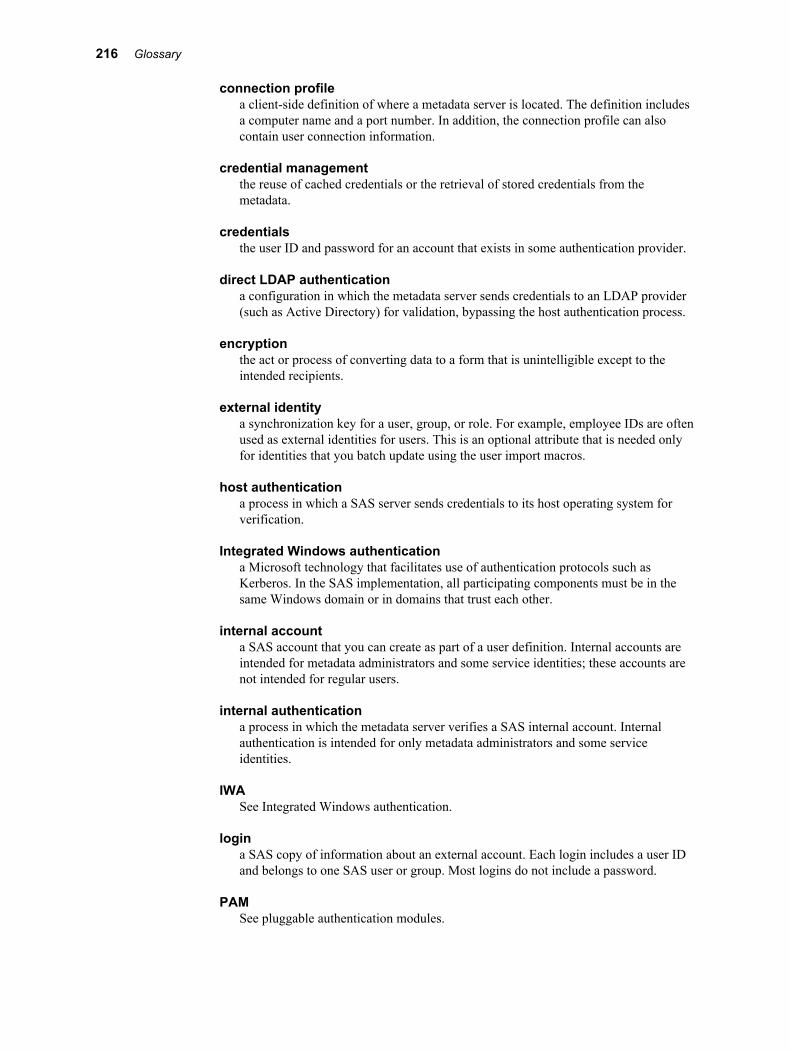
connection profilea client-side definition of where a metadata server is located. The definition includesa computer name and a port number. In addition, the connection profile can alsocontain user connection information.
credential managementthe reuse of cached credentials or the retrieval of stored credentials from themetadata.
credentialsthe user ID and password for an account that exists in some authentication provider.
direct LDAP authenticationa configuration in which the metadata server sends credentials to an LDAP provider(such as Active Directory) for validation, bypassing the host authentication process.
encryptionthe act or process of converting data to a form that is unintelligible except to theintended recipients.
external identitya synchronization key for a user, group, or role. For example, employee IDs are oftenused as external identities for users. This is an optional attribute that is needed onlyfor identities that you batch update using the user import macros.
host authenticationa process in which a SAS server sends credentials to its host operating system forverification.
Integrated Windows authenticationa Microsoft technology that facilitates use of authentication protocols such asKerberos. In the SAS implementation, all participating components must be in thesame Windows domain or in domains that trust each other.
internal accounta SAS account that you can create as part of a user definition. Internal accounts areintended for metadata administrators and some service identities; these accounts arenot intended for regular users.
internal authenticationa process in which the metadata server verifies a SAS internal account. Internalauthentication is intended for only metadata administrators and some serviceidentities.
IWASee Integrated Windows authentication.
logina SAS copy of information about an external account. Each login includes a user IDand belongs to one SAS user or group. Most logins do not include a password.
PAMSee pluggable authentication modules.
216 Glossary

permission conditiona control that defines access to data at a granular level, specifying who can accessparticular rows within a table or particular members within an OLAP cube. Suchcontrols are typically used to subset data by a user characteristic such as employeeID or organizational unit.
pluggable authentication modulesan industry-standard technology that extends UNIX host authentication to recognizeadditional authentication providers.
puddlea group of servers that are started and run using the same login credentials. Eachpuddle can also allow a group of clients to access the servers.
repository access control templatethe access control template (ACT) that controls access to a particular repository andto resources for which access controls are not specified. You can designate onerepository ACT for each metadata repository. The repository ACT is also called thedefault ACT.
restricted identitya user or group that is subject to capability requirements and permission denials inthe metadata environment. Anyone who isn't in the META: Unrestricted Users Roleand isn't listed in the adminUsers.txt file with a preceding asterisk is a restrictedidentity.
SAS authenticationa form of authentication in which the target SAS server is responsible for requestingor performing the authentication check. SAS servers usually meet this responsibilityby asking another component (such as the server's host operating system, an LDAPprovider, or the SAS Metadata Server) to perform the check. In a few cases (such asSAS internal authentication to the metadata server), the SAS server performs thecheck for itself. A configuration in which a SAS server trusts that another componenthas pre-authenticated users (for example, Web authentication) is not part of SASauthentication.
SAS token authenticationa process in which the metadata server generates and verifies SAS identity tokens toprovide single sign-on to other SAS servers. Each token is a single-use, proprietarysoftware representation of an identity.
server-side poolinga configuration in which a SAS object spawner maintains a collection of reusableworkspace server processes that are available for clients. The usage of servers in thispool is governed by the authorization rules that are set on the servers in the SASmetadata.
service identityan identity or account that exists only for the purpose of supporting certain systemactivities and does not correspond to a real person. For example, the SAS TrustedUser is a service identity.
single sign-onan authentication model that enables users to access a variety of computing resourceswithout being repeatedly prompted for their user IDs and passwords. For example,single sign-on can enable a user to access SAS servers that run on different platforms
Glossary 217

without interactively providing the user's ID and password for each platform. Singlesign-on can also enable someone who is using one application to launch otherapplications based on the authentication that was performed when the user initiallylogged on.
SSOSee single sign-on.
trusted usera privileged service account that can act on behalf of other users on a connection tothe metadata server.
unrestricted identitya user or group that has all capabilities and permissions in the metadata environmentdue to membership in the META: Unrestricted Users Role (or listing in theadminUsers.txt file with a preceding asterisk).
user contexta set of information about the user who is associated with an active session. The usercontext contains information such as the user's identity, profile, and active repositoryconnections.
Web authenticationa configuration in which users of Web applications and Web services are verified atthe Web perimeter and the metadata server trusts that verification.
well-formed user definitiona user definition that includes a login with an appropriate user ID. For a Windowsaccount, the user ID in the login must be qualified (for example, WIN\marcel [email protected]). The login does not have to include a password. Formetadata administrators and some service identities, it is appropriate to use aninternal account instead of a login.
218 Glossary
Index
Special Characters%MDSECDS macro 89%MDUCHGLB macro 208%MDUCHGV macro 207%MDUCMP macro 205%MDUEXTR macro 204%MDUIMPC macro 202%MDUIMPLB macro 203
Aaccess control templates (ACTs)
See also baseline ACTsconsolidation of 72permission patterns 212predefined 212
access controlsrelative priority of 55
access to data and resourcesopening up 37
account lockout period 36Active Directory
ID format 20sample code for user import 200
Administer (A) permission 62administrators
adding 32SAS Administrators group 12
align authentication 100anonymous access 106application features
availability of 15authentication 95, 131
See also authentication mechanismsSee also authentication tasksalign 100coordinating the workspace server 132identifying or creating user accounts
131token 101
authentication domains
unique names and IDs 22authentication mechanisms 109
credential management 110direct LDAP authentication 112host authentication 114Integrated Windows authentication 115pluggable authentication modules 117SAS internal authentication 118SAS token authentication 120server type summary 128single sign-on summary 127trusted peer connections 122trusted user connections 123
authentication modelcredential gaps 101data servers and processing servers 98logins 103metadata server 96mixed providers 99PUBLIC and anonymous access 106
authentication tasks 133changing internal account policies 146configuring direct LDAP authentication
135configuring Integrated Windows
authentication 138configuring SAS token authentication
133configuring Web authentication 134forcing the Kerberos protocol 141reducing exposure of SASTRUST
password 149storing passwords for third-party server
145storing passwords for workspace server
144workspace server's Options tab 151
authorization data setsadditional resources for building 87generating 89
authorization model
219

authorization decisions 55fine-grained controls for data 56granularity and mechanics 42identity precedence 42inheritance paths 42, 44permissions by item 46permissions by task 50use and enforcement of each permission
62
Bbaseline ACTs 63
examples 65, 66, 69key points for 71
batch reportingfine-grained controls and 60
Ccanonical tables 190capabilities
contributed 6explicit 6implicit 6redistributing 13relationship with permissions 28
CEL parameterOBJECTSERVERPARMS system
option 178CheckInMetadata (CM) permission 62client-side pooling 164contributed capabilities 6Create (C) permission 62credential gaps 101credential management 110credentials
launch credentials 155
Ddata access
opening up 37data retrieval 153data servers
authentication to 98Delete (D) permission 62direct access 159direct LDAP authentication 112
configuring 135dual users 32dynamic filters 58
Eencryption 3, 171
algorithms 171changing over-the-wire settings for SAS
servers 177contexts for coverage 171default settings for on-disk 172default settings for over-the-wire 172increasing strength for outbound
passwords in transit 180increasing strength for passwords at rest
179on-disk 171over-the-wire 171SAS/SECURE 173
explicit capabilities 6external accounts
unique names and IDs 22external identities 18external passwords 16
Ffilters
dynamic 58fine-grained controls 42, 56
assigning 60batch reporting 60identity-driven properties 58implementations of 57
folder permissions 63ACT consolidation 72baseline ACTs 63, 71examples 65, 66, 69separated administration 72
Ggranularity 42group definitions 12
unique names and IDs 22groups
compared with roles 15identity precedence 17management of 10password updates for 16PUBLIC 12SAS Administrators 12SASUSERS 12
HHide baseline ACT 63host access
example 162multiple levels of 162to SAS tables 159
host authentication 114
220 Index

IID formats 20identity, preserving 154identity hierarchy 17identity passing 154identity precedence 17identity relationships network 43identity-driven properties 58IDs, unique 22implicit capabilities 6import, user
See user importimport macros 187information maps
fine-grained controls and 57inheritance paths 42, 44internal account policies
changing 146per-account 148server-level 146
internal accountsunlocking 36
internal authentication 118IWA (Integrated Windows authentication)
115configuring 138Kerberos protocol 141
KKerberos protocol 21
forcing 141
Llaunch credentials 155
creating and designating 158criteria for 156launching a standard workspace server
159LimitData baseline ACT 64lockout period 36logging security events 4logins
authentication and 103for Web authentication 134
Mmacros
for user import and synchronization187, 202
mediated access 159metadata
WriteMetadata andWriteMemberMetadata permissions29
metadata layer 210metadata server
authentication 96determining SAS identity 96
mixed providers 99align authentication for 100SAS token authentication for 101storing user IDs and passwords 101
Nnames, unique 22NETENCRALG system option 178
OOBJECTSERVERPARMS system option
CEL parameter 178on-disk encryption 171
default settings 172Options tab
workspace server 151outbound passwords
increasing encryption strength for 180over-the-wire encryption and 180
over-the-wire encryption 171changing settings for SAS servers 177default settings 172outbound passwords and 180
PPAM (pluggable authentication modules)
117passwords 15
encryption strength for outboundpasswords in transit 180
encryption strength for passwords at rest179
enhanced protection for 211external accounts 16outbound, and over-the-wire encryption
180policies 15SAS internal accounts 16SAS003 180, 181SASTRUST 149storing for mixed providers 101storing for third-party servers 145storing for workspace server 144updates for users and groups 16updates in the SAS Deployment
Manager 33
Index 221
per-account policies 148permission conditions 42permissions
See also folder permissionsassigning 27by object 46by task 50fine-grained controls 42granularity and mechanics 42identity relationships network 43inheritance paths 42, 44key points for 29patterns of selected ACTs 212relationship with capabilities 28repository-level controls 42resource relationships network 42resource-level controls 42setting 27use and enforcement of each permission
62WriteMetadata (WM) and
WriteMemberMetadata (WMM) 29pluggable authentication modules (PAM)
117pooling
See workspace server poolingpreservation of user identity 154processing servers
authentication to 98Protect baseline ACT 64PUBLIC access 106PUBLIC group 12
RRead (R) permission 62ReadMetadata (RM) permission 62reporting
See security reportingrepository-level controls 42resource access
opening up 37resource relationships network 42resource-level controls 42RETURNPASSWORDS=SAS003 180
compatibility and 181role definitions 13
unique names and IDs 22roles 6
application features and 15compared with groups 15increasing or reducing availability of 13management of 10redistributing capabilities 13
SSAS Administrators group 12SAS identity
determining 96SAS internal authentication 118SAS internal passwords 16SAS OLAP Server
fine-grained controls and 57SAS Scalable Performance Data Server
fine-grained controls and 57SAS servers
changing over-the-wire encryptionsettings for 177
SAS tablesdirect access versus mediated access
159host access 159risks of mediated host access 161
SAS token authentication 101, 120configuring 133
SAS/SECURE 173SAS.ExternalIdentity property 58SAS.IdentityGroupName property 59SAS.IdentityGroups property 59SAS.IdentityName property 59SAS.PersonName property 59SAS.Userid property 58SAS003 passwords
connections that cannot use 181RETURNPASSWORDS=SAS003 and
compatibility 181upgrading to
RETURNPASSWORDS=SAS003180
SASProprietary encryption 171SASTRUST password
reducing exposure of 149SASUSERS group 12scope
of import process 192of synchronization process 193
security 3security checklist 209
metadata layer 210passwords 211
security logging 4security reporting 6, 83
%MDSECDS macro 89authorization data sets 87
security tasksensuring availability of application
features 15facilitating authentication 131managing passwords 15opening up access 37
server definitions
222 Index

access to 78protecting 75
server-level accountschanging policies 146
server-side pooling 164benefits and risks of 164
serverspreserving identity 154
service accountspassword updates for 33
single sign-on (SSO) 4, 127standard workspace server
authentication to 99launching 159
synchronizationSee user synchronization
Ttables
canonical 190direct access versus mediated access
159host access 159risks of mediated host access 161
third-party serversauthentication to 99storing passwords for 145
token authentication 101, 120configuring 133
trusted peer connections 122trusted user connections 123
UUNIX
sample code for UNIX /etc/passwdimport 199
unlocking internal accounts 36user accounts
identifying or creating 131user definitions and 11
user administration 9user context 110
contents of 110user definitions 11
unique names and IDs 22user identity preservation 154user IDs
storing for mixed providers 101user import 187, 192
canonical tables 190external identities 18importing identities 193macros for 187, 202sample code for Active Directory import
200sample code for generic file import 196sample code for UNIX /etc/passwd
import 199scope of import process 192
user synchronization 187, 193macros for 187, 202sample code 195scope of 193synchronizing identities 194
usersadding regular users 31dual users 32ID formats 20identity information 11identity precedence 17management of 10password updates for 16
WWeb authentication 124
configuring 134logins for 134vendor-specific instructions 134
WindowsIWA 115
workspace serverauthentication to 99coordinating 132credential gaps 101launching 159Options tab 151storing passwords for 144
workspace server pooling 164client-side 164comparison of configurations 165eligible requests actually using pooling
166modifying the initial configuration 168requests eligible for 166server-side 164
Write (W) permission 62WriteMemberMetadata (WMM)
permission 29, 62WriteMetadata (WM) permission 29, 62
Index 223

224 Index