sartorius miras-series - affordable scales and balances · harmful interference in which case the...
TRANSCRIPT
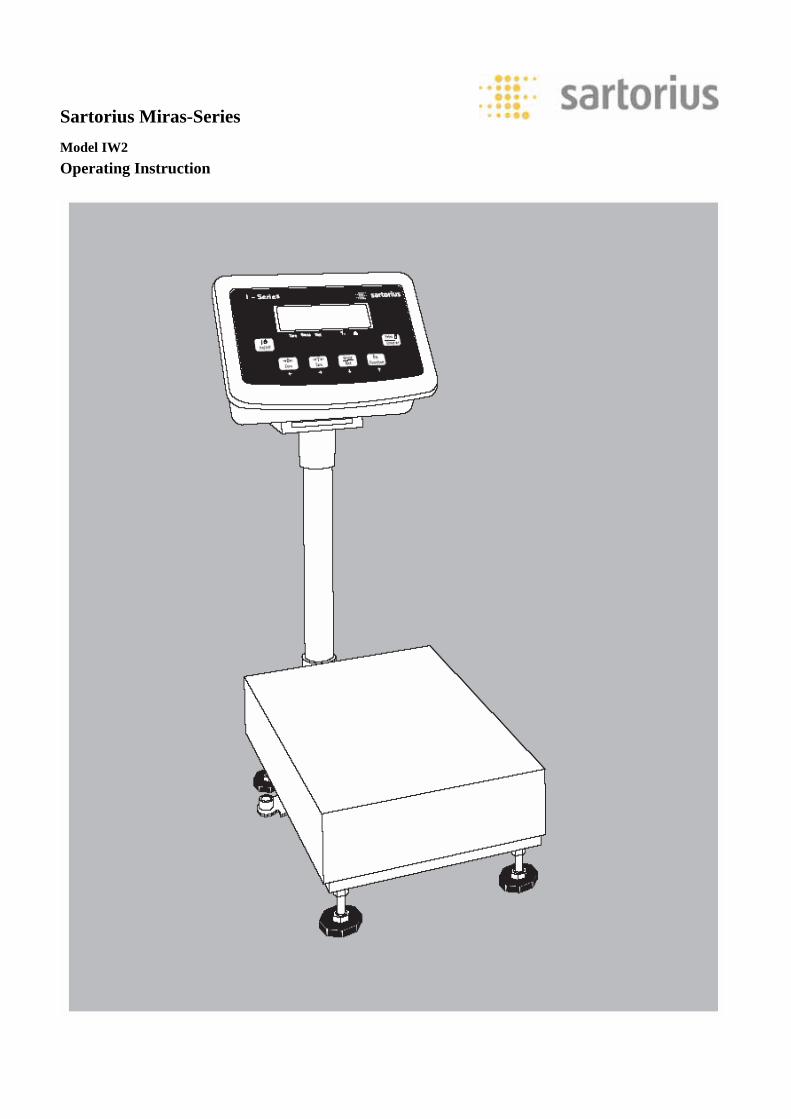
Sartorius Miras-Series Model IW2 Operating Instruction

Contents Connection to Power ..........................................................................................................................................................1 General View of the Equipment ..........................................................................................................................................2 Installing Instructions .........................................................................................................................................................3 Setting Up the Scale ...........................................................................................................................................................4 Installation..........................................................................................................................................................................5 Key Function Definitions ....................................................................................................................................................6 Application Program Menu.................................................................................................................................................7 Calibration and Linearization Mode Menu........................................................................................................................10 Configuration Mode Menu ...............................................................................................................................................12 Setup Menu ......................................................................................................................................................................13 SBI Interface .....................................................................................................................................................................14 Power Management Option..............................................................................................................................................17 Printing Mode Options.....................................................................................................................................................18 Error Codes .......................................................................................................................................................................21 Connect to Peripheral Devices ..........................................................................................................................................23 Specifications ...................................................................................................................................................................24

1
Connection to Power
Check the voltage rating and the plug design The scale is powered through the pre-installed power cord. the power supply is built into display and
control bit, which can be operated with a supply voltage of 100V to 240 V. make sure that the voltage rating printed on the manufacturer’s ID label is identical of AC adapter do not match the rating or standard you use, please contact your Sartorius office or dealer.
The power connection must be made in accordance with the regulations applicable in your country. To power a device of protection class I, plug the power cord into an electrical outlet (main supply) that is
properly installed with a protective grounding conductor (protective earth=PE). the power plug or a different, suitable disconnecting device for the power must be easily accessible.
NOTE: This equipment has been tested and found to comply with the limits pursuant to part 15 of FCC Rules. These limits are designed to provide reasonable radio frequency energy and, if not installed and used in accordance with these instructions, may cause harmful interference to radio communications. for information on the specific limits and class of this equipment, please refer to the Declaration of Conformity. Depending on the particular class, you are either required or requested to correct the interference. If you have a class A digital device, you need to comply with the FCC statement as follows: ”Operation of this equipment in a residential area is likely to cause harmful interference in which case the user will be required to correct the interference at his own expense.” If you have a Class B digital device, please read and follow the FCC information given below: “[…] However, there is no guarantee that interference will not occur in a particular installation. if this equipment does cause harmful interference to radio or television reception which can be determined by turning the equipment off and on, the user is encouraged to try to correct the interference by one or more of the following measures - Reorient or relocate the receiving the antenna. - Increase the separation between the equipment and receiver. - Connect the equipment into an outlet on a circuit different from that to which the receiver is connected. - Consult the dealer or an experienced radio/TV technician for help.”
Before you operate this equipment, check which FCC class (Class A or Class B).It has according to the
Declaration of Conformity included. Be sure to observe the information of this Declaration.
Safety Precautions
If you use an electrical outlet that does not have a protective grounding conductor, make sure to have an
equivalent protective conductor installed by a certified electrician as specified in the applicable regulations for
installation in your country. Make sure the protective grounding effect is not neutralized by use of an extension cord
that lacks a protective grounding conductor.
Warm up Time
To deliver exact results, the scale must warm up for at least 30 minutes after initial connection to AC power or after
relatively long power outages. Only after this time will the scale have reached the reched the required operation
temperature.
Using Equipment verified as Legal Measuring Instrument in the EU:
Allow the equipment to warm up for at least 6 hours after initial connection to AC power.

2
General View of the Equipment
1. Name Plate 2. Housing 3. Power Cable 4. Indicator Holder 5. Indicator Pole 6.Pole Support foot 7. Bubble (option) 8. Leveling feet 9. Stainless Cover/Pan 10. Power Plug 11.Cable gland cover 12.RS232 Port outlet

3
Installing Instructions
• The air bubble must be centered within the
• Circle on the level Indicator
• Level the weighing platform using the leveling
• Feet as described below:
Check to ensure that all leveling feet rest
securely on the work surface.
• To remove the platform cover
Under the metal frame structure
There are four safety overload protection pins
• The transportation protection nut is painted in red
• To loose the nut by turning the nut upward until tight before use.

4
Setting Up the Scale
ASSEMBLE PROCEDURE
1. To fix the pole bracket with 4 screws
2. To install the pole support leveling foot
3. To push the loadcell cable into the Pole
4. To insert the Pole into the bracket holder
5. To fix the pole with 2 screws
6. To insert the Indicator holder to the pole
7. To tighten the screw at Indicator bracket
Battery Powered Operation
If the user intended to use battery operation
• Open the battery cover at the back of the
Indicator.
• Purchase 6 pieces 1.5 V D size dry cell and insert
into the battery compartment.
• In case battery sign is appeared on the display,
It means the battery power is weak. You are
required to replace new batteries.

5
Installation
-Attach the wires to the screws terminals
Pin Assignment in the indicator
No Signal Meaning
1 +Excitation Bridge supply voltage positive
2 +Sense Sense positive
3 +Output Measuring Voltage positive
4 -Output Measuring Voltage negative
5 -Sense Sense negative
6 -Excitation Bridge supply voltage negative
Loadcell color code
Terminal assignment 1 2 3 4 5 6
For Load Cell
4 wires type Red Green White Black
6 wires type Red blue Green White Brown or Yellow Black
* For 4 wires loadcell - Pin 1, 2 and Pin 5, 6 connected with a jumper wire.
Operating Limits
Never exceed the maximum capacity of the weighing platform.
The maximum loading capacities of the weighing platforms in this series are listed
in the table below, and depend on the position of the load on platform:
Model Width(mm) Length(mm) Center* Side Comer
DC 240 320 50 35 20
ED 300 400 130 85 45
FE 400 500 500 400 200
GF 500 650 600 400 200
HH 700 700 600 400 200
IG 600 800 600 400 200
LL 1000 1000 4500 3000 1500
NL 1000 1250 4500 3000 1500
NN 1250 1250 45000 3000 1500
RN 1250 1500 4500 3000 1500
RR 1500 1500 4500 3000 1500
WR 1500 2000 4500 3000 1500

6
Key Function Definitions
1) On/Off
”on/off” function will depend on different power supply condition.
Needs setup menu for Back light control and for Auto power off.
When System is connected to mains and the « On/Off » switch turns the system on or off.
Off-Mode: Scale is in standby mode but there is no display visible (no backlight, no symbols, no display)
On-Mode: Scale is in operation and the display shows the function, which is in use. In this mode, “power
auto off” function is invalid.
When system runs on batteries and the « On/Off » switch turns the system on or off.
Off-Mode: Scale is totally off.
On-Mode: Scale is in operation and the display shows the function, which is in use. Back light
works based on setup menu
In this mode, “power auto off” function is valid. After 5, 10, 15 minutes system goes off when not in use according
to the setup menu.
2) Zero / Arrow-Left (ZERO/LEFT)
Weighing Mode: Set scale zero
Parameter Mode: Shift set position of digit to the Left
3) Tare / Arrow-Right (TARE/RIGHT)
Weighing Mode: Set scale Tare
Parameter Mode: Shift set position of digit to the Right
4) Gross-Net/Arrow-Down (G/N/DOWN)
Weighing Mode: Toggle Weight Unit Gross & Net
Counting Mode: Toggle Weight Unit Gross, Net & Pcs
Function Mode: To scroll Down menu selection
Parameter Mode: Decrement digit
5) Function / Arrow-Up (Fn/UP)
Weighing Mode: Switch the scale from Normal Weight mode to Application Setup mode
Function Mode: To scroll Up menu selection
Parameter Mode: Increment digit
6) Print/Enter (PRINT/ENTER)
Weighing Mode: Print key
Function mode: To scroll Level up in menu Mode/Confirm menu selected.

7
Application Program Menu Counting Step Key (or instruction) Display a. Select Application Program b. Select Counting c. Press PRINT/ENTER. Then
shows reference piece selection. now counting is blinking.
d. Place container and press
Tare if required(display “tared”)
e. Select reference sample
quantity: Options (5, 10, 20, 50, 100), and put the references on the scale. (Counting is blinking)
f. Press PRINT/ENTER .Now “O”
is blinking. Automatic Optimization Active.
g. Place more reference
samples on scale (The number is the same with reference sample quantity.)
h. Place uncounted
parts/samples on the scale i. Toggle between reference
piece weight, Total weight, and total pieces.
j. Unload the scale k. Exit Counting application to
App selection menu. (If want to exit app mode
completely, press zero key > 2 Sec.)
(Fn/UP) > 2 Sec (Fn/UP) or (G/N/DOWN) Repeatedly (PRINT/ENTER) (TARE/RIGHT) (Fn/UP) or (G/N/DOWN) Repeatedly (PRINT/ENTER) (G/N/DOWN) (Fn/UP) > 2 Sec (Zero key)>2 Sec

8
Check Weighing Step Key (or instruction) Display a. Select Application Program
b. Select Check Weighing c. Press PRINT/ENTER to
confirm.
d. Set low limit, “LO” is
blinking. e. Press PRINT/ENTER to
confirm and save. f. Set high limit, “HI” is
blinking. g. Press PRINT/ENTER to
confirm and save.
h. Place the sample on the
Scale Display shows the difference and HI/LO/OK symbol
i. Unload the scale 2. Exit Check Weighing to App
selection menu. (If want to exit app mode
completely, press zero key > 2 Sec.)
(Fn/UP) > 2 Sec
(Fn/UP) or (G/N/DOWN) Repeatedly
(PRINT/ENTER) (Fn/UP) or (G/N/DOWN) and/or (ZERO/LEFT) or (TARE/RIGHT) (PRINT/ENTER) (Fn/UP) or (G/N/DOWN) and (ZERO/LEFT) or (TARE/RIGHT) (PRINT/ENTER) (Fn/UP) > 2 Sec (Zero key)>2 Sec

9
Unit Toggling Step Key (or instruction) Display
a. Select Application Program
b. Select Unit Toggling
Application
c. Select Weight Unit 1 d. Confirm Weight Unit 1
e. Select Weight Unit 2
f. Confirm Weight Unit2 g. Place sample on the scale h. Toggle weight Unit i. Exit Unit toggling
Application (Unit Changes to Basic Unit).
(If want to exit app mode completely, press zero key > 2 Sec.)
(Fn/UP) > 2 Sec (Fn/UP) or (G/N/DOWN) Repeatedly (Fn/UP) or (G/N/DOWN) (PRINT/ENTER) (Fn/UP) or (G/N/DOWN) (PRINT/ENTER) (Fn/UP)>2 Sec (Zero key) > 2 Sec

10
Calibration and Linearization Mode Menu
Calibrate the Scale Step Key (or instruction) Display A. Switch on the scale B. Zero the scale C. Select
Calibration/Linearization Mode
D. Select Calibration E. Confirm/Start Calibration
After the zero point is stored, the required calibration weight showed on the display
F. Place the required weight on the scale If the weight is applied within the defined time limit and tolerance the weight will be accepted and the display shows the actual weight value and comes back to mode of operation selected previously. (To exit from linearization press ZERO/LEFT > 2 second)
(ON/OFF)
(ZERO/LEFT) (TARE/RIGHT) > 2 Sec (Fn/UP) or (G/N/DOWN) Repeatedly (PRINT/ENTER)

11
Linearize the Scale Step Key (or instruction) Display A. Switch on the scale B. Zero the scale C. Select
Calibration/Linearization Mode
D. Select Linearization E. Confirm/Start Linearization
After the zero point is stored, the required Linearization weight showed on the display
F. Place the required weight on the scale. If the weight is applied within the defined time limit and tolerance, the weight will be accepted and the display shows the second Linearization weight point.(To exit from linearization press ZERO/LEFT > 2 second)
G. Place the required weight on the scale. If the weight is accepted the Linearization is complete and comes out of the procedure. (To exit from linearization press ZERO/LEFT > 2 second)
H. Remove the Linearization
Weight I. Linearization Complete
(ON/OFF)
(ZERO/LEFT)
(TARE/RIGHT) > 2 Sec (Fn/UP) or (G/N/DOWN) Repeatedly (PRINT/ENTER)

12
Configuration Mode Menu
To configure the user interface of the scale to individual requirement
Step Key (or instruction) Display 1. Switch off the scale 2. Switch on the scale, Press and hold ZERO key while all the segments are displayed, then it will enter into configuration mode automatically.
(ON/OFF) (ZERO/LEFT) > 2 Sec
Navigation in the Setup Menu Key Function (PRINT/ENTER) Menu Item: Confirm Setting (Fn/UP) Menu Item: Scrolling Up
Digit Entry: Increment (G/N/DOWN) Menu Item: Scrolling Down
Digit Entry: Decrement
(ZERO/LEFT) Digit Entry: Selection Shift Left (TARE/RIGHT) Digit Entry: Selection Shift Right

13
Setup Menu
Menu 1. Serial Com 1.1 Baud Rate 1.1.1 600 1.1.2 1200 1.1.3 2400 1.1.4 4800 1.1.5 9600 1.1.6 19200
1.2 Parity 1.2.1 7bit-none
1.2.2 7bit-Odd 1.2.3 7bit-Even 1.2.4 8bit-none 1.2.5 8bit-Odd 1.2.6 8bit-Even
1.3 Print Option 1.3.1 Short
1.3.2 Long/Block
2. Back Light 2.1 ON
2.2 Off
3. Auto power off
3.1 Permanent On
3.2 5 minutes3.3 10 minutes3.4 15 minutes
4.Standby Options
4.1 ON
4.2 Off
5.Auto power off
5.1 Very stable condition
5.2 Stable condition5.3 Unstable condition5.3 Very unstable condition
6.ADC configuration menu
6.1 Decimal Point
6.2 Basic Unit
6.1.1 0
6.1.2 16.1.3 26.1.4 36.1.5 46.2.1 g
6.2.2 kg 6.2.3 lb 6.2.4 oz 6.2.5 t
6.3 Step width 6.3.1 1 6.3.2 2 6.3.3 5
6.4 e<>d frame 6.4.1 on 6.4.2 off
6.5 Adjust FSD(Span) 6.5.1 (Enter FSD Weight)
6.6 Calibration Weight 6.6.1 (Enter CAL Weight)
6.7 Linearization Weight
6.7.1 (Enter Lin Weight)
7.1 Do not restore 7.2 Restore
7.Reset menu
For some countries, these three units are forbidden to use
1.3.3 Continous Mode

14
SBI Interface
Output format with 22 characters The following data block format is output:
K K K K K K V W W W W W W W W W E E E CR LF
K : ID V : +/- Sign W : weighed Value E : Unit
ID Codes
S t a t Indicates a special weighing platform status, e.g., Initialization, self test, adjustment/ calibration
N Indicates net or gross value N 1 Indicates net value with 1st tare memory assigned (not main tare) N 2 Indicates net value with 2nd tare memory assigned (not main tare)
S / N Indicates equipment serial number
M o d e l Indicates equipment Model
Plus/Minus Sign + Plus Sign
- Minus Sign
Space (i.e., no plus or minus sign; if weighed value is 0 or if output does not include a weighed value)
Unit No stable parameter.; no weighed value
g Grams k g Kilograms l b Pounds o z Ounces t Tons

15
Special Codes The data block may contain special information. Special status-dependent codes:
1 2 3 4 5 6 7 8 9 10 11 12 13 14 15 16 17 18 19 20 21 22 S1 S2 CR LF
The following status codes are output for “S1” and “S2”:
: Taring
C : Internal calibration - - : All numerals shown in stable readout H : Overload L : Underload
Special Error-dependent codes:
1 2 3 4 5 6 7 8 9 10 11 12 13 14 15 16 17 18 19 20 21 22 E R R n n1 n2 CR LF
n – n3 contain error code of up to 3 digits. Data Input formatData formats You can enter certain commands to control weighing platform functions through the SBI interface. As with data output, data is input as 7-bit ASCII characters; hardware and protocol configuration are identical to those for data output. Formats:
ESC K CR LF
ESC K K1 - CR LF ESC : Escape
K : Command Character K1 : 2nd Command Character (Number) - : Underline CR : Carriage return LF : Line feed The CR and LF characters do not have to be transmitted in the data string.
Data Input formatData formats
ESC P CR LF

16
Print, Auto Print: initiate / Stop ESC T CR LF
Zero/Tare – combi ESC V CR LF
Zero the weighing platform ESC U CR LF
Tare the weighing platform ESC S CR LF
Reset ESC O CR LF
Lock Key Board
ESC R CR LF ESC R CR LF Unlock Key Board
ESC X 1 - CR LF ESC x 1 - CR LF Output model Name ESC X 2 - CR LF
ESC x 2 - CR LF Output Serial Number Adaptation to Ambient Conditions
ESC K CR LF Very Stable ESC L CR LF
Stable ESC M CR LF
ESC M CR LF Unstable ESC N CR LF
Very Unstable

17
Power Management Option
The scale connected to AC power: On/Off Switch: On – Scale is operational & display shows function/Mode, which is in use
Off – Depend on the setup menu “4. Standby option.”
Back Light: Depending on setup Menu Backlight is On/Off. Auto Power Off: Not Active The Scale connected to Battery:
On/Off Switch: On – Scale is operational & the display shows the function/mode, which is in use Off – Completely Off (No Display & No internal Circuitry)
Back Light: Depending on setup Menu Back light is On/Off. Backlight goes off after 15 Seconds if no
operation is done (No key press/No weighing). Backlight comes back whenever a Key (Except On/Off) is pressed or when something is put on the scale.
Auto Power Off: Depending on setup menu system power goes down.
Time limit for Auto power in Setup Menu are 5, 10, 15 Minute or can be disabled also.

18
Printing Mode Options
Printing out Options
Mode of Operation Short Print Block Print(Long Print) Continuous Mode
Normal Weighing Mode
Net Weight Gross Weight(if tare is active) Tare Weight(If tare is active) Net Weight
Gross Weight(if tare is not active) or Net Weight(if tare is active)
Counting Mode Net Weight Pcs Ref. Weight
Gross Weight(if tare is active) Tare Weight(If tare is active) Net Weight Pcs Ref. Weight
Pcs(default) By pressing G/N key, it can switch to: Gross Weight(if tare is not active) or Net Weight(if tare is active)
Check Weighing Mode
Net Weight Chk OK/LO/HI
Gross Weight(if tare is active) Tare Weight(If tare is active) Net Weight Chk OK/LO/HI LL(Low Limit) HH(High Limit)
By pressing toggle key, It can Switch between: Gross Weight(with unit 1) Or Gross Weight(with unit 2)
The print out put can be configured to three modes, Short Mode (option 1.3.1), Long/ Block Mode (option 1.3.2) and Continuous Mode (option 1.3.3). Sample print outputs are given below for all the three printing options in different weighing modes. a. Print output : Expansion of Abbreviations
N Net weight G Gross Weight T Tare Weight (Appears in Block Printing mode, if Tare is not zero) Chk. Check weighing Status (If Check Weighing Application is selected) OK Ok (Check Weighing mode, if the placed weight is in the range set) HI High LO Low LL Lower Limit (Check Weighing) HL Higher Limit (Check Weighing) W.Ref. Reference weight (Counting Application). Pcs Number of units on the pan. g Weight in Grams. kg Weight in Kilograms + Appears, if the value is greater than or equal to zero. - Appears, if the value is less than zero.

19
b. Sample print outputs in different applications
1. Short Printing mode: i. Normal Weighing -------------------- G + 200 g -------------------- ii. Counting -------------------- N + 400 g Pcs 10 pcs
W.Ref. 40 g -------------------- iii. Check weighing Ex 1: If the weight on the pan is <10% of Lower Limit set. -------------------- N + 0 g Chk. --------------------
Ex 2: : If the weight on the pan < Lower Limit set. -------------------- N + 100 g
Chk. LO --------------------
Ex 3: : If the weight on the pan is between the set Limit. -------------------- N + 200 g Chk. OK --------------------
Ex 4: : If the weight on the pan > Higher limit set. -------------------- N + 410 g Chk. HI --------------------
iv. Unit Toggling Output 1: Before toggle key is pressed -------------------- G + 300 g -------------------- Output 2 : After Unit is toggled to kilograms. -------------------- G + 0.300 kg -------------------- 2. Block Printing mode: i. Normal Weighing Ex 1: If Tare is zero --------------------
G + 200 g -------------------- Ex 2: If Tare is Not zero -------------------- G + 100 g T + 50 g N + 50 g -------------------- ii. Counting Mode Ex 1: If Tare is zero. -------------------- G + 400 g Pcs 10 pcs W.Ref. 40 g -------------------- Ex 2: If Tare value is set. -------------------- G + 440 g T + 400 g N + 80 g Pcs 2 pcs W.Ref. 40 g -------------------- iii. Check Weighing Mode Ex 1: : If the weight on the pan is <10% of Lower Limit set, with zero Tare. -------------------- G + 0 g Chk. LL 200 g HL 400 g -------------------- Ex 2:: If the weight on the pan < Lower Limit set, with zero Tare. -------------------- G + 100 g Chk. LO LL 200 g HL 400 g --------------------
Ex 3: If the weight on the pan is between the set Limit, with zero Tare. -------------------- G + 200 g Chk. OK LL 200 g HL 400 g -------------------- Ex 4: If the weight on the pan > Higher limit set. -------------------- G + 410 g Chk. HI LL 200 g HL 400 g --------------------

20
Ex 5: If the weight on the pan is <10% of Lower Limit set, with a set Tare value. -------------------- G + 400 g T + 400 g N + 0 g Chk. LL 200 g HL 400 g -------------------- Ex 6: If the weight on the pan < Lower Limit set, with a set Tare value. -------------------- G + 800 g T + 400 g N + 400 g Chk. OK
LL 200 g HL 400 g -------------------- Ex 7: If the weight on the pan > Higher limit set, with Tare value set. -------------------- G + 810 g T + 400 g N + 410 g Chk. HI LL 200 g HL 400 g -------------------- iv. Unit Toggling Output 1: Before toggle key is pressed -------------------- G + 300 g T + 200 g N + 100 g -------------------- Output 2 : After Unit is toggled to kilograms. -------------------- G + 0.300 kg T + 0.200 kg N + 0.100 kg --------------------
3. Continuous Printing mode i. Normal Weighing Ex 1: If Tare is not active G + 200 g Ex 2 : If Tare Value is present. N + 200 g
ii. Counting Mode Default: Pcs 2 Pcs
Ex 1: If Tare is not active (G/N Key) G + 200 g Ex 2 : If Tare Value is present. (G/N Key) N + 200 g
iii. Check Weighing Ex 1: If Tare is not active G + 200 g Ex 2 : If Tare Value is present. N + 200 g
iv. Unit toggling Output 1: Before toggle key is pressed G + 300 g
Output 2: After the unit is toggled to Kilograms. G + 0.300 Kg

21
Error Codes
Error codes are shown on the main display. Err codes are shown continuously; Inf. messages are shown for 2 seconds, after which the program returns automatically to the weighing mode. Problem Cause Solution Nothing appears or some symbols exist desultorily on the display
No power available The AC adapter is not plugged in Battery is drained LCD cable is loose
Check the power supply Plug in the AC adapter Replace battery; chargeable battery using external charger Plug in the cable again or contact with Miras customer service
oL
The load exceeds the balance/scale capacity
Unload the balance/scale
uL Weighing pan is not in place Something is touching the weighing pan
Place the weighing pan on the pan Move the object that is touching the weighing pan
d5PErr Display overflow: Value cannot be shown on the display
Reduce the load on the balance/scale
CALErr Calibration parameter not met; e.g.: --balance/scale not zeroed --balance/scale is loaded
Calibrate only when zero is displayed Press(zero) to tare the balance/scale Unload the balance /scale
APPErr Weight is too high or there is no sample on the balance/scale with application in use
Increase the weight on the balance/scale
PrtErr Data interface for printing is blocked
Contact the Miras customer service center
5y5Err APP board can’t get data from AD board
Contact the Miras customer service center
E2Pro EEPROM defective
Contact the Miras customer service center
FnErr Function not allowed in scales verified for use in legal metrology
Contact the Miras customer service center
5b1Err There is no such SBI command for Miras
Contact the Miras customer service center
Err08 Zero is not possible Remove some objects from scale
Err09 Tare is not possible when the gross weight is a minus value
Zero the balance/scale

22
no11P No platform is connected
Connect a platform or sensor
Max. weighing capacity is less than indicated under “calibrate”
The balance/scale is switched on without the weighing pan in place
Place the weighing pan on the balance/scale and press “ON/OFF”
The weight readout is obviously wrong
The balance/scale was not calibrated/adjusted before weighing Balance/scale not zeroed
Calibrate/adjusted the balance/scale Zero the balance/scale

23
Connect to Peripheral Devices
Diagram for interfacing a computer or different peripheral device to the scale using RS232 and cable up to 15m.

24
Specifications
Mode IW2-3 IW2-6 IW2-15
Accuracy class III III III
Weighing capacity(kg) 3 6 15
Verification(g) 1 2 5
Readability(≤± g) 1 2 5
Linearity(≤± g) 1 2 5
Operating temperature -10℃ ~ 40℃
Mode IW2-30 IW2-60 IW2-150
Accuracy class III III III
Weighing capacity(kg) 30 60 150
Verification(g) 10 20 50
Readability(≤± g) 10 20 50
Linearity(≤± g) 10 20 50
Operating temperature -10℃ ~ 40℃
Mode IW2-300 IW2-600
Accuracy class III III
Weighing capacity(kg) 300 600
Verification(g) 100 200
Readability(≤± g) 100 200
Linearity(≤± g) 100 200
Operating temperature -10℃ ~ 40℃
Mode IW2-1000 IW2-1500 IW2-3000
Accuracy class III III III
Weighing capacity(kg) 1000 1500 1000
Verification(g) 500 500 1000
Readability(≤± g) 500 500 1000
Linearity(≤± g) 500 500 1000
Operating temperature -10℃ ~ 40℃