sap scripting guide v0.6
DESCRIPTION
KTRANSCRIPT

I n t e r n a l U s e O n l y
Load Runner SAP Scripting GuideSAP R/3
Draft
0.6
November 19, 2008

I n t e r n a l U s e O n l y
TABLE OF CONTENTSDocument Information......................................................................................4
0.1 Version Control...................................................................................4Technology Overview.......................................................................................4
1.1 Document purpose..............................................................................41.2 Suggested Usage................................................................................4
Prerequisites...................................................................................................52.1 Requirements to begin scripting.........................................................52.2 Enabling Scripting on the Application Server Procedure.......................5
Enabling Scripting at the Front End ..................................................................73.1 Prerequisites..............................................................................................7
3.1.1 Procedure........................................................................................7Example...................................................................................................7
4. Parameterization..........................................................................................8 4.1 Preparing the data.............................................................................84.2 Placement of the Parameter file..........................................................84.3 Why parameterize different data?.......................................................94.4 Not the obvious data dependency.......................................................94.5 Testing the data.................................................................................94.6 Creating a New Parameter..................................................................94.7 Deleting a parameter........................................................................114.8 Using the Parameter List ..................................................................12
What is lr_strings.h.........................................................................................13Recording Settings.........................................................................................14
6.1 Normal Recording:............................................................................15Recording a Script..........................................................................................20
7.1 To record the script:.........................................................................217.2 How do I view the script?..................................................................237.3 Tree View.........................................................................................237.4 Script View.......................................................................................24
Runtime Settings............................................................................................258.1 Run Logic.........................................................................................25Pacing....................................................................................................26Log........................................................................................................27Think Time.............................................................................................28Additional Attributes..............................................................................29Miscellaneous.........................................................................................308.6 Speed Simulation..............................................................................31
I n t e r n a l U s e O n l y
Browser Emulation.................................................................................328.8 Proxy...............................................................................................338.9 Preferences......................................................................................348.10 Download Filters.............................................................................368.11 Content Check................................................................................37
Correlation.....................................................................................................37Definition...............................................................................................379.1 Solving Common Playback Problems..................................................389.2 How do I work with unique server values?..........................................38
Most common SAP functions...........................................................................40Load Runner shortcuts....................................................................................435.Performance helpful tips – Terminology........................................................43

Document Information
0.1 Version Control
Version Status Date Author Changes
0.1 Draft September 1, 2008 Carlos Antunez Initial Draft
0.2 Draft September 4, 2008 Ricardo Ortiz Example of required style changes
0.5 Draft November, 16, 2008
Carlos Antunez Adding Information runtime settings, recording options
0.6 Draft November, 18, 2008
Carlos Antunez Changed format and added information regarding parameters
Technology Overview
1.1 Document purpose
The purpose of this tutorial is to provide a detailed explanation of how to develop LoadRunner scripts for the SAPGUI protocol.
This document explains how to record, parameterize, debug, execute and analyze the SAPGUI protocol and provides general guidance on working with the SAPGUI protocol.
1.2 Suggested Usage
Before reading this document, the user must know how to record and replay a script. This is an SAP guide to scripting.
This document can be used as a guide for new consultants or as a reference for experienced consultants.
This document will help answer the following questions: What recording options should be used? How do I correlate between actions? How can I identify code redundancies? How can I debug my script? Why do my scripts fail after the first iteration? Why do my scripts work in VuGen but not in Controller? How can I verify that my scripts complete the business process as intended/expected?
This document uses information, settings and screenshots from HP-Mercury LoadRunner version 8.1. Older versions of LoadRunner, prior to version 8.0, record SAP script slightly differently without some of the automatic script correlation features. Please make sure you are using the latest HP Software version.
Prerequisites
2.1 Requirements to begin scripting
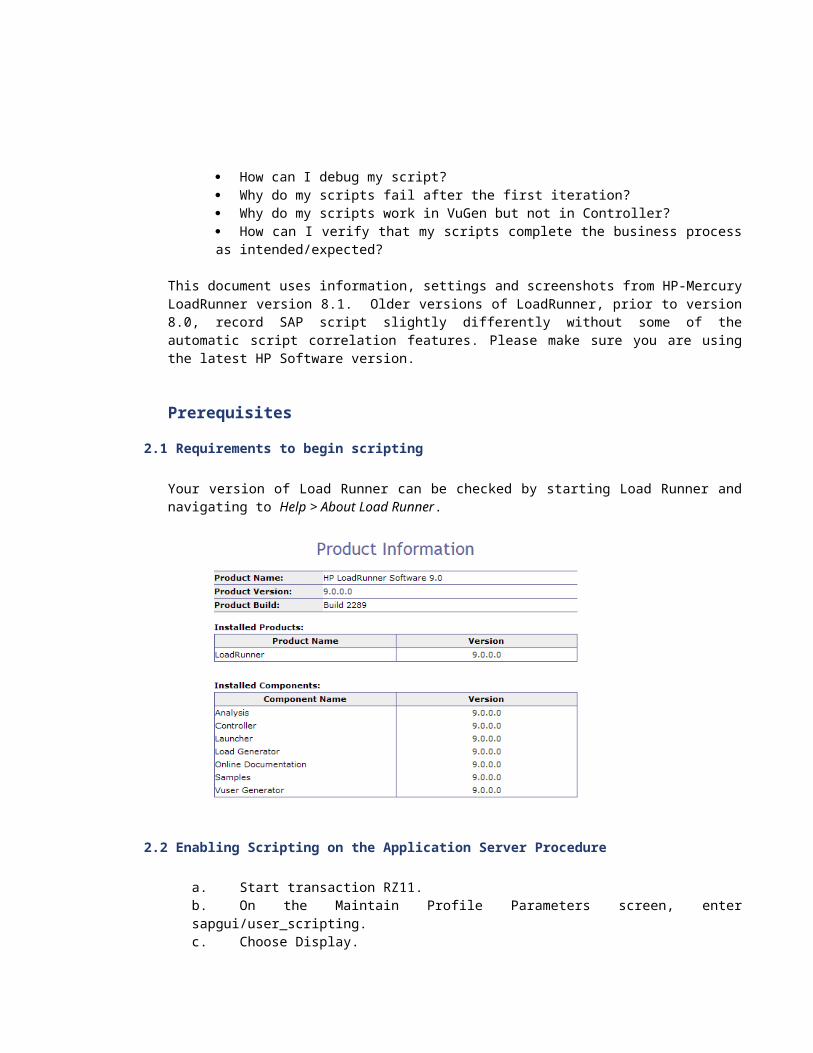
Your version of Load Runner can be checked by starting Load Runner and navigating to Help > About Load Runner.
2.2 Enabling Scripting on the Application Server Procedure...
a. Start transaction RZ11.b. On the Maintain Profile Parameters screen, enter sapgui/user_scripting.c. Choose Display.d. In the Display Profile Parameter Attributes screen, choose Change value.e. Enter TRUE in the NEW value field.f. Choose .
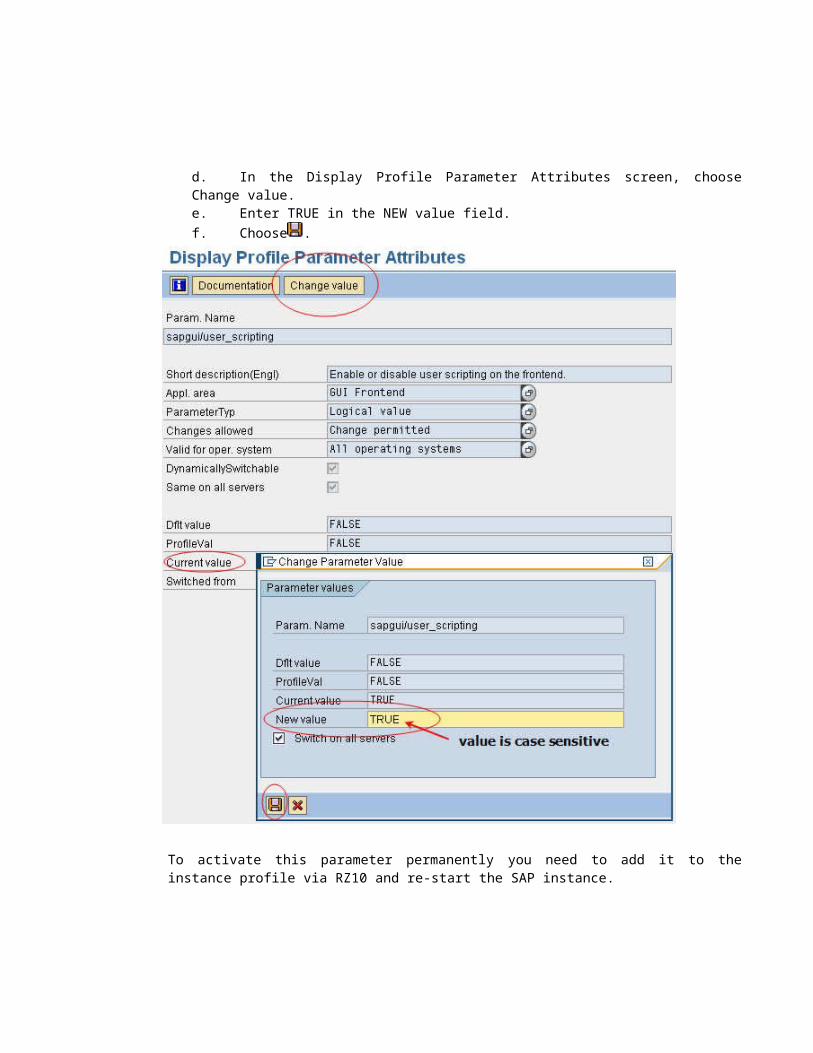
To activate this parameter permanently you need to add it to the instance profile via RZ10 and re-start the SAP instance.

Enabling Scripting at the Front End
3.1 Prerequisites
The SAP GUI Scripting component is installed.
3.1.1 Procedure
1. On any screen, choose Customizing of local layout. 2. Choose Options.... 3. Choose the Scripting tab. 4. Select Enable Scripting.
5. Choose Apply.
Example
The following screenshot shows the recommended settings.
If you are using GUI scripting only within eCATT, there is no need to have a message displayed each time a script starts. On the other hand, a script never tries to open a new GUI connection in the eCATT environment
4. Parameterization
Point to note that parameterization may result in data dependency which the tester should be aware of and handle it appropriately. Every load test should at least require parameterization.

Parameterization includes passing different types of data into the application to emulate the real world users performing/entering different values.
What do clients want to achieve from parameterization?
To test different data Just to load/emulate the data
Parameterization requires identifying with the clients which areas required data input. This will be useful when discussing in the Application Design. From there, they can prepare the data from the database which is a more efficient method.
4.1 Preparing the data
Usually after walking through the application, I will request the client to prepare the date via the database and export it out as an excel file. This will reduce time in preparing lengthy excel or notepad files. From there, you can manipulate the data easily in either Excel or OpenOffice.org. After I’ve amended the files properly, I will save it as a .dat file and placed it in a shared folder for my scripts to access.
Once converted into .dat file, ensure that they have been delimited properly with the commas. Take note that Vugen allows different delimiters in the Parameter List.
The usual items to parameterize are username, password, dates, etc but not limited to the mentioned. However, there are also hidden values that are stored in web pages or HTML codes (e.g. hard-coded hidden input) which are captured by Vugen.
4.2 Placement of the Parameter file
When you create a parameter for each script, by default, it’s stored in the root of the script folder. That is, if you save the script as test_script.usr in C:\, the parameter file will be saved in C:\test_script. For every script that has a parameter, it will be saved in its individual script folder. This way is good for a single script but when multiple scripts using the same parameter file is involved in the load test, it will be advisable to centralize the parameter file.
4.3 Why parameterize different data?
Why is there different effort on different data? A simple example is uploading of different size of files. If parameter A is uploading 2 MB of file while parameter B is uploading 4 MB of file, it will definitely generate a higher throughput on the latter parameter. This may be a concern of the client.
Another example is querying different items in a database. Parameter A may query and return a smaller result while parameter B returns a bigger result causing a higher throughput.

4.4 Not the obvious data dependency
Point to note that parameterization may result in a data dependency which the tester should be aware of and handle it appropriately.
Examples are username and password submission: a username login will require a valid password. This may seemed obvious for this situation. However, as pointed earlier about the hidden input, you will have to be cautious on it. As Vugen records whatever is been transmitted to the server, the hidden input are recorded as well. Therefore, you will need to check back with the application developers to find out more about the hidden values associated with each parameter value. If possible, request them to provide a list of the values in excel file format for you to manipulate.
4.5 Testing the data
There is various ways to test if the parameters are correct. You can perform the following:Replay the script in Vugen with one iteration.Replay the script in Vugen with three iterations. Replay the script in Controller with one Vuser. Replay the script in Controller with three Vusers.
These will be sufficient to test out the validity of the parameters used. You can also defined at which point the parameter values are been used by defining the starting row to retrieve data.
Some applications/business processes only allow one time use of the parameter. For example; deletion. As such, you should be aware that after each test, request the client or the application team to revert the changes for you so that there are data for you to delete.
4.6 Creating a New ParameterTo create a parameter first you must identify which values you are going to parameterize, let’s take for example the username and password.
As we see in the image below, the value for the user and password are hard-coded into the script, this is because Vugen recordeds the values that the scripter inputs while recording.
Select the text userid and right click; this will bring up the following menu.

Click on the option Replace with a paramter; which will bring up the following pop-up window.
Replace the text NewParam to the parameter you are creating which in this case is Username to indicate that this parameter will be for the username.
Then click OK and the text should look like the following:
Repeat this as many times as you need to create parameters
4.7 Deleting a parameter
Select the parameter from the parameter tree, and click Delete.

The Delete Parameter dialog box opens.
If you want to delete the parameter file from the disk, select Delete parameter data file from disk. Click Yes.
If you selected Delete parameter data file from disk, VuGen sends a warning message. Click YES to confirm your action.
4.8 Using the Parameter List You use the Parameter List to examine all of the parameters, create new parameters, delete parameters, or modify parameter properties.
To view the Parameter List and view a parameter's properties:
Click the Parameter List button or select Vuser > Parameter List. Select a parameter to show its properties.
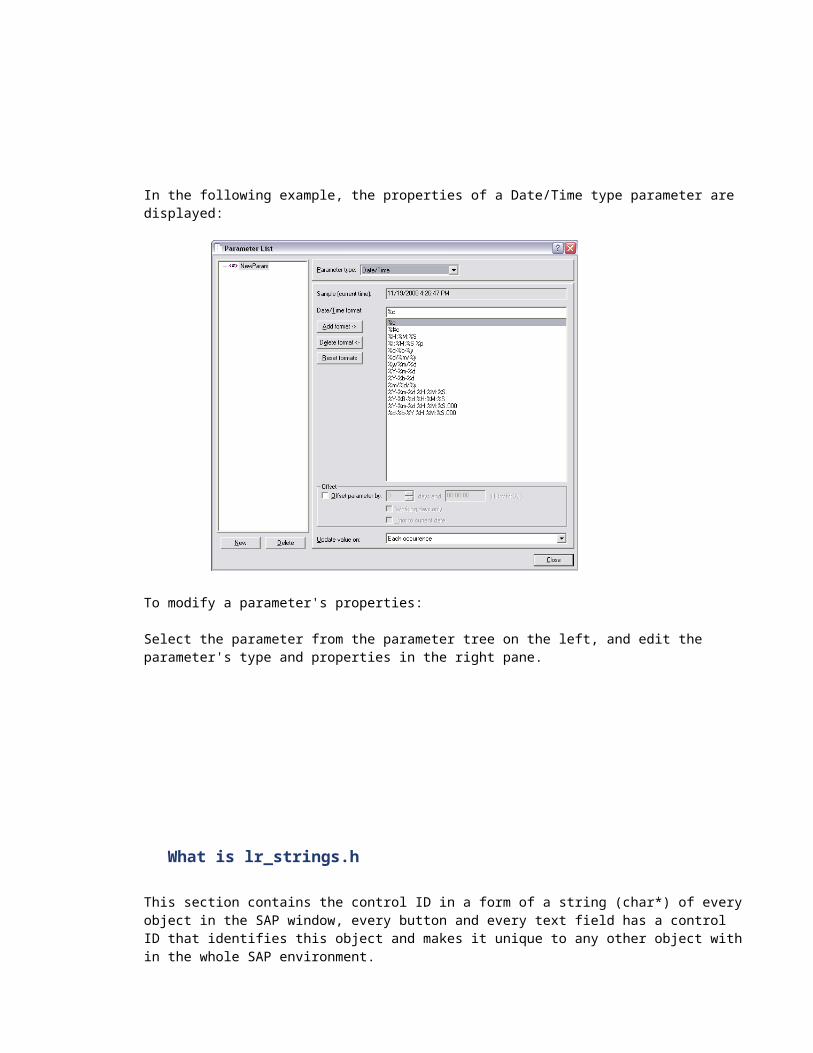
In the following example, the properties of a Date/Time type parameter are displayed:

To modify a parameter's properties:
Select the parameter from the parameter tree on the left, and edit the parameter's type and properties in the right pane.
What is lr_strings.h
This section contains the control ID in a form of a string (char*) of every object in the SAP window, every button and every text field has a control ID that identifies this object and makes it unique to any other object with in the whole SAP environment.
While recording Load Runner by default gives it the name it already has in SAP and stores it in the lr_string.h section, although it is not recommended to delete any of the data that is in this section, a user can add variables if needed.
The control ID for the save button (circled in RED) is: ses[0]/wnd[0]/tbar[0]/btn[11]
ses[0] indicates the number if the session that is open.wnd[0] indicates the number of the window that is open, because in SAP GUI.tbar[0] indicates the address where the object is in, in this case it is in the toolbar (tbar).Btn[11] indicates what type of object it is, and the number of the object in SAP GUI.
You will find this object this way in lr_string.h:
Const char* btn11 = “ses[0]/wnd[0]/tbar[0]/btn[11]”;
Recording Settings
When recording against the SAP protocol, usually a single protocol script is used – SAPGUI; however, if recording against the web based CRM module a multi-protocol script may need to be recorded using SAPGUI and SAP-Web.

Normal recording settings should allow scripting without any problems; however, check with the Basis team for any specific web based configuration if using the SAP–Web protocol.
6.1 Normal Recording:
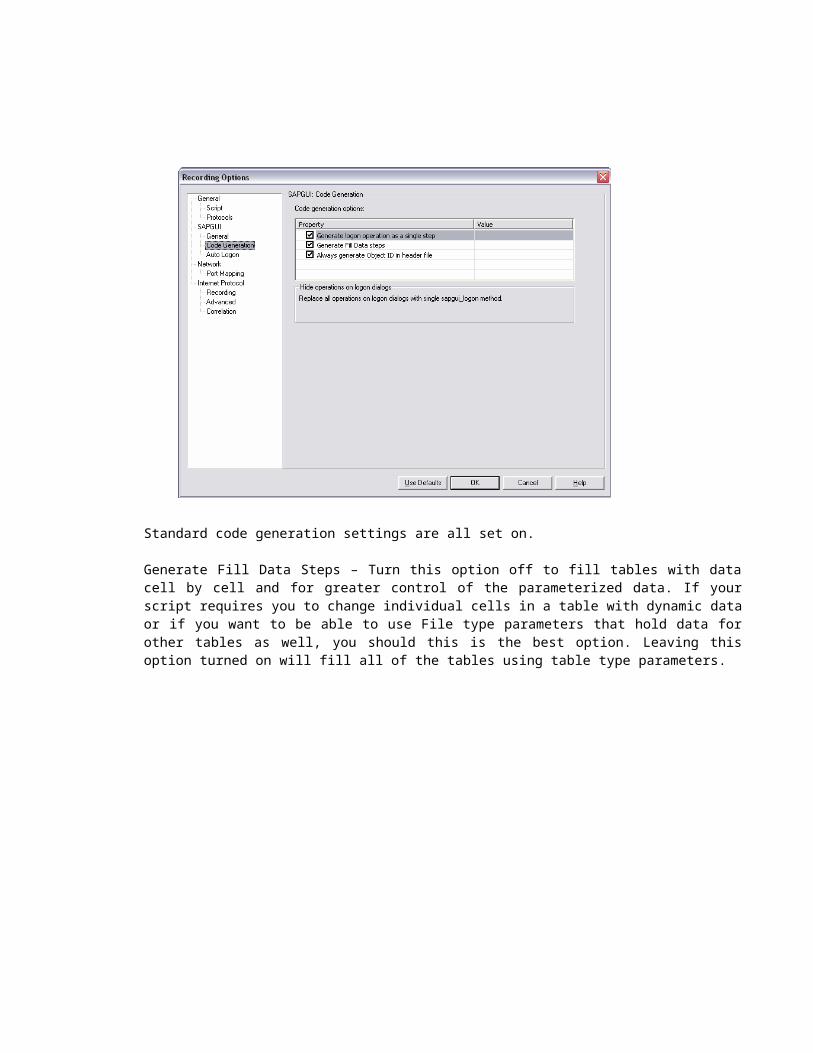
All recording screen settings can be accessed by keying CTRL+F7 from within VUGen or from Tools > Recording Options.The options displayed in the following screenshot are for normal SAP recording:

Initially, capturing screenshots can facilitate script debugging; however, for improved efficiency and performance this option should be disabled once it is certain that the scripts are working as intended.
Standard code generation settings are all set on.
Generate Fill Data Steps – Turn this option off to fill tables with data cell by cell and for greater control of the parameterized data. If your script requires you to change individual cells in a table with dynamic

data or if you want to be able to use File type parameters that hold data for other tables as well, you should this is the best option. Leaving this option turned on will fill all of the tables using table type parameters.
Unless there is a specific reason to do so, Auto-Logon should be turned off and separate actions should be used to logon and logoff.
There are a number of instances where you may need to logon and off using different users within a scenario, especially within some of the financial transactions where you will be required to logon with one user create a purchase order, logoff and then re-logon as an approver. This is only possible with this option turned off and using separate logon/logoff actions.
Ensure that ‘HTML-based script’ is selected for any SAP-Web based scripting.
Accept the default settings in the Internet Protocol > Advanced section. These settings only require modification on rare occasions to accommodate unique client configurations.

Correlation is used to automatically capture and re-use values sent by the server, such as Session ID’s. With SAP, unlike Siebel, scripting against the SAPGUI protocol does not have any correlation except for passing values between actions in scenarios.
Correlation for SAP-Web will require the same configuration as with any Web environment. To begin with, accept the default correlation settings however due to the high level of customization required for each client, it is almost a certainty that other correlation rules will need to be developed.

Recording a ScriptTo begin recording user actions, you open VuGen and create a blank script. You fill the blank script by recording events and adding manual enhancements.
In this section, you will open VuGen and create a blank Web script.
1. Start LoadRunner.
Choose Start > Programs > LoadRunner > LoadRunner. The HP LoadRunner Launcher window opens.
2. Open VuGen.
In the Launcher window, click the Load Testing tab.
Click Create/Edit Scripts. VuGen’s Start Page opens.
3. Create a blank Web script.
Click New Vuser Script in the Scripts tab in the VuGen Start Page.
The New Virtual User dialog box opens, displaying the options for a new single protocol script.

A protocol is the language that your client uses to communicate with the back-end of the system. HP Tours is a Web-based application, so you will create a Web virtual user script.
Make sure the Category type is All Protocols. VuGen displays a list of all of the available protocols for a single protocol script. Scroll down the list, select Web (HTTP/HTML), and click OK to create an empty Web script.
Note: Advanced users can record several protocols during a single recording session in a multi-protocol script. In this tutorial, you create a single protocol script of Web type. The procedure for recording other types of single protocols or multi-protocol scripts is similar to the method you will use for recording a Web script.
7.1 To record the script:a) Start recording on the HP Tours Web site.
Click Record Application in step 1 in the Task pane.Click Start Recording at the bottom of the instruction pane.
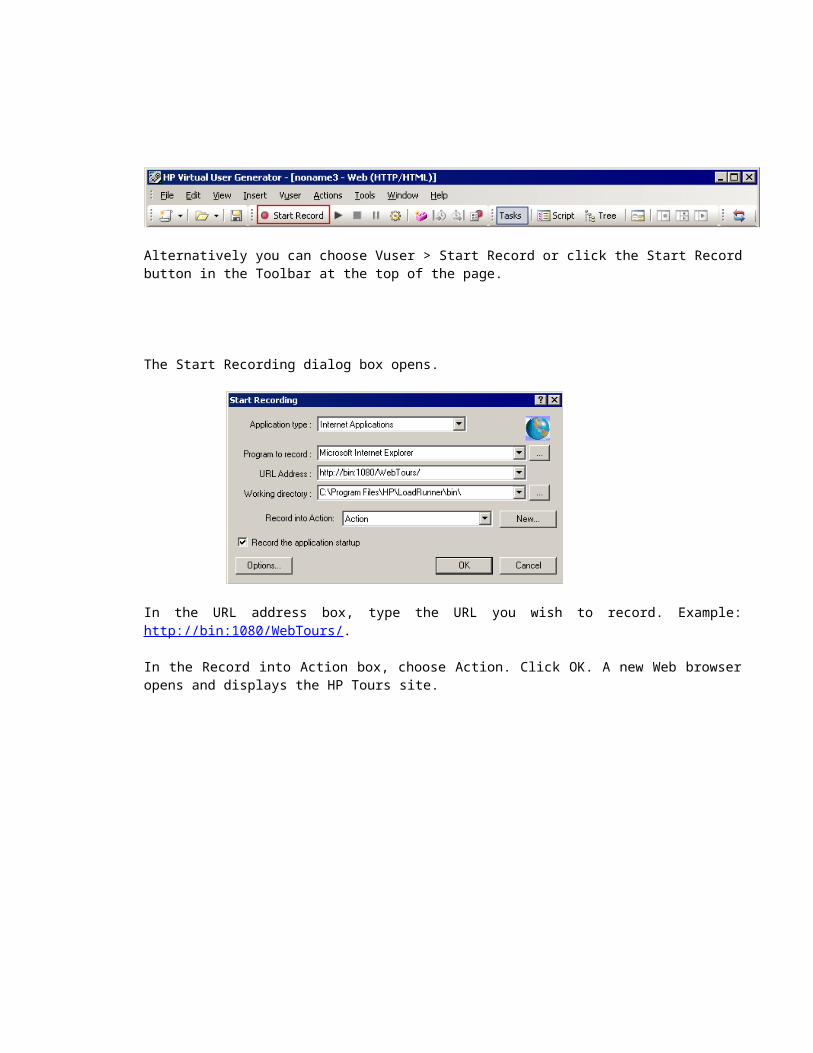
Alternatively you can choose Vuser > Start Record or click the Start Record button in the Toolbar at the top of the page.
The Start Recording dialog box opens.

In the URL address box, type the URL you wish to record. Example: http://bin:1080/WebTours/.
In the Record into Action box, choose Action. Click OK. A new Web browser opens and displays the HP Tours site.
Note: If there is an error opening the site, make sure that the web server is running. To start the server choose Start > Programs > LoadRunner > Samples > Web > Start Web Server.
The floating Recording toolbar opens. Comment button

Continue to record the business process. While recording a step within the BP it is recommended that you add comments or a description explaining what step of the BP it is. For example Login, Logoff, Click Add button, etc.
When the business process is complete, proceed to click the Stop button, to view the script that has just been recorded.
7.2 How do I view the script?VuGen recorded your steps from the moment you clicked the Start Record button to the moment you clicked the Stop button.
You can now view the script inside VuGen. You can view the script in Tree view or Script view. Tree view is an icon-based view that lists the actions of the Vuser as steps, while Script view is a text-based view that lists the actions of the Vuser as functions.
7.3 Tree ViewTo view the script in Tree view choose View > Tree View or click the Tree view button. To view the Tree View across the whole window, remove the Task pane by clicking the Task button.
For each step you performed during recording, VuGen generated an icon and a title in the test tree. In Tree view, you see the actions of the user as script steps. Most steps are accompanied by a corresponding snapshot of the recording.
7.4 Script ViewScript view is a text-based view that lists the actions of the Vuser as API functions. To view the script in Script view choose View > Script View or click the Script View button.
Stop Button
In Script view, VuGen shows the script in an editor with color coded functions and their argument values. You can type C or LoadRunner API functions, as well as control flow statements, directly into this window.
Runtime Settings
Configuring the runtime settings is very important while executing your scripts in Vugen and in the controller so the configuration must be made correctly. We will review the most important options that must be setup. First of all the runtime settings are collections of settings that the script uses while being executed.

8.1 Run Logic
The Run Logic displays the execution sequence initiating with the Init section that contains the “vuser_init” action and finalizing with the End section that contains the “vuser_end” action. The only section that iterates is the Run section and any action block that it contains.
It’s also possible to add/remove action blocks from any section within the Run Logic. It all depends on how you want to configure the execution of your script and what you want to iterate.
Pacing
The pacing is disabled while executing the script in Vugen when debugging, because it’s not necessary to have pacing when debugging.

The first option indicates that the script will continue onto the next iteration immediately when the prior iteration ends.
The second option is selected fixed when you want to indicate that the next iteration to begin at a certain number of seconds after the previous iteration ended like for example 60 seconds.
Random is selected when you want the next iteration to begin within an interval of time. This means that the next iteration will begin in a random time between 60 and 90 seconds. The default is 60 to 90 seconds.
The last option is selected when you want to indicate to the script that the next iteration will begin in a certain time. Fixed is selected when you indicate to the script that the next iteration will begin in a certain amount of time.
For example if an iteration takes 30 seconds to be completed and the pacing is set to 60 seconds, no matter how long the first iteration takes, the next iteration will begin in 60 seconds.
If random is selected the time will be in an interval of times; Explained above.

Log
The log is a very helpful way of identifying what is happening while the script is running and should be enabled while debugging in Vugen. Select Always send messages when debugging this option will display every action that is being occurred while running the script. Extended log is very highly recommended while debugging.
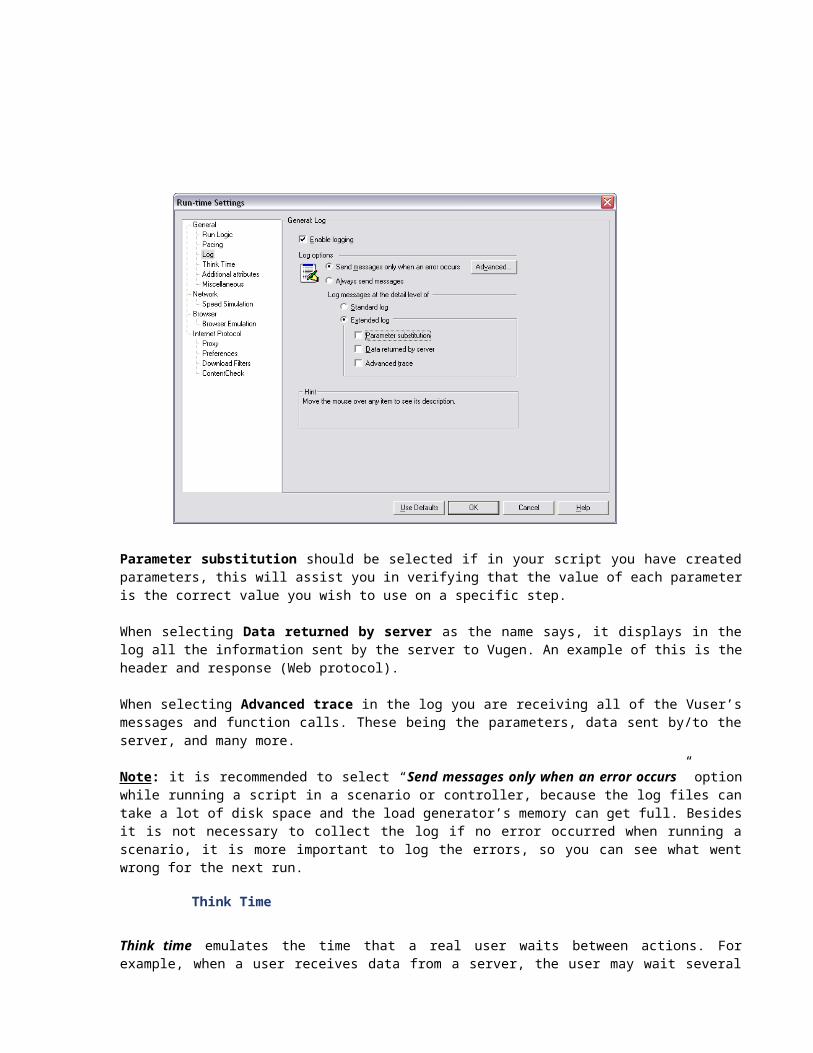
Parameter substitution should be selected if in your script you have created parameters, this will assist you in verifying that the value of each parameter is the correct value you wish to use on a specific step.
When selecting Data returned by server as the name says, it displays in the log all the information sent by the server to Vugen. An example of this is the header and response (Web protocol).
When selecting Advanced trace in the log you are receiving all of the Vuser’s messages and function calls. These being the parameters, data sent by/to the server, and many more.

Note: it is recommended to select “Send messages only when an error occurs” option while running a script in a scenario or controller, because the log files can take a lot of disk space and the load generator’s memory can get full. Besides it is not necessary to collect the log if no error occurred when running a scenario, it is more important to log the errors, so you can see what went wrong for the next run.
Think Time
Think time emulates the time that a real user waits between actions. For example, when a user receives data from a server, the user may wait several seconds to review the data before responding. This delay is known as the think time.
While debugging the think time is ignored because it takes too much time between transactions. But once in a scenario the think time is very important and must be configured appropriately.
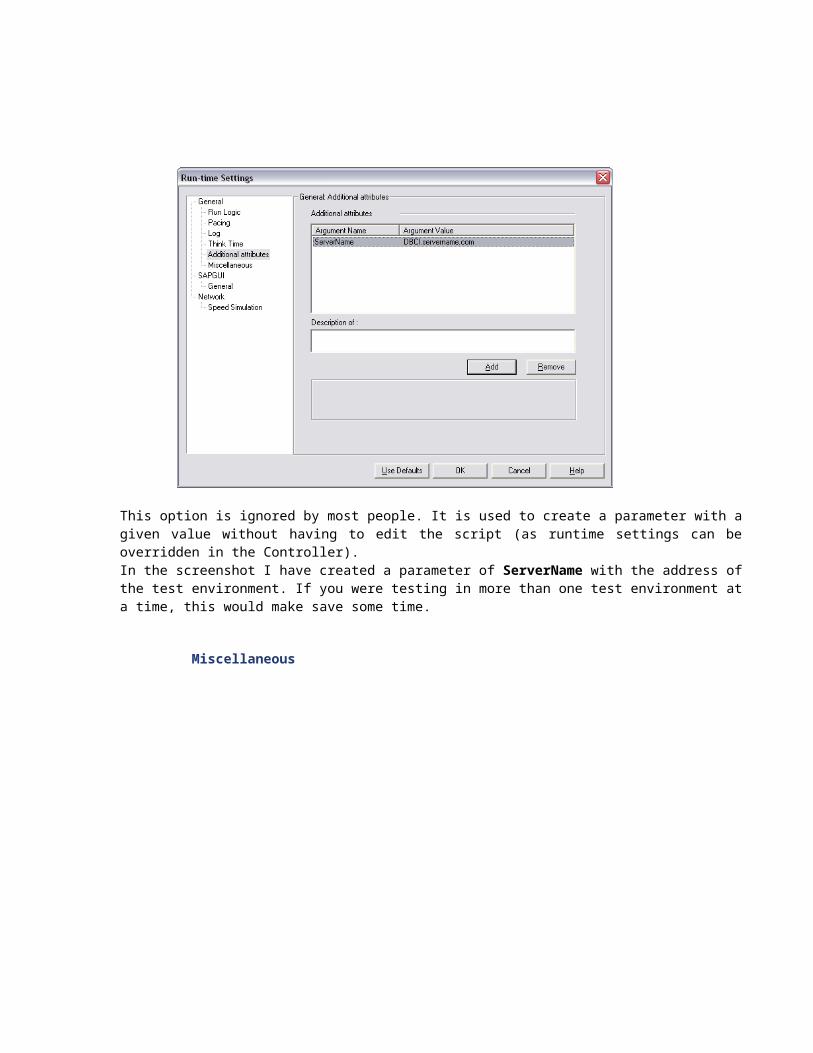
Additional Attributes

This option is ignored by most people. It is used to create a parameter with a given value without having to edit the script (as runtime settings can be overridden in the Controller). In the screenshot I have created a parameter of ServerName with the address of the test environment. If you were testing in more than one test environment at a time, this would make save some time.
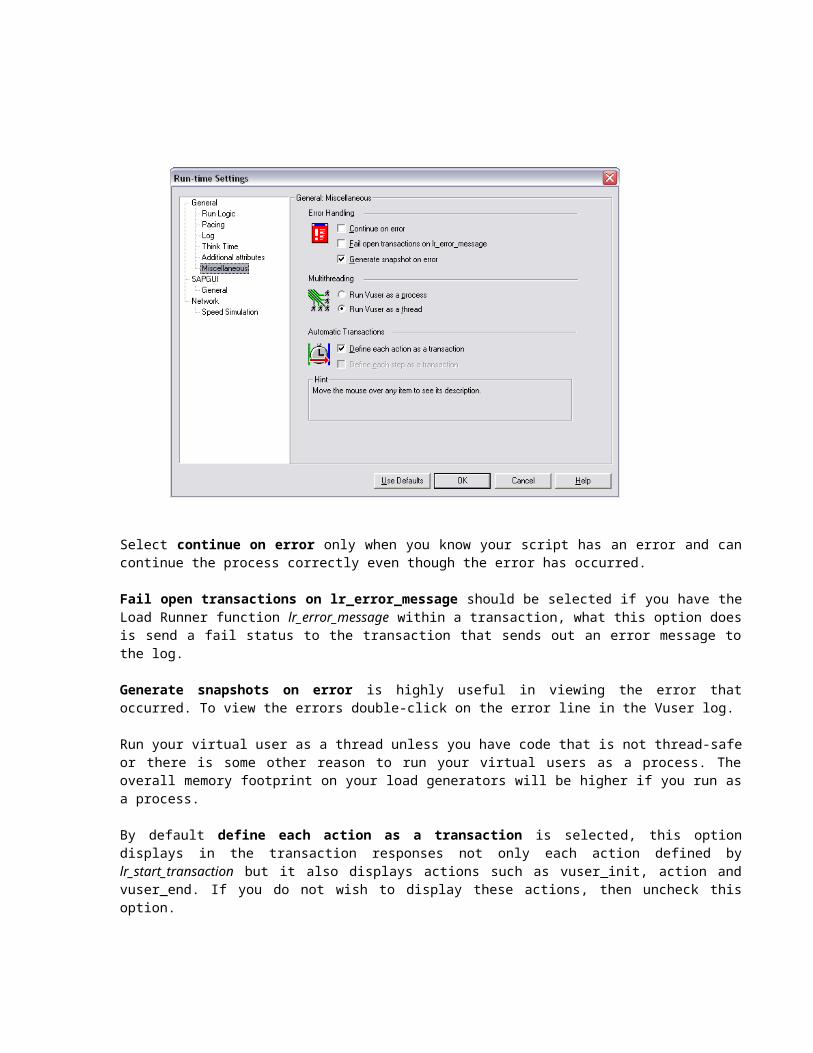
Miscellaneous

Select continue on error only when you know your script has an error and can continue the process correctly even though the error has occurred.
Fail open transactions on lr_error_message should be selected if you have the Load Runner function lr_error_message within a transaction, what this option does is send a fail status to the transaction that sends out an error message to the log.
Generate snapshots on error is highly useful in viewing the error that occurred. To view the errors double-click on the error line in the Vuser log.
Run your virtual user as a thread unless you have code that is not thread-safe or there is some other reason to run your virtual users as a process. The overall memory footprint on your load generators will be higher if you run as a process.
By default define each action as a transaction is selected, this option displays in the transaction responses not only each action defined by lr_start_transaction but it also displays actions such as vuser_init, action and vuser_end. If you do not wish to display these actions, then uncheck this option.
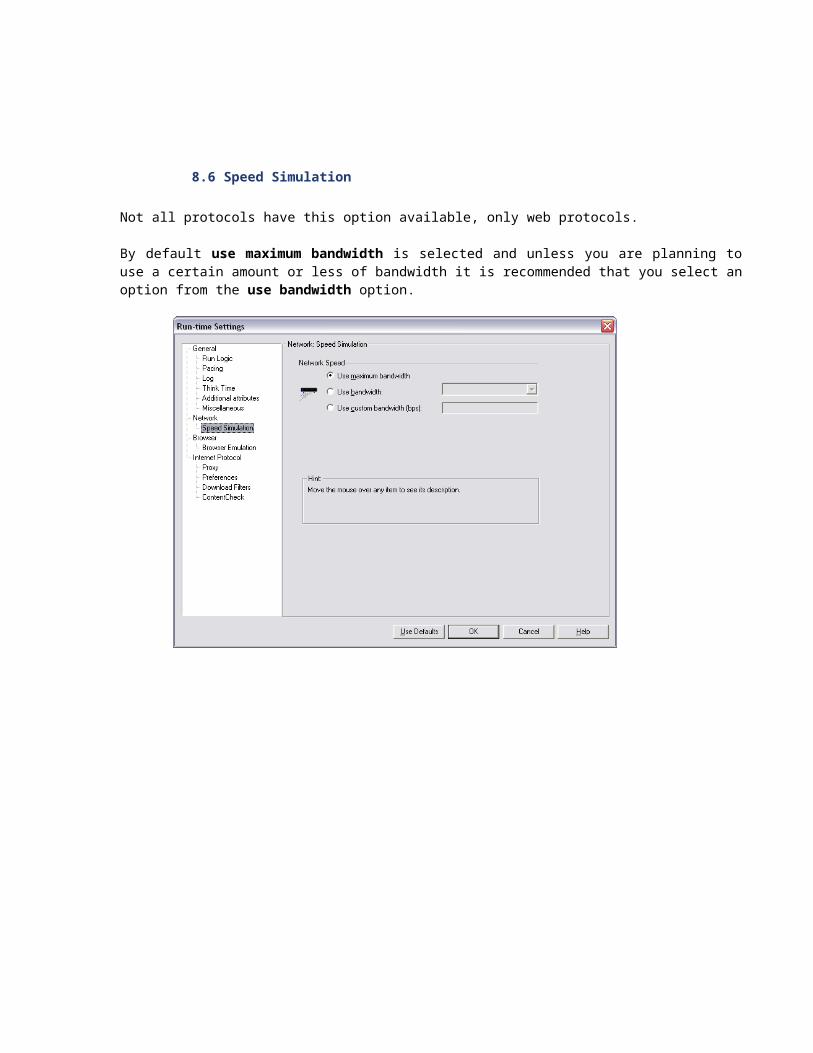
8.6 Speed Simulation
Not all protocols have this option available, only web protocols.
By default use maximum bandwidth is selected and unless you are planning to use a certain amount or less of bandwidth it is recommended that you select an option from the use bandwidth option.
Browser EmulationYou use the Browser: Browser Emulation Run-Time Settings to set the browser properties of your tuning or testing environment.
In this section a default browser can be selected by clicking on the change button, this opens up another window where you can select the options User browser or use custom browser.

Simulate browser cache instructs the Vuser to simulate a browser cache. By default, cache simulation is enabled. If this is disabled all Vusers emulate a browser with no cache. This means that if the cache is disabled every time a Vuser runs a script this will load every document from the webpage such as images. This takes more time, because it is downloading all the resources each time.
Download non-HTML resources instructs the Vuser to load graphic images when accessing a Web page during replay. When real users access a webpage, they wait for the image to load. Enable this option if you are trying to test the entire system, including the end-user time. To increase performance and not emulate real users, disable this option.
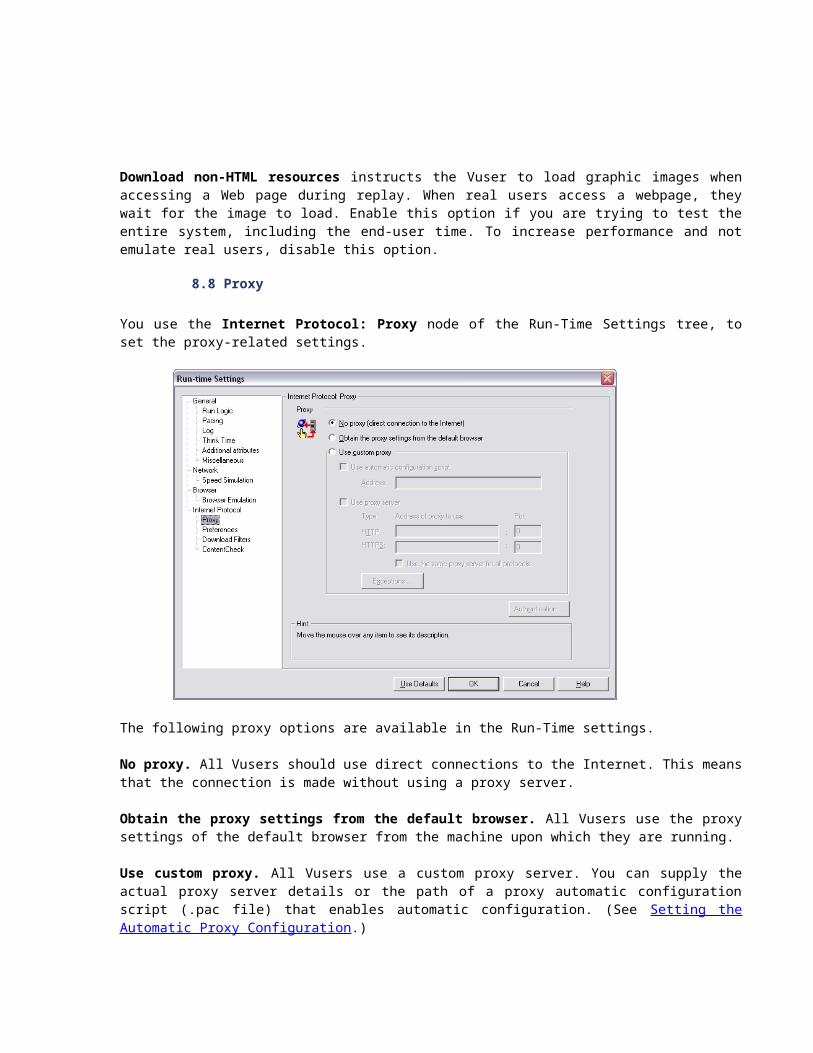
8.8 Proxy
You use the Internet Protocol: Proxy node of the Run-Time Settings tree, to set the proxy-related settings.
The following proxy options are available in the Run-Time settings.
No proxy. All Vusers should use direct connections to the Internet. This means that the connection is made without using a proxy server.
Obtain the proxy settings from the default browser. All Vusers use the proxy settings of the default browser from the machine upon which they are running.
Use custom proxy. All Vusers use a custom proxy server. You can supply the actual proxy server details or the path of a proxy automatic configuration script (.pac file) that enables automatic configuration. (See Setting the Automatic Proxy Configuration.)
To supply the details of the server, you specify its IP address or name and port. You can specify one proxy server for all HTTP sites, and another proxy server for all HTTPS (secure) sites.
After providing the proxy information, you can specify Authentication information for the proxy server, and indicate Exceptions to the proxy rules.
Note: To instruct the Vusers to wait for the proxy response during replay, and not to assume that the proxy supports basic authentication, add the following statement: web_set_sockets_option("PROXY_INITIAL_BASIC_AUTH", "0");
8.9 Preferences
You use the Internet Protocol: Preferences node in the Run-Time Settings tree, to set the settings related to the following areas:
Image and Text Checks
The Enable image and text checks option allows the Vuser to perform verification checks during replay by executing the verification functions: web_find or web_image_check. This option only applies to statements recorded in HTML-based mode. Vusers running with verification checks use more memory than Vusers who do not perform checks (disabled by default).
Generating Web Performance Graphs
Instructs a Vuser to collect data used to create Web Performance graphs; You view the Hits per Second, Pages per Second, and Response Bytes per Second (Throughput) graphs during test execution using the online monitors and after test execution using the Analysis. You view the Component Breakdown graph after test execution using the Analysis. Select the types of graph data for the Vuser to collect.
Note: If you do not use the Web performance graphs, disable these options to save memory.
Advanced Web Run-Time Options
WinInet Replay; instructs VuGen to use the WinInet replay engine instead of the standard Sockets replay. VuGen has two HTTP replay engines: Sockets-based (default) or WinInet based. The WinInet is the engine used by Internet Explorer and it supports all of the features incorporated into the IE browser. The limitations of the WinInet replay engine are that it is not scalable, nor does it support UNIX. In addition, when working with threads, the WinInet engine does not accurately emulate the modem speed and number of connections.
VuGen's proprietary sockets-based replay is a lighter engine that is scalable for load testing. It is also accurate when working with threads. The limitation of the sockets-based engine is that it does not support SOCKS proxy. If you are recording in that type of environment, use the WinInet replay engine.
File and line in automatic transaction names; Creates unique transaction names for automatic transactions by adding file name and line number to the transaction name (enabled by default).
Note: This option places additional information in the log file, and therefore requires more memory.
Non-critical item errors as warnings; This option returns a warning status for a function which failed on an item that is not critical for load testing, such as an image or Java applet that failed to download. This option is enabled by default. If you want a certain warning to be considered an error and fail your test, you can disable this option. You can set a content-type to be critical by adding it to the list of Non-Resources. For more information, see Specifying Non-Resource Content Types.
Save snapshot resources locally. Instructs VuGen to save the snapshot resources to files on the local machine. This feature lets the Run-Time viewer create snapshots more accurately and display them quicker.
You can specify the Web sites from which Vusers should download resources during replay. You can indicate either the sites to exclude or the sites to include. You control the allowed or disallowed sources, by specifying a URL, host name, or host suffix name.
A URL is the complete URL address of a Web site, beginning with http:// or https://. Host is the name of the host machine with its domain, such as www.hp.com.
Host suffix is the common suffix for several host names, such as hp.com. This is useful where you have several Web sites on a common domain.
If you specify the sites to exclude, VuGen downloads resources from all Web sites except for those specified in the list. If you specify the sites to include, VuGen filters out resources from all Web sites except for those in the Include list.
8.10 Download Filters
To create a list of filtered Web sites: 1. Click the Internet Protocol: Download Filters node.2. Select the desired option: Include only addresses in list or Exclude addresses in list.3. Add entries to the list. To add an entry, click Add. The Add filter dialog box opens.
Choose a filter type: URL, Host, or Host Suffix, and enter the filter data, such as a URL. When entering a URL, make sure to enter a complete URL beginning with http:// or https://. Click OK.
4. To edit an entry, select it and click Edit.

5. To delete and entry, select it and click Remove. To delete all entries, click Remove All.
8.11 Content Check
The Content Check wizard step lets you check your script for specific text or content.
Using a Text Check, you can search for a text string during replay.
Using Content Checks, you can instruct VuGen to search for server strings automatically using predefined rules, even if you don't know the exact text that will be returned by the server.
Correlation
Definition
The primary reasons for correlating statements are:
To simplify or optimize your code
For example, if you perform a series of dependent queries one after another, your code may become very long. In order to reduce the size of the code, you can nest the queries, but then you lose precision and the code becomes complex and difficult to understand. Correlating the statements enables you to link queries without nesting.
For dynamic data
Many applications and Web sites identify a session by the current date and time. If you try to replay a script, it will fail, because the current time is different than the recorded time. Correlating the data enables you to save the dynamic data and use it throughout the scenario run.
To accommodate unique data records
Certain database applications require the use of unique values. A value which was unique during recording is no longer unique for script execution. For example, suppose you record the process of opening a new bank account. Each new account is assigned a unique number which is unknown to the user. This account number is inserted into a table with a unique key constraint during recording. If you try to run the script as recorded, it will try to create an account with the recorded number, rather than a new unique number. An error will result because the account number already exists.
If you encounter an error when running your script, examine the script at the point where the error occurred. In many cases, a correlated query will solve the problem, by enabling you to use the results of one statement as input to another.
9.1 Solving Common Playback ProblemsAfter you create a script, you validate it by running it from VuGen. Occasionally, a simple playback will fail, even though the recording of the same actions succeeded.
Many applications use dynamic values that change each time you use the application. For example, some servers assign a unique session ID for every new session. When you try to replay a recorded session, the application creates a new session ID that differs from the recorded session ID.
LoadRunner addresses this issue through correlation. Correlation saves the changing values, in our case the session ID, to a parameter. When running the emulation, the Vuser does not use the recorded value—instead; it uses the new session ID, assigned to it by the server.
9.2 How do I work with unique server values?To overcome this issue, you use VuGen to automatically detect the need to correlate the session ID. After you run the script, VuGen prompts you to scan the script for correlations.
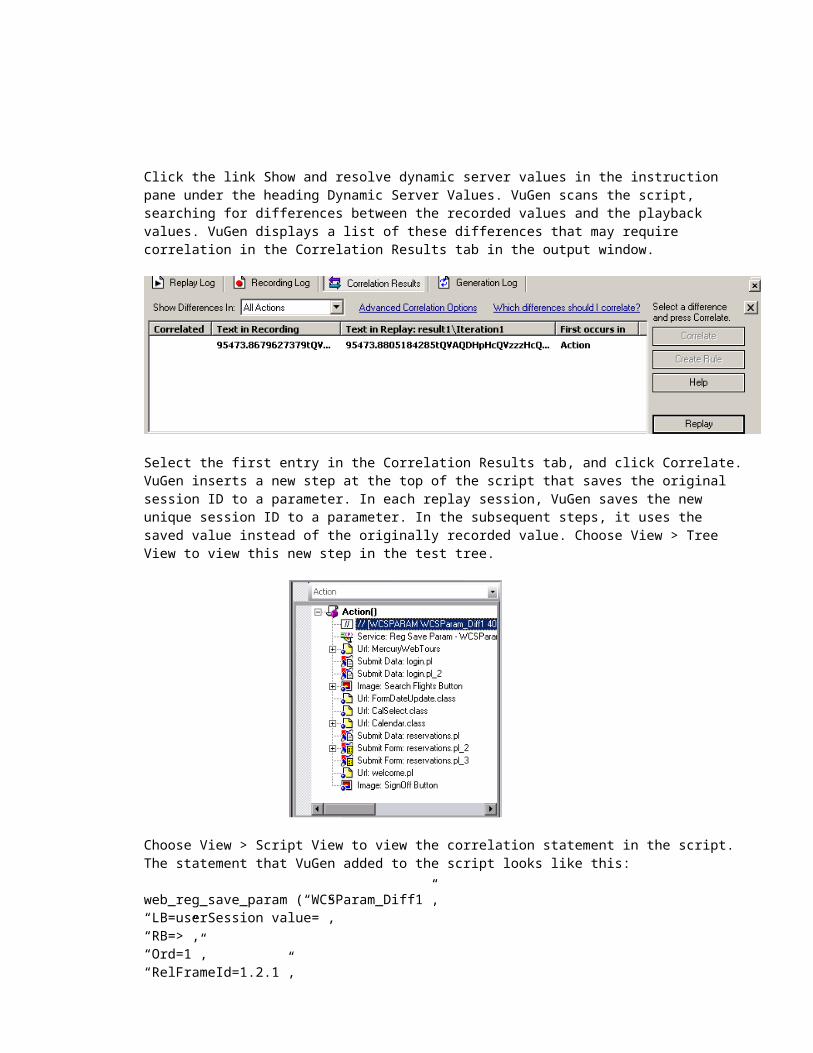
Click the link Show and resolve dynamic server values in the instruction pane under the heading Dynamic Server Values. VuGen scans the script, searching for differences between the recorded values and the playback values. VuGen displays a list of these differences that may require correlation in the Correlation Results tab in the output window.

Select the first entry in the Correlation Results tab, and click Correlate. VuGen inserts a new step at the top of the script that saves the original session ID to a parameter. In each replay session, VuGen saves the new unique session ID to a parameter. In the subsequent steps, it uses the saved value instead of the originally recorded value. Choose View > Tree View to view this new step in the test tree.
Choose View > Script View to view the correlation statement in the script. The statement that VuGen added to the script looks like this:
web_reg_save_param (“WCSParam_Diff1”,“LB=userSession value=”,“RB=>”,“Ord=1”,“RelFrameId=1.2.1”,“Search=Body”,LAST);
This statement means “Check the server response for data located between the following two strings” Left boundary userSession value= and right boundary >. Save the first occurrence of this data to a parameter called WCSParam_Diff1.”
Most common SAP functions
sapgui_logon
This function is used to logon the script to the SAP server,
sapgui_logon("User1", Username"password123", Password"400", Client Number"EN", LanguageBEGIN_OPTIONAL,
"AdditionalInfo=sapgui1013", END_OPTIONAL);
sapgui_set_text
This is the way this function appears in the SAP code once recorded, the value inserted in the field is the value “Test1” and to tell SAP where to place this text is the Control ID ctxtRMMG13 this value contains an address that points to the field on the screen.
The address of the control ID is in lr_strings.h.
ctxtRMMG13= ses[0]/wnd[0]/usr/ctxtRMMG1-MATNR;
sapgui_set_text("Test", “Test1”, Text to insertctxtRMMG13, Control ID of ObjectBEGIN_OPTIONAL,
"AdditionalInfo=sapgui6018", END_OPTIONAL);
sapgui_press_button
This function tells SAP to click a button on the screen; the button is indicated by the address of the control ID in the second line. This address tells SAP where the button is, in what session and what window.
The address is: btn= ses[0]/wnd[0]/tbar[0]/btn[11]".
sapgui_press_button("Save", btn, Control ID of button to pressBEGIN_OPTIONAL,
"AdditionalInfo=sapgui6070", END_OPTIONAL);
sapgui_send_vkey
This function emulates the keyboard and sends a keystroke. The different keys that can be sent are:

CONSTANT VALUEENTER 0HELP 1F2 2BACK 3F4 4CANCEL 12PAGEDOWN 82
sapgui_send_vkey(ENTER, BEGIN_OPTIONAL,
"AdditionalInfo=sapgui6015", END_OPTIONAL);
sapgui_set_focus
This functions is used as the name says to set focus on an object, this function can set focus on any object on the SAP screen, like a button, text field, table, etc.
This function is mostly used to set the focus on a text field so the script can insert text into it.
sapgui_set_focus("usr/chkDEMO_TPROP-V_SCROLL", LAST);
The object as named “usr/chkDEMO_TPROP-V_SCROLL” is going to be active once the Load Runner script passed this function.
sapgui_table_set_text
This function is very similar to the “sapgui_set_text” the only difference is that this function sets/inserts text into a cell of a table specifying the row and column which the cell is located.
Example 1 Example 2 sapgui_table_set_text("Table1", "usr/tblRSDEMO_TABLE_CONTROLTABLE_CONTROL",
"0", Row Number "1", Column Number "Philadelphia", BEGIN_OPTIONAL, "AdditionalInfo=info1020", END_OPTIONAL);
sapgui_table_set_text("Table1", "usr/tblRSDEMO_TABLE_CONTROLTABLE_CONTROL",
"4", Row Number "2", Column Number "Philadelphia", BEGIN_OPTIONAL, "AdditionalInfo=info1020", END_OPTIONAL);

Example 1 is inserting a text in the Red cell and Example 2 is inserting text in the blue cell.
sapgui_set_ok_code
This function is used to enter a text into the address bar; this is where the TCODES are entered.
sapgui_set_ok_code("/NME21N", Text to be inserted in the address bar TCODE to be executed.BEGIN_OPTIONAL,
"AdditionalInfo=sapgui6043", END_OPTIONAL);
sapgui_is_object_available
This function checks if an object with in the SAP screen is available or not. The return values are -1 if the object is not available and a 0 if the object is found.
This is the best way to check if an object is available or not. Using an IF statement.
If (!sapgui_is_object_available (expandGridID, LAST)) sapgui_press_button("Expand Button", expandID , LAST);
This IF statement indicates if the object expandGridID (controlID for an object) is availabe do sapgui_press_button("Expand Button", expandID , LAST); if the return value of this IF statement is 0 it means the value is found and skips the press_button function but if the value is not found and the return value is -1 the script goes to the press_button section.
lr_output_message

This function is used to send messages through the replay log; you can send variables, values or just display text indicating some point in the script.
Text:lr_output_message("HELLO");
Variables: there are several ways to display a variable, being there is several types of variables, for example:
This is the way to indicate the variable is an integer.
lr_output_message("%i", y);
This is the way to indicate the variable is a string.
lr_output_message("%s", y);
Note: the last 3 lines of the code are not necessary and can be deleted. The lines from BEGIN_OPTIONAL to END_OPTIONAL can be deleted, are not necessary.
Load Runner shortcuts
Key DescriptionF5 Run
Ctrl+F5 StopShift+F5 Compile
F10 Run Step by stepF4 Run-time settings
Ctrl+F7 Recoding optionsCtrl+L Parameter ListCtrl+R Start Recording
5. Performance helpful tips – Terminology
Stress test
Stress test examines how application behaves under maximum load. In simple terms find the upper threshold for the application which it can work normally. Think time ignored in these tests.
Performance test
Performance test indicates response time for the entire application from the user’s perspective.
Transaction Response Time
Useful in determining / describing the transaction response time over time when vusers are generated into the application. This will determine the point or amount of users that the server can handle with respect to the defined transaction response time.
Load Testing
Load testing typically consists of five phases: planning, script creation, scenario definition, scenario execution, and results analysis.
Plan Load Test: Define your performance testing requirements, for example, number of concurrent users, typical business processes and required response times.
Create Vuser Scripts: Capture the end-user activities into automated scripts.
Define a Scenario: Use the LoadRunner Controller to set up the load test environment.
Run a Scenario: Drive, manage, and monitor the load test from the LoadRunner Controller.
Analyze the Results: Use LoadRunner Analysis to create graphs and reports, and evaluate the performance.
Stress Testing
This testing is normally used to break the application. Double the number of users is added to the application and the test is run again until the application breaks down. This kind of test is done to determine the application's robustness in times of extreme load and helps application administrators to determine if the application will perform sufficiently if the current load goes well above the expected load.
Endurance Testing (Soak Testing)
This test is usually done to determine if the application can sustain the continuous expected load. Generally this test is done to determine if there are any memory leaks in the application.
Spike Testing
Spike testing, as the name suggests is done by spiking the number of users and understanding the behavior of the application whether it will go down or will it be able to handle dramatic changes in load.
Pre-requisites for Performance Testing
A stable build of the application which must resemble the Production environment as close as possible.
The performance testing environment should not be clubbed with UAT or development environment. This is dangerous as if an UAT or Integration testing or other testing is going on the same environment, then the results obtained from the performance testing may not be reliable. As a best practice it is always advisable to have a separate performance testing environment resembling the production environment as much as possible.
Scenario
A scenario is a file that defines the events that occur during each testing session, based on performance requirements.
Vusers
In the scenario, LoadRunner replaces human users with virtual users or Vusers. Vusers emulate the actions of human users working with your application. A scenario can contain tens, hundreds, or even thousands of Vusers.
Vuser Script
The actions that a Vuser performs during the scenario are described in a Vuser script.
Transactions
To measure the performance of the server, you define transactions. A transaction represents end-user business processes that you are interested in measuring.