sap mm/wm configuration pack warehouse...
TRANSCRIPT
SAP MM/WMConfiguration Pack
Warehouse Management
Published by Team of SAPConsultants at SAPTOPJOBS
Visit us at www.sap-topjobs.com
Copyright 2006-07@SAPTOPJOBS
All rights reserved. No part of this publication may be reproduced, stored in aretrieval system, or transmitted in any form, or by any means electronic ormechanical including photocopying, recording or any information storage andretrieval system without permission in writing from SAPTOPJOBS
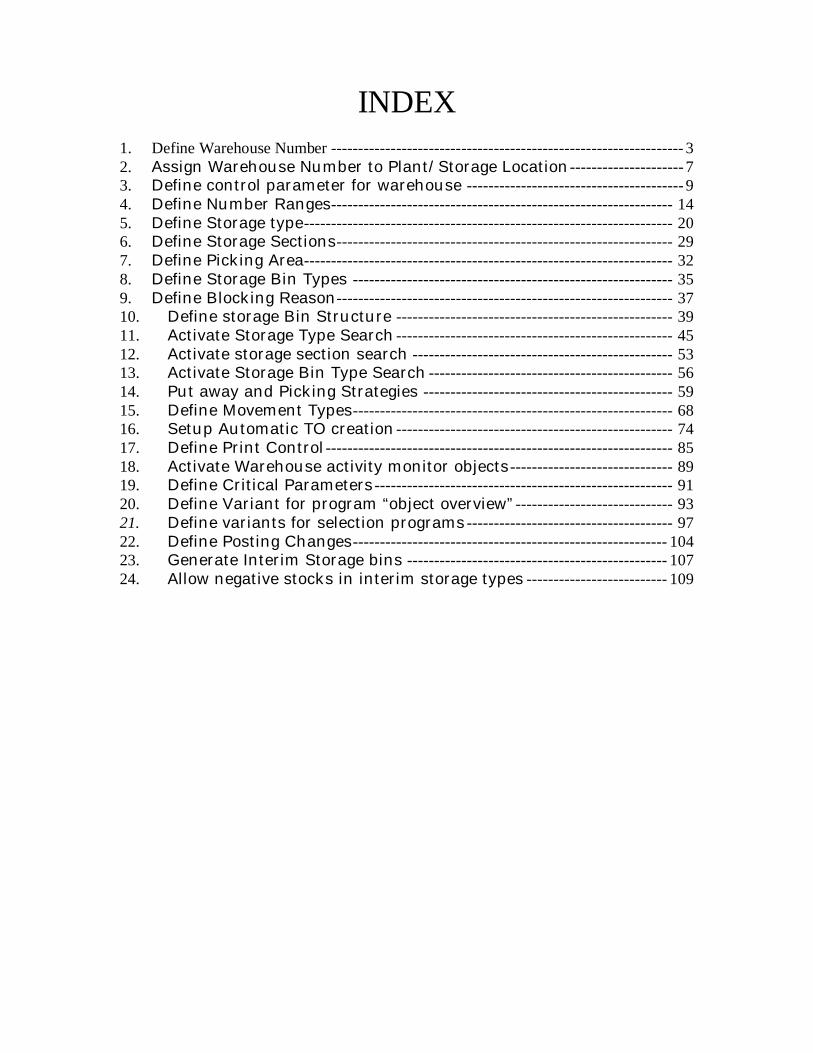
INDEX1. Define Warehouse Number ----------------------------------------------------------------- 32. Assign Warehouse Number to Plant/Storage Location--------------------- 73. Define control parameter for warehouse ---------------------------------------- 94. Define Number Ranges--------------------------------------------------------------- 145. Define Storage type-------------------------------------------------------------------- 206. Define Storage Sections-------------------------------------------------------------- 297. Define Picking Area-------------------------------------------------------------------- 328. Define Storage Bin Types ----------------------------------------------------------- 359. Define Blocking Reason-------------------------------------------------------------- 3710. Define storage Bin Structure --------------------------------------------------- 3911. Activate Storage Type Search --------------------------------------------------- 4512. Activate storage section search ------------------------------------------------ 5313. Activate Storage Bin Type Search --------------------------------------------- 5614. Put away and Picking Strategies ---------------------------------------------- 5915. Define Movement Types----------------------------------------------------------- 6816. Setup Automatic TO creation --------------------------------------------------- 7417. Define Print Control ---------------------------------------------------------------- 8518. Activate Warehouse activity monitor objects------------------------------ 8919. Define Critical Parameters ------------------------------------------------------- 9120. Define Variant for program “object overview” ----------------------------- 9321. Define variants for selection programs -------------------------------------- 9722. Define Posting Changes---------------------------------------------------------- 10423. Generate Interim Storage bins ------------------------------------------------ 10724. Allow negative stocks in interim storage types -------------------------- 109
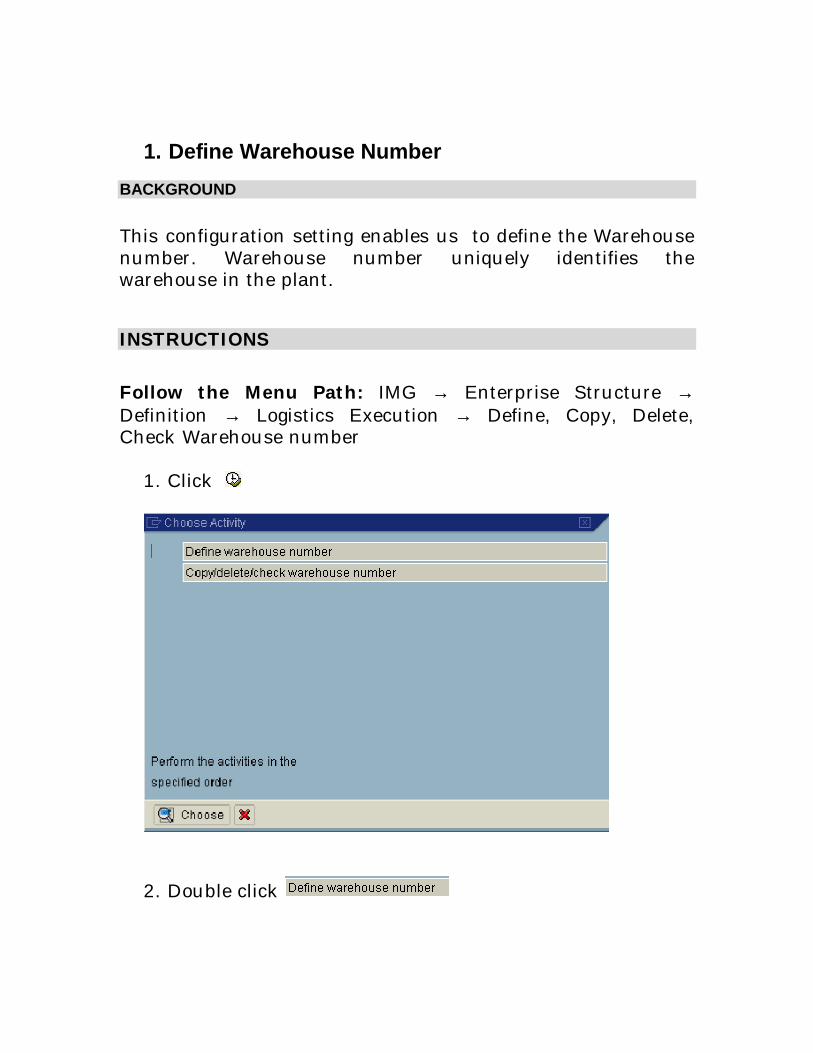
1. Define Warehouse NumberBACKGROUND
This configuration setting enables us to define the Warehousenumber. Warehouse number uniquely identifies thewarehouse in the plant.
INSTRUCTIONS
Follow the Menu Path: IMG → Enterprise Structure →Definition → Logistics Execution → Define, Copy, Delete,Check Warehouse number
1. Click
2. Double click
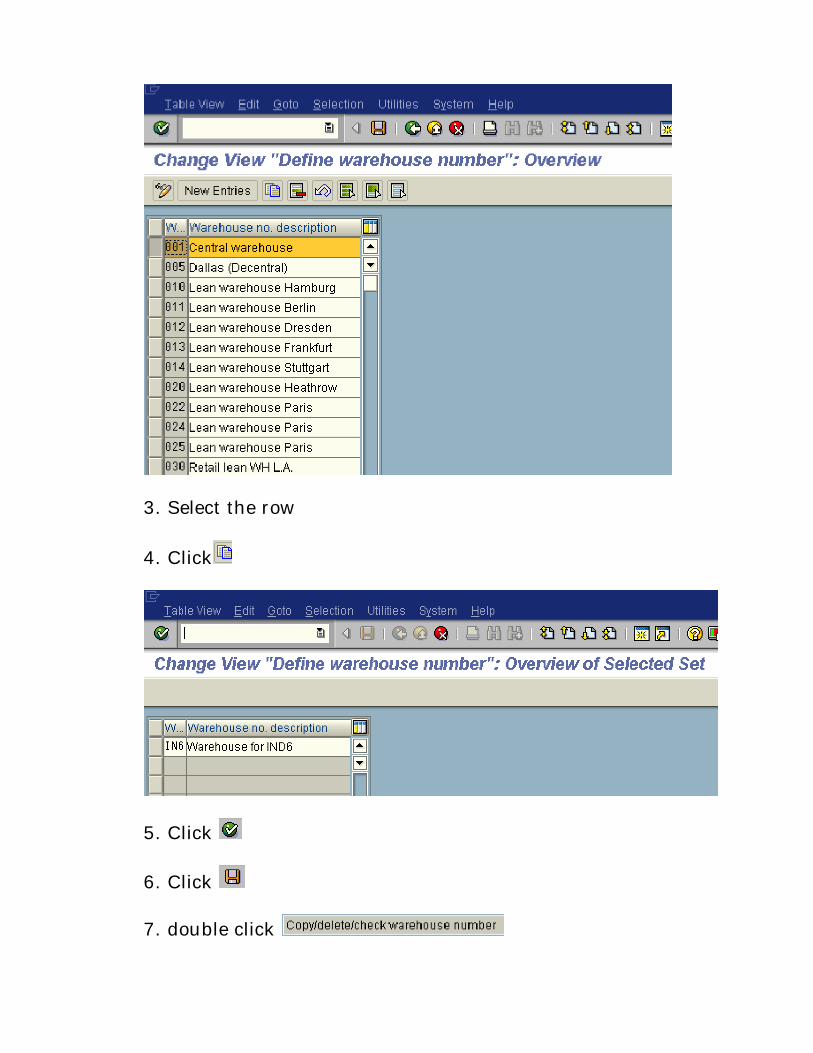
3. Select the row
4. Click
5. Click
6. Click
7. double click
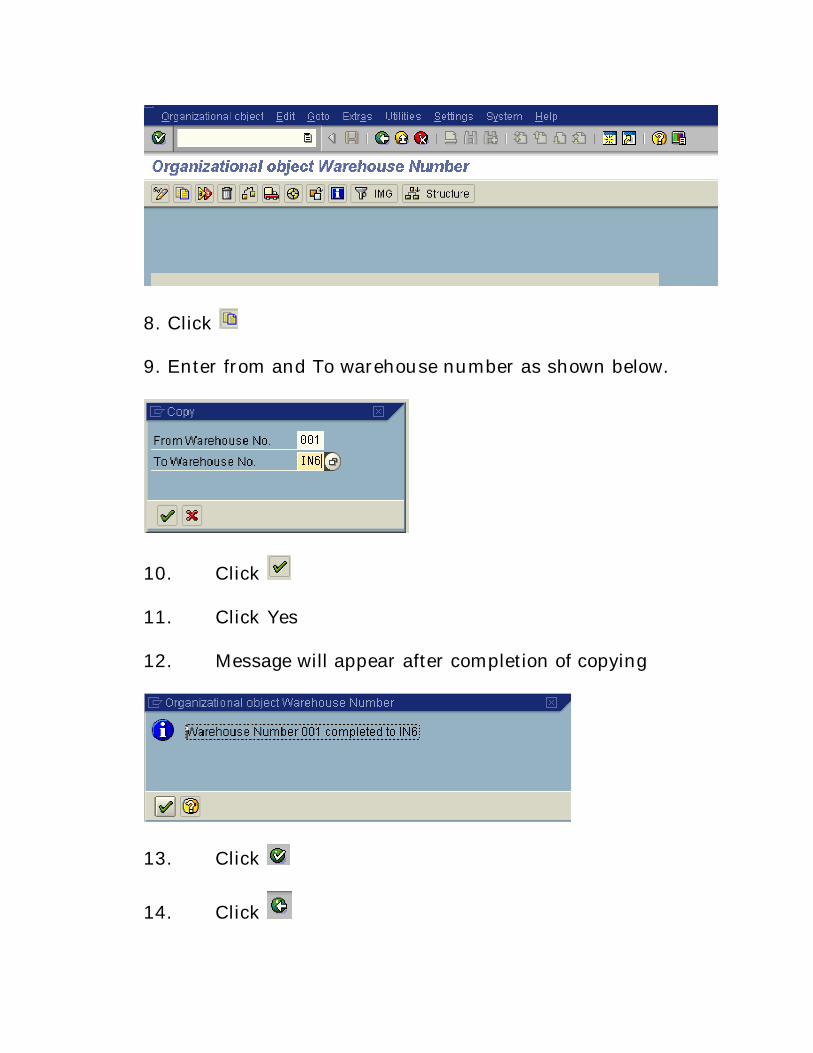
8. Click
9. Enter from and To warehouse number as shown below.
10. Click
11. Click Yes
12. Message will appear after completion of copying
13. Click
14. Click
Effect of this configuration
Warehouse number defined here is used throughout thewarehouse management module
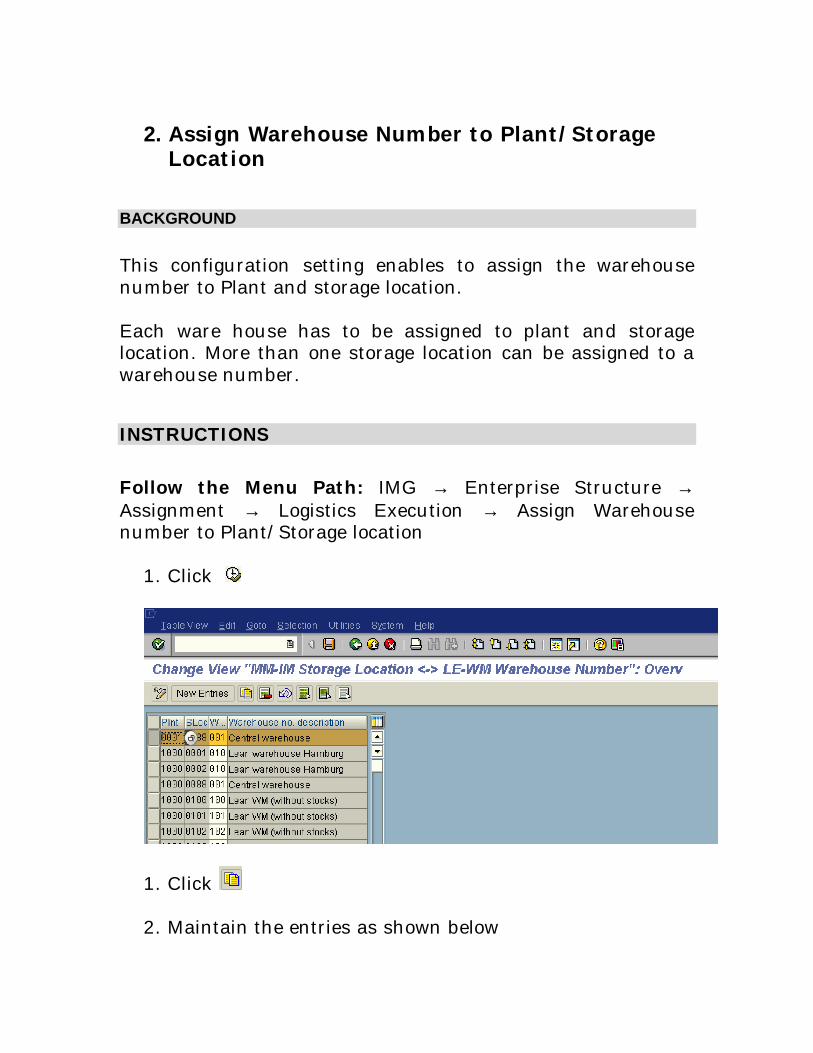
2. Assign Warehouse Number to Plant/StorageLocation
BACKGROUND
This configuration setting enables to assign the warehousenumber to Plant and storage location.
Each ware house has to be assigned to plant and storagelocation. More than one storage location can be assigned to awarehouse number.
INSTRUCTIONS
Follow the Menu Path: IMG → Enterprise Structure →Assignment → Logistics Execution → Assign Warehousenumber to Plant/Storage location
1. Click
1. Click
2. Maintain the entries as shown below
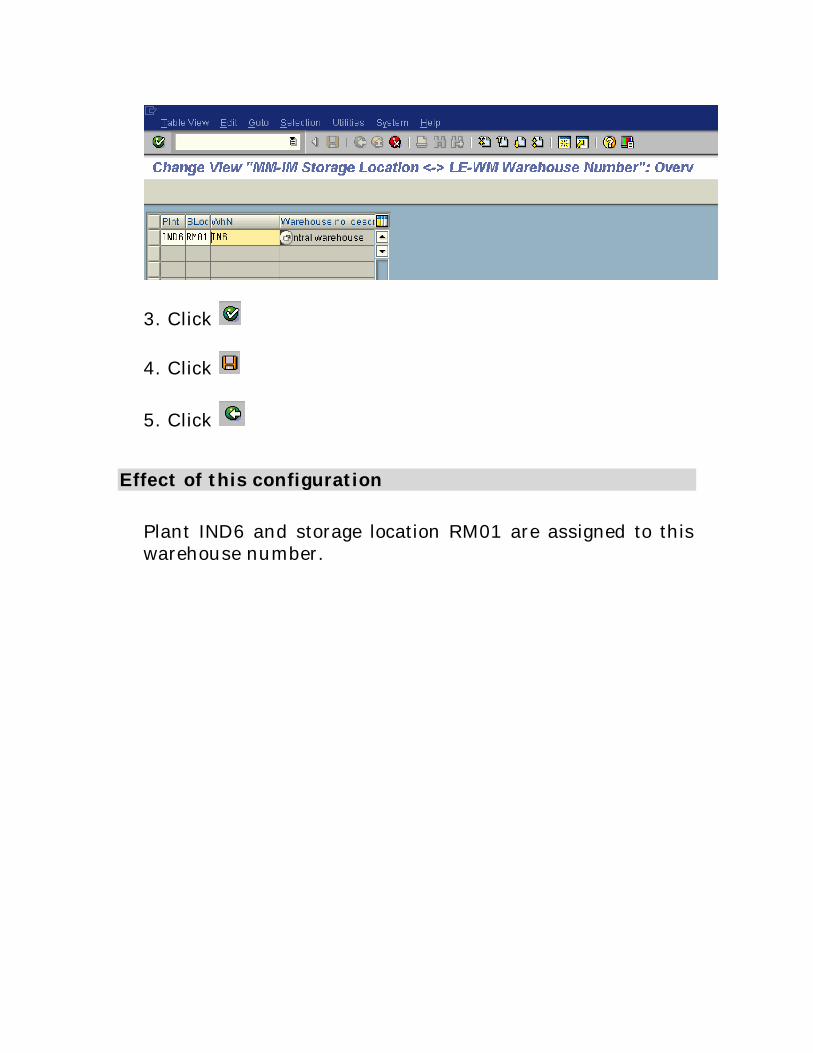
3. Click
4. Click
5. Click
Effect of this configuration
Plant IND6 and storage location RM01 are assigned to thiswarehouse number.
3. Define control parameter for warehouse
BACKGROUND
This configuration setting enables to define the controlparameter for warehouse number.
Control parameter governs
• Default Unit Of Measure for Weight and Volume• Blocking of bin for simultaneous access• Message control
INSTRUCTIONS
Follow the Menu Path: IMG → Logistics Execution →Warehouse Management → Master Data → Define controlparameter for warehouse Number
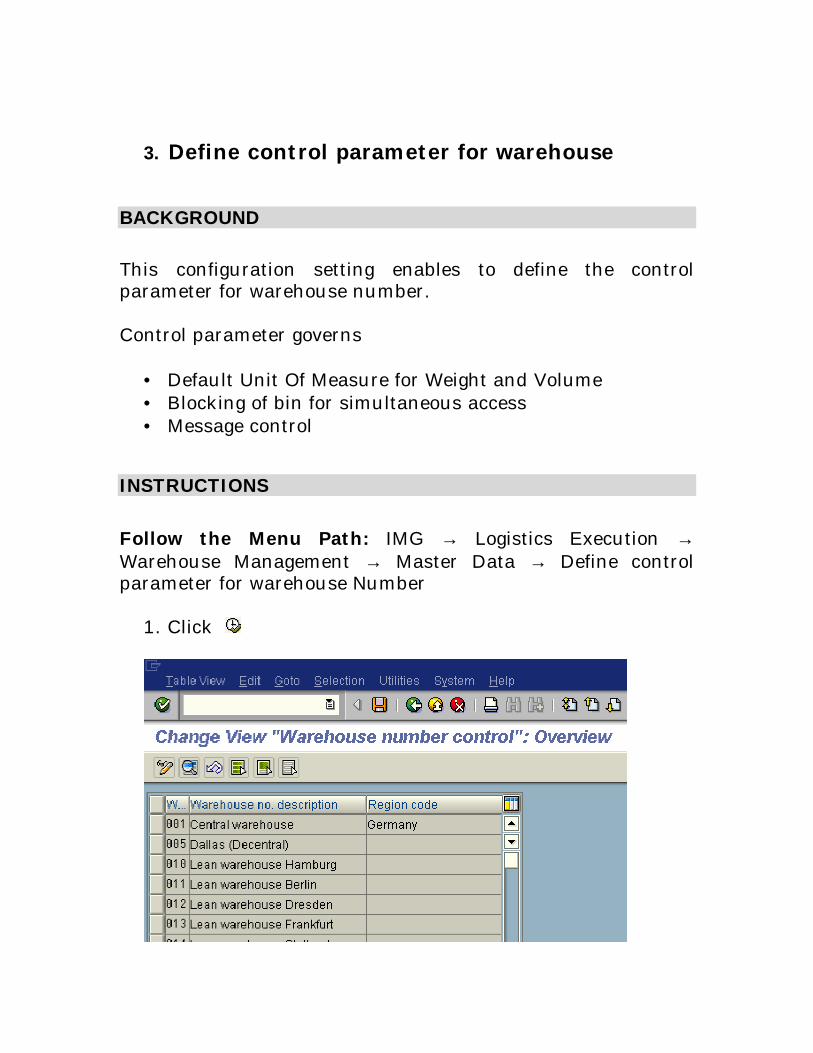
1. Click
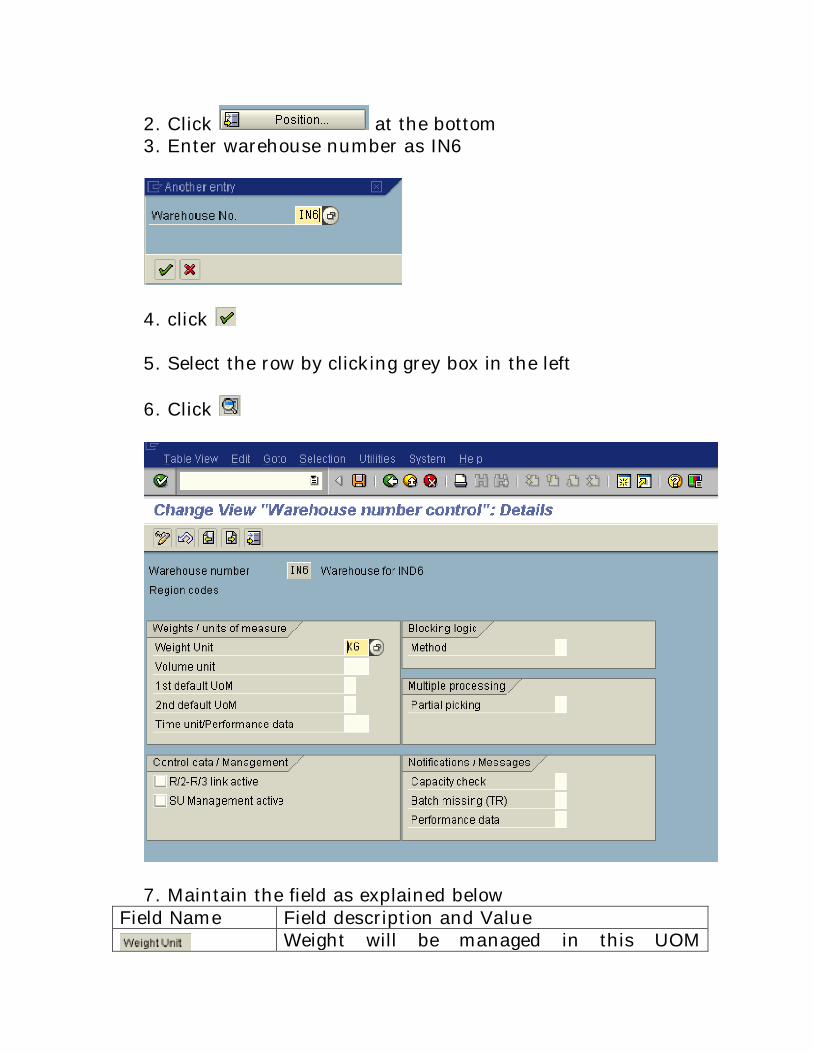
2. Click at the bottom3. Enter warehouse number as IN6
4. click
5. Select the row by clicking grey box in the left
6. Click
7. Maintain the field as explained belowField Name Field description and Value
Weight will be managed in this UOM
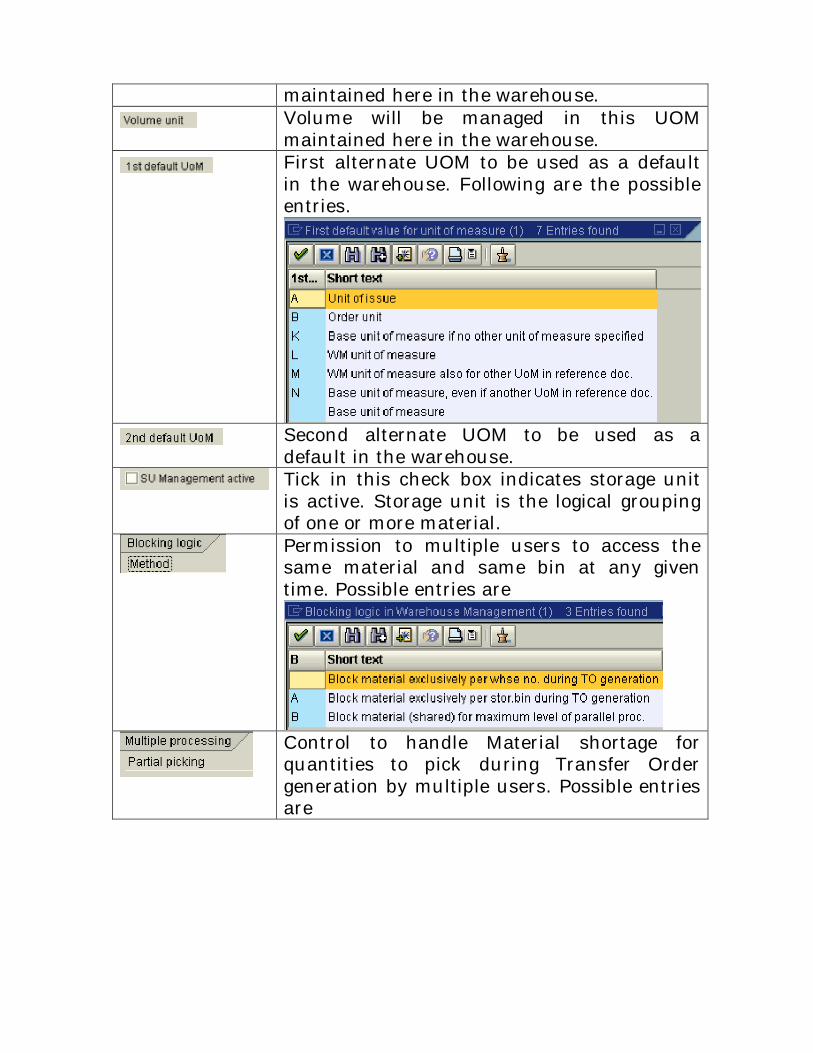
maintained here in the warehouse.Volume will be managed in this UOMmaintained here in the warehouse.First alternate UOM to be used as a defaultin the warehouse. Following are the possibleentries.
Second alternate UOM to be used as adefault in the warehouse.Tick in this check box indicates storage unitis active. Storage unit is the logical groupingof one or more material.Permission to multiple users to access thesame material and same bin at any giventime. Possible entries are
Control to handle Material shortage forquantities to pick during Transfer Ordergeneration by multiple users. Possible entriesare
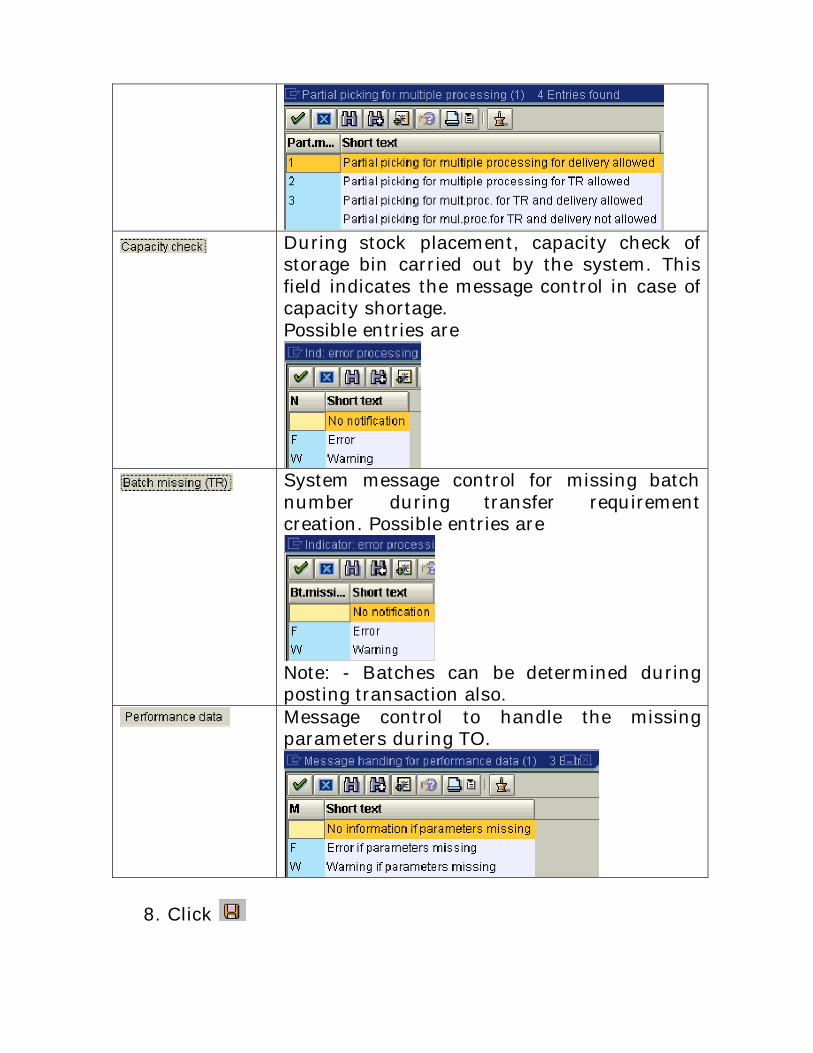
During stock placement, capacity check ofstorage bin carried out by the system. Thisfield indicates the message control in case ofcapacity shortage.Possible entries are
System message control for missing batchnumber during transfer requirementcreation. Possible entries are
Note: - Batches can be determined duringposting transaction also.Message control to handle the missingparameters during TO.
8. Click
Effect of this configuration
Warehouse number control parameters are picked up fromthe configuration done here.
4. Define Number Ranges
BACKGROUND
This configuration setting enables to define the number range.
In WM number ranges are required for
• Transfer Requirement• Transfer Order• Quant• Posting change• Group• Storage Unit
Each number range is warehouse specific. Let us look at thenumber range for Transfer order for understanding.
INSTRUCTIONS
Follow the Menu Path: IMG → Logistics Execution →Warehouse Management → Master Data → Define NumberRanges
1. Click
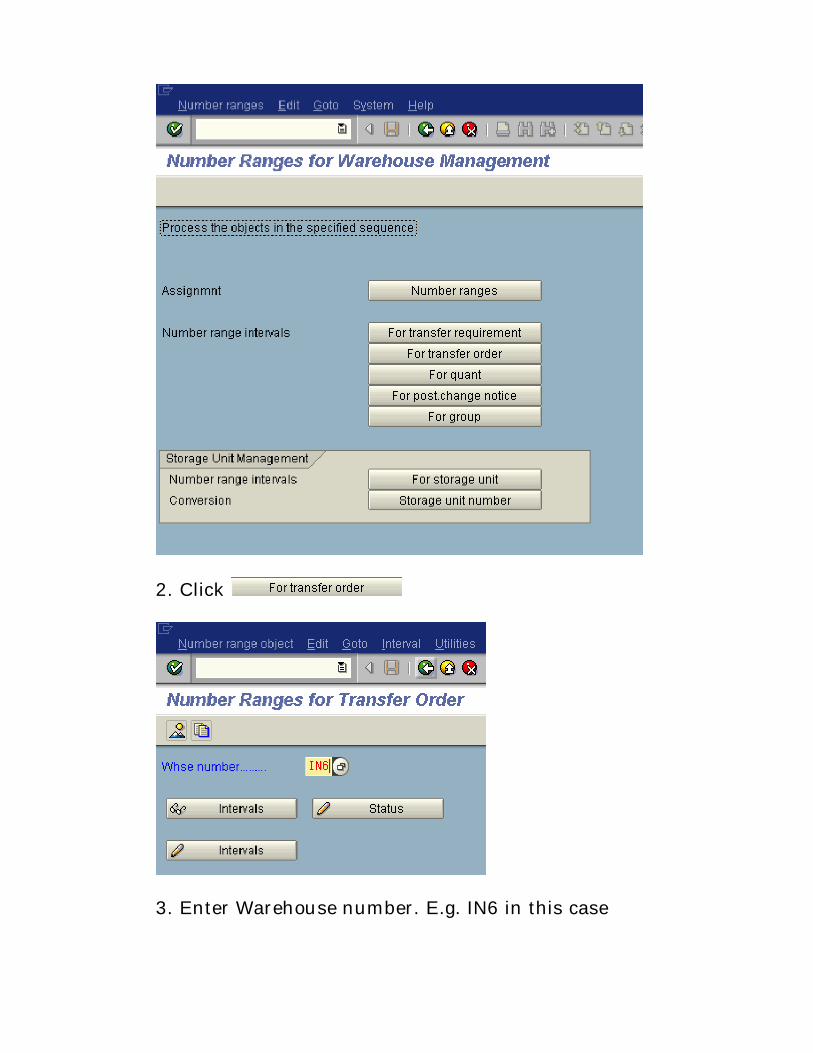
2. Click
3. Enter Warehouse number. E.g. IN6 in this case
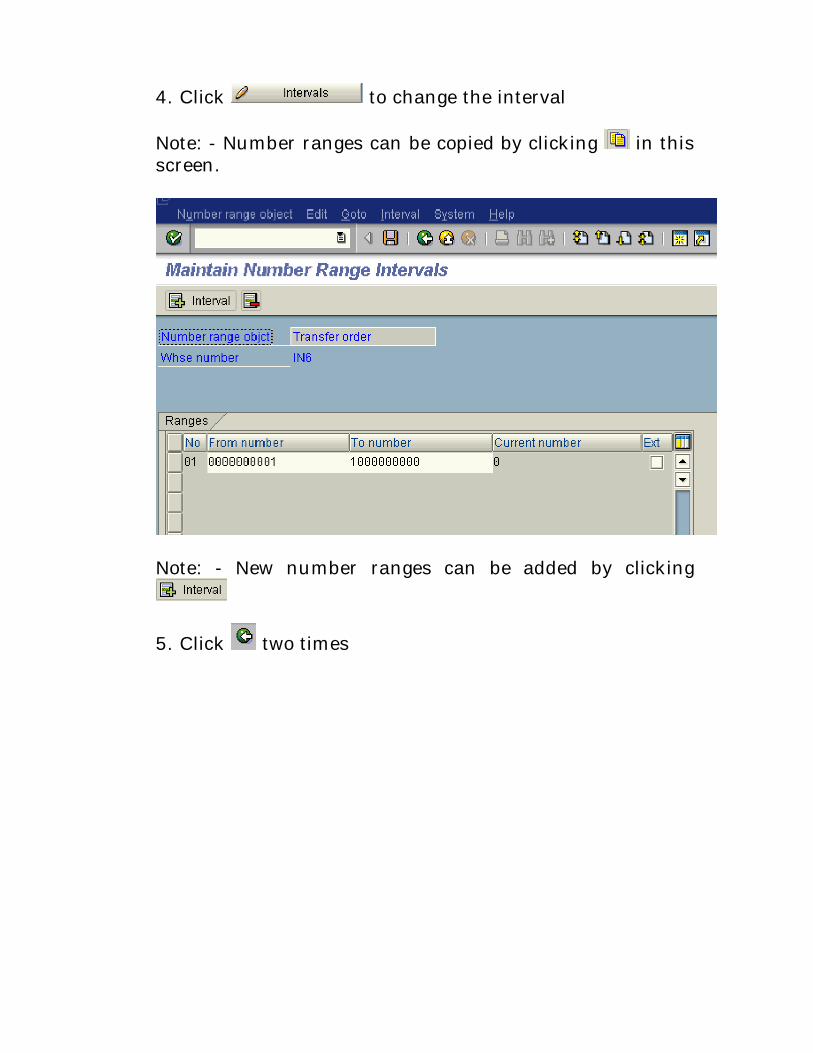
4. Click to change the interval
Note: - Number ranges can be copied by clicking in thisscreen.
Note: - New number ranges can be added by clicking
5. Click two times
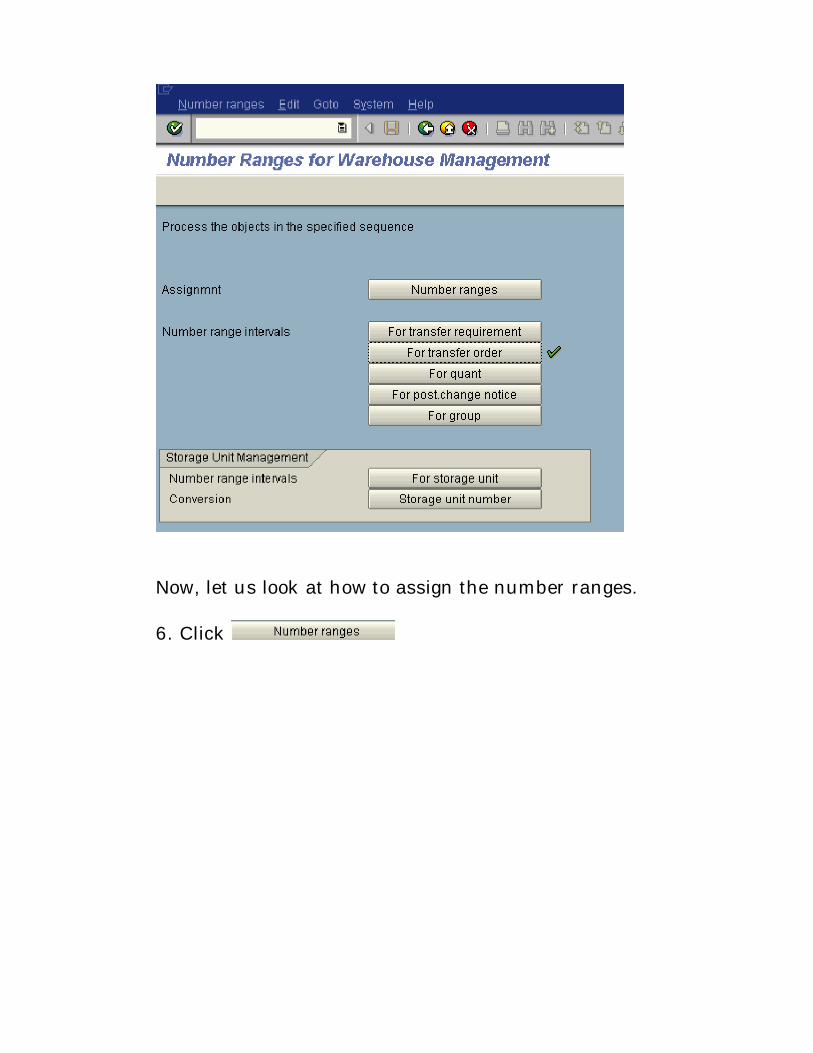
Now, let us look at how to assign the number ranges.
6. Click
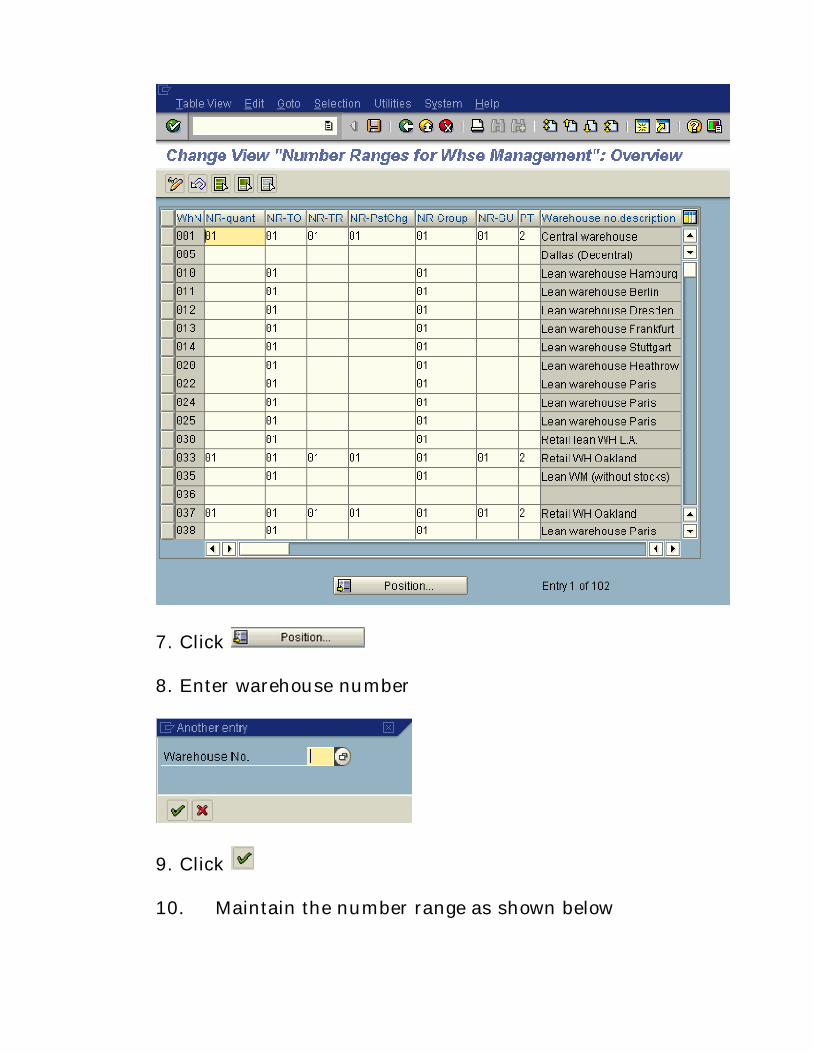
7. Click
8. Enter warehouse number
9. Click
10. Maintain the number range as shown below
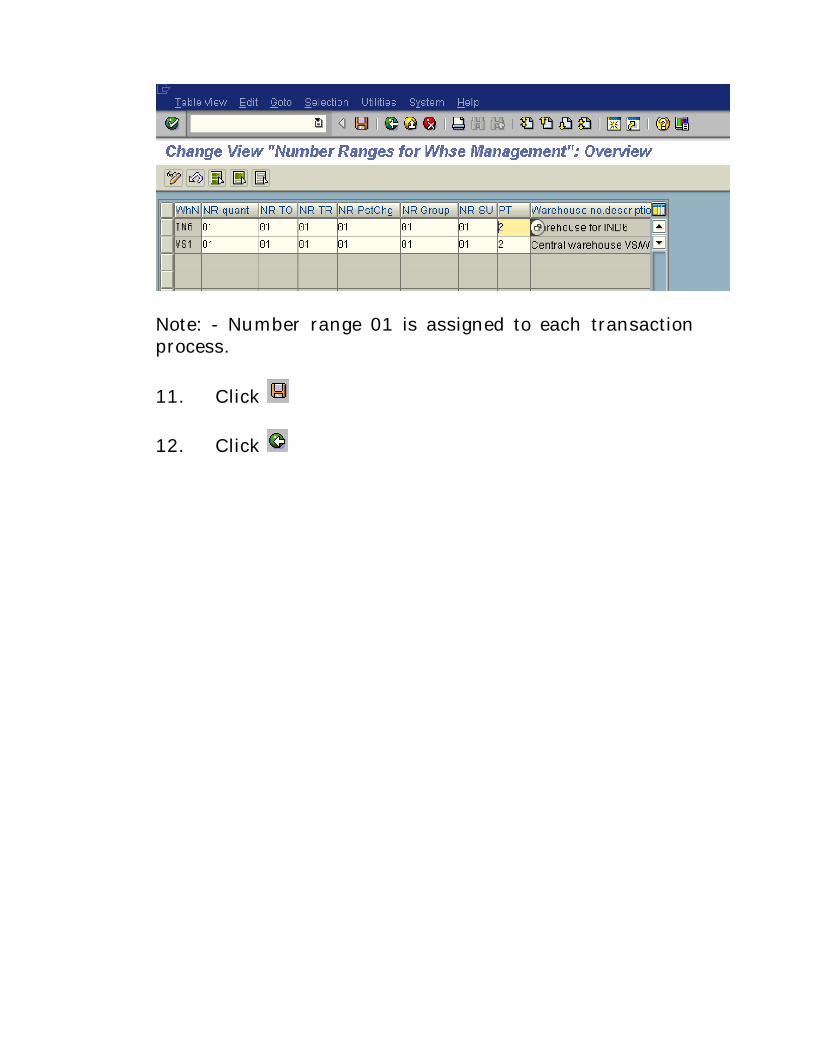
Note: - Number range 01 is assigned to each transactionprocess.
11. Click
12. Click
5. Define Storage type
BACKGROUND
This configuration setting enables to define the Storage Type.
Storage type indicates the type of storage to be used within awarehouse. Storage type can be
• Vertical storage
• Rack storage
• Open storage
Storage type does not have any address like storage location;inside the storage type inventory is placed in storage bin.
Note: - Storage type with number greater than 900 series areSAP standard used for communicating with InventoryManagement.
INSTRUCTIONS
Follow the Menu Path: IMG → Logistics Execution →Warehouse Management → Master Data → Define StorageTypes
1. Click
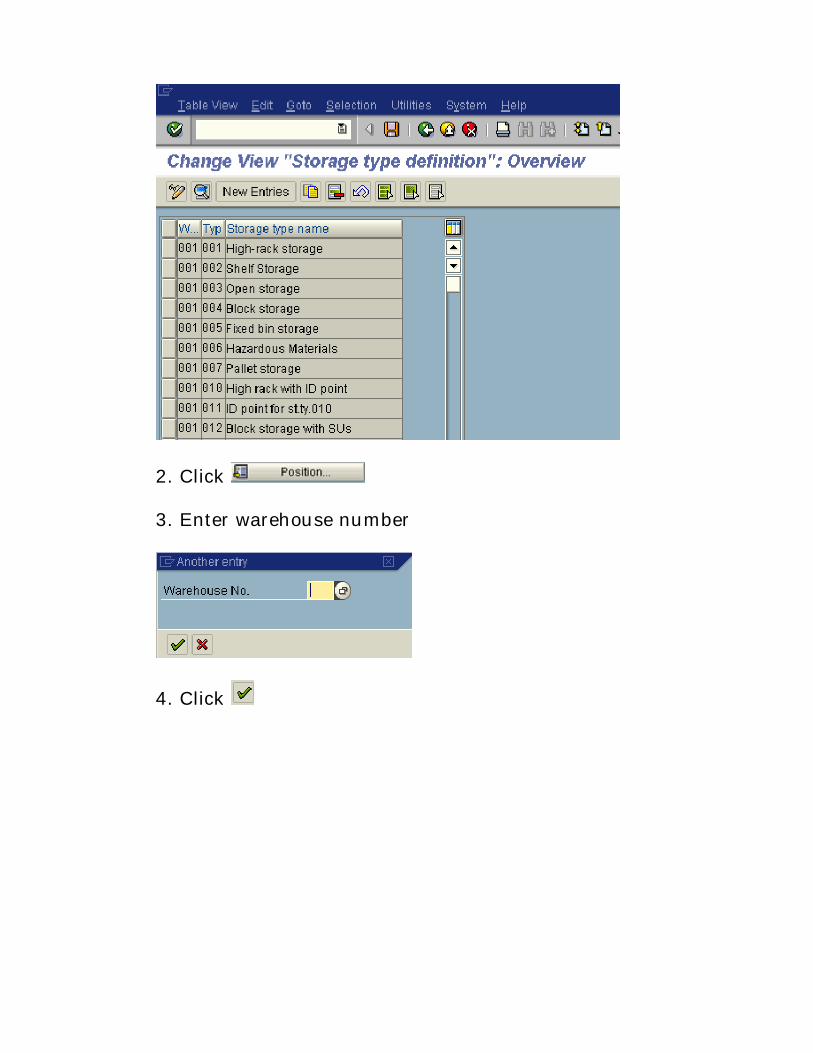
2. Click
3. Enter warehouse number
4. Click
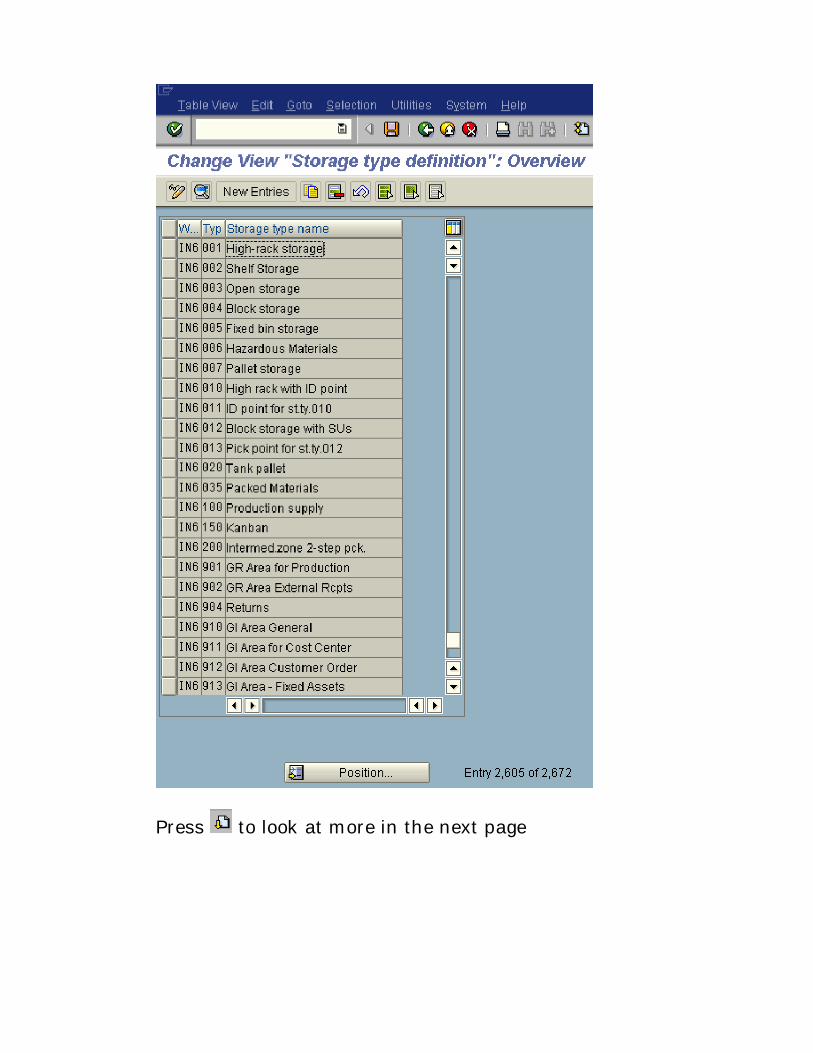
Press to look at more in the next page
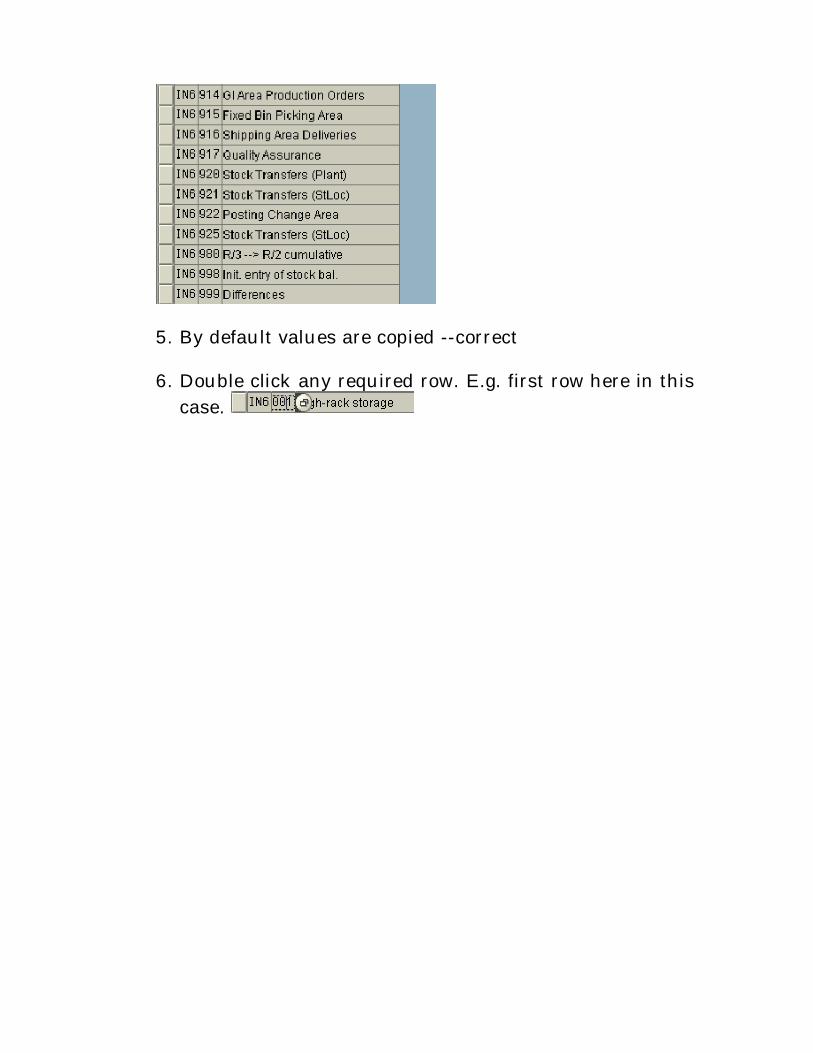
5. By default values are copied --correct
6. Double click any required row. E.g. first row here in thiscase.
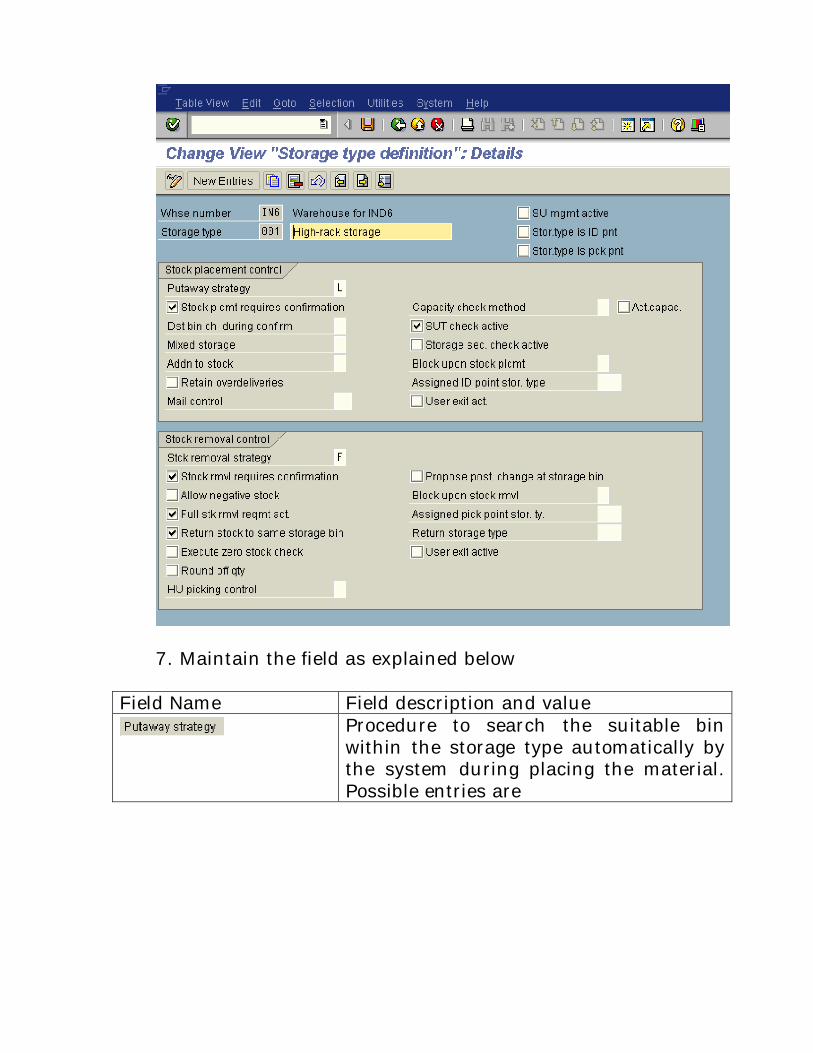
7. Maintain the field as explained below
Field Name Field description and valueProcedure to search the suitable binwithin the storage type automatically bythe system during placing the material.Possible entries are
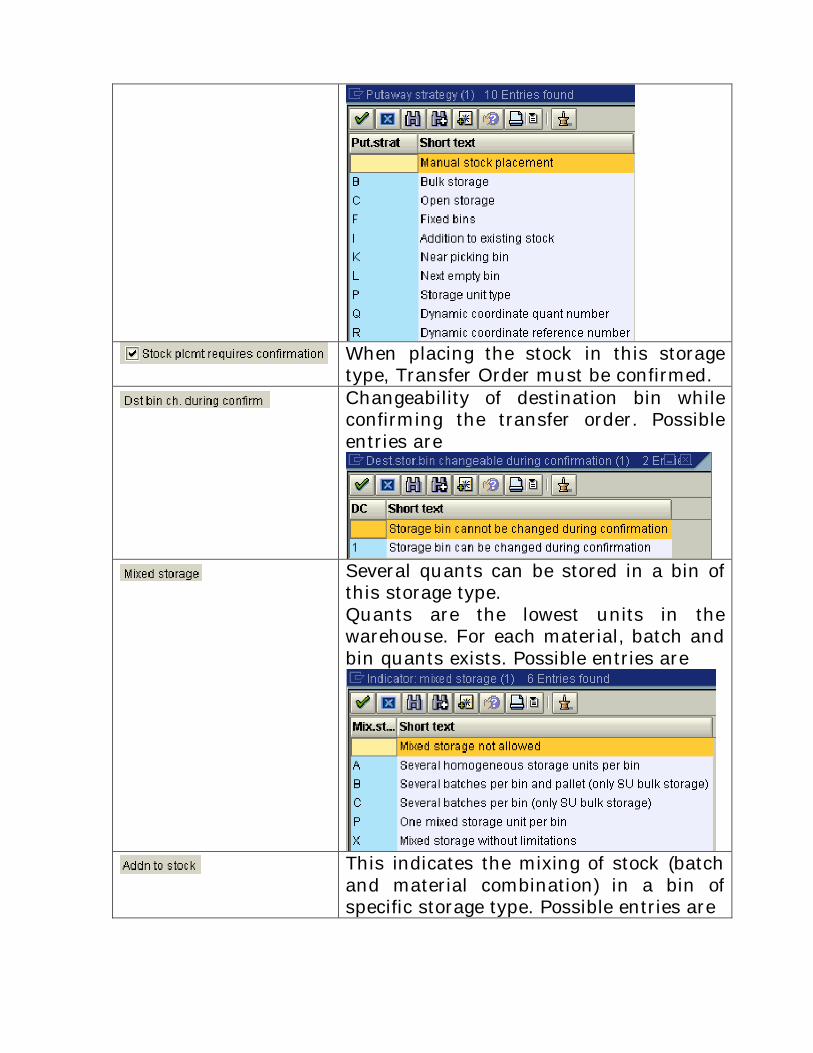
When placing the stock in this storagetype, Transfer Order must be confirmed.Changeability of destination bin whileconfirming the transfer order. Possibleentries are
Several quants can be stored in a bin ofthis storage type.Quants are the lowest units in thewarehouse. For each material, batch andbin quants exists. Possible entries are
This indicates the mixing of stock (batchand material combination) in a bin ofspecific storage type. Possible entries are
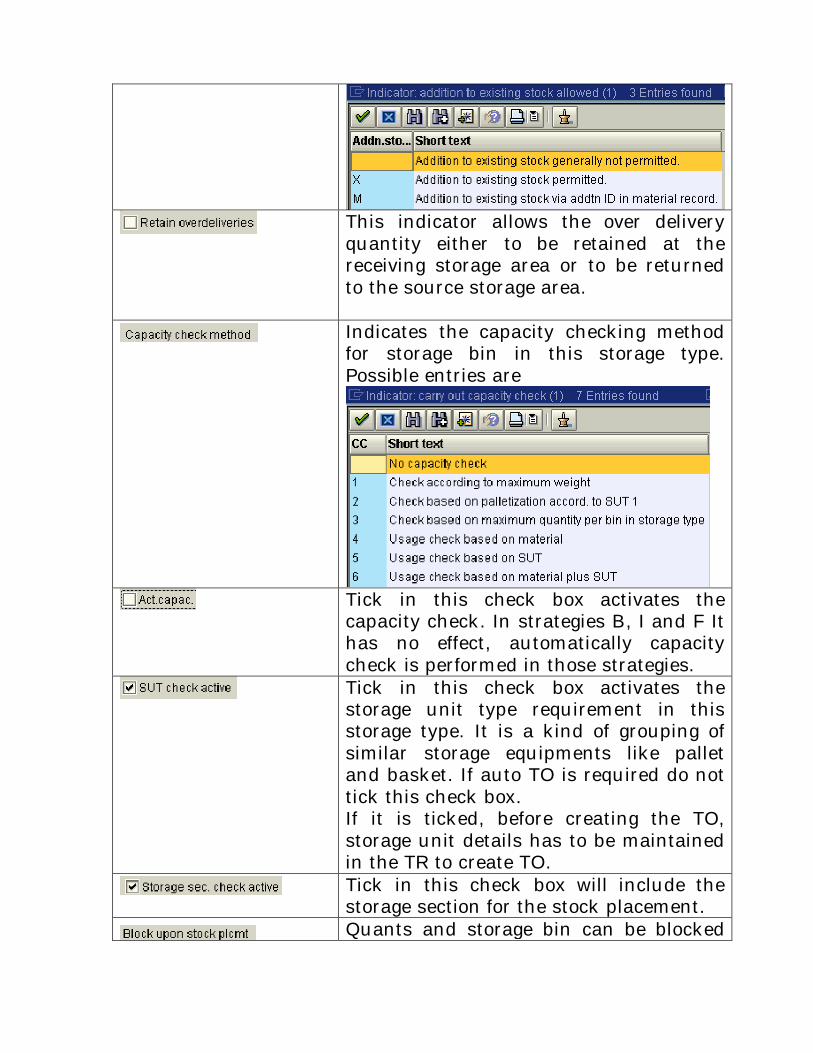
This indicator allows the over deliveryquantity either to be retained at thereceiving storage area or to be returnedto the source storage area.
Indicates the capacity checking methodfor storage bin in this storage type.Possible entries are
Tick in this check box activates thecapacity check. In strategies B, I and F Ithas no effect, automatically capacitycheck is performed in those strategies.Tick in this check box activates thestorage unit type requirement in thisstorage type. It is a kind of grouping ofsimilar storage equipments like palletand basket. If auto TO is required do nottick this check box.If it is ticked, before creating the TO,storage unit details has to be maintainedin the TR to create TO.Tick in this check box will include thestorage section for the stock placement.Quants and storage bin can be blocked
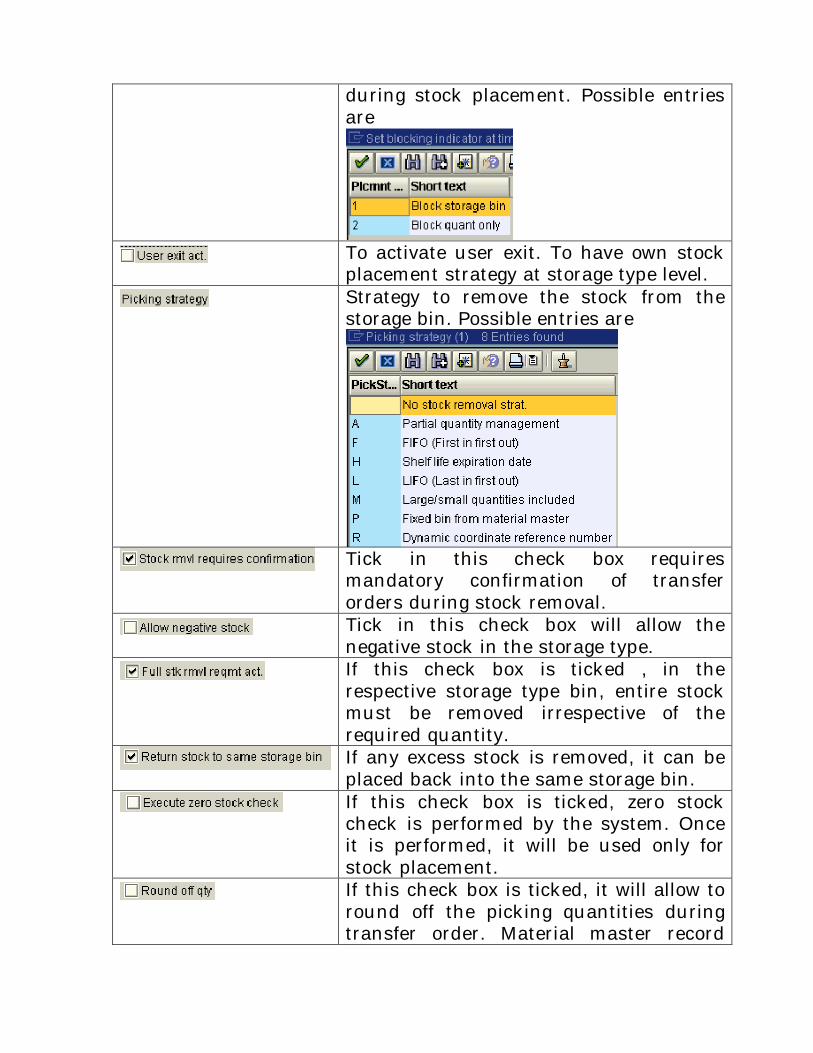
during stock placement. Possible entriesare
To activate user exit. To have own stockplacement strategy at storage type level.Strategy to remove the stock from thestorage bin. Possible entries are
Tick in this check box requiresmandatory confirmation of transferorders during stock removal.Tick in this check box will allow thenegative stock in the storage type.If this check box is ticked , in therespective storage type bin, entire stockmust be removed irrespective of therequired quantity.If any excess stock is removed, it can beplaced back into the same storage bin.If this check box is ticked, zero stockcheck is performed by the system. Onceit is performed, it will be used only forstock placement.If this check box is ticked, it will allow toround off the picking quantities duringtransfer order. Material master record
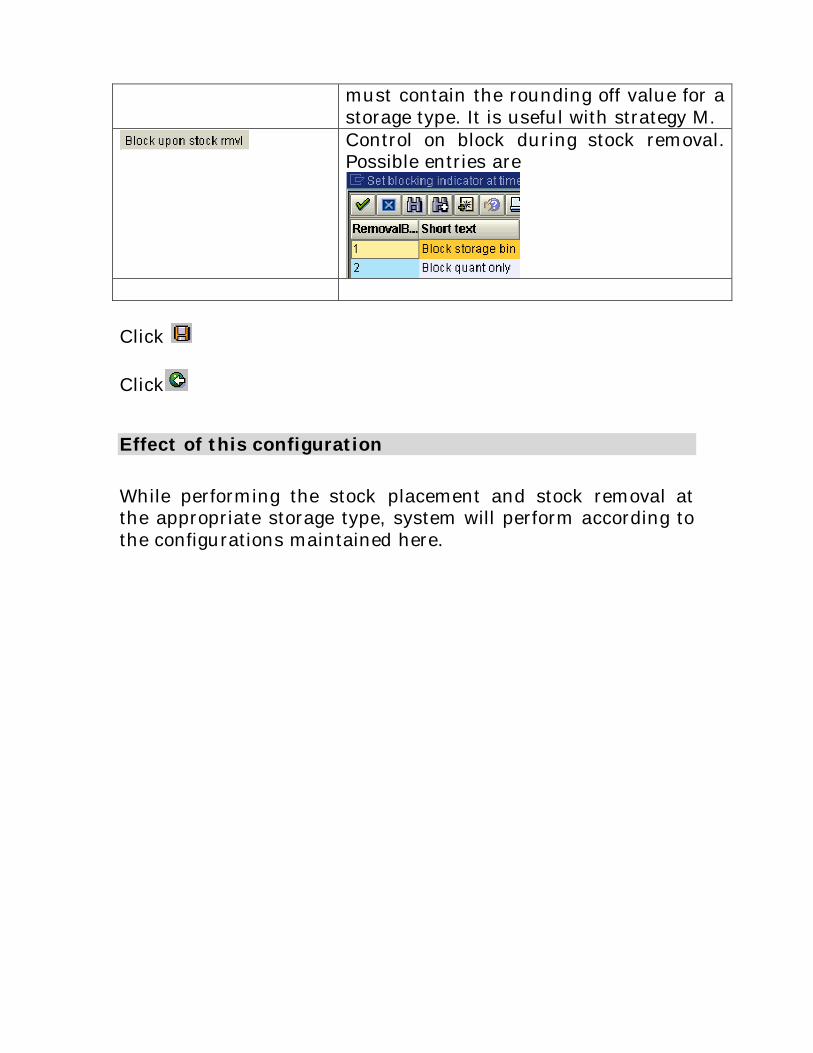
must contain the rounding off value for astorage type. It is useful with strategy M.Control on block during stock removal.Possible entries are
Click
Click
Effect of this configuration
While performing the stock placement and stock removal atthe appropriate storage type, system will perform according tothe configurations maintained here.
6. Define Storage Sections
BACKGROUND
This configuration setting enables to define the storagesections.
Storage section is the logical or physical separation of area inthe ware house.
INSTRUCTIONS
Follow the Menu Path: IMG → Logistics Execution →Warehouse Management → Master Data → Define StorageSections
1. Click
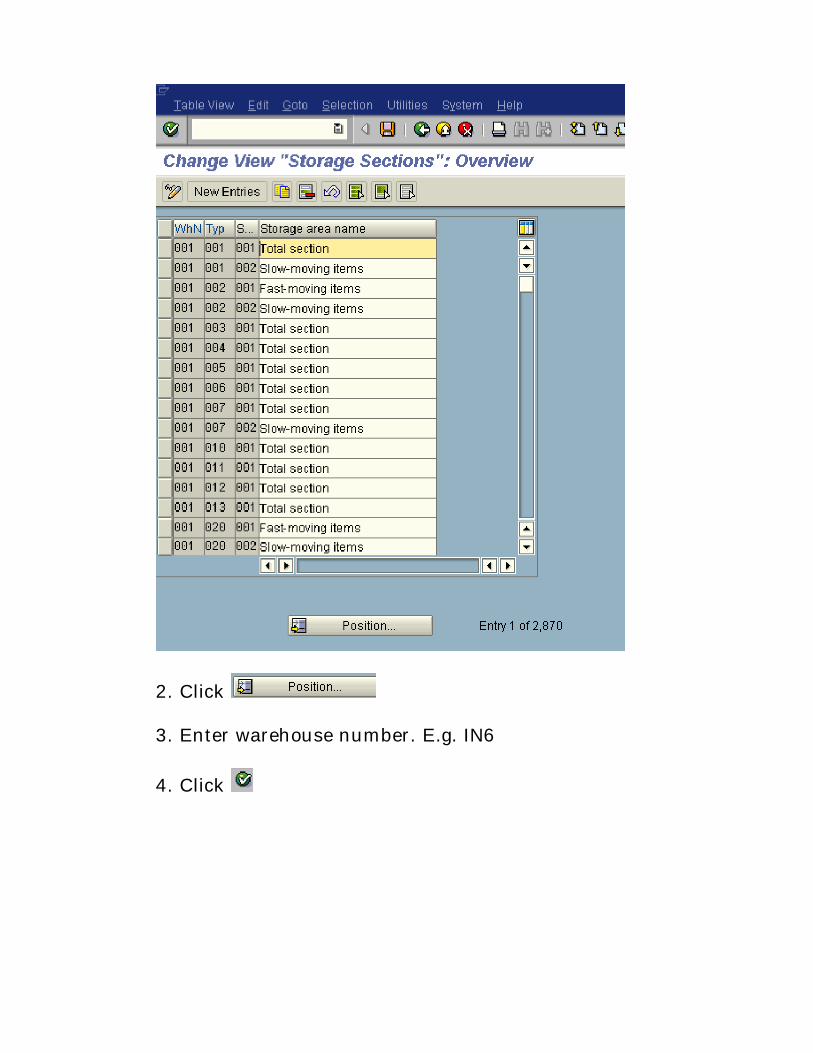
2. Click
3. Enter warehouse number. E.g. IN6
4. Click
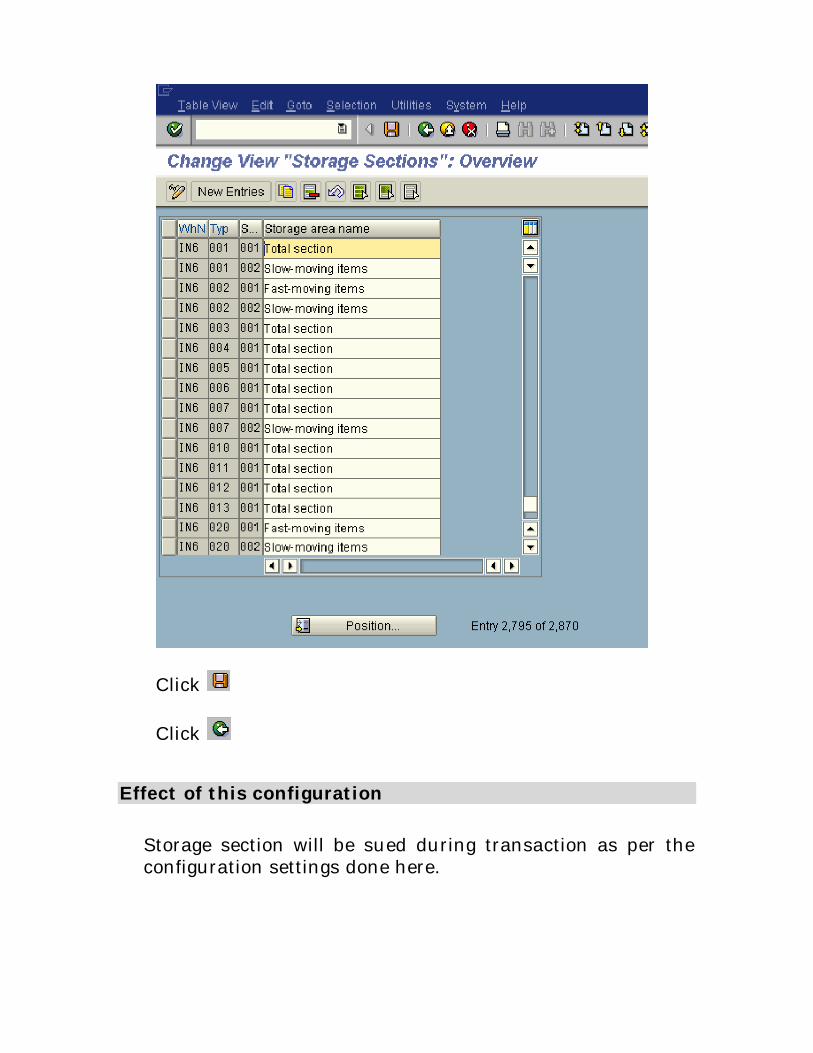
Click
Click
Effect of this configuration
Storage section will be sued during transaction as per theconfiguration settings done here.
7. Define Picking Area
BACKGROUND
This configuration setting enables to define the pickingarea. Picking area is with in the storage type defines thegroup of bins.
When creating storage bins, picking area is assigned.
INSTRUCTIONS
Follow the Menu Path: IMG → Logistics Execution →Warehouse Management → Master Data → Define PickingAreas
1. Click
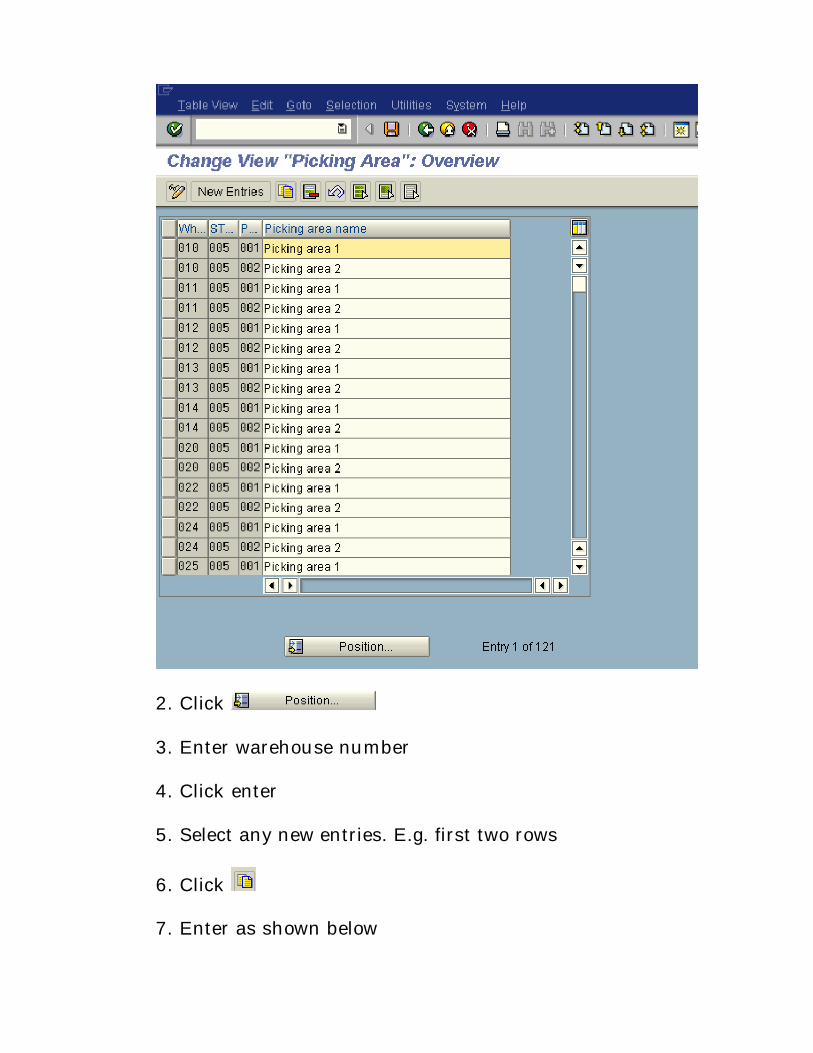
2. Click
3. Enter warehouse number
4. Click enter
5. Select any new entries. E.g. first two rows
6. Click
7. Enter as shown below
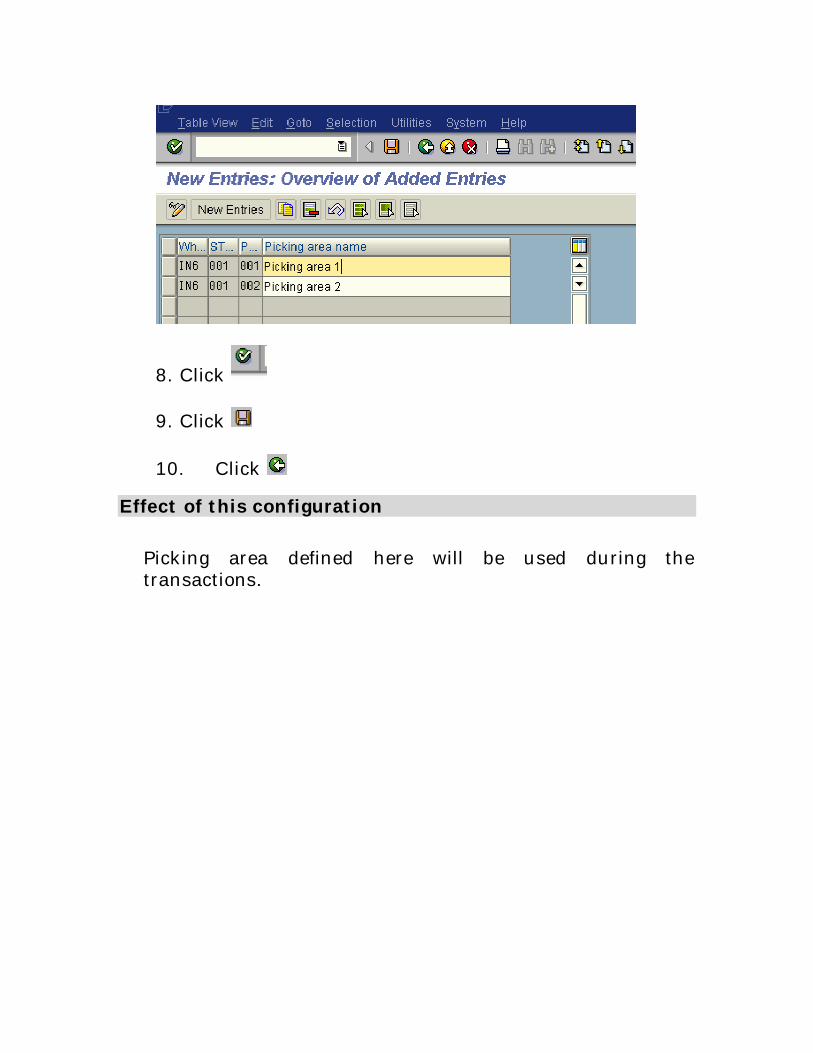
8. Click
9. Click
10. Click
Effect of this configuration
Picking area defined here will be used during thetransactions.
8. Define Storage Bin Types
BACKGROUND
This configuration setting enables to define the storage bintypes. Example: Storage bins can be divided based on thesized.
INSTRUCTIONS
Follow the Menu Path: IMG → Logistics Execution →Warehouse Management → Master Data → Storage Bins →Define Storage Bin Types
1. Click
2. Click to create new keys.
3. Maintain the fields as explained below
Field Name Field description and value - Warehouse number Key identifying the warehouse
number. E.g. IN6Storage bin type. E.g. LRDescription of the storage bin.E.g. Large Bin
4. Click
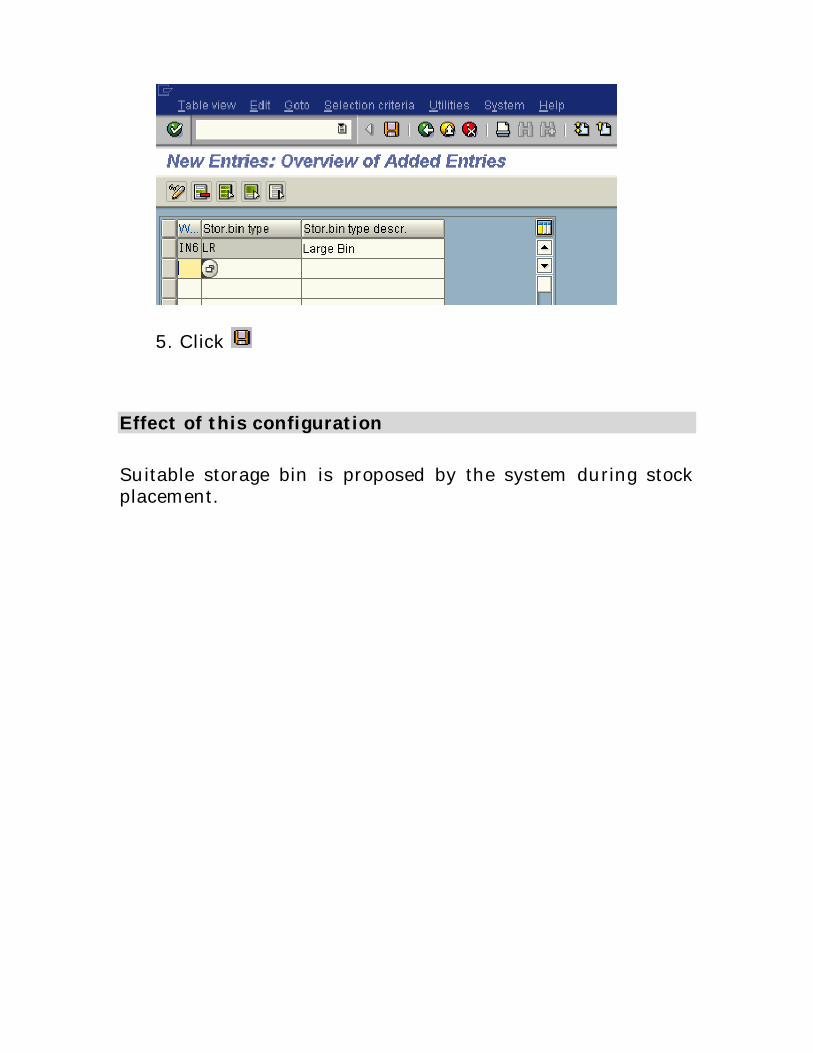
5. Click
Effect of this configuration
Suitable storage bin is proposed by the system during stockplacement.
9. Define Blocking Reason
BACKGROUND
This configuration setting enables to define the blockingreason.
Blocking can be used to block during stock placement andstock removal from
• Storage type• Storage bin• Quant
INSTRUCTIONS
Follow the Menu Path: IMG → Logistics Execution →Warehouse Management → Master Data → Storage Bins →Define Blocking Reason
1. Click
2. Click to create new keys.
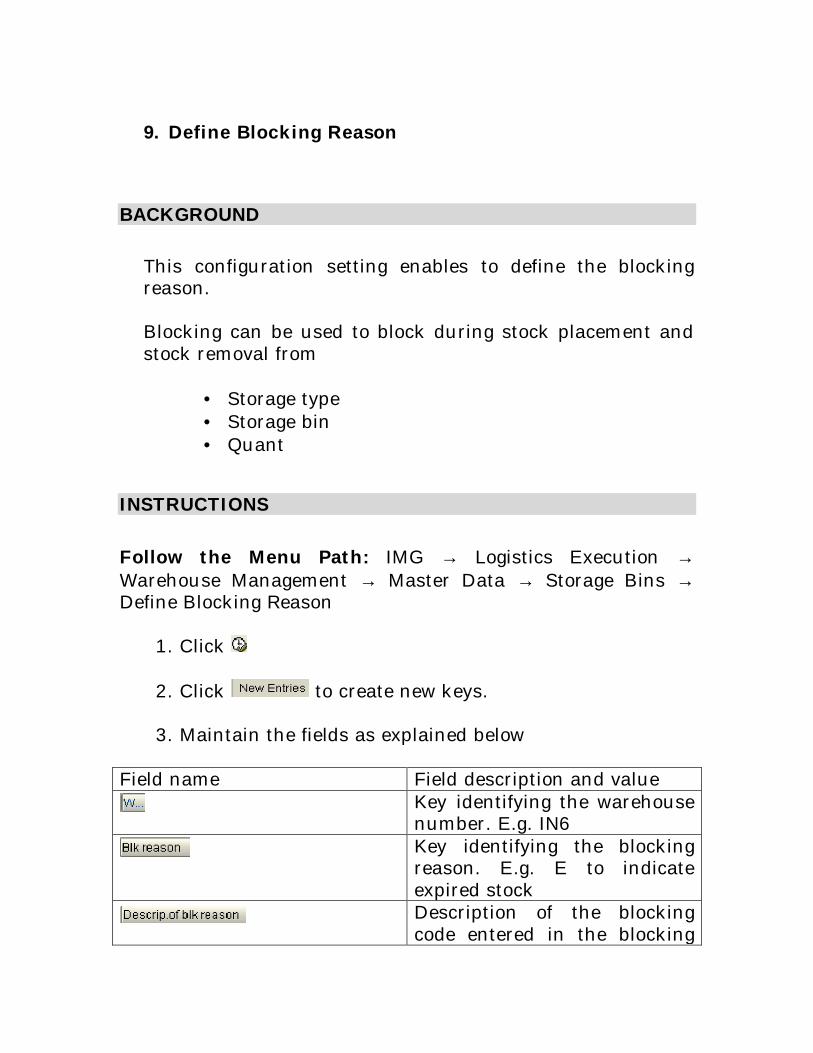
3. Maintain the fields as explained below
Field name Field description and valueKey identifying the warehousenumber. E.g. IN6Key identifying the blockingreason. E.g. E to indicateexpired stockDescription of the blockingcode entered in the blocking
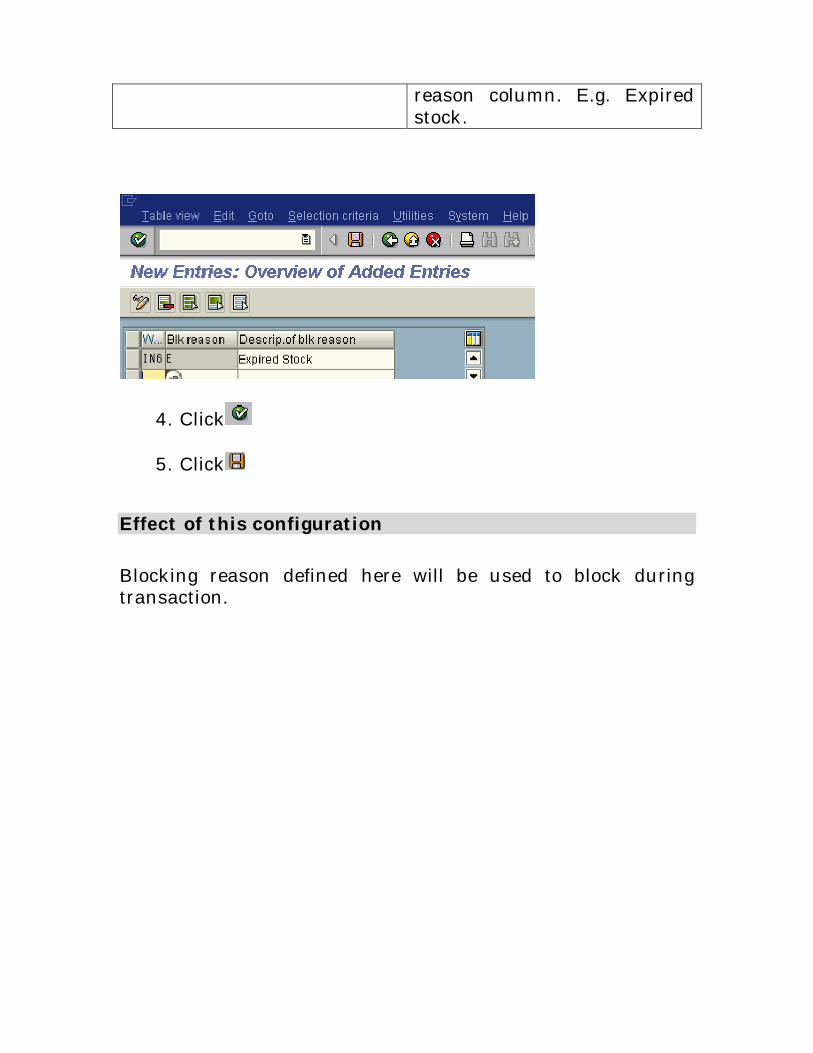
reason column. E.g. Expiredstock.
4. Click
5. Click
Effect of this configuration
Blocking reason defined here will be used to block duringtransaction.
10. Define storage Bin Structure
BACKGROUND
This configuration setting enables to define the storage binstructure.
Storage bin structure determines the kind of numbering ofbins.
Example: -
• Bin numbering can be starting from A1
• Bin numbering can be starting from A-1-001
• Bin numbering can be starting from 1 or 001
It is possible to define the own structure for numbering thestorage bins. When creating the storage bins, numberingadopted as per the structure defined here.
When creating storage bin it is important to mention storagetype to which the structure is to be created.
INSTRUCTIONS
Follow the Menu Path: IMG → Logistics Execution →Warehouse Management → Master Data → Storage Bins →Define Storage Structure
1. Click
2. Click to create new keys.
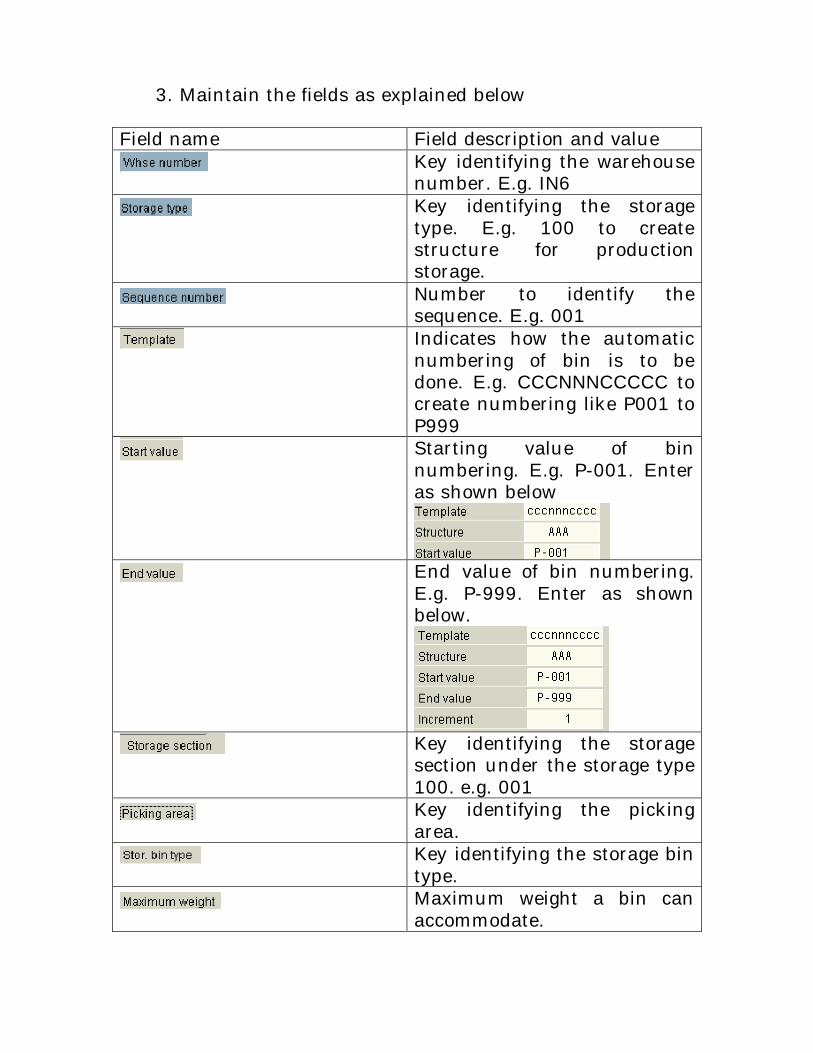
3. Maintain the fields as explained below
Field name Field description and valueKey identifying the warehousenumber. E.g. IN6Key identifying the storagetype. E.g. 100 to createstructure for productionstorage.Number to identify thesequence. E.g. 001Indicates how the automaticnumbering of bin is to bedone. E.g. CCCNNNCCCCC tocreate numbering like P001 toP999Starting value of binnumbering. E.g. P-001. Enteras shown below
End value of bin numbering.E.g. P-999. Enter as shownbelow.
Key identifying the storagesection under the storage type100. e.g. 001Key identifying the pickingarea.Key identifying the storage bintype.Maximum weight a bin canaccommodate.
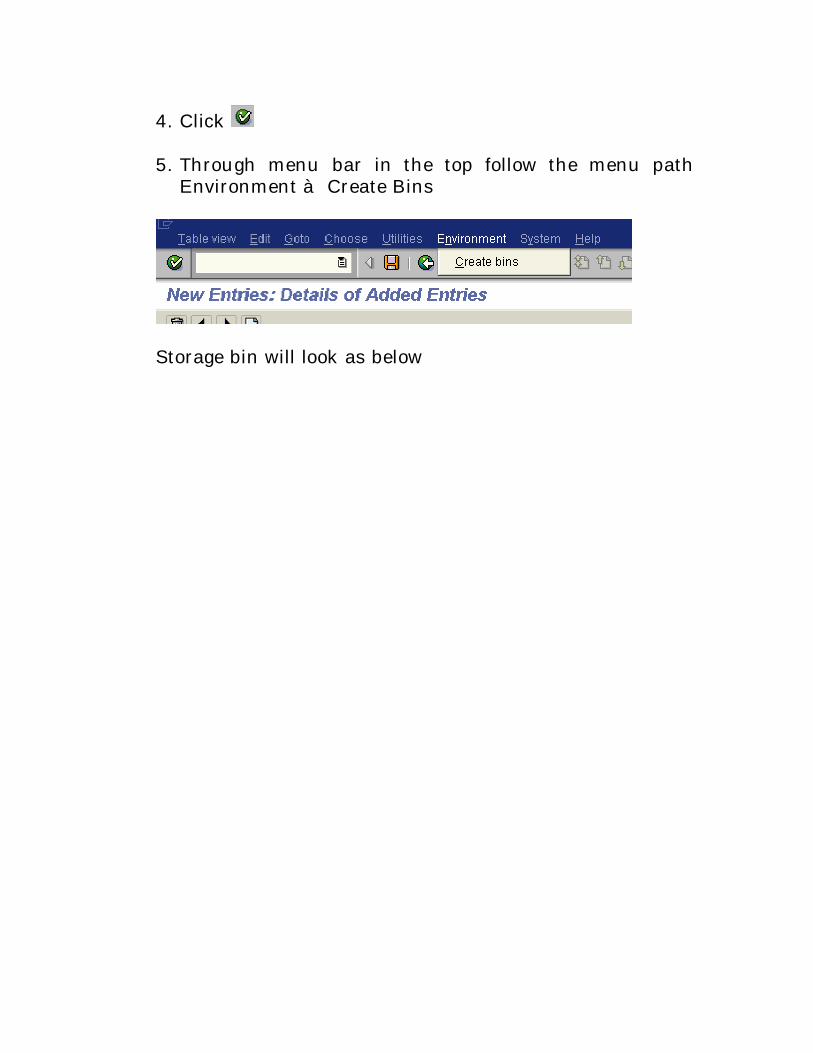
4. Click
5. Through menu bar in the top follow the menu pathEnvironment à Create Bins
Storage bin will look as below
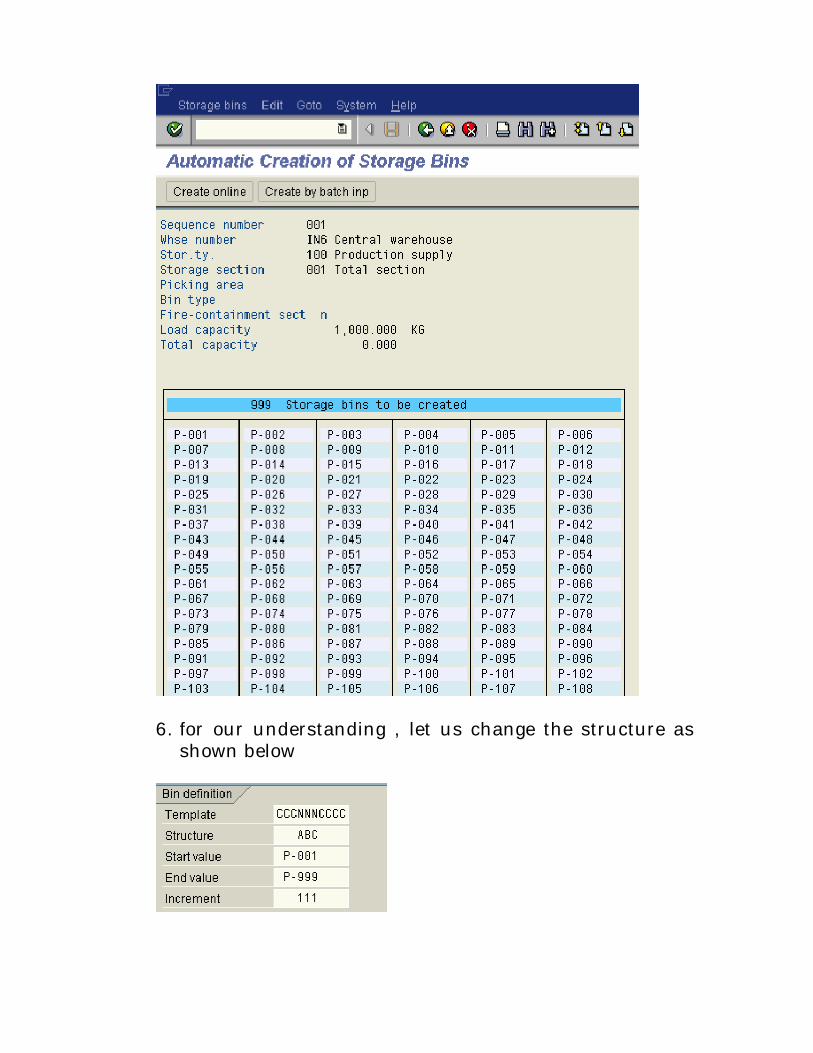
6. for our understanding , let us change the structure asshown below
Enter C for Alphabet and other character in thenumbering
Maintain the structure same letter under the numericindicator if the increment is to consider all the digits andmaintain the increment.
If the increment is for each digit wise, maintain thedifferent letters in the structure and maintain theincrement for each digit.
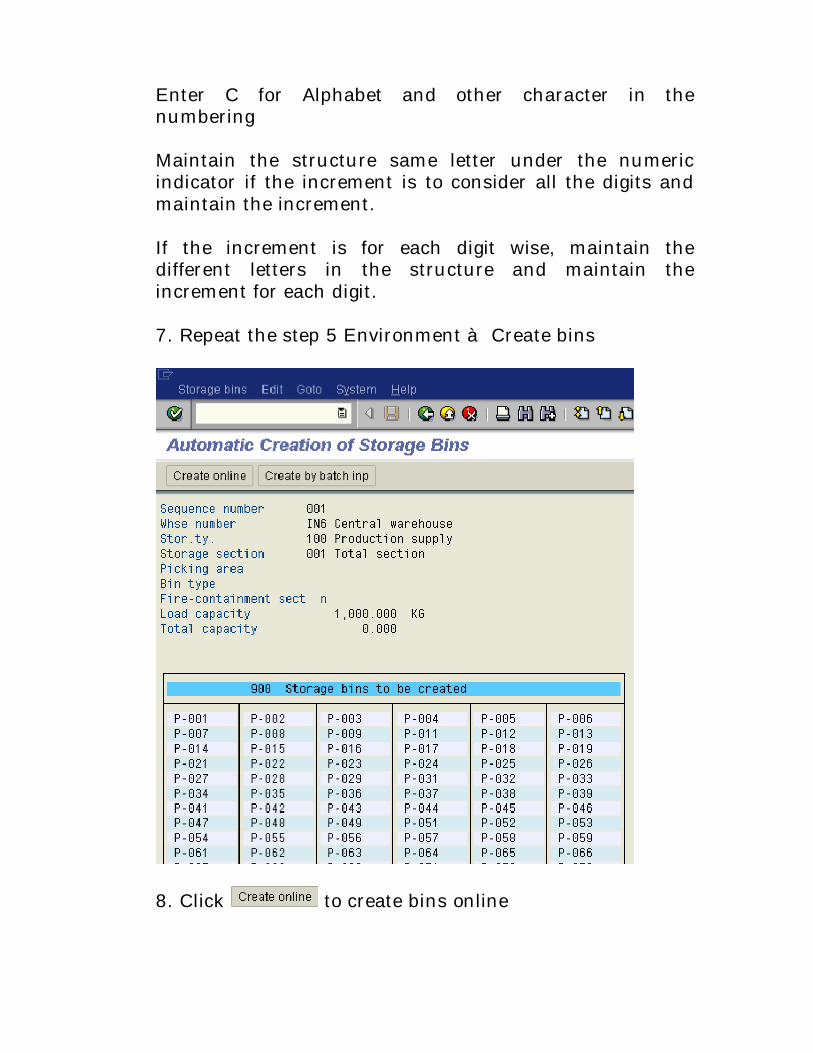
7. Repeat the step 5 Environment à Create bins
8. Click to create bins online
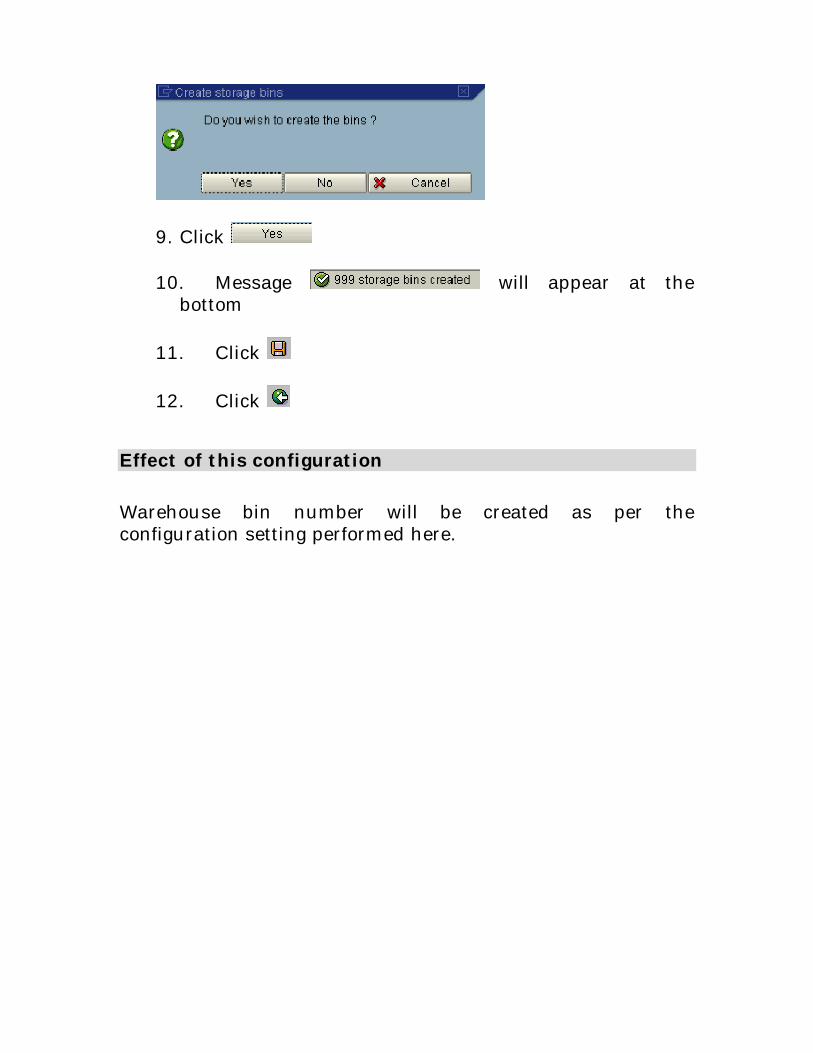
9. Click
10. Message will appear at thebottom
11. Click
12. Click
Effect of this configuration
Warehouse bin number will be created as per theconfiguration setting performed here.
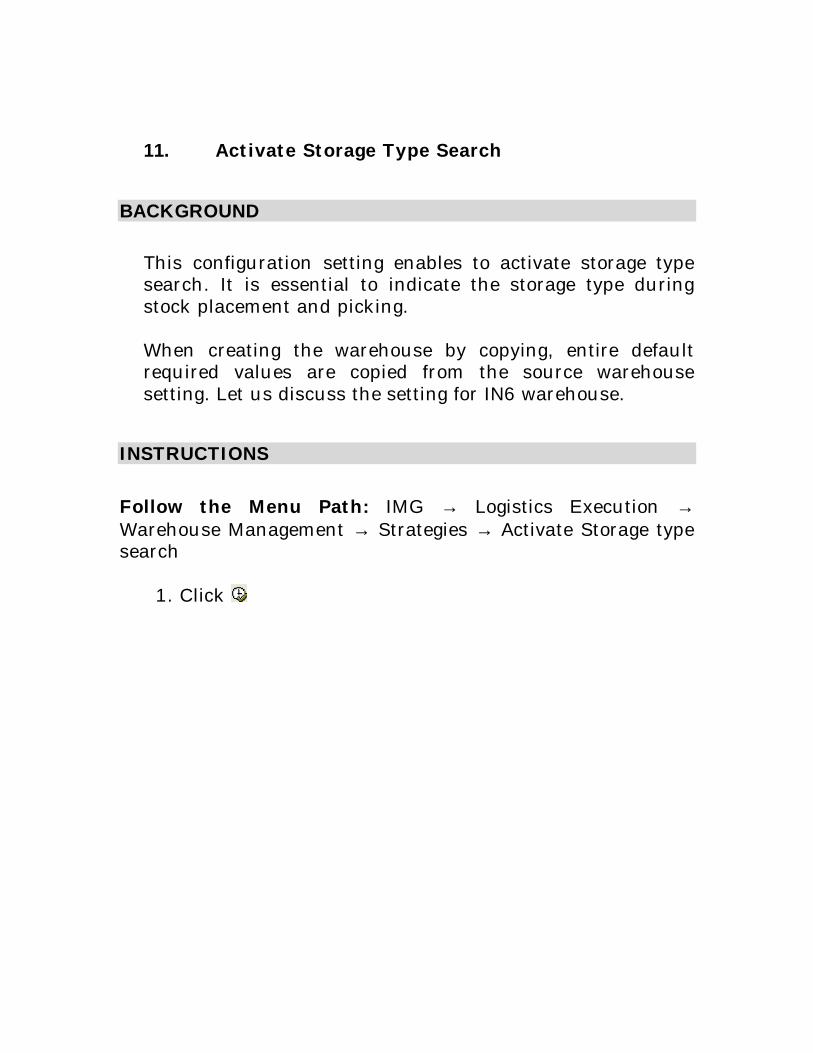
11. Activate Storage Type Search
BACKGROUND
This configuration setting enables to activate storage typesearch. It is essential to indicate the storage type duringstock placement and picking.
When creating the warehouse by copying, entire defaultrequired values are copied from the source warehousesetting. Let us discuss the setting for IN6 warehouse.
INSTRUCTIONS
Follow the Menu Path: IMG → Logistics Execution →Warehouse Management → Strategies → Activate Storage typesearch
1. Click
2. Click inRow to define the storage type indicator.
3. Click
4. Enter warehouse number. E.g. IN6
5. Click
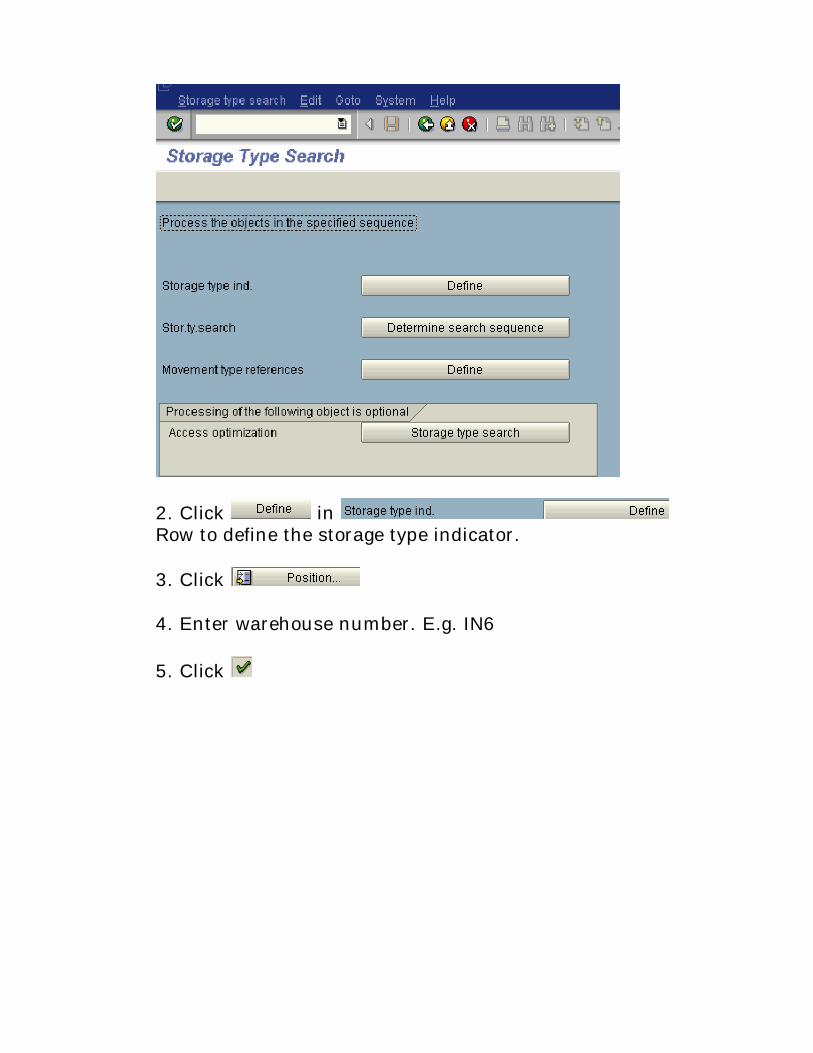
6. Click (It is already defined)
7. Click
8. Click to create new keys.( only if required, bydefault when copying the warehouse, all entries will getcopied)
9. Maintain the fields as explained below
Field Name Field description and value - Warehouse number Key identifying the warehouse
number. E.g. IN6Key identifying the operationwhether Pick or put away.Possible entries are
- Storage type Key identifying the storagetype. It indicates the priorityfor storage type one by one.
- Stock category Key identifying the priority forstock type during picking and
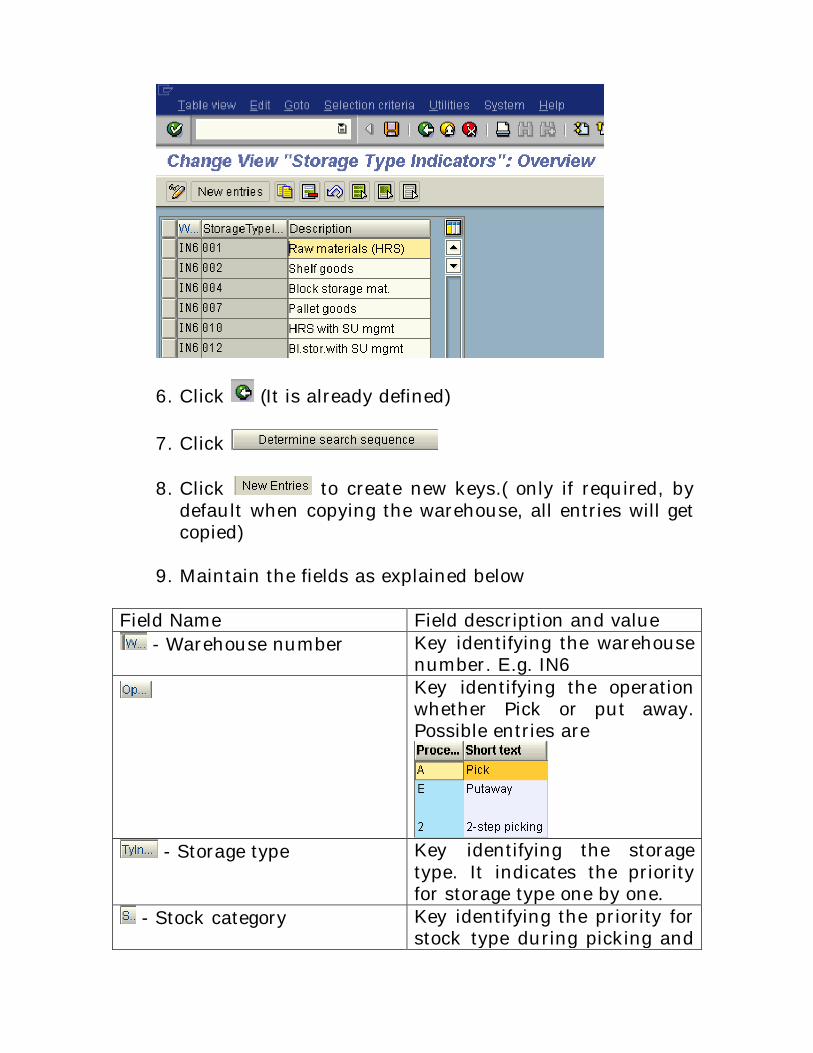
storing. Possible entries are
- Special stock indicator Key indicating the specialstock. Like project stock.Possible entries are
- Storage class Key identifying the storageclass. Mainly to indicate thehazardous material stockplacement and picking.
- Water pollution Key classifies hazardousmaterial with their ability topollute water. Possible entriesare
- Reference to movementtype
Reference key to trigger thesearch during put away andpicking. Through this key,different strategy for differentmovement type can beadopted.
- Storage location reference Key identifying the storagelocation reference.
- priority Enter the storage type as perthe priority.
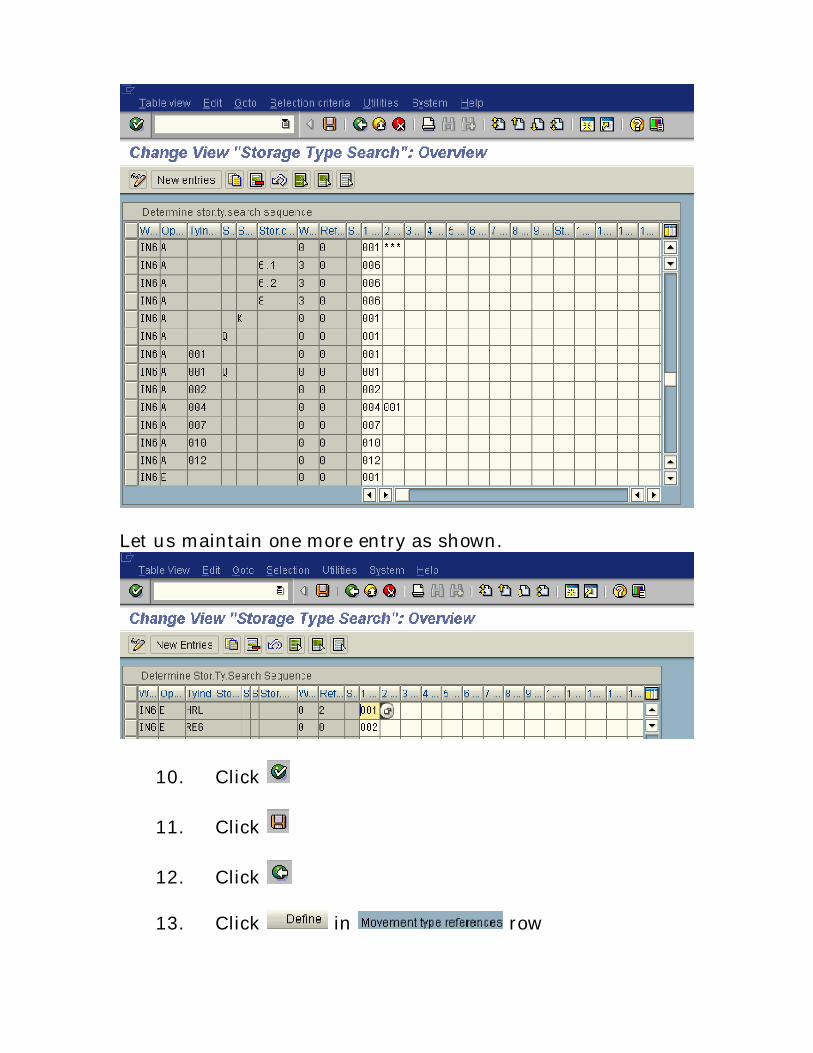
Let us maintain one more entry as shown.
10. Click
11. Click
12. Click
13. Click in row

14. Maintain the reference key for movement type totrigger the search during those movements.
Note: - Reference to movement type. This will influence thestorage type search.
Note: - Maintain the entry to all other movement type aswell.
15. Click
16. Click
17. Click
18. Click
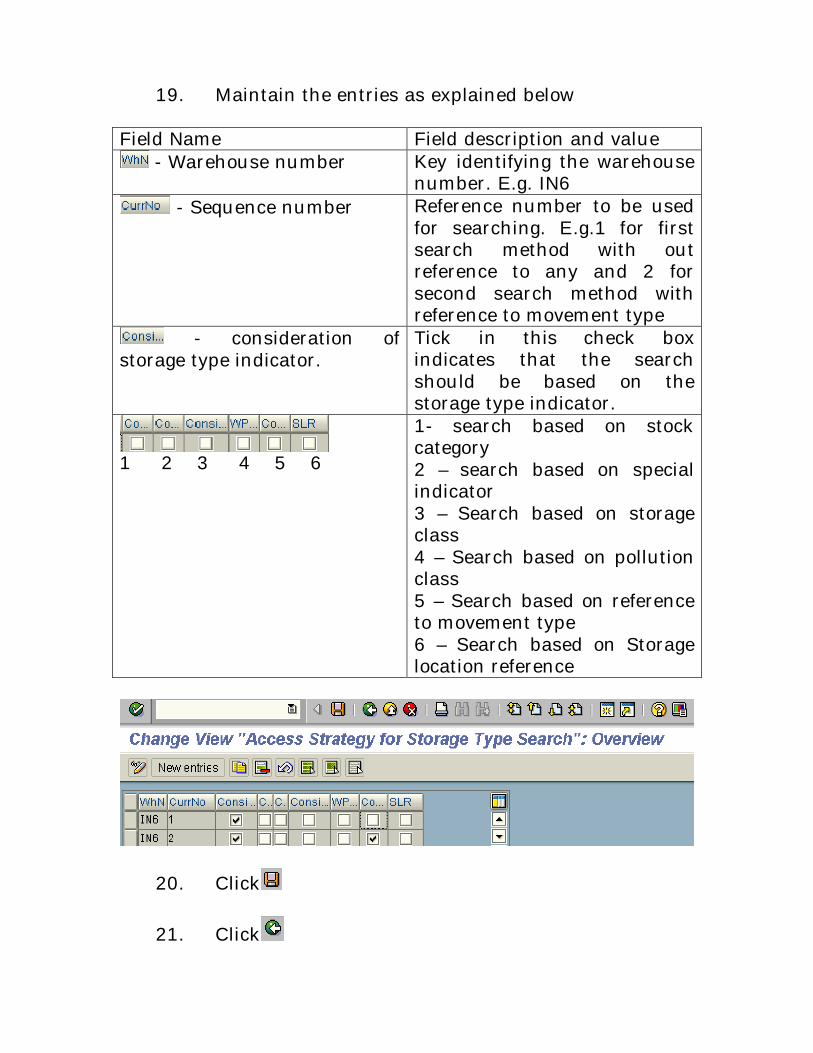
19. Maintain the entries as explained below
Field Name Field description and value - Warehouse number Key identifying the warehouse
number. E.g. IN6 - Sequence number Reference number to be used
for searching. E.g.1 for firstsearch method with outreference to any and 2 forsecond search method withreference to movement type
- consideration ofstorage type indicator.
Tick in this check boxindicates that the searchshould be based on thestorage type indicator.
1 2 3 4 5 6
1- search based on stockcategory2 – search based on specialindicator3 – Search based on storageclass4 – Search based on pollutionclass5 – Search based on referenceto movement type6 – Search based on Storagelocation reference
20. Click
21. Click
Effect of this configuration
Storage type search will be performed as per the setting here.
12. Activate storage section search
BACKGROUND
This configuration setting enables to activate storagesection search. It is essential to indicate the storage sectionduring stock placement and picking.
INSTRUCTIONS
Follow the Menu Path: IMG → Logistics Execution →Warehouse Management → Strategies → Activate StorageSection search
1. Click
2. Click
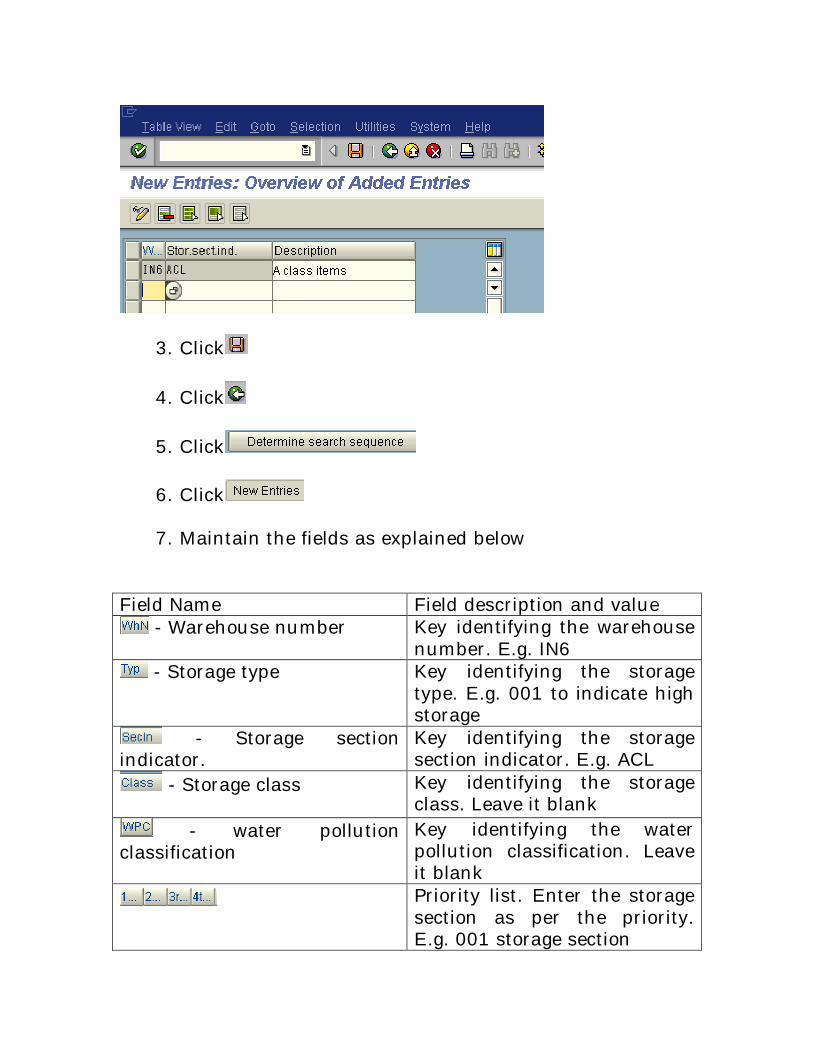
3. Click
4. Click
5. Click
6. Click
7. Maintain the fields as explained below
Field Name Field description and value - Warehouse number Key identifying the warehouse
number. E.g. IN6 - Storage type Key identifying the storage
type. E.g. 001 to indicate highstorage
- Storage sectionindicator.
Key identifying the storagesection indicator. E.g. ACL
- Storage class Key identifying the storageclass. Leave it blank
- water pollutionclassification
Key identifying the waterpollution classification. Leaveit blankPriority list. Enter the storagesection as per the priority.E.g. 001 storage section
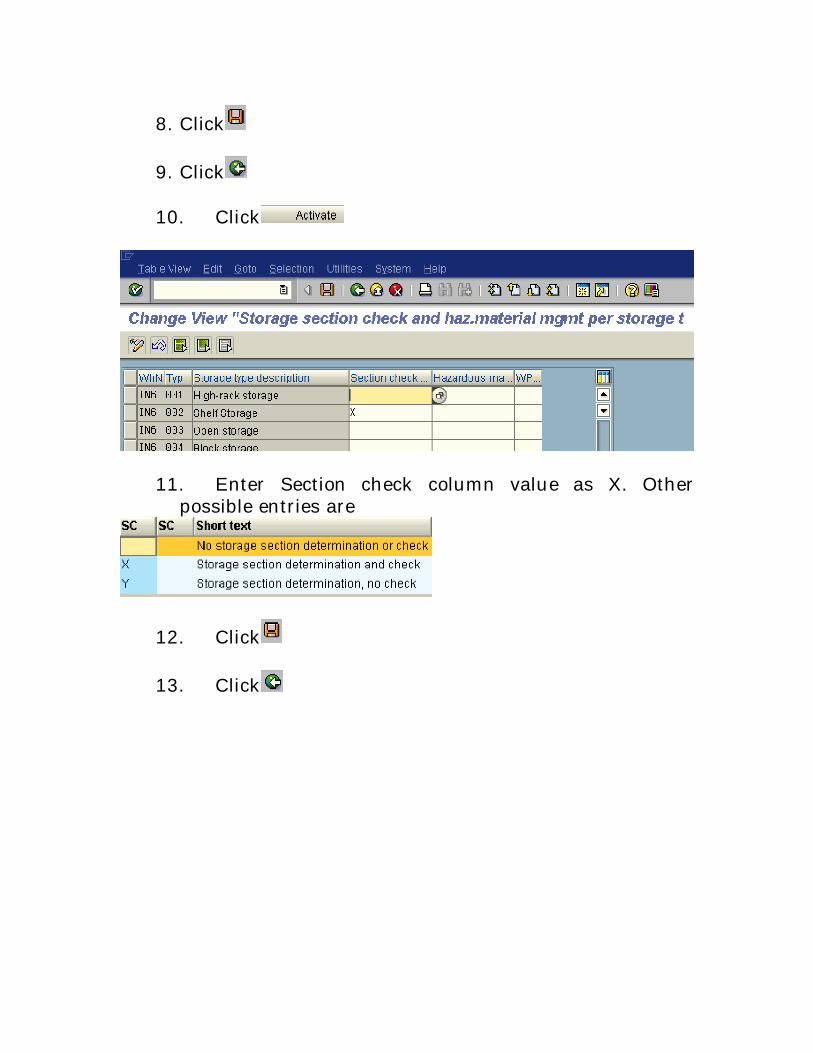
8. Click
9. Click
10. Click
11. Enter Section check column value as X. Otherpossible entries are
12. Click
13. Click
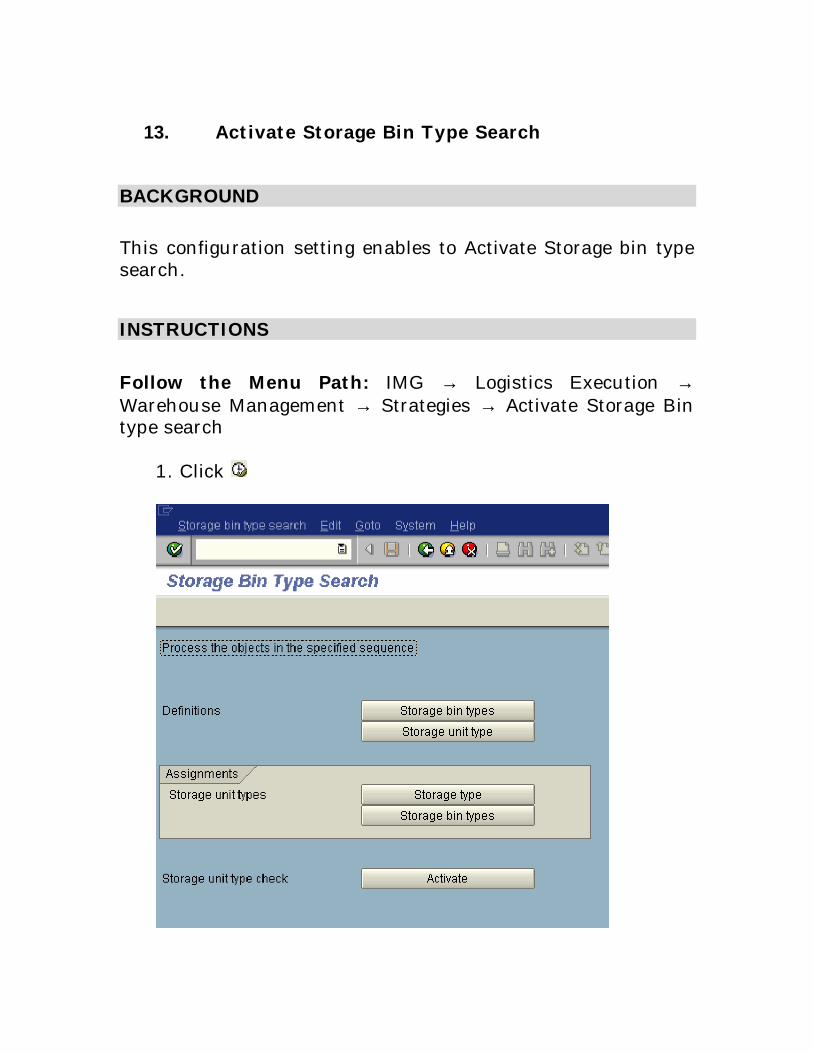
13. Activate Storage Bin Type Search
BACKGROUND
This configuration setting enables to Activate Storage bin typesearch.
INSTRUCTIONS
Follow the Menu Path: IMG → Logistics Execution →Warehouse Management → Strategies → Activate Storage Bintype search
1. Click

2. Click in the definitions area
Note: - If required maintain the storage bin types. In thisexample, it is already maintained.
3. Click
4. Click
5. Entries are already maintained when copying thewarehouse. Change the entries if reqired to suit the bintype. E.g. Bin type LR added as 3rd priority in IN6storage unit IP.
6. Click
7. Click
Effect of this configuration
Bin search strategy will be performed as per theconfiguration done here.
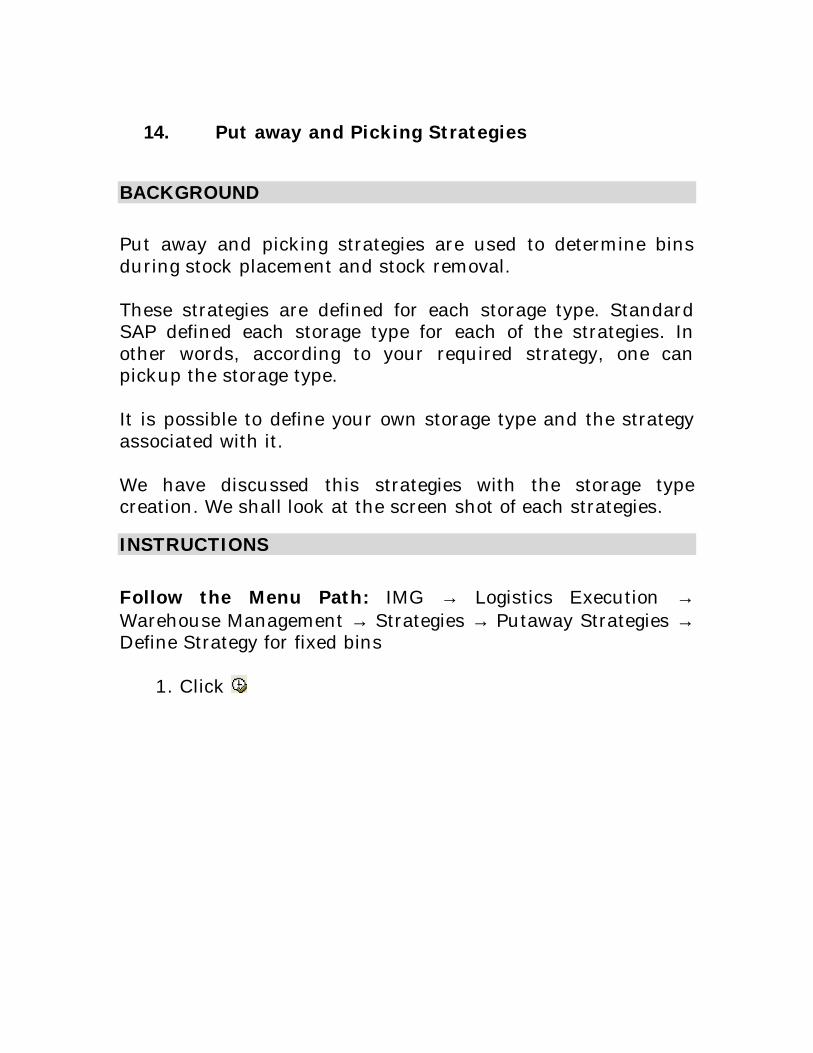
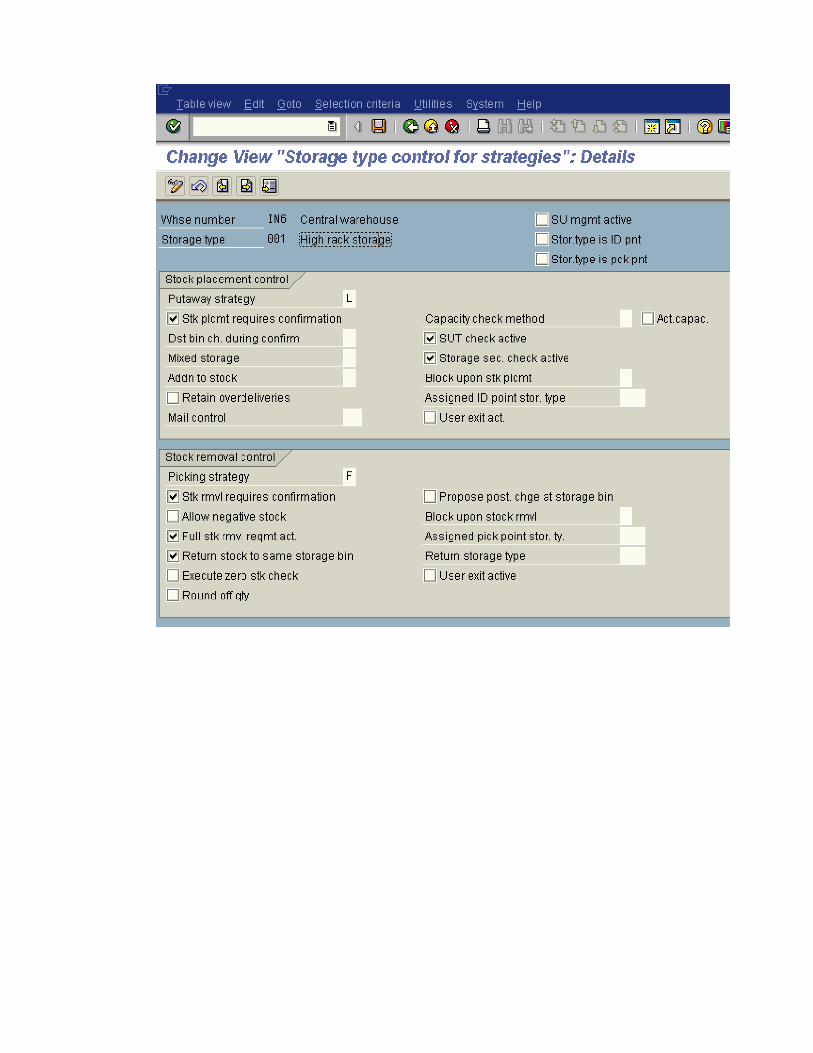
14. Put away and Picking Strategies
BACKGROUND
Put away and picking strategies are used to determine binsduring stock placement and stock removal.
These strategies are defined for each storage type. StandardSAP defined each storage type for each of the strategies. Inother words, according to your required strategy, one canpickup the storage type.
It is possible to define your own storage type and the strategyassociated with it.
We have discussed this strategies with the storage typecreation. We shall look at the screen shot of each strategies.
INSTRUCTIONS
Follow the Menu Path: IMG → Logistics Execution →Warehouse Management → Strategies → Putaway Strategies →Define Strategy for fixed bins
1. Click
Double click on the desired row to look at the details.
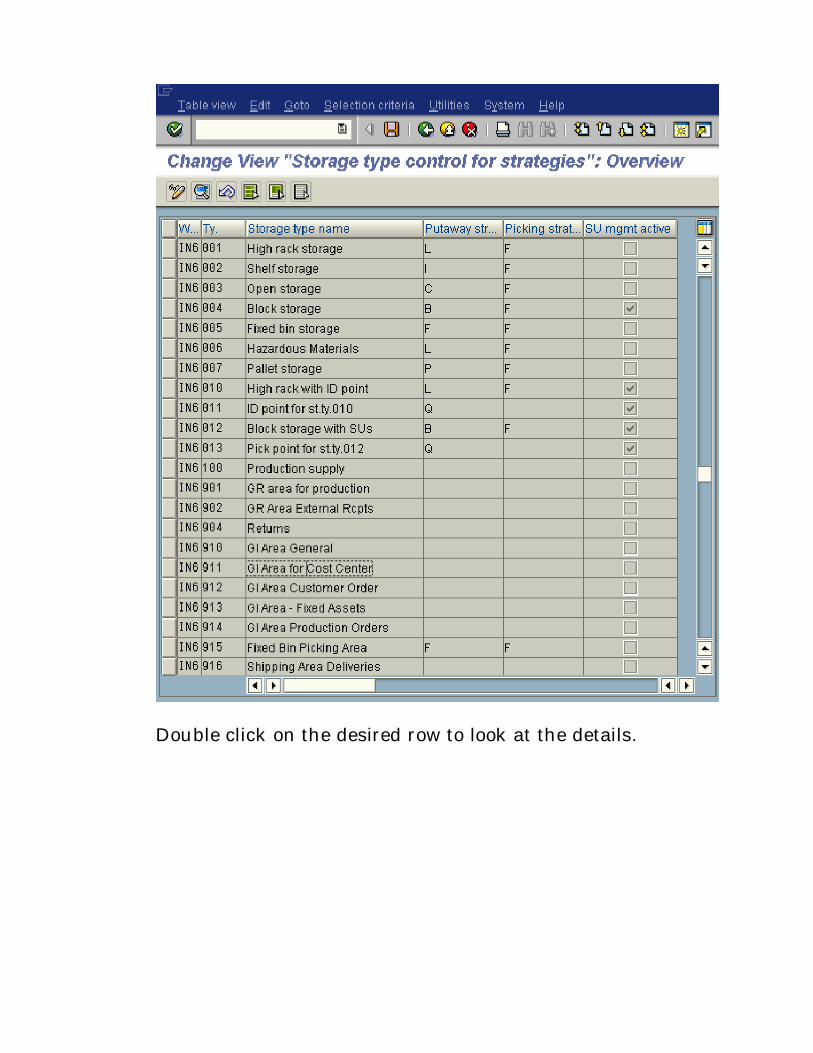
Strategy for Fixed bins
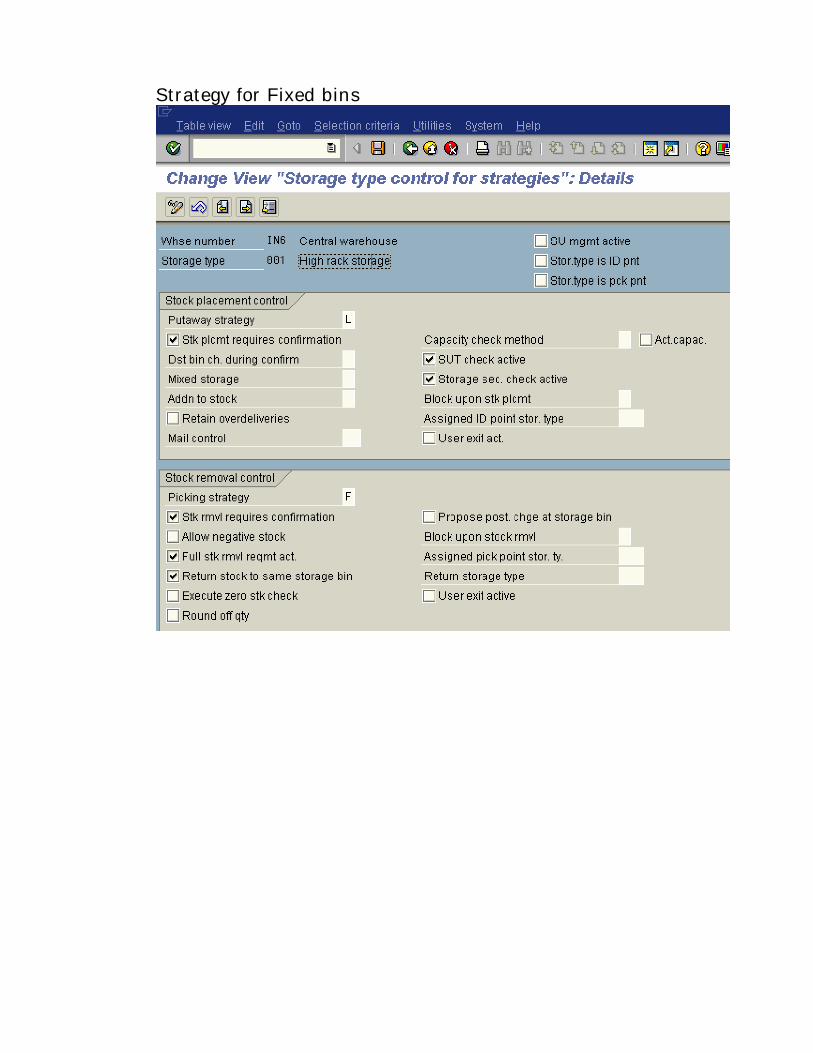
Define Strategy for Open storage
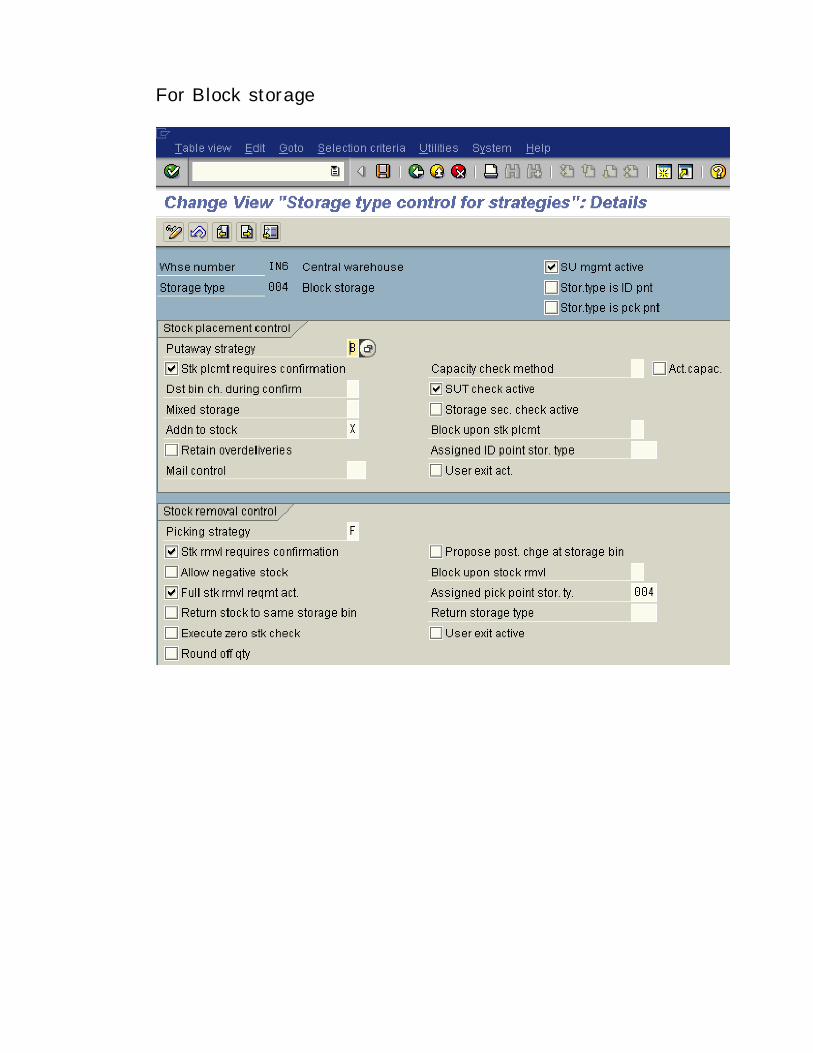
For Block storage
Let’s look at the few screen shots of picking strategies.
Follow the Menu Path: IMG → Logistics Execution →Warehouse Management → Strategies → Picking Strategies →Define FIFO Strategy
Note: - Please refer the detailed explanation given in thestorage type are. Here the screen shots are shown for yourreference only.
1. Click
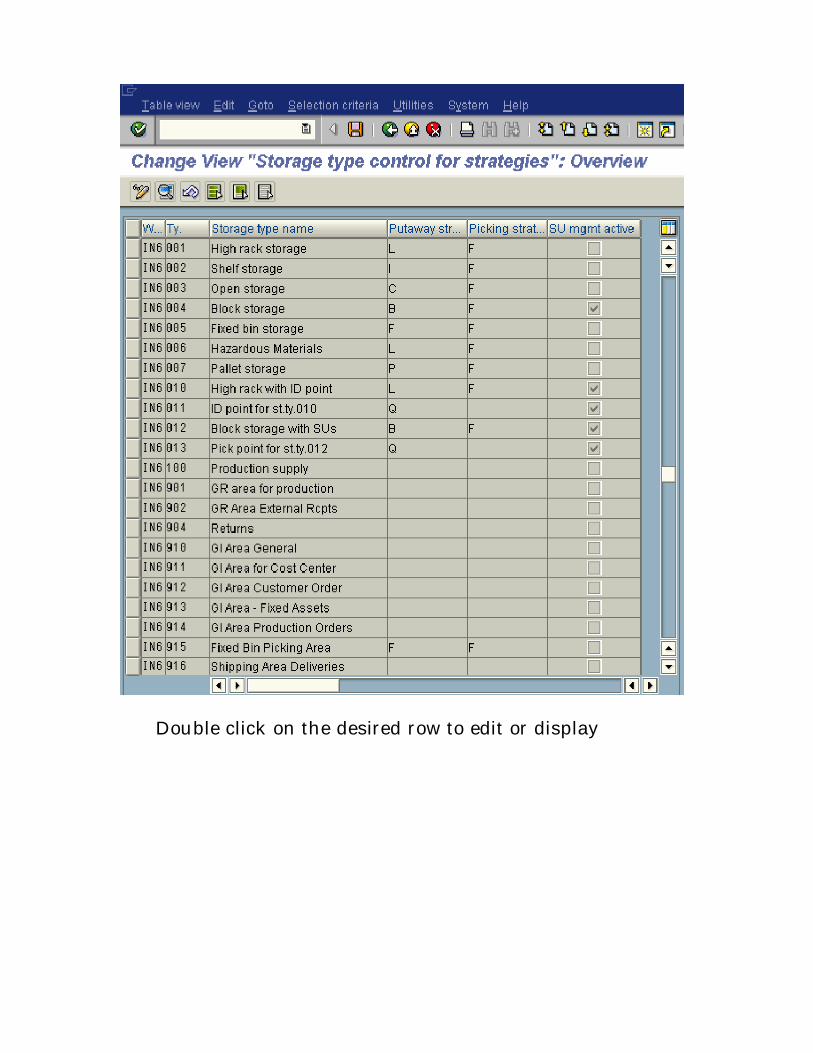
Double click on the desired row to edit or display
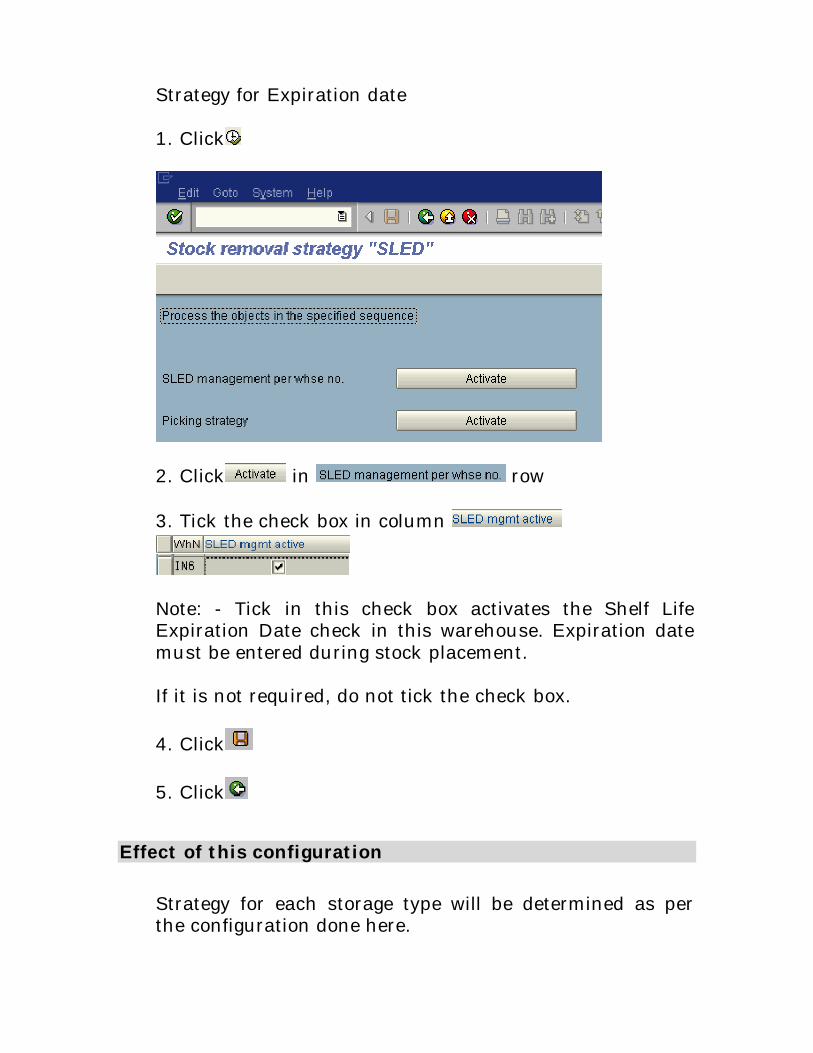
Strategy for Expiration date
1. Click
2. Click in row
3. Tick the check box in column
Note: - Tick in this check box activates the Shelf LifeExpiration Date check in this warehouse. Expiration datemust be entered during stock placement.
If it is not required, do not tick the check box.
4. Click
5. Click
Effect of this configuration
Strategy for each storage type will be determined as perthe configuration done here.
15. Define Movement Types
BACKGROUND
This configuration setting enables to define movement types.When copying the warehouse entire movement type settingsare copied.
Movement type contains control on Interim storage area Storage bin where items are to be placed Type of transaction Transfer order creation Automatic TO creation Printing controls TO Confirmation
Let us discuss the standard SAP movement type setting forwarehouse IN6.
INSTRUCTIONS
Follow the Menu Path: IMG → Logistics Execution →Warehouse Management → Activities → Transfers → DefineMovement types
1. Click
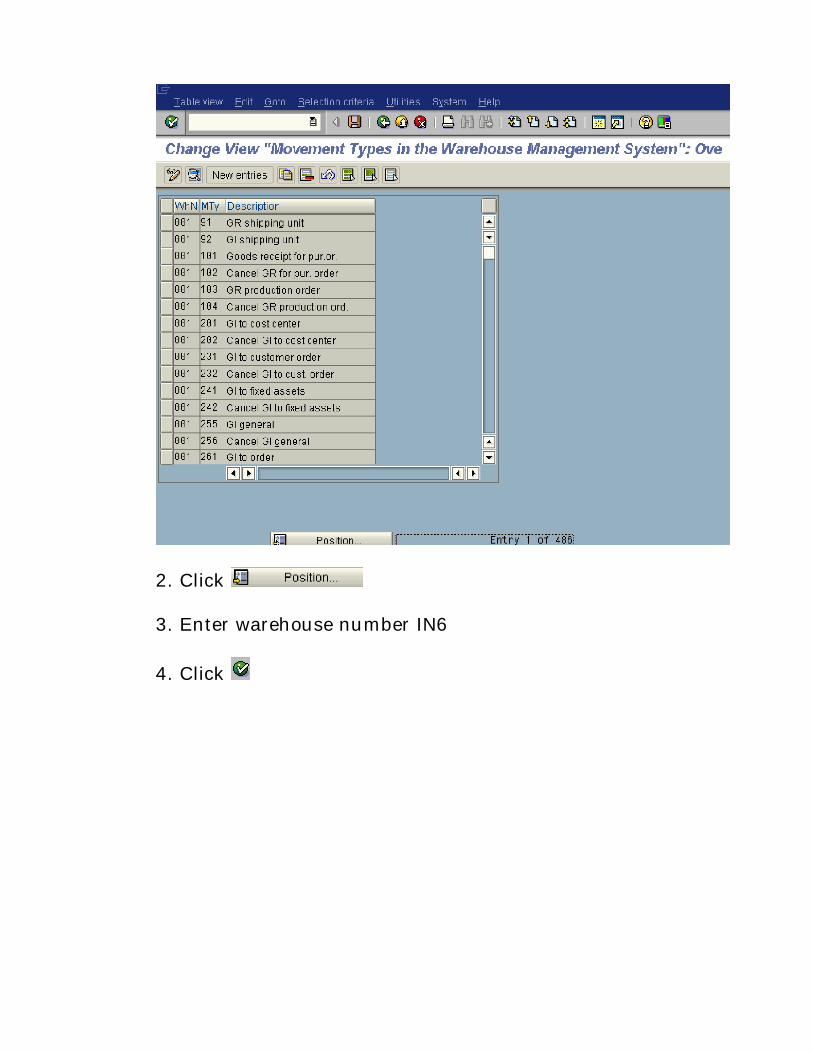
2. Click
3. Enter warehouse number IN6
4. Click
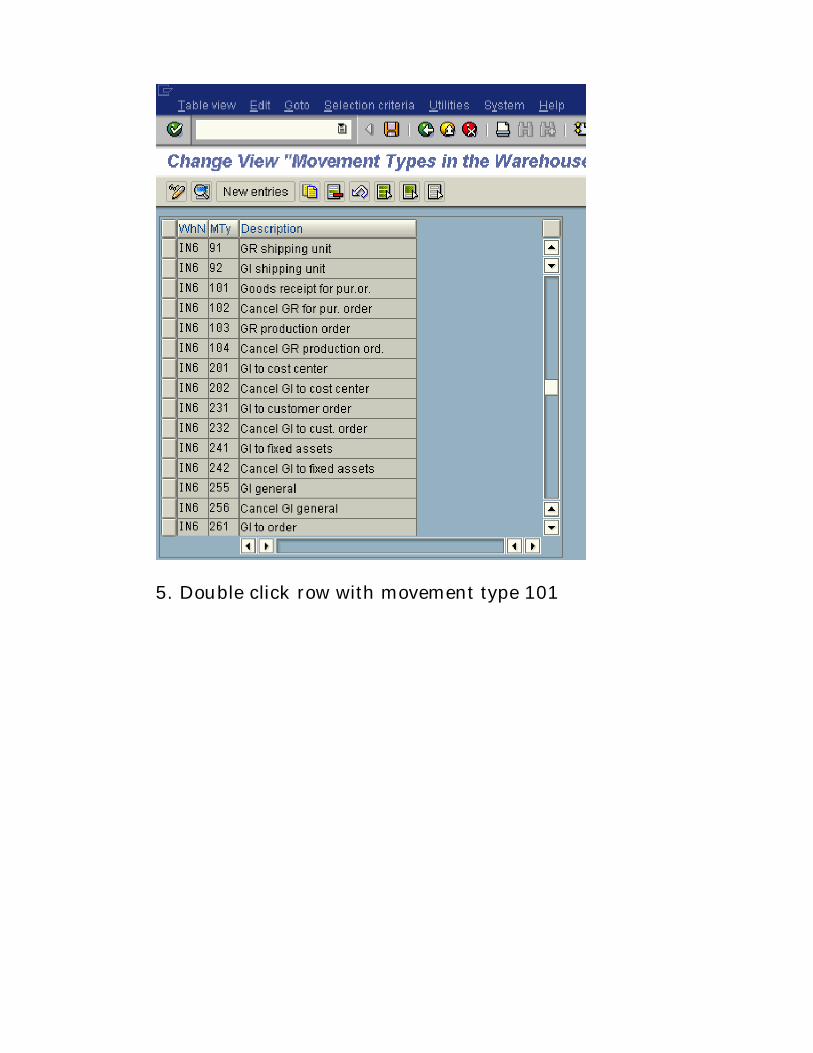
5. Double click row with movement type 101
Field Name Field description and valueKey identifying the warehousenumber. E.g. IN6Key identifying the movementtype. E.g. 101Source storage type fromwhere the stock is to bemoved. E.g. 902 to indicate tobe moved from interim storagetype for GR area externalreceiptsDestination storage type towhich the stock is to beplaced. E.g. 001 to indicate
high storage rack in thiswarehouse.Storage type to keep the leftover quantity. E.g. 001Storage bin reference for eachstorage type. If storage bin ismaintained, this will be usedas a fixed bin.Indicates the type of transfer.E.g. E to indicate stockplacement.Requirement type indicatesthe type of transaction. E.g. Bindicates purchase order.Tick in this check box will notallow the creation of manualTransfer Order. (TO)Tick in this check box willallow manual creation ofTransfer Requirement.Tick in this check box will setthe GR number and date inthe quant automatically.In the TO system will notpropose any bin using anystrategy, user can manuallyenter the bin.System checks for any pre-allocation of the incomingmaterial stock. If so , issuesmessage.Tick in this check box willallow for complete quantremoval (stock removal).Screen control for TO creation.It is possible to split thequantity during stockplacement, during stockremoval or both together.
Possible entries are
Screen control for TOconfirmation. Leave it as it is.Printing code for printing ofTO.Automatic TO creation inbackground processing. Weshall discuss thisconfiguration below.Confirmation of TO can bedone immediately as soon asit is createdThis will propose the TOconfirmation as soon as it iscreated.Tick in this check boxindicates that no transfer isrequired for a posting change.
6. Click
7. Click
Effect of this configuration
When performing the transaction, TR and TO will be create asper the configuration done here.
16. Setup Automatic TO creation
BACKGROUND
This configuration setting enables to define automatic transferorder creation.
For every warehouse management movements TO is essential.Transfer Order can be created manually or automatically.Transfer Order indicates what is to be placed and where is itbe placed.
INSTRUCTIONS
Follow the Menu Path: IMG → Logistics Execution →Warehouse Management → Activities → Transfers → Setupautom. TO creation for TRs/posting change notices
1. Click
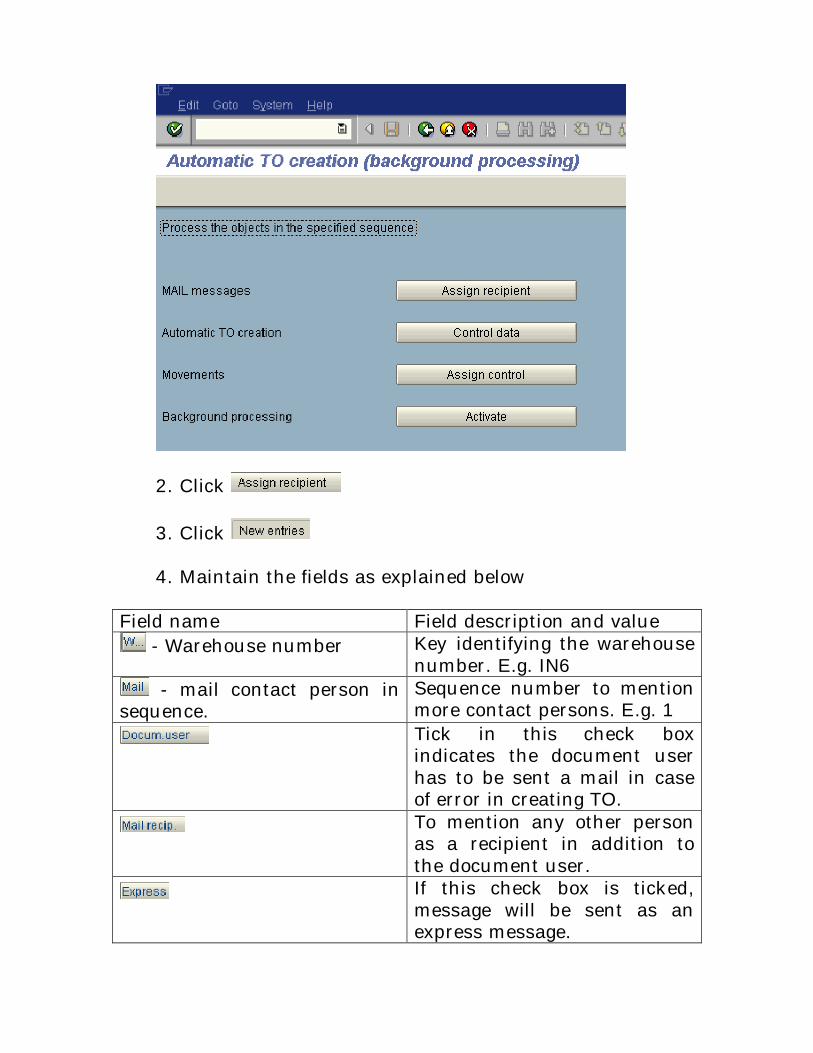
2. Click
3. Click
4. Maintain the fields as explained below
Field name Field description and value - Warehouse number Key identifying the warehouse
number. E.g. IN6 - mail contact person in
sequence.Sequence number to mentionmore contact persons. E.g. 1Tick in this check boxindicates the document userhas to be sent a mail in caseof error in creating TO.To mention any other personas a recipient in addition tothe document user.If this check box is ticked,message will be sent as anexpress message.
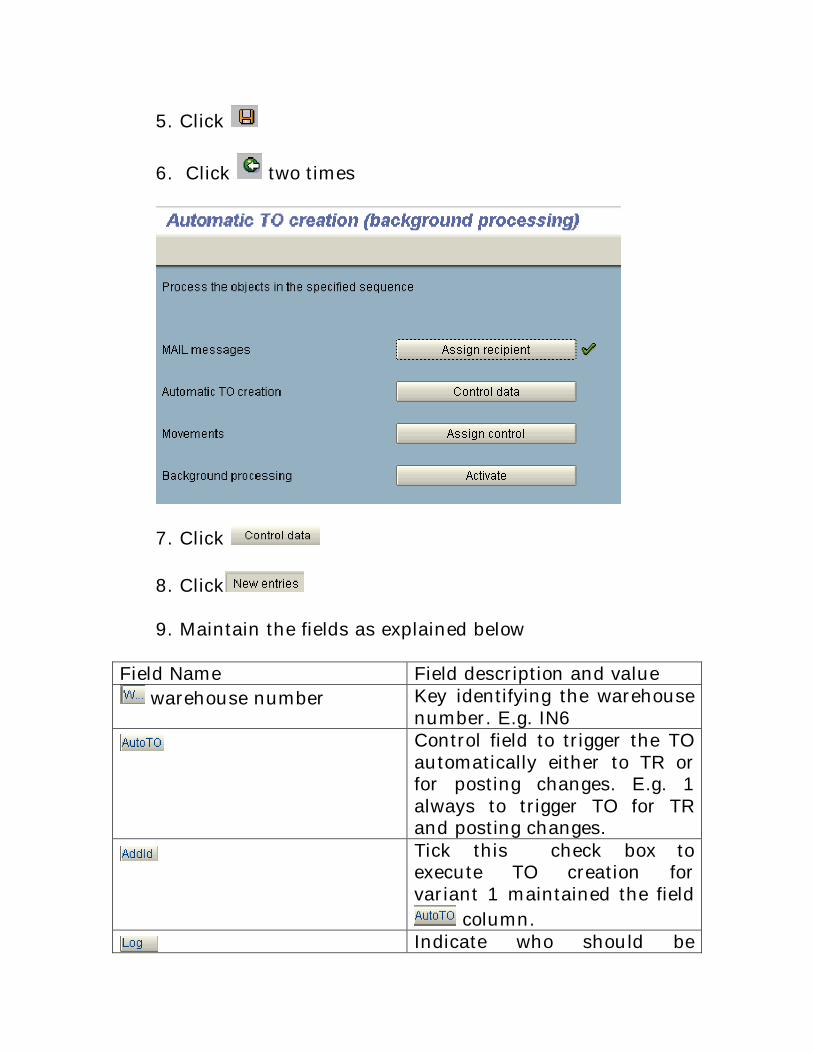
5. Click
6. Click two times
7. Click
8. Click
9. Maintain the fields as explained below
Field Name Field description and value warehouse number Key identifying the warehouse
number. E.g. IN6Control field to trigger the TOautomatically either to TR orfor posting changes. E.g. 1always to trigger TO for TRand posting changes.Tick this check box toexecute TO creation forvariant 1 maintained the field
column.Indicate who should be
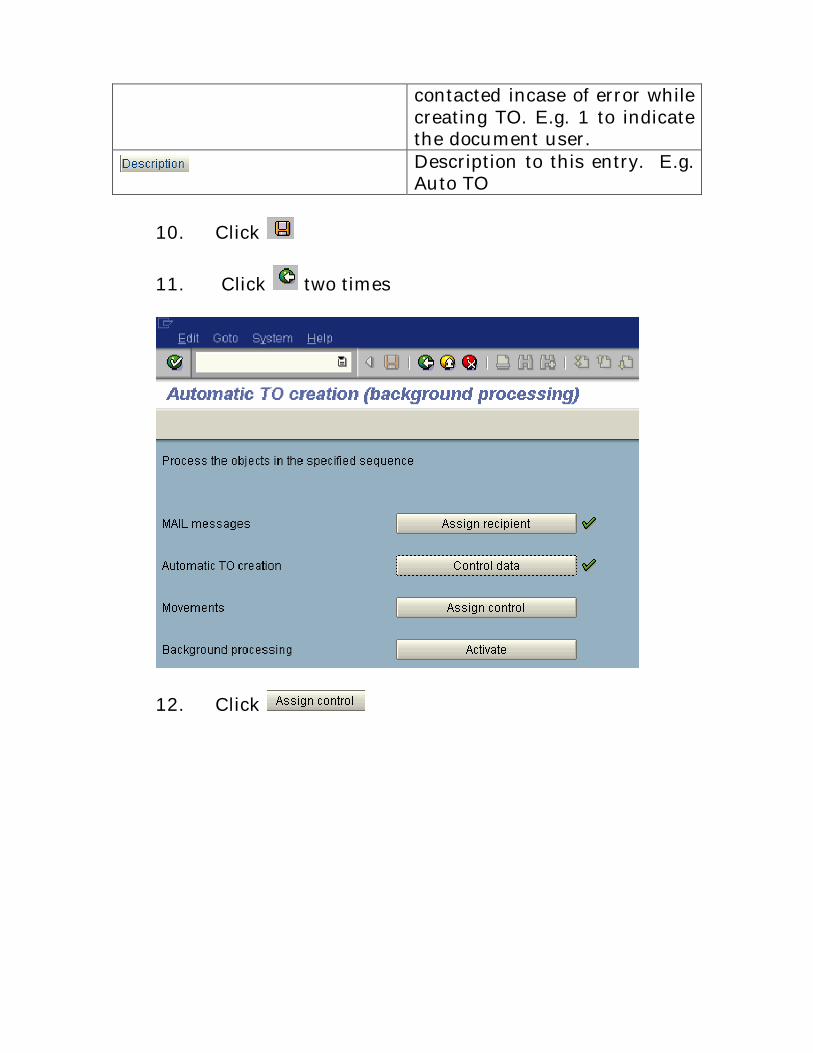
contacted incase of error whilecreating TO. E.g. 1 to indicatethe document user.Description to this entry. E.g.Auto TO
10. Click
11. Click two times
12. Click
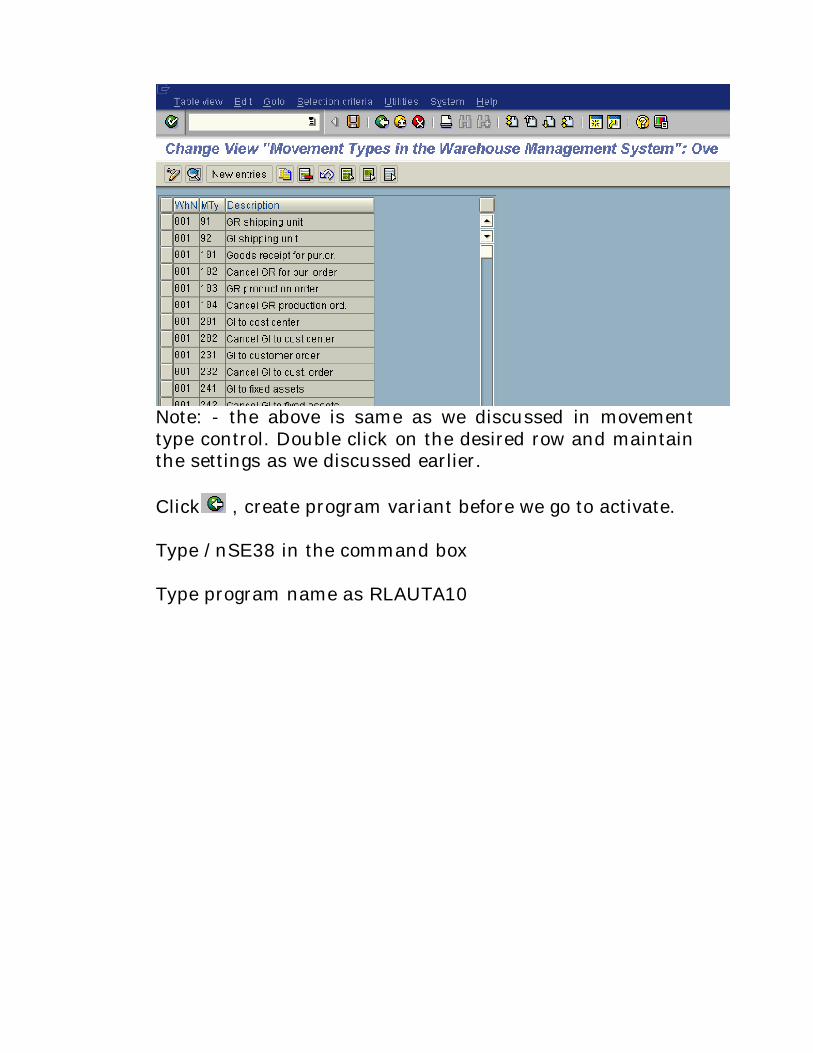
Note: - the above is same as we discussed in movementtype control. Double click on the desired row and maintainthe settings as we discussed earlier.
Click , create program variant before we go to activate.
Type /nSE38 in the command box
Type program name as RLAUTA10
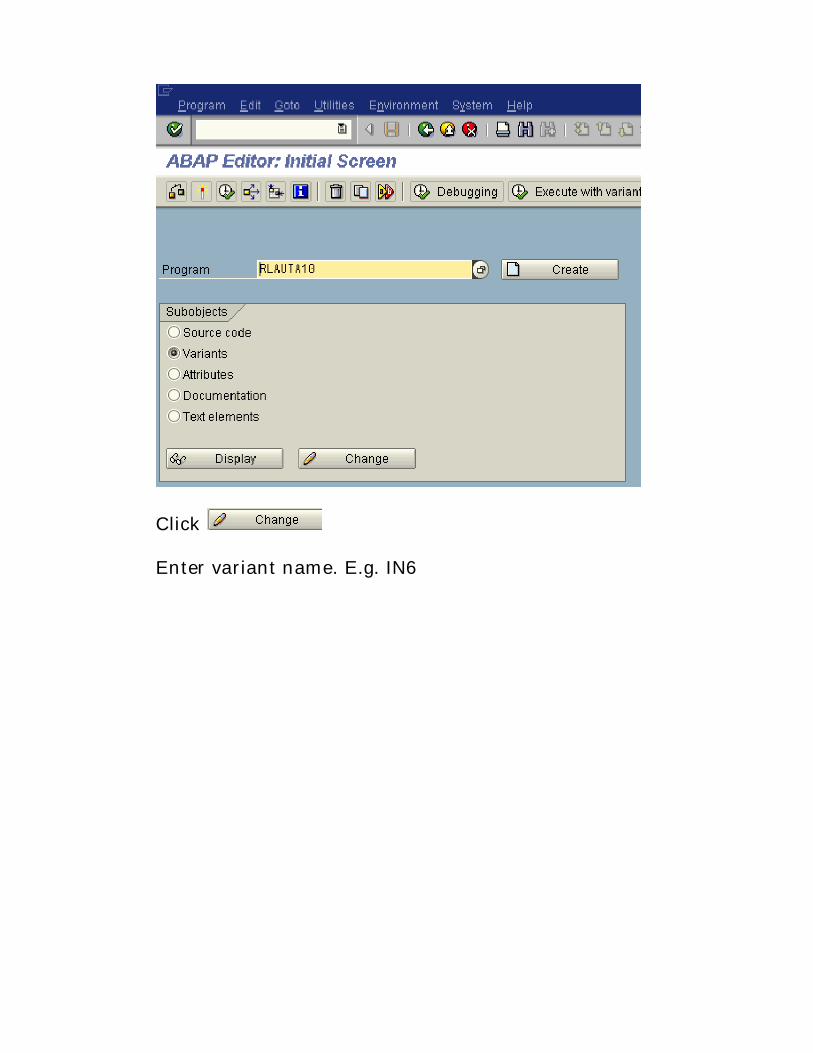
Click
Enter variant name. E.g. IN6
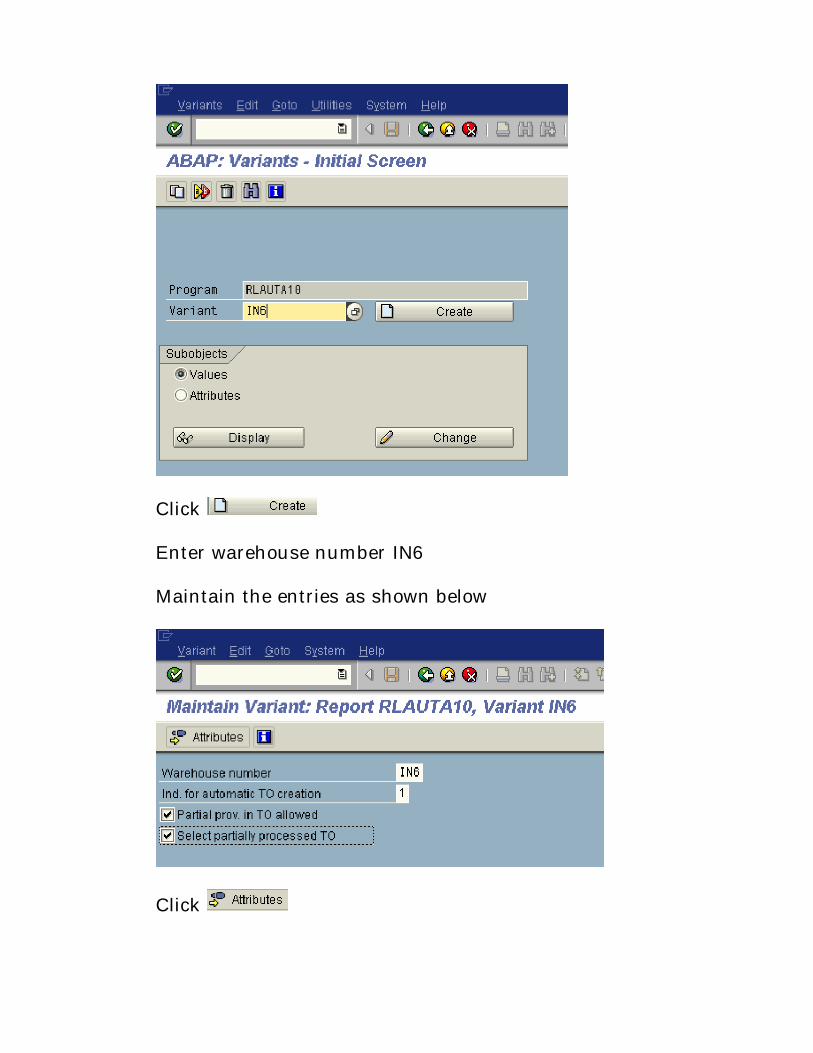
Click
Enter warehouse number IN6
Maintain the entries as shown below
Click
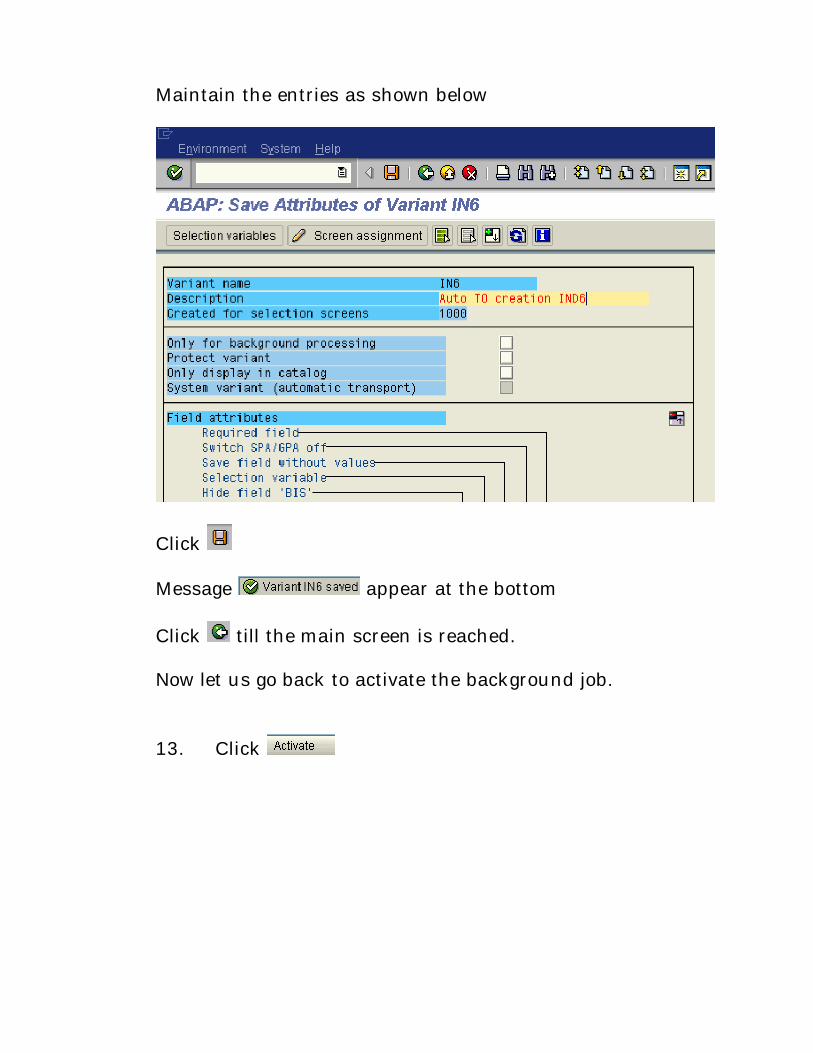
Maintain the entries as shown below
Click
Message appear at the bottom
Click till the main screen is reached.
Now let us go back to activate the background job.
13. Click
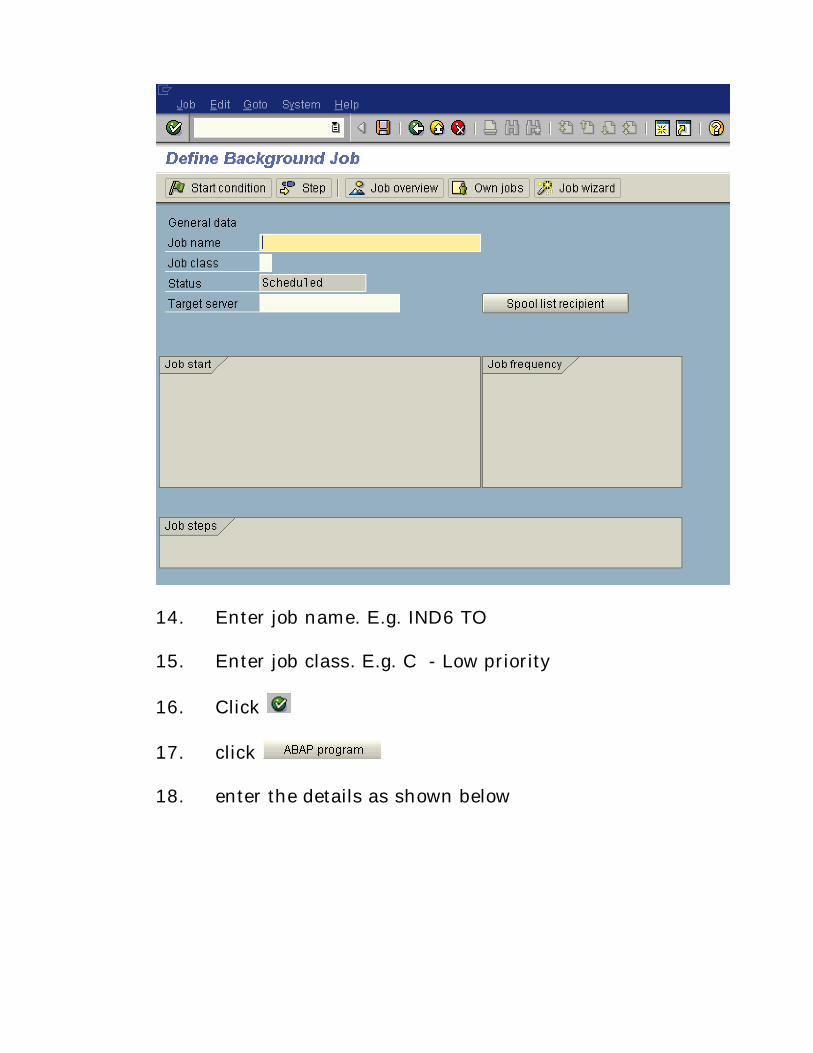
14. Enter job name. E.g. IND6 TO
15. Enter job class. E.g. C - Low priority
16. Click
17. click
18. enter the details as shown below
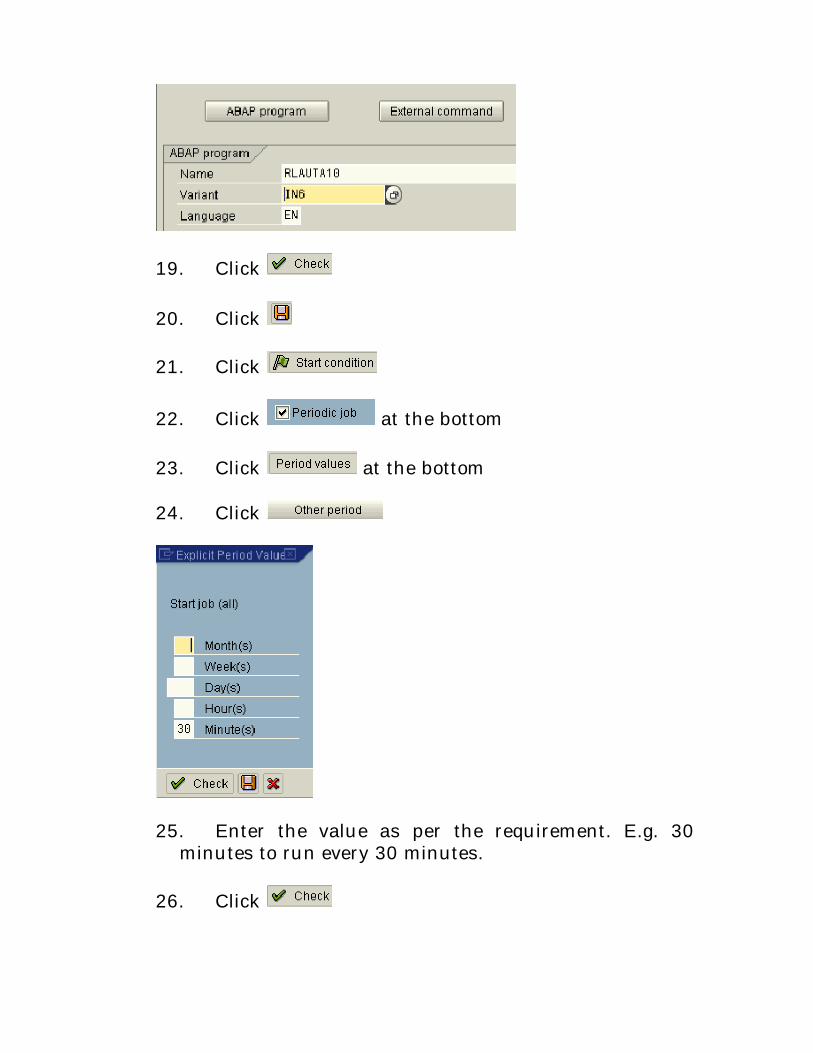
19. Click
20. Click
21. Click
22. Click at the bottom
23. Click at the bottom
24. Click
25. Enter the value as per the requirement. E.g. 30minutes to run every 30 minutes.
26. Click
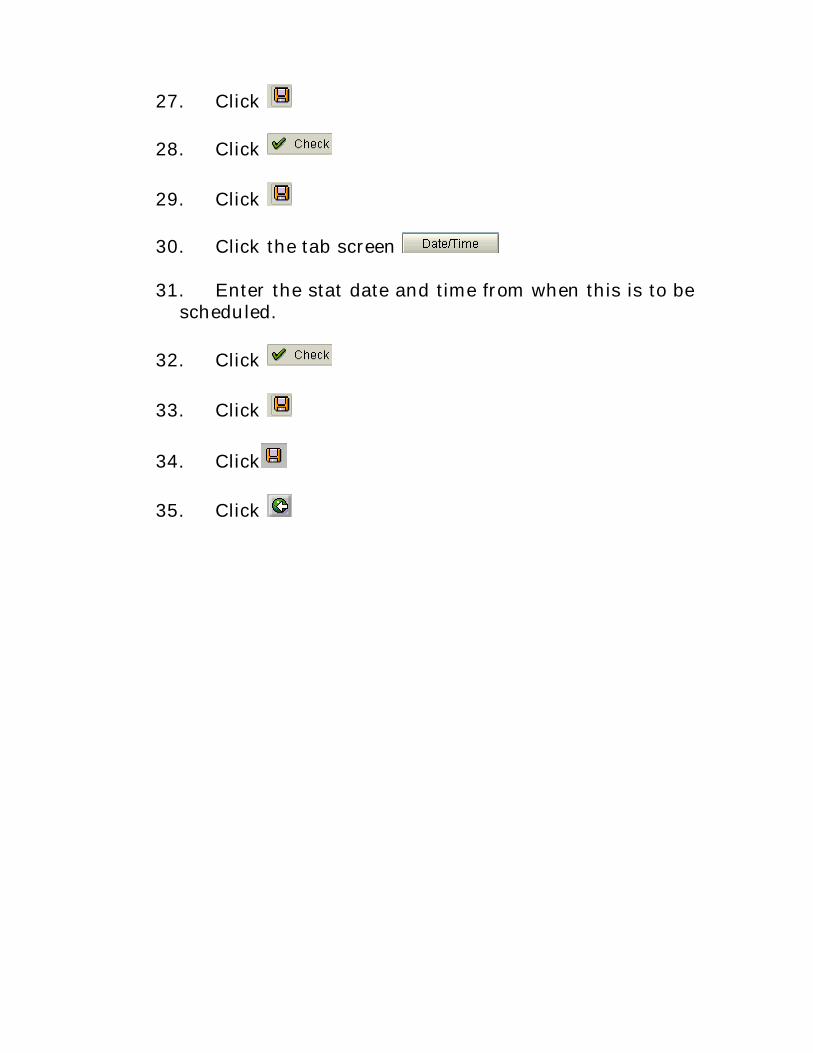
27. Click
28. Click
29. Click
30. Click the tab screen
31. Enter the stat date and time from when this is to bescheduled.
32. Click
33. Click
34. Click
35. Click
17. Define Print Control
BACKGROUND
This configuration setting enables to define print control.
Print control defines
• Documents to be printed for each movement types• Form and layout to be used for printout• Printer to be used
INSTRUCTIONS
Follow the Menu Path: IMG → Logistics Execution →Warehouse Management → Activities → Define Print Control
1. Click
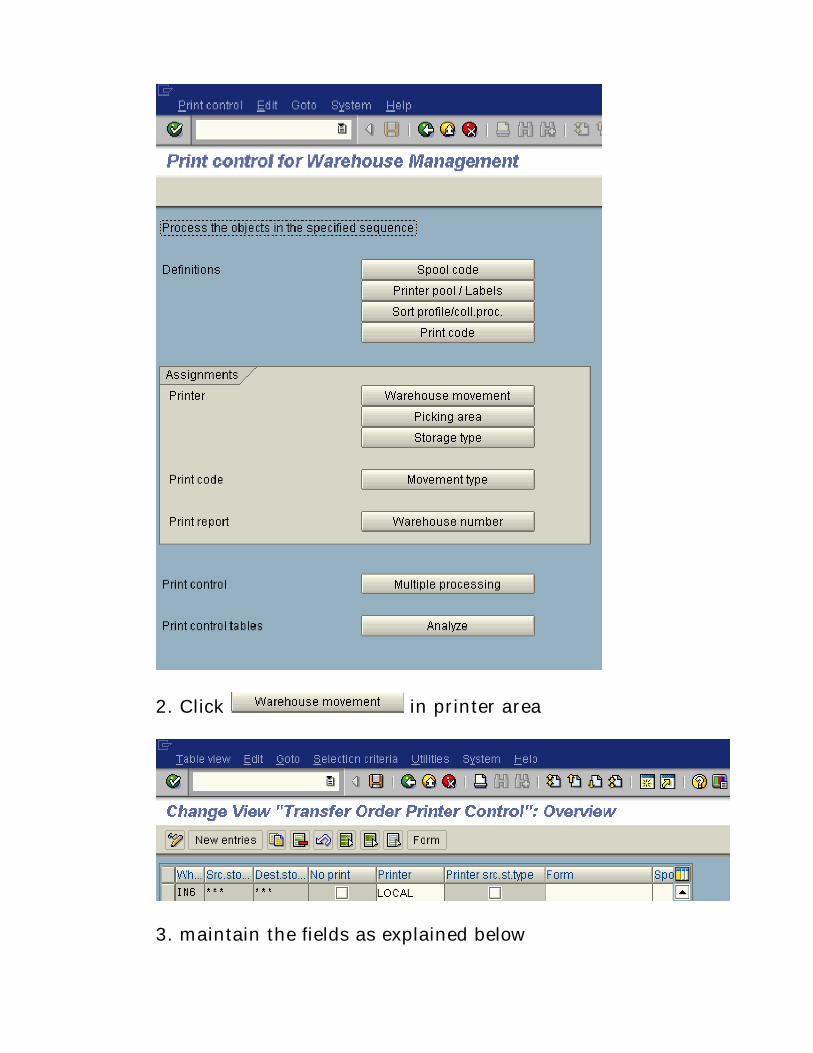
2. Click in printer area
3. maintain the fields as explained below
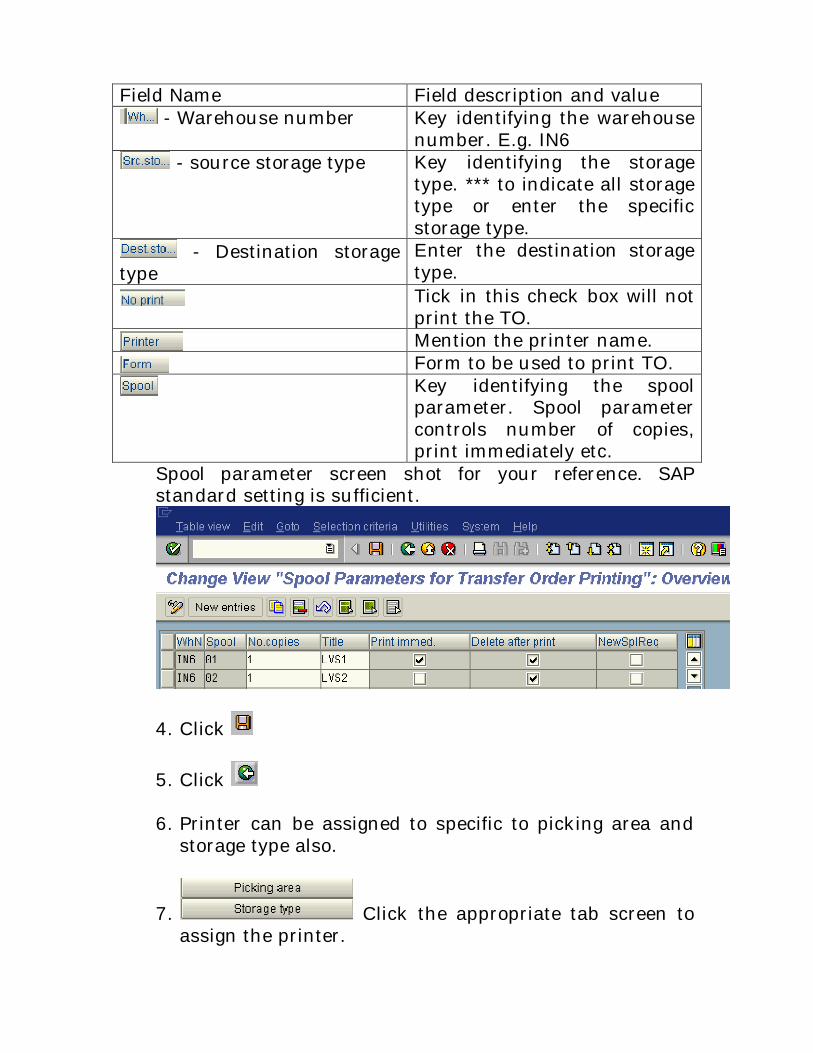
Field Name Field description and value - Warehouse number Key identifying the warehouse
number. E.g. IN6 - source storage type Key identifying the storage
type. *** to indicate all storagetype or enter the specificstorage type.
- Destination storagetype
Enter the destination storagetype.Tick in this check box will notprint the TO.Mention the printer name.Form to be used to print TO.Key identifying the spoolparameter. Spool parametercontrols number of copies,print immediately etc.
Spool parameter screen shot for your reference. SAPstandard setting is sufficient.
4. Click
5. Click
6. Printer can be assigned to specific to picking area andstorage type also.
7. Click the appropriate tab screen toassign the printer.
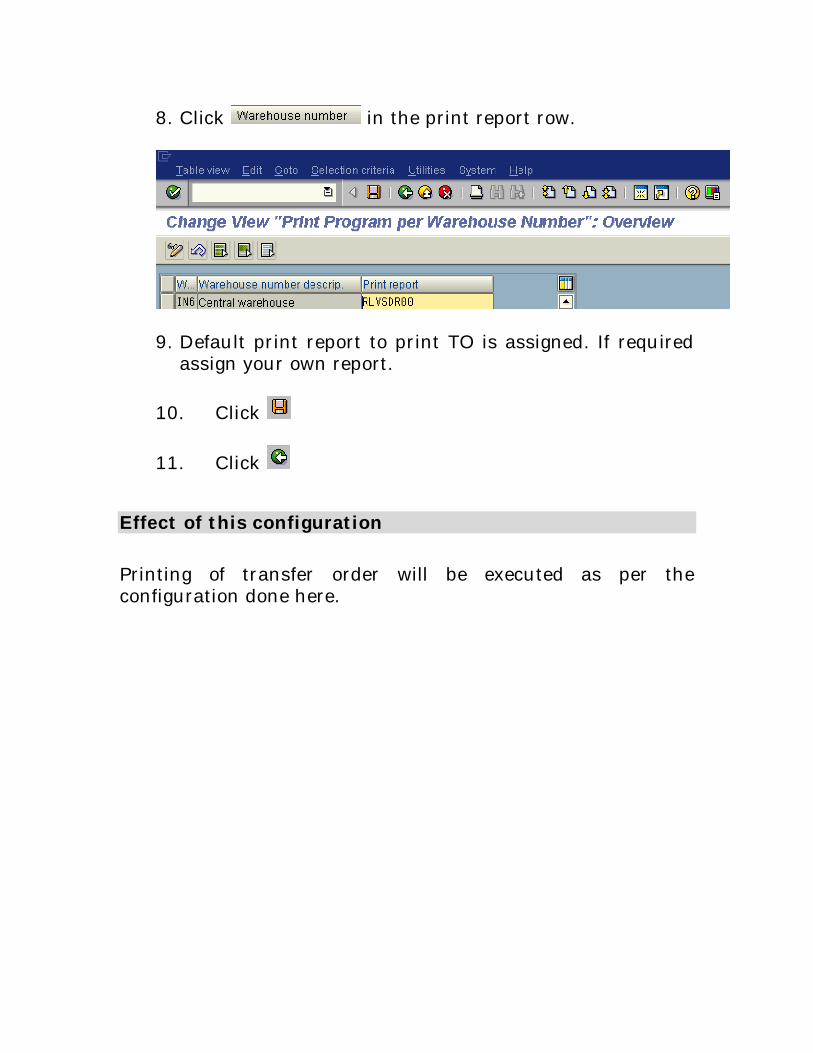
8. Click in the print report row.
9. Default print report to print TO is assigned. If requiredassign your own report.
10. Click
11. Click
Effect of this configuration
Printing of transfer order will be executed as per theconfiguration done here.

18. Activate Warehouse activity monitor objects
BACKGROUND
This configuration setting enables to define the warehousemonitoring object.
It is primarily to monitor the open items and uncompletedprocess in the warehouse.
Please note that only the inventory management movementtriggers the movement in the warehouse. Each IM movementwill create a TO. Each TO has to be confirmed.
In the above process it is possible to have unprocessed wmdocuments. This configuration will help to get a report of thosunprocessed items.
INSTRUCTIONS
Follow the Menu Path: IMG → Logistics Execution →Warehouse Management → Planning and monitoring →Warehouse Activity Monitor → Activate Warehouse activitymonitor objects
1. Click
2. Click
3. Maintain the fields as explained below
Field name Field description - Monitoring object Select the monitoring object
from the possible entreis
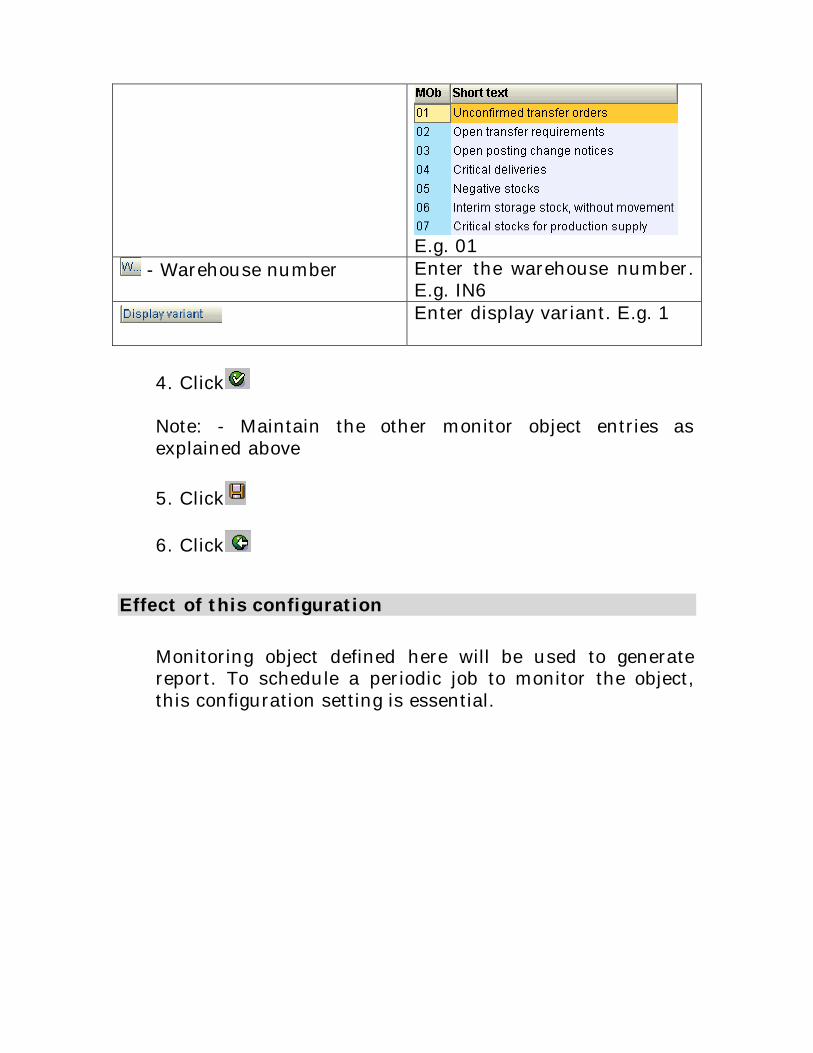
E.g. 01 - Warehouse number Enter the warehouse number.
E.g. IN6Enter display variant. E.g. 1
4. Click
Note: - Maintain the other monitor object entries asexplained above
5. Click
6. Click
Effect of this configuration
Monitoring object defined here will be used to generatereport. To schedule a periodic job to monitor the object,this configuration setting is essential.

19. Define Critical Parameters
BACKGROUND
This configuration setting enables to define the criticalparameters for monitoring object.
This configuration setting defines the period after which thereport is to be generated for the monitoring object.
INSTRUCTIONS
Follow the Menu Path: IMG → Logistics Execution →Warehouse Management → Planning and monitoring →Warehouse Activity Monitor → Define Critical Parameters
1. Click
2. Double click on to define criticalparameter to this.
3. Select any similar row to copy
4. Click
5. maintain entries as explained below
Field name Field description and value - warehouse number Key identifying the warehouse
number. E.g.IN6 - movement type Enter the movement type. E.g.
101 - Source storage type Enter the source storage type.
E.g. 902 - Destination storage type Enter the destination storage
type. E.g. 001 to indicate high
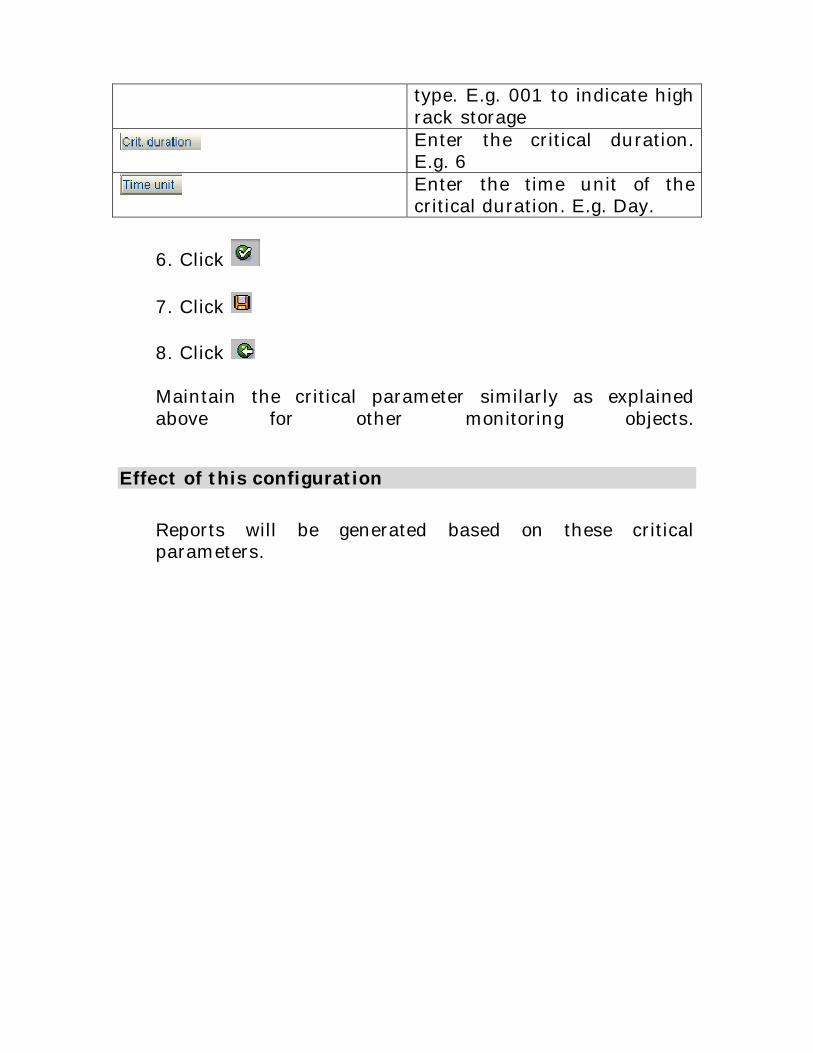
type. E.g. 001 to indicate highrack storageEnter the critical duration.E.g. 6Enter the time unit of thecritical duration. E.g. Day.
6. Click
7. Click
8. Click
Maintain the critical parameter similarly as explainedabove for other monitoring objects.
Effect of this configuration
Reports will be generated based on these criticalparameters.
20. Define Variant for program object overview
BACKGROUND
This configuration setting enables to define the variants forprogram object overview.
Above configuration setting we have defined the warehousemanagement monitoring objects and we have defined thecritical parameters to those monitoring objects.
To schedule a job in background and generate report, it isrequired to define to which selection parameter the report is tobe generated. Here it is defined through the selection variantfor all monitoring objects.
INSTRUCTIONS
Follow the Menu Path: IMG → Logistics Execution →Warehouse Management → Planning and monitoring →Warehouse Activity Monitor → Report Variants → DefineVariant for program “object overview”
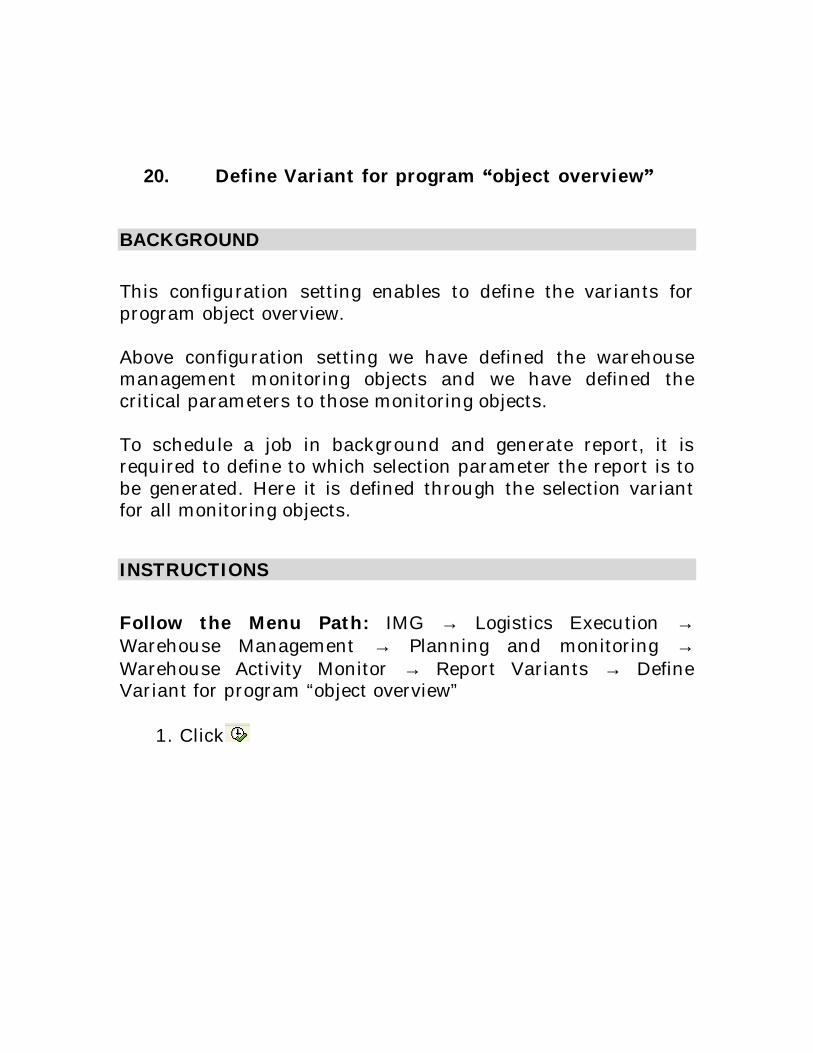
1. Click
2. Enter IN6 as variant name
3. Click
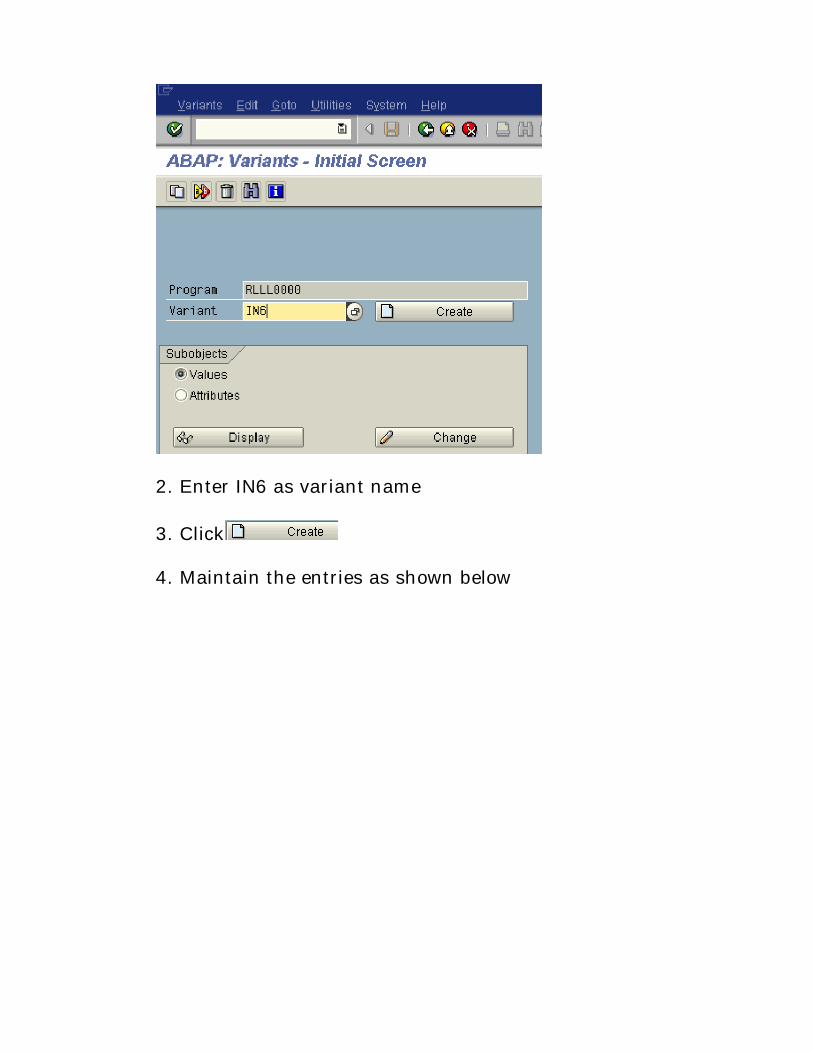
4. Maintain the entries as shown below
5. Click
6. Enter description to this layout
7. Click
8. Click
Effect of this configuration
Reports will be generated based on these selection variant.
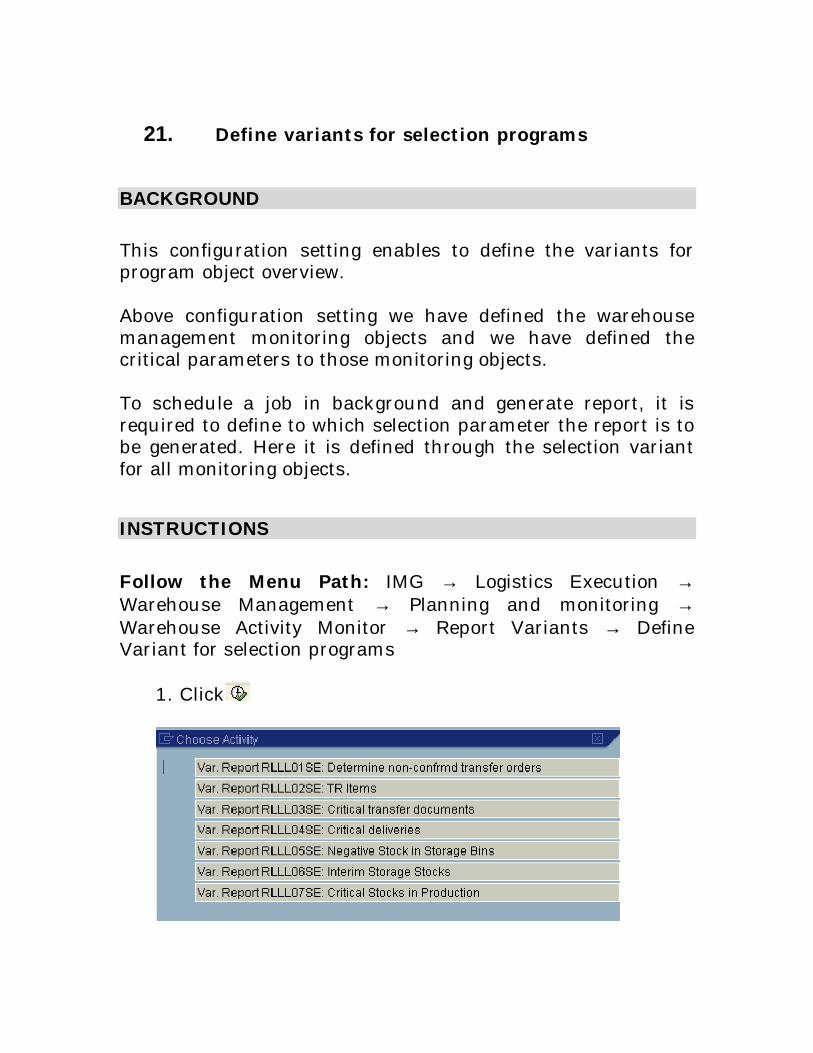
21. Define variants for selection programs
BACKGROUND
This configuration setting enables to define the variants forprogram object overview.
Above configuration setting we have defined the warehousemanagement monitoring objects and we have defined thecritical parameters to those monitoring objects.
To schedule a job in background and generate report, it isrequired to define to which selection parameter the report is tobe generated. Here it is defined through the selection variantfor all monitoring objects.
INSTRUCTIONS
Follow the Menu Path: IMG → Logistics Execution →Warehouse Management → Planning and monitoring →Warehouse Activity Monitor → Report Variants → DefineVariant for selection programs
1. Click
Note: - For each monitoring object, there is a reportprogram. Selection parameter can be defined for each.
To create a variant double click on the desire row andcreate variant as explained in the previous heading.
We have
Defined the warehouse monitoring objects Defined the parameter for each monitoring object
Defined the selection parameter for each monitoringobject to generate reports
Now it is possible to run the report periodically throughthe background job processing using the below setting.
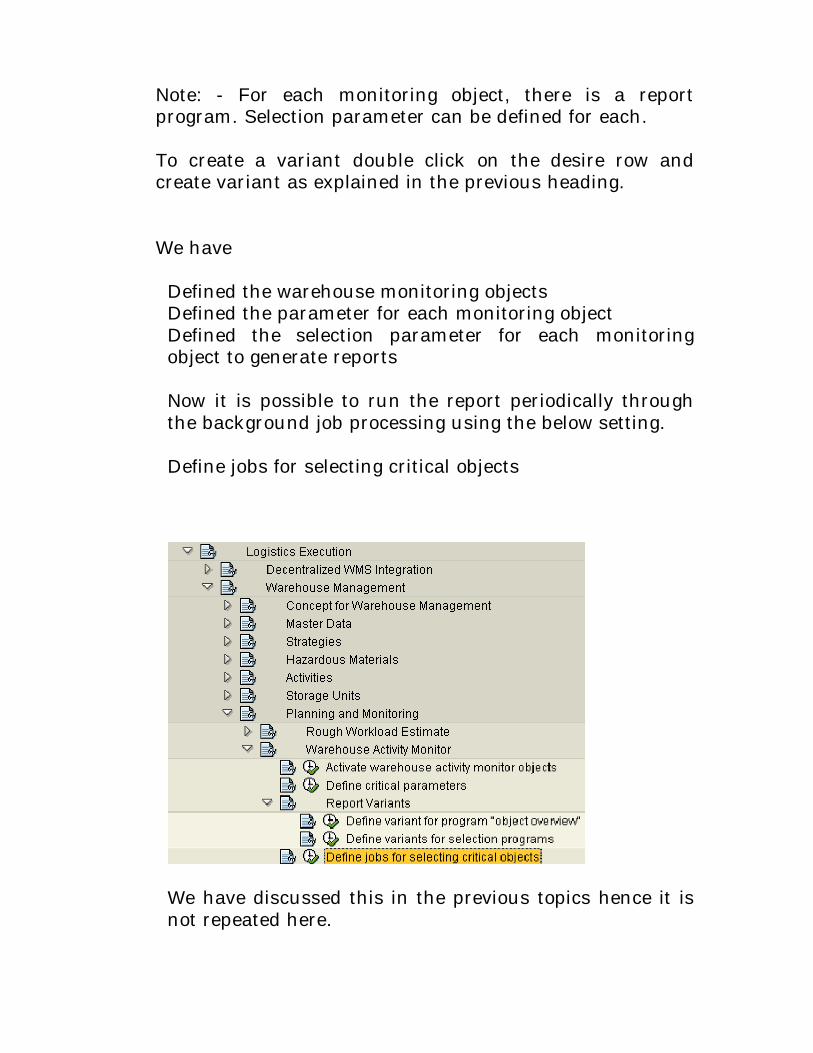
Define jobs for selecting critical objects
We have discussed this in the previous topics hence it isnot repeated here.
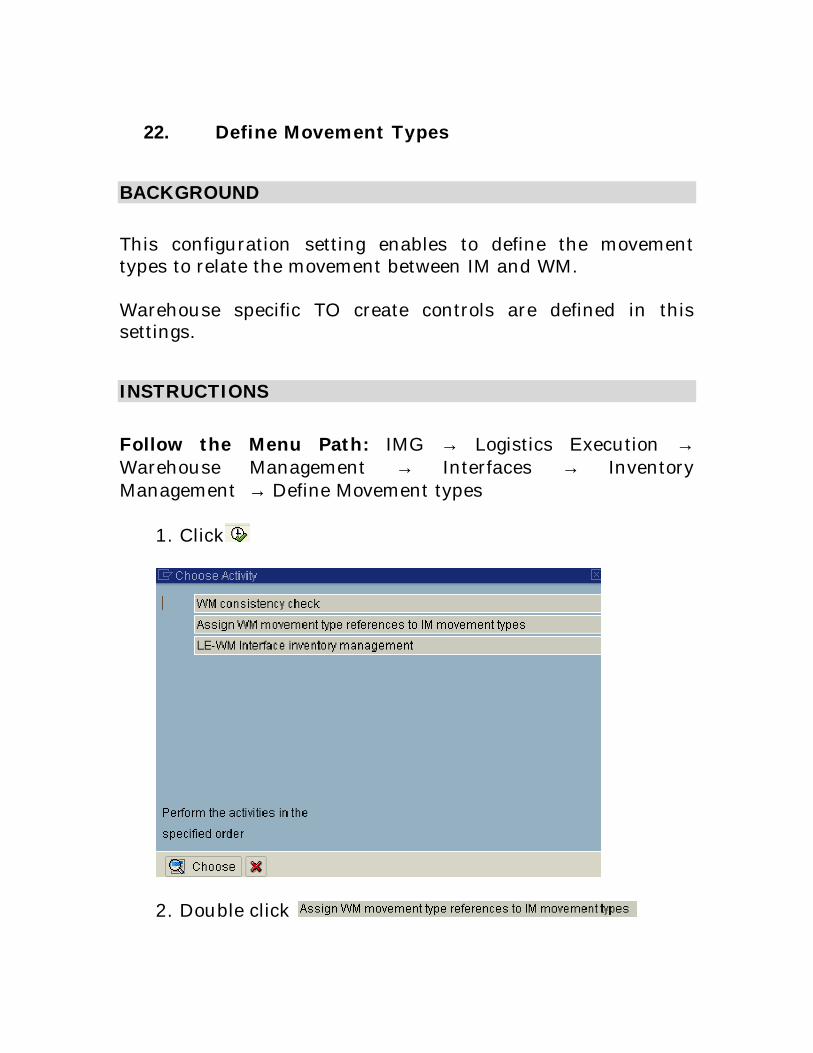
22. Define Movement Types
BACKGROUND
This configuration setting enables to define the movementtypes to relate the movement between IM and WM.
Warehouse specific TO create controls are defined in thissettings.
INSTRUCTIONS
Follow the Menu Path: IMG → Logistics Execution →Warehouse Management → Interfaces → InventoryManagement → Define Movement types
1. Click
2. Double click
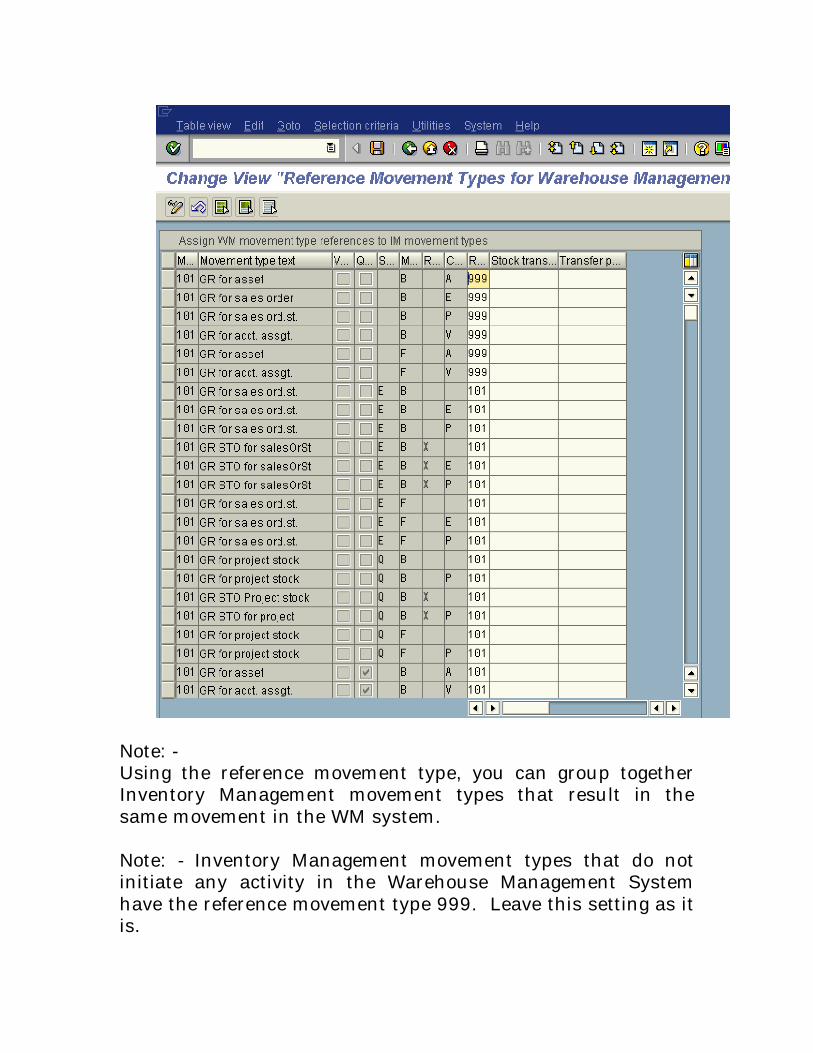
Note: -Using the reference movement type, you can group togetherInventory Management movement types that result in thesame movement in the WM system.
Note: - Inventory Management movement types that do notinitiate any activity in the Warehouse Management Systemhave the reference movement type 999. Leave this setting as itis.
3. Click
4. Double click
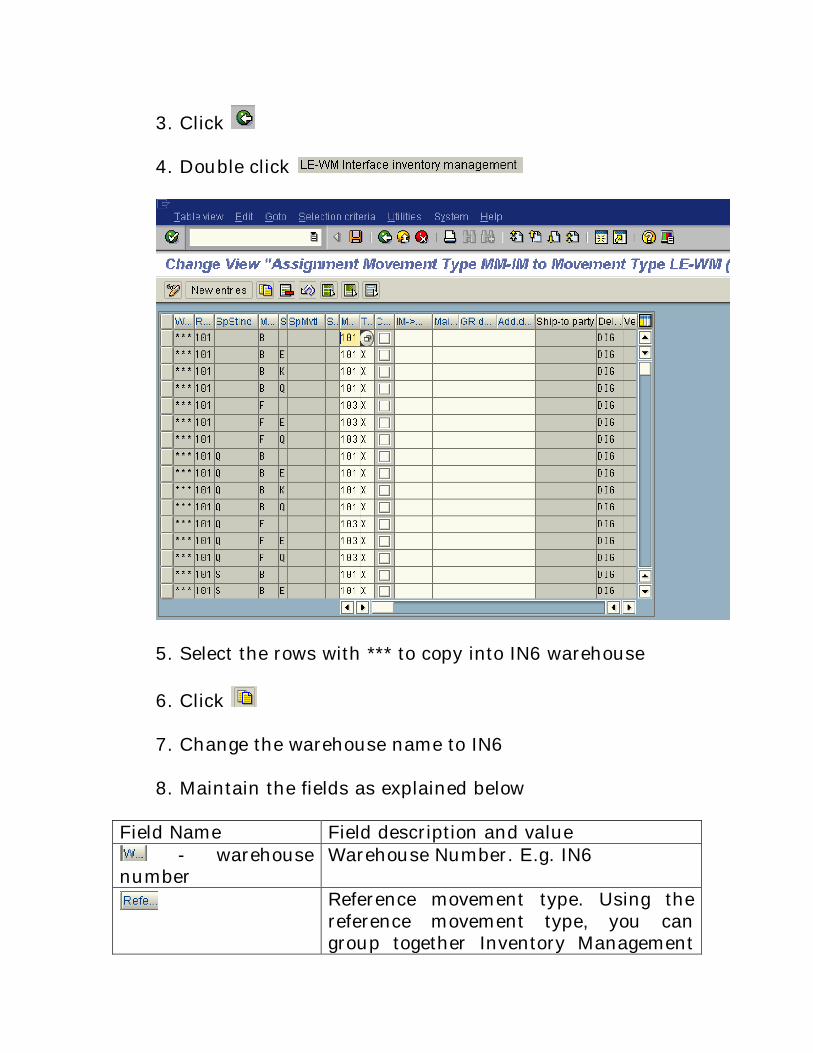
5. Select the rows with *** to copy into IN6 warehouse
6. Click
7. Change the warehouse name to IN6
8. Maintain the fields as explained below
Field Name Field description and value - warehouse
numberWarehouse Number. E.g. IN6
Reference movement type. Using thereference movement type, you cangroup together Inventory Management
movement types that result in the samemovement in the WM system.Note: - Inventory Managementmovement types that do not initiate anyactivity in the Warehouse ManagementSystem have the reference movementtype 999.
- Special stockindicator
Key identifying the special indicator.Leave it as it is
- movementindicator
Key identifying the movement indicator.Leave it as it is.
- Special stockindicator
Key identifying the special stockindicator. Leave it as it is.
- Specialmovement indicator
Key identifying the special movementindicator. This is used to group thematerial for similar movement typesbehaviour.
-Storage locationreference
Storage location reference used forsearching. Leave it as it is.
- movement typefor warehousemanagement
Key identifying the warehousemanagement movement.Note: - The movement type influencesthe creation of the transfer order inmanyways (for example, printing, definingthe interim storage area confirmation,and so on).
- TR createtransferrequirements
Key identifying the creation of transferrequirement.Possible entries are
- Creation ofposting changenotices
Tick in this check box will createposting change notices. Note: - whenyou create TR, leave this blank. Youcan tick this if you do not create TR.
- IN->WM Key to trigger TO creation in WM.
initiate immediateTO creation
Possible entries are
- mail control Contact person incase of error duringTO creation. Enter as per your mailconfiguration.
- Goods receiptdate
GR date determination. Used for FIFOmaterials. Possible entries are
- Additionaldialog box
Used to have additional dialog boxduring posting. Used in Palletization.Possible entries are
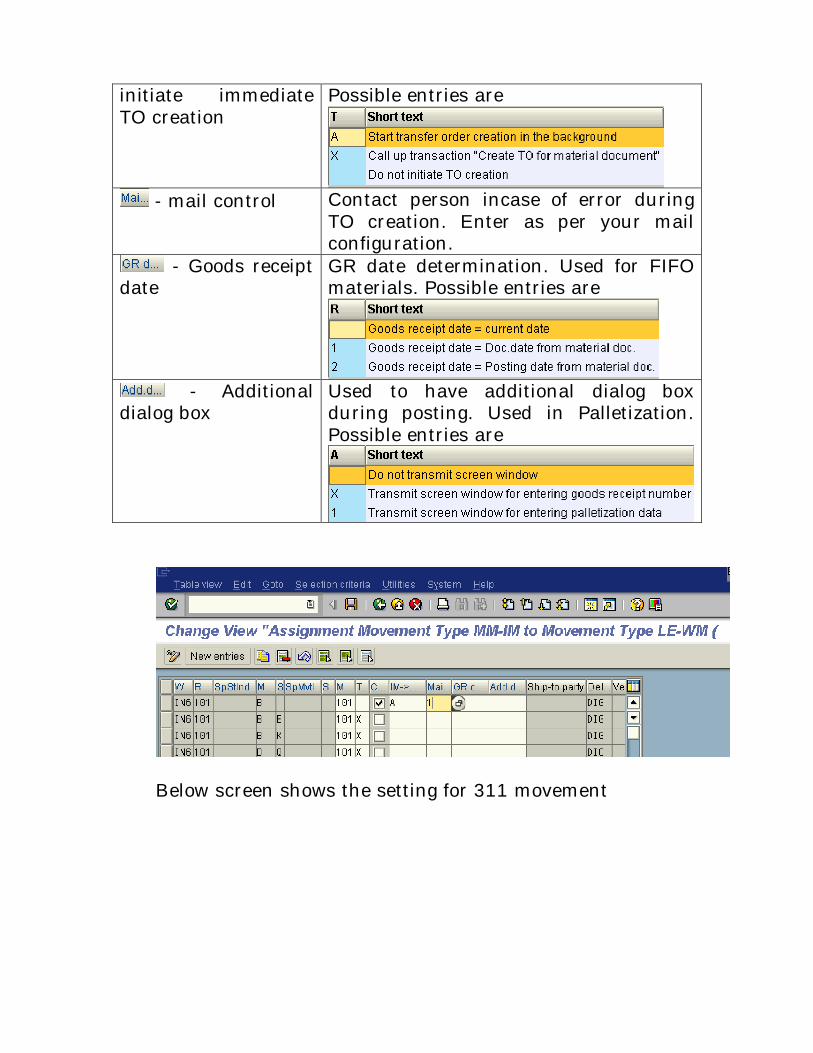
Below screen shows the setting for 311 movement
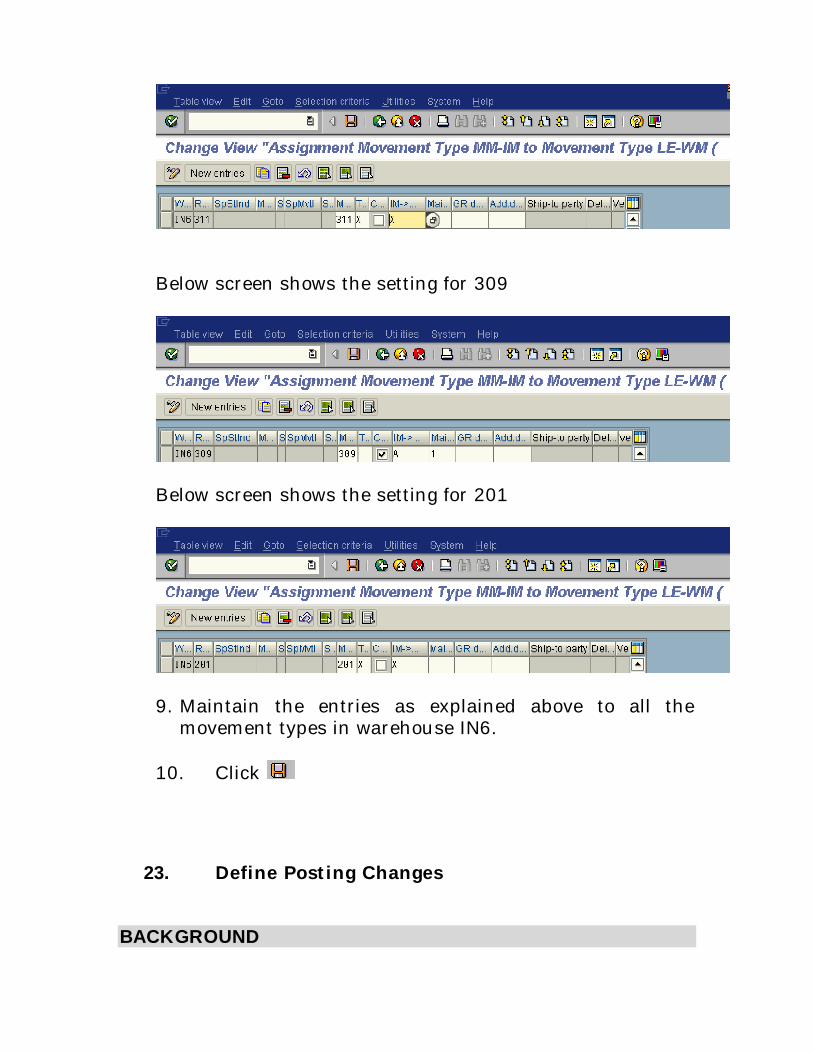
Below screen shows the setting for 309
Below screen shows the setting for 201
9. Maintain the entries as explained above to all themovement types in warehouse IN6.
10. Click
23. Define Posting Changes
BACKGROUND
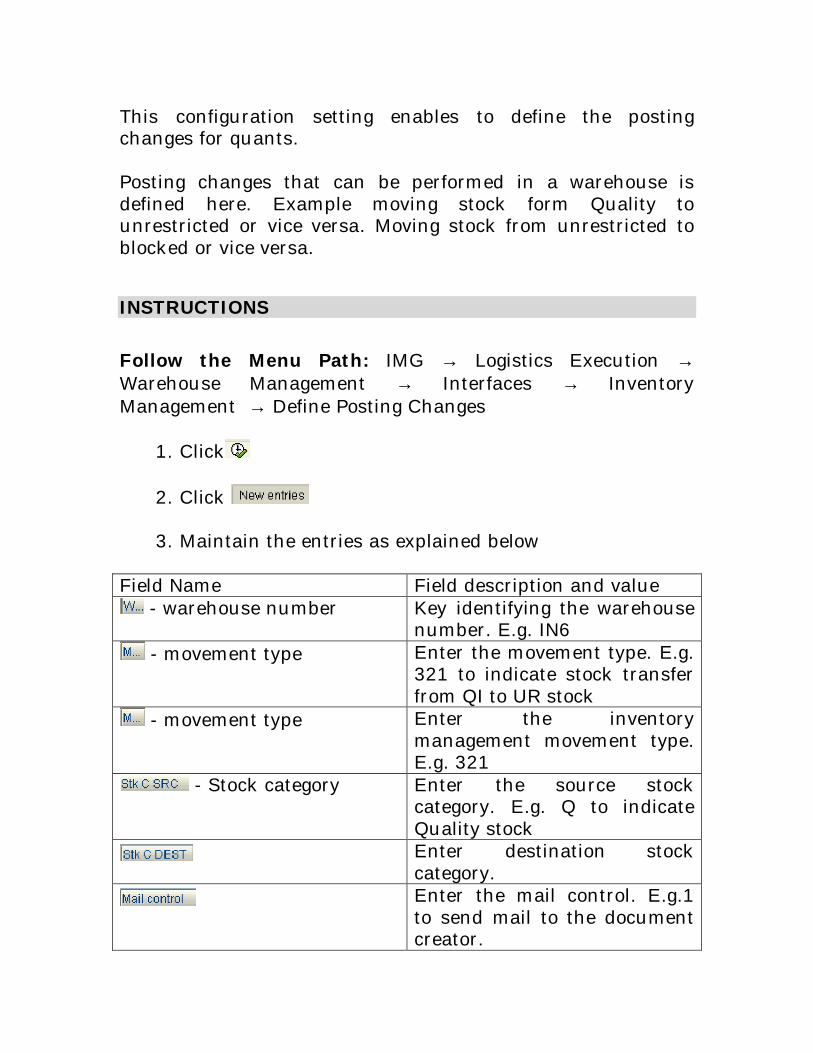
This configuration setting enables to define the postingchanges for quants.
Posting changes that can be performed in a warehouse isdefined here. Example moving stock form Quality tounrestricted or vice versa. Moving stock from unrestricted toblocked or vice versa.
INSTRUCTIONS
Follow the Menu Path: IMG → Logistics Execution →Warehouse Management → Interfaces → InventoryManagement → Define Posting Changes
1. Click
2. Click
3. Maintain the entries as explained below
Field Name Field description and value - warehouse number Key identifying the warehouse
number. E.g. IN6 - movement type Enter the movement type. E.g.
321 to indicate stock transferfrom QI to UR stock
- movement type Enter the inventorymanagement movement type.E.g. 321
- Stock category Enter the source stockcategory. E.g. Q to indicateQuality stockEnter destination stockcategory.Enter the mail control. E.g.1to send mail to the documentcreator.
4. Click
5. Click
Effect of this configuration
This configuration setting enables to perform the postingchange in the warehouse.
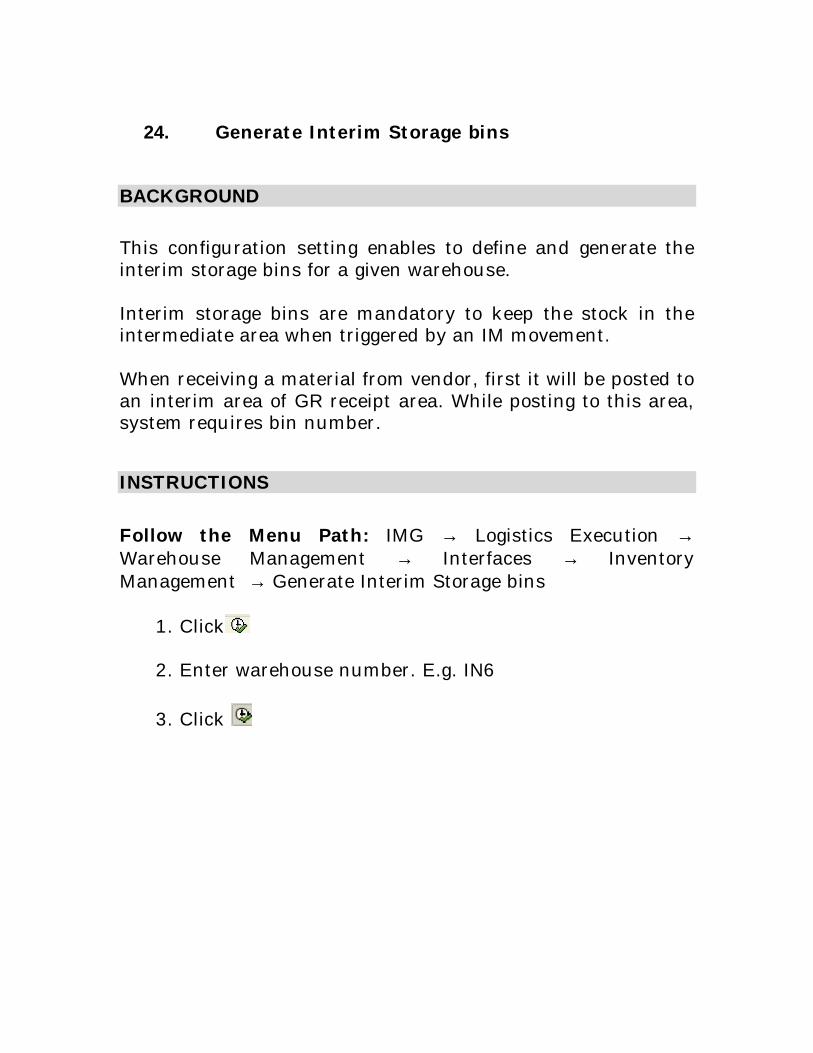
24. Generate Interim Storage bins
BACKGROUND
This configuration setting enables to define and generate theinterim storage bins for a given warehouse.
Interim storage bins are mandatory to keep the stock in theintermediate area when triggered by an IM movement.
When receiving a material from vendor, first it will be posted toan interim area of GR receipt area. While posting to this area,system requires bin number.
INSTRUCTIONS
Follow the Menu Path: IMG → Logistics Execution →Warehouse Management → Interfaces → InventoryManagement → Generate Interim Storage bins
1. Click
2. Enter warehouse number. E.g. IN6
3. Click
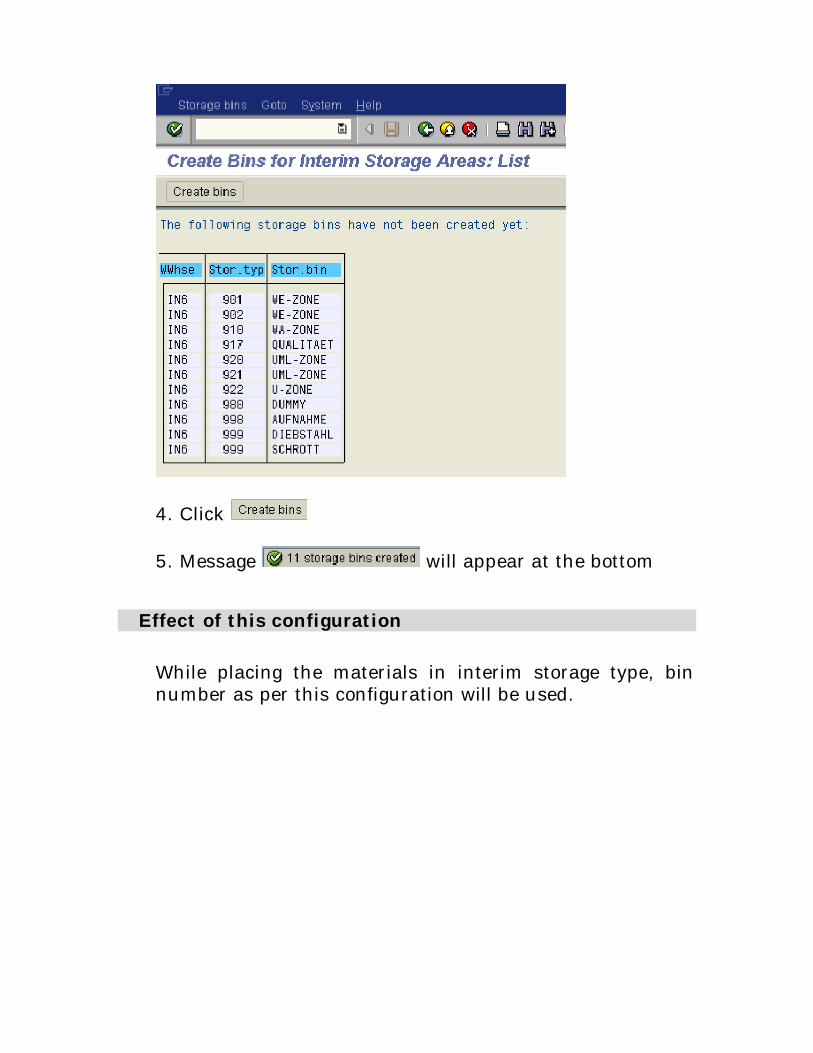
4. Click
5. Message will appear at the bottom
Effect of this configuration
While placing the materials in interim storage type, binnumber as per this configuration will be used.
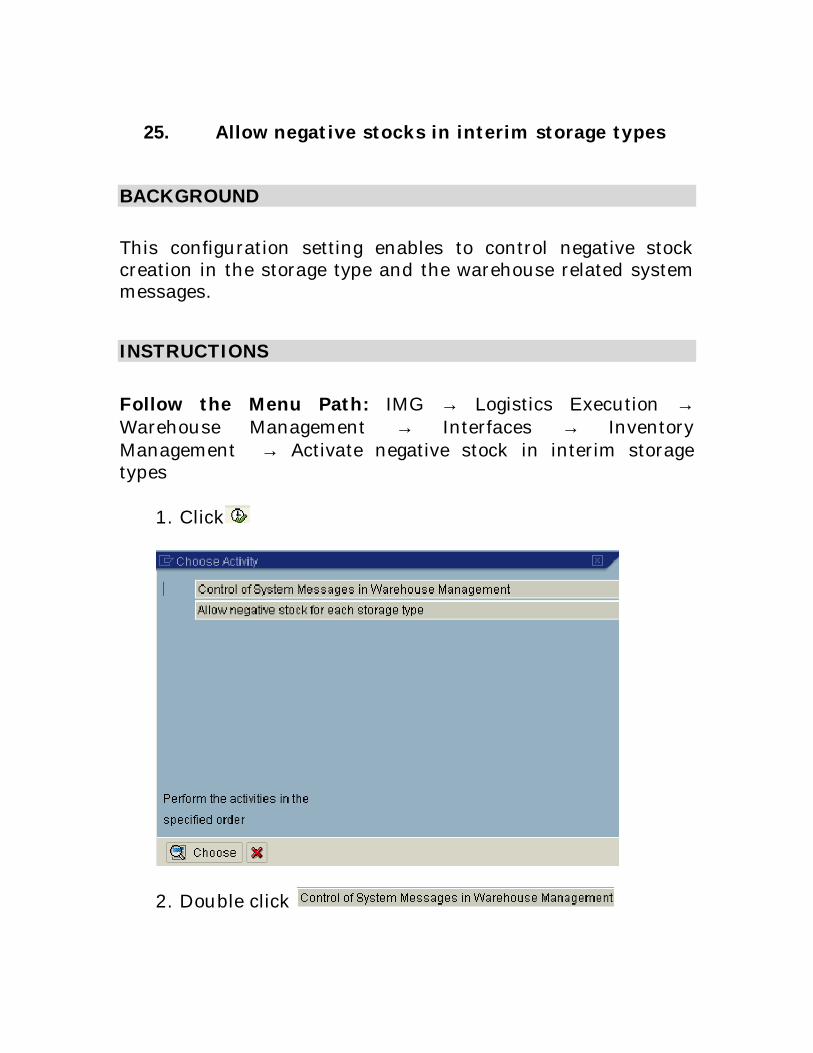
25. Allow negative stocks in interim storage types
BACKGROUND
This configuration setting enables to control negative stockcreation in the storage type and the warehouse related systemmessages.
INSTRUCTIONS
Follow the Menu Path: IMG → Logistics Execution →Warehouse Management → Interfaces → InventoryManagement → Activate negative stock in interim storagetypes
1. Click
2. Double click
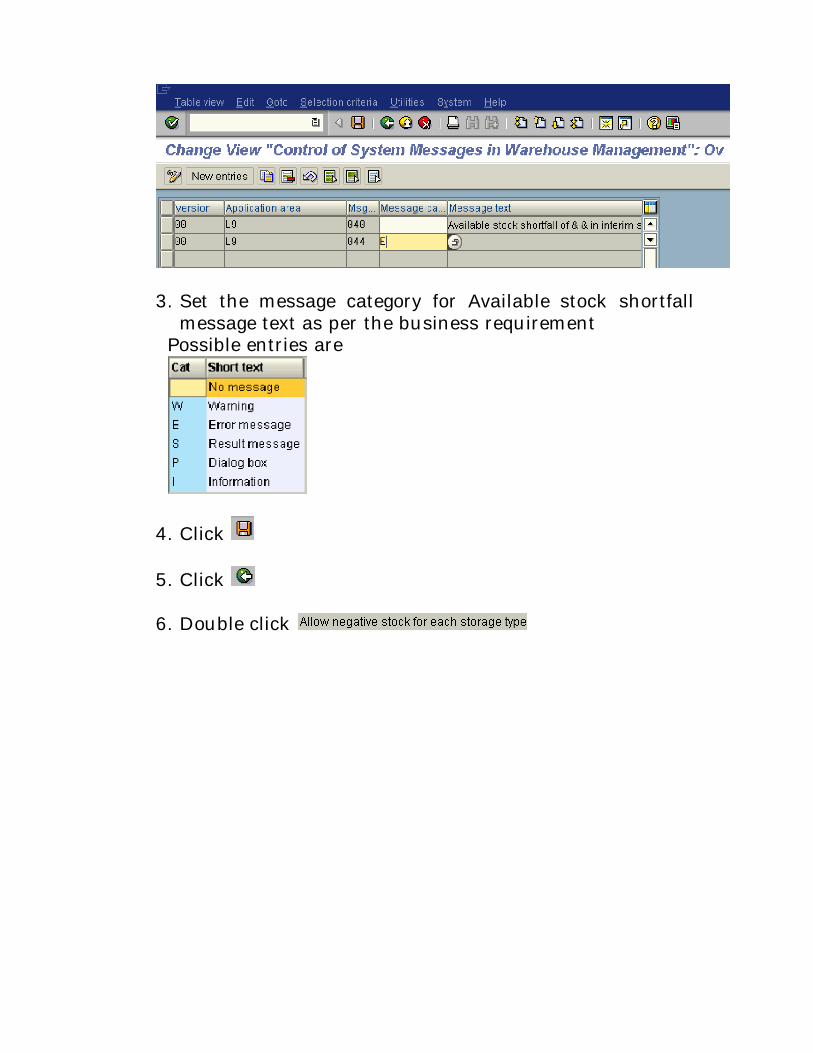
3. Set the message category for Available stock shortfallmessage text as per the business requirement
Possible entries are
4. Click
5. Click
6. Double click
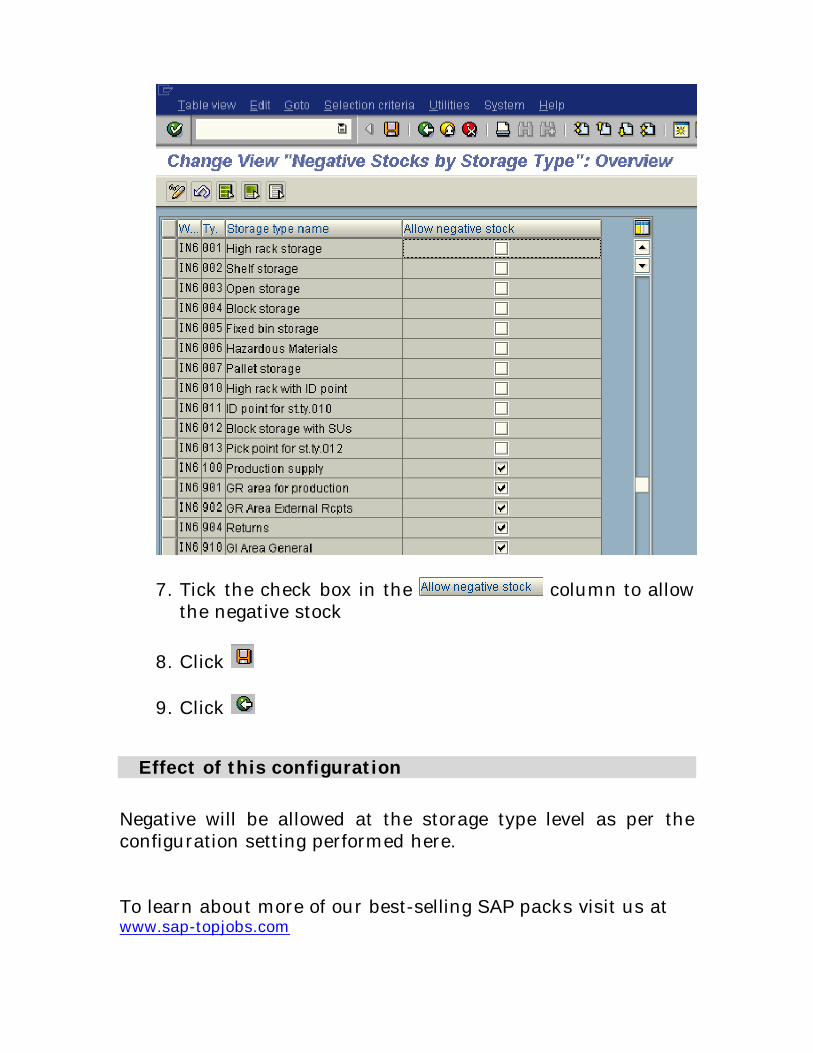
7. Tick the check box in the column to allowthe negative stock
8. Click
9. Click
Effect of this configuration
Negative will be allowed at the storage type level as per theconfiguration setting performed here.
To learn about more of our best-selling SAP packs visit us atwww.sap-topjobs.com
