sap cps 8.0 quick install guide
DESCRIPTION
SAP Central Process Scheduling - Quick Installation Guide - Version 8.0TRANSCRIPT
SAP CPS Quick Install Guide
Version M33.87-66904

Table of Contents1. Preparation for SAP NetWeaver ................................................................................................................. 1
1.1 Checking Hardware and Software Requirements ................................................................................. 1Required Support Package Stack ................................................................................................... 1
1.2 Preparing the Installation Files ......................................................................................................... 12. Prerequisites for SAP NetWeaver ............................................................................................................... 3
Installation Prerequisites ...................................................................................................................... 33. Installation on SAP NetWeaver .................................................................................................................. 4
Purpose ............................................................................................................................................ 4Process Flow ..................................................................................................................................... 4Deliverables ...................................................................................................................................... 4Prerequisites ..................................................................................................................................... 5Procedure ......................................................................................................................................... 5Backup Strategy for SAP CPS .............................................................................................................. 53.1 Installation and Upgrade on SAP NetWeaver Version 7.00 and 7.01 ........................................................ 6
Purpose .................................................................................................................................... 6Process Flow ............................................................................................................................. 6Deliverables .............................................................................................................................. 6Prerequisites ............................................................................................................................. 7Procedure ................................................................................................................................. 7
3.2 Installation on SAP NetWeaver Version 7.02 ...................................................................................... 8Purpose .................................................................................................................................... 8Process Flow ............................................................................................................................. 9Deliverables .............................................................................................................................. 9Procedure ................................................................................................................................. 9
3.3 Installation on SAP NetWeaver Version 7.30 ..................................................................................... 10Purpose .................................................................................................................................. 10Process Flow ........................................................................................................................... 10Procedure ............................................................................................................................... 10
3.4 Creating Roles in SAP NetWeaver .................................................................................................. 12Use ........................................................................................................................................ 12Prerequisites ............................................................................................................................ 13Procedure ............................................................................................................................... 14Example ................................................................................................................................. 15
3.5 Creating Users in SAP NetWeaver .................................................................................................. 16Use ........................................................................................................................................ 16Prerequisites ............................................................................................................................ 17Procedure ............................................................................................................................... 17
3.6 Assigning Isolation Groups in SAP NetWeaver ................................................................................. 18Use ........................................................................................................................................ 18Prerequisites ............................................................................................................................ 18Procedure ............................................................................................................................... 18
3.7 Installing a License ...................................................................................................................... 19Use ........................................................................................................................................ 19Prerequisites ............................................................................................................................ 19Procedure ............................................................................................................................... 19
3.8 Advanced Remote Installation on SAP NetWeaver ............................................................................. 20Use ........................................................................................................................................ 20Prerequisites ............................................................................................................................ 20Procedure ............................................................................................................................... 21
iii
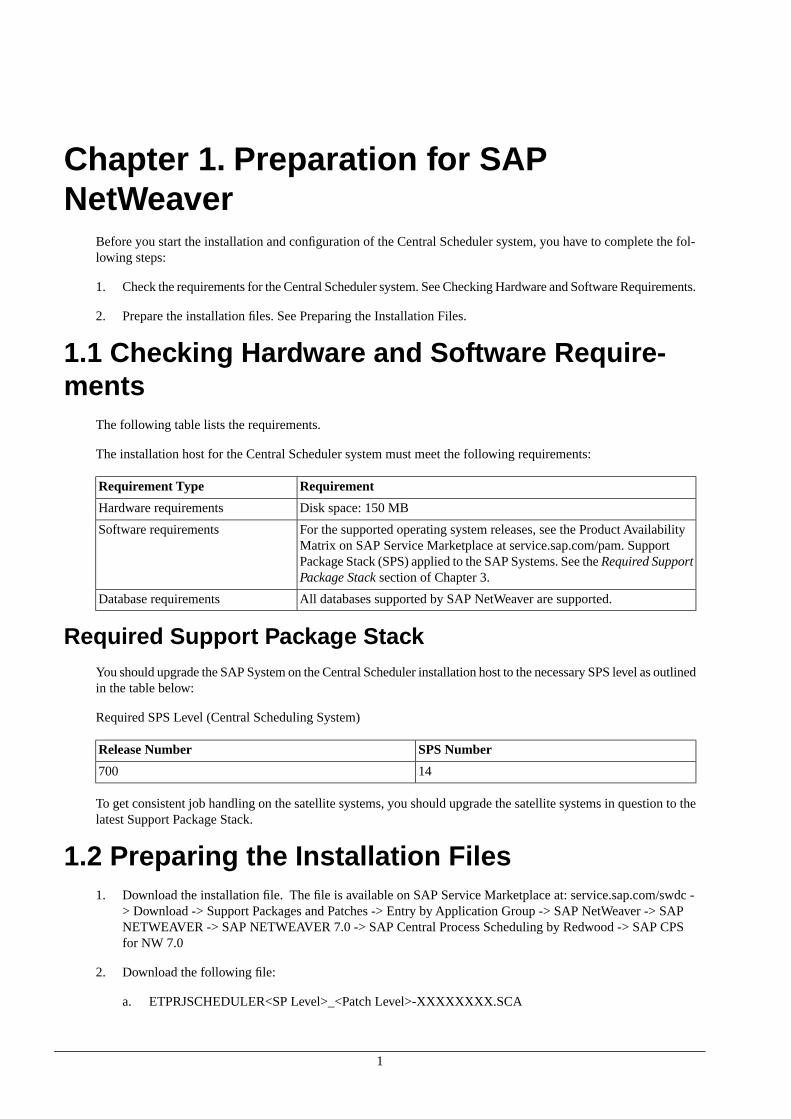
Chapter 1. Preparation for SAPNetWeaver
Before you start the installation and configuration of the Central Scheduler system, you have to complete the fol-lowing steps:
1. Check the requirements for the Central Scheduler system. See Checking Hardware and Software Requirements.
2. Prepare the installation files. See Preparing the Installation Files.
1.1 Checking Hardware and Software Require-ments
The following table lists the requirements.
The installation host for the Central Scheduler system must meet the following requirements:
RequirementRequirement Type
Disk space: 150 MBHardware requirements
For the supported operating system releases, see the Product AvailabilityMatrix on SAP Service Marketplace at service.sap.com/pam. SupportPackage Stack (SPS) applied to the SAP Systems. See the Required SupportPackage Stack section of Chapter 3.
Software requirements
All databases supported by SAP NetWeaver are supported.Database requirements
Required Support Package StackYou should upgrade the SAP System on the Central Scheduler installation host to the necessary SPS level as outlinedin the table below:
Required SPS Level (Central Scheduling System)
SPS NumberRelease Number
14700
To get consistent job handling on the satellite systems, you should upgrade the satellite systems in question to thelatest Support Package Stack.
1.2 Preparing the Installation Files1. Download the installation file. The file is available on SAP Service Marketplace at: service.sap.com/swdc -
> Download -> Support Packages and Patches -> Entry by Application Group -> SAP NetWeaver -> SAPNETWEAVER -> SAP NETWEAVER 7.0 -> SAP Central Process Scheduling by Redwood -> SAP CPSfor NW 7.0
2. Download the following file:
a. ETPRJSCHEDULER<SP Level>_<Patch Level>-XXXXXXXX.SCA
1
Note
Login credentials are required to access the website.
2
Preparation for SAP NetWeaver
Chapter 2. Prerequisites for SAPNetWeaverInstallation Prerequisites
• A fully functional and supported SAP NetWeaver installation; see the Choose Your Installation Hosts topic (see the Administration Guide ).
• Hostname and HTTP port number for NetWeaver applications. The default HTTP port number is 50000.
• SAP username/password for the NetWeaver application server with privileges to deploy Software and cre-ate/modify SAP users and roles.
• The following deliverable:
DescriptionFile
Scheduler software with GUIETPRJSCHEDULER<SP Level>_<Patch Level>-XXXXXXXX.SCA
Note
Note that as of SAP NetWeaver 7.02, SAP CPS may already be deployed in the Java stack. SAP NetWaver7.30 requires you to install an additional usage type to get SAP CPS deployed; please see the Installation onSAP NetWeaver topic ( see the Administration Guide ) for more information.
3
Chapter 3. Installation on SAP NetWeaverPurpose
This section tells you how to install and configure the Central Scheduler system on Windows and UNIX. Youneed direct access to the NetWeaver system to perform the deployment procedure described below, remote deploy-ment is described in the section Remote Installation on SAP NetWeaver.
Process Flow1. You download and deploy the ETPRJSCHEDULER<SP Level>_<Patch Level>-XXXXXXXX.SCA.
2. You assign administrative privileges to a user, via a role, in UME.
3. You request and install a license for SAP CPS.
DeliverablesRequiredDescriptionFile
AlwaysScheduler software with GUIETPRJSCHEDULER<SP Level>_<Patch Level>-XXXXXXXX.SCA.
You deploy the SCA file using the Java Support Package Manager (JSPM). You have to deploy the SCA file asa new software component.
You deploy SDA files using Software Deployment Manager (SDM).
For more information on starting JSPM, please see Starting JSPM [http://help.sap.com/saphelp_nwpi71/helpdata/-en/87/4797422930c56ae10000000a155106/frameset.htm].
To deploy a file using JSPM, you need to know the location of the JSPM Inbox Directory, perform the followingcommand to detect it:
sappfpar pf=<install_directory>:\usr\sap\<SID>\SYS\profile\<SID>_<Central instance name>_<host> DIR_EPS_ROOT
Note
Make sure this directory only contains packages that you want to install at this moment as JSPM will installall packages in contained in this directory, by default. You can choose to skip one or more packages, theSAP CPS package is named redwood.com/&package;.
You use the SCA file to deploy the following actions in AS Java:
• AccessScheduler
• ManageScheduler
These actions contain the permissions for SAP CPS that need to be granted to roles.
You use the SDA file to deploy a scripting environment which allows you to use RedwoodScript ( see the Admin-istration Guide ); a Java-based scripting language with a subset of Java classes. RedwoodScript can be used in aShell as well as in jobs to interact with the Central Scheduler. Please refer to the Administration Guide for moredetails.
4
The Scripting Module is delivered with extensive API documentation, which is available when you have theChargeable version. If you have the Chargeable version but no API documentation, please contact SAP.. Pleasecontact your Sales Representative if you require the Scripting Module, which is shipped with the Chargeable version.
Note that the following actions should not be used:
• scheduler-ear/scheduler-administrator
• scheduler-ear/scheduler-isolation-administrator
• scheduler.ear/scheduler-user
Prerequisites• JSPM Inbox Directory
• <SAPSID>adm credentials
• SDM needs to be started and available, only one connection to the SDM is allowed at any given time.
ProcedureDeploying ETPRJSCHEDULER<SP Level>_<Patch Level>-XXXXXXXX.SCA
1. Copy the file to the JSPM Inbox Directory.
2. Start JSPM and log on as user <SAPSID>adm.
3. Choose New Software Components, No NWDI control and choose Next.
4. If there are one or more packages you do not want to install, please choose Skip under Target Release.SP-Level.PatchLevel to skip the installation of unwanted packages. Choose Next to check the deliverable(s). SAPCPS deliverables start with redwood.com and should be installed if you were instructed to. The name ofthe Central Scheduler package is redwood.com/&package;.
5. Choose Next to confirm deployment.
6. Verify that the Status is set to Deployed and choose Exit.
Starting & Stopping SAP CPS
When setup and configuration of SAP CPS have been finished, SAP CPS starts and stops together with the hostingSAP NetWeaver AS Java. For more information on starting and stopping SAP NetWeaver AS Java, please see:
Starting and Stopping SAP NetWeaver ABAP and Java [http://help.sap.com/saphelp_nw70/helpdata/en/71/-1c9a4267f9c66ae10000000a155106/frameset.htm]
Backup Strategy for SAP CPSSince SAP CPS is a mission critical component of your SAP System landscape, SAP strongly recommends to setup a backup strategy. When you encounter issues, you can restore and, if required, recover your system from aspecific point in time.
5
Installation on SAP NetWeaver
SAP CPS is backed up together with the hosting SAP NetWeaver AS Java. Backups can be performed online. Thebackup strategy and the tools being used are database specific. Detailed information about the strategy and toolsfor each SAP NetWeaver database can be found here:
Database Administration [http://help.sap.com/saphelp_nw70/helpdata/en/29/7d4ed11dc11d45a73850df6e8a1bac/-frameset.htm]
3.1 Installation and Upgrade on SAP NetWeaverVersion 7.00 and 7.01
PurposeThis section tells you how to install and configure the Central Scheduler system on Windows and UNIX. Youneed direct access to the NetWeaver system to perform the deployment procedure described below, remote deploy-ment is described in the section Remote Installation on SAP NetWeaver.
Note
Note that as of SAP NetWeaver 7.02, SAP CPS version M28 is deployed in the Java stack and you will needto upgrade to version 8.0.0. In SAP NetWeaver 7.30, you can install SAP CPS version M28 by installingthe Job-Sched usage type; if you have done so, you will need to upgrade to version 8.0.0.
Process FlowFor SAP NetWeaver version 7.00 and 7.01
1. You download and deploy the ETPRJSCHEDULER<SP Level>_<Patch Level>-XXXXXXXX.SCA or patch.
2. You assign administrative privileges to a user, via a role or group, in UME.
3. You request and install a license for SAP CPS.
4. You connect the Central Scheduler system to remote systems. See Chapter 6.2 Connecting to Remote SAPSystems ( see the Administration Guide ).
Deliverables
RequiredDescriptionFile
AlwaysScheduler software with GUIETPRJSCHEDULER<SP Level>_<Patch Level>-XXXXXXXX.SCA.
You deploy the SCA file using the Java Support Package Manager (JSPM). You have to deploy the SCA file asa new software component.
You deploy SDA files using Software Deployment Manager (SDM).
For more information on starting JSPM, please see Starting JSPM [http://help.sap.com/saphelp_nwpi71/helpdata/-en/87/4797422930c56ae10000000a155106/frameset.htm].
To deploy a file using JSPM, you need to know the location of the JSPM Inbox Directory, perform the followingcommand to detect it:
sappfpar pf=<install_directory>:\usr\sap\<SID>\SYS\profile\<SID>_<Central instance name>_<host> DIR_EPS_ROOT
6
Installation on SAP NetWeaver
Note
Make sure this directory only contains packages that you want to install at this moment as JSPM will installall packages in contained in this directory, by default. You can choose to skip one or more packages, theSAP CPS package is named redwood.com/&package;.
You use the SCA file to deploy the following actions in AS Java:
• AccessScheduler
• ManageScheduler
These actions contain the permissions for SAP CPS that need to be granted to roles.
You use the SDA file to deploy a scripting environment which allows you to use RedwoodScript ( see the Admin-istration Guide ); a Java-based scripting language with a subset of Java classes. RedwoodScript can be used in aShell as well as in jobs to interact with the Central Scheduler. Please refer to the Administration Guide for moredetails.
The Scripting Module is delivered with extensive API documentation, which is available when you have theChargeable version. If you have the Chargeable version but no API documentation, please contact SAP.. Pleasecontact your Sales Representative if you require the Scripting Module, which is shipped with the Chargeable version.
Note that the following actions should not be used:
• scheduler-ear/scheduler-administrator
• scheduler-ear/scheduler-isolation-administrator
• scheduler.ear/scheduler-user
Prerequisites• JSPM Inbox Directory
• <SAPSID>adm credentials
• SDM needs to be started and available, only one connection to the SDM is allowed at any given time.
Procedure
Installing ETPRJSCHEDULER<SP Level>_<Patch Level>-XXXXXXXX.SCA
1. Copy the file to the JSPM Inbox Directory.
2. Start JSPM and log on as user <SAPSID>adm.
3. Choose New Software Components, No NWDI control and choose Next.
4. If there are one or more packages you do not want to install, please choose Skip under Target Release.SP-Level.PatchLevel to skip the installation of unwanted packages. Choose Next to check the deliverable(s). SAPCPS deliverables start with redwood.com and should be installed if you were instructed to. The name ofthe Central Scheduler package is redwood.com/&package;.
5. Choose Next to confirm deployment.
7
Installation on SAP NetWeaver
6. Verify that the Status is set to Deployed and choose Exit.
Assigning Privileges
• See the Creating Roles in SAP NetWeaver topic for instructions.
Upgrading or patching SAP CPS
1. Copy the file to the JSPM Inbox Directory.
2. Start JSPM and log on as user <SAPSID>adm.
3. Choose Single Patch and choose Next.
4. If there are one or more packages you do not want to install, please choose Skip under Target Release.SP-Level.PatchLevel to skip the installation of unwanted packages. Choose Next to check the deliverable(s). SAPCPS deliverables start with redwood.com and should be installed if you were instructed to. The name ofthe Central Scheduler package is redwood.com/&package;.
5. Choose Next to confirm deployment.
6. Verify that the Status is set to Deployed and choose Exit.
Starting & Stopping SAP CPS
When setup and configuration of SAP CPS have been finished, SAP CPS starts and stops together with the hostingSAP NetWeaver AS Java. Starting and stopping SAP NetWeaver AS Java is described in great detail in SAP HelpPortal. For more details, please see:
Starting and Stopping SAP NetWeaver ABAP and Java [http://help.sap.com/saphelp_nw70/helpdata/en/71/-1c9a4267f9c66ae10000000a155106/frameset.htm]
3.2 Installation on SAP NetWeaver Version 7.02
PurposeThis section tells you how to upgrade as well as configure the Central Scheduler system on Windows and UNIX.You need direct access to the NetWeaver system to perform the deployment procedure described below, remotedeployment is described in the section Remote Installation on SAP NetWeaver.
Note
Since SAP CPS M28 is already deployed on SAP NetWeaver 7.02, this document describes the tasks requiredto upgrade to version 8.0.0. If you have already performed the authorization steps in this topic for your M28installation, you do not need to repeat them.
Upgrading SAP NetWeaver
Once you have installed version 8.0.0 and attempt to upgrade SAP NetWeaver, to SAP NetWeaver 7.10 for example,SAP NetWeaver might consider its version to be newer than version 8.0.0 and attempt to downgrade version 8.0.0to M28.nn (where nn is a two digit number). In this case you must make sure that SAP NetWeaver does not attemptto upgrade SAP CPS. Contact SAP Customer Support for more information.
8
Installation on SAP NetWeaver
Process Flow1. You assign administrative privileges to a user, via a role or group, in UME.
2. You upgrade version M28 to version 8.0.0.
3. You request and install a license for SAP CPS.
4. You connect the Central Scheduler system to remote systems. See Chapter 6.2 Connecting to Remote SAPSystems ( see the Administration Guide ).
Deliverables
RequiredDescriptionFile
AlwaysScheduler software with GUIETPRJSCHEDULER<SP Level>_<Patch Level>-XXXXXXXX.SCA.
You deploy the SCA file using the Java Support Package Manager (JSPM). You have to deploy the SCA file asa new software component.
You deploy SDA files using Software Deployment Manager (SDM).
For more information on starting JSPM, please see Starting JSPM [http://help.sap.com/saphelp_nwpi71/helpdata/-en/87/4797422930c56ae10000000a155106/frameset.htm].
To deploy a file using JSPM, you need to know the location of the JSPM Inbox Directory, perform the followingcommand to detect it:
sappfpar pf=<install_directory>:\usr\sap\<SID>\SYS\profile\<SID>_<Central instance name>_<host> DIR_EPS_ROOT
Note
Make sure this directory only contains packages that you want to install at this moment as JSPM will installall packages in contained in this directory, by default. You can choose to skip one or more packages, theSAP CPS package is named redwood.com/&package;.
Procedure
Assigning Privileges
• See the Creating Roles in SAP NetWeaver topic for instructions.
Note
You may have previously completed this task for M28; in this case, there is no need to repeat this step.
Upgrading to version M28 to version 8.0.0
1. Copy the file to the JSPM Inbox Directory.
2. Start JSPM and log on as user <SAPSID>adm.
3. Choose Single Patch and choose Next.
9
Installation on SAP NetWeaver
4. If there are one or more packages you do not want to install, please choose Skip under Target Release.SP-Level.PatchLevel to skip the installation of unwanted packages. Choose Next to check the deliverable(s). SAPCPS deliverables start with redwood.com and should be installed if you were instructed to. The name ofthe Central Scheduler package is redwood.com/&package;.
5. Choose Next to confirm deployment.
6. Verify that the Status is set to Deployed and choose Exit.
Starting & Stopping SAP CPS
When setup and configuration of SAP CPS have been finished, SAP CPS starts and stops together with the hostingSAP NetWeaver AS Java. Starting and stopping SAP NetWeaver AS Java is described in great detail in SAP HelpPortal. For more details, please see:
Starting and Stopping SAP NetWeaver ABAP and Java [http://help.sap.com/saphelp_nw70/helpdata/en/71/-1c9a4267f9c66ae10000000a155106/frameset.htm]
3.3 Installation on SAP NetWeaver Version 7.30
PurposeThis section tells you how to install and configure the Central Scheduler system on Windows and UNIX. Youneed direct access to the NetWeaver system to perform the deployment procedure described below, remote deploy-ment is described in the section Remote Installation on SAP NetWeaver.
Upgrading SAP NetWeaver
If you have the Job-SCHED usage type installed, once you have installed version 8.0.0 and attempt to upgradeSAP NetWeaver, it might consider its version to be newer than version 8.0.0 and attempt to downgrade version8.0.0 to M28.nn (where nn is a two digit number). In this case you must make sure that SAP NetWeaver does notattempt to upgrade SAP CPS or the JOB_SCHED usage type. Contact SAP Customer Support for more information
Process Flow1. You check to see if you installed the JOB-SCHED usage type.
2. You deploy the deliverable.
3. You assign administrative privileges to a user, via a role or group, in UME. See Chapter 5.4 Creating Rolesin SAP NetWeaver.
4. You request and install a license for SAP CPS. See Chapter 5.6 Installing a License.
5. You connect the Central Scheduler system to remote systems. See Chapter 6.2 Connecting to Remote SAPSystems ( see the Administration Guide ).
Procedure
Determine if Usage Type JOB-SCHED is installed
1. Navigate to http://<server>:<port>/utl/UsageTypesInfo.
10
Installation on SAP NetWeaver
2. Locate the line with UT Code JOB-SCHED. If there is no such line, then the usage type is not installed andyou proceed to Installing SAP CPS. If JOB-SCHED is installed, you proceed to Upgrading or Patching SAPCPS.
Installing SAP CPS
1. Copy the file to the JSPM Inbox Directory.
2. Start JSPM and log on as user <SAPSID>adm.
3. Choose New Software Components, No NWDI control and choose Next.
4. If there are one or more packages you do not want to install, please choose Skip under Target Release.SP-Level.PatchLevel to skip the installation of unwanted packages. Choose Next to check the deliverable(s). SAPCPS deliverables start with redwood.com and should be installed if you were instructed to. The name ofthe Central Scheduler package is redwood.com/&package;.
5. Choose Next to confirm deployment.
6. Verify that the Status is set to Deployed and choose Exit.
Assigning Privileges
• See the Creating Roles in SAP NetWeaver topic for instructions.
Upgrading or patching SAP CPS
1. Copy the file to the JSPM Inbox Directory.
2. Start JSPM and log on as user <SAPSID>adm.
3. Choose Business Packages (advanced users only) and choose Next.
4. If there are one or more packages you do not want to install, please choose Skip under Target Release.SP-Level.PatchLevel to skip the installation of unwanted packages. Choose Next to check the deliverable(s). SAPCPS deliverables start with redwood.com and should be installed if you were instructed to. The name ofthe Central Scheduler package is redwood.com/&package;.
5. Choose Next to confirm deployment.
6. Verify that the Status is set to Deployed and choose Exit.
Starting & Stopping SAP CPS
When setup and configuration of SAP CPS have been finished, SAP CPS starts and stops together with the hostingSAP NetWeaver AS Java. Starting and stopping SAP NetWeaver AS Java is described in great detail in SAP HelpPortal. For more details, please see:
Starting and Stopping SAP NetWeaver ABAP and Java [http://help.sap.com/saphelp_nw70/helpdata/en/71/-1c9a4267f9c66ae10000000a155106/frameset.htm]
11
Installation on SAP NetWeaver
3.4 Creating Roles in SAP NetWeaver
UseA role is a set or group of privileges that can be granted to users or other roles. Roles are part of the Security sectionin the navigation bar.
The following standard roles are provided with SAP CPS:
• scheduler-administrator - can perform all actions.
• scheduler-bae-user - indicates that the user uses the BAE interface
• scheduler-business-user - can access the business-user-centric user interface
• scheduler-event-operator - can raise and clear events.
• scheduler-it-user - can access the default user interface
• scheduler-job-administrator - can create/edit/delete event definitions, job definitions, job chains.Can modify jobs.
• scheduler-user - has access to SAP CPS only, cannot see any objects.
• scheduler-viewer - read only access to all objects.
• scheduler-isolation-administrator - can create/edit/delete isolation groups and add users tothese.
• scheduler-screen-reader - indicates that you are using a screen reader. (not displayed when runningin SAP NetWeaver)
Note
The roles scheduler-business-user and scheduler-it-user are use by the Financial ProcessAutomation module.
Note
If you get an HTTP error 403 - Access Denied after logging in, your user may be lacking thescheduler-user role.
These are the standard roles, it is not possible to edit the standard roles. You create a role with the correspondingname in the UME, assign it the AccessScheduler action and grant it to SAP CPS users. Once you grant these rolesto users in the UME, the users will get the corresponding SAP CPS roles granted and have the privileges grantedto these roles as soon as they log on or the isolation administrator adds them to an isolation group.
The UME also allows you to grant SAP CPS privileges directly to roles via the following actions:
• AccessScheduler - read-only access, all roles that you want to use in SAP CPS must have this action assigned.
• ManageScheduler - scheduler Administrator (same as scheduler-administrator role)
• ManageSchedulerIsolation - isolation group administrator (same as scheduler-isolation-adminis-trator role); you are not allowed to grant the ManageScheduler action to the same role.
12
Installation on SAP NetWeaver
SAP strongly recommends you start by creating the above roles in the UME and assign them the AccessScheduleraction. Once that is done, you grant these roles to users. If the roles do not exactly suit your needs, create customroles (with names that do not match the above roles) in the UME and assign them the same action; these roles willbe editable in SAP CPS and allow you to extend privileges of users.
Note that the following actions should not be used:
• scheduler-ear/scheduler-administrator
• scheduler-ear/scheduler-isolation-administrator
• scheduler.ear/scheduler-user
Accessibility
SAP CPS has been tested with the JAWS screen-reader for the visually impaired. When you want to use a screen-reader, you have the following options, depending on your application server:
• SAP NetWeaver - SAP UME allows you to set a property for visually impaired users, this property is supportedby SAP CPS
• Other supported application servers - you use the scheduler-screen-reader role or append &sap-accessibility=X in the URL. Note that the use of the role is highly recommended. Despite what the namemight suggest, the URL parameter is supported on all supported application servers, and is designed for testingpurposes.
Granting Privileges
You can grant privileges to custom roles. Custom roles are recognizable by the name (it is not allowed to be oneof the above) as well as the description and comment fields, which contain Created automatically on first login.
Some privileges are not dependent on a partition or isolation group, these are known as global Privileges.
You grant specific privileges to roles for each object type; available privileges are dependent on the object. Theseprivileges are known as system privileges and are granted via the role object. There are two levels at which youcan grant system privileges, Access and Admin. Privileges granted with the Admin level allow the grantee to grantthe privileges to other users.
You can also grant privileges for specific objects on object-level to users or roles, these are known as object privilegesand are granted via the Security tab on the object.
The following topics in the Security Guide and Administration Guide provide more information on privileges andhow you grant them:
• System Privileges ( see the Administration Guide )
• Object Privileges ( see the Administration Guide )
• Granting and Revoking System Privileges ( see the Administration Guide )
• Granting or Revoking Object Privileges ( see the Administration Guide )
Prerequisites• The URL to the NetWeaver UME. Usually http://<host>:<port>/useradmin
• An account with sufficient privileges to create a role and add members to the role.
13
Installation on SAP NetWeaver
• The username and password of a user you add to the role.
• A Scheduler Manager user account for SAP CPS
ProcedureCreating a role to map to a SAP CPS role
1. Connect to the UME in SAP NetWeaver where SAP CPS was installed.
2. Choose Role in the drop-down box for Search Criteria.
3. Choose Create Role and enter a name of one of the SAP CPS roles into the Unique Name field.
4. Choose the Assigned Actions tab.
5. Search for scheduler and choose the action name AccessScheduler, choose Add and Save.
6. Log out of the UME.
Creating a custom role to manage isolation groups in the UME
1. Connect to the UME in SAP NetWeaver where SAP CPS was installed.
2. Choose Role in the drop-down box for Search Criteria.
3. Choose Create Role and enter a role name in the Unique Name field, SAP recommends to prefix the rolename with scheduler as it will be easier to distinguish the role fro other roles in the UME .
4. Choose the Assigned Actions tab.
5. Search for scheduler and choose the action names AccessScheduler and ManageSchedulerIsolation.
6. Choose Add and Save.
7. Log out of the UME.
Editing a custom role in SAP CPS
1. Navigate to Security > Roles.
2. Choose Edit from the context-menu of an editable role.Editable roles have a description: Created automaticallyon first login.
3. On the Assign Privileges tab, choose an Object definition and then Next.
4. Choose the desired range of the privileges.
5. Choose a Rank with the desired privileges. Admin privileges allow the user to perform the action and to grantthe privilege to others as well. Access privileges allow the user to perform the actions.
Assigning a user to a role
1. Connect to the UME in SAP NetWeaver where SAP CPS was installed.
2. Fill in the Search Criteria field and locate the user.
3. Choose the user, and choose the Assigned Roles tab.
14
Installation on SAP NetWeaver
4. Search for one of the roles previously created, and choose Add.
5. Choose Add and Save.
6. Log out of the UME.
Values
Assign Privileges
• Object Definition - The role name.
• Grantable - If this option is selected, the user can grant this role to any other user.
Assigned Global Privileges
• Granted Subject - The privilege name.
• Grantable - If this option is selected, the user can grant this privilege to any other user.
Example
Create a Role to access SAP CPS
• The URL to the NetWeaver UME http://sapnwprd.masalan.com:50200/useradmin
• The account with sufficient privileges to create a role and add members to the role is Administrator
• The username and password of the user to add to the role is masalan and process1 respectively, created previ-ously.
• The Scheduler Manager user account is ProcAdmin.
Creating a role that maps to the scheduler-event-operator SAP CPS role
1. Connect to http://sapnwprd.masalan.com:50200/useradmin using the Administrator login
2. Choose Role in the drop-down box for Search Criteria.
3. Choose Create Role and enter scheduler-event-operator into the Unique Name field.
4. Choose the Assigned Actions tab.
5. Search for scheduler and choose the action name AccessScheduler, choose Add and Save.
6. Log out of the UME.
Custom Roles
Custom roles must allow users to see all properties of objects they are supposed to. This means that if you wantthe user to be able to see jobs, the user needs to be able to see the job definition, queue and process server as wellas have View privileges for DatumDefinition on system-level.
Note that shared objects reside in the GLOBAL partition and might also require privileges, for example, all usersshould be able to see the GLOBAL.Custom library, as this is used by job definitions as well as period functions,for example.
15
Installation on SAP NetWeaver
Example
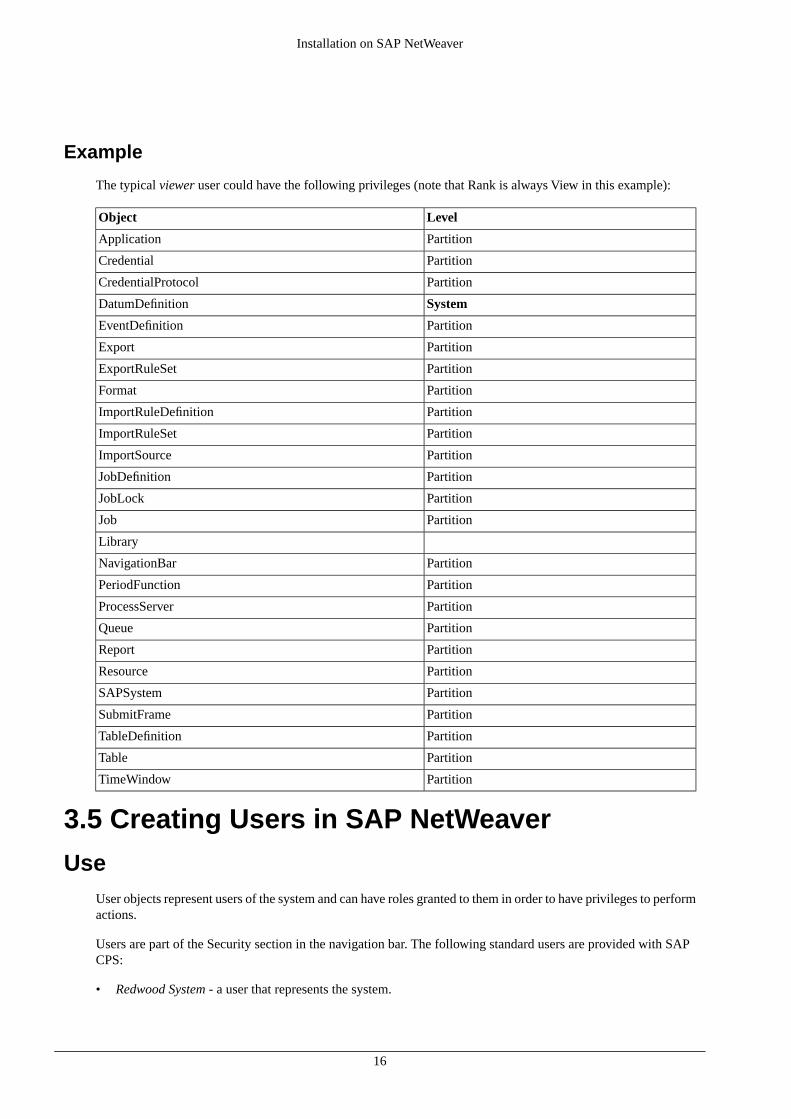
The typical viewer user could have the following privileges (note that Rank is always View in this example):
LevelObject
PartitionApplication
PartitionCredential
PartitionCredentialProtocol
SystemDatumDefinition
PartitionEventDefinition
PartitionExport
PartitionExportRuleSet
PartitionFormat
PartitionImportRuleDefinition
PartitionImportRuleSet
PartitionImportSource
PartitionJobDefinition
PartitionJobLock
PartitionJob
Library
PartitionNavigationBar
PartitionPeriodFunction
PartitionProcessServer
PartitionQueue
PartitionReport
PartitionResource
PartitionSAPSystem
PartitionSubmitFrame
PartitionTableDefinition
PartitionTable
PartitionTimeWindow
3.5 Creating Users in SAP NetWeaver
UseUser objects represent users of the system and can have roles granted to them in order to have privileges to performactions.
Users are part of the Security section in the navigation bar. The following standard users are provided with SAPCPS:
• Redwood System - a user that represents the system.
16
Installation on SAP NetWeaver
Users are imported automatically from the SAP User Management Engine (UME) as soon as they log on for thefirst time and kept in sync with UME at each login. This synchronization only occurs one way, from UME to SAPCPS. Users are created in UME and cannot be created in SAP CPS. They must have the following action assignedto at least one of their roles to get read-only access:
• AccessScheduler
Administrator users additionally have the UME role scheduler-administrator or the following actionassigned to one of their roles:
• ManageScheduler
To view all the available users, choose Security > Users in the Navigation bar.
You can enable and disable login for a user; when you disable login for a user, the user will be notified at the nextlogin attempt that the user has no access to the system.
Prerequisites• A user account and password with appropriate privileges for managing users in the SAP NetWeaver system
where SAP CPS was installed.
• The URL to the User Management interface of the SAP NetWeaver system where SAP CPS was installed.
ProcedureCreate a user in SAP NetWeaver UME
1. Connect to the User Management interface in SAP NetWeaver where SAP CPS was installed.
2. Choose Create User and fill in the data.
3. Add this user to at least one of the roles created during the installation of SAP CPS.
4. Log on with this user in SAP CPS.
Disable a user from logging into SAP CPS
1. Navigate to Security > Users.
2. Choose Disable Login from the context-menu of the user
Values
• Name - The name of the user.
• Description - The description of the user.
• Documentation - A comment about the user.
• Creation Time - The time the user ID was created.
• Last Modification time - The last time the user ID was modified.
17
Installation on SAP NetWeaver
3.6 Assigning Isolation Groups in SAP NetWeaver
UseWith an isolation group, a user is limited to interacting with objects of the same isolation group as well as objectsfrom the GLOBAL isolation group. You assign users to isolation groups ( see the Administration Guide ) in theSecurity section in the navigation bar. The user must either have the role scheduler-isolation-administrator or acustom role granted which has the ManageSchedulerIsolation action to be able to add users to an isolation group.Users can have multiple isolation groups; in this case, the user needs to choose an isolation group for the sessionduring login.
Note
In the Free of Charge version, only one SAP client can be in an isolation group. This is governed by thevalue of the ProcessServerService.SAP.limit license key ( see the Administration Guide ).
Tip
SAP does not recommend the use of isolation groups in the Chargeable version; these have been implementedto adhere to the limitations of the Free of Charge version and demand a high level of configuration. Usepartitions instead.
Prerequisites• the user needs the role scheduler-isolation-administrator or a custom role granted which has the AccessScheduler
action.
ProcedureCreate an isolation group
1. Navigate to Security > Isolation Groups.
2. Choose New Isolation Group from the context-menu.
3. Enter a name for the isolation group. Names should be all upper case.
4. Choose Save & Close to exit edit dialog.
Assign an isolation group to users
1. Navigate to Security > Isolation Groups.
2. Choose Import Users
3. Use the search dialog to locate users from the Authentication system, wildcards * and ? are allowed.
4. Select the users to import and choose Import.
5. Close the window when you are finished importing users into the isolation group.
18
Installation on SAP NetWeaver
3.7 Installing a License
UseAfter a successful installation and login, you will be presented with the licensing page.
To request a license, follow the instructions on the screen: please create an OSS ticket and copy the license requestincluding ## BEGIN REQUEST ## and ## END REQUEST ## into the OSS ticket. Next, assign to componentXX-PART-REDWOOD-CPS and submit the ticket. You will receive your license via the OSS ticket.
Note
A Free of Charge license is only available for installations on SAP NetWeaver.
You can also use the Free of Charge license, which does not require you to send an email to Redwood Software.On the licensing page, you need to fill in your company name and choose Generate Free of Charge License. Notethat a lot of features are disabled with the Free of Charge license and your SAP instances are isolated from eachother in SAP CPS; you can only schedule jobs in one SAP System per session.
Prerequisites• The full URL to the SAP CPS installation
• An email account to request the license, which will be sent inline to that account.
ProcedureGenerate a license request and install the license
1. Log on to SAP CPS If the licensing page does not appear, or you want to install a new license, go to ht-tp://<sever>:<port>/scheduler/ui/licence/request1.jsp
2. Fill in a company name and proceed to the following screen.
3. The text displayed needs to be sent to Redwood Software, it is required for the license generation, pleasecopy-paste it into an email message or use the link provided and send the email.
4. Once you have received the license, you can paste it into the following window. If you closed the window,you may proceed to http://<sever>:<port>/scheduler/ui/licence/request1.jsp; notethat this time, since you have the license, there is no need to send another email.
Use the Free of Charge license
1. Log on to SAP CPS If the licensing page does not appear, or you want to install a new license, go to ht-tp://<sever>:<port>/scheduler/ui/licence/request1.jsp
2. Fill in a company name and choose Generate Free of Charge License.
19
Installation on SAP NetWeaver
3.8 Advanced Remote Installation on SAPNetWeaver
UseYou are advised to follow the standard deployment instructions if you can, which are described in the 5 Installationon SAP NetWeaver ( see the Administration Guide ) section.
The Software Deployment Manager (SDM) server deploys Software in SAP NetWeaver, you use the SDM Guior the Java Support Package Manager (JSPM) client to load archives in the form of war, ear, sca or sda files intoSDM. SDM Gui can be used to deploy all these file types, however, the use of JSPM is highly recommended forthe deployment of sda files, JSPM does not support the other file formats.
You usually access the JSPM or SDM Gui on the NetWeaver server itself, this requires direct access to the server,which can be an issue for some companies, It is possible to deploy software on NetWeaver servers from remoteclients.
JSPM requires you to copy the archives to the JSPM Inbox on the NetWeaver server, SDM allows you to load thefiles from the client, which can be stored locally or on a network share.
Using JSPM for remote deployments
For information on starting JSPM, please see Starting JSPM [http://help.sap.com/saphelp_nwpi71/helpdata/en/87/-4797422930c56ae10000000a155106/frameset.htm].
To deploy a file using JSPM, you need to know the location of the JSPM Inbox Directory, perform the followingcommand to detect it:
sappfpar pf=<install_directory>:\usr\sap\<SID>\SYS\profile\<SID>_<Central instance name>_<host> DIR_EPS_ROOT
Refer to 5 Installation on SAP NetWeaver ( see the Administration Guide ) for more information on deployingsoftware with JSPM.
Using SDM for remote deployments
SDM lives in /usr/sap/<SID>/<central instance>/SDM/program. The command is named Re-moteGui with the sh extension for Unix and bat for Windows.
It is a graphical tool and if the NetWeaver system is running on a GNU/Linux or Unix system you need an XServer running on your Windows machine.
Note
SDM has been removed from SAP NetWeaver as of release 7.10.
Prerequisites• Location fo the JSPM inbox directory, if you are going to use JSPM
• Credentials of the <SID>adm user of the target NetWeaver system
• An X server on your Windows Client, if you plan on using SDM remotely and your NetWeaver system is in-stalled on Unix
20
Installation on SAP NetWeaver
Procedure
Using JSPM from a remote client
1. Copy the archive into the JSPM inbox directory. Use the following command to detect the location of thedirectory:
sappfparpf=<install_directory>:\usr\sap\<SID>\SYS\profile\<SID>_<Central instance name>_<host> \DIR_EPS_ROOT
1. Determine your situation:
a. Your NetWeaver instance is installed on a Windows system and you are accessing it from a Windowsclient, you can safely run /usr/sap/<SID>/<central instance>/j2ee/JSPM/go.bat
b. Your NetWeaver instance is installed on a Unix system and you are using a Unix system as a client oryour Windows installation has an X server you can safely run /usr/sap/<SID>/<central in-stance>/j2ee/JSPM/go on Unix clients or /usr/sap/<SID>/<central in-stance>/j2ee/JSPM/go.bat on Windows clients
c. Your NetWeaver instance is installed on a Unix system and your Windows installation does not havean X server, you will have to copy part of the JSPM directory structure to your system, change somefiles and run JSPM from you computer.
i. Copy StartGui.bat and the lib directory from /usr/sap/<SID>/<centralinstance>/j2ee/JSPM to yoursystem.
ii. go to /usr/sap/<SID>/<central instance>/j2ee/JSPM/param and open the file jspm_config.txt; inthat file change the line /dialog/SDTServerConnection/SDTGui/launch = trueto /dialog/SDTServerConnection/SDTGui/launch = false
iii. save the change
iv. start the go command again; it should come up with the “Waiting for SDTServer to connect onhostname.. “ message
v. Start StartGui.bat on your machine and specify the host and port from the message
Note
A supported X server on Windows is Hummingbird Exceed, other x servers may work, some have been re-ported to display an unresponsive GUI.
Using SDM from a remote client
1. Copy the whole SDM directory, /usr/sap/<SID>/<central instance>/SDM/program over toyour machine.
2. Edit the following files:
a. SDM/program/RemoteGui.bat - fix the paths
b. SDM/program/sdm_prep_com.bat - fix the paths
c. SDM/program/sdm_jdk.bat - fix the path to your Java home directory
21
Installation on SAP NetWeaver
3. Run RemoteGui.bat
Note
If your NetWeaver server is on a Unix-based system, you will need an X server on your Windows system.
22
Installation on SAP NetWeaver