sanpath user’s guide - seagate · iv sanpath user’s guide • june 2004 ... changing the...
TRANSCRIPT
SANpath User’s GuideVersion 4.0
June 200483-00002722, Revision B
CopyrightCopyright 2001-2004 Dot Hill Systems Corp. All rights reserved. No part of this publication may be reproduced, stored in a retrieval system, translated, transcribed, or transmitted, in any form or by any means – manual, electric, electronic, electromechanical, chemical, optical, or otherwise – without prior explicit written permission of Dot Hill Systems Corp., 6305 El Camino Real, P.O. Box 9000, Carlsbad, CA., 92009-1606.
TrademarksDot Hill Systems, the Dot Hill logo, SANscape, SANnet, and SANpath are registered trademarks of Dot Hill Systems Corp. All other trademarks and registered trademarks are proprietary to their respective owners.
ChangesThe material in this document is for information only and is subject to change without notice. While reasonable efforts have been made in the preparation of this document to assure its accuracy, Dot Hill Systems Corp., assumes no liability resulting from errors or omissions in this document, or from the use of the information contained herein. Dot Hill Systems Corp., reserves the right to make changes in the product design without reservation and without notification to its users.
Contents
Preface . . . . . . . . . . . . . . . . . . . . . . . . . . . . . . . . . . . . . . . . . . . . . . . . . . . .vii
1. Overview . . . . . . . . . . . . . . . . . . . . . . . . . . . . . . . . . . . . . . . . . . . . . . . . . . . .1
What is SANpath? . . . . . . . . . . . . . . . . . . . . . . . . . . . . . . . . . . . . . . . . . . . . .1
Failover/Failback Data Paths . . . . . . . . . . . . . . . . . . . . . . . . . . . . . . . . . . . . .1
I/O Load Balancing . . . . . . . . . . . . . . . . . . . . . . . . . . . . . . . . . . . . . . . . . . . .2
Dynamic LUN Masking . . . . . . . . . . . . . . . . . . . . . . . . . . . . . . . . . . . . . . . . . .2
How SANpath Works . . . . . . . . . . . . . . . . . . . . . . . . . . . . . . . . . . . . . . . . . . .2
Supported SANpath Configurations . . . . . . . . . . . . . . . . . . . . . . . . . . . . . . . .2
Summary of SANpath Benefits . . . . . . . . . . . . . . . . . . . . . . . . . . . . . . . . . . . .3
2. Hardware Preparation . . . . . . . . . . . . . . . . . . . . . . . . . . . . . . . . . . . . . . . . .5
Hardware Overview . . . . . . . . . . . . . . . . . . . . . . . . . . . . . . . . . . . . . . . . . . . .5
Multiple I/O Paths . . . . . . . . . . . . . . . . . . . . . . . . . . . . . . . . . . . . . . . . . . .5
Host Computer and Storage Devices . . . . . . . . . . . . . . . . . . . . . . . . . . .5
Example Configurations . . . . . . . . . . . . . . . . . . . . . . . . . . . . . . . . . . . . . . . . .6
Host LUN Mapping . . . . . . . . . . . . . . . . . . . . . . . . . . . . . . . . . . . . . . . . . .7
3. SANpath Operation . . . . . . . . . . . . . . . . . . . . . . . . . . . . . . . . . . . . . . . . . . .9
Overview . . . . . . . . . . . . . . . . . . . . . . . . . . . . . . . . . . . . . . . . . . . . . . . . . . . .9
The setsp Command . . . . . . . . . . . . . . . . . . . . . . . . . . . . . . . . . . . . . . . . . . .9
The sppath Command . . . . . . . . . . . . . . . . . . . . . . . . . . . . . . . . . . . . . . . . . 11
Display Options for sppath . . . . . . . . . . . . . . . . . . . . . . . . . . . . . . . . . . . 14
Ignore and Reclaim Devices with sppath . . . . . . . . . . . . . . . . . . . . . . . . 14
Understanding the setsp –a Screen . . . . . . . . . . . . . . . . . . . . . . . . . . . . 15
spd field . . . . . . . . . . . . . . . . . . . . . . . . . . . . . . . . . . . . . . . . . . . . . . 16
iii

Path/disk field . . . . . . . . . . . . . . . . . . . . . . . . . . . . . . . . . . . . . . . . .16
Status field . . . . . . . . . . . . . . . . . . . . . . . . . . . . . . . . . . . . . . . . . . . .16
Primary field . . . . . . . . . . . . . . . . . . . . . . . . . . . . . . . . . . . . . . . . . . .17
Exclude field . . . . . . . . . . . . . . . . . . . . . . . . . . . . . . . . . . . . . . . . . .17
Buf field . . . . . . . . . . . . . . . . . . . . . . . . . . . . . . . . . . . . . . . . . . . . . .17
Balance field . . . . . . . . . . . . . . . . . . . . . . . . . . . . . . . . . . . . . . . . . .17
RtrCnt field . . . . . . . . . . . . . . . . . . . . . . . . . . . . . . . . . . . . . . . . . . . .17
RtrDly field . . . . . . . . . . . . . . . . . . . . . . . . . . . . . . . . . . . . . . . . . . . .17
FailBack field . . . . . . . . . . . . . . . . . . . . . . . . . . . . . . . . . . . . . . . . . .18
ID= identifier . . . . . . . . . . . . . . . . . . . . . . . . . . . . . . . . . . . . . . . . . .18
Changing the Configuration . . . . . . . . . . . . . . . . . . . . . . . . . . . . . . . . . . . . .18
Specifying a Device for setsp . . . . . . . . . . . . . . . . . . . . . . . . . . . . . . . . .18
Assigning a New Primary Path . . . . . . . . . . . . . . . . . . . . . . . . . . . . . . . .18
Turning the Exclusion Setting Off and On . . . . . . . . . . . . . . . . . . . . . . . .19
Redefining the Buffer Pointer Allocation . . . . . . . . . . . . . . . . . . . . . . . . .20
Turning Load Balancing On and Off . . . . . . . . . . . . . . . . . . . . . . . . . . . .20
Changing the Retry Count and Retry Delay . . . . . . . . . . . . . . . . . . . . . .20
Turning Failback Off and On . . . . . . . . . . . . . . . . . . . . . . . . . . . . . . . . . .21
Dynamic Device Detection . . . . . . . . . . . . . . . . . . . . . . . . . . . . . . . . . . . . . .21
Claiming New Devices in Windows . . . . . . . . . . . . . . . . . . . . . . . . . . . .21
Claiming New Devices in Solaris . . . . . . . . . . . . . . . . . . . . . . . . . . . . . .22
Claiming New Devices in IBM AIX . . . . . . . . . . . . . . . . . . . . . . . . . . . . .23
Claiming New Devices in Linux . . . . . . . . . . . . . . . . . . . . . . . . . . . . . . .24
Using SANpath with SANscape . . . . . . . . . . . . . . . . . . . . . . . . . . . . . . . . . .24
Microsoft Windows, Solaris, Linux, and IBM AIX . . . . . . . . . . . . . . . . . .24
Monitoring SANpath through SANscape . . . . . . . . . . . . . . . . . . . . . . . .25
Search SANpath Devices . . . . . . . . . . . . . . . . . . . . . . . . . . . . . . . . . . . .26
Managing SANpath Devices . . . . . . . . . . . . . . . . . . . . . . . . . . . . . . . . . .27
To Manage SANpath Devices from the Main Window . . . . . . . . . . .27
To Manage SANpath Devices Using Drag and Drop . . . . . . . . . . . .28
SANpath Dynamic LUN Assignments . . . . . . . . . . . . . . . . . . . . . . . . . .29
Switching to the Resource View . . . . . . . . . . . . . . . . . . . . . . . . . . . .29
iv SANpath User’s Guide • June 2004
4. Setting Up SANpath on Solaris . . . . . . . . . . . . . . . . . . . . . . . . . . . . . . . . . 37
Installing SANpath on Solaris . . . . . . . . . . . . . . . . . . . . . . . . . . . . . . . . . . . 38
Installed SANpath Files . . . . . . . . . . . . . . . . . . . . . . . . . . . . . . . . . . . . . . . . 40
Uninstalling SANpath on Solaris . . . . . . . . . . . . . . . . . . . . . . . . . . . . . . . . . 40
SANpath Device Naming in Solaris . . . . . . . . . . . . . . . . . . . . . . . . . . . . . . . 41
How Device File Names Are Chosen . . . . . . . . . . . . . . . . . . . . . . . . . . . 42
Devices with Only One Path to the Host . . . . . . . . . . . . . . . . . . . . . . . . 43
Reconfiguration for Existing Applications . . . . . . . . . . . . . . . . . . . . . . . 43
Underlying Device Path Names . . . . . . . . . . . . . . . . . . . . . . . . . . . . . . 43
5. Troubleshooting Solaris . . . . . . . . . . . . . . . . . . . . . . . . . . . . . . . . . . . . . . 45
Comparing setsp with System Events . . . . . . . . . . . . . . . . . . . . . . . . . . . . . 45
Cable Failure Errors . . . . . . . . . . . . . . . . . . . . . . . . . . . . . . . . . . . . . . . . . . . 46
Failover Error Reporting . . . . . . . . . . . . . . . . . . . . . . . . . . . . . . . . . . . . . . . . 47
Recovering from a Failure . . . . . . . . . . . . . . . . . . . . . . . . . . . . . . . . . . . . . . 47
6. Setting Up SANpath on Linux . . . . . . . . . . . . . . . . . . . . . . . . . . . . . . . . . . 49
Requirements . . . . . . . . . . . . . . . . . . . . . . . . . . . . . . . . . . . . . . . . . . . . . . . . 49
Installing SANpath on Linux . . . . . . . . . . . . . . . . . . . . . . . . . . . . . . . . . . . . . 50
Uninstalling SANpath . . . . . . . . . . . . . . . . . . . . . . . . . . . . . . . . . . . . . . . . . . 51
SANpath Device Naming in Linux . . . . . . . . . . . . . . . . . . . . . . . . . . . . . . . . 52
7. Troubleshooting Linux . . . . . . . . . . . . . . . . . . . . . . . . . . . . . . . . . . . . . . . . 53
Before Installing SANpath . . . . . . . . . . . . . . . . . . . . . . . . . . . . . . . . . . . . . . 53
Troubleshooting Linux . . . . . . . . . . . . . . . . . . . . . . . . . . . . . . . . . . . . . . . . . 54
Failover Error Reporting in Linux . . . . . . . . . . . . . . . . . . . . . . . . . . . . . . 54
Recovering from a Linux Path Failure . . . . . . . . . . . . . . . . . . . . . . . . . . 54
8. Setting Up SANpath on Windows . . . . . . . . . . . . . . . . . . . . . . . . . . . . . . . 55
Installing SANpath on Windows NT/2000 . . . . . . . . . . . . . . . . . . . . . . . . . . . 55
Installed Windows Files . . . . . . . . . . . . . . . . . . . . . . . . . . . . . . . . . . . . . . . . 57
Uninstalling with Windows . . . . . . . . . . . . . . . . . . . . . . . . . . . . . . . . . . . . . . 57
Microsoft Clustering Software . . . . . . . . . . . . . . . . . . . . . . . . . . . . . . . . . . . 57
MSCS Requirements and Configuration . . . . . . . . . . . . . . . . . . . . . . . . 57
Contents v
Installing SANpath Prior to MSCS . . . . . . . . . . . . . . . . . . . . . . . . . . . . .58
Installing SANpath after MSCS . . . . . . . . . . . . . . . . . . . . . . . . . . . . . . .59
SANpath Device Naming in Windows . . . . . . . . . . . . . . . . . . . . . . . . . . . . . .59
9. Troubleshooting Windows . . . . . . . . . . . . . . . . . . . . . . . . . . . . . . . . . . . . .61
Before Installing SANpath . . . . . . . . . . . . . . . . . . . . . . . . . . . . . . . . . . . . . .61
Recognizing Non-Zero LUNS . . . . . . . . . . . . . . . . . . . . . . . . . . . . . . . . . . . .62
Errors in the Event Viewer . . . . . . . . . . . . . . . . . . . . . . . . . . . . . . . . . . . . . .62
10. Setting Up SANpath on IBM AIX . . . . . . . . . . . . . . . . . . . . . . . . . . . . . . . .65
Overview . . . . . . . . . . . . . . . . . . . . . . . . . . . . . . . . . . . . . . . . . . . . . . . . . . .65
Installing SANpath on IBM AIX . . . . . . . . . . . . . . . . . . . . . . . . . . . . . . . . . . .65
Uninstalling on IBM AIX . . . . . . . . . . . . . . . . . . . . . . . . . . . . . . . . . . . . . . . .67
SANpath Device Naming in AIX . . . . . . . . . . . . . . . . . . . . . . . . . . . . . . . . .68
SMIT . . . . . . . . . . . . . . . . . . . . . . . . . . . . . . . . . . . . . . . . . . . . . . . . . . . . . .68
11. Troubleshooting IBM AIX . . . . . . . . . . . . . . . . . . . . . . . . . . . . . . . . . . . . . .69
Before Installing SANpath . . . . . . . . . . . . . . . . . . . . . . . . . . . . . . . . . . . . . .69
Troubleshooting IBM AIX . . . . . . . . . . . . . . . . . . . . . . . . . . . . . . . . . . . . . . .70
Failover Error Reporting in AIX . . . . . . . . . . . . . . . . . . . . . . . . . . . . . .70
Recovering from an AIX Path Failure . . . . . . . . . . . . . . . . . . . . . . . . . . .70
Emulex Driver Setup . . . . . . . . . . . . . . . . . . . . . . . . . . . . . . . . . . . . . . .71
A. Error Messages - - - - - - - - - - - - - - - - - - - - - - - - - - - - - - - - - - - - - - - - - 73
vi SANpath User’s Guide • June 2004
Preface
This manual provides instructions for installing, configuring, operating, and troubleshooting SANpath.
How This Book Is Organized
This book contains the following topics:
Chapter 1 introduces SANpath and provides an overview.
Chapter 2 describes the SANpath hardware.
Chapter 3 describes SANpath commands and general configuration options.
Chapter 4 describes how install and configure SANpath on the Solaris operating system.
Chapter 5 provides Solaris troubleshooting suggestions.
Chapter 6 describes how to install and configure SANpath on the Linux operating system.
Chapter 7 provides Linux troubleshooting suggestions.
Chapter 8 describes how to install and configure SANpath on the Windows operating system.
Chapter 9 provides Windows troubleshooting suggestions.
Chapter 10 describes how to set up and install SANpath on the IBM AIX operating system.
Chapter 11 provides IBM AIX troubleshooting suggestions.
Appendix A provides a list of error codes and error and status messages.
vii
Typographic Conventions
Related Documentation
Technical Support
For late-breaking Release Notes and all manuals for this product, go to the SANpath section at:
http://www.dothill.com/manuals
The following information may be required when contacting Technical Support: Dot Hill serial number and part number of hardware; version of Dot Hill supplied software; host computer platform and operating system version; description of the problem and any related error messages.
Please also supply the following information to facilitate our tracking system and improve our response time: customer name, company name; state and country; telephone number with area code; Internet mail address; maintenance contract number, if applicable.
Typeface1
1 The settings on your browser might differ from these settings.
Meaning Examples
AaBbCc123 The names of commands, files, and directories; onscreen user input
Edit your.login file.Use ls -a to list all files.sccli> about
AaBbCc123 Book titles, new words or terms, words to be emphasized, command-line variables.
Read Chapter 6 in the User’s Guide.
These are called class options.You must be a superuser to do this.To delete a file, type rm filename.
Title Part Number
SANpath Release Notes 83-00002723
SANscape User’s Guide 83-00003197
SANscape 3.0 Release Notes 83-00003225
SANscape Alert User’s Guide 83-00003198
SANscape CLI User’s Guide 83-00003199
viii SANpath User’s Guide • June 2004

Placing a Support Call
After obtaining the above information, a support call may be placed by Internet mail, fax, or telephone.
Phone: 1-877-DOT7X24 (1-877-368-7924) URL: http://www.dothill.com/support/index.htm
Corporate Headquarters Contacts
United States (California) Corporate HeadquartersTel: 1-760-931-5500 or 1-800-872-2783Fax: 1-760-931-5527E-mail: [email protected]
Netherlands: European HeadquartersDot Hill Systems Corp., B.V. (Netherlands)Tel: 31 (0) 53 428 4980; Fax: 31 (0) 53 428 0562E-mail: [email protected]
Japan: Japanese HeadquartersNihon Dot Hill Systems Corp., Ltd.Tel: 81-3-3251-1690; Fax: 81-3-3251-1691E-mail: [email protected]
For additional sales offices in the U.K., China, Sweden, Germany, France, Israel, and Singapore, see our website:
http://www.dothill.com/company/offices.htm
Dot Hill Welcomes Your Comments
Dot Hill is interested in improving its documentation and welcomes your comments and suggestions. You can email your comments to:
Please include the part number (83-00002722) of your document in the subject line of your email.
Preface ix

x SANpath User’s Guide • June 2004
CHAPTER 1
Overview
This chapter introduces SANpath. Topics covered in this chapter include:
■ “What is SANpath?” on page 1■ “Failover/Failback Data Paths” on page 1■ “I/O Load Balancing” on page 2■ “Dynamic LUN Masking” on page 2■ “How SANpath Works” on page 2■ “Supported SANpath Configurations” on page 2■ “Summary of SANpath Benefits” on page 3
What is SANpath? SANpath is a host-based SAN (Storage Area Network) management software product that manages virtual storage and SAN data paths. Its primary purpose is to allow for the easy configuration of multiple hosts in a SAN network configuration and to provide an instantaneous failover capability.
SANpath offers a new level of data accessibility and improved performance for storage systems, including Dot Hill’s SANnet I and SANnet II FC and SCSI arrays. It eliminates the point of failure represented by a single input/output (I/O) path between servers and storage systems and permits I/O to be distributed across multiple paths.
SANpath is available on Solaris, Windows NT 4, Windows 2000, IBM AIX, and Linux.
Failover/Failback Data PathsBy providing alternate I/O paths from the server to the storage system, SANpath provides uninterrupted access to mission-critical data. This substantially insulates server applications from I/O path failures.
In the event of a failed HBA, interface cable, or channel I/O card within the storage system, SANpath automatically reroutes I/O traffic to an alternate data path. Failover is essentially transparent, ensuring continuous access to data stored on the storage system. When configured in the recommended failback mode, SANpath automatically restores the primary data path and system redundancy once the defective component is replaced.
1
I/O Load Balancing SANpath supports up to 32 data paths per LUN. Multiple data paths can be used to improve performance in one of three ways:
1. by allowing SANpath to uniformly distribute primary paths among all available I/O paths.This is the default behavior of SANpath.
2. by manually assigning I/O traffic for a logical drive to a particular path. The administrator with an understanding of the I/O load patterns of his or her applications can optimize performance through an intelligent choice of paths.
3. by enabling automatic load balancing. In this mode of operation SANpath monitors the load on each path and sends I/O requests through the path with the lightest load. This is the default behavior when you use SANpath with a Network Appliance storage device.
Dynamic LUN MaskingIn SAN configurations with multiple servers attached to the same storage device, SANpath allows the system administrator to assign a logical drive to one server and prevent the other servers in the SAN from accessing that same logical drive.
How SANpath WorksSANpath’s filter driver resides between the file system drivers and the SCSI disk device drivers. I/O requests are passed from the file system through SANpath, SANpath then the SCSI disk driver and ultimately to the hardware.
SANpath monitors the execution of I/O requests through the layered driver architecture. When it detects a failure along an I/O path, it automatically reroutes the request to an alternate path. Failover to the redundant I/O path is transparent to server applications and permits continuous access to the information stored on the disk array(s). To applications, there is only a slight delay in normal I/O operations during path failover. Existing drive numbers and device access functions continue to work as expected.
Supported SANpath ConfigurationsSANpath supports single and multiple-server configurations. See Table 1-1 for specific software/hardware requirements for SANpath.
User documentation for products used with SANpath is referenced throughout this manual. Have your hardware and operating system manuals available for quick reference.
2 SANpath User’s Guide • June 2004
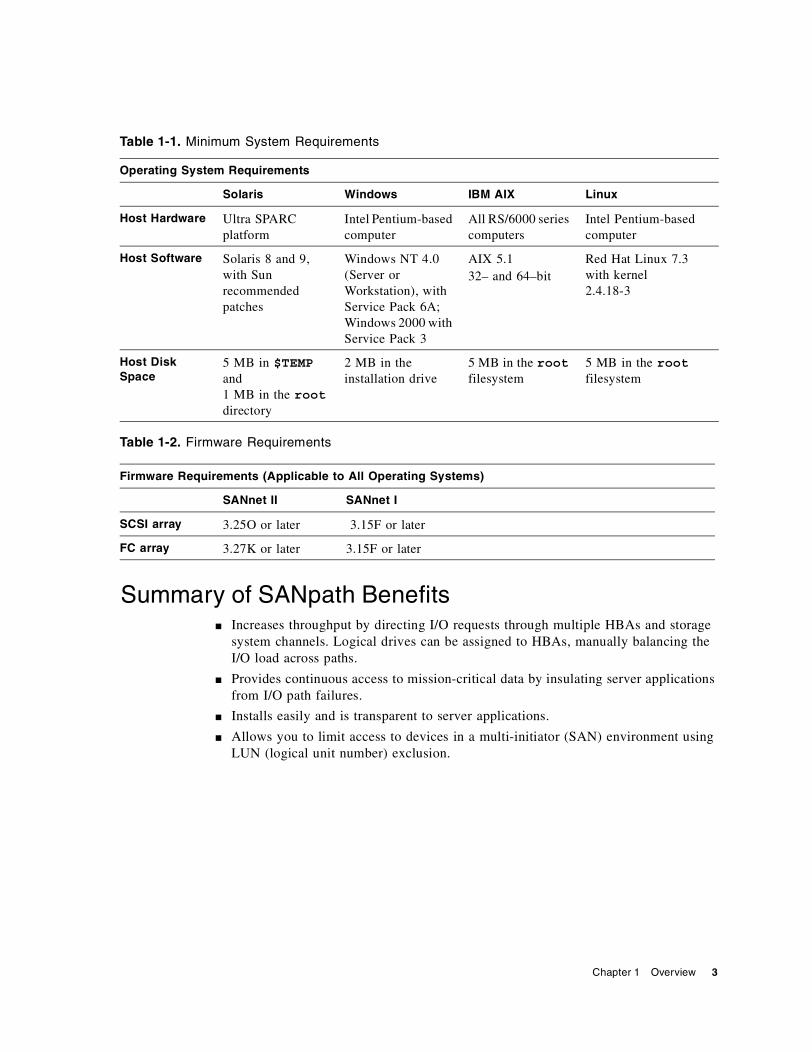
Table 1-2. Firmware Requirements
Summary of SANpath Benefits■ Increases throughput by directing I/O requests through multiple HBAs and storage
system channels. Logical drives can be assigned to HBAs, manually balancing the I/O load across paths.
■ Provides continuous access to mission-critical data by insulating server applications from I/O path failures.
■ Installs easily and is transparent to server applications.
■ Allows you to limit access to devices in a multi-initiator (SAN) environment using LUN (logical unit number) exclusion.
Table 1-1. Minimum System Requirements
Operating System Requirements
Solaris Windows IBM AIX Linux
Host Hardware Ultra SPARC platform
Intel Pentium-based computer
All RS/6000 series computers
Intel Pentium-based computer
Host Software Solaris 8 and 9, with Sun recommended patches
Windows NT 4.0 (Server or Workstation), with Service Pack 6A; Windows 2000 with Service Pack 3
AIX 5.1 32– and 64–bit
Red Hat Linux 7.3 with kernel 2.4.18-3
Host Disk Space
5 MB in $TEMP and 1 MB in the root directory
2 MB in the installation drive
5 MB in the root filesystem
5 MB in the root filesystem
Firmware Requirements (Applicable to All Operating Systems)
SANnet II SANnet I
SCSI array 3.25O or later 3.15F or later
FC array 3.27K or later 3.15F or later
Chapter 1 Overview 3

4 SANpath User’s Guide • June 2004
CHAPTER 2
Hardware Preparation
This chapter describes the SANpath hardware. Topics covered in this chapter include:
■ “Hardware Overview” on page 5■ “Example Configurations” on page 6
Hardware Overview
Multiple I/O Paths
Although SANpath can claim and manage qualified devices accessible from the host by only a single I/O path (see “Devices with Only One Path to the Host” on page 43), one of its primary purposes is the management of multiple I/O paths to storage system devices. This eliminates the data path as a potential single point of failure in the storage system.
To be properly configured for this purpose, every I/O-path element in the system must be redundant. A given host must be equipped with at least two HBAs (with a maximum of four HBAs), connected, in turn, by at least two cables to the storage system.
Host Computer and Storage Devices
SANpath supports all of Dot Hill’s SANnet I and SANnet II FC and SCSI arrays. In order to take advantage of failover data paths and load balancing, these must be equipped with redundant interfaces.
■ Τhe SANnet II FC array are dual-controller, fibre channel RAID systems. Full I/O path redundancy requires them to be used with multiple hubs (see Figure 2-1.). SANnet II firmware 3.27K or later is required for operation with SANpath software.
■ The SANnet II SCSI array are dual-controller, SCSI RAID systems. Full I/O path redundancy is achieved through independent host connections to the dual controllers. SANnet II firmware 3.25O or later is required for operation with SANpath software.
■ Τhe SANnet I FC array are dual-controller, fibre channel RAID systems. Full I/O path redundancy requires them to be used with multiple hubs. SANnet I firmware 3.15F or later is required for operation with SANpath software.
5
■ The SANnet I SCSI array are dual-controller, SCSI RAID systems. Full I/O path redundancy is achieved through independent host connections to the dual controllers. SANnet I firmware 3.15F or later is required for operation with SANpath software.
All hardware elements in the system should be installed according to the directions in their respective user documentation.
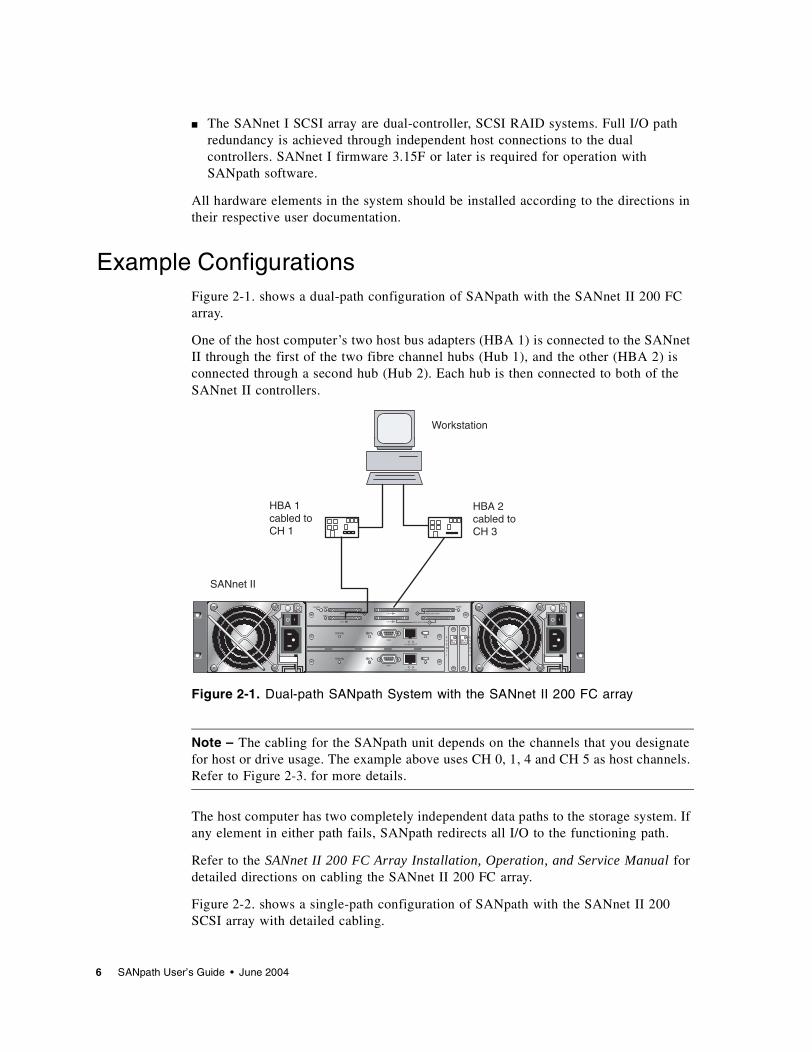
Example ConfigurationsFigure 2-1. shows a dual-path configuration of SANpath with the SANnet II 200 FC array.
One of the host computer’s two host bus adapters (HBA 1) is connected to the SANnet II through the first of the two fibre channel hubs (Hub 1), and the other (HBA 2) is connected through a second hub (Hub 2). Each hub is then connected to both of the SANnet II controllers.
Figure 2-1. Dual-path SANpath System with the SANnet II 200 FC array
Note – The cabling for the SANpath unit depends on the channels that you designate for host or drive usage. The example above uses CH 0, 1, 4 and CH 5 as host channels. Refer to Figure 2-3. for more details.
The host computer has two completely independent data paths to the storage system. If any element in either path fails, SANpath redirects all I/O to the functioning path.
Refer to the SANnet II 200 FC Array Installation, Operation, and Service Manual for detailed directions on cabling the SANnet II 200 FC array.
Figure 2-2. shows a single-path configuration of SANpath with the SANnet II 200 SCSI array with detailed cabling.
Workstation
HBA 1cabled toCH 1
HBA 2cabled to CH 3
SANnet II
6 SANpath User’s Guide • June 2004

Figure 2-2. Single-path SANpath System with the SANnet II 200 SCSI array
Note – The cabling for the SANpath unit depends on the channels that you designate for host or drive usage. The example above uses CH 1 and CH 3 as host channels.
Refer to the SANnet II 200 SCSI Array Installation, Operation, and Service Manual for detailed directions on cabling the SANnet II 200 SCSI array.
Host LUN Mapping
For both the SANnet II 200 FC and SCSI arrays, you must assign host channel target IDs. This can be done using the Hyperterm program, Kermit or other terminal emulation software or with a VT–100 compatible terminal.
Connect the RS–232 cable to the COM1 connector on the internal bus jumper I/O card in the back of the SANnet II.
Refer to the SANscape User's Guide for detailed directions on establishing a serial interface connection.
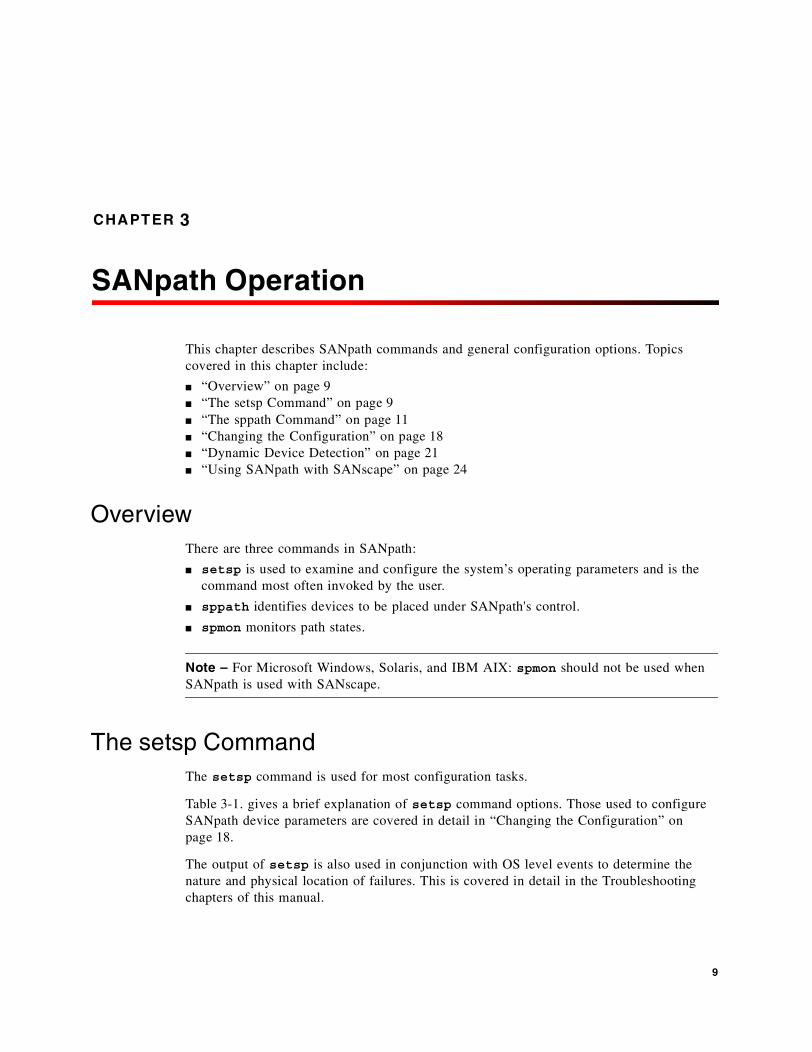
From the main menu, choose view and edit SCSI Channels. Set the primary (PID) and secondary (SID) SCSI IDs for the host channels. For SANnet I, the host channels should be set to Channels 6 and 7. For SANnet II, the host channels should be set to Channels 0 and 1 for the FC array and to Channels 1 and 3 for the SCSI array, as shown in Figure 2-3. and Figure 2-4..
Workstation
HBA 1cabled toCH 1
HBA 2cabled to CH 3
SANnet II
Chapter 2 Hardware Preparation 7
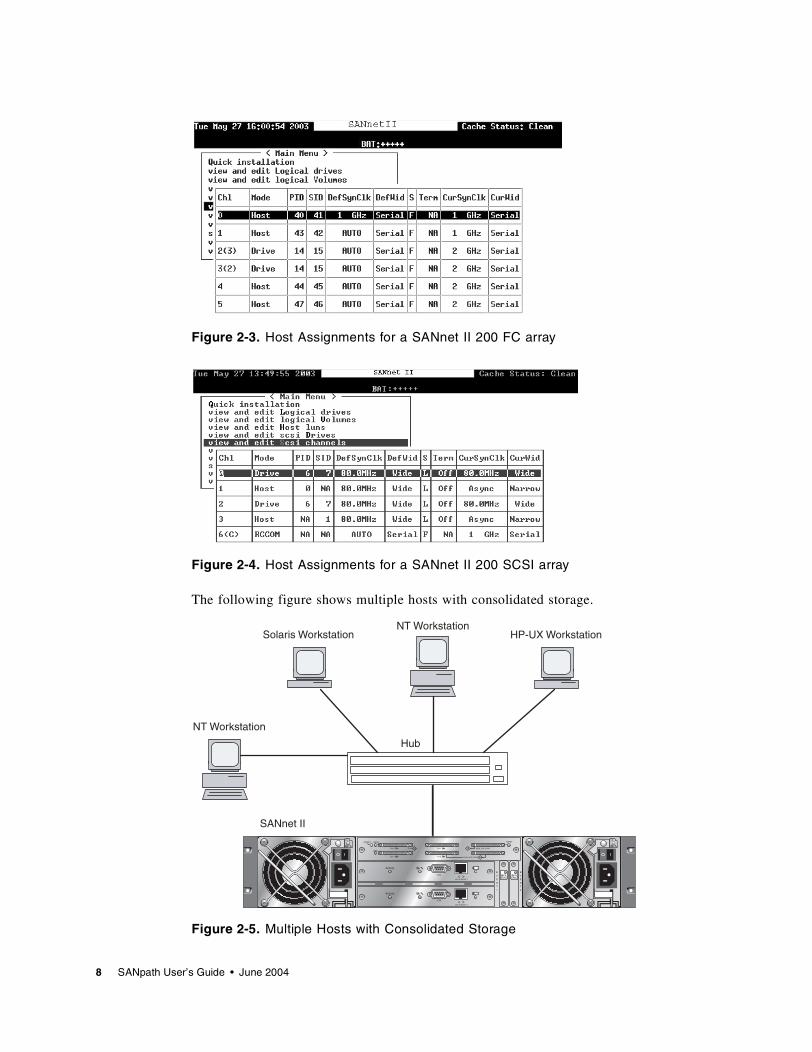
Figure 2-3. Host Assignments for a SANnet II 200 FC array
Figure 2-4. Host Assignments for a SANnet II 200 SCSI array
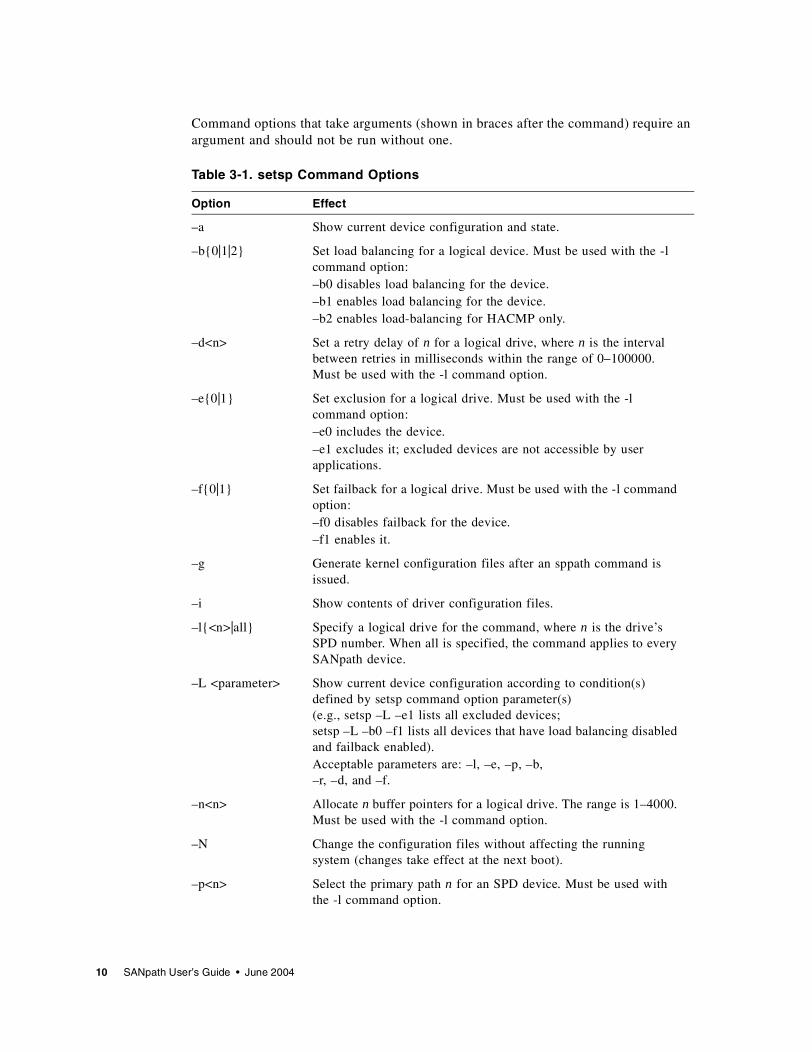
The following figure shows multiple hosts with consolidated storage.
Figure 2-5. Multiple Hosts with Consolidated Storage
Hub
NT Workstation
NT Workstation
Solaris Workstation HP-UX Workstation
SANnet II
8 SANpath User’s Guide • June 2004
CHAPTER 3
SANpath Operation
This chapter describes SANpath commands and general configuration options. Topics covered in this chapter include:
■ “Overview” on page 9■ “The setsp Command” on page 9■ “The sppath Command” on page 11■ “Changing the Configuration” on page 18■ “Dynamic Device Detection” on page 21■ “Using SANpath with SANscape” on page 24
OverviewThere are three commands in SANpath:
■ setsp is used to examine and configure the system’s operating parameters and is the command most often invoked by the user.
■ sppath identifies devices to be placed under SANpath's control.
■ spmon monitors path states.
Note – For Microsoft Windows, Solaris, and IBM AIX: spmon should not be used when SANpath is used with SANscape.
The setsp CommandThe setsp command is used for most configuration tasks.
Table 3-1. gives a brief explanation of setsp command options. Those used to configure SANpath device parameters are covered in detail in “Changing the Configuration” on page 18.
The output of setsp is also used in conjunction with OS level events to determine the nature and physical location of failures. This is covered in detail in the Troubleshooting chapters of this manual.
9
Command options that take arguments (shown in braces after the command) require an argument and should not be run without one.
Table 3-1. setsp Command Options
Option Effect
–a Show current device configuration and state.
–b{0|1|2} Set load balancing for a logical device. Must be used with the -l command option:–b0 disables load balancing for the device.–b1 enables load balancing for the device.–b2 enables load-balancing for HACMP only.
–d<n> Set a retry delay of n for a logical drive, where n is the interval between retries in milliseconds within the range of 0–100000. Must be used with the -l command option.
–e{0|1} Set exclusion for a logical drive. Must be used with the -l command option: –e0 includes the device. –e1 excludes it; excluded devices are not accessible by user applications.
–f{0|1} Set failback for a logical drive. Must be used with the -l command option: –f0 disables failback for the device.–f1 enables it.
–g Generate kernel configuration files after an sppath command is issued.
–i Show contents of driver configuration files.
–l{<n>|all} Specify a logical drive for the command, where n is the drive’s SPD number. When all is specified, the command applies to every SANpath device.
–L <parameter> Show current device configuration according to condition(s) defined by setsp command option parameter(s) (e.g., setsp –L –e1 lists all excluded devices; setsp –L –b0 –f1 lists all devices that have load balancing disabled and failback enabled).Acceptable parameters are: –l, –e, –p, –b, –r, –d, and –f.
–n<n> Allocate n buffer pointers for a logical drive. The range is 1–4000. Must be used with the -l command option.
–N Change the configuration files without affecting the running system (changes take effect at the next boot).
–p<n> Select the primary path n for an SPD device. Must be used with the -l command option.
10 SANpath User’s Guide • June 2004
The sppath CommandThe sppath command is run automatically at boot after SANpath is installed. The main function of sppath is to create the configuration file that identifies devices to be put under SANpath’s control. Its command options are used to display or modify this device set.
sppath examines disk devices attached to the system to determine whether any physical devices are accessible via redundant paths and whether those devices should be put under the control of the SANpath driver. Qualifying devices are written to the sppath.conf file. This file should not be modified directly by the user.
To qualify, devices must not be boot devices, and must be a SANnet I or SANnet II storage device.
–r<n> Set a retry count of n for a logical drive, where n is the number of times a command will be retried. The number must be between 0 and 8192. Must be used with the -l command option.
–S Start the SPD driver. Must be used with the -l command option. If this option does not include an argument, it starts all SPD devices.
–T Terminate the SPD driver. Must be used with the -l command option.If this option does not include an argument, it terminates all SPD devices.
–u{0|1|2} Show devices by their configuration status: –u0 shows all available devices. –u1 shows configured disks.–u2 shows unconfigured disks.
–U Unmount a drive letter (Windows 2000 only): –U G removes the drive assigned to the letter G
–v Runs the –a command in verbose mode.
–V Display the SANpath version.
–x Removes an SPD device from the config file. It suppresses the named (with –l) SPD device(s). If the device is started, it won't take effect until the device is stopped or the host rebooted. The end result is “similar” to a device ignored on sppath (sppath –I). That is, the paths to that LUN are not mapped through a single pseudo device. “setsp –g –l<n>” must be used to cancel.
Table 3-1. setsp Command Options (Continued)
Chapter 3 SANpath Operation 11
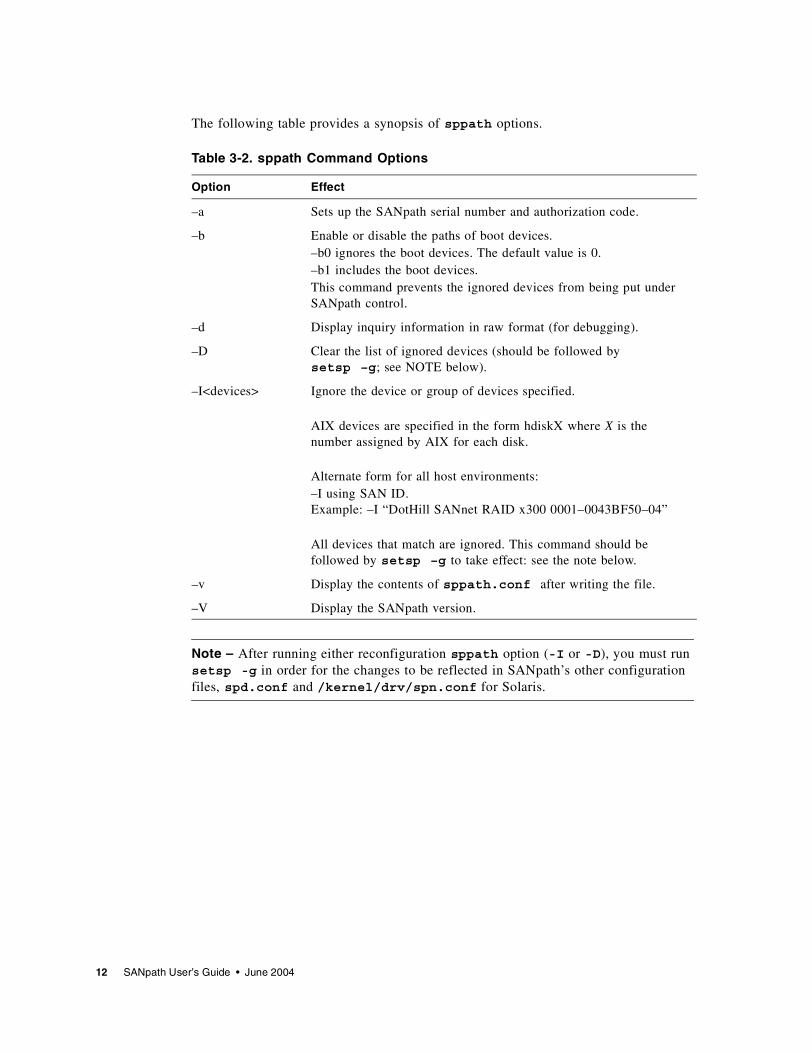
The following table provides a synopsis of sppath options.
Note – After running either reconfiguration sppath option (-I or -D), you must run setsp -g in order for the changes to be reflected in SANpath’s other configuration files, spd.conf and /kernel/drv/spn.conf for Solaris.
Table 3-2. sppath Command Options
Option Effect
–a Sets up the SANpath serial number and authorization code.
–b Enable or disable the paths of boot devices.–b0 ignores the boot devices. The default value is 0.–b1 includes the boot devices. This command prevents the ignored devices from being put under SANpath control.
–d Display inquiry information in raw format (for debugging).
–D Clear the list of ignored devices (should be followed by setsp –g; see NOTE below).
–I<devices> Ignore the device or group of devices specified.
AIX devices are specified in the form hdiskX where X is the number assigned by AIX for each disk.
Alternate form for all host environments: –I using SAN ID.Example: –I “DotHill SANnet RAID x300 0001–0043BF50–04”
All devices that match are ignored. This command should be followed by setsp –g to take effect: see the note below.
–v Display the contents of sppath.conf after writing the file.
–V Display the SANpath version.
12 SANpath User’s Guide • June 2004
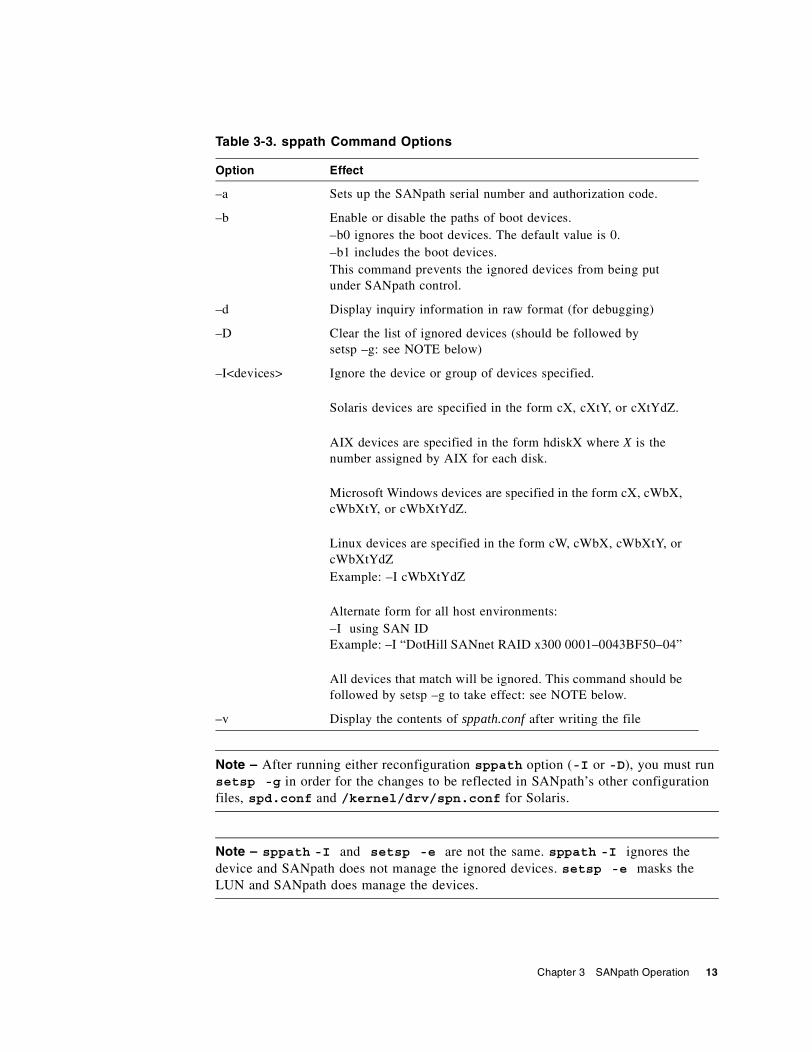
Note – After running either reconfiguration sppath option (-I or -D), you must run setsp -g in order for the changes to be reflected in SANpath’s other configuration files, spd.conf and /kernel/drv/spn.conf for Solaris.
Note – sppath -I and setsp -e are not the same. sppath -I ignores the device and SANpath does not manage the ignored devices. setsp -e masks the LUN and SANpath does manage the devices.
Table 3-3. sppath Command Options
Option Effect
–a Sets up the SANpath serial number and authorization code.
–b Enable or disable the paths of boot devices.–b0 ignores the boot devices. The default value is 0.–b1 includes the boot devices. This command prevents the ignored devices from being put under SANpath control.
–d Display inquiry information in raw format (for debugging)
–D Clear the list of ignored devices (should be followed by setsp –g: see NOTE below)
–I<devices> Ignore the device or group of devices specified.
Solaris devices are specified in the form cX, cXtY, or cXtYdZ.
AIX devices are specified in the form hdiskX where X is the number assigned by AIX for each disk.
Microsoft Windows devices are specified in the form cX, cWbX, cWbXtY, or cWbXtYdZ.
Linux devices are specified in the form cW, cWbX, cWbXtY, or cWbXtYdZExample: –I cWbXtYdZ
Alternate form for all host environments: –I using SAN IDExample: –I “DotHill SANnet RAID x300 0001–0043BF50–04”
All devices that match will be ignored. This command should be followed by setsp –g to take effect: see NOTE below.
–v Display the contents of sppath.conf after writing the file
Chapter 3 SANpath Operation 13
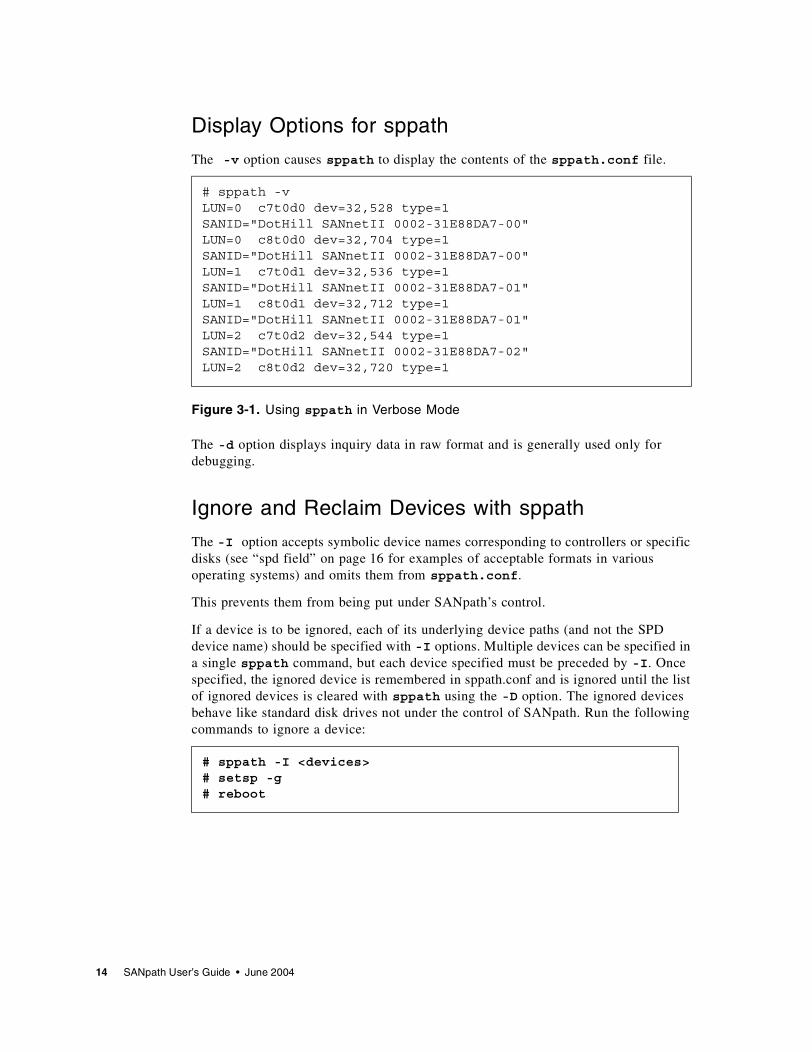
Display Options for sppath
The -v option causes sppath to display the contents of the sppath.conf file.
Figure 3-1. Using sppath in Verbose Mode
The -d option displays inquiry data in raw format and is generally used only for debugging.
Ignore and Reclaim Devices with sppath
The -I option accepts symbolic device names corresponding to controllers or specific disks (see “spd field” on page 16 for examples of acceptable formats in various operating systems) and omits them from sppath.conf.
This prevents them from being put under SANpath’s control.
If a device is to be ignored, each of its underlying device paths (and not the SPD device name) should be specified with -I options. Multiple devices can be specified in a single sppath command, but each device specified must be preceded by -I. Once specified, the ignored device is remembered in sppath.conf and is ignored until the list of ignored devices is cleared with sppath using the -D option. The ignored devices behave like standard disk drives not under the control of SANpath. Run the following commands to ignore a device:
# sppath -v LUN=0 c7t0d0 dev=32,528 type=1 SANID="DotHill SANnetII 0002-31E88DA7-00"LUN=0 c8t0d0 dev=32,704 type=1 SANID="DotHill SANnetII 0002-31E88DA7-00"LUN=1 c7t0d1 dev=32,536 type=1 SANID="DotHill SANnetII 0002-31E88DA7-01"LUN=1 c8t0d1 dev=32,712 type=1 SANID="DotHill SANnetII 0002-31E88DA7-01"LUN=2 c7t0d2 dev=32,544 type=1 SANID="DotHill SANnetII 0002-31E88DA7-02"LUN=2 c8t0d2 dev=32,720 type=1
# sppath -I <devices># setsp -g# reboot
14 SANpath User’s Guide • June 2004
Note – The sppath -I (ignore) command should not be confused with the setsp -e (exclude) command. The sppath -I (ignore) command removes the device completely from SANpath’s control, treating it exactly as though it is incompatible with SANpath and could not be recognized and claimed.
The setsp -e command is intended chiefly for multiple host configurations and prevents particular logical devices from being accessed by a host. (For more information on device exclusion, see “setsp Command Options” on page 10 and “Turning the Exclusion Setting Off and On” on page 19.)
The -D option clears the entire list of ignored devices, allowing any eligible device to be placed under SANpath’s control on the next reboot.
Run the following commands to clear the list of ignored devices:
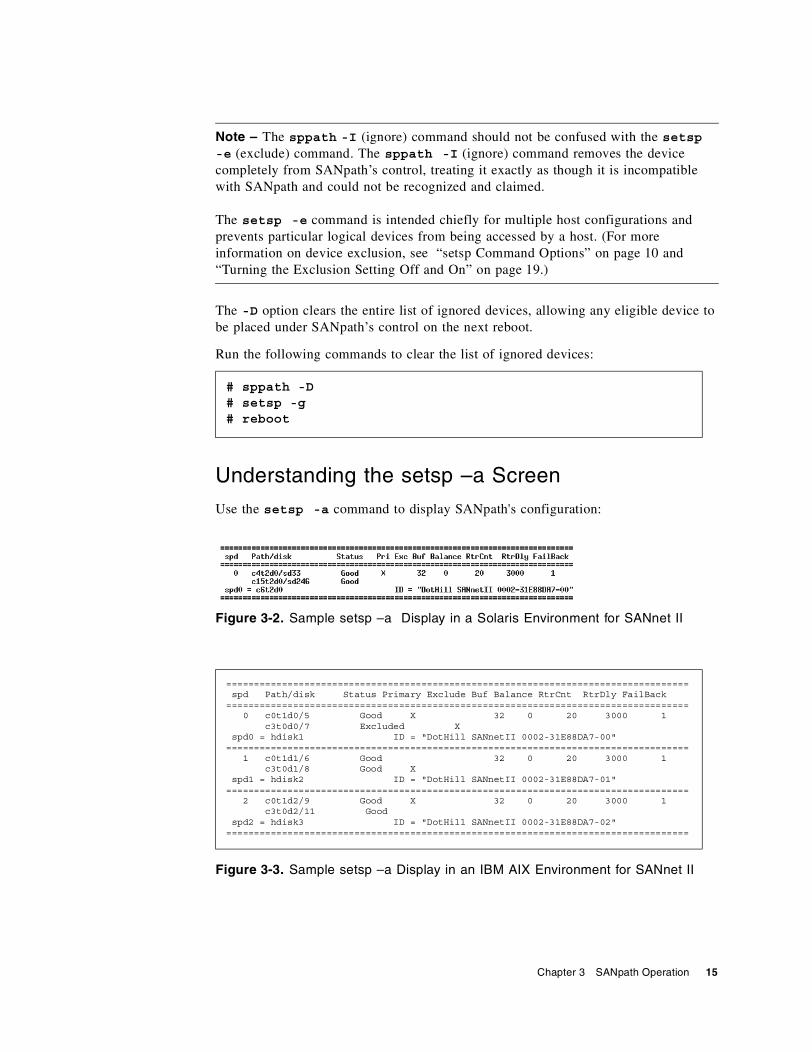
Understanding the setsp –a Screen
Use the setsp -a command to display SANpath's configuration:
Figure 3-2. Sample setsp –a Display in a Solaris Environment for SANnet II
Figure 3-3. Sample setsp –a Display in an IBM AIX Environment for SANnet II
# sppath -D# setsp -g# reboot
=================================================================================== spd Path/disk Status Primary Exclude Buf Balance RtrCnt RtrDly FailBack=================================================================================== 0 c0t1d0/5 Good X 32 0 20 3000 1 c3t0d0/7 Excluded X spd0 = hdisk1 ID = "DotHill SANnetII 0002-31E88DA7-00"=================================================================================== 1 c0t1d1/6 Good 32 0 20 3000 1 c3t0d1/8 Good X spd1 = hdisk2 ID = "DotHill SANnetII 0002-31E88DA7-01"=================================================================================== 2 c0t1d2/9 Good X 32 0 20 3000 1 c3t0d2/11 Good spd2 = hdisk3 ID = "DotHill SANnetII 0002-31E88DA7-02"===================================================================================
Chapter 3 SANpath Operation 15
The column headings identify the various fields on this screen, the last seven of which are user-configurable parameters for the device. The setsp output fields (with their default values, when applicable) are described below. The commands used to change the default settings are described in the following section.
spd field
spd shows the spd (SANpath device) number, an ID assigned to the device by SANpath, and the name of the spd special device file created by SANpath to access the storage.
■ In Solaris, the spd device is displayed in the form spdN = cXtYdZ, and provides the spd number (N in the spdN field) and the virtual device name (in the format cXtYdZ). This device number also appears in errors reported in the /var/adm/messages file.
■ In Microsoft Windows, the disk number is given as HardDisk X, where X is a number used by Disk Administrator (Windows NT) or Disk Management (Windows 2000), and the Drive Letter(s) assigned by Disk Administrator (Windows NT) or Disk Management (Windows 2000). This device number also appears in errors reported in the (System) Event Log.
■ In IBM AIX, the disk number is given as hdiskX, where X is a number used by ODM database.
■ In Linux, the spd device is displayed in the form spdN = spdX, and provides the spd number (N in the spdN field) and the virtual device name (in the format spdX). This device name also appears in errors reported in the /var/log/messages file.
Path/disk field
Path/disk shows the device names and disk numbers for each of the redundant physical paths to the device. Their appearance in the setsp -a output facilitates interpreting these events in terms of the spd device names by which applications access devices.
■ In Solaris, this field shows both the disk number in the form cXtYdZ and the number assigned by the sd driver (sdnn). The sdnn versions of the names appear in the file /var/adm/messages when the sd driver reports hardware events.
■ In Microsoft Windows, this field shows both the disk number in the form cWbXtYdZ and the number assigned by Disk Administrator (Windows NT) or Disk Management (Windows 2000).
■ In IBM AIX, this field shows the disk number in the form hdiskN.
■ In Linux, this field shows the disk number in the form cWbXtYdZ.
Status field
Status shows the current state of the path. Good paths are functioning normally. Bad paths have failed. Excluded paths are unavailable to applications on this host.
16 SANpath User’s Guide • June 2004
Primary field
Primary shows which of the physical I/O paths connecting the device to the host’s HBAs (or controllers) is defined as primary (marked by an X). Initially, primary path assignments are distributed evenly among the available paths. Figure 1-2 on page 6 shows this as an alternating pattern in a dual-path configuration: spd0 has a primary path through controller 7, spd1 uses its path through controller 8 as primary, and spd2 alternates back to controller 7. The device’s duplicate path(s) are not used unless the primary path fails or the load balancing option is selected for that device.
Exclude field
Exclude indicates the device’s exclusion setting, which can be used to keep a host from seeing particular logical drives. As a safety measure, SANpath excludes all devices from host access by default, giving them an exclusion setting of 1. Excluded devices are marked by an X in this column.
Buf field
Buf is the number of buffer pointers (or buffer structures) pre-allocated for each logical device. For peak performance, Buf should be approximately equal to the maximum useful queue depth of the logical unit. Values between 1 and 100 are permitted. The default value is 32.
Balance field
Balance indicates whether dynamic load balancing is enabled for the device. When load balancing is enabled, SANpath tracks the volume of I/O on each path and automatically sends I/O requests to the path with the lightest I/O load. Automatic load balancing can be used with the SANnet storage systems only.
RtrCnt field
RtrCnt is the number of times SANpath retries the I/O operation on the primary path after an I/O operation has failed on all alternate paths. When the specified number of retries has failed, the I/O fails. The default value is 20. The highest value allowed is 1024.
RtrDly field
RtrDly is the time interval, in milliseconds, between the retry attempts described in the preceding parameter. The default value is 3000 ms. This value cannot be set above 100,000 ms (100s).
Chapter 3 SANpath Operation 17
FailBack field
FailBack indicates whether failback is enabled for the logical device. When failback is enabled (the default setting of 1), SANpath continues testing a path that has failed and returns it to service (as the primary path or in load balancing) as soon as the path has been restored.
ID= identifier
In addition to the information defined by the setsp -a output’s column headings, the last part of the last line for each device (ID =) shows the physical device’s unique identifier, which is derived from the device’s inquiry data.
Changing the ConfigurationThe information displayed by setsp -a is stored in the spd.conf configuration file, which should never be edited directly.
User-configurable parameters must be changed exclusively through the setsp command options provided for that purpose and described in more detail in the sections below.
Specifying a Device for setsp
To name a specific device in any setsp command, use the -l option (NOTE that this is a lowercase letter L, and not the number 1) followed by the device’s spd number, as expressed in the syntax illustrations used in the remainder of this chapter as -l <x>. A device’s spd number is listed in the first column of the setsp -a output. (See setsp -a examples under “Understanding the setsp –a Screen” on page 15.) To name all devices under SANpath’s control, use all.
Whether you are applying the configuration command to a single device or to all the devices, only one parameter can be changed per command.
Assigning a New Primary Path
The syntax for changing a device’s primary data path is:
where <x> is the spd number (or all) and <n> is the number of the new path. The path number can be obtained by simply counting down setsp’s list of physical paths (in the Path/disk column), starting from zero.
setsp -l<x> -p<n>
18 SANpath User’s Guide • June 2004
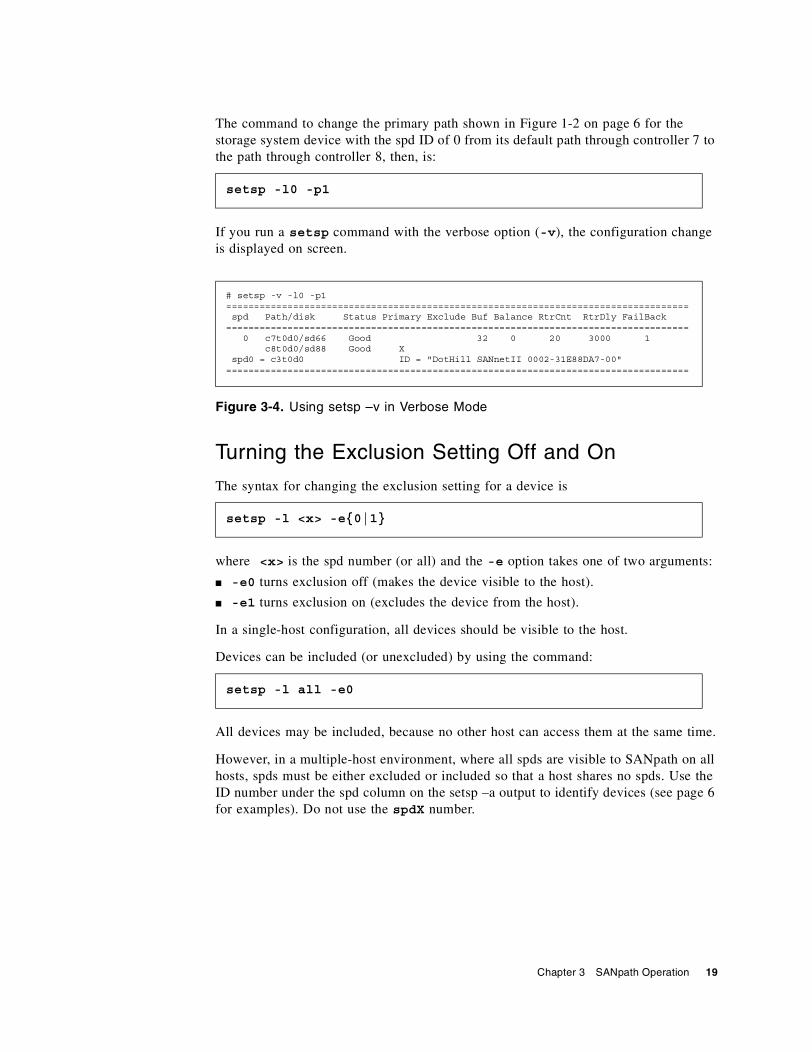
The command to change the primary path shown in Figure 1-2 on page 6 for the storage system device with the spd ID of 0 from its default path through controller 7 to the path through controller 8, then, is:
If you run a setsp command with the verbose option (-v), the configuration change is displayed on screen.
Figure 3-4. Using setsp –v in Verbose Mode
Turning the Exclusion Setting Off and On
The syntax for changing the exclusion setting for a device is
where <x> is the spd number (or all) and the -e option takes one of two arguments:
■ -e0 turns exclusion off (makes the device visible to the host).
■ -e1 turns exclusion on (excludes the device from the host).
In a single-host configuration, all devices should be visible to the host.
Devices can be included (or unexcluded) by using the command:
All devices may be included, because no other host can access them at the same time.
However, in a multiple-host environment, where all spds are visible to SANpath on all hosts, spds must be either excluded or included so that a host shares no spds. Use the ID number under the spd column on the setsp –a output to identify devices (see page 6 for examples). Do not use the spdX number.
setsp -l0 -p1
# setsp -v -l0 -p1=================================================================================== spd Path/disk Status Primary Exclude Buf Balance RtrCnt RtrDly FailBack =================================================================================== 0 c7t0d0/sd66 Good 32 0 20 3000 1 c8t0d0/sd88 Good X spd0 = c3t0d0 ID = "DotHill SANnetII 0002-31E88DA7-00"===================================================================================
setsp -l <x> -e{0|1}
setsp -l all -e0
Chapter 3 SANpath Operation 19
Redefining the Buffer Pointer Allocation
The syntax for changing the number of buffer pointers pre-allocated for a given device is:
where <x> is the numerical element of the spd number and <n> is the new value. The system must be rebooted for this change to take effect. The number of buffer pointers recommended for a given device is approximately equal to the logical unit’s maximum useful queue depth; the default value of 32 suits most storage system devices.
Turning Load Balancing On and Off
Load balancing is on by default. The syntax for changing a device’s load balancing mode is:
where <x> is the spd number (or all) and the -b option takes one of three arguments:
■ -b0 turns load balancing off.
■ -b1 turns load balancing on.
■ -b2 turns load balancing on for HACMP only.
Changing the Retry Count and Retry Delay
The syntax for changing the retry count for a device is:
where <x> is the numerical element of the spd number and <n> is the number of times a failed I/O is retried on the primary path (after its alternate paths have been tried unsuccessfully) before the path is marked as failed (with a Status of Bad).
The syntax for changing the retry delay for a device is:
where <x> is the numerical element of the spd number and <n> is the interval, in milliseconds, between the retries specified by the retry count parameter.
setsp -l<x> -n<n>
setsp -l<x> -b{0|1|2}
setsp -l<x> -b{0|1}
setsp -l<x> -r<n>
setsp -l<x> -d<n>
20 SANpath User’s Guide • June 2004
Turning Failback Off and On
The syntax for changing a device’s failback mode is:
where <x> is the numerical element of the spd number and the -f option takes one of two arguments:
■ -f0 turns failback off.
■ -f1 turns failback on.
Dynamic Device DetectionYou may be able to add new storage devices and place them under SANpath's control without requiring a reboot of the host. This is also known as dynamic LUN allocation.
Claiming New Devices in Windows
To add a fibre channel device to an existing path, perform the following steps after the devices are physically connected. Under Windows NT only, if the device is mapped to a LUN other than 0, a modification to the Registry may be necessary.
1. Run Disk Administrator (Windows NT) or Disk Management (Windows 2000).
This causes new devices to be detected by Microsoft Windows. If more than one path exists for a device, only write the disk signature once.
2. Run this command to cause SANpath to detect the new devices:
3. Run setsp –a and check for a newly created spd number.
4. To create an updated configuration file, run:
5. To start SANpath on the new device, run:
setsp -l<x> -f{0|1}
# sppath -v
# setsp -a
# setsp -g
# setsp -S -l <new_spd_number>
Chapter 3 SANpath Operation 21

6. Lastly, unexclude the device:
Claiming New Devices in Solaris
To add a fibre channel device to an existing path, perform the following steps after the devices are physically connected. These commands are intended for use only if you are using Sun HBAs.
1. Run luxadm to create a loop initialization, which causes the ssd driver to recognize new devices.
Before running these commands, you can determine the Path from the second column of the setsp -a output. For example, the two paths for spd0 in Figure 1-2 on page 6 are c7t0d0 and c8t0d0.
2. The following command checks for new devices:
Note – This command also causes SANpath to detect the new drives (sppath -v), to create a new configuration file (setsp -g), and to start on the new devices (setsp -S -l all).
3. Next, create a device file for the newly-recognized devices:
4. Run this command to detect the new drives:
5. To create an updated configuration file, run:
# setsp -e0 -l <new_spd_number>
# luxadm -e forcelip /dev/rdsk/ <Path1 of spd0>
# luxadm -e forcelip /dev/rdsk/ <Path2 of spd0>
# cfgmgr
# drvconfig -i ssd
# disks
# sppath -v
# setsp -g
22 SANpath User’s Guide • June 2004

6. To start SANpath on the new device, run:
7. Run setsp -a and check for a newly created spd number.
8. Lastly, unexclude the device:
Claiming New Devices in IBM AIX
To add a device to an existing path, perform the following steps after the devices are physically connected, to detect “defined” devices. However, the system may have to be rebooted.
1. The following command causes the system to check for new devices:
2. Next, view the newly-recognized devices:
3. Run this command to detect the new drives:
4. To create an updated configuration file, run:
5. To start SANpath on the new device, run:
6. Lastly, unexclude the device:
# setsp -S -l <new_spd_number>
# setsp -a
# setsp -e0 -l <new_spd_number>
# cfgmgr
# lsdev -Cc disk
# sppath -v
# setsp -g
# setsp -S -l <new_spd_number>
# setsp -e0 -l <new_spd_number>
Chapter 3 SANpath Operation 23
Claiming New Devices in Linux
Claiming new devices in Linux is not supported from the command line. To add new devices, reboot the host or reload the driver.
Using SANpath with SANscape
Microsoft Windows, Solaris, Linux, and IBM AIX
If you are installing SANpath after SANscape has already been installed, do the following:
1. After installing SANpath each logical drive that will be monitored by SANscape must be unexcluded with the command:
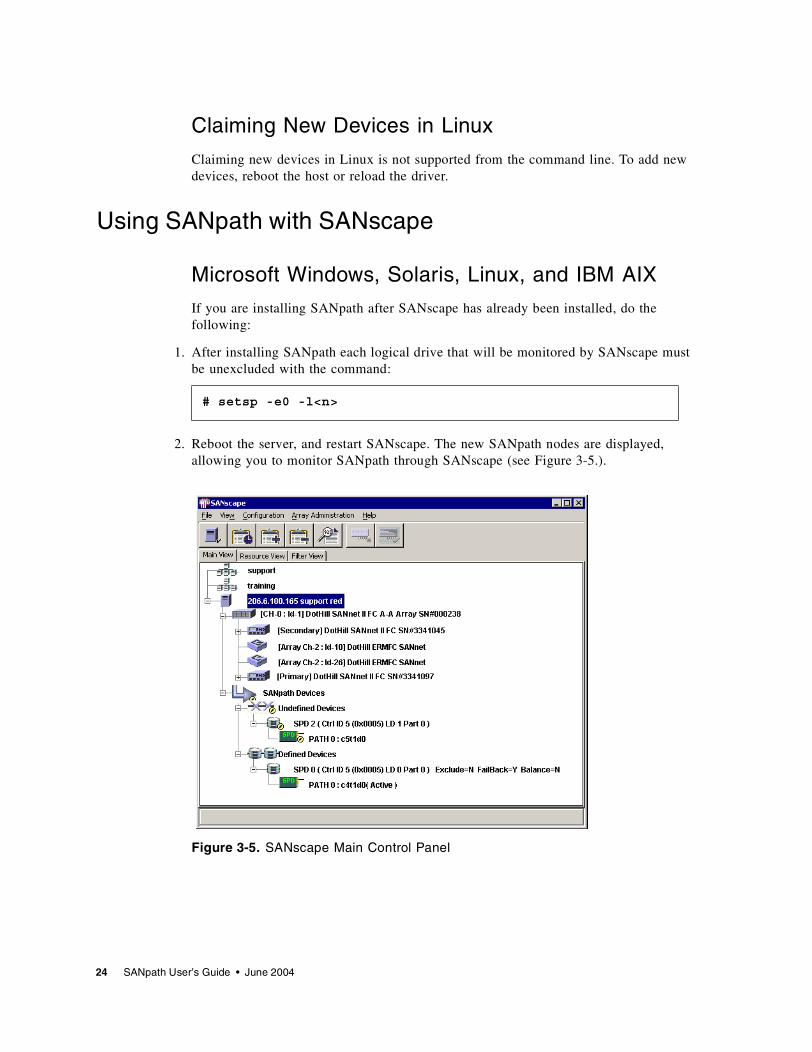
2. Reboot the server, and restart SANscape. The new SANpath nodes are displayed, allowing you to monitor SANpath through SANscape (see Figure 3-5.).
Figure 3-5. SANscape Main Control Panel
# setsp -e0 -l<n>
24 SANpath User’s Guide • June 2004
3. If you are installing SANscape after SANpath, you must first unexclude a logical drive in SANpath with the following command in order for SANscape to see your storage system:
Monitoring SANpath through SANscape
SANpath parameters cannot be changed through SANscape.
Note – spmon should not be used when SANpath is used with SANscape.
When SANscape is running the following SANpath nodes display in the main window:
■ SANpath Device■ Undefined Devices■ Defined Devices■ SPD #■ Path #
1. In the main window, select SANpath Devices, then SPD # (SANpath driver number).
You should see the paths displayed with an (Active) and (Standby) beside them. All icons should be green now. Quick reference information is available beside the “SPD” icon.
2. Double-click the SANpath Devices node to open the SANpath Management window which displays all qualifying Logical devices.
The drives being used for the current SANpath configuration are displayed under the Define SP devices window. The devices not being used are displayed under Undefined SP devices.
3. Double-click the Defined Devices or Undefined Devices node to access the SANpath Devices List window.
4. Double-click the SPD or Path node to access the SANpath Device Information window.
All of SANpath’s current configuration properties are displayed here.
# setsp -e0 -l<n>
Chapter 3 SANpath Operation 25
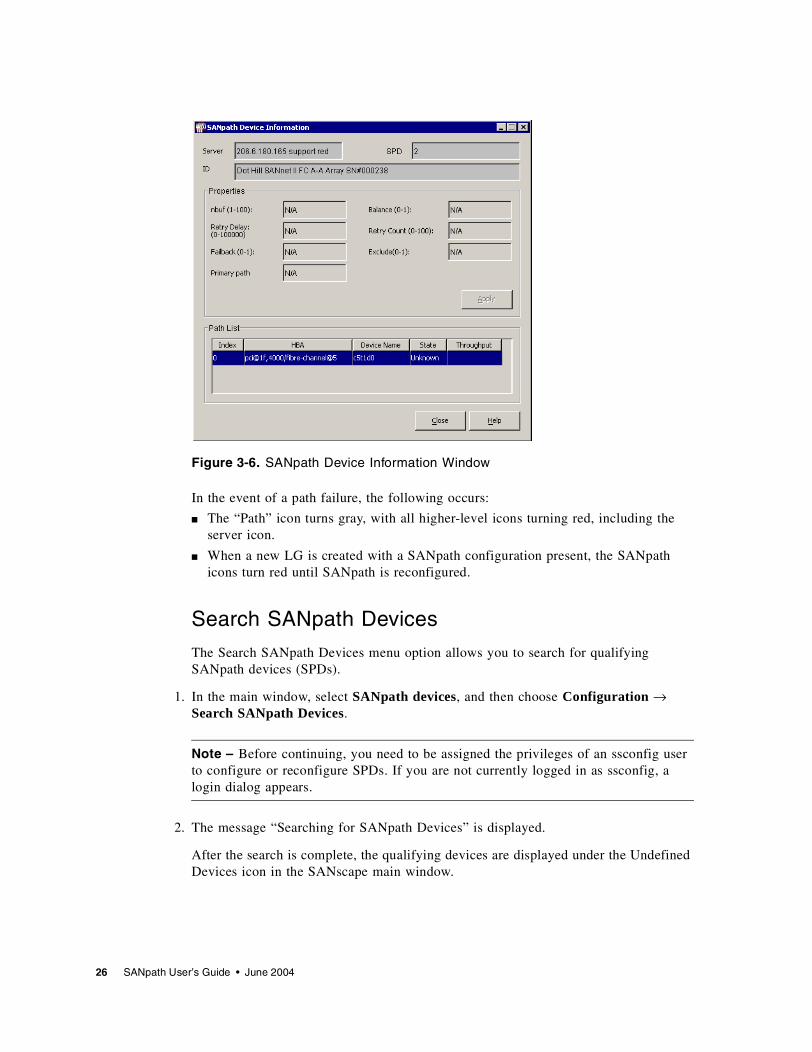
Figure 3-6. SANpath Device Information Window
In the event of a path failure, the following occurs:
■ The “Path” icon turns gray, with all higher-level icons turning red, including the server icon.
■ When a new LG is created with a SANpath configuration present, the SANpath icons turn red until SANpath is reconfigured.
Search SANpath Devices
The Search SANpath Devices menu option allows you to search for qualifying SANpath devices (SPDs).
1. In the main window, select SANpath devices, and then choose Configuration → Search SANpath Devices.
Note – Before continuing, you need to be assigned the privileges of an ssconfig user to configure or reconfigure SPDs. If you are not currently logged in as ssconfig, a login dialog appears.
2. The message “Searching for SANpath Devices” is displayed.
After the search is complete, the qualifying devices are displayed under the Undefined Devices icon in the SANscape main window.
26 SANpath User’s Guide • June 2004
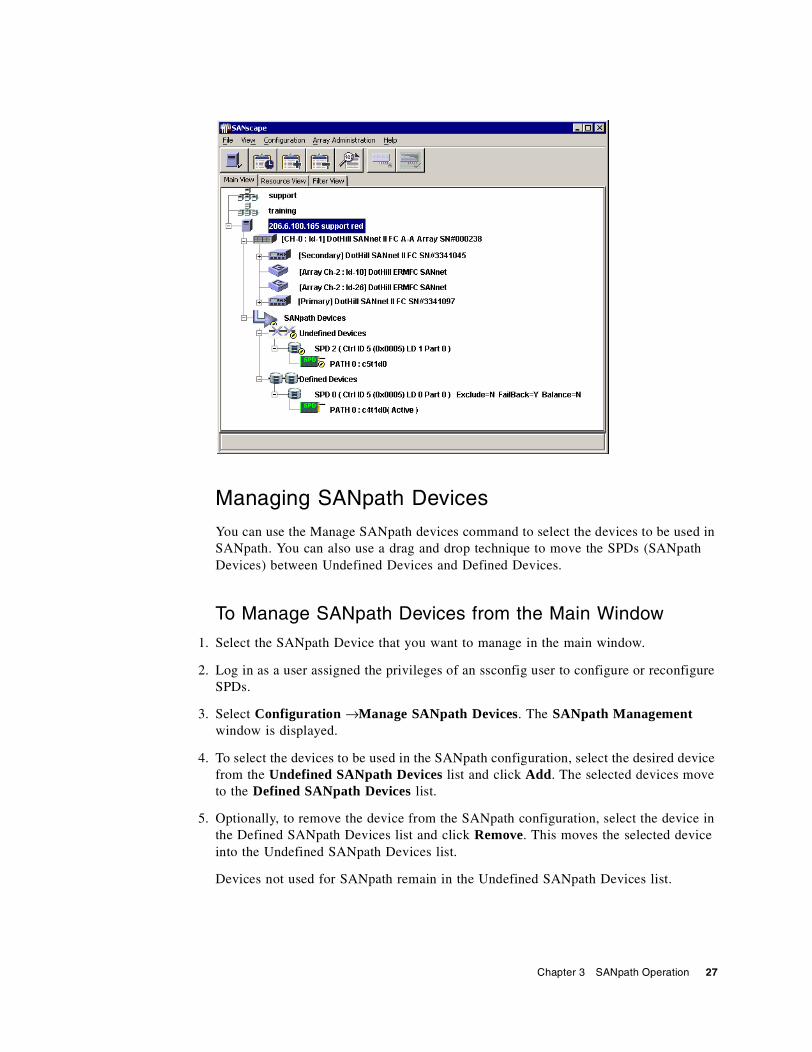
Managing SANpath Devices
You can use the Manage SANpath devices command to select the devices to be used in SANpath. You can also use a drag and drop technique to move the SPDs (SANpath Devices) between Undefined Devices and Defined Devices.
To Manage SANpath Devices from the Main Window
1. Select the SANpath Device that you want to manage in the main window.
2. Log in as a user assigned the privileges of an ssconfig user to configure or reconfigure SPDs.
3. Select Configuration → Manage SANpath Devices. The SANpath Management window is displayed.
4. To select the devices to be used in the SANpath configuration, select the desired device from the Undefined SANpath Devices list and click Add. The selected devices move to the Defined SANpath Devices list.
5. Optionally, to remove the device from the SANpath configuration, select the device in the Defined SANpath Devices list and click Remove. This moves the selected device into the Undefined SANpath Devices list.
Devices not used for SANpath remain in the Undefined SANpath Devices list.
Chapter 3 SANpath Operation 27

Figure 3-7. SANpath Management Window with Defined and Undefined SANpath Devices
To Manage SANpath Devices Using Drag and Drop
1. Log in as a user assigned the privileges of an ssconfig user to configure or reconfigure SPDs.
2. From the main window, select the desired SPD within the Undefined Devices group and drag it to the Defined Devices group while holding down the left mouse button.
28 SANpath User’s Guide • June 2004
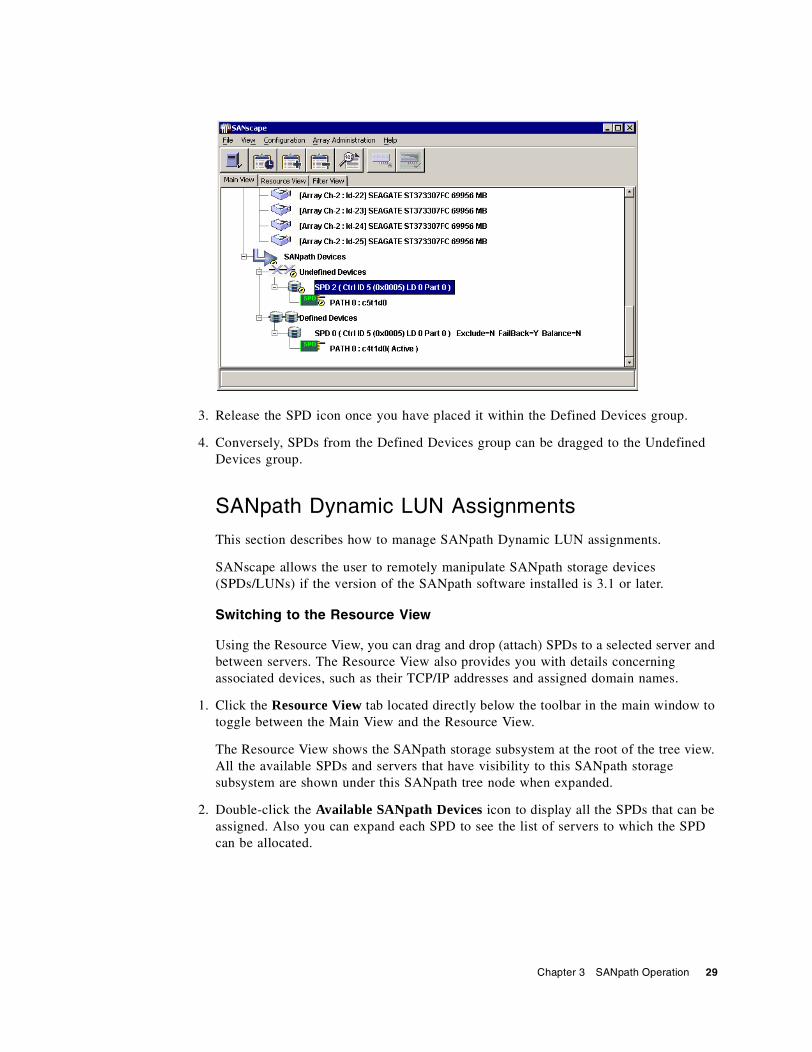
3. Release the SPD icon once you have placed it within the Defined Devices group.
4. Conversely, SPDs from the Defined Devices group can be dragged to the Undefined Devices group.
SANpath Dynamic LUN Assignments
This section describes how to manage SANpath Dynamic LUN assignments.
SANscape allows the user to remotely manipulate SANpath storage devices (SPDs/LUNs) if the version of the SANpath software installed is 3.1 or later.
Switching to the Resource View
Using the Resource View, you can drag and drop (attach) SPDs to a selected server and between servers. The Resource View also provides you with details concerning associated devices, such as their TCP/IP addresses and assigned domain names.
1. Click the Resource View tab located directly below the toolbar in the main window to toggle between the Main View and the Resource View.
The Resource View shows the SANpath storage subsystem at the root of the tree view. All the available SPDs and servers that have visibility to this SANpath storage subsystem are shown under this SANpath tree node when expanded.
2. Double-click the Available SANpath Devices icon to display all the SPDs that can be assigned. Also you can expand each SPD to see the list of servers to which the SPD can be allocated.
Chapter 3 SANpath Operation 29
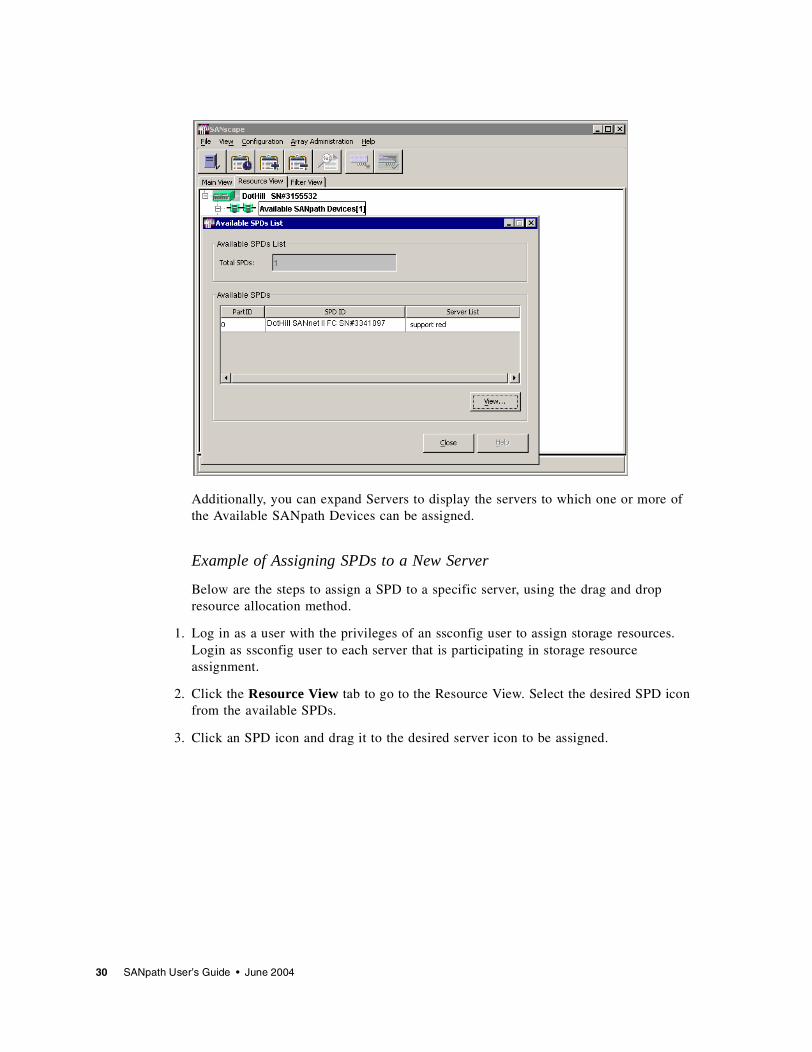
Additionally, you can expand Servers to display the servers to which one or more of the Available SANpath Devices can be assigned.
Example of Assigning SPDs to a New Server
Below are the steps to assign a SPD to a specific server, using the drag and drop resource allocation method.
1. Log in as a user with the privileges of an ssconfig user to assign storage resources. Login as ssconfig user to each server that is participating in storage resource assignment.
2. Click the Resource View tab to go to the Resource View. Select the desired SPD icon from the available SPDs.
3. Click an SPD icon and drag it to the desired server icon to be assigned.
30 SANpath User’s Guide • June 2004
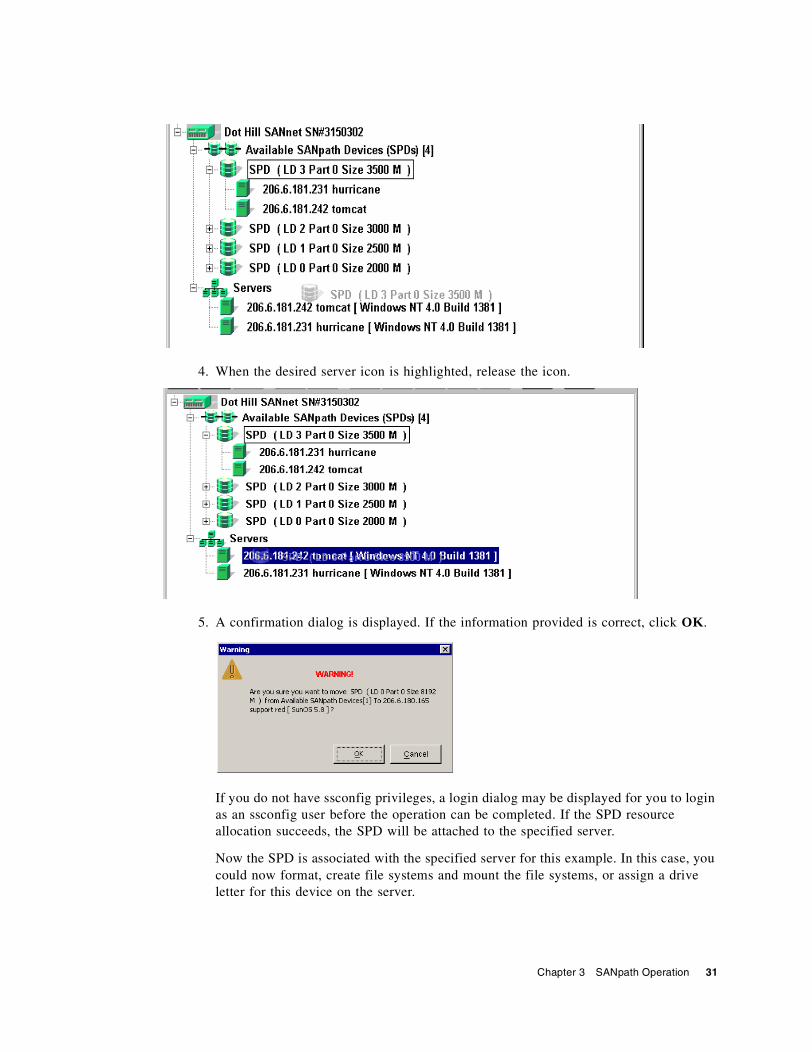
4. When the desired server icon is highlighted, release the icon.
5. A confirmation dialog is displayed. If the information provided is correct, click OK.
If you do not have ssconfig privileges, a login dialog may be displayed for you to login as an ssconfig user before the operation can be completed. If the SPD resource allocation succeeds, the SPD will be attached to the specified server.
Now the SPD is associated with the specified server for this example. In this case, you could now format, create file systems and mount the file systems, or assign a drive letter for this device on the server.
Chapter 3 SANpath Operation 31
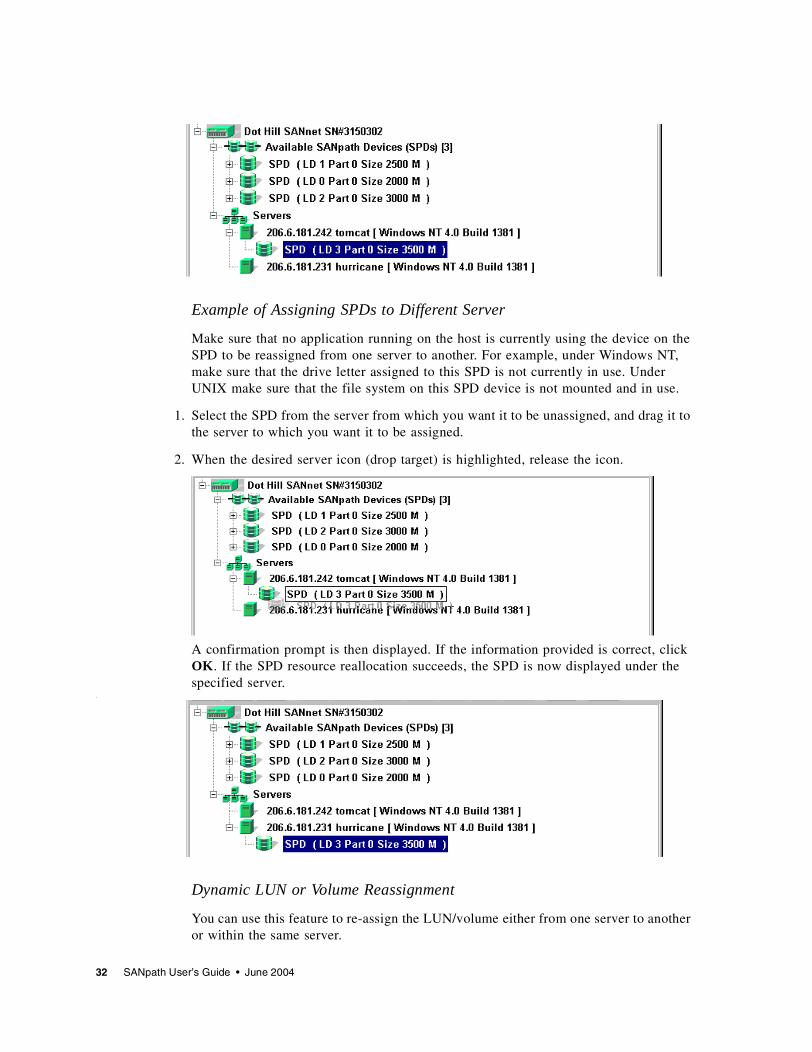
Example of Assigning SPDs to Different Server
Make sure that no application running on the host is currently using the device on the SPD to be reassigned from one server to another. For example, under Windows NT, make sure that the drive letter assigned to this SPD is not currently in use. Under UNIX make sure that the file system on this SPD device is not mounted and in use.
1. Select the SPD from the server from which you want it to be unassigned, and drag it to the server to which you want it to be assigned.
2. When the desired server icon (drop target) is highlighted, release the icon.
A confirmation prompt is then displayed. If the information provided is correct, click OK. If the SPD resource reallocation succeeds, the SPD is now displayed under the specified server.
.
Dynamic LUN or Volume Reassignment
You can use this feature to re-assign the LUN/volume either from one server to another or within the same server.
32 SANpath User’s Guide • June 2004
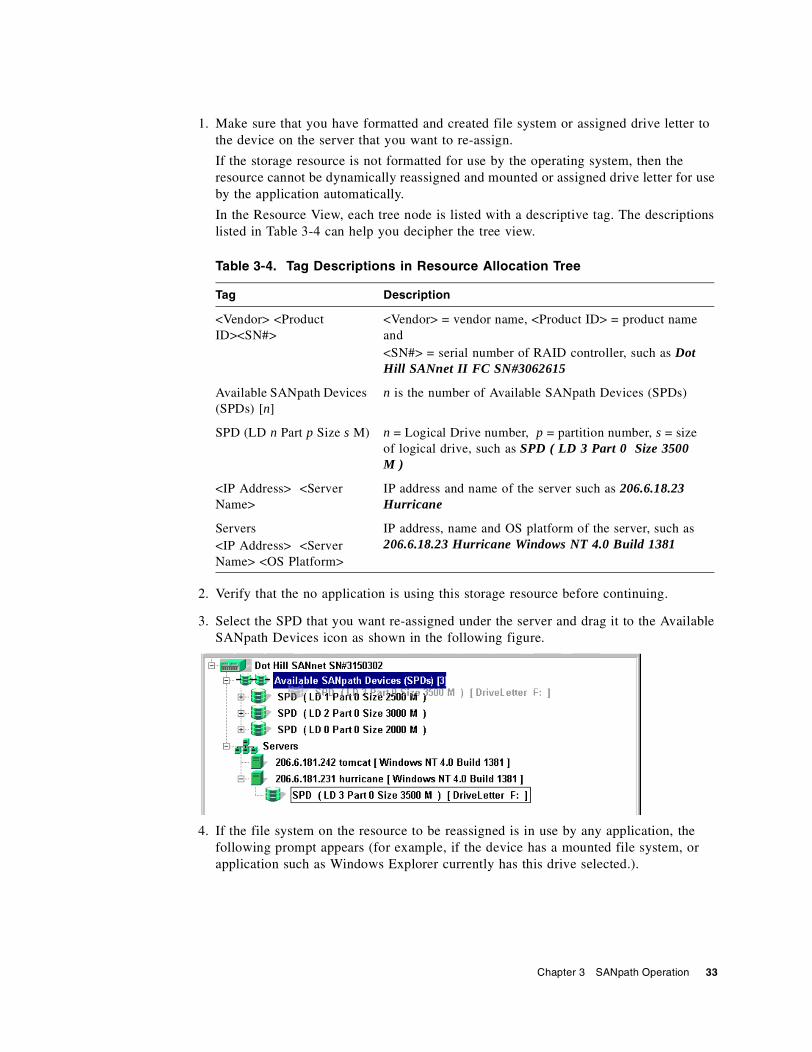
1. Make sure that you have formatted and created file system or assigned drive letter to the device on the server that you want to re-assign.
If the storage resource is not formatted for use by the operating system, then the resource cannot be dynamically reassigned and mounted or assigned drive letter for use by the application automatically.
In the Resource View, each tree node is listed with a descriptive tag. The descriptions listed in Table 3-4 can help you decipher the tree view.
2. Verify that the no application is using this storage resource before continuing.
3. Select the SPD that you want re-assigned under the server and drag it to the Available SANpath Devices icon as shown in the following figure.
4. If the file system on the resource to be reassigned is in use by any application, the following prompt appears (for example, if the device has a mounted file system, or application such as Windows Explorer currently has this drive selected.).
Table 3-4. Tag Descriptions in Resource Allocation Tree
Tag Description
<Vendor> <Product ID><SN#>
<Vendor> = vendor name, <Product ID> = product name and<SN#> = serial number of RAID controller, such as Dot Hill SANnet II FC SN#3062615
Available SANpath Devices (SPDs) [n]
n is the number of Available SANpath Devices (SPDs)
SPD (LD n Part p Size s M) n = Logical Drive number, p = partition number, s = size of logical drive, such as SPD ( LD 3 Part 0 Size 3500 M )
<IP Address> <Server Name>
IP address and name of the server such as 206.6.18.23 Hurricane
Servers<IP Address> <Server Name> <OS Platform>
IP address, name and OS platform of the server, such as 206.6.18.23 Hurricane Windows NT 4.0 Build 1381
Chapter 3 SANpath Operation 33
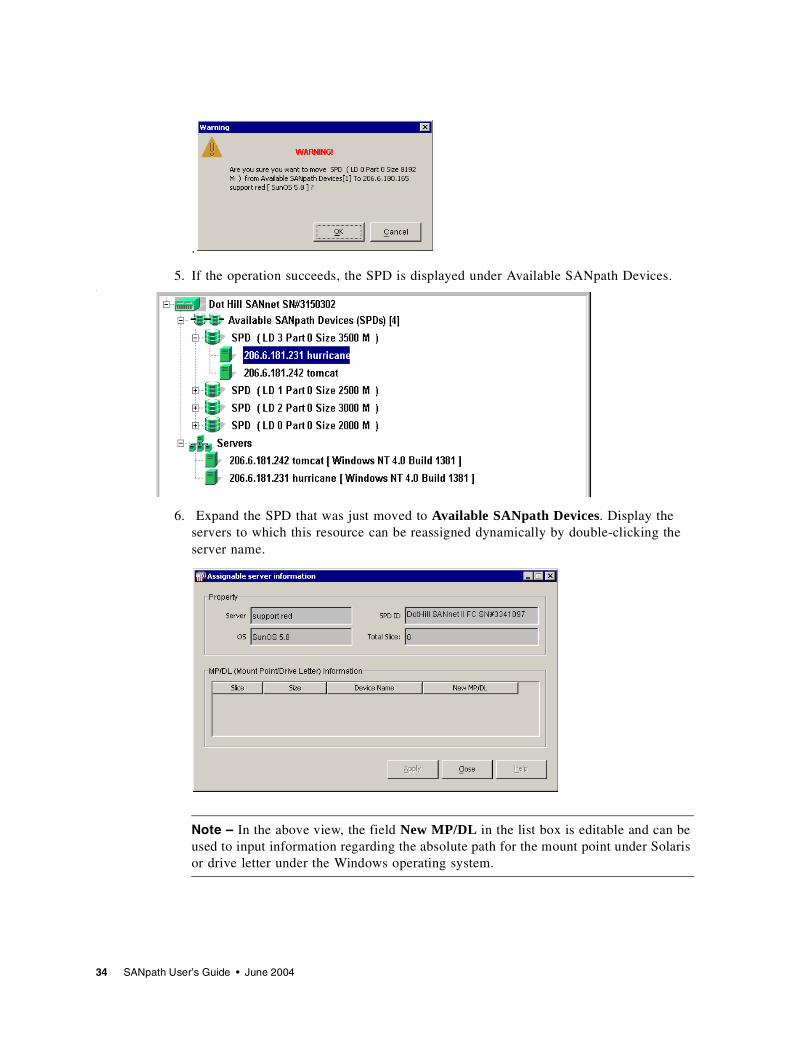
.
5. If the operation succeeds, the SPD is displayed under Available SANpath Devices..
6. Expand the SPD that was just moved to Available SANpath Devices. Display the servers to which this resource can be reassigned dynamically by double-clicking the server name.
Note – In the above view, the field New MP/DL in the list box is editable and can be used to input information regarding the absolute path for the mount point under Solaris or drive letter under the Windows operating system.
34 SANpath User’s Guide • June 2004

7. Click New MP/DL in the list box and specify the new mount point or the driver letter under which you want this resource to be reassigned on the server. Make sure that you press Enter after the new mount point or driver letter is entered to enable Apply.
8. Click Apply and then close the view.
9. Select this SPD icon and drag it to the server to which this resource is to be reassigned.
Now the resource is available on the server under the new mount point or drive letter specified. Any application can access this resource for use.
Note – Under Solaris, if you have made use of this dynamic LUN assignment feature, the table of file system defaults such as /etc/vfstab might have been modified to ensure the availability of the resource across system reboots. If you uninstall the SANpath software or reconfigure the SANpath, make sure to verify the entries in the file system table defaults file such as /etc/vfstab.
Chapter 3 SANpath Operation 35

36 SANpath User’s Guide • June 2004

CHAPTER 4
Setting Up SANpath on Solaris
This chapter describes how to install and configure SANpath on the Solaris operating system. Topics covered in this chapter include:
■ “Installing SANpath on Solaris” on page 38■ “Installed SANpath Files” on page 40■ “Uninstalling SANpath on Solaris” on page 40■ “SANpath Device Naming in Solaris” on page 41
Note – SANpath 4.0 is incompatible with RAIDscape and versions of SANscape before 2.2. Before installing SANpath on a system running SANscape verify that the SANscape agent running on the system is version 2.2 or higher. For more information on installing and configuring SANpath with SANscape, see “Using SANpath with SANscape” on page 24.
37
Installing SANpath on SolarisSANpath is distributed as the Solaris package file, HILsp.pkg.
Note – Before installing SANpath, be sure to read the release notes for your array.
Follow these steps to install the SANpath driver and its supporting files:
1. Set up your system hardware according the instructions in their respective user manuals and in “Hardware Preparation” on page 5.
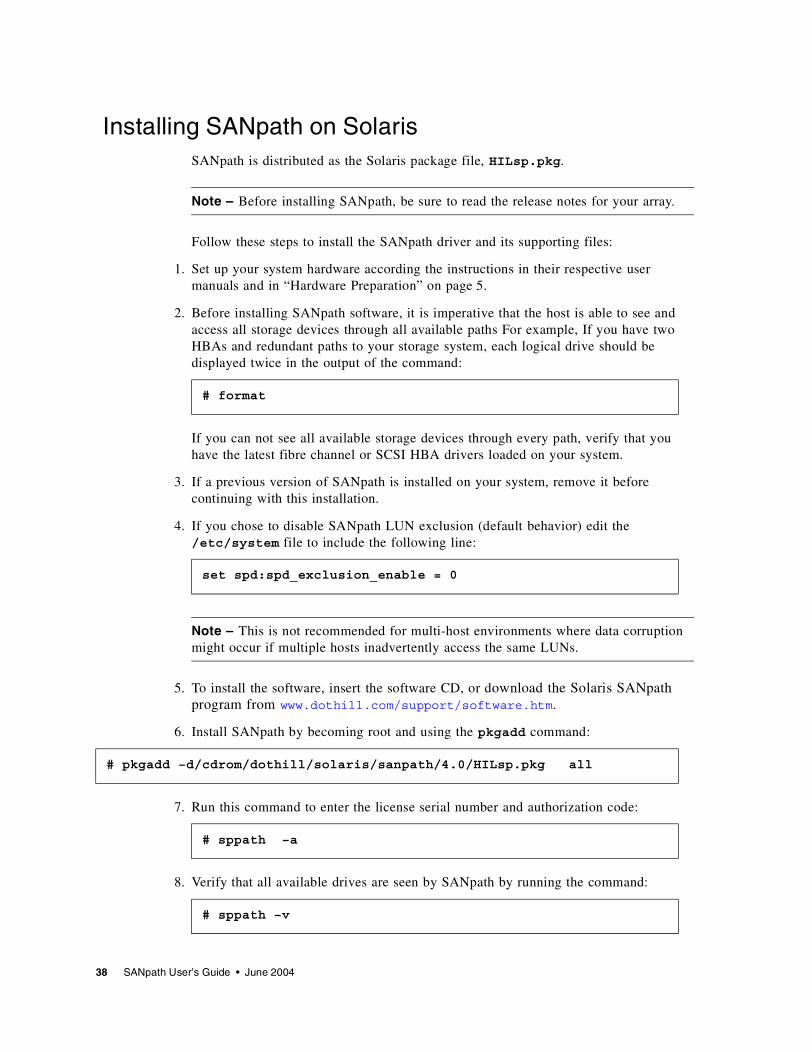
2. Before installing SANpath software, it is imperative that the host is able to see and access all storage devices through all available paths For example, If you have two HBAs and redundant paths to your storage system, each logical drive should be displayed twice in the output of the command:
If you can not see all available storage devices through every path, verify that you have the latest fibre channel or SCSI HBA drivers loaded on your system.
3. If a previous version of SANpath is installed on your system, remove it before continuing with this installation.
4. If you chose to disable SANpath LUN exclusion (default behavior) edit the /etc/system file to include the following line:
Note – This is not recommended for multi-host environments where data corruption might occur if multiple hosts inadvertently access the same LUNs.
5. To install the software, insert the software CD, or download the Solaris SANpath program from www.dothill.com/support/software.htm.
6. Install SANpath by becoming root and using the pkgadd command:
7. Run this command to enter the license serial number and authorization code:
8. Verify that all available drives are seen by SANpath by running the command:
# format
set spd:spd_exclusion_enable = 0
# pkgadd –d/cdrom/dothill/solaris/sanpath/4.0/HILsp.pkg all
# sppath –a
# sppath –v
38 SANpath User’s Guide • June 2004
9. Run the following command to save and implement changes to configuration files:
10. Reboot the host.
Note – To choose individual devices to be claimed by SANpath, use –l in the next step, as described in “Specifying a Device for setsp” on page 18.
11. SANpath excludes all devices from host access by default. To turn the exclusion setting off for all devices and make all SANpath-compatible devices accessible by the host, run the command:
Device exclusion is covered in more detail in Table 3-1. and “Turning the Exclusion Setting Off and On” on page 19.
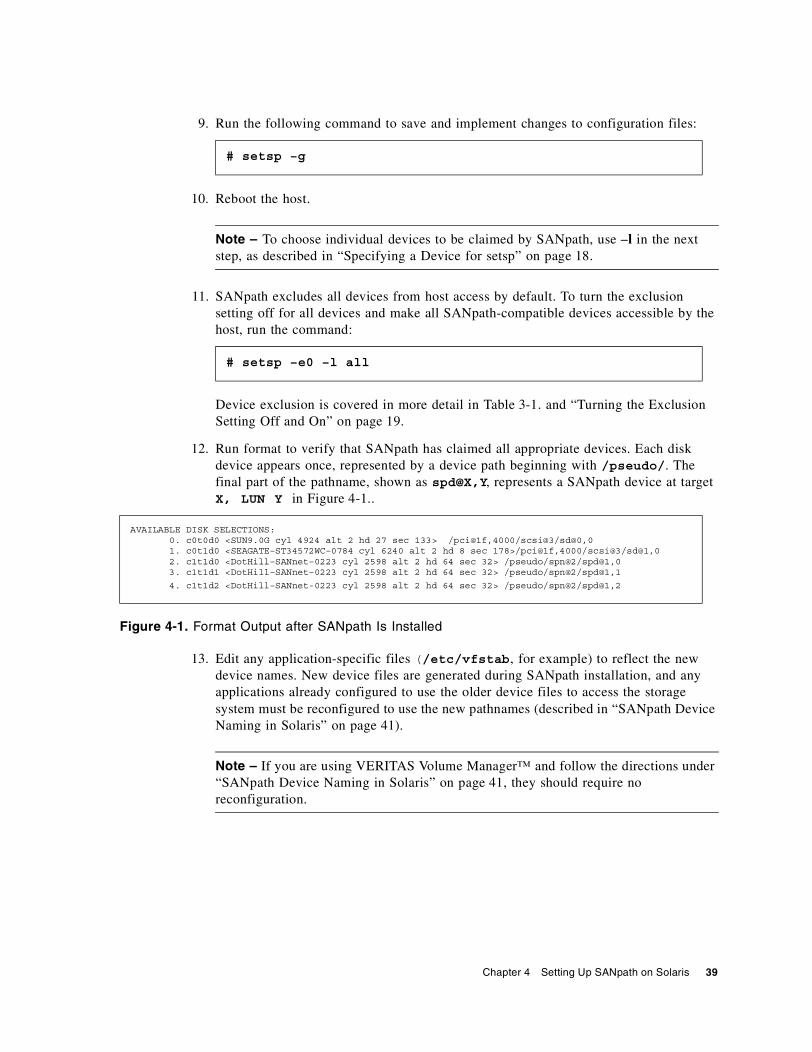
12. Run format to verify that SANpath has claimed all appropriate devices. Each disk device appears once, represented by a device path beginning with /pseudo/. The final part of the pathname, shown as spd@X,Y, represents a SANpath device at target X, LUN Y in Figure 4-1..
Figure 4-1. Format Output after SANpath Is Installed
13. Edit any application-specific files (/etc/vfstab, for example) to reflect the new device names. New device files are generated during SANpath installation, and any applications already configured to use the older device files to access the storage system must be reconfigured to use the new pathnames (described in “SANpath Device Naming in Solaris” on page 41).
Note – If you are using VERITAS Volume Manager™ and follow the directions under “SANpath Device Naming in Solaris” on page 41, they should require no reconfiguration.
# setsp –g
# setsp –e0 –l all
AVAILABLE DISK SELECTIONS: 0. c0t0d0 <SUN9.0G cyl 4924 alt 2 hd 27 sec 133> /pci@1f,4000/scsi@3/sd@0,0 1. c0t1d0 <SEAGATE–ST34572WC–0784 cyl 6240 alt 2 hd 8 sec 178>/pci@1f,4000/scsi@3/sd@1,0 2. c1t1d0 <DotHill–SANnet–0223 cyl 2598 alt 2 hd 64 sec 32> /pseudo/spn@2/spd@1,0 3. c1t1d1 <DotHill–SANnet–0223 cyl 2598 alt 2 hd 64 sec 32> /pseudo/spn@2/spd@1,1
4. c1t1d2 <DotHill–SANnet-0223 cyl 2598 alt 2 hd 64 sec 32> /pseudo/spn@2/spd@1,2
Chapter 4 Setting Up SANpath on Solaris 39

Installed SANpath FilesDuring installation, these files are placed in your system.
If SANpath is uninstalled, all the files in Table 4-1. are removed, except /kernel/drv/ap.
Uninstalling SANpath on SolarisTo remove SANpath, enter the package remove command:
Then, reboot the system.
Table 4-1. Installed Solaris SANpath Files
File Description
/kernel/drv/spn nexus (virtual HBA) driver, 32-bit mode
/kernel/drv/sparcv9/spn nexus driver, 64-bit mode
/kernel/drv/spn.conf spn configuration file
/kernel/drv/spd SANpath driver, 32-bit mode
/kernel/drv/sparcv9/spd SANpath driver, 64–bit mode
/kernel/drv/spd.conf spd configuration file
/kernel/drv/ap see “SANpath Device Naming in Solaris” on page 41.
/usr/sbin/sppath qualifies and claims storage devices for SANpath control
/usr/sbin/setsp configures SANpath parameters
/etc/sppath.conf sppath configuration file
/etc/spd/bin/spmon daemon that interacts with SANnet series controllers
/etc/spd/bin/badlinks removes inactive links during uninstall process
/etc/spd/bin/forceload_add adds forceload statements to /etc/system (invoked by setsp)
/etc/spd/bin/forceload_rm removes forceload statements from /etc/system (invoked by setsp)
/etc/init.d/spconfigure configures SANpath devices at reconfiguration reboot
# pkgrm HILsp
40 SANpath User’s Guide • June 2004

Note – During the removal process, three SANpath configuration files, spd.conf, spn.conf and sppath.conf are placed in a tar archive file located in /var/tmp. The tar file will contain a name in the form:
sp-configuration-backup–YYYYMMDDhhmm.tar
where
YYYY is the 4–digit yearMM is the 2–digit monthDD is the 2–digit day hh is the 2–digit hour in military format mm is the current minute
This format allows multiple backups of the configurations files to be archived. Should you wish to reinstall SANpath and restore the last configuration, you can extract the content of this file. Otherwise, if SANpath is not to be reinstalled, this file can be deleted manually.
SANpath Device Naming in SolarisIn a typical, single-path disk storage system, each physical disk is represented in the host’s /dev directory by a set of special device files representing the raw and block mode device instances for each possible disk partition on that device.
For simplicity, we refer to this set of device files as a single device file name and disregard both the first parts of the pathnames that distinguish between raw and block modes and the suffixes that identify individual partitions.
As a layered driver that runs on top of the standard Solaris disk driver (sd or ssd), SANpath creates its own device files for physical devices, and it is through these file names that applications access the devices.
When multiple paths to a single device exist, multiple device files are present, one for each path via the native disk driver. In these cases, SANpath creates a single additional device file name for applications to access the device and manages the original device files transparently to those applications.
Note – The virtual device file is used by applications to access that device. The original and redundant data paths should never be used to access the device, or the data it contains could be corrupted.
For example, a dual-ported disk subsystem might present a single physical disk device to the Solaris host as both c1t0d0 and c2t0d0. When SANpath is installed, it creates a third set of device files named c3t0d0, and blocks applications’ access to the original two device files, which are not protected by SANpath.
Chapter 4 Setting Up SANpath on Solaris 41
How Device File Names Are Chosen
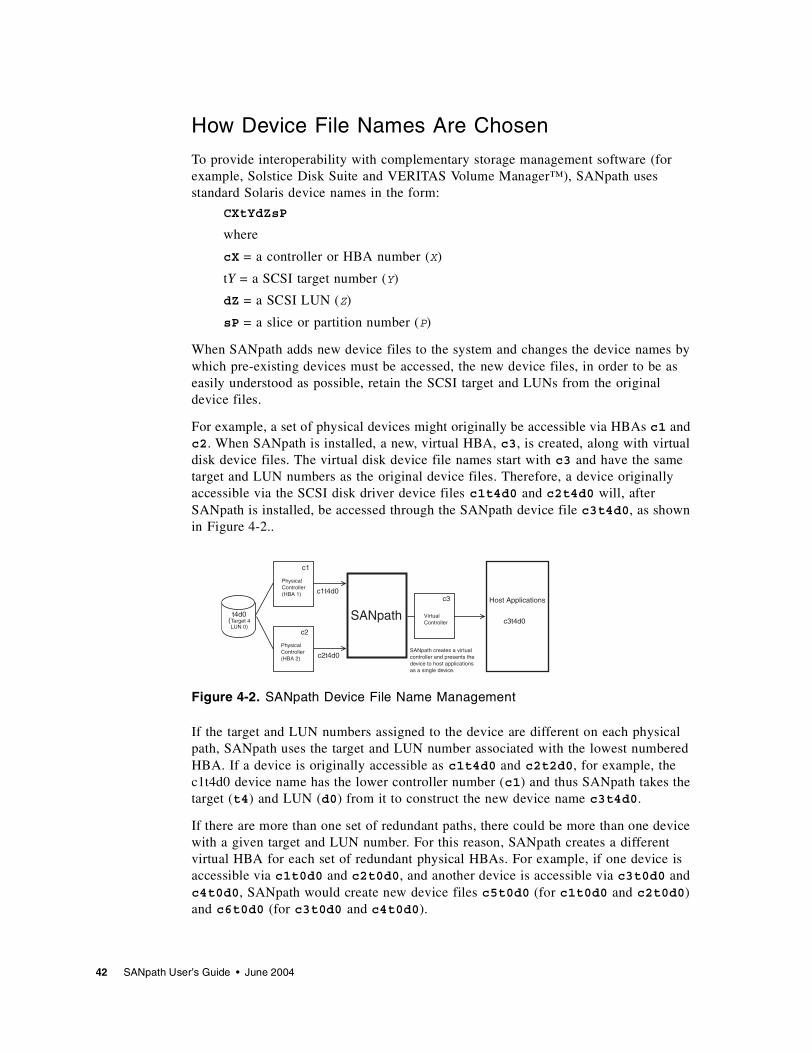
To provide interoperability with complementary storage management software (for example, Solstice Disk Suite and VERITAS Volume Manager™), SANpath uses standard Solaris device names in the form:
CXtYdZsP
where
cX = a controller or HBA number (X)
tY = a SCSI target number (Y)
dZ = a SCSI LUN (Z)
sP = a slice or partition number (P)
When SANpath adds new device files to the system and changes the device names by which pre-existing devices must be accessed, the new device files, in order to be as easily understood as possible, retain the SCSI target and LUNs from the original device files.
For example, a set of physical devices might originally be accessible via HBAs c1 and c2. When SANpath is installed, a new, virtual HBA, c3, is created, along with virtual disk device files. The virtual disk device file names start with c3 and have the same target and LUN numbers as the original device files. Therefore, a device originally accessible via the SCSI disk driver device files c1t4d0 and c2t4d0 will, after SANpath is installed, be accessed through the SANpath device file c3t4d0, as shown in Figure 4-2..
Figure 4-2. SANpath Device File Name Management
If the target and LUN numbers assigned to the device are different on each physical path, SANpath uses the target and LUN number associated with the lowest numbered HBA. If a device is originally accessible as c1t4d0 and c2t2d0, for example, the c1t4d0 device name has the lower controller number (c1) and thus SANpath takes the target (t4) and LUN (d0) from it to construct the new device name c3t4d0.
If there are more than one set of redundant paths, there could be more than one device with a given target and LUN number. For this reason, SANpath creates a different virtual HBA for each set of redundant physical HBAs. For example, if one device is accessible via c1t0d0 and c2t0d0, and another device is accessible via c3t0d0 and c4t0d0, SANpath would create new device files c5t0d0 (for c1t0d0 and c2t0d0) and c6t0d0 (for c3t0d0 and c4t0d0).
Host Applications
SANpath creates a virtual controller and presents the device to host applications as a single device.
SANpath c3t4d0t4d0
(Target 4LUN 0)
c1
PhysicalController(HBA 1)
c2
PhysicalController(HBA 2)
c1t4d0
c2t4d0
c3
Virtual Controller
42 SANpath User’s Guide • June 2004
SANpath does not have direct control over the controller number used; instead, the number is assigned by the disks(1m) program automatically during the reconfiguration reboot process, just as it would be for any new physical HBA added to the system.
Devices with Only One Path to the Host
SANpath creates virtual device files for all supported devices and blocks access to them through their original device file names whether or not they are accessible via redundant paths.
Virtual device files are created for devices that have only one physical path for two reasons:
■ a device could actually have redundant paths but only one was functional at the time that SANpath was installed, and
■ the device could be part of a SAN configuration where it is necessary to prohibit applications on the local host from accessing the device because the device was assigned to another host on the SAN.
Note – Boot devices do not qualify as supported devices, and virtual device files are never created for them (For a complete description of qualifying devices, see “The sppath Command” on page 11.)
Reconfiguration for Existing Applications
As explained in the preceding section, any physical device supported by SANpath and in use prior to SANpath's installation is, from the perspective of host applications, renamed during SANpath installation.
This has no effect on storage encapsulated by the VERITAS Volume Manager™ or Sun Enterprise Volume Manager, but other applications need to be redirected to the new file names, by either editing /etc/vfstab or modifying the configuration of the individual application to reflect the new device names.
Underlying Device Path Names
Following Solaris convention, the device files in /dev/dsk and /dev/rdsk are actually symbolic links to real device files in the /devices directory tree.
A typical SCSI disk driver device file is
/devices/pci@1f,4000/scsi@3/sd@4,0
which refers to a disk at target 4, LUN 0 attached to the SCSI HBA in PCI slot 3.
In some hardware configurations, the word scsi may be replaced by the name of a specific HBA driver, such as isp or glm. Also, the number after scsi@ may not reflect the physical PCI slot.
Chapter 4 Setting Up SANpath on Solaris 43

The corresponding SANpath device file is similar. For example, /devices/pseudo/spn@1/spd@4,0 indicates an spd (SANpath driver) device with target 4 and LUN 0, attached to SANpath virtual HBA (spn) number 1. These device paths are also displayed by format (1m) and certain other utilities.
44 SANpath User’s Guide • June 2004

CHAPTER 5
Troubleshooting Solaris
This chapter provides Solaris troubleshooting suggestions. Topics covered in this chapter include:
■ “Comparing setsp with System Events” on page 45■ “Cable Failure Errors” on page 46■ “Failover Error Reporting” on page 47■ “Recovering from a Failure” on page 47
Comparing setsp with System EventsSANpath interfaces with system components at the I/O path level, which does not support sophisticated device error reporting.
The application reports failed I/O to /var/adm/messages as well as when a data path is found to have stopped functioning, when I/O is redirected to an alternate path, and when the failed path resumes functioning.
Whether a path failure is intermittent or is caused by a hardware failure can usually be deduced from the events listed in /var/adm/messages, and a faulty device can be located physically by cross-referencing the output of setsp –a. Figure 5-1. shows the example configuration used in this section.
Figure 5-1. Example setsp –a Output Showing No Failures
# setsp –a============================================================================= spd Path/disk Status Primary Exclude Buf Balance RtrCnt RtrDly FailBack ============================================================================= 0 c7t0d0/sd66 Good X 32 0 20 3000 1 c8t0d0/sd88 Good spd0 = c3t0d0 ID = "DotHill SANnetII 0002-31E88DA7–00"============================================================================= 1 c7t0d1/sd67 Good 32 0 20 3000 1 c8t0d1/sd89 Good X spd1 = c3t0d1 ID = "DotHill SANnetII 0002-31E88DA7–01"============================================================================= 2 c7t0d2/sd68 Good X 32 0 20 3000 1 c8t0d2/sd90 Good spd2 = c3t0d2 ID = "DotHill SANnetII 0002-31E88DA7-02"=============================================================================
45
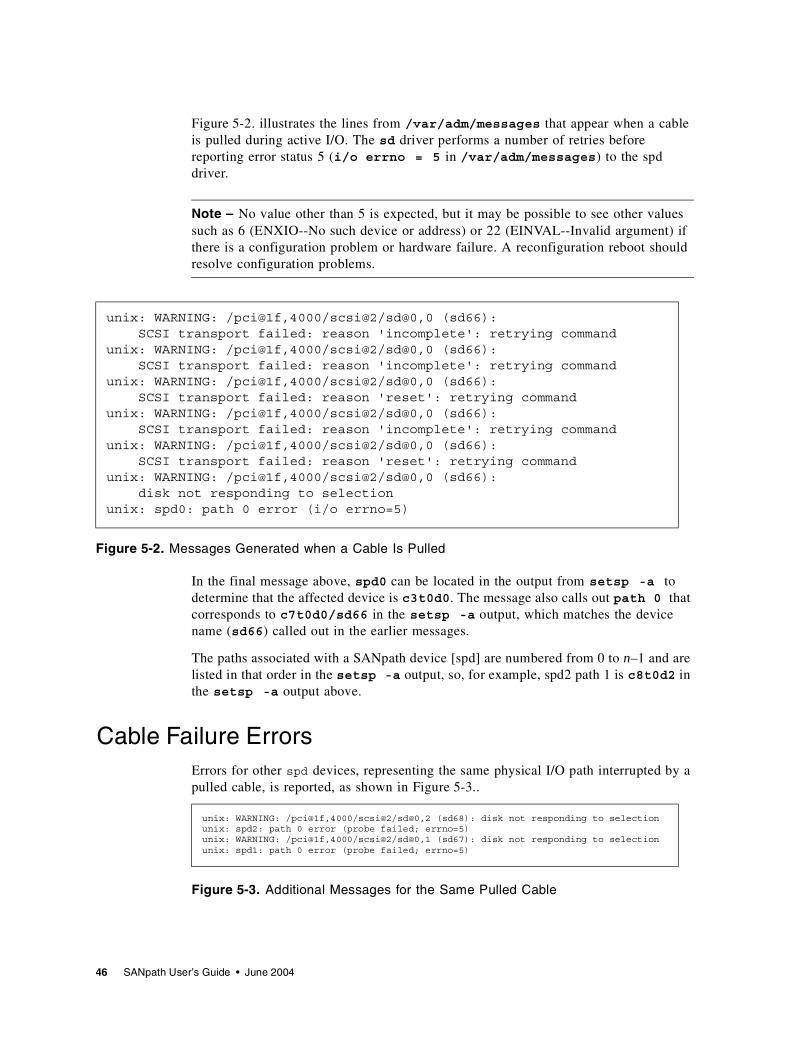
Figure 5-2. illustrates the lines from /var/adm/messages that appear when a cable is pulled during active I/O. The sd driver performs a number of retries before reporting error status 5 (i/o errno = 5 in /var/adm/messages) to the spd driver.
Note – No value other than 5 is expected, but it may be possible to see other values such as 6 (ENXIO--No such device or address) or 22 (EINVAL--Invalid argument) if there is a configuration problem or hardware failure. A reconfiguration reboot should resolve configuration problems.
Figure 5-2. Messages Generated when a Cable Is Pulled
In the final message above, spd0 can be located in the output from setsp -a to determine that the affected device is c3t0d0. The message also calls out path 0 that corresponds to c7t0d0/sd66 in the setsp -a output, which matches the device name (sd66) called out in the earlier messages.
The paths associated with a SANpath device [spd] are numbered from 0 to n–1 and are listed in that order in the setsp -a output, so, for example, spd2 path 1 is c8t0d2 in the setsp -a output above.
Cable Failure ErrorsErrors for other spd devices, representing the same physical I/O path interrupted by a pulled cable, is reported, as shown in Figure 5-3..
Figure 5-3. Additional Messages for the Same Pulled Cable
unix: WARNING: /pci@1f,4000/scsi@2/sd@0,0 (sd66): SCSI transport failed: reason 'incomplete': retrying command unix: WARNING: /pci@1f,4000/scsi@2/sd@0,0 (sd66): SCSI transport failed: reason 'incomplete': retrying command unix: WARNING: /pci@1f,4000/scsi@2/sd@0,0 (sd66): SCSI transport failed: reason 'reset': retrying command unix: WARNING: /pci@1f,4000/scsi@2/sd@0,0 (sd66): SCSI transport failed: reason 'incomplete': retrying command unix: WARNING: /pci@1f,4000/scsi@2/sd@0,0 (sd66): SCSI transport failed: reason 'reset': retrying command unix: WARNING: /pci@1f,4000/scsi@2/sd@0,0 (sd66): disk not responding to selection unix: spd0: path 0 error (i/o errno=5)
unix: WARNING: /pci@1f,4000/scsi@2/sd@0,2 (sd68): disk not responding to selection unix: spd2: path 0 error (probe failed; errno=5) unix: WARNING: /pci@1f,4000/scsi@2/sd@0,1 (sd67): disk not responding to selection unix: spd1: path 0 error (probe failed; errno=5)
46 SANpath User’s Guide • June 2004

Even when an spd device is idle, a SCSI Test Unit Ready command is sent periodically to the device to confirm that it is functioning. A failure of this test is reported as “probe failed” along with the errno value as described above.
Failover Error ReportingFailover events are recorded in /var/adm/messages as well. The event in Figure 5-4. records the I/O for the device spd0 is redirected from path 0 (c7t0d0) to path 1 (c8t0d0).
Figure 5-4. The Failover Event
The output from setsp -a (Figure 5-5.) now shows that every device’s path 0 (those with device file names beginning c7) have a Status of Bad.
Figure 5-5. setsp –a Output after the Failed Path Is Detected
Recovering from a FailurePath failures generate a lot of output, resulting primarily from the disk driver’s attempts at error recovery (Figure 5-6.).
Figure 5-6. Messages from Disk Driver’s Retry Attempts
unix: spd0: path
# setsp –a =============================================================================== spd Path/disk Status Primary Exclude Buf Balance RtrCnt RtrDly FailBack =============================================================================== 0 c7t0d0/sd66 Bad X 32 0 20 3000 1 c8t0d0/sd88 Good spd0 = c3t0d0 ID = "DotHill SANnetII 0002-31E88DA7-00"=============================================================================== 1 c7t0d1/sd67 Bad 32 0 20 3000 1 c8t0d1/sd89 Good X spd1 = c3t0d1 ID = "DotHill SANnetII 0002-31E88DA7-01"=============================================================================== 2 c7t0d2/sd68 Bad X 32 0 20 3000 1 c8t0d2/sd90 Good spd2 = c3t0d2 ID = "DotHill SANnetII 0002-31E88DA7-02"===============================================================================
unix: WARNING: /pci@1f,4000/scsi@2/sd@0,0 (sd66): disk not responding to selection unix: WARNING: /pci@1f,4000/scsi@2/sd@0,2 (sd68): disk not responding to selection unix: WARNING: /pci@1f,4000/scsi@2 (glm3): Connected command timeout for Target 0.1
Chapter 5 Troubleshooting Solaris 47
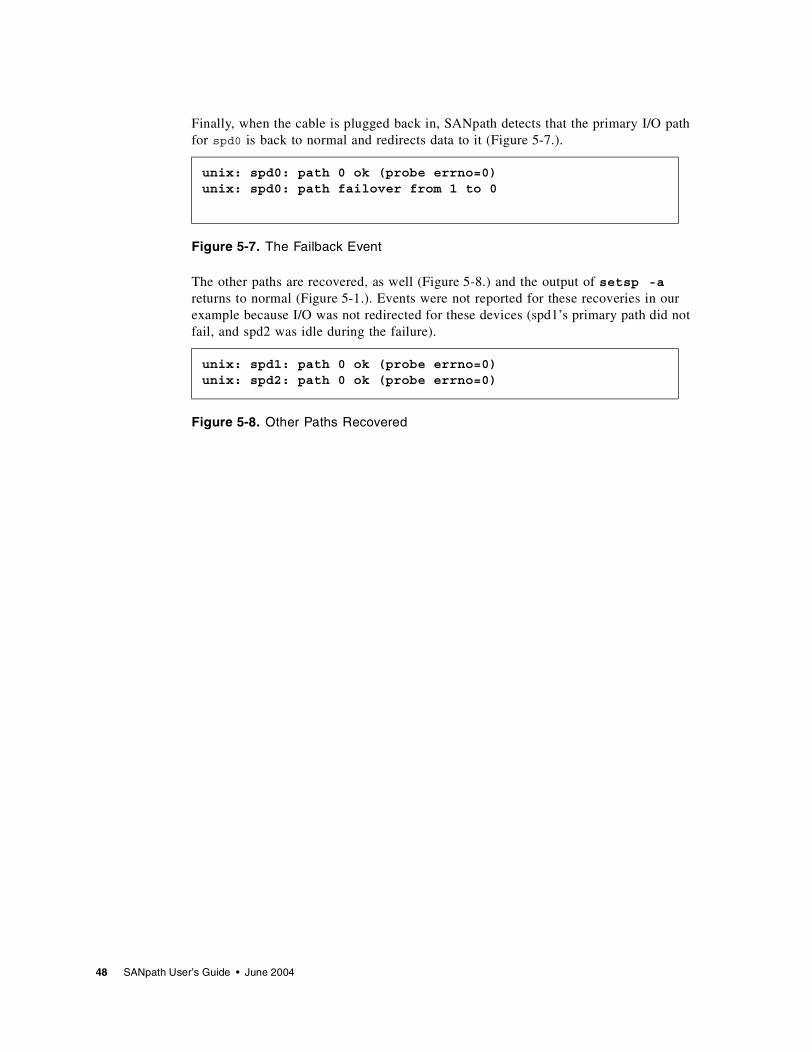
Finally, when the cable is plugged back in, SANpath detects that the primary I/O path for spd0 is back to normal and redirects data to it (Figure 5-7.).
Figure 5-7. The Failback Event
The other paths are recovered, as well (Figure 5-8.) and the output of setsp -a returns to normal (Figure 5-1.). Events were not reported for these recoveries in our example because I/O was not redirected for these devices (spd1’s primary path did not fail, and spd2 was idle during the failure).
Figure 5-8. Other Paths Recovered
unix: spd0: path 0 ok (probe errno=0) unix: spd0: path failover from 1 to 0
unix: spd1: path 0 ok (probe errno=0) unix: spd2: path 0 ok (probe errno=0)
48 SANpath User’s Guide • June 2004
CHAPTER 6
Setting Up SANpath on Linux
This chapter describes how to install and configure SANpath on the Linux operating system. Topics covered in this chapter include:
■ “Requirements” on page 49■ “Installing SANpath on Linux” on page 50■ “Uninstalling SANpath” on page 51■ “SANpath Device Naming in Linux” on page 52
Note – The installation instructions may refer to specific versions of this package (for instance, 4.0–1). The current version should be substituted where appropriate.
RequirementsRequirements for installing SANpath on the Linux operating system include:
■ Red Hat Software. A Linux system running Red Hat Linux 7.3 with kernel 2.4.18-3.
Caution – Other kernels or customizations are unsupported. Continuing with the installation of SANpath using other kernels or customizations will result in the loss of such customization and can potentially render the system unbootable.
49
Installing SANpath on Linux
Note – In the installation instructions, the tag <KERNEL–VERSION> is used as a placeholder for the specific version of the Red Hat Kernel. For example, if SANpath is installed on a Red Hat 7.3 system with kernel 2.4.18-3, replace <KERNEL–VERSION> with 2.4.18-3.
The Linux SANpath driver and applications consist of two rpm files including:
■ SANpath–driver–4.0–9.i386.rpm – This supplies the driver for non-smp (uni-processor or “up”) and “smp” (Symmetric Multiprocessor) kernels.
/etc/spd.conf
/etc/sppath.conf
/usr/share/doc/SANpath–driver–4.0–9/README
/usr/local/dothill/sanpath/kernel/INSTALL
/usr/local/dothill/sanpath/kernel/<KERNEL–VERSION>/spd.o
/usr/local/dothill/sanpath/kernel/<KERNEL–VERSION>/spd–smp.o
■ SANpath-utils–4.0–9.i386.rpm – This contains the utility applications to control the behavior of the SANpath driver.
/usr/local/dothill/sanpath/bin/setsp
/usr/local/dothill/sanpath/bin/spmon
/usr/local/dothill/sanpath/bin/sppath
/usr/sbin/setsp
/usr/sbin/spmon
/usr/sbin/sppath
/sbin/setsp
/sbin/sppath
Note – Before installing SANpath, be sure to read the release notes for your array.
To install SANpath, perform the following commands.
1. If a previous version of SANpath is installed on your system, remove it before continuing with this installation.
2. To install the software, insert the software CD, or download the Linux SANpath program from www.dothill.com/support/software.htm.
3. If you are installing from a CD, perform the following steps:
a. Mount the cd if it is not already mounted.
# mount /dev/cdrom /mnt/cdrom
50 SANpath User’s Guide • June 2004
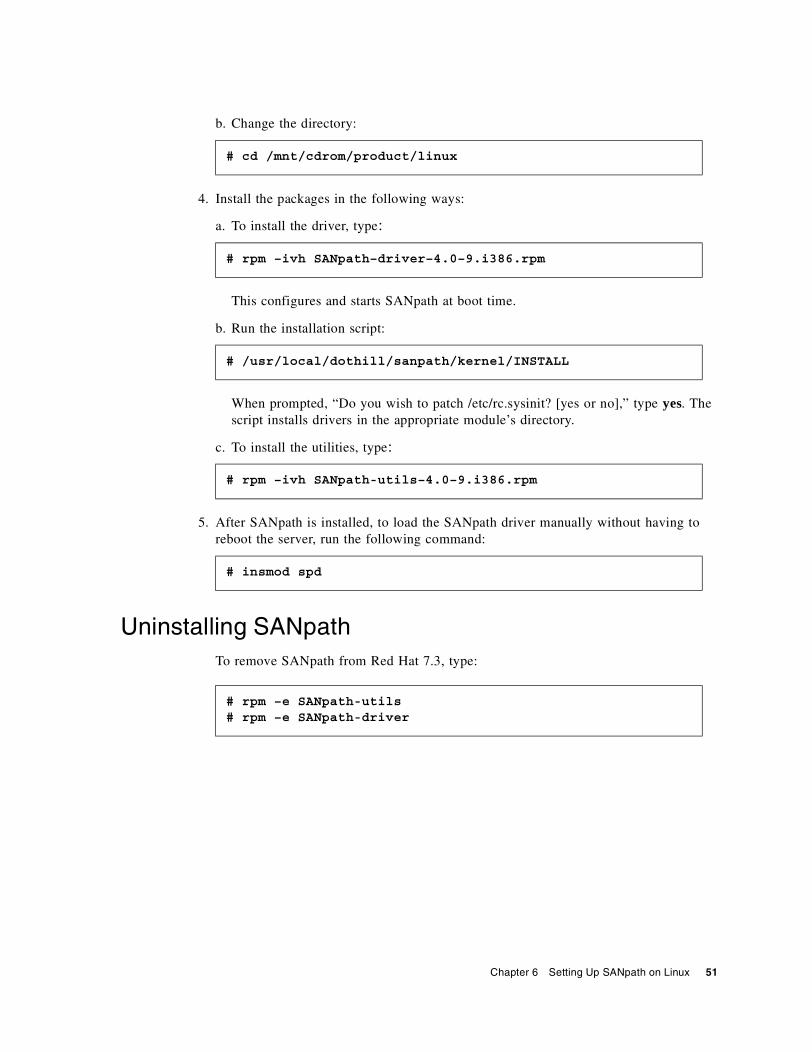
b. Change the directory:
4. Install the packages in the following ways:
a. To install the driver, type:
This configures and starts SANpath at boot time.
b. Run the installation script:
When prompted, “Do you wish to patch /etc/rc.sysinit? [yes or no],” type yes. The script installs drivers in the appropriate module’s directory.
c. To install the utilities, type:
5. After SANpath is installed, to load the SANpath driver manually without having to reboot the server, run the following command:
Uninstalling SANpath
To remove SANpath from Red Hat 7.3, type:
# cd /mnt/cdrom/product/linux
# rpm –ivh SANpath–driver–4.0–9.i386.rpm
# /usr/local/dothill/sanpath/kernel/INSTALL
# rpm –ivh SANpath-utils–4.0–9.i386.rpm
# insmod spd
# rpm –e SANpath-utils# rpm –e SANpath-driver
Chapter 6 Setting Up SANpath on Linux 51
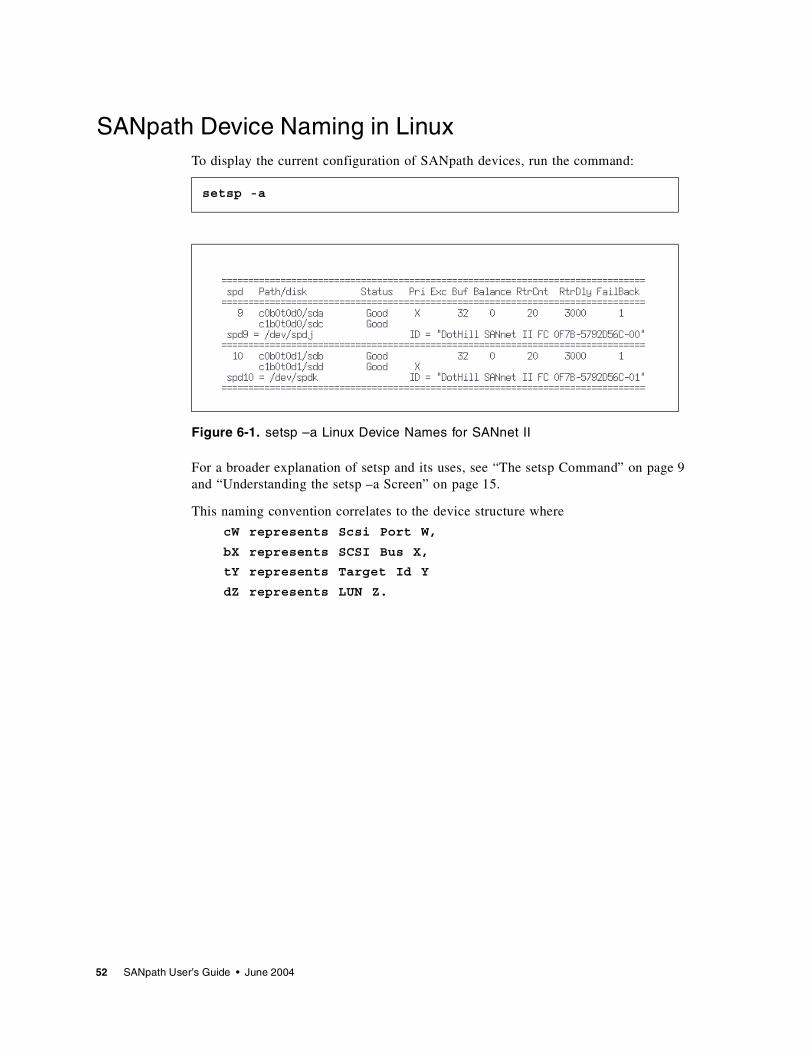
SANpath Device Naming in LinuxTo display the current configuration of SANpath devices, run the command:
Figure 6-1. setsp –a Linux Device Names for SANnet II
For a broader explanation of setsp and its uses, see “The setsp Command” on page 9 and “Understanding the setsp –a Screen” on page 15.
This naming convention correlates to the device structure where
cW represents Scsi Port W,
bX represents SCSI Bus X,
tY represents Target Id Y
dZ represents LUN Z.
setsp -a
52 SANpath User’s Guide • June 2004
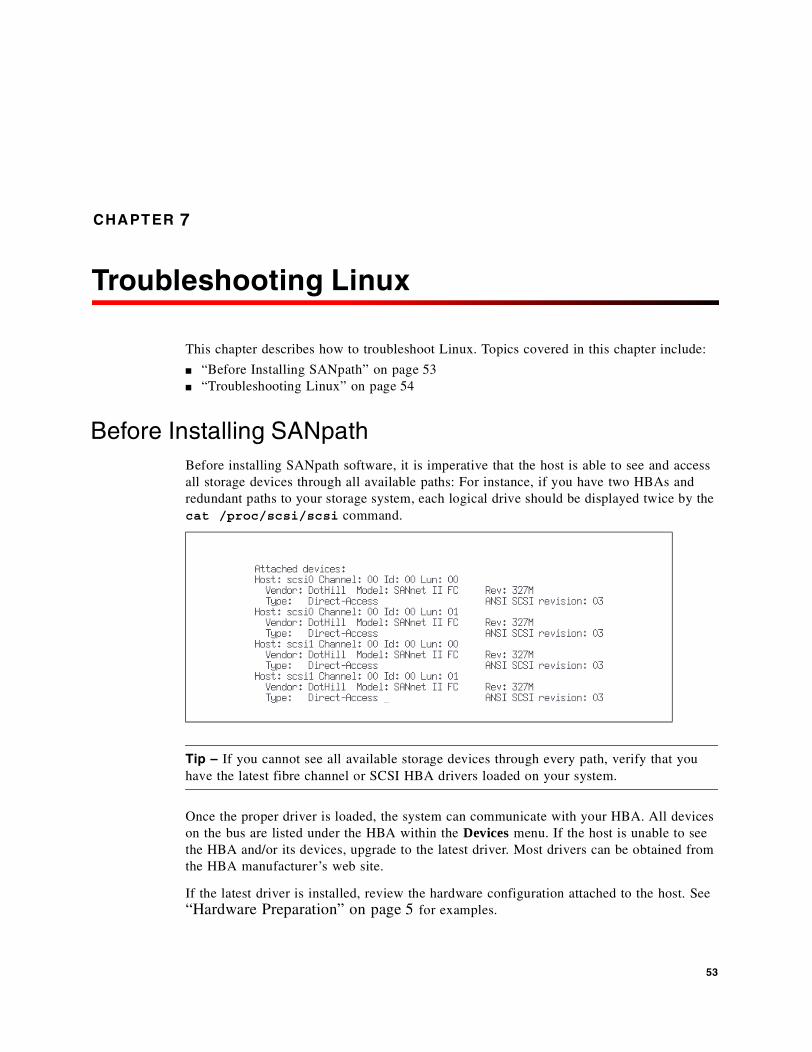
CHAPTER 7
Troubleshooting Linux
This chapter describes how to troubleshoot Linux. Topics covered in this chapter include:
■ “Before Installing SANpath” on page 53■ “Troubleshooting Linux” on page 54
Before Installing SANpath Before installing SANpath software, it is imperative that the host is able to see and access all storage devices through all available paths: For instance, if you have two HBAs and redundant paths to your storage system, each logical drive should be displayed twice by the cat /proc/scsi/scsi command.
Tip – If you cannot see all available storage devices through every path, verify that you have the latest fibre channel or SCSI HBA drivers loaded on your system.
Once the proper driver is loaded, the system can communicate with your HBA. All devices on the bus are listed under the HBA within the Devices menu. If the host is unable to see the HBA and/or its devices, upgrade to the latest driver. Most drivers can be obtained from the HBA manufacturer’s web site.
If the latest driver is installed, review the hardware configuration attached to the host. See “Hardware Preparation” on page 5 for examples.
53
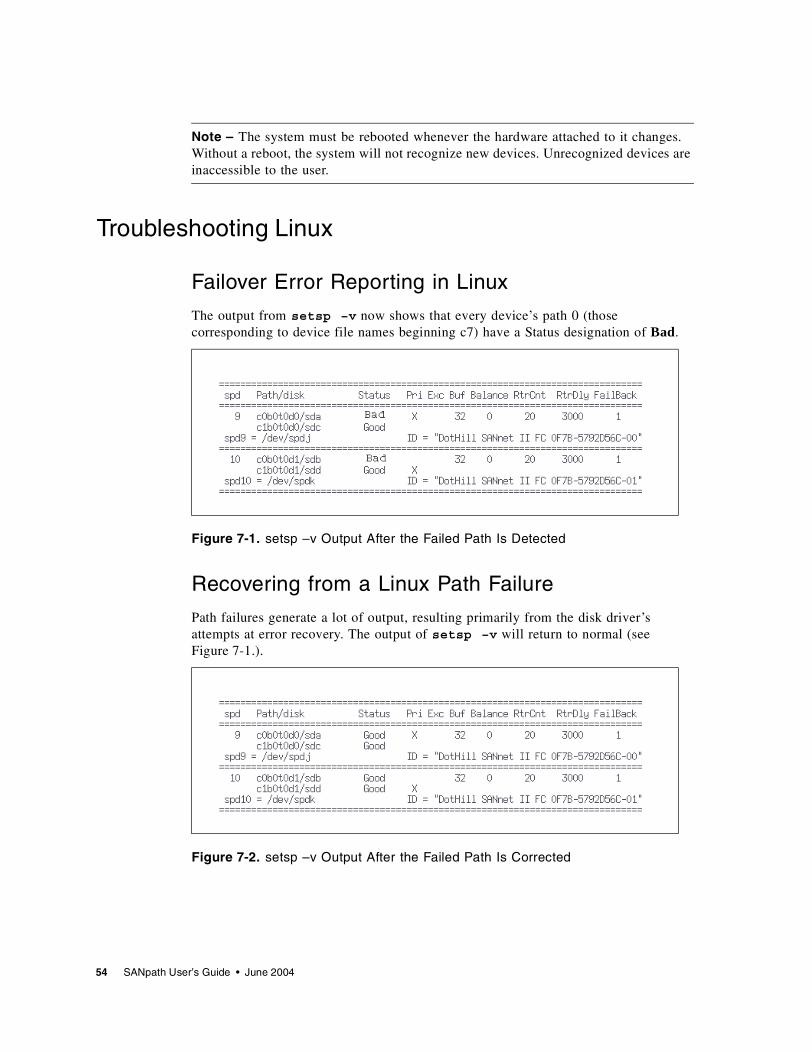
Note – The system must be rebooted whenever the hardware attached to it changes. Without a reboot, the system will not recognize new devices. Unrecognized devices are inaccessible to the user.
Troubleshooting Linux
Failover Error Reporting in Linux
The output from setsp –v now shows that every device’s path 0 (those corresponding to device file names beginning c7) have a Status designation of Bad.
Figure 7-1. setsp –v Output After the Failed Path Is Detected
Recovering from a Linux Path Failure
Path failures generate a lot of output, resulting primarily from the disk driver’s attempts at error recovery. The output of setsp –v will return to normal (see Figure 7-1.).
Figure 7-2. setsp –v Output After the Failed Path Is Corrected
54 SANpath User’s Guide • June 2004
CHAPTER 8
Setting Up SANpath on Windows
This chapter describes how to install SANpath on hosts running Windows NT or Windows 2000. Topics covered in this chapter include:
■ “Installing SANpath on Windows NT/2000” on page 55■ “Installed Windows Files” on page 57■ “Uninstalling with Windows” on page 57■ “Microsoft Clustering Software” on page 57■ “SANpath Device Naming in Windows” on page 59
Note – If you are using Microsoft Cluster Server software, additional steps may be required before installing SANpath. See “Microsoft Clustering Software” on page 57 for more information.
SANpath 4.0 is incompatible with RAIDscape and versions of SANscape before 2.2. Before installing SANpath with SANscape verify that the SANscape agent running on the system is version 2.2 or higher. For more information on installing and configuring SANpath with SANscape, read the section titled “Using SANpath with SANscape” on page 24.
Installing SANpath on Windows NT/2000SANpath is distributed as the file setup.exe in the \winntand2000\sanpath\4.0 directory.
Note – Before installing SANpath, be sure to read the release notes for your array.
Follow these steps to install the SANpath driver and its supporting files.
1. Set your system hardware up according to the instructions in their respective user manuals and in “Hardware Preparation” on page 5.
2. If a previous version of SANpath is installed on your system, remove it before continuing with this installation.
3. Login as Administrator.
55
4. To install the software, insert the software CD, or download the Windows SANpath program from www.dothill.com/support/software.htm.
5. Navigate to the \winntand2000\sanpath\4.0 directory.
6. Double-click the setup.exe program and follow the step-by-step instructions during the installation process.
7. Run this command to enter the license serial number and authorization code:
8. Open a Command Prompt and verify that all available drives are seen by SANpath by running the following command from the installation directory:
9. Run the following command to save and implement changes to configuration files:
Note – To chose individual devices to be claimed by SANpath, use –l in the next step, as described in “Specifying a Device for setsp” on page 18.
10. SANpath excludes all devices from host access by default. To turn the exclusion setting off for all devices and make all SANpath-compatible devices accessible by the host, run the command:
Device exclusion is covered in more detail in Table 3-1. and “Turning the Exclusion Setting Off and On” on page 19.
11. Reboot the host.
12. Verify that all available drives are seen by SANpath by running the command:
# sppath –a
# sppath –v
# setsp –g
# setsp –e0 –l all
# setsp –a
56 SANpath User’s Guide • June 2004
Installed Windows FilesThese files are placed in whichever directory is selected at the time of install (with the exception of spd.sys). The default directory is \Program Files\Dot Hill\SANpath 4.0.
These files are removed if SANpath is uninstalled.
Uninstalling with Windows1. From the Control Panel, open Add/Remove Programs (Windows NT) or
Add/Remove Software (Windows 2000).
2. Select SANpath 4.0 and chose Add/Remove (Windows NT) or Change/Remove (Windows 2000). Select Yes when asked to confirm the removal of the software.
3. Reboot the host.
Microsoft Clustering SoftwareIf you are using Microsoft NT Enterprise Edition with Microsoft Cluster support (MSCS), you can install SANpath. In addition to Clustering detecting node failure, SANpath detects data path and HBA failures.
MSCS Requirements and Configuration
SANpath must be installed on both nodes in a cluster.
Microsoft Clustering works with any of the SANnet II 200 SCSI array storage devices, providing they contain firmware revision 3.12G or later. Consult your SANnet user manual for information on determining the firmware revision of your system.
Any two clients in a local area network (LAN) can become clustering nodes, as shown in Figure 8-1..
Table 8-1. Installed Microsoft Windows SANpath Files
File Description
\%windir%\System32\drivers\spd.sys
SANpath driver, 32–bit mode
spd.conf spd configuration file
sppath.exe qualifies and claims storage devices for SANpath control
setsp.exe configures SANpath parameters
sppath.conf sppath configuration file
Uninst.isu uninstall script used by Install Shield
Chapter 8 Setting Up SANpath on Windows 57
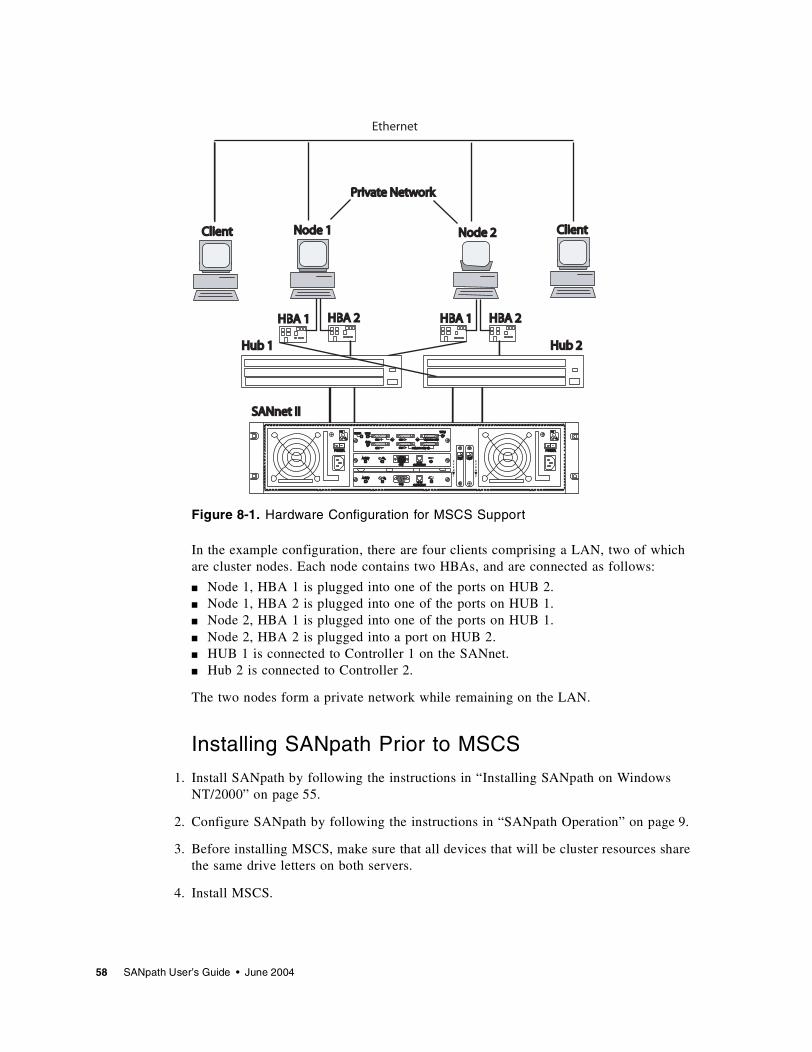
Figure 8-1. Hardware Configuration for MSCS Support
In the example configuration, there are four clients comprising a LAN, two of which are cluster nodes. Each node contains two HBAs, and are connected as follows:
■ Node 1, HBA 1 is plugged into one of the ports on HUB 2. ■ Node 1, HBA 2 is plugged into one of the ports on HUB 1. ■ Node 2, HBA 1 is plugged into one of the ports on HUB 1.■ Node 2, HBA 2 is plugged into a port on HUB 2. ■ HUB 1 is connected to Controller 1 on the SANnet. ■ Hub 2 is connected to Controller 2.
The two nodes form a private network while remaining on the LAN.
Installing SANpath Prior to MSCS
1. Install SANpath by following the instructions in “Installing SANpath on Windows NT/2000” on page 55.
2. Configure SANpath by following the instructions in “SANpath Operation” on page 9.
3. Before installing MSCS, make sure that all devices that will be cluster resources share the same drive letters on both servers.
4. Install MSCS.
POWERPOWER
COMCOM 10/100 BASE-T10/100 BASE-T
ERRORERROR TERMTERM
SNGLSNGL
CH 0CH 0
CH 1CH 1
CH 3CH 3
CH 2CH 2
SNGL BUS CONFSNGL BUS CONF
DUAL BUS CONFDUAL BUS CONF
TERMTERM
DBDB
SBSB SBSB
E
V
E
N
T T
1
E
V
E
N
T T
2
POWERPOWER
ActivityActivity
< >< >......
+
COMCOM 10/100 BASE-T10/100 BASE-T
ActivityActivity
< >< >......
+
PSPS PSPS
EMUEMUEMUEMU
Hub 1Hub 1 Hub 2Hub 2
Node 1Node 1
SANnet IISANnet II
HBA 1HBA 1HBA 2HBA 2HBA 1HBA 1 HBA 2HBA 2
ClientClient Node 2Node 2 ClientClient
Private NetworkPrivate Network
Ethernet
58 SANpath User’s Guide • June 2004
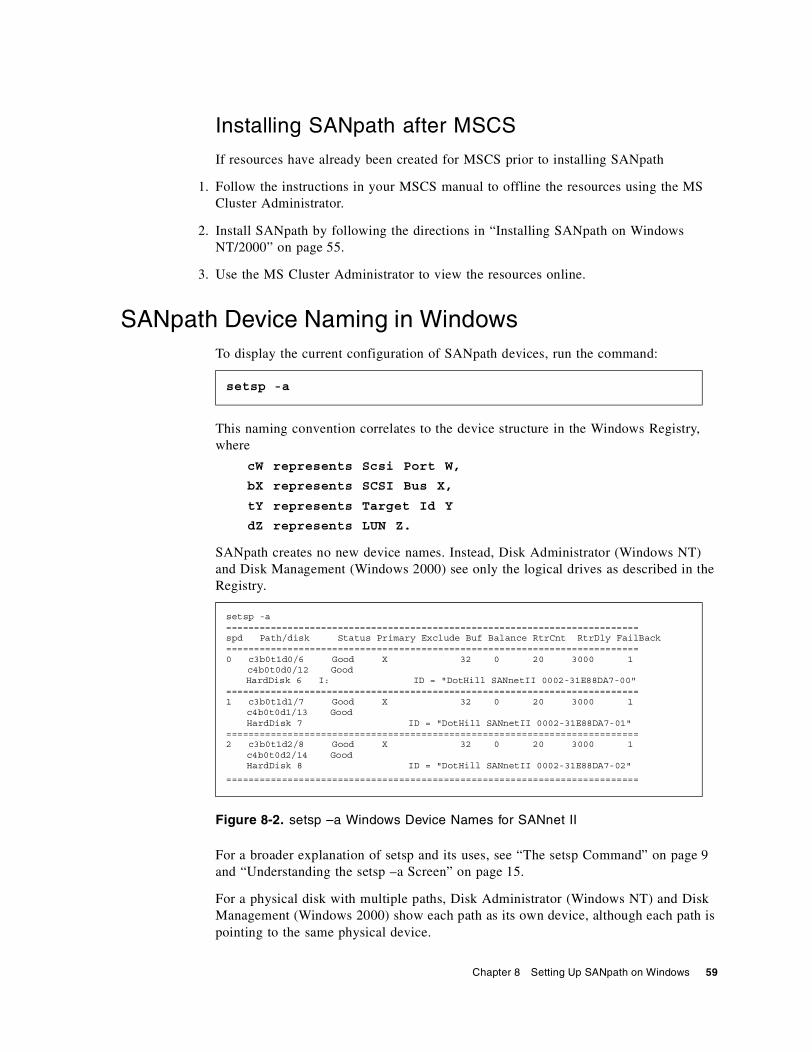
Installing SANpath after MSCS
If resources have already been created for MSCS prior to installing SANpath
1. Follow the instructions in your MSCS manual to offline the resources using the MS Cluster Administrator.
2. Install SANpath by following the directions in “Installing SANpath on Windows NT/2000” on page 55.
3. Use the MS Cluster Administrator to view the resources online.
SANpath Device Naming in WindowsTo display the current configuration of SANpath devices, run the command:
This naming convention correlates to the device structure in the Windows Registry, where
cW represents Scsi Port W,
bX represents SCSI Bus X,
tY represents Target Id Y
dZ represents LUN Z.
SANpath creates no new device names. Instead, Disk Administrator (Windows NT) and Disk Management (Windows 2000) see only the logical drives as described in the Registry.
Figure 8-2. setsp –a Windows Device Names for SANnet II
For a broader explanation of setsp and its uses, see “The setsp Command” on page 9 and “Understanding the setsp –a Screen” on page 15.
For a physical disk with multiple paths, Disk Administrator (Windows NT) and Disk Management (Windows 2000) show each path as its own device, although each path is pointing to the same physical device.
setsp -a
setsp -a==========================================================================spd Path/disk Status Primary Exclude Buf Balance RtrCnt RtrDly FailBack==========================================================================0 c3b0t1d0/6 Good X 32 0 20 3000 1
c4b0t0d0/12 GoodHardDisk 6 I: ID = "DotHill SANnetII 0002-31E88DA7-00"
==========================================================================1 c3b0t1d1/7 Good X 32 0 20 3000 1
c4b0t0d1/13 GoodHardDisk 7 ID = "DotHill SANnetII 0002-31E88DA7-01"
==========================================================================2 c3b0t1d2/8 Good X 32 0 20 3000 1
c4b0t0d2/14 GoodHardDisk 8 ID = "DotHill SANnetII 0002-31E88DA7-02"
==========================================================================
Chapter 8 Setting Up SANpath on Windows 59
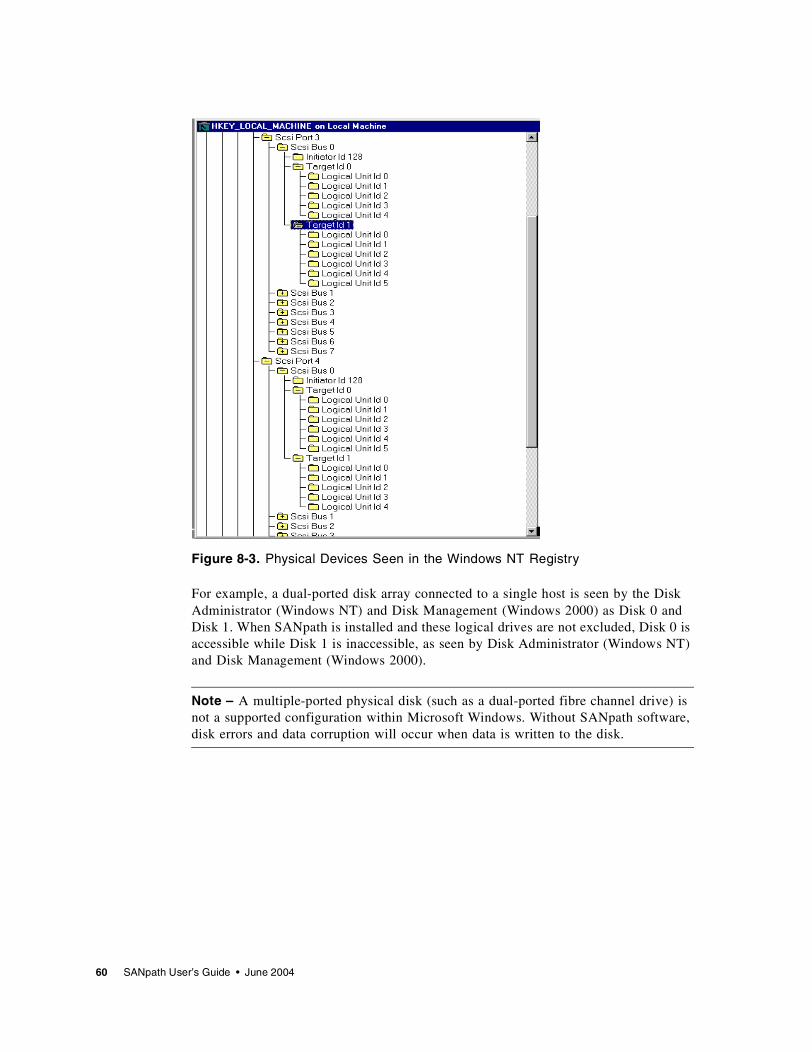
Figure 8-3. Physical Devices Seen in the Windows NT Registry
For example, a dual-ported disk array connected to a single host is seen by the Disk Administrator (Windows NT) and Disk Management (Windows 2000) as Disk 0 and Disk 1. When SANpath is installed and these logical drives are not excluded, Disk 0 is accessible while Disk 1 is inaccessible, as seen by Disk Administrator (Windows NT) and Disk Management (Windows 2000).
Note – A multiple-ported physical disk (such as a dual-ported fibre channel drive) is not a supported configuration within Microsoft Windows. Without SANpath software, disk errors and data corruption will occur when data is written to the disk.
60 SANpath User’s Guide • June 2004
CHAPTER 9
Troubleshooting Windows
This chapter describes how to troubleshoot Windows 2000/NT. Topics covered in this chapter include:
■ “Before Installing SANpath” on page 61■ “Recognizing Non-Zero LUNS” on page 62■ “Errors in the Event Viewer” on page 62
Before Installing SANpath Before installing SANpath software, it is imperative that the host is able to see and access all storage devices through all available paths.
For instance, if you have two HBAs and redundant paths to your storage system, each logical drive should be displayed twice by the Disk Administrator (Windows NT) or Disk Management (Windows 2000) program.
If you cannot see all available storage devices through every path, verify that you have the latest fibre channel or SCSI HBA drivers loaded on your system.
Windows NT
To load HBA drivers in Windows NT, run the SCSI Adapters program in the Control Panel and click the Drivers tab. Drivers for fibre channel HBAs are also installed using the SCSI Adapters program. Once the proper driver is loaded, the system can communicate with your HBA. All devices on the bus are listed under the HBA within the Devices menu. If the host is unable to see the HBA and/or its devices, upgrade to the latest driver. Most drivers can be obtained from the HBA manufacturer’s web site. If the latest driver is installed, review the hardware configuration attached to the host. See “Hardware Preparation” on page 5 for examples.
61
Caution – The system must be rebooted whenever the hardware attached to it is changed. Without a reboot, the system will not recognize new devices. Unrecognized devices are inaccessible to the user.
Recognizing Non-Zero LUNSIn order for Windows NT 4.0 to recognize new devices that use LUNs with values other than 0, one change must be made to the Registry. These steps are not required for Windows 2000.
1. Start the regedt32 Registry Editor, and, under the following subkey:\\HKEY_LOCAL_MACHINE\System\CurrentControlSet\Services\Disk
2. Add the following value:
Value name: LunRescan
Data type: REG_MULTI_SZ
The Data field for this value can be left NULL, which allows a rescan of all devices.
The Windows NT operating system searches for LUNs beginning at LUN0 and scans progressively forward. NT ends its scan at the first non-existent LUN it encounters.
Errors in the Event ViewerAll changes in SANpath devices and activity on devices under SANpath’s control are recorded as System events in the Windows Event Logs, and can be viewed with the Event Viewer utility.
If a path to a storage system becomes unusable, the disk driver reports a “device not ready for access” error (Figure 9-1.).
Windows 2000
In Windows 2000, new devices are detected at boot time, prompting a wizard that guides you through choosing and installing an HBA driver. If a new device is not automatically detected by Windows 2000, or if the wizard fails to install a driver, click the Add/Remove Hardware icon under the Control Panel and follow the onscreen directions. All devices on the bus are listed under the HBA within the Device Manager menu, which can be accessed by clicking Control Panel, then Administrative Tools, and then Computer Management. If the host is unable to see the HBA and/or its devices, upgrade to the latest driver. Most drivers can be obtained from the HBA manufacturer’s web site. If the latest driver is installed, review the hardware configuration attached to the host. See “Hardware Preparation” on page 5 for examples.
62 SANpath User’s Guide • June 2004
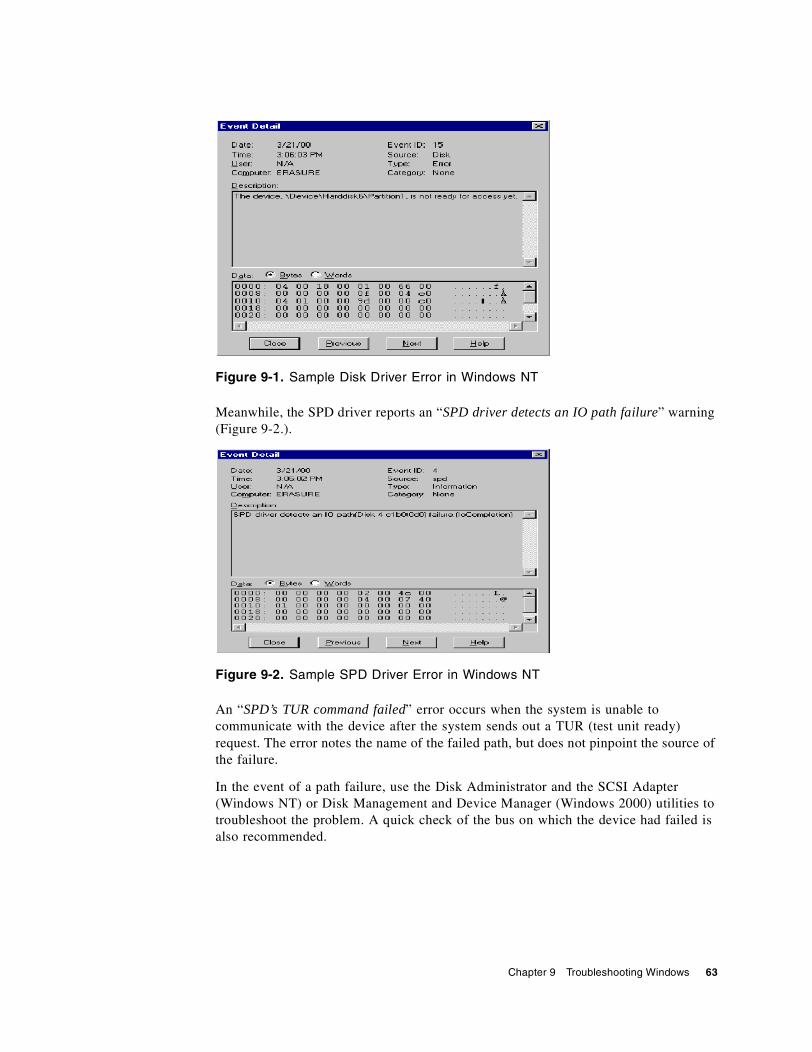
Figure 9-1. Sample Disk Driver Error in Windows NT
Meanwhile, the SPD driver reports an “SPD driver detects an IO path failure” warning (Figure 9-2.).
Figure 9-2. Sample SPD Driver Error in Windows NT
An “SPD’s TUR command failed” error occurs when the system is unable to communicate with the device after the system sends out a TUR (test unit ready) request. The error notes the name of the failed path, but does not pinpoint the source of the failure.
In the event of a path failure, use the Disk Administrator and the SCSI Adapter (Windows NT) or Disk Management and Device Manager (Windows 2000) utilities to troubleshoot the problem. A quick check of the bus on which the device had failed is also recommended.
Chapter 9 Troubleshooting Windows 63

64 SANpath User’s Guide • June 2004
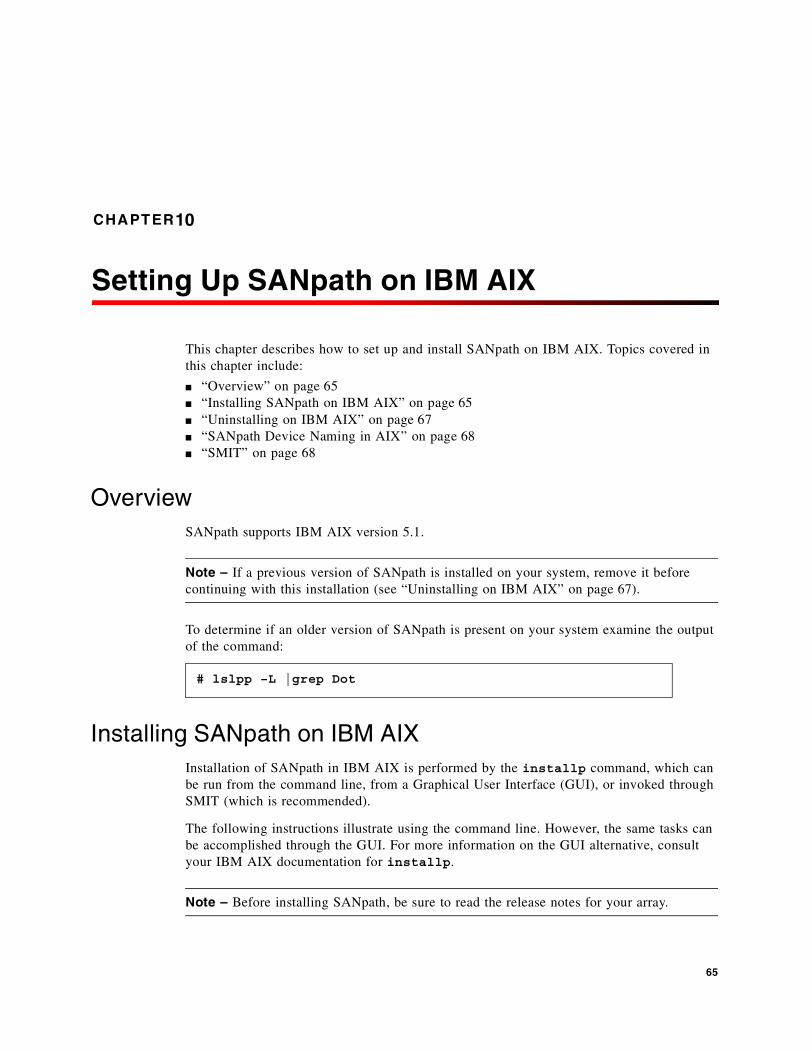
CHAPTER10
Setting Up SANpath on IBM AIX
This chapter describes how to set up and install SANpath on IBM AIX. Topics covered in this chapter include:
■ “Overview” on page 65■ “Installing SANpath on IBM AIX” on page 65■ “Uninstalling on IBM AIX” on page 67■ “SANpath Device Naming in AIX” on page 68■ “SMIT” on page 68
OverviewSANpath supports IBM AIX version 5.1.
Note – If a previous version of SANpath is installed on your system, remove it before continuing with this installation (see “Uninstalling on IBM AIX” on page 67).
To determine if an older version of SANpath is present on your system examine the output of the command:
Installing SANpath on IBM AIX Installation of SANpath in IBM AIX is performed by the installp command, which can be run from the command line, from a Graphical User Interface (GUI), or invoked through SMIT (which is recommended).
The following instructions illustrate using the command line. However, the same tasks can be accomplished through the GUI. For more information on the GUI alternative, consult your IBM AIX documentation for installp.
Note – Before installing SANpath, be sure to read the release notes for your array.
# lslpp –L |grep Dot
65
Follow these steps to manually install the SANpath driver and its supporting files.
1. Set your system hardware up according the instructions in their respective user manuals and in “Hardware Preparation” on page 5.
2. Before installing SANpath software, it is imperative that the host is able to see and access all storage devices through all available paths. For example, if you have two HBAs and redundant paths to your storage system, each logical drive should be displayed twice by the command:
If you cannot see all available storage devices through every path, verify that you have the latest fibre channel or SCSI HBA drivers loaded on your system.
3. To install the software, insert the software CD, or download the AIX SANpath program from www.dothill.com/support/software.htm.
4. Install SANpath by logging on as root and using the installp command as follows:
a. Make a “temp” directory called /tmp/sanpath.
b. Copy the SANpath package to the previously created “temp” directory.
c. Go to the temp directory:
d. Enter the following command:
e. Run this command to enter the license serial number and authorization code:
f. Optionally, remove the /tmp/sanpath directory.
g. Reboot the host.
# lsdev –Cc disk
cd /tmp/sanpath
# installp –ac –d /tmp/sanpath DotHill.SANpath
# sppath –a
66 SANpath User’s Guide • June 2004
Uninstalling on IBM AIX
To remove SANpath:
1. If the SANscape application is installed, enter the following command to stop the SANscape agent:
2. Enter the following command:
3. Enter the following command:
4. Enter the following commands:
where # is the spd number; example: "spd22"
To list all spd's, enter:
5. Enter the following command:
6. Enter the following command:
7. Reboot the system.
8. Restart SANscape, if desired, by typing the following command:
/etc/ssagent stop
setsp –T
/etc/rc.sanpath stop
setsp –x –lall
lsdev –C | grep spd
rmdev –d –l spdctrl
installp –u DotHill.SANpath
/etc/ssagent start
Chapter 10 Setting Up SANpath on IBM AIX 67
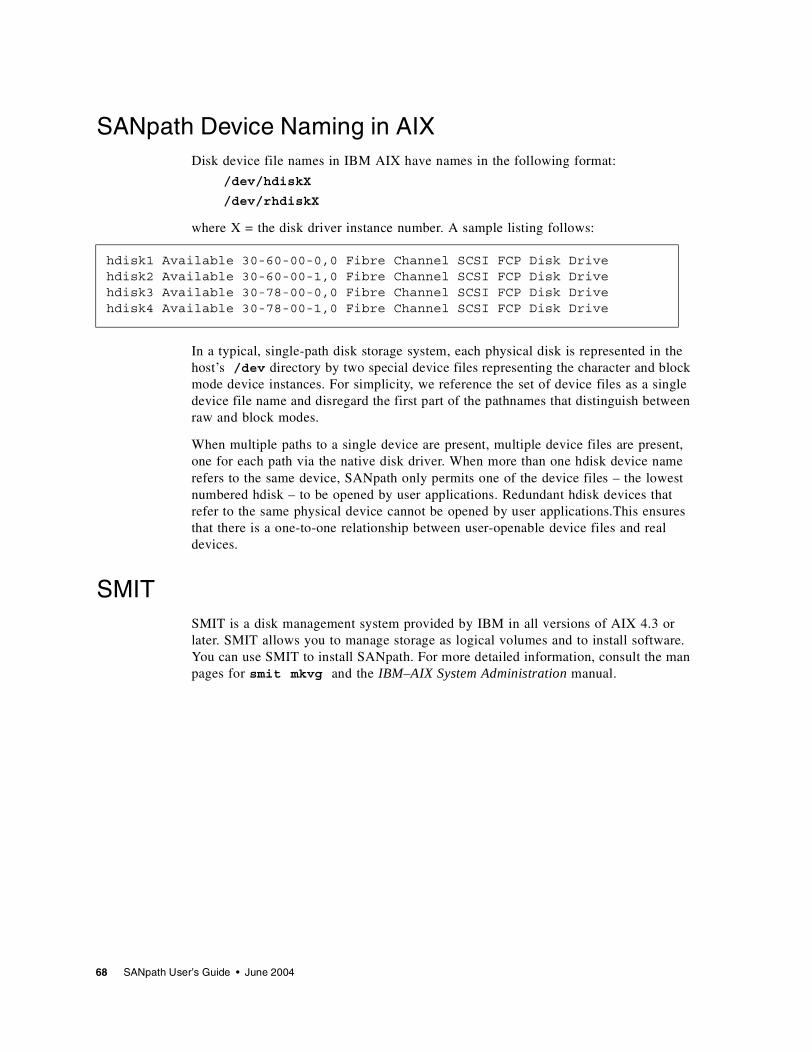
SANpath Device Naming in AIX Disk device file names in IBM AIX have names in the following format:
/dev/hdiskX
/dev/rhdiskX
where X = the disk driver instance number. A sample listing follows:
In a typical, single-path disk storage system, each physical disk is represented in the host’s /dev directory by two special device files representing the character and block mode device instances. For simplicity, we reference the set of device files as a single device file name and disregard the first part of the pathnames that distinguish between raw and block modes.
When multiple paths to a single device are present, multiple device files are present, one for each path via the native disk driver. When more than one hdisk device name refers to the same device, SANpath only permits one of the device files – the lowest numbered hdisk – to be opened by user applications. Redundant hdisk devices that refer to the same physical device cannot be opened by user applications.This ensures that there is a one-to-one relationship between user-openable device files and real devices.
SMIT SMIT is a disk management system provided by IBM in all versions of AIX 4.3 or later. SMIT allows you to manage storage as logical volumes and to install software. You can use SMIT to install SANpath. For more detailed information, consult the man pages for smit mkvg and the IBM–AIX System Administration manual.
hdisk1 Available 30-60-00-0,0 Fibre Channel SCSI FCP Disk Drivehdisk2 Available 30-60-00-1,0 Fibre Channel SCSI FCP Disk Drivehdisk3 Available 30-78-00-0,0 Fibre Channel SCSI FCP Disk Drivehdisk4 Available 30-78-00-1,0 Fibre Channel SCSI FCP Disk Drive
68 SANpath User’s Guide • June 2004
CHAPTER11
Troubleshooting IBM AIX
This chapter describes how to troubleshoot IBM AIX. Topics covered in this chapter include:
■ “Before Installing SANpath” on page 69■ “Troubleshooting IBM AIX” on page 70
Before Installing SANpath Before installing SANpath software, it is imperative that the host is able to see and access all storage devices through all available paths: For instance, if you have two HBAs and redundant paths to your storage system, each logical drive should be displayed twice by the lsdev –Cc disk command.
■ If you cannot see all available storage devices through every path, verify that you have the latest fibre channel or SCSI HBA drivers loaded on your system.
■ To load HBA drivers in IBM AIX, run installp or use the SMIT utility.
Once the proper driver is loaded, the system can communicate with your HBA. All devices on the bus are listed under the HBA within the Devices menu. If the host is unable to see the HBA and/or its devices, upgrade to the latest driver. Most drivers can be obtained from the HBA manufacturer’s web site.
If the latest driver is installed, review the hardware configuration attached to the host. See “Hardware Preparation” on page 5 for examples.
Note – The system must be rebooted whenever the hardware attached to it is changed. Without a reboot, the system will not recognize new devices. Unrecognized devices are inaccessible to the user.
69

Troubleshooting IBM AIX
Failover Error Reporting in AIX
The output from setsp –v (Figure 11-1.) now shows that the primary paths for spd every device’s path 0 and spd 1 (those corresponding to device file names beginning c7) have a Status designation of Bad.
Figure 11-1.setsp –v Output after the Failed Path Is Detected
Recovering from an AIX Path Failure
Path failures generate a lot of output, resulting primarily from the disk driver’s attempts at error recovery. The output of setsp –v will return to normal as shown in the following figure.
Figure 11-2.setsp –v Output after the Failed Path Is Recovered
70 SANpath User’s Guide • June 2004
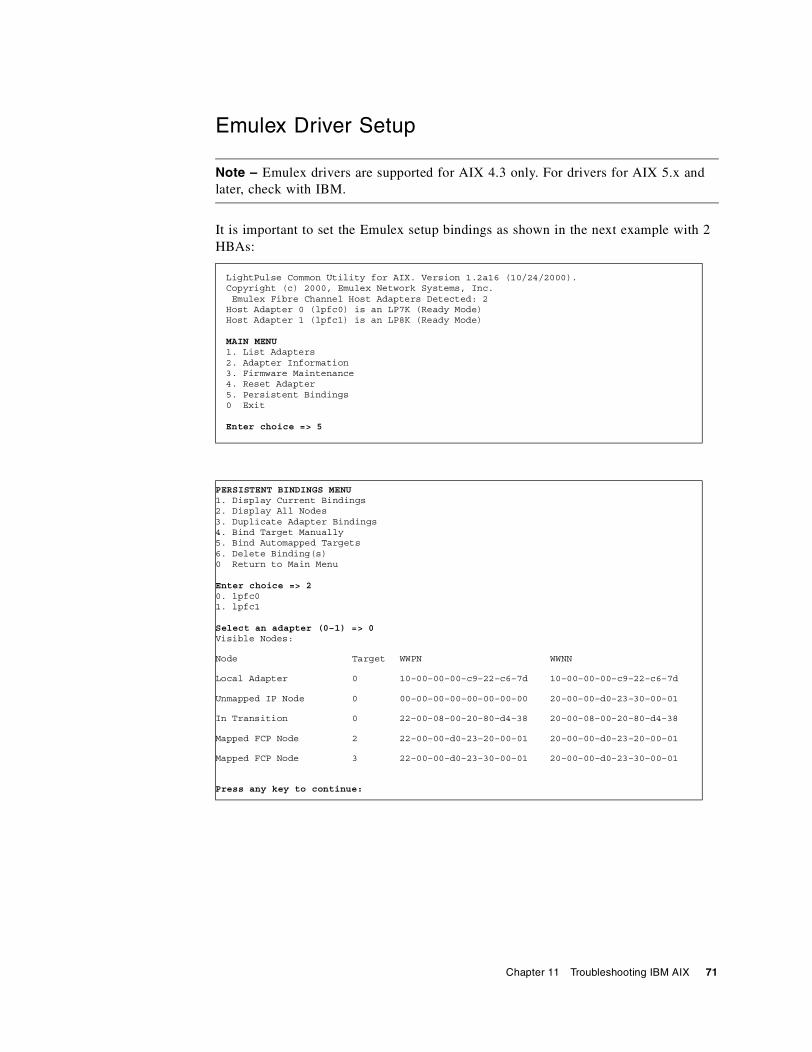
Emulex Driver Setup
Note – Emulex drivers are supported for AIX 4.3 only. For drivers for AIX 5.x and later, check with IBM.
It is important to set the Emulex setup bindings as shown in the next example with 2 HBAs:
LightPulse Common Utility for AIX. Version 1.2a16 (10/24/2000).Copyright (c) 2000, Emulex Network Systems, Inc. Emulex Fibre Channel Host Adapters Detected: 2Host Adapter 0 (lpfc0) is an LP7K (Ready Mode)Host Adapter 1 (lpfc1) is an LP8K (Ready Mode)
MAIN MENU1. List Adapters2. Adapter Information3. Firmware Maintenance4. Reset Adapter5. Persistent Bindings0 Exit
Enter choice => 5
PERSISTENT BINDINGS MENU1. Display Current Bindings2. Display All Nodes3. Duplicate Adapter Bindings4. Bind Target Manually5. Bind Automapped Targets6. Delete Binding(s)0 Return to Main Menu
Enter choice => 20. lpfc01. lpfc1
Select an adapter (0–1) => 0Visible Nodes:
Node Target WWPN WWNN
Local Adapter 0 10–00–00–00–c9–22–c6–7d 10–00–00–00–c9–22–c6–7d
Unmapped IP Node 0 00–00–00–00–00–00–00–00 20–00–00–d0–23–30–00–01
In Transition 0 22–00–08–00–20–80–d4–38 20–00–08–00–20–80–d4–38
Mapped FCP Node 2 22–00–00–d0–23–20–00–01 20–00–00–d0–23–20–00–01
Mapped FCP Node 3 22–00–00–d0–23–30–00–01 20–00–00–d0–23–30–00–01
Press any key to continue:
Chapter 11 Troubleshooting IBM AIX 71

PERSISTENT BINDINGS MENU1. Display Current Bindings2. Display All Nodes3. Duplicate Adapter Bindings4. Bind Target Manually5. Bind Automapped Targets6. Delete Binding(s)0. Return to Main Menu
Enter choice => 20. lpfc0l. pfc1
Select an adapter (0–1) => 1
Visible Nodes:
Node Target WWPN WWNN
Unmapped IP Node 0 10–00–00–00–c9–21–1d–ae 20–00–00–00–c9–21–1d–ae
Unmapped IP Node 0 00–00–00–00–00–00–00–00 20–00–00–d0–23–10–00–01
Inaccessible FCP 4 21–00–00–d0–23–00–00–01 20–00–00–d0–23–00–00–01
Inaccessible FCP 5 21–00–00–d0–23–10–00–01 20–00–00–d0–23–10–00–01
Unmapped IP Node 0 21–00–08–00–20–80–d4–38 20–00–08–00–20–80–d4–38
Unmapped IP Node 0 20–00–00–e0–8b–01–87–52 20–00–00–e0–8b–01–87–52
Press any key to continue:
PERSISTENT BINDINGS MENU1. Display Current Bindings2. Display All Nodes3. Duplicate Adapter Bindings4. Bind Target Manually5. Bind Automapped Targets6. Delete Binding(s)0. Return to Main Menu
Enter choice => 0
MAIN MENU1. List Adapters2. Adapter Information3. Firmware Maintenance4. Reset Adapter5. Persistent Bindings0. Exit
Enter choice => 0
72 SANpath User’s Guide • June 2004
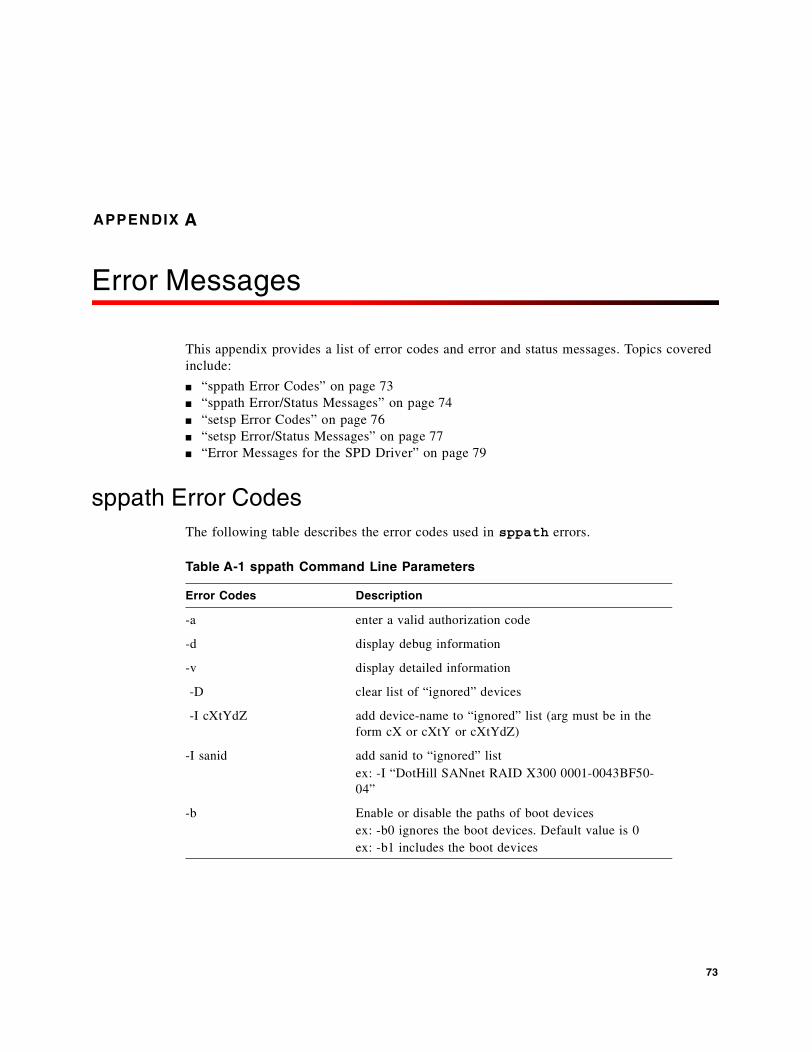
APPENDIX A
Error Messages
This appendix provides a list of error codes and error and status messages. Topics covered include:
■ “sppath Error Codes” on page 73■ “sppath Error/Status Messages” on page 74■ “setsp Error Codes” on page 76■ “setsp Error/Status Messages” on page 77■ “Error Messages for the SPD Driver” on page 79
sppath Error CodesThe following table describes the error codes used in sppath errors.
Table A-1 sppath Command Line Parameters
Error Codes Description
-a enter a valid authorization code
-d display debug information
-v display detailed information
-D clear list of “ignored” devices
-I cXtYdZ add device-name to “ignored” list (arg must be in the form cX or cXtY or cXtYdZ)
-I sanid add sanid to “ignored” list ex: -I “DotHill SANnet RAID X300 0001-0043BF50-04”
-b Enable or disable the paths of boot devicesex: -b0 ignores the boot devices. Default value is 0ex: -b1 includes the boot devices
73
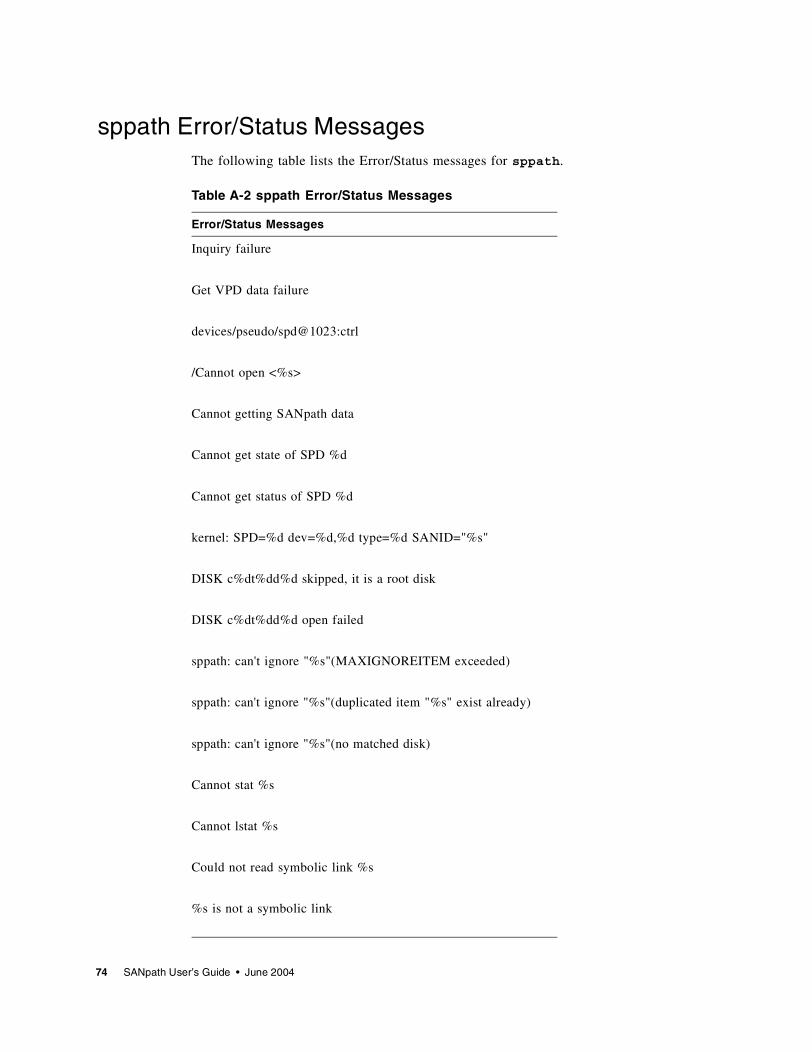
sppath Error/Status MessagesThe following table lists the Error/Status messages for sppath.
Table A-2 sppath Error/Status Messages
Error/Status Messages
Inquiry failure
Get VPD data failure
devices/pseudo/spd@1023:ctrl
/Cannot open <%s>
Cannot getting SANpath data
Cannot get state of SPD %d
Cannot get status of SPD %d
kernel: SPD=%d dev=%d,%d type=%d SANID="%s"
DISK c%dt%dd%d skipped, it is a root disk
DISK c%dt%dd%d open failed
sppath: can't ignore "%s"(MAXIGNOREITEM exceeded)
sppath: can't ignore "%s"(duplicated item "%s" exist already)
sppath: can't ignore "%s"(no matched disk)
Cannot stat %s
Cannot lstat %s
Could not read symbolic link %s
%s is not a symbolic link
74 SANpath User’s Guide • June 2004
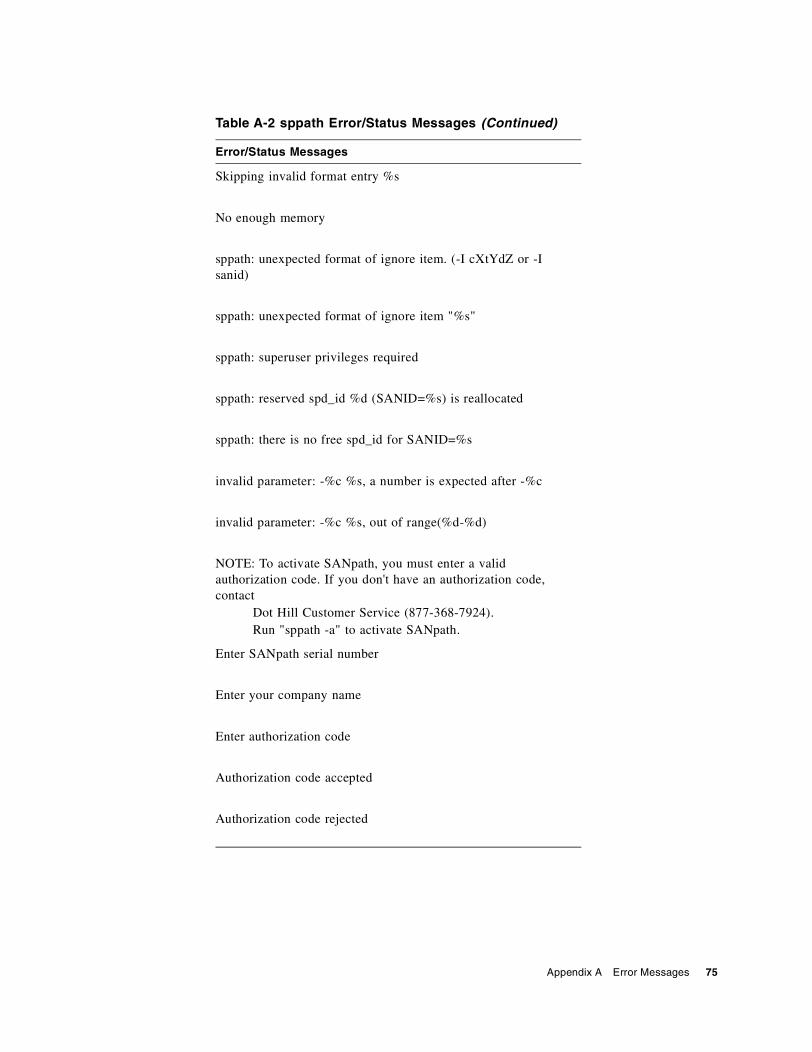
Skipping invalid format entry %s
No enough memory
sppath: unexpected format of ignore item. (-I cXtYdZ or -I sanid)
sppath: unexpected format of ignore item "%s"
sppath: superuser privileges required
sppath: reserved spd_id %d (SANID=%s) is reallocated
sppath: there is no free spd_id for SANID=%s
invalid parameter: -%c %s, a number is expected after -%c
invalid parameter: -%c %s, out of range(%d-%d)
NOTE: To activate SANpath, you must enter a valid authorization code. If you don't have an authorization code, contact Dot Hill Customer Service (877-368-7924). Run "sppath -a" to activate SANpath.
Enter SANpath serial number
Enter your company name
Enter authorization code
Authorization code accepted
Authorization code rejected
Table A-2 sppath Error/Status Messages (Continued)
Error/Status Messages
Appendix A Error Messages 75
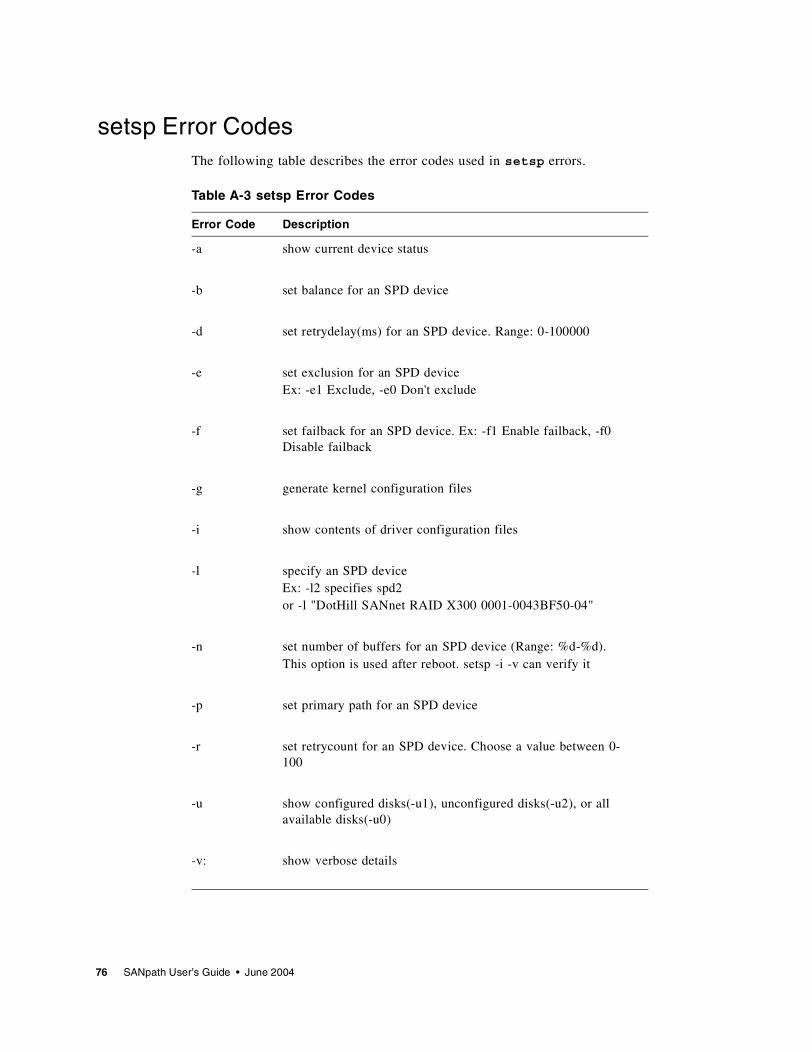
setsp Error CodesThe following table describes the error codes used in setsp errors.
Table A-3 setsp Error Codes
Error Code Description
-a show current device status
-b set balance for an SPD device
-d set retrydelay(ms) for an SPD device. Range: 0-100000
-e set exclusion for an SPD device Ex: -e1 Exclude, -e0 Don't exclude
-f set failback for an SPD device. Ex: -f1 Enable failback, -f0 Disable failback
-g generate kernel configuration files
-i show contents of driver configuration files
-l specify an SPD device Ex: -l2 specifies spd2or -l "DotHill SANnet RAID X300 0001-0043BF50-04"
-n set number of buffers for an SPD device (Range: %d-%d).This option is used after reboot. setsp -i -v can verify it
-p set primary path for an SPD device
-r set retrycount for an SPD device. Choose a value between 0-100
-u show configured disks(-u1), unconfigured disks(-u2), or all available disks(-u0)
-v: show verbose details
76 SANpath User’s Guide • June 2004

setsp Error/Status MessagesThe following table lists the error and status messages for setsp.
-x remove an SPD device from the configuration file Ex: -x -l2 The spd driver will no longer configure it after reboot
-L list SPDs with condition Ex: -L -e1 List excluded LUNs, -L -s0 List bad paths
-N don't apply changes specified with options below to the running system (just for the configuration files)
-S Start an SPD device Ex: -S -l2
-T Stop an SPD device. Ex: -T -l2
Table A-4 setsp Error Messages
Error/Status Messages
spd%d: cannot open spd controller device
spd%d: cannot start device
spd%d: start device OK
spd%d: cannot stop device
setsp: can't undef "%s"(MAXUNDEFITEM exceeded)
No spd devices found
No spd devices matched
invalid spd_id = %d
Table A-3 setsp Error Codes (Continued)
Error Code Description
Appendix A Error Messages 77

setsp: ignore spd_id=%d, SANID="%s"
setsp: "setsp -g -l <spd_id>" restores an ignored SPD
Run "setsp -g" to generate correct configuration file
No errors found
Warning: spd%d's exclude must be 0 because it is a boot device
setsp: cannot exclude the spd%d
setsp: cannot open <%s>
setsp: cannot get path info of <%s>. err = %d
setsp: cannot change settings of spd%d. err = %d
setsp: spd %d is deleted from spd.conf, while it is in kernel yet
It is better to run "setsp -T -l <spd_id>" first
setsp: cannot get SANpath SPD data
setsp: cannot get status of spd%d
setsp: superuser privileges required
setsp: please specify an drive letter, like "setsp -U G:"
setsp: please specify only one of -o or -O
setsp -U may not be run with other arguments
setsp -g may not be run with other arguments
Table A-4 setsp Error Messages (Continued)
Error/Status Messages
78 SANpath User’s Guide • June 2004
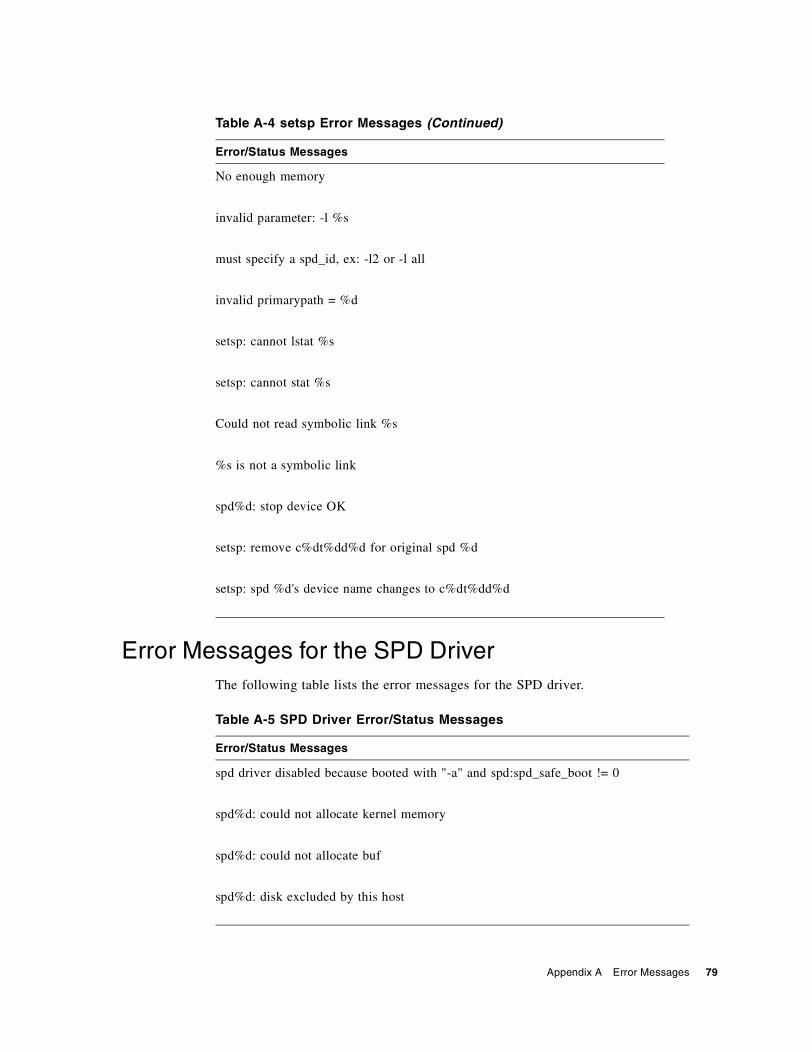
Error Messages for the SPD DriverThe following table lists the error messages for the SPD driver.
No enough memory
invalid parameter: -l %s
must specify a spd_id, ex: -l2 or -l all
invalid primarypath = %d
setsp: cannot lstat %s
setsp: cannot stat %s
Could not read symbolic link %s
%s is not a symbolic link
spd%d: stop device OK
setsp: remove c%dt%dd%d for original spd %d
setsp: spd %d's device name changes to c%dt%dd%d
Table A-5 SPD Driver Error/Status Messages
Error/Status Messages
spd driver disabled because booted with "-a" and spd:spd_safe_boot != 0
spd%d: could not allocate kernel memory
spd%d: could not allocate buf
spd%d: disk excluded by this host
Table A-4 setsp Error Messages (Continued)
Error/Status Messages
Appendix A Error Messages 79
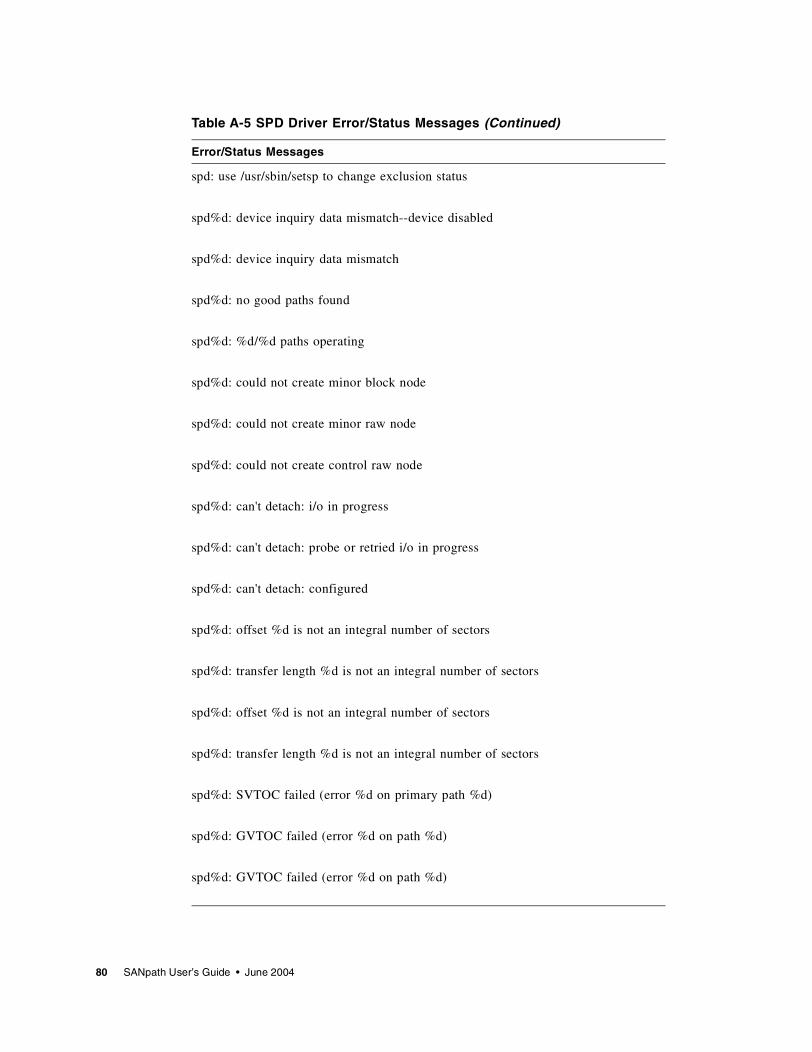
spd: use /usr/sbin/setsp to change exclusion status
spd%d: device inquiry data mismatch--device disabled
spd%d: device inquiry data mismatch
spd%d: no good paths found
spd%d: %d/%d paths operating
spd%d: could not create minor block node
spd%d: could not create minor raw node
spd%d: could not create control raw node
spd%d: can't detach: i/o in progress
spd%d: can't detach: probe or retried i/o in progress
spd%d: can't detach: configured
spd%d: offset %d is not an integral number of sectors
spd%d: transfer length %d is not an integral number of sectors
spd%d: offset %d is not an integral number of sectors
spd%d: transfer length %d is not an integral number of sectors
spd%d: SVTOC failed (error %d on primary path %d)
spd%d: GVTOC failed (error %d on path %d)
spd%d: GVTOC failed (error %d on path %d)
Table A-5 SPD Driver Error/Status Messages (Continued)
Error/Status Messages
80 SANpath User’s Guide • June 2004

spd%d: path failover from %d to %d
spd: could not create kernel thread
spd%d: path %d ok (%s%d)
spd%d: path %d error (%s%d)
Table A-5 SPD Driver Error/Status Messages (Continued)
Error/Status Messages
Appendix A Error Messages 81

82 SANpath User’s Guide • June 2004