samsung camera gx-1l user manual
TRANSCRIPT


1
For Safe Use of Your Camera Thank you for buying a Samsung Digital Camera.
Prior to using this camera, please read the user manual thoroughly.
When you require After Sales service, please bring the camera and the cause of the camera
malfunction (such as battery, Memory card etc.) to the A/S centre.
Please check that the camera is operating properly prior to when you intend to use it (e.g. for a trip or
an important event) to avoid disappointment. Samsung camera takes no responsibility for any loss or
damages that may result from camera malfunction.
Keep the manual in a safe place.
Microsoft, Windows and Windows logo are registered trademarks of Microsoft Corporation
incorporated in the United States and/or other countries.
All brand and product names appearing in this manual are registered trademarks of their respective
companies.
DANGERDANGER indicates an imminently hazardous situation which, if not avoided, will result
in death or serious injury.
WARNINGWARNING indicates a potentially hazardous situation, which, if not avoided, could
result in death or serious injury.
CAUTIONCAUTION indicates a potentially hazardous situation, which, if not avoided, may result
in a minor or moderate injury.
This manual contains instructions on using this camera that will help you to use this camera
safely and correctly. This will help prevent danger and injury to others.

2
DangerDo not attempt to modify this camera in any way. This may result in fire, injury, electric shock orsevere damage to you or your camera. Internal inspection, maintenance and repairs should becarried out by your dealer or Samsung Camera Service centre.Please do not use this product in close proximity to flammable or explosive gases, as this couldincrease the risk of explosion.Should any form of liquid or a foreign object enter the camera, do not use it. Switch off the camera,and then disconnect the power source (batteries or AC Power Adapter).You must contact your dealer or Samsung Camera Service centre. Do not continue to use thecamera as this may cause a fire or electric shock.Do not insert or drop metallic or inflammable foreign objects into the camera through access pointse.g. the memory card slot and battery chamber. This may cause a fire or electric shock.Do not operate this camera with wet hands. This could pose a risk of electric shock.
Warning
Do not use the flash in close proximity to people or animals. Positioning the flash too close to yoursubject’s eyes, may cause eyesight damage.When taking photographs, never point the lens of the camera directly into very strong light. This mayresult in permanent damage to your eyesight.For safety reasons keep this product and accessories out of reach of children or animals to preventaccidents e.g.:
Swallowing batteries or small camera accessories. If an accident should occur, please consult adoctor immediately.There is the possibility of injury from the camera’s moving parts.
Batteries and camera may become hot during prolonged use and it may result in camera malfunction.Should this be the case, allow the camera to sit idle for a few minutes to allow it time to cool.Do not recharge non rechargeable batteries. This may cause an explosion.Do not leave this camera in places subject to extremely high temperatures, such as a sealed vehicle,direct sunlight or other places of extreme variances in temperature. Exposure to extreme temperatures may adversely affect the camera s internal components and couldcause a fire.When in use, do not cover the camera or AC Power Adapter. This may cause heat to build up anddistort the camera body or cause a fire. Always use the camera and its accessories in a well-ventilatedarea.

3
CautionLeaking, overheating, or burst batteries could result in fire or injury.
Use batteries with the correct specification for the camera.Do not short circuit, heat or dispose of battery in fire.Do not insert the batteries with the reverse polarities.
Remove the batteries when not planning to use the camera for a long period of time.Batteries may leak corrosive electrolyte and permanently damage the camera's components.Do not fire the flash while it is in contact with hands or objects. Do not touch the flash after using itcontinuously. It may cause burns.If you are using the AC power adaptor be careful when moving the camera.After use, always switch off the camera before unplugging the adapter from the wall socket. Thenmake sure that any connector cords or cables to other devices are disconnected before moving thecamera. Failure to do so may damage the cords or cables and cause a fire or electric shock.The Lens is attached to the camera body. Do not drop or press the lens by force.It may cause a camera malfunction.Do not pull the lens by hand or do not rotate the zoom ring quickly. It may cause a cameramalfunction. Please be careful when using the lens.Do not extract the external flash from the camera by force. It may cause damage to the top of thecamera.
Only use specified batteries with this camera. Use of other batteries can cause overheating orexplosion.Replace the batteries at the same time. Do not mix battery brands, type or an old battery with a newone. It may cause explosion or overheating.The battery should be inserted correctly with regard to polarity (+ and -) marked on the battery andthe camera.AA lithium batteries, AA alkaline batteries and CR-V3 are not rechargeable. Do not disassemble thebattery. Recharging and disassembling can cause explosion or overheating.
PRECAUTIONS FOR BATTERY USAGE

4
ContentsFOR SAFE USE OF YOUR CAMERA 1
Danger 2
Warning 2
Caution 3
PRECAUTIONS FOR BATTERY USAGE 3
Contents 4
Composition of the Operating Manual 8
Before Using Your Camera 11
GX-1L Camera Characteristics 10
Checking the Contents of the Package 11
Names of Working Parts 12
Camera 12
LCD Monitor Indications 14
Viewfinder Indications 18
LCD Panel Indications 20
Getting Started 23
Attaching the Strap 22
Connecting to a Power Source 23
Batteries 24
Battery Level Indicator 25
Approximate Playback Time (new batteries) 25
Using the AC Adapter (Optional) 26
Using the memory card 27
Turning the Camera On and Off 30
Initial Settings 31
Setting the Display Language 31
Setting the Date and Time 33
Attaching the Lens 35
Adjusting the Viewfinder Diopter 37
Basic Operations
Basic Shooting Operation 40
Holding the Camera 40
Letting the Camera Choose the Optimal Settings 41
Selecting the Appropriate Capturing Mode for Scenes 45

5
ContentsUsing the Zoom Lens 48
Using the Built-in Flash 49
Other Shooting Modes 53
Continuous Shooting 53
Self-Timer Shooting 55
Remote Control Shooting (Remote Control F: Sold Separately) 59
Using Mirror Lock Up Function to Prevent Camera Shake 62
Playing Back Still Pictures 63
Playing Back Images 63
Rotating Images 64
Enlarging Playback Images 65
Nine-Image Display 66
Slideshow 68
Connecting the Camera to AV Equipment 70
Processing Images with Filters 71
Deleting Images 73
Deleting a Single Image 73
Deleting All Images 74
Deleting Selected Images (from Nine-Image Display) 75
Protecting Images 77
Protecting Images from Deletion (Protect) 77
Setting the Printing Service (DPOF) 79
Printing Single Images 79
Settings for All Images 81
Printing Using PictBridge 83
Setting [Transfer Mode] 84
Connecting the Camera to the Printer 85
Printing Single Images 86
Printing All Images 88
Printing Images Using the DPOF Settings 90
Disconnecting the Cable from the Printer 90
Menu Reference
Using the Button Functions 92
Capture Mode 92
Playback Mode 94
Using the Menu 96

6
ContentsHow to Operate the Menu 96
[ Rec. Mode] Menu Setting Items 98
[ Playback] Menu Setting Items 98
[ Set-up] Menu Setting Items 99
[ Custom Setting] Menu Setting Items 100
Using the Fn Menu 102
Capture Mode 102
Playback Mode 103
Using the Mode Dial 104
Function Reference
Setting the Recorded Pixels and Quality Level 108
Setting the Image Tone 108
Setting the Recorded Pixels 109
Setting the Quality Level 110
Setting the Saturation/ Sharpness/ Contrast 111
Setting the White Balance 112
Setting the Sensitivity 115
Setting the Color Space 117
Focusing 118
Using the Autofocus 118
Setting the AF Mode 121
Setting the Focusing Area 122
Fixing the Focus (Focus Lock) 123
Adjusting the Focus Manually (Manual Focus) 125
Setting the Exposure 127
Effect of Aperture and Shutter Speed 127
Selecting the Metering Method 129
Changing the Exposure Mode 131
Setting the Exposure 140
Changing the Exposure and Shooting (Auto Bracket) 142
Checking the Composition, Exposure and Focus Before Shooting 145
Using the Built-in Flash 148
Compensating Flash Output 148
Allowing Shooting while Charging Flash 149
Flash Characteristics in Each Exposure Mode 149
Distance and Aperture when Using the Built-in Flash 151

7
ContentsUsing an External Flash (Optional) 153
Settings During Playback 158
Changing Playback Display Method 158
Setting the Slideshow Display Interval 159
Camera Settings 160
Formatting the SD Memory Card 160
Turning the Beep On and Off 161
Changing the Date and Time and the Display Style 161
Setting the World Time 162
Setting the Display Language 165
Turning the Guide Display On and Off 165
Adjusting the Brightness of the LCD Monitor 166
Selecting the Video Output Format 166
Setting Auto Power Off 167
Resetting the File Number 168
Displaying Histogram and Bright Portion 169
Resetting to Default Settings 170
Resetting Rec. Mode/ Playback/ Set-up Menu 170
Resetting the Custom Function Menu 171
Software information
Software Notes 174
About the software 175
Setting up the application software 176
Starting PC mode 177
Removable Disk 178
Removing the removable disk 180
Digimax Master 182
Appendix
Default Settings 190
Cleaning the CCD 194
Optional Accessories 196
Error Messages 198
Troubleshooting 200
Main Specifications 204
Glossary 206

8
Composition of the Operating ManualThis operating manual contains the following chapters.
1. Before Using Your CameraExplains camera characteristics, accessories and the names of various parts.
2. Getting StartedExplains your first steps from purchasing the camera to taking pictures. Be sure to read it and followthe instructions.
3. Basic OperationsExplains the procedures for taking, playing back, and printing still pictures.Read it to learn all of the basic operations about capturing, playing back, and printing.
4. Menu ReferenceExplains the functions of GX-1L by buttons and menus.
5. Function ReferenceIntroduces functions to further enhance your GX-1L experience.
6. Software informationExplains software installation and how to use the program.
7. AppendixExplains troubleshooting, introduces optional accessories and provides various resources.

Check the package contents and names of working parts before use.
GX-1L Camera Characteristics 10
Checking the Contents of the Package 11
Names of Working Parts 12
1 Before Using Your Camera

10
GX-1L Camera CharacteristicsFeatures a 23.5x15.7 mm CCD with 6.1 million effective pixels for high precision and a wide dynamicrange.Uses CR-V3, AA lithium batteries, rechargeable AA Ni-MH batteries or AA alkaline batteries.Features a Digital Preview function for checking the image to ensure that the desired result isachieved.Features a large 2.5-inch LCD monitor with 210,000 pixels and a brightness adjusting function forhigh-precision viewing performance.Concepts of Universal Design have been implemented to various parts of the camera.The large, high-resolution LCD monitor and easy-to-use menus make the camera easier to operate.
The captured area (view angle) will differ between the GX-1L and 35 mm SLR cameras even if thesame lens is used because the format size for 35 mm film and CCD are different.Sizes for 35 mm film and CCD
35 mm film : 36x24 mmGX-1L CCD : 23.5x15.7 mm
Angles of view being equal, the focal length of a lens used with a 35 mm camera must beapproximately 1.5 times longer than that of GX-1L. To obtain a focal length framing the same area,divide the focal length of the 35 mm lens by 1.5.
Example) To capture the same image as a 150 mm lens attached to a 35 mm camera150÷1.5=100Use a 100 mm lens with the GX-1L.
Inversely, multiply the focal length of the lens used with GX-1L by 1.5 to determine the focal lengthfor 35 mm cameras.
Example) If 300 mm lens is used with GX-1L300x1.5=450Focal length is equivalent to 450 mm lens on a 35 mm camera.

11
Checking the Contents of the PackageThe following accessories are packaged with your camera.Check that all accessories are included.
Hot shoe cover(Installed on camera)
Eyecup(Installed on camera)
Viewfinder cap
Body mount cover(Installed on camera)
USB cableI-USB17
Video cableI-VC28
Software (CD-ROM)S-SW43
StrapO-ST10
AA Alkaline batteries*(four)
Operating Manual(this manual)
* The batteries packaged with the camera are for checking the camera's functionality.

12
Names of Working Parts
Shutter release button
button
button
button
button
Lens mount index
Tripod socket
Mirror
Focus modelever
AF coupler
Lens information contactsLens unlock button
Self-Timer lamp/Remote control receiver
Battery cover
button
button
/ button
Four-way controller
e-dial
Main switch
Camera

13
Names of Working Parts
button Built-in flash
Hot shoe
Card cover
LCD panel
Diopter adjustmentlever
button
Card access lamp
Card coverunlock lever
Viewfinder
Mode dial
Strap lug
LCD monitor
USB/ Videoterminal
DC input terminal
Terminal cover
Cable switchterminal

14
Names of Working Parts
The following indicators appear on the LCD monitor dependingon the status of the camera.
Guides appear on the LCD monitor for 3 seconds when powered on or setting dial mode.
1. Flash mode (Active mode appears) (p.49)2. Drive mode (p.102)3. AE metering (p.129)4. AF mode (p.118)5. Focusing area (p.122)6. White balance (p.112)7. Sensitivity (p.115)8. Shooting mode, Scene mode (p.104)9. World time warning display (p.162)10. Date and time (p.161)
* Indicators 3,5,6 and 7 only appear when the settingother than the default setting is selected. 9 only appearswhen World Time is On ( ).
12 : 3012 : 30
16001600
2006 / / 0106062006 / / 01
1
8
10
2 3 54 6 7
9
AF.SAF.S
LCD monitor
While Power is On or Operating Mode Dial
Select [Off] for [Guide display] in [ Set-up] to not show indicators. (p.165)
INFORMATION
LCD Monitor Indications
Night Scene

15
Names of Working Parts
Capture Mode
Press the button in capture mode to display the capture function settings on the LCD monitorfor 15 seconds.
1. AF mode (p.118)2. Mode dial position (p.104)3. AE metering (p.129)4. Flash mode (p.49)5. Drive mode (p.102)6. Auto bracket (p.144)7. ISO sensitivity (p.115)8. Image tone (p.108)9. Quality level (p.110)10. Recorded pixels (p.109)
11. Color space (p.117)12. White balance (p.112)13. Date and time (p.161)14. Focusing area (p.122)15. Saturation (p.111)16. Sharpness (p.111)17. Contrast (p.111)18. Lens focal length19. SCN mode (Only displayed in Scene
mode.)
Detailed Information
Explanation of Set Mode Dial
- Press the four-way controller ( ) to view explanation of set mode dial.
Detailed Info Detailed Info
Detailed Info
Night Scene
Used for night scenes.Use a tripod, tripod, etc. toprevent shaking

16
Names of Working Parts
Playback Mode
The camera switches screen displays every time you press button during playback.
Detailed Information
1. Captured images2. Rotate icon (p.64)3. Image folder number and file number
(p.167, 168)4. Protect icon (p.77)5. AF mode (p.121)6. Focusing area (p.122)7. Shutter speed (p.133)8. Aperture (p.135)9. EV compensation (p.140)10. Saturation (p.111)11. Shooting mode (p.104)12. AE metering (p.129)13. Flash mode (p.49)
14. Drive mode (p.102)15. Auto bracket (p.144)16. Sharpness (p.111)17. ISO sensitivity (p.113)18. Image tone (p.106)19. Contrast (p.111)20. Quality level (p.110)21. Recorded pixels (p.109)22. Color space (p.117)23. Lens focal length24. White balance (p.112)25. Captured date and time (p.161)26. SCN mode (Only displayed in Scene
mode.)
You can change the information initially displayed by pressing the button. (p.158)
INFORMATION

17
Names of Working PartsHistogram Display
1. Capture quality (Image file type)2. Image folder number and file number (p.167, 168)3. Protect icon (p.77)4. Histogram
Areas where blooming occurred blink if [Bright Portion] warning is on.Press the four-way controller ( ) in the histogram display to move the Histogram displayposition up or down.
INFORMATION

18
Names of Working Parts
1. Autofocus frame (p.37)2. Spot metering frame (p.129)3. Flash status (p.49)
Appears when flash is available and blinks when flash is recommended but not set.4. ISO sensitivity warning
Appears when warning value is exceeded.5. Continuous mode
Appears when [AF Mode] in the [ Rec. Mode] is set to (Continuous mode).6. Auto Scene mode icon (p.45)
Icon for Auto Scene mode in use appears.Night Scene Portrait, Moving Object, Macro, Landscape, Portrait, mode
in 7. Focus indicator (p.42)
Appears when image is focused.8. Shutter speed (p.133)
Shutter speed when capturing or adjusting (underlined when shutter speed can be adjusted with e-dial).
9. Aperture (p.135)Aperture when capturing or adjusting (underlined when aperture can be adjusted with e-dial).
10. EV compensation (p.140)Appears when EV compensation is available or in use.Blinks slowly when compensating flash output.Blinks quickly when compensating exposure and flash output.Adjusted value appears where number of recordable images is shown.
1
3 4 5
12 13 14
6 7 8 9 10 11
2
1
Viewfinder Indications

19
Names of Working Parts11. Number of recordable images/ EV compensation
Show the number of recordable images with current quality and recorded pixel setting.Show the number of continuous shooting recordable images. (p.100)EV compensation value appears when EV compensation is being adjusted. (p.132)The difference with the appropriate exposure value appears if exposure mode is . (p.137)
12. Manual focus (p.125)Appears when focus mode is .
13. SCN mode iconAppears when taking pictures in SCN mode.
14. AE lock indicator (p.141)Appears during AE lock.

20
Names of Working Parts
1
3
4
2
98
7
111065
1. Shutter speed (p.133)2. Aperture (p.135)3. Flash mode (p.49)
: Built-in flash is ready(when blinking, flash should be used)
: Flash off: Auto discharge: Red-eye reduction flash on
4. Drive mode (p.102): Single frame shooting: Continuous shooting: Self-Timer shooting: Remote control shooting
5. Focusing area (p.122)No indicator : Auto
: Spot
6. AE metering (p.129)No indicator : Multi-segment metering
: Center-weighted metering: Spot metering
7. Auto bracketing (p.144)8. White balance (p.112)
(Not displayed when set to Auto)9. Battery level (p.25)10. EV compensation (p.140)11. Number of recordable images/
EV compensation value/ PC (Pb)(PC=Personal Computer (mass storage),Pb=PictBridge)
The following information appears in the LCD panel on top of the camera.
LCD Panel Indications

This chapter explains your first steps from purchasing the camera to taking pictures. Be sure toread it and follow the instructions.
Attaching the Strap 22
Connecting to a Power Source 23
Inserting/ Removing the SD Memory Card 27
Turning the Camera On and Off 30
Initial Settings 31
Attaching the Lens 35
Adjusting the Viewfinder Diopter 37
2 Getting Started

22
Attaching the Strap1. Pass the end of the strap through the strap lug, then secure on
the inside of the clasp.
2. Pass the other end of the strap through the other strap lug on thecamera, then secure on the inside of the clasp.

CR-V3, AA lithium batteries and AA alkaline batteries are not rechargeable.Do not open the battery cover or remove the batteries while the power is on.Remove the batteries when you will not use the camera for a long while. The batteries may leak.If the date and time settings have been reset when you insert new batteries after a long while,follow the procedure for Setting the Date and Time”. Insert batteries correctly. Batteries inserted incorrectly may cause a camera breakdown. Wipe theelectrodes of the batteries before inserting.Replace all the batteries at the same time. Do not mix battery type, brands or an old battery with anew one.
23
Connecting to a Power Source
1
2
Insert batteries into the camera. Use two CR-V3 or four AA Ni-MH batteries, AA lithium batteries, orAA alkaline batteries.
1. Push and hold the battery cover unlock lever as shown in theillustration ( ), and slide the battery cover toward the lens ( ),and then flip open.
2. Insert the batteries according to the + / - indicators in thebattery chamber.
This camera is packaged with AA alkaline batteries for checking the camera’s functionality but someother kinds of batteries are also compatible. Refer to “Batteries” (p.24) for details on compatiblebatteries and when to use them.
Inserting the Batteries
INFORMATION

24
Connecting to a Power Source3. Press down on the batteries with the battery cover ( ) and
slide it as shown in the illustration ( ) to close.
You can use four kinds of batteries with your camera. Battery performance differs by type. Please choose the type that best suits your purpose.
CR-V3 The CR-V3 is a long-life battery and is convenient when traveling.
AA lithium batteries Recommended in cold climates.
AA Ni-MHrechargeablebatteries
AA alkaline batteries
These are rechargeable and are economical.
Provided with the camera. These are easily obtainable when your usualbatteries run out but they may not support all the camera functions undercertain conditions. We do not recommend their use except in emergenciesand checking the camera's functionality.
1
2
Check the battery orientation if the camera does not operate properly after replacing the batteries.
INFORMATION
Oxyride batteries and rechargeable CR-V3 batteries may cause malfunctions due to their voltagecharacteristics so their use is not recommended.
INFORMATION
Batteries

25
Connecting to a Power Source
You can confirm remaining battery level by checking the displayed on the LCD panel.
The still picture storage capacity is based on measuring conditions in accordance with CIPAstandards and the playback time is based on SAMSUNG measuring conditions. Some deviation fromthe above figures may occur in actual use depending on shooting mode and shooting conditions.
Battery Level Indicator
Approximate Playback Time (new batteries)
lit : Battery is full.
lit : Battery is running low.
lit : Battery is almost empty.
blink : The camera turns off after displaying a message.
Battery performance temporarily decreases as the temperature decreases. When using thecamera in cold climates, have extra batteries on hand and keep them warm in your pocket.Battery performance will return to normal when returned to room temperature.AA alkaline batteries may not support all the camera functions. We do not recommend their useexcept in emergencies and checking the camera's functionality.Have extra batteries ready when traveling overseas, taking pictures in cold climates, or when youwill be taking a lot of pictures.
INFORMATION
1,500 minutes 900 minutes 650 minutes 950 minutes
800 minutes 540 minutes 400 minutes 520 minutes
310 minutes 200 minutes 130 minutes 490 minutes
Normalrecording
Batteries
AA Alkaline Batteries
AA rechargeable batteries
(NiMH)
CR-V3
Playbacktime
Flash photography
50% use 100% use

26
Connecting to a Power Source
We recommend using the AC adapter D-AC10 (optional) when using the LCD monitor for a long timeor when connecting to your PC.
1. Make sure the camera is turned off before opening the terminal cover.2. Connect the DC terminal on the AC adapter to the DC input terminal on the camera.3. Connect the AC plug cord to the AC adapter.4. Plug the AC cord into the power outlet.
Make sure the camera is turned off before connecting or disconnecting the AC adapter.Make sure connections are secure between the camera, AC adapter, AC plug cord terminal andthe power outlet. SD Memory Card and data will be corrupted if disconnected while camera isrecording or reading data.Be sure to read the AC adapter D-AC10 operating manual when using the AC adapter.The rechargeable batteries in your camera will not charge when connected to the AC adapter.
INFORMATION
Using the AC Adapter (Optional)
1
2
3
4
AC adapter (D-AC10, optional) for PENTAX DSLR camera can be used with SAMSUNG DSLRcamera.

27
Using the memory card
Captured images are recorded on the SD Memory Card. Make sure the camera is turned off beforeinserting or removing the SD Memory Card (market product).
Do not remove the SD Memory Card while card access lamp is lit.Format new SD Memory Card. Also format SD Memory Card used with other cameras. Refer to “Formatting the SD Memory Card” (p.160) for details on formatting.
INFORMATION
Inserting/ Removing the SD Memory Card
1. Press the card cover unlock lever in the indicated direction.Card cover opens.
2. Insert the card all the way with the SD Memory Card labeltoward the LCD monitor.
3. Close the card cover.
4. Push the SD Memory Card in once to remove.

28
Using the memory card
The SD Memory Card is equipped with a write-protect switch.Setting the switch to LOCK protects the existing data by prohibitingrecording of new data, deletion of existing data or formatting of thecard.Care should be taken when removing the SD Memory Cardimmediately after using the camera because the card may be hot.Do not remove the SD Memory Card or turn the camera off whiledata is being saved to the card, images are being played back, or the camera is connected to acomputer with the USB cable. This may cause the data to be lost or the card to be damaged.Do not bend the SD Memory Card or subject it to violent impact. Keep it away from water and storeaway from high temperatures.Do not remove the SD Memory Card during formatting. The card may be damaged beyond use.Data on the SD Memory Card may be deleted in the following circumstances.Samsung Camera does not accept any liability for data that is deleted if(1) the SD Memory Card is mishandled by the user.(2) the SD Memory Card is exposed to static electricity or electrical interference.(3) the card has not been used for a long time.(4) the card is ejected or the battery is removed while the data on the card is being recorded or
accessed.The SD Memory Card has a limited service life. If it is not used for a long time, the data on the cardmay become unreadable. Be sure to regularly make a backup of important data on a computer.Avoid using or storing the card where it may be exposed to static electricity or electrical interference.Avoid using or storing the card in direct sunlight or where it may be exposed to rapid changes intemperature or to condensation.For information on compatible SD Memory Card, visit the Samsung Camera website or contact yournearest Samsung Camera customer service center.Format new SD Memory Cards. Also format SD Memory Card used with other cameras.
Formatting the SD Memory Card (p.160)If you are going to discard, give away or sell your SD memory card you should ensure that the dataon the card is completely deleted or the card itself is destroyed if it contains any personal or sensitiveinformation. Please note that formatting the SD card will not necessarily delete the data so that itcannot be recovered using off the shelf data recovery software. There are off the shelf secure datadeletion software programs available that will completely delete the data. In any case the data onyour SD memory card should be managed at your own risk.
Write-protectswitch
Precautions When Using the SD Memory Card

29
Using the memory card
Choose the number of pixels (size) and quality level (data compression rate) of pictures according tohow you intend to use the pictures you have taken.Pictures with larger recorded size or the more are clearer when printed.The number of pictures that can be taken (the number of pictures that can be recorded on an SDMemory Card) becomes less with larger file sizes.The quality of the captured photo or printed picture depends on the quality level, exposure control,resolution of the printer and a variety of other factors so you do not need to select more than therequired number of pixels. For example, to print in postcard size, (1536 1024) is adequate. Set the appropriate recorded size and quality level depending on purpose.
Choose the appropriate number of recorded pixels and quality level for images on the [ Rec. Mode]menu.
Setting the Recorded Pixels (p.109)Setting the Quality Level (p.110)
- The above table shows the approximate image storage capacity and recording time when using a128 MB SD Memory Card.
- The above figures may vary depending on the subject, shooting conditions, shooting mode and SDMemory Card, etc.
Recorded Pixels, Quality Level and Approximate Image Storage Capacity
Recorded Pixels and Quality Level
11 - - -
- 35 70 117
- 51 96 159
- 105 171 267
(3008x2008)
(3008x2000)
(2400x1600)
(1536x1024)
Recorded Pixels
Quality LevelRAW
Best Better Good

30
Turning the Camera On and OffMove the main switch to [ON] position.The camera will turn on. Move the main switch to [OFF] position to turn off the camera.
Always turn the camera off when not in use.The power will automatically turn off when you do not perform any operations within a set periodof time. (Default setting is 1 minute) (p.167)
INFORMATION

31
Initial SettingsThe first time the camera is turned on after purchasing, the “Initial Settings” screen appears on theLCD monitor. Follow the procedure below to set the language displayed on the LCD monitor and thecurrent date and time.Once setting is done, these will not need to be set again when turning your camera on.
You can choose the language in which the menus, error messages, etc. are displayed from thefollowing: English, French, German, Spanish, Italian, Swedish, Dutch, Russian, Korean, Chinese(traditional/ simplified) and Portuguese.
1. Press the four-way controller ( ).
2. Use the four-way controller ( ) to select your applicablelanguage.The default setting is English.
3. Press the button.
Setting the Display Language
Initial SettingsLanguage English
New York
DST
Cancel OK
OK
Language
EnglishFrançaisDeutschEspañolItalianoSvenska
Nederlands
Português

32
Initial Settings4. Press the four-way controller ( ).
The cursor moves to [ ].
5. Press the four-way controller ( ) to select the city.
6. Press the four-way controller ( ).The cursor moves to DST (daylight saving time).
7. Use the four-way controller ( ) to select (On) or (Off).
8. Press the button.The screen for setting the date and time will be displayed.
When an Incorrect Language is Set
Follow the procedure below to display the screen for setting the language, and go to Step 2 on p.31to set the language again.
1. Turn the camera off and turn it on again.2. Press the button.3. Press the four-way controller ( ) twice.4. Press the four-way controller ( ) five times.5. Press the four-way controller ( ) once.
The screen for setting the language will be displayed.
OK
OK
Initial Settings
Language English
New York
DST
Cancel OK
Initial Settings
Language English
New York
DST
Cancel OK

33
Initial Settings
1. Press the four-way controller ( ).The frame moves to [mm/dd/yy].
2. Use the four-way controller ( ) to choose the date style.
3. Press the four-way controller ( ).The frame moves to [24h].
4. Use the four-way controller ( ) to select 24h (24 hourdisplay) or 12h (12-hour display).
5. Press the four-way controller ( ).The frame returns to [Date Style].
6. Press the four-way controller ( ).The frame moves to [Date].
Set the current date and time and the display style.
OK
24h
2006/0101 /
00 : 00
24h
00 : 00
OK
2006/0101 /
Setting the Date and Time
Date Adjust
Date Stylemm/dd/yy
Date
Time
Time
Cancel OK
Date Adjust
Date Stylemm/dd/yy
Date
Cancel OK

34
Initial Settings7. Press the four-way controller ( ).
The frame moves to the month.
8. Use the four-way controller ( ) to set the month.Set the day and year in the same manner.Next, set the time.If you select [12h] in Step 4, the setting switches between am and pm depending on the time.
9. Press the button.The camera is ready to take pictures. If you set the date and time with the menu operations, thescreen will return to the [ Set-up] menu.Press the button again.
24h
00 : 00
2006/0101 /
OK
You can cancel the setting operation and switch to Capture mode during initial settings bypressing the button. In this case, the Initial Settings screen will appear again the next timeyou turn the camera on.When you finish the settings and press the button, the camera clock is reset to 00 seconds.To set the exact time, press the button when the time signal (on the TV, radio, etc.) reaches 0seconds.You can change the language and date and time settings with the menu operations. (p.161, p.165)
INFORMATION
Date Adjust
Date Stylemm/dd/yy
Date
Time
Cancel OK

35
Attaching the LensOnly D-XENON lens can be used with this camera.
1. Check that the camera is off.2. Remove the body mount cover ( ) and lens mount cover ( ).
Be sure to put the lens down with the lens mount side facingupward to damage.
3. Align the red dots on the camera and the lens, and secure byturning the lens clockwise until it clicks.After attaching, check that the lens is secure. Also check thatthe red dots of the lens are on top and attachment portion doesnot move sideways.
Turn the camera off before attaching or removing the lens to prevent unexpected lens movement.
INFORMATION
1
2

36
Attaching the Lens4. Remove the front lens cap by pushing the indicated portions
inward.
To detach the lens, hold down the lens unlock button ( ) andturn the lens counterclockwise.
The body mount cover ( ) is a cover to prevent damage during shipping.We assume no responsibility nor liability for accidents, damages and malfunctions resulting fromthe use of lenses made by other manufacturers.The camera body and lens mount incorporate lens information contacts and an AF coupler. Dirt, dust, or corrosion may damage the electrical system.Clean the contacts with a soft dry cloth.
INFORMATION
3

37
Adjusting the Viewfinder DiopterAdjust the viewfinder to suit your eyesight.If it is difficult to see the viewfinder image clearly, slide the diopter adjustment lever sideways.You can slide the diopter from -2.5m -1 to +1.5m-1.
1. Look through the viewfinder and point the camera at a well-litscene. Slide the diopter adjustment lever left or right.Adjust the lever until the AF frame in the viewfinder is focused.
AF Frame
Eyecup is attached to the viewfinder portion when cameraleaves the factory. Diopter adjustment is available with theeyecup attached. However, adjustment is easier with theeyecup removed as shown above. To remove the eyecup,pull one side of the Eyecup out and toward you as shown onthe right.If it is difficult to see the viewfinder image clearly even if youset the diopter adjustment lever, use the diopter correctionlens adapter (optional). However, the eyecup must be removed.
INFORMATION

38
MEMO

This chapter explains basic operations for shooting by setting mode dial to Scene mode(AutoScene or Portrait mode - Flash OFF mode) and mode to ensure success.For information about advanced functions and settings for taking pictures, refer to chapter 4 andonward.
Basic Shooting Operation 40
Selecting the Appropriate Capturing Mode for Scenes 45
Using the Zoom Lens 48
Using the Built-in Flash 49
Other Shooting Modes 53
Playing Back Still Pictures 63
Connecting the Camera to AV Equipment 70
Processing Images with Filters 71
Deleting Images 73
Protecting Images 77
Setting the Printing Service (DPOF) 79
Printing Using PictBridge 83
3 Basic Operations

40
Basic Shooting Operation
How you hold the camera is important when taking pictures.- Hold the camera firmly with both hands.- Press the shutter release button gently when taking a picture.
[ Horizontal position ] [ Vertical position ]
To reduce camera shake, support your body or the camera on a solid object such as a table, tree,or wall. Always use the shortest practical shutter speed for hand-held shots, especially whenusing Zoom or Telephoto lenses.Although there are individual differences among photographers, the slowest recommendedshutter speed for a handheld camera is generally 1/(focal lengthx1.5). For example, it is 1/75 of asecond for a focal length of 50 mm and 1/150 of a second for 100 mm. A tripod should be usedfor shutter speeds slower than this.When using a telephoto lens, a tripod that is heavier than the total weight of the camera and lensis recommended to avoid camera shake.
INFORMATION
Holding the Camera

41
How to set the camera so it will choose the optimum settings based on the subject lighting, distanceand motion.
1. Set the mode dial to .The camera will select the optimal capturing mode for thesubject.- Selecting the Appropriate Capturing Mode for Scenes(p.45)
2. Set the focus mode lever to .Autofocus mode is set. (p.118)
Letting the Camera Choose the Optimal Settings
Basic Shooting Operation

42
Basic Shooting Operation3. Turn the zoom ring to select the size of the subject.
- Using the Zoom Lens (p.48)
5. Press the shutter release button fully.The picture is taken.
4. Position the subject inside the autofocus frame and press theshutter release button halfway.The autofocus system operates. The focus indicator appears in the viewfinder when thesubject is in focus.The flash pops up automatically when necessary (manuallylift the flash when Flash mode is not set to [Auto]).- Operating the shutter release button (p.43)- Hard-to-Autofocus Subjects (p.44)- Using the Built-in Flash (p.49)
You can preview the image in the LCD monitor and checkthe composition, exposure, and focus before taking thepicture. (p.145)
Focus indicator

43
Basic Shooting Operation6. Review captured images on the LCD monitor.
Image displays for 1 second on the LCD monitor aftercapturing (Instant Review.) You can delete the image during Instant Review by pressingthe button.- Setting the Display Time (p.168)- Deleting Images (p.73)- Displaying Bright Portion Warning (p.169)- Histogram Display (p.169)
DeleteDelete
The shutter release button has two positions.
Pressing it down halfway (first position) turns on the viewfinder and LCD panel indicators and theautofocus system operates. Pressing it fully (second position) takes the picture.
Not pressed Pressed halfway(first position)
Pressed fully(second position)
Operating the shutter release button
Press the shutter release button gently when taking a picture to prevent camera shake.Practice pressing the shutter release button halfway to learn where the first position is.The viewfinder indicators stay on while shutter release button is pressed. The indications stay onfor about 10 seconds (default setting) after the button is released.
INFORMATION

44
Basic Shooting Operation
The autofocus mechanism is not perfect. Focusing may be difficult when taking pictures under thefollowing conditions ((a) to (f) below). These also apply to manual focusing using the focus indicator
in the viewfinder. If the subject cannot be focused automatically, set the focus mode lever toand use the manual focus mode to focus on the subject with the aid of the matte field in theviewfinder.
(a) Extremely low-contrast subjects such as a white wall in the focus points range.(b) Subjects which do not reflect much light within the focus points range.(c) Fast moving objects.(d) Strongly reflected light or strong backlighting (bright background).(e) If vertical or horizontal line patterns appear within the focus points range.(f) Multiple subjects in the foreground and background within the focus points range.
Hard-to-Autofocus Subjects
Subject may not be focused even when (focus indicator) is displayed when (f) above applies.
INFORMATION

45
Selecting the Appropriate Capturing Mode for ScenesThe camera selects and set the optimum mode when (Auto Scene) on the mode dial is setto the dial indicator.
Select (Portrait), (Landscape), (Macro), (Moving Object), (Night Scene Portrait),(Flash OFF), (Scene) with the mode dial if desired image is not captured in Auto Scene
mode. The modes are as follows.
Selects automatically from Normal, Portrait, Landscape, Macro,
and Moving Object modes.
(Portrait) Optimal for capturing portraits.
Deepens the focus range, emphasizes contour and saturation
of trees and the sky, and produces a bright image.
Lets you take vibrant pictures of flowers and other small
subjects at short distances.
Lets you take sharp pictures of a quickly moving subject, such
as at a sporting event.
(Night Scene Portrait) Lets you capture people against a night view or dusk.
The built-in flash is deactivated. Other settings are the same as
the (Normal) mode in .
Lets you select from 8 shooting scenes depending on the
shooting conditions.
(Auto Scene)
(Landscape)
(Macro)
(Moving Object)
(Flash OFF)
(Scene)
Dial indicator
For (Night Scene Portrait), the shutter speed becomes slower in dark places, even if the built-in flash is used. Use a tripod to avoid camera shake.
INFORMATION

46
Selecting the Appropriate Capturing Mode for Scenes
Selecting the Shooting
By setting the (Scene) icon to the dial indicator, you can choose from the following 8 shootingscenes.
(Night Scene) Used for night scenes. Use a tripod, etc. to prevent shaking.
(Surf & Snow)For capturing images of dazzling backgrounds, such as snowy
mountains.
(Text) Lets you take clear pictures of text or writing.
(Sunset) For capturing the sunrise or sunset in beautiful colors.
(Kids) For capturing moving kids. Reproduces healthy and bright skin tone.
(Pet) For capturing moving pets.
(Candlelight) For capturing scenes in candlelight.
(Museum) For capturing images in places where a flash is prohibited.
The flash is deactivated in (Night Scene), (Sunset), (Candlelight) and (Museum)modes. Use a tripod to avoid camera shake.
How to Select a Shooting Scene
1. Set the mode dial to (Scene).2. The Fn menu appears. The icon for the currently selected
shooting scene appears in the Fn menu screen in (Scene)mode.
Fn
AUTOAUTOAUTOOK
Fn Exit

47
Selecting the Appropriate Capturing Mode for Scenes3. Press the button. The mode palette appears.
OK
4. Use the four-way controller ( ) to choose amode. If Pet mode is selected, you can turn the e-dial tochoose a dog or a cat icon.The function is the same,regardless of which icon you choose.
5. Press the button. The screen returns to the Fn menu.
6. Press the button.The camera is ready to take a picture.
OK
Night Scene
Used for night scenes.Use a tripod, etc. toprevent shaking.
OK
Pet
For capturing movingpets
OK

48
Using the Zoom LensEnlarge the subject (telephoto) or capture a wider area (wide angle) with a zoom lens. Adjust it to thedesired size and take the picture.
Turn the zoom ring to the right or left.Turn the zoom ring clockwise for telephoto and counterclockwisefor wide angle.
Wide Angle Telephoto
The smaller the number of the displayed focal length, the wider the angle.The larger the number, the more magnified the image appears.Power Zoom functions (Image Size Tracking, Zoom Clip, and Auto Zoom Effect) are notcompatible with this camera.
INFORMATION

49
Using the Built-in FlashUse the following procedures to take a picture in low light or backlit conditions or when you want tomanually use the built-in flash.The built-in flash is optimum at about 0.7 m to 4 m from the subject. Exposure will not be properly controlled and vignetting may occur when used at a distance closerthan 0.7 m (this distance varies slightly depending on the lens being used and set sensitivity).
Compatibility of built-in flash and lensVignetting (darkening of the corners of the image due to a lack of light) may occur depending on thelens being used and the capture conditions. We recommend taking a test shot to confirm this.
Camera automatically determines surrounding light and built-in
flash pops up and discharges automatically when necessary (flash
does not discharge even if it is popped up when not necessary).
Discharges flash manually. Flash discharges when popped up,
does not discharge when retracted.
Discharges flash manually. Lights a red-eye reduction light before
manual flash.
Auto discharge
Manual discharge
Auto flash+Redeye
reduct
Manual flash+Redeye
reduct
When using the built-in flash, remove the lens hood before shooting.
INFORMATION
Manual discharge mode (Flash ON) is used regardless of flash mode settings if the button ispressed to pop up the flash manually.
INFORMATION
Lights a red-eye reduction light before automatic flash.

50
Using the Built-in Flash
1. Press the button.The Fn menu appears.
2. Press the four-way controller ( ).The flash options screen appears.
3. Use the four-way controller ( ) to choose a flash mode.
4. Press the button. The screen returns to the Fn menu.The camera is ready to take a picture.
5. Press the Fn button. The camera is ready to take a picture.
1. Set the mode dial to , , , or .The flash is deactivated when (Night Scene), (Sunset), (Candlelight) or
(Museum) is selected in (Scene) mode.
Fn
OK AUTOAUTOAUTO
Fn
OK
2. Press the shutter release button halfway.The built-in flash pops up if necessary and begins charging.When the flash is fully charged, appears in the LCD panel andviewfinder. (p.14 ~ p.20)
Selecting Flash Mode
Using Auto Discharge , (Automatic Flash Popup)
When the mode dial is set to , , , or , and appear gray and cannot beselected.
INFORMATION
Exit
OK
Flash ModeAuto discharge

51
Using the Built-in Flash
3. Press the shutter release button fully. The picture is taken.
2. Press the shutter release button fully. The flash discharges and the picture is taken.
3. Push the flash down to retract.
4. Push down on the portion indicated in the illustration to retract the flash.
1. Press the button.The built-in flash pops up and begins charging. Manual discharge mode (Flash ON) is used regardless of flashmode settings. When the flash is fully charged, appears inthe LCD panel and viewfinder.
Using Manual Discharge (Flash ON) ,
Switch between Auto discharge mode and Manual discharge mode (Flash ON) by pressing thebutton while the built-in flash is popped up.
If Auto discharge is set, appears on the LCD panel.
INFORMATION
When Flash mode is set to or and you pop up thebuilt-in flash, you can switch between Auto discharge modeand Manual discharge mode (Flash ON) by pressing thebutton under the following conditions.- Shooting mode is set to , , , , , - mode is set to , , ,
INFORMATION

52
Using the Built-in Flash
“Red-eye” is the phenomenon where eyes look reddish in photographs taken in dark environmentswith a flash. This is caused by the reflection of the electronic flash in the retina of the eye. Red-eye occurs because pupils are dilated in dark environments.This phenomenon cannot be averted but the following measures can be used to combat it.
Brighten the surroundings when shooting.Set to wide angle and shoot from closer if a zoom lens is in use.Use a flash that supports red-eye reduction.Position the flash as far away from the camera as possible when using an external flash.
The red-eye reduction function on this camera reduces red-eye by discharging the flash twice. With the red-eye reduction function, the pre-flash is discharged just before the shutter is released.This reduces pupil dilation. The main flash is then discharged while the pupils are smaller, reducingthe red-eye effect. To use the red-eye reduction function, set (Red-eye reduction auto flash) inPicture mode or (Red-eye reduction manual flash) in other modes for Flash mode.
In daylight conditions, the flash will eliminate shadows when a portrait picture is taken with a person sface cast in shadow. Use of the flash in this way is called Daylight-Sync Shooting. Flash is dischargedmanually when shooting with Daylight-Sync Shooting.
Taking pictures (Auto Scene)1. Confirm that the flash has popped up and the flash mode is set to (Manual discharge). (p.49)2. Confirm that the flash is fully charged.3. Take the picture.The picture may be over-exposed if the background is too bright.
[ Without Daylight-Sync ] [ With Daylight-Sync ]
Using Red-eye Reduction Flash
Daylight-Sync Shooting

Continuous Shooting
53
Other Shooting Modes
Pictures can be taken continuously while the shutter release button is held down.
1. Press the button.
The Fn menu appears.Fn
OK AUTOAUTOAUTO
Fn Exit

54
Other Shooting Modes2. Press the four-way controller ( ).
The Drive Mode options screen appears.
3. Use the four-way controller ( ) to select .
4. Press the button. The screen returns to the Fn menu.
5. Press the button. The camera is ready to take a picture.
6. Press the shutter release button halfway.The autofocus system operates. The focus indicator appears in the viewfinder when thesubject is in focus.
OK
OK
Drive ModeSingle frame shooting
OK
Drive ModeContinuous shooting
OK

55
Other Shooting Modes
7. Press the shutter release button fully.Pictures are taken continuously while the shutter release button is fully pressed. Take your finger offthe shutter release button to stop. Continuous shooting settings are retained when the power is turned off.Display the Fn menu again and set to (Single frame shooting) to stop Continuous shooting.
This camera has two types of self-timers: and .
Shutter will be released after about 12 seconds. Use this mode to include thephotographer in the picture.A mirror pops up immediately after shutter release button is pressed. Shutter isreleased after about 2 seconds. Use this mode to avoid camera shake when theshutter release button is pressed.
1. Mount the camera to a tripod.
The focus is adjusted each time the shutter is released if the focus mode is set to (Singlemode). (p.121)Focusing is continuously active when the mode dial is set to , , or and [AF Mode] inthe [ Rec. Mode] is set to (Continuous mode), when scene mode is set to (MovingObject) or mode is set to (Kids) or (Pet).Note that the shutter will release even if the focusing is not complete.The shutter cannot be released until charging is complete when using the built-in flash. Use acustom function to enable shutter release before the built-in flash is ready.
INFORMATION
Self-Timer Shooting
Set [No. cnt shtng rcd im] in [Recordable Image No.] of the [ Custom Setting] menu. The number of continuously recordable images (buffer space) appears when shutter is pressedhalfway. (p.100)

56
Other Shooting Modes
2. Press the button.
The Fn menu appears.
3. Press the four-way controller ( ).
Fn
OK AUTOAUTOAUTO
Fn Exit

57
Other Shooting ModesThe Drive Mode options screen appears.
OK
OK
4. Use the four-way controller ( ) to select or .
5. Press the button. The screen returns to the Fn menu.
6. Press the button. The camera is ready to take a picture.
7. Confirm in the viewfinder that the subject you wishto shoot is in the display and press the shutterrelease button halfway.The focus indicator appears when the subjectis in focus.
Drive ModeSingle frame shooting
OK
Drive ModeSelf-Timer (12 secs)
OK

58
Other Shooting Modes8. Press the shutter release button fully.
For , the self-timer lamp starts blinking slowly and blinksrapidly 2 seconds before the shutter is released. The beep is heard and the rate increases. The shutter will be released about 12 seconds after theshutter release button is pressed fully.For , the shutter will be released about 2 seconds afterthe shutter release button is pressed fully.
9. Turn the camera off after shooting.The next time the power is turned on, self-timer shooting iscanceled and returns to single frame shooting.

59
Other Shooting Modes
The shutter can be released with the optional remote control unit. You can select from h (remotecontrol) and (three-second delay) for remote control shooting.
The shutter will be released immediately after the shutter release button on the
remote control unit is pressed.
The shutter will be released 3 seconds after the shutter release button on the
remote control unit is pressed.
1. Mount the camera to a tripod.
Fn
OK AUTOAUTOAUTO
Fn
2. Press the button.
The Fn menu appears.
Remote Control Shooting (Remote Control F: Sold Separately)
Remote Control for PENTAX DSLR can be used with SAMSUNG DSLR.
Exit

60
Other Shooting Modes
3. Press the four-way controller ( ).The Drive Mode options screen appears.
OK
4. Use the four-way controller ( ) to select or . The self-timer lamp will blink to let you know that the camera isin remote control wait status.
5. Press the button. The screen returns to the Fn menu.
6. Press the button. The camera is ready to take a picture.
7. Press the shutter release button halfway.The autofocus system operates. The focus indicator appears in the viewfinder when thesubject is in focus.
You cannot focus with the remote control unit in default settings. Focus on the subject first beforeoperating with the remote control. You can set [AF in remote control] to [On] in the customfunction. (p.100)When using the Remote Control Unit, flash does not pop up automatically even when set to(Auto discharge). Pop up the flash manually beforehand. (p.49)
INFORMATION
Drive ModeRemote Control Unit
OK

Exposure may be affected if light enters the viewfinder. Attach the provided viewfinder cap or usethe AE lock function (p.161) (ignore the light entering the viewfinder when the exposure mode isset to a (manual) (p.137)).Remove the Eyecup by pulling one side out and toward you when using accessories such as theME viewfinder cap.
Turn the power off to stop the remote control operation after it has been activated.The remote control may not operate in backlit conditions.The remote control does not work while the flash is being charged.When using the built-in flash, raise the flash into position first.The camera automatically returns to single frame shooting after the remote control shooting modeis left unused for 5 minutes.The remote control unit battery can send a remote control signal about 30,000 times.
INFORMATION
61
Other Shooting Modes7. Point the remote control unit towards the front of the camera
and press the shutter release button on the remote control.The operating distance of the remote control unit is about 5 mfrom the front of the camera. The shutter will be releasedimmediately or approximately 3 seconds after the shutterrelease button on the remote control unit is presseddepending on the drive mode selected.When the picture is taken, the self-timer lamp lights for 2seconds and will then resume blinking.
[ Removing the Eyecup ] [ Attaching the Viewfinder cap ]

62
Other Shooting Modes
Use the Mirror Lock Up function if camera shake is evident even when Cable Switch (optional) orRemote Control Unit (optional) is used.When shutter release button is pressed, mirror pops up and shutter is released 2 seconds later if 2sec. Self-Timer is used. Avoid camera shake when mirror pops up by using this method. Follow theprocedure below to take a picture with the mirror lock up.
1. Mount the camera to a tripod.
2. Use the button and the four-way controller ( ) to select (2 sec. Self-Timer).- Self-Timer Shooting (p.55)
3. Focus on the subject.
4. Press the shutter release button fully.The mirror pops up and the picture is taken 2 seconds later. AE lock is enabled with the exposurevalue set immediately before the mirror goes up.
Using Mirror Lock Up Function to Prevent Camera Shake

63
Playing Back Still Pictures
You can play back captured still pictures with the camera.
1. Press the button after taking a picture.The most recently captured image (image with thelargest file number) is displayed on the LCD monitor.
Use the included “Digimax Master” software to play back using a PC. Refer to the software instructions for details. (p.173)
INFORMATION
Playing Back Images

64
2. Press the four-way controller ( ).: The previous image appears.: The next image appears.
You can rotate images 90° counterclockwise at a time. Make images shot vertically easier to view.
1. Press the button after taking a picture.The most recently captured image (image with the largest filenumber) is displayed on the LCD monitor.
2. Press the four-way controller ( ).The image is rotated 90° counterclockwise each time thebutton is pressed.
100-0001100-0001100-0001100-0001100-0001100-0001
OK OK
Rotating Images
Playing Back Still Pictures
OK OK
Enlarging Playback Images
65
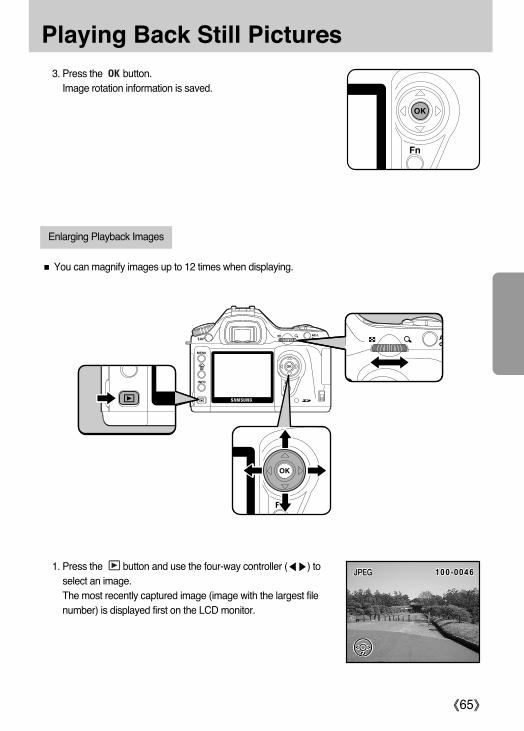
3. Press the button.Image rotation information is saved.
You can magnify images up to 12 times when displaying.
1. Press the button and use the four-way controller ( ) toselect an image.The most recently captured image (image with the largest filenumber) is displayed first on the LCD monitor.
Playing Back Still Pictures

66
Playing Back Still Pictures2. Turn the e-dial to the right (toward ).
Image enlarges at each calibration and can be enlarged to 12times the original. Turn to the left (toward ) to return. Press the button to return to the original size.Press four-way controller ( ) in zoom display to changethe display area.
2 0.x
You can display nine images on the LCD monitor at the same time.
The first calibration on the e-dial is 1.2 times. You can change this in [Mag to Strt Zm Plybk] in [ Custom Setting] menu. (p.101)
INFORMATION
Nine-Image Display

67
Playing Back Still Pictures1. Press the button.
The most recently captured image (image with the largest filenumber) is displayed on the LCD monitor.
2. Turn the e-dial to the left (toward ).Up to nine thumbnail images will be displayed at once.Press the four-way controller ( ) to select an image. A scroll bar appears at the right of the screen. With an image selected in the bottom row, pressing the four-way controller ( ) displays the next nine images.[?] appears for an image that cannot be displayed.
100-0046
3. Turn the e-dial to the right (towards ) or press the button.A full screen display of the selected image appears.
Frame
Scroll bar
Select&Delete

68
Playing Back Still Pictures
You can play back all images recorded on your SD Memory Card successively. To start continuousplayback, use the menu screen displayed on the LCD monitor.
1. Press the button and use the four-way controller ( ) toselect an image to be displayed first.The most recently captured image (image with the largest filenumber) is displayed first on the LCD monitor.
2. Press the button.The Fn menu appears.
Fn
OK
Fn
Slideshow
Exit

69
Playing Back Still Pictures3. Press the four-way controller ( ).
Start screen is displayed and slideshow begins.
Press any button to end slideshow.Press the shutter release button or the button, slide themain switch to (preview) or turn the mode dial to change toCapture mode.
Set the display time for slideshow in the [ Playback] menu. Alternatively, start the slideshowfrom the [ Playback] menu. (p.159)
INFORMATION
Start

70
Connecting the Camera to AV EquipmentBy using the video cable, you can play back images using a TV or other device with a video IN jackas your monitor. Make sure that both the TV and the camera are turned off before connecting thecable.
- Selecting the Video Output Format (p.166)
1. Open the terminal cover and connect the video cable to the USB/ Video terminal.
2. Connect the other end of the video cable to the video IN jack on the AV device.
3. Turn the AV device and camera on.
If you intend to use the camera continuously for a long period, use of the AC adapter (D-AC10,optional) is recommended. (p.26)For AV equipment with multiple video IN jacks (such as TVs), check the operating manual of theAV device, and select the video IN jack to which the camera is connected.Depending on the country or region, images may fail to be played back if the video output formatis set different from the one in use there. If this happens, change the video output format setting.(p.166)The camera LCD monitor turns off while the camera is connected to the AV device.
INFORMATION

71
Processing Images with FiltersYou can edit shot images using digital filters. Processed images are saved under a different name.
Digital Filter
Slim
B&W Convert to a black and white image.
Sepia Add a vintage touch to photos by converting them to sepia color.
Soft Create a soft image by lightly fading the entire image. Select from three levels.
Change the horizontal and vertical ratio of images. Adjust height or width up to
two times the original size.
Brightness Change the brightness of images. Adjust in a range of ±8 levels.
1. Press the button in Playback mode.The Fn menu appears.
Fn
OK
Fn
RAW images cannot be processed using the digital filter.Additionally, set digital filters from the [ Playback] menu.
INFORMATION
Exit

72
Processing Images with Filters2. Press the four-way controller ( ).
The screen for selecting the filter appears.
OK
7. Use the four-way controller ( ) to select [Save as].
OK
5. Adjust with e-dial if slim filter, soft filter or brightness filter isselected.Turn counterclockwise for wider and clockwise for slimmer ifslim filter is selected. Turn counterclockwise to darken andclockwise to brighten if brightness filter is selected. Selectsoftness from three levels if soft filter is selected.Use the four-way controller ( ) to select an image. The image appears in the set slimness or softness.
OK
3. Use the four-way controller ( ) to select an image.
4. Use the four-way controller ( ) to select a filter.Select a filter and preview the effects on the image. Proceed to Step 6 if [B&W] or [Sepia] isselected.
6. Press the button. The save confirmation screen appears.
8. Press the button.The filtered image is saved under a different name.
B&W
OK
Slim
OK
Save image as a new file
Save asCancel
OK

73
Deleting Images
You can delete one image at a time.
1. Press the button and use the four-way controller ( ) toselect an image to delete.
2. Press the button.The Delete screen appears.
3. Use the four-way controller ( ) to select [Delete]. 100-0046100-0046
OK
4. Press the button.The image is deleted.
Deleted images cannot be restored.Protected images cannot be deleted.
INFORMATION
Deleting a Single Image
DeleteCancel
All images OK

74
Deleting Images
You can delete all saved images at once.
2. Press the button twice.The Delete All screen appears.
1. Press the button.
4. Press the button. All images are deleted.
3. Use the four-way controller ( ) to select [Delete All].
OK
Deleted images cannot be restored.Protected images cannot be deleted.
INFORMATION
Deleting All Images
Delete all imageson memory card?
Delete AllCancel
OK

75
Deleting Images
You can delete multiple images from the nine-image display at once.
1. Press the button.The most recently captured image (image with the largest filenumber) is displayed first on the LCD monitor.
2. Turn the e-dial to the left (toward ).
Nine thumbnail images appear.
100-0046
Deleted images cannot be restored.Protected images cannot be deleted.Only files in the same folder can be selected at once.
INFORMATION
Deleting Selected Images (from Nine-Image Display)
Select&Delete

76
Deleting Images3. Press the button.
appears above the images.
4. Use the four-way controller ( ) to move to the imagesto delete and press the button.Image is selected and appears.Press button to select all images (the selection of imagesmay take time to complete depending on the number ofimages).
5. Press the button.The Delete confirmation screen appears.
7. Press the button.The selected images are deleted.
OK
6. Use the four-way controller ( ) to select [Select&Delete].
OK
Delete
All selectedimages are deleted
Select&DeleteCancel
OK

77
Protecting Images
You can protect images from being accidentally deleted.
Even protected images are deleted if the SD Memory Card is formatted.
1. Press the button and use the four-way controller ( ) toselect an image.The most recently captured images (image with the largestfile number) are displayed first on the LCD monitor.
2. Press the button.The Protect screen appears.
3. Use the four-way controller ( ) to select [Protect].
4. Press the button.The selected image is protected.
100-0046100-0046
OK
Select [Unprotect] in Step 3 to cancel the Protect setting.The symbol is displayed when playing back protected images. (p.17)
INFORMATION
Protecting Images from Deletion (Protect)
ProtectUnprotect
All images OK

78
Protecting Images
1. Press the button.
2. Press the button twice.The Protect all images screen appears.
3. Press the four-way controller ( ) to select [Protect] and press the button.All images saved in the SD Memory Card are protected.
Select [Unprotect] in Step 3 to cancel the Protect setting on all of the images.
OK
Protecting All Images
Protect all images
ProtectUnprotect
OK

79
Setting the Printing Service (DPOF)You can order conventional photograph prints by taking the SD Memory Card with recorded imagesto a store for a printing service.DPOF (Digital Print Order Format) settings allow you to specify the number of copies or to imprint thedate.
Set the following items for each image.
1. Press the button and use the four-way controller ( ) to select an image.
Copies Selects the number of copies. You can print up to 99 copies.
Date Specifies whether you want the date inserted on the print or not.
2. Press the button.The Fn menu appears.
Fn
OK
Fn
3. Press the four-way controller ( ).The DPOF screen appears.If DPOF settings have already been made for an image, theprevious number of prints and date setting ( (on) or (off))will be displayed. 00
100-0046100-0046
Fn OK
DPOF settings cannot be applied to RAW images.
Printing Single Images
Exit
CopiesDate
All images OK

80
Setting the Printing Service (DPOF)4. Use the four-way controller ( ) to choose the number of copies and press the four-way controller
( ).The frame moves to [Date].
6. Press the button.The DPOF settings are saved and the camera returns to playback status.
5. Use the four-way controller ( )to choose whether to insertthe date ( ) or not ( ).- ( ) : The date will be imprinted.- ( ) : The date will not be imprinted.
100-0046100-0046
Fn OK
01
Depending on the printer or printing equipment at the photo processing lab, the date may not beimprinted on the pictures even if the DPOF setting was made.To cancel DPOF settings, set the number of copies to [00] in Step 4 and press the button.
INFORMATION
CopiesDate
All images OK

81
Setting the Printing Service (DPOF)
1. Press the button in Playback mode.The Fn menu appears.
Fn
OK
Fn
2. Press the four-way controller ( ).The DPOF screen appears.
00
100-0046100-0046
Fn OK
3. Press the button.The screen for making DPOF settings for all imagesappears.
00
OK
4. Use the four-way controller ( ) to choose the number of copies and whether to insert the date ( ) or not ( ).Refer to Steps 4 and 5 in Printing Single Images” (p.79) for details of how to make the settings.
Settings for All Images
Exit
CopiesDate
All images OK
CopiesDate
OK
DPOF setting for allimages

82
Setting the Printing Service (DPOF)5. Press the button.
The DPOF settings for all the images are saved and the camera returns to playback status.
The number of copies specified in settings for all images applies to all the images. Before printing, check that the number is correct.Settings for single images are canceled when settings are made for all images.
INFORMATION

83
Printing Using PictBridgeThis function lets you print images directly from the camera without using a PC (direct printing).Connect the camera and PictBridge compatible printer with the included USB cable to print directly.Select the images you want to print, the number of copies and whether to insert the date or not on thecamera after connecting to the printer.Direct printing is performed in the following steps.
Set [Transfer Mode] on camera to [PictBridge]
Connect the camera to the printer (p.85)
Set the printing options (p.79)Print single images (p.86)Print all images (p.88)Print with DPOF settings (p.90)
Disconnect the camera from the printer (p.90)
Use of the AC adapter (D-AC10, optional) is recommended when connecting the camera to aprinter. The printer may not work properly or the image data may be lost if the batteries run out ofpower while the camera is connected to the printer.Do not disconnect the USB cable during data transfer.Depending on the type of printer, not all the settings made on the camera (such as print settingsand DPOF settings) may be valid.A printing error may occur if the selected number of copies exceeds 500.You cannot use the camera to select multiple images for printing on a single sheet. Make the settings on the printer. For details, refer to the operating manual for your printer.RAW images cannot be printed directly. Use a PC to print RAW images.See the software instructions when connecting to a PC. (p.173)
INFORMATION
OK
Set-up
Brightness LevelVideo OutTransfer ModeAuto Power OffFolder NameFile #
0NTSCPCPictBridgePC-FSerialNo
Cancel OK

84
Printing Using PictBridge
1. Press the button.The [ Rec. Mode] menu appears.
2. Use the four-way controller ( ) to select the [ Set-up] menu.
3. Use the four-way controller ( ) to select [Transfer Mode].
4. Press the four-way controller ( ).A pop-up menu appears.
Setting [Transfer Mode]
Set-up
FormatBeepDate AdjustWorld TimeLanguageGuide display
Exit
English

85
Printing Using PictBridge5. Use the four-way controller ( ) to select [PictBridge].
OK
6. Press the button.The setting is changed.
7. Press the button.
1. Turn the camera off.2. Connect the camera and PictBridge compatible printer using the USB cable supplied with the camera.
Connecting the Camera to the Printer
Set-up
Brightness LevelVideo OutTransfer ModeAuto Power OffFolder NameFile #
Cancel OK
0NTSCPCPictBridgePC-FSerialNo

86
Printing Using PictBridge
4. After printer start-up is complete, turn the camera on.The PictBridge menu appears.
OK
3. Turn the printer on.
1. Use the four-way controller ( ) to select [Print One] on thePictBridge menu.
OK
2. Press the button.The Print one screen appears.
PictBridge menu is not displayed if [Transfer Mode] is set to [PC] or [PC-F].
INFORMATION
Printing Single Images
Select printing mode
Print OnePrint All
DPOF AUTOPRINT
OK
Select printing mode
Print OnePrint All
DPOF AUTOPRINT
OK

87
Printing Using PictBridge3. Use the four-way controller ( ) to choose an image to print.
1
OK
1
100-0046100-0046
Fn
4. Use the four-way controller ( ) to choose the number of copies. You can print up to 99 copies.
5. Use the button to choose whether to insert the date ( ) or not ( ).( ) : The date will be printed.( ) : The date will not be printed.
6. Press the button.The print settings confirmation screen appears.Proceed to Step 12 to print the images by default.To change the print settings, go to Step 7.
OKFn
7. Press the button.The screen for changing print settings appears.
PictBridge
OK
8. Select [Paper Size] and press the four-way controller ( ).The Paper Size screen appears.
Print this image
Copies Date
DatePrint
Print accordingto setting?
Paper SizePaper TypeQualityBorder Status
StandardStd.Std.Std.
PrintChange Setting
Paper SizePaper TypeQualityBorder Status
StandardStd.Std.Std.
Cancel OK

88
Printing Using PictBridge9. Use the four-way controller ( ) to choose the paper size.
You can only choose a size that is supported by your printer.When the Paper Size is set to [Standard], images are printedaccording to the printer settings.
OK
10. Press the button.
11. [Repeat Steps 8 to 10 to set [Paper Type], [Quality] and [Border Status].The print settings change screen appears after each item has been set.When the Paper Size is set to [Standard], images are printed according to the printer settings.- [Paper Type] : (Best), (Better), (Good) - [Quality] : (Super fine), (fine), (Normal)
12. Press the button twice.The image is printed according to the settings.Press the button to cancel printing.
1. Use the four-way controller ( ) to select [Print All] onthe PictBridge menu.
OK
2. Press the button.The Print all images screen appears.
Printing All Images
Paper Size
StandardCardL100x150Postcard4" x 6"
2L8" x 10"A4Letter11" x 17"A3
Cancel OK
Select printing mode
Print OnePrint All
DPOF AUTOPRINT
OK

89
Printing Using PictBridge3. Choose the number of copies and whether to imprint the date or
not.The number of copies and the date setting that you choose applyto all of the images.Refer to Steps 4 and 5 of Printing Single Images” (p.87) fordetails on how to change the settings.
128
OK
128
100-0046100-0046
Fn
4. Press the button.The print settings confirmation screen appears.Refer to Steps 7 and 11 of Printing Single Images” (p.87 and 88) for details on how to change thesettings.
5. Press the button on the print settings confirmation screen.All the images are printed according to the settings.Press the button to cancel printing.
Print all images
CopiesTotal
Date
DatePrint

90
Printing Using PictBridge
1. Use the four-way controller ( ) to select [DPOF AUTOPRINT] on the PictBridge menu.
2. Press the button.The Print w/ DPOF settings screen appears. Use the four-way controller ( ) to check the number of copiesfor each image, whether the date is imprinted or not, and totalnumber of copies. Print settings are set with the Print Service.(p.79)
110
110
OK
3. Press the button.The print settings confirmation screen appears.Refer to Steps 7 and 11 of Printing Single Images (p.87 and 88) for details on how to change thesettings.
4. Press the button on the print settings confirmation screen.The images are printed according to the settings.Press the button to cancel printing.
Disconnect the cable from the printer when you have finished printing.
1. Turn off the camera.
2. Disconnect the USB cable from the camera and printer.
Printing Images Using the DPOF Settings
Disconnecting the Cable from the Printer
Print w/DPOF settings
CopiesTotal
Date

When using menus and Fn menu, items which cannot be changed due to camera settingsappear gray and cannot be selected.
Explains the functions of GX-1L by buttons and menus.
Using the Button Functions 92
Using the Menu 96
Using the Fn Menu 102
Using the Mode Dial 104
4 Menu Reference

92
Using the Button Functions
Functions of buttons used during shooting are noted.
Shutter release buttonPress to capture images. (p.43)Main switchMove to turn the power on/off (p.30) and confirm the depth of field (Preview) (p.128).Lens unlock buttonPress to detach lens. (p.36)
Capture Mode

93
Using the Button FunctionsFocus mode leverSwitches between Autofocus mode (p.118) and Manual focus mode (p.125).Mode dialChanges the Shooting mode. (p.104)
buttonPress to pop up the built-in flash. (p.49)
buttonDisplays the [ Rec. Mode] menu (p.98). Next, press the four-way controller ( ) to display [ Playback] menu (p.98), [ Set-up] menu (p.99) and [ Custom Setting] menu. (p.98)
buttonPress to show shooting information on the LCD monitor. (p.15)
buttonSwitches to the Playback mode. (p.63)
buttonPress to set aperture and EV compensation values. (p.137, p.140)
buttonLocks the exposure before shooting. (p.141)Automatically adjusts the appropriate exposure in the Manual mode. (p.137)e-dialSets shutter speed, aperture, and EV compensation values. (p.133, 135, 140)
buttonSaves the setting you selected in the menu.Four-way controller ( )Uses it to move cursor or change items in menus and Fn menu.
buttonPress to display the Fn menu. Press the four-way controller ( ) to determine the followingoperation. (p.102)

94
Using the Button Functions
Functions of buttons used during playback are noted.
Shutter release buttonPress to switch to capture mode.Main switchMove to turn the camera on and off. (p.30)
buttonPress to display the [ Playback] menu (p.98). Next, press the four-way controller ( ) to display[ Set-up] menu (p.99), [ Custom Setting] menu (p.100) and [ Rec. Mode] menu (p.98).
Playback Mode

buttonPress to delete images. (p.73)
buttonPress to show shooting information on the LCD monitor. (p.16)
buttonPress to switch to capture mode.
buttonPress to protect images from being accidentally erased. (p.77)e-dialUses it to enlarge an image (p.65) or display nine images at the same time. (p.66)OK buttonSaves the setting you selected in the menu or playback screen.Four-way controller ( )Uses it to move cursor or change items in menus, Fn menu and playback screen.Fn buttonPress to display the Fn menu. Press the four-way controller ( ) to determine the followingoperation. (p.102)
95
Using the Button Functions

96
Using the Menu
This section explains operation methods for [ Rec. Mode] menu, [ Playback] menu, [ Set-up] menu and [ Custom Setting] menu.
Displaying the Menu screen
1. Press the button in Capture mode.- The [ Rec. Mode] menu appears on the LCD monitor.
2. Press the four-way controller ( ).- [ Playback] menu, [ Set-up] menu and [ CustomSetting] menu appear in order each time the four-waycontroller is pressed.
How to Operate the Menu
Rec. Mode
Image ToneRecorded PixelsQuality LevelSaturationSharpness Contrast
Set-up
FormatBeepDate AdjustWorld TimeLanguageGuide display
Exit
Exit
English

Select a menu item and set
Procedure to set the [Quality Level] on the [ Rec. Mode] menu is explained as an example.
3. Use the four-way controller ( ) to choose an item.
4. Press the four-way controller ( ).- Available [Quality Level] options appear.Press the four-way controller ( ) to move to the pop-upmenu if there is one.
5. Use the four-way controller ( ) to select a setting.
6. Press the button.- The camera returns to the menu screen. Next, set other items.- Press the button to return to Capture or Playback mode.
OK
Even after you press the button and close the menu screen, your settings will not besaved if the camera is turned off improperly (such as by removing the batteries while the camerais on).You can use the e-dial to switch among the [ Rec. Mode] menu, the [ Playback] menu,[ Set-up] menu, and [ Custom Setting] menu when no pop-up menu is displayed.If the button is pressed in Capture mode, the [ Rec. Mode] menu appears. If the button is pressed in Playback mode, the [ Playback] menu appears.
INFORMATION
97
Using the Menu
Rec. Mode
Image ToneRecorded PixelsQuality LevelSaturationSharpness Contrast
Exit
Rec. Mode
Image ToneRecorded PixelsQuality LevelSaturationSharpness Contrast
Cancel OK

98
Using the Menu[ Rec. Mode] Menu Setting Items
Perform settings related to capturing in the [ Rec. Mode] menu.
Item Function Page
Image Tone Sets the color tone of pictures. p.108
Recorded Pixels Sets the recording size of images. p.109
Quality Level Sets the image quality. p.110
Saturation Sets the color saturation. p.111
Sharpness Makes the image outlines sharp or soft. p.111
Contrast Sets the image contrast. p.111
Auto Bracket Sets Auto Bracket shooting. p.142
AE MeteringSelects the part of the screen to use for measuring
p.129brightness and determining exposure.
Focusing Area Selects the area on which the autofocus focuses. p.121
AF Mode Selects the autofocus mode. p.118
Flash Exp. Comp. Adjusts the flash exposure to brighten or darken the image. p.148
Item Function Page
Plybk dsply mthdSets shooting information to show during playback and
p.158whether to display overexposed area warning.
Instant Review Sets the Instant Review time. p.168
Preview DisplaySets to display overexposed area warning or histogram
p.145during Instant Review or Digital Preview.
Edits captured images to black and white or sepia tint, orp.71
add softening and slimming effects.
Slideshow Plays back recorded images one after another. p.68
[ Playback] Menu Setting Items
Perform settings related to playback and editing images in the [ Playback] menu.
Digital Filter
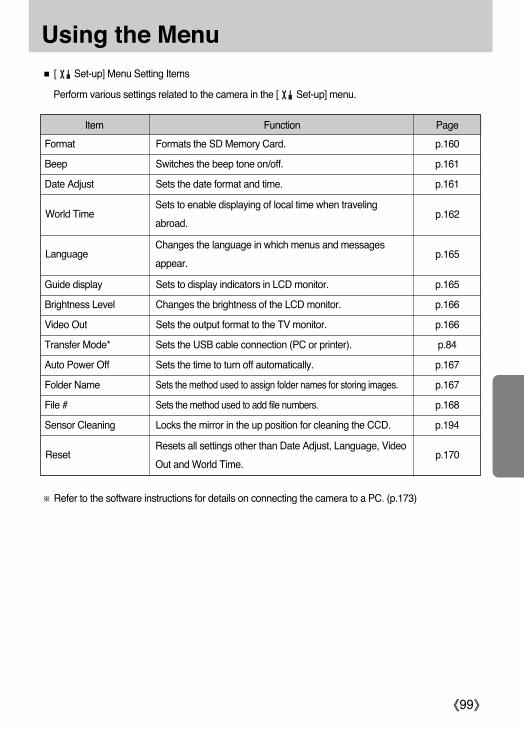
Item Function Page
Format Formats the SD Memory Card. p.160
Beep Switches the beep tone on/off. p.161
Date Adjust Sets the date format and time. p.161
Guide display Sets to display indicators in LCD monitor. p.165
Brightness Level Changes the brightness of the LCD monitor. p.166
Video Out Sets the output format to the TV monitor. p.166
Transfer Mode* Sets the USB cable connection (PC or printer). p.84
Auto Power Off Sets the time to turn off automatically. p.167
Folder Name Sets the method used to assign folder names for storing images. p.167
File # Sets the method used to add file numbers. p.168
Sensor Cleaning Locks the mirror in the up position for cleaning the CCD. p.194
Refer to the software instructions for details on connecting the camera to a PC. (p.173)
99
Using the Menu[ Set-up] Menu Setting Items
Perform various settings related to the camera in the [ Set-up] menu.
Sets to enable displaying of local time when traveling
abroad.
Changes the language in which menus and messages
appear.
Resets all settings other than Date Adjust, Language, Video
Out and World Time.
World Time
Language
Reset
p.162
p.165
p.170

100
Using the Menu
Set custom functions to fully use the functions of a SLR camera with the Custom Function Menu. The default setting does not use Custom Function. [ Custom Setting] menu settings are activated when [Setting], the first item, is (on).
Item Function Page
Setting Sets to use the Custom Function Menu. -
Noise Reduction Sets to use Noise Reduction in slow speed shooting. -
Expsr Setting Steps Sets the adjustment steps for exposure. p.141
Automatically corrects sensitivity range when Sensitivity p.115
is set to [AUTO].
Sets to adjust AE and Focusing Area in multisegment p.130
metering based on AF point.
Meter Operating Time Sets the exposure metering time. p.131
AE-L with AF locked Sets to fix exposure value when focus is locked. -
Sets the action for the button when pressed during
shooting.
Selects the exposure adjustment method when thep.139
button is pressed in (Manual) mode.
Sets to use Autofocus when shooting with remote control.
Shutter releases after AF activates if shutter is released from
remote control when [On].
Shutter cannot be released until in focus. AF does not
activate at shutter release from remote control when [Off].
[ Custom Setting] Menu Setting Items
ISO Corction in AUTO
ISO Snstvty Wrn Dspl
Link AF Point and AE
Recordable Image No.
OK btn when shooting
AE-L bttn on M expsr
AF in remote control
Sets the maximum sensitivity level. ISO Sensitivity Warning
Display appears when set sensitivity is reached or
exceeded.
Sets to switch number of recordable images in the LCD
panel and viewfinder to number of continuous shooting
recordable images when shutter release button is pressed
halfway.
p.116
-
p.120
p.59

Item Function Page
FI with S lens used
Sets to enable focus indicator when screw mount lens is
in use. Lens is recognized even when lens is not attached
to the camera when enabled.
Using aperture ringSets to enable shutter release when lens aperture ring is set
at other than A.
Release when Chrging Sets to release shutter while the built-in flash is charging. p.149
Selects Digital Preview or Optical Preview when the main switch
is in the preview position ( ). Digital Preview lets you check
the composition, exposure and focus on the LCD monitor before
taking the picture. Optical Preview lets you check the depth of
field with the viewfinder.
Sets the initial magnification of the zoom playback.
Mag to Strt Zm Plybk Choose from [1.2 times], [2 times], [4 times], [8 times] and -
[12 times]. The default setting is [1.2 times].
Sets to meter entire screen or Spot area when setting p.113
white balance to manual.
Color Space Sets the color space to use. p.117
Reset Custom FnctionResets all the settings in the Custom Function menu
p.171to the defaults.
101
Using the Menu
Man. WB Measurement
-
-
p.145
*1 : When the screw mount lens is in use, [Fl with S lens used] menu is available.*2 : When a lens that has aperture ring is in use, [Using aperture ring] menu is available.
*1
*2
Preview Method

102
Using the Fn Menu
Press the four-way controller ( ) to set the operation.
Fn
OK AUTOAUTOAUTO
Fn
Flash Mode Adjusts the method of flash discharge. p.49
Sensitivity Sets the sensitivity. p.115
Press the button while taking a picture.The Fn menu appears.
Drive Mode
White Balance
Capture Mode
Four-waycontroller Item Function Page
Adjusts the color for the color of the light source
illuminating the subject.
Selects Continuous shooting, Self-Timer, Remote
control or Auto bracket.p.53
p.112
Exit

Fn
OK
Fn
Press the button during playback. The Fn menu appears.
Press the four-way controller ( ) to set the operation.
103
Using the Fn Menu
Playback Mode
DPOF Settings Sets the DPOF settings. p.79
Slideshow Plays back recorded images one after another. p.68
Digital Filter
Four-waycontroller Item Function Page
Edits captured images to black and white or sepia tint,
adds softening and slimming effects, or adjusts
brightness.
p.71
Exit

104
Using the Mode Dial
You can switch the Shooting mode by setting the icons on the mode dial to the dial indicator.
Item Function Page
Selects automatically from Normal, Portrait, Landscape,
Macro, and Moving Object modes.
(Portrait) Optimal for capturing portraits.
Deepens the focus range, emphasizes contour and
saturation of trees and the sky, and produces a bright
image.
Lets you take vibrant pictures of flowers and other small
subjects at short distances.
Lets you take sharp pictures of a quickly moving subject,
such as at a sporting event.
(Night Scene Portrait) Lets you capture people against a night view or dusk.
The built-in flash is deactivated. Other settings are the
same as the Normal mode in .
Lets you select from 8 shooting scenes depending on
the shooting conditions.
(Auto Scene)
P.45
(Landscape)
(Macro)
(Moving Object)
(Flash OFF)
(Scene)
For (Night Scene Portrait), the shutter speed becomes slower in dark places, even if the built-in flash is used. Use a tripod to avoid camera shake.
INFORMATION
Dial indicator

105
Item Function Page
Automatically sets shutter speed and aperture to the
proper exposure when taking pictures.
Lets you set the desired shutter speed for expressing
the motion of moving subjects.
Take pictures of fast moving subjects that look still or
subjects that give a sense of movement.
Lets you set the desired aperture for controlling the depth
(Aperture Priority) of field. Use to blur or focus on the background.
Lets you create the picture you have in mind by combining
set shutter speed and aperture.
Lets you capture images that require slow shutter speeds
such as fireworks and night scenes.
P (Program) p.132
p.133
p.135
p.137
p.139
(Shutter Priority)
M (Manual)
(Bulb)
Using the Mode Dial

106
MEMO

Introduces functions to further enhance your GX-1L experience.
Setting the Recorded Pixels and Quality Level 108
Focusing 118
Setting the Exposure 127
Checking the Composition, Exposure and Focus Before Shooting 145
Using the Built-in Flash 148
Using an External Flash (Optional) 153
Settings During Playback 158
Camera Settings 160
Resetting to Default Settings 170
5 Function Reference

108
Setting the Recorded Pixels and Quality Level
Set the basic color tone of pictures. The default setting is (Bright).
Set in [Image Tone] in the [ Rec. Mode] menu. (p.98)
Bright Images are finished brightly, with high contrast and sharp.
Natural Images are finished naturally and suitable for retouching.
OK
Settings cannot be changed in Scene mode and mode. Setting is fixed to (bright).
INFORMATION
Setting the Image Tone
Rec. Mode
Image ToneRecorded PixelsQuality LevelSaturationSharpness Contrast
Cancel OK

109
Setting the Recorded Pixels and Quality Level
Set in [Recorded Pixels] in the [ Rec. Mode] menu. (p.98)
You can select the number of recorded pixels from (3008x2008/ 3008x2000), (2400x1600)and (1536x1024). The more pixels there are, the larger the picture and the bigger the file size.The file size will also differ according to quality level settings.The default setting is (3008x2000).
OK
[Recorded Pixels] cannot be selected if the [Quality Level] is set to RAW. (Fixed at 3008x2008)
INFORMATION
3008x2008 (RAW)
3008x2000 (JPEG)
2400x1600 Suited for printing on A4 paper.
1536x1024 Suited for printing on A5 paper.
Suited for printing on A3 paper.
Setting the Recorded Pixels
Rec. Mode
Image ToneRecorded PixelsQuality LevelSaturationSharpness Contrast
Cancel OK

110
Setting the Recorded Pixels and Quality Level
You can set the image quality level. The file size will also differ according to the Recorded Pixelssettings. The default setting is (Best).
RAW data is CCD output data saved without processing.
Effects such as White Balance, Contrast, Saturation and are not applied
RAW to the image but such information is saved.
Transfer to a PC, apply effects with the enclosed Digimax Master and
create JPEG and TIFF images.
Lowest compression rate, suited for printing large pictures such as A4 size.
Image is saved in JPEG format.
Standard compression rate, suited for viewing as photographs or on
your computer screen. Image is saved in JPEG format.
Highest compression rate, suitable for attaching to e-mail or posting on
websites. Image is saved in JPEG format.
RAW
Best
Better
Good
Set in [Quality Level] in the [ Rec. Mode] menu. (p.98)
OK
Setting the Quality Level
Rec. Mode
Image ToneRecorded PixelsQuality LevelSaturationSharpness Contrast
Cancel OK

111
Setting the Recorded Pixels and Quality Level
Select from five levels of Saturation, Sharpness and Contrast. The default setting is [0 (Standard)] forall.
Set [Saturation], [Sharpness] and [Contrast] in the [ Rec. Mode] menu. (p.98)
Saturation Sets the color saturation.
Sharpness Makes the image outlines sharp or soft.
Contrast Sets the image contrast.
Settings cannot be changed in Scene mode and mode (p.45).
INFORMATION
Towards + : Higher saturationTowards – : Lower saturation
Towards + : Higher sharpnessTowards – : Lower sharpness
Towards + : Higher contrastTowards – : Lower contrast
Setting the Saturation/ Sharpness/ Contrast
Rec. Mode
Image ToneRecorded PixelsQuality LevelSaturationSharpness Contrast
Exit
Rec. Mode
Image ToneRecorded PixelsQuality LevelSaturationSharpness Contrast
Exit
Rec. ModeImage ToneRecorded PixelsQuality LevelSaturationSharpness Contrast
Exit

112
Setting the Recorded Pixels and Quality Level
The color of the subject changes with the light source. For example, the same white object will be adifferent shade of white in daylight than under a light bulb. In cameras using film, this is adjusted bychanging the film or using filters. In digital cameras, the whiteness is adjusted using white balance.The default setting is (Auto).
Auto Automatically adjusts the white balance. (About 4000 to 8000K)
Daylight For use when taking pictures in sunlight. (About 5200K)
Shade For use when taking pictures in the shade. (About 8000K)
Cloudy For use when taking pictures on cloudy days. (About 6000K)
For use this when taking pictures under fluorescent lighting. Select the
type of fluorescent light, from W (white) (About 4200K), N (neutral white)
(About 5000K), and D (daylight) (About 6500K).
For use when taking pictures under light bulb or other tungsten light.
(About 2850K)
Flash For use to take pictures using the built-in flash. (About 5400K)
For use when taking pictures by manually adjusting the white balance.
FluorescentLight
Tungsten Light
Manual
The color temperature (K) is an estimate. This does not indicate precise colors.
The white balance is adjusted based on preset values provided in the camera when set to(Daylight), (Shade), (Cloudy), (Fluorescent Light), (Tungsten Light), or (Flash).
Set [White Balance] in the Fn menu. (p.102)
Refer to p.113 for manual adjustment method.White balance cannot be adjusted in Scene mode and mode (p.45).
INFORMATION
Setting the White Balance
White BalanceAuto
OK

113
Setting the Recorded Pixels and Quality Level
1. Set the mode dial to , , ,
2. Press the button.- The Fn menu appears.
3. Press the four-way controller ( ).- The White Balance screen appears.
Color Temperature
The color of light shifts towards blue as the color temperature rises, and towards red as the colortemperature falls. Color temperature describes this change in light color in terms of absolutetemperature (K: Kelvin).This camera is capable of setting the white balance to enable taking pictures with natural coloringunder a variety of lighting conditions.
You can adjust the white balance depending on the light source when taking pictures. With ManualWhite Balance, the camera can store delicate shades that cannot be precisely adjusted with the whitebalance preset values provided in the camera. This provides the optimum white balance for yoursurroundings.
Adjusting the White Balance Manually
2000 3000 4000 5000 6000 8000 10000 12000 [ K ]
Fn
OK AUTOAUTOAUTO
Fn Exit
Red tint Blue tint
Candle
flame
Oillam
p
Tungstenlight
Halogen
lightbulb
White
(Fluorescentlight)
Daylight
Cloudy
Daylight(Fluorescentlight)
Shade
ClearskyFlash
Neutralw
hite(Fluorescentlight)
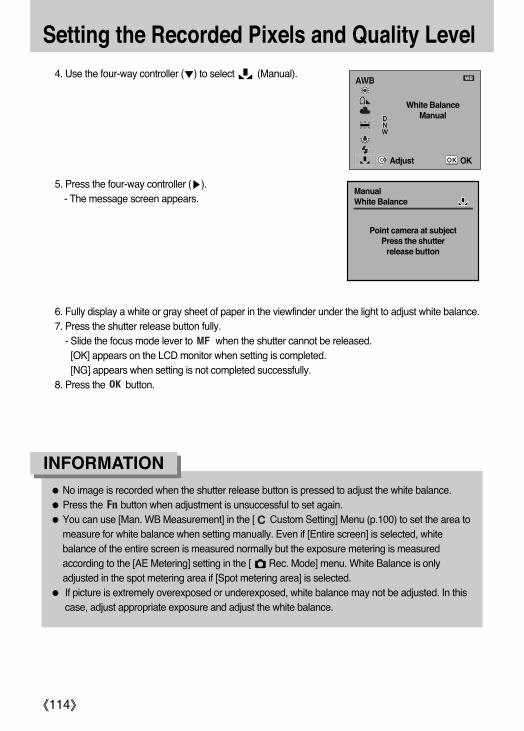
114
Setting the Recorded Pixels and Quality Level4. Use the four-way controller ( ) to select (Manual).
5. Press the four-way controller ( ).- The message screen appears.
6. Fully display a white or gray sheet of paper in the viewfinder under the light to adjust white balance.7. Press the shutter release button fully.
- Slide the focus mode lever to when the shutter cannot be released.[OK] appears on the LCD monitor when setting is completed.[NG] appears when setting is not completed successfully.
8. Press the button.
No image is recorded when the shutter release button is pressed to adjust the white balance.Press the button when adjustment is unsuccessful to set again.You can use [Man. WB Measurement] in the [ Custom Setting] Menu (p.100) to set the area tomeasure for white balance when setting manually. Even if [Entire screen] is selected, whitebalance of the entire screen is measured normally but the exposure metering is measuredaccording to the [AE Metering] setting in the [ Rec. Mode] menu. White Balance is onlyadjusted in the spot metering area if [Spot metering area] is selected.If picture is extremely overexposed or underexposed, white balance may not be adjusted. In thiscase, adjust appropriate exposure and adjust the white balance.
INFORMATION
White BalanceManual
Adjust OK
ManualWhite Balance
Point camera at subject Press the shutter
release button

115
Setting the Recorded Pixels and Quality Level
8008001600160032003200
400400200200
AUTOAUTO
OK
Set in [ISO Corction in AUTO] in the [ Custom Setting] menu.(p.100)
You can set the sensitivity to suit the brightness of thesurroundings. The sensitivity can be set to [AUTO] or within asensitivity range equivalent to ISO 200 to 3200. The default setting is [AUTO].Set [Sensitivity] in the Fn menu. (p.102)
Captured images can show more noise if higher Sensitivity is set.
INFORMATION
Set range to automatically correct sensitivity when Sensitivity is set to [AUTO]. The sensitivity isautomatically corrected in the range of [ISO 200- 800] by default.
Setting the Range of Automatic Correction in AUTO
1 ISO 200-800 Corrects sensitivity automatically in the range of ISO 200 to 800.
2 ISO 200-400 Corrects sensitivity automatically in the range of ISO 200 to 400.
3 ISO 200-1600 Corrects sensitivity automatically in the range of ISO 200 to 1600.
4 ISO 200-3200 Corrects sensitivity automatically in the range of ISO 200 to 3200.
Setting the Sensitivity
Sensitivity
OK
ISO Corction in AUTO
ISO 200-800ISO 200-400ISO 200-1600ISO 200-3200
Corrects sensitivityautomatically in therange of ISO 200 to 800

116
Setting the Recorded Pixels and Quality Level
Sensitivity is not corrected in the following.Exposure mode is (Manual) or (Bulb) modeFlash is dischargedAuto bracketingEV Compensation
INFORMATION
ISO Sensitivity Warning appears in the viewfinder when a sensitivity value of your choice is reachedor exceeded. Set a sensitivity that is not regularly used to avoid forgetting to reset when sensitivity israised. ISO Sensitivity Warning is not displayed by default.
ISO Sensitivity Warning Display
1 Off ISO Sensitivity Warning is not displayed.
2 ISO 400 ISO Sensitivity Warning is displayed when ISO 400 is set or exceeded.
3 ISO 800 ISO Sensitivity Warning is displayed when ISO 800 is set or exceeded.
4 ISO 1600 ISO Sensitivity Warning is displayed when ISO 1600 is set or exceeded.
5 ISO 3200 ISO Sensitivity Warning is displayed when ISO 3200 is set.
Set in [ISO Snstvty Wrn Dspl] in the [ Custom Setting] menu.(p.100)
(ISO Sensitivity Warning) appears in the viewfinder whenthe set sensitivity is set or exceeded.
ISO Sensitivity Warning is not displayed if sensitivity is automatically corrected (p.115).
INFORMATION
ISO Snstvty Wrn Dspl
OffISO 400ISO 800ISO 1600ISO 3200
ISO sensitvty wrning notdisplayed in vewfnder

117
Setting the Recorded Pixels and Quality Level
Set in [Color Space] in the [ Custom Setting] menu. (p.101)
You can set the color space to use. The default setting is [sRGB].
1 sRGB Sets to sRGB color space.
2 AdobeRGB Sets to AdobeRGB color space.
Color Space
Color ranges for various input/output devices, such as digital cameras, monitors, and printers,differ.This color range is called the Color Space.To recreate different color spaces in different devices, standard color spaces have been proposed.This camera supports sRGB and AdobeRGB.sRGB is mainly used for devices such as a PC.AdobeRGB covers a wider area than sRGB and is used for occupational uses such as industrialprinting. An image created in AdobeRGB may appear lighter than an imagecreated in sRGB when output from a sRGB compatible device.
Setting the Color Space
File names differ depending on the color space setting as shown below.- For sRGB : SG1LXXXX.JPG- For Adobe RGB : _G1LXXXX.JPG[XXXX] is the file number and numbering continues from the last stored file number.
INFORMATION
Color Space
sRGBAdobeRGB
Sets to sRGB color space

118
FocusingYou can focus with the following methods.
1. Set the focus mode lever to .
Autofocus The camera is focused when the shutter release button is pressed halfway.
Manual focus Manually adjust the focus.
You can choose the autofocus area from [Wide] and [Spot].You can also choose the autofocus mode from (Single mode) Where the shutter release buttonis pressed halfway to focus on the subject and the focus is locked at that position, and(Continuous mode) where the subject is kept in focus by continuous adjustment while the shutterrelease button is pressed halfway.
Using the Autofocus

119
Focusing2. Look through the viewfinder and press the shutter release
button halfway.
- The focus indicator appears in the viewfinder whenfocused (if it is blinking, the subject is not in focus).
Hard-to-Autofocus Subjects (p.44)
Focus indicator
In (Single mode), the focus is locked (focus lock) while is lit. To focus on anothersubject, take your finger off the shutter release button first.During (Moving Object) mode, when the mode is set to (Kids) or (Pet) orwhen the [AF Mode] in the [ Rec. Mode] is set to (Continuous mode), focus is adjustedcontinuously, tracking The moving object as long as the shutter release button is kept pressedhalfway.The shutter cannot be released until the subject is in focus in (Single mode). If the subject is too close to the camera, move back and take the picture. Adjust the focusmanually if the subject is difficult to focus. (p.44), (p.125)In (Single mode), press the shutter release button halfway. The built-in flash will dischargeautomatically several times, enabling the autofocus to focus on the subject easier if the subject isin a dark area and the built-in flash is up.Regardless if the camera is set to (Single mode) or (Continuous mode), the cameraautomatically tracks the subject if it is determined to be a moving object.
INFORMATION

120
Focusing
You can set the camera so that the focusing is not performedwhen the shutter release button is pressed halfway and isperformed when the button is pressed. This is useful when you wish to temporarily use autofocus whileusing manual focus.Set [Enable AF] in [OK btn when shooting] in the [ CustomSetting] menu.
Use the Button to Focus on the Subject
Only use this function with lenses that are compatible with Quick Shift Focus.Select [Cancel AF]. appears in the viewfinder while the button is pressed. Autofocus doesnot activate when the shutter release button is pressed. This is useful when you wish totemporarily use manual focus while using autofocus.You can focus using the focus ring and release the shutter while OK button is pressed when usinga lens compatible with Quick Shift Focus. (Let go of the OK button to immediately return to AFmode.)
INFORMATION
OK btn when shooting
OffSpot AFEnable AFCancel AF
AF with shutter releasebutton disabled so AFperformed with OK button

121
Focusing
Setting the AF Mode
AF.CAF.S
OK
Settings cannot be changed in Scene mode (p.45).(Continuous mode) can be set when the mode dial is set to , , , or .
The autofocus mode is set to k in (Moving Object) of Scene mode or (Kids) or (Pet)of mode.
INFORMATION
You can choose from the following two autofocus modes. The default setting is (Single mode).
When the shutter release button is pressed halfway to focus on the
subject, the focus is locked at that position.
The subject is kept in focus by continuous adjustment while the
shutter release button is pressed halfway.
Continuousmode
Single mode
Set [AF Mode] in the [ Rec. Mode] menu (p.98). Rec. Mode
Auto BracketAE MeteringFocusing Area AF ModeFlash Exp. Comp.
Cancel OK

122
Focusing
If [Spot AF] is selected for [ btn when shooting] in the [ Custom Setting] menu, the cameraswitches to (Spot) for as long as the OK button is held down when the focusing area is setto (Wide).
INFORMATION
Setting the Focusing Area
You can choose the area on which the autofocus focuses. The default setting is (Wide).
WideThe camera targets the wide area in the center of the screen (within the
focusing area) and focuses on the nearest object.
SpotThe camera narrows the focusing area to facilitate focusing on a specific
subject.
Set in [Focusing Area] in the [ Rec. Mode] menu.
0.0
OK
Rec. Mode
Auto BracketAE MeteringFocusing AreaAF ModeFlash Exp. Comp.
Cancel OK

123
Focusing
If the subject is outside the range of the focusing area, the camera Cannot automatically focus on thesubject. In this situation, you can aim the focusing area toward the subject, use focus lock andrecompose the picture.
1. Frame the desired composition for your picture in theviewfinder.- Use focus lock function when the subject you wish to focuson is not inside the focusing area.
(Example) The person is out offocus
and the background isfocused instead.
2. Center the subject to focus in the viewfinder and press theshutter release button halfway.- The focus indicator appears and you will hear a beepwhen the subject comes into focus (if it is blinking, thesubject is not in focus).
3. Lock the focus.- Keep the shutter release button pressed halfway. The focus will remain locked.
Fixing the Focus (Focus Lock)

124
Focusing4. Re-compose the picture while keeping the shutter release
button pressed halfway.
The focus is locked while the focus indicator is lit.Turning the zooming ring in focus lock mode may cause the subject to be out of focus.The beep can be turned off. (p.161)You cannot set focus lock when the [AF Mode] in the [ Rec. Mode] is set to (Continuousmode), the capture mode is set to (Moving Object) or mode is set to (Kids) or
(Pet). In (Continuous mode), (Moving Object) mode or (Kids) or (Pet) ofmode, the autofocus continues to focus on the subject until the shutter is released.
(Continuous Autofocus)
INFORMATION
Set [AE-L with AF locked] in the [ Custom Setting] menu (p.100) to fix the exposure value whilefocus is locked. Exposure is not fixed by default during focus lock.
Fixing Exposure when Focus is Locked
1 Off Exposure is not fixed when focus is locked.
2 On Exposure is fixed when focus is locked.
AE-L with AF locked
Off On
AE is not lockedwhen the focusis locked

125
Focusing
When you adjust the focus manually, you can either check with the focus indicator in the viewfinder oruse the viewfinder matte field to adjust focus.
You can manually adjust the focus using the focus indicator .
Using the Focus Indicator
Adjusting the Focus Manually (Manual Focus)
1. Set the focus mode lever to .
2. Look through the viewfinder, press the shutter release buttonhalfway and turn the focusing ring.
- The focus indicator appears and you will hear a beepwhen the subject comes into focus.
Focus indicator

126
Focusing
1. Set the focus mode lever to .
2. Look through the viewfinder and turn the focusingring until the subject looks sharp on the screen.
You can manually adjust the focus using the viewfinder matte field.
Using the Viewfinder Matte Field
Use the matte field in the viewfinder when the subject is difficult to focus and the focus indicatorwill not stay lit.The beep can be turned off. (p.161)
INFORMATION

127
Setting the Exposure
Correct exposure of the subject is determined by the combination of shutter speed and aperturesetting. There are many correct combinations of shutter speed and aperture for a particular subject.Different combinations produce different effects.
The shutter speed determines the length of time that light is allowed to strike the CCD. Adjust theamount of light striking the CCD.
Effect of Shutter Speed
Using slower shutter speed
If the subject is moving, the image will be blurred because theshutter is open longer. It is possible to enhance the effect of motion (rivers, waterfalls,waves, etc.) by intentionally using a slower shutter speed.
Using faster shutter speed
Choosing a faster shutter speed will allow freezing the action of amoving subject.A faster shutter speed also helps preventing camera shake.
Effect of Aperture and Shutter Speed

128
Setting the Exposure
Adjust the amount of light hitting the CCD by changing the aperture.
Effect of Aperture
Opening the aperture (reduce the aperture value)
Objects closer and farther than the focused subject will be moreout of focus. For instance, if you take a picture of flower againsta landscape with the aperture open, the landscape in front andbehind the flower will be blurred, emphasizing only the flower.
Closing the aperture (increase the aperture value)The range in focus expands forward and backward. For instance, if you take a picture of flower against a landscapewith the aperture narrowed, the landscape in front and behindthe flower will be in focus..
Depth of Field
When you focus on a portion of the subject, there is a range in which object closer and farther willalso be in focus. This focused range is called the depth of field.
The depth of field for the GX-1L differs depending on the lens but compared to a 35 mmcamera, the value is roughly one aperture setting lower (the focused range becomes narrower).The wider the wide-angle lens, and the farther away the subject, the wider the depth of field is(some zoom lenses do not have a scale for depth of field because of their structure).
Depth of field Shallow Deep
Area of focus Narrow Wide
Open Close
(Smaller value) (Larger value)
Longer Shorter
(Telephoto) (Wider)
Distance to the subject Near Far
Aperture
Lens focal length

129
Setting the Exposure
Choose the part of the screen to use for measuring brightness and determining exposure. (Multi-segment metering), (Center-weighted metering) or (Spot metering) mode can be
selected. The default setting is (Multi-segment metering).
The center-weighted metering mode is automatically set even if you select the multi-segmentmetering mode when using a lens other than the D-XENON lens (can only be used if permissionis set in [Using aperture ring] in the [ Custom Setting] menu (p.101)).
INFORMATION
Measure only the center of the screen and determine exposure.
0.0
OK
Set in [AE Metering] in the [ Rec. Mode] menu. (p.98)
The scene in the viewfinder is metered in 16 different zones asshown in the illustration when using the multi-segment metering.This mode automatically determines what level of brightness is inwhich portion.
Using the Multi-Segment Metering
Selecting the Metering Method
Multi-segmentmetering
Segment the screen in 16 parts, meter each portion and determine the
appropriate exposure.
Center-weightedmetering
Spot metering
Measure the entire screen with an emphasis on the center and determine the
exposure.
Rec. Mode
Auto BracketAE MeteringFocusing AreaAF ModeFlash Exp. Comp.
Cancel OK

130
Setting the Exposure
Linking AF Point and AE During Multi-Segmented Metering
In [Link AF Point and AE] (p.100) of the [ Custom Setting] menu, you can link the exposure andfocus point during multi-segment metering. The default setting is [Off].
1 Off Exposure is set separately from focus point.
2 On Exposure is set in accordance with focus point.
Metering is weighted at the center of the screen. Use this metering when you want to compensate the exposureby experience, instead of leaving it to the camera. The illustration shows that sensitivity increases as the patternheight increases (center). This mode does not automaticallycompensate for backlit scenes.
Using the Center-Weighted Metering
With spot metering, brightness is measured only within a limitedarea at the center of the screen as shown in the illustration. You can use this in combination with the AE lock (p.141)when the subject is extremely small and proper exposure isdifficult to obtain.
Using the Spot Metering

131
Setting the Exposure
Setting the Meter Operating Time
Set the metering time in [Meter Operating Time] in the [ Custom Setting] menu (p.100). The default setting is [10sec].
1 10sec Metering time is set to 10 seconds.
2 3sec Metering time is set to 3 seconds.
3 30sec Metering time is set to 30 seconds.
This camera features five exposure modes along with the Scene modes.Use the mode dial (p.104) to change the exposure mode.
Automatically sets shutter speed and
aperture for taking pictures at the proper
exposure.
Lets you set a desired shutter speed
for expressing moving subjects.
Take pictures of fast moving subjects
that look still or subjects that show
movement.
Lets you set a desired aperture for
controlling the depth of field.
Use to blur the background or be sharp
from front to back.
Lets you set shutter speed and aperture
to create the picture you have in mind.
Lets you capture images that require slow
shutter speeds such as fireworks and night
scenes.
Exposure Mode
(Program) Yes No No
Yes Yes No
Yes No Yes
No Yes Yes
No No Yes
(Shutter Priority)
(Aperture Priority)
(Manual)
(Bulb)
DescriptionExposureCompen-
sation
ChangeShutterSpeed
ChangeAperture
Changing the Exposure Mode

132
Setting the Exposure
Shutter speed and aperture value are automatically set for taking pictures at the proper exposure.Perform the following to adjust the exposure.
Using the (Program) Mode
1. Set the mode dial to .
2. Turn the e-dial while pressing the button and adjustthe exposure.
- The EV Compensation is displayed in the viewfinder and onthe LCD panel.
- The shutter speed and aperture value are also displayedwhile adjusting the exposure. EV Compensation
Set EV Compensation in increments of 1/2 EV or 1/3 EV. Set exposure setting steps in [ExpsrSetting Steps] in the [ Custom Setting] menu. (p.141)You can automatically correct the sensitivity if appropriate exposure cannot be set with the setcriteria. Set [Sensitivity] to [AUTO] in the Fn menu. (p.115)
INFORMATION
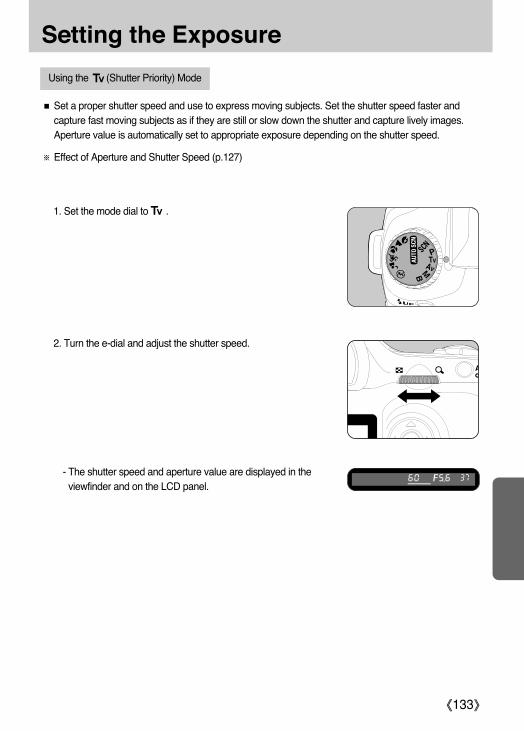
133
Setting the Exposure
Set a proper shutter speed and use to express moving subjects. Set the shutter speed faster andcapture fast moving subjects as if they are still or slow down the shutter and capture lively images.Aperture value is automatically set to appropriate exposure depending on the shutter speed.
Effect of Aperture and Shutter Speed (p.127)
Using the (Shutter Priority) Mode
1. Set the mode dial to .
2. Turn the e-dial and adjust the shutter speed.
- The shutter speed and aperture value are displayed in theviewfinder and on the LCD panel.
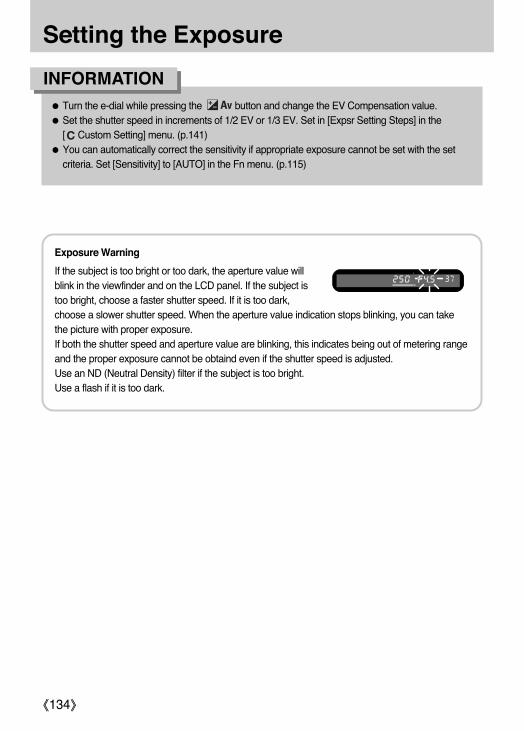
134
Setting the Exposure
Turn the e-dial while pressing the button and change the EV Compensation value.Set the shutter speed in increments of 1/2 EV or 1/3 EV. Set in [Expsr Setting Steps] in the [ Custom Setting] menu. (p.141)You can automatically correct the sensitivity if appropriate exposure cannot be set with the setcriteria. Set [Sensitivity] to [AUTO] in the Fn menu. (p.115)
INFORMATION
Exposure Warning
If the subject is too bright or too dark, the aperture value willblink in the viewfinder and on the LCD panel. If the subject istoo bright, choose a faster shutter speed. If it is too dark,choose a slower shutter speed. When the aperture value indication stops blinking, you can takethe picture with proper exposure.If both the shutter speed and aperture value are blinking, this indicates being out of metering rangeand the proper exposure cannot be obtaind even if the shutter speed is adjusted.Use an ND (Neutral Density) filter if the subject is too bright.Use a flash if it is too dark.

135
Setting the Exposure
Set a proper aperture and use when you want to adjust the depth of field. The depth of field is deeperand the front and back of the focused object is clear when aperture is set to a large value. The depthof field is shallower and the front and back of the focused object is blurred when aperture is set to asmall value. Shutter speed is automatically set to appropriate exposure depending on the aperture value.
Effect of Aperture and Shutter Speed (p.127)
Using the (Aperture Priority) Mode
1. Set the mode dial to .
2. Turn the e-dial and adjust the aperture value.
- The shutter speed and aperture value are displayed in theviewfinder and on the LCD panel.

136
Setting the Exposure
Turn the e-dial while pressing the button and change the EV Compensation value.Set the aperture value in increments of 1/2 EV or 1/3 EV. Set in [Expsr Setting Steps] in the [ Custom Setting] menu. (p.141)You can automatically correct the sensitivity if appropriate exposure cannot be set with the setcriteria. Set [Sensitivity] to [AUTO] in the Fn menu. (p.115)
INFORMATION
Exposure Warning
If the subject is too bright or too dark, the shutter speed will blinkin the viewfinder and on the LCD panel. If the subject is toobright, set the aperturesmaller (larger number), and when too dark, open the aperture further (smaller number). Once blinking stops, you can take the picture.If both the shutter speed and aperture value are blinking, this indicates being out of metering rangeand the proper exposure cannot be obtained even if the aperture is adjusted.Use an ND (Neutral Density) filter if the subject is too bright.Use a flash if it is too dark.

137
Setting the Exposure
You can set the shutter speed and aperture value. This mode is suitable to take pictures of yourchoice by combining them. This mode is convenient for taking pictures using the same shutter speedand aperture setting combination or taking intentionally under-exposed (darker) or over-exposed(brighter) photographs.
Effect of Aperture and Shutter Speed (p.127)
Using (Manual) Mode
1. Set the mode dial to .
2. Turn the e-dial and adjust the shutter speed.
3. Turn the e-dial while pressing the button and adjustthe aperture.

138
Setting the Exposure- The shutter speed and aperture value are displayed in theviewfinder and on the LCD panel. Of the shutter speed and aperture, the value being adjusted isunderlined in the viewfinder. While adjusting the shutter speedor aperture value, the difference with the appropriateexposure (EV value) appears at the bottom right of the viewfinder. The appropriate exposure isset when [0.0] is displayed.
Difference from theappropriate exposure
When in (Manual) mode, the sensitivity is equivalent to ISO 200 when sensitivity is set to[AUTO].Blinks when the difference with appropriate exposure is over ±3.0.Set the shutter speed and aperture values in increments of 1/2 EV or 1/3 EV.Set in [Expsr Setting Steps] in the [ Custom Setting] menu. (p.141)
INFORMATION
Exposure Warning
You are out of the measuring area if the shutter speed andaperture blink. Use an ND (Neutral Density) filter if the subject istoo bright. Use a flash if it is too dark.

139
Setting the Exposure
About the Button
The aperture and shutter speed are automatically adjusted to the appropriate exposure at thatmoment if the button is pressed in (Manual) mode. You can choose from the followingthree adjustment methods in [AE-L bttn on M expsr] in the [ Custom Setting] menu.
1 Program Line The aperture and shutter speed are adjusted automatically.
2 Tv Shift The aperture is locked and the shutter speed is adjusted automatically.
3 Av Shift The shutter speed is locked and the aperture is adjusted automatically.
This mode is useful for the long exposures required for shooting night scenes and fireworks.The shutter remains open as long as the shutter release button is kept pressed.
Using the (Bulb) Mode
1. Set the mode dial to .
Turn the e-dial to adjust the aperture value.Set the aperture value in increments of 1/2 EV or 1/3 EV. Set in [Expsr Setting Steps] in the [ Custom Setting] menu. (p.141)Use a sturdy tripod and the cable switch SSR-D1 (optional) to prevent camera shake when using
(Bulb) mode. Connect the cable switch to the cable switch terminal.Bulb shooting is available when using the remote control shooting mode (p.59). The shutterremains open as long as the optional remote control s shutter release button is held down.Noise reduction is a process to reduce noise (image roughness or unevenness) caused by lowshutter speed. Set in [Noise Reduction] in the [ Custom Setting] menu. (p.100)When in (Bulb) mode, the sensitivity is equivalent to ISO 200 when sensitivity is set to [AUTO].
INFORMATION

140
Setting the Exposure
This allows you to deliberately over-expose (brighten) or under-expose (darken) your picture. You can adjust the EV Compensation from -2 to +2 (EV) in increments of 1/2 EV or 1/3 EV.Set in [Expsr Setting Steps] in the [ Custom Setting] menu. (p.141)
Setting the Exposure
1. Set the compensation with the e-dial while the button is pressed.
button
2. Confirm the compensation value in the viewfinder.- is displayed during compensation.- blinks when the flash is popped up if the flashcompensation is set.
Compensation value
Exposure compensation is not available when the exposure mode is set to (Manual) or(Bulb) mode.
The exposure compensation cannot be canceled by turning the camera off or by setting any otherexposure mode.
INFORMATION

141
Setting the Exposure
Set Exposure Setting Steps in [Expsr Setting Steps] in [A Custom Setting] to increments of 1/2 EV or 1/3 EV.
Changing the Exposure Setting Steps
AE Lock is a function that memorizes the exposure prior to taking the picture. Use this when thesubject is too small or backlit and a proper exposure setting cannot be obtained.
1. Press the button.- The camera memorizes the exposure (brightness) at thatinstant.Press it again to unlock.
Recording the Exposure Before Shooting (AE Lock)
is displayed in the viewfinder while the AE lock is engaged. (p.18)The exposure remains in memory for twice as much time as the metering timer after releasing the
button. The exposure remains locked as long as the button is kept pressed or theshutter release button is kept pressed halfway.You will hear a beep when the button is pressed. The beep can be turned off. (p.161)AE lock is not available when the exposure mode is (Manual) or (Bulb) mode.The combination of shutter speed and aperture value changes depending on the zoomingposition even while the AE lock is engaged when using a zoom lens for which maximum aperturevaries depending on the focal length. However, the exposure value does not change and thepicture is taken at the brightness level set by the AE lock.If the exposure mode is (Manual), the aperture and/or shutter speed are automaticallyadjusted to set the appropriate exposure when the button is pressed. (p.137)Exposure can be fixed when focus is locked. Set in [AE-L with AF locked] in the [ CustomSetting] menu. (p.124)
INFORMATION
Expsr Setting Steps
1/2 EV Steps1/3 EV Steps
Exposure setting stepsare set to 1/2 EV

142
Setting the Exposure
You can take continuous pictures with different exposure when the shutter release button is pressed.The first frame is exposed with no compensation, the second frame is under-exposed (negativecompensation) and the third is over-exposed (positive compensation).
[ Normal exposure ] [ Under-exposure ] [ Over-exposure ]
1. Press the button in capture mode.- The Fn menu appears.
2. Press the four-way controller ( ).- The Drive Mode options screen appears.
3. Use the four-way controller ( ) to select (Auto Bracket).
Fn
OK AUTOAUTOAUTO
Fn
OK
Changing the Exposure and Shooting (Auto Bracket)
Exit
Drive ModeAuto Bracket
OK

143
Setting the Exposure4. Press the button. The screen returns to the menu.
5. Press the button. The camera is ready to take a picture.- Shooting is ready and is displayed on the LCD panel.
6. Press the shutter release button halfway.- Focus indicator appears in the viewfinder when focused.
7. Press the shutter release button fully.- Three continuous pictures will be taken, the first with no compensation, the second with negativecompensation, and the third with positive compensation.
When the focus mode is set to (Single mode), the focus is locked in the first frame positionand used for subsequent continuous frames.The auto bracketing exposure setting will remain effective for twice as much time as the exposuremetering timer (default setting is 20 seconds)when you release your finger from the shutter release button during auto bracketing, and you cantake the next picture at the next compensation value.In this case, auto focusing works for each frame. After about twice as much time as the exposuremetering timer (default setting is 20 seconds), the camera returns to settings for taking the firstpicture.You can combine Auto Bracket with the built-in flash or external flash (P-TTL auto only) to changeonly the flash output continuously. However, when using an external flash, holding the shutterrelease button down to take three continuous frames may cause the second and third frame to betaken before the flash is fully recharged. Always take one frame at a time after confirming thatcharging is complete.Auto Bracket is not available when the exposure mode is set to (Bulb) mode.
INFORMATION

144
Setting the Exposure
Change the shooting order and steps of Auto Bracket.
Set interval of steps in [Expsr Setting Steps] in the [ Custom Setting] menu. (p.141)
Setting Auto Bracket
1/2 EV 0.5, 1.0, 1.5, 2.0
1/3 EV 0.3, 0.7, 1.0, 1.3, 1.7, 2.0
0 - +, - 0 +, + 0 -
0.50
Set in [Auto Bracket] in the [ Rec. Mode] menu. (p.98)
Taking Only Over-exposed or Under-exposed Pictures
You can use the auto bracketing mode for only under-exposure or over-exposure shots bycombining the operation with exposure compensation (p.140). The auto bracketing is performed inboth cases on the basis of the specified exposure compensation value.
Shooting images
Bracketng amount
(Step interval)
Auto Bracket
Bracketng amountShooting images

145
Checking the Composition, Exposure and Focus Before ShootingYou can use the preview function to check the depth of field, composition, exposure and focus beforetaking a picture. There are 2 preview methods.
Select the preview method in [Preview Method] in the [ Custom Setting] menu (p.101). The defaultsetting is [Digital Preview]
Displaying the PreviewDisplay the digital preview or optical preview.
Displaying the Digital Preview
Focus on the subject, then compose the picture in the viewfinderand move the main switch to .
The ( ) icon appears in the LCD monitor during preview and you can check the composition,exposure and focus.Press the shutter release button halfway to end Digital Preview and start focusing. The imagedisplayed in Digital Preview is not saved.
Digital Preview For checking the composition, exposure and focus in the LCD monitor.
Optical Preview For checking the depth of field with the viewfinder.
You can display the overexposed area warning or histogram in Digital Preview. Set in [PreviewDisplay] (p.98) in the [ Playback] menu.The maximum display time for Digital Preview is 60 seconds.
INFORMATION

146
Checking the Composition, Exposure and Focus Before Shooting
No shooting information is displayed in the viewfinder, and the shutter cannot be released whilethe main switch is in the preview position ( ).You can check the depth of field in all exposure modes.
INFORMATION
Displaying the Optical Preview
1. Position the subject inside the AF frame and press the shutterrelease button halfway.
2. Turn the main switch to while looking through the viewfinder.- You can check the depth of field in the viewfinder while the mainswitch is on .

147
Checking the Composition, Exposure and Focus Before Shooting
Selecting the Preview Method
Choose the preview method to use when the main switch is turned to the preview position ( ).The default setting is Digital Preview.
Set in [Preview Method] in the [ Custom Setting] menu.
Digital PreviewFor checking the composition, exposure and focus in the LCD monitor before
taking a picture.
Optical Preview For checking the depth of field with the viewfinder.
Preview Method
Digital PreviewOptical Preview
For checking exposure,composition and focusw/LCD before shooting

148
Using the Built-in Flash
You can change the flash output in a range of -2.0 to +1.0. The Flash Compensation values are asfollows for 1/2 EV and 1/3 EV.
Set interval of steps in [Expsr Setting Steps] in the [ Custom Setting] menu. (p.141)
Set in [Flash Exp. Comp.] in the [ Rec. Mode] menu. (p.98)
Step interval Flash Compensation
1/2 EV -2.0, -1.5, -1.0, -0.5, 0.0, +0.5, +1.0
1/3 EV -2.0, -1.7, -1.3, -1.0, -0.7, -0.3, 0.0, +0.3, +0.7, +1.0
blinks in the viewfinder when the flash pops up during Flash Compensation. (p.19)If the maximum flash output is exceeded when corrected to the plus (+) side, no compensationwill be effective.Compensating to the minus (-) side may not effect the image if the subject is too close, aperture islow or sensitivity is high.This flash compensation is also effective for external flash units which support P-TTL auto flashmode.
INFORMATION
Compensating Flash Output
OK
1.00.5
0.50.0
Rec. Mode
Auto BracketAE MeteringFocusing AreaAF ModeFlash Exp. Comp.
Cancel OK

149
Using the Built-in Flash
You can set to enable shooting while flash is being charged. Set [On] for [Release when Chrging] in the [ Custom Setting]menu (p.101). Pictures cannot be taken while the flash ischarging by default.
Using the Flash in Tv (Shutter Priority) Mode
- When taking a moving subject, you can use the flash to change the blur effect.- Any desired shutter speed 1/180 sec. or slower can be set for taking a flash photograph.- The aperture value automatically changes according to the ambient brightness.
Using the Flash in Av (Aperture Priority) Mode
- You can set the desired aperture to take a flash photograph when you want to change the depth offield or shoot a subject farther away.
- The shutter speed automatically changes with the ambient brightness.- The shutter speed shifts automatically anywhere from 1/180 sec. to a slow shutter speed thatreduces camera shake. The slowest shutter speed depends on the focal length of the lens in use.
Allowing Shooting while Charging Flash
Flash Characteristics in Each Exposure Mode
Release when Chrging
OffOn
Enables shutter releasewhile the built-inflash is charging

150
Using the Built-in Flash
Using (Shutter Priority) Mode
1. Set the mode dial to .b (Shutter Priority) mode is set.
2. Use the e-dial to set the desired shutter speed.The background is not properly corrected if aperture value is flashing when shutter speed is set. Set the shutter speed so that aperture does not flash.
3. Press the button.The flash pops up.
4. Take the picture.
Slow-speed-sync slows the shutter speed. Use a tripod to avoid camera shake. The picture will also blur if the subject moves.Slow-speed-sync shooting can also be performed with an external flash.
INFORMATION
You can use slow-speed-sync when shooting portraits with the sunset in the background. Both theportrait and the background are captured beautifully.
Using (Manual) Mode
1. Set the mode dial to .a (Manual) mode is set.
2. Set the shutter speed (under 1/180 sec.) and aperture value to obtain correct exposure.3. Press the button.
The flash pops up.In (Manual) mode, pop up the flash at any time.
4. Take the picture.
Using Slow-Speed-Sync

151
Using the Built-in Flash
A set criteria is necessary between the guide number, aperture and distance when shooting with theflash. Calculate and adjust the shooting conditions if flash is not sufficient.
Built-in flash guide number
Sensitivity Built-in flash guide number
ISO 200 15.6
ISO 400 22
ISO 800 31
ISO 1600 44
ISO 3200 62
The following equation calculates the distance of the flash for aperture values.Maximum flash distance L1 = Guide number ÷ Selected apertureMinimum flash distance L2 = Maximum flash distance L1 ÷ 5*
* The value 5 used in the formula above is a fixed value which applies only when using the
built-in flash alone.
Example)When sensitivity is [ISO 200] and aperture value is F4L1 = 15.6 ÷ 4 = approx. 3.9 (m)L2 = 3.9 ÷ 5 = approx. 0.8 (m)Therefore, the flash can be used in a range of about 0.8 m to 3.9 m.The flash cannot be used when the distance is less than 0.7 m. When the flash is used at closer than0.7 m, it causes vignetting in the picture corners, light is distributed unevenly and the picture may beover-exposed.
Calculating Shooting Distance from Aperture Value
Distance and Aperture when Using the Built-in Flash

152
Using the Built-in Flash
The following equation calculates the aperture value for shooting distances.
Aperture Value Used F = Guide number ÷ Shooting distance
When sensitivity is [ISO 200] and shooting distance is 5.2 m, aperture value is:F = 15.6 ÷ 5.2 = 3If the resulting number (3, in the above example) is not available as a lens aperture, the smallernumber that is closest (2.8, in the above example) is generally used.
Calculating Aperture Value from Shooting Distance

153
Using an External Flash (Optional)
*1 : Shutter speed of 1/90 sec. or slower.*2 : Can be combined with SEF-36PZF for rear curtain sync flash.*3 : When combined with the SEF-36PZF, 1/3 of the flash discharge can be output by the built-in flash
and 2/3 can be output by the external flash.*4 : Two or more SEF-36PZF units are required.
Using the optional external flash SEF-36PZF enables a variety of flash modes, such as P-TTL autoflash mode, high-speed flash sync mode, and wireless mode. See the chart below for details.(Yes: Available #: Restricted No: Not available)
See the SEF-36PZF operating manual for details.
When using an external flash, it is recommended to use the high-precision SEF-36PZF, as it iscapable of P-TTL auto flash mode.
Red-eye reduction flash Yes Yes
Automatic flash discharge Yes Yes
P-TTL auto flash (appropriate sensitivity: 200 to 3200) Yes Yes
Slow-speed sync Yes Yes
Flash exposure compensation Yes Yes
AF illuminator Yes Yes
Rear curtain sync flash*1 # *2 Yes
Contrast-control-sync flash mode # *3 Yes
Slave flash No Yes
High-speed flash sync No Yes
Wireless flash*4 No Yes
After the flash is charged, the camera automatically switches to
the flash sync speed.
Aperture is automatically set in (Program) mode and
b (Shutter Priority) mode.
YesYes
YesYes
Camera Function
FlashBuilt-in Flash SEF-36PZF

154
Using an External Flash (Optional)
The SEF-36PZF will automatically convert the field angle differential between 35 mm format and theGX-1L depending on the focal length of the lens you are using (when using D-XENON lenses). The conversion indicator appears and the format size indicator disappears when the exposuremetering timer of the GX-1L is on (it returns to 35 mm format display when the exposure meteringtimer is turned off).
Use this flash mode with the SEF-36PZF flash unit. When flash mode is set to “P-TTL auto”, the flashpre-fires right before taking pictures using 16-segment metering and allows more precise control. P-TTL auto is available in wireless flash mode when two or more SEF-36PZF units are used.
1. Remove the cover of the hot shoe and attach the SEF-36PZF.2. Turn on the SEF-36PZF.3. Set the SEF-36PZF flash mode to P-TTL auto.4. Confirm that the SEF-36PZF is fully charged and then take the picture.
P-TTL auto is only available with the SEF-36PZF flash unit.The will light in the viewfinder when the flash is ready (fully charged).For details such as operation method and effective distance, please read the external flashmanual.The flash does not discharge when the subject is bright enough when Flash Mode is or .Therefore, it may not suitable for daylight-sync shooting.Never press the flash pop up button when any external flash unit is attached to the camera. The built-in flash will hit the external flash.See the SEF-36PZF operating manual for details.
INFORMATION
Using P-TTL Auto Mode
About the LCD Panel Display for SEF-36PZF
85mm 77mm 50mm 35mm 28mm 24mm 20mm 18mm
70mm 50mm 28mm 24mm*
48mm 34mm 19mm 16mm*58mm
85mm
24mm
35mm
Lens focal length
SEF-36PZF
LCD panel
Exposuremetering timer
Off
Exposuremetering timer
On
* Using wide adaptor

155
Using an External Flash (Optional)
Shoot using the flash without connecting the camera and flash with a cord by using two SEF-36PZFunits.The High-speed sync mode is also available in wireless mode.
With the SEF-36PZF, you can discharge the flash to take a picture at a shutter speed faster than1/180 second. High-speed flash sync can be used with the flash attached to the camera, or wireless.
Attaching and Using the SEF-36PZF on the Camera
1. Remove the hot shoe cover and attach the SEF-36PZF.2. Turn the mode dial and set the exposure mode to or .3. Turn on the SEF-36PZF.4. Set the SEF-36PZF sync mode to HS (high-speed flash sync.).5. Confirm that the SEF-36PZF is fully charged and then take the picture.
The will light in the viewfinder when the flash is ready (fully charged).High-speed flash sync is only available when the shutter speed is faster than 1/180 sec.High-speed flash sync is not available when the exposure mode is set to (Bulb).See the SEF-36PZF operating manual for details.
INFORMATION
Be sure to set the two SEF-36PZF units to the same channel. See the SEF-36PZF operatingmanual for details.
INFORMATION
Using in Wireless Mode
Using High-Speed Flash Sync Mode

156
Using an External Flash (Optional)Using in Wireless Mode
1. Place the SEF-36PZF at the desired location.2. Set the SEF-36PZF power switch to [WIRELESS].3. Set the SEF-36PZF wireless mode to S (Slave).4. Turn the camera mode dial and set the exposure mode to , , or mode.5. Set the SEF-36PZF power switch on the camera to [WIRELESS].6. Set the SEF-36PZF wireless mode on the camera to (Master) or (Control).
Wireless mode is not available for the built-in flash.Set the SEF-36PZF wireless slave mode to SLAVE1.See the SEF-36PZF operating manual for details.
INFORMATION
Wireless Flash Control (P-TTL Flash Mode)
The following information is exchanged between the two SEF-36PZF flash units before the flash isdischarged when the SEF-36PZF is used for wireless flash.Press the shutter release button fully.
1. The camera s flash discharges a pre-flash (the camera s flash mode is transmitted).2. The external flash unit discharges a pre-flash (the subject s lighting condition is checked).3. The camera s flash unit discharges a pre-flash (the required flash output is transmitted to the
external flash).The camera s flash will discharge another pre-flash to transmit the flash duration in HS(High-speed sync).
4. The external flash discharges the main flash.Set the SEF-36PZF wireless slave mode to SLAVE1.

157
Using an External Flash (Optional)
The red-eye reduction feature works even when only an external flash is used. (p.52)If red-eye reduction is used when the SEF-36PZF is set as the slave unit or with the wirelessfunction, the preflash for red-eye reduction will trigger the external flash. Do not use red-eyereduction when using a slave unit.See the SEF-36PZF operating manual for details.
INFORMATION
As with the built-in flash, red-eye reduction is available with an external flash.
Red-Eye Reduction

158
Settings During Playback
Sets the information to show first during playback and whether to Display overexposed area warning.The camera switches display information when you press the button.
Changing Playback Display Method
Images only Only captured images are displayed.
Histogram Images and histogram are displayed.
Detailed Info Shooting information appears with a small image in the upper left.
Last memory Display settings are retained from previous session.
1. Select [Plybk dsply mthd] on the [ Playback] menu.
2. Press the four-way controller ( ). The screen for setting thePlayback display method appears.
3. Use the four-way controller ( ) to select [Display Style].
4. Use the four-way controller ( ) to select the information toshow.
Bright Portion
OK
Plybk dsply mthd
Display StyleImages only
Bright Portion
Plybk dsply mthd
Display StyleImages onlyHistogramDetailed InfoLast memory
Cancel OK

159
Settings During Playback
You can play back all images recorded on your SD Memory Cardsuccessively. (p.68)Set image display interval to [3 sec], [5 sec], [10 sec] or [30 sec].The default setting is [3 sec].Set in [Slideshow] in the [ Playback] menu (p.98).
After setting, press the button to start slideshow.
5. Press the button. The selected information setting is saved.
6. Use the four-way controller ( ) to select [Bright Portion].
7. Use the four-way controller ( ) to select (On) or (Off).
8. Press the MENU button twice. The camera is ready to take a picture.
OK
Setting the Slideshow Display Interval
Refer to p.16 for various display information details.
INFORMATION
Playback
Plybk dsply mthdInstant ReviewPreview DisplayDigital FilterSlideshow
Off3 sec5 sec10 sec30 sec
Cancel OK

160
Camera Settings
Be sure to format new SD Memory Card with the camera before using the card.Formatting will delete all the data on the SD Memory Card.
1. Select [Format] on the [ Set-up] menu (p.99).
2. Press the four-way controller ( ) to display the Format screen.
3. Use the four-way controller ( ) to select [Format].
4. Press the button.Formatting starts. When formatting is completed, the camera is ready to take pictures.
Do not open the card cover while formatting SD Memory Card. The card may be damagedbeyond use.Formatting will delete protected data. Be aware.
INFORMATION
OK
Formatting the SD Memory Card
Format
All data deleted
CancelFormat
OK

161
Camera Settings
You can turn the camera operation beep on or off. The default setting is [On].Set in [Beep] in the [ Set-up] menu. (p.99)
You can change the initial date and time settings. You can also set the display style. Choose [mm/dd/yy],[dd/mm/yy] or [yy/mm/dd]. Choose [12h (12 hour)] or [24h (24hour)] for time display method.
- Setting the Date and Time (p.33)
OK
24h
2006/0101 /
00 : 00
Turning the Beep On and Off
Changing the Date and Time and the Display Style
Set-up
FormatBeepDate AdjustWorld TimeLanguage/Guide display
English
Exit
Date Adjust
Date Style
Date
Time
mm/dd/yy
Cancel OK

162
Camera Settings
The date and time selected in “Initial Settings” (p.31) serve as the date and time of your presentlocation.Setting [World Time] enables you to display the local date and time on the LCD monitor whentraveling overseas.
1. Select [World Time] on the [ Set-up] menu. (p.99)
2. Press the four-way controller ( ).The World Time screen appears.
3. Use the four-way controller ( ) to select (On) or (Off).
4. Press the four-way controller ( ).The selection frame moves to . The city with blinks.
5. Press the four-way controller ( ).The screen for magnifying the Destination region appears.Use the four-way controller ( ) to change the region to magnify.
6. Press the four-way controller ( ).The frame moves to city.
00:25
Applies time of city set in (Destination)
Applies time of city set in (Hometown)
Setting the World Time
World Time
New YorkNew York

163
Camera Settings7. Use the four-way controller ( ) to select the Destination city.
The current time, location and time difference of the selectedcity appears.
8. Use the four-way controller ( ) to select [DST].
9. Use the four-way controller ( ) to select (On) or (Off).Select (On) if the Destination city uses daylight saving time (DST).
11. Press the button twice.The camera is ready to take pictures.
05:25+05:00
OK
10. Press the button.The World Time setting is saved.To continue with World Time setting operations, press the button to return to the World Time screen.
01:25
See List of World Time Cities” (p.164) for cities that can be specified as a destination.Select in Step 4 to set the city and DST setting.
appears on the guide display screen if World Time is On ( ). (p.14)
INFORMATION
Destination
LondonDST
Cancel OK
World Time
LondonNew York

164
Camera Settings
Region City
North Honolulu
America Anchorage
Vancouver
San Francisco
Los Angeles
Calgary
Denver
Chicago
Miami
Toronto
New York
Halifax
Central and Mexico City
South Lima
America Santiago
Caracas
Buenos Aires
Sao Paulo
Rio de Janeiro
Europe Madrid
London
Paris
Amsterdam
Milan
Rome
Berlin
Stockholm
Athens
Helsinki
Moscow
Africa/ Dakar
West Asia Algiers
Johannesburg
Istanbul
Cairo
Jerusalem
Region City
Africa/ Nairobi
West Asia Jeddah
Tehran
Dubai
Karachi
Kabul
Male
Delhi
Colombo
Katmandu
Dacca
East Asia Yangon
Bangkok
Kuala Lumpur
Vientiane
Singapore
Phnom Penh
Ho chi Minh
Jakarta
Hong Kong
Beijing
Shanghai
Manila
Taipei
Seoul
Tokyo
Guam
Oceania Perth
Adelaide
Sydney
Noumea
Wellington
Auckland
Pago Pago
List of World Time Cities

165
Camera Settings
You can change the language in which the menus, errormessages, etc. are displayed.Set in [Language] in the [ Set-up] menu. (p.99)You can choose from eleven languages: English, French,German, Spanish, Italian, Swedish, Dutch, Russian, Korean,Chinese (Traditional/ Simplified) and Portuguese.
- Setting the Display Language (p.31)
Set to display guides on the LCD monitor when main switch is on or Exposure mode is changed.(p.14)
Set in [Guide display] in the [ Set-up] menu. (p.99)
Guide display on
Guide display off
Setting the Display Language
Turning the Guide Display On and Off
Set-up
FormatBeepDate AdjustWorld TimeLanguageGuide display
English
Exit
OK
Language
EnglishFrançaisDeutschEspañolItalianoSvenska
Nederlands
Português

166
Camera Settings
You can adjust the brightness of the LCD monitor. Adjust settings when the LCD monitor is hard to see.Set in [Brightness Level] in the [ Set-up] menu. (p.99)
0
OK
When you connect the camera to AV equipment such as a TV,choose the appropriate video output format (NTSC or PAL) forplaying back images.Set in [Video Out] in the [ Set-up] menu. (p.99)
- Connecting the Camera to AV Equipment (p.70)
NTSCPAL
0
OK
The video output format varies according to region. The video output format used in NorthAmerica is NTSC.
INFORMATION
Adjusting the Brightness of the LCD Monitor
Selecting the Video Output Format
Set-up
Brightness LevVideo OutTransfer ModeAuto Power OffFolder NameFile #
1 minStd.SerialNo
OK
Set-up
Brightness LevelVideo OutTransfer ModeAuto Power OffFolder NameFile #
1 minStd.SerialNo
Cancel OK

167
Camera Settings
You can set the camera to turn off automatically if unused after acertain length of time. Select from [1 min], [3 min], [5 min], [10 min], [30 min] or [Off].The default setting is [1 min]. Set in [Auto Power Off] in the [ Set-up] menu. (p.99)
OK
OK
Auto Power Off will not work during slideshow playback, a USB connection, remote controlshooting or while displaying menu or Fn menu.
INFORMATION
Setting Auto Power Off
You can select the method for assigning the folder names for Storing images. The default setting is[Std.].
Selecting the Folder Name
The folder name is assigned in the form of [XXXSSCAM].[XXX] is a sequential
number from 100 to 900. (Example) 100SSCAM.
The two digits of the [month] and [day] on which the picture was taken are
assigned as the folder name in the form of [XXX_MMDD].
(Example) 100-0101: for folders with pictures taken on January First.
Std.
Date
Set in [Folder Name] in the [ Set-up] menu. (p.99)
Set-up
Brightness LevelVideo OutTransfer ModeAuto Power OffFolder NameFile #
1 min3 min5 min10 min30 minOff
OKCancel
Set-up
Brightness LevelVideo OutTransfer ModeAuto Power OffFolder NameFile #
0NTSCPAL1 minStd.Date
OKCancel

168
Camera Settings
You can set the File Number used for the images when inserting a new SD Memory Card. The default setting is [SerialNo].
Set in [File #] in the [ Set-up] menu. (p.99)
Setting the Display Instant Review and Digital PreviewYou can perform the settings related to Instant Review and Digital Preview.
OK
The file number for the most recently captured image is placed in memory and
the file number will remain continuous after inserting the new SD Memory Card.
Every time a new SD Memory Card is inserted, the file number is the smallest
number. When an SD Memory Card with stored images is inserted, numbering
continues from the last stored file number.
SerialNo
Reset
Resetting the File Number
Setting the Display Time of the Instant Review
Select from [1 sec], [3 sec], [5 sec] or [Off]. The default setting is[1 sec]. Set in [Instant Review] in the [ Playback] menu.(p.98)
OK
Set-up
Brightness LevelVideo OutTransfer ModeAuto Power OffFolder NameFile #
0NTSCPAL1 minSerialNoReset
OKCancel
Playback
Plybk dsply mthdInstant ReviewPreview DisplayDigital FilterSlideshow
1 sec3 sec5 secoff
Cancel OK

169
Camera Settings
Displaying Histogram and Bright Portion
Set to display histogram and bright portion during Instant Review And Digital Preview. Set in [PreviewDisplay] in the [ Playback] menu. In the default setting, the histogram and overexposed areawarning do not appear.
1. Select [Preview Display] in the [ Playback] menu.
2. Press the four-way controller ( ). The screen for setting thePreview Display appears.
3. Use the four-way controller ( ) to select (On) or (Off) for [Histogram].
The histogram is displayed in the Instant Review and Digital Preview screens.
The histogram is not displayed.
The overexposed area warning is displayed in the Instant Review and Digital
Preview screens.
The overexposed area warning is not displayed.
4. Use the four-way controller ( ) to select [Bright Portion].
5. Use the four-way controller ( ) to select (On) or (Off).
6. Press the button twice.The camera is ready to take a picture.
Preview Display
HistogramBright Portion
For setting displayedinformation in InstantReview/Digital Preview

170
Resetting to Default Settings
Settings in [ Rec. Mode] menu, [ Playback] menu and [ Set-up] menu are reset to defaultsettings.However, Date Adjust, Language, Video Out and World Time are not reset.
1. Select [Reset] on the [ Set-up] menu.
2. Press the four-way controller ( ) to display the [Reset] screen.
3. Use the four-way controller ( ) to select [Reset].
4. Press the button.The camera is ready to take or play back images.
OK
Resetting Rec. Mode/ Playback/ Set-up Menu
Reset
Back to initial settings
ResetCancel
OK

171
Resetting to Default Settings
Reset settings in [ Custom Setting] menu to default settings.Settings in [ Rec. Mode] menu, [ Playback] menu and [ Set-up] menu are not reset.
1. Select [Reset] on the [ Custom Setting] menu.
2. Press the four-way controller ( ) and display the Reset Custom Fnction screen.
3. Use the four-way controller ( ) to select [Reset].
4. Press the button.The camera is ready to take or play back images.
OK
Resetting the Custom Function Menu
Reset Custom Fnction
Returns the customfunction settingsto initial settings
ResetCancel
OK

172
MEMO

Software Notes 174
About the software 175
Setting up the application software 176
Starting PC mode 177
Removable Disk 178
Removing the removable disk 180
Digimax Master 182
6 Software information
Explains software installation and how to use the program.

174
Software NotesPlease ensure that you read the instruction manual carefully before use.
The attached software is a camera driver and image editing software tool for Windows.Under no circumstances should all or part of either the software or the user manual be reproduced.Copyrights for software are licensed only for use with a camera.In the unlikely event of a manufacturing fault, we will repair or exchange your camera.We cannot, however, be held responsible in any way for damage caused by inappropriate use.Using a Hand-made PC or a PC and OS that has not been guaranteed by the manufactureris not covered by the Samsung warranty.Before reading this manual, you should have a basic knowledge of computers and O/S (OperatingSystems).
System Requirements
For Windows For Macintosh
Windows 2000/ME/XP Mac OS 9.0 or later
Minimum 256MB RAM (512MB recommended) Minimum 256MB RAM
250MB of available hard disk space 250MB of available hard-disk space
(1GB recommended)
USB port USB port
CD-ROM drive CD-ROM drive
PC with processor better than Pentium II 450Mz
(Pentium 700MHz recommended)
1024x768 pixels, 16-bit colour display
compatible monitor (24-bit colour display
recommended)
Power Mac G3 or later

175
About the softwareDigimax Master : This is the all-in-one multi media software solutionYou can download, view, edit and save your digital images (RAW, JPEG) with this software. Thissoftware is only compatible with Windows.
You should allow 5~10 seconds for running the automatic setup program according to thecapability of your computer. If the frame does not show, run the [Windows Explorer] and select[setup.exe] in the CD-ROM Drive root directory.PDF documents of user manual are included in the Software CD-ROM supplied with this camera. Search the PDF files with Window s explorer. Before opening the PDF files, you must install theAdobe Reader included in the Software CD-ROM.
INFORMATION

176
Setting up the application softwareTo use this camera with a PC, install the application software first.After this has been done, the stored images in the camera can be moved to the PC and can beedited by an image editing program.
You can visit the Samsung web-site through the internet.
http://www.samsungcamera.com : Englishhttp://www.samsungcamera.co.kr : Korean
1. Install the Digimax Master as the instructions shown on yourPC monitor.
[Click!]
[Click!]
[Click!]
[Click!]
[Click!]
[Click!]

177
Setting up the application software2. After restarting the computer, connect the PC to the camera with the USB cable.
3. Turn the camera power on.The [Found New Hardware Wizard] will open and thecomputer will recognize the camera.
If your OS is Windows XP, an image viewer program willopen.If the download window of Digmax Master opens afterstarting Digimax Master, the camera driver was setupsuccessfully.
In this mode, you can download stored images to your PC through the USB cable.The LCD monitor is always turned off in PC mode.
Connecting the camera to a PC
1. Press the MENU button and select the [ Set-up] menu. 2. Set [Transfer Mode] on camera to [PC].3. Connect the PC to the camera with the USB cable.
Starting PC mode
OK
Set-up
Brightness LevelVideo OutTransfer ModeAuto Power OffFolder NameFile #
0NTSCPCPictBridgePC-FSerialNo
Cancel OK
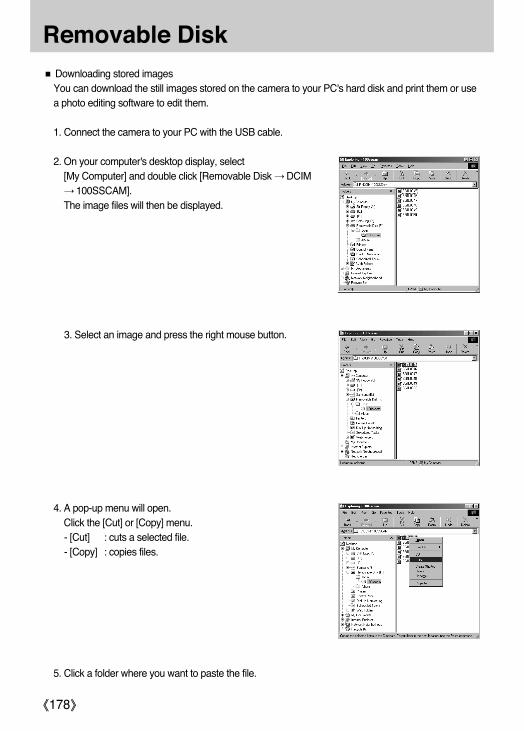
178
Removable DiskDownloading stored imagesYou can download the still images stored on the camera to your PC's hard disk and print them or usea photo editing software to edit them.
1. Connect the camera to your PC with the USB cable.
2. On your computer's desktop display, select[My Computer] and double click [Removable Disk DCIM
100SSCAM].The image files will then be displayed.
3. Select an image and press the right mouse button.
4. A pop-up menu will open.Click the [Cut] or [Copy] menu.- [Cut] : cuts a selected file.- [Copy] : copies files.
5. Click a folder where you want to paste the file.

179
Removable Disk
7. An image file is transferred from the camera to your PC.
6. Press the right mouse button and a pop-up menu will open.Click [Paste].
- By using [Digimax Master], you can see the stored images in the memory directly on the PCmonitor and you can copy or move the image files.
We recommend that you should copy the images to the PC to view them. Opening imagesdirectly from the removable disk may be subject to unexpected disconnection.When you upload a file that is not taken by this camera to the Removable Disk, the [Cameracannot display this image] message will be displayed on the LCD monitor in the PLAY mode, and[?] message is displayed in THUMBNAIL mode.
CAUTION

180
Removing the removable diskWindows 2000/ME/XP(The illustrations may be different from the real display in accordance with the Windows O/S.)
1. Check whether the camera and PC is transferring a file. If the Card in use lamp blinks, you have towait until the lamp is turned off.
3. The [Unplug or Eject Hardware] window will open.Select the [USB Mass Storage Device] and click the[Stop] button.
4. The [Stop a Hardware device] window will open. Selectthe [USB Mass Storage Device] and click the [OK]button.
2. Double-click the [Unplug or Eject Hardware] icon on thetask bar.
5. A [Safe to Remove Hardware] window will open. Clickthe [OK] button.
[Click!]
[Click!]
[Click!]
[Double-click!]

181
Removing the removable disk6. A [Unplug or Eject Hardware] window will open.
Click the [Close] button and the removable disk will beremoved safely.
7. Unplug the USB cable.
1. A USB Driver for MAC is not included with the software CD as MAC OS supports the cameradriver.
2. Check the MAC OS. This camera is compatible with MAC OS 9.0 or later.3. Connect the camera to the Macintosh and turn the camera power on.4. A new icon will be displayed on the desktop after connecting the camera to the MAC.
[Click!]
Setting up the USB Driver for MAC
1. Double click a new icon on the desktop and the folder in the memory will be displayed.
2. Select an image file and copy or move it to MAC.
Using the USB Driver for MAC
For Mac OS 10.0 or later : First complete uploading from computer to camera and then removethe removable disk with the Extract command.
CAUTION

182
Digimax MasterYou can download, view, edit and save your digital images and movies with this software. Thissoftware is only compatible with Windows except for the Windows 98.
To start the program, click [Start Programs Samsung Digimax Master Digimax Master].
Downloading images
1. Connect the camera to your PC.
2. A window for downloading images will display afterconnecting the camera and your PC.- To download the captured images, select the [SelectAll(A)] button.
- Select desired folder in the window and click the[Select All(A)] button. You can save captured imagesand selected folder.
- If you click the [Cancel] button, downloading will becancelled.
3. Click [Next(N) >] button.
[Click!]
[Click!]

183
Digimax Master4. Select a destination and make a folder to save
downloaded images and folders.- Folders will be made in order of date and images willbe downloaded.
- Folder names can be made as you want and imageswill be downloaded.
- After selecting a folder that was made before,images will be downloaded.
5. Click [Next(N) >] button.
6. A window will open as shown alongside.The destination of the selected folder will be displayedon the upper side of the window.Click the [Start] button to download the images.
7. Downloaded images will be displayed.
[Click!]
[Click!]

184
Digimax MasterImage viewer : You can view the stored images.
- Image viewer functions are listed below.Menu bar : You can select menus.
File, Edit, View, Tools, Change functions, Auto download, help, etc.Image selection window : You can select the desired images in this window.Media type selection menu : You can select image viewer, image edit, movie edit functions in this
menu.Preview window : You can preview a image or a movie clip and check the multi media information.Zoom bar : You can change preview size.Folder display window : You can see the folder location of the selected image.Image display window : Images of the selected folder are displayed.
Refer to the [Help] menu in Digimax Master for further information.

185
Digimax Master
- Image edit functions are listed below.Edit menu : You can select the following menus.[Tools] : You can resize or crop the selected image. See the [Help] menu.[Adjust] : You can modify image quality. See the [Help] menu.[Retouch] : You can change image or insert effects on the image. See the [Help] menu.
Drawing tools : Tools for editing an image.Image display window : a selected image displays in this window.Preview window : You can preview the changed image.
A still image edited with Digimax Master can’t be played back on the camera.Refer to the [Help] menu in Digimax Master for further information.
Image edit : You can edit the still image.

186
Digimax MasterDNG converter : You can convert a RAW (*.pef, *.dng) file into a JPEG or TIFF file format.
- DNG converter functions are listed below.Histogram display : Histogram of displayed image will be displayed.Tools : You can edit the RAW (*.pef, *.dng) files as you want[White Balance] : You can edit the colour temperature and saturation of the image.[Exposure] : You can edit the Exposure value, Contrast and gamma value.[Sharpness] : You can edit the Sharpness of the image.
File format : You can convert the RAW (*.dng) file into a file format as you want (*.jpg, *.tiff).
Refer to the [Help] menu in Digimax Master for further information.

187
Digimax Master
- Movie clip edit functions are listed below.Edit menu : You can select the following menus.[Add Media] : You can add other media elements to a movie.[Edit Clip] : You can change the brightness, contrast, colour and saturation.[Effects] : You can insert an effect.[Set Text] : You can insert texts.[Narrate] : You can insert a narration.[Produce] : You can save the edited multi media as a new file name.
You can select AVI, Windows media (wmv), Windows media (asf) and movie clip forthis camera (avi, MPEG-4) file types.
Frame display window : You can insert multi media in this window.
Some movie clips that was compressed with a codec that is not compatible with the Digimax Mastercan’t play back in the Digimax Master.Refer to the [Help] menu in Digimax Master for further information.
Movie edit : You can have still images, movies, narration and music all in one movie file.

188
MEMO

Default Settings 190
Cleaning the CCD 194
Optional Accessories 196
Error Messages 198
Troubleshooting 200
Main Specifications 204
Glossary 206
7 Appendix
Explains troubleshooting, introduces optional accessories and provides various resources.

190
Default SettingsThe table below lists the factory default settings.Table notations are as follows.
Last Memory Setting
Yes : The current setting (last memory) is saved when the camera is turned off.No : The setting returns to the default setting when the camera is turned off.
Reset SettingYes : The setting returns to the default setting with the reset function (p.170).No : The setting is saved even after reset.
[ Rec. Mode] Menu
[ Playback] Menu
Image Tone (Bright) Yes Yes p.108
Recorded Pixels (3008X2000) Yes Yes p.109
Quality Level (Best) Yes Yes p.110
Saturation (0) Yes Yes p.111
Sharpness (0) Yes Yes p.111
Contrast (0) Yes Yes p.111
Auto Bracket 0.5/ 0 - + Yes Yes p.144
AE Metering (Multi-segment) Yes Yes p.129
Focusing Area (Wide) Yes Yes p.122
Flash Exp. Comp. 0.0 Yes Yes p.148
Item
AF ModeAF.S
(Single mode)Yes Yes p.121
Default SettingLast Memory
SettingReset Setting Page
Images only Yes Yes p.158
OFF Yes Yes p.169
1 sec Yes Yes p.168
OFF Yes Yes p.169
OFF Yes Yes p.169
Digital Filter B&W Yes Yes p.71
Slideshow 3 sec Yes Yes p.69
Item Default SettingLast Memory
SettingReset Setting Page
Plybk dsplymthd
Preview Display
Display StyleBright Portion
Instant Review
HistogramBright Portion

191
Default Settings[ Set-up] Menu
Format - - - p.160
Beep (On) Yes Yes p.161
Hometown
(DST)
Destination (City) Same as Hometown Yes No
Destination
(DST)
Guide display (On) Yes Yes p.165
Brightness Level 0 Yes Yes p.166
Transfer Mode PC Yes Yes p.84
Auto Power Off 1 min Yes Yes p.167
Folder Name Std. Yes Yes p.167
File # SerialNo Yes Yes p.168
Sensor Cleaning - - - p.194
Reset - - - p.170
Item
WorldTime
World Timesetting
Hometown (City)
(Off) Yes Yes
Date AdjustAccording to
default settingYes No p.161
Default SettingLast Memory
SettingResetSetting
Page
According to default setting
According to default setting
Yes
Yes
Yes
Yes
Yes
No
No
No
No
No p.166
Same as Hometown
According to default setting
According to default setting
p.162
p.165Language
Video Out

192
Default Settings[ Custom Setting] Menu
*1 : When the screw mount lens is in use, [Fl with S lens used] menu is available.*2 : When a lens that has aperture ring is in use, [Using aperture ring] menu is available.*3 : ResetReset settings in [ Custom Setting] menu.
Setting (Off) Yes Yes p.100
Noise Reduction On Yes Yes p.139
Expsr Setting Steps 1/2 EV Steps Yes Yes p.141
ISO Corction in AUTO ISO 200-800 Yes Yes p.115
ISO Snstvty Wrn Dspl Off Yes Yes p.116
Link AF Point and AE Off Yes Yes p.130
Meter Operating Time 10 sec Yes Yes p.131
AE-L with AF locked Off Yes Yes p.124
AE-L bttn on M expsr Program Line Yes Yes p.139
AF in remote control Off Yes Yes p.100
FI with S lens used Not available Yes Yes -
Using aperture ring Prohibited Yes Yes -
Release when Chrging Off Yes Yes p.149
Preview Method Digital Preview Yes Yes p.
Mag to Strt Zm Plybk 1.2 times Yes Yes p.101
Man. WB Measurement Entire screen Yes Yes p.113
Color Space sRGB Yes Yes p.117
Reset Custom Fnction - - - p.170
Item Default SettingLast Memory
SettingReset Setting Page
Recordable Image No.
OK btn when shooting
Remaining imagestorage capacity
Off
Yes
Yes
Yes
Yes
p.100
p.100, p.120
*1
*2
*3

193
Default SettingsFn Menu
*1 : Only continuous shooting settings are saved.
Flash Mode (Auto) Yes Yes p.49
White Balance (Auto) Yes Yes p.112
ISO Sensitivity AUTO Yes Yes p.115
Mode Night Scene Yes Yes p.45, 104
DPOF Settings - Yes No p.79
Digital Filter B&W Yes Yes p.71
Slideshow 3 sec Yes Yes p.68
Item Default SettingLast Memory
SettingReset Setting Page
(Single frameshooting)
Drive Mode No Yes p.53*1

194
Cleaning the CCDShadows may appear in the image for white backgrounds and other shooting conditions if the CCDbecomes dirty or dusty. This indicates that the CCD must be cleaned. Please contact SamsungCamera service center for professional cleaning because the CCD is a precision part.
1. Turn the camera off and remove the lens.
2. Turn the camera on.
3. Select [Sensor Cleaning] on the [ Set-up] menu.
4. Press the four-way controller ( ).- The Sensor Cleaning screen appears.
Do not use a spray type blower.Do not clean the CCD when the exposure mode is set to (Bulb) mode.Always cap the lens mount area to prevent dirt and dust from accumulating on the CCD when nolens is on the camera.It is recommended to use the AC adapter (D-AC10, optional) when cleaning the CCD.When the battery level is low, [Not enough battery remaining to clean sensor] is displayed on theLCD monitor.If you are not using the AC adapter, please use batteries with ample capacity remaining. A warning beep will sound if the battery capacity becomes low during cleaning. Please stopcleaning immediately.Do not put the tip of the blower inside the lens mount area. If the power is turned off, this couldcause damage to the shutter or the CCD sensor.The self-timer lamp blinks and [Cln] appears on the LCD panel while cleaning the CCD.
INFORMATION

195
Cleaning the CCD5. Use the four-way controller ( ) to select [Mirror Up].
6. Press the button.- The mirror is locked in the up position.
7. Clean the CCD.- Use a brush-less blower to remove dirt and dust from theCCD. Using a blower with a brush may scratch the CCD. Do not wipe the CCD with a cloth.
8. Turn the camera off.
9. Attach the lens after the mirror returns to its original position.
OK
Sensor Cleaning
Mirror Up to Clean CCDTurn the power OFF
to end
Mirror UpCancel
OK

196
Optional AccessoriesA number of dedicated accessories are available for this camera. Please contact a service center fordetails regarding accessories. Accessories for PENTAX DSLR can be used with SAMSUNG DSLR.
This is a remote shutter release cord. The cord length is 0.5 m.
Auto Flash SEF-36PZFThis is an auto flash unit with a maximum guide number of 36 (ISO 100/m). Its features include slave-sync flash, contrast-control-sync flash, AF spot beam, high-speed sync, wireless flash and front/rearcurtain-sync.
Flash Accessories
Cable Switch SSR-D1

197
Optional Accessories
Camera Case SCP-D1
Camera Case
The accessories below are the same as the accessories that are packaged with the camera.
- Viewfinder cap
Others
- Eyecup
- Strap

198
Error Messages
Memory card full
The SD Memory Card is full and no more imagescan be saved. Insert a new SD Memory Card or deleteunwanted images. (p.27, 73)You may be able to save new images by changing the qualitylevel or recorded pixels.(p.109, 110)
There are no images for playback on the SD Memory Card.
You are trying to play back an image in a format notsupported by this camera. You may be able to play it back onanother brand of camera or your computer.
The SD Memory Card is not inserted in the camera. (p.27)
The SD Memory Card has a problem, and image capture andplayback are impossible. It may be viewable on a PC but notthe camera.
The SD Memory Card you have inserted is unformatted orhas been formatted on a computer or other device and is notcompatible with this camera. Use after formatting with thecamera.
A locked SD Memory Card is inserted in the camera. Unlockthe SD Memory Card. (p.28)
The selected rotated image is protected.Remove protection from the image.
The inserted card cannot be used on a camera.Insert a usable card.
The batteries are exhausted. Install new batteries in thecamera. (p.23)
No image
Camera cannot display this image
No card in camera
Memory card error
Card not formatted
Card locked
Card is lockedRotation information cannot be saved
This image is protectedRotation information cannot be saved
Cannot use this card
Battery depleted
Not enough battery remaining to clean sensor
Appears during CCD cleaning if battery set level is insufficient.Replace the battery set with a new one or use an AC adaptor(D-AC10, optional). (p.26)
Error Message Description

199
Error Messages
Image folder could not be createdThe maximum folder number (999) and file number (9999)are being used, and no more images can be saved. Insert a new SD Memory Card or format the card. (p.160)
The image could not be saved because of an SD MemoryCard error.
The DPOF settings file could not be saved because SDMemory Card is full. Delete unwanted images and set DPOFagain. (p.73)
DPOF cannot be applied to the RAW images.
RAW images cannot be processed using the digital filter.
When digital filter is started from [ Playback] menu, thismessage appears if all saved images are RAW files orimages captured with other cameras.
Appears when digital filter is started from Fn menu for imagescaptured with other cameras.
No file set with DPOF. Set DPOF and print. (p.79)
There is an error with the printer and the file cannot beprinted. Fix error and print.
Printer has run out of paper. Put paper in printer and print.
The image is not stored
Settings not stored
RAW images cannot be set
RAW images are not supported
No image to be filtered
This image cannot be filtered
No DPOF files
Printer error
No paper in a printer
No ink in a printer
Paper stuck in a printer
Data error
Printer has run out of ink. Replace ink and print.
Paper is jammed in printer. Remove paper and print.
A data error has occurred during printing.
Error Message Description

200
The capture modeisset to (MovingObject) mode
TroubleshootingWe recommend checking the following items before contacting a service center.
Replace with a charged battery set or use the AC adapter
(D-AC10, optional). (p.26)
Insert SD Memory Card with available space or delete
unwanted images. (p.27, 73)
Wait until recording is finished.
Autofocus cannot focus well on subjects that have low
contrast (the sky, white walls), dark colors, intricate
designs, are moving quickly or scenery shot through a
window or a net-like pattern.
Lock focus on another object located at same distance
(press shutter release button halfway), then aim at target
and press shutter release button fully. Alternatively, use
manual focus. (p.125)
Position subject in focus frame in middle of viewfinder.
If the subject is outside thefocusing area, aim the camera
at the subject and lock the focus (press shutter release
button halfway), then compose picture and press the
shutter release button fully.
Problem Cause Remedy
Camera does notturn on
The shutter doesnot release
The Autofocusdoes not work
Batteries are notinstalled
Batteries are notinstalled properly
Check orientation of batteries. Re-insert batteries
according to the symbols. (p.23)
Check if batteries are installed. If not, install batteries.
Wait until charging is finished.
Move away from the subject and take a picture.
Set the focus mode lever to . (p.118)
Set the focus mode to (Single mode). (p.121)
Battery power is low
Flash is charging
No available spaceon SD Memory Card
Recording
Subject is difficult tofocus on
Subject is not infocusing area
Subject is too close
The focus mode is set to
The focus mode isset to(Continuous mode)
Set the capture mode to setting other than (MovingObject) mode. (p.45)

201
Troubleshooting
* In rare cases, the camera may not operate correctly due to static electricity. This can be remedied bytaking the batteries out and putting them back in again. When the mirror remains in the up position,take the batteries out and put them back in again. Then, turn the power on. The mirror will retract. After the procedure is done, if the camera operates correctly, it does not require any repairs.
* Refer to the software instructions for details on connecting the camera to a PC. (p.173)
Problem Cause Remedy
AE lock functiondoes not operate
Built-in Flashdoes notdischarge
The power zoomsystem does notfunction
USB connectionwith computerdoes not workproperly*
USB connectionwith printer doesnot work properly
Use AE lock with any setting other than (Manual)mode or (Bulb) mode.
AE lock is notavailable when set to (Manual) modeor (Bulb) mode
When flash mode isset to [Autodischarge] or [Autoflash+Redeyereduct], the flash willnot discharge if thesubject is bright
Mode dial is set to a (Flash OFF)
(Scene) mode isset to (NightScene), (Sunset),
(Candlelight) or (Museum)
The camera doesnot have the powerzoom function
The transfer mode isset to [PictBridge]
An error occurredwhile sending USBdata
The transfer mode isset to [PC] or [PC-F]
Set flash mode to [Manual discharge] or [Manlflash+Redeye reduct]. (p.49)
Set mode dial to any setting other than (Flash OFF).(p.45)
Set mode to any setting other than (NightScene), (Sunset), (Candlelight) or(Museum). (p.47)
Use manual zoom. (p.48)
Set transfer mode to [PC].
Change the transfer mode to [PC-F].
Set transfer mode to [PictBridge]. (p.84)

202
TroubleshootingPlease check the following if the USB connection malfunctions.
[Case 1] The USB cable is not connected or you are using a cable with an incorrect specification.
Use a USB cable with the correct specification.
[Case 2] The camera is not recognized by your PC. Sometimes, the camera may appear under
[Unknown Devices] in Device Manager.
Turn off the camera, remove the USB cable, plug in the USB cable again, and then
turn on the camera.
[Case 3] There is an unexpected error during file transfer
Turn the camera power off and on again. Transfer the file again.
[Case 4] When using the USB hub.
There may be a problem in connecting the camera to the PC through the USB hub if
the PC and the hub are not compatible. Wherever possible, connect the camera to
the PC directly.
[Case 5] Are other USB cables connected to the PC?
The camera may malfunction when it is connected to the PC at the same time as
another USB cable. In this case, disconnect the other USB cable, and connect only
one USB cable to the camera.
[Case 6] When I open the Device Manager (by clicking Start (Settings) Control Panel
(Performance and Maintenance) System (Hardware) Device Manager), there
are Unknown Devices or Other Devices entries with a yellow question mark (?)
beside them or devices with an exclamation mark (!) beside them.
Right-click on the entry with the question (?) or exclamation (!) mark and select
"Remove". Restart the PC and connect the camera the again. For Windows 98 PC,
remove the camera driver also, restart the PC, and then reinstall the camera driver.

203
Troubleshooting[Case 7] In some security programs (Norton Anti Virus, V3, etc.), the computer may not
recognise the camera as a removable disk.
Stop the security programs and connect the camera to the computer. Refer to the
security program instructions about how to stop the program.
[Case 8] If a PC connected with the camera stops responding while Windows is starting.
In this case, disconnect the PC and the camera and Windows will start.
If the problem happens continuously, set the Legacy USB Support to disable and re-
start the PC. The Legacy USB Support is in the BIOS setup menu (The BIOS setup
menu differs from the PC manufacturers and some BIOS menus don’t have Legacy
USB Support). If you can’t change the menu by yourself, contact to the PC
manufacturer or BIOS manufacturer.
[Case 9] The camera is connected to the USB port located on the front of the computer.
When the camera is connected to the USB port located on the front of the computer,
the computer may not recognise the camera.
Connect the camera to the USB port located on the back of the computer.

204
Main Specifications
Type 23.5mm x 15.7mm CCD
Effective Pixel Approx. 6.1 Mega-pixel
Total Pixel Approx. 6.3 Mega-pixel
Mount PENTAX KAF bayonet mount
Schneider D-XENON Lens
Usable Lens * All PENTAX DSLR lenses are available.
* KAF2 (not power zoom compatible), KAF mount lenses, KA mount lenses
Type Pentamirror, Natural-Bright-Matte Focusing Screen
Field of View 96%
Magnification 0.85X (50mm F1.4 lens )
Diopter Adjustment -2.5m-1 ~ 1.5m-1
Low-temperature polysilicon TFT color LCD monitor
2.5" (approximately 210,000 dots)
Type TTL phase-matching 5-points wide AF
Modes AF Single (with focus lock), Manual focus, Continuous AF
Type Electronically controlled vertical-run focal plane shutter
Speed 30 ~ 1/4,000 sec. with Bulb
TTL open-aperture 16-segment (coupled with lens and AF information)
Metering : Multi, Center-weighted, Spot
Compensation 2 (1/3EV or 1/2EV steps)
ISO Equivalent Auto, 200, 400, 800, 1600, 3200
Type Built-in retractable P-TTL auto pop-up flash
Modes Auto, Manual, Auto/Red-eye reduction, Manual/Red-eye reduction
Guide Number 15.6 (at ISO 200)
28mm wide-angle (equivalent to 35mm)
Sync. Speed 1/180 sec.
Recharging Time Approx. 3 sec.
External Flash SEF-36PZF SAMSUNG dedicated flash (optional)
Auto, Daylight, Shade, Cloudy, Tungsten, Fluorescent (W, D,
N), Flash, Manual
Program AE, Shutter, Priority AE, Aperture Priority AE, Manual, Bulb
AUTO SCN, Portrait, Landscape, Macro, Moving Object, Night
Scene Portrait, Flash off
SCN Mode : Night Scene, Surf & Snow, Text, Sunset, Kids,
Pet, Candlelight, Museum
Drive Modes Single, Continuous, Auto Bracket
2.8 fps up to 5 frames (JPEG), 3 frames (RAW)
Image Sensor
Lens
Viewfinder
Focusing
Shutter
Exposure Control
Flash
White Balance
Shooting
LCD Monitor
Metering System
Angle of ViewCoverage
Modes
Continuous

205
Main SpecificationsSelf-timer 2 sec., 12 sec., Remote control, Remote control 3 sec
Media SD Card (up to 1GB guaranteed)
File Format RAW(PEF), JPEG(DCF), EXIF 2.21, DPOF 1.1, PictBridge 1.0
6M : 3008x2008 pixels (RAW)
6M : 3008x2000 pixels
4M : 2400x1600 pixels
1.5M: 1536x1024 pixels
6M : RAW 11 Super Fine 35 Fine 70 Normal 117
4M : - Super Fine 51 Fine 96 Normal 159
1.5M : - Super Fine 105 Fine 171 Normal 267
These figures are measured under Samsung s standard
conditions and may vary depending on shooting conditions
and camera settings.
Type Single image, Thumbnails, Slide show
Editing Rotate, Digital Filter
Digital Filter B&W, Sepia, Soft, Slim, Brightness
Digital Output Connector : USB 2.0 (HI-SPEED)
Video Output : NTSC, PAL (user selectable)
DC Power Input Connector : DC 6.5V, 3.0A
Power Source 4xAA Alkaline, Lithium, Ni-MH, 2 x CR-V3 (Lithium) batteries
Dimensions (WxHxD) 125x92.5x67mm (excluding the projecting parts of the camera)
Weight 470g (without batteries and card)
Operating Temperature 0 ~ 40 C
Operating Humidity 5 ~ 85%
Camera Driver Storage Driver (Windows 2000/ME/XP, Mac OS 9.0 or later)
Application Digimax Master
Storage
Image Play
Interface
Software
Image Size
Capacity (128MB)
* Specifications are subject to change without prior notice.* All trademarks are the property of their respective owners.* Accessories for PENTAX DSLR can be used with SAMSUNG DSLR.

206
GlossaryAdobeRGB
Color space recommended by Adobe Systems, Inc. for commercial printing. Wider range of colorreproduction than sRGB. Covers most of the color range so colors only available when printed are notlost when editing images from a computer. When image is opened by non-compatible software, thecolors look lighter.
AE Metering
Brightness of subject is measured to determine exposure. In this camera, select from [Multi-segmentMetering], [Center-weighted Metering] and [Spot Metering].
Aperture
The aperture increases or reduces the light beam (thickness) that passes through the lens.
Auto BracketFor automatically changing the shooting conditions. When the shutter button is pressed, three imagesare shot. The first one has no compensation, the second is under-exposed and the third is over-exposed.
Bright Portion
Over exposed area in the image loses contrast and appears white.
Camera Shake (Blur)
When the camera moves while the shutter is open, the entire image appears as if flowing. This occursmore often when shutter speed is low.Prevent camera shake by raising the sensitivity, using the flash, and raising the shutter speed.Alternatively, use a tripod to stabilize the camera. Because camera motion causes camera shake, usethe self-timer, the remote control unit, and the cable switch to prevent.
CCD (Charge Coupled Devices)
Photography element which converts the light entering through the lens into electric signals.

207
GlossaryColor space
A defined range of colors from the spectrum which are used. In digital cameras, [sRGB] is defined as thestandard by Exif. In this camera, [AdobeRGB] is also used because of the richer color expression oversRGB.
Color Temperature
This numerically expresses the color of the light source illuminating the subject. This is indicated inabsolute temperature, using Kelvin (K) units.The color of light shifts to a bluish color as the color temperature rises, and to a reddish color as the colortemperature falls.
DCF (Design Rule for Camera File System)
A digital camera file system standard established by the Japan Electronics and Information TechnologyIndustries Association (JEITA).
Depth of Field
Area of focus. This depends on the aperture, lens focal length, and distance to the subject. For example,select a smaller aperture to increase the depth of field or use a larger aperture to decrease the depth offield.
DPOF (Digital Print Order Format)
Rules for writing information onto a card with recorded images regarding the specific images andnumber of copies to be printed. Prints can easily be made by taking images to a DPOF photo printingstore.
EV (Exposure Value)
Exposure Value is determined by the combination of the aperture value and the shutter speed.
EV Compensation
Process of adjusting the image brightness by changing the shutter speed and aperture value.
Exif (Exchangeable image file format for digital still camera)
A standard digital camera file format established by the Japan Electronics and Information TechnologyIndustries Association (JEITA).
Focus point
Position in the viewfinder that determines focus.

208
GlossaryHistogram
A graph that shows the darkest and brightest points in an image. The horizontal axis represents thebrightness and the vertical axis represents the number of pixels. This is useful when you wish to refer tothe exposure status of an image.
JPEG
An image compression method. The image is recorded in JPEG format when the quality level is set to (Best), (Better), or (Good). Images recorded in JPEG format are suited for viewing on your PC
or for attaching to e-mail.
ND (Neutral Density) Filter
A filter with many saturation levels that adjusts the brightness without affecting the picture itself.
Noise Reduction
Process to reduce noise (image roughness or unevenness) caused by low shutter speed.
NTSC/ PAL
These are video output formats. NTSC is mainly used in Japan, North America, and South Korea. PALis mainly used in Europe and in China.
Quality Level
This refers to the image compression ratio. The lower the compression, the more detailed the image.The image becomes rougher as the compression rate rises.
RAW data
Unedited image data output from the CCD. RAW data is data before being internally processed by thecamera. Add settings that are added before shooting in other file formats (such as White Balance,Contrast, Saturation and Sharpness) individually frame by frame after shooting. In addition, RAW data is 12-bit data that contains 16 times the information of 8-bit JPEG and TIFF data.Rich gradations are possible. Transfer RAW data to your computer and use the provided software tocreate image data with different settings, such as JPEG or TIFF.
209
GlossaryRecorded Pixels
Indicates the size of the image by the number of pixels. The more pixels that compose a picture, thelarger the image size.
Sensitivity
The degree of light. With a high sensitivity, images can be shot with a high shutter speed even in darkplaces, reducing camera shake.However, images with high sensitivity are more susceptible to noise.
Shutter Speed
The length of time that the shutter is open and light strikes the CCD. The amount of light that strikes theCCD can be changed by altering the shutter speed.
sRGB (standard RGB)
International standard of color space established by the IEC (International ElectrotechnicalCommission). This is defined from color space for PC monitors and is also used as the standard colorspace for Exif.
Vignetting
Vignetting occurs when corners of pictures are blackened because the subject was blocked by the hoodor filter or the flash was blocked.
White Balance
While shooting, color temperature is adjusted to match the light source so that the subject appears tohave correct color.

210
Correct Disposal of This ProductCorrect Disposal of This Product (Waste Electrical & Electronic Equipment)(Applicable in the European Union and other European countries with separate collectionsystems) This marking shown on the product or its literature, indicates that it should not bedisposed with other household wastes at the end of its working life.To prevent possible harm to the environment or human health from uncontrolled waste
disposal, please separate this from other types of wastes and recycle it responsibly to promote thesustainable reuse of material resources. Household users should contact either the retailer where theypurchased this product, or their local government office, for details of where and how they can take thisitem for environmentally safe recycling. Business users should contact their supplier and check the termsand conditions of the purchase contract.This product should not be mixed with other commercial wastes for disposal.
This device has been tested in accordance with the limits of a class B digital device under item 15of the FCC rules. These limits are designed to provide protection against harmful interference incommercial installation. This equipment generates, absorbs and can emit radio frequency energy.If it is not installed and used in accordance with the instructions, it may cause harmful interferenceto radio communication. There is however, no guarantee that interference will not occur in some situations. Should anyinterference occur when this device is in operation, please try one or more of the followingmeasures.
Change the location and direction of any aerial.Increase distance between the camera and the affected device.Use a different socket away from the affected device.Please contact a Samsung agent or a radio/TV engineer.
This device complies with part 15 of the FCC Rules.Changes or modifications not expressly approved by the party responsible for compliance couldvoid user's authority to operate the equipment.
An FCC warning

211
MEMO

212
MEMO

6806-3263
Internet address - http : //www.samsungcamera.com/
The CE Mark is a Directive conformitymark of the European Community (EC)
SAMSUNG TECHWIN CO., LTD.OPTICS & DIGITAL IMAGING DIVISION145-3, SANGDAEWON 1-DONG, JUNGWONGU,SUNGNAM-CITY, KYUNGKI-DO, KOREA 462-121TEL : (82) 31-740-8086, 8088, 8090, 8092, 8099FAX : (82) 31-740-8398www.samsungcamera.com
SAMSUNG OPTO-ELECTRONICS AMERICA, INC.HEADQUARTERS40 SEAVIEW DRIVE, SECAUCUS, NJ07094, U.S.A.TEL : (1) 201-902-0347FAX : (1) 201-902-9342WESTERN REGIONAL OFFICE18600 BROADWICK ST.,RANCHO DOMINGUEZ, CA 90220, U.S.A.TEL : (1) 310-900-5263/5264FAX : (1) 310-537-1566www.samsungcamerausa.com
SAMSUNG FRANCE S.A.S.BP 51 TOUR MAINE MONTPARNASSE 33, AV .DU MAINE 75755, PARIS CEDEX 15, FRANCEHOTLINE PHOTO NUMÉRIQUE :00 800 22 26 37 27(Numéro Vert-Appel Gratuit)TEL : (33) 1-4279-2200FAX : (33) 1-4320-4510www.samsungphoto.fr
SAMSUNG OPTO-ELECTRONICS GMBHAM KRONBERGER HANG 6D-65824 SCHWALBACH/TS., GERMANYTEL : 49 (0) 6196 66 53 03FAX : 49 (0) 6196 66 53 66www.samsungcamera.de
TIANJIN SAMSUNG OPTO-ELECTRONICS CO.,LTD.7 PINGCHANG ROAD NANKAI DIST., TIANJINP.R CHINA POST CODE:300190TEL : (86) 22-2761-4599FAX : (86) 22-2769-7558www.samsungcamera.com.cn
SAMSUNG OPTO-ELECTRONICS UK LIMITEDSAMSUNG HOUSE 1000 HILLSWOOD DRIVEHILLSWOOD BUSINESS PARKCHERTSEY KT16 OPS U.K.TEL : 00800 12263727(free for calls from UK only)UK Service Hotline : 01932455320www.samsungcamera.co.uk
RUSSIA INFORMATION CENTER SAMSUNG ELECTRONICS117545 ST. DOROZHNAYA BUILDING 3, KORPUS 6, ENTRANCE 2, MOSCOW, RUSSIATEL : (7) 095-363-1700CALL FREE : (8) 800 200 0 400 (from Russia only)www.samsungcamera.ru