samsung appliance rfg237aars use and care manual · pdf filerefrigerator user manual ......
TRANSCRIPT

Refrigeratoruser manual
imagine the possibilitiesThank you for purchasing this Samsung product.To receive more complete service, please register your product at
www.samsung.com/register
RFG237**RFG238**
English
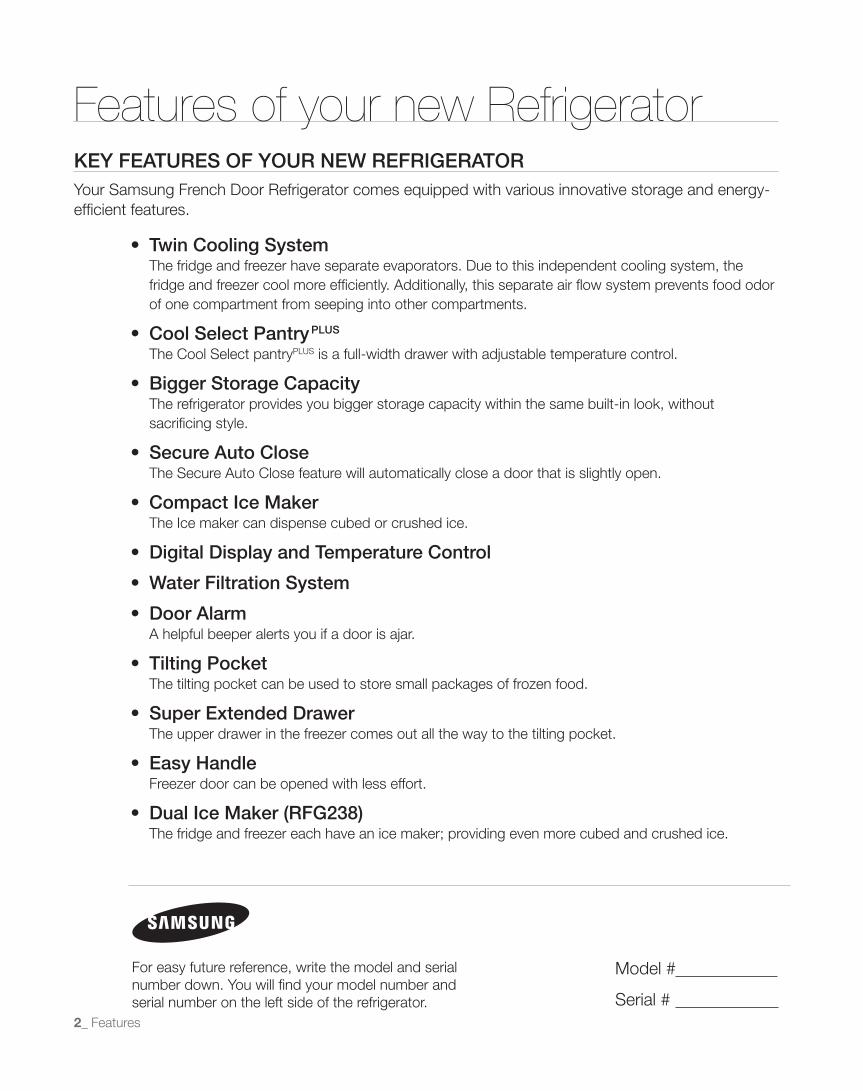
Features of your new RefrigeratorKEy FEatuREs oF youR nEw REFRiGERatoRYour Samsung French Door Refrigerator comes equipped with various innovative storage and energy-efficient features.
• twin Cooling systemThe fridge and freezer have separate evaporators. Due to this independent cooling system, the fridge and freezer cool more efficiently. Additionally, this separate air flow system prevents food odor of one compartment from seeping into other compartments.
• Cool select PantryPLus
The Cool Select pantryPLUS is a full-width drawer with adjustable temperature control.
• Bigger storage CapacityThe refrigerator provides you bigger storage capacity within the same built-in look, without sacrificing style.
• secure auto CloseThe Secure Auto Close feature will automatically close a door that is slightly open.
• Compact ice MakerThe Ice maker can dispense cubed or crushed ice.
• Digital Display and temperature Control
•water Filtration system
• Door alarmA helpful beeper alerts you if a door is ajar.
• tilting PocketThe tilting pocket can be used to store small packages of frozen food.
• super Extended DrawerThe upper drawer in the freezer comes out all the way to the tilting pocket.
• Easy HandleFreezer door can be opened with less effort.
• Dual ice Maker (RFG238)The fridge and freezer each have an ice maker; providing even more cubed and crushed ice.
2_ Features
For easy future reference, write the model and serial number down. You will find your model number and serial number on the left side of the refrigerator.
Model #
Serial #
Safety Information _3
Safety InformationsaFEty inFoRMationBefore using your new Samsung French Door Refrigerator, please read this manual thoroughly to ensure that you know how to safely and efficiently operate the features and functions that your new appliance offers.
This appliance is not intended for use by persons (including children) with reduced physical, sensory or mental capabilities, or lack of experience and knowledge, unless they have been given supervision or instruction concerning use of the appliance by a person responsible for their safety.
Because the following Instructions cover various models, the characteristics of your refrigerator may differ slightly from the refrigerator described in this manual. If you have any questions contact us at 1-800-SAMSUNG or find help and information online at www.samsung.com.
important safety symbols and precautions:
WARNINGHazards or unsafe practices that may result in severe personal injury or death.
CAUTION
Hazards or unsafe practices that may result in minor personal injury or property damage.
Do NOT attempt.
Do NOT disassemble.
Do NOT touch.
Follow directions carefully.
Unplug the power plug from the wall socket.
Make sure the refrigerator is grounded to prevent electric shock.
Call the contact center for help.
Note.
Thesewarningsignsareheretopreventinjurytoyouandothers.Pleasefollowthemcarefully.Afterreadingthissection,keepitinasafeplaceforfuturereference.
sEVERE waRninG siGns FoR instaLLation• Do not install the refrigerator in a damp place or place where it may come in contact with
water. - Deteriorated insulation of electrical parts may cause an electric shock or fire.
• Do not place this refrigerator in direct sunlight or expose to the heat from stoves, room heaters or other appliance.
• Do not plug several appliances into the same multiple power board. The refrigerator should always be plugged into its own individual electrical board which has a voltage rating that matched the rating plate.
- This provides the best performance and also prevents overloading house wiring circuits, which could cause a fire hazard from overheated wires.
WARNING

4_ Safety Information
Safety Information
• The Refrigerator must be safely grounded - Always make sure that you have grounded the Refrigerator before attempting to investigate
or repair any part of the appliance. Power leakages can cause severe electric shock.
• Never use gas pipes, telephone lines or other potential lightning attractors as an electrical ground. - Improper use of the grounding plug can result in a risk of electric shock. If it is necessary to use an extension cord, use only a 3-wire extension cord that has a
3-blade grounding plug and a 3-slot receptacle that will accept the plug on the appliance. The marked rating of the extension cord should be AC115-120V, 10A, or more. If a grounding adapter is used, make sure the receptacle box is fully grounded.
• If the power cord is damaged, have it replaced immediately by the manufacturer or its service agent.
• If the wall socket is loose, do not insert the power plug. - There is a risk of electric shock of fire.• Do not use a cord that shows cracks or abrasion damage along its length or at either end.• Do not bend the power cord excessively or place heavy articles on it.• Never unplug your refrigerator by pulling on the power cord. Always grip plug firmly and
pull straight out from the outlet. - Damage to the cord may cause a short-circuit, fire and/or electric shock.• Do not use aerosols near the Refrigerator. - Aerosols used near the Refrigerator may cause an explosion or fire.
• this refrigerator must be properly installed and located in accordance with the manual before it is used.
• Connect the power plug in proper position with the cord hanging down. - If you connect the power plug upside down, the wire can get cut off and cause a fire or electric shock.• When moving the refrigerator, be careful not to roll over or damage the power cord. - This constitutes a fire hazard.• Make sure that the power plug is not squashed or damaged by the back of the refrigerator.• Keep the packing materials out of reach of children. - There is a risk of death from suffocation if children put them on their head.• The appliance must be positioned so that the plug is accessible after installation.• You need to remove all the protective plastic film before you initially plug in to use the product.
CAUTION Caution siGns FoR instaLLation• Allow sufficient space to install the refrigerator on a flat surface. - If your refrigerator is not level, the internal cooling system may not work correctly.• Keep ventilation opening in the appliance enclosure or mounting structure clear of obstruction.• Allow the appliance to stand for 2 hours after installation.
sEVERE waRninG siGns FoR usinG• Do not insert the power plug with wet hands.• Do not store articles on the top of the appliance. - When you open or close the door, the articles may fall and cause personal injury and/or
material damage.• Do not put a container filled with water on the refrigerator. - If spilled, there is a risk of fire or electric shock.• Children should be supervised to ensure that they do not play with the appliance.• Do not let children hang on the door. A serious injury may occur.• Do not let children enter inside of the refrigerator. There is a risk of children entrapment.
WARNING

Safety Information _5
sEVERE waRninG siGns FoR usinG
• Do not insert your hands into the bottom area under the appliance. - Any sharp edges may cause personal injury.• Do not let children step on drawer’s cover. - The drawer may break and cause them to slip.• Do not overfill the refrigerator with food. - When you open the door, an item may fall out and cause personal injury or material damage.• Do not touch the inside walls of the freezer or products stored in the freezer with wet hands. - This may cause frostbite.• Never put fingers or other objects into the water dispenser hole, ice chute and ice maker bucket. - It may cause personal injury or material damage.• Do not spray inflammable gas near the refrigerator. - There is a risk of explosion or fire.• Do not store volatile or flammable substances in the refrigerator. - The storage of benzene, thinner, alcohol, ether, LP gas and other such products may cause
explosions.• Do not store pharmaceuticals products, scientific materials or temperature sensitive
products in the refrigerator. - Products that require strict temperature controls must not be stored in the refrigerator.• Do not place or use an electrical appliance inside the refrigerator, unless it is of a type
recommended by the manufacturer.• Do not use mechanical devices or any other means to accelerate the defrosting process,
other than those recommended by the manufacturer. • Do not damage the refrigerant circuit.
• Do not disassemble or repair the refrigerator by yourself. - You run risk of causing a fire, malfunction and/or personal injury. - When the interior or exterior LED lamp has gone out, please contact your service agents.
WARNING
• Pull the power plug out of the socket before changing the interior lamps of the refrigerator. - Otherwise, there is a risk of electric shock.
• Children should be supervised to ensure that they do not play with the appliance.• Bottles should be stored tightly together so that they do not fall out.• This product is intended only for the storage of food in a domestic environment.• If a gas leak is detected, avoid any naked flames or potential sources of ignition and air
the room in which the appliance is standing for several minutes.• Use only the LED Lamps provided by manufacturer or service agents
• If there are burning smells or smoke, pull out power plug immediately and contact your samsung Electronics service center.
• If you experience difficulty when changing the light, contact service agents.
• If the products equipped with LED Lamp, do not disassemble Lamp Cover and LED Lamp by yourself.
- Please contact your service agents.
• If any dust or water is in Refrigerator, pull out power plug and contact your Samsung Electronics service center.
- Otherwise there is a risk of fire
Caution siGns FoR usinG• Do not re-freeze frozen foods that have thawed completely. Do not place carbonated or fizzy drinks in the freezer compartment. Do not put bottles or
glass containers in the freezer. - When the contents freeze, the glass may break and cause personal injury.
CAUTION

6_ Safety Information
Safety Information
• When the refrigerator gets wet by water, pull out the power plug and contact your samsung Electronics service center.
• Service warranty and Modification. - Any changes or modifications performed by a 3rd party on this finished appliance is not
covered under Samsung warranty service, nor can Samsung be responsible for safety issues that result from 3rd party modifications.
• Do not block air holes. - If the air holes are blocked, especially with a plastic bag, the refrigerator can be over
cooled. If this cooling period lasts too long, the water filter may break and cause water leakage.
• If the refrigerator is disconnected from the power supply, you should wait for at least five minutes before plugging it back.
• If you have a long vacation planned or the refrigerator is not to be used for a long period of time, you must empty the refrigerator and pull out the power plug.
- Deterioration in the insulation may cause fire. wipe excess moisture from the inside and leave the doors open. - Otherwise, odor and mold may develop.
• To get Best performance of product, - Do not place foods too closely in front of the vents at the rear of the appliance as it can
obstruct free air circulation in the refrigerator compartment. - Wrap the food up properly or place it in airtight containers before putting it into the refrigerator.
• Fill water tank, ice tray, water cubes only with potable water.
Caution siGns FoR CLEaninG• Do not directly spray water inside or outside the refrigerator. - There is a risk of fire or electric shock.
• Remove any foreign matter or dust from the power plug pins. Do not use a wet or damp cloth when cleaning the plug, remove any foreign material or dust from the power plug pins.
- Otherwise there is a risk of fire or electric shock.
• Unplug the refrigerator before cleaning and making repairs.
CAUTION
sEVERE waRninG siGns FoR DisPosaL• Risk of child entrapment. Before you throw away your old refrigerator or freezer. - Take off the doors. - Leave the shelves in place so that children may not easily climb inside.
• Please dispose of the packaging material for this product in an environmentally friendly manner.
• Leave the shelves in place so that children may not easily climb inside. Ensure that none of the pipes on the back of the appliance are damaged prior to disposal.
• When disposing of this refrigerator, remove the door/door seals and door latch so that small children or animals cannot become trapped inside.
Children should be supervised to ensure that they do not play with the appliance.
• Cyclopentane is used as in the insulation. The gases in insulation material require a special disposal procedure. Please contact your local authorities in regard to the environmentally safe disposal of this product. Ensure that none of the pipes on the back of the refrigerator are damaged prior to disposal.
WARNING

Contents
SETTINGUPYOURFRENCHDOORREFRIGERATOR
08
OPERATINGYOURFRENCHDOORREFRIGERATOR
21
TROUBLESHOOTING
42WARRANTY
43
08 Getting ready to install the refrigerator09 Setting up the refrigerator09 Removing the refrigerator doors11 Disassemble the freezer drawer12 Reattaching the refrigerator doors14 Assemble the freezer drawer15 Adjusting the doors16 Making minor adjustments between doors17 Adjusting the freezer drawer level18 Checking the water dispenser line19 Installing the water line
21 Using the control panel(RFG237 Model)22 Using the digital display(RFG237 Model)23 Controlling the temperature(RFG237 Model)24 Using the cold water dispenser(RFG237 Model)26 Using the control panel(RFG238 Model)27 Using the digital display(RFG238 Model)28 Controlling the temperature(RFG238 Model)29 Using the cold water dispenser(RFG238 Model)31 Parts and features32 Storing food in the refrigerator32 Storing food in the freezer drawer33 Using the Cool Select PantryPLUS
34 Removing the refrigerator accessories35 Using the doors35 Using the tilting pocket36 Removing the freezer accessories37 Food storage tips39 Cleaning the refrigerator40 Changing the interior lights41 Changing the water filter
42 Troubleshooting
43 Water filter chart44 Water filter certification45 Warranty on SAMSUNG refrigerator
Contents _7

Setting up your French Door RefrigeratorGEttinG REaDy to instaLL tHE REFRiGERatoRCongratulations on your purchase of the Samsung French Door Refrigerator. We hope you enjoy the state-of-art features and efficiencies that this new appliance offers.
Selectingthebestlocationfortherefrigerator• A location with easy access to the water supply.• A location without direct exposure to sunlight.• A location with a leveled floor.• A location with enough space for the refrigerator doors to open easily.• Allow sufficient space to the right, left, back and top for air circulation. If the Refrigerator does not have enough space, the internal cooling system may not work properly.• Please ensure that appliance can be moved freely in the event of maintenance & service.
8_ Setting Up
Model
RFG238 ** /RFG237 **
3 inch3/4
2 inch
2 inch
First thing! Make sure that you can easily move your refrigerator to its final location by measuring doorways(both width and height), thresholds, ceilings, stairways, etc.
The following chart details the exact height and depth of Samsung French Door Refrigerator.
B
A
CE
D
B
A
CE
D
Depth“a”
width“B”
Height“C”
overall Height “D”
Depth“E”
30 3/8”(772mm)
35 7/8”(912mm)
69 1/8”(1755mm)
69 7/8”(1775mm)
25 5/8”(650mm)
If your refrigerator has an ice maker, allow extra space at the back for the water line connections. When you install the refrigerator next to a fixed wall, minimum clearance is 3 ¾” (95mm) between the refrigerator and wall to allow the door to swing open.
• Allow clearance to the right, left, back and top when installing. This will help reduce power consumption and keep your energy bills lower.• Do not install the refrigerator where the temperature will go below 50ºF (10ºC). • Do not locate the refrigerator where it may become wet.
CAUTION
When moving your refrigerator To prevent floor damage be sure the front adjusting legs are in the up position(above the floor).Refer to ‘Adjusting the doors’ in the manual (on page 15).
Control LeverFlat-blade screw driver(-)
FLooRinGFor proper installation, this refrigerator must be placed on a leveled surface of hard material that is the same height as the rest of the flooring. This surface should be strong enough to support a fully loaded refrigerator, or approximately 660lbs(299kg). To protect the finish of the flooring, cut a large section of the cardboard carton and place under the refrigerator where you are working. When moving a refrigerator, it is needed to pull and push in the back-and-forth direction.

Setting Up _9
01 sE
tt
inG
uP
2
1
sEttinG uP tHE REFRiGERatoRNow that you have your new refrigerator installed in place, you are ready to set up and enjoy the features and functions of the appliance. By completing the following steps, your Refrigerator should be fully operational.
1. Place the refrigerator in an appropriate location with reasonable clearance between the walls and the refrigerator.
Refer to installation instructions in this manual. (page 9, Selecting the best location for the refrigerator)2. Once the refrigerator is plugged in, make sure the interior light comes on when you open the doors.3. Set the Temperature control to the coldest temperature and wait for an hour. The freezer will get slightly
chilled and the motor will run smoothly.4. After powering the refrigerator, it will take a few hours to reach the appropriate temperature. You can
store food and drinks in the refrigerator after the temperature is sufficiently low.Check the accessories listed below.
Water filter Hex wrench Compression fitting Compression nutFastener
Disassemble the refrigerator doors1. With the door opened, remove the hinge top table ( 1 )
with a flat-blade screwdriver, and close the door. Remove the 3 screws holding down the top table ( 2 ) and remove it.
Disassemble the refrigerator doors
WARNING
Be careful not to drop and scratch the doors while removing the doors.
Required Tools(Not provided)
Philips screwdriver(+) Flat-blade screwdriver(-) Socket wrench (10mm) Pliers Allen wrench(3/16”)(5mm)
REMoVinG tHE REFRiGERatoR DooRsSome installations require door removal to transport the refrigerator to its final location.Do not remove the door/drawer if it is not needed. Before removing the door/drawer, make sure you read following items.
• Be careful not to drop, damage or scratch the door/drawer while removing them.• Be careful not to get injured while removing the door/drawer.• Reattach the door/drawer properly to avoid: - Moisture from air leakage. - Uneven door alignment. - Wasting energy due to improper door seal.
WARNINGDisconnect power to the refrigerator before removing the door or drawer.
Setting up your French Door Refrigerator
10_ Setting Up
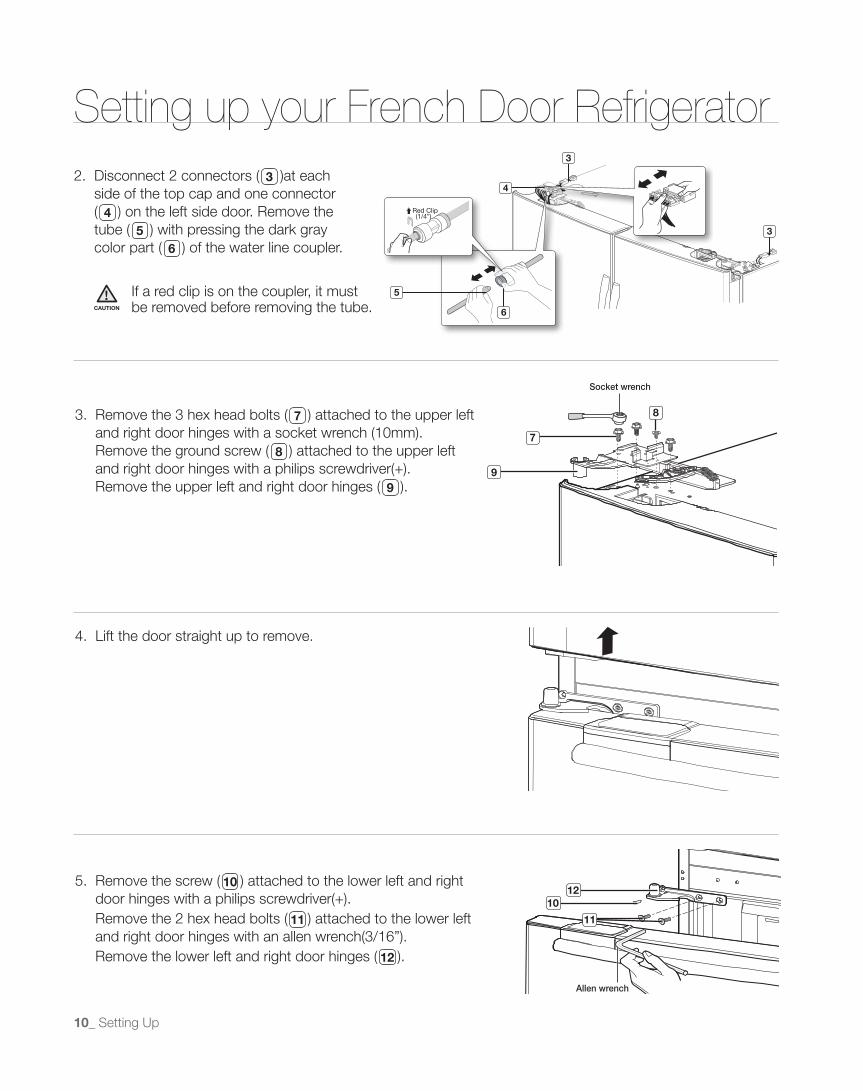
4. Lift the door straight up to remove.
3. Remove the 3 hex head bolts ( 7 ) attached to the upper left and right door hinges with a socket wrench (10mm).
Remove the ground screw ( 8 ) attached to the upper left and right door hinges with a philips screwdriver(+).
Remove the upper left and right door hinges ( 9 ). 9
7
8
socket wrench
12 10
5. Remove the screw ( 10 ) attached to the lower left and right door hinges with a philips screwdriver(+).
Remove the 2 hex head bolts ( 11 ) attached to the lower left and right door hinges with an allen wrench(3/16”).
Remove the lower left and right door hinges ( 12 ).
allen wrench
5
6
4
3
3
2. Disconnect 2 connectors ( 3 )at each side of the top cap and one connector ( 4 ) on the left side door. Remove the tube ( 5 ) with pressing the dark gray color part ( 6 ) of the water line coupler.
CAUTION
If a red clip is on the coupler, it must be removed before removing the tube.
11
Setting Up _11
01 sE
tt
inG
uP
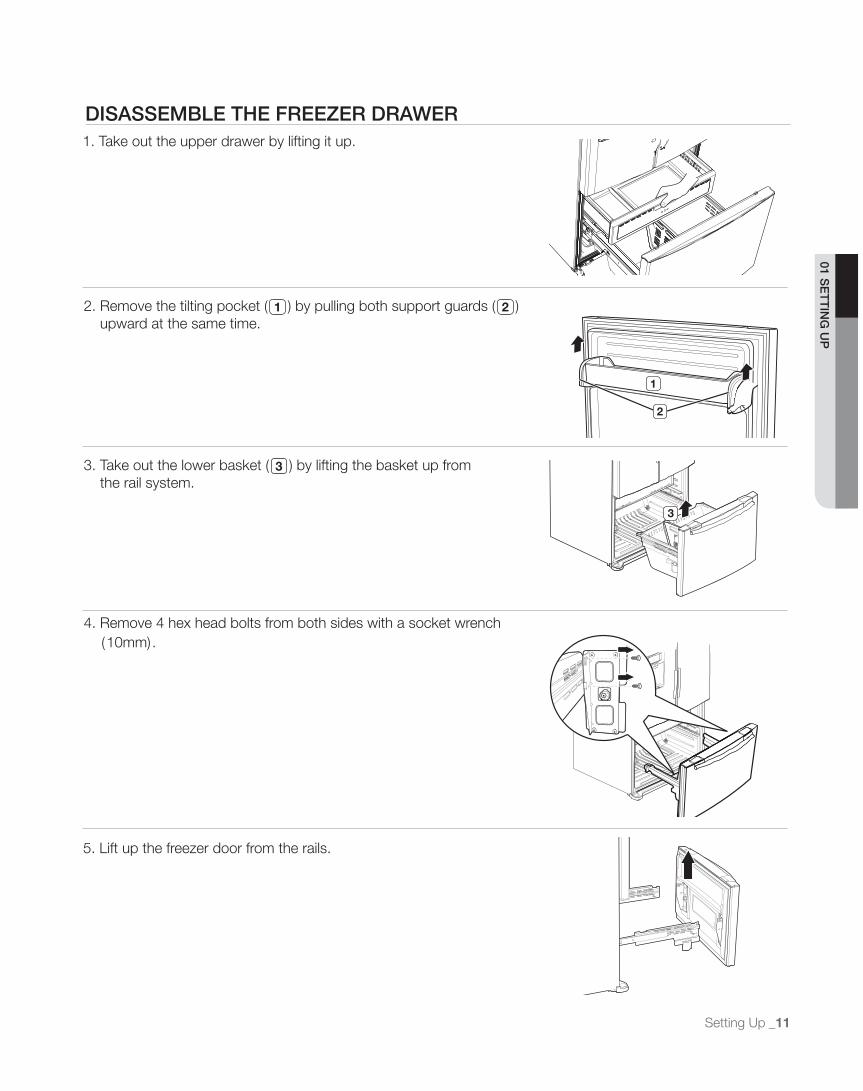
4. Remove 4 hex head bolts from both sides with a socket wrench (10mm).
5. Lift up the freezer door from the rails.
2. Remove the tilting pocket ( 1 ) by pulling both support guards ( 2 ) upward at the same time.
3. Take out the lower basket ( 3 ) by lifting the basket up from the rail system.
1. Take out the upper drawer by lifting it up.
DisassEMBLE tHE FREEzER DRawER
1
2
3
SlotSlot

12_ Setting Up
3. Insert the upper hinges ( 9 ) into the holes at the top of the doors.
Insert and tighten the 3 hex head bolts ( 7 ) into the upper left and right door hinges with a socket wrench (10mm).
Insert and tighten the ground screw ( 8 ) into the upper left and right door hinges with a philips screwdriver(+).
12
7 8
9
10
2. Place the hole in the bottom of the door over the door hinge ( 12 ).
Be careful not to miss the hinge cap because it canbe easily taken off.
12
Setting up your French Door Refrigerator
assemble the refrigerator doors
1. Reattach the lower left and right door hinges ( 12 ). With a Philips head screwdriver, insert and tighten the
screw ( 10 ) into the lower left and right door hinges. With a allen wrench (3/16”), insert and tighten the 2
hex head bolts ( 11 ) into the lower left and right door hinges.
REattaCHinG tHE REFRiGERatoR DooRs
allen wrench
socket wrench
11
Setting Up _13
01 sE
tt
inG
uP
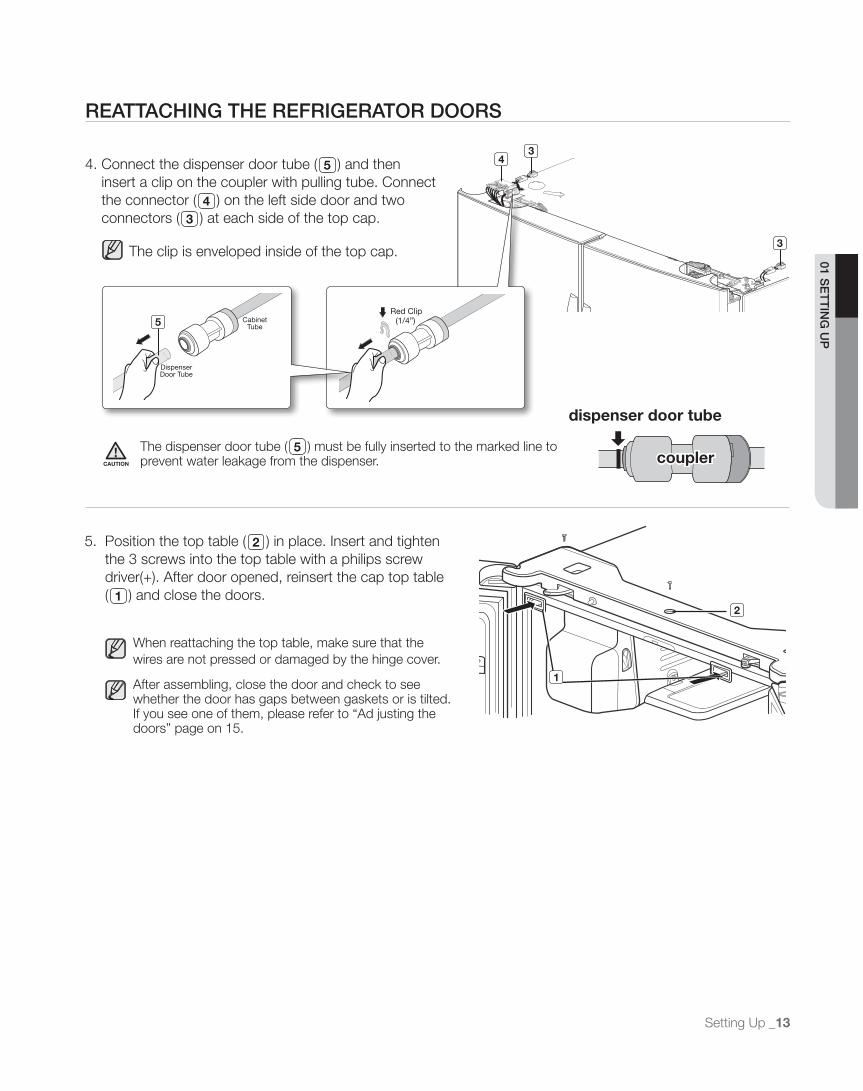
5. Position the top table ( 2 ) in place. Insert and tighten the 3 screws into the top table with a philips screw driver(+). After door opened, reinsert the cap top table ( 1 ) and close the doors.
When reattaching the top table, make sure that thewires are not pressed or damaged by the hinge cover.
After assembling, close the door and check to see whether the door has gaps between gaskets or is tilted. If you see one of them, please refer to “Ad justing the doors” page on 15.
1
2
REattaCHinG tHE REFRiGERatoR DooRs
The dispenser door tube ( 5 ) must be fully inserted to the marked line to prevent water leakage from the dispenser.CAUTION
3
3
4
5
4. Connect the dispenser door tube ( 5 ) and then insert a clip on the coupler with pulling tube. Connect the connector ( 4 ) on the left side door and two connectors ( 3 ) at each side of the top cap.
The clip is enveloped inside of the top cap.
coupler
dispenserdoortube

14_ setting up
assEMBLE tHE FREEzER DRawER
Setting up your French Door Refrigerator1. Pull out the rails fully on each side of the cabinet.
7
8
5. Hook the ends of the tilting pocket ( 7 ) onto the brackets and push down until they are locked into place.
6. Insert the upper drawer.
SlotSlot
2. Attach the freezer door front onto the open slots on the sides. SlotSlot
3. Tighten 4 hex head bolts completely with a socket wrench(10mm).
SlotSlot
4. Insert the lower basket ( 6 ) into the rail system.
6
Remove 2 pieces of tape ( 9 ) attached to the side of the drawer bin.Reattach the tape in the same position when moving the refrigerator toprevent scratching the drawer bin.
9
setting up _15
01 sE
tt
inG
uP
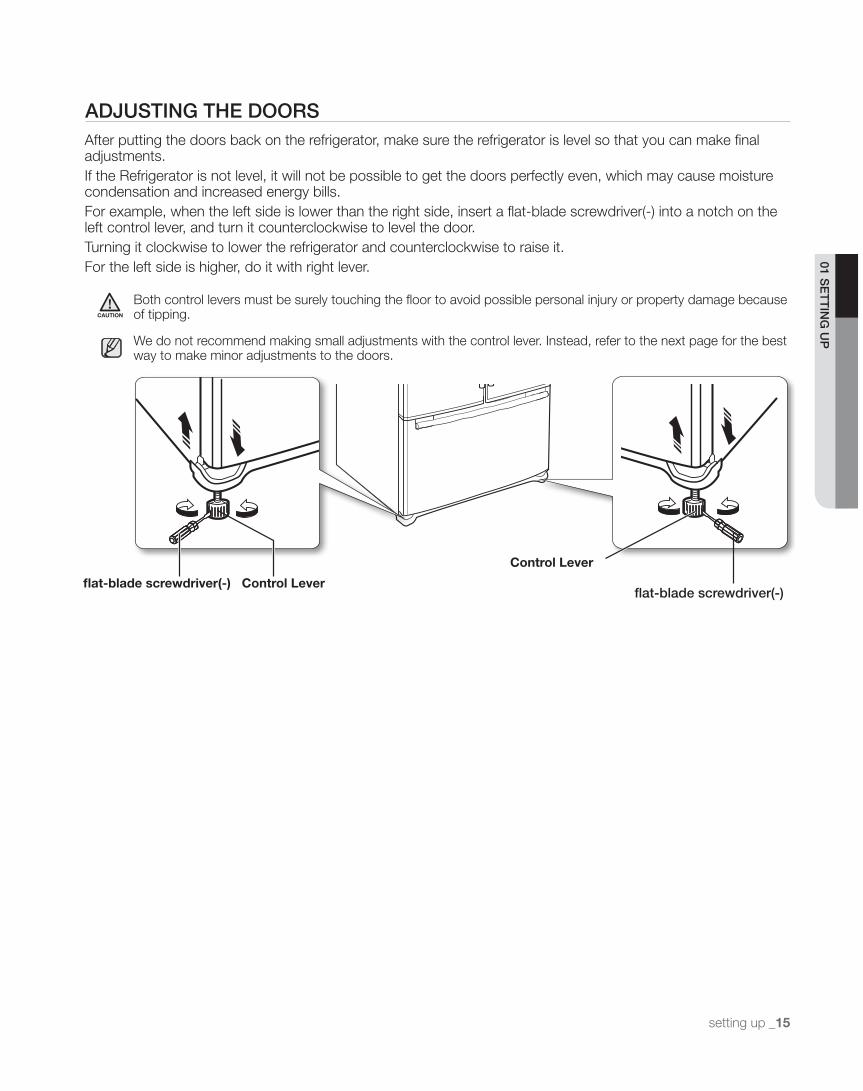
aDJustinG tHE DooRsAfter putting the doors back on the refrigerator, make sure the refrigerator is level so that you can make final adjustments.If the Refrigerator is not level, it will not be possible to get the doors perfectly even, which may cause moisture condensation and increased energy bills.For example, when the left side is lower than the right side, insert a flat-blade screwdriver(-) into a notch on the left control lever, and turn it counterclockwise to level the door.Turning it clockwise to lower the refrigerator and counterclockwise to raise it.For the left side is higher, do it with right lever.
We do not recommend making small adjustments with the control lever. Instead, refer to the next page for the best way to make minor adjustments to the doors.
Both control levers must be surely touching the floor to avoid possible personal injury or property damage because of tipping.CAUTION
ControlLever
flat-blade screwdriver(-)flat-bladescrewdriver(-) ControlLever

Setting up your French Door RefrigeratorMaKinG MinoR aDJustMEnts BEtwEEn DooRsRemember a leveled refrigerator is necessary for getting the doors perfectly flush. If you need help, review theprevious section on leveling the refrigerator.
When the left door is lower than the right
door.
When the left door is higher than the right door.
Adjustment part Adjustment
part
16_ Setting Up
1. Pull out the freezer drawer ( 1 ), then you can see the lower hinge ( 2 ).2. Insert the supplied allen wrench (7/16”) ( 3 ) into the shaft ( 4 ) of the lower hinge.3. Please adjust the height by turning the hex wrench ( 3 ) clockwise ( ) or counter-clockwise ( ).
When you turn the hex wrench counter-clockwise( ), the door will move up.
2 fastener are enclosed with the refrigerator. The thickness of each fastener-ring is 0.04”.
1. After adjusting the doors, please insert the supplied fastener ( 6 ) using a pliers ( 5 ) in the gap between the hinge-grommet ( 7 ) and the lower hinge ( 8 ). The number of fastener you’ll need to insert depends on the gap.
2
3 4
3
1

Setting Up _17
01 sE
tt
inG
uP
aDJustinG tHE FREEzER DRawER LEVEL
1. Locate the height-adjuster ( 1 ) in the freezer drawer. Unscrew the 8 Phillips screws ( 2 ) slightly to loosen the door.
2. Loosen the controller screw ( 3 ) with a Phillips screwdriver(+).
3. Find the best level to align the door slope.
After adjustment, tighten the controller screw ( 3 ) and philips screws.
Freezer Drawer
Adjustment part
Example) The slope is about 0.08”(2mm) as shown below.- Rotate the height adjuster to -2.0 to reduce the door slope.
3
Slope
Referenceplane
2
1

18_ Setting Up
Setting up your French Door RefrigeratorCHECKinG tHE watER DisPEnsER LinEA water dispenser is one of the helpful features on your new refrigerator. To help promote betterhealth, the water filter removes unwanted particles from your water. However, it does not sterilize ordestroy microorganisms. You may need to purchase a water purifying system to do that.
In order for the ice maker to operate properly, a water pressure of 20~125 psi is required.Under normal conditions, a 170 cc (5.75 oz.) cup can be filled in 10 seconds.
If the refrigerator is installed in an area with low water pressure (below 20psi), you can install a booster pump tocompensate for the low pressure.
Make sure the water storage tank inside the refrigerator is properly filled. To do this, press the water dispenserlever until the water runs from the water outlet.
Shut off valve
Pipe clamp
Cold water line
Water line installation kit
Water line installation kits are available at extra cost from your dealer. We recommend using a water line installation kit that contains copper tubing and ¼” compression nut.
After connecting the water supply with water filter, turn on water supply and Flush 3 gallons through filter before use (flush approximately 6 minutes).If water drop or leakage is found on the connection area, turn off the main water supply. Check it and, if necessary, tighten it more.
Pipe clamp
Cold water line
Shut off valve
2. Locate the nearest cold water drinking line and install the pipe clamp and shut off valve.
3. Connect the water line installation kit to shut off valve.
1. First, shut off the main water supply.
Connecting to the water supply line

01 sE
tt
inG
uP
Setting Up _19
instaLLinG tHE watER LinE
Connecting the water supply line to the refrigerator.There are several items that you need to purchase to complete this connection. You may find these items sold as a kit at your local hardware store.
2 3
Indicator sticker(month indicator)
1
1. Slip the compression nut through the supplied plastic tubing .2. Tighten the compression nut onto the 1/4” compression fitting. - If you are using copper tubing, slip the compression nut (not supplied) and ferrule (not supplied) on
copper tubing (not supplied) as shown. - If you are using plastic tubing , insert the molded end(Bulb) of the plastic tubing into the
compression fitting.
Do not use without the molded end(Bulb) of the plastic tubing .
3. Tighten the compression nut onto the compression fitting. Do not over-tighten the compression nut .4. Turn water on and check for any leakage.
Only connect the water line to a drinkable water source.If you have to repair or disassemble the water line, cut off 1/4“ of the plastic tubing to make sure you get a snug, leak-free connection.
CAUTION
1. Remove the water filter cover ( 1 )2. Remove the fixed cap ( 2 ) by turning it counter clockwise. Keep
the cap in a safe place for later use if you don’t use the filter.3. Remove the water filter ( 3 ) from the box and put a
replacement indicator sticker (Indicator sticker is included in the box) on the filter as shown. Place the sticker on the filter that dates six months in the future. For example, if you install the water filter in March, put the “SEP” sticker on the filter to remind you to replace it in September. This way, you can remember the time to replace the water filter. Normally, a filter life is about 6 months.
Installing the water filter.After remove the right side upper shelf, you can install the water filter more easily.
Plastic tubing(Supplied)
Ferrule(Not supplied)
Compression nut(1/4”) (Supplied)
Compression fitting(Supplied)
Molded end(Bulb)
Compression nut(1/4”) (Not supplied)
Copper tubing or Plastic tubing(Not supplied) (Not supplied)
Household water supply line
Refrigeratoruse Copper tubing use Plastic tubing• ¼” copper tubing• ¼” compression nut (2pc)• Ferrule (2pc)
• ¼” plastic tubing → Molded end(Bulb)• ¼” compression nut (2pc)

20_ Setting Up
Removing any residual matter inside the water supply line after installing the water filter.
1. Turn on the main water supply & turn on the valve to the water supply line.2. Run water through the dispenser until the water runs clear (approx.
6-7minutes). This will clean the water supply system and remove air from the lines.
3. Additional clearing time may be required in some households.4. Open the Refrigerator door and make sure there are no water leaks coming
from the water filter.
4. Remove the filter cap ( 4 ) and insert the filter into the filter housing.
5. Slowly turn the water filter 90º clockwise to align with the printing mark on the cover, locking the filter in position. Make sure to align the water filter label mark ( 5 ) with center of cover filter printing as illustrated. Remember, do not over-tighten.
Reverse osmosis water supply
iMPoRtant : The pressure of the water supply coming out of a reverse osmosis system going to the water inlet valve of the refrigerator needs to be between 35 and 120 psi (241 and 827 kPa).
If a reverse osmosis water filtration system is connected to your cold water supply, the water pressure to the reverse osmosis system needs to be a minimum of 40 to 60 psi (276 to 414 kPa.)If the water pressure to the reverse osmosis system is less than 40 to 60 psi (276 to 414 kPa):
• Check to see whether the sediment filter in the reverse osmosis system is blocked. Replace the filter if necessary.
• Allow the storage tank on the reverse osmosis system to refill after heavy usage.• If your refrigerator has a water filter, it may further reduce the water pressure when used in conjunction with a
reverse osmosis system. Remove the water filter.
If you have questions about your water pressure, call a licensed, qualified plumber.
Be sure to flush the dispenser thoroughly or water may leak from it.This is due to the fact that there is still air in the line.
Setting up your French Door Refrigerator
Turn until the label is aligned.
Separationof filter cap(red)
Cover filter.
4
5

Operating _21
02 oP
ER
atin
G
Operating your French Door Refigerator (RFG237 MODEL)
usinG tHE ContRoL PanEL
1
2
3
4
5
6
87
Press the EnergySaver button for better energy efficiency. If water drops appear on the doors, turn the EnergySaver function off.( 1 ) Energy saver
( 2 ) Freezer/hold 3 sec for Power Freezer
Press the Freezer/hold3secforPowerFreezerbutton to set the freezer to your desired temperature.You can set the temperature between -8°F and 8°F. Press and hold the Freezer/hold3secforPowerfreezerbutton for 3 seconds to speed up the time needed to freeze products in the freezer. It can be helpfulif you need to quickly freeze easily spoiled items or if the temperature in the freezer has warmed dramatically (For example, if the door was left open).
Press the Alarm/hold3secforPowerFreezer button to turn off the door open alarm. (At first, alarm modeis On ) After removing the old water filter and installing a new one, reset the indicator by pressing and holdingthis button for 3 seconds. (The indicator is lit at first and will light again in about 6 months to let you know itis time to change your water filter.)
( 3 ) Alarm / hold 3 sec for Filter Reset
Press the Lighting button to turn on the Dispenser LED lamp.( 4 ) Lighting
Press the Fridge/hold3secforPowerCool button to set the fridge to your desired temperature.You can set the temperature between 34°F and 46°F.Press and hold the Fridge/hold3secforPowerCoolbutton for 3 seconds to speed up the time needed to cool products in the refrigerator. It can be helpful if you need to quickly cool easily spoiled items or if the temperature in the fridge has warmed dramatically (For example, if the door was left open).
( 5 ) Fridge / hold 3 sec for Power Cool
Press the IceOFF/hold3secforChildLockbutton to turn the fridge or freezer ice making function off.If you press and hold this button for 3 seconds, the display and dispenser will be locked.
( 6 ) Ice off / Hold 3 sec for Child Lock
Press the IceType button to select your desired ice type. Cubed and crushed ice modes will be alternatively changed whenever you press the button. This mode can not be used with the Water mode simultaneously.( 7 ) ice type
Press the Water button to dispense water. This mode can not be used with the Ice Type mode simultaneously. Water mode will be off if you press the Ice Type button.
( 8 ) water
Some functions are activated after a few-second delay when the buttons are pressed, while others operate immediately. This is normal operation.

22_ Operating
Operating your French Door RefrigeratorusinG tHE DiGitaL DisPLayFreezerTemp ( 1 ) indicates the current freezer temperature.FridgeTemp ( 2 ) indicates the current refrigerator temperature.If you do not press any button, freezer & fridge temperature indicator will turn off in a few seconds.If any button is pressed, the display will light up again.
1 2
Power Freeze This icon will light up when you press the Freezer/Hold3secforPowerFreezer button for 3 seconds.PowerFreezeis great when you need a lot of ice. When you have enough ice, just press the same button again for 3 seconds to cancel the PowerFreeze mode. After 2 and a half hours, PowerFreeze mode will turn off automatically to decrease energy consumption.
Power CoolThis icon will light up when you press the Fridge/Hold3secforPowerCool button for 3 seconds. For a quick fridge cool down, use PowerCool mode. If you want to cancel the PowerCoolmode, just press the same button again for 3 seconds. After 2 and a half hours, Powercool mode will turn off automatically to decrease energy consumption.
FilterWhen the filter indicator light is on, it is time to change the filter. Typically this happens about every 6 months.The filter indicator will be Blue when you initially insert the water filter.The filter indicator will be Light Pink when you have used your water filter for 270 gallons.The filter indicator will be Red when you have used your water filter for 300 gallons.After removing the old water filter and installing a new one(see page 41 of the owner’s manual for instructions) when the filter indicator is red, reset the indicator by pressing and holding the “Alarm/Hold 3 sec for Filter Reset” button for 3 seconds. (The filter indicator will be blue or yellow green when the indicator is reset.)
Cubed Ice , Crushed Ice , WaterEnjoy cubed or crushed ice by selecting your preference from the digital control panel. If you don’t need ice, turn the function off to save on water and energy consumption. Each Ice type icon will light up by your selection.
Cooling off Mode (“oF & oF” code on the display)Cooling Off Mode stops cooling in the freezer and refrigerator compartments, but does not shut off electrical power to the refrigerator. To use this feature, press EnergySaver Button and Freezer/hold3secforPowerFreezer Button simultaneously for 3 seconds until an alarm sound is heard. To cancel this mode, press the same buttons again for 3 seconds and the refrigerator will return to cooling mode.
This function is for store display refrigerators. It is not for customer use.

Operating _23
02 oP
ER
atin
G
ice offThis icon will light up when you press the “Ice Off” button. In this case, the ice will not be produced.
Energy saverThis icon will light up when you press the Energy saver button. The Energy Saver function is automatically set to “ON” when power is supplied to the refrigerator. If condensation occurs on the doors, turn the Energy Saver mode off.
LightingThis icon will light up when you press the Lighting button. In this case, the dispenser light(under thedisplay) will be on constantly. If you would like the dispenser light to come on only when using the dispenser, turn the Lighting mode off.
alarmThis icon will light up when you press the alarm button. The door alarm will sound if any door is open for more than 3 minutes. The beeping stops when you close the door. Initially the Alarm is set to on.
LockThis icon will light up when you press the Lock button. In this case, you won’t be able to use the control panel. If you press and hold the Ice Off/Hold button for 3 sec to unlock Child Lock, you will be able to use the control panel again.
ContRoLLinG tHE tEMPERatuRE
Basic temperature of Freezer and Refrigerator CompartmentsThe basic temperature and/or recommended temperatures of the freezer and refrigerator Compartments are -2°F and 38°F respectively. If the temperature of freezer and fridge Compartments are too high or low, adjust the temperature manually.
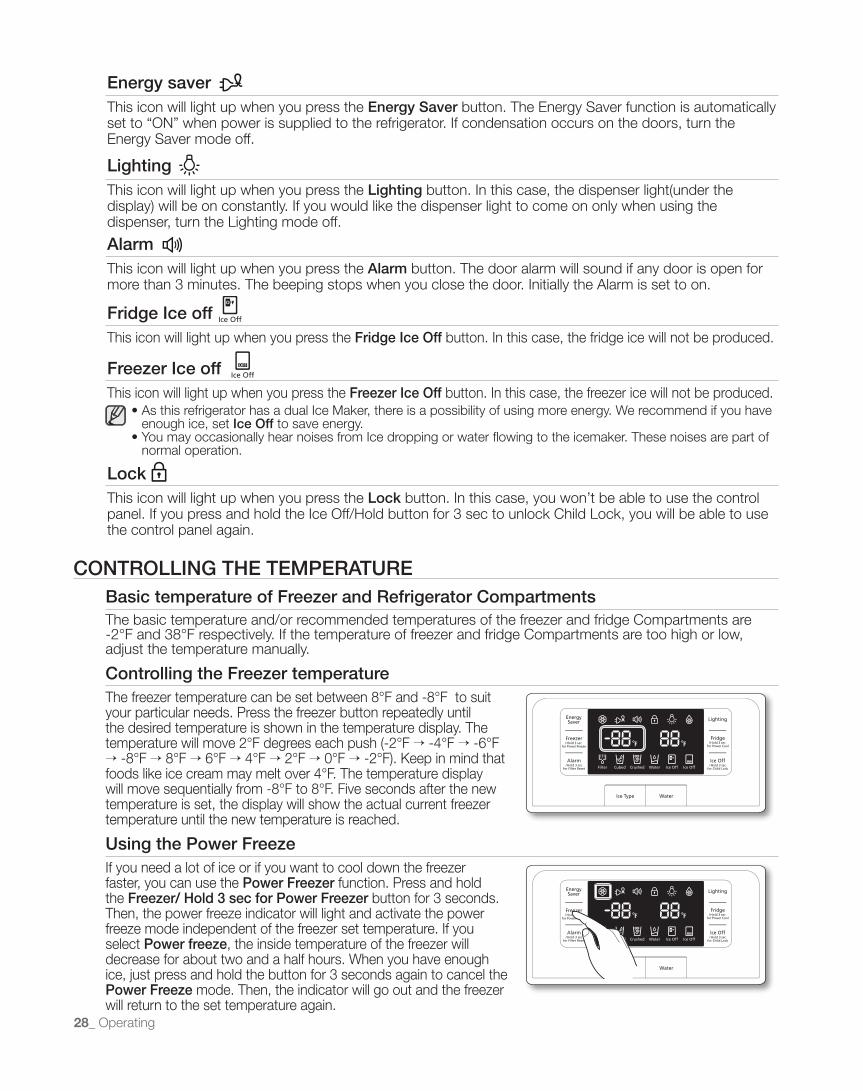
Controlling the Freezer temperatureThe freezer temperature can be set between 8°F and -8°F to suit your particular needs. Press the freezer button repeatedly until the desired temperature is shown in the temperature display. The temperature will move 2°F degrees each push (-2°F → -4°F → -6°F → -8°F → 8°F → 6°F → 4°F → 2°F → 0°F → -2°F). Keep in mind that foods like ice cream may melt at 4°F. The temperature display will move sequentially from -8°F to 8°F. Five seconds after the new temperature is set, the display will show the actual current freezer temperature until the new temperature is reached.
using the Power FreezeIf you need a lot of ice or if you want to cool down the freezer faster, you can use the Power Freezer function. Press and hold the Freezer/ Hold 3 sec for Power Freezer button for 3 seconds. Then, the power freeze indicator will light and activate the power freeze mode independent of the freezer set temperature. If you select Power freeze, the inside temperature of the freezer will decrease for about two and a half hours. When you have enough ice, just press and hold the button for 3 seconds again to cancel the Power Freeze mode. Then, the indicator will go out and the freezer will return to the set temperature again.

24_ Operating
Operating your French Door Refigerator (RFG237 MODEL)
ContRoLLinG tHE tEMPERatuRE
Controlling the fridge temperatureThe fridge temperature can be set between 46°F and 34°F to suit your particular needs. Press the fridge button repeatedly until the desired temperature is shown in the temperature display. The temperature will move 2°F degrees each press(38°F → 36°F → 34°F → 46°F → 44°F → 42°F → 40°F → 38°F). The temperature control process for the fridge works just like the freezer process. Press the fridge button to set your desired temperature. After a few seconds, the fridge will begin adjusting towards the newly set temperature. This will be reflected in the digital display.
- The temperature of the Freezer, fridge or Pantry Room may rise when you open the doors too frequently, or if a large amount of warm or hot food is placed inside.- This may cause the digital display to blink. Once the Freezer and fridge temperature return to their normal set temperatures, the blinking will stop.- If the blinking continues, you may need to “reset” the Refrigerator. Try unplugging the appliance, wait for around 10 minutes and then plug the power cord back in.- If there is an communication error between the Display and Main Controller, the Pantry Display light may blink.
Once the normal set temperatures are reached, the blinking will stop. If the blinking continues for a long period of time, please contact a Samsung Electronics Service Center.
using the Power CoolFor a quick Fridge cool down, use the Power Cool function. Press and hold the Fridge/Hold 3 sec for Power Cool button for 3 seconds. Then, the power cool indicator will light and activate the power cool mode independent of fridge set temperature. If you select Power Cool, the inside temperature of the fridge will decrease for about two and a half hours or until 25°F is reached. Press and hold the button for 3 seconds again to cancel the Power Cool mode. Then, the indicator will go out and the Refrigerator will return to the set temperature again.
usinG tHE CoLD watER DisPEnsERPress the Ice / Water button to select the type of you want
NoICESelect this if you want to turn ice maker off.
Operating _25
02 oP
ER
atin
G
PUSH
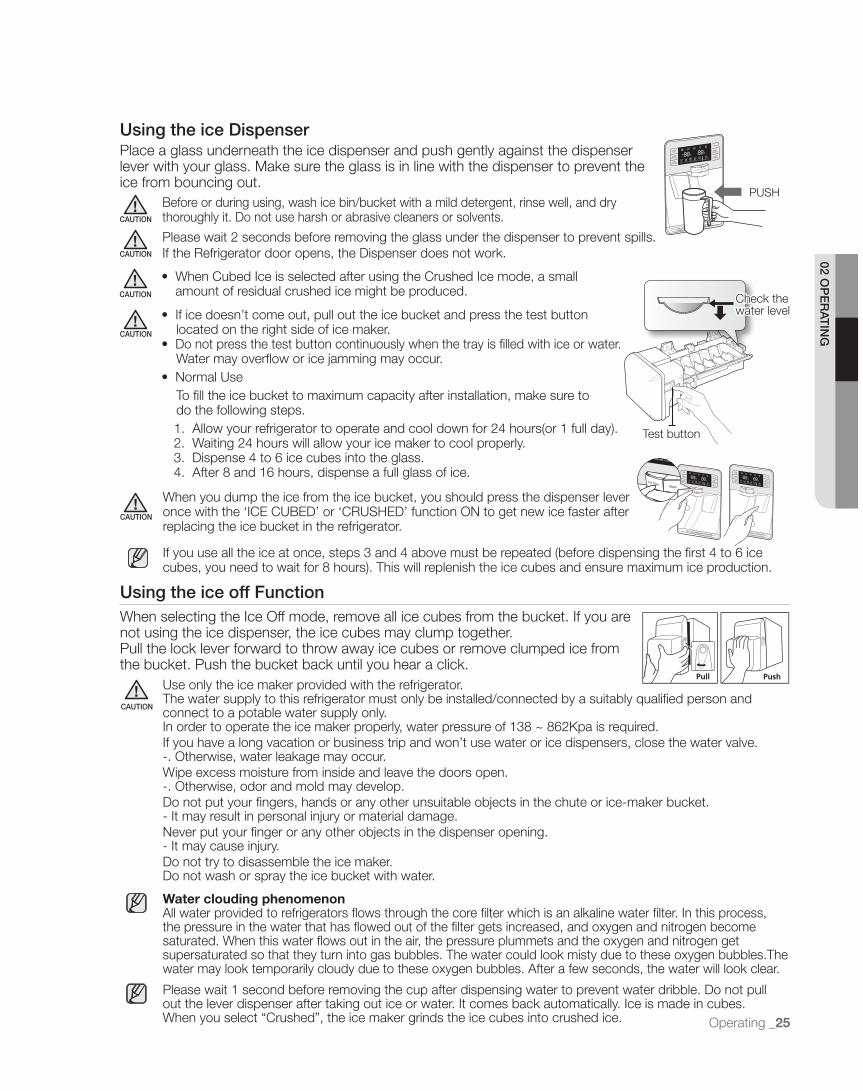
using the ice DispenserPlace a glass underneath the ice dispenser and push gently against the dispenser lever with your glass. Make sure the glass is in line with the dispenser to prevent the ice from bouncing out.
If you use all the ice at once, steps 3 and 4 above must be repeated (before dispensing the first 4 to 6 ice cubes, you need to wait for 8 hours). This will replenish the ice cubes and ensure maximum ice production.
When you dump the ice from the ice bucket, you should press the dispenser lever once with the ‘ICE CUBED’ or ‘CRUSHED’ function ON to get new ice faster after replacing the ice bucket in the refrigerator.
Caution
Please wait 1 second before removing the cup after dispensing water to prevent water dribble. Do not pull out the lever dispenser after taking out ice or water. It comes back automatically. Ice is made in cubes.When you select “Crushed”, the ice maker grinds the ice cubes into crushed ice.
WatercloudingphenomenonAll water provided to refrigerators flows through the core filter which is an alkaline water filter. In this process, the pressure in the water that has flowed out of the filter gets increased, and oxygen and nitrogen become saturated. When this water flows out in the air, the pressure plummets and the oxygen and nitrogen get supersaturated so that they turn into gas bubbles. The water could look misty due to these oxygen bubbles.The water may look temporarily cloudy due to these oxygen bubbles. After a few seconds, the water will look clear.
using the ice off Function When selecting the Ice Off mode, remove all ice cubes from the bucket. If you are not using the ice dispenser, the ice cubes may clump together. Pull the lock lever forward to throw away ice cubes or remove clumped ice from the bucket. Push the bucket back until you hear a click.
Caution
Use only the ice maker provided with the refrigerator.The water supply to this refrigerator must only be installed/connected by a suitably qualified person andconnect to a potable water supply only.In order to operate the ice maker properly, water pressure of 138 ~ 862Kpa is required.If you have a long vacation or business trip and won’t use water or ice dispensers, close the water valve.-. Otherwise, water leakage may occur.Wipe excess moisture from inside and leave the doors open.-. Otherwise, odor and mold may develop.Do not put your fingers, hands or any other unsuitable objects in the chute or ice-maker bucket.- It may result in personal injury or material damage.Never put your finger or any other objects in the dispenser opening.- It may cause injury.Do not try to disassemble the ice maker.Do not wash or spray the ice bucket with water.
Before or during using, wash ice bin/bucket with a mild detergent, rinse well, and dry thoroughly it. Do not use harsh or abrasive cleaners or solvents.Caution
Please wait 2 seconds before removing the glass under the dispenser to prevent spills.If the Refrigerator door opens, the Dispenser does not work.Caution
Caution
• When Cubed Ice is selected after using the Crushed Ice mode, a small amount of residual crushed ice might be produced.
Caution
Test button
Check the water level• If ice doesn’t come out, pull out the ice bucket and press the test button
located on the right side of ice maker.• Do not press the test button continuously when the tray is filled with ice or water. Water may overflow or ice jamming may occur.• Normal Use To fill the ice bucket to maximum capacity after installation, make sure to do the following steps. 1. Allow your refrigerator to operate and cool down for 24 hours(or 1 full day). 2. Waiting 24 hours will allow your ice maker to cool properly. 3. Dispense 4 to 6 ice cubes into the glass. 4. After 8 and 16 hours, dispense a full glass of ice.

26_ Operating
Operating your French Door Refigerator (RFG238 MODEL)
usinG tHE ContRoL PanEL
1
2
3
4
5
6
87
Press the EnergySaver button for better energy efficiency. If water drops appear on the doors, turn the EnergySaver function off.( 1 ) Energy saver
( 2 ) Freezer/hold 3 sec for Power Freezer
Press the Freezer/hold3secforPowerFreezerbutton to set the freezer to your desired temperature.You can set the temperature between -8°F and 8°F. Press and hold the Freezer/hold3secforPowerfreezerbutton for 3 seconds to speed up the time needed to freeze products in the freezer. It can be helpfulif you need to quickly freeze easily spoiled items or if the temperature in the freezer has warmed dramatically (For example, if the door was left open).
Press the Alarm/hold3secforPowerFreezer button to turn off the door open alarm. (At first, alarm modeis On ) After removing the old water filter and installing a new one, reset the indicator by pressing and holdingthis button for 3 seconds. (The indicator is lit at first and will light again in about 6 months to let you know itis time to change your water filter.)
( 3 ) Alarm / hold 3 sec for Filter Reset
Press the Lighting button to turn on the Dispenser LED lamp.( 4 ) Lighting
Press the Fridge/hold3secforPowerCool button to set the fridge to your desired temperature.You can set the temperature between 34°F and 46°F.Press and hold the Fridge/hold3secforPowerCoolbutton for 3 seconds to speed up the time needed to cool products in the refrigerator. It can be helpful if you need to quickly cool easily spoiled items or if the temperature in the fridge has warmed dramatically (For example, if the door was left open).
( 5 ) Fridge / hold 3 sec for Power Cool
Press the IceOFF/hold3secforChildLockbutton to turn the fridge or freezer ice making function off.If you press and hold this button for 3 seconds, the display and dispenser will be locked.
( 6 ) Ice off / Hold 3 sec for Child Lock
Press the IceType button to select your desired ice type. Cubed and crushed ice modes will be alternatively changed whenever you press the button. This mode can not be used with the Water mode simultaneously.( 7 ) ice type
Press the Water button to dispense water. This mode can not be used with the Ice Type mode simultaneously. Water mode will be off if you press the Ice Type button.( 8 ) water
Some functions are activated after a few-second delay when the buttons are pressed, while others operate immediately. This is normal operation.

Operating _27
02 oP
ER
atin
G
Operating your French Door Refigerator (RFG238 MODEL)usinG tHE DiGitaL DisPLaRyFreezerTemp ( 1 ) indicates the current freezer temperature.FridgeTemp ( 2 ) indicates the current refrigerator temperature.If you do not press any button, freezer & fridge temperature indicator will turned off in a few seconds. If any button is pressed, the display will light up again.
Power Freeze This icon will light up when you press the Freezer/Hold3secforPowerFreezer button for 3 seconds.PowerFreezeis great when you need a lot of ice. When you have enough ice, just press the same button again for 3 seconds to cancel the PowerFreeze mode. After 2 and a half hours, PowerFreeze mode will turn off automatically to decrease energy consumption.
Power CoolThis icon will light up when you press the Fridge/Hold3secforPowerCool button for 3 seconds. For a quick fridge cool down, use PowerCool mode. If you want to cancel the PowerCoolmode, just press the same button again for 3 seconds. After 2 and a half hours, Powercool mode will turn off automatically to decrease energy consumption.
FilterWhen the filter indicator light is on, it is time to change the filter. Typically this happens about every 6 months.The filter indicator will be Blue when you initially insert the water filter.The filter indicator will be Light Pink when you have used your water filter for 270 gallons.The filter indicator will be Red when you have used your water filter for 300 gallons.After removing the old water filter and installing a new one(see page 41 of the owner’s manual for instructions) when the filter indicator is red, reset the indicator by pressing and holding the “Alarm/Hold 3 sec for Filter Reset” button for 3 seconds. (The filter indicator will be blue or yellow green when the indicator is reset.)
Cubed Ice , Crushed Ice , WaterEnjoy cubed or crushed ice by selecting your preference from the digital control panel. If you don’t need ice, turn the function off to save on water and energy consumption. Each Ice type icon will light up by your selection.
Cooling off Mode (“oF & oF” code on the display)Cooling Off Mode stops cooling in the freezer and refrigerator compartments, but does not shut off electrical power to the refrigerator. To use this feature, press EnergySaver Button and Freezer/hold3secforPowerFreezer Button simultaneously for 3 seconds until an alarm sound is heard. To cancel this mode, press the same buttons again for 3 seconds and the refrigerator will return to cooling mode.
This function is for store display refrigerators. It is not for customer use.
1 2
28_ Operating
Energy saverThis icon will light up when you press the Energy saver button. The Energy Saver function is automatically set to “ON” when power is supplied to the refrigerator. If condensation occurs on the doors, turn the Energy Saver mode off.
LightingThis icon will light up when you press the Lighting button. In this case, the dispenser light(under thedisplay) will be on constantly. If you would like the dispenser light to come on only when using the dispenser, turn the Lighting mode off.
alarmThis icon will light up when you press the alarm button. The door alarm will sound if any door is open for more than 3 minutes. The beeping stops when you close the door. Initially the Alarm is set to on.
LockThis icon will light up when you press the Lock button. In this case, you won’t be able to use the control panel. If you press and hold the Ice Off/Hold button for 3 sec to unlock Child Lock, you will be able to use the control panel again.
Fridge ice offThis icon will light up when you press the Fridge ice off button. In this case, the fridge ice will not be produced.
Freezer ice offThis icon will light up when you press the Freezer ice off button. In this case, the freezer ice will not be produced.
• As this refrigerator has a dual Ice Maker, there is a possibility of using more energy. We recommend if you have enough ice, set ice off to save energy.
• You may occasionally hear noises from Ice dropping or water flowing to the icemaker. These noises are part of normal operation.
ContRoLLinG tHE tEMPERatuREBasic temperature of Freezer and Refrigerator CompartmentsThe basic temperature and/or recommended temperatures of the freezer and fridge Compartments are -2°F and 38°F respectively. If the temperature of freezer and fridge Compartments are too high or low, adjust the temperature manually.
Controlling the Freezer temperatureThe freezer temperature can be set between 8°F and -8°F to suit your particular needs. Press the freezer button repeatedly until the desired temperature is shown in the temperature display. The temperature will move 2°F degrees each push (-2°F → -4°F → -6°F → -8°F → 8°F → 6°F → 4°F → 2°F → 0°F → -2°F). Keep in mind that foods like ice cream may melt over 4°F. The temperature display will move sequentially from -8°F to 8°F. Five seconds after the new temperature is set, the display will show the actual current freezer temperature until the new temperature is reached.
using the Power FreezeIf you need a lot of ice or if you want to cool down the freezer faster, you can use the Power Freezer function. Press and hold the Freezer/ Hold 3 sec for Power Freezer button for 3 seconds. Then, the power freeze indicator will light and activate the power freeze mode independent of the freezer set temperature. If you select Power freeze, the inside temperature of the freezer will decrease for about two and a half hours. When you have enough ice, just press and hold the button for 3 seconds again to cancel the Power Freeze mode. Then, the indicator will go out and the freezer will return to the set temperature again.

Operating _29
02 oP
ER
atin
G
Operating your French Door Refigerator (RFG238 MODEL)
using the ice DispenserPlace a glass underneath the ice dispenser and push gently against the dispenser lever with your glass.Make sure the glass is in line with the dispenser to prevent the ice from bouncing out.
Caution
When Cubed Ice is selected after using the Crushed Ice mode, a small amount of residual crushed ice might be produced.
Caution
Before or during using, wash ice bin/bucket with a mild detergent, rinse well, and dry thoroughly it. Do not use harsh or abrasive cleaners or solvents.
Caution
Please wait 2 seconds before removing the glass under the dispenser to prevent spills.If the Refrigerator door opens, the Dispenser does not work.
PUSH
Controlling the fridge temperatureThe fridge temperature can be set between 46°F and 34°F to suit your particular needs. Press the fridge button repeatedly until the desired temperature is shown in the temperature display. The temperature will move 2°F degrees each press(38°F → 36°F → 34°F → 46°F → 44°F → 42°F → 40°F → 38°F). The temperature control process for the fridge works just like the freezer process. Press the fridge button to set your desired temperature. After a few seconds, the fridge will begin adjusting towards the newly set temperature. This will be reflected in the digital display.
- The temperature of the Freezer, fridge or Pantry Room may rise when you open the doors too frequently, or if a large amount of warm or hot food is placed inside.- This may cause the digital display to blink. Once the Freezer and fridge temperature return to their normal set temperatures, the blinking will stop.- If the blinking continues, you may need to “reset” the Refrigerator. Try unplugging the appliance, wait for around 10 minutes and then plug the power cord back in.- If there is an communication error between the Display and Main Controller, the Pantry Display light may blink.
Once the normal set temperatures are reached, the blinking will stop. If the blinking continues for a long period of time, please contact a Samsung Electronics Service Center.
using the Power CoolFor a quick Fridge cool down, use the Power Cool function. Press and hold the Fridge/Hold 3 sec for Power Cool button for 3 seconds. Then, the power cool indicator will light and activate the power cool mode independent of fridge set temperature. If you select Power Cool, the inside temperature of the fridge will decrease for about two and a half hours or until 25°F is reached. Press and hold the button for 3 seconds again to cancel the Power Cool mode. Then, the indicator will go out and the Refrigerator will return to the set temperature again.
usinG tHE CoLD watER DisPEnsERPress the ice type or water button to select the type of you want
NoICESelect this if you want to turn ice maker off.

30_ Operating
Caution
using the water dispenserPlace a glass underneath the water outlet and push gently against the water dispenser lever with your glass. Make sure the glass is in line with the dispenser to prevent the water from splashing out.If you have just installed the refrigerator or installed a new water filter,Flush 3 gallons through filter before use (flush approximately 6 minutes). Make sure that water flows clearly again before drinking.
Caution
When you do not use the water dispenser for 2~3 days (especially during the summer), the dispensed water may have a funny smell or taste.If this occurs, we recommend that you discard the first 1~2 glasses of water for better taste.
Please wait 1 second before removing the cup after dispensing water to prevent water dribble. Do not pull out the lever dispenser after taking out ice or water. It comes back automatically. Ice is made in cubes.When you select “Crushed”, the ice maker grinds the ice cubes into crushed ice.
WatercloudingphenomenonAll water provided to refrigerators flows through the core filter which is an alkaline water filter. In this process, the pressure in the water that has flowed out of the filter gets increased, and oxygen and nitrogen become saturated. When this water flows out in the air, the pressure plummets and the oxygen and nitrogen get supersaturated so that they turn into gas bubbles. The water could look misty due to these oxygen bubbles.The water may look temporarily cloudy due to these oxygen bubbles. After a few seconds, the water will look clear.
using the ice off Function When selecting the Ice Off mode, remove all ice cubes from the bucket. If you are not using the ice dispenser, the ice cubes may clump together. Pull the lock lever forward to throw away ice cubes or remove clumped ice from the bucket. Push the bucket back until you hear a click.
Caution
Use only the ice maker provided with the refrigerator.The water supply to this refrigerator must only be installed/connected by a suitably qualified person andconnect to a potable water supply only.In order to operate the ice maker properly, water pressure of 138 ~ 862Kpa is required.If you have a long vacation or business trip and won’t use water or ice dispensers, close the water valve.-. Otherwise, water leakage may occur.Wipe excess moisture from inside and leave the doors open.-. Otherwise, odor and mold may develop.Do not put your fingers, hands or any other unsuitable objects in the chute or ice-maker bucket.- It may result in personal injury or material damage.Never put your finger or any other objects in the dispenser opening.- It may cause injury.Do not try to disassemble the ice maker.Do not wash or spray the ice bucket with water.
Test button
Check the water level
• If ice doesn’t come out, pull out the ice bucket and press the test button located on the right side of ice maker.• Do not press the test button continuously when the tray is filled with ice or
water. Water may overflow or ice jamming may occur.• Normal Use To fill the ice bucket to maximum capacity after installation, make sure to do the following steps. 1. Allow your refrigerator to operate and cool down for 24 hours (or 1 full day). 2. Waiting 24 hours will allow your ice maker to cool properly. 3. Dispense 4 to 6 ice cubes into the glass. 4. After 8 and 16 hours, dispense a full glass of ice.
If you use all the ice at once, steps 3 and 4 above must be repeated (before dispensing the first 4 to 6 ice cubes, you need to wait for 8 hours). This will replenish the ice cubes and ensure maximum ice production.
If a power failure occurs, ice cubes may melt then freeze together when the power comes back on, causing the dispenser to be out of order. To prevent this problem, pull out the ice bucket and discard the residual ice or water.
Caution
When you dump the ice from the ice bucke t, you should press thedispenser lever once with the ‘ICE CUBED’ or ‘CRUSHED’ functionON to get new ice faster after replacing the ice bucket in the refrigerator.
Caution
Operating _31
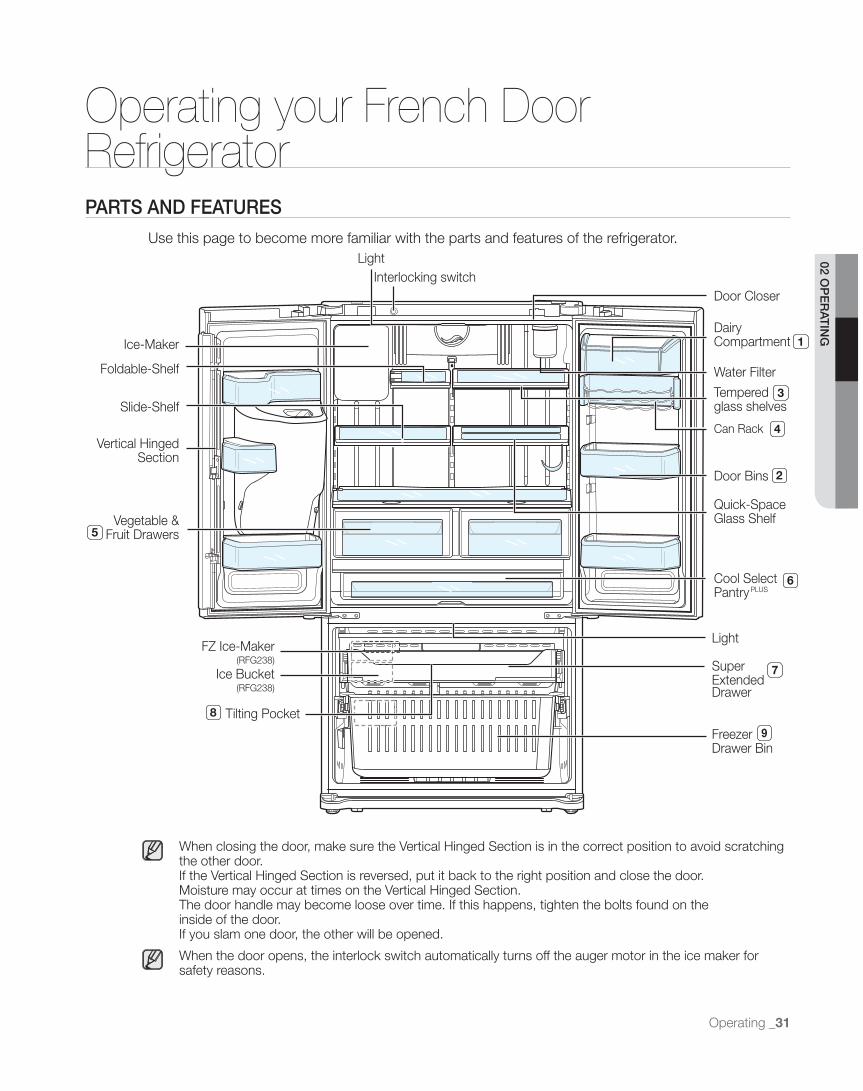
Operating your French Door RefrigeratorPaRts anD FEatuREs
02 oP
ER
atin
G
Use this page to become more familiar with the parts and features of the refrigerator.
When closing the door, make sure the Vertical Hinged Section is in the correct position to avoid scratchingthe other door.If the Vertical Hinged Section is reversed, put it back to the right position and close the door.Moisture may occur at times on the Vertical Hinged Section.The door handle may become loose over time. If this happens, tighten the bolts found on theinside of the door.If you slam one door, the other will be opened.
When the door opens, the interlock switch automatically turns off the auger motor in the ice maker for safety reasons.
Door Closer
Water Filter
Door Bins
Cool Select PantryPLUS
Light
Vertical HingedSection
Vegetable & Fruit Drawers
Slide-Shelf
Light
Super Extended Drawer
FreezerDrawer Bin
Ice-Maker
Foldable-Shelf
Tempered glass shelves
Quick-SpaceGlass Shelf
Dairy Compartment 1
3
Can Rack 4
2
6
7
9
5
FZ Ice-Maker(RFG238)
Ice Bucket(RFG238)
Tilting Pocket8
Interlocking switch
32_ Operating
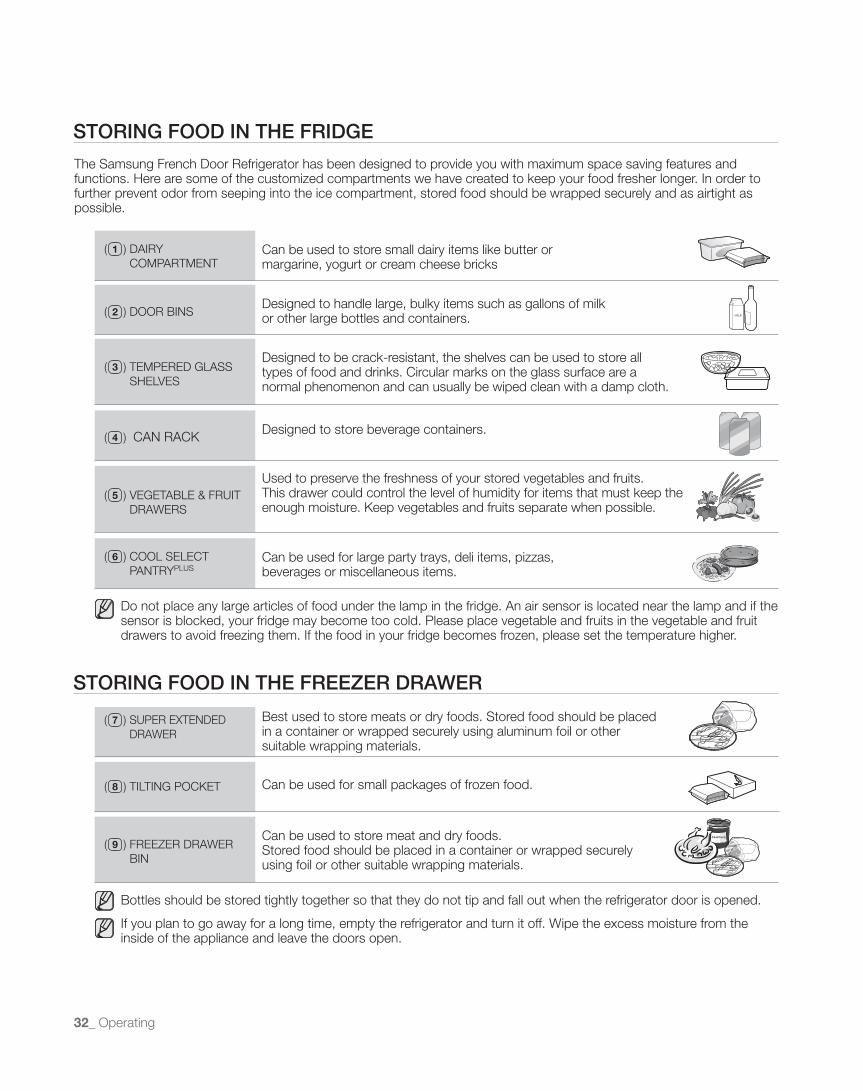
stoRinG FooD in tHE FRiDGE
Do not place any large articles of food under the lamp in the fridge. An air sensor is located near the lamp and if the sensor is blocked, your fridge may become too cold. Please place vegetable and fruits in the vegetable and fruit drawers to avoid freezing them. If the food in your fridge becomes frozen, please set the temperature higher.
Can be used to store small dairy items like butter or margarine, yogurt or cream cheese bricks
( 1 ) DAIRY COMPARTMENT
Designed to handle large, bulky items such as gallons of milk or other large bottles and containers.( 2 ) DOOR BINS
Can be used for large party trays, deli items, pizzas, beverages or miscellaneous items.
( 6 ) COOL SELECT PANTRYPLUS
( 3 ) TEMPERED GLASS SHELVES
Used to preserve the freshness of your stored vegetables and fruits.This drawer could control the level of humidity for items that must keep the enough moisture. Keep vegetables and fruits separate when possible.
( 5 ) VEGETABLE & FRUIT DRAWERS
Designed to store beverage containers.( 4 ) CAN RACK
stoRinG FooD in tHE FREEzER DRawER
Can be used to store meat and dry foods.Stored food should be placed in a container or wrapped securely using foil or other suitable wrapping materials.
Best used to store meats or dry foods. Stored food should be placed in a container or wrapped securely using aluminum foil or other suitable wrapping materials.
( 7 ) SUPER ExTENDED DRAWER
Can be used for small packages of frozen food.( 8 ) TILTING POCKET
( 9 ) FREEZER DRAWER BIN
If you plan to go away for a long time, empty the refrigerator and turn it off. Wipe the excess moisture from the inside of the appliance and leave the doors open.
Bottles should be stored tightly together so that they do not tip and fall out when the refrigerator door is opened.
The Samsung French Door Refrigerator has been designed to provide you with maximum space saving features and functions. Here are some of the customized compartments we have created to keep your food fresher longer. In order to further prevent odor from seeping into the ice compartment, stored food should be wrapped securely and as airtight as possible.
Designed to be crack-resistant, the shelves can be used to store all types of food and drinks. Circular marks on the glass surface are a normal phenomenon and can usually be wiped clean with a damp cloth.

Operating _33
02 oP
ER
atin
G
The Cool Select PantryPLUS is a full-width drawer with an adjustable temperature control. This pantry can be used for large party trays, deli items, pizzas, beverages or miscellaneous items.There is a temperature sensor which can adjust the amount ofcold air allowed into the pantry.The control is located on the right side of the pantry.
• Press the button you want. The Chilled mode(34°F), Fresh mode(38°F) and Deli mode(41°F) will be selected whenever you
press each button. Initially, the Fresh mode is set. Though the set temperature is different from the current temperature, the temperature will be changed to the set temperature automatically.• It can be changed Pantry temperature by amount of items, surround temperature, and frequency of
door opening.• It can be changed due to the grocery thermal loading in the pantry.
temperatureYou can select your pantry temperature from among Chilled mode(34°F), Fresh mode(38°F) and Deli mode(41°F) modes.
Fruits and vegetables may be damaged under the “Chilled” setting.Do not store lettuce or other leafy produce in this setting.
Do not store glass bottles in this pantry. If they are frozen, they can break and cause personal injury.Caution
selection Button1. When “Deli” is selected, the temperature of the pantry will be kept
around 41°F(5°C). This feature helps keep food fresh for a long time.
2. When “Fresh” is selected, the temperature of the pantry will be kept around 38°F(3°C). This feature helps keep food fresh for a longer time.
3. When “Chilled” is selected, the temperature of the pantry will be kept around 34°F(1°C). This feature also helps keep meat or fish fresh for a longer time.
Deli· pineapples· lemons· avocados· potatoes
Fresh· cucumbers· apples· oranges· grapes· zucchinis· corn
Chilled· steaks· hard cheeses· cold cuts· bacon· hot dogs
Operating your French Door RefrigeratorusinG tHE CooL sELECt PantRyPLus

34_ Operating
REMoVinG tHE REFRiGERatoR aCCEssoRiEs
2
1
2. tempered Glass shelves
To remove - Tilt up the front of the shelf in the direction shown ( 1 ) and lift it up vertically ( 2 ) . Pull the shelf out.
To relocate - Tilt the front of the shelf up and guide the shelf hooks into the slots at a desired height. Then lower the front of the shelf so that the hooks can drop into the slots.
Caution
The Tempered Glass shelves are heavy.Use special care when removing them.
1. Door Bins & Dairy Compartment
To remove - Simply lift the bin up and pull straight out. To relocate - Slide it in above the desired location and push
down until it stops.
Dust removal method -Remove the guard and wash with water.
Do not adjust a bin with full of foods.
Caution
Injury may occur if the door bins are not firmly assembled.Do not allow children to play with bins. Sharp corners of the binsmay cause injury.
3. Vegetable & Fruit Drawers
To remove - Pull the drawer out to full extension. Tilt up the front of the drawer and pull straight out.
To relocate - Insert the drawer into the frame rails and push back into place.
Caution
The drawers ( 2 ) need to be removed before the glass shelf ( 1 ) lifted out.Do not open the drawers while the pantry is open.It may cause a scratch or breakage to the drawer covers.
2
1

Operating _35
02 oP
ER
atin
G
To remove the divider - Pull the pantry completely out to full extension and raise the front side of the divider to unhook it from the rear wall of the pantry, then lift the divider out.
To relocate the divider - Hook the back of the divider over the rear wall of the pantry and push the divider down.
usinG tHE tiLtinG PoCKEtThe tilting pocket can be used to store small packages of frozen food.
The Refrigerator doors ensure that the doors close all the way and are securely sealed.
When the refrigerator door is only partially open, it will automatically close. But the door will stay open when opened more than the auto close range.
usinG tHE DooRs
Operating your French Door Refrigerator
4. Cool select Pantry PLus
To remove the pantry - Pull the pantry out to full extension. Tilt up the front side of pantry and pull straight out.
To relocate the pantry - Pull the rails out to full extension of refrigerator. Place the drawer onto the rails and slide the pantry back until it is in place.
36_ Operating
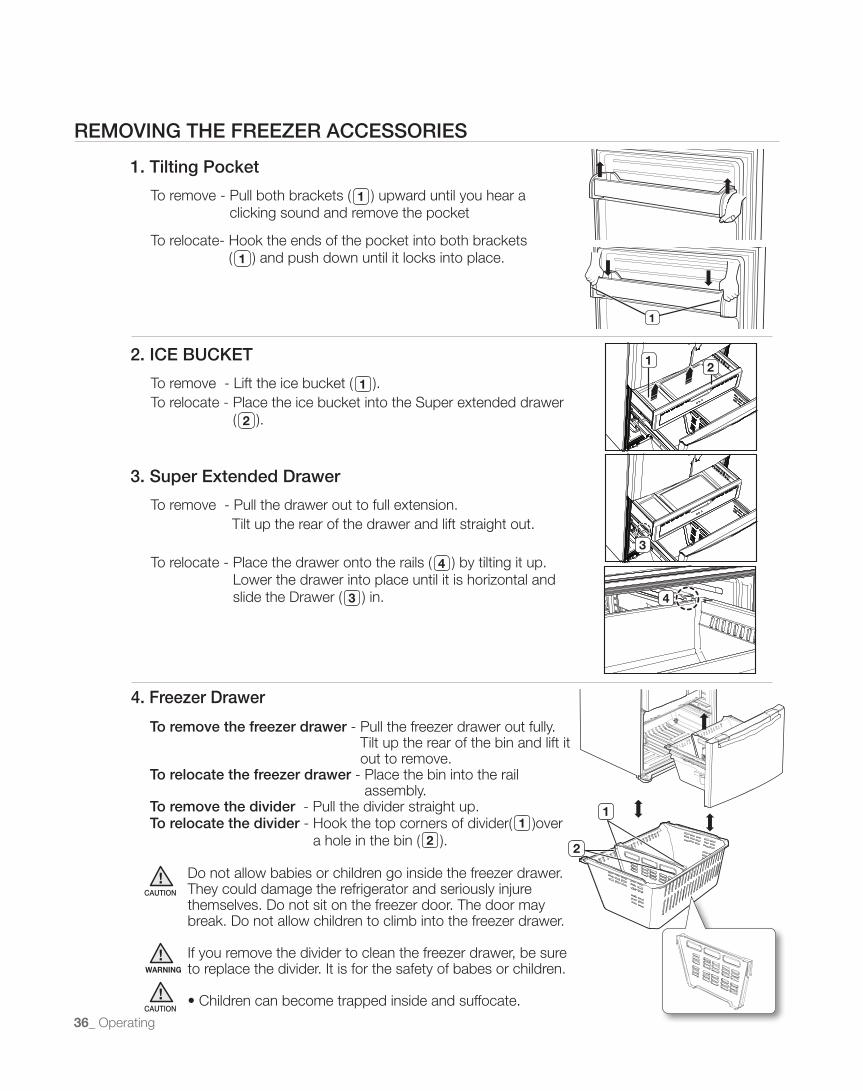
REMoVinG tHE FREEzER aCCEssoRiEs
1. tilting Pocket
To remove - Pull both brackets ( 1 ) upward until you hear a clicking sound and remove the pocket
To relocate- Hook the ends of the pocket into both brackets ( 1 ) and push down until it locks into place.
1
2. iCE BuCKEt
To remove - Lift the ice bucket ( 1 ). To relocate - Place the ice bucket into the Super extended drawer
( 2 ).
3. super Extended Drawer
To remove - Pull the drawer out to full extension. Tilt up the rear of the drawer and lift straight out.
To relocate - Place the drawer onto the rails ( 4 ) by tilting it up. Lower the drawer into place until it is horizontal and slide the Drawer ( 3 ) in.
3
4
1 2
2
1
4. Freezer Drawer
to remove the freezer drawer - Pull the freezer drawer out fully. Tilt up the rear of the bin and lift it out to remove.
to relocate the freezer drawer - Place the bin into the rail assembly.
to remove the divider - Pull the divider straight up.to relocate the divider - Hook the top corners of divider( 1 )over
a hole in the bin ( 2 ).
Do not allow babies or children go inside the freezer drawer. They could damage the refrigerator and seriously injure themselves. Do not sit on the freezer door. The door may break. Do not allow children to climb into the freezer drawer.
If you remove the divider to clean the freezer drawer, be sure to replace the divider. It is for the safety of babes or children.
• Children can become trapped inside and suffocate.
Caution
Caution
WARNING

Operating _37
02 oP
ER
atin
G
Operating your French Door RefrigeratorFooD stoRaGE tiPs
Foods Fridge Freezer storage tipsDAIRY PRODUCTS
Butter 2-3 Weeks 6-9 Months Wrap or cover tightly.
Milk 1-2 Weeks Not recommended Check date code. Most milk and similar products are sold in date-coded cartons that indicate a product’s peak freshness. Re-seal with cap or wrap tightly. Do not return unusedportions to original container.
Cream Cheese, cheese food, and cheese spread
2-4 Weeks Not recommended Check date code. Keep all cheese tightly packed in moisture proof wrap.
Hard Cheese(unopened) 3-4 Months 6 Months
Hard Cheese(opened) 2 Months Not recommended
Cottage Cheese 10-15 Days Not recommended
Cream 7-10 Days 2 Months Check date code. Most yogurt, creams, and similar products are sold in date-coded car-tons that indicate a product’s peak freshness. Re-seal or cover tightly. Do not return unused portions to original container.
Sour Cream 2 Weeks Not recommended
Cream Dips (opened) 1 week Not recommended
Yogurt 10-14 Days Not recommended Check date code. Keep covered.
Frozen Yogurt n/a 2 Months
EGGS
Eggs (uncooked) 3-4 Weeks Not recommended Check date code. Store eggs in coldest part of refrigerator and in their original container.
Eggs (cooked) 1 week Not recommended Store in covered container.
Leftover egg dishes 3-4 Days Not recommended Store in covered container.
FRESH FRUITS
Apples I Month Not recommended If storing in refrigerator, do not wash fruit be-fore storing. Store in moisture resistant bags or containers. Wrap cut fruits. Some fruits darken when refrigerated.
Bananas 2-4 Days Not recommended
Peaches, Melons, Pears,Avocados
3-5 Days Not recommended
Berries and Cherries 2-3 Days 12 Months
Apricots 3-5 Days Not recommended
Grapes 3-5 Days n/a
Pineapple (un-cut) 2-3 Days Not recommended
Pineapple (cut) 5-7 Days 6-12 Months
Citrus 1-2 Weeks Not recommended Store uncovered.
Juice 6 Days Not recommended Check date code and re-seal in original container. Don not return unused portions to original container.
Frozen Juice Thawing only 12 Months Check date code. Do not re-freeze.

38_ Operating
FooD stoRaGE tiPs
Foods Fridge Freezer storage tipsFISH AND SHELLFISH
Fish
Fatty Fish (mackerel, trout,salmon)
1-2 Days 2-3 Months Keep in original wrapper and store in coldest part of refrigerator. Package in vapor-proof and moisture proof wrap for freezer. Freeze at 0°F. Thaw in refrigerator or under cold running water.
Lean Fish (cod, flounder, etc)
1-2 Days 6 Months
Frozen or Breaded n/a 3 Months Check date code. Freeze in original packag-ing. Shellfish
Shrimp (uncooked) 1-2 Days 12 Months Freeze package in vapor and moisture-proof container.Crab 3-5 Days 10 Months
Cooked Fish or Shellfish
2-3 Days 3 Months
MEAT
Fresh, Uncooked
Chops 2-4 Days 6-12 Months Check date code for use. Store in coldest part of refrigerator in original packaging. Add more packaging in moisture-proof and vapor-proof container for freezing. Recommended refrig-erator temperature 33°F to 36°F and freezer temperature 0°F to 2°F.
Ground 1 day 3-4 months
Roast 2-4 Days 6-12 Months
Bacon 1-2 weeks 1-2 Months
Sausage 1-2 Days 1-2 Months
Steak 2-4 Days 6-9 Months
Poultry 1 day 12 Months
Lunch meat 3-5 Days 1 month
Cooked
Meat 2-3 Days 2-3 Months Check date code for use. Store in coldest part of refrigerator in original packaging. Package in moistureproof and vapor-proof container for freezing.
Poultry 2-3 Days 4-5 months
Ham 1-2 weeks 1-2 Months
sources :American Meat Institute Foundation. 1994. Yellow pages: answers to predictable questions consumers ask about meat and poultry.American Meat InstituteFood Marketing Institute. 1999. The food keeper. Food Marketing Institute, Washington, D.C.F reeland-Graves, J.H. and G.C. Peckham. 1996. Foundations of food preparation, 6th ed. Prentice-Hall, Inc. Englewood Cliffs, NJ.Hillers, V.N. 1993. Storing foods at home. Washington State University Cooperative Extension, Pullman, WA. Publ. EB 1205.National Restaurant Association. 2001. Be cool-chill out! Refrigerate promptly. National Restaurant Association EducationFoundation¼s International Food Safety Council, Washington, D.C.USDA. 1997. Basics for handling food safely. U.S. Department of Agriculture, Food Safety and Inspection Service, Washington, D.C.

Operating _39
02 oP
ER
atin
G
Cleaning the interiorClean the inside walls and accessories with a mild detergent and then wipe dry with a soft cloth. You can remove the drawers and shelves for a more thorough cleaning. Just make sure to dry drawers and shelves before putting them back into place.
Cleaning the ExteriorWipe the control panel and digital display with a damp, clean, soft cloth. Do not spray water directly on the surface of the refrigerator.The doors, handles and cabinet surfaces should be cleaned with a mild detergent and then wiped dry with a soft cloth. To keep your appliance looking its best, polish the exterior once or twice a year.
Do not spray water directly or not use a wet or damp cloth.
Do not use benzene, thinner, or Clorox for cleaning. They may damage the surface of the appliance and may cause a fire.
Printed letters on the display may be erased if the stainless cleaner is applied directly to the area where the letters are printed.
Cleaning the Ice / Water DispenserPush down one end of the tray dispenser and remove it. Wipe the Ice / Water Dispenser with a clean and soft cloth.
When using the crushed ice selection from the dispenser some residual ice chips may start to collect in the ice chute. In order to prevent that residual ice from melting and running out of the chute you should clean out the residual ice when you see it start to collect in the ice chute.
caution
caution
caution
caution
Operating your French Door RefrigeratorCLEaninG tHE REFRiGERatoRCaring for your Samsung French Door Refrigerator prolongs the life of your appliance and helps keep the refrigerator free of odor and germs.

40_ Operating
Operating your French Door Refrigerator
Cleaning the Rubber door sealsIf the rubber door seals are dirty, the doors may not close properly, and the refrigerator will not operate efficiently. Keep the door seals free of dust or stain by cleaning the doors with a mild detergent and damp cloth. Wipe dry with a clean, soft cloth.
Do not clean the refrigerator with benzene, thinner, or car detergent due to risk of fire.
Cleaning the rear side of the refrigeratorTo keep cords and exposed parts free of dust and dirt accumulation.Vacuum the rear side of the appliance once or twice a year.
Do not remove the back cover( 1 ). You could suffer an electric shock.
REPLaCinG tHE intERioR LiGHt
For LED lamp, please contact service engineer to replace it.
1
caution
caution
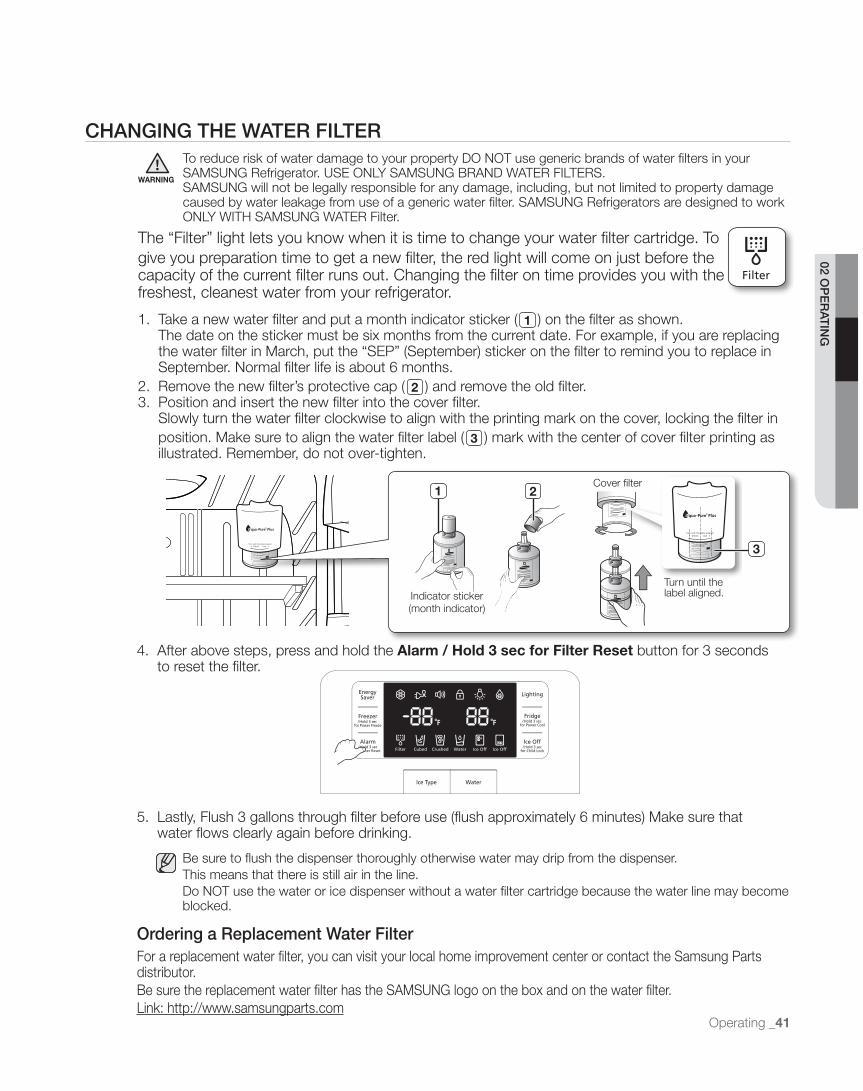
Operating _41
02 oP
ER
atin
G
ordering a Replacement water FilterFor a replacement water filter, you can visit your local home improvement center or contact the Samsung Parts distributor.Be sure the replacement water filter has the SAMSUNG logo on the box and on the water filter.Link: http://www.samsungparts.com
5. Lastly, Flush 3 gallons through filter before use (flush approximately 6 minutes) Make sure that water flows clearly again before drinking.
Be sure to flush the dispenser thoroughly otherwise water may drip from the dispenser.This means that there is still air in the line.Do NOT use the water or ice dispenser without a water filter cartridge because the water line may become blocked.
4. After above steps, press and hold the Alarm/Hold3secforFilterReset button for 3 seconds to reset the filter.
CHanGinG tHE watER FiLtER To reduce risk of water damage to your property DO NOT use generic brands of water filters in your
SAMSUNG Refrigerator. USE ONLY SAMSUNG BRAND WATER FILTERS. SAMSUNG will not be legally responsible for any damage, including, but not limited to property damage caused by water leakage from use of a generic water filter. SAMSUNG Refrigerators are designed to work ONLY WITH SAMSUNG WATER Filter.
The “Filter” light lets you know when it is time to change your water filter cartridge. To give you preparation time to get a new filter, the red light will come on just before the capacity of the current filter runs out. Changing the filter on time provides you with the freshest, cleanest water from your refrigerator.
1. Take a new water filter and put a month indicator sticker ( 1 ) on the filter as shown. The date on the sticker must be six months from the current date. For example, if you are replacing
the water filter in March, put the “SEP” (September) sticker on the filter to remind you to replace in September. Normal filter life is about 6 months.
2. Remove the new filter’s protective cap ( 2 ) and remove the old filter.3. Position and insert the new filter into the cover filter. Slowly turn the water filter clockwise to align with the printing mark on the cover, locking the filter in
position. Make sure to align the water filter label ( 3 ) mark with the center of cover filter printing as illustrated. Remember, do not over-tighten.
Turn until the label aligned.
Cover filter
Indicator sticker(month indicator)
1 2
3
WARNING

42_ Troubleshooting
PRoBLEM soLution
The refrigerator does not work at all or it does not chill sufficiently.
• Check that the power plug is properly connected.• Check the set temperature on the digital display is warmer than the freezer or fridge
inner temperature.• Set the refrigerator colder.• Is the refrigerator in direct sunlight or located near a heat source?• Is the back of the Refrigerator too close to the wall and therefore keeping air from
circulating?
The food in thefridge is frozen.
• Check to see if the set temperature on the digital display is too low.• Try setting it to a warmer temperature.• Is the temperature in the room too low? Set the refrigerator warmer.• Did you store the food which soft in the coldest part of the refrigerator?• Try moving those items on the other shelves in fridge instead of keeping them in the
Cool Select PantryPLUS.
You hear unusual noise or sounds.
• Check that the refrigerator is level and stable.• Is the back of the refrigerator too close to the wall and therefore keeping air from
circulating?• Try locating the refrigerator at least 2 inches from the wall.• Was anything dropped behind or under the refrigerator?• A “ticking” sound is heard from inside the refrigerator. It is normal and occurs because
various accessories are contracting or expanding according to the temperature of the refrigerator interior.
The cabinet-door sealing area of the appliance is hot and condensation is occurring.
• Some heat is normal as anti-condensators are installed in the vertical hinged section of the refrigerator to prevent condensation.
• Is the refrigerator door ajar? Condensation can occur when you leave the door open for a long time.
• If a sound that hit something is heard from inside the refrigerator, It is normal. The sound comes due to ice cubes rubbing in the bucket periodically.
Ice Maker is not producing ice. • Did you wait for 12 hours after installation of the water supply line before making ice?• Is the water line connected and the shut-off valve opened?• Did you manually stop the ice making function?• Is the freezer temperature too warm? Try setting the freezer temperature lower.
You can hear water bubbling in the refrigerator.
• This is normal. The bubbling comes from refrigerant circulating through the refrigerator.
There is a bad smell in the refrigerator.
• Check for spoiled food.• Foods with strong odors(for example, fish) should be tightly covered.• Clean out your freezer periodically and throw away any spoiled food.
Frost forms on the walls of the freezer.
• Is the air vent blocked? Remove any obstructions so air can circulate freely.• Allow sufficient space between the foods stored for efficient air circulation.• Is the freezer drawer closed properly?
Water dispenser is not functioning.
• Is the water line connected and the shut-off valve opened?• Has the water supply line tubing been crushed or kinked?• Make sure the tubing is free and clear of any obstruction.• Is the water tank frozen because the fridge temperature is too low? Try selecting a warmer setting on the Digital display.
Auto close system does notwork with the freezer door.
• Is there an imbalance between the right and left parts of the door?
Troubleshooting

Water Filter Chart _43
Warranty
03 wa
RR
an
ty
watER FiLtER CHaRt
PerformanceDataSheetForSamsungModelDA97-06317AUsingReplacementCartridgeDA29-00003G
This system has been tested according to NSF/ANSI Standards 42 and 53 for the reduction of the substances listedbelow. The concentration of the indicated substances in water entering the system was reduced to a concentration lessthan or equal to the permissible limit for water leaving the system, as specified in NSF/ANSI 42 and 53.
To a capacity of 300 gallons (1,136 liters).
Note that while the testing was performed under standard laboratory conditions, actual performance may vary.
System tested and specified by NSF International against NSF/ANSI Standard 42 for the reduction of Chlorine Taste and Odor, Particulate Class I, and against NSF/ANSI Standard 53 for the reduction of Cysts, Turbidity, Lead, Asbestos, Benzene, Carbofuran, p-Dichlorobenzene and Mercury.
*BasedontheuseofCryptosporidiumparvumoocysts
ContaminantReduction
averageInfluent
Concentration
NSF SpecifiedInfluent
ChallengeConcentration
units apply to each row
average%
Reduction
averageProduct water
Concentration
Max. Permissible
Product water
Concentration
nsFReduction
Requirements
nsFtest
Chlorine taste and odor
2.1 mg/L 2.0 mg/L ± 10% 97.6 0.05 mg/L NA > 50% J-00029741
ParticulateClass I Particle size: < 0.5 to < 1 um
10,566,666pt/mL
At least 10,000particles/mL
98.4 171,833 pts/mL NA > 85% J-00029739
Cysts* 127,500 cysts/LMinimum 50,000
cysts/L99.99 <1 cyst/L NA > 99.95% J-00031000
Turbidity 10.5 11±1 NTU 98.6 0.15 NTU 0.5 NTU > 0.5 NTU J-00033223
Lead @ pH 6.5 153 ug/L 0.15±10% 99.3 <1ug/L 0.010 mg/L 10 ug/L J-00039590
Lead @ pH 8.5 155 ug/L 0.15±10% >99.4 <1ug/L 0.010 mg/L 10 ug/L J-00039591
Mercury @ pH 6.5 5.97 ug/L 0.006±10% 96.6 <0.2 ug/L 0.002 mg/L 2 ug/L J-00039589
Mercury @ pH 8.5 6.29 ug/L 0.006±10% 88.9 0.7 ug/L 0.002 mg/L 2 ug/L J-00039586
Asbestos 140 MFL107 to 108 fibers
> um in length> 99 <0.17 MFL NA 99% J-00029743
Benzene 13.88 ug/L 0.015±10% 96.4 <0.5 ug/L 0.005 mg/L < 5 ug/L J-0029751
Carbofuran 79.6 ug/L 0.190 mg/L 98.7 1 ug/L 0.001 mg/L < 40 ug/L J-00029750
p-Dichlorobenzene 237.5 ug/L 0.225±10% 99.8 0.525 ug/L 0.075 mg/L < 75 ug/L J-00029749
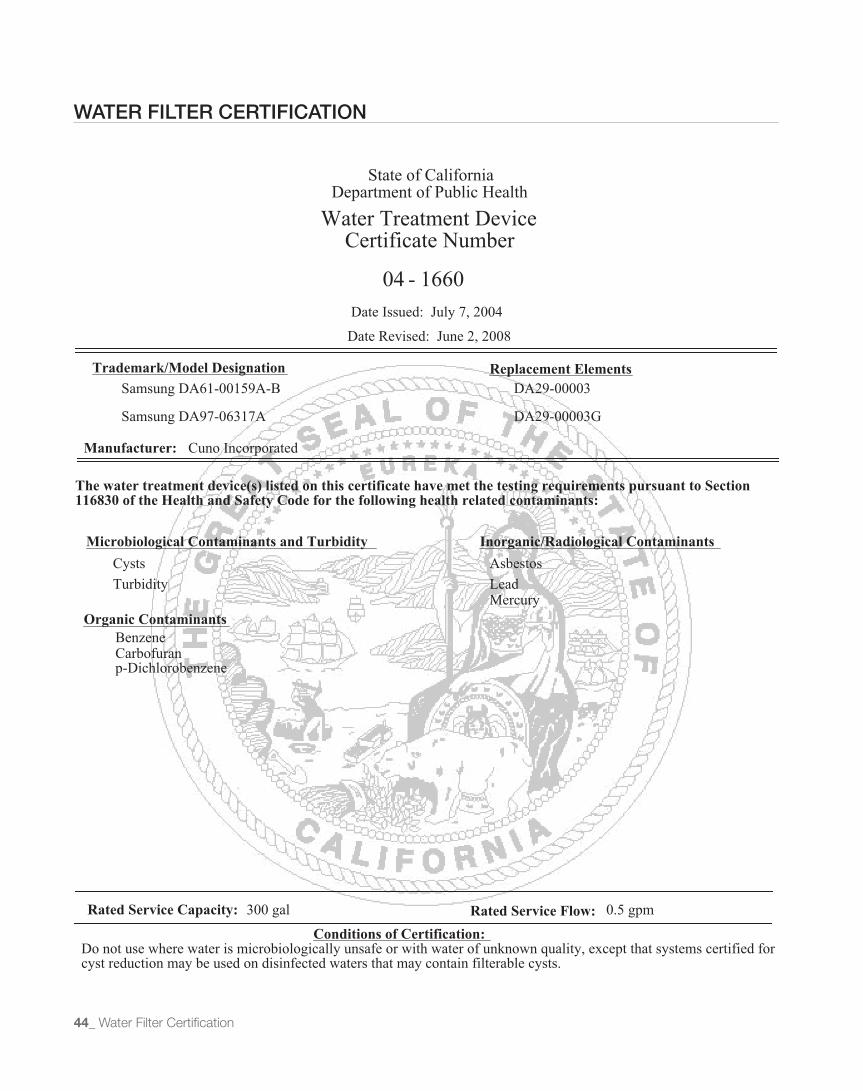
44_ Water Filter Certification
watER FiLtER CERtiFiCation

Warranty _45
WarrantywaRRanty on saMsunG REFRiGERatoR
LIMITED WARRANTY TO ORIGINAL PURCHASERThis Samsung brand product, as supplied and distributed by Samsung Electronics America, Inc. (Samsung) and delivered new, in the original carton to the original consumer purchaser, is warranted by Samsung against manufacturing defects in materials and workmanship for a limited warranty period of:
one (1) year Parts and Labor on RefrigeratorFive (5) years Parts and Labor on sealed Refrigeration system only*(*Compressor, evaporator, condenser, drier, connecting tubing)
This limited warranty begins on the original date of purchase, and is valid only on products purchased and used in the United States. To receive warranty service, the purchaser must contact Samsung for problem determination and service procedures. Warranty service can only be performed by a Samsung authorized service center. The original dated bill of sale must be presented upon request as proof of purchase to Samsung or Samsung authorized service center.
Samsung will repair or replace any part found to be defective, at our option and at no charge as stipulatedx herein, with new or reconditioned parts during the limited warranty period specified above. All replaced parts and products become the property of Samsung and must be returned to Samsung. Replacement parts and products assume the remaining original warranty, or ninety (90) days, whichever is longer.
In-home service will be provided during the warranty labor period subject to availability within the contiguous United States. In-home service is not available in all areas. To receive in-home service, the product must be unobstructed and accessible from floor level to service personnel. If during in-home service repair cannot be completed, it may be necessary to remove, repair and return the product. If in-home service is unavailable, Samsung may elect, at our option, to provide for transportation of our choice to and from a Samsung authorized service center. Otherwise, transportation to and from the Samsung authorized service center is the responsibility of the purchaser.
This limited warranty covers manufacturing defects in materials and workmanship encountered in normal, noncommercial use of this product, and shall not apply to the following, including, but not limited to: damage which occurs in shipment; delivery and installation; applications and uses for which this product was not intended; altered product or serial numbers; cosmetic damage or exterior finish; accidents, abuse, neglect, fire, water, lightning or other acts of nature; use of products, equipment, systems, utilities, services, parts, supplies, accessories, applications, installations, repairs, external plumbing and leaks, external wiring, circuit breakers, fuses or connectors not supplied and authorized by Samsung, or which damage this product or result in service problems; incorrect electrical line voltage, fluctuations and surges; customer adjustments and failure to follow operating instructions, cleaning, maintenance and environmental instructions that are covered and prescribed in the instruction book; loss of food due to spoilage; consumable items including filters and light.
03 wa
RR
an
ty

46_ Warranty
THERE ARE NO ExPRESS WARRANTIES OTHER THAN THOSE LISTED AND DESCRIBED ABOVE, AND NO WARRANTIES WHETHER ExPRESS OR IMPLIED, INCLUDING, BUT NOT LIMITED TO, ANY IMPLIED WARRANTIES OF MERCHANTABILITY OR FITNESS FOR A PARTICULAR PURPOSE, SHALL APPLY AFTER THE ExPRESS WARRANTY PERIODS STATED ABOVE, AND NO OTHER ExPRESS WARRANTY OR GUARANTY GIVEN BY ANY PERSON, FIRM OR CORPORATION WITH RESPECT TO THIS PRODUCT SHALL BE BINDING ON SAMSUNG. SAMSUNG SHALL NOT BE LIABLE FOR LOSS OF REVENUE OR PROFITS, FAILURE TO REALIZE SAVINGS OR OTHER BENEFITS, OR ANY OTHER SPECIAL, INCIDENTAL OR CONSEQUENTIAL DAMAGES CAUSED BY THE USE, MISUSE OR INABILITY TO USE THIS PRODUCT, REGARDLESS OF THE LEGAL THEORY ON WHICH THE CLAIM IS BASED, AND EVEN IF SAMSUNG HAS BEEN ADVISED OF THE POSSIBILITY OF SUCH DAMAGES. NOR SHALL RECOVERY OF ANY KIND AGAINST SAMSUNG BE GREATER IN AMOUNT THAN THE PURCHASE PRICE OF THE PRODUCT SOLD BY SAMSUNG AND CAUSING THE ALLEGED DAMAGE. WITHOUT LIMITING THE FOREGOING, PURCHASER ASSUMES ALL RISK AND LIABILITY FOR LOSS, DAMAGE OR INJURY TO PURCHASER AND PURCHASER’S PROPERTY AND TO OTHERS AND THEIR PROPERTY ARISING OUT OF THE USE, MISUSE OR INABILITY TO USE THIS PRODUCT SOLD BY SAMSUNG NOT CAUSED DIRECTLY BY THE NEGLIGENCE OF SAMSUNG. THIS LIMITED WARRANTY SHALL NOT ExTEND TO ANYONE OTHER THAN THE ORIGINAL PURCHASER OF THIS PRODUCT, IS NONTRANSFERABLE AND STATES YOUR ExCLUSIVE REMEDY.
Some states do not allow limitations on how long an implied warranty lasts, or the exclusion or limitation ofincidental or consequential damages, so the above limitations or exclusions may not apply to you. This warrantygives you specific legal rights, and you may also have other rights, which vary from state to state.To obtain warranty service, please contact Samsung at:
saMsunG CustoMER CaRE CEntERSamsung Electronics America, Inc. 85 Challenger Road Ridgefield Park, NJ 076601-800-SAMSUNG (1-800-726-7864) and www.samsung.com

Memo

Memo

Memo

QUESTIONS OR COMMENTS?
COUNTRY CALL ORVISITUSONLINEAT WRITE
U.S800-SAMSUNG(800-726-7864)
www.samsung.comSamsung Electronics America, Inc. 85 Challenger
Road Ridgefield Park, NJ 07660
CANADA800-SAMSUNG(800-726-7864)
www.samsung.com/caSamsung Electronics Canada Inc. Customer
Service, 55 Standish Court Mississauga, OntarioL5R 4B2 Canada
In an effort to promote recycling this user manual is printed on recycled paper.