sample video docs use me for new changes - lynda.com · lynda.com confidential recording sample...
TRANSCRIPT

l y n d a . c o m c o n f i d e n t i a l R e c o r d i n g S a m p l e V i d e o s f o r l y n d a . c o m
1
The lynda.com Guide to Recording Sample Videos
Part of the process of becoming a lynda.com author is to create a sample movie. The purpose of the sample movie is to help us determine if your teaching and presentation style is a fit for lynda.com. If you’ve already done video tutorials, we’d love to see them, but it’s also important that we receive a custom sample movie based on the guidelines here. We’ve found this is the best way for you to start becoming accustomed to the recording process and for us to gauge how your approach meshes with ours.
Depending on the subject you teach and the course ideas we’re discussing, we may ask you to record two sample movies. Or you may simply want to in order to give us a better look at your teaching approach. Your Content Manager will talk with you about how many sample movies you should record.
In the following pages you will find step-by-step instructions for setting up your Mac (go to page 12) or Windows (go to page 4) machine for sample movie recording. Please see the end of the document for example sample movies.
Planning your topic
Choose a specific task that you can teach effectively within about five min-utes. It’s important to pick a task rather than a concept. For example, “Con-verting a color photo to black and white” makes a better sample movie than “Understanding JPEG compression.”
Choose a topic in which you are proficient and that you are passionate about. If you enjoy the topic you’re talking about, it will come through in the video. Teach viewers how to do something that they may not know how to do. Avoid samples based on simple subjects, such as how to save a file.
Your Content Manager is happy to discuss the topic with you before you re-cord. If you don’t have a specific course under consideration, we can work with you to determine a proper topic based on your experience.

l y n d a . c o m c o n f i d e n t i a l R e c o r d i n g S a m p l e V i d e o s f o r l y n d a . c o m
2
Editorial guidelines
• Choose a short- to medium-length topic so that you can focus on quality, not quantity. The ideal video is between three to five minutes long. If you find yourself going beyond about six minutes, you may want to re-focus your topic.
• Tell us what you are going to teach, then teach us, and finally tell us what you taught. Briefly introduce the task the tutorial covers and explain the real-world relevance of the task you’re teaching. Then teach the task. Then give a short conclusion. This gives context to viewers and then rein-forces the context at the end.
For example: “Chances are you always shoot your photos in color. But some subjects look better in black and white. PhotoWhiz gives you two different ways to perform the conversion, and each method has its advan-tages. (Here’s where you show us the methods.) So, when you want to give your photos a retro look, use the Add Retro Look command. And when you want to give a photo a rich, black-and-white tonal range, use the Ansel Adams Effect.”
• Teach your video as if you are speaking to someone who’s a complete novice at this task. At the same time, avoid patronizing or subjective lan-guage such as “It might seem hard, but it’s actually pretty easy.” Speak in plain, clear terms. Define complex or unfamiliar terms the first time you use them.
• Teach with a specific goal in mind. Define what you want someone to be able to do after watching this movie, then design the movie to achieve that goal.
• When possible, show us the final product at the beginning. A great way to make a task-oriented movie more engaging is to show us the end result before showing us how to perform the task. For example, “I’m going to show you some retouching techniques, and when we’re done, we’ll have a photo that looks like this instead of like this.” Or, “We’re going to add some motion and lighting effects to text to create this animated 3D title.” This approach is a bit like a cookbook that contains a beautiful photo of the finished dish: it gives viewers the incentive to want to try the recipe.
• When possible, address the larger concepts surrounding the specific task. For example, if you’re teaching viewers how to crop in Photoshop, it isn’t enough to teach them about Crop tool—be sure to tell them why they should crop and to what end. When you make an assertion of any kind in your movie – when you tell someone to use a certain tool or to do some-thing in a certain way -- imagine your viewer asking “why?” and narrate your movie in a way that briefly answers that question. This will help the viewer apply the techniques learned to their project instead of only learn-

l y n d a . c o m c o n f i d e n t i a l R e c o r d i n g S a m p l e V i d e o s f o r l y n d a . c o m
3
ing how to follow along with your project.
• Outline your video before you start recording. Many authors find it helpful to script the first and last sentences, and then outline the rest of the video. Practice delivering your video before you record to find any pitfalls.
• Try to be good, but don’t worry about being perfect. We’re looking for a practiced but unedited video. Every title in the lynda.com Online Training library has been edited and tested before publication. Every author says “um” and “uh” and stumbles over words sometimes. If you stumble once or twice in your sample video and recover smoothly, it’s sometimes better than if you never stumbled at all—it lets us assess how quickly you re-cover when the tape is rolling, as it were. If you feel you can do better, just record a second take.
• Have fun and show your personality! Our viewers like the human element our authors bring—they like to know who you are. Letting your passion come through in the video helps to engage the viewer. At the same time, endeavor to stay focused on the task at hand. We frequently get viewer feedback exhorting us to be sure to use their time well and stay on topic.
l y n d a . c o m c o n f i d e n t i a l R e c o r d i n g S a m p l e V i d e o s f o r l y n d a . c o m
4
Recording on Windows
This document walks you through the process of setting up for and recording sample videos for lynda.com, including:
• Setting up a microphone
• Downloading and installing Camtasia and QuickTime
• Configuring the audio and video settings in Camtasia
• Recording a test video and submitting it to lynda.com for review
Alternatively, you may view Windows recording set up and instructions in video format by going here:
http://milton.lynda.com:8020/SuperContainer/RawData/PAuth/1598/SampleVid/507
This sect ion appl ies to Windows users only . I f you are recording on a Mac, p lease refer to the “Recording on a Mac” sect ion.
Setting up an external Microphone (if you do not have a built in mic in your computer)
In order to record a sample video, you must have a microphone. However, during the sample video recording process, we are
assessing the teaching quality, not the audio quality. Any microphone will do (including the built-‐in mic on your computer if you
have one). If you want to purchase a microphone, we recommend a Plantronics USB headset
(http://accessories.us.dell.com/sna/productdetail.aspx?sku=A1375275&cs=04&c=us&l=en&dgc=SS&cid=27722&lid=628335#Ov
erview). If you have questions or problems setting up your mic, please contact the Content Manager who is working with you
on your proposal for assistance.
To set up your external microphone:
1) Plug in the USB mic into one of the USB ports on your computer.
2) Put your headset on and position the microphone slightly below your mouth.
Make sure you position the mic so it’s not in your direct airway. This will help decrease the “plosive” sound on hard consonants
(particularly those poppy P’s).
Downloading and Installing Camtasia and QuickTime
At lynda.com, we use Camtasia for Windows to record the video, audio, and microphone tracks for our video training courses. A
demo version of Camtasia Studio can be downloaded from http://www.techsmith.com. This is a fully functional trial that’s valid
for 30 days.
You’ll also need QuickTime version 7.2 or higher in order to properly compress your sample video for submission to lynda.com.
If you have a version prior to 7.2, visit http://www.apple.com/quicktime/download to download and install the latest version.
Setting Up Camtasia for Recording Video
Now that you’ve successfully installed Camtasia, you’ll need to spend a few minutes setting up Camtasia.
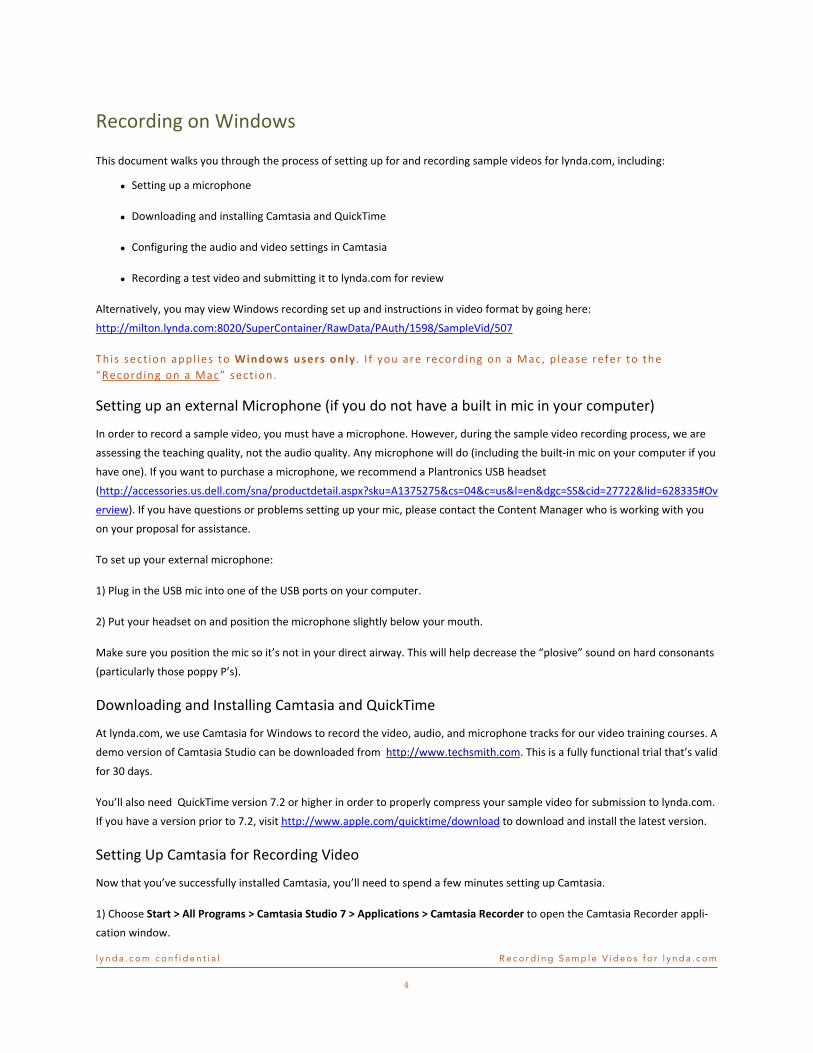
1) Choose Start > All Programs > Camtasia Studio 7 > Applications > Camtasia Recorder to open the Camtasia Recorder appli-‐
cation window.

l y n d a . c o m c o n f i d e n t i a l R e c o r d i n g S a m p l e V i d e o s f o r l y n d a . c o m
5
The Camtasia Recorder window should look as it appears here. Choose Full screen, Webcam off, and Audio on.
2) Choose Tools > Options to open the Tools Options dialog box.
3) In the Tools Options dialog box, click the General tab. In the Saving area, choose Record to .avi. In the Capture area, make
sure the following options are checked:
• Capture layered windows
• Disable screensaver during capture
4) Click the File options button to open the File Options dialog box. Check Ask for file name and click OK.
l y n d a . c o m c o n f i d e n t i a l R e c o r d i n g S a m p l e V i d e o s f o r l y n d a . c o m
6
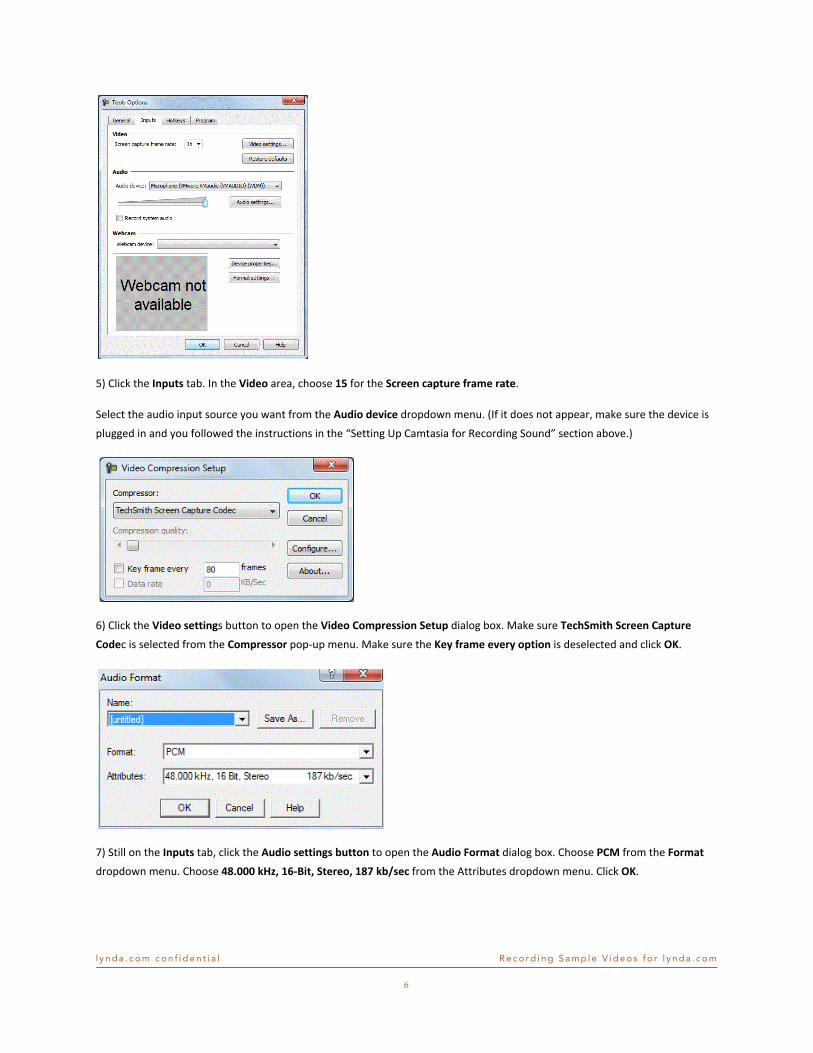
5) Click the Inputs tab. In the Video area, choose 15 for the Screen capture frame rate.
Select the audio input source you want from the Audio device dropdown menu. (If it does not appear, make sure the device is
plugged in and you followed the instructions in the “Setting Up Camtasia for Recording Sound” section above.)
6) Click the Video settings button to open the Video Compression Setup dialog box. Make sure TechSmith Screen Capture
Codec is selected from the Compressor pop-‐up menu. Make sure the Key frame every option is deselected and click OK.
7) Still on the Inputs tab, click the Audio settings button to open the Audio Format dialog box. Choose PCM from the Format
dropdown menu. Choose 48.000 kHz, 16-‐Bit, Stereo, 187 kb/sec from the Attributes dropdown menu. Click OK.

l y n d a . c o m c o n f i d e n t i a l R e c o r d i n g S a m p l e V i d e o s f o r l y n d a . c o m
7
8) In the Tool Options dialog box, choose the Hotkeys tab.
• Click Record/Pause and make sure CTRL, SHIFT, and ALT are unchecked. Choose F9 from the dropdown menu.
• Click Stop make sure CTRL, SHIFT, and ALT are unchecked. Choose F10 from the dropdown menu.
If these hotkeys are reserved for the software you are using in the course, choose any other hotkey of your choosing.
9) Choose the Program tab. Make sure the options are set as shown in the illustration above. Make sure to choose Produce
from the Do this with my recording dropdown menu and Minimize recorder: If recorder will be recorded.
10) Click OK to close the Tool Options dialog box and to return to the main Camtasia Recorder window.

l y n d a . c o m c o n f i d e n t i a l R e c o r d i n g S a m p l e V i d e o s f o r l y n d a . c o m
8
With Camtasia successfully setup, you’re ready to record. You’ll learn how to record in the next section.
Recording with Camtasia Now that you’ve got all the settings and preferences set in Camtasia, you can begin recording.
1) Press F9 to begin recording. A countdown will begin letting you know you’re about to record. Before you begin speaking or
performing any actions on screen, pause for a minimum of 3 seconds after the countdown.
Leaving a minimum of 3 seconds ensures nothing gets cut off and sounds are not clipped at the beginning of the video.
2) Speak into the microphone using your normal speaking voice and perform a few test actions on screen. We recommend re-‐
cording a test movie to review sound levels, making sure to interact with the program and play any media you will use in the
training.
3) When you are finished recording the video, pause for 3 seconds and press F10 to stop recording. Camtasia will automatically
prompt you to save the file.
l y n d a . c o m c o n f i d e n t i a l R e c o r d i n g S a m p l e V i d e o s f o r l y n d a . c o m
9
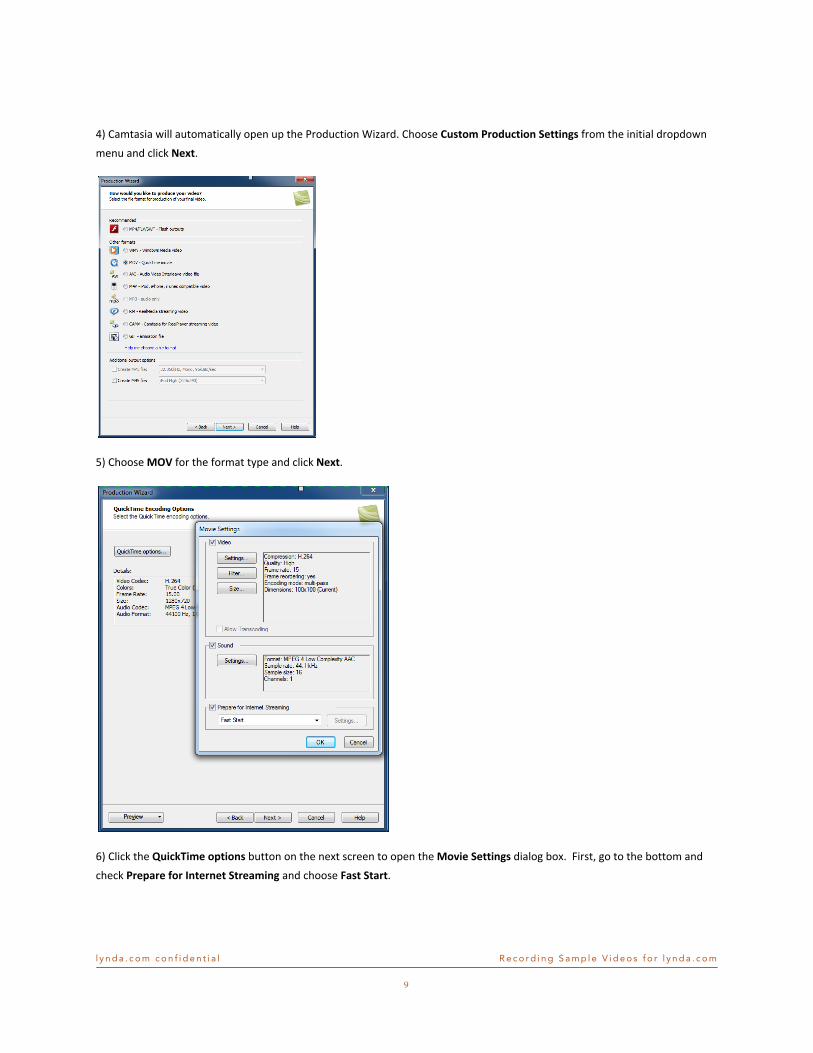
4) Camtasia will automatically open up the Production Wizard. Choose Custom Production Settings from the initial dropdown
menu and click Next.
5) Choose MOV for the format type and click Next.
6) Click the QuickTime options button on the next screen to open the Movie Settings dialog box. First, go to the bottom and
check Prepare for Internet Streaming and choose Fast Start.
l y n d a . c o m c o n f i d e n t i a l R e c o r d i n g S a m p l e V i d e o s f o r l y n d a . c o m
1 0
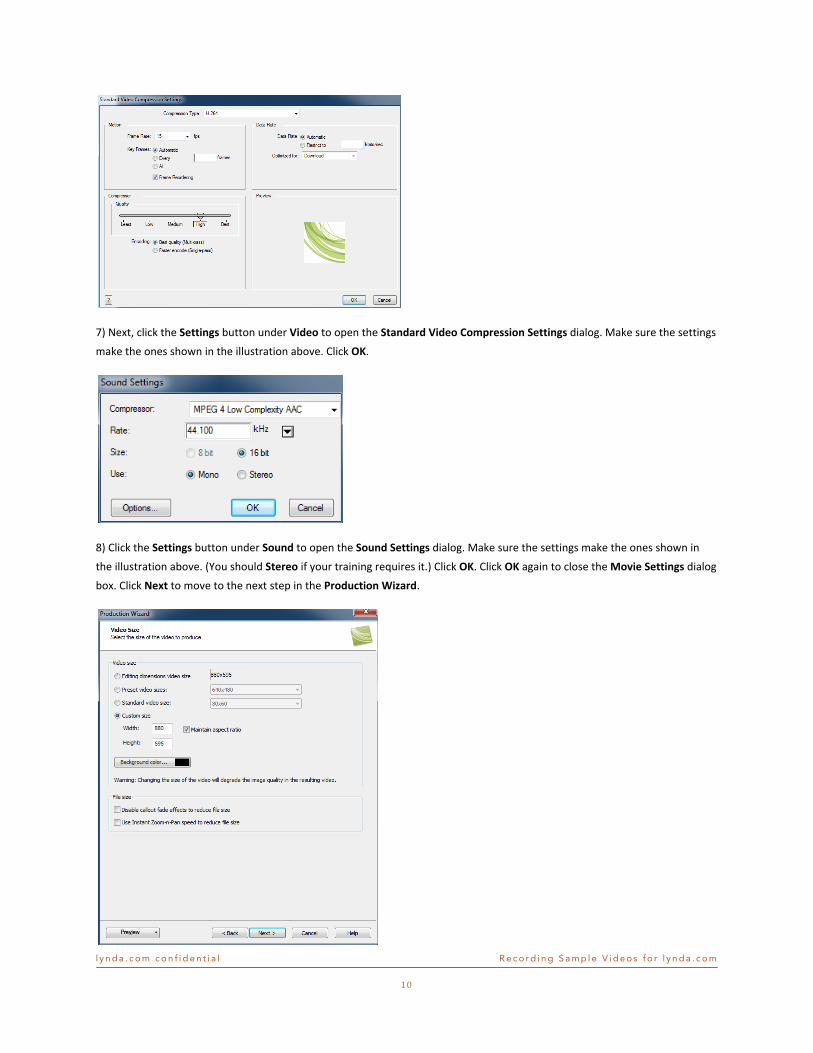
7) Next, click the Settings button under Video to open the Standard Video Compression Settings dialog. Make sure the settings
make the ones shown in the illustration above. Click OK.
8) Click the Settings button under Sound to open the Sound Settings dialog. Make sure the settings make the ones shown in
the illustration above. (You should Stereo if your training requires it.) Click OK. Click OK again to close the Movie Settings dialog
box. Click Next to move to the next step in the Production Wizard.

l y n d a . c o m c o n f i d e n t i a l R e c o r d i n g S a m p l e V i d e o s f o r l y n d a . c o m
1 1
9) Check Custom Size for the video size and enter the dimensions of your monitor to make sure Camtasia compresses the video
at full-‐screen. If the width is greater than 1280 pixels, enter 1280 and the height should automatically adjust. Click Next.
10) Uncheck all the boxes on the Video Options screen. Click Next and click Next again, skipping the Marker Options screen.
11) Name your video, select a place to save it, check Play video after production, and click Finish. Camtasia will automatically
open the movie in QuickTime. Review your work and then send it to lynda.com using the FTP instruction below.

l y n d a . c o m c o n f i d e n t i a l R e c o r d i n g S a m p l e V i d e o s f o r l y n d a . c o m
1 2
Uploading Sample Videos for Review
If you do not already have a browser based upload URL, please contact your Content Manager to get one.
Getting Help and More Information
If you have any trouble during the recording process, please contact the Content Manager who is working with you on your
proposal. If you are unable to reach your lynda.com contact please try one of the contacts listed below.
Auriga Martin Content Team Coordinator
805.624.5781
Max Smith Manager of Training Production [email protected]
805.477.3900 x106

l y n d a . c o m c o n f i d e n t i a l R e c o r d i n g S a m p l e V i d e o s f o r l y n d a . c o m
1 3
Recording on a Mac This document walks you through the process of setting up for and recording sample videos for lynda.com, including:
• Setting up a microphone
• Downloading and installing Snapz Pro and QuickTime
• Configuring the audio and video settings in Snapz Pro
• Recording a test video and submitting it to lynda.com for review
Alternatively, you may view Macintosh recording set up and instructions in video format by going here:
http://milton.lynda.com:8020/SuperContainer/RawData/PAuth/1598/SampleVid/508
This sect ion appl ies to Mac users only . I f you are recording on a Mac, p lease refer to the “Recording on Windows” sect ion.
Setting up an external Microphone (if you do not have a built in mic in your computer)
In order to record a sample video, you must have a microphone. However, during the sample video recording process, we are
assessing the teaching quality, not the audio quality. Any microphone will do (including the built-‐in mic on your computer if you
have one). If you want to purchase a microphone, we recommend a Plantronics USB headset
(http://accessories.us.dell.com/sna/productdetail.aspx?sku=A1375275&cs=04&c=us&l=en&dgc=SS&cid=27722&lid=628335#Ov
erview). If you have questions or problems setting up your mic, please contact the Content Manager who is working with you
on your proposal for assistance.
To set up your microphone:
1) Plug in the USB mic into one of the USB ports on your computer.
2) Put your headset on and position the microphone slightly below your mouth.
Make sure you position the mic so it’s not in your direct airway. This will help decrease the “plosive” sound on hard consonants
(particularly those poppy P’s).
3) Open the Mac OS X System Preferences dialog box. Click Sound.

l y n d a . c o m c o n f i d e n t i a l R e c o r d i n g S a m p l e V i d e o s f o r l y n d a . c o m
1 4
4) In the Sound dialog box, click Output. In the Choose a device for sound output section, choose Plantronics Headset.
5) Play a music file and adjust the Output volume slider so the sound from your computer is at a comfortable volume.
Setting the Output volume does not affect the recording but ensures it won’t be too loud or too soft for your comfort during
the recording.
6) In the Sound dialog box, click Input. In the Choose a device for sound input, choose Plantronics Headset. Adjust the Input
volume slider to about midway and talk into the microphone. Watch the Input level bars as you speak.
When you speak in your normal speaking voice, make sure the Input level bars are about 3/4 of the way. If the Input level bars
are going beyond 3/4, try adjusting the microphone further away from your mouth. If the Input level bars are too low, position
the microphone closer to your mouth. If repositioning the microphone does not increase the levels, increase the Input volume
slider one notch to the right and speak again. Make sure the bars do not reach the right side of the Input level bars. Otherwise
the audio will clip and your voice will sound distorted, which may require re-‐recording.
7) Close the Mac OS X System Preferences dialog box.
Now that you have your microphone setup for recording, next you’ll download and install the recording software-‐-‐Snapz Pro.

l y n d a . c o m c o n f i d e n t i a l R e c o r d i n g S a m p l e V i d e o s f o r l y n d a . c o m
1 5
Downloading and Installing Snapz Pro
At lynda.com, we use Snapz Pro for the Mac to record the video, audio, and microphone tracks for our video training courses.
Download and install Snapz Pro X from http://www.ambrosiasw.com/utilities/snapzprox/.
Setting Up Snapz Pro for Recording
Now that you’ve successfully installed Snapz Pro, you’ll need to spend a few minutes setting up Snapz Pro.
1) Navigate to the Applications > Snapz Pro X folder on your hard drive. Open the Snapz Pro X folder and double-‐click the Snapz
Pro X application icon to launch Snapz Pro.
You’ll know Snapz Pro X has opened successfully when you see the dialog box shown in the illustration here.
2) In the Capture Options section of the Snapz Pro window, select where you’d like to save your movies from the Send to pop-‐
up menu. Check the Open after saving, Choose filename and Stick around options.
The Choose file name option allows you to manually provide a filename for the video you capture, rather than having Snapz Pro
automatically name the file for you. The Stick around option means Snapz Pro will always be running in the background, even
though you don’t always see it. This ensures you can begin capturing video at anytime, without having to relaunch Snapz Pro.
3) Click Preferences at the top of the Snapz Pro window.

l y n d a . c o m c o n f i d e n t i a l R e c o r d i n g S a m p l e V i d e o s f o r l y n d a . c o m
1 6
4) In the Snapz Pro hot key field, press F13. In the Modifiers pop-‐up menu, uncheck Command and Shift and make sure the
rest of the settings match the illustration shown here.
Note: If you’re using a Mac laptop, you may need to press fn+F13, depending on how your keyboard is setup.
F13 is a good hot key to use because it’s not assigned to other commonly used functions in most software programs. If you use
commonly used shortcuts, such as CMD+P, which conflicts with the hot key used for printing in most programs, you’ll con-‐
stantly run into problems when starting and stopping Snapz Pro during the recording process.
Recording with Snapz Pro
Now that you’ve got all the settings and preferences set in Snapz Pro, you can begin recording.
1) Open Snapz Pro X and click the Movie button. The Movie Settings window will appear automatically.
2) In the Movie Settings window, match the settings to the ones shown in the illustration here. Pay careful attention to the
following:
• Choose Fixed size for Selection style.
• Make sure the Width and Height fields match your screen size (usually 1024x768 or 1280x720). Make sure you see the
marching ants around the entire screen.
• Set the Framerate is set to 15.
• Check all the check box options. Auto mic input gain can be turned on or off, depending on your preference and the re-‐
sulting audio quality.

l y n d a . c o m c o n f i d e n t i a l R e c o r d i n g S a m p l e V i d e o s f o r l y n d a . c o m
1 7
3) Press Return. You’ll automatically be prompted to choose a file name for the video.
4) When you are ready to begin recording, click Save. Before you begin speaking or performing any actions on screen, pause for
a minimum of 3 seconds.
We recommend recording a test movie to review sound levels, making sure to interact with the program and play any media
you will use in the training. Speak into the microphone using your normal speaking voice and perform a few test actions on
screen.
NOTE | Be Ready to Record! Make sure you are ready to begin recording before you c l ick Save. As soon as you c l ick Save, Snapz Pro wi l l automatica l ly begin the recording process . 5) When you are finished recording the video, pause for 3 seconds and press F13. The Movie saving settings dialog box will
open automatically.
Changing Movie saving settings is usually only required the first time you use Snapz Pro. However, we recommend you double-‐
check these settings that each time you reboot your computer, since when you reboot your computer or restart Snapz Pro
these settings can revert to the default settings.
6) Click the Settings buttons and adjust the settings for the video, audio, and microphone tracks so they match the settings
shown here. Click Save Now or press Return to save the video.

l y n d a . c o m c o n f i d e n t i a l R e c o r d i n g S a m p l e V i d e o s f o r l y n d a . c o m
1 8
WARNING | Don’t C l ick Delete! Do NOT c l ick Delete. Press ing Delete wi l l delete the v ideo you just recorded and there is no way to get i t back. A lso, after sav ing, you’ l l see a d ia log box with a progress meter. Do NOT c l ick Cancel . I f you c l ick Cancel , the v ideo wi l l not save proper ly and you wi l l need to re-‐record the v ideo. 7) Navigate to the folder where you saved the video. Listen to a few seconds at the beginning and end of the video to ensure
the audio, video, and microphone tracks looks/sounds as they should.
8) If you’d like to record another video, press F13 to open the Snapz Pro window and repeat the steps.
Uploading Sample Videos for Review
If you do not already have a browser based upload URL, please contact your Content Manager for one.
Getting Help and More Information
If you have any trouble during the recording process, please contact the Content Manager who is working with you on your
proposal. If you are unable to reach your lynda.com contact please try one of the contacts listed below.
Auriga Martin Content Team Coordinator
805.624.5781
Max Smith Manager of Training Production [email protected]
805.477.3900 x106

l y n d a . c o m c o n f i d e n t i a l R e c o r d i n g S a m p l e V i d e o s f o r l y n d a . c o m
1 9
Example sample movies
• Bonnie Biafore, Creating an Inventory Item in QuickBooks: http://milton.lynda.com:8020/SuperContainer/RawData/PAuth/1598/SampleVid/453
• Gini Courter, Creating a Pivot Table in Excel: http://milton.lynda.com:8020/SuperContainer/RawData/PAuth/1598/SampleVid/504
• Chris Coyier, CSS Technique: http://milton.lynda.com:8020/SuperContainer/RawData/PAuth/1598/SampleVid/454
• David Diskin: Enhancing a Text Box in PowerPoint: http://milton.lynda.com:8020/SuperContainer/RawData/PAuth/1598/SampleVid/455
• Drew Falkman, PHP Plugins: http://milton.lynda.com:8020/SuperContainer/RawData/PAuth/1598/SampleVid/456
• Ashley Kennedy, Avid Media Composer: http://milton.lynda.com:8020/SuperContainer/RawData/PAuth/1598/SampleVid/503
• Joseph Lowery, Dreamweaver and WordPress: http://milton.lynda.com:8020/SuperContainer/RawData/PAuth/1598/SampleVid/457