salesforce integration - calliduscloud integration- product... · salesforce integration there is a...
TRANSCRIPT

Salesforce
Integration Installation Manual
Release

Table of Contents
Salesforce Integration ............................................................................... Error! Bookmark not defined.
1. Integration with LeadForce1(Manual) ............................................................................................ 3
2. Integration with LeadForce1 (Automated Synchronization) ........................................................... 4
Existing Customers (Those who have installed the old Salesforce package) ....................................... 4
Fresh Installation of LeadForce1 Package ........................................................................................... 5
3. Customizing Salesforce ................................................................................................................. 10
Customizing buttons ......................................................................................................................... 10
Customizing Tabs .............................................................................................................................. 11
Adding Visits tab in Leads / Contacts/Accounts pages ...................................................................... 12
4. Customizing the settings in LeadForce1 ........................................................................................ 13
Configuration Settings ...................................................................................................................... 14
Schedule Settings .............................................................................................................................. 15
5. Interpreting Synced data ............................................................................................................... 16
Moving data to LeadForce1 - .......................................................................................................... 17

Salesforce Integration
There is a two way integration between Salesforce and LeadForce1. Leads generated from leadforce1
can be added into Salesforce as Leads/Contacts/Accounts and behavioral activity from email identified
contacts can be seen in Salesforce. There are two types of integration available
1. Manual
2. Automated Synchronization
The Manual system will work with all editions of Salesforce while the Automated Synchronization will
only work if your Salesforce Account has API access.
1. Integration with LeadForce1 (Manual) Leads and Contacts generated within LeadForce1 can be added one by one to Salesforce. This will work
with any account of Salesforce and requires you to login each time to do the activity. If you have
selected Salesforce as the CRM and provided the username/password/token credentials, these links will
be active as shown in 0.
Figure 0–1 Adding LeadForce1 data into Salesforce
There are 4 actions that can be performed using this integration – Search, Create Account, Create Lead
and Create Contact
-The company information can be searched for in Salesforce using the Search link
The Company visiting can be added as an Account in Salesforce using the Create Account Link

The Decision Makers can be added as a Salesforce Lead (Create Lead) or Contact (Create Contact)
Note: You must click Submit to create the lead/contact. These are not automatically created.
2. Integration with LeadForce1 (Automated Synchronization) LeadForce1 data can be synced to Salesforce data in an automated manner using the API. The API access
is a default feature if you use Enterprise or Unlimited version but is an add-on in the other versions.
Please check with your Salesforce Admin on the availability of API access.
If you have not installed the package before move to the Installing a new package section
Existing Customers (Those who have installed the old Salesforce package)
You will need to delete the existing package before you install the new package. The steps to be followed are:
1. Delete the existing buttons that were created in the old package. 2. Click Setup->(App Setup) Customize ->Leads->Search Layout ->Lead List View (Edit) 3. From the Selected Buttons list move “LeadForce1” to Available Buttons so that it is removed
from the list view. Save the setting. Figure 1-1 shows you how to ….

Figure 1-1. Deleting Existing Settings
4. Follow the same procedure to remove the LeadForce1 button from the Contacts tab too 5. To uninstall the package, Click on Setup->View Installed Packages (under App Setup)->Click
Uninstall.
Figure 1-2. Uninstalling the Package
6. The uninstall process may take a few seconds –and the status is updated on the screen.
Figure 1-3. Completed Uninstallation Process
7. Note – The existing data that has been updated in the leads / contacts with the old package will be unaffected.
Fresh Installation of LeadForce1 Package The New package can be installed from the LeadForce1 site – www.leadforce1.com.
Entering CRM Credentials

1. Login to the LeadForce1 site using your credentials
2. Click on Settings - > CRM Settings ->Select Salesforce in the dropdown
Figure 1-4. CRM Credentials and Install Package
3. Enter your Salesforce username and password and enter the Security token..If the security
token is not handy, follow this process to get it
Generating security Token Security token is a unique code that Salesforce provides for every account. To generate a new Security Token login to your instance of Salesforce. Click on 'setup' > 'My Personal Information" > "Reset My Securuty Token". The Security Token will be sent to you on the email registered for your Salesforce account.
4. If you are logging into a Sandbox account, please change the default URL to the sandbox URL
e.g. https://cs3.salesforce.com. If using default production account, the default setting can
remain,
5. If the credentials match then a success message will be displayed on the screen.
Note: Ensure that each leadforce1 user is mapped to a unique Salesforce user

Installing the Package
The next step is to install the package – this package will transfer the LeadForce1 data into Salesforce.
1. Click on the Install package link – Click continue on that page
Figure 1-5. Installing the package
2. There are 3 steps to install the package o Approve Package API Access – click Next

Figure 1-6. Approve API Package Access
o Choose Security Level – Choose the second option of Grant Access to All Users
Figure 1-7. Chose Security Level
o The third step is to install the package – Choose Install to start
3. After installation, the package needs to be deployed to show the new tabs and components in Salesforce. Choose Deploy now

Figure 1-8. Deploying the Package
4. The custom component called Visit into which all the LeadForce1 Visit data is pushed is shown on the screen.
Figure 1-9. Deployed Package
5. After deploying, the components added are shown on screen. The installation of the package is now complete

Figure 1-10. Deployment Successful
3. Customizing Salesforce
The installed application needs to be customized to add the buttons and tabs in the default view of Lead
/ Account /Contact Objects
Customizing buttons
1. In Salesforce, Click Setup->customize ->Leads ->Search Layouts 2. From the main page click on edit 'Lead list view'. Now you see two columns- move LeadForce1
from the Available Buttons to Selected Buttons

Figure 1-11. Adding Salesforce1 button in leads
6. Follow the same procedure for Contacts and Accounts to add the LeadForce1 button
Customizing Tabs We will then add the Visit Tab in the default view
1. On the homepage Click on the Arrow next to the tabs as shown below
Figure 1-12. Modify tabs
2. In the tab selection screen select Customize My tabs
3. Select Visits from the Available Tabs and move it to the Selected Tabs

Figure 1-13. Customize Tabs
Adding Visits tab in Leads / Contacts/Accounts pages To view leadforce1 data in Salesforce objects we need to customize the page layouts
1. Click on Setup->AppSetup ->Leads->Page Layouts ->Edit Lead Layout 2. From he Lead Layout, Click Related Lists and Drag and Drop the Visits tab to a location on the
page
Figure 1-14. Modify Page Layout
3. You could place it before open activities as in the figure below or any location convenient to you

Figure 1-15. Drag and Drop Visit tab
4. Set up the same way for the Account object 5. In Salesforce the visits data would appear along with the rest of the data (this is a screenshot of
an account object)
Figure 1-16. Visit Data in Contact object
This completes the set up on Salesforce
4. Customizing the Settings in LeadForce1
After installing the application the syncing of Salesforce data needs to be set up (Note : these screens will only be seen after the userid / password has been successfully added)

Configuration Settings
1. This screen allows us to setup what data from LeadForce1 has to be pushed into Salesforce and what objects of Salesforce will be updated
2. Saved Search – Choose the saved search whose results will be updated into Salesforce. One saved search can be added per user
3. Object synchronization Settings – This will push all the Salesforce data selected into LeadForce1. This ensures that the LeadForce1 system is aware what are the latest objects created in Salesforce so that they are not recreated again e.g. if a Lead object already exists, then visit data for that lead will be updated and new lead object will not be created again. There are two options under this
o Lead Object in Salesforce – All lead objects in Salesforce are moved into LeadForce1 o Account Object in Salesforce – All account objects are moved into LeadForce1
4. Object mapping o There are two types of leadforce1 data that can be pushed into Salesforce – unidentified
leads or identified leads o There are 3 Salesforce objects into which the data can be moved – Leads / Accounts /
Contacts Please do not select option to update only contacts, that will create contacts but
will not associate site visit data to any of them (known issue).Always associate with Account and Contact
o Depending on the privilege options new objects can be created or the visit items (LeadForce1 visit data) updated on an existing object
o Privilege – Create and update specifies that a new Salesforce object will be created if one doesn’t already exist or update an existing one (Recommended)
o Update – specifies that only if the object exists leadforce1 data will be associated with it If there is existing data in Salesforce then unless it is moved to LeadForce1, we
cant push visit data for that object o For leads and contacts “email id” is used to determine if an object exists and for
Accounts company name will be used as criteria for match

Figure 1-17. Salesforce Configuration Settings
Schedule Settings
This setting is used to set the schedule for moving the data from LeadForce1 to Salesforce
1. For the first run, put a scheduled start date as a date from which we need to move data from LeadForce1 to Salesforce (say 1st Dec 2009)
2. Data from that day to today’s date will be moved into Salesforce based on the object settings shown
3. The schedule interval determines at what frequency the data is moved from LeadForce1 to Salesforce
4. To start the sync process , in the user action action, the Start button has to be pressed 5. The syncing started at any arbitrary time by using the “Sync Now” option 6. Once data Sync happens then the data is visible in Salesforce
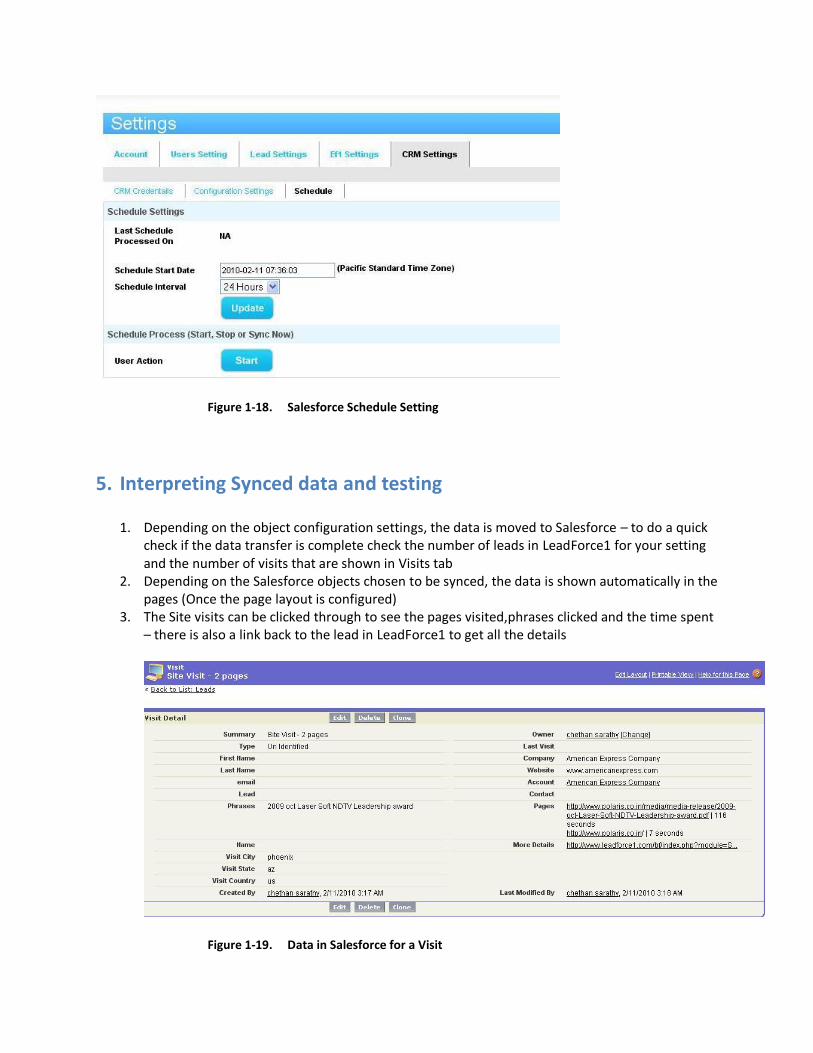
Figure 1-18. Salesforce Schedule Setting
5. Interpreting Synced data and testing
1. Depending on the object configuration settings, the data is moved to Salesforce – to do a quick check if the data transfer is complete check the number of leads in LeadForce1 for your setting and the number of visits that are shown in Visits tab
2. Depending on the Salesforce objects chosen to be synced, the data is shown automatically in the pages (Once the page layout is configured)
3. The Site visits can be clicked through to see the pages visited,phrases clicked and the time spent – there is also a link back to the lead in LeadForce1 to get all the details
Figure 1-19. Data in Salesforce for a Visit

6. Email Integration Email campaigns that are sent through LeadForce1 will be synchronized by default with the Lead data in
Salesforce. No synchronization settings need to be enabled but the following details of the campaign will
be shown
Campaign sent
Campaign opened
Campaign clicked
Email bounced
Email id unsubscribed
These activities are shown along with the regular website visit data in the Visits tab in the Lead Objects.
The emails need not be triggered from within SalesForce but can be sent through LeadForce1. As long as
that lead exists in Salesforce, the email activity captured will be appended
Figure 1-20. Campaign Activity in the Visits tab
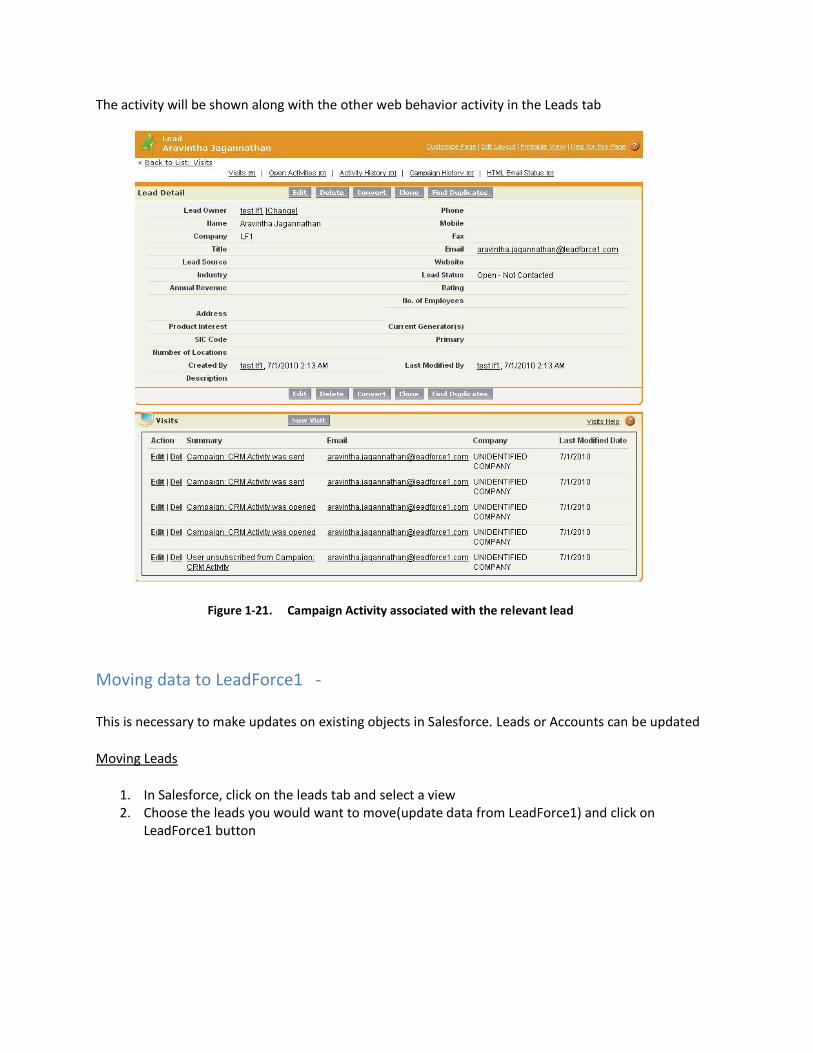
The activity will be shown along with the other web behavior activity in the Leads tab
Figure 1-21. Campaign Activity associated with the relevant lead
Moving data to LeadForce1 -
This is necessary to make updates on existing objects in Salesforce. Leads or Accounts can be updated
Moving Leads
1. In Salesforce, click on the leads tab and select a view 2. Choose the leads you would want to move(update data from LeadForce1) and click on
LeadForce1 button

Figure 1-22. Move data from Salesforce to LEadforce1 for Update
3. It will connect to LeadForce1 and ask you to enter the Salesforce credentials again (this is a one time setting – you would need to enter these detais every time)
4. Choose either the option to add to an existing list or to create a new list .Once the next button is clicked the data is pushed to LEadforce1. So any visits which match the leads will be updated
Moving Accounts
The steps are the same as the previous case except that when you select accounts to move, the accounts are moved to LeadForce1 the minute the LeadForce1 page is opened