sales training series - amazon web services · your smart terminal is on its way! step 1: set up...
TRANSCRIPT

Sales Training SeriesPart 2: Get Started
1

Overview
01 Getting Started
02 Transactions + Settling
03 Poynt Ecosystem
2

Your Smart Terminal is on its way!
Step 1: Set up your Poynt Web Portal account. Open your welcome email and click “Get Started” to create your login credentials.
Step 2: Log in at Poynt.net to view your dashboard. Once your terminal arrives, this is where you’ll be able to see your real-time customer and transaction data.
Step 3: Visit the Poynt Help Center to review helpful video tutorials and support articles.
3

Navigating Your Device
4
Microphone
Hybrid EMV/MSR Reader Slot
Merchant Facing CameraTouchscreen Display800(w) x 1280(h) pixels tvdpi7”
Volume Control
Touchscreen Display800(w) x 1280(h) pixels tvdpi
Charging Pins
Micro USB Port
Speaker
8-Hour Battery

Navigating Your Device
5
Touchscreen Display800(w) x 480(h) pixels tvdpi4.3”
QR Code &Barcode Scanner
Thermal Printer
Dedicated Secure Processor
Power Button
NFC Antenna (surrounds touch screen)

Your Smart Terminal has arrived!
Step 1: Check your box
Do a quick component check to ensure all content is in the box. It should include:
❏ Poynt Device❏ Charging Dock❏ Power cable❏ Power Adapter❏ 3 Rolls of Printer Paper❏ Quick Start Guide
6

Smart Terminal Setup
Step 2: Placing the Device
There are two screens - the bigger one should face you and the smaller is directed at customers.
When connecting a strong, private WiFi connection you have the freedom to place your device wherever you’d like to transact. If connecting with secure ethernet, the device will need to be placed on the docking station within reach of your ethernet cord.
7

Smart Terminal Setup
Step 3: Power on your device
To turn on your device, press and hold the power button behind the merchant screen for 3 seconds.
When placing your terminal on the dock make sure that both Poynt logos are facing you, aligning the terminal with the charging pins. Your device will charge while on the dock. We recommend fully charging the device (approximately one hour) before initial use.
8

Smart Terminal Setup
Step 4: Connect your device
Your device will walk you through connecting to the internet via WiFi the first time you turn it on. To connect via Ethernet instead, simply plug your cord into the back of the dock.
After connecting, it may begin to update its software as required. This can take a few minutes. Allow the device to download, install, and reboot before getting started.
9
Smart Terminal Setup
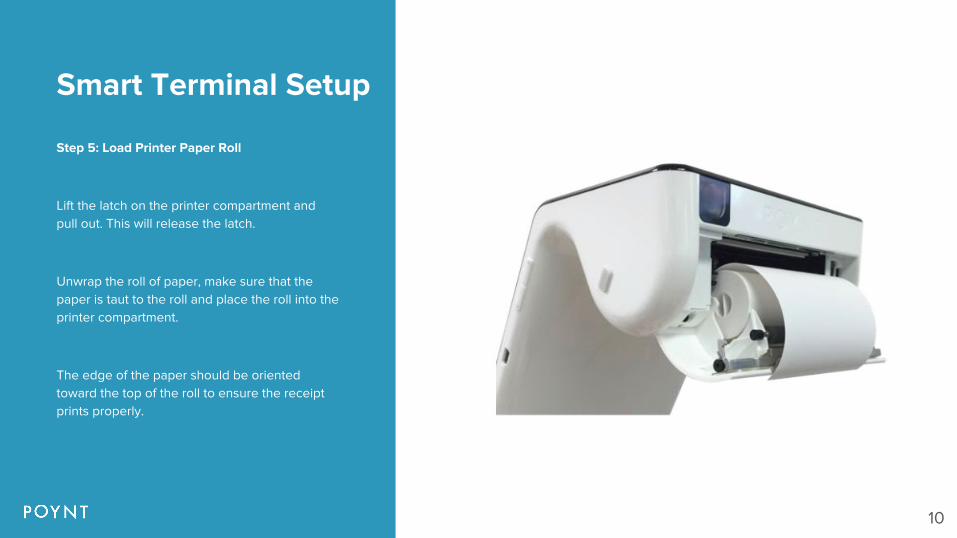
Step 5: Load Printer Paper Roll
Lift the latch on the printer compartment and pull out. This will release the latch.
Unwrap the roll of paper, make sure that the paper is taut to the roll and place the roll into the printer compartment.
The edge of the paper should be oriented toward the top of the roll to ensure the receipt prints properly.
10

02 Transactions & Settlements
11

Transacting with PoyntTo start accepting credit card transactions, simply tap on the 'Terminal' app, enter the amount, and swipe the card. Customers can choose to have their receipt printed, emailed, or no receipt.
You can review a list of your transactions by tapping the menu on the left and then 'Transactions.’ To return to the terminal, pull up the menu and tap 'Terminal.’
12

Credit Card
Step 1: Enter the amount on the terminal and press “Charge”.
Step 2: Insert the card fully into the slot and and wait for authorization confirmation. Remove when instructed.
Step 3: Customer will be prompted to enter tip amount and/or on-screen signature on second screen.
Step 4: Customer then can select receipt preference.
Step 5: Transaction Complete.
13

Credit Card Customer-Facing Screen
The customer will be prompted to select a tip amount. These options are customizable by the merchant on their Web Portal.
They will also be asked for on-screen signature if the merchant enables in their Web Portal settings.
14

Cash Transaction
This option only applies if you have connected a cash drawer and/or want to track cash transactions.
Step 1: Enter the amount on the terminal app and tap ‘CASH’.
Step 2: Enter the amount of cash received using keypad or shortcut keys and then tap ‘COMPLETE’.
Step 3: Customer then can select receipt preference.
Step 4: Transaction Complete.
15

Multi-Tender
For merchants who have customers who want to split payments into 2 or more payments.
Step 1: Open the Terminal app and type in the exact amount of the sale
Step 2: Tap ‘CHARGE’ in the terminal screen so the payment window pops up. Then, tap the drop-down menu in the top right corner to access more payment options
Step 3: Select the option labeled ‘MANUAL ENTRY’.
Step 4: The payment will automatically split into two equal-amount transactions.
Step 5: Tap on arrow to proceed with payment with the first transaction. When complete, the first transaction will show a checkmark. Tap on arrow to proceed to the next transaction.
16
Note: These split payments will appear separately in the Transactions List.

More Payment Types
The Poynt Smart Terminal accepts and keeps track of more payment types:
● NFC
● Manual Entry
● Checks
● Other: Gift cards, Vouchers, Store Credit, etc.
17

Refunds
To refund a previous transaction, tap the Terminal menu (left side) and go to Transactions list.
Swipe a transaction row to the left for a shortcut to Refunds. When you pull up a specific transaction, tap "Refund".
Confirm the refund amount. If Partial Refund is needed, tap amount and edit.
18

Settlements
Step 1: View settlement options directly from the terminal in the Settlements App. Enter from the Home Screen.
19
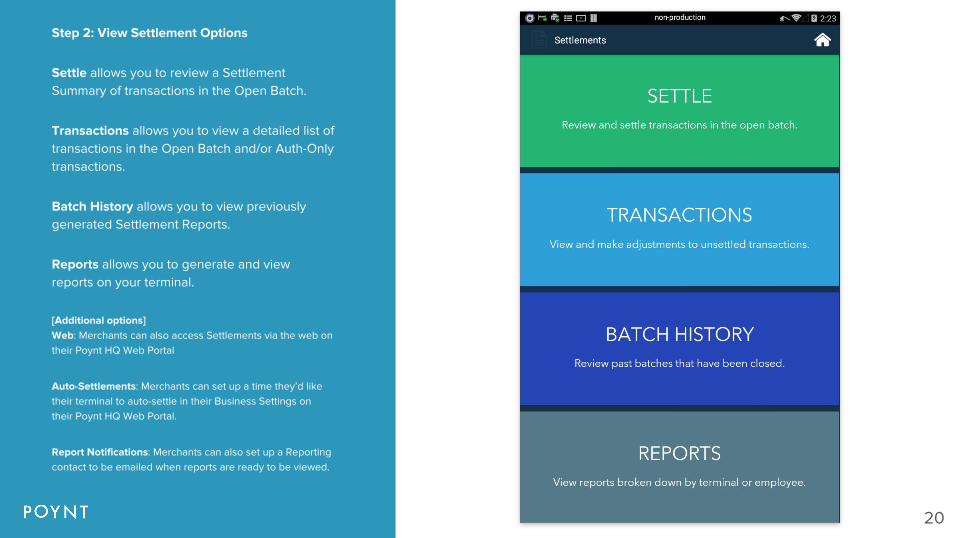
Step 2: View Settlement Options
Settle allows you to review a Settlement Summary of transactions in the Open Batch.
Transactions allows you to view a detailed list of transactions in the Open Batch and/or Auth-Only transactions.
Batch History allows you to view previously generated Settlement Reports.
Reports allows you to generate and view reports on your terminal.
[Additional options] Web: Merchants can also access Settlements via the web on their Poynt HQ Web Portal
Auto-Settlements: Merchants can set up a time they’d like their terminal to auto-settle in their Business Settings on their Poynt HQ Web Portal.
Report Notifications: Merchants can also set up a Reporting contact to be emailed when reports are ready to be viewed.
20

Summary & Bulk SettleFrom the Settlements menu, follow the following instructions to view and settle your open batch of transactions:
Step 1: Tap on Settle to review a Settlement Summary of transactions currently in the Open Batch.
Step 2: View summary amounts for Sales and any Tips or Refunds.
Step 3: If you have any Transactions Pending Tips and/or Auth-Only transactions, you will see an option to Review Transactions.
Step 4: After reviewing the summary and/or Transaction details, and if you are ready, then tap on “Settle Open Batch”.
21

Review & Adjust TransactionsFollow the instructions below to view "Open Batch", “Pending Tips”, and/or "Auth-Only" transactions.
Step 1: Tap on Transactions or Review Transactions to view a detailed list of transactions in your Open Batch, Pending Tips, and/or in Auth-Only status.
Step 2: If you need to adjust transactions for Tips, tap on Pending Tips > Edit > Enter Tip Amount > Add to Batch.
Step 3: If you have any Auth-Only transactions you are ready to post, tap on Auth Only > Add to Batch.
Step 4: You can also Void transactions. When ready, tap on ‘Review’ to go back to Summary screen and tap Settle Open Batch.
22
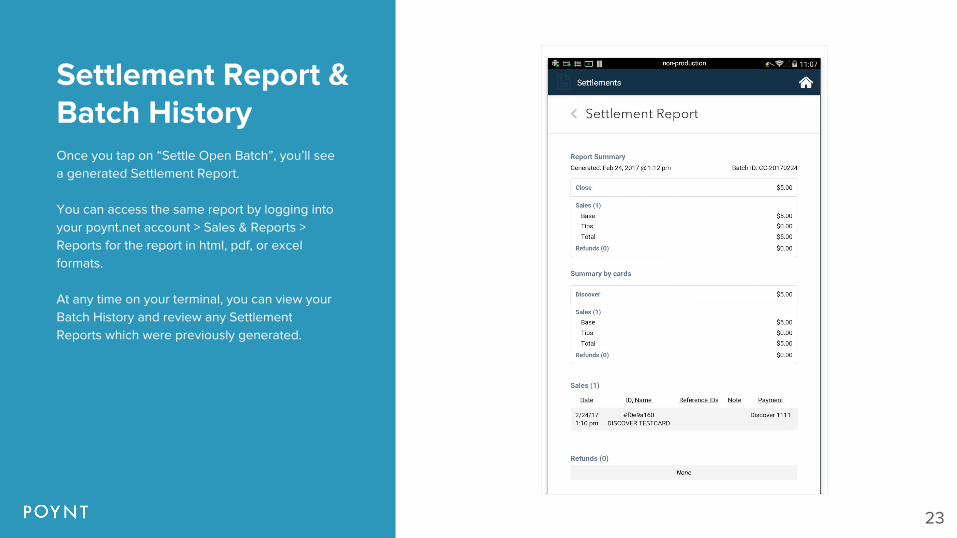
Settlement Report & Batch HistoryOnce you tap on “Settle Open Batch”, you’ll see a generated Settlement Report.
You can access the same report by logging into your poynt.net account > Sales & Reports > Reports for the report in html, pdf, or excel formats.
At any time on your terminal, you can view your Batch History and review any Settlement Reports which were previously generated.
23

03 Poynt Ecosystem
24

25
At Poynt, smart isn't limited to just your terminal. Here are all of the tools you can use to handle your business any time and anywhere.
The Terminal HQ Web Portal
And Mobile AppSelf-Help Center Poynt Support Team
The Terminal
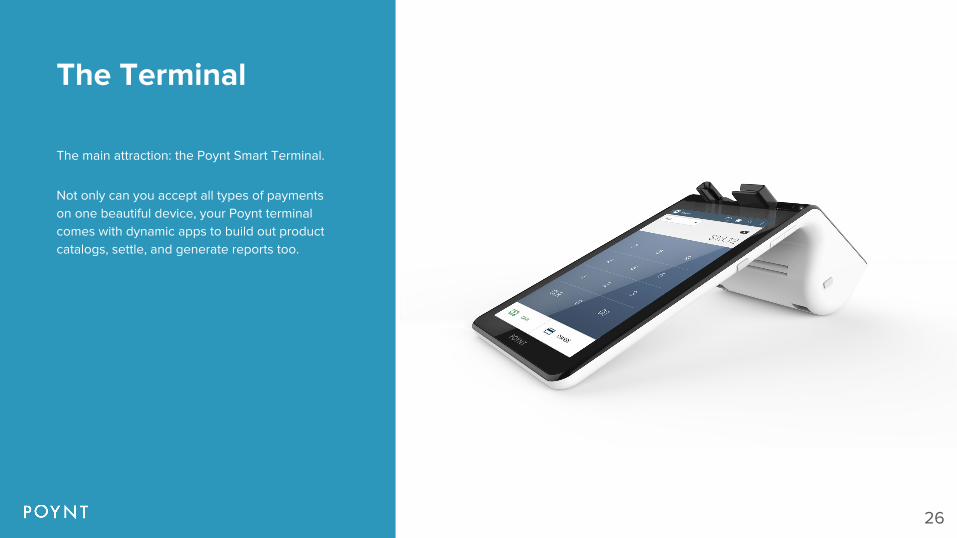
The main attraction: the Poynt Smart Terminal.
Not only can you accept all types of payments on one beautiful device, your Poynt terminal comes with dynamic apps to build out product catalogs, settle, and generate reports too.
26

HQ Web Portal and Mobile AppThe Poynt HQ Web Portal and Mobile App provide management and reporting tools for all of your terminals, all in one place.
Sales & Reports: View dashboard and generate reports of all customer, transaction, and sales activities.
Business: Manage business settings, user permissions, and terminal preferences all from the web.
Products: Build out and edit your product catalog, taxes, and discounts.
27

Poynt Self-Help Center and SupportIn the Poynt Self-Help Center you'll find tons of FAQs, tutorial videos, and articles to help you navigate your Smart Terminal efficiently and effectively.
But if you have any additional questions, please don't hesitate to reach out to our Support team for help.
28