sage business cloud accounting: payments and allocations
TRANSCRIPT

P a g e | 1
Sage Business Cloud Accounting: Payments and Allocations
Education Alliance Program Curriculum: Canada

P a g e | 2
Payments and Allocations Lack of capital is one of the primary reasons that businesses are unable to flourish. Positive cash flow is critical for Divine Chocolates to run smoothly. Christina has invested a lot of time ensuring her start-up would attract and keep new customers. Now she’ll need to ensure payments received from customers are on time and posted correctly as this later becomes the funds she’ll need for her business expenses. Through use of Accounting, we’ll explore how to record and manage payments.
There are two places Divine Chocolates can record payments:
• Sales Invoice: By opening an invoice, Divine Chocolates can record a payment for an individual invoice directly from the Sales Invoice screen, marking it as paid updating any outstanding amounts.
• Banking: Payments can be recorded to an invoice from the Customer Receipt option for individual invoices but more conveniently used to cover multiple invoices. Payments can be allocated to more than one invoice at the same time. If an overpayment is sent, the remaining amount can be recorded here as a credit on account, as well.
Learning Objectives
By the end of this lesson, you will be able to:
• Record a payment against a single invoice • Allocate payments to an account for future use • Un-allocate a payment or receipt • Process a refund • Payment/Invoice Management • Create Credit Notes • Allocate stand alone payments/credit notes
NOTE Throughout the duration of the course, you will encounter important icons and visual conventions as part of your learning experience to guide learners through the chapters. Some of the cues are indicated here.

P a g e | 3
P a g e | 4
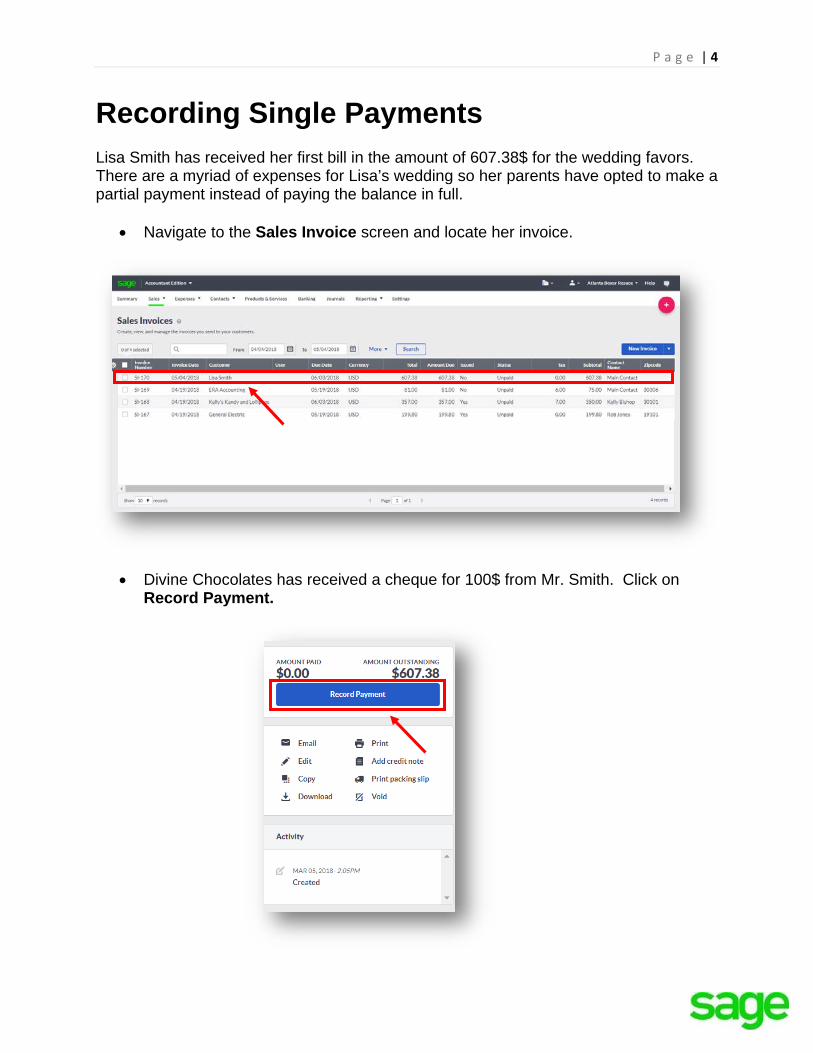
Recording Single Payments Lisa Smith has received her first bill in the amount of 607.38$ for the wedding favors. There are a myriad of expenses for Lisa’s wedding so her parents have opted to make a partial payment instead of paying the balance in full.
• Navigate to the Sales Invoice screen and locate her invoice.
• Divine Chocolates has received a cheque for 100$ from Mr. Smith. Click on Record Payment.
P a g e | 5
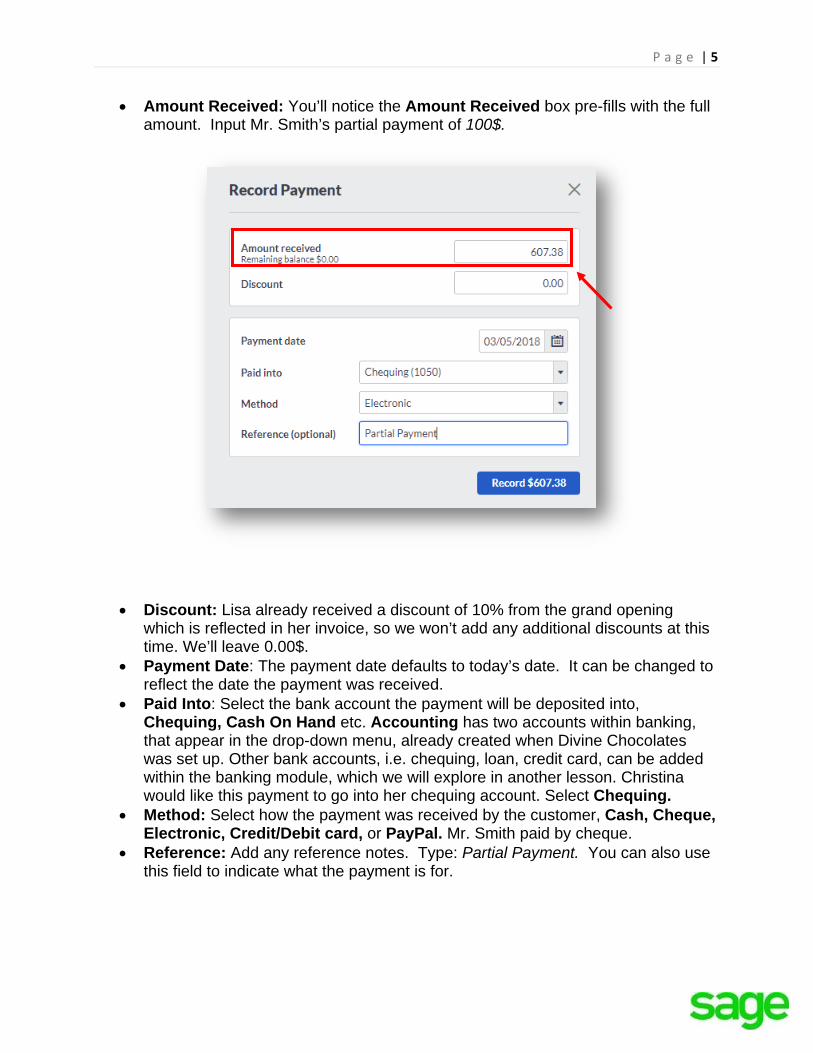
• Amount Received: You’ll notice the Amount Received box pre-fills with the full amount. Input Mr. Smith’s partial payment of 100$.
• Discount: Lisa already received a discount of 10% from the grand opening which is reflected in her invoice, so we won’t add any additional discounts at this time. We’ll leave 0.00$.
• Payment Date: The payment date defaults to today’s date. It can be changed to reflect the date the payment was received.
• Paid Into: Select the bank account the payment will be deposited into, Chequing, Cash On Hand etc. Accounting has two accounts within banking, that appear in the drop-down menu, already created when Divine Chocolates was set up. Other bank accounts, i.e. chequing, loan, credit card, can be added within the banking module, which we will explore in another lesson. Christina would like this payment to go into her chequing account. Select Chequing.
• Method: Select how the payment was received by the customer, Cash, Cheque, Electronic, Credit/Debit card, or PayPal. Mr. Smith paid by cheque.
• Reference: Add any reference notes. Type: Partial Payment. You can also use this field to indicate what the payment is for.

P a g e | 6
Once payment is received, a confirmation will appear at the bottom of the screen in green, Payment Successfully Created. A notification will appear at the top highlighted in orange, Part Paid. If the invoice was paid in full the notification would read Paid. There is an additional notification above the Record Payment, showing ‘1 payment on Mar 05, 2018’.
Un-allocate a receipt or payment from an invoice There may be times when you need to un-allocate (or unlink) transactions, for example, if you've allocated a payment on an account in error. You may also need to do this if you need to edit or void an invoice to which you've allocated a payment or credit note. It can be done within the invoice or the banking module. For purposes of this lesson, we’ll look at un-allocating a payment within an invoice.
Lisa Smith’s wedding is only a few short weeks away. With all the exciting activity going on, the wedding is approaching faster than the Smith’s realized. If you recall from the terms and conditions on the invoice, Divine Chocolates requires a 50% deposit/payment before they’re able to proceed with the order/services.
“Final changes to custom orders must be made 7 days in advance. 50% deposit required. Remaining balance due upon pickup.”

P a g e | 7
Christina has called Mr. Smith to notify him additional payment is required. To prevent any delay in processing the future bride’s order, Mr. Jone’s has decided to make payment in full, directly from his bank to Divine Chocolates. He’s requested the $150 payment be left on his account as a credit for future use. If the credit doesn’t get applied towards wedding favors or other catering services, Divine Chocolates can send Mr. Smith a refund after the wedding.
• Pleased with Mr. Smith’s prompt payment, Divine Chocolates will need to un-allocate the original 150.00$ payment from the account. Directly from the invoice, navigate to and click on the the blue hyperlink in the top right: ‘1 payment on Mar 05, 2018’.
• When the Payments and Allocations box launches, the details of the payment appear. We see Mr. Smith’s partial payment was made on March 5, 2018 for 100.00$ and still has a remaining balance of $507.38.

P a g e | 8
• From here, we can un-allocate the payment associated with this invoice and apply the payment as a credit to Mr. Smith’s account OR click on the blue pencil to send Mr. Smith a Refund. In this case, we are going to un-allocate the payment associated with this invoice and leave the payment on Mr. Smith’s account. Click on the blue hyperlink in the Amount column 100.00$.
• The Customer Receipt/Payment box appears. Accounting automatically selects the payment box in the line item (with a check mark) below assuming this is the transaction you want to un-allocate. If there are multiple payments, select the one you would like to un-allocate.
• Uncheck the transaction to un-allocate it from the invoice. In doing so, you’ll notice the ‘Paid’ amount moves to the ‘Outstanding’ amount and increases the amount owed. By un-allocating the full 100$ payment, the outstanding balance returns to $607.38.
• The Left To Allocate box updates to reflect the 100$ payment being un-allocated (or the amount no longer associated with an invoice). This is the amount that will be allocated to Mr. Smith’s account as a payment towards future invoices.

P a g e | 9
• Click Save. A notification will appear indicating Mr. Smith’s payment is being un-allocated from the invoice. Further, it will require confirmation to ensure you want to save the unallocated amount (100.00$) as a payment on his account.
• Click Yes. The invoice status reverts from Part Paid to Awaiting Payment. The Amount Paid and Amount Outstanding also returns to the original amounts of 0.00$ and 607.38$ respectively.

P a g e | 10
Un-allocate partial payments/amounts To un-allocate a partial payment from an invoice as opposed to the entire payment amount, input the partial amount in the Amount Received box. In doing so, this will unallocate the partial payment and can be allocated to another invoice on Mr. Smith’s account at a later date.
• Click Save. As with above, A notification will appear indicating a payment is being un-allocated from the invoice. Further, it will require confirmation to ensure you want to save the unallocated partial payment as a payment on his account.
P a g e | 11
Payments and Allocations - Refunds
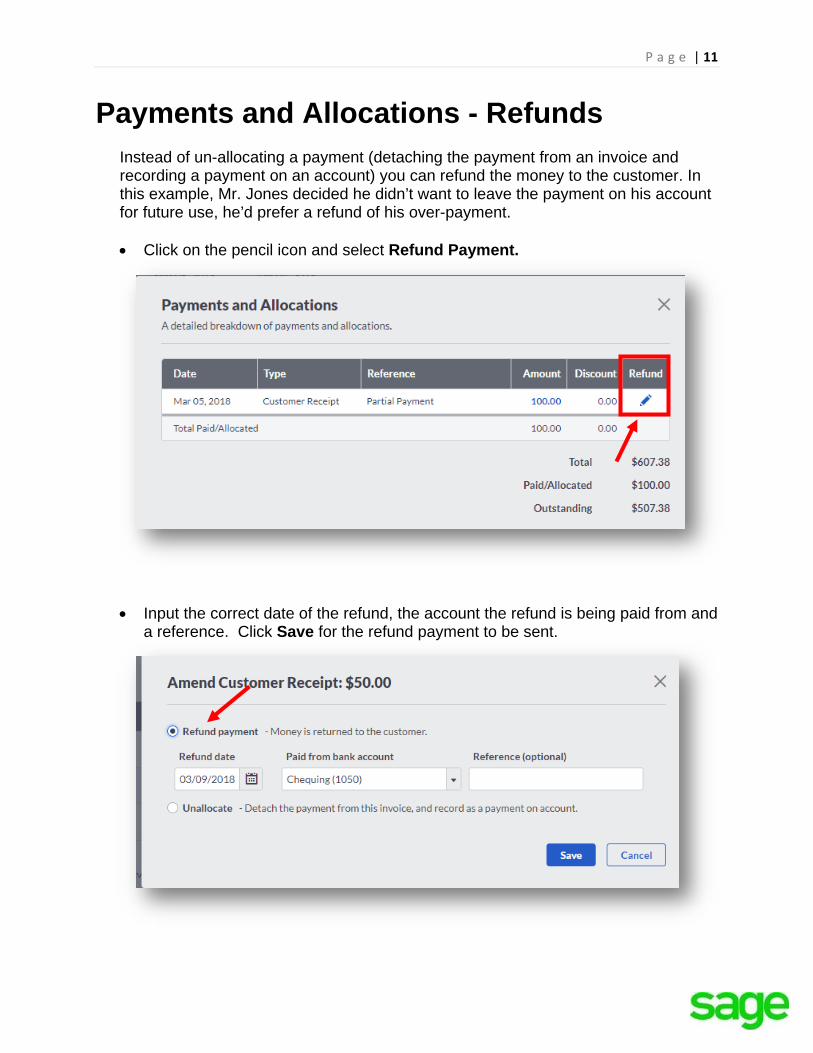
Instead of un-allocating a payment (detaching the payment from an invoice and recording a payment on an account) you can refund the money to the customer. In this example, Mr. Jones decided he didn’t want to leave the payment on his account for future use, he’d prefer a refund of his over-payment.
• Click on the pencil icon and select Refund Payment.
• Input the correct date of the refund, the account the refund is being paid from and
a reference. Click Save for the refund payment to be sent.

P a g e | 12
Payment/Invoice Management In the beginning of this lesson, we learned how to record an individual payment on an invoice. Once the payment has been completed there are several options available within the invoice screen.
Email: To email an individual invoice, reflecting payments made and outstanding amounts, click the Email icon. To expedite and automate invoicing, they can be sent in batch form but for purposes of this lesson, we’ll email only one.
When the dialogue box appears, you’ll notice Janes wedding coordinator is automatically cc’d on the correspondence.

P a g e | 13
If you recall, when adding Jane Jones to Lisa Smith’s contact record, we selected the Cc’d into emails box to ensure Ms. Jones was included on all correspondence.
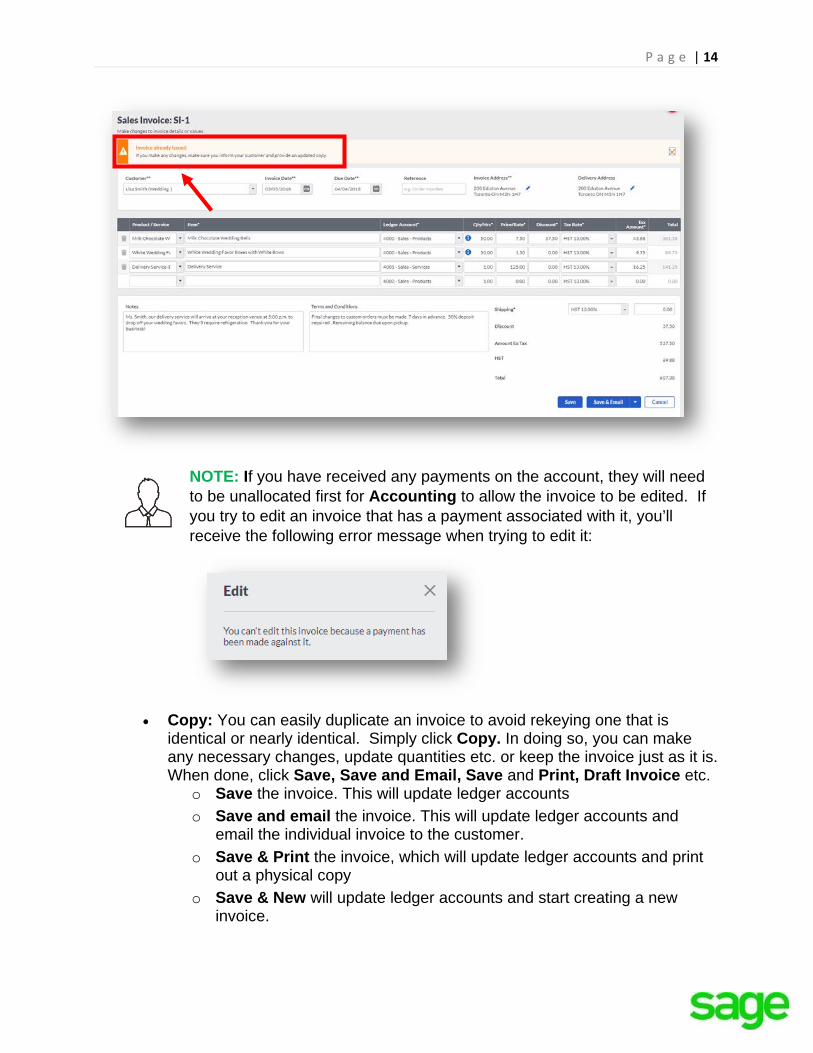
Edit: To make any changes to an existing invoice, click Edit. The invoice will launch in full edit mode to make any changes necessary. You will receive a notification, Invoice already issued if an invoice has already been sent to the customer. If that’s the case, you’ll want to send them an updated invoice with any edits/updates made.
P a g e | 14
NOTE: If you have received any payments on the account, they will need to be unallocated first for Accounting to allow the invoice to be edited. If you try to edit an invoice that has a payment associated with it, you’ll receive the following error message when trying to edit it:
• Copy: You can easily duplicate an invoice to avoid rekeying one that is identical or nearly identical. Simply click Copy. In doing so, you can make any necessary changes, update quantities etc. or keep the invoice just as it is. When done, click Save, Save and Email, Save and Print, Draft Invoice etc.
o Save the invoice. This will update ledger accounts o Save and email the invoice. This will update ledger accounts and
email the individual invoice to the customer. o Save & Print the invoice, which will update ledger accounts and print
out a physical copy o Save & New will update ledger accounts and start creating a new
invoice.

P a g e | 15
o Draft Invoice will not update ledger accounts. These are invoices not ready to be sent with non-posting transactions, also known as ‘Delayed Charges’.
o Pro-Forma Invoice will not update ledger accounts. These are invoices not ready to be sent with non-posting transactions, or ‘Delayed Charges’
NOTE: It’s important to note, if you copy an invoice that contains inventory insufficienct to be fullfilled, a notification will appear with a red exclamation mark in the Qty/Hrs column. By hovering over the notification, you’ll see the quanity in stock and the insufficent amount. You’ll need to return to Products/Services and adjust stock levels before the invoice can be sent.

P a g e | 16
Copy Invoice / Update Pricing When copying an invoice, you’ll receive a notifcation asking if you want to use the default product price associated with the customer or update them. In this instance, the originial invoice used the Sales Price. If you recall from our previous lesson, you can create up to 10 different prices for products and services.
The last two options on the invoice are Download, to download a PDF of the invoice to print or email to the customer and Print: Launches a new window to print the invoice or download a PDF.

P a g e | 17
Credit Notes A credit note can be utilized for customers who have returned goods and can be done easily directly from the original invoice. You can also create a stand-alone credit note and link it to any outstanding invoice at a later date. Similar to an invoice, you can print or email the credit note to the customer.
Whenever a sales credit note is created, stock/inventory will track the movement upon the return as Negative Goods Out. Accounting automatically increases stock levels as goods have been returned.
Two of the chocolate wedding favors made for Lisa Smith’s wedding arrived broken. Divine Chocolates will process a Credit Note on her behalf.
• To create a Credit Note associated with an invoice, from the Sales Invoice dashboard, select the invoice within the list you want to create a credit for. In this case, Lisa Smith.
• When the invoice launches, navigate to the management features box and click Add Credit Note.

P a g e | 18
• In doing so, the credit note launches with the all the same details of the original
invoice. It looks identical to the invoice except it’s notated at the top with New Sales Credit Note. We only want to credit Lisa Smith for the two damaged chcocolates, navigate to the Qty/Hrs column and type ‘2’.
• Since the credit note allows for editing, you can add products/services, tweak quantities you are applying a credit note for, amounts, address, notes etc. Once complete click Save. This creates a customer allocation transaction.

P a g e | 19
Stand Alone Credit Notes We discussed credit notes associated with an invoice in great length above as well as how to un-allocate them if necessary. There is one additional feature within the Sales Invoice dashboard that enables you to create a stand-alone credit note, or a credit note not associated with an invoice. These are one-off credit notes.
Exercise
Lisa Smith has decided she’d like to have special boxes printed with the wedding party’s names to put her chocolates in as wedding favors. Since Lisa will be using some of her own boxes, Divine Chocolates is going to offer a credit.
• To do this, navigate to New Invoice and click New Credit Note:
• Fill in all pertinent info and type a description in the Description box what the credit being issued is for. Type: Customer Supplied Boxes.
• In the amount type 25.00$. We won’t credit for sales tax so be sure and select No Tax in the Tax Rate field.

P a g e | 20
• Click Save. The stand-alone credit note now appears on Lisa Smith’s account where it can be save on her account towards a future balance or sent to her in the form of a refund.
Credit Note Refunds Lisa Smith would like a refund as opposed to a credit on her account. Click on Record Refund.

P a g e | 21
• The amount of the refund pre-fills. Select the account the refund should be Paid From, and the Method. Select Electronic. Click Refund 25.00$
• Once the refund is complete, a Refund Created Successfully notification appears in green at the bottom. Additionally, the sales credit note changes to Paid and 1 payment is reflected under the Amount Paid:
Lesson
Since Divine Chocolates will be sending multiple invoices to fulfill Lisa Smith’s order, they won’t charge for Delivery on every order. Therefore we need to provide a credit for

P a g e | 22
the delivery charge she was invoiced for. We don’t want to apply a credit for the Milk Chocolate Wedding Bells or the White Boxes they’ll be delivered in.
• As such, click on the trash can icon to remove those items from the Credit Note and ensure Ms. Smith still gets billed for those. This will leave the Delivery Service as the only item on the Credit Note Ms. Smith will receive a Credit Note for in the amount of 141.25$.
• Once complete, let’s send Lisa Smith an email notifying her of the credit posted to her account. Click Save and Email.
• Both Lisa and her wedding planner will receive a copy of the credit note on the
account.

P a g e | 23
The Sales Credit Note (SCN) will appear as a line item on the Sales Credit Note dashboard:
• To access Sales Credit notes at a later date, simply select Sales Credit Notes from the Sales tab in the menu at the top of the screen:

P a g e | 24
When returning to the Sales Invoice dashboard, it has been updated to reflect the Sales Credit Note changing the status to Part Paid:
A notification of the credit note appears at the top of the screen highlighted in orange as Part Paid:
• The credit note is reflected to the right of the invoice in the Amount Paid of 141.25$. It has been reduced from the orignal amount owed, 607.38$ to the Amount Outstanding 466.13$.
• To review the credit note or to un-allocate it, if done in error, click the blue hyperlink ‘1 payment Mar 06, 2018’ to be navigated to the Allocations screen:

P a g e | 25
• This should look familiar as we just learned how to review and un-allocate payments in a previous lesson. From here, Divine Chocolcates has two options. They can Void the Credit Note or they can un-allocate or ‘un-link’ the Credit Note (customer allocation transaction) from this particular invoice.
• To un-allocate a Credit Note posted to the account, click on the blue hyperlink $141.25 in the Amount column.
• Clear the check boxes for the invoice and the Credit Note you want to un-allocate.
• It’s important to note, you must ensure an invoice is selected along with the credit note or notes you want to unallocate. You must have 0.00$ in the Left To Allocate box for the record to be unallocated and saved. Otherwise you will receive the following error message:
NOTE: If you allocated multiple transactions at the same time, and you only want to unallocate one invoice and Credit Note, the remaining transactions are unaffected. If the Credit Note covered multiple invoices, click the Credit Note. Change the amount Paid and click Save. For example, if the invoice was for $50 and the credit note was $100, the amount Paid should be $50.

P a g e | 26
• Click Save.
We’ve successfully un-allocated the Sales Invoice and Credit Note which are now outstanding. You can make any changes as required, or if the Credit Note was allocated to the wrong invoice, you can now allocate it to the correct invoice.
The customer record is updated in the activity section as seen here and a notification appears at the bottom on the screen in green, that the allocation has been successfully deleted.
Customer Allocation You’ve just seen how account Allocations can be done directly from an invoice or Credit Note. If you’ve created stand-alone credit notes or payments on account for a customer or vendor, you can allocate these to one or more invoices using the Account Allocation option directly from within the Contact record. Navigate to to Manage and select Account Allocation:

P a g e | 27
Stand-alone Credit Notes or Payments • If you’ve created stand-alone credit notes or payments on account (meaning,
those not associated with an invoice as above) for a customer or vendor, you can allocate these to one or more invoices using the Account Allocation option.
• You can only use this option to allocate (or link) outstanding transactions together. You can’t use it to record a payment or a receipt. If you have received any money in or are paying money out, you must record it using the Customer Receipt or Vendor Payment option from Banking which we will explore further in another lesson.

P a g e | 28
We have two remaining featuers we haven’t discussed on the completed invoice form:
Print Packing Slip The packing slip or delivery list can be inserted inside a package itemizing the goods being shipped. This is different than the shipping label which is attached to the outside of the package for shipment.
Accounting has a nifty feature within SETTINGS > INVOICE FORM SETTINGS that allows you to customize packing slips. For the features to be enabled, they must be selected within Terms & Conditions with a checkmark, as shown below:
• Add Delivery Notes for customer • Show a Signature Line: for customer signature upon delivered items • Show a Picked Column: column used to check off items that have been
picked from inventory and fulfilled in the order • Show Document Notes • Show Contact Details
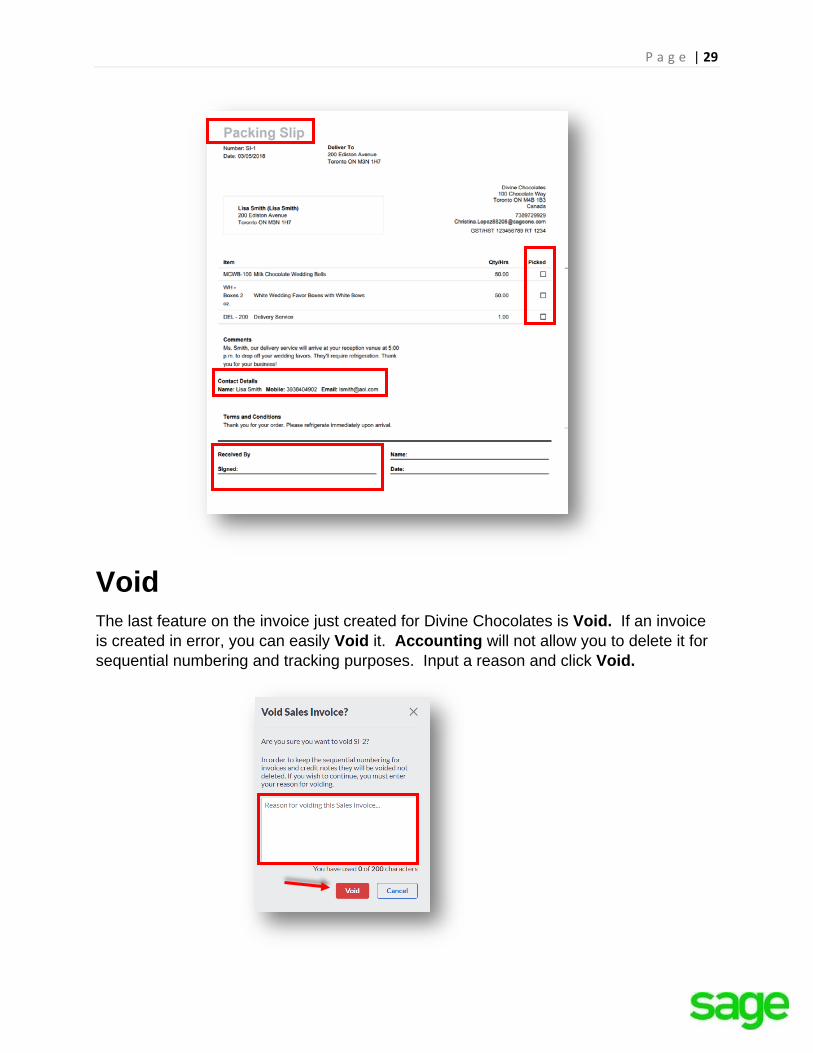
P a g e | 29
Void The last feature on the invoice just created for Divine Chocolates is Void. If an invoice is created in error, you can easily Void it. Accounting will not allow you to delete it for sequential numbering and tracking purposes. Input a reason and click Void.

P a g e | 30
Doing so will change the status to Void on the Dashboard:
NOTE: It’s important to note if an invoice has been reconciled you won’t be able to void the invoice. We’ll discuss how to do this in a later lesson.
Check Your Knowledge Answer the following questions about the material covered in this lesson.
Short Answer
Write a short answer to the question below.
1. Why might you need to un-allocate a payment or receipt?
Multiple Choice
Mark the correct answer(s) to the question below.
2. What are two areas you can record a payment? A. _____ Banking B. _____ Customer Contact dashboard/Payment Details Tab C. _____ Settings within Online Payments D. _____ Sales Invoice

P a g e | 31
3. Where would you go to un-allocate a payment on an account? A. _____ Customer Contact record, Payment Details tab B. _____ From the invoice, navigate to and click on the blue hyperlink in the
invoice management box to the top right of the invoice. It would say, ‘1 payment on Mar 05, 2018’.
C. _____ Vendor Details D. _____ Settings, Credit Card Payments & Adjustments
4. Once unchecking a transaction to un-allocate it from an invoice, the Paid amount
moves to the ____________ amount and _________ the amount owed. A. _____ Total / Decreases B. _____ Pending / Suspends C. _____ Payment Details / Changes D. _____ Outstanding / Increases
5. There are two types/ways to process a credit note. What are they?
A. _____ Customer Contact record, Payment Details tab B. _____ Refunds and Returns tab C. _____ Stand-Alone (From Sales Invoice Menu/Credit Notes), and Directly from
an Invoice D. _____ Settings, Financial Settings & Adjustments
6. When un-allocating a credit note, you must have _____ in the _______________for
the record to be unallocated and saved. A. _____ 0.00$ / Left to Allocate B. _____ Ample reserves / Bank C. _____ A 30-day notice to the customer / Notes Section D. _____ A bank account / Banking module
7. Creating an invoice/credit note and recording payment/refund from within an invoice
automatically creates a transaction allocation. To link a one-off payment or stand-alone credit note to associated invoices/credit notes, you can use the __________ option from within the _________ .
A. _____ Refund / Banking Allocation B. _____ Account Allocation option / Contact Record C. _____ Customer Management / Profile D. _____ Banking / Payment Settings
8. To view all Credit Notes in Accounting, navigate to:
A. _____ Reporting tab, Run a Credit Notes report B. _____ Sales Invoice dashboard, Select More and then Credit Notes from within
the drop-down menu C. _____ Exports tab D. _____ The Sales tab and select Credit Notes from the menu

P a g e | 32
9. Christina is mailing some chocolates to a customer. In printing the packing slip, she
noticed the signature line and picked column is missing from the packing slip? Why might that be?
A. _____ It wasn’t indicated when setting up the inventory item B. _____ Packing Slips aren’t a feature in Accounting C. _____ The items were set to Inactive D. _____ It wasn’t indicated with a checkmark in the Delivery Note tab within the
Invoice Form Settings/Terms & Conditions
True or False
Enter ‘T’ for True or ‘F’ for False for each of the affirmations below.
10. _____ Accounting is unable to process partial payments 11. _____ A Discount can be applied while creating an invoice AND while recording a
payment 12. _____ To edit an invoice that have payments on the account, the payments need
to be unallocated first 13. _____ You can copy and save an invoice with depleted inventory 14. _____ A stand-alone credit note IS associated with a particular invoice 15. _____ Once a refund has been recorded, the status changes to UNPAID 16. _____ You can delete an invoice in Accounting
End Of Lesson

P a g e | 33
Please note:
Every effort has been made to ensure that the information provided in this educational series is accurate, up-to-date, and complete, but no guarantee is made to that effect. URLs and additional resources 'Beyond the Classroom' are continuously changing. Because the software is customizable in a number of ways, the language used in this guide may be different from what you 'see' when you work with your company's data file(s).
©Sage Software 2018. No part of this document may be copied, photocopied, reproduced, translated or reduced to any electronic medium or machine-readable form, in whole or in part in any manner without the permission of ©Sage Software. Any other reproduction in any form without the permission of ©Sage Software is prohibited. All educational materials contained on this site are protected by United States copyright law and may not be reproduced, distributed, transmitted, displayed, published or broadcast without the prior written permission of ©Sage Software.