sage abra sql hrms/media/site/sage hrms/pdf/inproduct/ab… · sage abra sql hrms and abra link...
TRANSCRIPT
Sage Abra SQL HRMS Abra Link User Guide
© 2010 Sage Software, Inc. All rights reserved. Sage, the Sage logos, and the Sage product and service names mentioned herein are registered trademarks or trademarks of Sage Software, Inc., or its affiliated entities. Business Objects, the Business Objects logo, and Crystal Reports are registered trademarks of SAP France in the United States and in other countries. NetLib is a registered trademark of Communication Horizons. OrgPlus is a trademark of HumanConcepts, LLC. TextBridge is a registered trademark of ScanSoft, Inc. Microsoft, Outlook, Windows, Windows NT, Windows Server, the .NET logo, Windows Vista and the Windows logo are trademarks or registered trademarks of Microsoft Corporation in the United States and /or other countries. The names of all other products and services are the property of their respective holders.
Sage has made every effort to ensure this documentation is correct and accurate but reserves the right to make changes without notice at its sole discretion. Use, duplication, modification, or transfer of the product described in this publication, except as expressly permitted by the Sage License Agreement is strictly prohibited. Individuals who make any unauthorized use of this product may be subject to civil and criminal penalties.
For additional assistance on this and other Sage products and services, visit our Web site at: http://www.sageabra.com
Abra Link i
Table of Contents Getting Started.............................................................................................................. 1
Overview............................................................................................................................................................... 1 Start Abra Link.............................................................................................................................................. 2
Importing and Exporting ASCII Files............................................................................ 3
Importing into Sage Abra SQL HRMS.............................................................................................................. 3 Exporting from Sage Abra SQL HRMS............................................................................................................. 3
How the Import Process Works.................................................................................................................. 3 Create an Import Template.......................................................................................................................... 4 Import into Sage Abra SQL HRMS from an ASCII File........................................................................... 7 Export from Sage Abra to an ASCII File.................................................................................................... 8
Importing Service Bureau Files .................................................................................... 9
Create a Service Bureau Template.............................................................................................................. 9 Import Service Bureau Data ...................................................................................................................... 13
Exporting Abra HR Data to ADP PC Exchange......................................................... 15
Change a Translation Table....................................................................................................................... 16 Create an ADP Template ........................................................................................................................... 17 Perform a Trial Export From Abra HR to ADP PC Exchange .............................................................. 25 Perform a Final Export From Abra HR to ADP PC Exchange.............................................................. 26
Reports ......................................................................................................................... 29
Run a Report................................................................................................................................................ 29 Purge Report Information.......................................................................................................................... 29 Sample Reports ........................................................................................................................................... 30
Reference Material ..................................................................................................... 31
ASCII File Formats............................................................................................................................................. 31 Comma‐Delimited Format ........................................................................................................................ 31 Blank Fields ................................................................................................................................................. 32 Space‐Delimited Format ............................................................................................................................ 32 Tab‐Delimited Format................................................................................................................................ 32 Fixed‐Length Format.................................................................................................................................. 33
ii Sage Abra SQL HRMS
Required Fields on ASCII Files ........................................................................................................................ 33 Sage Abra SQL HRMS Tables and Required Fields............................................................................... 34
ADP Export Errors............................................................................................................................................. 39 Setup Procedures for Abra Link and ADP PC Exchange ............................................................................. 40
PC Exchange Required Fields ................................................................................................................... 41 Expression Builder............................................................................................................................................. 41
To Determine the Databases and Fields Available ................................................................................ 42 Create an Expression.................................................................................................................................. 42 Write a Conversion Rule............................................................................................................................ 43
Index ............................................................................................................................ 45
Abra Link 1
Getting Started Overview Abra Link is an import/export software application. It is designed to let you easily transfer your personnel, and training data to Abra HR, Time Off, and Training.
Sage Abra SQL HRMS and Abra Link share databases and tables. When you set up Sage Abra SQL HRMS, databases are automatically established to store all necessary employee and system information. You also set up rules, such as code tables, that instruct the Sage Abra HRMS components how to manage information. Because these databases and rules are shared, you do not have to re‐establish them in Abra Link.
Each time you use Abra Link, it keeps track of all the imports and exports you perform. Using the reports provided with Abra Link, you can review the entire process.
Templates
Abra Link uses templates to transfer data. A template is a set of parameters or selected variables used for importing or exporting ASCII files. It might help to think of a template as a map of the data fields which will be used when moving data through Abra Link.
Importing Data to Sage Abra SQL HRMS
With Abra Link you can quickly and efficiently:
Import ASCII files from another application (human resources, applicant tracking, payroll, attendance, training, or any spreadsheet application) into your Sage Abra SQL HRMS databases.
These can be new employees or applicants or additional data for employees already maintained by Sage Abra.
Import data from your ADP PC/Payroll System directly into Sage Abra SQL HRMS databases.
Exporting Data from Sage Abra SQL HRMS
With Abra Link you can:
Export information from your Sage Abra SQL HRMS databases to ASCII files for use in other applications, such as a spreadsheet or another database application.
Export data from your Sage Abra SQL HRMS databases to ADP PC Exchange.
During installation of Sage Abra SQL HRMS, the system installed every option you purchased, including Abra Link. Before you start using Abra Link, you must do the following:
Overview
2 Sage Abra SQL HRMS
Set up Sage Abra SQL HRMS.
Set up an employer in Abra HR or Training.
Set up security and give users access to Abra Link. Note that if you do not access Abra Link using the Master user ID, you can import and export only those fields to which you have access.
If you will be using ADP PC Exchange, install and implement PC Exchange. Abra Link supports Versions 4, 5 and 6 of your ADP PC/Payroll System for imports and supports all versions for exports.
Be familiar with the master files and using the Abra data dictionary so you can find the fields you need for the template.
Know how to read the ASCII file you intend to import into your Abra database. You should understand what each field represents and the properties for each field.
Understand file formats. Abra Link imports or exports ASCII files with these common file formats: comma‐delimited, space‐delimited, tab‐delimited, fixed‐length.
Understand the import process and its impact on the Sage Abra SQL HRMS databases.
Verify the ASCII file from your source application will work effectively with the template. You may have to prepare your ASCII Files for import.
Tip: For additional information on developing an external interface or importing time sheet data into Abra Link, refer to the Technical Reference document available at SupportPlus Online.
Start Abra Link
1. Log on to Sage Abra SQL HRMS, enter your user name and password, select Abra Link from the drop‐down list, and click Logon.
2. The first time you start Abra Link, it asks if you want to link your ADP codes to your Abra HR codes. If you will be using Abra Link to export Abra HR Data to ADP PC Exchange and you want your PC Exchange codes to default to the Abra HR codes, click Yes. Otherwise, click No.
Tip: We recommend you select Yes so you will only need to do minimal editing to translation tables before you start using Abra Link to export data to PC Exchange. If you select No, you will need to manually create all your translation tables, which can be a time‐consuming task.
Importing into Sage Abra SQL HRMS
Abra Link 3
Importing and Exporting ASCII Files You will use a template to define the information in the ASCII files that you will use to import and export personnel, payroll, and training data from and to Sage Abra SQL HRMS.
Importing into Sage Abra SQL HRMS You can import new employees into Sage Abra SQL HRMS, or you can import additional data for employees already maintained in Sage Abra SQL HRMS.
1. Create an ASCII file of the data.
2. Select a template to use for the import.
3. Use the Import ASCII File feature to import the data into Sage Abra. Use the reports provided with Abra Link to review the entire process.
4. When you open Sage Abra SQL HRMS, the employee information is there.
Exporting from Sage Abra SQL HRMS With Abra Link, you can also export Sage Abra SQL HRMS data from those products to an ASCII file for use with other software. You can export any data field maintained by Sage Abra SQL HRMS to a comma‐delimited, tab‐delimited, space‐delimited, or fixed‐length ASCII file.
1. Determine the information you want to export.
2. Select a template to use for the export.
3. Use the Export to an ASCII File feature to export the data from Sage Abra. Use the reports provided with Abra Link to review the entire process.
4. The information is now in simple ASCII form.
How the Import Process Works
When you import data from an ASCII file into a Sage Abra SQL HRMS database, the master files are affected differently than other files.
When you import data from an ASCII file to a master file, Abra Link looks for employee numbers and company codes and updates changed information for employees already existing in Sage Abra SQL HRMS . If an employee in the ASCII file is not found in Sage Abra SQL HRMS, Abra Link adds the employee and all that employee’s data to the Sage Abra SQL HRMS database.
If you imported the same data three times to a master file, you would only have one set of the data.
When you import data from an ASCII file to any file other than a master file, Abra Link alwaysadds the data to the Sage Abra SQL HRMS database file. Additionally, if a particular
Exporting from Sage Abra SQL HRMS
4 Sage Abra SQL HRMS
employee number does not already exist in Sage Abra SQL HRMS, Abra Link adds that number to HRPERSNL and adds the rest of the data to the file to which you are importing.
If you imported the same data three times to a non‐master file, you would have three sets of the same data.
Example: If you want to import dependent information, you would import to the Employee Dependent file (HDEPEND). Abra Link adds allthe data from your ASCII file to the HDEPEND file. It also adds any new employee numbers to HRPERSNL.
However, if your template only includes fields from the Employee Dependent file, the only information Abra Link adds for employees not found in HRPERSNL is the employee number and the company code in HRPERSNL. All other information, such as name, address, and birth date, is left blank in Sage Abra SQL HRMS. You need to enter that data manually or create a different template to import it.
Tip: If you donʹt want duplicate records in HDEPEND, use Abra Link to import to files other than HRPERSNL only for initial setup of your system, or delete duplicate records after you complete an import. If, on the other hand, you are importing data such as events, you may want duplicate or additional event records because new ones would have different dates and different comments. To keep your event records up to‐date, you could import new event data from an ASCII file to the HEVENTS file.
Create an Import Template
The process for creating a template is the same whether you are importing to Abra HR, Attendance, or Train.
1. From the Abra Link menu, select File > New Template. The Template Setup page opens.
2. Enter a Template ID and Description. The Template ID merely provides a short name (up to 12 characters) for the template. The description field allows up to 30 characters for you to describe the template.
3. From the Database drop‐down list, select the database file into which your ASCII data should be imported. This will most likely be a master file; however, you can add a second database.
4. From the Database drop‐down list, select the second database.
5. Click Add. The Add Template Field dialog box opens. Both the database you selected and the master database are listed in the Select Field From area.
6. Complete the Add Template Field dialog box for each field you want to import. You must know the format of the ASCII file and be able to relate the fields in the ASCII file to fields in Sage Abra. Refer to Required Fields on ASCII Files for the fields that should be populated when you import the ASCII file. Then add these fields to your import template.
7. By default, Abra Link shows the first field in the selected database file. Use the Field Name drop‐down list to display all the fields in the database file; if necessary, select a different field.
Exporting from Sage Abra SQL HRMS
Abra Link 5
8. After you select a field, Abra Link completes the entries for the field type, length, decimal places and field order. If necessary, you can make changes.
9. Field Type. Identifies whether field contains a date, numbers or alphanumeric characters. If you want to import a character field in your ASCII file as a numeric field in Sage Abra, you can change the field type accordingly.
10. Field Length. Determines the number of characters. It is recommended that you keep the fields the same size.
Warning: If you do choose a field size smaller than that maintained by Sage Abra, Abra Link truncates (removes) characters in the imported file. Character data is truncated on the right; numeric data is truncated on the left. Truncating numeric data could result in considerable data loss in your imported file.
• Decimal Places. Determines the number of decimal places for numeric fields.
• Field Order. Identifies the sequence in which the fields appear in your imported file. You can change the field order to suit your needs.
• The Conversion Rule text box allows you to change the nature of a field as you import it.
Note: When you are exporting, if you have a field in a rule, that field must exist in the template. When you are importing, if you have a field in a rule, that field must exist in the Abra file you have selected.
11. Click OK to add this field to the template. The fields you have added now appear in the Template Fields list.
12. Repeat for each field you want to add to the template
13. If you want to select defaults for your template, click Template Defaults.
14. Set your template defaults.
15. When done, click OK.
16. Click OK to save your template.
Create an Export Template
The process for creating a template is the same whether you are importing to Abra HR, Attendance or Train.
1. From the Abra Link menu, select File > New Template.
2. Enter a Template ID and Description.
3. Select the database file containing the majority of the data you want to export. This will most likely be a master file; however, you can add a second database.
4. From the Database drop‐down list, select the second database.
Exporting from Sage Abra SQL HRMS
6 Sage Abra SQL HRMS
5. Click Add. The Add Template Field dialog box opens. Both the database you selected and the master database are listed in the Select Field From area.
6. Add a field for each field in the ASCII file to which you are exporting.
7. You can change field type, field length, number of decimal places, and field order.
Warning: If you do choose a field size smaller than that maintained by Sage Abra, Abra Link truncates data (removes characters) to fit the data in the size field you indicate in the template.
8. Click OK to add the field to the template.
9. When you’ve finished adding fields, click Template Defaults.
10. Set your template defaults.
11. When done, click OK.
12. Click OK to save your export template.
Modify a Template
1. From the Abra Link menu, select File > Modify Template to display a list of all the templates you have created.
Tip: Click the ID radio button to list the templates by template ID rather than by description.
2. Double‐click the template you want to modify. The Template Setup page opens.
3. If you want, you can add a second database.
4. If you want to add, edit, or delete fields, do the following:
5. To delete a field, highlight the field and click Delete. Confirm the deletion. Abra Pay Link automatically re‐orders the remaining fields.
6. To add a field, click Add. The Add Template Field dialog box opens. Insert the field where you want it to be in the template.
7. To edit a field, click the More button in front of the field name. The Edit Template Field dialog box opens.
8. Change the order of fields as necessary.
9. Click OK to save your changes.
10. If you need to modify the defaults for the template, click the Template Defaults arrow button on the Template Setup page.
11. When you finish editing the template, click OK.
Exporting from Sage Abra SQL HRMS
Abra Link 7
Copy a Template
Abra Link enables you to open a template, change the ID, and any other values and selections (such as, employer), and then copy those changes to a new template. This feature is handy if you want to set up several templates with different fields selected.
1. From the Abra Link menu, select File > Modify Template.
2. Double‐click the template from which you want to copy.
3. Change the ID so Abra Link can copy the template. Change the other information as necessary.
4. Click OK when you finish. Abra Link asks if you want to save another copy of the template with the new Description.
5. Click Yes to copy the template.
Delete a Template
1. From the Abra Link menu, select File > Delete Template.
2. Select the template.
3. Abra Link asks you to confirm the deletion. Click Yes to delete the template. Click No if you do not want to delete the template.
Import into Sage Abra SQL HRMS from an ASCII File
1. Back up your Sage Abra SQL HRMS databases before you import.
2. From the Import/Export menu, select Import ASCII File into Sage Abra.
3. Double‐click the template you want to use for the import. The Import to Sage Abra page opens with the defaults set for this template.
4. Confirm all settings are correct and change any as necessary.
5. After you select the file to import, we recommend you check the contents of the ASCII file for accuracy before you start the import process.
6. From the Import to Sage Abra page, click View File. The ASCII file you selected for import lists all employee records to be imported.
Note: Because Abra Link opens the ASCII file as a read‐only file, you cannot add, edit, or delete any information in the file.
7. Scroll through the file and check its contents to make sure your records import correctly. Verify file type, field order, and date format.
8. When you finish viewing the file, click the Close button.
9. If you determine your import might not run correctly, make corrections before you perform the import process. You might need to modify your import template, edit the ASCII file, or change your import options.
Exporting from Sage Abra SQL HRMS
8 Sage Abra SQL HRMS
10. Click Start to begin the import. When the import is complete, a message box shows you the total number of records added and imported to your databases.
11. Check the imported information for accuracy by reviewing the appropriate pages and reports in Sage Abra.
Export from Sage Abra to an ASCII File
1. From the Import/Export menu, select Export to ASCII File from Sage Abra.
2. Double‐click the template you want to use for the export. The Export from Sage Abra page opens with the defaults set for this template.
3. Confirm all settings are correct and change any as necessary.
4. Click Start to begin the export. When the process is complete, a message box shows you the total number of records exported to your ASCII file.
5. Click View File to see the records you just exported to the ASCII file.
6. Scroll through the file and check its contents to make sure it exported properly. Verify file type, field order, date format, selection criteria, and employer.
Note: Because Abra Link opens the ASCII file as a read‐only file, you cannot add, edit, or delete any information in the file.
7. When you finish viewing the file, click the Close button to close the file.
8. If you see inconsistencies or errors, make corrections. You might need to modify your export template or change your export options.
9. After you make corrections, perform the export process again.
Abra Link 9
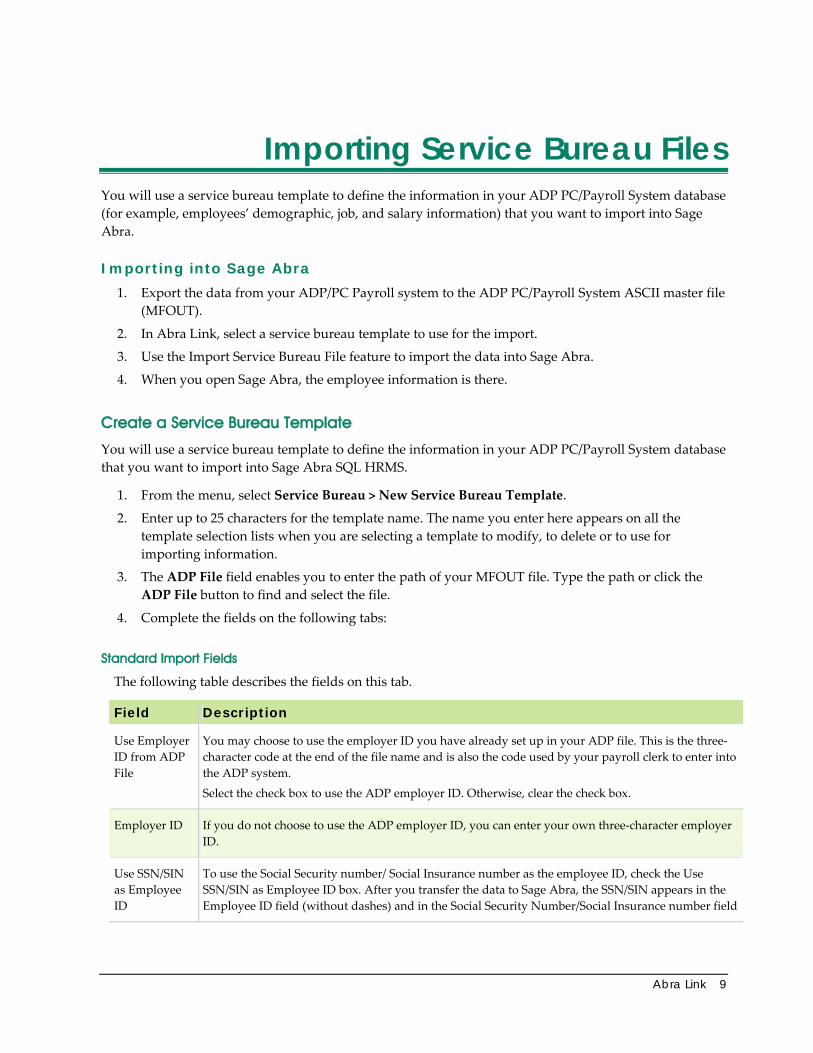
Importing Service Bureau Files You will use a service bureau template to define the information in your ADP PC/Payroll System database (for example, employees’ demographic, job, and salary information) that you want to import into Sage Abra.
Importing into Sage Abra
1. Export the data from your ADP/PC Payroll system to the ADP PC/Payroll System ASCII master file (MFOUT).
2. In Abra Link, select a service bureau template to use for the import.
3. Use the Import Service Bureau File feature to import the data into Sage Abra.
4. When you open Sage Abra, the employee information is there.
Create a Service Bureau Template
You will use a service bureau template to define the information in your ADP PC/Payroll System database that you want to import into Sage Abra SQL HRMS.
1. From the menu, select Service Bureau > New Service Bureau Template.
2. Enter up to 25 characters for the template name. The name you enter here appears on all the template selection lists when you are selecting a template to modify, to delete or to use for importing information.
3. The ADP File field enables you to enter the path of your MFOUT file. Type the path or click the ADP File button to find and select the file.
4. Complete the fields on the following tabs:
Standard Import Fields
The following table describes the fields on this tab.
Field Description
Use Employer ID from ADP File
You may choose to use the employer ID you have already set up in your ADP file. This is the three‐character code at the end of the file name and is also the code used by your payroll clerk to enter into the ADP system.
Select the check box to use the ADP employer ID. Otherwise, clear the check box.
Employer ID If you do not choose to use the ADP employer ID, you can enter your own three‐character employer ID.
Use SSN/SIN as Employee ID
To use the Social Security number/ Social Insurance number as the employee ID, check the Use SSN/SIN as Employee ID box. After you transfer the data to Sage Abra, the SSN/SIN appears in the Employee ID field (without dashes) and in the Social Security Number/Social Insurance number field
Exporting from Sage Abra SQL HRMS
10 Sage Abra SQL HRMS
Field Description
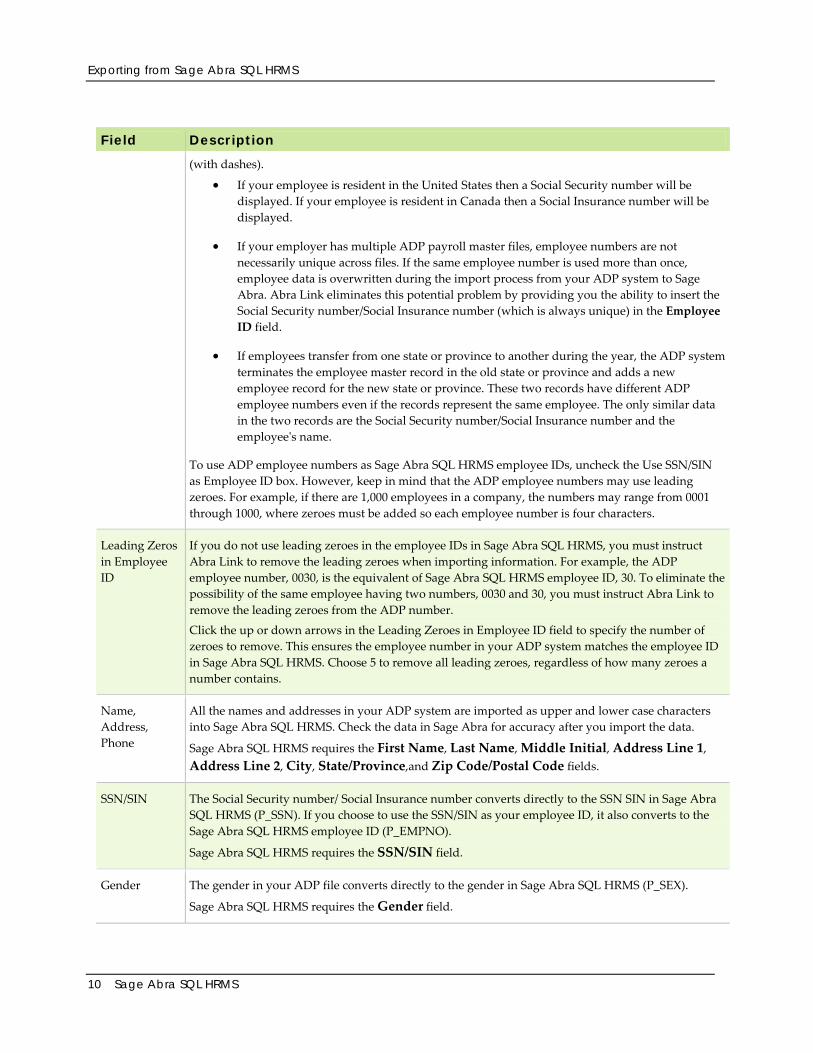
(with dashes).
• If your employee is resident in the United States then a Social Security number will be displayed. If your employee is resident in Canada then a Social Insurance number will be displayed.
• If your employer has multiple ADP payroll master files, employee numbers are not necessarily unique across files. If the same employee number is used more than once, employee data is overwritten during the import process from your ADP system to Sage Abra. Abra Link eliminates this potential problem by providing you the ability to insert the Social Security number/Social Insurance number (which is always unique) in the Employee ID field.
• If employees transfer from one state or province to another during the year, the ADP system terminates the employee master record in the old state or province and adds a new employee record for the new state or province. These two records have different ADP employee numbers even if the records represent the same employee. The only similar data in the two records are the Social Security number/Social Insurance number and the employeeʹs name.
To use ADP employee numbers as Sage Abra SQL HRMS employee IDs, uncheck the Use SSN/SIN as Employee ID box. However, keep in mind that the ADP employee numbers may use leading zeroes. For example, if there are 1,000 employees in a company, the numbers may range from 0001 through 1000, where zeroes must be added so each employee number is four characters.
Leading Zeros in Employee ID
If you do not use leading zeroes in the employee IDs in Sage Abra SQL HRMS, you must instruct Abra Link to remove the leading zeroes when importing information. For example, the ADP employee number, 0030, is the equivalent of Sage Abra SQL HRMS employee ID, 30. To eliminate the possibility of the same employee having two numbers, 0030 and 30, you must instruct Abra Link to remove the leading zeroes from the ADP number.
Click the up or down arrows in the Leading Zeroes in Employee ID field to specify the number of zeroes to remove. This ensures the employee number in your ADP system matches the employee ID in Sage Abra SQL HRMS. Choose 5 to remove all leading zeroes, regardless of how many zeroes a number contains.
Name, Address, Phone
All the names and addresses in your ADP system are imported as upper and lower case characters into Sage Abra SQL HRMS. Check the data in Sage Abra for accuracy after you import the data.
Sage Abra SQL HRMS requires the First Name, Last Name, Middle Initial, Address Line 1, Address Line 2, City, State/Province,and Zip Code/Postal Code fields.
SSN/SIN The Social Security number/ Social Insurance number converts directly to the SSN SIN in Sage Abra SQL HRMS (P_SSN). If you choose to use the SSN/SIN as your employee ID, it also converts to the Sage Abra SQL HRMS employee ID (P_EMPNO).
Sage Abra SQL HRMS requires the SSN/SIN field.
Gender The gender in your ADP file converts directly to the gender in Sage Abra SQL HRMS (P_SEX).
Sage Abra SQL HRMS requires the Gender field.
Exporting from Sage Abra SQL HRMS
Abra Link 11
Field Description
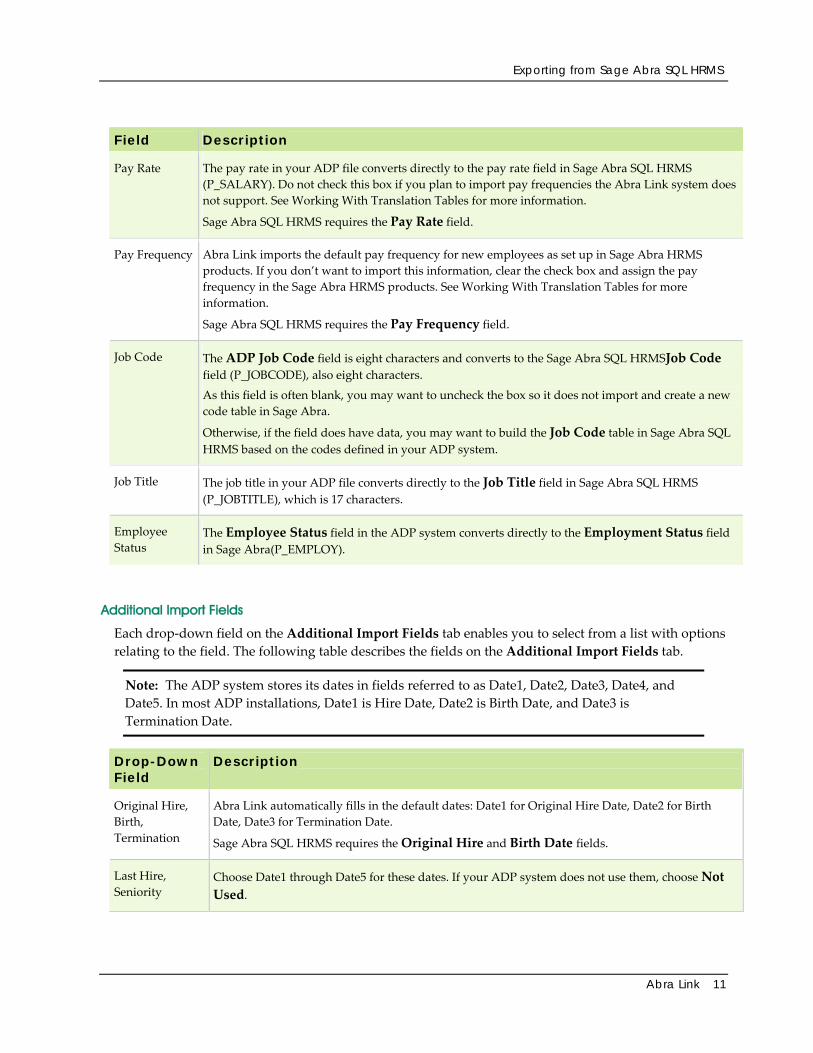
Pay Rate The pay rate in your ADP file converts directly to the pay rate field in Sage Abra SQL HRMS (P_SALARY). Do not check this box if you plan to import pay frequencies the Abra Link system does not support. See Working With Translation Tables for more information.
Sage Abra SQL HRMS requires the Pay Rate field.
Pay Frequency Abra Link imports the default pay frequency for new employees as set up in Sage Abra HRMS products. If you don’t want to import this information, clear the check box and assign the pay frequency in the Sage Abra HRMS products. See Working With Translation Tables for more information.
Sage Abra SQL HRMS requires the Pay Frequency field.
Job Code The ADP Job Code field is eight characters and converts to the Sage Abra SQL HRMSJob Code field (P_JOBCODE), also eight characters.
As this field is often blank, you may want to uncheck the box so it does not import and create a new code table in Sage Abra.
Otherwise, if the field does have data, you may want to build the Job Code table in Sage Abra SQL HRMS based on the codes defined in your ADP system.
Job Title The job title in your ADP file converts directly to the Job Title field in Sage Abra SQL HRMS (P_JOBTITLE), which is 17 characters.
Employee Status
The Employee Status field in the ADP system converts directly to the Employment Status field in Sage Abra(P_EMPLOY).
Additional Import Fields
Each drop‐down field on the Additional Import Fields tab enables you to select from a list with options relating to the field. The following table describes the fields on the Additional Import Fields tab.
Note: The ADP system stores its dates in fields referred to as Date1, Date2, Date3, Date4, and Date5. In most ADP installations, Date1 is Hire Date, Date2 is Birth Date, and Date3 is Termination Date.
Drop-Down Field
Description
Original Hire, Birth, Termination
Abra Link automatically fills in the default dates: Date1 for Original Hire Date, Date2 for Birth Date, Date3 for Termination Date.
Sage Abra SQL HRMS requires the Original Hire and Birth Date fields.
Last Hire, Seniority
Choose Date1 through Date5 for these dates. If your ADP system does not use them, choose Not Used.
Exporting from Sage Abra SQL HRMS
12 Sage Abra SQL HRMS
Drop-Down Field
Description
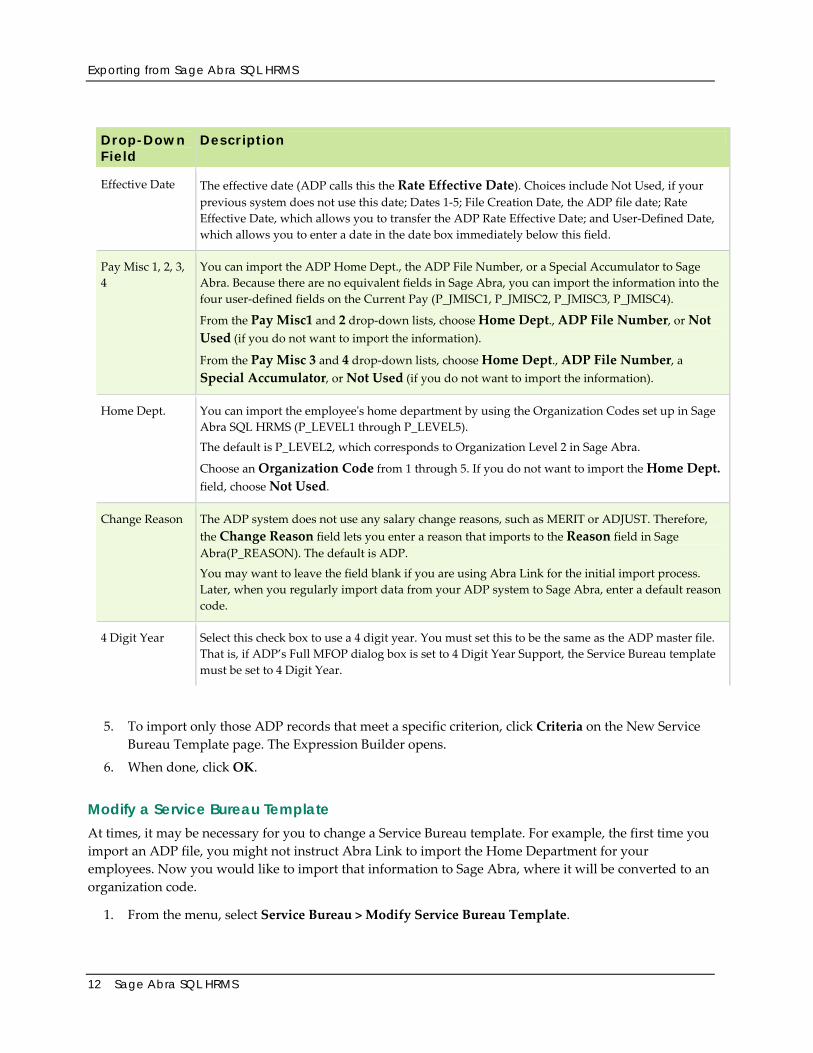
Effective Date The effective date (ADP calls this the Rate Effective Date). Choices include Not Used, if your previous system does not use this date; Dates 1‐5; File Creation Date, the ADP file date; Rate Effective Date, which allows you to transfer the ADP Rate Effective Date; and User‐Defined Date, which allows you to enter a date in the date box immediately below this field.
Pay Misc 1, 2, 3, 4
You can import the ADP Home Dept., the ADP File Number, or a Special Accumulator to Sage Abra. Because there are no equivalent fields in Sage Abra, you can import the information into the four user‐defined fields on the Current Pay (P_JMISC1, P_JMISC2, P_JMISC3, P_JMISC4).
From the Pay Misc1 and 2 drop‐down lists, choose Home Dept., ADP File Number, or Not Used (if you do not want to import the information).
From the Pay Misc 3 and 4 drop‐down lists, choose Home Dept., ADP File Number, a Special Accumulator, or Not Used (if you do not want to import the information).
Home Dept. You can import the employeeʹs home department by using the Organization Codes set up in Sage Abra SQL HRMS (P_LEVEL1 through P_LEVEL5).
The default is P_LEVEL2, which corresponds to Organization Level 2 in Sage Abra.
Choose an Organization Code from 1 through 5. If you do not want to import the Home Dept. field, choose Not Used.
Change Reason The ADP system does not use any salary change reasons, such as MERIT or ADJUST. Therefore, the Change Reason field lets you enter a reason that imports to the Reason field in Sage Abra(P_REASON). The default is ADP.
You may want to leave the field blank if you are using Abra Link for the initial import process. Later, when you regularly import data from your ADP system to Sage Abra, enter a default reason code.
4 Digit Year Select this check box to use a 4 digit year. You must set this to be the same as the ADP master file. That is, if ADP’s Full MFOP dialog box is set to 4 Digit Year Support, the Service Bureau template must be set to 4 Digit Year.
5. To import only those ADP records that meet a specific criterion, click Criteria on the New Service Bureau Template page. The Expression Builder opens.
6. When done, click OK.
Modify a Service Bureau Template At times, it may be necessary for you to change a Service Bureau template. For example, the first time you import an ADP file, you might not instruct Abra Link to import the Home Department for your employees. Now you would like to import that information to Sage Abra, where it will be converted to an organization code.
1. From the menu, select Service Bureau > Modify Service Bureau Template.
Exporting from Sage Abra SQL HRMS
Abra Link 13
2. Highlight the template you want to modify and click OK. The Modify Service Bureau Template page opens.
3. Change the information on both tabs as necessary. For a description of each field on the tabs, see Create a Service Bureau Template.
4. Click OK when you finish.
5. If you modify the Template Name, Abra Link reminds you the template description has changed and asks if you want to save another copy of the template with the new description. Click Yes to save a new template with the modified description.
Copy a Service Bureau Template After you have created a template, Abra Link enables you to open it, change the ID, and the selected ADP file, and then copy those changes to a new template. This feature is handy if you want to set up several similar templates with different ADP files selected.
1. From the menu, select Service Bureau > Modify Service Bureau Template.
2. Highlight the template you want to copy and click OK. The Modify Service Bureau Template page opens.
3. Change the Template Name so Abra Link can copy the template. Change the other information as necessary. For a description of each field, see Create a Service Bureau Template.
4. Click OK when you finish. Abra Link asks if you want to save another copy of the template with the new description.
5. Click Yes to copy the template.
Delete a Service Bureau Template At any time, you can delete a Service Bureau template from Abra Link.
1. From the menu, select Service Bureau > Delete Service Bureau Template.
2. Highlight the template you want to delete and click OK.
3. Abra Link asks you to confirm the deletion. Click Yes to delete the template.
Import Service Bureau Data
After creating a service bureau template, you are ready to import your ADP data into Sage Abra SQL HRMS.
1. Back up your Sage Abra SQL HRMS databases before you import.
2. From the Import/Export menu, select Import Service Bureau File into Sage Abra. The Service Bureau Import page opens.
3. All the templates you created are listed on this page. Each template lists the employer, the date and time the ADP master file was created, the version number of your ADP PC/Payroll System, and the name of the ADP master file. Scroll to the right to see details.
Exporting from Sage Abra SQL HRMS
14 Sage Abra SQL HRMS
4. You can view the data in the file or view the actual ASCII file created.
5. To view data in a file, select the template and click View Data. The file data is displayed in columns. Each employee record appears as one line in the master file. Scroll to the right to see all the columns. When done, click the Close button.
6. To view the actual ASCII file as it was created with your ADP PC/Payroll System, select the template and click View File. Scroll to the right to see the complete file. Generally, each employee record consists of five lines. This file is read‐only and cannot be edited. When done, click the Close button.
7. Click Start to import the data using the selected template. Or click Start All to import service bureau data using all the templates listed on the page. Abra Link displays the employeeʹs name and Social Security number as it is processed.
8. When processing is complete, a message box shows you the number of new employees added and the total employees processed. If you clicked Start All, the message box also displays the total number of employers processed.
Exporting from Sage Abra SQL HRMS
Abra Link 15
Exporting Abra HR Data to ADP PC Exchange Abra Link enables you to export data from Abra HR to an ASCII file format that can be imported (using the ADP PC Exchange module) into ADP PC Payroll. Using a template, you can choose the fields in Abra HR’s databases that you want to export to PC Payroll.
1. Determine the information you want to export.
2. Select a template to use for the export.
3. Use the Perform a Trial Export feature to export the data from Sage Abra. Use the reports provided with Abra Link to review the entire process.
4. The information is now in simple ASCII form and can be imported into ADP PC Payroll.
Things You Should Know
Before you begin, review some basic information that will help you create effective and efficient templates:
• Abra Link Translation Tables
• Abra HR Code Tables
• Field Lengths in Abra HR and ADP
Translation Tables and Code Tables
Most of the fields in Abra HR correspond to fields in ADP PC Exchange. For example, the last name field in Abra HR matches the last name field in PC Exchange. However, there are some fields in Abra HR that contain codes that are different in PC Exchange. Translation tables enable Abra Link to correctly interpret codes as they are exported to ADP.
Translation Tables
Each Abra HR code table has an equivalent translation table. Each time you start up Abra Link, it asks if you want to update your translation tables with any code table additions you might have made in Abra HR.
If you choose Yes, Abra Link updates the translation tables that are affected by code table additions.
If you choose No, your translation tables might not include all the codes referenced in Abra HR.
Tip: If you are not using Abra Link to export data to ADP PC Payroll, you do not need your translation tables updated. Select No to quickly open Abra Link.
From the Service Bureau menu, click ADP Translation Tables to open the list of tables.
Exporting from Sage Abra SQL HRMS
16 Sage Abra SQL HRMS
Abra HR Code Tables
All Abra HR code tables have corresponding translation tables. While in Abra HR, you can add to, change, or delete codes in these tables as necessary.
If you add a new code or change an existing code while working in Abra HR, the next time you start up Abra Link, the system checks the translation tables and reminds you to add a corresponding ADP code.
If you delete a code in Abra HR and then start up Abra Link, you do not have to make any change to the translation table. Abra Link keeps the deleted code in the translation table. This has no effect on the way the translation table works. However, at any time you can delete the code from the translation table.
Some Abra HR code tables cannot be altered; that is, Abra provides them already filled in. Examples of these system‐provided tables are Marital Status, State 1 Tax and I‐9 Verification Status. These tables require translation tables in Abra Link; however, the translation tables are already filled in with the appropriate ADP code.
Note: If the Abra Marital Status is M, then the ADP Federal Marital Status is M. Any other value for the Abra Marital Status results in a Federal Marital Status of S.
Other Abra HR code tables are also system‐provided and automatically filled in. If you add to, change or delete a system‐provided code, you must make the corresponding addition, modification, or deletion in the equivalent translation table in Abra Link. When you start up Abra Link, the changes you made to the code table in Abra HR are not automatically updated in the corresponding translation table. Therefore, you must remember to update your translation table accordingly.
Warning: The Ethnic Origin code table is available to you in Abra HR. We strongly recommend you do not change these codes because they are required for EEO reports.
Change a Translation Table
You can add, edit, or delete a code from the translation tables.
• For translation tables that correspond to a system provided code table (for example, Marital Status, I‐9 Verification Status), you are modifying the translation tables for all employers.
• For translation tables that correspond to a non‐system provided code table (for example, Union Affiliation, Pay Frequency), you can modify the translation tables for either the enterprise or a specific employer.
• System‐provided tables are automatically filled in with pre‐defined values. All other translation tables contain ADP codes that are equivalent to Abra HR codes. However, in some cases the content and length of the codes may not correspond to what is required in ADP.
Exporting from Sage Abra SQL HRMS
Abra Link 17
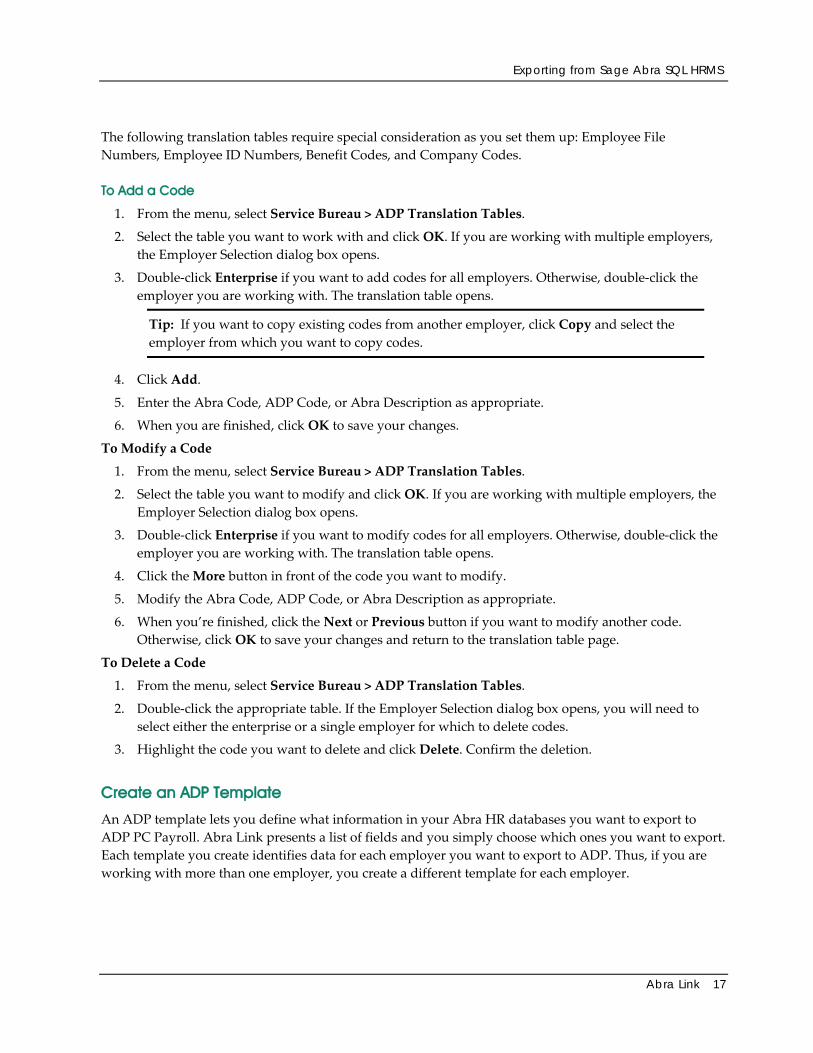
The following translation tables require special consideration as you set them up: Employee File Numbers, Employee ID Numbers, Benefit Codes, and Company Codes.
To Add a Code
1. From the menu, select Service Bureau > ADP Translation Tables.
2. Select the table you want to work with and click OK. If you are working with multiple employers, the Employer Selection dialog box opens.
3. Double‐click Enterprise if you want to add codes for all employers. Otherwise, double‐click the employer you are working with. The translation table opens.
Tip: If you want to copy existing codes from another employer, click Copy and select the employer from which you want to copy codes.
4. Click Add.
5. Enter the Abra Code, ADP Code, or Abra Description as appropriate.
6. When you are finished, click OK to save your changes.
To Modify a Code 1. From the menu, select Service Bureau > ADP Translation Tables.
2. Select the table you want to modify and click OK. If you are working with multiple employers, the Employer Selection dialog box opens.
3. Double‐click Enterprise if you want to modify codes for all employers. Otherwise, double‐click the employer you are working with. The translation table opens.
4. Click the More button in front of the code you want to modify.
5. Modify the Abra Code, ADP Code, or Abra Description as appropriate.
6. When you’re finished, click the Next or Previous button if you want to modify another code. Otherwise, click OK to save your changes and return to the translation table page.
To Delete a Code 1. From the menu, select Service Bureau > ADP Translation Tables.
2. Double‐click the appropriate table. If the Employer Selection dialog box opens, you will need to select either the enterprise or a single employer for which to delete codes.
3. Highlight the code you want to delete and click Delete. Confirm the deletion.
Create an ADP Template
An ADP template lets you define what information in your Abra HR databases you want to export to ADP PC Payroll. Abra Link presents a list of fields and you simply choose which ones you want to export. Each template you create identifies data for each employer you want to export to ADP. Thus, if you are working with more than one employer, you create a different template for each employer.
Exporting from Sage Abra SQL HRMS
18 Sage Abra SQL HRMS
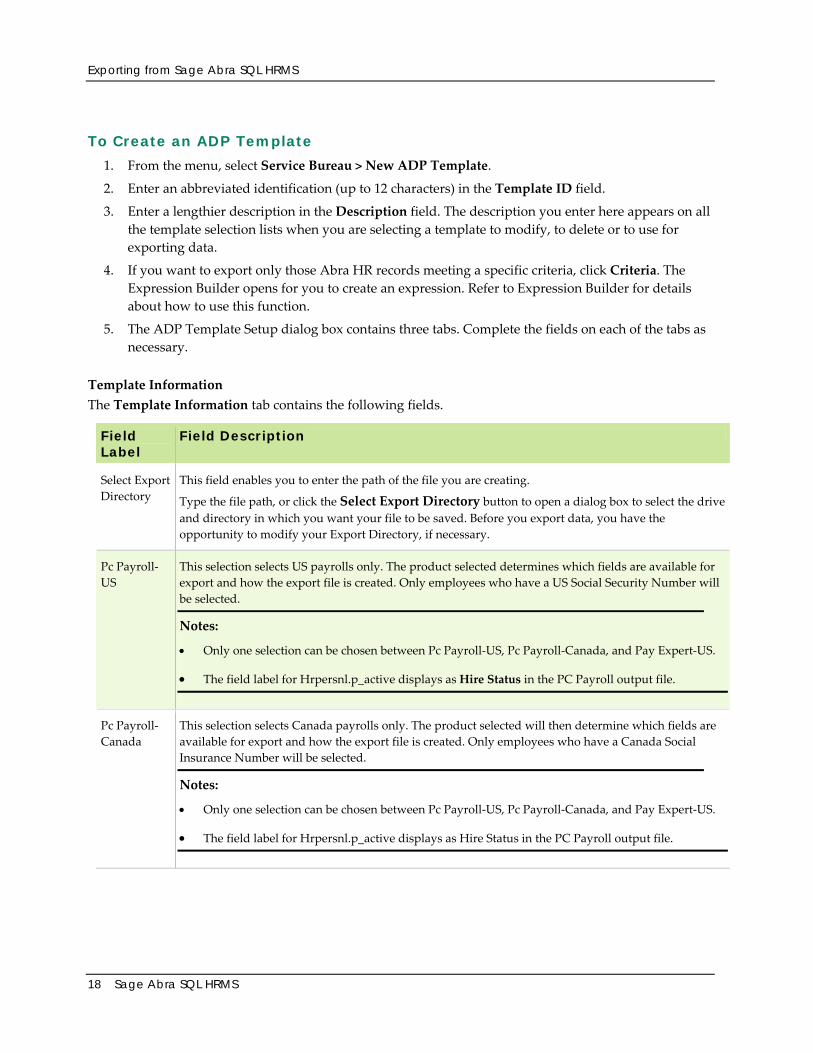
To Create an ADP Template
1. From the menu, select Service Bureau > New ADP Template.
2. Enter an abbreviated identification (up to 12 characters) in the Template ID field.
3. Enter a lengthier description in the Description field. The description you enter here appears on all the template selection lists when you are selecting a template to modify, to delete or to use for exporting data.
4. If you want to export only those Abra HR records meeting a specific criteria, click Criteria. The Expression Builder opens for you to create an expression. Refer to Expression Builder for details about how to use this function.
5. The ADP Template Setup dialog box contains three tabs. Complete the fields on each of the tabs as necessary.
Template Information The Template Information tab contains the following fields.
Field Label
Field Description
Select Export Directory
This field enables you to enter the path of the file you are creating.
Type the file path, or click the Select Export Directory button to open a dialog box to select the drive and directory in which you want your file to be saved. Before you export data, you have the opportunity to modify your Export Directory, if necessary.
Pc Payroll‐US
This selection selects US payrolls only. The product selected determines which fields are available for export and how the export file is created. Only employees who have a US Social Security Number will be selected.
Notes:
• Only one selection can be chosen between Pc Payroll‐US, Pc Payroll‐Canada, and Pay Expert‐US.
• The field label for Hrpersnl.p_active displays as Hire Status in the PC Payroll output file.
Pc Payroll‐Canada
This selection selects Canada payrolls only. The product selected will then determine which fields are available for export and how the export file is created. Only employees who have a Canada Social Insurance Number will be selected.
Notes:
• Only one selection can be chosen between Pc Payroll‐US, Pc Payroll‐Canada, and Pay Expert‐US.
• The field label for Hrpersnl.p_active displays as Hire Status in the PC Payroll output file.
Exporting from Sage Abra SQL HRMS
Abra Link 19
Field Label
Field Description
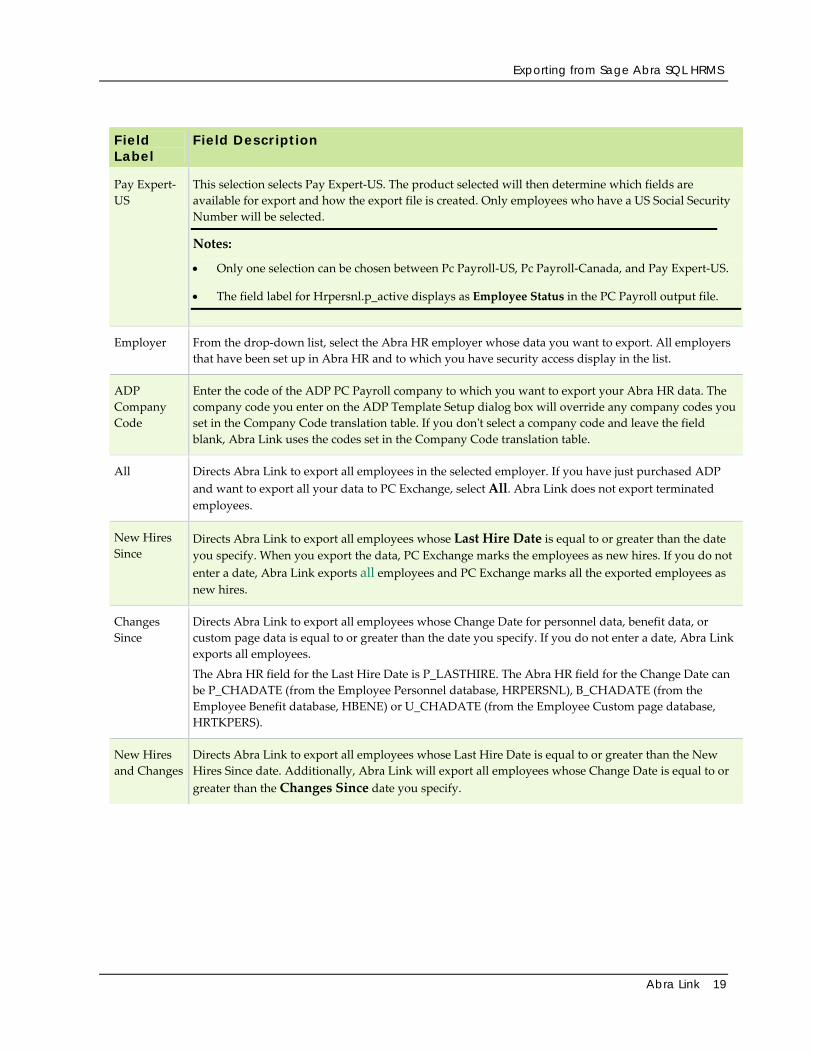
Pay Expert‐US
This selection selects Pay Expert‐US. The product selected will then determine which fields are available for export and how the export file is created. Only employees who have a US Social Security Number will be selected.
Notes:
• Only one selection can be chosen between Pc Payroll‐US, Pc Payroll‐Canada, and Pay Expert‐US.
• The field label for Hrpersnl.p_active displays as Employee Status in the PC Payroll output file.
Employer From the drop‐down list, select the Abra HR employer whose data you want to export. All employers that have been set up in Abra HR and to which you have security access display in the list.
ADP Company Code
Enter the code of the ADP PC Payroll company to which you want to export your Abra HR data. The company code you enter on the ADP Template Setup dialog box will override any company codes you set in the Company Code translation table. If you donʹt select a company code and leave the field blank, Abra Link uses the codes set in the Company Code translation table.
All Directs Abra Link to export all employees in the selected employer. If you have just purchased ADP and want to export all your data to PC Exchange, select All. Abra Link does not export terminated employees.
New Hires Since
Directs Abra Link to export all employees whose Last Hire Date is equal to or greater than the date you specify. When you export the data, PC Exchange marks the employees as new hires. If you do not enter a date, Abra Link exports all employees and PC Exchange marks all the exported employees as new hires.
Changes Since
Directs Abra Link to export all employees whose Change Date for personnel data, benefit data, or custom page data is equal to or greater than the date you specify. If you do not enter a date, Abra Link exports all employees.
The Abra HR field for the Last Hire Date is P_LASTHIRE. The Abra HR field for the Change Date can be P_CHADATE (from the Employee Personnel database, HRPERSNL), B_CHADATE (from the Employee Benefit database, HBENE) or U_CHADATE (from the Employee Custom page database, HRTKPERS).
New Hires and Changes
Directs Abra Link to export all employees whose Last Hire Date is equal to or greater than the New Hires Since date. Additionally, Abra Link will export all employees whose Change Date is equal to or greater than the Changes Since date you specify.
Exporting from Sage Abra SQL HRMS
20 Sage Abra SQL HRMS
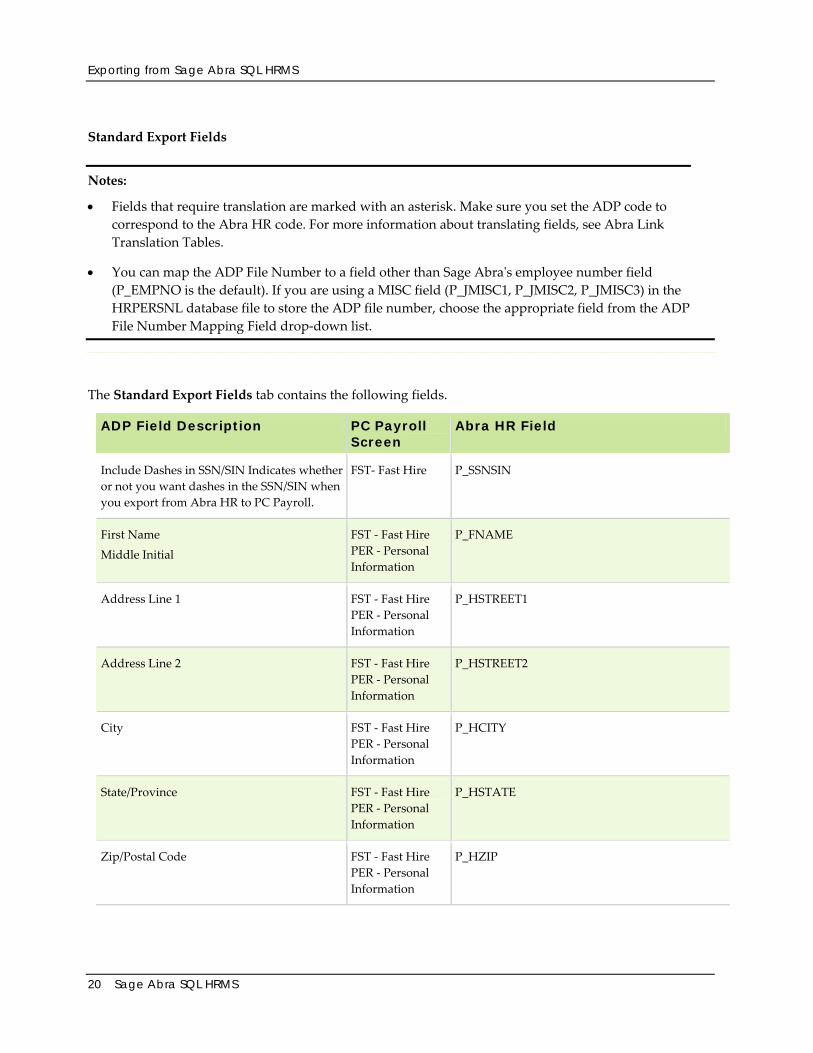
Standard Export Fields Notes:
• Fields that require translation are marked with an asterisk. Make sure you set the ADP code to correspond to the Abra HR code. For more information about translating fields, see Abra Link Translation Tables.
• You can map the ADP File Number to a field other than Sage Abraʹs employee number field (P_EMPNO is the default). If you are using a MISC field (P_JMISC1, P_JMISC2, P_JMISC3) in the HRPERSNL database file to store the ADP file number, choose the appropriate field from the ADP File Number Mapping Field drop‐down list.
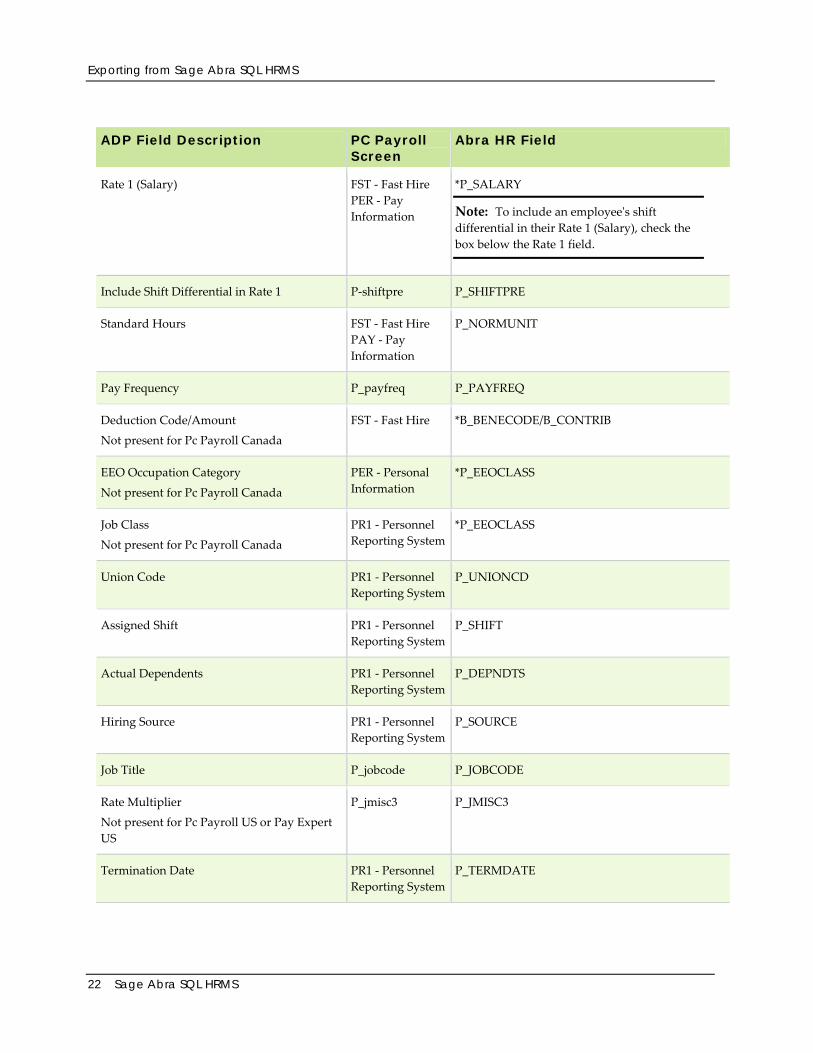
The Standard Export Fields tab contains the following fields.
ADP Field Description PC Payroll Screen
Abra HR Field
Include Dashes in SSN/SIN Indicates whether or not you want dashes in the SSN/SIN when you export from Abra HR to PC Payroll.
FST‐ Fast Hire P_SSNSIN
First Name
Middle Initial
FST ‐ Fast Hire PER ‐ Personal Information
P_FNAME
Address Line 1 FST ‐ Fast Hire PER ‐ Personal Information
P_HSTREET1
Address Line 2 FST ‐ Fast Hire PER ‐ Personal Information
P_HSTREET2
City FST ‐ Fast Hire PER ‐ Personal Information
P_HCITY
State/Province FST ‐ Fast Hire PER ‐ Personal Information
P_HSTATE
Zip/Postal Code FST ‐ Fast Hire PER ‐ Personal Information
P_HZIP

Exporting from Sage Abra SQL HRMS
Abra Link 21
ADP Field Description PC Payroll Screen
Abra HR Field
Home Phone Number PR1 ‐ Personnel Reporting System
P_HPHONE
Birth Date PFE ‐ Personal Family & Emergency SPO ‐ Spouse
P_BIRTH
Original Hire Date CTL ‐ Control Information
P_ORIGHIRE
Last Hire Date CTL ‐ Control Information
P_LASTHIRE
Adjusted Service Date CTL ‐ Control Information
P_SENDATE
Next Performance Review Date SAL ‐ Salary P_NEXTPERF
Gender FST ‐ Fast Hire PER ‐ Personal Information PFE ‐ Personal Family & Emergency
*P_SEX
Race
Not present for Pc Payroll Canada
FST ‐ Fast Hire PER ‐ Personal Information PFE ‐ Personal Family & Emergency
*P_RACE
Federal Marital Status
Not present for Pc Payroll Canada
FST ‐ Fast Hire *P_MARRIED
Actual Marital Status P_married P_MARRIED
Active Status (Employment Status) FST ‐ Fast Hire PER ‐ Personal Information
*P_ACTIVE
Exporting from Sage Abra SQL HRMS
22 Sage Abra SQL HRMS
ADP Field Description PC Payroll Screen
Abra HR Field
Rate 1 (Salary) FST ‐ Fast Hire PER ‐ Pay Information
*P_SALARY
Note: To include an employeeʹs shift differential in their Rate 1 (Salary), check the box below the Rate 1 field.
Include Shift Differential in Rate 1 P‐shiftpre P_SHIFTPRE
Standard Hours FST ‐ Fast Hire PAY ‐ Pay Information
P_NORMUNIT
Pay Frequency P_payfreq P_PAYFREQ
Deduction Code/Amount
Not present for Pc Payroll Canada
FST ‐ Fast Hire *B_BENECODE/B_CONTRIB
EEO Occupation Category
Not present for Pc Payroll Canada
PER ‐ Personal Information
*P_EEOCLASS
Job Class
Not present for Pc Payroll Canada
PR1 ‐ Personnel Reporting System
*P_EEOCLASS
Union Code PR1 ‐ Personnel Reporting System
P_UNIONCD
Assigned Shift PR1 ‐ Personnel Reporting System
P_SHIFT
Actual Dependents PR1 ‐ Personnel Reporting System
P_DEPNDTS
Hiring Source PR1 ‐ Personnel Reporting System
P_SOURCE
Job Title P_jobcode P_JOBCODE
Rate Multiplier
Not present for Pc Payroll US or Pay Expert US
P_jmisc3 P_JMISC3
Termination Date PR1 ‐ Personnel Reporting System
P_TERMDATE
Exporting from Sage Abra SQL HRMS
Abra Link 23
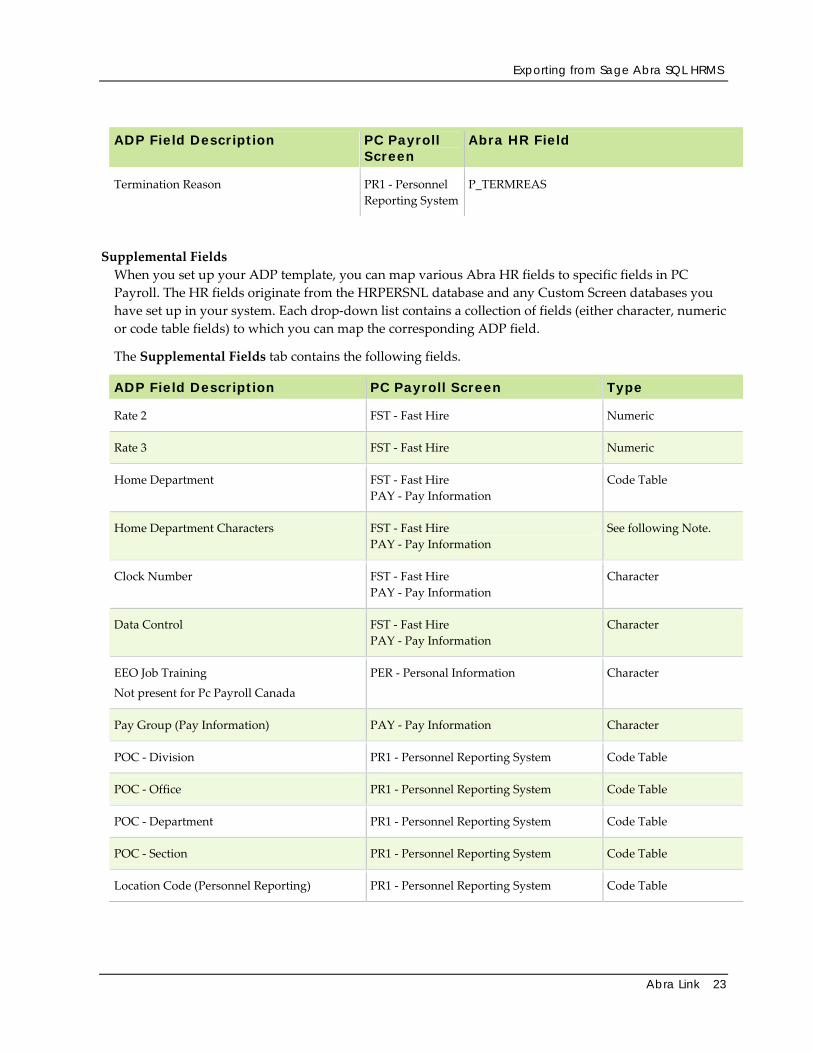
ADP Field Description PC Payroll Screen
Abra HR Field
Termination Reason PR1 ‐ Personnel Reporting System
P_TERMREAS
Supplemental Fields When you set up your ADP template, you can map various Abra HR fields to specific fields in PC Payroll. The HR fields originate from the HRPERSNL database and any Custom Screen databases you have set up in your system. Each drop‐down list contains a collection of fields (either character, numeric or code table fields) to which you can map the corresponding ADP field.
The Supplemental Fields tab contains the following fields.
ADP Field Description PC Payroll Screen Type
Rate 2 FST ‐ Fast Hire Numeric
Rate 3 FST ‐ Fast Hire Numeric
Home Department FST ‐ Fast Hire PAY ‐ Pay Information
Code Table
Home Department Characters FST ‐ Fast Hire PAY ‐ Pay Information
See following Note.
Clock Number FST ‐ Fast Hire PAY ‐ Pay Information
Character
Data Control FST ‐ Fast Hire PAY ‐ Pay Information
Character
EEO Job Training
Not present for Pc Payroll Canada
PER ‐ Personal Information Character
Pay Group (Pay Information) PAY ‐ Pay Information Character
POC ‐ Division PR1 ‐ Personnel Reporting System Code Table
POC ‐ Office PR1 ‐ Personnel Reporting System Code Table
POC ‐ Department PR1 ‐ Personnel Reporting System Code Table
POC ‐ Section PR1 ‐ Personnel Reporting System Code Table
Location Code (Personnel Reporting) PR1 ‐ Personnel Reporting System Code Table
Exporting from Sage Abra SQL HRMS
24 Sage Abra SQL HRMS
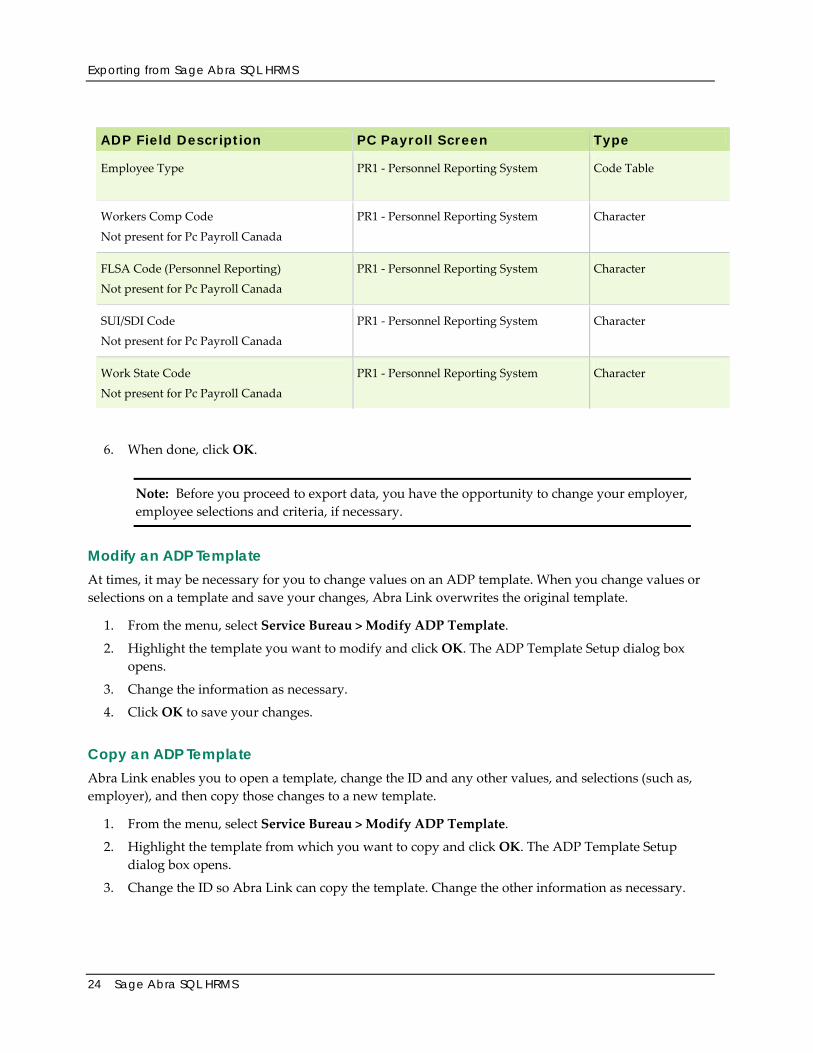
ADP Field Description PC Payroll Screen Type
Employee Type
PR1 ‐ Personnel Reporting System Code Table
Workers Comp Code
Not present for Pc Payroll Canada
PR1 ‐ Personnel Reporting System Character
FLSA Code (Personnel Reporting)
Not present for Pc Payroll Canada
PR1 ‐ Personnel Reporting System Character
SUI/SDI Code
Not present for Pc Payroll Canada
PR1 ‐ Personnel Reporting System Character
Work State Code
Not present for Pc Payroll Canada
PR1 ‐ Personnel Reporting System Character
6. When done, click OK.
Note: Before you proceed to export data, you have the opportunity to change your employer, employee selections and criteria, if necessary.
Modify an ADP Template At times, it may be necessary for you to change values on an ADP template. When you change values or selections on a template and save your changes, Abra Link overwrites the original template.
1. From the menu, select Service Bureau > Modify ADP Template.
2. Highlight the template you want to modify and click OK. The ADP Template Setup dialog box opens.
3. Change the information as necessary.
4. Click OK to save your changes.
Copy an ADP Template Abra Link enables you to open a template, change the ID and any other values, and selections (such as, employer), and then copy those changes to a new template.
1. From the menu, select Service Bureau > Modify ADP Template.
2. Highlight the template from which you want to copy and click OK. The ADP Template Setup dialog box opens.
3. Change the ID so Abra Link can copy the template. Change the other information as necessary.
Exporting from Sage Abra SQL HRMS
Abra Link 25
4. Click OK when you finish. Abra Link asks if you want to save another copy of the template with the new ID.
5. Click Yes to copy the template.
Delete an ADP Template At any time, you can delete an ADP template from Abra Link.
1. From the menu, select Service Bureau > Delete ADP Template.
2. Highlight the template you want to delete and click OK. Abra Link asks you to confirm the deletion.
3. Click Yes to delete the template.
Perform a Trial Export From Abra HR to ADP PC Exchange
After you’ve defined your ADP template and modified your translation tables, you are ready to export data to PC Exchange. We recommend you perform a trial export before you perform the final export. The trial export process simulates the ADP export and generates any errors that would occur during the actual export.
The trial export process generates an error log report listing each error by date, employer, employee ID and error message. For more information about ADP errors, see ADP Export Errors.
• Each time you run a trial export, errors are added to the end of the error log report, so you should purge the error log report between your trial export processes.
• You should correct each error and perform subsequent trial exports until Abra Link generates no more errors, at which time you can perform a final export to PC Exchange.
To Perform a Trial Export
1. From the menu, select File > Purge > ADP Error Log. Purging report information clears old reported results from the log.
2. From the menu, select File > Optimize Databases. Click Yes to confirm optimization.
Note: Because of how a computer stores data, your files can, in time, become unnecessarily large. This is because the system does not actually delete records at the time you tell it to. It simply removes them from your access. The Optimize Databases process actually purges the records you have marked for deletion and reorganizes the files to minimize the space required. The system purges only those records you have marked for deletion. It does not change any information stored in the system. This process only optimizes databases for Abra Pay Link. After you optimize your databases, you should rebuild the Abra Link index files. This process
Exporting from Sage Abra SQL HRMS
26 Sage Abra SQL HRMS
does not delete or change any data within the system. To rebuild the indexes, select Reform Index files from the File menu.
3. From the Import/Export menu, select Trial Export to ADP from Sage Abra. The template selection list opens.
4. Highlight the template you want to use for your trial export and click OK. The Trial Export dialog box opens.
The template parameters, including record selection criteria, appear as you set them when you defined the selected template. If you need to change them, you can do so before you export.
Any template changes you make at this time are not saved to your selected template; rather, the changes are temporary and affect only the export you are currently performing.
5. Click Start to begin the trial export. When exporting is complete, Abra Link shows the number of records to be exported and indicates how many errors were generated.
6. Click OK, and then click the Close button to close the Trial Export dialog box.
7. Print the ADP Error Log report and correct the errors.
8. After correcting your errors, purge the error log report and perform another trial export.
9. Continue to perform trial exports until you receive no more errors.
Perform a Final Export From Abra HR to ADP PC Exchange
After you have successfully performed a trial export, you are ready to perform a final export to a PC Exchange file.
Note: Abra Link does not export terminated employees.
To Perform a Final Export
1. From the menu, select File > Purge > ADP Error Log. Purging report information clears old reported results from the log.
2. From the menu, select File > Optimize Databases. The system asks if you want to optimize databases. Click Yes to confirm optimization.
3. From the Import/Export menu, select Export to ADP from Sage Abra. The template selection list opens.
4. Highlight the template you want to use for your final export and click OK. The Export to ADP dialog box opens.
5. The template parameters, including record selection criteria, appear as you set them when you created the ADP template. If you need to change them, you can do so before you export. Any template changes you make at this time are not saved to your selected template, rather the changes are temporary and affect only the export you are currently performing.
Exporting from Sage Abra SQL HRMS
Abra Link 27
6. Click Start to begin the final export. When exporting is complete, Abra Link shows the number of records that were exported and indicates how many errors were generated.
Tip: If errors are reported, you should first purge the ADP Error Log report, then run it. Correct the errors and perform another final export to overwrite the data you previously exported.
7. Click OK, then click the Close button to close the dialog box.
8. After you perform a final export, run the Last ADP Export report to see a list of all new hires and employee exchanges exported to PC Exchange. After you have imported the files into PC Exchange, you can run the PC Exchange Audit report for a detail of all fields changed.
Exporting from Sage Abra SQL HRMS
28 Sage Abra SQL HRMS
Abra Link 29
Reports Just as Sage Abra SQL HRMS enables you to generate standard reports to help gather and analyze information, Abra Link provides several reports to help you prepare your files before importing and exporting.
Run a Report
Using the selection criteria and sort options, you can produce a variety of different reports to meet your specific needs. You can also choose to preview the report on your page or print the report.
1. From the Abra Link menu, select Reports.
2. Select a report from the list. The Report Options dialog box opens.
3. From the Selection Criteria drop‐down list, choose the information for your report. The selection criteria options are different for each report. Each reportʹs selection criteria are listed in the sample reportʹs description. For example, you may want to generate a report that describes the import/export templates you have created. You can choose to include all the templates or select the specific template you want to review.
4. From the Sort by drop‐down list, select how you want the information sorted on the report. The sort options available are dictated by the information on the report. For example, when you use the New Employee List, you can choose to list employees alphabetically by name or to list them by ID number.
5. Select whether you want to preview or print the report.
6. To print the report, select Printer and then click OK. The report is sent directly to your printer.
7. To preview the report, select Preview and then click OK. The Page Preview window opens and displays the report.
8. Use the page preview toolbar to enlarge your view, page through, print, and e‐mail the report.
9. Click Close to close the Page Preview window
10. Click Close to close the Report Options dialog box.
Purge Report Information
As you use Abra Link to import or export information, it maintains information for the Import/Export History Report, New Employee List and ADP Error Log. However, as this information increases, it consumes more hard disk space. Abra Link lets you purge report information, as of a date you specify, to help manage disk space.
• You should purge your error log and optimize databases before you perform a trial or final export to ADP.
• If you want a permanent record of the information you have imported or exported, print each report before purging the information.
Exporting from Sage Abra SQL HRMS
30 Sage Abra SQL HRMS
1. From the menu, select File > Purge. A second menu lists the New Employee List, Import/Export History Report and ADP Error Log.
2. Select the report for which you want to purge information.
3. A dialog box appears and prompts you for the date through which to purge information. Abra Link defaults to the current date.
4. Enter the date and click OK. Abra Link purges the report information.
Note: Each time you purge the ADP Error Log, you should optimize Abra Link’s databases. From the File menu, select Optimize Databases and confirm the optimization.
Sample Reports
This section provides samples of the reports included with Abra Link:
• Import/Export Templates ‐ This report lists all attributes associated with a template. The Report Options dialog box enables you to generate a report for a specific import or export template or for all templates. Abra Link sorts the report by template ID.
• Import/Export History ‐ This report shows a summary of all imports and exports processed with a particular template. You can choose to display all templates or a specific import or export template. Abra Link sorts the report by user ID, date processed, and template ID.
• New Employee List ‐ This report provides a list of all employees who did not exist in Sage Abra SQL HRMS but were imported from an ADP PC/Payroll System. You can choose to show new employees from the enterprise or from a specific employer. You can sort the report either by employer ID and employee name or by employer ID and employee ID.
• Service Bureau Templates ‐ This report lists all the selected options associated with a service bureau template. The Report Options dialog box enables you to generate a report for a specific template or all templates. Abra Link sorts the report by the template ID.
• ADP Templates ‐ This report shows all selected options associated with an ADP template. The Export Fields group displays all the fields selected in the template, including Supplemental Fields. You can generate a report for a specific template or all templates.
• Last ADP Export ‐ This report contains information about the data you last exported to ADP PC Exchange. The report lists the Abra HR employee ID and the corresponding ADP Employee File Number as well as the employee name, Social Security number, and whether it is a new record or changed record.
• ADP Error Log ‐ The trial and final export process generates an error log listing each error by employer name and employee ID. Each time you run a trial or final export, errors are added to the end of the error log report. You can sort the report by error occurrence or error date, employer, and employee ID.
ASCII File Formats
Abra Link 31
Reference Material As you work with Abra Link, refer to the following information as needed.
ASCII File Formats
Required Fields on ASCII Files
ADP Export Errors
Expression Builder
Setup Abra Link and ADP PC Exchange
ASCII File Formats The ASCII file formats supported by Abra Link are: comma‐delimited, space‐delimited, tab‐delimited, and fixed‐length.
Comma-Delimited Format
The comma‐delimited format is the most widely used for ASCII file transfer. Data fields appear in a record and are separated by commas:
Example: ʺBrooksʺ,ʺJamesʺ,ʺʺ,04121992,ʺSMD Corporationʺ,35000
Note: When exporting data to ADP, the system converts any commas in the fields p_fname, p_lname, p_hstreet1, p_hstreet2, and p_hcity to spaces (blanks) to avoid creating extra columns when the data is imported to ADP.
When you create or edit a template, each field you choose from the database file is identified as a character, date‐character, date‐numeric, or logical field. You can also find the field type in the data dictionary.
Character Fields
Character fields and date‐character fields consist of letters, numbers, or symbols and are enclosed in quotes. (Quotes are not necessary when you are importing.)
Examples
• A Social Security number is a character field is enclosed in quotes ʺ379‐452‐7855ʺ
• A date‐character field is enclosed in quotes ʺ12/07/08ʺ
Numeric Fields
Numeric and date‐numeric fields can only contain numbers and are not enclosed in quotes. Examples
A numeric amount of 35000
Date numeric field of 04122008
ASCII File Formats
32 Sage Abra SQL HRMS
Logical Field A logical field, such as Yes/No or On/Off, appears as T (True) or F (False) in an ASCII file.
In the Sage Abra SQL HRMS database, it will appear as .T. or .F. with the letter T or F preceded and followed by a period. The field length is always one character and not enclosed in quotes. (Periods are not used when the T or F is exported.)
Blank Fields
If the ASCII file you are transferring does not have a corresponding field in the database, you must create a place holder, or a DUMMY field, that marks the place in the Sage Abradatabase file.
Example: In the example above, the middle initial field is blank, so it is represented by a set of open and closed quotes along with the normal comma‐delimiter. If a blank field is numeric, only an extra comma marks the field, since open and closed quotes are not used for a numeric field.
When you create a template for ASCII files with blank fields, you must tell Abra Link which fields are blank. Use the DUMMY field name (located at the end of the field name list) to indicate a blank field.
Space-Delimited Format
The space‐delimited format uses a blank space (instead of a comma) to separate the fields in each record. There is no distinction between a character, date or numeric field. Unnecessary spaces at the beginning or end of a field are deleted since the space determines where one field ends and the next field begins. Thus, the length of each record may vary. As a space‐delimited record, our example appears as:
Example: Brooks James 04121992 SMD Corporation 35000
This format type is not generally used because it creates problems when transferring records that include fields which normally contain spaces within the field. In the example above, Abra Link would view SMD Corporation as two fields, SMD and Corporation, because they are separated by a space. Because of this limitation, we recommend you do not use the space‐delimited format for records with fields containing internal spaces, such as names, addresses and titles.
Tab-Delimited Format
The tab‐delimited format is the same as the space‐delimited format except a tab symbol is used instead of a space to separate each field. As a tab‐delimited record, our example appears as:
Example: Brooks→ James→ 04121992→ SMD Corporation→ 35000
Required Fields on ASCII Files
Abra Link 33
Fixed-Length Format
This format is based upon the fixed length of each field in a record, with all records containing the same selected fields. Since the exact length of each field is known, no comma or space is needed to separate the fields. As a fixed‐length record, our example looks like this:
Example: Brooks James 04121992SMD Corporation 035000
‐‐‐‐‐‐‐‐‐‐‐‐‐‐‐‐‐‐‐‐‐‐‐‐‐‐‐‐‐‐‐‐‐‐‐‐‐‐‐‐‐‐‐‐‐‐‐‐‐‐‐‐‐‐‐‐‐‐‐‐‐‐‐‐‐‐‐‐‐‐
The dashed line represents blank spaces to help you count the spaces in the record.
Our record contains the employeeʹs last name, first name, middle initial (this field is blank), hire date, previous employer and salary. The field lengths for these fields are 25, 14, 1, 8, 20 and 10, respectively. Each record in the file contains the same number and length of fields.
If you do not have any data recorded in a particular field, such as the middle initial, you still must include that field when you create your template for the transfer. As explained previously, use the DUMMY field name (located at the end of the field name list) to indicate a blank field.
Required Fields on ASCII Files Sage Abra SQL HRMS requires that several fields be populated during an import if you want to immediately start processing information.
• If you are importing an ASCII text file into Sage Abra, you should include these fields in your ASCII file as well as in your import template.
• If you are importing an ADP Master file into Sage Abra, make sure these fields are either selected (on the check box) or selected (from the drop‐down lists) on your Service Bureau template.
For example, after you import an ASCII text file that includes the pay rate field (P_SALARY) for each of your employees, you can immediately perform a mass update on the P_SALARY field.
Be aware that if you do not import these required fields, you can still use pages to input the information.
Required Fields on ASCII Files
34 Sage Abra SQL HRMS
Sage Abra SQL HRMS Tables and Required Fields
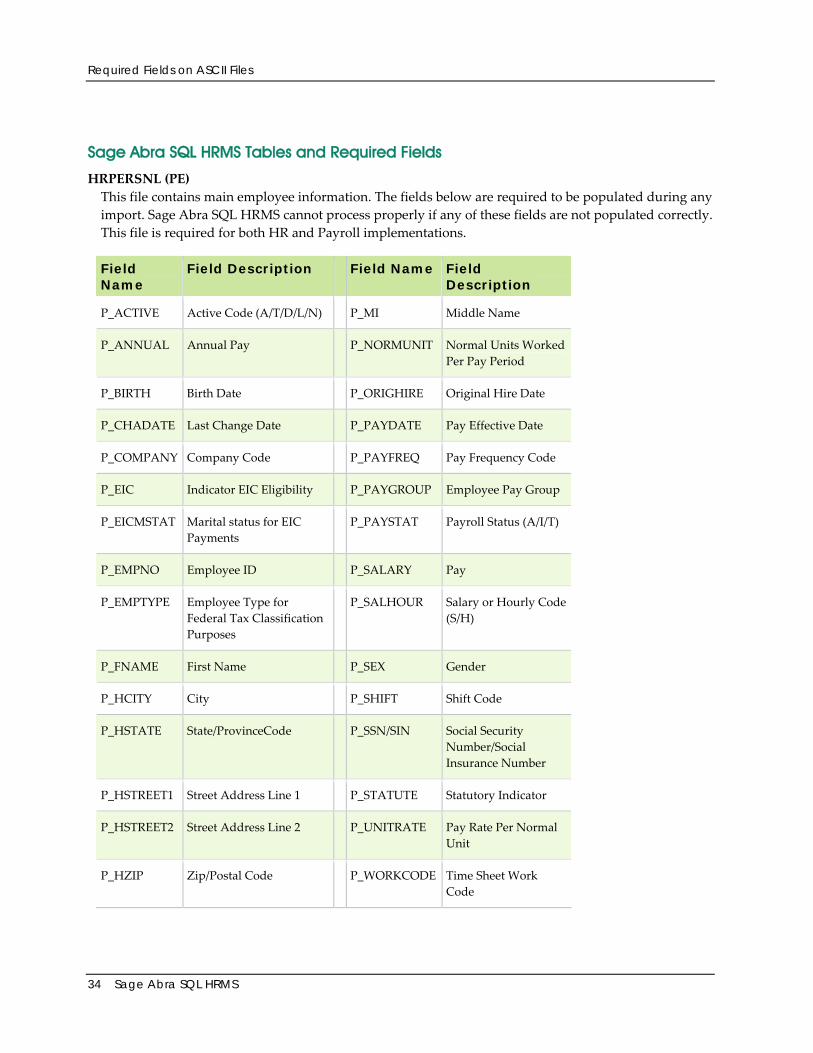
HRPERSNL (PE) This file contains main employee information. The fields below are required to be populated during any import. Sage Abra SQL HRMS cannot process properly if any of these fields are not populated correctly. This file is required for both HR and Payroll implementations.
Field Name
Field Description Field Name Field Description
P_ACTIVE Active Code (A/T/D/L/N) P_MI Middle Name
P_ANNUAL Annual Pay P_NORMUNIT Normal Units Worked Per Pay Period
P_BIRTH Birth Date P_ORIGHIRE Original Hire Date
P_CHADATE Last Change Date P_PAYDATE Pay Effective Date
P_COMPANY Company Code P_PAYFREQ Pay Frequency Code
P_EIC Indicator EIC Eligibility P_PAYGROUP Employee Pay Group
P_EICMSTAT Marital status for EIC Payments
P_PAYSTAT Payroll Status (A/I/T)
P_EMPNO Employee ID P_SALARY Pay
P_EMPTYPE Employee Type for Federal Tax Classification Purposes
P_SALHOUR Salary or Hourly Code (S/H)
P_FNAME First Name P_SEX Gender
P_HCITY City P_SHIFT Shift Code
P_HSTATE State/ProvinceCode P_SSN/SIN Social Security Number/Social Insurance Number
P_HSTREET1 Street Address Line 1 P_STATUTE Statutory Indicator
P_HSTREET2 Street Address Line 2 P_UNITRATE Pay Rate Per Normal Unit
P_HZIP Zip/Postal Code P_WORKCODE Time Sheet Work Code
Required Fields on ASCII Files
Abra Link 35
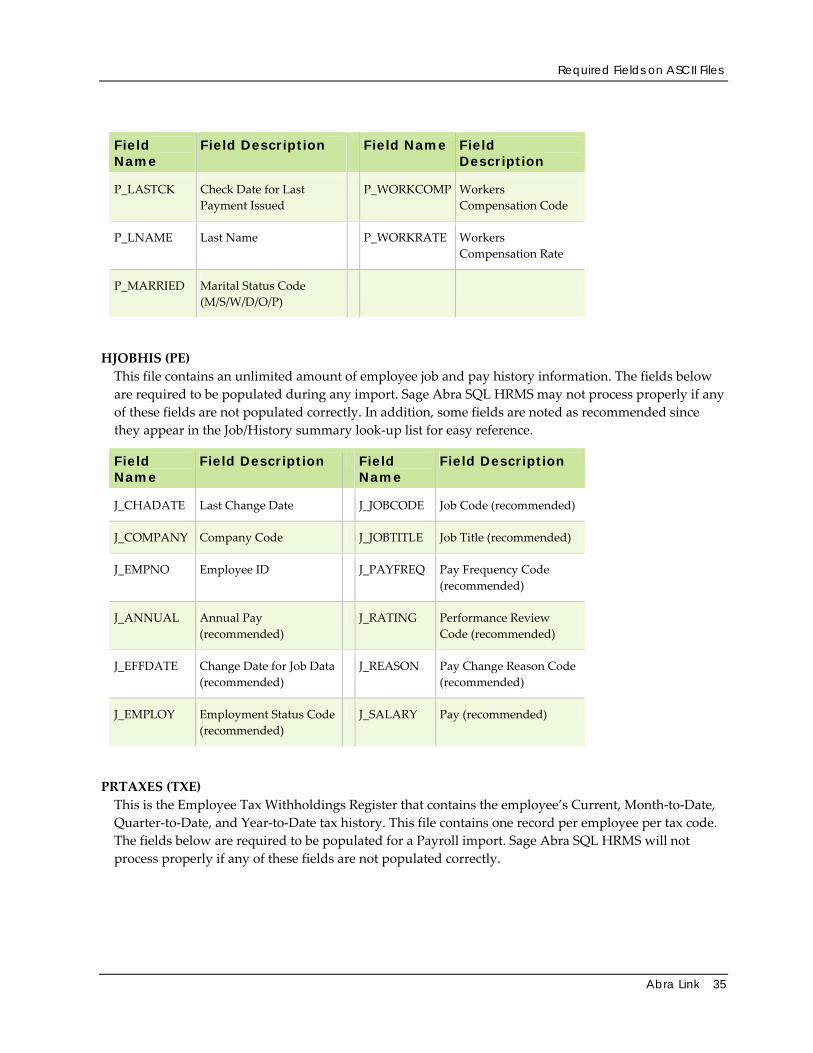
Field Name
Field Description Field Name Field Description
P_LASTCK Check Date for Last Payment Issued
P_WORKCOMP Workers Compensation Code
P_LNAME Last Name P_WORKRATE Workers Compensation Rate
P_MARRIED Marital Status Code (M/S/W/D/O/P)
HJOBHIS (PE) This file contains an unlimited amount of employee job and pay history information. The fields below are required to be populated during any import. Sage Abra SQL HRMS may not process properly if any of these fields are not populated correctly. In addition, some fields are noted as recommended since they appear in the Job/History summary look‐up list for easy reference.
Field Name
Field Description Field Name
Field Description
J_CHADATE Last Change Date J_JOBCODE Job Code (recommended)
J_COMPANY Company Code J_JOBTITLE Job Title (recommended)
J_EMPNO Employee ID J_PAYFREQ Pay Frequency Code (recommended)
J_ANNUAL Annual Pay (recommended)
J_RATING Performance Review Code (recommended)
J_EFFDATE Change Date for Job Data (recommended)
J_REASON Pay Change Reason Code (recommended)
J_EMPLOY Employment Status Code (recommended)
J_SALARY Pay (recommended)
PRTAXES (TXE) This is the Employee Tax Withholdings Register that contains the employee’s Current, Month‐to‐Date, Quarter‐to‐Date, and Year‐to‐Date tax history. This file contains one record per employee per tax code. The fields below are required to be populated for a Payroll import. Sage Abra SQL HRMS will not process properly if any of these fields are not populated correctly.
Required Fields on ASCII Files
36 Sage Abra SQL HRMS
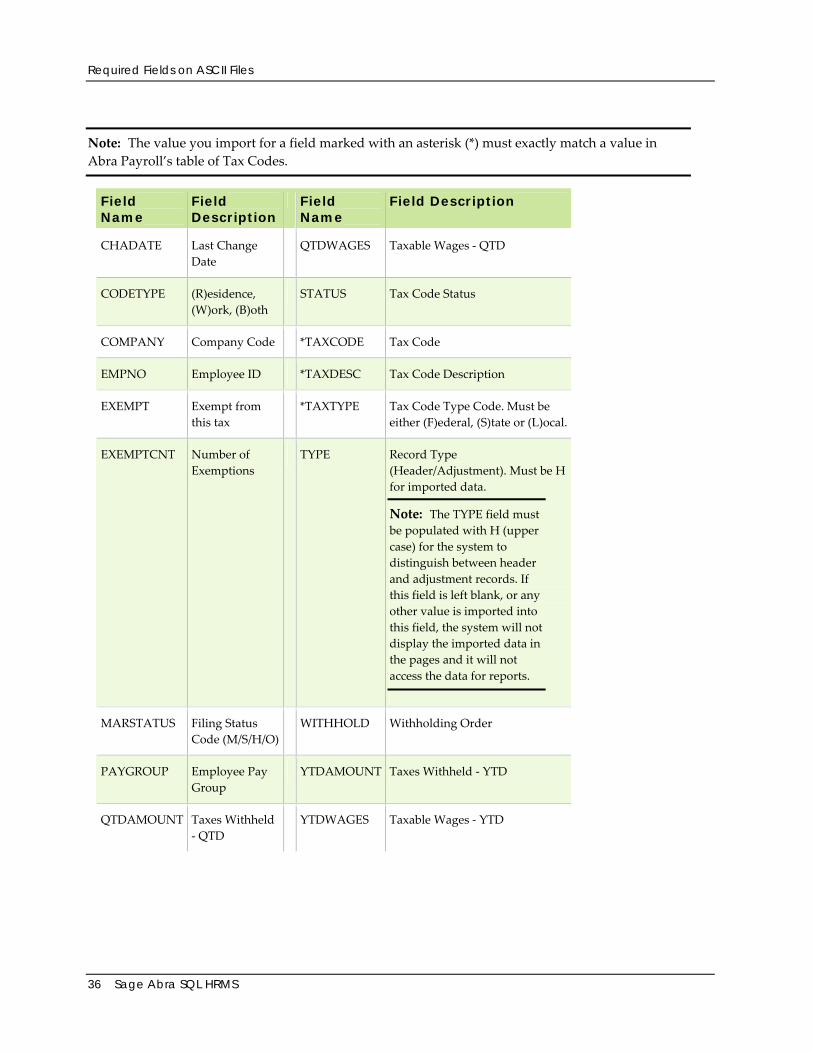
Note: The value you import for a field marked with an asterisk (*) must exactly match a value in Abra Payroll’s table of Tax Codes.
Field Name
Field Description
Field Name
Field Description
CHADATE Last Change Date
QTDWAGES Taxable Wages ‐ QTD
CODETYPE (R)esidence, (W)ork, (B)oth
STATUS Tax Code Status
COMPANY Company Code *TAXCODE Tax Code
EMPNO Employee ID *TAXDESC Tax Code Description
EXEMPT Exempt from this tax
*TAXTYPE Tax Code Type Code. Must be either (F)ederal, (S)tate or (L)ocal.
EXEMPTCNT Number of Exemptions
TYPE Record Type (Header/Adjustment). Must be H for imported data.
Note: The TYPE field must be populated with H (upper case) for the system to distinguish between header and adjustment records. If this field is left blank, or any other value is imported into this field, the system will not display the imported data in the pages and it will not access the data for reports.
MARSTATUS Filing Status Code (M/S/H/O)
WITHHOLD Withholding Order
PAYGROUP Employee Pay Group
YTDAMOUNT Taxes Withheld ‐ YTD
QTDAMOUNT Taxes Withheld ‐ QTD
YTDWAGES Taxable Wages ‐ YTD
Required Fields on ASCII Files
Abra Link 37
PREARN (ERR) This is the Employee Earnings Register that contains the employee’s Current, Month‐to‐Date, Quarter‐to‐Date, and Year‐to‐Date earning history. This file contains one record per employee per earning code. The fields below are required to be populated during any import. Sage Abra SQL HRMS will not process properly if any of these fields are not populated correctly.
Note: The value you import for a field marked with an asterisk (*) must exactly match a value in Abra Payroll’s table of earnings codes.
Field Name
Field Description
Field Name
Field Description
BALANCE Balance Remaining for Other Earnings
QTDAMOUNT Amount Earned ‐ QTD
*CALCRULE Calculation Rule. Must be either (P)ay Rate x Hours x Rate Factor or (F)lat Amount.
QTDHOURS Hours/Unit Charged ‐ QTD
CHADATE Last Change Date STARTDATE Start Date for Other Earnings
COMPANY Company Code STATUS Earning Code Status
*DESCRIPT Earning Code Description
STOPDATE Stop Date for Other Earnings
*EARNCODE Earnings Code TYPE Record Type (Header/Adjustment). Must be H for imported data. The TYPE field must be populated with H (upper case) for the system to distinguish between header and adjustment records. If this field is left blank, or any other value is imported into this field, the system will not display the imported data in the pages and it will not access the data for reports.
EMPNO Employee ID YTDAMOUNT Amount Earned ‐ YTD
GOAL Earnings Goal for YTDHOURS Hours/Units Charged‐YTD
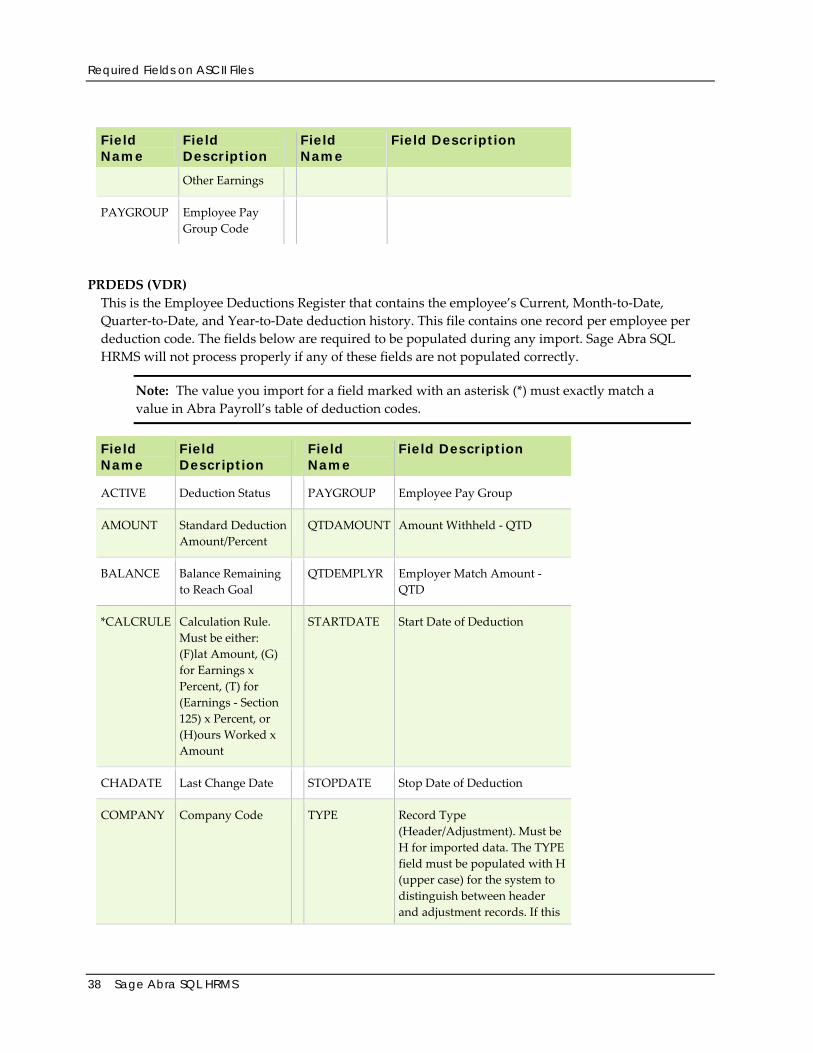
Required Fields on ASCII Files
38 Sage Abra SQL HRMS
Field Name
Field Description
Field Name
Field Description
Other Earnings
PAYGROUP Employee Pay Group Code
PRDEDS (VDR) This is the Employee Deductions Register that contains the employee’s Current, Month‐to‐Date, Quarter‐to‐Date, and Year‐to‐Date deduction history. This file contains one record per employee per deduction code. The fields below are required to be populated during any import. Sage Abra SQL HRMS will not process properly if any of these fields are not populated correctly.
Note: The value you import for a field marked with an asterisk (*) must exactly match a value in Abra Payroll’s table of deduction codes.
Field Name
Field Description
Field Name
Field Description
ACTIVE Deduction Status PAYGROUP Employee Pay Group
AMOUNT Standard Deduction Amount/Percent
QTDAMOUNT Amount Withheld ‐ QTD
BALANCE Balance Remaining to Reach Goal
QTDEMPLYR Employer Match Amount ‐ QTD
*CALCRULE Calculation Rule. Must be either: (F)lat Amount, (G) for Earnings x Percent, (T) for (Earnings ‐ Section 125) x Percent, or (H)ours Worked x Amount
STARTDATE Start Date of Deduction
CHADATE Last Change Date STOPDATE Stop Date of Deduction
COMPANY Company Code TYPE Record Type (Header/Adjustment). Must be H for imported data. The TYPE field must be populated with H (upper case) for the system to distinguish between header and adjustment records. If this
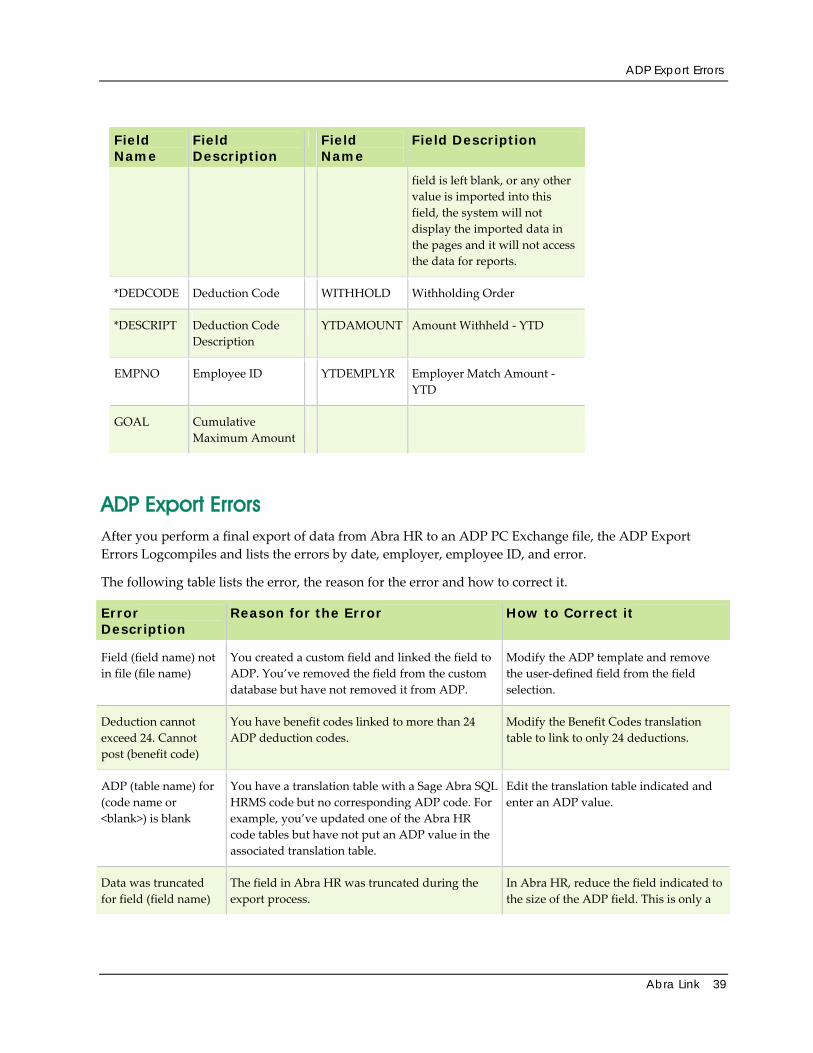
ADP Export Errors
Abra Link 39
Field Name
Field Description
Field Name
Field Description
field is left blank, or any other value is imported into this field, the system will not display the imported data in the pages and it will not access the data for reports.
*DEDCODE Deduction Code WITHHOLD Withholding Order
*DESCRIPT Deduction Code Description
YTDAMOUNT Amount Withheld ‐ YTD
EMPNO Employee ID YTDEMPLYR Employer Match Amount ‐ YTD
GOAL Cumulative Maximum Amount
ADP Export Errors After you perform a final export of data from Abra HR to an ADP PC Exchange file, the ADP Export Errors Logcompiles and lists the errors by date, employer, employee ID, and error.
The following table lists the error, the reason for the error and how to correct it.
Error Description
Reason for the Error How to Correct it
Field (field name) not in file (file name)
You created a custom field and linked the field to ADP. You’ve removed the field from the custom database but have not removed it from ADP.
Modify the ADP template and remove the user‐defined field from the field selection.
Deduction cannot exceed 24. Cannot post (benefit code)
You have benefit codes linked to more than 24 ADP deduction codes.
Modify the Benefit Codes translation table to link to only 24 deductions.
ADP (table name) for (code name or <blank>) is blank
You have a translation table with a Sage Abra SQL HRMS code but no corresponding ADP code. For example, you’ve updated one of the Abra HR code tables but have not put an ADP value in the associated translation table.
Edit the translation table indicated and enter an ADP value.
Data was truncated for field (field name)
The field in Abra HR was truncated during the export process.
In Abra HR, reduce the field indicated to the size of the ADP field. This is only a
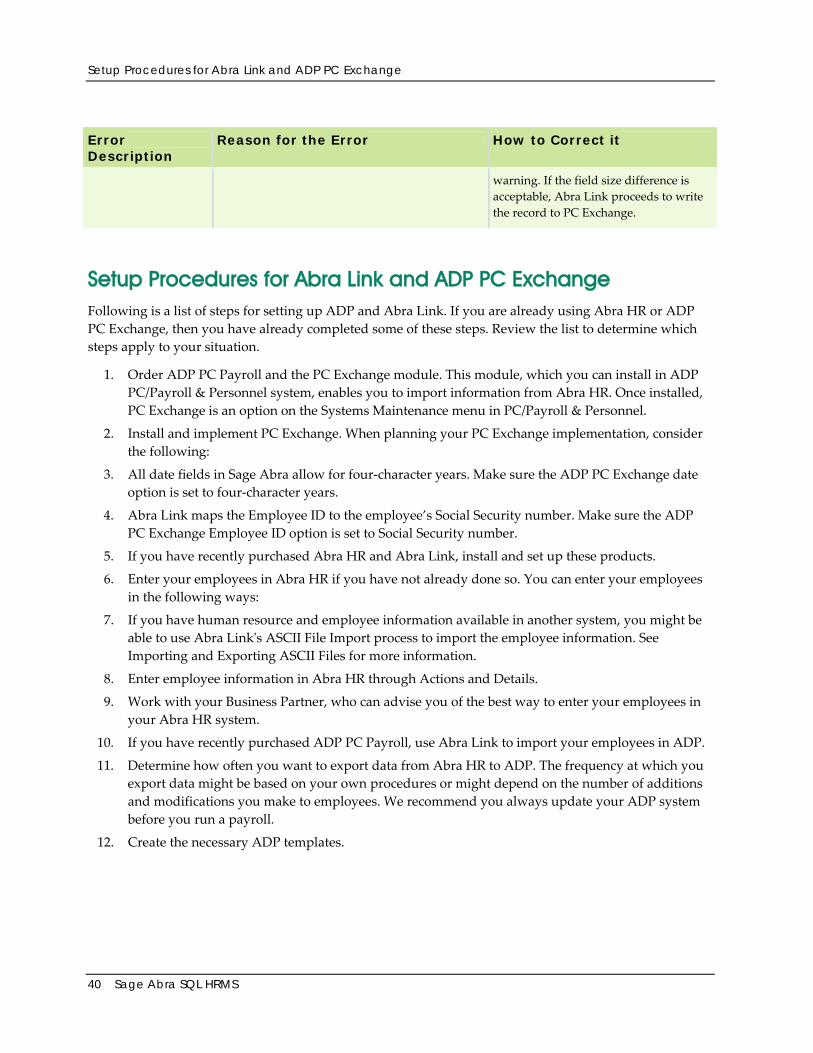
Setup Procedures for Abra Link and ADP PC Exchange
40 Sage Abra SQL HRMS
Error Description
Reason for the Error How to Correct it
warning. If the field size difference is acceptable, Abra Link proceeds to write the record to PC Exchange.
Setup Procedures for Abra Link and ADP PC Exchange Following is a list of steps for setting up ADP and Abra Link. If you are already using Abra HR or ADP PC Exchange, then you have already completed some of these steps. Review the list to determine which steps apply to your situation.
1. Order ADP PC Payroll and the PC Exchange module. This module, which you can install in ADP PC/Payroll & Personnel system, enables you to import information from Abra HR. Once installed, PC Exchange is an option on the Systems Maintenance menu in PC/Payroll & Personnel.
2. Install and implement PC Exchange. When planning your PC Exchange implementation, consider the following:
3. All date fields in Sage Abra allow for four‐character years. Make sure the ADP PC Exchange date option is set to four‐character years.
4. Abra Link maps the Employee ID to the employee’s Social Security number. Make sure the ADP PC Exchange Employee ID option is set to Social Security number.
5. If you have recently purchased Abra HR and Abra Link, install and set up these products.
6. Enter your employees in Abra HR if you have not already done so. You can enter your employees in the following ways:
7. If you have human resource and employee information available in another system, you might be able to use Abra Linkʹs ASCII File Import process to import the employee information. See Importing and Exporting ASCII Files for more information.
8. Enter employee information in Abra HR through Actions and Details.
9. Work with your Business Partner, who can advise you of the best way to enter your employees in your Abra HR system.
10. If you have recently purchased ADP PC Payroll, use Abra Link to import your employees in ADP.
11. Determine how often you want to export data from Abra HR to ADP. The frequency at which you export data might be based on your own procedures or might depend on the number of additions and modifications you make to employees. We recommend you always update your ADP system before you run a payroll.
12. Create the necessary ADP templates.
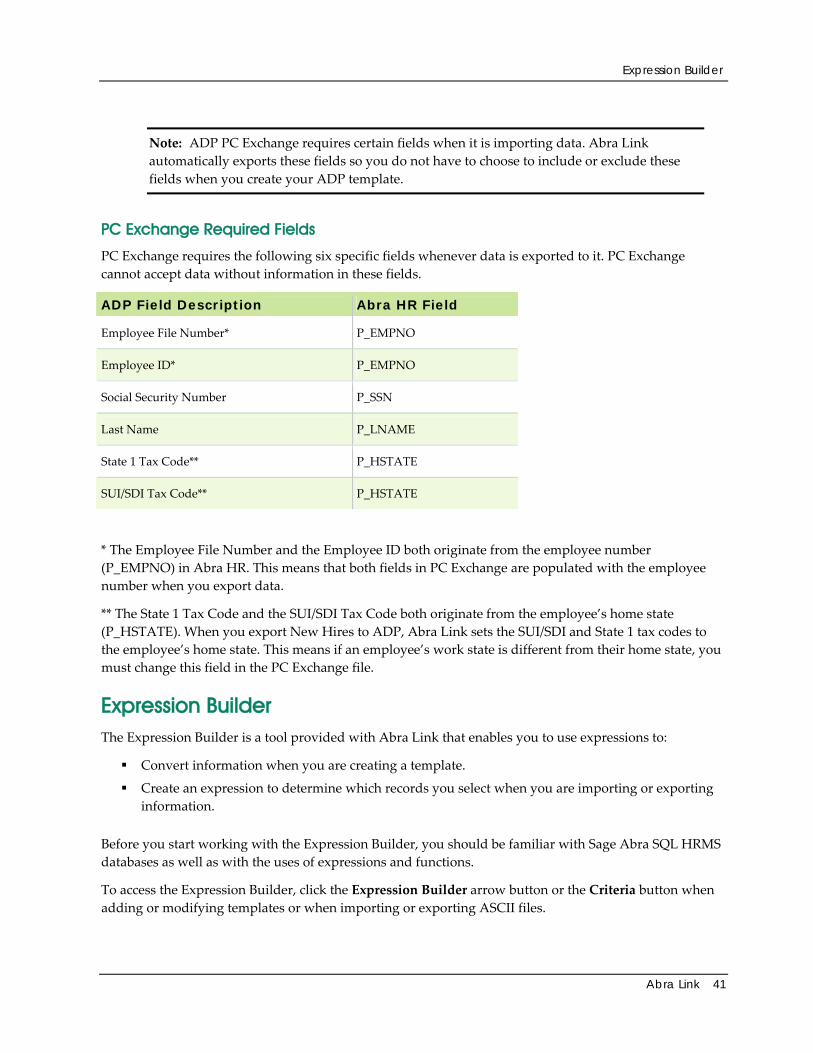
Expression Builder
Abra Link 41
Note: ADP PC Exchange requires certain fields when it is importing data. Abra Link automatically exports these fields so you do not have to choose to include or exclude these fields when you create your ADP template.
PC Exchange Required Fields
PC Exchange requires the following six specific fields whenever data is exported to it. PC Exchange cannot accept data without information in these fields.
ADP Field Description Abra HR Field
Employee File Number* P_EMPNO
Employee ID* P_EMPNO
Social Security Number P_SSN
Last Name P_LNAME
State 1 Tax Code** P_HSTATE
SUI/SDI Tax Code** P_HSTATE
* The Employee File Number and the Employee ID both originate from the employee number (P_EMPNO) in Abra HR. This means that both fields in PC Exchange are populated with the employee number when you export data.
** The State 1 Tax Code and the SUI/SDI Tax Code both originate from the employee’s home state (P_HSTATE). When you export New Hires to ADP, Abra Link sets the SUI/SDI and State 1 tax codes to the employee’s home state. This means if an employee’s work state is different from their home state, you must change this field in the PC Exchange file.
Expression Builder The Expression Builder is a tool provided with Abra Link that enables you to use expressions to:
Convert information when you are creating a template.
Create an expression to determine which records you select when you are importing or exporting information.
Before you start working with the Expression Builder, you should be familiar with Sage Abra SQL HRMS databases as well as with the uses of expressions and functions.
To access the Expression Builder, click the Expression Builder arrow button or the Criteria button when adding or modifying templates or when importing or exporting ASCII files.
Expression Builder
42 Sage Abra SQL HRMS
Expression Builder has various drop‐down lists, list boxes, and buttons to use when creating an expression. Refer to Using the Expression Builder for detailed information.
To Determine the Databases and Fields Available
If you are working in Expression Builder, all fields in all database files are available for use in an expression.
However, if you are adding an expression on any page other than the Expression Builder (such as, Template Defaults, Add Template Field, Edit Template Field, Import to Sage Abra, Export from Sage Abra, New Service Bureau Template, ADP Template Setup pages) the fields which are available for use depend upon the database you selected on that page.
If you are adding an expression on the Template Defaults page, all fields listed are from the database selected on the Template Setup page.
If you are adding an expression on the Add Template Field page, all fields listed are from the database selected in the Select Field From area of the dialog box.
Create an Expression
To determine which records you want to import or export, you can type an expression in the text box in the Import/Export Record Selection group or use the Expression Builder. This group appears on the Template Defaults page as well as on the Import to Sage Abra and Export from Sage Abra pages.
1. To access Expression Builder, click the Expression Builder arrow.
2. Abra Link automatically defaults to the correct table in the From Table field so you do not need to make a selection in that field.
3. Also, you do not need to make a selection in the Variables list; this list is available for programmers.
4. Scroll through the Fields list and double‐click the field you want to use in the expression.
5. Expression Builder enters the field name in the Record Selection Criteria box.
Note: Expression Builder enters the field name using the table alias. Sage Abra SQL HRMS does not recognize aliases during the import process. Therefore, if you are importing information, you must highlight and delete the file alias and period.
6. Place the insertion point next to the field name and enter the logical operator.
7. Enter a value to complete the expression.
8. Click Verify. The Expression Builder presents a message indicating if you have used the correct structure for your expression. For example, if you have an equal sign, it will confirm that you have a value after the equal sign.
9. When you are satisfied with the expression, click OK.
Expression Builder
Abra Link 43
Write a Conversion Rule
You can add a conversion rule to a template for importing or exporting information.
1. Open the Add Template Field page or the Edit Template Field page.
2. Make sure the template includes the fields that you will be using in the rule.
Note: When you are exporting, if you have a field in a rule, that field must exist in the template. When you are importing, if you have a field in a rule, that field must exist in the Abra file you have selected.
3. Create the conversion rule using one of the following methods:
4. Type an expression or function in the Conversion Rule text box.
5. Click the Expression Builder arrow to build a more complex rule. Click OK when done.
6. Click OK to save the changes to the template.
Expression Builder
44 Sage Abra SQL HRMS
Abra Link 45
Index A
about the Abra Link interface, 1
about the import process, 3
Abra Link, 1
accessing Abra Link, 2
Add Template Field page, 4, 5
additional import fields, 11
ADP export errors, 39
ADP fields to import, 9
ADP Template Setup page, 17
ADP translation tables, 15
an overview, 1
ASCII file formats, 31
auditing the changes, 26
B
before you begin exporting data to ADP PC Exchange, 15
C
changing an ADP translation table, 16
checklist for exporting from Sage Abra to an ASCII file, 8
checklist for importing from an ASCII file, 7
checklist for importing service bureau data, 13
comma‐delimited format, 31
conversion rules, 43
copying a service bureau template, 13
copying an ADP template, 24
copying an import/export template, 7
creating a service bureau template, 9
creating an ADP template, 17
creating an export template, 5
creating an expression, 42
creating an import template, 4
D
date fields, 17
deleting a service bureau template, 13
deleting an ADP template, 25
deleting an import/export template, 7
E
error messages on export to ADP, 39
expansion fields, 17
exporting from Sage Abra to ASCII files, 8
F
field selection for service bureau templates, 9
file formats, 31
final export from Abra HR to ADP PC Exchange, 26
fixed length format, 31
Index
46 Sage Abra SQL HRMS
H
HJOBHIS database, 33
how the import process works, 3
HRPERSNL database, 33
I
Import to Sage Abra page, 7
importing service bureau data, 13
importing to Sage Abra from ASCII files, 7
installing the PC Exchange module, 40
L
linking ADP codes to ABra HR codes, 2
M
MFOUT file path, 9
Modify Service Bureau Template page, 13
modifying a service bureau template, 12
modifying an ADP template, 24
modifying an import/export template, 6
N
New Service Bureau Template panel, 9
O
overview of exporting data to ADP PC Exchange, 15
overview of importing service bureau files into Sage Abra, 9
P
pay frequencies, 11
PC Exchange Audit report, 27
PRDEDS database, 33
PREARN database, 33
preparing your ASCII file for importing, 4
previewing a report, 29
Print Preview toolbar, 29
printing a report, 29
PRTAXES database, 33
purging ADP error log, 29
purging report information, 29
R
reference material, 31
report options, 29
reports, 29, 30
required fields for import to Sage Abra, 33
running a report, 29
S
sample reports, 30
selecting employees to include, 29
selecting records to import/export, 42
selection criteria for reports, 29
Service Bureau Import page, 13
setting up Abra Link and ADP PC Exchange, 40
sort options for reports, 29
space‐delimited format, 32
Index
Abra Link 47
standard export fields, 20
standard import fields, 9
starting Abra Link, 2
supplemental fields, 23
T
tab‐delimited format, 32
template information, 18
Template Setup page, 4, 5
trial export from Abra HR to ADP PC Exchange, 25
U
using Abra Link, 1
V
viewing data in the MFOUT file, 13
W
working with ADP translation tables, 15
writing a conversion rule, 43