safety recall s83 / nhtsa 16v-813 windshield washer pump
TRANSCRIPT

Copyright 2016, FCA US LLC, All Rights Reserved (srg)
December 2016 Dealer Service Instructions for:
Safety Recall S83 / NHTSA 16V-813
Windshield Washer Pump
2016 (PF) Dodge Dart
NOTE: This recall applies only to the above vehicles built from April 13, 2015
through June 06, 2016 (MDH 041306 through 060608).
The front windshield washer pump on about 53,000 of the above vehicles may
produce a “voltage spike” in the front windshield wiper electrical circuit when the
front windshield washer pump is activated. This “voltage spike” could overload
the Body Control Module (BCM) front windshield wiper electrical circuit and
cause a loss of front windshield wiper function. A loss of front windshield wiper
function, under certain driving conditions, could impair the driver’s vision and
cause a crash without warning.
Models
IMPORTANT: Some of the involved vehicles may be in dealer new vehicle
inventory. Federal law requires you to complete this recall service on these
vehicles before retail delivery. Dealers should also consider this requirement to
apply to used vehicle inventory and should perform this recall on vehicles in for
service. Involved vehicles can be determined by using the VIP inquiry process.
Subject

Safety Recall S83 -- Windshield Washer Pump Page 2
The front windshield washer pump will be replaced on all involved vehicles. If the
front windshield wiper electrical circuit in the BCM is inoperative, the BCM will
also be replaced.
Part Number Description
CSFGS831AA Package, Washer Pump
Each package contains the following components:
Quantity Description
1 Pump, Windshield Washer
1 Grommet, Windshield Washer Pump
68040095AB Washer Fluid, Drum (MS-3037)
or
04318067AB Washer Fluid, 16oz (MS-3037) (MSQ24)
or
04318068AB Washer Fluid, 32oz (MS-3037) (MSQ12)
06509444AA Screw, Splash Shield (as required)
06510827AA Screw, Splash Shield (as required)
Due to the small number of involved vehicles expected to require Body Control
Module replacements, no parts will be distributed initially. If the Body Control
Module does require replacement, the dealer will need to email the VIN requiring
parts and dealer code to [email protected]. Once the VIN is
verified, parts will be ordered on your behalf.
Body Control Modules should only be requested to the campaign team after
inspection determines that a repair is required. Very few vehicles are expected
to require [part] repair.
68273182AB Body Control Module – w/Halogen Headlamps
(If needed)
68273184AB Body Control Module – w/HID Headlamps
(If needed)
Repair
Parts Information

Safety Recall S83 -- Windshield Washer Pump Page 3
Part return may be required for this campaign. Please hold the removed Body
Control Module (BCM) until the recall warranty claim is paid and review “Return
Material Utility” in DealerCONNECT for further instructions.
If part return is required, then print the United Parcel Service (UPS) return
label with prepopulated return information.
If part return is not required, material can be scrapped.
The following special tools are required to perform this repair:
NPN wiTECH micro pod II
NPN Laptop Computer
NPN wiTECH Software
Parts Return
Special Tools

Safety Recall S83 -- Windshield Washer Pump Page 4
A. Replace Windshield Washer Pump
NOTE: The washer pump/motor unit may be removed from the washer
reservoir without removing the reservoir from the vehicle.
1. Disconnect and isolate the negative battery cable.
2. Raise and support the vehicle.
3. Remove the left front tire and wheel assembly.
4. Remove and save the five screws that secure the forward end of the left front
wheel house splash shield to the inner fender panel and the front fascia
(Figure 1).
5. Remove and save the three plastic push-in fasteners that secure of the left front
wheel house splash shield to the inner fender panel (Figure 1).
Service Procedure
Figure 1 – Left Front Wheel House Splash Shield
SCREWS
PUSH-IN FASTENERS

Safety Recall S83 -- Windshield Washer Pump Page 5
6. Pull the forward end of the left front wheel house splash shield away from the
inner fender panel and front fascia far enough to access the washer pump/motor
unit on the outboard side of the washer reservoir on the outboard end of the
Front End Module (FEM) carrier.
7. Disconnect the wire harness connector for the washer pump motor from the
motor connector receptacle (Figure 2).
8. Disconnect the reservoir washer hose from the barbed outlet nipple of the
washer pump and allow the washer fluid to drain into an appropriate container
(Figure 2).
Service Procedure (continued)
Figure 2 – Washer Pump Location
WASHER PUMP MOTOR
RESERVOIR
WIRE HARNESS
CONNECTOR
WASHER HOSE

Safety Recall S83 -- Windshield Washer Pump Page 6
9. Pull lightly outward on the top of
the washer pump/motor housing
away from the washer reservoir to
disengage the top of the motor
from the receptacle in the
reservoir.
10. Using hand pressure, firmly grasp
and pull the washer pump upward
far enough to disengage the pump
inlet nipple from the rubber
grommet seal/filter screen in the
reservoir. Care must be taken not
to damage the reservoir.
11. Remove and discard the washer
pump/motor unit from the washer
reservoir (Figure 3).
12. Remove and discard the rubber grommet seal/filter screen from the washer
pump mounting hole in the reservoir and discard (Figure 3).
13. Lubricate a NEW rubber grommet seal/filter screen with clean washer fluid and
install it into the washer pump mounting hole in the washer reservoir. Always
use a new rubber grommet seal/filter screen on the reservoir.
14. Position the inlet nipple on the base of the pump housing of the NEW washer
pump/motor unit to the NEW rubber grommet seal/filter screen in the reservoir.
15. Using hand pressure, press firmly and evenly downward on the top of washer
pump/motor unit until the inlet nipple is fully seated in the rubber grommet
seal/filter screen in the pump mounting hole of the reservoir.
Service Procedure (continued)
Figure 3 – Washer Pump Motor and Seal
RUBBER GROMMET SEAL
WASHER PUMP
MOTOR

Safety Recall S83 -- Windshield Washer Pump Page 7
16. Align the top of the motor housing with the receptacle in the washer reservoir.
17. Using hand pressure, press firmly and evenly on the top of motor housing until
the motor snaps into the receptacle.
18. Connect the reservoir washer hose to the barbed outlet nipple of the washer
pump.
19. Connect the wire harness connector to the washer pump/motor unit connector
receptacle on the top of the motor.
20. Position the left front wheel house splash shield to the inner fender panel.
21. Install the three plastic push-in fasteners that secure the left front wheel house
splash shield to the inner fender panel.
22. Install the five screws that secure the left front wheel house splash shield to the
inner fender panel and the front fascia.
23. Install the left front tire and wheel assembly. Progressively tighten all wheel
mounting (lug) bolts in a star pattern and tighten to 92 ft. lbs. (125 N·m).
Service Procedure (continued)

Safety Recall S83 -- Windshield Washer Pump Page 8
24. Remove the support and lower the vehicle.
25. Connect the negative battery cable.
26. Fill the washer reservoir with new washer fluid.
27. Turn the ignition key to the “ON” position.
28. Verify the washer pump functions properly.
29. Verify the wipers function properly.
If the wipers function properly continue with Step 30.
If the wipers do not function properly continue with Section B. Replace
Body Control Module (BCM).
30. Close the hood and return the vehicle to the customer.
Service Procedure (continued)
Safety Recall S83 -- Windshield Washer Pump Page 9
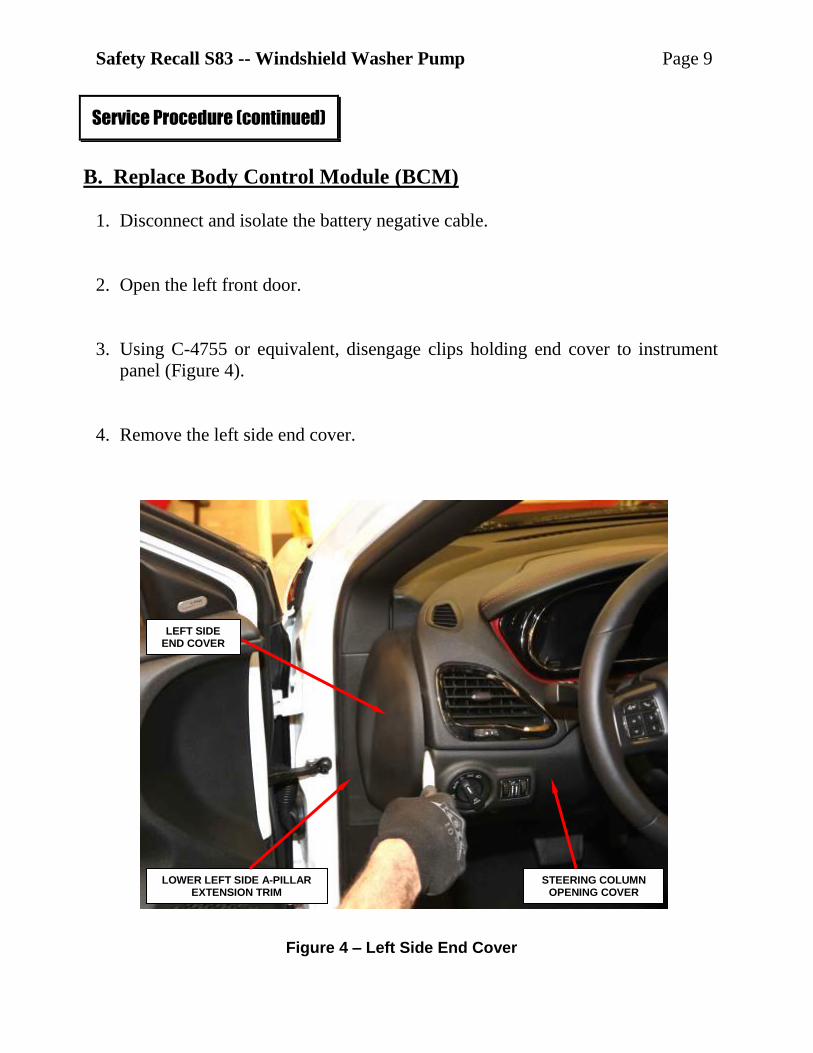
B. Replace Body Control Module (BCM)
1. Disconnect and isolate the battery negative cable.
2. Open the left front door.
3. Using C-4755 or equivalent, disengage clips holding end cover to instrument
panel (Figure 4).
4. Remove the left side end cover.
Service Procedure (continued)
Figure 4 – Left Side End Cover
LEFT SIDE END COVER
LOWER LEFT SIDE A-PILLAR EXTENSION TRIM
STEERING COLUMN OPENING COVER

Safety Recall S83 -- Windshield Washer Pump Page 10
5. Remove the hood release handle from the
steering column opening cover by
pushing down to disengage and then
pulling rearward on the handle.
6. Remove the lower left side A-Pillar
extension trim (Figure 4 and 5).
7. Remove the two side screws and one
bottom screw, securing the steering
column opening cover to the instrument
panel (Figure 5).
8. Using C-4755 or equivalent, partially
remove the upper portion of the steering
column opening cover by gently prying
between the knee blocker trim and the
instrument panel to release the snap
retainers. Do not remove the steering
column opening cover or pull with
excessive force.
9. Disconnect the in-car temperature sensor
electrical connector (Figure 6).
10. Disconnect the light switch harnesses
from the switch electrical connectors and
remove the steering column opening
cover (Figure 6).
Service Procedure (continued)
Figure 5 – Steering Column Opening Cover Screws
Figure 6 – Electrical Connectors
SCREWS
LOWER LEFT SIDE A-PILLAR EXTENSION TRIM
ELECTRICAL CONNECTORS
STEERING COLUMN OPENING COVER

Safety Recall S83 -- Windshield Washer Pump Page 11
11. Remove the left side door sill scuff
panel.
12. Remove and save the two screws that
secure the datalink connector bracket
to the instrument panel (Figure 7).
13. Release the datalink connector
bracket clips from the instrument
panel and position the bracket to the
side.
14. Disconnect the six wire harness
connectors from the connector
receptacles of the Body Control
Module (BCM) located on the
rearward facing surface of the BCM
housing (Figure 8).
Service Procedure (continued)
Figure 8 – BCM Electrical Connector Locations
Figure 7 – Datalink Connector Bracket
DATALINK CONNECTOR
BRACKET
SCREWS
DATALINK
CONNECTOR
CONNECTOR
RECEPTACLES

Safety Recall S83 -- Windshield Washer Pump Page 12
15. Remove the seven screws that secure the BCM to the mounting bracket and the
instrument panel support structure outboard of the steering column (Figure 9).
16. Reposition the BCM to access the remaining electrical connectors on the
forward facing surface of the BCM.
Service Procedure (continued)
Figure 9 – BCM Mounting Brackets
(BCM Removed From Vehicle for Photographic Purposes)
SCREWS
SCREWS

Safety Recall S83 -- Windshield Washer Pump Page 13
17. Disconnect the two wire harness
connectors from the connector
receptacles of the BCM located on the
forward facing surface (Figure 10).
18. Remove the BCM from the instrument
panel and discard.
19. Position the NEW BCM to the
mounting bracket.
20. Connect the two wire harness
connectors to the connector
receptacles of the BCM located on the
forward facing surface (Figure 10).
21. Position the BCM and the BCM mounting brackets to the instrument panel
support structure outboard of the steering column.
22. Install and tighten the seven screws that secure the BCM to the mounting
brackets. Tighten the five m6 screws to 30 in. lbs. (2.5 N·m) (Figure 9).
23. Connect the six wire harness connectors to the connector receptacles of the
BCM located on the rearward facing surface of the BCM housing (Figure 8).
Service Procedure (continued)
Figure 10 - BCM Electrical Connectors
(BCM Removed From Vehicle for Photographic Purposes)
CONNECTOR RECEPTACLES
Safety Recall S83 -- Windshield Washer Pump Page 14
24. Position the datalink connector bracket to the instrument panel and secure the
bracket to the panel.
25. Install the two screws that secure the datalink connector bracket to the
instrument panel and tighten securely (Figure 7).
26. Install the left side door sill scuff panel.
27. Position the steering column opening cover to the instrument panel and connect
the electrical connectors (Figure 6).
28. Install the steering column opening cover onto the instrument panel. Tighten the
three screws securely (Figure 5)
29. Install the hood release handle to the steering column opening cover.
30. Install the lower left A-pillar extension trim (Figure 4).
31. Install the left side end cover (Figure 4).
32. Connect the battery negative cable.
Service Procedure (continued)

Safety Recall S83 -- Windshield Washer Pump Page 15
NOTE: The wiTECH scan tool must be used to perform this recall. The
wiTECH software is required to be at the latest release level before
performing this procedure. If the reprogramming flash for the BCM is
aborted or interrupted, repeat the procedure.
33. Open the hood. Install a battery charger and verify that the charging rate
provides 13.0 to 13.5 volts. Do not allow the charger to time out during the
flash process. Set the battery charger timer (if so equipped) to continuous
charge.
NOTE: Use an accurate stand-alone voltmeter. The battery charger volt
meter may not be sufficiently accurate. Voltages outside of the specified
range will cause an unsuccessful flash. If voltage reading is too high, apply
an electrical load by activating the park or headlamps and/or HVAC
blower motor to lower the voltage.
NOTE: After installing a brand new BCM, the scan tool will be unable to
identify the vehicle. Manual VIN entry into the scan tool must be used to
continue scan tool communication.
34. Connect the wiTECH micro pod II to the vehicle data link.
35. Place the ignition in the “RUN” position.
36. Open the wiTECH Diagnostic application.
37. Starting at the “Select Tool” screen, highlight the row/tool for the wiPOD
device you are using. Then select “Next” at bottom right side of the screen.
38. Enter your “User id” and “Password”, then select “Finish” at the bottom of the
screen.
39. When requested, follow screen prompts to enter VIN information then go to the
“Vehicle View” screen, click on the BCM icon.
40. From the “BCM View” screen, compare the “Current ECU Flash Number”
with the “New Part Number” listed on the “sort table”. If the “Current ECU
Flash Number” is the same as the “New Part Number” continue to Step 46.
If the part numbers are not the same, continue to Step 41.
Service Procedure (continued)

Safety Recall S83 -- Windshield Washer Pump Page 16
41. With the cursor over the desired flash file, click the small green arrow button on
the right side of the screen.
42. From the “ECU Flash” screen follow the wiTECH screen instructions to
complete the flash.
43. Once the flash is complete click the “OK” button on the “ECU Flash” screen.
44. Select the “Clear Stored DTC’s” button.
45. From the “BCM View” screen, compare the “Current ECU Flash Number”
with the “New Part Number” listed on the “sort table”. If the “Current ECU
Flash Number” is the same as the “New Part Number” the flash is complete,
continue with Step 46. If the part numbers are not the same, repeat Steps 39
through 44.
46. Using the wiTECH scan tool, in the “Vehicle View” screen under the “Vehicle
Preparations” tab select “Restore BCM PROXI Configuration” and follow
the screen prompts.
47. Using the wiTECH scan tool, in the “Vehicle View” screen under the “Vehicle
Preparations” tab select “PROXI Configuration Alignment” and follow the
screen prompts.
48. Using the wiTECH scan tool, in the “Vehicle View” screen under the “RF
Hub” module select “Miscellaneous Functions” tab, then highlight and select
“BCM Immobilizer Replace” and follow the screen prompts.
NOTE: Step 48 requires the vehicle PIN number using Dealer Connect /
Service tab / Repair Information / Key Code to complete the wiTECH
routine.
49. Perform the EPS VERIFICATION TEST.
a. Turn the ignition off.
b. Remove all test equipment.
Service Procedure (Continued)

Safety Recall S83 -- Windshield Washer Pump Page 17
c. Connect all previously disconnected components and connectors.
d. Verify all accessories are turned off, the battery is fully charged and the
charging system has a status of "charged".
e. Verify that the ignition is on. With the scan tool, record and erase all
Diagnostic Trouble Codes (DTCs) from all modules.
NOTE: Turn the steering wheel from stop to stop, holding at each stop
position for One second.
f. Turn the ignition off and wait five minutes. Turn the ignition on and using
the scan tool, read DTCs from all modules.
g. If there are no DTCs present after turning ignition on, road test the vehicle
for at least five minutes.
h. Again, with the scan tool read DTCs. If any DTCs are present, refer to the
Table of Contents in the applicable section for the Diagnostic procedure and
troubleshoot the new or recurring symptom.
i. If there are no DTCs present, continue with Step 50.
50. Turn the ignition to the “OFF” position and remove the wiTECH micro pod II
and battery charger from the vehicle.
51. Close the hood and return the vehicle to the customer.
Service Procedure (Continued)

Safety Recall S83 -- Windshield Washer Pump Page 18
Claims for vehicles that have been serviced must be submitted on the
DealerCONNECT Claim Entry Screen located on the Service tab. Claims
submitted will be used by FCA to record recall service completions and provide
dealer payments.
Use one of the following labor operation numbers and time allowances:
Labor Operation Time
Number Allowance
Replace windshield washer pump 23-S8-31-82 0.5 hours
Replace windshield washer pump
and BCM 23-S8-31-83 1.4 hours
NOTE: See the Warranty Administration Manual, Recall Claim Processing
Section, for complete recall claim processing instructions.
To view this notification on DealerCONNECT, select “Global Recall System” on
the Service tab, then click on the description of this notification.
All involved vehicle owners known to FCA are being notified of the service
requirement by first class mail. They are requested to schedule appointments for this
service with their dealers. A generic copy of the owner letter is attached.
Enclosed with each owner letter is an Owner Notification postcard to allow owners
to update our records if applicable.
Completion Reporting and Reimbursement
Dealer Notification
Owner Notification and Service Scheduling

Safety Recall S83 -- Windshield Washer Pump Page 19
All involved vehicles have been entered into the DealerCONNECT Global Recall
System (GRS) and Vehicle Information Plus (VIP) for dealer inquiry as needed.
GRS provides involved dealers with an updated VIN list of their incomplete
vehicles. The owner’s name, address and phone number are listed if known.
Completed vehicles are removed from GRS within several days of repair claim
submission.
To use this system, click on the “Service” tab and then click on “Global Recall
System.” Your dealer’s VIN list for each recall displayed can be sorted by: those
vehicles that were unsold at recall launch, those with a phone number, city, zip
code, or VIN sequence.
Dealers must perform this repair on all unsold vehicles before retail delivery.
Dealers should also use the VIN list to follow up with all owners to schedule
appointments for this repair.
Recall VIN lists may contain confidential, restricted owner name and address information that
was obtained from the Department of Motor Vehicles of various states. Use of this information
is permitted for this recall only and is strictly prohibited from all other use.
If you have any questions or need assistance in completing this action, please
contact your Service and Parts District Manager.
Customer Services / Field Operations
FCA US LLC
Vehicle Lists, Global Recall System, VIP and Dealer Follow Up
Additional Information

This notice applies to your vehicle,
S83 / NHTSA 16V-813
YOUR SCHEDULING OPTIONS
1. RECOMMENDED OPTION
Call your authorized Dodge
Dealership
2. Call the FCA Recall Assistance
Center at 1-800-853-1403. An
agent can confirm part
availability and help schedule an
appointment
3. Visit our Recall Website,
recalls.mopar.com or scan below.
You can find your nearest dealer and
review all your scheduling options
from this website. You will be asked
to provide your Vehicle Identification
Number (VIN) to protect and verify
your identity. The last eight characters
of your VIN are provided above.
DEALERSHIP INSTRUCTIONS
Please reference Safety Recall S83.
IMPORTANT SAFETY RECALL Windshield Washer Pump
Dear [Name],
This notification is being sent to you in accordance with the National Traffic and Motor
Vehicle Safety Act.
FCA has decided that a defect, which relates to motor vehicle safety, exists in certain
[2016 Dodge Dart] vehicles.
WHY DOES MY VEHICLE NEED REPAIRS?
The front windshield washer pump on your vehicle [1]
may produce a “voltage spike” in the
front windshield wiper electrical circuit when the front windshield washer pump is activated.
This “voltage spike” could overload the Body Control Module (BCM) front windshield wiper
electrical circuit and cause a loss of front windshield wiper function. A loss of front
windshield wiper function, under certain driving conditions, could impair the driver’s vision
and cause a crash without warning.
HOW DO I RESOLVE THIS IMPORTANT SAFETY ISSUE
FCA will repair your vehicle [2]
free of charge (parts and labor). To do this, your dealer will
replace the front windshield washer pump on all involved vehicles. If the front windshield
wiper electrical circuit in the BCM is inoperative, the BCM will also be replaced. In addition,
your dealer will require your vehicle for proper check-in, preparation, and check-out during
your visit. Your time is important to us; please be aware that these steps may require more
time. The estimated repair time is one hour. We recommend that you schedule a service
appointment to minimize your inconvenience. Please bring this letter with you to your
dealership.
TO SCHEDULE YOUR FREE REPAIR CALL 1-800-853-1403
OR YOUR CHRYSLER, DODGE, JEEP OR RAM DEALER TODAY
WHAT IF I ALREADY PAID TO HAVE THIS REPAIR COMPLETED?
If you have already experienced this specific condition and have paid to have it repaired, you
may visit www.fcarecallreimbursement.com to submit your reimbursement request online. [3]
Once we receive and verify the required documents, reimbursement will be sent to you within
60 days. If you have had previous repairs performed and/or already received reimbursement,
you may still need to have the recall repair performed.
We apologize for any inconvenience, but are sincerely concerned about your safety. Thank
you for your attention to this important matter.
Customer Assistance/Field Operations
Fiat Chrysler Automobiles US LLC
[Model Year and Model]
VIN XXXXXXXXXXXXXXXXX
VEHICLE PICTURE
LOGO
QR Code

[1] If you no longer own this vehicle, please help us update our records. Call the FCA Recall Assistance Center at 1-800-853-1403 to update your information.
[2] If your dealer fails or is unable to remedy this defect without charge and within a reasonable time, you may submit a written complaint to the Administrator, National
Highway Traffic Safety Administration, 1200 New Jersey Ave., S.E., Washington, DC 20590, or you can call the toll-free Vehicle Safety Hotline at 1-888-327-4236 (TTY 1-800-424-9153), or go to safercar.gov.
[3] You can also mail in your original receipts and proof of payment to the following address for reimbursement consideration: FCA Customer Assistance, P.O. Box 21-
8004, Auburn Hills, MI 48321-8007, Attention: Recall Reimbursement.
Note to lessors receiving this recall notice: Federal regulation requires that you forward this recall notice to the lessee within 10 days.
Mr. Mrs. Customer
1234 Main Street
Hometown, MI 48371