safeseanet norway users guide
TRANSCRIPT

Kystverket Vest
Flathauggata 12 5525 Haugesund
Telephone: +47 52 73 32 00 Telefax: +47 52 73 32 01
E-post: [email protected] Web: http://www.kystverket.no
SafeSeaNet Norway
Users Guide

User Guide for SafeSeaNet Norway Web Client
Page 2 of 53
Table of Contents 1 Introduction ........................................................................................................................................... 3
2 SafeSeaNet Norway Web Client ............................................................................................................ 4
2.1 Log In Screen ................................................................................................................................... 4 2.2 Voyage Registration Wizard ............................................................................................................. 4
2.2.1 Ship Search.............................................................................................................................. 5 2.2.2 Voyage .................................................................................................................................... 6 2.2.3 Voyage Details ........................................................................................................................ 8 2.2.4 Quay........................................................................................................................................ 9 2.2.5 Hazmat Information ............................................................................................................... 10 2.2.6 Bunkers ................................................................................................................................. 11 2.2.7 Customs ................................................................................................................................. 11 2.2.8 Crew and Passengers ............................................................................................................. 15 2.2.9 Security ................................................................................................................................. 17 2.2.10 Military ................................................................................................................................. 18 2.2.11 Waste .................................................................................................................................... 21 2.2.12 NOx ....................................................................................................................................... 22 2.2.13 Port State Control .................................................................................................................. 22 2.2.14 Pilotage Information .............................................................................................................. 24 2.2.15 Pilot Exemption Certificate .................................................................................................... 26 2.2.16 PEC Exam ............................................................................................................................. 27 2.2.17 Pilotage Dispensation ............................................................................................................ 28 2.2.18 Confirmation (completion of notification) ............................................................................... 31
2.3 Voyages ......................................................................................................................................... 36 2.4 Pilotages ........................................................................................................................................ 37 2.5 Map ............................................................................................................................................... 38 2.6 Report Position .............................................................................................................................. 39 2.7 Annual Fee..................................................................................................................................... 40 2.8 Exemptions .................................................................................................................................... 42 2.9 Shared PECs .................................................................................................................................. 46
2.9.1 Connections ........................................................................................................................... 46 2.9.2 My connection requests .......................................................................................................... 46 2.9.3 Incoming connection requests ................................................................................................ 47
3 My Account .......................................................................................................................................... 48
3.1 My Profile...................................................................................................................................... 48 3.1.1 Connect Account To PEC ....................................................................................................... 48
3.2 Favourite Ships Administration ...................................................................................................... 50 4 My Company ....................................................................................................................................... 51
4.1 Contact Information ....................................................................................................................... 51 4.2 User Accounts ................................................................................................................................ 51
5 Glossary ............................................................................................................................................... 53
User Guide for SafeSeaNet Norway Web Client
Page 3 of 53
1 Introduction The purpose of this document is to explain the usage of the SafeSeaNet (SSN) Norway Web
Client, which together with the Norwegian SSN Server makes up the Norwegian national
SafeSeaNet system.
All countries in EU and Associated countries are connected or will soon be connected to the
central SSN system. These countries are hereafter called Member States (MS). Every country
has to dedicate an internal authority as a National Competent Authority that will be the official
connection between the country and the central SSN system that is under the responsibility of
the European Maritime Safety Agency (EMSA).
The Norwegian SSN Server sends messages to the central SafeSeaNet system in EU. The
central system is operated by EMSA. Users operating in Norwegian waters have to conform
to Norwegian SafeSeaNet rules. Here you will find information of what and when to notify.
The SafeSeaNet systems’ goals are:
• Better detection of potential risk situations
• Better reaction in case of threat to maritime safety and the environment
• Improved emergency response in case of incidents or pollution at sea
• Improved controls of vessels in ports
• Increased efficiency of port logistics (accurate ETAs, waste handling…)
• Produce statistics for EMSA, Member States and the Commission

User Guide for SafeSeaNet Norway Web Client
Page 4 of 53
2 SafeSeaNet Norway Web Client SafeSeaNet Norway Web Client can be accessed through the URL https://www.shiprep.no/
SafeSeaNet Norway Support are authorised to define and update ships and ports.
All times in the web client are in the current local time zone in Norway. This is CET
(UTC+01:00) during the winter, and CEST (UTC+02:00) when observing daylight saving
time.
2.1 Log In Screen
Figure 1: Log in screen
The log in screen (Figure 1) will give access to all relevant background information and the
latest relevant news.
2.2 Voyage Registration Wizard
To register or update voyages, you will be led through a wizard containing several steps for
entering different types of information. Depending on the type of voyage, the mandatory
information required will vary. Mandatory information will be highlighted during registration

User Guide for SafeSeaNet Norway Web Client
Page 5 of 53
and when viewing your reporting in retrospect. Some reporting options are not relevant for all
voyage types and will then be disabled in the user interface. In the following section each
available step is described.
2.2.1 Ship Search
After logging in you will be presented with the first page of a wizard for registering a new
voyage. On this first page, you must select a ship.
Figure 2: Ship search
You can select a ship from the Favourite Ships list or you can search for the ship by
specifying Ship Name, Call Sign and/or IMO No and clicking the Search button.
When you search for the ship, you will get a list that matches the criteria given. You must
select a ship from either the list or the search results before moving to the next step.
Ships are added to the Favourite Ships list automatically every time the user registers a
voyage for a ship which is not already on the list. In addition, you can manually manage the
list via My Ships in the My Account menu.
If you don’t find your ship, please inform SafeSeaNet Norway Support. They will add the
ship to the list, and you will be able to register the voyage.
Figure 3 shows the result of a sample ship search.
Figure 3: Ship search results

User Guide for SafeSeaNet Norway Web Client
Page 6 of 53
To select a ship, you must click on one of the Select links to the left in the result list. The
row for the selected ship will be marked with a bright yellow colour. When a ship is selected,
either from the dropdown list or the search results, the notification can be created by clicking
the Next button.
2.2.2 Voyage
If the selected ship has any previous voyages, you will get the screen as shown in Figure 4:
Figure 4: Voyages
You can choose to update, continue, or return one of the previous voyages by clicking one of
the actions. If you do not wish to continue or return any of the voyages previously registered,
you need to click the click here link underneath the table. This will present the page for
registering voyage information with no pre-entered values. Having clicked on one of the links,
the system would present the same page for port information, but with the departure and
arrival information pre-entered according to the selected action link.
[Update]: Is used when some of the information of an already registered voyage is to be
updated.
[Continue]: Can be used when a new voyage is to be registered and this new voyage is a
continuation from the last harbour of an already registered voyage.
[Return]: Can be used when a new voyage is to be registered and this new voyage is a
return of an already registered voyage (arrival port of the existing notification = departure port
of the new voyage and departure port of the existing voyage = arrival port of the new voyage).
After choosing to either continue, return, or create a new voyage you are presented with the
sections for entering Departure Port and Arrival Port information (Figure 5).

User Guide for SafeSeaNet Norway Web Client
Page 7 of 53
Figure 5: Voyage information
In these sections the following fields must be filled in:
Location Code/Name for departure, ETD for departure, Location Code/Name for
arrival, ETA for arrival, and ETD for arrival.
While typing in the departure and arrival location fields, the system will present a list of
relevant locations matching the entered combination of characters. Departure and arrival
locations must be either a harbour name or a country name (both Norwegian and foreign
harbours are accepted). If you are using only the keyboard to fill in the form, it is
recommended that you use the Tab key instead of the Enter key to select the location. By
doing so, the cursor will jump to the next field in the form instead of to the top of the page.
In the date fields, you can either enter a date manually or select a date from a calendar which
will pop up when clicking on the calendar icon to the right of the date field. The required date
format is dd.MM.yyyy (e.g. 21.04.2008). The time to the right of the calendar icon is not
mandatory. When entered, the required format is hh:mm (e.g. 12:30).
User Guide for SafeSeaNet Norway Web Client
Page 8 of 53
2.2.3 Voyage Details
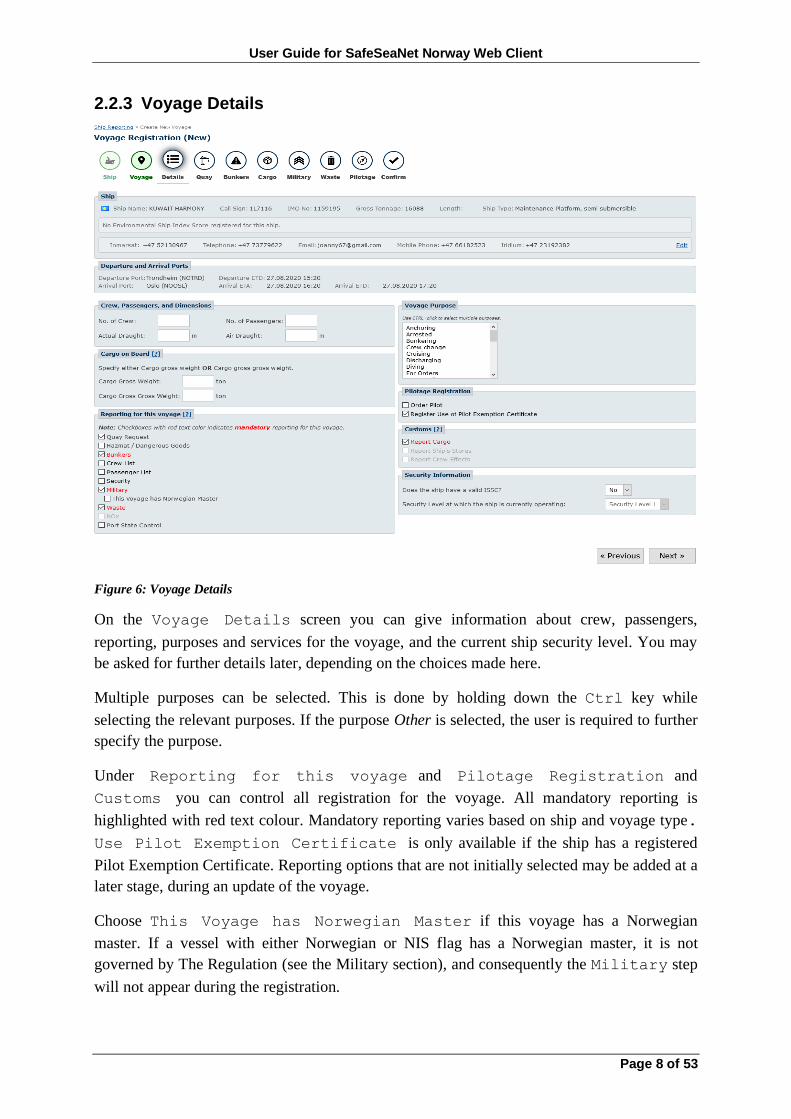
Figure 6: Voyage Details
On the Voyage Details screen you can give information about crew, passengers,
reporting, purposes and services for the voyage, and the current ship security level. You may
be asked for further details later, depending on the choices made here.
Multiple purposes can be selected. This is done by holding down the Ctrl key while
selecting the relevant purposes. If the purpose Other is selected, the user is required to further
specify the purpose.
Under Reporting for this voyage and Pilotage Registration and
Customs you can control all registration for the voyage. All mandatory reporting is
highlighted with red text colour. Mandatory reporting varies based on ship and voyage type.
Use Pilot Exemption Certificate is only available if the ship has a registered
Pilot Exemption Certificate. Reporting options that are not initially selected may be added at a
later stage, during an update of the voyage.
Choose This Voyage has Norwegian Master if this voyage has a Norwegian
master. If a vessel with either Norwegian or NIS flag has a Norwegian master, it is not
governed by The Regulation (see the Military section), and consequently the Military step
will not appear during the registration.

User Guide for SafeSeaNet Norway Web Client
Page 9 of 53
For ships that already have registered their ISSC (International Ship Security Certificate)
through normal Security reporting, the dropdown for Does the ship have a valid
ISSC? will always be set to Yes. All ships that have a valid ISSC are required to report
Crew and Passenger lists, and Security information to the arrival port, also on domestic
voyages.
2.2.4 Quay
The purpose of this section is to allow agents to deliver quay requests directly to the relevant
port authorities through SafeSeaNet.
Figure 7: Quay
Agent in Arrival Port and Invoice Receiver is required. If the arrival port has
a port administrator selection of quay is not required. A port administrator is able to handle all
unspecified quay requests. Note that all quays nearby the arrival port are available both in the

User Guide for SafeSeaNet Norway Web Client
Page 10 of 53
drop down list and in the map. The information in this section will be forwarded directly to
the relevant port authority upon submission.
2.2.5 Hazmat Information
Vessels, regardless of size, carrying dangerous or polluting goods (DPG) in bulk or in
packaged form shall declare detailed information about the vessels HAZMAT cargo. This
screen, however, is only shown if you have ticked off the Hazmat/Dangerous Goods
checkbox on the Voyage Details screen.
The system has code registers for IMDG, IMSBC, IGC, IBC, and Marpol Annex I. When
entering data in the Un No/Name field the system will automatically present a drop-down
list of proper shipping names based on the selected code register and text input. Please inform
SafeSeaNet Norway Support if you find errors or that data is missing.
Figure 8: Hazmat
From this screen you can generate a list of different types of hazmat goods until you have
registered all the different types you have on board. This list is temporary until you confirm it
on the Confirmation screen. Even if you have only one item you have to add it to the list
(using the Add Entry button).
Please note that you can select different measuring units. The selected unit will apply to both
the gross and the net weights.

User Guide for SafeSeaNet Norway Web Client
Page 11 of 53
2.2.6 Bunkers
Vessels of 1000 GT or more is required to declare bunkers regardless of the cargo type.
If you have ticked off the Bunkers checkbox on the Voyage Details screen, you
will have to fill in information on the Bunkers page. At least one entry is required in the list.
To add an entry to the bunkers list, you will need to specify Bunkers Type,
Quantity, and Unit. Bunkers Type can be selected by using the list presented by
the system. The Quantity field accepts comma separated decimal numbers with up to
four decimal places. There are two available types of Unit: m3 and ton.
If Bunkers Type is set to Other, you will be required to enter a description text
specifying the cargo type, before adding the entry.
Figure 9: Bunkers
2.2.7 Customs
The customs notification consists of multiple parts: cargo, ship’s stores, and crew effects, in
addition to a complete crew list. All of these parts have their own respective checkbox for
reporting in the Voyage Details screen.

User Guide for SafeSeaNet Norway Web Client
Page 12 of 53
2.2.7.1 Cargo
The purpose of this section is to report information regarding loading and unloading of cargo.
You also have the option to register the next port of call for the voyage.
Figure 10: Cargo
Figure 10 shows the screen for registering cargo information. Depending on the departure and
arrival locations of the voyage, some fields may not be required and are therefore hidden.
You have the option to register the date (and time) and specific location in the port. In
addition, cargo manifest files may be uploaded, and a text description of the cargo being
processed can also be provided.
You may also specify the next port of call for the voyage. This must be in the form of a
location with a registered LOCODE. By typing in three or more of the first letters of the
destination, the system will suggest valid locations for you.
If you are using only the keyboard to fill in the form, it is recommended that you use the Tab
key instead of the Enter key to select the location. By doing so, the cursor will jump to the
next field in the form instead of to the top of the page.

User Guide for SafeSeaNet Norway Web Client
Page 13 of 53
2.2.7.2 Ship Stores
The purpose of this section is to report the amount and nature of ship’s stores upon arrival to
Norway.
Figure 11: Ship Stores
Ship stores are reported by filling in the Quantity in the box next to the item in question. If
there are no quantities to be reported to the Customs Authorities, 0 should be specified in the
relevant box.
If there are any restricted items (e.g. drugs, live animals, weapons, ammunition etc.) on board
(in addition to the standard alcohol, food and tobacco categories), they can be specified with
text in the four lines at the bottom of the table.
If there have been adjustments made to the allowable quotas for the voyage made by the
Customs Authorities, they will be shown in the four columns on the right side of the table.
User Guide for SafeSeaNet Norway Web Client
Page 14 of 53
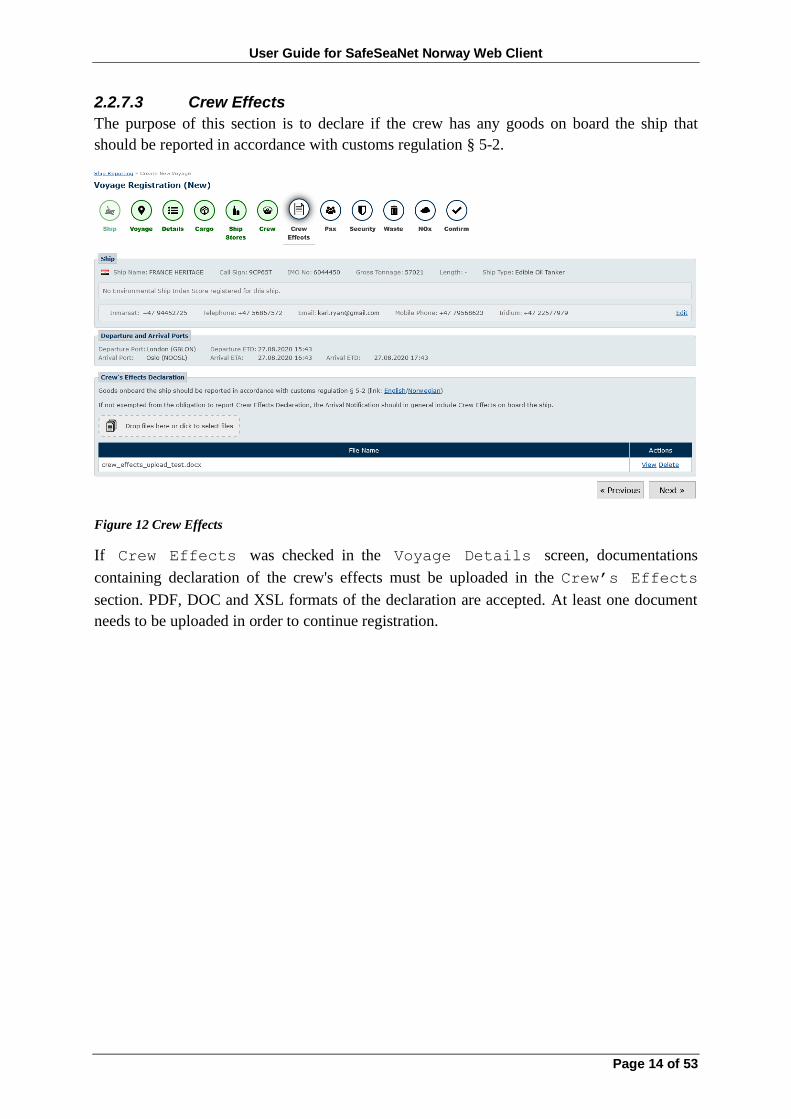
2.2.7.3 Crew Effects
The purpose of this section is to declare if the crew has any goods on board the ship that
should be reported in accordance with customs regulation § 5-2.
Figure 12 Crew Effects
If Crew Effects was checked in the Voyage Details screen, documentations
containing declaration of the crew's effects must be uploaded in the Crew’s Effects
section. PDF, DOC and XSL formats of the declaration are accepted. At least one document
needs to be uploaded in order to continue registration.

User Guide for SafeSeaNet Norway Web Client
Page 15 of 53
2.2.8 Crew and Passengers
Crew and passenger lists are required for all inbound and outbound voyages, and for domestic
voyages for ships with valid ISSC (International Ship Security Certificate). The registration
steps will be available if the respective checkboxes for Crew List or Passenger
List is checked in the Voyage Details screen.
2.2.8.1 Crew
The purpose of this section is to register information about the crew members.
Figure 13: Crew
If a crew list has been prepared in a properly formatted Excel file (available from Kystverket
or under Documents in the top menu) crew member information can be uploaded directly. If
you wish to fill in this information manually or edit already existing information, you also
have the option to do so.
In the Crew Member Info box, you can register details about the crewmember. These
details include name, rank, date of birth and home country. In addition, one is asked to fill in
ID of the crewmember in question, either a Passport number or a Seaman’s book ID.
User Guide for SafeSeaNet Norway Web Client
Page 16 of 53
When you click the Add Entry (or Update Entry during an edit) the crewmember
information is added to a list in the Crew List section. This list is temporary until you
confirm it on the Confirmation screen. You may delete or modify entries from this list by
pressing the appropriate links at the end of each row.
Before you can progress further from this screen, the number of crewmembers in Crew
List must match the number previously reported in the Voyage Details screen.
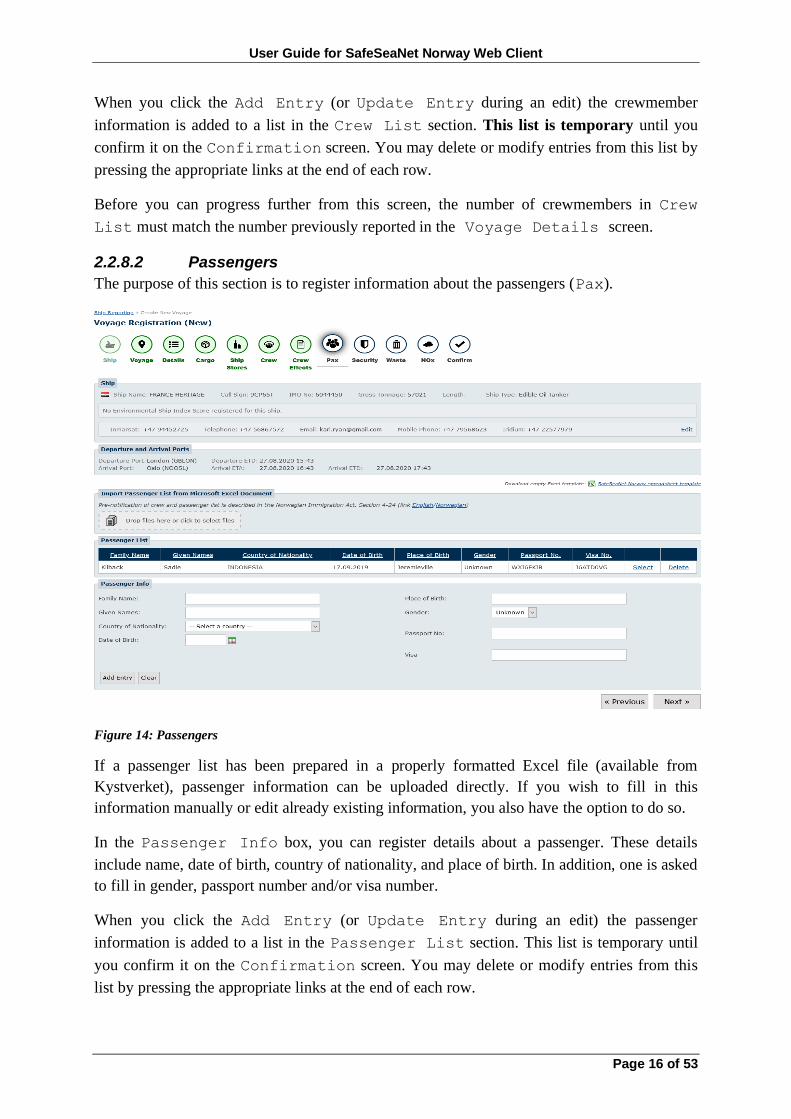
2.2.8.2 Passengers
The purpose of this section is to register information about the passengers (Pax).
Figure 14: Passengers
If a passenger list has been prepared in a properly formatted Excel file (available from
Kystverket), passenger information can be uploaded directly. If you wish to fill in this
information manually or edit already existing information, you also have the option to do so.
In the Passenger Info box, you can register details about a passenger. These details
include name, date of birth, country of nationality, and place of birth. In addition, one is asked
to fill in gender, passport number and/or visa number.
When you click the Add Entry (or Update Entry during an edit) the passenger
information is added to a list in the Passenger List section. This list is temporary until
you confirm it on the Confirmation screen. You may delete or modify entries from this
list by pressing the appropriate links at the end of each row.

User Guide for SafeSeaNet Norway Web Client
Page 17 of 53
Before you can progress further from this screen, the number of passengers in Passenger
List must match the number previously reported in the Voyage Details screen.
2.2.9 Security
This step requires you to provide information required by the SOLAS regulation XI-2/9.2.1.
Under Security Details you must state whether the ship has a valid Ship Security
Plan (SSP). If there are security-related matters to report, you will be required to provide
details for these. The Ship Security Level can only be set in the Voyage
Details step.
Details regarding the ship’s International Ship Security Certificate (ISSC) are also required.
ISSC Expiry Date, ISSC Issuer Type, and ISSC Issuer are all required
fields. If the ship does not have a valid ISSC you must provide a reason for why this is the
case.
Company Security Officer (CSO) and 24 hour contact details is required for all security
registrations. If there no CSO is registered you will have to add one by clicking Add new
CSO. If you do not know who the CSO is you need to contact the ship owner.
Under Ship Call History at least the ten last ship calls should be listed. If there are
any ship calls missing you are required to add them to the list.
If any Ship to Ship Activities have been performed during the listed ship calls,
you are required to specify them.
Added CSOs, Ship Calls, and ISSC will be stored in the system and can be reused in future
registrations.

User Guide for SafeSeaNet Norway Web Client
Page 18 of 53
Figure 15: Security
2.2.10 Military
The Military page is supporting the enforcement of the Regulations governing the Entry
into and Passage through Norwegian Territorial Waters in Peacetime of Foreign, Non-
Military Vessels (referred to as The Regulation in this document). The regulation can be found
at http://lovdata.no/dokument/SF/forskrift/1994-12-23-1130
Users that have successfully and correctly reported using the Military pages is not
required to report directly to the Coastal Surveillance Centre.

User Guide for SafeSeaNet Norway Web Client
Page 19 of 53
The vessels master is always responsible for adhering to The Regulation. Not obeying to The
Regulation will have consequences for the vessels master even if the omission has been done
by the vessels agent.
Figure 16: Military
To report in accordance with The Regulation, choose Military in the Voyage
Details screen.
NB: The Regulation requires vessels to report at least 24 hours prior to arrival Norwegian
Internal Waters (NIW).
Fill inn estimated time and planned position for entering and leaving NIW (Baseline). Please
note that the SSN portal only accepts valid positions +/- 3nm along the baseline. To ensure
correct position report, click the map button ( right next to the location input fields) and
then mark your position in map within the highlighted area along the NIW boundary. Your
estimated position for entering and leaving NIW will then be automatically highlighted in the
position field.
Validation rules for entering and leaving NIW:
• When entering NIW (Voyage from a foreign to a Norwegian Port):
o The ETA for entering NIW must be later than ETD for leaving the last foreign
port.

User Guide for SafeSeaNet Norway Web Client
Page 20 of 53
o The ETA for entering NIW must be prior to the ETA for entering the first
Norwegian port.
• Within NIW (Voyage from a Norwegian to a Norwegian Port):
o The ETA for entering NIW must be prior to the ETA for entering the first
Norwegian port.
o The ETD for leaving NIW must be later than the ETD for leaving the last
Norwegian port.
• Leaving NIW (Voyage from a Norwegian to a foreign Port):
o The ETD for leaving NIW must be later than the ETD for leaving the last
Norwegian port.
o The ETD for leaving NIW must be prior to ETA for entering the next foreign
port.
• Transit NIW (Voyage without entering a Norwegian port):
o The ETA for entering NIW must be later than ETD for leaving the last foreign
port.
o The ETD for leaving NIW must be prior to ETA for entering the next foreign
port.
Fill in the master's First Name, Last Name, and Home Country. Masters from
previous voyages can be found by starting to type the name.
Make sure the Norwegian Point of Contact is correct. You can either choose a
registered agent (company) or a contact person.
To change a registered agent, press Change Company and choose the correct Point of
Contact. Finish by pressing the Change button.
Select the preferred communication method and fill in the various communications means.
2.2.10.1 Operational support
For operational support and issues regarding The Regulation please contact the Coastal
Surveillance Centre:
• Phone: +47 75536298
• E-mail: [email protected]

User Guide for SafeSeaNet Norway Web Client
Page 21 of 53
2.2.11 Waste
The Waste step is available for all voyages to Norwegian ports. You will have the option to
specify whether to deliver a Waste notification or not. You should only choose the option of
not delivering if you are making a partial registration at this time and are going to complete it
later.
Under Waste Status you are required to specify how much waste that is to be delivered
at arrival.
Under Last Waste Delivery you are required to fill in Port of Last
Delivery and Date of Last Delivery.
For all waste statuses you will be required to specify Waste Disposal
Information. This includes specifying Waste Type, Amounts to deliver,
Max Storage Capacity, Retained Amount, and Estimated Generated
Amount.
Figure 17: Waste

User Guide for SafeSeaNet Norway Web Client
Page 22 of 53
2.2.12 NOx
The purpose of this section is to report if the vessel is encompassed by the obligation to pay
the excise duty on emissions of NOx (nitrogen oxides), due to Regulation on Excise Duties
sections 3-19-1 and 3-19-2. The regulation can be found at:
https://www.skatteetaten.no/en/business-and-organisation/vat-and-duties/excise-duties/about-
the-excise-duties/nox/
Figure 18: NOx
Only foreign ships on inbound voyages are obligated to report at this step, because Norwegian
vessels are already registered with excise duties at the Tax Authorities.
The field Representative’s Enterprise Organization Number or
Vessel owner’s Certificate of Compliance Number needs to be filled out
(at least one of them). The enterprise organization number must be exactly 9 digits, whereas
the certificate of compliance number can be 0-9 digits. If a certificate of compliance number
has been registered for this vessel before, SSN will automatically suggest this number the next
time as well.
2.2.13 Port State Control
If the checkbox Port State Control is ticked off in the Voyage Details screen,
the Port State Control (PSC) screen is shown (Figure 19).

User Guide for SafeSeaNet Norway Web Client
Page 23 of 53
Figure 19: Port State Control
This screen is used to give a notice to the Norwegian Maritime Authority well in advance
when a ship is due for an expanded port state control inspection. The user is asked to fill in
the following PSC inspection information:
Expected to berth: Yes or No (No, means that the ship will go for anchorage)
Planned operations: Free text in English language describing the planned operations
at the port or anchorage (loading, unloading, other). NB: In Norway this field will by default
contain the text from the Voyage Purpose field reported earlier. Additions can be made.
Planned works: Free text in English language describing the planned statutory survey
inspections and substantial maintenance and repair work to be carried out whilst in the port or
anchorage of destination.
For tankers only, the user is asked to fill in the following:
Ship configuration: The options are Single Hull Tanker (SHT), Single Hull Tanker
with Segregated Ballasts Tanks (SHT-SBT) or Double Hull Tanker (DHT).
Nature and volume of cargo: Free text entry in English language identifying the
volume and nature of the cargo.
Conditions of cargo and ballast tanks: Free text entry in English language
identifying the condition of the cargo and ballast tanks: full, empty, inerted.

User Guide for SafeSeaNet Norway Web Client
Page 24 of 53
2.2.14 Pilotage Information
To register pilotages, you must have ticked off the Order Pilot checkbox or Register
Use of Pilot Exemption Certificate on the Voyage Details screen.
Please note that a pilotage is connected to a voyage.
The Norwegian Coastal Administration has developed LOCODEs for all the pilot boarding
areas. Each LOCODE that describe a sea area start with a Z (e.g. NOZFA). Only Norwegian
harbours and pilotage places are permitted as pilotage locations.
The Norwegian Coastal Administration has an arrangement called Pilot Exemption Certificate
(PEC). This is a permission given to a master or a navigator to sail without a pilot in waters
where use of pilot is mandatory. A qualification program is required to get this type of
certificate, together with documented experience.
Figure 20: Order pilot
To register a pilotage, the following fields are mandatory: Location Code/Name for
pilotage from, the Time for pilotage from and the Location Code/Name for pilotage to.
If the selected ship does not have any registered certificates, the Register Use of
Pilot Exemption Certificate radio button will be disabled, and you will not be
able to register PEC pilotages.

User Guide for SafeSeaNet Norway Web Client
Page 25 of 53
If the user is updating an existing voyage with one or more pilotages with status ACTUAL,
that is not using PEC or has any registered PEC exams, the checkbox Apply for
Dispensation from Compulsory Pilotage is available.
The Time must be between departure ETD and arrival ETA, and at least 3 hours ahead.
When the processing of the pilotage has started (status is then changed to ACTIVE by the
Norwegian Coastal Administration), the Time can be updated until 2 hours until start. If the
from time is less than 2 hours ahead, the pilotage cannot be updated or cancelled.
Confirmed is used when the pilotage is confirmed. The user will not be able to change the
pilotage anymore.
The Mark Invoice With field is a free text field. The text typed in this field will be
found on the invoice.
Several pilotages can be added to the same voyage.
Figure 21: Use Pilot Exemption Certificate
To register a pilotage with PEC, you must select the Use Pilotage Exemption
Certificate radio button. In such a case, Time is not mandatory.

User Guide for SafeSeaNet Norway Web Client
Page 26 of 53
• By checking the Register PEC exam candidate, you will be able to register
a PEC exam candidate in a later step. This is only possible when there is a declared
PEC exam registered on the ship.
2.2.15 Pilot Exemption Certificate
If you have registered at least one pilotage with pilotage exemption certificate on the
Pilotage page, the next page will be PEC (Figure 22) where you have to connect each of
these pilotages with one or more certificates.
Figure 22: PEC
To be able to go to the next page from PEC, you must connect each PEC pilotage with one or
more of the certificates available in the Pilotage Exemption Certificate list. This
is done by selecting each PEC pilotage in turn from the Distance list, selecting the
certificate type (Ordinary PEC or Cadet PEC), selecting a specific certificate, and clicking the
Add entry button.
For each Distance you will have to register one, and only one Master. If there are none,
or more than one master, you will get an error upon clicking the Next button.

User Guide for SafeSeaNet Norway Web Client
Page 27 of 53
2.2.16 PEC Exam
If you checked the Register PEC exam candiate in the Pilotage step, you will
be able to select availible exams in this step.
Figure 23: Add PEC exam to voyage
Select the appropriate distance in the Pilotage Distance drop down list, and the
corresponding exam candidate in the PEC Exam drop down list. Click the Add Exam
button to add the exam to the voyage. You can add more than one exam to a voyage. Click the
Next button to move to the next step in the registration wizard.

User Guide for SafeSeaNet Norway Web Client
Page 28 of 53
2.2.17 Pilotage Dispensation
If the checkbox Apply for Dispensation from Compulsory Pilotage is
ticked off in the Pilotage step, the Pilotage Dispensation screen is shown. The
dispensation screen initially shows a table with all unfinished applications (Figure 24).
Figure 24: Unfinished dispensation applications
The table shows one application for each pilotage registered with Apply for
Dispensation from Compulsory Pilotage. Clicking the Add icon under the
column Actions in the table will show the application form (Figure 25).

User Guide for SafeSeaNet Norway Web Client
Page 29 of 53

User Guide for SafeSeaNet Norway Web Client
Page 30 of 53
Figure 25: Pilotage dispensation application form
In order to register the application the user is asked to select or fill in the following:
Dispensation Reason: required drop down list containing five different reasons. If
reason Other is selected, the user is asked to supply a comment.
Confirmation Statement: select between two radio buttons to state whether the user
is either the responsible captain for this voyage, or acting on behalf of the responsible master
as the master’s representative.
Use English Language in Correspondence: if this checkbox is ticked off all
correspondence emails will be in English language.
Master’s email address: required text field to supply the master’s email address.
This email address will be used for all case correspondence emails.
Send copy to email address: optional text field where the user can supply one or
more email addresses to receive copy of all case correspondence emails.
Responsible Master: the user must select a responsible master from the table. If there
are none, the user must register a new master with or without a PEC. If the master has a PEC,
the user can supply his or her PEC number and click Add. If not, the user must manually
enter the master’s first name, last name, and nationality before clicking Add.
Declaration of Master’s Relevant Navigational Experience:
required drop down list with values ranging from 0 to More than 10.
PEC application number: optional text field. If the master has previously applied for
a PEC in the navigational waters of the dispensation application, the PEC application number
should be supplied. This can can help the case worker, thus speeding up the processing of the
application.
Declaration of Ship Compliance: the user must confirm that the ship complies
with the criterias listed to register the application.
When the application has been registered it will show up in a table under the Registered
Applications for Dispensation from Compulsory Pilotage section
(Figure 26). The user may update or view registered applications by clicking the Update or
the View button in the Actions column.

User Guide for SafeSeaNet Norway Web Client
Page 31 of 53
Figure 26: Pilotage dispensation scren after adding an application
2.2.18 Confirmation (completion of notification)
The screen shot in Figure 27 shows the final verification information.

User Guide for SafeSeaNet Norway Web Client
Page 32 of 53

User Guide for SafeSeaNet Norway Web Client
Page 33 of 53
Figure 27: Confirmation
This screen is for verification. Please look through all the data given and verify that they are
correct. If anything is wrong, then navigate to the respective step and correct it. All data given
is kept in place as you go back or forward for corrections. When you are satisfied with the
result, click the Save button.
2.2.18.1 Declaration of flu infection or Corona/COVID-19 related symptoms
It is the master’s responsibility to report any flu or Corona/COVID-19 related symptoms to
The Norwegian Coastal Administration as soon as possible. This is done in the Confirmation
screen, prior to saving the voyage registration.
2.2.18.2 Declaration of crew change last 10 days
The Norwegian Coastal Administration requires information regarding crew change during
the last 10 days for all voyages with regular pilotage requests. The data is collected to be able
to take the correct precautions to reduce any risk of infection.
This reporting is done in the Confirmation screen, prior to saving the voyage registration.

User Guide for SafeSeaNet Norway Web Client
Page 34 of 53
Figure 28: Voyage saved successfully
After having clicked on the Save button and after the system registers the data successfully,
you will still see the Confirmation page (Figure 28). Each of the entries in the pilotage
User Guide for SafeSeaNet Norway Web Client
Page 35 of 53
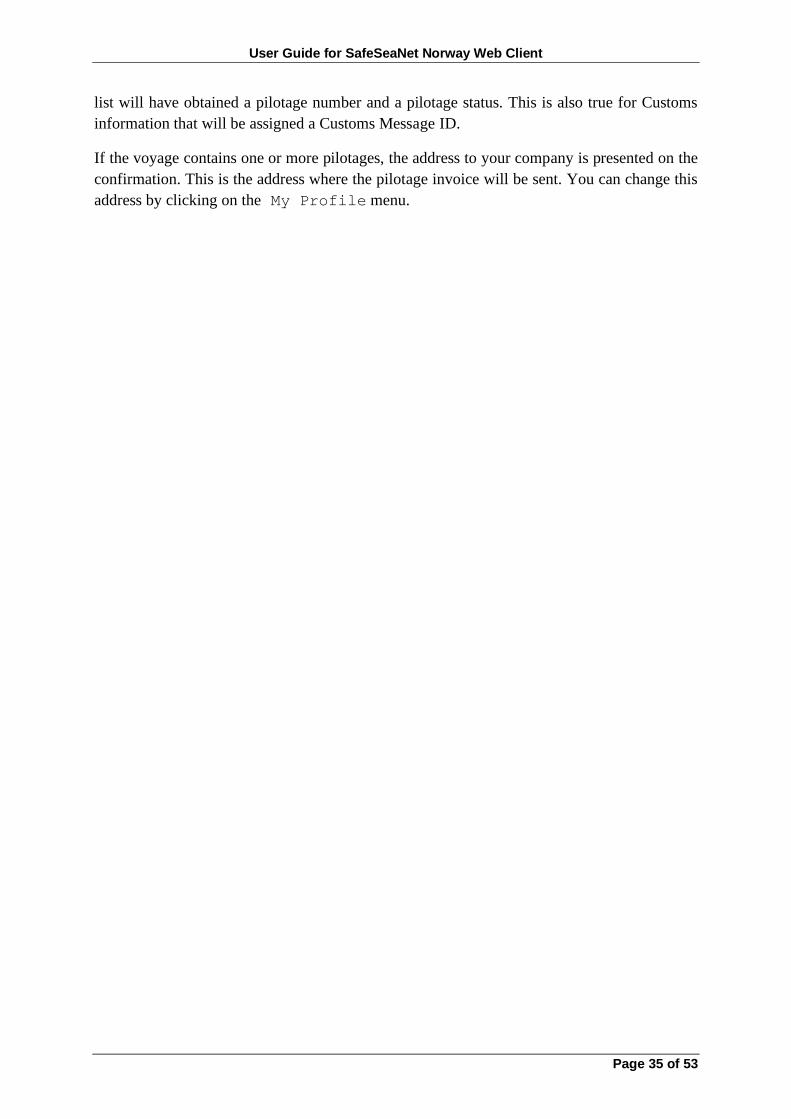
list will have obtained a pilotage number and a pilotage status. This is also true for Customs
information that will be assigned a Customs Message ID.
If the voyage contains one or more pilotages, the address to your company is presented on the
confirmation. This is the address where the pilotage invoice will be sent. You can change this
address by clicking on the My Profile menu.

User Guide for SafeSeaNet Norway Web Client
Page 36 of 53
2.3 Voyages
From Voyages you can see the registered voyages.
Figure 29: Voyages
The Deliveries column shows relevant deliveries for the respective voyages. Red icons
indicate a lack of reported information, green icons indicate OK reporting, while grey icons
indicate that this information is not required for this specific voyage. Icon description and
help can be found via the link in the header.
From the Actions column you can pick one of the functions Update, Update with
Excel, View, Change Time, New, or Cancel.
With Update you can update all data on an existing voyage.
With Update with Excel you can update all data on an existing voyage using the
SafeSeaNet Norway Spreadsheet Template.
With View you can view data on an existing voyage.
With Change Time you can change the registered times for an existing voyage using the
Change Time dialog box.

User Guide for SafeSeaNet Norway Web Client
Page 37 of 53
With New you can start registration on a new voyage. This link will start a voyage
registration at the Voyage screen, with ship already selected.
With Cancel you can cancel a voyage. If the voyage has any pilotages, these pilotages must
be cancelled prior to cancelling the voyage.
Figure 30: Change Times
You can search among the list of voyages by opening the panel with search criteria. By
default, only the voyages registered by users in your company will be present. To search
amongst all voyages, select Anyone from the Registered By drop down list. To search
among your registered voyages, select Me.
2.4 Pilotages
From Pilotages you can see the pilotages registered by users belonging to your
company. Some of the pilotages in this list may belong to the same voyage, but this view does
not show which pilotages are grouped together.
You can search among the list of pilotages by opening the panel with search criteria.

User Guide for SafeSeaNet Norway Web Client
Page 38 of 53
Figure 31: Pilotages
From the Action column you can pick one of the actions View, Update, Change
Time, or Cancel. The options to Update and Cancel are only available for recent
voyages. Change Time is not available for PEC pilotages.
With Update you can update the pilotage. For regular pilotages with status REQUEST,
and PEC pilotages, the update will be accomplished right away. For pilotages without PEC
and status ACTUAL, only Pilotage From Time can be edited. If the pilotage without
PEC has status ACTUAL, there will be registered a pilotage change request first, which will
result in an update after the pilotage change request is accepted by another system. If the
pilotage without PEC has a Pending Change Request, the update of the pilotage
will be denied.
With Cancel you can cancel the pilotage. If the pilotage is a PEC or if the pilotage is not a
PEC with status REQUEST, the cancellation will be accomplished right away. If the pilotage
is not a PEC with status ACTUAL, there will be registered a pilotage cancellation request
first, which will result in a cancellation after the pilotage cancellation request is accepted by
another system. If the pilotage to be cancelled is not a PEC with status ACTUAL and has a
Pending Change Request, the cancellation of the pilotage will be denied.
With View you can view details for the registered pilotage with pilotage invoices if there
exist any invoices for the pilotage.
2.5 Map
On the Map page, all current voyages for your company are shown. A mark will show the
position of the ship. If the mark is pressed, the current voyage and position time is shown in a
popup page. Press View Voyage to see the all information about the voyage. Hover over
the symbols to show the pilot boarding name.

User Guide for SafeSeaNet Norway Web Client
Page 39 of 53
Figure 32: Map
2.6 Report Position
Figure 33: Report Position
Choose a ship from My Ships or use Ship Search to find your ship. Press the Next
button to go to the next page. Fill inn Position, Position Time and Position
Type. To ensure correct position report, click the map button and then mark your position in
the map. The Position fields will then automatically be filled.

User Guide for SafeSeaNet Norway Web Client
Page 40 of 53
Figure 34: Ship Position Reporting
Press the Finish button to register the position.
The Regulation requires all vessels to report their position to Norwegian authorities when
entering and leaving Norwegian Internal Waters (Baseline) and when passing specified
geographical positions. Note that baseline reporting is always required, but vessels may omit
to report when passing the specified geographical positions if the vessel have a functional
Automatic Identification System (AIS).
Please make sure that you report in logical sequence (e.g. Baseline in, Port, Port, Port, and
Baseline out).
2.7 Annual Fee
The Annual Fee page is used to order an invoice for one or more annual fees. The invoice
will be sent by mail to the company address of the person logged in.
Start by selecting the ship:
Figure 35: Annual Fee, ship selection
After a ship is chosen, you will get an overview of all invoices for this ship:
User Guide for SafeSeaNet Norway Web Client
Page 41 of 53
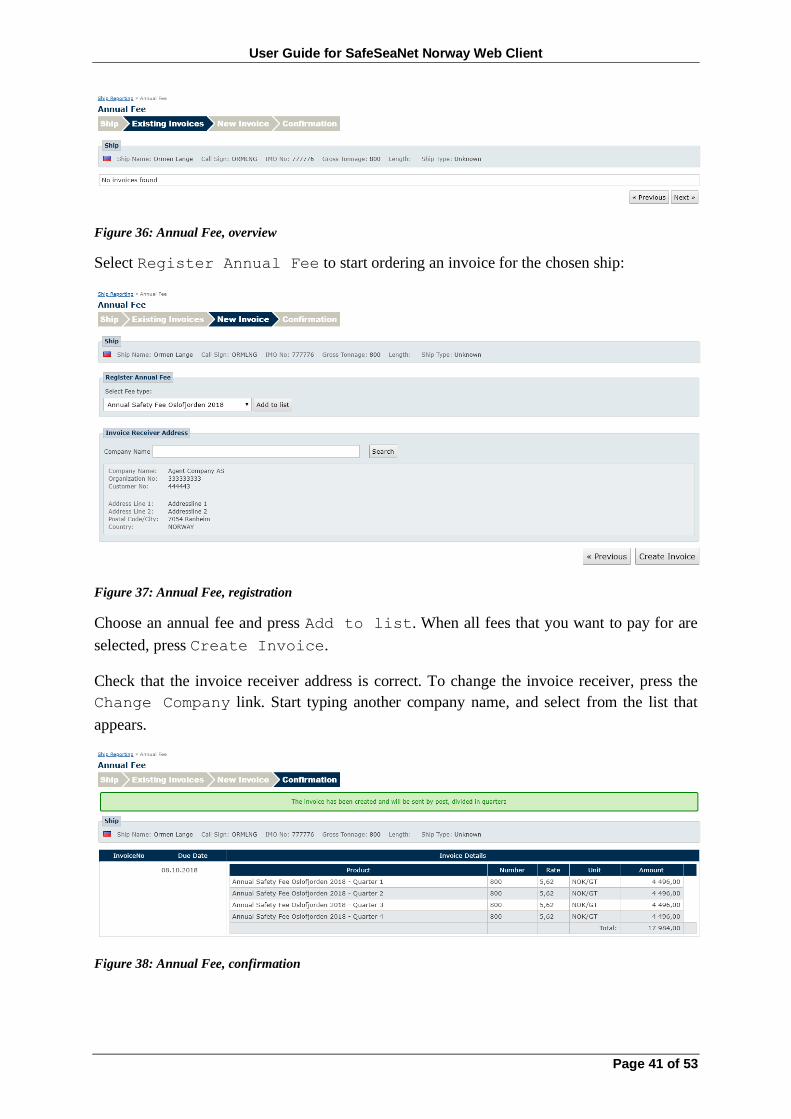
Figure 36: Annual Fee, overview
Select Register Annual Fee to start ordering an invoice for the chosen ship:
Figure 37: Annual Fee, registration
Choose an annual fee and press Add to list. When all fees that you want to pay for are
selected, press Create Invoice.
Check that the invoice receiver address is correct. To change the invoice receiver, press the
Change Company link. Start typing another company name, and select from the list that
appears.
Figure 38: Annual Fee, confirmation

User Guide for SafeSeaNet Norway Web Client
Page 42 of 53
The invoice will be sent to the company address if the invoice receiver has not been changed.
The address can be changed by choosing the My Profile link on the menu.
2.8 Exemptions
On the Exemptions page you can view your granted reporting exemptions, or apply for a
new reporting exemption.
Figure 39: My Reporting Exemptions
Click the Create New Exemption link to apply for a new exemption.
You can edit an existing exemption by clicking the Edit icon in Actions column.
You can delete an existing exemption by clicking the Delete icon in Actions column.
Figure 40: Select Ship
Whe you click the Create New Exemption link, you go to the the Select Ship
screen. You can select one of your registered ships from the My Ships drop down list or
search for a ship by Ship Name, Call Sign or IMO No.
After you have selected your ship, click the Next button to go to the Create
Exemptions screen.

User Guide for SafeSeaNet Norway Web Client
Page 43 of 53
Figure 41: Create Exemptions Screen
You must pick at least one Exemption Type. Mark the check box in front of the ones that
applies to your reporting exemption.
You must add at least two Scheduled Service Locations. Enter the name of the
location, and click Add Location for each location you wish to add. The locations you add
will appear in a list below. If you wish to remove an added location, click the Delete link
behind the location.

User Guide for SafeSeaNet Norway Web Client
Page 44 of 53
Figure 42: Service Locations Added
In the Validity Period section you must enter a valid from date and a valid to date. The
valid from date can not be earlier than todays date, and the valid to date can not be more than
one year from todays date.
In the Company section your associated company will be automatically selected for you. If
you wish to enter a different company to contact about hazardous materials, you can use the
search box to select a different company.
Use the Remark section for any additional information you wish to provide.
Click Add to add it to the Exemptions list. You can add more than one exemption.

User Guide for SafeSeaNet Norway Web Client
Page 45 of 53
Figure 43: Exemption Added
When you are finished click Next to go to the Confirm and Submit screen.
Figure 44: Confirm and Submit reporting exemption
In the Confirm and Submit screen you can review your exemptions. If you wish to
make any changes to any of them, you can us the Previous button to go back and edit the ones
you wish.
When you have reviewed your exemptions click the Finish button to submit them to
SafeSeaNet Norway.

User Guide for SafeSeaNet Norway Web Client
Page 46 of 53
Figure 45: Reporting Exemption Successfully Submitted
You will get a message confirming that your exemption has been successfully submitted.
2.9 Shared PECs
On the Shared PECs page one can view connections, make new connection requests and
see pending and incoming requests.
The purpose of this page is to make it easier and more accessible to share PEC details. Once a
connection with another party has been made, both parties can view PEC details.
A prerequisite to making a connection is that one of the parties must have a PEC. This is also
applied when doing a search.
2.9.1 Connections
Approved connections are displayed in a table along with the certificate number, name of
party and the company.
To view a connection’s certificate click the View link and to remove an existing connection
click the Disconnect link in the Actions column.
If no PEC Number or Valid To information is shown, the person does not have a PEC.
2.9.2 My connection requests
Connection requests to other parties are listed in a table where it is also possible to cancel a
pending request.
In order to connect to another party one must apply at least one search criteria – either first,
last or company name. In the resulting table a connection request may be made by clicking on
the connect link upon which a dialog will be shown where remarks and a correspondence e-
mail address can be entered.

User Guide for SafeSeaNet Norway Web Client
Page 47 of 53
Pending requests are shown at the bottom where one also can cancel a request by clicking the
appropriate link.
2.9.3 Incoming connection requests
Requests to connect with you are listed in the Incoming connection requests tab.
To approve a request click the Approve link upon which a connection is created in the
Connections tab. To reject a request click the Reject link upon which a dialog opens
where Remarks are shown and buttons to either accept or cancel the operation.
User Guide for SafeSeaNet Norway Web Client
Page 48 of 53
3 My Account
3.1 My Profile
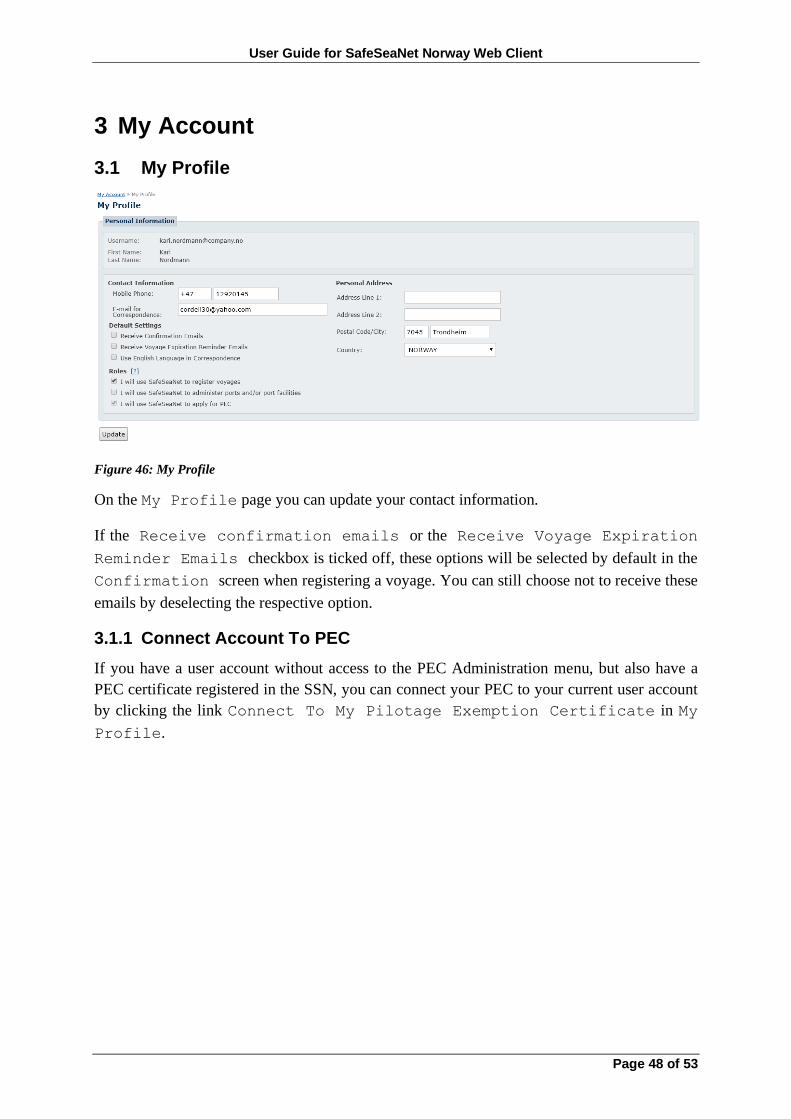
Figure 46: My Profile
On the My Profile page you can update your contact information.
If the Receive confirmation emails or the Receive Voyage Expiration
Reminder Emails checkbox is ticked off, these options will be selected by default in the
Confirmation screen when registering a voyage. You can still choose not to receive these
emails by deselecting the respective option.
3.1.1 Connect Account To PEC
If you have a user account without access to the PEC Administration menu, but also have a
PEC certificate registered in the SSN, you can connect your PEC to your current user account
by clicking the link Connect To My Pilotage Exemption Certificate in My
Profile.
User Guide for SafeSeaNet Norway Web Client
Page 49 of 53
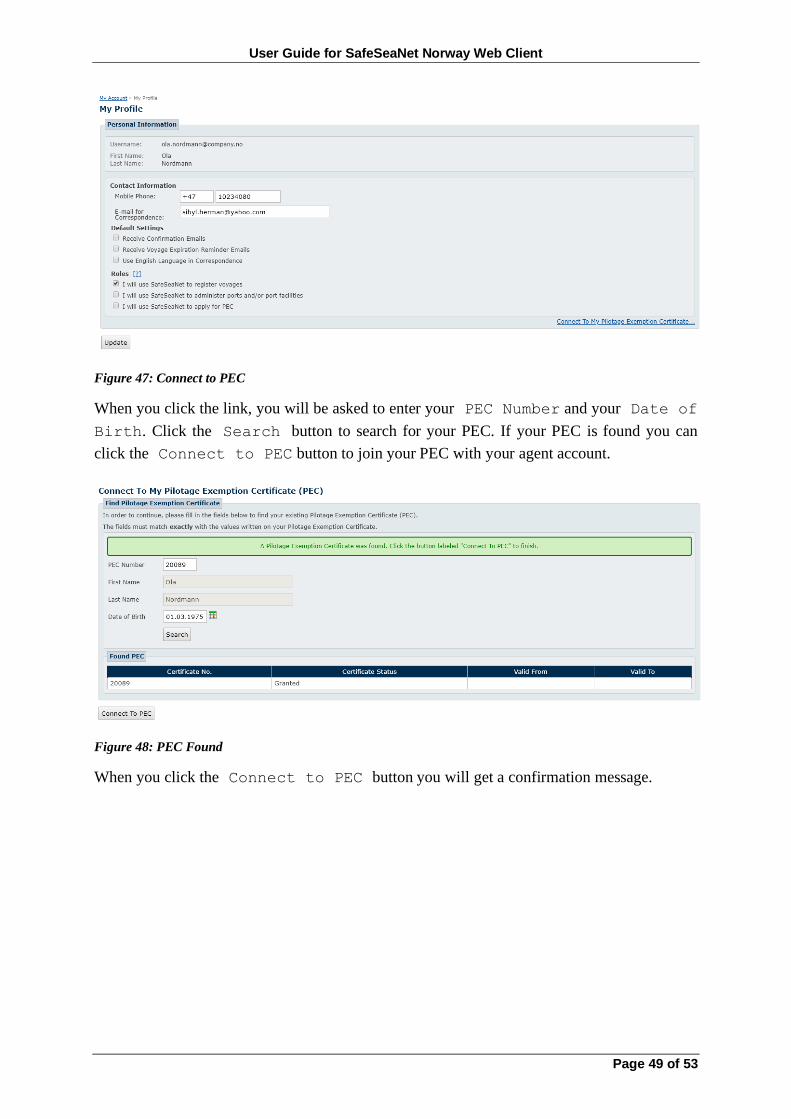
Figure 47: Connect to PEC
When you click the link, you will be asked to enter your PEC Number and your Date of
Birth. Click the Search button to search for your PEC. If your PEC is found you can
click the Connect to PEC button to join your PEC with your agent account.
Figure 48: PEC Found
When you click the Connect to PEC button you will get a confirmation message.

User Guide for SafeSeaNet Norway Web Client
Page 50 of 53
Figure 49: PEC Connected
3.2 Favourite Ships Administration
The Favourite Ships Administration page lets you administer the ships shown
in the dropdown box selecting a ship for a new voyage. You can add and remove ships from
the list. When a notification is delivered for a ship, this ship is automatically added to the
Favourite Ships list.
Figure 50: Favourite Ships Administration

User Guide for SafeSeaNet Norway Web Client
Page 51 of 53
4 My Company
4.1 Contact Information
On the Contact Information Page you can update your company’s contact
information.
The company address on this page is the address where pilotage invoices will be sent to.
You can chose to have your invoices sent in english rather than norwegian by selecting Use
English Language on Invoice.
Figure 51: Company Information
4.2 User Accounts
In the Company User Accounts tab you can administer users associated with your company.
Figure 52: Company User Accounts
You can view all user accounts or filter by newly created un-activated accounts.
You can see the users First Name, Last Name, Username, Blocked status, Active
status and Verified status.
If their Blocked status is listed as Yes, it means that they have not verified their email
address. They have to verify it by following the instructions that were sent to them in the
email address verification email. The email address verification is open for one month after
account creation. After one month, only Kystverket can control the Blocked status of a user
account.

User Guide for SafeSeaNet Norway Web Client
Page 52 of 53
To associate a user with your company you can check the Active checkbox. Click Save or
Save All. When the users have been activated, they will be able to log in to SafeSeaNet
Norway with their username and password.
Clicking Remove will remove the user as someone associated with your company. The user
account will still exist, and the user can select a new company if needed.

User Guide for SafeSeaNet Norway Web Client
Page 53 of 53
5 Glossary This chapter contains definitions for words, abbreviations etc. used throughout the
documentation.
AIS
Automatic Identification System
Domestic voyage
A voyage between two Norwegian locations
EMSA
European Maritime Safety Agency
ETA
Estimated Time of Arrival
ETD
Estimated Time of Departure
Inbound voyage
A voyage between a foreign (non-Norwegian) location and a Norwegian location
ISPS
The International Ship and Port Facility Security Code
ISSC
International Ship Security Certificate
LOCODE (or UN/LOCODE)
United Nations Code for Trade and Transport Locations
NIS
The Norwegian International Ship Register, see http://www.nis-nor.no/NIS.aspx
NIW
Norwegian Internal Waters
NOx
Nitrogen Oxides
Outbound voyage
A voyage between a Norwegian location and a foreign (non-Norwegian) location
PEC
Pilot Excemption Certificate
PSC
Port State Control
SOLAS
The International Convention for the Safety of Life at Sea
SSN
SafeSeaNet: centralised European platform established by EMSA for maritime data exchange, linking
together maritime authorities from across Europe
Transit voyage
A voyage between two foreign locations