s3.amazonaws.com · web viewto use both autodesk® revit® and a360® rendering cloud service you...
TRANSCRIPT

Introduction to BIMModule 08 Cloud Rendering
In this module, you explore workflows for creating many types of rendered visualizations leveraging infinite computing.
You will be able to: Access and define cloud
rendering parameters for both exterior and interior renderings.
Access your cloud renderings from the A360 Rendering website.
Steps to takeExercise 1 Creating an Exterior RenderingExercise 2 Creating an Interactive PanoramaExercise 3 Creating Solar StudiesExercise 4 Creating an Interior Illuminance StudyExercise 5 Downloading Images for Sharing
Exercise requirementsTo use both Autodesk® Revit® and A360® Rendering cloud service you will need an Autodesk ID. As a Student or Educator, you can obtain an Autodesk ID for free at www.autodesk.com/education . The A360® Rendering cloud service is
1

offered to students and educators for free with a valid Autodesk ID.
Download the Autodesk Revit software for free at www.autodesk.com/education and install it. Designs that you create in Autodesk® Revit® will be saved on your local machine or network server. Renderings created through the Autodesk A360® Rendering cloud service will be stored on the cloud in Autodesk’s A360 site and organized by projects.
Autodesk® Revit® runs locally on your machine and does not require an internet connection to run. Accessing the cloud rendering service requires an Autodesk ID account along with an internet connection to use this service. The preferred web browser for accessing your renderings from the cloud service is Google® Chrome.
Exterior renderingExterior renderings allow you to review various aspects of your design for materials, shadow studies, and building form during the design process that helps you make better design decisions.
Exercise 1 — Creating an exterior rendering In this exercise we will look at the configuration settings for creating a cloud rendering of an existing exterior perspective camera view of a Revit model.
Objectives: Open a 3D view for rendering Configure cloud rendering
parameters
2

Generate rendering View rendered image
1. Navigate to the folder containing the downloaded resources for Module 8.Module08_Resources
2. Open Revit file: Module08_Unit_CloudRendering_Imperial_start.rvt
3. Open the Exterior Perspective 2 3D view.
4. On the View tab, Graphics panel, click Render in Cloud.
5. Sign in to your Autodesk account. Enter your Autodesk ID credentials; click Sign In to proceed forward.
Note: If you do not have an Autodesk ID, you can register for one using the link in the lower left corner of the dialog box.
3

6. After the process overview dialog box appears, click Continue to proceed forward.
7. Set cloud rendering parameters as follows:3D view: Exterior Perspective 2Output type: Still imageRender quality: StandardImage size: LargeExposure: AdvancedFile format: PNG
Notes:Render qualityAffects how long renderings will take to process. Use standard for interim reviews, final for final submissions.
Image sizeAffects how long renderings will take to process. Images small to large are good for design reviews. Extra large and higher can be used for final submissions.
4
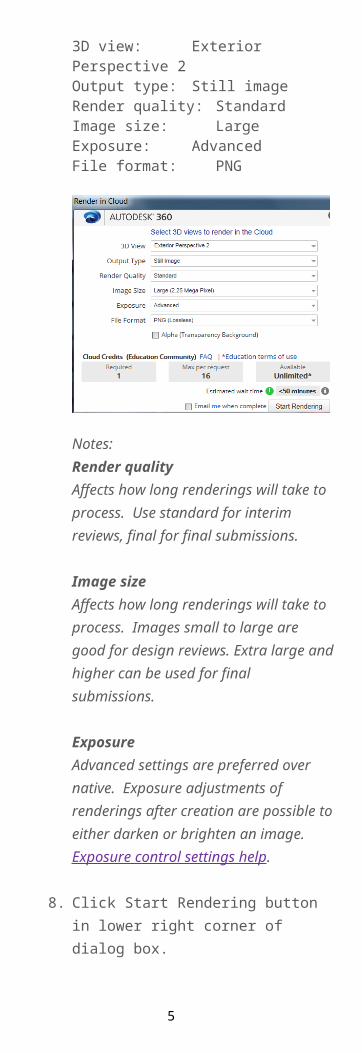
ExposureAdvanced settings are preferred over native. Exposure adjustments of renderings after creation are possible to either darken or brighten an image. Exposure control settings help.
8. Click Start Rendering button in lower right corner of dialog box.
Note: An internet connection is required to use the Autodesk cloud rendering service. A landline connection is recommended for best experience.
Note: When the rendering is complete, you will be notified by a pop up window in the lower right corner of Revit and by email (if you selected that option prior to selecting Start Rendering).
9. Click Continue in Background to continue working in Revit while the cloud service processes your rendering.
10.On the View tab, Graphics panel, click Render Gallery to access your rendering.
11.Sign In to A360 in the upper right corner of web page if needed using the same Autodesk ID credentials entered in Step 5.
12.Click My Renderings in the web browser to access your projects.
5

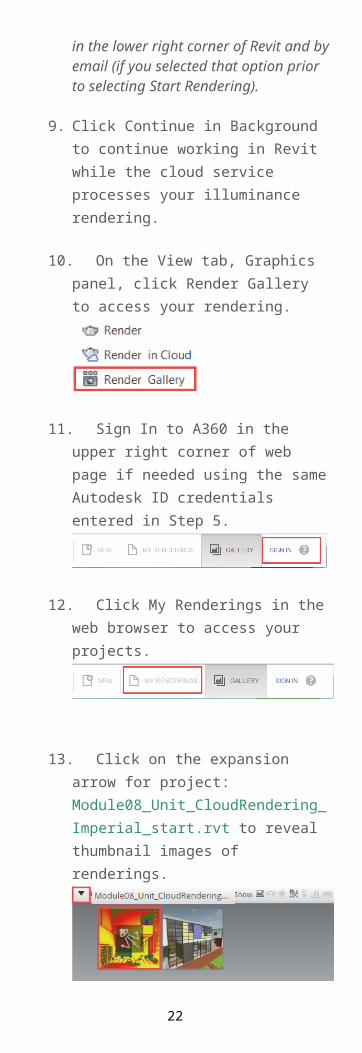
13.Click on the expansion arrow for project: Module08_Unit_CloudRendering_Imperial_start.rvt to reveal thumbnail images of renderings.
14.Left click thumbnail image to expand.
15.Close the file without saving.
This concludes Exercise 1
Interactive panoramasPanoramas provide a unique interactive experience to view your project from multiple directions from a fixed camera point in the model.
Exercise 2 — Creating an Interactive Panorama
In this exercise we will look at the configuration settings for creating an interactive panorama of an existing exterior perspective camera view of a Revit model.
Objectives: Open a 3D view for rendering Configure cloud rendering
parameters Generate rendering View interactive panorama
6

1. Navigate to the folder containing the downloaded resources for Module 8.Module08_Resources
2. Open Revit file: Module08_Unit_CloudRendering_Imperial_start.rvt
3. Open Exterior Perspective 3D view.
4. On the View tab, Graphics panel, click Render in Cloud.
5. Sign in to your Autodesk account. Enter your Autodesk ID credentials; click Sign In to proceed forward.
Note: If you do not have an Autodesk ID, you can register for one using the link in the lower left corner of the dialog box.
6. After the process overview dialog box appears, click Continue to proceed forward.
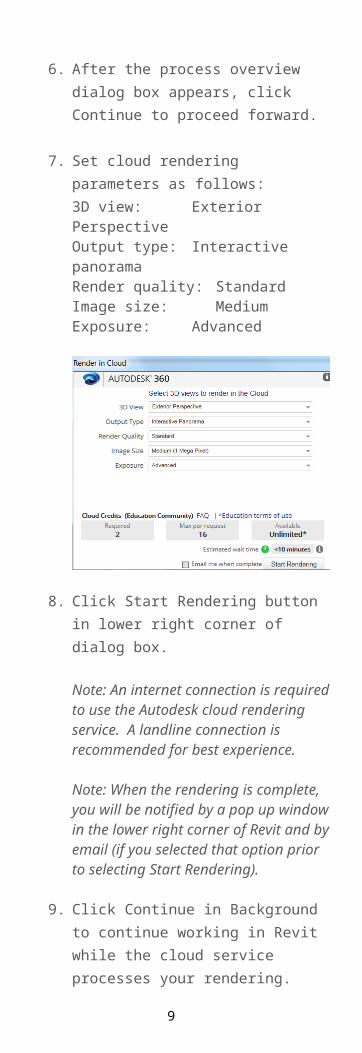
7. Set cloud rendering parameters as follows:
7

3D view: Exterior PerspectiveOutput type: Interactive panoramaRender quality: StandardImage size: MediumExposure: Advanced
8. Click Start Rendering button in lower right corner of dialog box.
Note: An internet connection is required to use the Autodesk cloud rendering service. A landline connection is recommended for best experience.
Note: When the rendering is complete, you will be notified by a pop up window in the lower right corner of Revit and by email (if you selected that option prior to selecting Start Rendering).
9. Click Continue in Background to continue working in Revit while the cloud service processes your rendering.
10.On the View tab, Graphics panel, click Render Gallery to access your rendering.
11.Sign In to A360 in the upper right corner of web page if needed using the same Autodesk ID credentials entered in Step 5.
8
12.Click My Renderings in the web browser to access your projects.
13.Click on the expansion arrow for project: Module08_Unit_CloudRendering_Imperial_start.rvt to reveal thumbnail images of renderings.
14.Open panorama of Exterior Perspective view. To navigate the panorama:View direction = click and drag left
mouse button in the view
Zoom magnification = mouse scroll wheel
Note: An internet connection is required to view interactive panoramas. A landline connection is recommended for best experience.
15.Close the file without saving.
This concludes Exercise 2.
Solar studiesSolar studies help you visualize the impact of natural light and shadows
9

on the exteriors and interiors of projects.
Create solar studies to see how shadows from terrain and surrounding buildings affect a site, or where natural light penetrates a building at specific times of the day and year.
By showing the impact of natural light and shadows on your project, solar studies yield valuable information that can help support effective passive solar design.
Exercise 3 — Creating Solar Studies
In this exercise we will look at the configuration settings for creating solar studies of an existing exterior perspective camera view of a Revit model.
Objectives: Open a 3D view for rendering Configure cloud rendering
parameters Generate rendering View rendered image Perform solar study View solar rendering
1. Navigate to the folder containing the downloaded resources for Module 8.Module08_Resources
2. Open Revit file: Module08_Unit_CloudRendering_Imperial_start.rvt
3. Open the Living Room Interior 3D view.
10

4. On the View tab, Graphics panel, click Render in Cloud.
5. Sign in to your Autodesk account. Enter your Autodesk ID credentials; click Sign In to proceed forward.
Note: If you do not have an Autodesk ID, you can register for one using the link in the lower left corner of the dialog box.
6. After the process overview dialog box appears, click Continue to proceed forward.
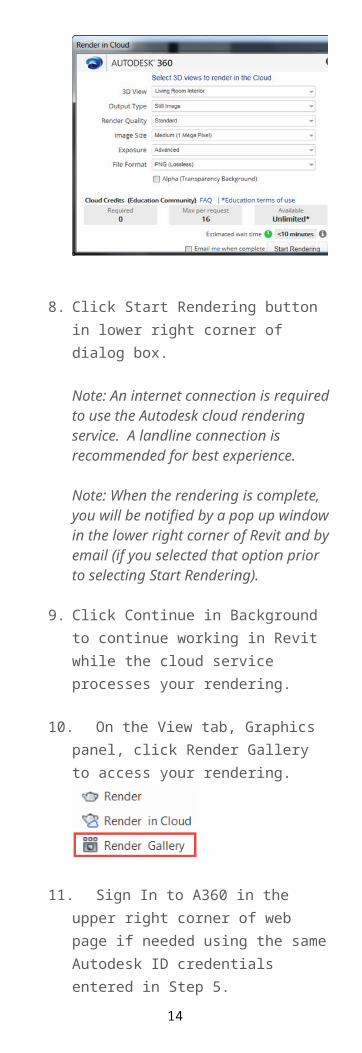
7. Set cloud rendering parameters as follows:3D view: Living Room InteriorOutput type: Still imageRender quality: StandardImage size: MediumExposure: AdvancedFile format: PNG
11

8. Click Start Rendering button in lower right corner of dialog box.
Note: An internet connection is required to use the Autodesk cloud rendering service. A landline connection is recommended for best experience.
Note: When the rendering is complete, you will be notified by a pop up window in the lower right corner of Revit and by email (if you selected that option prior to selecting Start Rendering).
9. Click Continue in Background to continue working in Revit while the cloud service processes your rendering.
10.On the View tab, Graphics panel, click Render Gallery to access your rendering.
11.Sign In to A360 in the upper right corner of web page if needed using the same Autodesk ID credentials entered in Step 5.
12.Click My Renderings in the web browser to access your projects.
12

13.Click on the expansion arrow for project: Module08_Unit_CloudRendering_Imperial_start.rvt to reveal thumbnail images of renderings.
14.Left click thumbnail image to expand.
15.Click on the pull down menu button over the Living Room Interior thumbnail image to reveal the menu and select Solar Study.
13
16.Set the Solar Study parameters as follows:Start / End Date: June 21, 2015
(summer solstice)Start Time: 6:00 amFinish Time: 21:00 pmInterval: 1 hour
Notes:IntervalAffects how long renderings will take to process. Decreasing the interval of time will create more images and require more time to create them. One hour intervals are a good place to start.
17.Click Start Rendering button in lower right corner of dialog box.
Note: An internet connection is required to use the Autodesk cloud rendering service. A landline connection is recommended for best experience.
Note: When the rendering is complete, you will be notified by a pop up window in the lower right corner of Revit and by email (if you selected that option prior to selecting Start Rendering).
18.Wait for rendering to finish. Time will vary due to the amount of projects being received for processing.
14

19.Click on the expansion arrow for the project:Module08_Unit_CloudRendering_Imperial_start.rvt to reveal thumbnail images of renderings. Verify Solar Study icon adjacent to the word Show is on.
20.Click the Solar Study thumbnail image to enlarge and reveal the movie view.
21.Click the play button to play the solar study animation for the time period you specified.
22.Close the file without saving.
This concludes Exercise 3.
Illuminance studiesIlluminance is a measure of how much light falls on a surface. It is useful for determining whether or not there is enough light to perform different activities (like reading, office work, or drafting). Illuminance is measured in lux or foot-candles (1 foot-candle = 10.7 lux).
Exercise 4 — Creating an Interior Illuminance Study
In this exercise we will look at the configuration settings for creating an illuminance study of an existing
15

interior perspective camera view of a Revit model.
Objectives: Open a 3D view for rendering Configure cloud rendering
parameters Generate rendering View illuminance image
1. Navigate to the folder containing the downloaded resources for Module 8.Module08_Resources
2. Open Revit file: Module08_Unit_CloudRendering_Imperial_start.rvt
3. Open the Living Room Interior 3D view.
4. On the View tab, Graphics panel, click Render in Cloud.
5. Sign in to your Autodesk account. Enter your Autodesk ID credentials; click Sign In to proceed forward.
16

Note: If you do not have an Autodesk ID, you can register for one using the link in the lower left corner of the dialog box.
6. After the process overview dialog box appears, click Continue to proceed forward.
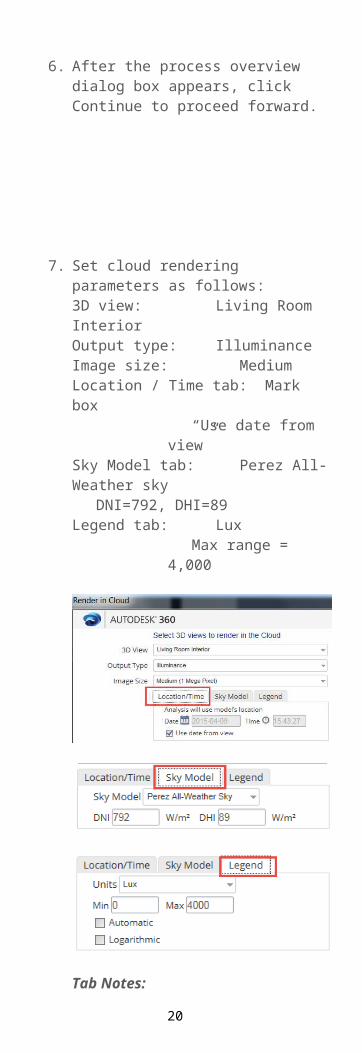
7. Set cloud rendering parameters as follows:3D view: Living Room InteriorOutput type: IlluminanceImage size: MediumLocation / Time tab: Mark box
“Use date from view”
Sky Model tab: Perez All-Weather sky
DNI=792, DHI=89Legend tab: Lux
Max range = 4,000
Tab Notes:Location / Time Is taken from the Model view Verify or Change project
location via Sun Settings 17

command located in View Control toolbar in Sun Path menu; Sun settings are view specific properties. Time is also specified in Sun Settings dialog box.
Sky Model Features 6 different sky models for the illumination rendering. You will also need to specify the irradiance values for your location and date and time, which can be gathered from weather data. For guidance on how to select a Sky Model, access this Help page. Gathering the required irradiance data from a GBS weather file is outlined here.
Legend You can set your units, range, and specify the increments of your scale. Material notes:Below are material properties that affect illuminance renderings.
Glazing propertiesAppearance properties of glazing affect illuminance renderings, not analytical properties. Links contains recommendations for appearance properties of glazing.
8. Click Start Rendering button in lower right corner of dialog box.Note: An internet connection is required to use the Autodesk cloud rendering service. A landline connection is recommended for best experience.
Note: When the rendering is complete, you will be notified by a pop up window in the lower right corner of Revit and by email (if you selected that option prior to selecting Start Rendering).
9. Click Continue in Background to continue working in Revit while the cloud service processes your illuminance rendering.
18

10.On the View tab, Graphics panel, click Render Gallery to access your rendering.
11.Sign In to A360 in the upper right corner of web page if needed using the same Autodesk ID credentials entered in Step 5.
12.Click My Renderings in the web browser to access your projects.
13.Click on the expansion arrow for project: Module08_Unit_CloudRendering_Imperial_start.rvt to reveal thumbnail images of renderings.
14.Open illuminance image of Studio Interior view. Note: An internet connection is required to view illuminance image. A landline connection is recommended for best experience.
Notes:
19
Color scale is from blue to yellow; low to high levels of light intensity in scene.
15.Close the file without saving.
This concludes Exercise 4.
Sharing imagesNow it is time to share your renderings with others either by downloading project files or sharing your project with others through online galleries or the cloud.
Exercise 5 — Downloading Images for Sharing
In this exercise we will look at the workflows for downloading and sharing your project work rendered on A360.
Objectives: Download still images Download interactive panoramas Download solar studies Sharing projects via linksExercise 5.1 – Downloading still images
Option 1 - Start Inside Revit
1. Navigate to the folder containing the downloaded resources for Module 8.Module08_Resources
2. Open Revit file: Module08_Unit_CloudRendering_Imperial_start.rvt
3. Open the Exterior Perspective 3D view or any 3D view.
4. On the View tab, Graphics panel, click Render in Cloud.
20

5. Proceed to Step 6
Option 2 - Start from web browser
1. Open link: https://rendering-gallery.360.autodesk.com/projects/all
2. Proceed to step 6 to continue.
Continuing on from either option
6. Sign In to A360 in the upper right corner of web page if needed using the same Autodesk ID credentials.
7. Click My Renderings in the web browser to access your projects.
8. Click on the expansion arrow for project: Module08_Unit_CloudRendering_Imperial_start.rvt to reveal thumbnail images of renderings.
9. Click on the Image icon adjacent to the word Show in the banner of the project window.
10.Identify the project you wish to download and hover your cursor over the image to reveal the pull down menu button. Click the pull
21
down menu button to display the menu.
11.Click Download Image to proceed with file download. The file should appear in your Downloads folder or whichever folder you set for downloads.
Exercise 5.2 – Downloading interactive panoramas
Panoramas have a dedicated download method due to the nature of its file type as HTML.
1. Login to your A360 account per the instructions in Exercise 5.1.
2. Click on the expansion arrow for project: Module08_Unit_CloudRendering_Imperial_start.rvt to reveal thumbnail images of renderings.
3. Click the Panorama icon adjacent to the word Show in the banner of the project folder to display panoramas if they exist.
4. Identify the panorama you wish to download and hover your cursor
22

over the image to reveal the pull down menu button. Click the pull down menu button to display the menu.
5. Select As HTML Viewer option.
6. You may then open the HTML file inside a web browser to display the panorama and interact with it just as you did online in A360.Note: It is recommended that you open the HTML file in Google Chrome for best experience.
Exercise 5.3 – Downloading solar studies
Solar studies are unique in that it is a collection of still images and will be downloaded as a Zip file.
1. Login to your A360 account per the instructions in Exercise 5.1.
2. Click on the expansion arrow for project: Module08_Unit_CloudRendering_Imperial_start.rvt to reveal thumbnail images of renderings.
3. Click the Solar Study icon adjacent to the word Show in the banner of the project folder to display Solar Studies if they exist.
23

4. Identify the Solar Study you wish to download and hover your cursor over the image to reveal the pull down menu button. Click the pull down menu button to display the menu.
5. Select Download Solar Study to proceed with download of Zip file of images.
6. The Zip file of your Solar Study should appear in the Downloads folder or whatever default directory you have specified.
7. To convert individual images to a movie format you will need to use programs such as Windows® Movie maker for Windows PC or Apple iMovie for the Mac or similar.
Exercise 5.4 – Sharing your project renderings externally
Share your amazing project images with others!
1. Login to your A360 account per the instructions in Exercise 5.1.
2. Click on the expansion arrow for project: Module08_Unit_CloudRendering_Imperial_start.rvt to reveal thumbnail images of renderings.
24

3. Click the Share Project icon select where you want to share your project.Gallery: Post your project to the A360 Rendering gallery
Autodesk A360:Posts your project to your A360 account where you can invite others to your project or send others a link to the project via email.
This concludes Exercise 5.
25