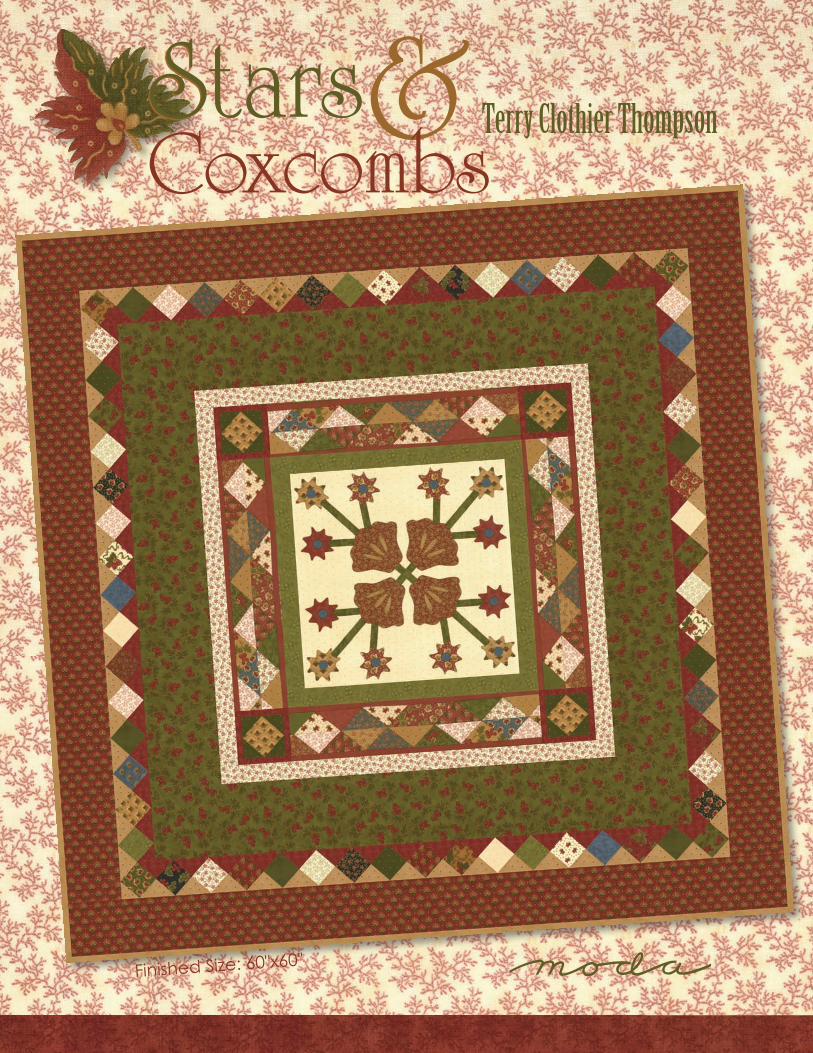
s stars - modafabrics.com · terry clothier thompson. stars . finished size: 60"x60"...
TRANSCRIPT
Terry Clothier Thompson
S &Coxcombs
Terry Clothier ThompsonStars
Finished Size: 60"x60"
&Coxcombs
Terry Clothier ThompsonStars Finished Size: 60"x60"
Quilter Basics Read instructions before beginning a project. All instructions include a ¼" seam allowance.
Label each group of cut pieces. Press as you go. Press seams in one direction toward the darker fabric whenever possible.
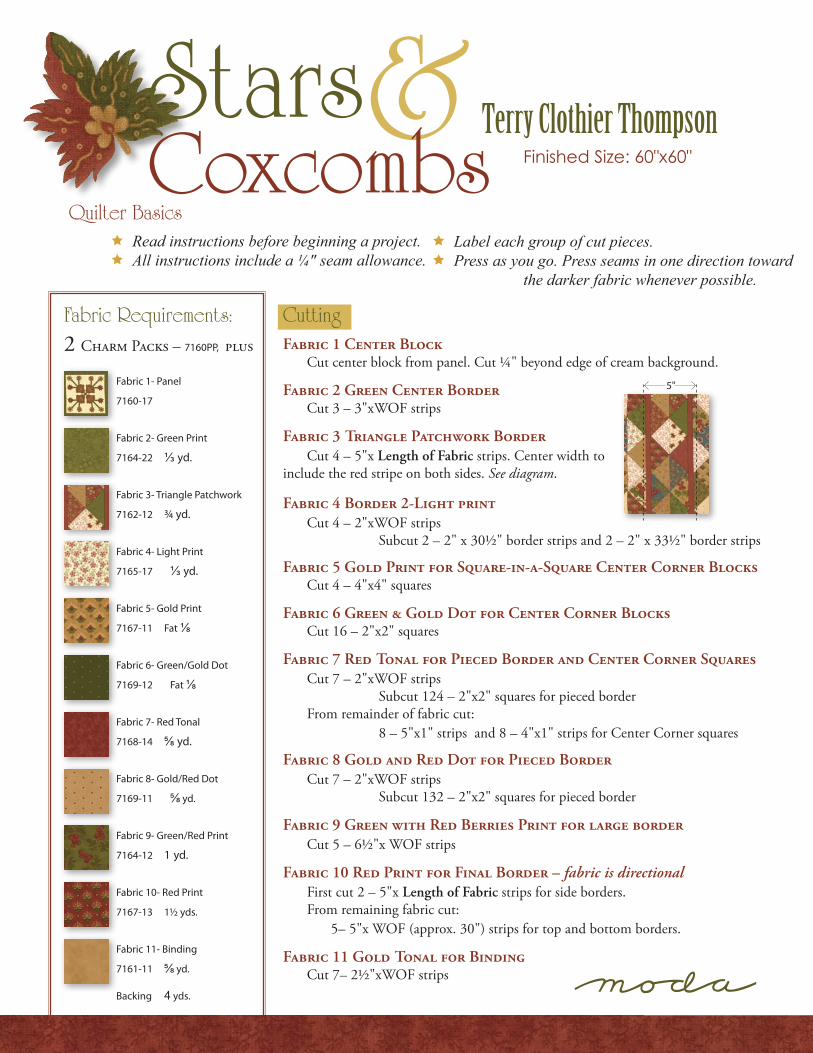
CuttingFabric Requirements:
Fabric 1- Panel
7160-17
Fabric 2- Green Print
7164-22 ⅓ yd.
Fabric 3- Triangle Patchwork
7162-12 ¾ yd.
Fabric 4- Light Print
7165-17 ⅓ yd.
Fabric 5- Gold Print
7167-11 Fat ⅛
Fabric 6- Green/Gold Dot
7169-12 Fat ⅛
Fabric 7- Red Tonal
7168-14 ⅝ yd.
Fabric 8- Gold/Red Dot
7169-11 ⅝ yd.
Fabric 9- Green/Red Print
7164-12 1 yd.
Fabric 10- Red Print
7167-13 1½ yds.
Fabric 11- Binding
7161-11 ⅝ yd.
2 Charm Packs – 7160PP, plus Fabric 1 Center Block Cut center block from panel. Cut ¼" beyond edge of cream background.
Fabric 2 Green Center Border Cut 3 – 3"xWOF strips
Fabric 3 Triangle Patchwork Border Cut 4 – 5"x Length of Fabric strips. Center width to include the red stripe on both sides. See diagram.
Fabric 4 Border 2-Light print Cut 4 – 2"xWOF strips Subcut 2 – 2" x 30½" border strips and 2 – 2" x 33½" border strips
Fabric 5 Gold Print for Square-in-a-Square Center Corner Blocks Cut 4 – 4"x4" squares
Fabric 6 Green & Gold Dot for Center Corner Blocks Cut 16 – 2"x2" squares
Fabric 7 Red Tonal for Pieced Border and Center Corner Squares Cut 7 – 2"xWOF strips Subcut 124 – 2"x2" squares for pieced border From remainder of fabric cut: 8 – 5"x1" strips and 8 – 4"x1" strips for Center Corner squares
Fabric 8 Gold and Red Dot for Pieced Border Cut 7 – 2"xWOF strips Subcut 132 – 2"x2" squares for pieced border
Fabric 9 Green with Red Berries Print for large border Cut 5 – 6½"x WOF strips
Fabric 10 Red Print for Final Border – fabric is directional First cut 2 – 5"x Length of Fabric strips for side borders. From remaining fabric cut: 5– 5"x WOF (approx. 30") strips for top and bottom borders.
Fabric 11 Gold Tonal for Binding Cut 7– 2½"xWOF strips
Backing 4 yds.
5"
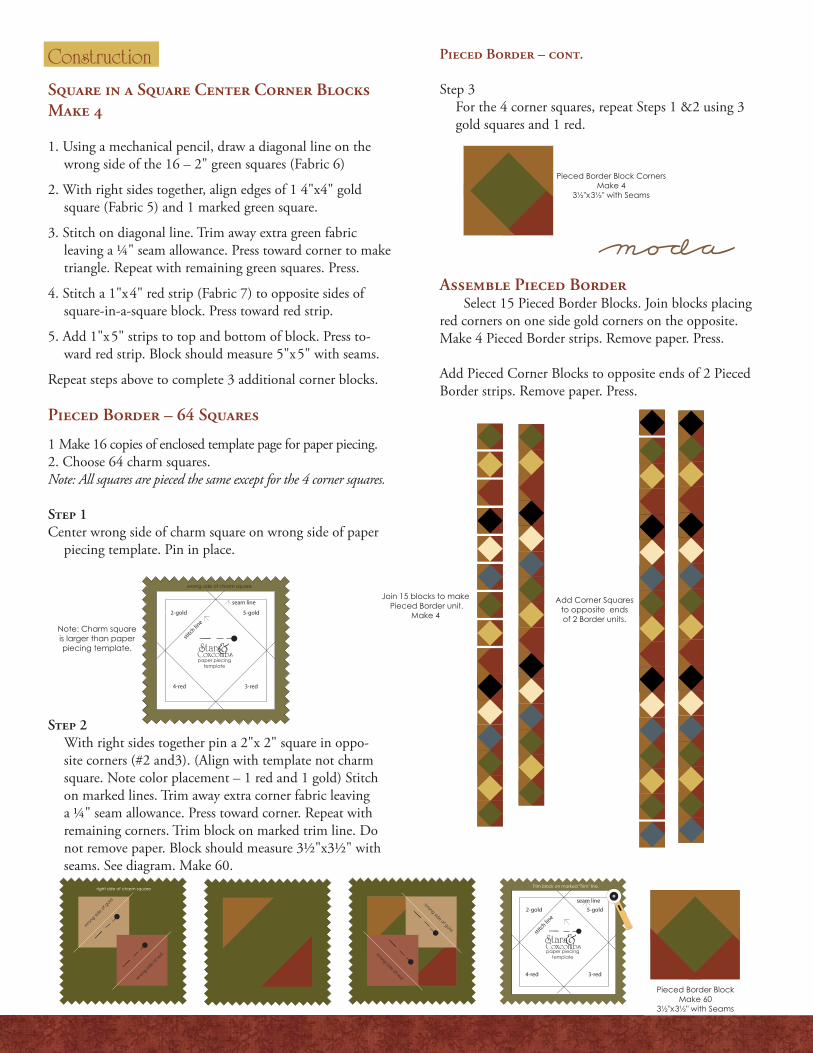
ConstructionSquare in a Square Center Corner Blocks Make 4
1. Using a mechanical pencil, draw a diagonal line on the wrong side of the 16 – 2" green squares (Fabric 6)
2. With right sides together, align edges of 1 4"x4" gold square (Fabric 5) and 1 marked green square.
3. Stitch on diagonal line. Trim away extra green fabric leaving a ¼" seam allowance. Press toward corner to make triangle. Repeat with remaining green squares. Press.
4. Stitch a 1"x4" red strip (Fabric 7) to opposite sides of square-in-a-square block. Press toward red strip.
5. Add 1"x5" strips to top and bottom of block. Press to-ward red strip. Block should measure 5"x5" with seams.
Repeat steps above to complete 3 additional corner blocks.
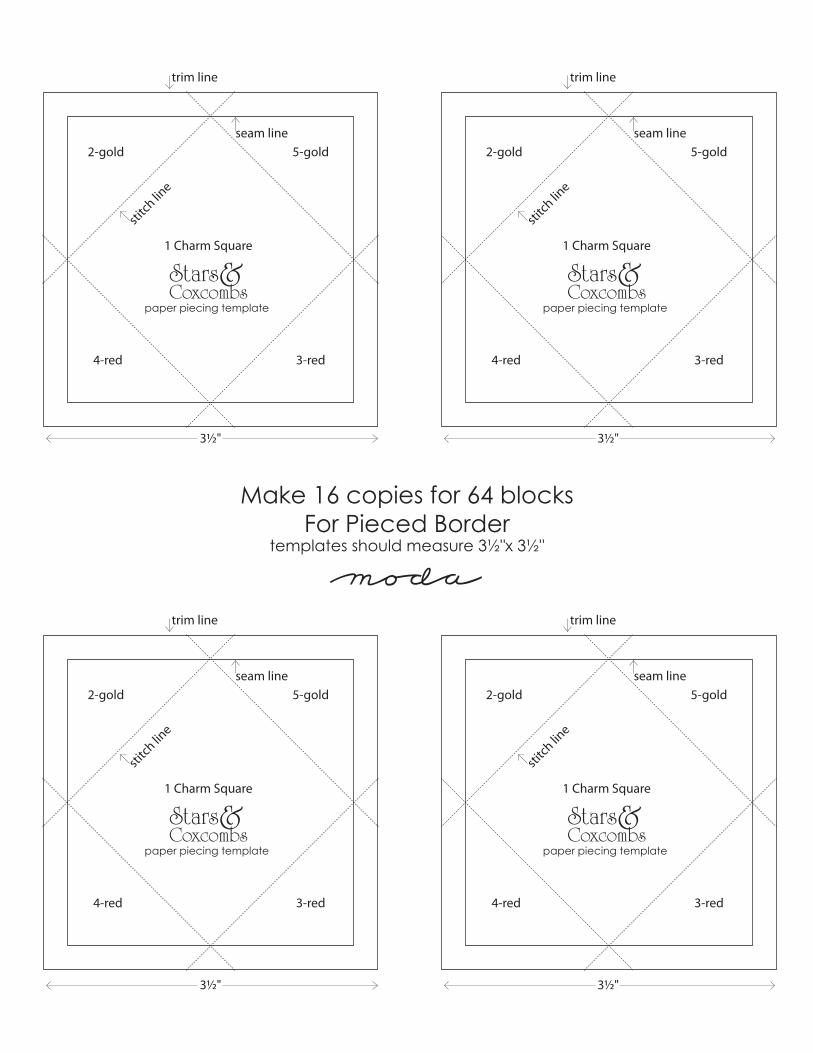
Pieced Border – 64 Squares
1 Make 16 copies of enclosed template page for paper piecing. 2. Choose 64 charm squares.Note: All squares are pieced the same except for the 4 corner squares.
Step 1Center wrong side of charm square on wrong side of paper
piecing template. Pin in place.
Step 2 With right sides together pin a 2"x 2" square in oppo-
site corners (#2 and3). (Align with template not charm square. Note color placement – 1 red and 1 gold) Stitch on marked lines. Trim away extra corner fabric leaving a ¼" seam allowance. Press toward corner. Repeat with remaining corners. Trim block on marked trim line. Do not remove paper. Block should measure 3½"x3½" with seams. See diagram. Make 60.
Pieced Border – cont.
Step 3 For the 4 corner squares, repeat Steps 1 &2 using 3
gold squares and 1 red.
Assemble Pieced Border Select 15 Pieced Border Blocks. Join blocks placing red corners on one side gold corners on the opposite. Make 4 Pieced Border strips. Remove paper. Press.
Add Pieced Corner Blocks to opposite ends of 2 Pieced Border strips. Remove paper. Press.
seam line
stitch
line
2-gold
3-red4-red
5-gold
Stars &Coxcombspaper piecing
template
wrong side of charm square
Note: Charm square is larger than paper piecing template.
Join 15 blocks to make Pieced Border unit.
Make 4
Add Corner Squaresto opposite endsof 2 Border units.
right side of charm square
wrong side of gold
wrong side of red
seam line
stitch
line
2-gold
3-red4-red
5-gold
Stars &Coxcombspaper piecing
template
Trim block on marked "Trim" line.
Pieced Border BlockMake 60
3½"x3½" with Seams
Pieced Border Block CornersMake 4
3½"x3½" with Seams
wrong side of g
old
right side of charm square
wrong side of re
d
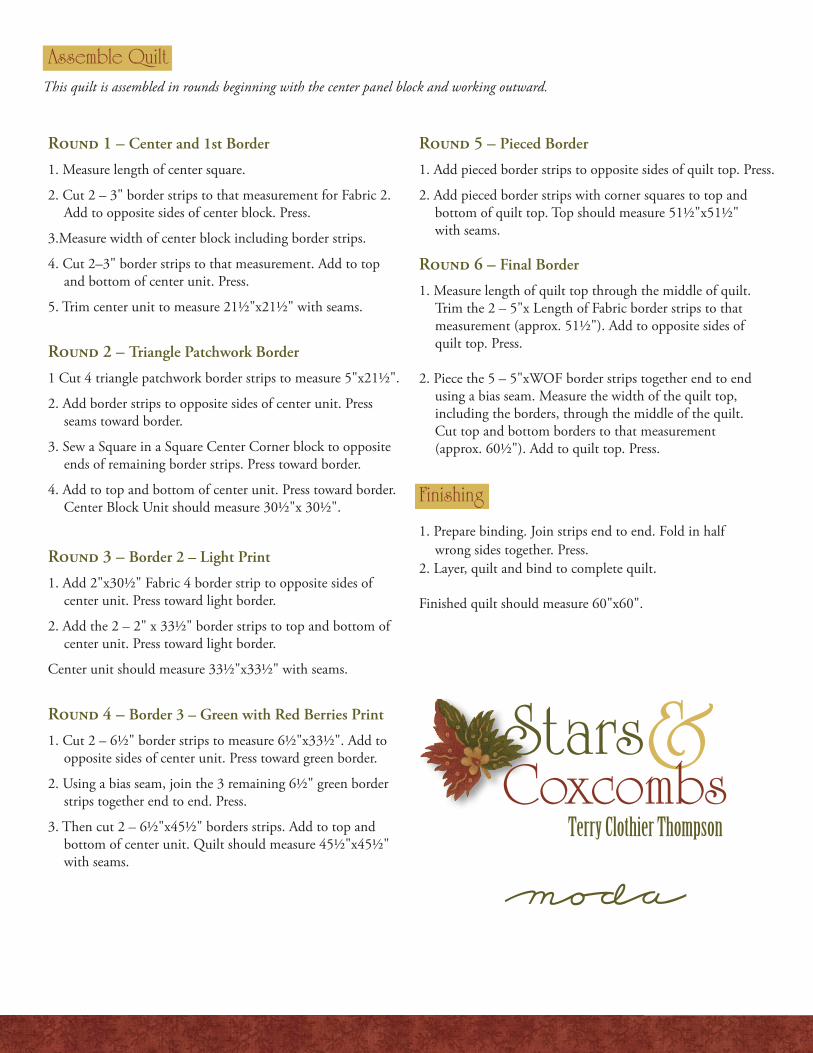
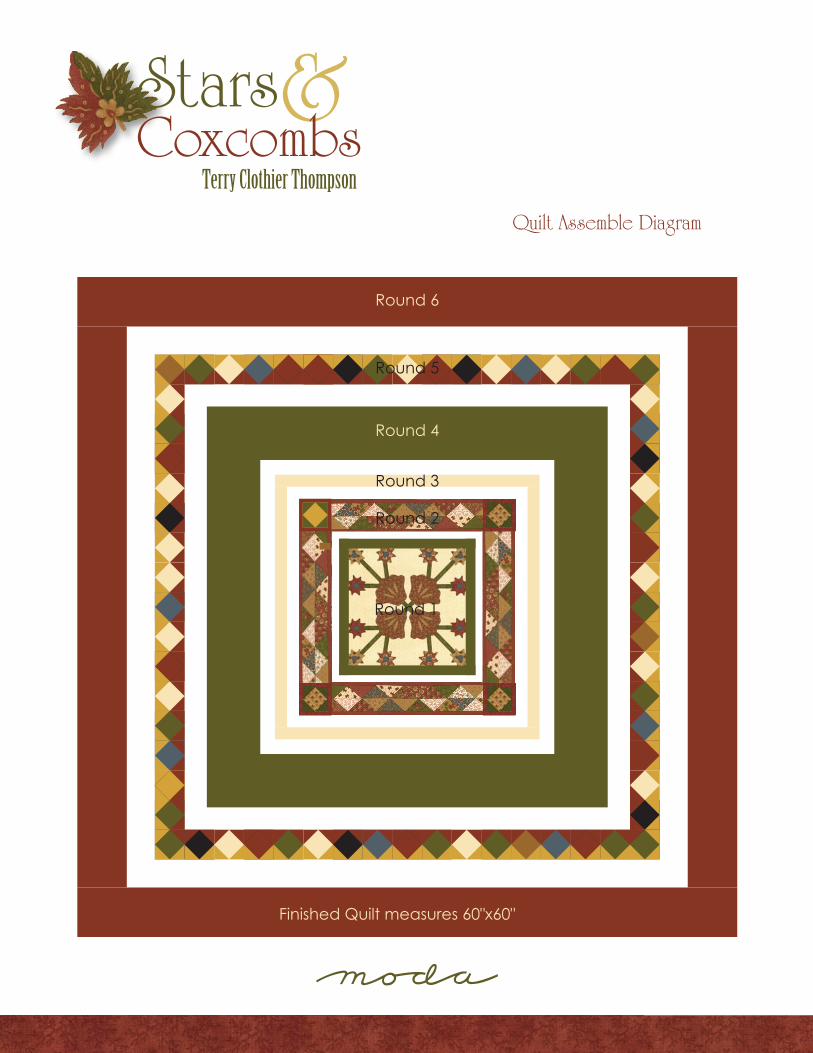
Assemble Quilt
Finishing
This quilt is assembled in rounds beginning with the center panel block and working outward.
Round 1 – Center and 1st Border
1. Measure length of center square.
2. Cut 2 – 3" border strips to that measurement for Fabric 2. Add to opposite sides of center block. Press.
3.Measure width of center block including border strips.
4. Cut 2–3" border strips to that measurement. Add to top and bottom of center unit. Press.
5. Trim center unit to measure 21½"x21½" with seams.
Round 6 – Final Border
1. Measure length of quilt top through the middle of quilt. Trim the 2 – 5"x Length of Fabric border strips to that measurement (approx. 51½"). Add to opposite sides of quilt top. Press.
2. Piece the 5 – 5"xWOF border strips together end to end using a bias seam. Measure the width of the quilt top, including the borders, through the middle of the quilt. Cut top and bottom borders to that measurement (approx. 60½"). Add to quilt top. Press.
Round 2 – Triangle Patchwork Border
1 Cut 4 triangle patchwork border strips to measure 5"x21½".
2. Add border strips to opposite sides of center unit. Press seams toward border.
3. Sew a Square in a Square Center Corner block to opposite ends of remaining border strips. Press toward border.
4. Add to top and bottom of center unit. Press toward border. Center Block Unit should measure 30½"x 30½".
Round 3 – Border 2 – Light Print
1. Add 2"x30½" Fabric 4 border strip to opposite sides of center unit. Press toward light border.
2. Add the 2 – 2" x 33½" border strips to top and bottom of center unit. Press toward light border.
Center unit should measure 33½"x33½" with seams.
Round 4 – Border 3 – Green with Red Berries Print
1. Cut 2 – 6½" border strips to measure 6½"x33½". Add to opposite sides of center unit. Press toward green border.
2. Using a bias seam, join the 3 remaining 6½" green border strips together end to end. Press.
3. Then cut 2 – 6½"x45½" borders strips. Add to top and bottom of center unit. Quilt should measure 45½"x45½" with seams.
Round 5 – Pieced Border
1. Add pieced border strips to opposite sides of quilt top. Press.
2. Add pieced border strips with corner squares to top and bottom of quilt top. Top should measure 51½"x51½" with seams.
1. Prepare binding. Join strips end to end. Fold in half wrong sides together. Press.
2. Layer, quilt and bind to complete quilt.
Finished quilt should measure 60"x60".
&Coxcombs
Terry Clothier Thompson
Stars
&Coxcombs
Terry Clothier Thompson
Stars
Quilt Assemble Diagram
Round 6
Round 4
Round 5
Finished Quilt measures 60"x60"
Round 3
Round 1
Round 2
trim line
seam line
stitch
line
1 Charm Square
2-gold
3-red4-red
5-gold
Stars &Coxcombs
paper piecing template
trim line
seam line
stitch
line
1 Charm Square
2-gold
3-red4-red
5-gold
Stars &Coxcombs
paper piecing template
trim line
seam line
stitch
line
1 Charm Square
2-gold
3-red4-red
5-gold
Stars &Coxcombs
paper piecing template
trim line
seam line
stitch
line
1 Charm Square
2-gold
3-red4-red
5-gold
Stars &Coxcombs
paper piecing template
Make 16 copies for 64 blocksFor Pieced Border
templates should measure 3½"x 3½"
3½"
3½"
3½"
3½"