s c e n a r i o b o o k l e t - gmt games · no retreat!—scenario booklet 2nd edition, feb. 2012...
TRANSCRIPT

�No Retreat!—SCENARIO BOOKLET 2nd Edition, Feb. 2012
© 2011 GMT Games, LLC© 2011 GMT Games, LLC • P.O. Box 1308, Hanford, CA 93232-1308 • www.GMTGames.com
T h e R u s s i a n F r o n t : 1 9 4 1 - 1 9 4 5
S C E N A R I OB O O K L E T
L i v i n g R u l e s O c t . 2 0 1 12 n d E d i t i o n , F e b . 2 0 1 2

� No Retreat!—SCENARIO BOOKLET 2nd Edition, Feb. 2012
© 2011 GMT Games, LLC
[3.0] SCENARIOSEach of the six Scenarios and Campaign Game includes a setup map and ending Game Turn. When the indicated ending Game Turn is completed, that scenario’s listed Victory Conditions are checked and the winner is deter-mined.
Important: A scenario cannot end in a tie; if the player with the Initiative (��.9) does not win, the other player does.
Campaign Games: Alternately, each scenario can be used as the starting point for a Campaign Game played to the end of Game Turn �� using the standard Victory Conditions (��.0; including Objectives and Sudden Death not used in the scenarios).
Joker (Event) Card: If used, the Axis player has possession of the Joker card in the Campaign Game and Scenarios A, B, D; the Soviet player in Scenarios C, E, F.
Optional Units and Markers: If used, both players can have the Optional units available as the start of the sce-narios, but they are not set-up on the map, unless agreed upon by both sides: if so, then the German player always sets his Optional units up first, followed by the Soviet player, as per the specific rule for each Optional unit.
A. BARBAROSSA & THE CAMPAIGN GAMESet Up Procedure1. Place the round markers in the Unused Markers Hold-ing Box.
2. Place the round Game Turn marker in the ‘�’ box of the Game Turn Track on its Axis side, and the square Victory Points marker in the ‘��’ box of the Victory Point Track on its Drang Nach Osten (“Drive to the East”) side and the round VP marker in the ‘0’ box of the VP Track.
3. Each player takes his remaining square units and turns them face-up. Those with a Reinforcement Number are placed in the corresponding turn box on the Game Turn Track (e.g., the Russian ‘Steppe’ Front unit is placed in the ‘�3’ box). As a memory aid for the first winter shock bonus (�0.6.�) put a Soviet control marker on the Map’s turn track on Turn 4.
4. Both players take their remaining square units and place them on the map as shown in this scenario’s setup illustra-tion on their indicated sides.
5. Starting Axis Hand: The Axis player shuffles the deck of cards, minus the �3 cards with the Green-circled “45” and the Joker card (the green-circled “45” cards are used in �945 only), and places them face-down next to the map forming the Draw Pile. He then draws six cards from the top of the Draw Pile, Discards two, and takes the rest into his hand.
DESIGN NOTE: The Soviet player begins with no cards to simulate the German surprise attack of June 22, 1941.
Special First Turn Restrictions: In addition to the ineq-uitable distribution of cards during setup, the following special restrictions apply to the Axis player’s forces on Game Turn � (only):
• ‘N’ units can only attack the Russian Northwest Front unit.
• ‘C’ units can only attack the Russian West Front unit.• ‘S’ units can only attack the Russian Southwest Front
unit.• ‘R’ units cannot move or Advance after Combat on Game
Turn � (they may attack).
[3.0] SCENARIOS . . . . . . . . . . . . . . . . . . . . . . . . . . . � A. Barbarossa & the Campaign Game . . . . . . . . � B. Fall Blau . . . . . . . . . . . . . . . . . . . . . . . . . . . . . . . 4 C. Operation Saturn . . . . . . . . . . . . . . . . . . . . . . . 5 D. Citadel . . . . . . . . . . . . . . . . . . . . . . . . . . . . . . . . 6 E. Operation Bagration . . . . . . . . . . . . . . . . . . . . 7 F. Na Berlin! (On To Berlin!) . . . . . . . . . . . . . . . . 8
T A B L E O F C O N T E N T S
G. Tournament Scenario . . . . . . . . . . . . . . . . . . . 9[�7.0] DESIGNER’S NOTES . . . . . . . . . . . . . . . . . . 9[�8.0] PLAYER’S NOTES . . . . . . . . . . . . . . . . . . . . . ��[�9.0] EXTRA EXAMPLES . . . . . . . . . . . . . . . . . . . �4CARD MANIFEST . . . . . . . . . . . . . . . . . . . . . . . . . . �0COUNTER SCANS . . . . . . . . . . . . . . . . . . . . . . . . . �3

3No Retreat!—SCENARIO BOOKLET 2nd Edition, Feb. 2012
© 2011 GMT Games, LLC
6. Players must note the Game Turn � Effects. These in-clude:• Weather: It is Clear weather.• Drang Nach Osten: The Axis side has the Initiative
through Game Turn ��, affecting the ability to play certain Event cards (as per 5.3.3) and how Victory Points are scored (Rule ��.0).
• Blitz! markers: The Axis player begins the game with three Blitz! markers available.
• Rail Disruption: During Game Turns � and �, Rail Movement capacity is limited (see �3.5 case �-�).
• No Axis Replacements: During Game Turns �–4, the Axis player cannot discard cards in order to Improve (7.�) or Replace (7.9) units. Only certain Event cards can
be used by the Axis player for these purposes during the first four Game Turns.
7. After completing these steps and noting the above special rules, the Axis player commences Game Turn � with his Phase 4: Movement.
8. Game End & Victory Conditions:A. Barbarossa Scenario: At the end of Game Turn 5, the Axis player wins if his final score is 23 or more Victory Points - OR - he controls Moscow and at least one other Axis Objective Hex. Otherwise, the Soviet player wins.
B. Campaign Game (all 28 Turns): The entirety of rule ��.0 fully applies.

4 No Retreat!—SCENARIO BOOKLET 2nd Edition, Feb. 2012
© 2011 GMT Games, LLC
B. FALL BLAUSet Up Procedure1. Place the round markers in the Unused Markers Hold-ing Box.
2. Place the round Game Turn marker in the ‘7’ box of the Game Turn Track on its Axis side, and the square VP marker in the ‘��’ box of the Victory Point Track (with Midway already taken into account) on its Drang Nach Osten side, and the round VP marker in the ‘�’ box of the VP Track, Axis side up.
3. Reinforcements: Each player takes his combat units and turns them face-up. Those with a Reinforcement Number greater than 6 are placed in the corresponding turn box on the Game Turn Track.
4. Setup: Both players take their remaining square units and place them on the map as shown in this scenario’s setup illustration on their indicated sides.
Not Shown: The 8th Italian Army starts in the Rail Move-ment Box. The Soviet “Central” Front starts in the De-stroyed Units Box.
5. Starting Axis Hand: The Axis player shuffles the deck of cards, minus the �3 cards with the Green-circled “45” and the Joker card, and places them face-down next to the map forming the Draw Pile. He then draws seven cards from the top of the Draw Pile and takes them into his hand, examines them, and then discards two of those cards, face-up, into a Discard Pile.
6. Starting Soviet Hand: Next, the Soviet play-er receives his starting cards, drawing three and discarding one.
7. Weather: It is Clear weather.
8. After completing these steps, the Axis player commences Game Turn 7 with his Phase 4: Move-ment.
9. Scenario End & Vic-tory Conditions: At the end of Game Turn �0, the Axis player wins if his final score is �6 or more Victory Points - OR - he controls 3 or more Axis Objective Hexes. Otherwise, the Soviet player wins.

5No Retreat!—SCENARIO BOOKLET 2nd Edition, Feb. 2012
© 2011 GMT Games, LLC
C. OPERATION SATURN Set Up Procedure1. Place the round markers in the Unused Markers Holding Box.
2. Place the round Game Turn marker in the ‘�0’ box of the Game Turn Track on its Soviet side, and the square Victory Points marker in the ‘�5’ box of the Victory Point Track (with El Alamein already taken into account) on its Drang Nach Osten side, and the round VP marker in the ‘0’ box of the VP Track.
3. Reinforcements: Each player takes his combat units and turns them face-up. Those with a Reinforcement Number greater than 9 are placed in the corresponding turn box on the Game Turn Track.
4. Setup: Both players take their remaining square units and place them on the map as shown in this scenario’s setup illustration on their indicated sides.
5. Starting Axis Hand: The Axis player shuffles the deck of cards, minus the �3 cards with the Green-cir-cled “45”, and places them face-down next to the map forming the Draw Pile. He then draws two cards from the top of the Draw Pile and takes them into his hand, examines them, and then discards one of those cards, face-up, into a Discard Pile next to the Draw Pile.
6. Starting Soviet Hand: Next, the Soviet player re-ceives his starting cards, drawing six and discarding two. He also receives the Joker card.
7. Weather: It is Snow weather.
8. Soviets Move First: After completing these steps, the Soviet player commences with his half of Game Turn �0 with his Phase 3: Organization. The setup situation shows the end of the Axis Player Turn; the Axis Blitz! marker is already spent for this turn.
9. [12.9 change] Shifting the Initiative: During the Victory Phase of Game Turn ��, the Soviet player re-ceives � VP for each City or Oil Field they control; plus any Russian (red) VPs OR minus any Axis (grey) VPs as indicated by the round VP marker. Flip the square VP marker to its Soviet side and adjust it to reflect the above-determined Russian VP total.
10. Scenario End & Victory Conditions: At the end of Game Turn 13, the Soviet player wins if his final score is �6 or more Victory Points. Otherwise, the Axis player wins.

6 No Retreat!—SCENARIO BOOKLET 2nd Edition, Feb. 2012
© 2011 GMT Games, LLC
D. CITADEL Set Up Procedure1. Place the round markers in the Unused Markers Holding Box near the northwest corner of the map.
2. Place the round Game Turn marker in the ‘�4’ box of the Game Turn Track on its Axis side, and the square VPs marker in the ‘�5’ box of the Victory Point Track (with Italy Invaded al-ready taken into account) on its Na Berlin! (“On To Berlin!”) side, the round VP marker in the ‘3’ box of the VP Track, Soviet side up, and the square Axis High Tide marker in the ‘�4’ box of the VP Track.
3. Both players take their square units and place them on the map as shown in this scenario’s setup illustration on their indicated sides.
4. Look through the Event cards and find the Soviet’s “Hitler Orders At-tack” (#�9). The Soviet player places it in his card hand.
5. Starting German Hand: Then the Axis player shuffles the remaining deck of cards, minus the �3 cards with the Green-circled “45” and the Joker card, and places them face-down next to the map forming the Draw Pile. He then draws six cards from the top of the Draw Pile and takes them into his hand, examines them, and then discards two of those cards, face-up, into a Discard Pile.
6. Starting Soviet Hand: Next, the Soviet player draws four cards and discards zero, adding these cards to his “Hitler Orders Attack” card for a total of five cards in his starting hand.
7. Weather: It is Clear weather.
8. After completing these steps, the Axis player commences Game Turn �4 with his Phase 3: Organization.
9. Scenario End & Victory Condi-tions: At the end of Game Turn �9, the Soviet player wins if his final score is 22 or more Victory Points. Otherwise, the Axis player wins.

7No Retreat!—SCENARIO BOOKLET 2nd Edition, Feb. 2012
© 2011 GMT Games, LLC
6. Starting Soviet Hand: Next, the Soviet player draws six cards and discards one. He also receives the Joker card.
7. Weather: It is Clear weather.
8. Who Moves First: After completing these steps, the Soviet player commences with his half of Game Turn �9 with his Phase 3: Organization. (The setup situation shows the end of the Axis Player Turn.)
9. Scenario End & Victory Conditions: At the end of Game Turn 22, the Soviet player wins if his final score is 30 or more Victory Points. Otherwise, the Axis player wins.
E. OPERATION BAGRATION Set Up Procedure1. Place the round markers in the Unused Markers Hold-ing Box.
2. Place the round Game Turn marker in the ‘�9’ box of the Game Turn Track on its Soviet side (the Axis’ Game Turn �9 is already completed), and the square VP marker in the ‘�3’ box of the Victory Point Track (with D-Day already taken into account) on its Na Berlin! side, the round VP marker in the ‘3’ box of the VP Track, Soviet side up, and the square Axis High Tide marker in the ‘�4’ box of the VP Track.
3. Both players take their square units and place them on the map as shown in this scenario’s setup illustration on their indicated sides. Errata: The Soviet 4th Tank Army next to Kiev is in fact the 6th Tank Army. (Note that the Moscow Regional Unit is not used in this scenario).
4. Reinforcements: Each player takes his remaining square units and, those with a Reinforcement Number greater than �9 are placed in the corresponding turn box on the Game Turn Track. Those with an Event Designation (e.g., “Oil”) are set aside near the Na Berlin! Game Turn Track.
5. Starting Axis Hand: The Axis player shuffles the deck of cards, minus the �3 cards with the Green-circled “45”, and places them face-down next to the map forming the Draw Pile. He then draws three cards from the top of the Draw Pile, examines them, and then discards one, face-up, into a Discard Pile.

8 No Retreat!—SCENARIO BOOKLET 2nd Edition, Feb. 2012
© 2011 GMT Games, LLC
F. NA BERLIN! (ON TO BERLIN!)Set Up Procedure1. Place the round markers in the Unused Markers Hold-ing Box.
2. Place the round Game Turn marker in the ‘�3’ box of the Turn Track on its Soviet side (the Axis’ Game Turn �3 is already completed), and the square VP marker in the ‘6’ box of the Victory Point Track on its Na Berlin! side, the round VP marker in the ‘�’ box of the VP Track, German
side up, and the square Axis High Tide marker is set aside (it is not used after Turn ��).
Note that the Soviets have 4 VPs on the eligible portion of the map (Lublin, Belgrade, Bucharest, and the Rumanian Oil Fields), and have an extra � VP from the round VP Marker.
3. Both players take their square units and place them on the map as shown in this scenario’s setup illustration on their indicated sides.

9No Retreat!—SCENARIO BOOKLET 2nd Edition, Feb. 2012
© 2011 GMT Games, LLC
Errata: The Soviet 3rd Tank Army next to Warsaw in fact the �nd Tank Army. (Note that Moscow Regional Unit is not used in this scenario).
4. The Soviet player takes his remaining square Polish unit with an Event Designation (“Warsaw”) and sets it aside near the Na Berlin! Game Turn Track.
5. Starting Axis Hand: The Axis player shuffles the deck of cards, minus the �3 cards with the Red-Barred “45”, (the Red-barred “45” cards are not used in �945) and places them face-down next to the map forming the Draw Pile. He then draws two cards from the top of the Draw Pile, examines them, and then discards one of those cards, face-up, into a Discard Pile.
6. Starting Soviet Hand: Next, the Soviet player draws seven cards and discards one. He also receives the Joker card.
7. Weather: It is Snow weather.
8. Who Moves First: After completing these steps, the Soviet player commences with his half of Game Turn �� with his Phase 3: Organization. The setup situation shows the end of the Axis player Turn.
9. Scenario End & Victory Conditions: At the end of Game Turn �8, apply the Na Berlin! Victory Conditions (��.0). The Soviet player wins by either: Sudden Death, capturing three Axis Objective Hexes, or killing Hitler (��.5)—otherwise the Axis player wins.
G. TOURNAMENT SCENARIOSet Up Procedure and Rules1. Use the same setup as for Barbarossa (Scenario A).
2. The Optional Rules and Counters (those with an asterisk turn of entry) are not used.
3. The Cadre units (those with an underlined turn of entry) are not used, disregard rule �4.��.
4. The Objectives Victory are in use, but the Soviets need only to control one of the four Russian Objectives to win, not three (��.�). The Sudden Death Victory Conditions are in use (��.�).
5. Scenario End & Victory Conditions: If the game doesn’t end in Sudden Death (��.�), then at the end of �944, Game Turn ��, check for a German Operational Victory (��.4): The Soviet player will win if the “Na Berlin!” VP marker is higher than the Axis “High Tide” VP marker. Otherwise the Axis player wins.
The Tournament Scenario game is close to the original ba-sic Victory Point Games edition, and plays faster than the regular Campaign Game. Without the Cadre units play of the late portion of the game will be far less forgiving.
[17.0] DESIGNER’S NOTESFirst, I would like to gratefully acknowledge Alan Em-rich and Victory Point Games. Thanks to them, and now to GMT, you’re holding the Deluxe version of my first wargame. Wow! Ever since I bought Avalon Hill’s The Rus-sian Campaign, as a teenager in the late �970’s, the Eastern Front of WW� never ceased to fascinate me. For years, my quest for the “perfect” Eastern Front game was on, and now I am making deluxe No Retreat! my contribution to that quest.
This is my own ‘designer’s take’ of the struggle between the Soviets and Nazis in WW�. After reading the VPG web site, their offer to help aspiring game designers and their ‘small format’ publishing model it made this an irresistible challenge for me. I wanted to make a reasonably accurate game with only 40 counters, a small map, and 8 pages of basic rules. Looking back at the hundreds of hours I’ve enjoyed working on this project, the effort was far greater that I ever anticipated—but what a great learning experi-ence it has been. Now this version includes the two later modules (Na Berlin! and No Surrender!), and a few more tweaks. The number of counters is still a very manageable 80 pieces, with less than �0 pages of basic rules.
While doing research for this game, many of my preconcep-tions about this war in Russia were thrown to the wind. For example, I learned that, right up to the end of �944, the Germans were still able to field a very large army despite having taken staggering losses. I also discovered that the Soviets never had much over a �:� advantage in soldiers along the entire front (around 6 million Russians to about 3 million Axis). I found it fascinating that, during each year of this war, the Soviet army suffered casualties amounting to more than their total front line strength (that is 30 times more casualties than the US Army suffered in the war), yet the Russians never gave up. Also, that Allied Lend-Lease to Russia supplied around �5% of all Russian war materiel. Make no mistake, WW� was won on the Eastern Front; although victory was an Allied effort, it was largely paid for in Russian blood. It was a war of manoeuvre yes, but also a terrible war of attrition.
I hope that No Retreat! will entice you to learn more about this decisive military campaign, show how close a fight it was, explain the why’s of the strategies used by both sides, and give you many hours of enjoyable challenges and gaming fun.
I also encourage you to go to the Victory Point Games or the GMT Web sites, and inspect the No Retreat! page for additional game material (like Vassal and Zun Tsu Com-puter Game boxes).
The very first thing I tried to make work in No Retreat! is to simulate as closely as possible, without any artificial rules and gimmicks, the historical German capabilities and advance rate in �94�. With a little experience, players will be able, barring extremely bad luck, to achieve historical

�0 No Retreat!—SCENARIO BOOKLET 2nd Edition, Feb. 2012
© 2011 GMT Games, LLC
success with the Wehrmacht in the early game. There is even a fair chance of Moscow falling in �94� if the Axis go all-out, but the flanks of their advance will probably be very tenuous; this is certainly a high risk/high reward strategy.
The Soviet Order of BattleFor a relatively “simple” wargame, a large amount of historical research was involved. I studied the actual performance and locations of all the armies and Fronts of this campaign, and this in two-month steps (one game turn) from �94� to �944. Within the 40-counter limitation, a simulation engine of the relative strengths and weak-nesses of the two sides in presence was created. In case of the Soviets this was doubly difficult because of the gradual upgrade of their forces: most of the time, I was able to use the actual historical names, and time frames of improve-ment, for the Fronts, using the early units that were not upgraded (but disappeared) for the making of the Tank Armies. And these Tank counters do represent more than the actual Armies, they also include supporting/attached troops! You should be able to represent most historical situations with a reasonable degree of accuracy using the game pieces included despite the minor “fudging” that had to be done.
The Combat Results TablesThe Combat Results Tables are a bit unusual; as an attacker, even at lower odds, you do not suffer many losses (save for the occasional EX result), but you could get a “CA” result, and that opens some interesting possibilities. It gives your opponent the option of counterattacking and possibly upsetting your position—thus making it easier for them to charge at you during your opponent’s upcoming Player Turn, or your opponent might simply “pass” the opportunity to counterattack and opt to simply play it safe and stay on the defensive. The Combat Results Tables are also tailored for the “Counterblow” rule. Upon study of the two different CRTs, you will notice subtle differences between them that have a substantial impact on how to play each side.
CounterblowsWhat does the “Counterblow” rule represent?
We wanted players to have some say in when it is their opponent’s turn and to reward the careful management of precious Event cards. Players need to envision counter-blows as local spoiling counterattacks launched in reaction to the enemy offensives. We did not go as far as to allow an actual attack by the defender (this is what players should do on their own turns), but it’s close. And because your troops are leaving their positions to engage the enemy, they lose their defensive terrain benefits—thus, some risk is involved in launching a counterblow.
It is a good idea to use this rule to quickly wipe out pock-ets of surrounded enemy units, and to allow your units a chance to advance during your opponent’s turn (if a CA result is rolled, and followed up with a successful coun-terattack of your own). You can also use it to put pressure on unsupported fortified cities, lowering their defensive advantages, or even as an end-run advance. In the new GMT version this result can also happen by a CRT result, to be resolved next turn, representing a drawn-out en-gagement. There are myriad possibilities for a well-timed counterblow, but alas all of this fancy footwork has a cost in precious Event cards, and you never have enough of those.
Event CardsThe very heart of the game is the Event card “engine;” play-ers simply never know what surprise their opponent can spring upon you with a sneaky card play. Consequently, perfect planning of moves or attacks is never entirely pos-sible. For example, can you afford to temporarily leave a hole in your line, or will your adversary be able to play a card allowing him to move a unit there during your own turn, thus creating an unexpected breakthrough?
Those cards are an excellent indicator of the resources a side still has at his disposal: if you start your turn with a full hand of 6 cards, and your opponent has none, then things are potentially very good for you! The cards you
1 2 3 4 5 6 7 8 9 10 11
Game TurnEvolution of the Soviet Army
12 13 14 15 16 17 18 19 20 21 22 23 24 25 26 27
updated Feb. 2012
��No Retreat!—SCENARIO BOOKLET 2nd Edition, Feb. 2012
© 2011 GMT Games, LLC
have in reserve represent energy you can spend: to replace troops, for rail moves, for Counterblows, etc. With a low card count, your options are limited; sure, a player can still get by holding only a card or two, but the game’s initiative is probably being held by the opponent who is holding five or six cards!
In the early years, for example, the Soviets can probably replace most of their losses easily, but this will leave them with precious few cards, if any, to react and try to take back control of the on-map situation. In fact, if both sides engage in an orgy of low odds attacks, and bleed themselves to death, they’ll probably have to use so many of their cards to replace losses that few decisive moves will be possible since there will not be many Event cards left to use for these endeavors.
Victory ConditionsSpeaking of initiative, you really have to carefully read and make sure that you understand the rule ��.0, “How to Win” . While the scenarios have their own, defined separate victory conditions, the last page of the rules tells you how to win the Campaign Game. There are many ways to win the Campaign Game, and they are all important.
The Objectives Victory is straight forward and works as most traditional wargamers might expect: capture key cities and you win the game. In fact, to play a simpler ver-sion of No Retreat!, use only that victory condition. The game will still play just fine and a good time will be had by both sides.
The Sudden Death Victory Condition is very intriguing and keeps player paying attention to the current Victory Point (VP) score. Here is how it works: every three Game Turns, this victory condition is checked against a sum of VPs that the Initiative Player (the Axis during the first half of the game, the Soviets during the latter half; and both sides on Game Turn ��) has. If the Initiative Player has sufficient VPs at that moment, the game is over and that player wins outright.
A sufficient sum of VPs are not that easy to get, but not impossibly hard to obtain either. This fact will stop your opponent from becoming complacent (i.e., from “knowing” in advance what the historical outcome of the war was; e.g., “Bah, I can just withdraw and lose Kiev without a fight! The Axis never got farther than Stalingrad anyway and I’ll get tons of new units in �944.”). Also, because only the side with the Initiative can win by Sudden Death, neither side can afford do lose too much ground too quickly, even if this is tactically a good idea on the map, hence the game title: No Retreat!
If you want a very short game, try to get a lot of your units killed while being Out of Supply, never do the same to your opponent, and never fulfill the Hitler/Stalin Orders Attack Event cards played by your opponent; that is a sure road to ruin!
Finally, there is the German Operational Victory Condi-tion. If things go that far without an Objectives or Sudden Death winner, then the more territory the Axis player has captured by Game Turn �� (i.e., when they place their High Tide marker on the Victory Point Track), the better the Axis’ chances of salvaging a victory out of a bad situation. If the Axis player was timid and didn’t advance boldly into Russia, chances are he will not win via this, and the game will continue on to the bitter end in �945. Or perhaps not, if the Soviet player is equally timid. One thing is certain: the Axis player has to keep as many German units in Russia as possible for a cautious advance approach toward win-ning to work. The tricky part is that the entire Axis front can crumble surprisingly fast in �944!
If the game continues past December of �944, then the Soviets have the opportunity to bring the war right up to Hitler’s doorstep. Yes, this means that the Russians can-not win using rule ��.4: it’s just a stepping-stone on their road toward victory! To represent the increased tempo of operations and the race to Berlin, the turns are only one month long instead of two.
FinlandWhat’s the deal with the strange way Finland is treated?
Given that Finland pretty much kept to its own agenda for the duration of the war (the re-conquest of lost Finnish territory only) and never made any serious penetrations into Russia after this was achieved, I decided to represent them by a simple Fort unit—it doesn’t move or attack by itself, and it has no ZOC to influence Soviet units beyond the Finnish border.
The Fort counter also represents the easy defensible and rugged Finnish country and the fierce fighting qualities of the Finnish army when attacked by the Russians. A similar rationale applies to the Balkans Yugoslav “Parti-san” areas.
Axis AlliesWhy are there no restrictions on the placement of the other Minor Axis nationalities?
Besides not being able to move into Finland (the Finns wouldn’t be too keen on that), I decided not to add an extra rule limiting the use of the Rumanians, Hungarians and Italians to the southern part of the map (as about half the larger size wargames on this subject do). I found no solid historical reason to do so other than the fact that they didn’t do so in the real war. In addition, I wanted to keep the game as simple as possible to fit in the small format rules. I mean, there were Spanish (and others) troops operating in the Leningrad area, and if Hitler had asked, I don’t see why those nationalities would not have been moved up north. If this bothers you, then by all means create your own House Rule artificially restricting Minor Axis units from entering the upper half of the map.

�� No Retreat!—SCENARIO BOOKLET 2nd Edition, Feb. 2012
© 2011 GMT Games, LLC
Zones of ControlWhy are you allowed to move through one Enemy Zone of Control, and then stop if the destination hex contains a friendly unit? Not every wargame allows that.
This one is easy to answer. Given the very large scale of the map (�00km per hex), the Zones of Control mainly represent a unit taking up some space in adjacent hexes, and not actual firepower controlling that adjoining hex. A bit of “reaction movement” is also being simulated by this rule—that is, where you displace some sub-units there to stop an enemy from advancing. All these occurrences are partially negated by the presence of a friendly unit that is helping you getting out of trouble, keeping open a path of retreat.
ConclusionI hope you have fun playing Deluxe No Retreat! and that this intense little game gives you some insight on what went on during this cataclysmic and tragic campaign. Following these notes are some more basic tips for both players. Also, I am looking forward for your comments, suggestions and replays on the game’s discussion folder at www.consimworld.com and www.boardgamegeek.com.
[18.0] PLAYER’S NOTESHere are a few very rough guidelines on how to play the game. It is not a difficult game to learn, but it can take time to master, especially when you are on the defensive strategically.
German OKH Directives (Avoiding Götterdämmerung): • Concentrate your troops and attack at high odds, thus
limiting the losses you’ll take, especially in �94� when you get almost no replacements.
• “Counterblow Attacks” are your friend, especially early in the game when you want to advance faster: if you have a stack of units next to a Soviet city, this could be a very effective way of gaining some ground in the opponent’s turn if he decides to stand and fight unsupported.
• At every opportunity, surround Soviets and let them die “Out of Supply”, this will save German blood, and give you the precious VPs that you need to achieve a “Sud-den Death” victory. Plus makes the enemy pay double to replace the lost armies.
• Have a goal, don’t just run away chasing after Soviets to blast them frontally. You can be sure that they will rebuilt those troops, and fast, while you suffer hard-to-replace losses.
• Always keep some units in the Rail Movement Box to reinforce areas where you are making progress.
• Your Army will almost inevitably dwindle in quality (as it costs double to flip units to full strength). So know when to cut your losses and switch to the defensive if outright victory seems out of sight.
• When everything crumbles away in �944, do remember that at the end of Turn �� you can still win an Opera-tional Victory if you hold enough Victory Point hexes. So there is still hope for German arms. For example, pockets of troops along the Baltic coast are in supply (by sea), and can be useful to that purpose, diverting Soviet resources, and can hold out indefinitely (as historically happened).
The German War Years in review:1941: You are the unstoppable Ger-manic Monster Blitzkrieg Army, all fear and tremble before you! So, you can go everywhere you wish, BUT you cannot be everywhere at once. What is an aspiring world conquer-or to do? An interesting option is the initial historical OKH plan: Going full tilt for Leningrad and Moscow, coupled with a steady advance in the south, aimed at capturing Kiev, Odessa and Dnepropetrovsk. But beware of the difficult northern terrain; your Panzers might very well end up bogged-down in the woods and swamps. You don’t want another war of attrition, right?
1942: If you have weathered the Soviet winter counter-offensive and hold two Objectives, now is the time to try to finish them off before their army starts improving too much. If you don’t have the Objectives, then your best bet is probably going south, trying to grab as many cities as possible, surrounding troops on the way, to get the biggest “High Tide” VP score before the VP flip on Turn 11. Do watch your losses, they can pile up very fast when you are fighting an ever-improving Russian army, and of course watch your flanks, and those unreliable Axis Allies.
1943: If the game is still on, the “Tide of War” is probably starting to turn against you. Gone is “Drang Nach Osten!” (Drive towards the East!) It’s “Na Berlin!” (On to Berlin!) time now. You will lose a lot of your nice attack Event cards, in exchange getting mostly lame defensive cards. Gone is the possibility of a “Sudden Death” victory, but make no mistake, your army is still powerful, and you get the useful Elite Panzer unit to spearhead those last big offensives. So don’t be afraid to counter-attack over-extended Soviets, but be ever watchful of being attritioned to death! Mud weather is a good time to dress up your line and replace some losses. If you are still in a good map position, an “Objective Victory” might even be a possibility!
1944: Well, the writing is on the wall (the Berlin walls!). Now you’re probably facing a huge, angry, and danger-ous Red Army; very capable of inflicting the disastrous

�3No Retreat!—SCENARIO BOOKLET 2nd Edition, Feb. 2012
© 2011 GMT Games, LLC
reverses you made it suffer in �94�/4�. Try not to get your units surrounded (this could be difficult to do), hold Königsberg at all costs, and keep as many German troops as possible in USSR proper until the end. If things really went bad south and you lost Rumania, and a lot of troops, then it’s maybe time to look for a nice farm in Argentina where to retire...
1945: You must try to hold the line almost everywhere as long as possible, as now you can lose the game to a Sudden Death victory easily if you abandon Yugoslavia and Budapest to concentrate too much on the defense of Berlin. So consider the implications in the rules and cards carefully!
Soviet STAVKA Directives (Winning the Great Patriotic War): • Most of the time you will be able to build back your army
every turn, just don’t get units killed while “Out of Sup-ply” or over-extend yourself making too many attacks too early in the game, as you initially have barely enough to cover the whole front. Leningrad with a fortress is a very good anchoring point, don’t lose it!
• Clear terrain is almost impossible to defend with regular infantry against a competent Axis player, so be aware that you’ll most certainly get your line breached.
• You have to start wearing down the Germans as soon as possible. The “EX” combat result is your friend. But don’t overdo it and create holes in your lines! Small-scale counter-attacks are the name of the game early on.
• “Counterblow Attacks” can be very effective in the first winter, where you have lots of “Shock” markers to use; plus lost troops will be rebuilt right away in your turn!
• ALWAYS, if possible, keep a minimum of one unit in the Rail Movement Box if you intend to attack in your turn, so to plug any holes created by “EX” results.
• Attrition up north, maneuver down south. If you ever have the possibility of killing “Out of Supply” German units: go for it! This will help final victory immensely.
• Go after lone enemy infantry, especially the Axis Allies.• Starting in late �943 you probably can pretty much do as
you wish strategically, so start doing some serious killing and advancing, be aggressive, now is payback time! Na Berlin!
The Soviet War Years in review:1941: Oh boy, I bet you dearly regret doing all those army purges now! Your forces start weak and badly deployed. You will indeed take quite a licking in this awful year. But don’t despair, with all the reinforcements and replace-ments you’ll get, the huge Red Army will “keep on ticking”. You must strive to field all of your troops each and
every turn, if counters stay in the Destroyed Units Box, things are not good! And get those Fortresses deployed in Leningrad and Sev-astopol ASAP. If you ever get the chance, even before winter, coun-ter-attack some, and let the Nazis bleed for a change. Remember that they can’t buy replacements before �94�, and that they will strive not to lose many when they are on the offensive, so you have to do the killing. If everything does go bad, try not to lose Leningrad and Moscow.
1942: This is another dangerous year: You probably do not have that much ground to give up; your army is improving, but not yet able to fight the Germans on even terms. Do continue to attrition them; make them pay for each City hex taken! “Not a Step Back!” At the end of the year, when winter comes, you can now mount bigger attacks against weak parts of the German line. You must now have half dozen improved units: You did remember to have a couple of Tank Armies and a Shock Front built in that lot, right?
1943: Now at last the tide starts turning. Payback time, Soviet style. You get a lot of strong attack-oriented Event cards: use them! Late in the year you’ll have the capability of making impressive territorial gains, a lot of the Germans will be at half-strength by now, don’t let them recover! Make at least two attacks per turn, four at lower odds are better for you than a few high-odds attacks, unless of course you have the possibility of a big encirclement happening. But always be aware that taking unnecessary losses will divert those precious Event cards for replace-ments purposes instead of the victorious offensives you want to start making.
1944: Put the Soviet steamroller into high gear! Your units have two steps now. This is a blessing (more staying power) but also a curse (you can only flip them using cards, no more free improvements), so try not to lose too many each turn: indeed, your huge troop reserves are becoming ex-hausted. Oh yes, kick the Finns out of the war for an easy � VP. Remember that if the German “High Tide” point total is high, you might have to evict most of the “Huns” out of the USSR, so be prepared for a savage fight up north. If the total is less impressive, you could have the luxury of concentrating your attention in the south, capturing Ruma-nia; and thus really start putting some nails (lend-leased of course!) on Hitler’s coffin. If all goes well, start polishing those medals for the big victory parade in Berlin!
1945: The Soviet player must not be too complacent; the enemy can still spring some nasty surprises on him de-spite the overwhelming superiority of the Red Army. So, comrade, don’t let the western bourgeois beat you to the finish line! Attack, attack, attack! Na Berlin!—Carl Paradis

�4 No Retreat!—SCENARIO BOOKLET 2nd Edition, Feb. 2012
© 2011 GMT Games, LLC
[19.0] EXTRA EXAMPLESArmy Group Center GambitHere is the situation after the Axis Turn � Movement Phase.
A note for the Germans: If your opponent is known for taking kamikaze-like risks, and you suspect he might just try to save the West Front (and there is a very small chance he might succeed with the right mix of cards). Then make sure, before doing this, that you still have three cards and one Blitz! marker left in your hand. This combination the Soviets will not be able to defeat!
Soviet Turn 1 DefenceIllustration #3 shows an example of a Soviet Turn � de-fense. The Germans decided to try the “Counterblow Gambit” against the West Front on Turn � to get an easy � VP and just surrounded the unit (they will use two cards for Counterblows in the Soviet Combat Phase). The posi-tion shown is at the start of the Soviet turn. The Central and Northwest Front were destroyed, but the South Front held its own against Army Group Rumania. What can the Soviets do to minimize the German gains? Let’s suppose the Russians will use two cards to replace the lost units, and keep the last two for future turns (it is always a good idea to save some cards if possible).
The surrounded West Front is almost surely a lost cause; so let’s not waste any more resources in trying to save it.
The Reserve Front is too far away from the action, let’s put it in the Rail Move Box (remember that for the first
2
Nothing very extraordinary here. Each German army group (N, C, and S) can only attack their opposing Soviet Fronts (NW, West and South). I’ll show you an interesting twist to this, if the Axis player feels bold, and has cards to spare (usually he has, as he starts the game with six cards to the Soviet who has none).
See illustration #� for the situation at the end of the turn. Yes indeed, the German Army Group Center has not at-tacked the Soviet West Front, but merely surrounded it, putting it “Out of Supply”.
During the Soviet Turn � the Axis will put two Counterblow counters on both stacks adjacent to the surrounded unit. Since the odds will be lower than �-3, it will be an automatic CA (at odds of 6-�). This will guarantee the elimination of the West Front (and “Out of Supply” to boot!), and � VP for the Axis player!
The only way the Soviets can try to save this unit is to have a replacement arrive in Minsk (the city to the East), and move to break the encirclement. But this will probably not delay the Germans very much, and will most certainly end up with not one, but TWO Soviet Fronts dying Out of Supply!
1

�5No Retreat!—SCENARIO BOOKLET 2nd Edition, Feb. 2012
© 2011 GMT Games, LLC
two turns you cannot move more than one unit per rail). It will be able to react to the German advance after the Counterblow is resolved.
We bring the two rebuilt units as shown (A & B in the illus-tration below). Note that the Central Front (B) can indeed appear in Kiev even if the City is in an enemy ZOC. It was put near the City to stop the German player trying another
Counterblow here too: a remote possibility, but it could be disastrous if it worked, so better play safe!
Note also that I try to put the regular infantry units in non-clear terrain to cancel the German Armor Bonus. The situ-ation at the end of the turn is shown in illustration #5.
Things are not rosy, but major encirclements shall now be avoided next turn. You are missing one unit (the out of supply West Front), so the line is pretty thin, but next turn you’ll get two new units.
The area West of Smolensk is a bit weak but there is nothing you can do about it, you don’t want to weaken the South more— the two 5 SP units there form a good defense group (one can Counterblow in support if the other is attacked alone). The Leningrad Front could be moved one or two hexes in front of the City if you think that the Germans might have a card giving them some extra movement points. Hey, it’s rough being the Soviets in �94�!
Soviet South Defense QuizSee illustration #6. This is the Soviet Turn � of the game, be-cause of having to replace heavy losses this turn, you have only one card left in your hand now, but a good one: card #�8 (Operational Reserves/ Conflicting Hitler Directives).
The Germans still have three cards, and for the sake of the problem let’s assume they could be any other card in the deck.
You have one unit that can be used as reinforcements (the Southwest Front, shown on the map with a disruption marker); and Stalin, in his wisdom, has allotted you one
35
4

�6 No Retreat!—SCENARIO BOOKLET 2nd Edition, Feb. 2012
© 2011 GMT Games, LLC
Rail move to use as you wish. Since things are going badly up North, you fear that there is a great possibility that the Germans will commit their �nd Army here in the South next turn.
Stalin expects you to guarantee that the Germans do not capture all three cities on the board by the end of next turn. You were also promised to get the Caucasian Front on Turn �, coming from Sevastopol. How do you BEST defend, and what are your actions, Comrade Marshal?
Here is a way to do it, remember, you have to make sure here that the three Cities do not fall by the end of Turn �.
You know that the Germans will not be able to move dur-ing your own turn (as you have card #�8, which includes
the German event “Operational Reserves”). Plus with it you can cancel any other card the Germans can throw at you (like “General Staff”).
You HAVE to give up Odessa and Kiev right away, as there is the danger that the Germans could “Counterblow” you, and if you lose one of your units because of bad luck, your front line will be wide open and disaster will ensue next turn.
You have your Southwest infantry unit appear in Kiev, move it away safely behind the Dnepr River. The Central Front will hold the main front in clear terrain (it will give no Armor Bonus to the Germans because it is a Mechanized unit). You use your precious Rail move to withdraw the South Front to Dnepropetrovsk, to ensure than a German Advance After Combat will not occupy it. See illustration #7.
If the Germans are extra-lucky during their turn, they could perhaps “Counterblow” against the City next turn, but you will be able to use the reinforcing Caucasus Front unit to help hold the line. So let’s see what will happen for “real”, and play the situation!
German AGS Turn 2 at Start: Illustration #8 shows the position at the start of Turn �. The OKH puts three cards at the disposal of the AGS com-mander, and one Blitz! marker: • #06 Luftwaffe Support • #07 Heinz Guderian • #�9 Roving Cauldron (Not usable for the event because
it is a Red Star card) The Soviets still have card #�8 in hand (Conflicting Hitler Directives).
Attack #1The Germans decide to do a high risk strategy, trying to get all three cities (which would give them a good chance of getting a “Sudden Death” victory at the start of Turn 3 because of events elsewhere on the map). So they use most of their troops to strike south towards Dnepropetrovsk,
and will keep their pre-cious “Guderian” card in reserve for the Soviet turn, hoping to be able to do a “Counterblow” on the City.
The f irst at tack is against the Southwest Front, at 4:� Odds (�:�, –� for the River, +� Tanks vs Infantry in Clear, +� Blitz!, +� for the Luftwaffe card). The die roll is a 6! DEFEND-ER DESTROYED.
6
7

�7No Retreat!—SCENARIO BOOKLET 2nd Edition, Feb. 2012
© 2011 GMT Games, LLC
The Germans victori-ously advance East, and surround the Central Front with their ZOC. Things are looking good for the Nazis!
German AGS Turn 2 Attack #2Now comes the big gamble: The Axis player attacks the Central Front at straight 3:� odds. they have a �/3 chance of success, the combat would be a guaranteed suc-cess using the “Guderian” card (a �:� or better attack is an automatic DR); but he keeps the card for later. Result: a 5! DEFENDER SHATTERED! The combat result becomes “Defender Destroyed”, as the Soviet player cannot retreat. Here is the final position after the German advance:
Things are bad for the So-viets.
Soviet Turn 2But help is coming. Stavka will not give you any more new cards but for #�8 you had last turn. The Southwest Front is built again and will defend Kharkov, The Caucasus Front appears in Sevastopol and moves south of Dnepropetrovsk. No attacks are declared by the Soviets.
So with some glee the Axis player discards his card #�9 “Roving Cauldron”, to put a “Counterblow” marker on his stack as shown. The Soviets will have to attack back at �:3, a 4/6 chance of a CA; and the Germans will be able to use their “Guderian” card in the Counter-attack, guaranteeing success!
Soviet Turn 2 (End):Then the Soviets play their own Ace in the hole: Theirs is card #�8 “Conflicting Hitler Directives”, which cancels the play of the German card.
Cursing, his op-ponent the Axis player now has no other choice but to discard his #07 “Guderian” card, to put back the “Counterblow” marker on their stack. Now things are a b i t more even!
The Soviet South Front must attack the two German armies at �:3 odds. The die roll is �: COUNTERATTACK! The Gods of War are really not kind for the Communists. NOW the Germans get to attack back. And since it’s a battle occurring because of a CA result, the City does not help the defense. The Attack is at 3:� odds.
The die roll is �: EXCHANGE! The South Front is elimi-nated, and one German army is reduced. No advances. So, against all odds, the City holds (but barely)!
Note that if the Soviets had one unit in the Rail Movement Box, it could be redeployed in the City at the very end of the turn.
Alas, there is now a huge hole in the line, a hole that the Germans will surely exploit, but at least Turn 3 is a Mud turn, and their “Sudden Death” victory was denied! And winter is approaching fast...
Situation at the end of the German attacks.

�8 No Retreat!—SCENARIO BOOKLET 2nd Edition, Feb. 2012
© 2011 GMT Games, LLC
Save Smolensk and the Bryansk Front!It is the Soviet Turn � Movement Phase. The situ-ation is critical because of very bad results on the southern part of the front, the Axis are but ONE point away from a Sudden Death victory at the start of next turn (Turn 3)! Two welcomed reinforcements have just arrived in Moscow and Tula (the West and Northwest Fronts). Infinite thanks, Comrade Stalin!
The rest of the frontline is safe, but for here, around Smo-lensk.
The Soviets have one card left (Conflicting Hitler Directives), the rest were used to replace our huge losses. The Germans still have three cards left in their hand (and it can be any card but the Soviet one), plus one “Blitz!” marker.
How can you move your patriotic troops (and do your battles, if need be) to make �00% sure that you do not lose � VP (and the game) before the start of next turn? If pos-sible it would be nice if Moscow does not fall to the Nazi invaders on Axis Turn 3; unless, of course, you want to go on a sightseeing tour of Siberia’s lead mines. Only the part of the map shown is playable.
Hint: Your soldiers are expendable (they are all heroes).
SOLUTION:“This looks like a trick question: I believe it is impos-sible.”
Your lack of patriotic faith is disturbing, comrade!
There is a way of making sure the Soviets do not lose � VP (and the game). Remember my hint, that the Russian troops were expendable? In this case, the Northwest Front in Tula will sacrifice itself for the sake of the Motherland!
The first picture shows how you move your units. You first place the Northwest Front next to Smolensk, thus allowing the Bryansk Front to slip out of the en-circlement. Read this rule:
[8.5.3] No Infiltration: Units cannot move directly from one hex in an EZOC to another, unless the hex being entered
is also occupied by a friendly unit.
Of course, the hex is now overstacked. So the Northwest Front is eliminated to the “Shattered” holding box. But their sacrifice was not in vain, as the Bryansk Front is now safe (remember, you lose � VP when an “Out of Supply” unit dies). The invaders will not be able to Counterblow and take Smolensk either.
Another important move: The Reserve Front is placed next to the two German infantry armies, to absorb any possible Counterblow. You do not want the “Out of Supply” Bry-ansk Front to be forced to attack!
The West Front takes a defensive position in front of Moscow in the Woods/Fortified line (the Woods hex also simu-lates the Soviet late 1941 fortifica-tions built there), there is an excel-lent chance of keeping your Capital (especially if you keep the “Conflicting Hitler’s Directives” card in your hand), at least in the Axis Turn 3; and most probably your own turn, too (with the help of some reinforcements). But after this victorious defense, chances are the German Panzers will move south in search of an easier prey.
DO NOT set up next to the enemy armor: your infantry could be “Counterblown” in clear terrain: not a good thing, as the Panzers could exploit right into Tula, or Smolensk
Protect Moscow at all costs!!You are at the start of the Turn 3 Russian Movement Phase, and the German AGC is poised to make a try at capturing Moscow next turn. Because of heavy losses to be replaced from Turn �, you don’t have any cards left in your hand. The Germans still have two cards, but “OKH” and “Gen-eral Staff” are (for now) in the Discard Pile.
How do you defend Moscow, Kalinin and Tula with the three Soviet Fronts available on the map?
“ I believe it is critical that Moscow has to be in supply and thus is able to have a unit placed in it next turn.”
Exactly! Besides stopping the German advance in put-

�9No Retreat!—SCENARIO BOOKLET 2nd Edition, Feb. 2012
© 2011 GMT Games, LLC
ting your units in Woods hexes and NOT occu-pying Moscow, the important factor is to in-sure that a sup-ply line will be kept open to the City so that your Turn 4 reinforce-ments (aka. the Volkov Front) can be deployed in the city even if the hexes occupied by the West and Kalinin Fronts are taken by the Germans. Tula is a lost cause for now, of course (“He who wants to defend everything, defends nothing” —Frederick the Great). But you’ll have two turns of Snow weather to take it back.
DO NOT set-up next to the large German stacks (unless you feel very lucky), as the chances for a “Counterblow” disaster are much too high. And in Jan/Feb 4� the Germans have a –� CRT shift for their attacks because of the weather: good luck to them in taking Moscow with that modifier!
The capital is saved, well done, Comrade!
How to crack open a Fortified City?Here is a classic situation in Late 4�/Early 4�. Von Manstein with the German ��th Army and the Rumanians are poised at the Gates of Sevastopol. This is the start of the German Turn. Sadly, you don’t have “Siege Artillery” in your hand to reduce the Fortifications.
What are the prospects of victory if you attack the Soviet Fort without this card? The maximum you can get is 8 SP vs 3 SP, so �-� odds. This goes down two columns because of the terrain (City plus Objective). Final odds: �-�
Even a Blitz! marker will not help here, as 3-� odds are not better.
The prospects are not very good: DR results do not affect Forts, so the best you can hope is an EX result; and you can bet the Soviet player will probably spend a card to flip
back the unit to its Fort side in his Organization Phase! So there is a zero chance of taking the City.
What’s a German commander to do?
Well... here is an idea: You don’t attack the City during your turn right away! You “Counterblow” it first during the op-ponent turn, hop-ing to cause some losses, THEN you attack it during your turn—in a series of one-two punches. So as you can see, Isolated Fortresses are far more vulnerable than supported ones. You need to have other troops nearby to absorb those “Counterblow” attacks. Historically, the Soviets strived to do exactly that—attacks from the Kerch Straits to support Sevastopol, and south of Lake Ladoga to help Leningrad survive.
Look at what a world of difference it would be if the Caucasus Front was adjacent to Sevastopol, instead of the 4th Rumanian Army being there!
So let’s suppose that the Germans were able to CA at 3-� and got an EX result (50% chance of that hap-pening). In the Ex-change the Fort was
flipped to it’s weak infantry side, and the 3rd Rum Army is eliminated. The Soviets also attacked the 4th Rum Army with the Caucasus Front and got a lucky DR result, too.
Well, things are not as rosy for the Germans now. Even with good cards and a Blitz! marker. Why? Because the Soviets can pull the same exact stunt the Germans did last turn, and put a “Counterblow” marker on their Caucasus Front if the Germans attack Sevastopol—now both units must be attacked!
Of course, all those sneaky maneuvers cost Event cards; and you never have enough of these. But you did keep some in reserve this turn, right comrade? RIGHT? Stalin is not very forgiving of major mistakes like these you know...

�0 No Retreat!—SCENARIO BOOKLET 2nd Edition, Feb. 2012
© 2011 GMT Games, LLC
1. 45 Erich von Manstein: During your Combat Phase, double the strength of one supplied German unit OR, during the Russian Combat Phase, you may declare up to two Counterblow Target Hexes that are within two hexes of each other.
STAVKA: Place the top card of the Discard Pile into your hand.
2. 45 Gott Mit Uns: You may perform (but not repeat) the Axis Event on the card currently residing at the top of the Discard Pile (if the timing is appropriate) regardless of the card’s Initiative symbol.
+ Manpower Reserves: Move up to two units from any of the Shattered, Destroyed or Surrendered Boxes to the Rail Movement Box.
3. 45 + Troop Transfer: Play during your Organization Phase to re-ceive one replacement step (even while prohibited during 1941, or one that normally costs two cards).
Black Sea Fleet: Play before rolling the die in any combat to get one column shift in Attack or Defense for any one Battle in a Black Sea Coast Hex.
4. 45 Elastic Defense: Play before one Soviet attack is rolled. Its result is automatically a DR (Defender Retreat).
Maskirovka: Play right after the German or Soviet Voluntary At-tack Step to Detrain (9.2) a Soviet unit in a friendly hex with an Overland Supply Path that is adjacent to a Target Hex (it may par-ticipate in a Battle or Counterblow).
5. 45 Expert Leaders: Play before rolling the die in any one Battle: Roll two dice, and chose any one to use for the Combat Result.
Cavalry Raid: Play at the Start of the German Organization Phase to put an “Out Of Supply” marker on any one enemy unit.
6. 45 + Luftwaffe Support: Play to receive (an additional) one column shift benefit in a single attack OR play during any Removals Phase to not remove unsupplied Axis units in a single hex that Player Turn.
Partisans: Play during your Organization Step: The Axis player must eliminate one step from a unit on the map.
7. 45 Production Problems: Play anytime to cancel one just performed Soviet unit Improvement or Replacement.
+ Scorched Earth: Play in the German Card Phase to put a “Scorched” marker on a Soviet-Controlled City: it is now consid-ered a Marsh hex for ALL purposes (including supply) until the Player Turn after capture, or if the Soviet player removes it; in the Marker Removal Phase.
8. 45 New Tank Design: In a Battle, you may receive the Armor Bonus in one attack regardless of the presence of Soviet armor or mecha-nized infantry (but not if prohibited by terrain or weather), OR negate the Soviet’s Armor Bonus in one of their attacks.
Allied Lend-Lease: Play during your Organization Phase (begin-ning on Game Turn 6 and thereafter) to draw two cards OR to upgrade one additional Soviet unit (7.2).
9. 45 + Siege Artillery: If it is designated as a Target Hex, you may reduce (flip) a Fort unit to its Regional infantry unit side at the start of the German Combat Phase.
Red Orchestra: Play at any time to examine the German card hand and discard any one card from it.
10. 45 + Kesselschlacht: Play at the end of either player’s Supply Check Phase to immediately eliminate one Soviet unit that is under an Out of Supply marker.
Strategic Surprise: Play during either player’s Card Phase to in-stantly Entrain and Detrain (9.0) up to two Soviet units for free.
11. 45 Fickle Weather: Play this card immediately and then draw a new one. If this turn has variable weather, then flip its Weather marker.
+ No Mercy! Play before any combat die roll is made to cause one extra step loss to both sides’ forces at that Battle (applied after that Battle has been completely resolved).
12. 45 Fedor von Bock: If this card is discarded to receive a replacement, then draw a new card.
General Mud: Play this card immediately and then draw a new one. If next turn has variable weather, then flip its Weather marker to Mud.
13. 45 Summer Campaign: Play in your Discard Phase, in Clear weather only, to draw three cards. You must declare at least three Attacks next Combat Phase or lose 1 VP.
General Winter: Play this card immediately and then draw a new one. If next turn has variable weather, then flip its Weather marker to Snow, if available.
14. + Inexperienced Soviet Officers: Cancel the just-played (or dis-carded for a specific purpose) Soviet card.
HPrepared Offensive: In up to three adjacent hexes this turn, you may stack one extra unit per hex. If they are still stacked together at the end of your Combat Phase, you must retreat one of them out of that hex.
15. HSoviet Logistics Problems: Play at any time during the Soviet Combat Phase. All Soviet attacks suffer a –1 odds shift penalty for the remainder of that Phase.
Conflicting Hitler Directives: Cancel the just-played (or discard-ed for a specific purpose) German card.
16. Knight’s Cross Wearers: You may make either player reroll any one die roll.
+ NKVD: Play before one German Attack: Both players roll a die: loser takes one step loss, no advances or retreats allowed. In case of a tie, then reroll the Combat normally on the CRT.
17. + General Staff: Play during your Movement Phase to add 2 MPs to a stack of supplied units OR play to add one hex to all victori-ous units’ Multi-Hex Advance after Combat in one Battle. Terrain / Weather will stop the Advance.
HInfiltration Tactics: The units in one Axis stack can be attacked separately. No Advance After Combat is allowed until the 2nd unit in the hex is defeated.
18. Operational Reserves: After the Soviet Movement Phase, prior to the Soviet Combat Phase, you may move one supplied (check now) unit, not in EZOC or under a Counterblow marker, up to half its Movement Points (rounded up).
+ Not a Step Back! Play at any time during the German Combat Phase. All DR results are treated as EX results for the remainder of that Phase.
CARD MANIFESTKey:+ = Axis Initiative Event H= Soviet Initiative Event45 = Remove in 1945 NB = Na Berlin! cards

��No Retreat!—SCENARIO BOOKLET 2nd Edition, Feb. 2012
© 2011 GMT Games, LLC
29. Walter Model: Play after one Soviet attack is rolled to double the defense strength of one participating, supplied German unit.
HWave Assault: Play after the Soviet Combat Phase to declare one new attack; you can use units that have already attacked this turn.
30. HLast Reserves: Play during either player’s Card Phase to im-mediately receive and place up to two Axis replacements and lose 1 VP.
Andrei Yeremenko: Play after one Axis attack is rolled in a Battle to shift that attack one column to the left.
31. Stalin’s Interference: Cancel the just-played (or discarded for a specific purpose other than receiving Soviet replacements) Soviet card and place it in your own card hand.
HAllied Strategic Bombing: Cancel one just-received German replacement step (even one that cost him two cards).
32. Counteroffensive: Play during a Soviet attack prior to the die roll. The result becomes CA that must be mandatorily conducted.
Russian Courage: Play during your Counterblows Step of the German Player’s Combat Phase to count as two discards instead of one.
33. Unseasonal Weather: Play this card immediately and then draw a new one. If this turn and/or next turn has variable weather, then flip their respective Weather markers.
HIndustrial Surge: Play at any time during your Player Turn to draw two cards and immediately receive and place one replace-ment.
34. Backhand Blow: Play at the end of any Axis Commitment Step to remove up to two Counterblow markers from Soviet units.
+ Russian Tenacity: Play before rolling the die in one German Combat against a City: The Combat Result is an Automatic EX.
35. HSoviet Manpower Crisis: Starting Jan/Feb 44, play during your Organization Phase to make the Soviet eliminate two steps from among his supplied on-map non-Cadre units.
+ Rasputitsa: Play during German Advance After Combat. No Multi-Hex Advance After Combat (10.81) is allowed from that Battle.
36. + Surprise Attack: Play after the Soviet Movement Phase, to move normally one German stack up to two hexes, ending next to an enemy unit(s), and put a “Counterblow” marker on the German stack.
Hitler’s Interference: Cancel the just-played (or discarded for a specific purpose) German card and place it in your own card hand.
37. + Heinz Guderian: Play before one Axis attack at 3-2 or better odds is rolled. Its result is automatically a DR.
H Western Allied Offensive: If available, the German player must discard two cards of his choice from his hand OR discard one card and lose one step from a German or Axis unit
38. Hedgehogs: Play before one Soviet attack: Both players roll a die: loser takes one step loss, in case of a tie, both take a step loss and roll again. No advances or retreats allowed.
+ New Conscripts: Play anytime to replace an on map Ostatky counter by an eliminated or surrendered unit.
19. HRoving Cauldron: You may retreat all the units in one Battle, regardless of their supply status, through Enemy Zones of Control without any penalty.
Hitler Orders Attack! Play at the start of the Axis Player Turn. The Axis player must initiate at least three voluntary attacks during his Combat Phase or lose 1 VP.
20. Anti-Bolshevik Crusade: You must play this card immediately upon drawing it. Reshuffle the deck and Discard Pile to form a new Draw Pile.
Major Offensive: Discard with another card in your Discard Phase, in Clear or Snow weather only, to draw four cards. You must declare at least four Attacks next Combat Phase or lose 2 VPs.
21. + OKH: You may examine the Discard Pile and place one card from it into your hand. Reminder: the same Event cannot occur twice in a single Player Turn.
HRussian Steam Roller: For this turn only, each Soviet Shock marker provides two shifts (instead of the usual 1).
22. HAlbert Speer Reorganizes Economy: Play at any time to draw three cards into your hand, and then discard any one card from your hand.
Georgy Zhukov: You may either use the German CRT for up to two Soviet attacks (within two hexes of each other) OR force the German player to use the Soviet CRT Table for one Axis attack.
23. Stalin Orders Attack! Play at the start of the Soviet Player Turn. The Soviet player must initiate at least three voluntary attacks dur-ing his Combat Phase or lose 1 VP.
HSturmoviks! Add 4 SPs to a single supplied Soviet attack in 1943, and 6 SPs from 1944 on.
24. Hold at All Costs! Play at any time during the Soviet Combat Phase. All DR results are treated as EX results for the remainder of that Soviet Combat Phase.
+ Strategic Reserves: Play at the conclusion of either Player’s Combat Phase to return to the map one supplied, just-eliminated Soviet unit via Rail Movement.
25. HErsatz Units: Play during your Organization Phase to bring as special reinforcements up to two Kampfgruppe units from the Cadre Holding Box.
+ Za Rodinu! Cancel the next Step C Sudden Death Victory Check OR play at any time to draw two cards.
26. Mobile Defense: Play during your Counterblows Step of the Soviet Player’s Combat Phase to count as two discards instead of one.
HNa Berlin! You may perform (but not repeat) the Soviet Event on the card at the top of the Discard Pile (if the timing and the card’s Initiative symbol are both appropriate).
27. River Crossing: Play before rolling the die in a Combat to cancel a defender’s River terrain defense shift, and reroll a “-“ (No Effect) result.
HIvan Konev: Play before rolling the die. One supplied Soviet attack made at 2-1 or better odds is an automatic DR result.
28. Soviet SNAFU: Play at any time during the Russian Combat Phase before the die is rolled in a Battle to shift that Soviet attack one column to the left.
HKatyushas: Shift a supplied Soviet attack one column to the right in 1943 or two columns to the right from 1944 on.
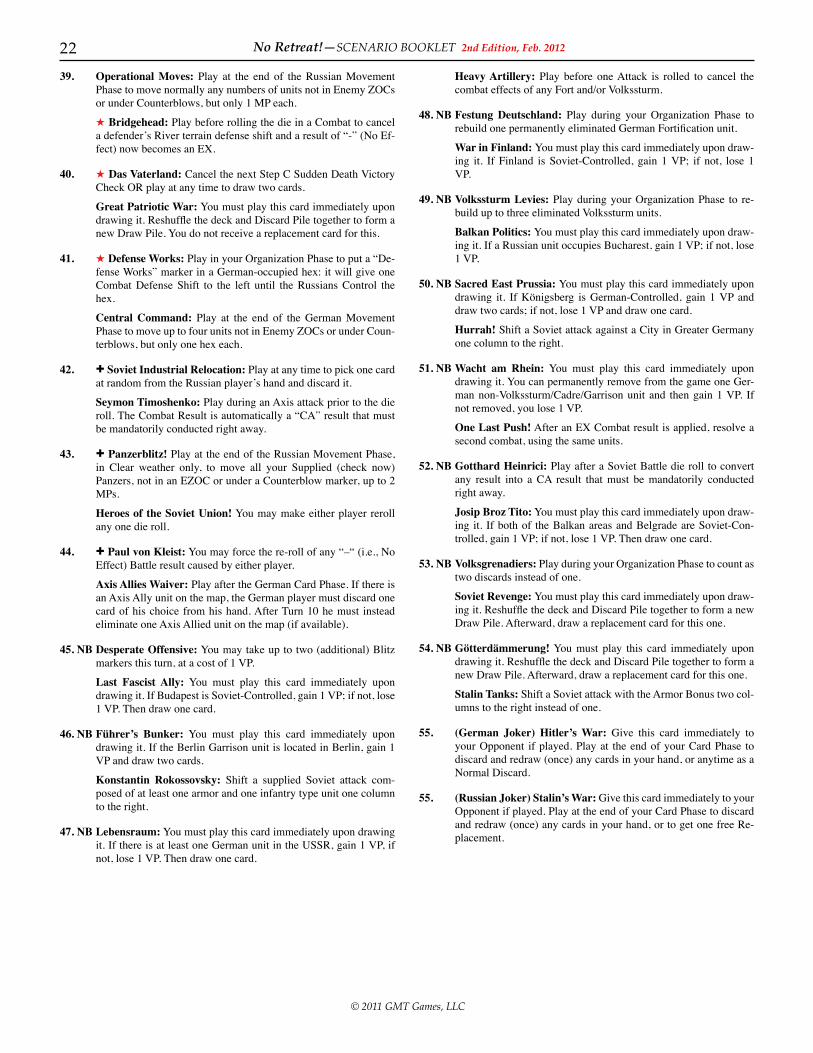
�� No Retreat!—SCENARIO BOOKLET 2nd Edition, Feb. 2012
© 2011 GMT Games, LLC
39. Operational Moves: Play at the end of the Russian Movement Phase to move normally any numbers of units not in Enemy ZOCs or under Counterblows, but only 1 MP each.
HBridgehead: Play before rolling the die in a Combat to cancel a defender’s River terrain defense shift and a result of “-” (No Ef-fect) now becomes an EX.
40. HDas Vaterland: Cancel the next Step C Sudden Death Victory Check OR play at any time to draw two cards.
Great Patriotic War: You must play this card immediately upon drawing it. Reshuffle the deck and Discard Pile together to form a new Draw Pile. You do not receive a replacement card for this.
41. HDefense Works: Play in your Organization Phase to put a “De-fense Works” marker in a German-occupied hex: it will give one Combat Defense Shift to the left until the Russians Control the hex.
Central Command: Play at the end of the German Movement Phase to move up to four units not in Enemy ZOCs or under Coun-terblows, but only one hex each.
42. + Soviet Industrial Relocation: Play at any time to pick one card at random from the Russian player’s hand and discard it.
Seymon Timoshenko: Play during an Axis attack prior to the die roll. The Combat Result is automatically a “CA” result that must be mandatorily conducted right away.
43. + Panzerblitz! Play at the end of the Russian Movement Phase, in Clear weather only, to move all your Supplied (check now) Panzers, not in an EZOC or under a Counterblow marker, up to 2 MPs.
Heroes of the Soviet Union! You may make either player reroll any one die roll.
44. + Paul von Kleist: You may force the re-roll of any “–“ (i.e., No Effect) Battle result caused by either player.
Axis Allies Waiver: Play after the German Card Phase. If there is an Axis Ally unit on the map, the German player must discard one card of his choice from his hand. After Turn 10 he must instead eliminate one Axis Allied unit on the map (if available).
45. NB Desperate Offensive: You may take up to two (additional) Blitz markers this turn, at a cost of 1 VP.
Last Fascist Ally: You must play this card immediately upon drawing it. If Budapest is Soviet-Controlled, gain 1 VP; if not, lose 1 VP. Then draw one card.
46. NB Führer’s Bunker: You must play this card immediately upon drawing it. If the Berlin Garrison unit is located in Berlin, gain 1 VP and draw two cards.
Konstantin Rokossovsky: Shift a supplied Soviet attack com-posed of at least one armor and one infantry type unit one column to the right.
47. NB Lebensraum: You must play this card immediately upon drawing it. If there is at least one German unit in the USSR, gain 1 VP, if not, lose 1 VP. Then draw one card.
Heavy Artillery: Play before one Attack is rolled to cancel the combat effects of any Fort and/or Volkssturm.
48. NB Festung Deutschland: Play during your Organization Phase to rebuild one permanently eliminated German Fortification unit.
War in Finland: You must play this card immediately upon draw-ing it. If Finland is Soviet-Controlled, gain 1 VP; if not, lose 1 VP.
49. NB Volkssturm Levies: Play during your Organization Phase to re-build up to three eliminated Volkssturm units.
Balkan Politics: You must play this card immediately upon draw-ing it. If a Russian unit occupies Bucharest, gain 1 VP; if not, lose 1 VP.
50. NB Sacred East Prussia: You must play this card immediately upon drawing it. If Königsberg is German-Controlled, gain 1 VP and draw two cards; if not, lose 1 VP and draw one card.
Hurrah! Shift a Soviet attack against a City in Greater Germany one column to the right.
51. NB Wacht am Rhein: You must play this card immediately upon drawing it. You can permanently remove from the game one Ger-man non-Volkssturm/Cadre/Garrison unit and then gain 1 VP. If not removed, you lose 1 VP.
One Last Push! After an EX Combat result is applied, resolve a second combat, using the same units.
52. NB Gotthard Heinrici: Play after a Soviet Battle die roll to convert any result into a CA result that must be mandatorily conducted right away.
Josip Broz Tito: You must play this card immediately upon draw-ing it. If both of the Balkan areas and Belgrade are Soviet-Con-trolled, gain 1 VP; if not, lose 1 VP. Then draw one card.
53. NB Volksgrenadiers: Play during your Organization Phase to count as two discards instead of one.
Soviet Revenge: You must play this card immediately upon draw-ing it. Reshuffle the deck and Discard Pile together to form a new Draw Pile. Afterward, draw a replacement card for this one.
54. NB Götterdämmerung! You must play this card immediately upon drawing it. Reshuffle the deck and Discard Pile together to form a new Draw Pile. Afterward, draw a replacement card for this one.
Stalin Tanks: Shift a Soviet attack with the Armor Bonus two col-umns to the right instead of one.
55. (German Joker) Hitler’s War: Give this card immediately to your Opponent if played. Play at the end of your Card Phase to discard and redraw (once) any cards in your hand, or anytime as a Normal Discard.
55. (Russian Joker) Stalin’s War: Give this card immediately to your Opponent if played. Play at the end of your Card Phase to discard and redraw (once) any cards in your hand, or to get one free Re-placement.

�3No Retreat!—SCENARIO BOOKLET 2nd Edition, Feb. 2012
© 2011 GMT Games, LLC
Rule ClarificationsOct. 2011TURN OF ENTRY• Some units have an asterisked (*) Turn of entry number:
it indicates that they are Optional Units.• Some units have an underlined turn of entry number: it
means they are Cadre units and go to the Cadre Holding box when entering the game.
AFV SILOUETTESThe Panzer/Tank counters in the game are offered in two styles: NATO Icons or AFV silhouettes. Use only one set in the game that suits your preferences.
COUNTERBLOWSYou always place counterblow markers of the colour/ownership of the stack it is put on (look at the example of play on Page �3).
• Soviet (Red) Counterblows are always placed on Soviet units.
• Axis (Gray) counterblows are always placed on Axis units.
• On the combat table, “Phasing Player” for Counterblow placement on a “CB” result means the players whose turns it is, at all times. Ex: During the Soviet player-turn you will ALWAYS put the Counterblow markers created from a combat result on the Soviet units involved in the combat, even if they are defending from a “CA” (Coun-terattack), never on the Axis units!
TERRAIN COMBAT BONUSESIn a multi-hex battle the defender will chose a single de-fending hex to use for the combat terrain modifiers.
SOVIET IMPROVEMENTSDo not forget that as per rule 7.� you can only improve by card discards:
• Regional Units to Fortresses: starting on Turn 3.• All other Soviet units: starting on Turn �7 (before this
they can only be flipped using free upgrades (7.�)).
GMT Games, LLC P.O. Box 1308, Hanford, CA 93232-1308
www.GMTGames.com
Solitaire Module Victory Points
A. Price of Failure:–1 VP (only 1 per turn maximum) if you cannot fulfill any or all of the Opposing Side’s Action Plans.
B. Stalin:–� VP each Sudden Death victory checks.
C. Fuhrer Directive:–� VP each Sudden Death victory checks.
Card Clarifications
#04 Maskirovka: Consider that a “friendly” hex in this case is any hex, OVERLAND SUPPLIED, that a unit could have regularly moved into (give unlimited movement points to the unit), obeying all the movement rules, from one of your supply sources (the board edge or a city).