rule book - gmt games book 1.0 introduction ... this rule not only speeds play, it also ... the map...
TRANSCRIPT

RULE BOOK
1.0 Introduction ............................................................ 22.0 Game Components ................................................. 23.0 Set Up .................................................................... 54.0 Winning.................................................................. 65.0 The Turn Sequence ................................................ 86.0 Stacking ................................................................. 87.0 Supply .................................................................... 88.0 Reinforcements, Replacements & Withdrawals .... 109.0 Entrenching ............................................................ 11
Table of Contents10.0 Command Control ................................................. 1111.0 Strategic Movement ............................................... 1212.0 Operational Movement .......................................... 1313.0 Combat ................................................................... 1414.0 Prepared Positions & Siege Guns .......................... 1615.0 (Optional) Dummy Counters ................................. 1816.0 Battle of the Marne Scenario ................................. 1817.0 Short Historical Campaign Scenario ..................... 19
GMT Games, LLC • P.O. Box 1308, Hanford, CA 93232-1308www.GMTGames.com
1914: Glory’s End Rules Manual2
© 2014 GMT Games, LLC
1.0 Introduction
1.1 In General1914: Glory’s End is a two-player wargame simulating the open-ing campaign of World War I in the west, from the Battle of the Frontiers to the final German effort to win the war that year at Ypres. Players step into the shoes of the supreme commanders of both sides. The German player is generally on the offensive, attempting to capture enough French towns and cities to bring on a military and political collapse, but the Allied armies are also powerful, and are capable of delivering strong counterblows of their own.
1.2 Game ScaleEach game turn represents three days. Each hex equals 9.5 miles (15.4 km) from side to opposite side. Units represent brigades (5,000 to 8,000 men), divisions (15,000 to 18,000 men) and corps (30,000 to 55,000 men).
1.3 Time LimitsAfter you’ve become familiar with the game, we recommend limiting each player to no more than 10 minutes to complete each of his player turns. This rule not only speeds play, it also forces players to make hurried decisions of the kind faced by their historic counterparts.
1.4 List of Game TermsFollowing is a list of acronyms used in 1914: Glory’s End, what each stands for, and the main rule reference for each.
CRT - Combat Results Table (13.0)DRM - Die Roll Modifier (13.12)FZs - Fortified Zones (14.3)LPs - Loss Points (13.17)MA - March Assault (13.23)MPs - Movement Points (12.1)OOC - Out of Command (10.1)OOS - Out of Supply (7.1)PA - Prepared Assault (13.0)RR&W - Reinforcements, Replacements & Withdrawals (8.1)SM - Strategic Movement (11.1)TEC - Terrain Effects ChartVPs - Victory Points (4.1)
2.0 Game Components
2.1 Component ListThe components of 1914: Glory’s End are as follows.
Two 176-counter 5/8" countersheetsOne 22"x34" mapsheetTwo player aid cards (identical)One pad of Roster SheetsThis rulebookTwo 6-sided dice (also usable for When Eagles Fight)
2.2 The Game MapThe map represents the areas of Western Europe across which the 1914 campaign was fought. A hexagonal (“hex”) grid is printed over the map to regulate placement and movement of units. A unit is considered to be in only one hex at any one time. Each hex contains natural and/or manmade terrain features that can effect the movement of units and the combat between units.
The manmade and natural terrain on the map have been altered from their real-world configurations to fit within the hex grid, but the relationships between the terrain from hex to hex are accurate to the degree necessary to present players with the same space/time dilemmas faced by their historic counterparts.
Each hex has a four-digit identification number. They are used to find places more quickly (for example, the city of Antwerp is in hex 1226), and to allow you to record unit positions if a match has to be interrupted and the game temporarily put away before it can be finished.
The charts and tracks are used for recording and resolving various game events and activities. Details on their use are explained in the appropriate sections below.
2.3 The CountersMost of the counters included in the game represent combat units; others are provided as informational markers and memory aids. After reading through these rules at least once, carefully punch out the counters. Hint: Trimming the “dog ears” off their corners with a fingernail clipper facilitates their handling and stacking during play.
Each combat unit counter displays several pieces of information: nationality, historical identification, organizational, size, combat and step strengths, operational movement allowance, and turn of entry or initial placement information.
1914: Glory’s End Rules Manual 3
© 2014 GMT Games, LLC
2.4 Sample Combat UnitsThe unit below is the German 2nd Infantry Corps. When at “full strength” it contains four “strength steps” (each side of the coun-ters represents one step, see 2.11). At its full (four-step) strength, it has an “attack factor” of 6, a “defense factor” of 7 (see 2.9), and a “movement factor” of 4 (see 2.10). It begins the game on the map as part of the German 1st Army (see 3.3 and 3.4).
Unit SizeUnit Type
Unit IDStep Strength
Initial ArmyDesignator
AttackFactor
DefenseFactor
MovementFactor
The three units depicted below illustrate information not shown in the preceeding illustration. The top unit starts the game in a specific hex, as indicated by the 4-digit number in its upper right corner. The other two units are reinforcements; they enter the game on the turn indicated by the first number in the upper left corner. The French unit in the middle also has a 4-digit hex number indicating the hex it enters on the turn indicated. The bottom unit is a cavalry division, which has different combat factors than infantry units (see 13.24).
Turn of Entry-Entry hex
Initial Placement
hex
Turn of Entry
Combat Factor vs.Cavalry only
Combat Factor vs.non-Cavalry (13.24)
Sample Cavalry unit
2.5 NationalityA unit’s nationality, and therefore the “side” it’s on, is indicated by its color scheme.
The Allied Side
Belgian Units* – Light Blue
British Units –Tan
French Units – Dark Blue
The German Side
German – Gray
*Design Note: It’s possible—if the German player decides not to invade there—that Belgium may not be actively involved in the game (neutral). Belgium is never on the German side (see 3.7).
2.6 Historical IdentificationEach unit is identified by a number and/or letter abbreviation of its full historical name. The abbreviations are listed below.
B – Bavarian BR – Bavarian Reserve C – Cavalry Co – Colonial DL – Deckungstruppen am Oberrhein des Landwehr
(Landwehr Covering Troops of the Upper Rhine) E – Ersatz FR – Fortress Reserve G – Guard GR – Guard Reserve I – Indian L – Landwehr (German Home Guard) LFD – Lille Fortress Division M – Moroccan N – Naval NR – New Reserve R – Reserve T – Territorial (French Home Guard)
2.7 Unit TypesThe symbols in the center of the counters indicate the types of units used in this campaign. They are:
Infantry
Naval Infantry
Fortress Infantry
Cavalry
Siege Guns
2.8 Unit SizeA unit’s organizational size is indicated by the follow symbols.
XXX – CorpsXX – DivisionX – BrigadeI – Battalion
Design Note: A bracket atop a unit’s size symbol means it’s an irregular or ad hoc formation of that approximate size. Such units should be referred to as “groups.” Fortress units don’t have size symbols (see 14.0).

1914: Glory’s End Rules Manual4
© 2014 GMT Games, LLC
2.9 Attack & Defense FactorsThese two “combat factors” are separate measures of a unit’s ability to conduct offensive and defensive combat operations. Their uses are explained in section 13.0.Design Note: The combat factors shown on cavalry and siege gun units are exceptions to the general arrangement described above. For details on those, see 13.24 and 13.25 for cavalry, and 14.7 for siege guns.Also note the French “R” groups are stronger on defense than their active corps brethren (the 5-4-4s). The reserve groups had three divisions each, rather than two.
2.10 Operational Movement FactorThis number is a measure of a unit’s ability to move across the map during its “Operational Movement Phase” every game turn. Units pay differing movement costs to enter different hexes, depending on the terrain in those hexes and along the hexsides surrounding them (see 12.0).
2.11 StepsAll units in the game are “one-step,” “two-step,” “three-step,” or “four-step” units. Those with combat and movement factors printed on only one side of one counter are “one-step” units; those with combat and movement factors printed on both sides of one counter are “two-step” units.Three- and four-step units are each represented by two coun-ters. Only one of those counters may be in play on the map at any one time. The lower-valued counter (with a large dot in its upper-left corner) is substituted for the higher-valued counter as the units take losses (see 13.20); the higher-valued counter may be substituted for the lower-valued if the unit receives replace-ments (see 8.6).The steps contained in a unit are a measure of its ability to absorb losses before being eliminated. When a unit is “eliminated” in game play, it doesn’t mean every individual in it has been killed; it means enough casualties and equipment losses have been suf-fered by the unit to render it useless for further combat operations.If a two- or multi-step unit “takes a step loss,” it is flipped over so its reduced side (the one with the lower step value) shows. If a one-step unit (or a two-, three- or four-step unit that had already been “reduced”) takes a step loss, it is removed from the map (“eliminated”) and placed in the “Deadpile.”
Sample “four step” unit
Black dot indicatesreduced unit counterStep Strength
2.12 Other CountersThe use of the following counters is explained in the rules section(s) indicated.
Mobilization marker (3.3)
Game Turn (5.2)
German Dummy/Control marker (4.2 and 15.0)
British Dummy/Control marker
French Dummy/Control marker
Out of Command marker (10.0)
Available Replacements (8.6)
Positive Victory Point marker (4.2)
Rest & Replenishment (8.6)
Fortified Zone (14.3)
Completed Entrenchment marker (9.2)

1914: Glory’s End Rules Manual 5
© 2014 GMT Games, LLC
3.0 Set Up
3.1 Choose Sides & Set UpChoose which of the two scenarios is to be played and which side each player will command. The “German player” commands all German units; the “Allied player” commands all units of the French, British and (if that nation is put into play by a German invasion) Belgian armies.Sort each side’s units into three piles: one for “at start” units (those with either an initial army or initial placement hex num-ber in the upper left corner), another for substitute units, and a third for reinforcements. Place the reinforcement units for both sides directly on the Turn Record Chart printed on the mapsheet, putting each in the box corresponding to the game turn during which they will enter play.
3.2 The Historical ScenarioThis scenario begins with Belgium and Luxembourg’s neutrality already violated by the Germans. (The Belgian army is therefore already actively on the Allied side; there is no Luxembourg army.) Holland and Switzerland are neutral and neither may have their territory violated by either side during play of the game.
Design Note: Swiss territory may never be entered by any units in either scenario. Holland’s neutrality may be violated by the Germans; see 3.7.
3.3 Historical Campaign Set UpPlace all at-start units with specific hex numbers, including the Mobilization Markers, directly in those hexes.Next, the German player should temporarily turn away from the map while the French player places on the map all his at-start units with an “Initial Army Indicator” number (see 2.4). All such units must be placed in France (only!) on or within three hexes of the appropriate mobilization counter. They may set up stacked (within normal limits) with other units of their own army and/or with starting units that don’t belong to any initial army. Units belonging to one army may not begin play stacked with units belonging to any other army. After that, the French player should turn away from the map while the German player places on the map all his at-start units with an “Initial Army Indicator” number. They must be placed within three hexes of their army’s mobilization counter in Ger-many, Luxembourg and Belgium. (Note: in this scenario, at least one eligible German unit must start in each of those last two countries.) No German unit may be set up in any hex of France. The stacking limits described above apply.During this process, neither player may examine the stacks of the other.
3.4 “0” UnitsThe French 1st Cavalry Corps and several units on the German side are indicated as belonging to army “0” (zero). That really means they started
the campaign under the direct control of their supreme headquar-ters. For set up purposes, both players assign them to any one (or, for the German, several) of the starting armies. Once as-signed, the “0” units are set up just as if the number of the as-signed army was the one printed behind their own unit ID.
Design Note: On 2 August, GQG ordered the French 4th Army from reserve to a position on the left of 3rd Army. However, that concentration was not completed by 14 August, which is why the 4th starts at hex 3223.
3.5 Free Set Up ScenarioThis scenario allows both players to devise their own mobiliza-tion plans for their initial army units, but at the cost of adding considerable time to play of the game. That is, both players again begin setting up by deploying their side’s at-start units with specific set up hexes printed in their upper-left corners directly in those hexes. Then the German player temporarily turns aside from the map while the Allied player deploys his five army mo-bilization markers onto the map to serve as visual aids for the rest of his deployment.In this scenario, neither player is required to place his army mo-bilization markers in the hexes printed on those counters. The Allied player may place his markers anywhere in France, and the German may place his anywhere in Germany (no more than one per hex in both cases—and also see 3.7).After deploying his army mobilization markers, the Allied player deploys his initial army units, including “zero” and dummy units, directly on the map within the same limits given for the histori-cal scenario. For example, each French unit must begin within three hexes of its proper army mobilization marker inside French territory, not stacked with units of other numbered armies, etc.After all his initial army units are placed, the Allied player records those units’ starting hex numbers on a piece of paper creating a roster sheet, puts that paper out of sight, and removes from the map his initial army units, including the “zero” unit, dummies and mobilization markers. Then the Allied player turns aside while the German repeats the same process for German Initial army units.After both sides’ plans are recorded as given above, the German again turns aside while the Allied player takes out his roster sheet and redeploys exactly as before. Then the Allied player turns aside while the German does the same on his side. The game is now set up.
Design Note: The final turning aside is so neither player ob-serves the exact deployment of the other’s dummy units or the composition of his stacks. This process can be considerably streamlined if both players own a copy of 1914 and arrange to come to the match with sides already determined and their own mobilization schemes already selected and put into roster sheet.

1914: Glory’s End Rules Manual6
© 2014 GMT Games, LLC
3.6 NeutralityThe neutrality status of Belgium and Luxembourg in the Free Set Up scenario is determined by the initial German placement. If the German doesn’t set up any units in one (or both) of those countries, they are neutral—meaning their territory may not be violated—for the rest of the game. (The German may choose to violate both, neither, or one and not the other, as he sees fit.)The German player may also violate Holland’s neutrality dur-ing his initial set up in the Free Set Up scenario. If Holland is invaded in this way, it too is considered to join the Allied camp. In such cases, rule 7.11 (the Liege Bottleneck) is no longer in effect. If Holland is violated, the German Game Turn 5 and 14 reinforcements do not appear (they are considered to be off map to the north fighting the Dutch). The German player loses 15VP for invading Holland, but the Allies don’t gain any VP for it.
Important: During mobilization planning, the German may not place any of his initial army mobilization markers in any hexes di-rectly bordering on Holland, Belgium and/or Luxembourg (1017, 1117, 1218, etc., south to 2717). He may place actual combat units in those hexes and within Belgium and Luxembourg. This distinction is important to limit the German penetration of the neutrals to the proper depth for the game’s starting date.Design Note: It’s important to understand that in both sce-narios if a given country’s neutrality is not violated during the German set-up as described in the rules above, then it may never be violated by either side during the rest of that match.
3.7 British Conditional EntryThe Allied player should include initial British units in his set up for both scenarios. If the Germans do not violate Belgian neutral-ity, the British are not placed on the map at the start of the game; place them off to the side of the map. The British enter the game on the Allied player turn after the German player has 20 VP or more. The British enter at any French port hex(es) controlled by the Allies. All British replacements and reinforcements become available per the historical schedule, but may not enter the map before England enters the war.
Design Note: Although the British ostensibly went to war over the Belgian “scrap of paper,” their real interest was maintaining a Continental balance of power. If that balance gets too far out of whack (20 VP worth), they will enter the war. We assume they still mobilize even if not involved, hence the historical reinforcement rate.
3.8 The Meuse RiverSeveral rules in the following sections restrict actions taking place west or east of “the Meuse River.” For those purposes, that river is considered to run from hexside 1520/1620 to hexside 3621/3720, and from there along the “Meuse Line” marked on the map to the Marne River at 3921/3922 then along the Marne to the south map edge.
Design Note: In both scenarios, all at-start units begin the game at their full step strength.
4.0 Winning
4.1 In GeneralThe game is won by amassing Victory Points (VP), which are earned by capturing key hexes in the opponent’s territory and, in one case, by destroying enemy units. Keep track of the cur-rent VP total on the track printed on the mapsheet, adjusting the totals up and down through each game turn. Victory is judged for each player during his side’s “Victory Check Phase” at the end of his player turns.
The Allied player wins the game if, at the start of any of his Victory Check Phases prior to Game Turn 30, he has 20 or more VP. The German player wins
the game if, at the start of any of his side’s Victory Check Phases prior to Game Turn 30, he has 30 or more VP. Note that only Allied victory is checked during Allied player turns, and only German victory is checked during German player turns. The German player begins the game with 0 (zero) VP; the Allied player begins with –7 (negative seven) VP. (These totals will have to be adjusted if any neutrals are violated.)Make only one, mutual victory check at the end of Game Turn 30. If neither player has won the game at that point (by reaching or exceeding his required VP level), that match is considered a draw. If both players have exceeded their VP level at that point, the one who has exceeded it by the largest amount wins. (If both exceed their victory level by the same amount, it’s a draw.)
4.2 VP Hexes VP Hexes are those containing red and/or black VP numbers. Hexes with red VP numbers in them are for the Allied player; those with black numbers in them are for the German. For ex-ample, Le Havre (2244) is a German VP hex worth 10 VP to that player; Volgelsheim (3912) is an Allied VP hex worth 4 VP to that player. Lille (1632) is the only VP hex that yields VP (5) to both players.When a player gains control (see 4.7) of one of his VP hexes, increase his VP total by that amount. Gaining VP does not lower the other side’s total; the two are calculated separately. For ex-ample, if the German seized control of a Paris hex, the German VP total is increased by 10 points; the Allied VP total is not decreased by any amount.It is possible for both sides to gain, lose and regain VP for the same VP hex(es) any number of times during a game. Simply adjust the gaining/losing side’s VP total by the same amount each time the cycle occurs.
Design Note: In instances where the shape of the front doesn’t make it instantly clear which side is in control of some VP hex, simply mark it appropriately with one of the dummy/control marker counters included in the counter mix.
1914: Glory’s End Rules Manual 7
© 2014 GMT Games, LLC
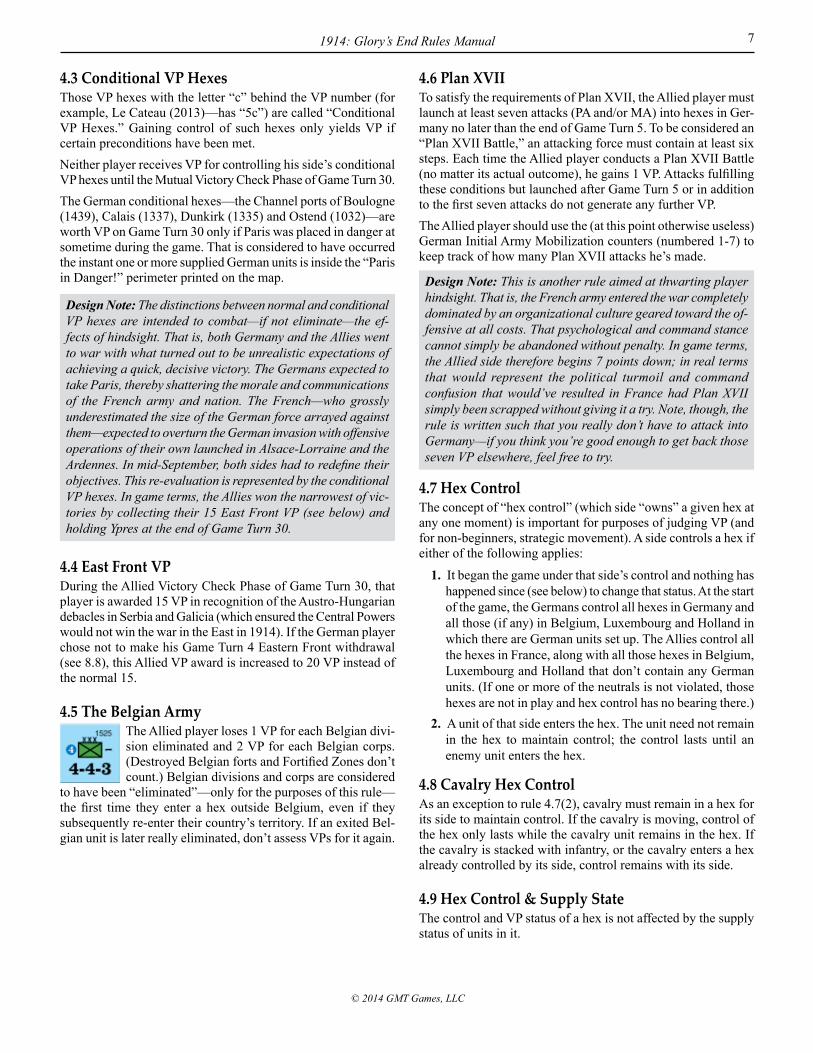
4.3 Conditional VP HexesThose VP hexes with the letter “c” behind the VP number (for example, Le Cateau (2013)—has “5c”) are called “Conditional VP Hexes.” Gaining control of such hexes only yields VP if certain preconditions have been met.Neither player receives VP for controlling his side’s conditional VP hexes until the Mutual Victory Check Phase of Game Turn 30.The German conditional hexes—the Channel ports of Boulogne (1439), Calais (1337), Dunkirk (1335) and Ostend (1032)—are worth VP on Game Turn 30 only if Paris was placed in danger at sometime during the game. That is considered to have occurred the instant one or more supplied German units is inside the “Paris in Danger!” perimeter printed on the map.
Design Note: The distinctions between normal and conditional VP hexes are intended to combat—if not eliminate—the ef-fects of hindsight. That is, both Germany and the Allies went to war with what turned out to be unrealistic expectations of achieving a quick, decisive victory. The Germans expected to take Paris, thereby shattering the morale and communications of the French army and nation. The French—who grossly underestimated the size of the German force arrayed against them—expected to overturn the German invasion with offensive operations of their own launched in Alsace-Lorraine and the Ardennes. In mid-September, both sides had to redefine their objectives. This re-evaluation is represented by the conditional VP hexes. In game terms, the Allies won the narrowest of vic-tories by collecting their 15 East Front VP (see below) and holding Ypres at the end of Game Turn 30.
4.4 East Front VPDuring the Allied Victory Check Phase of Game Turn 30, that player is awarded 15 VP in recognition of the Austro-Hungarian debacles in Serbia and Galicia (which ensured the Central Powers would not win the war in the East in 1914). If the German player chose not to make his Game Turn 4 Eastern Front withdrawal (see 8.8), this Allied VP award is increased to 20 VP instead of the normal 15.
4.5 The Belgian ArmyThe Allied player loses 1 VP for each Belgian divi-sion eliminated and 2 VP for each Belgian corps. (Destroyed Belgian forts and Fortified Zones don’t count.) Belgian divisions and corps are considered
to have been “eliminated”—only for the purposes of this rule—the first time they enter a hex outside Belgium, even if they subsequently re-enter their country’s territory. If an exited Bel-gian unit is later really eliminated, don’t assess VPs for it again.
4.6 Plan XVIITo satisfy the requirements of Plan XVII, the Allied player must launch at least seven attacks (PA and/or MA) into hexes in Ger-many no later than the end of Game Turn 5. To be considered an “Plan XVII Battle,” an attacking force must contain at least six steps. Each time the Allied player conducts a Plan XVII Battle (no matter its actual outcome), he gains 1 VP. Attacks fulfilling these conditions but launched after Game Turn 5 or in addition to the first seven attacks do not generate any further VP.The Allied player should use the (at this point otherwise useless) German Initial Army Mobilization counters (numbered 1-7) to keep track of how many Plan XVII attacks he’s made.
Design Note: This is another rule aimed at thwarting player hindsight. That is, the French army entered the war completely dominated by an organizational culture geared toward the of-fensive at all costs. That psychological and command stance cannot simply be abandoned without penalty. In game terms, the Allied side therefore begins 7 points down; in real terms that would represent the political turmoil and command confusion that would’ve resulted in France had Plan XVII simply been scrapped without giving it a try. Note, though, the rule is written such that you really don’t have to attack into Germany—if you think you’re good enough to get back those seven VP elsewhere, feel free to try.
4.7 Hex ControlThe concept of “hex control” (which side “owns” a given hex at any one moment) is important for purposes of judging VP (and for non-beginners, strategic movement). A side controls a hex if either of the following applies:
1. It began the game under that side’s control and nothing has happened since (see below) to change that status. At the start of the game, the Germans control all hexes in Germany and all those (if any) in Belgium, Luxembourg and Holland in which there are German units set up. The Allies control all the hexes in France, along with all those hexes in Belgium, Luxembourg and Holland that don’t contain any German units. (If one or more of the neutrals is not violated, those hexes are not in play and hex control has no bearing there.)
2. A unit of that side enters the hex. The unit need not remain in the hex to maintain control; the control lasts until an enemy unit enters the hex.
4.8 Cavalry Hex ControlAs an exception to rule 4.7(2), cavalry must remain in a hex for its side to maintain control. If the cavalry is moving, control of the hex only lasts while the cavalry unit remains in the hex. If the cavalry is stacked with infantry, or the cavalry enters a hex already controlled by its side, control remains with its side.
4.9 Hex Control & Supply StateThe control and VP status of a hex is not affected by the supply status of units in it.
1914: Glory’s End Rules Manual8
© 2014 GMT Games, LLC
5.0 The Turn Sequence
5.1 In GeneralEach “Game Turn” of 1914: Glory’s End is divided into two “Player Turns,” each of which is further divided into several steps (or “phases”). During some game turns, certain phases are skipped—these
omissions are noted in the outline below.Every action taken during a game turn must be carried out in the sequence given below. Once a player finishes his activities for a given phase, he may not go back to perform some forgot-ten action or redo a poorly executed one unless his opponent graciously permits it.
5.2 Turn Sequence OutlineThe Turn Sequence is given below in outline. The rest of the rules are organized, as much as possible, to explain things in the order they are encountered throughout the game turns. Note that the Allied Player Turn is the first player turn in every game turn.
I. Allied Player TurnA. Reinforcement & Replacement Phase (Not on Turn 1)B. Entrenching Phase (Turns 10-30 Only)C. Command Control Phase (Not on Turn 1)D. Strategic Movement Phase (Not on Turn 1)E. Operational Movement & March Combat PhaseF. Prepared Combat PhaseG. Attrition Phase (7.12)H. Allied Victory Check Phase (Not on Turn 30*)* On Game Turn 30 make one mutual victory check at the end of
the turn, adding in all conditional VPs at that time.
II. German Player TurnA. Reinforcement, Replacement & Withdrawal Phase (Not
on Turn 1)B. Entrenching Phase (Turns 10-30 Only)C. Command Control Phase (Not On Turn 1)D. Strategic Movement PhaseE. Operational Movement & March Combat PhaseF. Prepared Combat PhaseG. Attrition Phase (7.12)H. German Victory Check Phase (Mutual Check on Turn 30*)
6.0 Stacking
6.1 In General“Stacking” is the term used to describe the piling of more than one unit in the same hex at the same time. Both players generally may stack up to nine steps per hex; however, neither player may have more than two corps-sized units in a hex.Siege guns, fortified zones, entrenchments and all informational markers stack for free. That is, they don’t count toward the stack-ing total in the hex they are in.
6.2 Inter-Allied StackingWith one exception, Allied units of different nationalities may not stack together. The exception is the British Naval Infantry units, which may stack with any Allied units. Allied units of different nationalities are free to enter and pass through each other’s hexes as long as they don’t end their strategic or operational moves stacked together.
6.3 ParisAllied units of all nationalities may move into and through Paris hexes (3036, 3037, 3136); however, only French units may end their movement there.
6.4 Stacking & MovementStacking limits are in effect at all times. Players must pay at-tention to the order in which they move their units, or they risk having moving units blocked by carelessly made earlier moves. As long as the 9-step limit is observed, there is no limit to the number of units that may enter and pass through a given hex during a movement phase. See 12.5 for more on stacking and movement.
6.5 OverstackingIf a hex is found to be overstacked at any time, the opposing player may eliminate the minimum number of steps of his choice necessary to bring the stack back within limits.
7.0 Supply
7.1 In GeneralUnits require supply to operate with their full combat factors. Units are always in one of two supply states: “Supplied” (also called being “in supply”) or “Out of Supply” (“OOS”).
7.2 How Units Are SuppliedUnits are supplied when they are able to trace a “supply line” no longer than five hexes (across hexsides with at least some land in them), free of enemy units, fortresses and fortified zones, to an appropriate supply source. Supply lines of both sides may be traced into and through hexes controlled by the opposing side as long as such hexes are empty of all enemy unit types described above. Supply lines—except as given in 7.8 and 7.9—may not

1914: Glory’s End Rules Manual 9
© 2014 GMT Games, LLC
be traced across all-sea hexsides. Tracing is done in the mind’s eye; there are no counters representing the supplies consumed. When counting the length of a supply line, don’t count the hex the unit itself is in; do count the hex the supply source is in.
7.3 Supply SourcesIn general, German supply is traced to the eastern board edge, Allied supply to the western and southern board edges in France. Units of both sides within five hexes of their side’s friendly board edge may trace their supply line directly to that edge.Map edge hexes cease to be friendly while occupied by enemy units, but regain friendly status the instant such blockages are removed (a process that may occur any number of times each game for each map edge hex).Units of either side also may trace a supply line to any friendly-controlled town or city hex that can trace its own supply line—of any length—to a friendly board edge. Town and city hexes may likewise switch control any number of times during play (excep-tion, see 7.10); however, a player must have been in control of a town or city at the start of the game turn for his units to be able to use it as a supply source during that game turn.Adjacent enemy units have no effect on any supply source; only enemy units in those hexes affect supply.
7.4 Willful OOSIt is permissible for both players to use operational movement (not strategic movement) to move their units to hexes wherein they will be OOS.
7.5 When to Check SupplyThe general rule is to check the supply status of each lone unit or stack whenever you conduct any kind of movement or opera-tion with it.OOS units may not entrench, perform march combat, use stra-tegic movement, or receive replacements. OOS status does not decrease a unit’s operational movement factor, but such units may not conduct march combat. Units starting operational movement in supply are considered in supply for the entire move. Check the supply status of the involved units of both sides as a first step in calculating the odds in every prepared assault. Each unit OOS at the start of its side’s Attrition Phase loses one step.
7.6 Supply & Prepared AssaultsOOS units of both sides involved in a prepared assault have their appropriate combat factor halved. Round all remainders down. For example, an attacking OOS unit with an attack factor of “5” would actually attack with a factor of only “2” because of its supply state.
7.7 Fortress SupplyFortifications—along with any mobile units of their same nation-ality stacked with them—are always in supply for purposes of defense in combat and avoiding Attrition Phase losses (only!). Fortified Zones and trenches do not provide any kind of supply.
7.8 Allied Coastal SupplyAllied units in coastal hexes are always in supply for purposes of defense in combat and avoiding Attrition Phase losses (only!).
7.9 Allied Port SupplyBritish and Belgian units that can trace a supply path of five hexes or less to a friendly controlled port are in supply for all purposes except strategic movement. French units in such a situation are supplied only for purposes of avoiding Attrition Phase losses.Note that Rouen (2442) and Antwerp (1226) are inland ports. For them to be able to provide port supply, the Allied player must also control their river access hexes: 1126, 1127 and 1227 for Antwerp; 2243, 2244, 2342, 2343 and 2443 for Rouen. Those hexes are identified on the map with diagonal stripes.
7.10 Belgian SupplyBelgian units may only trace supply to Brussels (1525). If a line cannot be traced to Brussels, they may only use coastal and/or port supply. Non-Belgian Allied units may not use Brussels as a supply source. Once Brussels has come under German control, it never regains its status as a Belgian supply source if recaptured by the Allies (an exception to rule 7.3).
Design Note: Throughout these rules, when the terms “sup-plied” or “fully supplied” are used—for instance, “for a unit to…it must be supplied”—they refer to the supply described in rule 7.3. Whenever some action or situation is dependent on fortress, coastal or port supply, those specific terms will be used to mean just that.
7.11 Supply BottlenecksAs long as the Belgian fortress of Liege (1621) remains on the map, no German units may trace supply into or through any hex of Belgium west of the Meuse River.Whenever the German controls Abbeville (2038), French and British units north of hexrow 20xx may only use coastal and port supply.
7.12 The Attrition PhaseEach unit OOS at the start of its side’s Attrition Phase loses one step with the following exceptions:
• Fortifications (7.7) and units stacked with them do not suffer Attrition.
• Fortified Zones and Trenches do not suffer Attrition• Allied units in Coastal Hexes (7.8)
7.13 Abbeville In the Historical Campaign Scenario (only), German units may move through but may not end their move in Abbeville unless they currently control Antwerp, Ostend, Dunkirk, Calais, and Boulogne. They may attack and advance after combat into Ab-beville, at which point this restriction is lifted.

1914: Glory’s End Rules Manual10
© 2014 GMT Games, LLC
8.0 Reinforcements, Replacements & Withdrawals
8.1 In GeneralReinforcements are units that enter play for the first time after the game has begun. Any unit with a “Turn of Entry” number in its upper-left corner is a reinforcement. Reinforcement units are placed on the map—as described below—as the first step in their side’s Reinforcements, Replacements & Withdrawals (RR&W) Phase.Replacements enter play as strength steps according to the sched-ules below. There are no actual replacement unit counters in the game; their arrival and possible accumulation is kept track of on the chart printed on the mapsheet. Replacements are used to reclaim eliminated units from the Deadpile and to replenish re-duced units still in play. Replacements are absorbed or re-entered from the Deadpile as the second step in their side’s RR&W phase.Only the German player is called on to withdraw any of his units from play during the course of the game. The German withdrawal is conducted as the last step of that player’s RR&W Phase of Game Turn 5 (see 8.8).
8.2 German ReinforcementsGerman Reinforcements either enter through Cologne (1415) or along the map’s east edge (1015-4111). Cologne reinforcements are marked “1415” after their turn of entry, east edge reinforce-ments are marked “E.”
8.3 British ReinforcementsBritish reinforcements, except for the Indian Corps arriving on Turn 24, may enter through any Allied-controlled port city. The Indian Corps (marked “S” in
its upper-left corner) enters through the map’s south edge. The British Naval Brigade (not the Naval Division) may enter by landing in any coastal hex not occupied by a German unit.In the unlikely event the Germans control all the ports, British reinforcements (except the Indian Corps) may enter play along the map’s west edge.
8.4 French ReinforcementsFrench reinforcements marked “S” in their upper-left corners enter in the same way as the British Indian Corps. The two marked “P” may enter via any Paris hex; the others enter through the specific hexes printed on their counters.
Design Note: There are no Belgian reinforcements.
8.5 Reinforcement Entry SpecificsReinforcement units with a specific entry hex printed on their counter may only enter by being placed in that exact hex. If the entry hex is enemy-controlled or OOS if it’s a non-port city, or stacked full during the mandated turn of entry, entry must be delayed until a subsequent RR&W Phase of that side begins wherein the blocking condition has been removed—the hex of
entry may not be changed. Units entering along a board edge may enter by being placed in any hex along the designated edge not occupied by enemy units at that instant.Reinforcements may be withheld by the player receiving them until later turns.Reinforcement units must begin tracing supply from the instant of entry.Reinforcement units enter at full strength and immediately have available all normal movement and combat capabilities. Plac-ing reinforcement units on the map does not use up any of their movement allowance for that turn.
8.6 ReplacementsReplacements are received and recorded as strength steps; one replacement factor is able to replenish (or recreate from the Deadpile) one strength step of an eligible combat unit. Replacements may be accu-
mulated from turn to turn; neither side has any accumulated at the beginning of the game.Starting Game Turn 4, both the French and Germans receive three replacement steps per game turn. The British receive two steps on Game Turn 7 and another step on Game Turn 29. The Belgians never receive replacements. Allied replacements are nationality-specific and may not be switched, given or loaned among countries.
8.7 Replacement LimitsOnly weakened infantry units (not naval infantry) may receive replacements while still on the board, and only eliminated in-fantry corps (including ad hoc corps) may be reclaimed from the Deadpile. In all cases, no eligible unit may receive more than one step of replacements per game turn; infantry corps from the Deadpile are always returned at their one-step strength (though on later turns they could receive further replenishment).Reclaimed German infantry corps re-enter play along the map’s east edge. Reclaimed British infantry corps re-enter play via any Allied-controlled port. Reclaimed French infantry corps re-enter play along the board’s south edge in France.If Belgium’s neutrality has been violated, German units in France west of the Meuse (see 3.7) may not receive replacements prior to Game Turn 10.
Units receiving replacement on the map must be in full supply. Units receiving replacements (including infantry corps reclaimed from the Deadpile) may not perform any other actions during that player turn
(mark them with an “R&R” counter).
8.8 German East Front WithdrawalDuring Game Turn 5, the German player has the option of with-drawing units to reinforce the eastern front. The withdrawal deci-sion is an all-or-none choice—no partial withdrawal can be made, nor can it be delayed until a later game turn. If the German player decides not to make the withdrawal, the Allied player receives 20 VP at the end of Game Turn 30 instead of the normal 15.
1914: Glory’s End Rules Manual 11
© 2014 GMT Games, LLC
To meet withdrawal requirements, the German must remove any two full-strength infantry corps with an attack factor of at least “5.” The selected corps must be in supply at that moment. They do not move off the map; simply remove them permanently from the map. In addition, he must reduce any one supplied cavalry corps by a step.
9.0 Entrenching
9.1 In GeneralStarting Game Turn 10, each player may attempt to entrench supplied infantry (including naval infantry) units during his Entrenching Phase every game turn. At the start of his Entrench-ing Phase, roll one die. On a roll of 1, 2 or 3 he may entrench one supplied infantry unit of his choice; on a roll of 4, 5 or 6 he may entrench one or two supplied infantry units (his choice). Further, a player may always entrench any (all) of his supplied infantry units that begin the Entrenchment Phase in a hex next to an entrenched enemy unit.
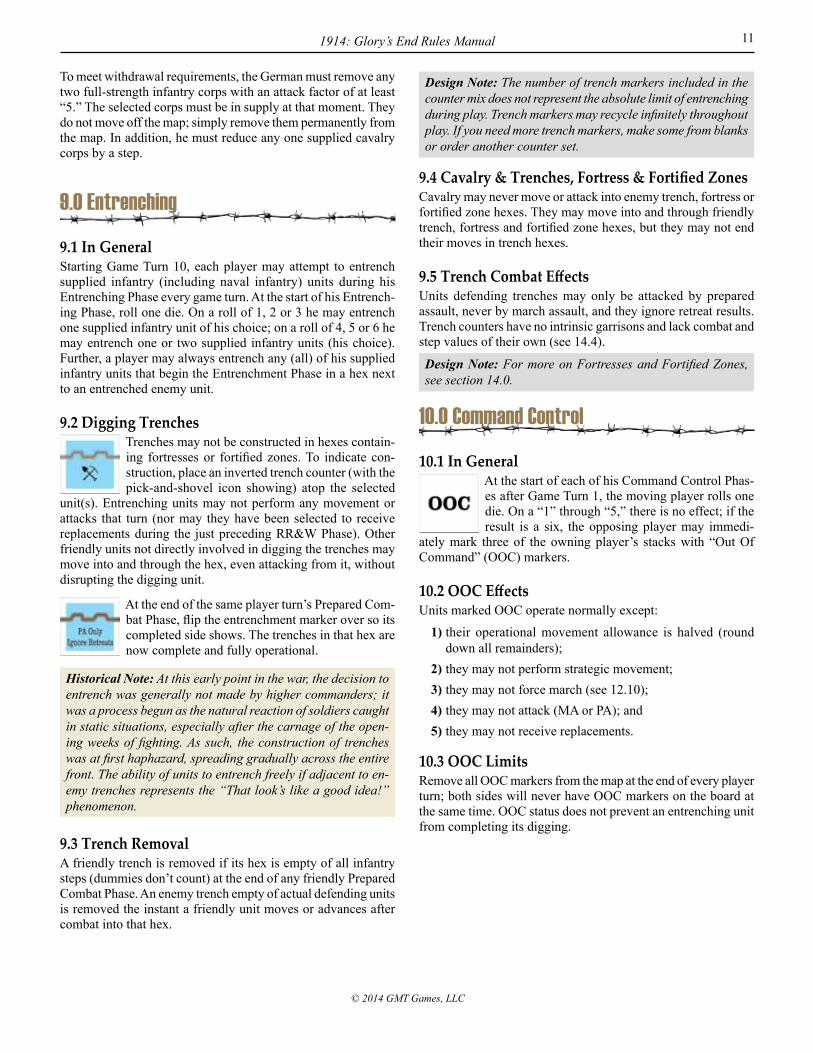
9.2 Digging TrenchesTrenches may not be constructed in hexes contain-ing fortresses or fortified zones. To indicate con-struction, place an inverted trench counter (with the pick-and-shovel icon showing) atop the selected
unit(s). Entrenching units may not perform any movement or attacks that turn (nor may they have been selected to receive replacements during the just preceding RR&W Phase). Other friendly units not directly involved in digging the trenches may move into and through the hex, even attacking from it, without disrupting the digging unit.
At the end of the same player turn’s Prepared Com-bat Phase, flip the entrenchment marker over so its completed side shows. The trenches in that hex are now complete and fully operational.
Historical Note: At this early point in the war, the decision to entrench was generally not made by higher commanders; it was a process begun as the natural reaction of soldiers caught in static situations, especially after the carnage of the open-ing weeks of fighting. As such, the construction of trenches was at first haphazard, spreading gradually across the entire front. The ability of units to entrench freely if adjacent to en-emy trenches represents the “That look’s like a good idea!” phenomenon.
9.3 Trench RemovalA friendly trench is removed if its hex is empty of all infantry steps (dummies don’t count) at the end of any friendly Prepared Combat Phase. An enemy trench empty of actual defending units is removed the instant a friendly unit moves or advances after combat into that hex.
Design Note: The number of trench markers included in the counter mix does not represent the absolute limit of entrenching during play. Trench markers may recycle infinitely throughout play. If you need more trench markers, make some from blanks or order another counter set.
9.4 Cavalry & Trenches, Fortress & Fortified ZonesCavalry may never move or attack into enemy trench, fortress or fortified zone hexes. They may move into and through friendly trench, fortress and fortified zone hexes, but they may not end their moves in trench hexes.
9.5 Trench Combat EffectsUnits defending trenches may only be attacked by prepared assault, never by march assault, and they ignore retreat results. Trench counters have no intrinsic garrisons and lack combat and step values of their own (see 14.4).
Design Note: For more on Fortresses and Fortified Zones, see section 14.0.
10.0 Command Control
10.1 In GeneralAt the start of each of his Command Control Phas-es after Game Turn 1, the moving player rolls one die. On a “1” through “5,” there is no effect; if the result is a six, the opposing player may immedi-
ately mark three of the owning player’s stacks with “Out Of Command” (OOC) markers.
10.2 OOC EffectsUnits marked OOC operate normally except:
1) their operational movement allowance is halved (round down all remainders);
2) they may not perform strategic movement;3) they may not force march (see 12.10);4) they may not attack (MA or PA); and5) they may not receive replacements.
10.3 OOC LimitsRemove all OOC markers from the map at the end of every player turn; both sides will never have OOC markers on the board at the same time. OOC status does not prevent an entrenching unit from completing its digging.

1914: Glory’s End Rules Manual12
© 2014 GMT Games, LLC
10.4 (Optional) Lt. Col. HentschUse this rule only if both players agree. If the German player roles a six for his OOC check and at that time there are one or more of his units inside the “Paris in Danger!” perimeter printed on the map, follow the procedure given above, and add the fol-lowing effect:
All German units within the perimeter must use operational movement that player turn-on as straight as possible a course—to try to end their movement outside the perimeter. The moving units may not launch MAs during the move. No German unit outside the perimeter may move or attack into it during this player turn.
This rule is only invoked once per game—and it must be the first time a rolled OOC six corresponds with German units be-ing inside the perimeter. If the German already controls one or more Paris hexes when that occurs, ignore the rule entirely for that game.
Historical Note: This rule simulates the German command breakdown that led Moltke to vest such extraordinary authority in Lt. Col. Hentsch, who ordered the move away from Paris.
11.0 Strategic Movement
11.1 In GeneralStrategic Movement (SM) is the term used to describe the shift-ing of units across relatively long distances, usually by rail but also by sea. Actual rail lines are not shown on the map (at this scale virtually all hexsides on it would be traversed by one or more lines), but their effects are simulated through the control of towns and cities (which, of course, were also key rail termini and junctions).Both sides may move up to eight steps by rail during each of their player turns (but see 11.3). Infantry and siege guns may use SM; cavalry, fortresses, fortified zones and entrenchments may not. Units using strategic movement may not perform any other operation that player turn.
11.2 SM ProcedureAn SM-eligible unit beginning its SM Phase in a supplied town/city hex that was under friendly control at the start of that game turn and is not adjacent to any enemy units may use SM that phase. The unit may move any distance to another friendly-controlled town/city also not adjacent to an enemy unit subject to the following restrictions.
1. SM may be of any length, but the moving units must still trace a hex path through normally crossable hexsides. SM paths may not be traced into or through hexes adjacent to enemy units.
2. If Belgium’s neutrality has been violated, German units may not use SM in France west of the Meuse prior to Game Turn 10.
3. If Belgium’s neutrality has been violated, French units starting their side’s SM Phase east of the Meuse may not use SM to move west of that river until one or more German units are in France west of the Meuse. (The French were certain the Germans would not use their reserve corps to extend their line west of the Meuse in Belgium and, therefore, had made no plans to shift forces by rail to meet such a threat.)
4. British and French units may never use SM in Belgium and Belgian units may never use SM outside of Belgium.
5. British and French units may not use SM north of hexrow 20xx during turns that Abbeville (2038) is German-controlled.
11.3 Allied SM ReductionDuring turns the Germans control Melun (3334) or manage to isolate it from normal supply, Allied rail movement capacity is reduced by four steps. During turns the Germans control or isolate hex Paris 3136, Allied rail movement capacity is reduced by four steps. (The loss of Melun would sever the direct rail link between western and eastern France; the loss of the south end of Paris would disrupt much of the entire French rail net.)
11.4 Off-Map SMA unit using SM may exit the map through a friendly map edge and re-enter through another hex of a friendly map edge (west and south for the Allies, east for the German).
11.5 Allied Sea MovementStarting on Game Turn 8, the Allies may move up to four steps by sea during their SM Phase. Sea Movement is considered Stra-tegic Movement, but its step limit is figured separately from that of rail movement. No unit can use both rail and sea movement during the same player turn.The eligibility requirements and strictures for sea movement are generally the same as those for rail movement with the further limit that it only takes place from port city to port city. British units may use sea movement into and out of Belgian port cities and the British Naval Brigade (not the division) may use sea movement to go from any coastal hex to any other coastal hex.The two inland ports (Antwerp and Rouen) may not be used for sea movement if any of their access hexes are German-occupied at the time of the move.
Design Note: There are no amphibious invasions—you may not use sea movement to enter a port or coastal hex occupied by German units.
1914: Glory’s End Rules Manual 13
© 2014 GMT Games, LLC
12.0 Operational Movement
12.1 In GeneralEvery unit in the game has a “Movement Factor” printed in its bottom-right corner. That factor is the number of “movement points” (or “MPs”) available to the unit to use to move across the hex grid of the map during its side’s Operational Move-ment Phase.Units move from hex to adjacent hex (no “skipping” of hexes is allowed), paying varied costs to do so, depending on the terrain in the hex being entered. The movement of each player’s units takes place only during his player turn’s Operational Movement Phase—no enemy movement takes place during the friendly player turn (except retreat after combat, see 13.18).
12.2 LimitsMPs may not be accumulated from turn to turn nor may they be loaned from one unit to another. A player may move all, some or none of his units in each of his Operational Movement Phases, providing they have not taken replacements, begun digging trenches or used SM that turn. Units that move are not required to expend all their MPs before stopping. The movement of each individual unit or stack must be completed before that of another is begun. A player may only change the position of an already-moved unit or stack if his opponent allows it.
12.3 Minimum Movement AbilityAny unit with a printed movement factor greater than zero (0) is guaranteed the ability to move at least one hex during its Opera-tional Movement Phase by expending all available MPs at the start of its move, providing it has not taken replacements, begun digging trenches or used SM that turn. This guarantee does not allow units to enter hexes or cross hexsides that are otherwise impassable to them. For example, units may never move across all-sea hexsides (such as from hex 1839 to 1939).
12.4 Enemy UnitsFriendly units may never enter hexes containing enemy units.
12.5 Stack MovementTo move together as a stack, units must begin their side’s Op-erational Movement Phase already stacked together. But units are not required to move together simply because they started the Operational Movement Phase in the same hex; in such situ-ations, those units might be moved together, individually, or in smaller sub-stacks.
12.6 Splitting StacksWhen moving a stack, you may halt it temporarily to allow a unit or sub-stack to split off and move away on a separate course. The units left behind in the original (or “parent”) stack may then resume their own movement, even splitting off other units and sub-stacks. But once you begin moving a different parent stack (or individual unit that began the phase in a different hex), you may no longer resume the movement of the earlier stack without your opponent’s consent.
12.7 Different MPs in a StackIf units with different movement factors are traveling together in a stack, the stack must use the movement factor of the slowest unit. Of course, as the slower units exhaust their MPs, you may leave them behind and continue on with the faster units.
12.8 Terrain & Operational MovementMost hexes on the map can be entered at the cost of 1 MP each; the exceptions are Forests, Marshes and Mountains. Forest hexes costs 2 MP each to enter; Marshes and Mountains cost three. These costs are summarized on the Terrain Effects Chart printed on the map sheet.
12.9 Major RiversMajor Rivers run between hexes, along the hexsides, rather than lying in-hex like the terrain types described above. All units pay an extra (+1) MP to cross a major river hexside: this crossing cost is in addition to the MP cost for the terrain type in the hex the unit is crossing into.
Design Note: There is no additional crossing cost for Minor Rivers.
12.10 German Forced MarchDuring Game Turns 2 through 6, inclusive, German infantry units starting their operational movement in supply and in com-mand control in hexes west of the Meuse may add 1 MP to their operational movement factor. No unit may launch an MA (see 13.23) during a player turn it uses Forced March. The German player may Forced March some eligible units while forgoing it with other, as he chooses.
Historical Note: The specificity of this rule as to time and location reflects the logistical planning of the Schlieffen Plan. The Germans had calculated march rates, allocated roads to specific units and made detailed supply preparations to support the required rapid march of the right wing through Belgium.
1914: Glory’s End Rules Manual14
© 2014 GMT Games, LLC
13.0 Combat
13.1 In GeneralCombat takes place between opposing units during the Prepared Assault (PA) Phase in both Player Turns and during both sides’ Operational Movement Phases; see 13.23. Attacking is always voluntary; the mere fact of opposing units’ adjacency does not necessitate combat. The player taking his turn is considered “the attacker” and the other is “the defender,” regardless of the situation on the map.
13.2 Attack SequencingThere is no limit on the number of attacks each player may set up during his PA Phase. The attacker need not declare all his attacks beforehand and he may resolve them in any order he wishes, as long as the resolution of one is completed before that of the next is begun.
13.3 Combat ProcedureUse the following procedure for each individual combat:
1) Determine which units will participate (13.4-13.7).2) Modify unit strength for supply if necessary (7.6) .3) Calculate the odds (13.9-13.11) .4) Determine which die roll modifiers apply (13.12-13.16) .5) Roll one 6-sided die and apply the final Die Roll Modifer
(DRM) to the result. Cross-index the final result with the appropriate odds column on the Combat Results Table (CRT) printed on the mapsheet to get the combat result (13.17). (For example, a final die roll of “6” at 3:1 odds yields a result of “0/2R.”)
6) Apply the results to the defender (13.18-13.20), then the attacker (13.20).
7) Conduct advance after combat (13.21), if any.
13.4 Multiple DefendersIf there are two or more enemy units in a hex being attacked by your units, you may only attack that stack as if it were one large, combined, defending unit.
13.5 Multi-Hex AttacksAn enemy-occupied hex may be attacked in one Prepared As-sault by as many of your units as you can bring to bear from one, some or all of the surrounding hexes. However, no more than one hex may ever be the object of a single PA. For example, a unit in hex 1820 may not attack enemy units in hexes 1919 and 1920 during the same PA Phase.
13.6 Indivisibility of UnitsNo attacking unit may have its attack factor divided and used in more than one battle. No defending unit may have part of its defense factor attacked by one attacker while another part of that defense factor is attacked by other enemy units. No attacking unit
may attack more than once per combat phase and no defending unit may be attacked more than once per combat phase.
13.7 Stacks AttackingIt is not necessary for all the units stacked in a hex to participate in the same attack. Some of those units might attack into one defender hex, while others attack into some other(s), or simply don’t attack at all. No defending unit may refuse combat.
13.8 Fog of WarNeither player may look beneath the top unit of enemy stacks until the time comes in the combat resolution process for odds computation. Once such an examination has been made, the at-tacking player may no longer call off that attack.
13.9 Calculating the OddsThe attacking player should strive to have more attack factors involved in a given battle than the defender has defense factors. Such battles are called “high odds attacks.” To calculate the “odds,” add up the attack factors of all the attacking units in-volved in the battle, then add up the defense factors of the enemy units defending in the battle. Divide that defender total into the attacker total and round off (down) any remainder.
High Odds Example: 26 attack factors vs. 7 defense factors yields an odds ratio of 3:1. That is: 26 divided by 7 = 3.71, which rounds down to 3. To turn that “3” into a ratio, you must set a “1” next to it on the right. Thus, “3” becomes “3:1” (which is read “3 to 1”), which corresponds to a column heading on the CRT printed on the mapsheet.
Play Note: Don’t forget supply effects (OOS=halved) when figuring your odds. See 7.6.
13.10 Poor Odds AttacksBattles in which the attacking force has fewer combat factors than the defender are called “poor odds attacks.” Procedures are modified in that now you divide the defender’s total by the attacker’s, round remainders up, and set the “1” on the left side.
Poor Odds Example: A force with 9 attack factors is attacking a force with 11 defense factors. Divide 11 by 9 = 1.22 and round up (1.22 becomes 2), then set the “1” on the left of that “2,” yielding odds of 1:2.
13.11 Odds LimitsThe odds columns on the CRT range from 1:2 to 5:1. Odds worse than 1:2 always yield a combat result of “2/0.” Odds higher than 5:1 are resolved at 5:1 (but see 13.13).
13.12 Die Roll Modifiers (DRMs)After the odds for an attack has been calculated, total the DRMs for that fight. All terrain DRMs are generated by the terrain in the defender’s hex and around its hexsides; the terrain in the attacker’s hex(es) have no effects.
1914: Glory’s End Rules Manual 15
© 2014 GMT Games, LLC
Positive DRMs favor the attacker and negative DRMs favor the defender. All DRMs that apply in a given battle are cumulative in their effects. After determining all the modifiers that apply, combine them to come up with one total—either zero, or a positive or negative number. For example, in a battle where the defender has –3 DRMs and the attacker has +2, the final effect would be to modify the combat die roll by –1. [That’s (–3) + (+2) = –1.] The final modifier of –1 is applied to the die roll for that combat. Note that no die roll may ever be modified to a number less than one or greater than six.
13.13 Super High Odds AttacksFor attacks above 5:1 odds, treat every odds multiple above 5:1 as a +1 DRM. For example, an attack at 7:1 odds would be resolved on the CRT (where no other modifiers applied) as a 5:1 with a DRM of +2.
13.14 Terrain DRMsCities, Marshes and both types of River each generate a –1 DRM; Mountains generate a –2 DRM. Note that terrain DRMs are cumulative so, for example, if a defender were located in a Marsh hex that also contained a city, the total terrain DRM there would be –2.
13.15 River DRMsFor the defender to receive the benefit of defending behind a river, all attacking units must be attacking across such hexsides. If one or more attackers is coming through a non-river hexside, no river DRM is received.
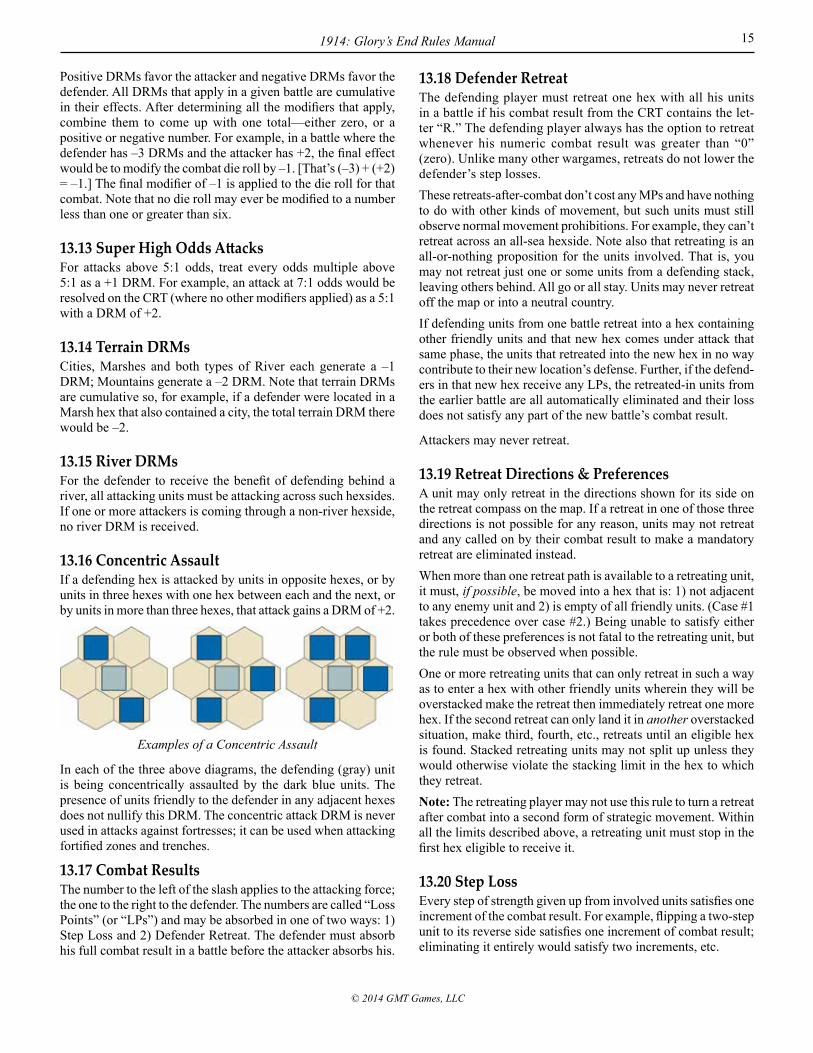
13.16 Concentric AssaultIf a defending hex is attacked by units in opposite hexes, or by units in three hexes with one hex between each and the next, or by units in more than three hexes, that attack gains a DRM of +2.
Examples of a Concentric Assault
In each of the three above diagrams, the defending (gray) unit is being concentrically assaulted by the dark blue units. The presence of units friendly to the defender in any adjacent hexes does not nullify this DRM. The concentric attack DRM is never used in attacks against fortresses; it can be used when attacking fortified zones and trenches.
13.17 Combat ResultsThe number to the left of the slash applies to the attacking force; the one to the right to the defender. The numbers are called “Loss Points” (or “LPs”) and may be absorbed in one of two ways: 1) Step Loss and 2) Defender Retreat. The defender must absorb his full combat result in a battle before the attacker absorbs his.
13.18 Defender RetreatThe defending player must retreat one hex with all his units in a battle if his combat result from the CRT contains the let-ter “R.” The defending player always has the option to retreat whenever his numeric combat result was greater than “0” (zero). Unlike many other wargames, retreats do not lower the defender’s step losses.These retreats-after-combat don’t cost any MPs and have nothing to do with other kinds of movement, but such units must still observe normal movement prohibitions. For example, they can’t retreat across an all-sea hexside. Note also that retreating is an all-or-nothing proposition for the units involved. That is, you may not retreat just one or some units from a defending stack, leaving others behind. All go or all stay. Units may never retreat off the map or into a neutral country.If defending units from one battle retreat into a hex containing other friendly units and that new hex comes under attack that same phase, the units that retreated into the new hex in no way contribute to their new location’s defense. Further, if the defend-ers in that new hex receive any LPs, the retreated-in units from the earlier battle are all automatically eliminated and their loss does not satisfy any part of the new battle’s combat result.
Attackers may never retreat.
13.19 Retreat Directions & PreferencesA unit may only retreat in the directions shown for its side on the retreat compass on the map. If a retreat in one of those three directions is not possible for any reason, units may not retreat and any called on by their combat result to make a mandatory retreat are eliminated instead.When more than one retreat path is available to a retreating unit, it must, if possible, be moved into a hex that is: 1) not adjacent to any enemy unit and 2) is empty of all friendly units. (Case #1 takes precedence over case #2.) Being unable to satisfy either or both of these preferences is not fatal to the retreating unit, but the rule must be observed when possible.One or more retreating units that can only retreat in such a way as to enter a hex with other friendly units wherein they will be overstacked make the retreat then immediately retreat one more hex. If the second retreat can only land it in another overstacked situation, make third, fourth, etc., retreats until an eligible hex is found. Stacked retreating units may not split up unless they would otherwise violate the stacking limit in the hex to which they retreat.Note: The retreating player may not use this rule to turn a retreat after combat into a second form of strategic movement. Within all the limits described above, a retreating unit must stop in the first hex eligible to receive it.
13.20 Step LossEvery step of strength given up from involved units satisfies one increment of the combat result. For example, flipping a two-step unit to its reverse side satisfies one increment of combat result; eliminating it entirely would satisfy two increments, etc.
1914: Glory’s End Rules Manual16
© 2014 GMT Games, LLC
Step losses may be apportioned by each player among his in-volved units as he sees fit. That is, the attacking player decides how to apportion losses to his involved attacking units and the defending player decides how to do so for the involved defend-ers. Each may reduce and/or eliminate units in any way, as long as the step-loss amount called for by the CRT result is satisfied.
13.21 Advance After CombatWhenever the defender’s hex in a battle is left vacant of defend-ers after that side’s combat result has been satisfied, surviving attacking units may immediately move into that hex. Normal stacking limits apply but, just like retreats after combat, these advances don’t require the expenditure of MPs. This is a free option given to victorious attackers; victorious defenders never advance, they simply hold their positions.Advances are not mandatory, but the decision to do so must be made immediately after the battle is resolved, and before the next is begun. Further, it is not necessary for an advancing attacker to try to fully stack the newly-won hex; he may send just one or a few units, rather than a full stack.
13.22 Prepared Assault LimitsTo be able to attack during a given PA Phase, a unit may not have moved (SM or OM) or performed any other action during that same player turn. OOC units may not attack. The best way to keep track of this is to set up all your units with a common fac-ing; then whenever a unit moves or performs any disqualifying action (moves in any way, receives replacements in the field or is returned from the Deadpile, entrenches or attacks) rotate it 180 degrees. At the end of each turn, make sure all your units are again facing one way before passing the turn over to your opponent.
13.23 March AssaultsMarch Assaults (MA) take place during your Operational Move-ment Phase. Simply move one attacking unit or stack adjacent to a defending hex and halt it. Check to see if that moving unit or stack would have sufficient MPs remaining to enter the hex to be attacked if it were empty of enemy units. If the attacking force has sufficient MPs, then the MA may proceed; if not, no MA takes place by that force.An MA is resolved immediately, before any other movement or combat takes place during that Operational Movement Phase. All PA combat procedures described above apply. No concentric DRM will ever be available, of course, and fortresses, fortified zones and trenches may not advance after combat. Surviving MA attackers may not move farther (beyond an advance after combat) nor may they PA that same player turn.
Play Note: There are no “multi-round MAs.” A failed MA force simply stays put in its hex for the rest of the player turn.
13.24 CavalryThe arrangement of combat factors on cavalry units is different than those on other units. The first num-ber (in parentheses) is used on both the attack and defense when engaging only enemy cavalry units.
The second number is used on both the attack and defense when engaging an enemy force containing one or more non-cavalry steps. Cavalry may never be used to attack (MA or PA) for-tresses, fortified zones or entrenchments.
13.25 Cavalry Retreat Before CombatA cavalry unit(s) defending alone in a hex and attacked by a force containing no cavalry may retreat before combat. The owning player simply announces his decision and retreats one hex (as in 13.19) before the resolution die is rolled. The attacker may advance into the vacated hex (as in 13.21) and—in the case of PAs only—announce a new attack with those units, possibly against the same cavalry unit again, thus setting off a chain of such moves.
13.26 Inter-Allied AttacksWith one exception, it is forbidden for Allied units of different nationalities to participate together in the same PA. The exception is the two British naval infantry units, which may cooperate in PAs and MAs with Allied units of any nationality.
14.0 Prepared Positions & Siege Guns
14.1 In GeneralThere are three kinds of prepared positions in the game: fortresses (“forts”), fortified zones (“FZs”) and trenches. The first two types begin the game on the map; trenches are built during play (and are discussed in section 9.0). Forts and FZs may be destroyed during play, but never built or rebuilt. Units defending in any kind of prepared position may only be attacked by PAs and may always ignore CRT-mandated retreat results.
14.2 FortressesThe fortress counters represent both those defensive works and the garrison troops that occupy them. Units defending in fortresses are never subject to the Concentric Assault DRM and are always in sup-
ply for defense and attrition purposes (but not for attacking). Fortresses do count toward stacking limits.Mobile units in fortress hexes may ignore any CRT-mandated retreat results. The fortress counter must be the last surviving defender step given up to satisfy step losses.The attacker combat result (the result from the CRT, not the die roll number used to find that result) is always increased by 2 loss points in any PA against a fortress.Once a fortress unit is destroyed, it may never be brought back into play and its hex is no longer considered a fortress, even if retaken by the original owner.

1914: Glory’s End Rules Manual 17
© 2014 GMT Games, LLC
Historical Note: The Liege Fortress is relatively weak to ac-count for Ludendorff’s infiltration into the city. The Maubeuge fortress is relatively strong to simulate poor German recon-naissance; they thought it was a stronger position than it actually was. Using an inflated defense factor proved to be the only way to cause German players in the game to treat the place with the same respect as their historic counterparts in the actual campaign.
14.3 Fortified Zones (FZs)FZs unoccupied by friendly mobile units block enemy strategic movement and halt enemy opera-tional movement. Enemy cavalry and siege guns moving alone (or together without infantry) may not
enter intact FZs. Enemy infantry units may use operational move-ment to enter intact FZs. Enemy infantry units may use opera-tional movement to enter intact FZs that are empty of mobile defending units, but the moving infantry must halt its move in that hex (remove the FZ marker).FZs do not provide mobile units in them with fortress supply, but are not subject to attrition themselves.FZs are always automatically destroyed when attacked by siege guns. Mobile units defending in FZs may ignore CRT-mandated retreat results. Mobile units defending in FZs always receive a –1 (minus one) DRM. Unlike fortresses, FZ counters have no intrinsic combat or step values and are destroyed when moved upon (if undefended) or when the last step of mobile unit strength within them is eliminated.
14.4 TrenchesTrenches have no combat or step values and are destroyed when moved upon by an enemy unit or when not stacked with a friendly infantry unit at the end
of a friendly PA phase (see 9.3). Siege guns have no effect on trenches. Trenches do not provide any mobile defending units in them with fortress supply, but neither do they themselves wither away during attrition phases when OOS. Units in Trench-es may not be attacked by a March Assault and may ignore Retreats.
14.5 Retreating From Prepared PositionsWhenever a defender makes a voluntary retreat from any kind of prepared position, that fortress, FZ or trench is automatically eliminated in place. In the case of fortresses, its intrinsic step strength of one does count toward satisfying the combat result’s LP requirement.
14.6 Mandatory UseAny and all mobile units defending in a hex containing a prepared position of any kind must use that position as part of their defense. There is no “meeting the enemy outside the defensive works.”
14.7 Siege GunsThe German player has two 305mm and one 420mm siege gun artillery units. Supplied guns can be used to attack enemy fortresses and FZs during the
Prepared Assault Phase of every German Player Turn.Siege guns have no step or combat values of their own and must be in a hex with one or more attacking (PA only!) infantry units in order to fire. Siege guns may never be given up to satisfy combat losses, nor may they advance after combat, and on the defense they may never retreat after combat. On the defense, they are eliminated when the last mobile step in their hex is gone. (If the mobile units retreat, the guns are automatically eliminated. Their elimination does not satisfy any LP requirements.)Siege guns alone in a hex block enemy SM, but if caught alone in a hex by an operationally moving enemy unit the guns are automatically eliminated without even stopping the enemy movement.
14.8 Siege Guns vs. FZsFZ counters attacked by siege guns are automatically eliminated (but not any mobile defenders that happen be in their hex). The procedure is the guns fire, the FZ counter is removed, and then the PA is conducted normally.
14.9 Siege Guns vs. FortressesSiege gun attacks against fortresses require a die roll and a check of the Siege Gun Table printed on the mapsheet. The result is either no effect (–) or elimination of the fortress (E).If a fortress is eliminated by the guns, remove the fortress counter. If the hex is otherwise empty of defending units, the German infantry designated to PA into the hex may advance after combat (but may not PA from that hex during that phase). If there were other units defending the hex, run the PA, but ignore the effects the now-destroyed fortress would have generated. If the guns do not eliminate the fortress, the designated PA force must launch its attack (adding in the garrison’s defense factor and increasing the attacker’s LP result by two, etc.).
14.10 Siege Gun ModifiersThe fortresses of Verdun (2822), Toul (3320), Epinal (3716) and Belfort (4115) were among the most modern defensive works in the world at the time. Siege gun attack die rolls against those fortresses
are modified by the amount shown after the plus-sign (+) next to those units’ defense factors. For example, the modifier for the Verdun fortress is +3.

1914: Glory’s End Rules Manual18
© 2014 GMT Games, LLC
15.0 (Optional) Dummy Counters
15.1 Use of Dummy CountersIf both players agree, you may use this rule to add another layer of Fog of War to the game. The
number of Dummy Counters provided is a design limit. Dummy units are placed in the opening set up of either Campaign Sce-nario within the strictures given in the set up rules as if they were “0” units. Entire stacks may be made up of dummies, while others may be made up of both dummies and real units, as each player desires. Dummies may be placed on top of or within stacks. Each dummy is permanently removed from play the instant it is attacked by any real enemy unit. All dummy units have a move-ment factor of 4.
15.2 Dummy Counters on DefenseIf a defending stack containing only dummy units is made the subject of an MA, all the dummies are instantly removed and the enemy stack that launched the MA may resume its movement (even MAing again) if it has sufficient MPs left to it. In the same situation in the case of a PA, again immediately eliminate the dummy stack, allow the attacker to advance after combat and then (if the owning player desires) PA with the same force again. No second PA is allowed, though, if any of the attacking units fails to make the advance after combat.
16.0 Battle of the Marne Scenario
IntroductionThis is a short scenario (five game turns) covering the fighting along the Marne and the German withdrawal to the Aisne River. All 1914 rules are in effect unless otherwise noted.
16.1 Playing AreaUse the Marne Scenario mini-map provided. Units forced to retreat off this map are out of play but not eliminated for Vic-tory Point purposes. Exception: German units forced to retreat off the east or west map edges are considered eliminated. The German player may trace his ultimate supply source to any north map edge hex and the Allied player to any south map edge hex.
16.2 Set UpThe number in parenthesis is the starting step strength of that unit. Place the three Paris forts on the map; no other fort or FZ units are used.
BEF: 1 XXX(4) 3334; 2 XXX(3) 3235; 4 XX(2) 3235; 19 X(1) 3235; 1 Cav XX(2) 3333. French Army: 1 Cav XXX(1) 3237; 9 XXX(3) 3230; 18 XXX(3) 3631; 4 XXX(2) 3036; 42 XX(2) 3130; 7 Cav XX(1) 3224; 12 XXX(3) 3326; 17 XXX(3) 3327. Col XXX(2) 3325; 9 Cav XX(1) 3433; 1 XXX(3) 3231; 2 XXX(3) 3324; 3 XXX(2) 3331; 10 XXX(3) 3231; 11 XXX(3) 3229; 4R Grp (3) 3332; 5RGrp (3) 2936; 45 XX(2) 3037; M XX(2) 2936; 61R XX(2) 3036; 62R XX(2) 3036; 4T XXX(2) 3136; 2 Cav XXX(2) 3433. German Army: 1 Cav XXX(1) 3232; 2 Cav XXX(2) 3233; 3 Cav XXX(2) 3124; 2 XXX(3) 3133; 3 XXX(2) 3232; 4 XXX(2) 3233; 4R XXX(3) 2934; 9 XXX(3) 3131; Gd XXX(2) 3129; 7 XXX(3) 3131; 10 XXX(2) 3030; 1OR XXX(3) 3031; 12 XXX(3) 3029; 12R XXX(3) 2928; 19 XXX(3) 3027; 8 XXX(3) 3226; 8R XXX(3) 3225; 18 XXX(3) 3124.

1914: Glory’s End Rules Manual 19
© 2014 GMT Games, LLC
Place the Game Turn Marker in the Turn 8 box (4-6 September). The scenario ends at the conclusion of Game Turn 12 (16-18 September). Place the French Replacement Marker on the “3” space of the Re-placement Track. Those are the French replacements for Turn 8. Place the German Replacement Marker, and both Allied and German Victory Markers, in the “0” space on the track. There are no British replacements in this scenario. Place German Control Markers on: 2435, 2331, 2932, 2529, 2829 and 2627.
16.3 Scenario Special RulesThe scenario begins with the Allied Player Turn of Game Turn 8. Command control has been rolled and hexes 3235, 3334 and 3333 (the BEF) are OOC. Players may use Optional Rule 10.4 if both agree.The French 7 XXX(4) enters by strategic movement during Turn 8. The German 15 XXX(4) and 7R XXX(4) enter by strategic movement during Turn 10. The German player receives three replacement steps per turn starting on Game Turn 9, as do the French (in addition to the three French at the start of the scenario).Eliminated units of both sides (including infantry corps) may not be rebuilt. The German player is subject to the restrictions of rules 10.4 and 11.2.
16.4 Winning. Both players score victory points as listed below. The player with the higher total at the end of Game Turn 12 is the winner (draws are possible). In addition, the German player (only!) can win an automatic victory at the end of any of his player turns by taking any hex of Paris or hex 3334 (Melun).
Allied VP: 2 VP for each German corps (of whatever type) elimi-nated. 2 VP each for holding Laon or Rethel at the end of Game Turn 12. 1 VP each for holding Reims, Chalons, Vitry, Epernay or Chateau Thierry at the end of Game Turn 12.German VP: 1 VP for each British STEP eliminated. 2 VP for each French corps eliminated (of whatever type). 1 VP for each French division eliminated. 1 VP for each supplied unit south of hexrow 31xx at the end of Game Turn 12.
17.0 Short Historical Campaign Scenario
IntroductionThis scenario covers the first ten turns of the campaign. All normal Historical Campaign game rules are in effect unless otherwise noted.
17.1 Set UpUse the Historical Campaign Set Up.
17.2 Scenario Special RulesGerman units may not end their movement in Boulogne, Calais, or Dunkirk unless (a) Paris has been placed in Danger and (b) Antwerp and Ostend are under German control. They may attack into those hexes, and advance after combat, at which point the restriction for that hex (only) is lifted.
17.3 WinningBoth players score victory points as listed in the Campaign rules. The German player wins an immediate victory if he gains control of any hex of Paris (play stops immediately). The Allied player wins an instant victory if he captures any two cities in Germany (play stops immediately). Otherwise, the German player wins if he has placed Paris in Danger and has at least 25 more victory points than the Allies at the end of Turn 10. For this scenario, the German player scores 5 VP for each supplied infantry corps adjacent to a Paris hex at the end of Turn 10. If the German player does not win, the Allied player wins.
Designer: Ted S. RaicerDevelopers: Ty Bomba and Chris PerelloArt Director: Rodger B. MacGowanPackage Art & Design: Rodger B. MacGowanMap: Charles KiblerCounters: Mark SimonitchPlaytesters: Jim Eliason, Jack Green, Rian van Meeteren
Proofreader: Kai JensenProduction Coordination: Tony CurtisProducers: Tony Curtis, Rodger MacGowan, Andy Lewis, Gene Billingsley and Mark Simonitch
Design Dedication: To my father, Theodore Racier, whose birth in 1914 started it all.
C REDITS
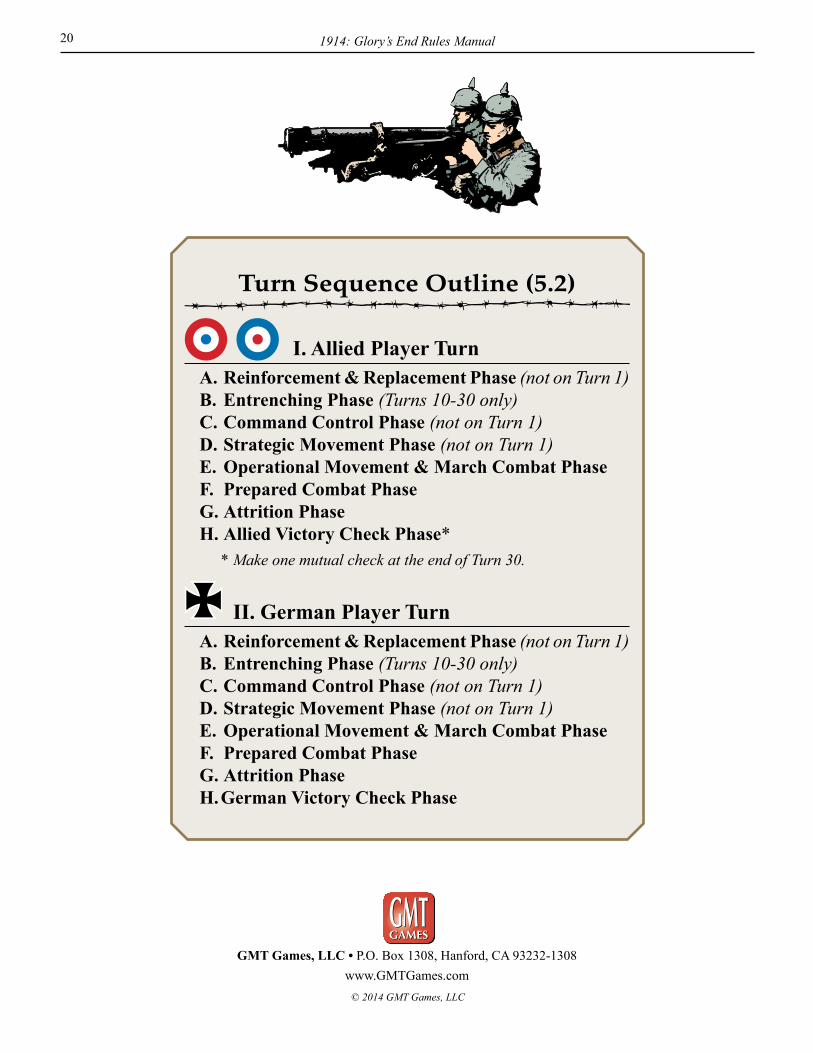
1914: Glory’s End Rules Manual20
© 2014 GMT Games, LLC
GMT Games, LLC • P.O. Box 1308, Hanford, CA 93232-1308www.GMTGames.com
Turn Sequence Outline (5.2)
I. Allied Player TurnA. Reinforcement & Replacement Phase (not on Turn 1)B. Entrenching Phase (Turns 10-30 only)C. Command Control Phase (not on Turn 1)D. Strategic Movement Phase (not on Turn 1)E. Operational Movement & March Combat PhaseF. Prepared Combat PhaseG. Attrition PhaseH. Allied Victory Check Phase* * Make one mutual check at the end of Turn 30.
II. German Player TurnA. Reinforcement & Replacement Phase (not on Turn 1)B. Entrenching Phase (Turns 10-30 only)C. Command Control Phase (not on Turn 1)D. Strategic Movement Phase (not on Turn 1)E. Operational Movement & March Combat PhaseF. Prepared Combat PhaseG. Attrition PhaseH. German Victory Check Phase