rstudioserver administrator’sguide - amazon s3 administrator’sguide ... for these systems you...
TRANSCRIPT

TM
RStudio ServerAdministrator’s Guide
RStudio Server Professional v0.98.501
Copyright c© 2013 RStudio, Inc.

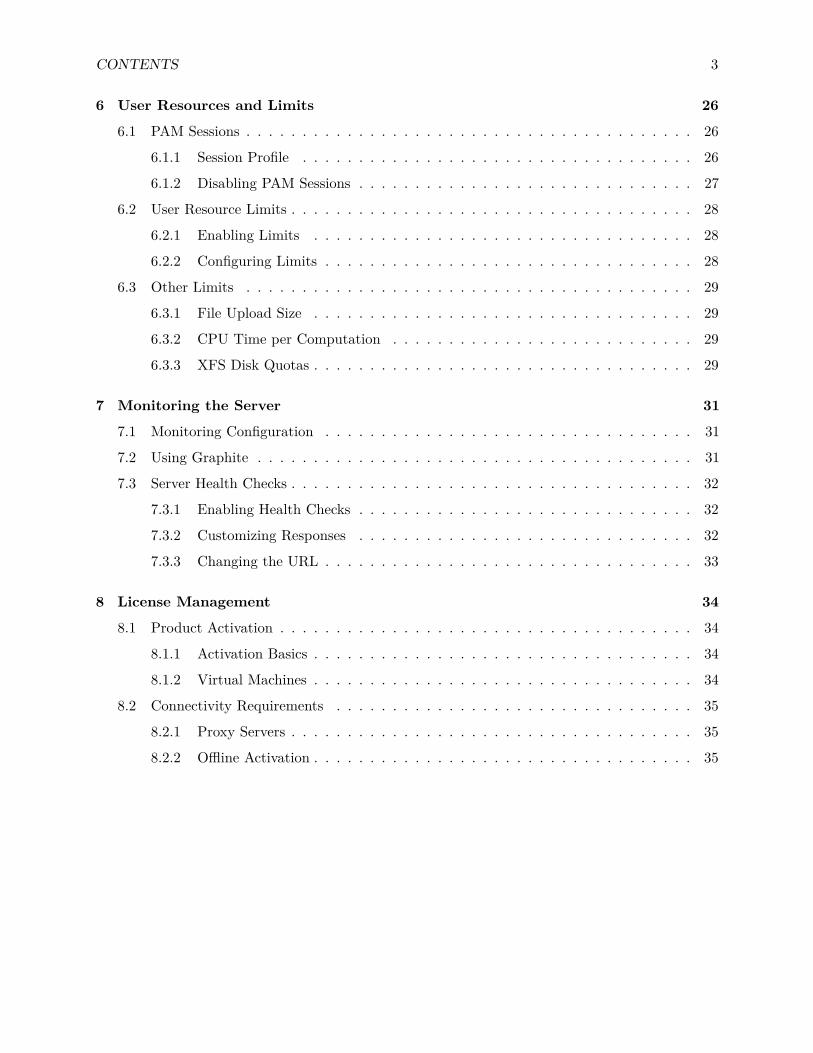
Contents
1 Getting Started 4
1.1 Introduction . . . . . . . . . . . . . . . . . . . . . . . . . . . . . . . . . . . . . . . . . 4
1.2 Installation . . . . . . . . . . . . . . . . . . . . . . . . . . . . . . . . . . . . . . . . . 4
1.2.1 Debian (6+) / Ubuntu (10.04+) . . . . . . . . . . . . . . . . . . . . . . . . . 4
1.2.2 RedHat/CentOS (5.4+) . . . . . . . . . . . . . . . . . . . . . . . . . . . . . . 5
1.3 Management Script . . . . . . . . . . . . . . . . . . . . . . . . . . . . . . . . . . . . . 6
1.4 Activation . . . . . . . . . . . . . . . . . . . . . . . . . . . . . . . . . . . . . . . . . . 6
1.5 Accessing the Server . . . . . . . . . . . . . . . . . . . . . . . . . . . . . . . . . . . . 6
1.5.1 Logging In . . . . . . . . . . . . . . . . . . . . . . . . . . . . . . . . . . . . . 6
1.5.2 Troubleshooting Problems . . . . . . . . . . . . . . . . . . . . . . . . . . . . . 7
2 Server Management 8
2.1 Core Administrative Tasks . . . . . . . . . . . . . . . . . . . . . . . . . . . . . . . . . 8
2.1.1 Configuration Files . . . . . . . . . . . . . . . . . . . . . . . . . . . . . . . . . 8
2.1.2 Stopping and Starting . . . . . . . . . . . . . . . . . . . . . . . . . . . . . . . 8
2.1.3 Managing Active Sessions . . . . . . . . . . . . . . . . . . . . . . . . . . . . . 9
2.1.4 Taking the Server Offline . . . . . . . . . . . . . . . . . . . . . . . . . . . . . 9
2.1.5 Upgrading to a New Version . . . . . . . . . . . . . . . . . . . . . . . . . . . 10
2.2 Administrative Dashboard . . . . . . . . . . . . . . . . . . . . . . . . . . . . . . . . . 10
2.2.1 Enabling the Dashboard . . . . . . . . . . . . . . . . . . . . . . . . . . . . . . 10
2.2.2 Administrator Superusers . . . . . . . . . . . . . . . . . . . . . . . . . . . . . 11
3 Authenticating Users 12
3.1 PAM Authentication . . . . . . . . . . . . . . . . . . . . . . . . . . . . . . . . . . . . 12
3.1.1 PAM Basics . . . . . . . . . . . . . . . . . . . . . . . . . . . . . . . . . . . . . 12
3.1.2 Default PAM Configuration . . . . . . . . . . . . . . . . . . . . . . . . . . . . 12
1

CONTENTS 2
3.1.3 Diagnosing PAM Authentication Problems . . . . . . . . . . . . . . . . . . . 13
3.2 Google Accounts . . . . . . . . . . . . . . . . . . . . . . . . . . . . . . . . . . . . . . 14
3.2.1 Enabling Google Accounts . . . . . . . . . . . . . . . . . . . . . . . . . . . . . 14
3.2.2 Translating to Local Accounts . . . . . . . . . . . . . . . . . . . . . . . . . . 14
3.2.3 Requiring Sign In . . . . . . . . . . . . . . . . . . . . . . . . . . . . . . . . . . 15
3.3 Proxied Authentication . . . . . . . . . . . . . . . . . . . . . . . . . . . . . . . . . . 15
3.3.1 Enabling Proxied Authentication . . . . . . . . . . . . . . . . . . . . . . . . . 15
3.3.2 Implementing the Proxy . . . . . . . . . . . . . . . . . . . . . . . . . . . . . . 16
3.4 Restricting Access by Group . . . . . . . . . . . . . . . . . . . . . . . . . . . . . . . . 16
3.4.1 Creating and Managing Group Membership . . . . . . . . . . . . . . . . . . . 16
4 Access and Security 18
4.1 Network Port and Address . . . . . . . . . . . . . . . . . . . . . . . . . . . . . . . . . 18
4.2 IP Access Rules . . . . . . . . . . . . . . . . . . . . . . . . . . . . . . . . . . . . . . . 18
4.3 Secure Sockets (SSL) . . . . . . . . . . . . . . . . . . . . . . . . . . . . . . . . . . . . 19
4.3.1 SSL Configuration . . . . . . . . . . . . . . . . . . . . . . . . . . . . . . . . . 19
4.3.2 SSL Ports . . . . . . . . . . . . . . . . . . . . . . . . . . . . . . . . . . . . . . 19
4.4 Server Permissions . . . . . . . . . . . . . . . . . . . . . . . . . . . . . . . . . . . . . 20
4.4.1 Server Account . . . . . . . . . . . . . . . . . . . . . . . . . . . . . . . . . . . 20
4.4.2 AppArmor . . . . . . . . . . . . . . . . . . . . . . . . . . . . . . . . . . . . . 20
5 R Sessions 21
5.1 R Executable and Libraries . . . . . . . . . . . . . . . . . . . . . . . . . . . . . . . . 21
5.1.1 Locating R . . . . . . . . . . . . . . . . . . . . . . . . . . . . . . . . . . . . . 21
5.1.2 Locating Shared Libraries . . . . . . . . . . . . . . . . . . . . . . . . . . . . . 21
5.1.3 Customzing Session Launches . . . . . . . . . . . . . . . . . . . . . . . . . . . 22
5.2 Suspend and Resume . . . . . . . . . . . . . . . . . . . . . . . . . . . . . . . . . . . . 23
5.2.1 Session Timeout . . . . . . . . . . . . . . . . . . . . . . . . . . . . . . . . . . 23
5.2.2 Forcing Suspends . . . . . . . . . . . . . . . . . . . . . . . . . . . . . . . . . . 24
5.2.3 Resume and .Rprofile . . . . . . . . . . . . . . . . . . . . . . . . . . . . . . . 24
5.3 Package Installation . . . . . . . . . . . . . . . . . . . . . . . . . . . . . . . . . . . . 24
5.3.1 User Library . . . . . . . . . . . . . . . . . . . . . . . . . . . . . . . . . . . . 24
5.3.2 Discouraging User Installations . . . . . . . . . . . . . . . . . . . . . . . . . . 25
5.3.3 CRAN Repositories . . . . . . . . . . . . . . . . . . . . . . . . . . . . . . . . 25
CONTENTS 3
6 User Resources and Limits 26
6.1 PAM Sessions . . . . . . . . . . . . . . . . . . . . . . . . . . . . . . . . . . . . . . . . 26
6.1.1 Session Profile . . . . . . . . . . . . . . . . . . . . . . . . . . . . . . . . . . . 26
6.1.2 Disabling PAM Sessions . . . . . . . . . . . . . . . . . . . . . . . . . . . . . . 27
6.2 User Resource Limits . . . . . . . . . . . . . . . . . . . . . . . . . . . . . . . . . . . . 28
6.2.1 Enabling Limits . . . . . . . . . . . . . . . . . . . . . . . . . . . . . . . . . . 28
6.2.2 Configuring Limits . . . . . . . . . . . . . . . . . . . . . . . . . . . . . . . . . 28
6.3 Other Limits . . . . . . . . . . . . . . . . . . . . . . . . . . . . . . . . . . . . . . . . 29
6.3.1 File Upload Size . . . . . . . . . . . . . . . . . . . . . . . . . . . . . . . . . . 29
6.3.2 CPU Time per Computation . . . . . . . . . . . . . . . . . . . . . . . . . . . 29
6.3.3 XFS Disk Quotas . . . . . . . . . . . . . . . . . . . . . . . . . . . . . . . . . . 29
7 Monitoring the Server 31
7.1 Monitoring Configuration . . . . . . . . . . . . . . . . . . . . . . . . . . . . . . . . . 31
7.2 Using Graphite . . . . . . . . . . . . . . . . . . . . . . . . . . . . . . . . . . . . . . . 31
7.3 Server Health Checks . . . . . . . . . . . . . . . . . . . . . . . . . . . . . . . . . . . . 32
7.3.1 Enabling Health Checks . . . . . . . . . . . . . . . . . . . . . . . . . . . . . . 32
7.3.2 Customizing Responses . . . . . . . . . . . . . . . . . . . . . . . . . . . . . . 32
7.3.3 Changing the URL . . . . . . . . . . . . . . . . . . . . . . . . . . . . . . . . . 33
8 License Management 34
8.1 Product Activation . . . . . . . . . . . . . . . . . . . . . . . . . . . . . . . . . . . . . 34
8.1.1 Activation Basics . . . . . . . . . . . . . . . . . . . . . . . . . . . . . . . . . . 34
8.1.2 Virtual Machines . . . . . . . . . . . . . . . . . . . . . . . . . . . . . . . . . . 34
8.2 Connectivity Requirements . . . . . . . . . . . . . . . . . . . . . . . . . . . . . . . . 35
8.2.1 Proxy Servers . . . . . . . . . . . . . . . . . . . . . . . . . . . . . . . . . . . . 35
8.2.2 Offline Activation . . . . . . . . . . . . . . . . . . . . . . . . . . . . . . . . . . 35

Chapter 1
Getting Started
1.1 Introduction
RStudio Server enables you to provide a browser based interface (the RStudio IDE) to a version ofR running on a remote Linux server. Deploying R and RStudio on a server has a number of benefits,including:
• The ability to access R sessions from any computer in any location;• Easy sharing of code, data, and other files with colleagues;• Allowing multiple users to share access to the more powerful compute resources (memory,
processors, etc.) available on a well equipped server; and• Centralized installation and configuration of R, R packages, TeX, and other supporting
libraries.
This manual describes RStudio Server Professional Edition, which adds many enhancements to theopen-source version of RStudio Server, including:
• An administrative dashboard that provides insight into active sessions, server health, andmonitoring of system-wide and per-user performance and resource metrics;
• Authentication using system accounts, ActiveDirectory, LDAP, or Google Accounts;• Full support for PAM (including PAM sessions for dynamically provisioning user resources);• Ability to establish per-user or per-group CPU priorities and memory limits;• HTTP enhancements including support for SSL and keep-alive for improved performance;• Ability to restrict access to the server by IP;• Customizable server health checks; and• Suspend, terminate, or assume control of user sessions; Impersonate users for assistance and
troubleshooting.
1.2 Installation
1.2.1 Debian (6+) / Ubuntu (10.04+)
Installing R
4
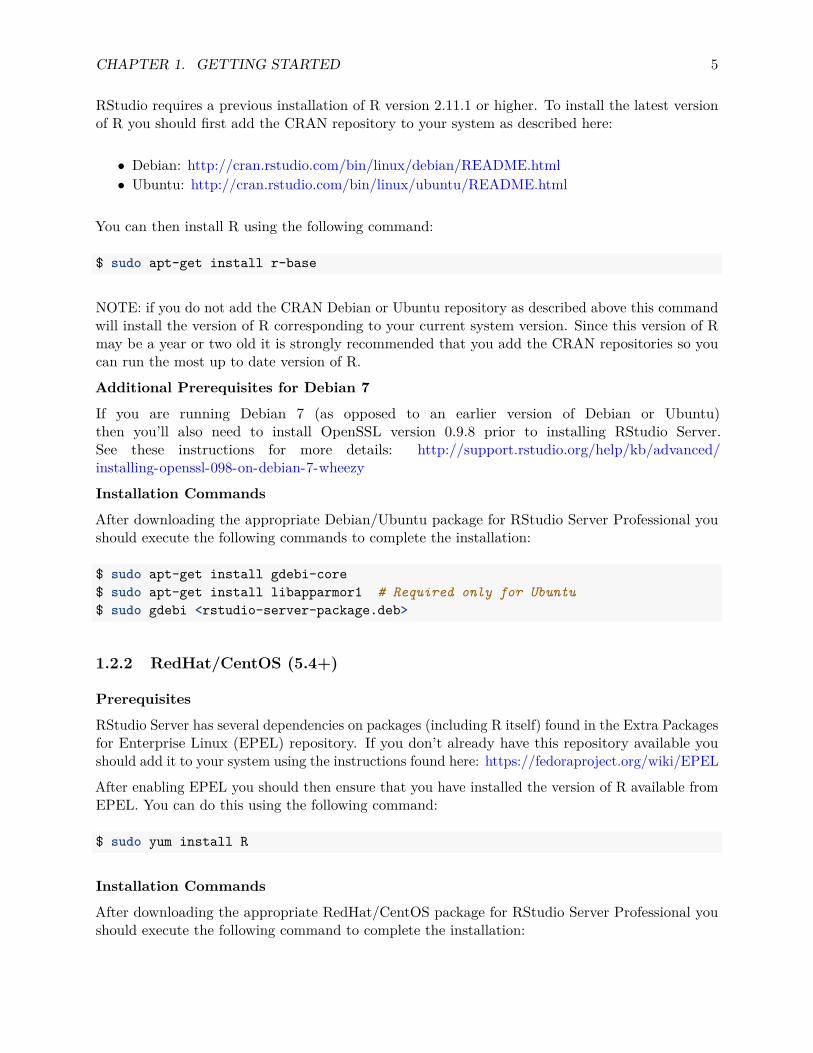
CHAPTER 1. GETTING STARTED 5
RStudio requires a previous installation of R version 2.11.1 or higher. To install the latest versionof R you should first add the CRAN repository to your system as described here:
• Debian: http://cran.rstudio.com/bin/linux/debian/README.html• Ubuntu: http://cran.rstudio.com/bin/linux/ubuntu/README.html
You can then install R using the following command:
$ sudo apt-get install r-base
NOTE: if you do not add the CRAN Debian or Ubuntu repository as described above this commandwill install the version of R corresponding to your current system version. Since this version of Rmay be a year or two old it is strongly recommended that you add the CRAN repositories so youcan run the most up to date version of R.
Additional Prerequisites for Debian 7
If you are running Debian 7 (as opposed to an earlier version of Debian or Ubuntu)then you’ll also need to install OpenSSL version 0.9.8 prior to installing RStudio Server.See these instructions for more details: http://support.rstudio.org/help/kb/advanced/installing-openssl-098-on-debian-7-wheezy
Installation Commands
After downloading the appropriate Debian/Ubuntu package for RStudio Server Professional youshould execute the following commands to complete the installation:
$ sudo apt-get install gdebi-core$ sudo apt-get install libapparmor1 # Required only for Ubuntu$ sudo gdebi <rstudio-server-package.deb>
1.2.2 RedHat/CentOS (5.4+)
Prerequisites
RStudio Server has several dependencies on packages (including R itself) found in the Extra Packagesfor Enterprise Linux (EPEL) repository. If you don’t already have this repository available youshould add it to your system using the instructions found here: https://fedoraproject.org/wiki/EPEL
After enabling EPEL you should then ensure that you have installed the version of R available fromEPEL. You can do this using the following command:
$ sudo yum install R
Installation Commands
After downloading the appropriate RedHat/CentOS package for RStudio Server Professional youshould execute the following command to complete the installation:

CHAPTER 1. GETTING STARTED 6
sudo yum install --nogpgcheck <rstudio-server-package.rpm>
1.3 Management Script
RStudio Server management tasks are performed using the rstudio-server utility (installed under/usr/sbin). This utility enables the stopping, starting, and restarting of the server, enumerationand suspension of user sessions, taking the server offline, as well as the ability to hot upgrade arunning version of the server.
For example, to restart the server you can use the following command:
$ sudo rstudio-server restart
Note that on some systems (including RedHat/CentOS 5) the sudo utility doesn’t have the/usr/sbin directory in it’s path by default. For these systems you can use a full path to themanagement script. For example:
$ sudo /usr/sbin/rstudio-server restart
1.4 Activation
After completing the installation steps described in the previous section you may need to activatethe product before using it. Alternatively, if you haven’t previously installed RStudio Server ona system then it will run in evaluation mode for a period of time before requiring activation. Todetermine the current license status of your system you can use the following command:
$ sudo rstudio-server license-manager status
To activate the product you obtain a product key and then use the following commands:
$ sudo rstudio-server license-manager activate <product-key>$ sudo rstudio-server restart
Note that you need to restart the server in order for licensing changes to take effect.
Additional details on license management (including discussions of offline activation and activatingthrough a proxy server) can be found in the License Management section.
1.5 Accessing the Server
1.5.1 Logging In
By default RStudio Server runs on port 8787 and accepts connections from all remote clients. Afterinstallation you should therefore be able to navigate a web browser to the following address toaccess the server:

CHAPTER 1. GETTING STARTED 7
http://<server-ip>:8787
RStudio will prompt for a username and password and will authenticate access using the PAMauthentication scheme configured for the server. Some notes related to user authentication:
• RStudio Server will not permit logins by system users (those with ids < 100).• By default on Debian/Ubuntu the system default PAM profile (/etc/pam.d/other) will be
used (this can be customized by creating an RStudio PAM profile at /etc/pam.d/rstudio).• By default on RedHat/CentOS an RStudio PAM profile (/etc/pam.d/rstudio) that authen-
ticates using the system username/password database will be used (this can be customized byediting the profile as appropriate).
• User credentials are encrypted using RSA as they travel over the network.
Additional details on customizing RStudio Server authentication are provided in AuthenticatingUsers. Details on customizing the port and enabling SSL are covered in Access and Security.
1.5.2 Troubleshooting Problems
If you are unable to access the server after installation, you should run the verify-installationcommand to output additional diagnostics:
$ sudo rstudio-server verify-installation
This command will start the server and run and connect to an R session. Note that this will test thecorrect installation of RStudio Server and ensure that it can connect to a locally installed version ofR. However, it won’t test whether networking or authentication problems are preventing access tothe server.
If problems persist, you can also consult the system log to see if there are additional messages there.On Debian/Ubuntu systems this will typically be located at:
/var/log/syslog
On RedHat/CentOS systems this will typically be located at:
/var/log/messages

Chapter 2
Server Management
2.1 Core Administrative Tasks
2.1.1 Configuration Files
RStudio Server uses several configuration files all located within the /etc/rstudio directory.Configuration files include:
rserver.conf Core server settings
rsession.conf Settings related to individual R sessions
ip-rules IP access rules (allow or deny groups of IP addresses)
health-check Template for content to return for server health checks
google-accounts Mappings from Google accounts to local accounts
Note that all configuration files are optional and no configuration files are created by default duringinstallation.
Whenever making changes to configuration files you need to restart the server for them to takeeffect. You can do this using the restart command of the server management utility:
$ sudo rstudio-server restart
2.1.2 Stopping and Starting
During installation RStudio Server is automatically registered as a daemon which starts along with therest of the system. On Debian, Ubuntu, and RedHat/CentOS 6 this registration is performed using anUpstart script at /etc/init/rstudio-server.conf. On other systems including RedHat/CentOS5 an init.d script is installed at /etc/init.d/rstudio-server.
To manually stop, start, and restart the server you use the following commands:
8

CHAPTER 2. SERVER MANAGEMENT 9
$ sudo rstudio-server stop$ sudo rstudio-server start$ sudo rstudio-server restart
2.1.3 Managing Active Sessions
There are a number of administrative commands which allow you to see what sessions are activeand request suspension of running sessions.
To list all currently active sessions:
$ sudo rstudio-server active-sessions
2.1.3.1 Suspending Sessions
When R sessions have been idle (no processing or user interaction) for a specified period of time(2 hours by default) RStudio Server suspends them to disk to free up server resources. When theuser next interacts with their session it is restored from disk and the user resumes right back wherethey left off. This is all done seamlessly such that users aren’t typically aware that a suspend andresume has occurred.
To manually suspend an individual session:
$ sudo rstudio-server suspend-session <pid>
To manually suspend all running sessions:
$ sudo rstudio-server suspend-all
The suspend commands also have a “force” variation which will send an interrupt to the session torequest the termination of any running R command:
$ sudo rstudio-server force-suspend-session <pid>$ sudo rstudio-server force-suspend-all
The force-suspend-all command should be issued immediately prior to any reboot so as topreserve the data and state of active R sessions across the restart.
2.1.4 Taking the Server Offline
If you need to perform system maintenance and want users to receive a friendly message indicatingthe server is offline you can issue the following command:

CHAPTER 2. SERVER MANAGEMENT 10
$ sudo rstudio-server offline
When the server is once again available you should issue this command:
$ sudo rstudio-server online
2.1.5 Upgrading to a New Version
If you perform an upgrade of RStudio Server and an existing version of the server is currentlyrunning, then the upgrade process will also ensure that active sessions are immediately migrated tothe new version. This includes the following behavior:
• Running R sessions are suspended so that future interactions with the server automaticallylaunch the updated R session binary
• Currently connected browser clients are notified that a new version is available and automati-cally refresh themselves.
• The core server binary is restarted
To upgrade to a new version of RStudio Server you simply install the new version. For example onDebian/Ubuntu:
$ sudo gdebi <rstudio-server-package.deb>
For RedHat/CentOS:
$ sudo yum install --nogpgcheck <rstudio-server-package.rpm>
2.2 Administrative Dashboard
RStudio Server includes an administrative dashboard with the following features:
1) Monitoring of active sessions and their CPU and memory utilization;2) The ability to suspend, forcibly terminate, or assume control of any active session;3) Historical usage data for individual server users (session time, memory, CPU, logs);4) Historical server statistics (CPU, memory, active sessions, system load); and5) Searchable server log (view all messages or just those for individual users)
The dashboard can be an invaluable tool in understanding server usage and capacity as well as todiagnose and resolve problems.
2.2.1 Enabling the Dashboard
The administrative dashboard is accessed at the following URL:

CHAPTER 2. SERVER MANAGEMENT 11
http://<server-address>/admin
The administrative dashboard is disabled by default. To enable it you set the admin-enabledoption. You can also specify that only users of certain group have access to the dashboard using theadmin-group option. For example:
/etc/rstudio/rserver.conf
admin-enabled=1admin-group=rstudio-admins
Note that changes to the configuration will not take effect until the server is restarted.
2.2.2 Administrator Superusers
You can further designate a certain user or group of users as administrative “superusers”. Superusershave the following additional privileges:
1) Suspend or terminate active sessions2) Assume control of active sessions (e.g. for troubleshooting)3) Login to RStudio as any other server user
Administrative superusers do not have root privilege on the system, but rather have a narrow setof delegated privileges that are useful in managing and supporting the server. You can define theusers with this privilege using the admin-superuser-group setting. For example:
/etc/rstudio/rserver.conf
admin-superuser-group=rstudio-superuser-admins
Changes to the configuration will not take effect until the server is restarted.
2.2.2.1 Google Accounts Restrictions
Note that the ability to login as other users and assume control of existing sessions is not available ifyou are authenticating with Google Accounts. This is because Google authentication uses a differentuser-identity mechanism which isn’t compatible with the way that user session impersonation isimplemented.

Chapter 3
Authenticating Users
3.1 PAM Authentication
RStudio Server Professional Edition authenticates users via the Linux standard PAM (PluggableAuthentication Module) API. PAM is typically configured by default to authenticate against thesystem user database (/etc/passwd) however it can also be configured to authenticate against awide variety of other systems including ActiveDirectory and LDAP.
The section describes the PAM configuration used for authentication by default after installation.Note that PAM can be used for both authentication as well as to tailor the environment for usersessions (PAM sessions). This section describes only authentication, see the User Resources andLimits section for details on how RStudio Server can be configured to use PAM sessions.
3.1.1 PAM Basics
PAM profiles are are located in the /etc/pam.d directory. Each application can have their ownprofile, and there is also a default profile used for applications without one (the default profile ishandled differently depending on which version of Linux you are running).
To learn more about PAM and the many options and modules available for it see the following:
• http://en.wikipedia.org/wiki/Pluggable_authentication_module• http://www.centos.org/docs/5/html/Deployment_Guide-en-US/ch-pam.html• http://tldp.org/HOWTO/User-Authentication-HOWTO/x115.html• http://linux.die.net/man/8/pam
3.1.2 Default PAM Configuration
Debian/Ubuntu
On Debian and Ubuntu systems RStudio Server does not provide an RStudio specific PAM con-figuration file. As a result, RStudio Server uses the /etc/pam.d/other profile, which by defaultinherits from a set of common configuration files:
/etc/pam.d/other
12
CHAPTER 3. AUTHENTICATING USERS 13
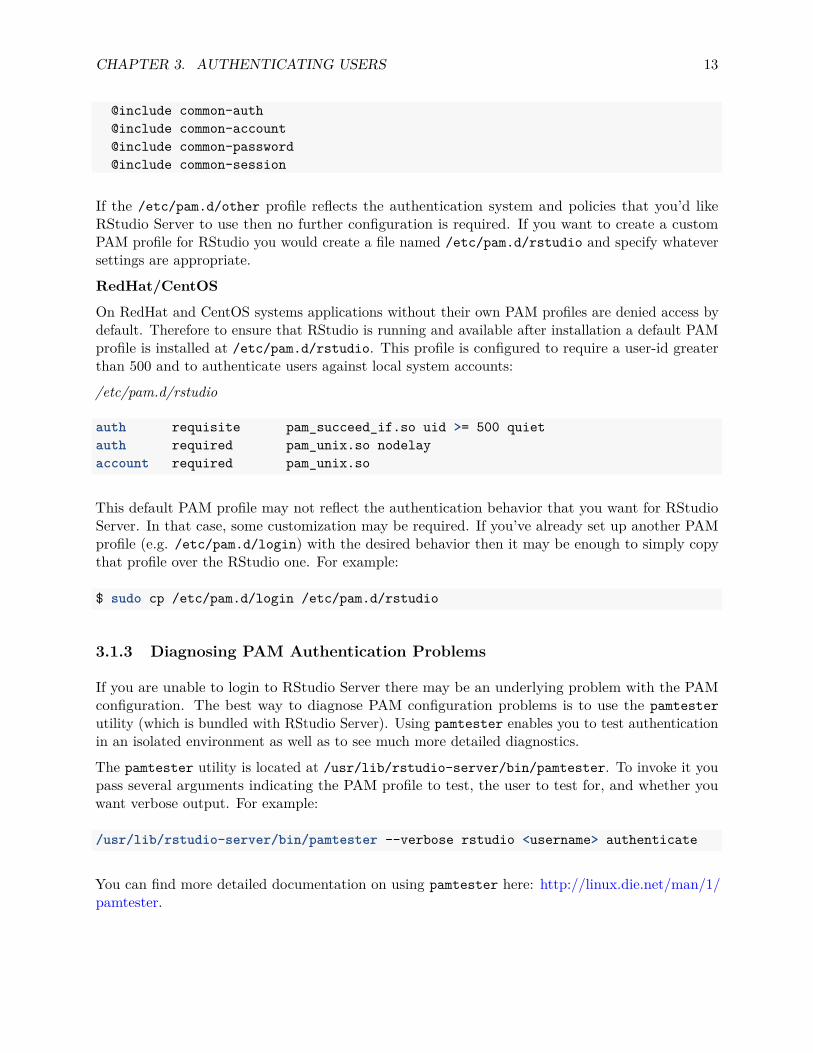
@include common-auth@include common-account@include common-password@include common-session
If the /etc/pam.d/other profile reflects the authentication system and policies that you’d likeRStudio Server to use then no further configuration is required. If you want to create a customPAM profile for RStudio you would create a file named /etc/pam.d/rstudio and specify whateversettings are appropriate.
RedHat/CentOS
On RedHat and CentOS systems applications without their own PAM profiles are denied access bydefault. Therefore to ensure that RStudio is running and available after installation a default PAMprofile is installed at /etc/pam.d/rstudio. This profile is configured to require a user-id greaterthan 500 and to authenticate users against local system accounts:
/etc/pam.d/rstudio
auth requisite pam_succeed_if.so uid >= 500 quietauth required pam_unix.so nodelayaccount required pam_unix.so
This default PAM profile may not reflect the authentication behavior that you want for RStudioServer. In that case, some customization may be required. If you’ve already set up another PAMprofile (e.g. /etc/pam.d/login) with the desired behavior then it may be enough to simply copythat profile over the RStudio one. For example:
$ sudo cp /etc/pam.d/login /etc/pam.d/rstudio
3.1.3 Diagnosing PAM Authentication Problems
If you are unable to login to RStudio Server there may be an underlying problem with the PAMconfiguration. The best way to diagnose PAM configuration problems is to use the pamtesterutility (which is bundled with RStudio Server). Using pamtester enables you to test authenticationin an isolated environment as well as to see much more detailed diagnostics.
The pamtester utility is located at /usr/lib/rstudio-server/bin/pamtester. To invoke it youpass several arguments indicating the PAM profile to test, the user to test for, and whether youwant verbose output. For example:
/usr/lib/rstudio-server/bin/pamtester --verbose rstudio <username> authenticate
You can find more detailed documentation on using pamtester here: http://linux.die.net/man/1/pamtester.

CHAPTER 3. AUTHENTICATING USERS 14
3.2 Google Accounts
RStudio Server can be configured to authenticate users via Google Accounts. This enables users tologin with their existing Gmail or Google Apps credentials and to be automatically authenticatedto RStudio Server whenever they are already logged into their Google account.
3.2.1 Enabling Google Accounts
To enable authentication with Google Accounts you add the auth-google-accounts option to theRStudio Server configuration file:
/etc/rstudio/rserver.conf
auth-google-accounts=1
Once you enable authentication with Google Accounts that becomes the exclusive means of authen-tication (you can’t concurrently use both PAM and Google Account authentication).
Changes to the configuration will not take effect until the server is restarted.
3.2.2 Translating to Local Accounts
3.2.2.1 Creating Matching Accounts
Once a user is authenticated via Google Accounts it’s necessary to map their Google Accountsidentity to a local system account. The default and most straightforward way to do this is to createa local account with a username identical to their Google email address.
If you choose to create local accounts that match Google email addresses be sure to use only lowercasecharacters in the account name, since Google email addresses are transformed to lower-case prior tomatching them to local account names.
One problem with creating local accounts that match Google email addresses is that they often containcharacters that are invalid by default within Linux usernames (e.g. @ or .). On Debian/Ubuntusystems it’s possible to force the system to create a user with these characters. Here’s an exampleof creating a user with a username that contains typically invalid characters:
$ sudo adduser --force-badname <username>
Note that the --force-badname option is only available on Debian/Ubuntu systems and is notavailable on RedHat/CentOS systems.
If the users you are creating will only be accessing the server via RStudio, you may also want todisable their ability to login as a normal interactive user and to specify that they have no password.For example:
$ sudo adduser --force-badname --disabled-login --disabled-password <username>

CHAPTER 3. AUTHENTICATING USERS 15
3.2.2.2 Using an Account Mappings File
Alternatively, you map create local accounts that do not match Google email addresses and thenspecify a mapping of Google accounts to local accounts via the /etc/rstudio/google-accountsconfiguration file. For example:
/etc/rstudio/google-accounts
[email protected][email protected]=sjones
Note that changes to the google-accounts configuration file take effect immediately and do notrequire a server restart.
3.2.3 Requiring Sign In
By default if users are already signed in to their Google Account they don’t need to type theirpassword again in order to authenticate with RStudio Server. If you’d like to force users to alwaysprovide a password when logging in you can use the auth-google-accounts-force-login option.For example:
/etc/rstudio/rserver.conf
auth-google-accounts=1auth-google-accounts-force-login=1
Note that users will be forced to enter their full login credentials including password the first timethey authenticate using a given browser however may be authenticated automatically for subsequentvisits from the same browser.
3.3 Proxied Authentication
You can configure RStudio Server to participate in an existing web-based single-sign-on authenticationscheme using proxied authentication. In this configuration all traffic to RStudio Server is handledby a proxy server which also handles user authentication.
In this configuration the proxy server adds a special HTTP header to requests to RStudio Serverletting it know which authenticated user is making the request. RStudio Server trusts this header,launching and directing traffic to an R session owned by the specified user.
3.3.1 Enabling Proxied Authentication
To enable proxied authentication you need to specify both the auth-proxy and auth-proxy-sign-in-urlsettings (the sign-in URL is the absolute URL to the page that users should be redirected to forsign-in). For example:
/etc/rstudio/rserver.conf
CHAPTER 3. AUTHENTICATING USERS 16
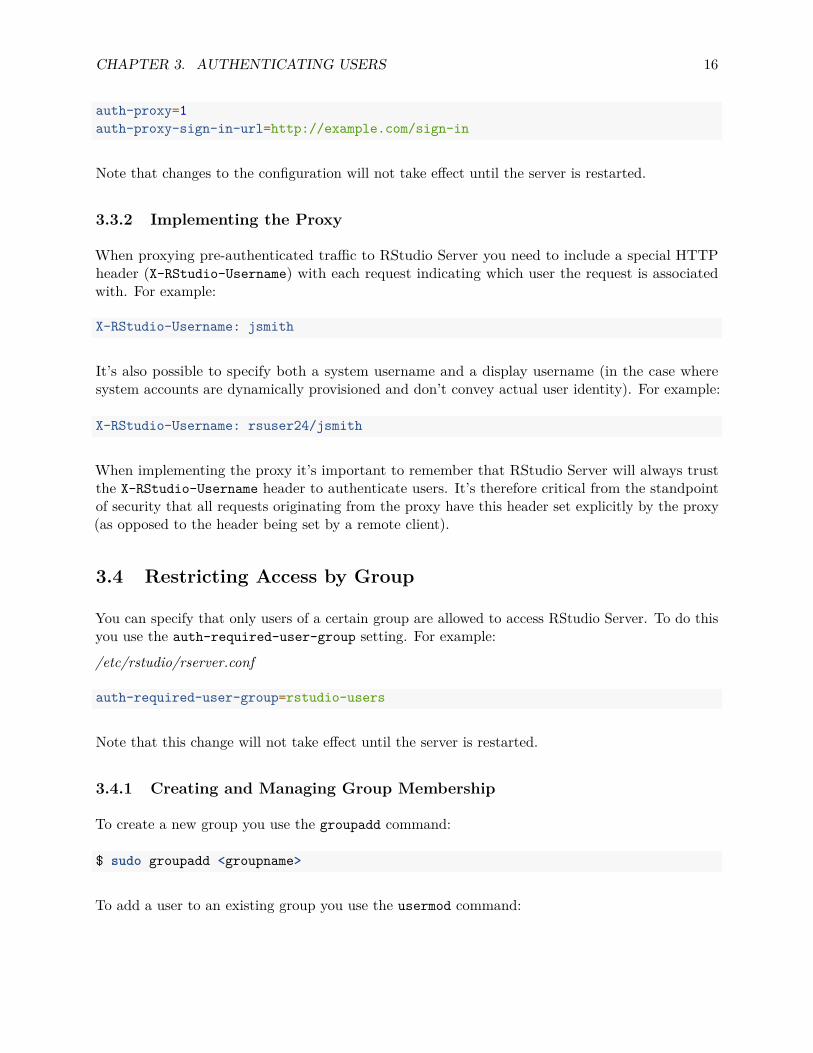
auth-proxy=1auth-proxy-sign-in-url=http://example.com/sign-in
Note that changes to the configuration will not take effect until the server is restarted.
3.3.2 Implementing the Proxy
When proxying pre-authenticated traffic to RStudio Server you need to include a special HTTPheader (X-RStudio-Username) with each request indicating which user the request is associatedwith. For example:
X-RStudio-Username: jsmith
It’s also possible to specify both a system username and a display username (in the case wheresystem accounts are dynamically provisioned and don’t convey actual user identity). For example:
X-RStudio-Username: rsuser24/jsmith
When implementing the proxy it’s important to remember that RStudio Server will always trustthe X-RStudio-Username header to authenticate users. It’s therefore critical from the standpointof security that all requests originating from the proxy have this header set explicitly by the proxy(as opposed to the header being set by a remote client).
3.4 Restricting Access by Group
You can specify that only users of a certain group are allowed to access RStudio Server. To do thisyou use the auth-required-user-group setting. For example:
/etc/rstudio/rserver.conf
auth-required-user-group=rstudio-users
Note that this change will not take effect until the server is restarted.
3.4.1 Creating and Managing Group Membership
To create a new group you use the groupadd command:
$ sudo groupadd <groupname>
To add a user to an existing group you use the usermod command:

CHAPTER 3. AUTHENTICATING USERS 17
$ sudo usermod -a -G <groupname> <username>
Note that it’s critical that you include the -a flag as that indicates that the group should be addedto the user rather than replace the user’s group list in it’s entirety.

Chapter 4
Access and Security
4.1 Network Port and Address
After initial installation RStudio accepts connections on port 8787. If you wish to listen on adifferent another port you can modify the www-port option. For example:
/etc/rstudio/rserver.conf
www-port=80
By default RStudio binds to address 0.0.0.0 (accepting connections from any remote IP). You canmodify this behavior using the www-address option. For example:
/etc/rstudio/rserver.conf
www-address=127.0.0.1
Note that changes to the configuration will not take effect until the server is restarted.
4.2 IP Access Rules
RStudio Server can be configured to deny access to specific IP addresses or ranges of addresses.Access rules are defined in the configuration file /etc/rstudio/ip-rules
Access rules are established using the allow and deny directives and are processed in order, withthe first matching rule governing whether a given address is allowed or denied. For example, toallow only clients within the 192.168.1.0/24 subnet but also deny access to 192.168.1.10 youwould use these rules:
/etc/rstudio/ip-rules
deny 192.168.1.10allow 192.168.1.0/24deny all
18

CHAPTER 4. ACCESS AND SECURITY 19
All clients outside of the specified subset are denied access because of the deny all rule at the endof the configuration.
Note that changes to the configuration will not take effect until the server is restarted.
4.3 Secure Sockets (SSL)
4.3.1 SSL Configuration
If your RStudio Server is running on a public network then configuring it to use SSL (Secure SocketsLayer) encryption is strongly recommended. You can do this via the ssl-enabled setting alongwith related settings that specify the location of your SSL certificate and key. For example:
/etc/rstudio/rserver.conf
ssl-enabled=1ssl-certificate=/var/certs/your_domain_name.crtssl-certificate-key=/var/certs/your_domain_name.key
It’s important when installing the certificate (.crt) file that you concatenate together any intermediatecertificates (i.e. the generic one from your certificate authority) with the certificate associated withyour domain name. For example you could use a shell command of this form to concatenate the CAintermediate certificate to your domain name’s certificate:
$ cat certificate-authority.crt >> your_domain_name.crt
The resulting file should then be specified in the ssl-certificate option.
It’s also important to ensure that the file permissions on your SSL certificate key are as restrictiveas possible so it can’t be read by ordinary users. The file should typically be owned by the rootuser and be set as owner readable and writeable. For example:
$ sudo chmod 600 /var/certs/your_domain_name.key
4.3.2 SSL Ports
When RStudio Server is configured to use SSL the default behavior with respect to ports is:
1) SSL is bound to port 443 (enabling access using the standard https protocol within thebrowser)
2) The server also listens on port 80 and redirects all requests to port 443 (allowing users tospecify the domain without the https protocol and be automatically redirected to the secureport)
However, if SSL is bound to another port (using the www-port option) then the automatic redirectbehavior is not enabled. It’s also possible to disable automatic SSL redirects entirely using thessl-redirect-http option as follows:
/etc/rstudio/rserver.conf

CHAPTER 4. ACCESS AND SECURITY 20
ssl-redirect-http=0
Note that changes to the configuration will not take effect until the server is restarted.
4.4 Server Permissions
4.4.1 Server Account
RStudio Server runs as the system root user during startup and then drops this privilege and runsas a more restricted user. RStudio Server then re-assumes root privilege for a brief instant whencreating R sessions on behalf of users (the server needs to call setresuid when creating the Rsession, and this call requires root privilege).
The user account that RStudio Server runs under in the normal course of operations isrstudio-server. This account is automatically added to the system during installation and iscreated as a system rather than end user account (i.e. the --system flag is passed to useradd).
4.4.2 AppArmor
On Debian and Ubuntu systems the RStudio Server process runs under an AppArmor profile (youcan find more information about AppArmor here: http://en.wikipedia.org/wiki/AppArmor).
If AppArmor is causing problems in your configuration you can disable it using theserver-app-armor-enabled option. For example:
/etc/rstudio/rserver.conf
server-app-armor-enabled=0
Note that there aren’t known scenarios where the RStudio Server AppArmor profile causes problemsso it’s unlikely that you’ll ever need to modify this setting. Note also that this setting will not takeeffect until the server is restarted.
Chapter 5
R Sessions
5.1 R Executable and Libraries
5.1.1 Locating R
RStudio Server uses the version of R pointed to by the output of the following command:
$ which R
The which command performs a search for the R executable using the system PATH. RStudio willtherefore by default bind to the same version that is run when R is executed from a terminal.
For versions of R installed by system package managers this will be /usr/bin/R. For versions of Rinstalled from source this will typically (but not always) be /usr/local/bin/R.
If RStudio is unable to locate R using which R, it will fall back to scanning explicitly for the Rscript in the /usr/local/bin and /usr/bin directories.
If you want to override which version of R is used then you can use the rsession-which-r setting.For example:
/etc/rstudio/rserver.conf
rsession-which-r=/usr/local/bin/R
Note that this change will not take effect until the server is restarted.
5.1.2 Locating Shared Libraries
You can add elements to the default LD_LIBRARY_PATH for R sessions (as determined by the Rldpaths script) by adding an rsession-ld-library-path entry to the server config file. Thismight be useful for ensuring that packages can locate external library dependencies that aren’tinstalled in the system standard library paths. For example:
/etc/rstudio/rserver.conf
21
CHAPTER 5. R SESSIONS 22
rsession-ld-library-path=/opt/someapp/lib:/opt/anotherapp/lib
Note that this change will not take effect until the server is restarted.
5.1.3 Customzing Session Launches
5.1.3.1 Profile Script Execution
RStudio Server launches R sessions under a bash login shell. This means that prior to the executionof the R session the bash shell will read and execute commands from this file if it exists:
/etc/profile
After reading that file, it looks for the following files and reads and executes commands from thefirst one that exists and is readable (it’s important to note that only one of these files will be readand executed):
~/.bash_profile~/.bash_login~/.profile
If you have further RStudio specific initialization logic (exporting environment variables, etc.) youcan optionally create an R session specific profile script at:
/etc/rstudio/rsession-profile
If it exists this script will be executed prior to the bash shell that launches the R session.
5.1.3.2 Environment Variables
R sessions inherit environment variables that are explicitly exported from the profile scripts describedabove. It’s also possible to append paths to the LD_LIBRARY_PATH environment variable using thersession-ld-library-path option (see previous section for details).
Another source of environment variables are PAM sessions. On Debian/Ubuntu systems, thedefault PAM profile run by RStudio Server includes the environment variables defined in/etc/security/pam_env.conf and /etc/environment. To learn more about setting environmentvariables with PAM you should consult the PAM Sessions section as well as the documentation onthe pam_env module here: http://linux.die.net/man/8/pam_env.
5.1.3.3 Program Supervisors
You may also wish to run R sessions under a program supervisor that modifies their environment oravailable resources. You can specify a supervisor (and the arguments which control it’s behavior)using the rsession-exec-command setting. For example:
/etc/rstudio/rserver.conf
CHAPTER 5. R SESSIONS 23
rsession-exec-command=nice -n 10
This example uses the nice command to run all R sessions with a lower scheduling priority. Seehttp://linux.die.net/man/1/nice for more details on nice. Note that for nice in particular it’spossible to accomplish the same thing using the pam_limits module (and even specify a custompriority level per user or group). See the PAM Sessions and User Resource Limits sections for moredetails.
5.2 Suspend and Resume
When R sessions have been idle (no processing or user interaction) for a specified period of time(2 hours by default) RStudio Server suspends them to disk to free up server resources. When theuser next interacts with their session it is restored from disk and the user resumes right back wherethey left off. This is all done seamlessly such that users aren’t typically aware that a suspend andresume has occurred.
5.2.1 Session Timeout
To configure the amount of idle time to wait before suspending sessions you can use thesession-timeout-minutes setting in the /etc/rstudio/rsession.conf file. For example:
/etc/rstudio/rsession.conf
session-timeout-minutes=30
Important note: this setting and a few others discussed in this section are specified in the/etc/rstudio/rsession.conf file (rather than the rserver.conf file previously referenced).
There are some conditions where an R session will not be suspended, these include:
1) When a top-level R computation is running2) When the R prompt is not in it’s default state (e.g. during a debugging session)
You can also specify that R sessions should never be suspended by setting the session-timeout-minutesto zero. For example:
/etc/rstudio/rsession.conf
session-timeout-minutes=0
Note that session timeout settings take effect the next time a user launches an R session (ratherthan requiring a full restart of the server).
CHAPTER 5. R SESSIONS 24
5.2.2 Forcing Suspends
You can force the suspend of individual sessions or even all sessions on the server. You can do thisdirectly from the main page of the Administrative Dashboard or from the system shell as follows:
$ sudo rstudio-server force-suspend-session <pid>$ sudo rstudio-server force-suspend-all
5.2.3 Resume and .Rprofile
By default the Rprofile.site and .Rprofile files are not re-run when a session is resumed (it’spresumed that all of their side-effects are accounted for by simply restoring loaded packages, options,environment variables, etc.).
In some configurations it might be desirable to force the re-execution of profile files. There is anend user option that controls this on the General options pane which defaults to false. However,server administrators may wish to ensure that this option defaults to true. To do this you use thesession-rprofile-on-resume-default option. For example:
/etc/rstudio/rsession.conf
session-rprofile-on-resume-default=1
Note that this setting is specified in the rsession.conf config file and takes effect the next time auser launches an R session (rather than requiring a full restart of the server).
5.3 Package Installation
You can customize the location of user packages installed from CRAN as well as the default CRANrepository. You can also configure the user-interface of the RStudio IDE to discourage end-userpackage installation in the case where packages are deployed centrally to a site library.
Important note: The settings discusseded in this section are specified in the /etc/rstudio/rsession.conffile (rather than the rserver.conf file previously referenced).
5.3.1 User Library
By default R packages are installed into a user-specific library based on the contents of theR_LIBS_USER environment variable (more details on this mechanism are here: http://stat.ethz.ch/R-manual/R-devel/library/base/html/libPaths.html).
It’s also possible to configure an alternative default for user package installation using ther-libs-user setting. For example:
/etc/rstudio/rsession.conf
CHAPTER 5. R SESSIONS 25
r-libs-user=~/R/library
One benefit of establishing an alternative default user library path is that by doing this you canremove the R version component of the package library path (which the default path contains).This makes it possible to upgrade the major version of R on the server and have user’s packagescontinue to work.
5.3.2 Discouraging User Installations
It may be that you’ve configured RStudio Server with a site package library that is shared by all users.In this case you might wish to discourage users from installing their own packages by removing thepackage installation UI from the RStudio IDE. To do this you use the allow-package-installationsetting. For example:
/etc/rstudio/rsession.conf
allow-package-installation=0
Note that this setting merely discourages package installation by removing user-interface elements.It’s still possible for users to install packages directly using the install.packages function.
5.3.3 CRAN Repositories
RStudio Server uses the RStudio CRAN mirror (http://cran.rstudio.com) by default. This mirror isglobally distributed using Amazon S3 storage so should provide good performance for all locales. Youmay however wish to override the default CRAN mirror. This can be done with the r-cran-repossettings. For example:
/etc/rstudio/rsession.conf
r-cran-repos=http://cran.at.r-project.org/
Whatever the default CRAN mirror is, individual users are still able to set their own default. Todiscourage this, you can set the allow-r-cran-repos-edit settings. For example:
/etc/rstudio/rsession.conf
allow-r-cran-repos-edit=0
Note that even with user editing turned off it’s still possible for users to install packages fromalternative repositories by directly specifying the repos parameter in a call to install.packages.

Chapter 6
User Resources and Limits
6.1 PAM Sessions
RStudio Server Professional uses PAM (Pluggable Authentication Modules) for both user authenti-cation as well to establish the resources available for R sessions. Binding resources (and limits ontheir use) to R sessions is accomplished by calling the PAM session API. This section explains howto configure and customize PAM sessions with RStudio Server.
6.1.1 Session Profile
For PAM authentication RStudio Server uses the either the /etc/pam.d/other profile (De-bian/Ubuntu) or /etc/pam.d/rstudio profile (RedHat/CentOS). However, for launching R sessionsa different PAM profile is used. This is because the launching of R sessions may not coincide withauthentication (e.g. returning to the site with login credentials cached in a cookie or resuming asuspended session). Therefore, the PAM directive that enables authentication with root privilegeonly (auth sufficient pam_rootok.so) needs to be present in the PAM profile.
The behavior that RStudio Server requires is essentially same as that of the su command (imperson-ation of a user without a password). Therefore by default RStudio Server uses the /etc/pam.d/suprofile for running R sessions.
6.1.1.1 Creating a Custom Profile
The /etc/pam.d/su profile has different default behavior depending upon your version of Linuxand local configuration. Depending upon what type of behavior you want associated with R sessions(e.g. mounting of disks, setting of environment variables, enforcing of resource limits, etc.) you’lllikely want to create a custom profile for R sessions. For example, if you wanted to use a profilenamed rstudio-session you would add this to the configuration file:
/etc/rstudio/rserver.conf
auth-pam-sessions-profile=rstudio-session
26

CHAPTER 6. USER RESOURCES AND LIMITS 27
Here is in turn what the custom profile might contain in order to enable a few common features ofPAM sessions (this is based on a modified version of the default su profile on Ubuntu):
/etc/pam.d/rstudio-session
# This allows root to su without passwords (this is required)auth sufficient pam_rootok.so
# This module parses environment configuration file(s)# and also allows you to use an extended config# file /etc/security/pam_env.conf.# parsing /etc/environment needs "readenv=1"session required pam_env.so readenv=1
# Locale variables are also kept into /etc/default/locale in etch# reading this file *in addition to /etc/environment* does not hurtsession required pam_env.so readenv=1 envfile=/etc/default/locale
# Enforces user limits defined in /etc/security/limits.confsession required pam_limits.so
# The standard Unix authentication modules@include common-auth@include common-account@include common-session
The above serves as a good default session profile for RStudio. If you want to learn more aboutPAM profile configuration the following are good resources:
• http://www.linux-pam.org/Linux-PAM-html/Linux-PAM_SAG.html• http://linux.die.net/man/8/pam.d• http://www.linuxjournal.com/article/2120• http://www.informit.com/articles/article.aspx?p=20968
6.1.2 Disabling PAM Sessions
If you don’t want RStudio Server to utilize PAM sessions you can disable this feature using theauth-pam-sessions-enabled setting. For example:
/etc/rstudio/rserver.conf
auth-pam-sessions-enabled=0
CHAPTER 6. USER RESOURCES AND LIMITS 28
6.2 User Resource Limits
6.2.1 Enabling Limits
By adding the following line to the R session PAM profile you enable the enforcement of per-user orper-group resource limits based on the contents of the file /etc/security/limits.conf:
session required pam_limits.so
Note that this entry is typically not enabled in the /etc/pam.d/su PAM profile used by default byRStudio Server. You should therefore either add it to the /etc/pam.d/su profile or create a customprofile for R sessions as described in Creating a Custom Profile.
If you have created a custom profile for R sessions it’s also possible to create a custom limits.confthat applies only to R sessions. You can do this by appending the path to the file to thepam_limits.so directive. For example:
session required pam_limits.so conf=/etc/rstudio/rsession-limits.conf
6.2.2 Configuring Limits
Once you’ve configured RStudio Server to enforce user limits using the pam_limits.so module youneed to edit the limits configuration file to reflect the limits you want enforced.
Limits configuration files are very flexible and can specify limits for all users, users of a particulargroup, or individual users. Several of the more useful limits for R sessions include:
priority Priority to run user processes with (“nice”)
as Address space limit (kilobytes)
nproc Maximum number of processes
cpu Maximum total CPU time (minutes)
nofile Maximum number of open files
It’s strongly recommended that if you want to enforce limits for RStudio Server you define a limitsconfiguration file specifically for R sessions (as described in the section above). Here’s an exampleconfiguration file that sets global default limits and then allows additional memory and increasedprocess priority for the “poweruser” group:
/etc/rstudio/rsession-limits.conf
* hard as 2048000@poweruser hard as 4096000@poweruser hard priority -10
Full documentation on the format of limit configuration files can be found here: http://linux.die.

CHAPTER 6. USER RESOURCES AND LIMITS 29
net/man/5/limits.conf.
6.3 Other Limits
RStudio Server has a number of other limits that can be configured. This section describes theselimits. Note that these settings are specified in the /etc/rstudio/rsession.conf file (rather thanthe rserver.conf file previously referenced).
6.3.1 File Upload Size
You can limit the maximum size of a file upload by using the limit-file-upload-size-mb setting.For example, the following limits file uploads to 100MB:
/etc/rstudio/rsession.conf
limit-file-upload-size-mb=100
The default behavior is no limit on the size of file uploads.
6.3.2 CPU Time per Computation
If you want to prevent runaway computations that consume 100% of the CPU you can setthe maximum number of minutes to allow top-level R computations to run for using thelimit-cpu-time-minutes setting. For example:
/etc/rstudio/rsession.conf
limit-cpu-time-minutes=30
This specifies that no top level computation entered at the R console should run for more than 30minutes. This constraint is implemented by calling the R setTimeLimit function immediately priorto handing off console commands to R. As a result it is possible for a particular script to overridethis behavior if it knows that it may exceed the threshold. This would be done as follows:
setTimeLimit(cpu = Inf)# Long running R code here...
6.3.3 XFS Disk Quotas
If your system uses the XFS file system (http://en.wikipedia.org/wiki/XFS) then RStudio Servercan be configured to notify users when they come close to or exceed their disk quota. You canenable this using the limit-xfs-disk-quota setting. For example:
/etc/rstudio/rsession.conf

CHAPTER 6. USER RESOURCES AND LIMITS 30
limit-xfs-disk-quota=1
The user’s XFS disk quota will be checked when the RStudio IDE loads and a warning message willbe displayed if they are near to or over their quota.

Chapter 7
Monitoring the Server
7.1 Monitoring Configuration
RStudio Server monitors the use of resources (CPU, memory, etc.) on both a per-user and systemwide basis. By default, monitoring data is written to a set of RRD (http://oss.oetiker.ch/rrdtool/)files and can be viewed using the Administrative Dashboard.
The storage of system monitoring data requires about 20MB of disk space and the storageof user monitoring data requires about 3.5MB per user. This data is stored by default at/var/lib/rstudio-server/monitor. If you have a large number of users you may wish to specifyan alternate volume for monitoring data. You can do this using the monitor-data-path setting.For example:
/etc/rstudio/rserver.conf
monitor-data-path=/monitor-data
You also might wish to disable monitoring with RRD entirely. You can do this using themonitor-rrd-enabled setting. For example:
/etc/rstudio/rserver.conf
monitor-rrd-enabled=0
Note that changes to the configuration will not take effect until the server is restarted.
7.2 Using Graphite
If you are managing several servers it might be convenient to send server monitoring data to acentralized database and graphing facility as opposed to local RRD files. You can do this byconfiguring the server to send monitoring data to Graphite (http://graphite.wikidot.com/). Thiscan be done in addition to or entirely in place of RRD.
There are three settings that control interaction with Graphite:
31

CHAPTER 7. MONITORING THE SERVER 32
monitor-graphite-enabled Write monitoring data to Graphite (defaults to 0)
monitor-graphite-host Host running Graphite (defaults to 127.0.0.1)
monitor-graphite-port Port Graphite is listening on (defaults to 2003)
For example, to enable Graphite monitoring on a remote host with the default Graphite port youwould use these settings:
/etc/rstudio/rserver.conf
monitor-graphite-enabled=1monitor-graphite-host=134.47.22.6
Note that changes to the configuration will not take effect until the server is restarted.
7.3 Server Health Checks
7.3.1 Enabling Health Checks
You may wish to periodically poll RStudio Server to ensure that it’s still responding to requests aswell as to examine various indicators of server load. You can enable a health check endpoint usingthe server-health-check-enabled setting. For example:
/etc/rstudio/rserver.conf
server-health-check-enabled=1
After restarting the server, the following health-check endpoint will be available:
http://<server-address-and-port>/health-check
By default, the output of the health check will appear as follows:
active-sessions: 1cpu-percent: 0.0memory-percent: 64.2swap-percent: 0.0load-average: 4.1
7.3.2 Customizing Responses
The response to the health check is determined by processing a template that includes severalvariables. The default template is:

CHAPTER 7. MONITORING THE SERVER 33
active-sessions: #active-sessions#cpu-percent: #cpu-percent#memory-percent: #memory-percent#swap-percent: #swap-percent#load-average: #load-average#
You can customize this template to return an alternate format (e.g. XML or JSON) that is parse-able by an external monitoring system. To do this you simply create a template and copy it to/etc/rstudio/health-check For example:
/etc/rstudio/health-check
<?xml version="1.0" encoding="UTF-8"?><health-check>
<active-sessions>#active-sessions#</active-sessions><cpu-percent>#cpu-percent#</cpu-percent><memory-percent>#memory-percent#</memory-percent><swap-percent>#swap-percent#</swap-percent><load-average>#load-average#</load-average>
</health-check>
7.3.3 Changing the URL
It’s also possible to customize the URL used for health checks. RStudio Server will use the first filewhose name begins with health-check in the /etc/rstudio directory as the template, and requirethat the full file name be specified in the URL. For example, a health check template located at thefollowing path:
/etc/rstudio/health-check-B64C900E
Would be accessed using this URL:
http://<server-address-and-port>/health-check-B64C900E
Note that changes to the health check template will not take effect until the server is restarted.
Chapter 8
License Management
8.1 Product Activation
8.1.1 Activation Basics
When RStudio Server is first installed on a system it operates in evaluation mode for a period oftime and then subsequently requires activation for continued use. To determine the current licensestatus of your system you can use the following command:
$ sudo rstudio-server license-manager status
After purchasing a license to RStudio Server you’ll receive a product key that can be used to activatethe license on a given system. You can perform the activation as follows:
$ sudo rstudio-server license-manager activate <product-key>$ sudo rstudio-server restart
Note that you need to restart the server in order for licensing changes to take effect.
If you want to move your license of RStudio Server to another system you should first deactivate iton the system you are moving from. For example:
$ sudo rstudio-server license-manager deactivate
8.1.2 Virtual Machines
By default RStudio Server cannot be activated on virtual machines (this is because virtual machinesconfound the hardware signature used by the underlying activation mechanism). However, it ispossible to activate on a virtual machine by contacting RStudio customer support and requestingthat your product key allow VM activations.
34
CHAPTER 8. LICENSE MANAGEMENT 35
8.2 Connectivity Requirements
In order to activate or deactivate RStudio Server internet connectivity is required for communicationwith the licensing server. If your server is behind an internet proxy or not connected to the internetat all this section describes what’s required to successfully activate.
8.2.1 Proxy Servers
If your server is behind an internet proxy you may need to add an additional command line flagindicating the address and credentials required to communicate through the proxy. Note howeverthat this may not be necessary if either the http_proxy or all_proxy environment variable isdefined (these are read and used by RStudio Server when available).
If you do need to specify a proxy server explicitly you can do so using the --proxy command lineparameter. For example:
$ sudo rstudio-server license-manager --proxy=http://127.0.0.1/ activate <product-key>
Proxy settings can include a host-name, port, and username/password if necessary. The followingare all valid proxy configurations:
http://127.0.0.1/http://127.0.0.1:8080/http://user:[email protected]:8080/
If the port is not specified, the license manager will default to using port 1080.
8.2.2 Offline Activation
If your system has no connection to the internet it’s also possible to perform an offline activation.To do this, you first generate an offline activation request as follows:
$ sudo rstudio-server license-manager activate-offline-request <product-key>
Executing this command will print an offline activation request to the terminal which you shouldcopy and paste and then send to RStudio customer support ([email protected]). You will receivea reply with a file attachment that can be used to activate offline as follows:
$ sudo rstudio-server license-manager activate-offline <activation-file>$ sudo rstudio-server restart
Note that you need to restart the server in order for licensing changes to take effect.
If you want to move your license of RStudio Server to another system you can also perform licensedeactivation offline. You can do this as follows:

CHAPTER 8. LICENSE MANAGEMENT 36
$ sudo rstudio-server license-manager deactivate-offline
Executing this command will print an offline deactivation request to the terminal which you shouldcopy and paste and then send to RStudio customer support ([email protected]).
You can also perform an offline check of your current license status using the following command:
$ sudo rstudio-server license-manager status-offline