rr & rc flap gates - rasman.in · installation, operation and maintenance manual model rr &...
TRANSCRIPT
Installation, Operation and
Maintenance Manual
RR & RC Flap Gates
ORBINOX reserves the right to change specifications without notice.
ORBINOX CANADA, ORBINOX USA, ORBINOX SPAIN, ORBINOX UK, ORBINOX FRANCE, ORBINOX GERMANY, ORBINOX INDIA, ORBINOX CHINA
WWW.ORBINOX.COM OBXC 06-2010 2
06-2010 Edition
Rev. A - 02/23/11 INSTALLATION, OPERATION AND MAINTENANCE MANUAL
MODEL RR & RC FLAP GATES
INDEX
Introduction ……………………………………………………………………………………….
Handling and Storage ……………………………………………………………………………
Installation ………………………………………………………………………………………...
Wall Mounted ……….…..……………….………………………………………….
Standard Flange Mounted ……………...…………………………………………..
Wall Thimble Mounted ………………………………………………….……….….
Operation …………………………………………………………………………………………
Maintenance ……………………………………………………………………………………...
Cleaning and lubrication ……………………………………………………………
RC Seal replacement ……………..…..……..……………………..……………...
RR Seal replacement ….…………..…..……..……………………….……………..
Trouble shooting ………………………………………………………………………………….
Page
3
3
4
4
7
7
8
9
9
10
12
14
ORBINOX reserves the right to change specifications without notice.
ORBINOX CANADA, ORBINOX USA, ORBINOX SPAIN, ORBINOX UK, ORBINOX FRANCE, ORBINOX GERMANY, ORBINOX INDIA, ORBINOX CHINA
WWW.ORBINOX.COM OBXC 06-2010 3
06-2010 Edition
Rev. A - 02/23/11 INSTALLATION, OPERATION AND MAINTENANCE MANUAL
MODEL RR & RC FLAP GATES
INTRODUCTION This manual describes the recommended procedures for installation, operation, maintenance and
safety precautions for Orbinox RR and RC model flap gates. Please read thoroughly all the instruc-
tions in the manual prior to installation, and contact an Orbinox representative in case of any ques-
tions. The manual makes reference to the “General Arrangement Drawing” (GAD). The GAD is the
drawing that is sent to and approved by the customer prior to the production of the gate. Orbinox
assumes no responsibility or liability if the RR or RC Flap Gate is not installed, operated and main-
tained in strict accordance to the procedures described in this manual.
HANDLING AND STORAGE Standard safety procedures should be followed to prevent personal injury or equipment damage.
Additionally, the following instructions shall be followed during handling and storage to prevent any
damage to the product:
Special care shall be taken on any machined surface when lifting the gate.
Equipment shall be stored in a dry, clean and even area on a raised even wood surface
to prevent distortion of the frame. Do not stack gates.
ORBINOX reserves the right to change specifications without notice.
ORBINOX CANADA, ORBINOX USA, ORBINOX SPAIN, ORBINOX UK, ORBINOX FRANCE, ORBINOX GERMANY, ORBINOX INDIA, ORBINOX CHINA
WWW.ORBINOX.COM OBXC 06-2010 4
06-2010 Edition
Rev. A - 02/23/11 INSTALLATION, OPERATION AND MAINTENANCE MANUAL
MODEL RR & RC FLAP GATES
INSTALLATION: WALL MOUNTED
Required Materials:
RR and RC flap gates are installed by means of mechanical anchor bolts (Hilti Kwilt 3 or equivalent)
and construction sealant (Sikabond or equivalent). Note that as standard, anchor bolts and construc-
tion sealant are not supplied with the flap gate.
For detailed information about the type, size and quantity of the required anchor bolts, or any other
specific installation notes or materials, please refer to the notes on the “General Arrangement Draw-
ing”.
INSTALLATION PROCEDURE
Step 1: Concrete construction inspection
The concrete construction shall be flat, level and plumb, and shall be in accordance to ACI 117-
06 standard. If necessary, use non-shrink grout in order to meet the specified standard. The
minimum concrete strength shall be 3,000 PSI (20.7 MPa).
The wall surface shall be dry.
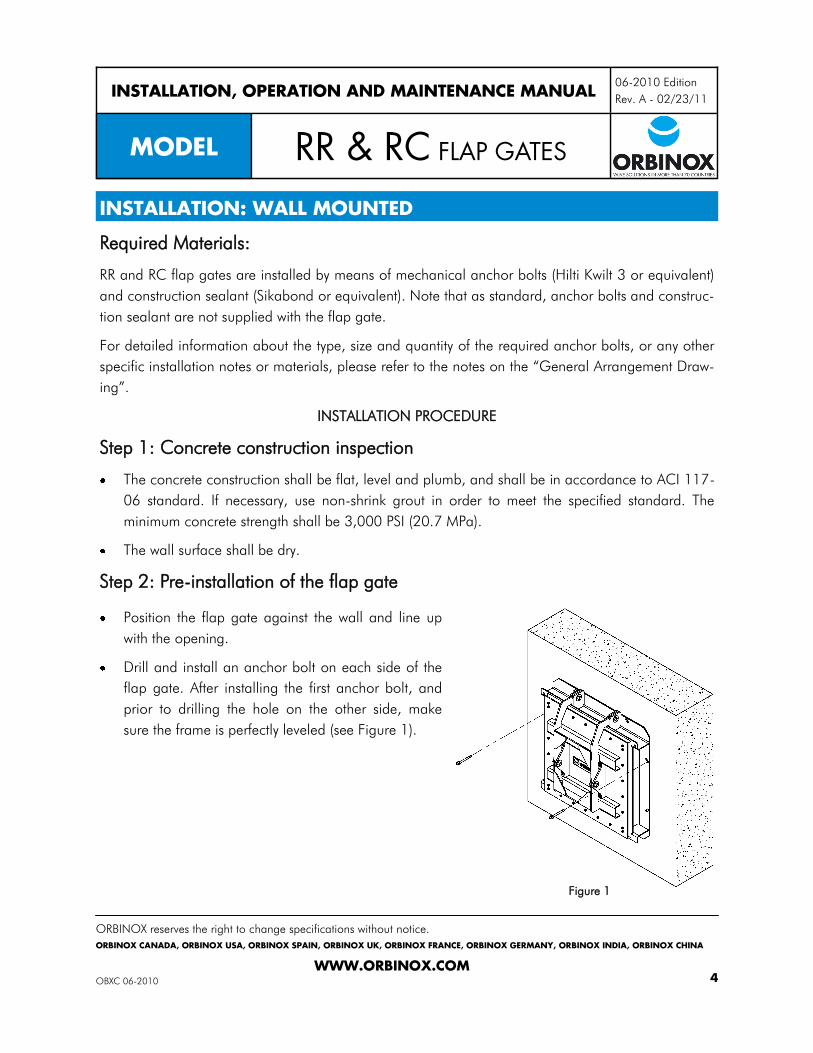
Step 2: Pre-installation of the flap gate
Position the flap gate against the wall and line up
with the opening.
Drill and install an anchor bolt on each side of the
flap gate. After installing the first anchor bolt, and
prior to drilling the hole on the other side, make
sure the frame is perfectly leveled (see Figure 1).
Figure 1
ORBINOX reserves the right to change specifications without notice.
ORBINOX CANADA, ORBINOX USA, ORBINOX SPAIN, ORBINOX UK, ORBINOX FRANCE, ORBINOX GERMANY, ORBINOX INDIA, ORBINOX CHINA
WWW.ORBINOX.COM OBXC 06-2010 5
06-2010 Edition
Rev. A - 02/23/11 INSTALLATION, OPERATION AND MAINTENANCE MANUAL
MODEL RR & RC FLAP GATES
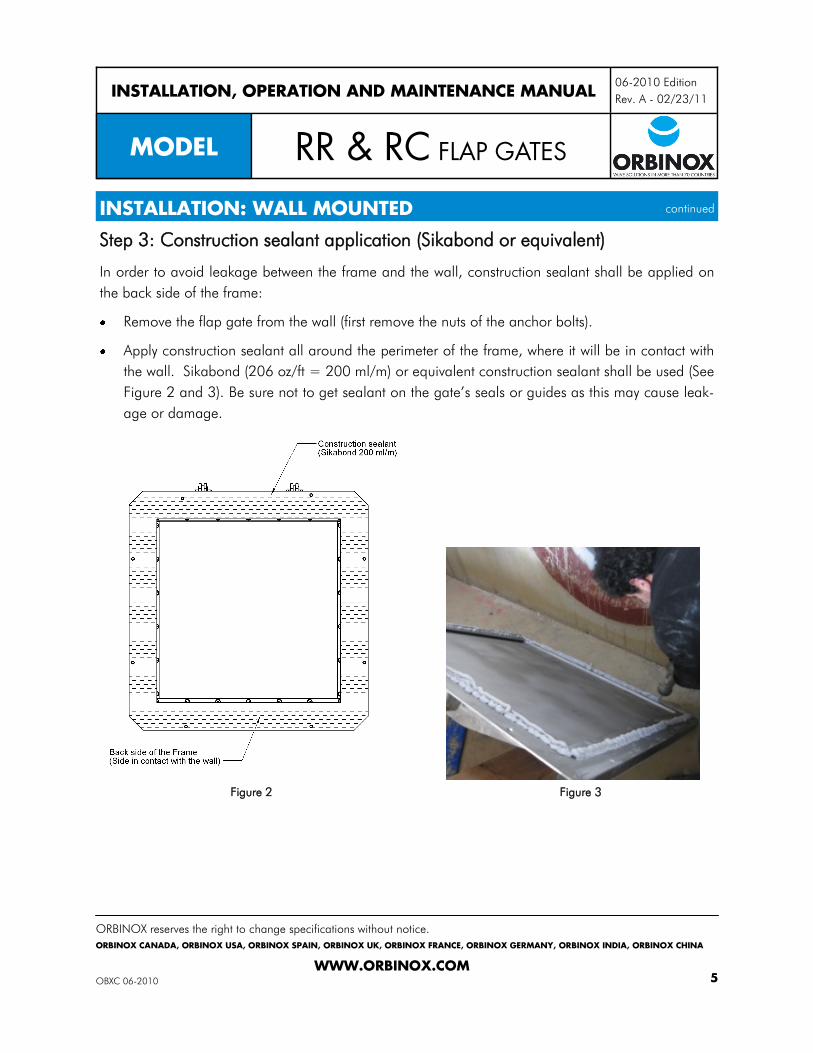
INSTALLATION: WALL MOUNTED Step 3: Construction sealant application (Sikabond or equivalent)
In order to avoid leakage between the frame and the wall, construction sealant shall be applied on
the back side of the frame:
Remove the flap gate from the wall (first remove the nuts of the anchor bolts).
Apply construction sealant all around the perimeter of the frame, where it will be in contact with
the wall. Sikabond (206 oz/ft = 200 ml/m) or equivalent construction sealant shall be used (See
Figure 2 and 3). Be sure not to get sealant on the gate‟s seals or guides as this may cause leak-
age or damage.
continued
Figure 2 Figure 3
ORBINOX reserves the right to change specifications without notice.
ORBINOX CANADA, ORBINOX USA, ORBINOX SPAIN, ORBINOX UK, ORBINOX FRANCE, ORBINOX GERMANY, ORBINOX INDIA, ORBINOX CHINA
WWW.ORBINOX.COM OBXC 06-2010 6
06-2010 Edition
Rev. A - 02/23/11 INSTALLATION, OPERATION AND MAINTENANCE MANUAL
MODEL RR & RC FLAP GATES
INSTALLATION: WALL MOUNTED continued
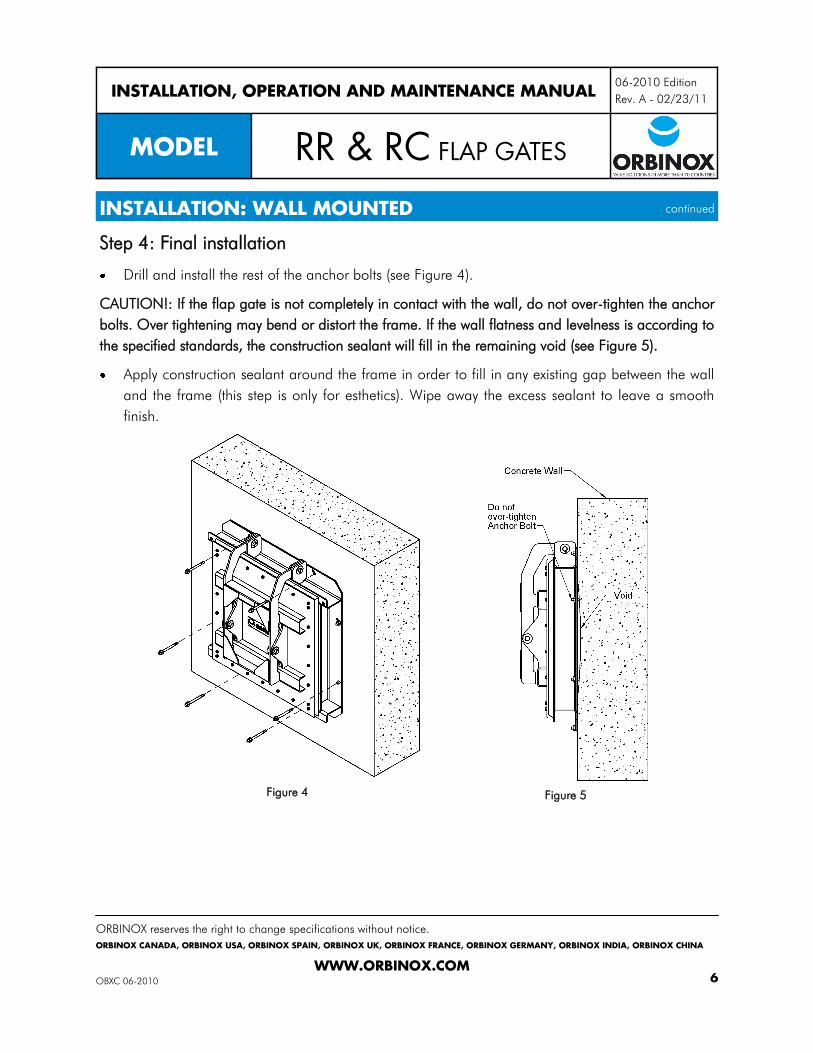
Step 4: Final installation
Drill and install the rest of the anchor bolts (see Figure 4).
CAUTION!: If the flap gate is not completely in contact with the wall, do not over-tighten the anchor
bolts. Over tightening may bend or distort the frame. If the wall flatness and levelness is according to
the specified standards, the construction sealant will fill in the remaining void (see Figure 5).
Apply construction sealant around the frame in order to fill in any existing gap between the wall
and the frame (this step is only for esthetics). Wipe away the excess sealant to leave a smooth
finish.
Figure 4 Figure 5
ORBINOX reserves the right to change specifications without notice.
ORBINOX CANADA, ORBINOX USA, ORBINOX SPAIN, ORBINOX UK, ORBINOX FRANCE, ORBINOX GERMANY, ORBINOX INDIA, ORBINOX CHINA
WWW.ORBINOX.COM OBXC 06-2010 7
06-2010 Edition
Rev. A - 02/23/11 INSTALLATION, OPERATION AND MAINTENANCE MANUAL
MODEL RR & RC FLAP GATES
INSTALLATION: STANDARD FLANGE MOUNTED Required Materials:
Orbinox Standard Flange Mounted RR Flap Gates are installed by means of Hex Bolts and a flange
gasket. For detailed information about the size and quantity of the required bolts, or any other spe-
cific installation notes or materials, please refer to the notes on the „General Arrangement Drawing‟.
Installation:
Partially tighten the four corner bolts, and check that the flap gate is perfectly lined up with the
flange.
Install the rest of the bolts, and evenly tighten all of them.
INSTALLATION: WALL THIMBLE MOUNTED Required Materials:
Orbinox Wall Thimble Mounted RR and RC Flap Gates are installed by means of Hex Bolts. In order
to avoid leakage between the wall thimble and the frame, construction sealant shall be used.
(Sikabond Construction Sealant or equivalent, 206oz/ft or 200ml/m of opening perimeter). For de-
tailed information about the size and quantity of the required bolts, or any other specific installation
notes or materials, please refer to the notes on the „General Arrangement Drawing‟. Note that as
standard, bolts and construction sealant are not supplied with the slide gate.
Installation:
The concrete construction shall be flat, level and plumb, and shall be in accordance to ACI
117-06 standard. If necessary, use non-shrink grout in order to meet the specified standard.
Apply construction sealant all around the perimeter of the frame. Sikabond (200 ml/m) or
equivalent construction sealant shall be used.
Partially tighten the four corner bolts, and check that the flap gate is perfectly lined up with the
wall thimble opening.
Install the rest of the bolts, and evenly tighten all of them.
ORBINOX reserves the right to change specifications without notice.
ORBINOX CANADA, ORBINOX USA, ORBINOX SPAIN, ORBINOX UK, ORBINOX FRANCE, ORBINOX GERMANY, ORBINOX INDIA, ORBINOX CHINA
WWW.ORBINOX.COM OBXC 06-2010 8
06-2010 Edition
Rev. A - 02/23/11 INSTALLATION, OPERATION AND MAINTENANCE MANUAL
MODEL RR & RC FLAP GATES
OPERATION
Initial Operation:
Before operating the flap gate, make sure there are no foreign deposits or materials on the seals,
guides or sealing area. Gate seals could be damaged if the area is not cleaned and coated with a
light grease. Please refer to section “Materials needed for maintenance and seal replacement” on
page 9 for detailed information about the required grease type.
Operation:
The RR and RC Flap Gate is operated (opened) automatically, when the seating water head is higher
than the unseating water head.
ORBINOX reserves the right to change specifications without notice.
ORBINOX CANADA, ORBINOX USA, ORBINOX SPAIN, ORBINOX UK, ORBINOX FRANCE, ORBINOX GERMANY, ORBINOX INDIA, ORBINOX CHINA
WWW.ORBINOX.COM OBXC 06-2010 9
06-2010 Edition
Rev. A - 02/23/11 INSTALLATION, OPERATION AND MAINTENANCE MANUAL
MODEL RR & RC FLAP GATES
MAINTENANCE: CLEANING AND LUBRICATION Orbinox model RR and RC Flap Gates need practically no maintenance. In order to assure maxi-
mum performance of the flap gate, the following maintenance inspections shall be carried out peri-
odically every 6 months:
Clean the gate with clear water and remove any deposits, especially on the seals.
Check the seals and make sure they are not damaged. Seals shall be replaced if damaged. See
section “Maintenance: Seal Replacement” for detailed procedures about seal replacement.
Seals shall be wet. If the flap gate has not been used for a long period of time under dry condi-
tions, the seals shall be wetted with clear water.
Spare parts:
Orbinox does not recommend stocking any spare parts by the owner of the equipment as the flap
gates are designed for a very long life cycle. If a repair part is required, please contact an Orbinox
representative and provide the following information:
Orbinox S/O number.
“Orbinox General Arrangement Drawing” number.
Project name (if applicable).
Vendor‟s company name.
Materials needed for maintenance and seal replacement:
Material Type Recommended or equivalent
Grease Silica-Gel Silicone Grease Verkosil G-2
Glue Instant adhesive Loctite 495
ORBINOX reserves the right to change specifications without notice.
ORBINOX CANADA, ORBINOX USA, ORBINOX SPAIN, ORBINOX UK, ORBINOX FRANCE, ORBINOX GERMANY, ORBINOX INDIA, ORBINOX CHINA
WWW.ORBINOX.COM OBXC 06-2010 10
06-2010 Edition
Rev. A - 02/23/11 INSTALLATION, OPERATION AND MAINTENANCE MANUAL
MODEL RR & RC FLAP GATES
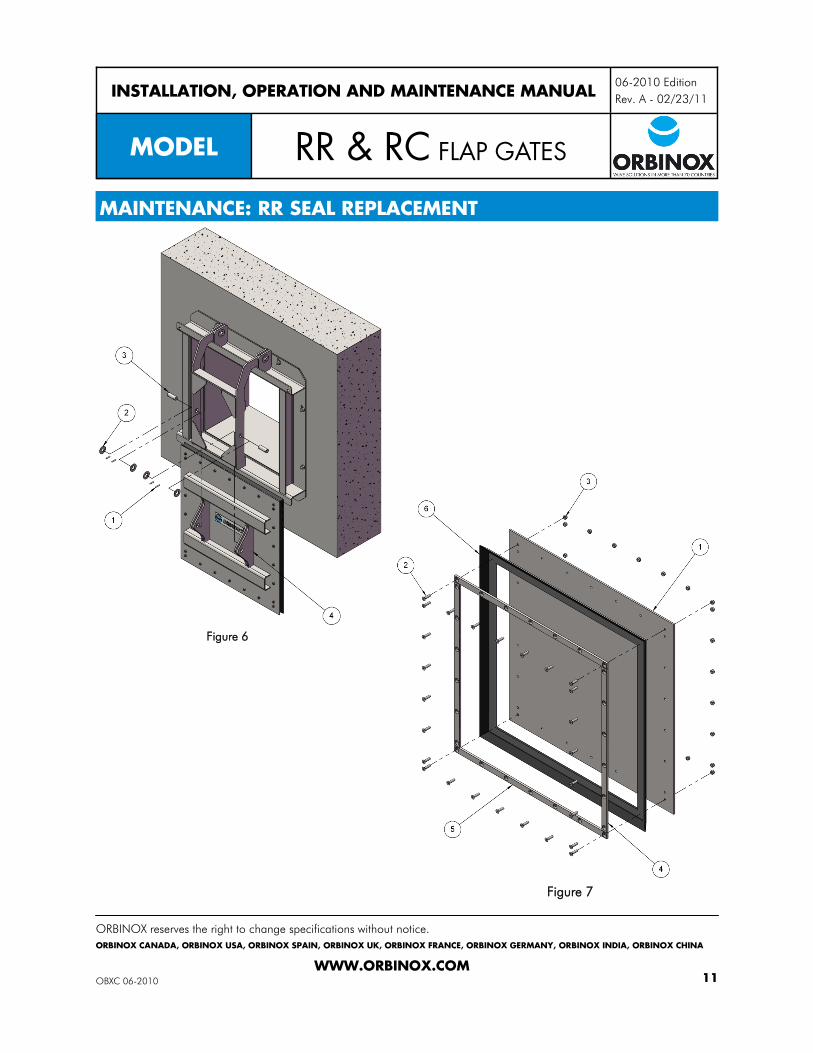
MAINTENANCE: RR SEAL REPLACEMENT
The following procedure describes how to replace the RC Flap Gate‟s seal. The flap shall be secured
by lifting it to the open position with a crane. In case it cannot be secured in the open position, the
flap should be first removed prior to the seal replacement.
Un-install flap (figure 6)
Step 1: Remove spring pins, washers and hinge pins (items 1, 2 and 3) with caution, as the flap
(item 4) is no longer secured.
Seal replacement (figure 7)
Step 1: Remove bolts and nuts (items 2 and 3) and remove the lateral and horizontal retainers
(item 4 and 5).
Step 2: Remove seal (item 6) and replace it with the new seal.
Reassembly:
Follow Steps 2 to 1.
ORBINOX reserves the right to change specifications without notice.
ORBINOX CANADA, ORBINOX USA, ORBINOX SPAIN, ORBINOX UK, ORBINOX FRANCE, ORBINOX GERMANY, ORBINOX INDIA, ORBINOX CHINA
WWW.ORBINOX.COM OBXC 06-2010 11
06-2010 Edition
Rev. A - 02/23/11 INSTALLATION, OPERATION AND MAINTENANCE MANUAL
MODEL RR & RC FLAP GATES
MAINTENANCE: SEAL REPLACEMENT continued
Figure 7
MAINTENANCE: RR SEAL REPLACEMENT
Figure 6
ORBINOX reserves the right to change specifications without notice.
ORBINOX CANADA, ORBINOX USA, ORBINOX SPAIN, ORBINOX UK, ORBINOX FRANCE, ORBINOX GERMANY, ORBINOX INDIA, ORBINOX CHINA
WWW.ORBINOX.COM OBXC 06-2010 12
06-2010 Edition
Rev. A - 02/23/11 INSTALLATION, OPERATION AND MAINTENANCE MANUAL
MODEL RR & RC FLAP GATES
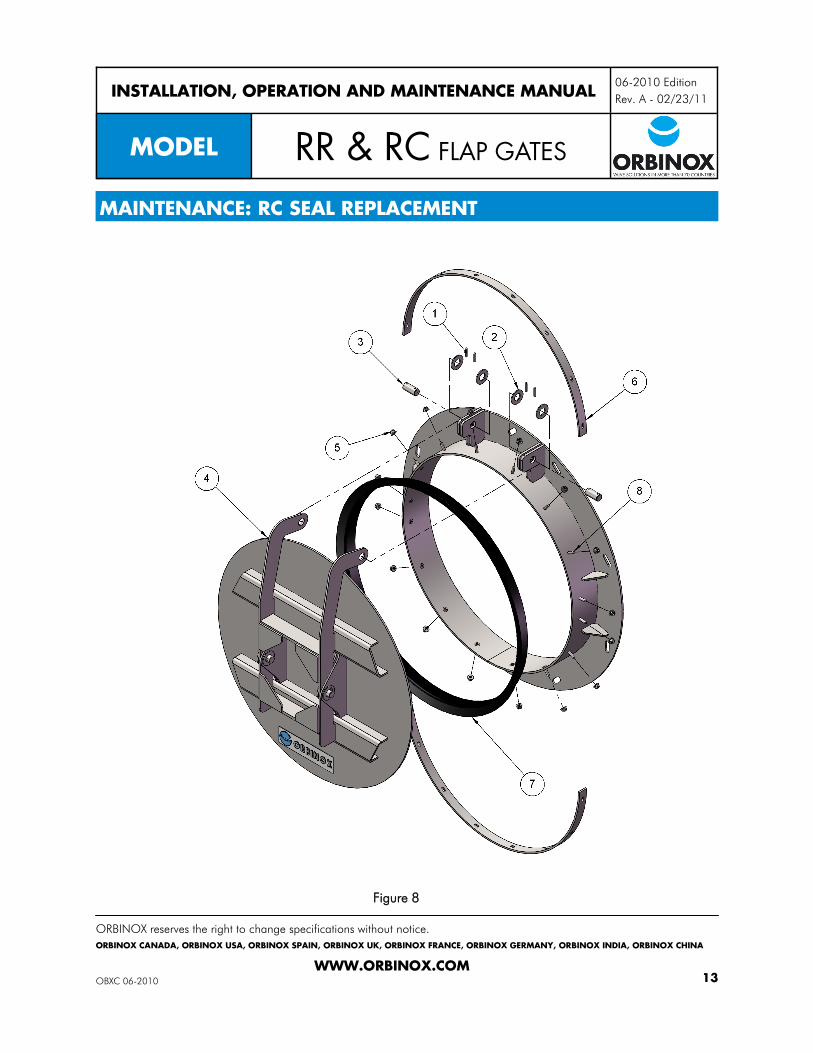
MAINTENANCE: RC SEAL REPLACEMENT
The following procedure describes how to replace the RR Flap Gate‟s seal. The flap shall be secured
by lifting it to the open position with a crane. In case it cannot be secured in the open position, the
flap should be first removed prior to the seal replacement.
Un-install flap
Step 1: Remove spring pins, washers and hinge pins (items 1, 2 and 3) with caution, as the flap
(item 4) is no longer secured.
Seal replacement
Step 1: Remove bolts and nuts (items 5 and 8) and remove the retainers (items 6).
Step 2: Remove seal (item 7) and replace it with the new seal.
Reassembly:
Follow Steps 2 to 1.
ORBINOX reserves the right to change specifications without notice.
ORBINOX CANADA, ORBINOX USA, ORBINOX SPAIN, ORBINOX UK, ORBINOX FRANCE, ORBINOX GERMANY, ORBINOX INDIA, ORBINOX CHINA
WWW.ORBINOX.COM OBXC 06-2010 13
06-2010 Edition
Rev. A - 02/23/11 INSTALLATION, OPERATION AND MAINTENANCE MANUAL
MODEL RR & RC FLAP GATES
MAINTENANCE: SEAL REPLACEMENT continued
Figure 8
MAINTENANCE: RC SEAL REPLACEMENT

ORBINOX reserves the right to change specifications without notice.
ORBINOX CANADA, ORBINOX USA, ORBINOX SPAIN, ORBINOX UK, ORBINOX FRANCE, ORBINOX GERMANY, ORBINOX INDIA, ORBINOX CHINA
WWW.ORBINOX.COM OBXC 06-2010 14
06-2010 Edition
Rev. A - 02/23/11 INSTALLATION, OPERATION AND MAINTENANCE MANUAL
MODEL RR & RC FLAP GATES
TROUBLE SHOOTING
SYMPTOM CAUSE SOLUTION
Leakage between flap
gate and concrete wall
Concrete wall does not
meet the required std.
Un-install the slide gate and fix
the wall.
Not enough construction
sealant.
Un-install the slide gate, clean
the wall and apply a new layer of
construction sealant.
Loose anchor bolts. Tighten anchor bolts.
Incorrect anchor bolts.
Check the “General Arrangement
Drawing” and make sure the
right anchor bolts have been in-
stalled.
Leakage through the seal
Foreign material trapped
between flap and frame
Remove the foreign material.
Check if there is any damage to
the seal.
Damaged seal. Replace seal.