route taken by protestors scene 1 - sahrc.org.za gw6(a).pdf · • incident 4 – trt line shoots...
TRANSCRIPT

1
ROUTE TAKEN BY PROTESTORS – SCENE 1
CALS analysis

2
SECTION 1: THE SAPS CASE

3
The SAPS case is that the protestors at scene 1 made three “separate, organised attempts” to
breach the police line. Those attempts are described in slide 195 as follows:
• Incident 1 – Protesters 1st attempt (Protesters approach police line the first time as
Nyala 4 starts deploying barbed wire – no POP engagement, protesters cut off by Nyala
4’s barbed wire)
• Incident 2 – Protesters 2nd attempt (before the kraal – POP engages with less than lethal
force, Nyala 4 cuts off advance the second time)
• Incident 3 – Protesters 3rd attempt (around the kraal – POP engages from right and left
flanks with less than lethal force. The POP armoured vehicles attempt to move past the
kraal to form a dispersion line)
• Incident 4 – TRT line shoots at advancing armed protesters – SCENE1

4
The route taken for these alleged attempts to breach the police line is described by the SAPS in slide
194 of Exhibit L as follows:

5
The purpose of this document is to demonstrate the falsity of the SAPS case and to show that the
core of the protest group took the route shown in yellow below. Others, who were not part of the
core protestor group, took slightly different routes, as shown in red.

6
The route of the core protestor group, described in yellow above, accords in general terms with the
initial route described by the SAPS in SAPS Hard Drive/Videos/Lon.mpg (shown below, at 14:49)
The route shown in that video - where the protestors are described as “circumnavigating the fence
line” - does not suggest four separate “attacks” on police lines, and does not suggest that incidents
1 or 2 took place at all.

7
Another SAPS document – Dg76.pdf (SAPS Hard Drive/Recycled/Dg76) – also describes a different
route as shown below:
This document – again referring to an attempt to “circumnavigate police armoured vehicles” - does
not suggest four separate “attacks” on police lines, and does not suggest that incidents 1 or 2 took
place as described in Exhibit L, or at all.
Both Lon.mpg (17.08.12) and Dg76.pdf (27.08.12) were produced within a fortnight of the incidents
of 16.08.12, and prior to the meeting at Potchefstroom. Exhibit L was produced substantially later
and after the meeting at Potchefstroom. The reason for the change in the SAPS case is unclear, but
the video and photographic evidence considered below does not support the version shown in
Exhibit L.

8
SECTION 2: SLIDE 198

9
An image purporting to show the first alleged attempt to enter the police enclosure is shown in
slide 198 of Exhibit L.
This slide claims to show Nyala 4 deploying barbed wire. However, what the SAPS claim is Nyala 4 is
in fact Nyala 5, which is driving on the path to Nkaneng. There are two reasons why.

10
REASON 1: BULL-BARS
Nyala 4 has distinctive bull bars, which cover the blue line which crosses the front of the Nyala, and
includes a protruding triangular section at the bottom.
Vermaak – IMGP4542 (zoomed) 042.MTS at 01:53
Nyala 4 at kraal after scene 1 Nyala 4 prior to deploying barbed wire in front of koppie
Protruding triangular section
on bullbar
High bulbar with protruding
triangular section

11
The Nyala in slide 198 does not have a protruding triangular section on its bulbar, nor does its
bullbar rise above the blue line which crosses the front of the Nyala. In fact, the Nyala in slide 198
has the same bullbar as Nyala 5.
Slide 198 (zoomed) Vermaak IMGP4548 (zoomed)
Nyala 5, adjacent to kraal after scene 1
Bullbar covers headlights only and blue
line across front of Nyala is exposed
Bullbar covers headlights only and blue
line across front of Nyala is exposed

12
REASON 2: ANGLE OF PHOTOGRAPH
It is possible to work out the location of the photographer for slide 198, from identifiable landmarks
marked in the image below.
Double pole Single Pole Pylons

13
Each of those landmarks are marked in the image below (Vermaak IMGP4527). The necessary field of view for the image in slide 198 is marked in yellow, with the centre line of the image marked in blue.
NB: The centre line of the image cuts between the single pole and double pole with both pylons to the right of the double pole

14
The following image (Vermaak Blackberry 01516) shows the routes taken by Nyalas 4 and 5 prior to scene 1. The line of barbed wire laid by Nyala 4 is marked in purple, and the route taken by Nyala 5 is marked in black.
Pole
Nyala 3
Nyala 4
Nyala 5

15
Below, the routes of Nyalas 4 and 5, as shown above, have been plotted onto the same image showing the camera field of view.
From this analysis, slide 198 cannot be an image of Nyala 4, as Nyala 4 at no stage crossed between the camera’s field of view and the pole.

16
Instead, the image is very likely to be an image of Nyala 5 commencing its move from the path towards the kraal.
The likely position of the protestor group in slide 198 is marked with a grey oval.

17
Statement of Warrant Officer Phaswana
The interpretation set out above not only accords with the photographs, but also accords with the account of the driver of Nyala 5, Warrant Officer Phaswana. His paragraphs 4 and 5 are repeated below:
“The instruction was given by Brig. Calitz to deploy the barbed wire all six Nyalas. While I was waiting Nayala four (4) to deploy so that I can deploy mine. A group of strikers were walking towards my Nyala. I drove slowly forward to avoid them encircling the Nyala while waiting for Nyala 4. Nyala four came and I drove in the action zone fast crossing in front of Nyala 4. Nyala 4 pulled
the wire until at the kraal. I stopped my Nyala next to the kraal and the strikers armed with
spears and pangas ran around the kraal. Water cannon was used and cs then later rubber
bullets but they continued running around the kraal to the direction of the police.”

18
SECTION 3: A CHRONOLOGY OF IMAGES

19
In what follows, we have considered nine photos which, together, indicate the route of the crowd and the respective Nyalas at scene 1. The images considered are:
Vermaak IMGP4539
Vermaak Blackberry - 01514
Loest 047.jpg
Vermaak IMGP4540
Slide 198
Ramanala – 121.jpg
Slide 188 at 03:25
Vermaak Blackberry – 01515
Vermaak Blackberry – 01516

20
Vermaak IMGP4539.jpg
15:40:10 (Vermaak Pentax time) ; 15:38:28 (ETV time)
This image shows the Nyalas in their pre-positioned deployment. Mr Mathunjwa has just departed.
The barbed wire Nyalas have not yet commenced their roll-out. Individuals can be seen walking on
the path from Nkaneng towards the koppie where the crowd remain.
Individuals walking
towards koppie circled in
blue.
Nyala 6 to north of
path to Nkaneng,
facing east
Nyala 3
Nyala 4
Mr Mathunjwa’s
vehicle
Nyala 5
NB: TRT have not exited
vehicles

21
Vermaak Blackberry - 01514 15:46:02 (Vermaak BB time) – 15:42:35 (ETV time)
Nyala 1 has started to
deploy barbed wire
Large numbers are dispersing from koppie. Many of
those dispersing are using path to Nkaneng and are
walking on both side of Nyala 6 to access the path.
TRT now in a line outside
their vehicles

22
Loest 047.jpg (zoomed)
15:42 (Loest time) – c.15:42:35 (ETV time)
The exact timing of this photograph cannot be confirmed, but it appears to be taken around the same time as the previous image. Loest 048.jpg is also timed at 15:42 (Loest time) and shows the TRT in a clear line outside their vehicles, as shown in Vermaak Blackberry 01514, but not in Vermaak Blackberry 01513 (15:40:31 – ETV time). It is also clear that this photo was taken prior to Vermaak IMGP4540 (15:43:56 - ETV time), because Nyala 6 is still facing east. Accordingly, the outer range for the photograph is between 15:40:31 and 15:43:56, but CALS estimate it was most likely taken at around 15:42:35.
Nyala 6
Small group of protestors returning on path
towards Nkaneng

23
The same image used above to show the camera position for slide 198 (Vermaak IMGP4527) is used below to show the camera field of view in Loest 047.jpg, The field of view of the original photograph is shown in yellow, with the zoomed field of view in blue. The location of the small group of protestors returning along the path to Nkaneng is shown as a grey oval.
Nyala 6 to north of
path to Nkaneng,
facing east

24
Vermaak IMGP4540.jpg 15:45:38 (Vermaak Pentax time) ; 15:43:56 (ETV time)
As Nyala 1 starts to deploy barbed wire, a significant number of protestors leave koppie and head in direction of Nkaneng, along path. Nyala 6 moves to south of path, apparently in order to allow protestors to walk along the path unimpeded.
Nyala 6 has moved to
south of path to Nkaneng,
apparently in order to
allow protestors to walk
along that path
TRT outside vehicles
Protestors moving
towards Nkaneng
Nyala 1 deploying
barbed wire
25
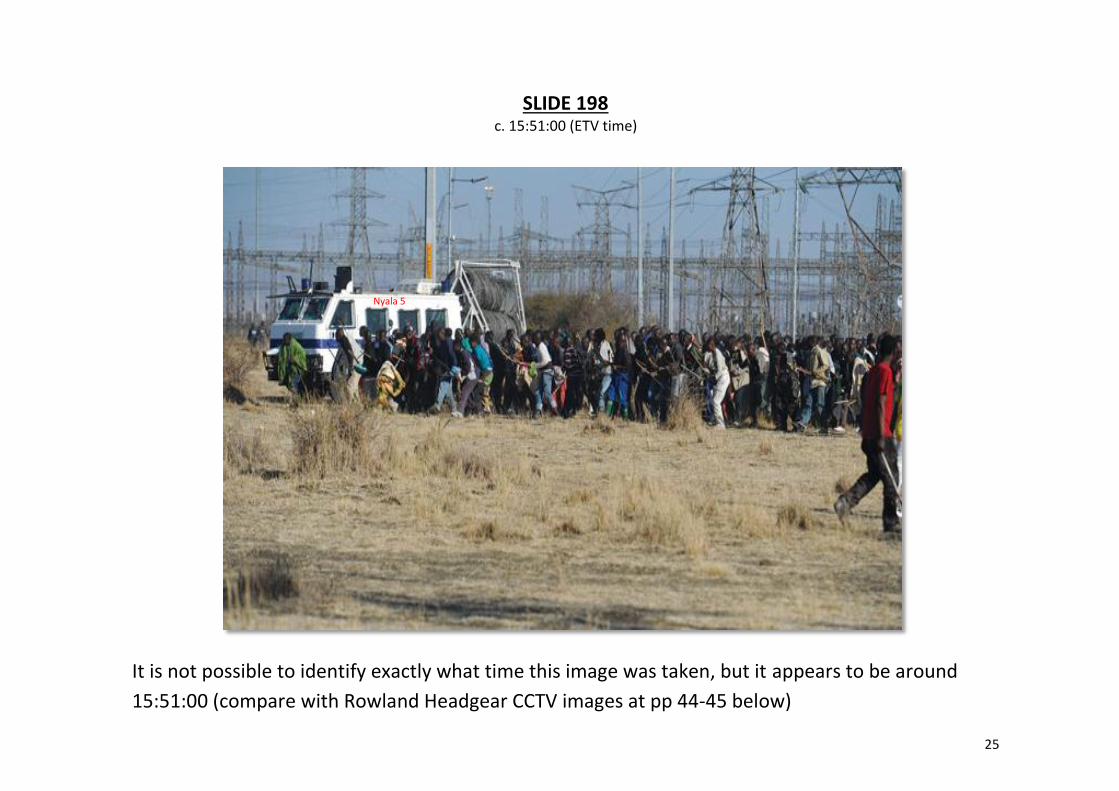
SLIDE 198 c. 15:51:00 (ETV time)
It is not possible to identify exactly what time this image was taken, but it appears to be around
15:51:00 (compare with Rowland Headgear CCTV images at pp 44-45 below)
Nyala 5

26
As above, the camera field of view in slide 198 is shown in yellow, and the position of the protestor
group in relation to Nyalas 4 and 5 is marked with a grey oval
Nyala 4
Nyala 3
Nyala 5

27
RAMANALA - 121.jpg
15:40:24 (Ramanala time) ; 15:51:09 (ETV time)
This photo shows Nyalas 3 and 4 adjacent to one another, as Nyala 4 prepares to roll out barbed wire
NB: the front of the protest group is a considerable distance ahead of Nyala 4 at this stage and does
not appear to be attacking Nyala 4 or trying to breach the police line in the vicinity of Nyala 4.
Nyala 3 with barbed
wire unrolled
Nyala 4 about to roll
out barbed wire
Edge of single
pole
Crowd moving in direction of arrow
Door of Nyala 2
Barbed wire triangle
discarded from Nyala 3
– visible in Vermaak
IMGP4544.jpg
Nyala P11, which has started to
move from its position shown in
Vermaak IMGP4539. Note the
dust kicked up by its wheels.
Also note that it is turning to
the right with its door slightly
open as in Helipad CCTV at
15:51:33 – 15:51:42

28
Below, the camera location and field of view is shown for 121.jpg. The positions of Nyalas 2, 3, 4
and 5 in 121.jpg are shown, and the likely position of the crowd is shown as a grey oval.
NB: Nyala 5 does not start its move until 15:51:21 (see Rowland Headgear @ 16:13:50, and below at p.45)
Nyala 4
Nyala 5
Nyala 3
Nyala in front of shot (P11)
Nyala 2

29
SLIDE 188 at 03:25 c.15:51:36 (ETV time)
This image below follows in the chronology. It shows Nyala 5 passing in front of Nyala 4. It is
possible to identify Nyala 4 by its high bullbars, which are not shared by Nyala 5 (see slide 198)
It is not possible to identify exactly what time this image was taken, but it appears to be around
15:51:36 (compare with Rowland Headgear image which captures N5 crossing N4 - p.45 below)

30
Once again, the likely location and field of view of the camera for slide 188 is shown. The likely
positions of Nyala 4 and 5 in the photo are also shown, marked in red, and the likely position of the
core protestor group is shown as a grey oval.
Nyala 5
Nyala 4
Double pole visible in
centre rear of shot

31
Slide 194 - Vermaak Blackberry 01515 15:55:14 (Vermaak Blackberry time) ; 15:51:47 (ETV time)
The next image in the chronology is the image from slide 194. Once again, we have marked Nyalas 4 and 5, with their routes in purple and black respectively. Fenceline on edge of Nkaneng is marked.
Nyala 5
Nyala 4

32
Vermaak Blackberry 01516 15:56:48 (Vermaak Blackberry time) ; 15:53:21 (ETV time)
The final image in the chronology – timed two minutes later than the previous image - shows the protestor group moving around the kraal towards the location of scene 1. Nyalas 4 and 5 are marked again, with their routes in purple and black respectively.
Nyala 4
Nyala 5
NB: comparing to Vermaak Blackberry 01515, it appears that some of those in rear group
(ie not core protester group) have continued to move north towards an alternative entry
point to Nkaneng, but the majority have not, instead, moving towards the kraal in a line
behind the core group. Taking into account the fact that it is alleged that rubber bullets
were fired from the position near Nyalas 4 and 5, the line of protestors appears to be
dictated by the fenceline along the southern edge of Nkaneng rather than by organisation)

33
A RECONSTRUCTION
We have plotted below the five positions of Nyalas 4 and 5, as well as the core protestor group, in each of the photos taken from 15:51:00 onwards. Red arrows show the route of other protestors.

34
Compare the route of the core protestors to the route described by the SAPS on slide 194 in SAPS
Hard Drive/Videos/Lon.mpg (shown below, at 14:49)
:

35
Now compare to the route described by the SAPS on slide 194:

36
SOME CONCLUSIONS ON THE PHOTOGRAPHIC EVIDENCE
The following conclusions emerge from the analysis above:
(1) The route described in slide 194 is not supported by the photographic evidence, but the route
described in the Lon.mpg video is supported, in general terms, by the photographic evidence.
(2) Before the path to Nkaneng was blocked by barbed wire rolled out by Nyala 4, many protestors had
been permitted to walk down that path, and Nyala 6 had moved out of the way to allow them to do so.
(3) The crowd in slide 198 were camera-side (north) of the path to Nkaneng and remained camera-side
(north) of the path to Nkaneng throughout their movement towards the kraal.
(4) There does not appear to have been any attempt to breach the police line prior to the kraal and
“Incident 1” appears to be a fiction.
(5) There is no clear evidence that “Incident 2” occurred as described by the SAPS, but the evidence does
not allow the possibility to be discounted.
(6) Although the shape of the crowd in slide 194 suggests a “spearhead”, the photographic evidence as a
whole suggests that this is not the case and the crowd, as a whole, is moving in a consistent direction
towards the kraal area.

37
SECTION 4: CCTV FOOTAGE

38
The CCTV video footage available confirms the conclusions set out above. Below, a series of
screenshots are provided from the available CCTV footage to indicate the movement of the crowd
from the koppie to the kraal. Screenshots are provided from the footage from:
FLIR
Rowland Headgear
The screenshots do not substitute for viewing the footage itself, which clearly shows the movement
of Nyalas and protestors on the ground. However, the screenshots are provided in order to assist
the interpretation of the footage itself.

39
FLIR camera location Rowland Headgear
camera location

40
FLIR CAMERA
TIMECODE: 15:55:20 (ETV time = 15:49:57) TIMECODE: 15:55:35 (ETV time = 15:50:13)
- The crowd begins to move off koppie 2 and heads to right of shot - Nyala 3 has begun to deploy barbed wire
- No indication of attempt to move towards police lines - Crowd continues to move to right of shot and no indication
- Nyala 3 visible of movement towards police lines
Nyala 3 preparing to roll out barbed wire
Arrow showing general direction of crowd movement
Nyala 3 has commenced roll-out of wire
Crowd continues to move in same general direction

41
TIMECODE: 15:56:50 (ETV time = 15:51:28) TIMECODE: 15:56:51 – 15:57:16 (ETV time = 15:51:29 - 15:51:54)
- Nyala 3 has reached Nyala 4 - Crowd continues to move in same direction, towards kraal - Nyala 4 begins to roll out barbed wire - No evidence of an attack on police or attempt to breach lines - Crowd visible in background moving left to right of screen - No evidence of a crowd retreat or loop as suggested by slide 194 - No indication of any attempt to breach police lines or attack Nyala 4
Arrow showing general
direction of crowd
movement
Nyala 4 begins to roll
out barbed wire Arrow showing general
direction of crowd
movement
Stationary
water cannon

42
TIMECODE: 15:58:11 (ETV time = 15:52:49) TIMECODE: 15:58:34 (ETV time = 15:53:13)
- NW water cannon sets off for kraal - As water cannon heads to kraal, the majority of the crowd have - No indication that NW water cannon was utilised for alleged Incident 1 made significant progress towards kraal. No evidence of an
apparent retreat or loop as suggested by SAPS
Water cannon heading
to kraal
Water cannon heading
to kraal
Majority of crowd
43
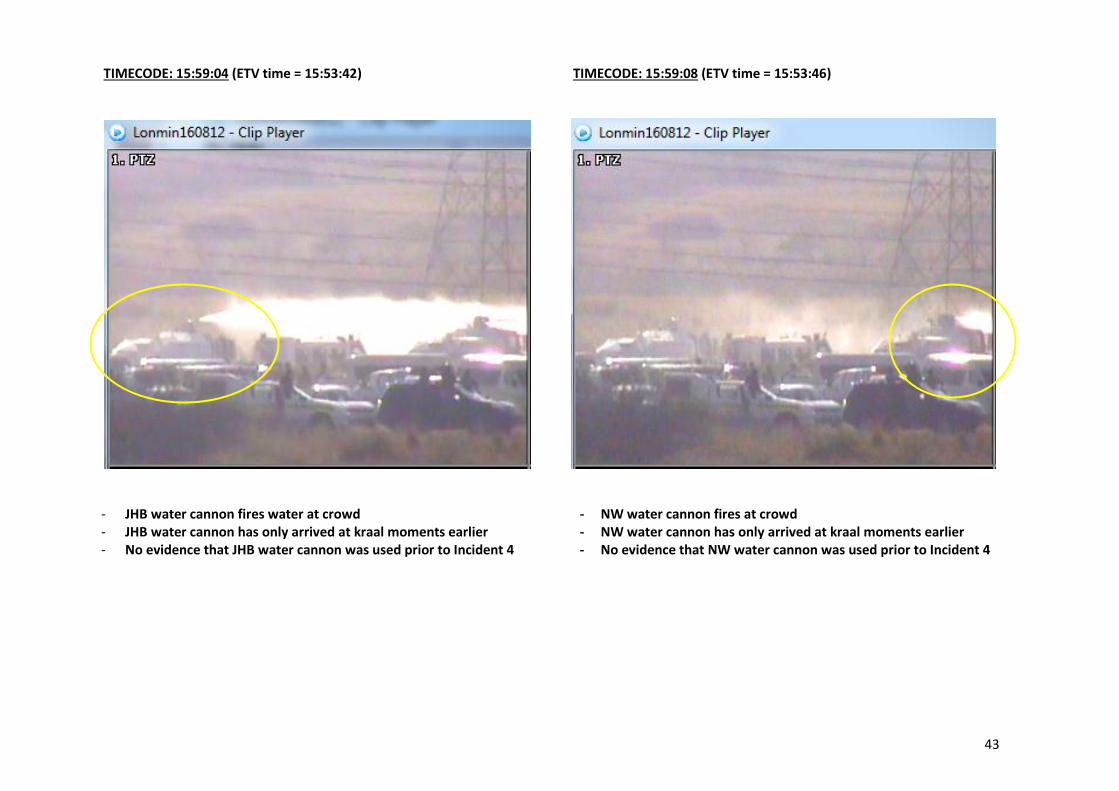
TIMECODE: 15:59:04 (ETV time = 15:53:42) TIMECODE: 15:59:08 (ETV time = 15:53:46)
- JHB water cannon fires water at crowd - NW water cannon fires at crowd - JHB water cannon has only arrived at kraal moments earlier - NW water cannon has only arrived at kraal moments earlier - No evidence that JHB water cannon was used prior to Incident 4 - No evidence that NW water cannon was used prior to Incident 4

44
ROWLAND HEADGEAR TIMECODE: 16:12:41 (ETV time = 15:50:12) TIMECODE: 16:13:21 (ETV time = 15:50:52)
- Nyala 3 starts to deploy barbed wire. - Nyalas 3 and 4 stop by single pole and Nyala 4 prepares to unravel - Crowd has started to move off hillside barbed wire. - Shortly after this screenshot, Nyala 4 begins to move forward - Nyala 5 is stationary in original position.
- Protestor group can be seen approaching Nyala 5 from the koppie
Nyala 3
Single pole
Nyala 4 Nyala 4 Nyala 3
Single pole
Nyala 5
Front of protestor group

45
TIMECODE: 16:13:50 (ETV time = 15:51:21) TIMECODE: 16:13:56 (ETV time = 15:51:27)
- Nyala 5 starts to drive back towards kraal area. - Nyala 4 starts to move towards kraal. The front of the protestor group - Protestor group has passed well beyond the right of Nyala 5 and is a considerable distance away from Nyala 4, beyond Nyala 5.
has not sought to breach police lines at this point - Protestor group continues in consistent direction, with no indication of - Nyala 4 stationary and has not yet started to deploy barbed wire an attack on Nyala 4 or an attempt to breach police lines, or a retreat - No indication of protestor group within vicinity of Nyala 5 and loop as suggested by slide 194.
Nyala 5
Nyala 4
Direction of crowd movement
Direction of Nyala 5
movement
Nyala 5
Nyala 4
Front of protest group
Direction of crowd movement

46
TIMECODE: 16:14:13 (ETV time = 15:51:44) TIMECODE: 16:14:25 (ETV time = 15:51:56)
- Nyala 5 crosses in front of Nyala 4. - Nyala 4 has not yet reached the kraal, but is just visible behind nyalas - The crowd is nowhere near the line of barbed wire laid by Nyala 4 as it moves towards the kraal. - There is no indication of an attack on police lines, or a retreat and
loop as suggested by slide 194. - The movement of Nyala 4 has slowed, but it has not stopped. - The protestor group continues in consistent direction towards kraal
Trailer of
Nyala 5
Nyala 4
NB: No protestors near line of
barbed wire laid by Nyala 4
Direction of crowd movement
Nyala 4

47
TIMECODE: 16:14:32 (ETV time = 15:52:03) TIMECODE: 16:15:48 (ETV time = 15:53:19)
- Nyala 4 has only just reached the kraal and is now stationary. - Nyalas have moved from south west of small kraal to north of small
- Front of crowd has already progressed around the back of the kraal kraal moving into position between the kraals
by the time Nyala 4 reaches the kraal. - see CALS analysis - Scene 1 vehicle movement for identification of
- By the time Nyala 4 reaches the kraal, other Nyalas are already each vehicle.
speeding around the northern side of the kraal to intercept protestors - Protest group is not clearly visible.
Shack between small and
large kraals
Front of protestor group
Direction of crowd movement
Nyala P11 on its way to north of kraal
to intercept protestor group
Small kraal
Nyala 4 Big kraal
3rd
kraal
Shack between small and
large kraals

48
TIMECODE: 16:16:08 (ETV time = 15:53:39) TIMECODE: 16:16:27 (ETV time = 15:53:57)
- Tear gas and stun grenades fired - Water cannon fired and hands held high for “cease fire” - See CALS analysis: Scene 1 vehicle movement for position of vehicles
Shack between small and
big kraals
Big kraal
Direction of crowd movement
Hand held high, indicating
“cease fire”
3rd
kraal

49
SECTION 5:
NEW MEDIA FOOTAGE AND ALLEGED INCIDENT 2

50
Channel 4 broadcast
Alleged incident 2 is said to have taken place in the 1min 24secs between the scenes captured in
Vermaak Blackberry 01515 (15:51:47) and Vermaak Blackberry 01516 (15:53:21).
Until recently there were no photographs or videos to fill in the gap between those two images,
save for the long distance CCTV video.
New footage broadcast on the UK’s Channel 4 Dispatches programme ‘South Africa’s Dirty Cops’
includes footage of Nyala 4 at around 15:52:09 – 15:52:13. CALS does not know the source of the
original footage but is making inquiries.
Given that Nyala 4 arrived at the kraal at around 15:52:03, this is the exact time that one might
expect to see images of alleged incident 2. Instead, one sees a few protestors walking past Nyala 4
towards the kraal.

51
‘Channel 4 Dispatches’ Timecode: 21:10 (approx. 15:52:08 ETV time1)
This shot, taken around 5 seconds after Nyala 4 arrived at the kraal, shows Nyala P7 driving past Nyala 4 and
towards the shack adjacent to the kraal. Circled in yellow is the trailer of Nyala 4. There is no visible attack on the Nyala.
1 See below at p.55 for proof of timing
Nyala 4 with trailer kraal
Nyala P7
52
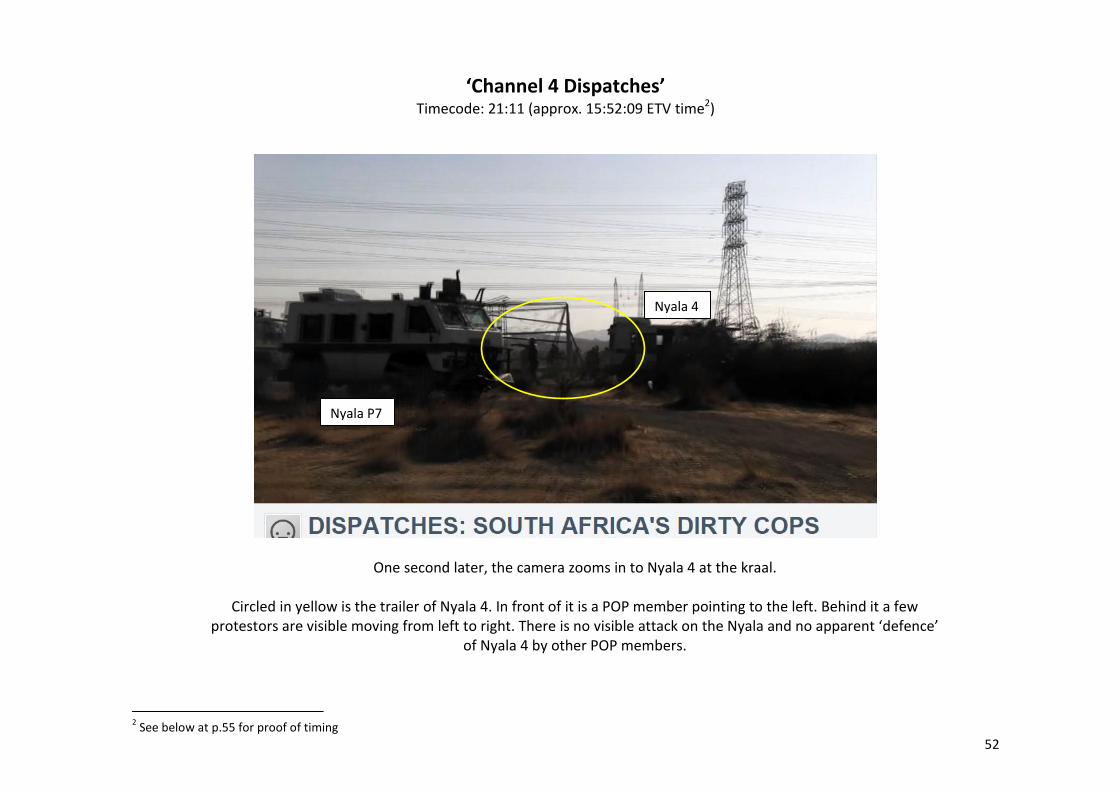
‘Channel 4 Dispatches’
Timecode: 21:11 (approx. 15:52:09 ETV time2)
One second later, the camera zooms in to Nyala 4 at the kraal.
Circled in yellow is the trailer of Nyala 4. In front of it is a POP member pointing to the left. Behind it a few
protestors are visible moving from left to right. There is no visible attack on the Nyala and no apparent ‘defence’ of Nyala 4 by other POP members.
2 See below at p.55 for proof of timing
Nyala P7
Nyala 4

53
‘Channel 4 Dispatches’
Timecode: 21:13 (approx. 15:52:11 ETV time3)
Two seconds later, the camera zooms further in to Nyala 4 at the kraal.
Circled in yellow, the POP member who was pointing to the left has swung his arm around in a large swooping movement to point right, as though he is directing members to move to the right. A few protestors are visible behind the trailer of Nyala 4.
On the following page, the area circled in yellow is zoomed in.
3 See below at p.55 for proof of timing
Nyala P7
Nyala 4 trailer

54
Zoomed image
Six protestors are visible close behind the trailer of Nyala 4, moving left to right. But the mass of protestors are a long way behind Nyala 4
NB: the smoke visible in this image is clearly identifiable in the video as exhaust fumes rather than tear gas.
Mass of protestors visible in distance
a long way from Nyala 4
6 protestors close to (but not adjacent
to) Nyala 4, walking right to left

55
‘Channel 4 Dispatches’ Timecode: 21:14 (approx. 15:52:12 ETV time4)
The protestors visible behind the trailer of Nyala 4, continue to move left to right. There is no indication of any attack on Nyala 4, no indication of any attempt by protestors to breach the barrier created by Nyala 4,
and no indication of any attempt by POP members to ‘defend’ Nyala 4.
4 See below at p.55 for proof of timing
Nyala P7
Nyala P18
Nyala 4

56
Timing of ‘Channel 4 Dispatches’ shots
The movement of Nyalas P7 and Nyala P18 has been tracked in the document ‘CALS analysis: Scene 1 vehicle movement’ where they are respectively described as Vehicle 2 and Vehicle 3. The following images from the
Rowland Headgear CCTV correspond approximately to the first and last images above.
16:14:37 (Rowland Headgear) 16:14:41 (Rowland Headgear) 15:52:09 (ETV) 15:52:13 (ETV)
Nyala 4 Nyala 4
Nyala P7 Nyala P18
Nyala P7
Note exhaust fumes visible as in images above

57
SOME CONCLUSIONS FROM THE DISPATCHES EVIDENCE
The following conclusions emerge from the Dispatches evidence above, considered with the other
available evidence:
(1) Nyala 4 arrived at the kraal at approximately 15:52:03. Alleged incident 2 is said to have taken place some
time after its arrival.
(2) Footage taken around 5 seconds after the arrival of Nyala 4 at the kraal shows no evidence:
a. of any significant attack on Nyala 4 by protestors;
b. any concentrated defence of Nyala 4 by POP members;
c. any attempt by protestors to breach the barbed wire line near Nyala 4.
(3) Instead, that footage shows:
a. A few protestors near Nyala 4 walking left to right, but a large mass of protestors some distance
behind;
b. A single POP member next to the trailer of Nyala 4, apparently directing other members to move
away from Nyala 4, and around the kraal;
c. POP vehicles moving away from Nyala 4 and around the kraal.

58
SECTION 6: OVERALL CONCLUSIONS

59
On the basis of the all the evidence above, the following conclusions can be drawn:
(1) The route described by the SAPS at slide 194 of Exhibit L finds no support in the video or photographic evidence, but the route described in Lon.mpg is supported in general terms.
(2) Before the path to Nkaneng was blocked by barbed wire rolled out by Nyala 4, many protestors had been permitted to walk down that path towards Nkaneng and Nyala 6 had moved to the south of the path to allow them to do so.
(3) The core protest group took a route from the koppie that led to the north of Nyala 5. At no stage was the core protest group to the south of Nyala 5 or to the south of the path to Nkaneng.
(4) There is no evidence of any attack on police lines prior to the kraal. “Incident 1” appears to be a fiction.
(5) There is no clear evidence that Incident 2 took place as described by the SAPS. By the time Nyala 4 arrived at the koppie, the core protest group already appears to have been making its way around the kraal, and nyalas are already speeding to the north of the kraal to intercept the core group. Any attack on Nyala 4 at the kraal cannot have been from the front of the core protestor group. Moreover, footage taken 6 seconds after the arrival of Nyala 4 at the kraal shows no evidence of an attack on Nyala 4, no evidence of any attempts to defend Nyala 4, and suggests that the focus of police concern was well to the right of Nyala 4, where police Nyalas were already heading.
(6) There is nothing in the video or photographic evidence to contradict the route described by Mr
Magidiwana in Exhibit EEE8.3.
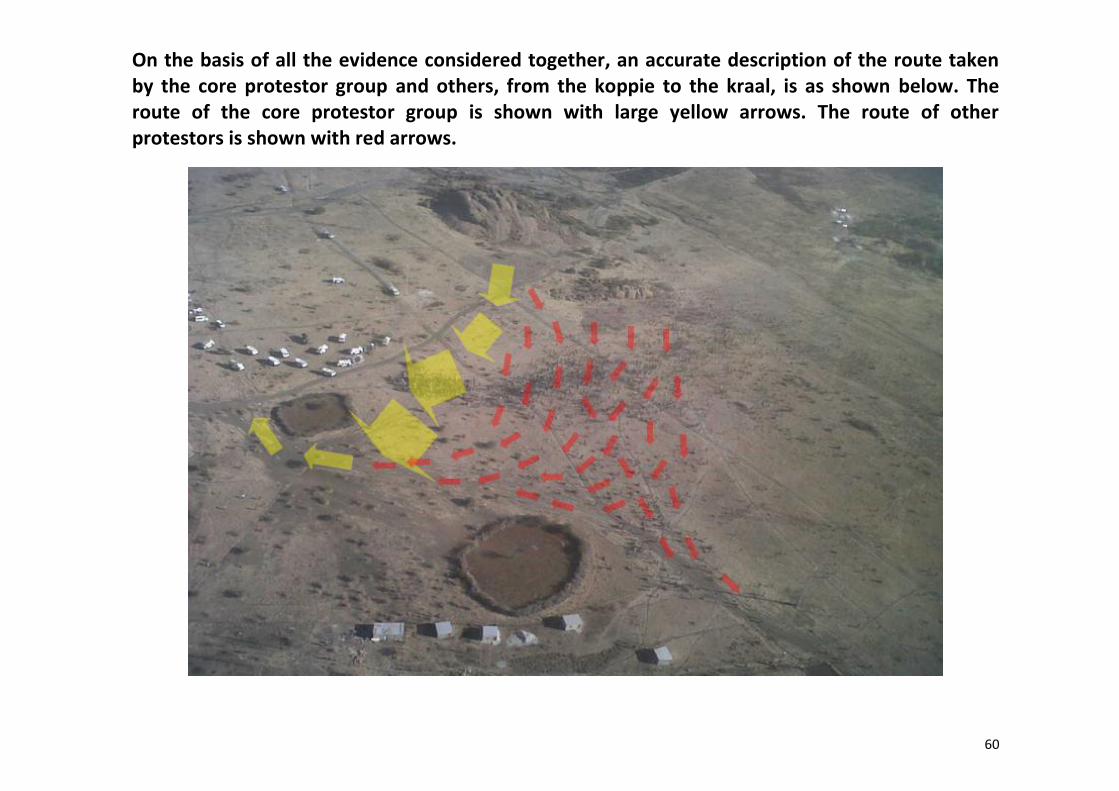
60
On the basis of all the evidence considered together, an accurate description of the route taken by the core protestor group and others, from the koppie to the kraal, is as shown below. The route of the core protestor group is shown with large yellow arrows. The route of other protestors is shown with red arrows.