rosemount tankmaster network configuration
TRANSCRIPT

Reference Manual303042EN, Edition 1November 2007
Rosemount TankMasterNetwork Configuration
Rosemount TankRadar
FBM 2180
Ext
. pw
r
RS
-232
US
B
Tx Rx
Lo - GAIN - Hi On - TERM - Off
www.rosemount-tg.com

Reference Manual 303042EN, Edition 1November 2007 Rosemount TankMaster Network Configuration
Rosemount TankMaster
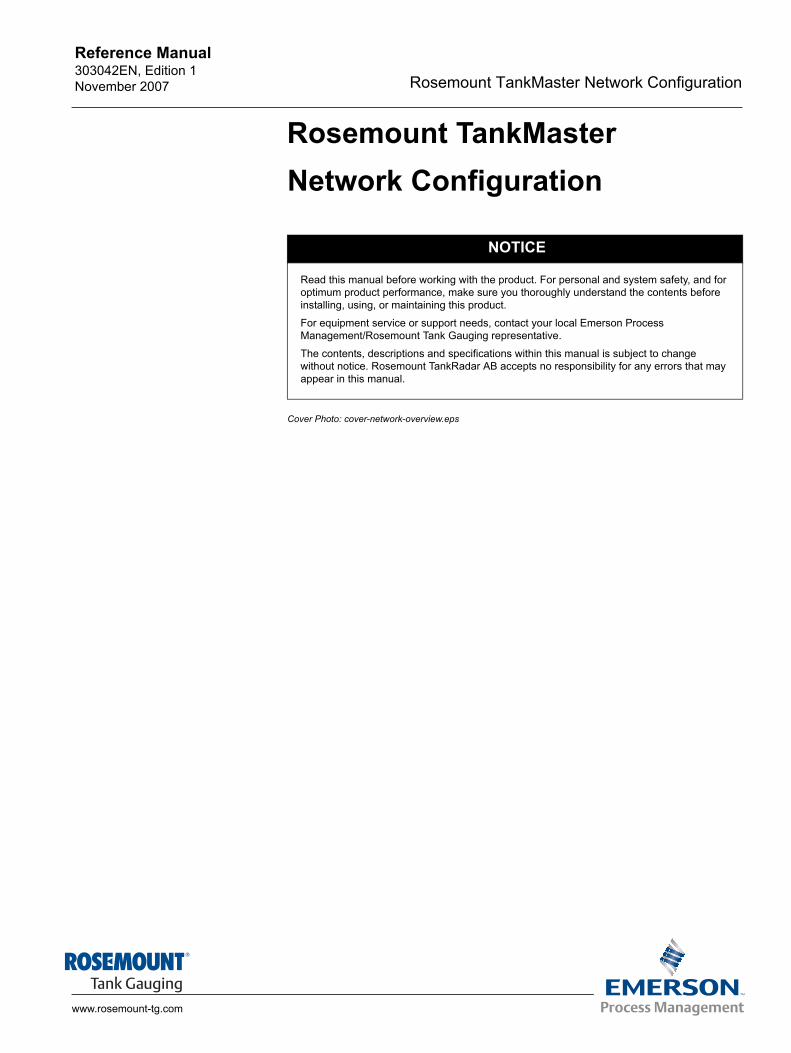
Network ConfigurationCover Photo: cover-network-overview.eps
NOTICE
Read this manual before working with the product. For personal and system safety, and for optimum product performance, make sure you thoroughly understand the contents before installing, using, or maintaining this product.
For equipment service or support needs, contact your local Emerson Process Management/Rosemount Tank Gauging representative.
The contents, descriptions and specifications within this manual is subject to change without notice. Rosemount TankRadar AB accepts no responsibility for any errors that may appear in this manual.
www.rosemount-tg.com

Reference Manual 303042EN, Edition 1November 2007 Rosemount Tank Master Network Configuration
Table of Contents
SECTION 1Getting started1.1 General information . . . . . . . . . . . . . . . . . . . . . . . . . . . . . . . . . . 1-11.2 Minimum requirements . . . . . . . . . . . . . . . . . . . . . . . . . . . . . . . 1-1
1.2.1 Software . . . . . . . . . . . . . . . . . . . . . . . . . . . . . . . . . . . 1-11.2.2 Hardware:. . . . . . . . . . . . . . . . . . . . . . . . . . . . . . . . . . 1-11.2.3 Network requirement . . . . . . . . . . . . . . . . . . . . . . . . . 1-2
1.3 Definitions and abbreviations . . . . . . . . . . . . . . . . . . . . . . . . . . 1-2
SECTION 2Installation
2.1 Windows Configuration . . . . . . . . . . . . . . . . . . . . . . . . . . . . . . . 2-32.1.1 Windows network configuration . . . . . . . . . . . . . . . . . 2-32.1.2 Configure regional and language settings . . . . . . . . . 2-52.1.3 TankMaster installation . . . . . . . . . . . . . . . . . . . . . . . 2-52.1.4 Configuring the Windows firewall . . . . . . . . . . . . . . . . 2-62.1.5 Configuring DCOM settings . . . . . . . . . . . . . . . . . . . . 2-82.1.6 Enable shared folder TM . . . . . . . . . . . . . . . . . . . . . 2-132.1.7 Access permission on shared folder TM . . . . . . . . . 2-15
2.2 Time Server Configuration. . . . . . . . . . . . . . . . . . . . . . . . . . . . 2-172.3 Time Client and WinOpi Configuration . . . . . . . . . . . . . . . . . . 2-192.4 Connect WinOpi to the Tank Server . . . . . . . . . . . . . . . . . . . . 2-20
SECTION 3Troubleshooting
3.1 DCOM error messages . . . . . . . . . . . . . . . . . . . . . . . . . . . . . . . 3-13.1.1 Server not available . . . . . . . . . . . . . . . . . . . . . . . . . . 3-13.1.2 Access is denied . . . . . . . . . . . . . . . . . . . . . . . . . . . . 3-13.1.3 Server execution failed. . . . . . . . . . . . . . . . . . . . . . . . 3-13.1.4 System message about protocol servers ... . . . . . . . . 3-13.1.5 The object exporter specified was not found . . . . . . . 3-13.1.6 The object has disconnected from it´s clients . . . . . . 3-1
3.2 Other . . . . . . . . . . . . . . . . . . . . . . . . . . . . . . . . . . . . . . . . . . . . . 3-13.2.1 Unable to connect to shared folder TM . . . . . . . . . . . 3-1
www.rosemount-tg.com

Reference Manual303042EN, Edition 1
November 2007Rosemount TankMaster Network Configuration
TOC-2 Table of Contents

Reference Manual 303042EN, Edition 1November 2007 TankMaster Network Configuration
Section 1 Getting started
1.1 General information . . . . . . . . . . . . . . . . . . . . . . . . . page 1-11.2 Minimum requirements . . . . . . . . . . . . . . . . . . . . . . page 1-11.3 Definitions and abbreviations . . . . . . . . . . . . . . . . . page 1-2
1.1 GENERAL INFORMATION
This document describes how to install and configure TankMaster in a network environment.
1.2 MINIMUM REQUIREMENTS
The following requirements should be met in order to run the Rosemount TankMaster System (version 4.G0):
1.2.1 Software • Windows XP english version with Service Pack 2 (SP2)• Installation of Windows XP fix (enclosed on the TankMaster CD)• Virtual memory size: 300 Mb or more is recommended.
1.2.2 Hardware: • Processor: Intel Pentium or compatible processor 2 GHz.• Free Hard Disk Space: 40GB
(TankMaster needs approximately 500 Mb).• CD-ROM player.• Internal Memory (RAM): 1024MB.• Two RS-232 ports. (USB port can be used if no RS-232 serial port
exists)• A 17 inch or larger monitor.• Graphical card: 1152*864, 65536 colors.• Field Bus Modem (FBM 2180).• One network card.• Hardware key. One key for each PC where a TM server or client is
installed.• One Parallel Port for the hardware key (USB port can be used if no
Parallel port exists).
If the TankMaster server has more than two clients it is recommended to use:• Twice the above specified requirements of RAM.• 2 GHz double processor or corresponding single processor.
www.rosemount-tg.com
Reference Manual303042EN, Edition 1
November 2007TankMaster Network Configuration
1.2.3 Network requirement
• TankMaster requires a minimum bandwidth of 2Mbit/s.• TankMaster network functionality is only supported on Windows
networks. (No support for Novell networks)• All TankMaster nodes must have the same regional settings. Especially
the decimal point must be the same.• All TankMaster nodes must have the same version of TankMaster
installed.• All network related hardware must support DCOM.
1.3 DEFINITIONS AND ABBREVIATIONS Abbreviation Explanation
ACL Access Control ListCOM Component Object ModelDCOM Distributed COMFCU Field Communication UnitFBM Field Bus ModemLAN Local Area NetworkOPC OLE For Process ControlRTG Radar Tank Gauge
1-2 Section 1. Getting started

Reference Manual 303042EN, Edition 1November 2007 TankMaster Network Configuration
Section 2 Installation
2.1 Windows Configuration . . . . . . . . . . . . . . . . . . . . . . page 2-32.2 Time Server Configuration . . . . . . . . . . . . . . . . . . . page 2-172.3 Time Client Configuration . . . . . . . . . . . . . . . . . . . . page 2-192.4 Connect WinOpi to the Tank Server . . . . . . . . . . . . page 2-20
The installation is divided into three parts:• The first part includes general Windows settings such as network
installation and configuration, firewall and DCOM settings, verification of the shared folder and the Tankmaster installation.
• The second part is server specific and includes the Windows Time Server.
• The third and final part is client specific and includes the Windows time client and WinOpi configuration.
www.rosemount-tg.com

Reference Manual303042EN, Edition 1
November 2007TankMaster Network Configuration
In this manual, the following network topology is used for the installation of TankMaster in a network environment:
Figure 2-1. A typical network topology
NOTEBasic knowledge about Local Area Network (LAN) is required for a network installation of TankMaster.
WinOpi
WinOpi
WinOpi
Firewall
TankMaster Server
Existing LANat Customer
WinOpi
WinOpi
Switch
2-2 Section 2. Installation

Reference Manual 303042EN, Edition 1November 2007 TankMaster Network Configuration
2.1 WINDOWS CONFIGURATION
This chapter applies to both servers and clients. The Windows configuration includes the following steps:
1. Windows network configuration, see “Windows network configuration” on page 2-3.
2. Configuration of regional and language settings, see “Configure regional and language settings” on page 2-5.
3. TankMaster installation, see “TankMaster installation” on page 2-5.4. Windows firewall configuration, see “Configuring the Windows firewall”
on page 2-6.5. DCOM configuration, see “Configuring DCOM settings” on page 2-8.6. Enabling the shared folder TM, see “Enable shared folder TM” on
page 2-13.7. Verifying the access permission on the shared folder TM, see “Access
permission on shared folder TM” on page 2-15.
A detailed description of these steps is given in the following sections.
2.1.1 Windows network configuration
Before installing TankMaster, it must be decided how the computers shall be connected to the network, i.e. if a domain or a workgroup shall be used.
A workgroup is the simplest alternative and does not require a separate logon server, but the same Windows user name and password must be used on all connected computers. This because the matching of the user is done locally in the server. If different user names are used, WinOpi produces an Access denied error message at connection time.
On a domain, different Windows user names can be used as long as they are members of the same domain. A domain requires a separate domain server.
Workgroup
When installing TankMaster in a workgroup, perform the following steps:• Create a Windows user name with administrator rights on the server
and all clients. User name: TMSystemPassword: TankMaster
• Configure both server and clients to auto logon on Windows with the newly created user name TMSystem, see “Configure auto logon in a Workgroup” on page 2-4.
• Restart and verify that the automatic logon works.
2-3Section 2. Installation

Reference Manual303042EN, Edition 1
November 2007TankMaster Network Configuration
Configure auto logon in a WorkgroupIt is recommended to use the auto logon feature on the server and all dedicated WinOpi clients.
1. Click Start > run.Type control userpasswords2 in the Open field, click OK.
Figure 2-2. User Accounts window.
2. Clear the check box Users must enter a user name and password to use this computer and click Apply. When the Apply button is pressed, the Automatically Log On window appears.
Figure 2-3. Automatically Log On.
3. Enter TMSystem in the User name field and TankMaster in the Password field. Confirm the password. Click the OK button.
Domain
When installing TankMaster in a domain, perform the following steps:• Create a Windows user name with administrator rights on the domain
server. The user shall have Administrators right on the local computer.User name: TMSystemPassword: TankMaster
• Configure both server and clients to auto logon on Windows with the newly created user name TMSystem, see “Configure auto logon for a domain” on page 2-5.
• Restart and verify that the automatic logon works.
NOTEIt is recommended that the same Windows user name is used on all TankMaster Servers and dedicated WinOpi clients.
2-4 Section 2. Installation
Reference Manual 303042EN, Edition 1November 2007 TankMaster Network Configuration
Configure auto logon for a domainIf more than one domain servers are present, it´s important that the TankMaster server and the WinOpi clients are connected to the same domain.
It is recommended that both the TankMaster server and all dedicated WinOpi clients have auto logon enabled as well, since reports and alarms are created on the clients. To enable the auto logon feature in a domain, create a file in Notepad and save it as AutoLogon.reg. Type the following in the AutoLogon.reg file:
REGEDIT4[HKEY_LOCAL_MACHINE\SOFTWARE\Microsoft\Wndows NT\CurrentVersion\Winlogon]“DefaultUserName”=”WINDOWS_DOMAIN_USER_NAME”“DefaultPassword”=”WINDOWS_DOMAIN_PASSWORD”“AutoAdminLogon”=”1”
Change the WINDOWS_DOMAIN_USER_NAME and WINDOWS_DOMAIN_PASSWORD to the newly created user name and password. Save and run the AutoLogon.reg file.
2.1.2 Configure regional and language settings
In the Control Panel, click Regional and Language Options.• Verify that all the computers use the same location.• Check the decimal symbol in the Numbers tab by clicking the
Customize button. Full stop “.” is recommended as decimal point.
2.1.3 TankMaster installation
1. Attach a hardware key with the inventory and network options enabled to the PCs.
2. Connect the server PC to the network switch and to the FCU.3. Install the Windows XP fix located on the TankMaster CD (Windows XP
SP2 Hotfix\WindowsXP-KB922668-x86-ENU.exe).4. Install Rosemount TankMaster on the server PC, see TankMaster
WinSetup User’s Guide.
2-5Section 2. Installation

Reference Manual303042EN, Edition 1
November 2007TankMaster Network Configuration
2.1.4 Configuring the Windows firewall
1. Open Windows Firewall from the Control panel.
Figure 2-4. Windows Firewall Exception tab
2. In the Exceptions tab, click the Add port button.
Figure 2-5. Add a Port
3. Enter DCOM in the Name field and 135 in the Port Number field. Make sure the TCP radio button is selected.
4. Click OK to close the Add a Port window.
2-6 Section 2. Installation

Reference Manual 303042EN, Edition 1November 2007 TankMaster Network Configuration
5. Open the Add program window by clicking the Add Program button in the Windows Firewall window.
Figure 2-6. Add a Program.
6. Click the Browse button and locate the following program file: C:\Windows\System32\OPCENUM.EXE.
7. Click OK in the Add program window.8. Repeat step 5 - 7 for the following files(1):
• C:\Windows\System32\mmc.exe• C:\Program Files\Rosemount\Server\TankServer.exe• C:\Program Files\Rosemount\Server\BatchServer.exe• C:\Program Files\Rosemount\Server\ModbusMaster.exe• C:\Program Files\Rosemount\Server\IOTMaster.exe• C:\Program Files\Rosemount\Server\enrafgpuMaster.exe• C:\Program Files\Rosemount\Server\ModbusSlave.exe• C:\Program Files\Rosemount\Server\DataHighwaySlave.exe• C:\Program Files\Rosemount\Server\AsciiLTSlave.exe• C:\Program Files\Rosemount\Server\AsciiSlave.exe• C:\Program Files\Rosemount\Opi\StmOpi.exe• C:\Program Files\Rosemount\Setup\StmSetup.exe
9. Click the OK button to close the Firewall window.
(1) Note that in TankMaster versions 4.H0 and older, the folder name is Program Files\Saab.
2-7Section 2. Installation
Reference Manual303042EN, Edition 1
November 2007TankMaster Network Configuration
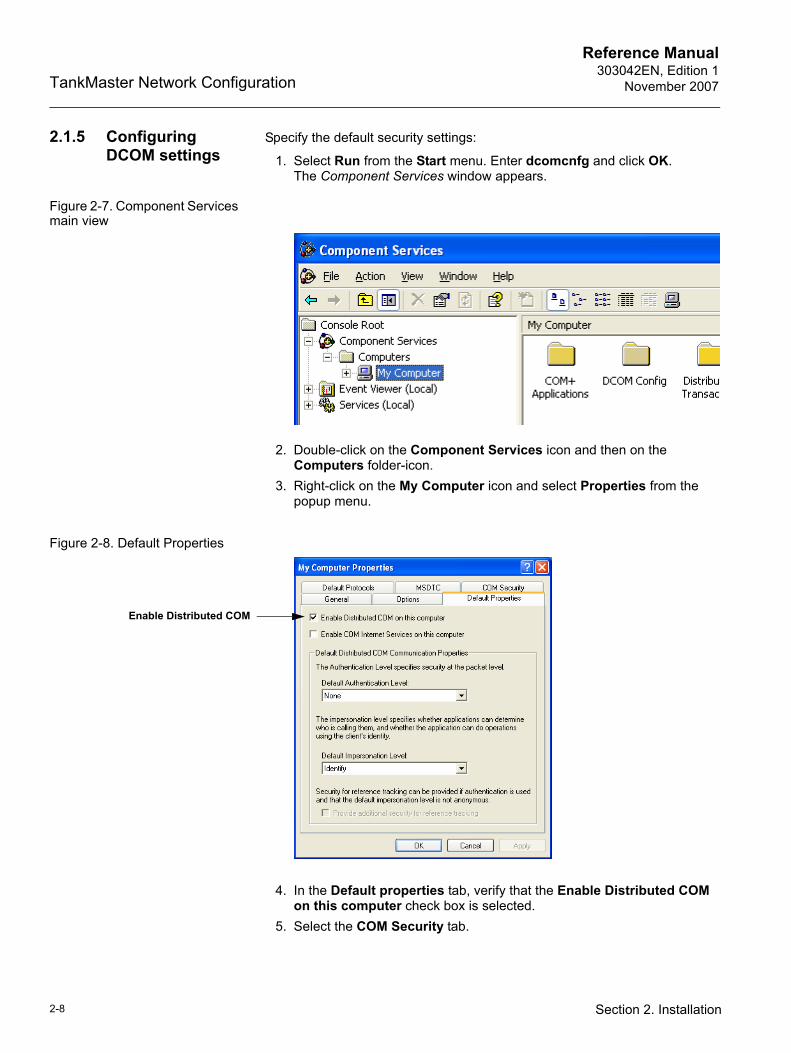
2.1.5 Configuring DCOM settings
Specify the default security settings:
1. Select Run from the Start menu. Enter dcomcnfg and click OK. The Component Services window appears.
Figure 2-7. Component Services main view
2. Double-click on the Component Services icon and then on the Computers folder-icon.
3. Right-click on the My Computer icon and select Properties from the popup menu.
Figure 2-8. Default Properties
4. In the Default properties tab, verify that the Enable Distributed COM on this computer check box is selected.
5. Select the COM Security tab.
Enable Distributed COM
2-8 Section 2. Installation
Reference Manual 303042EN, Edition 1November 2007 TankMaster Network Configuration
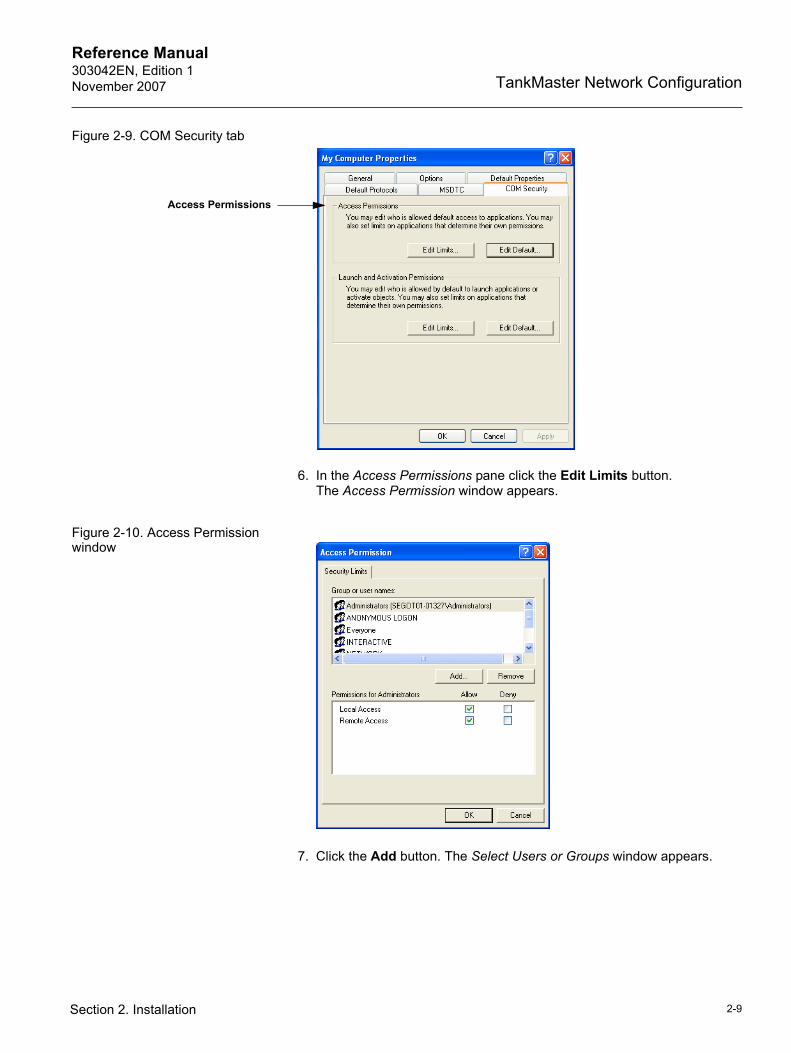
Figure 2-9. COM Security tab
6. In the Access Permissions pane click the Edit Limits button. The Access Permission window appears.
Figure 2-10. Access Permission window
7. Click the Add button. The Select Users or Groups window appears.
Access Permissions
2-9Section 2. Installation
Reference Manual303042EN, Edition 1
November 2007TankMaster Network Configuration
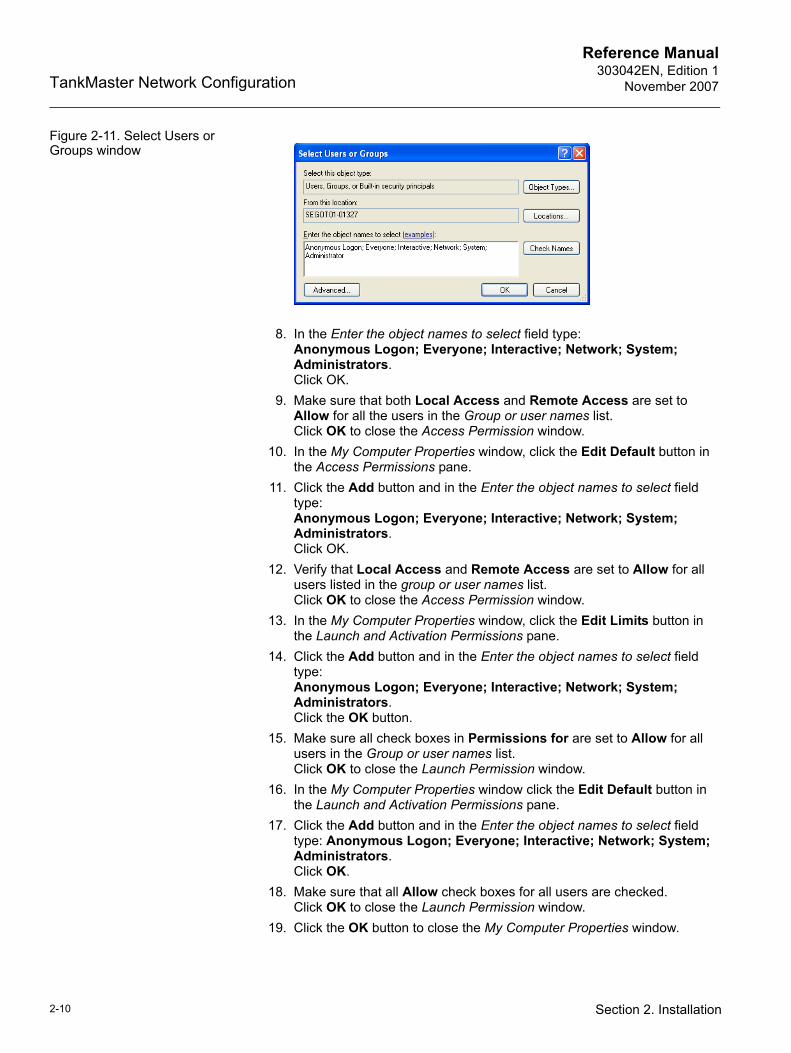
Figure 2-11. Select Users or Groups window
8. In the Enter the object names to select field type: Anonymous Logon; Everyone; Interactive; Network; System; Administrators. Click OK.
9. Make sure that both Local Access and Remote Access are set to Allow for all the users in the Group or user names list. Click OK to close the Access Permission window.
10. In the My Computer Properties window, click the Edit Default button in the Access Permissions pane.
11. Click the Add button and in the Enter the object names to select field type: Anonymous Logon; Everyone; Interactive; Network; System; Administrators. Click OK.
12. Verify that Local Access and Remote Access are set to Allow for all users listed in the group or user names list. Click OK to close the Access Permission window.
13. In the My Computer Properties window, click the Edit Limits button in the Launch and Activation Permissions pane.
14. Click the Add button and in the Enter the object names to select field type: Anonymous Logon; Everyone; Interactive; Network; System; Administrators. Click the OK button.
15. Make sure all check boxes in Permissions for are set to Allow for all users in the Group or user names list. Click OK to close the Launch Permission window.
16. In the My Computer Properties window click the Edit Default button in the Launch and Activation Permissions pane.
17. Click the Add button and in the Enter the object names to select field type: Anonymous Logon; Everyone; Interactive; Network; System; Administrators. Click OK.
18. Make sure that all Allow check boxes for all users are checked. Click OK to close the Launch Permission window.
19. Click the OK button to close the My Computer Properties window.
2-10 Section 2. Installation

Reference Manual 303042EN, Edition 1November 2007 TankMaster Network Configuration
NOTESince Everyone includes all authenticated users, it is often desirable to add these permissions to a smaller subset of users. One way to accomplish this is to create a group named TM Users. Add all user names to this group that will execute any OPC Server or Client e.g. user TMSystem(1). Then substitute TM Users everywhere that Everyone appears in the configuration dialogs described above. It is also possible to use a specific user, e.g. user TMSystem instead of the group Everyone.
Setting TankMaster permissions
1. Open the Component Service window (Step 1 in the previous section).2. Expand the My Computer icon. Expand the DCOM Config folder by
clicking the plus symbol.
Figure 2-12. Component Services window
3. Scroll down to the OpcEnum icon, right-click and select Properties.Response: the OpcEnum Properties window appears.
(1) See “Windows network configuration” on page 2-3 for more information on configuration of workgroups and domains..
2-11Section 2. Installation
Reference Manual303042EN, Edition 1
November 2007TankMaster Network Configuration
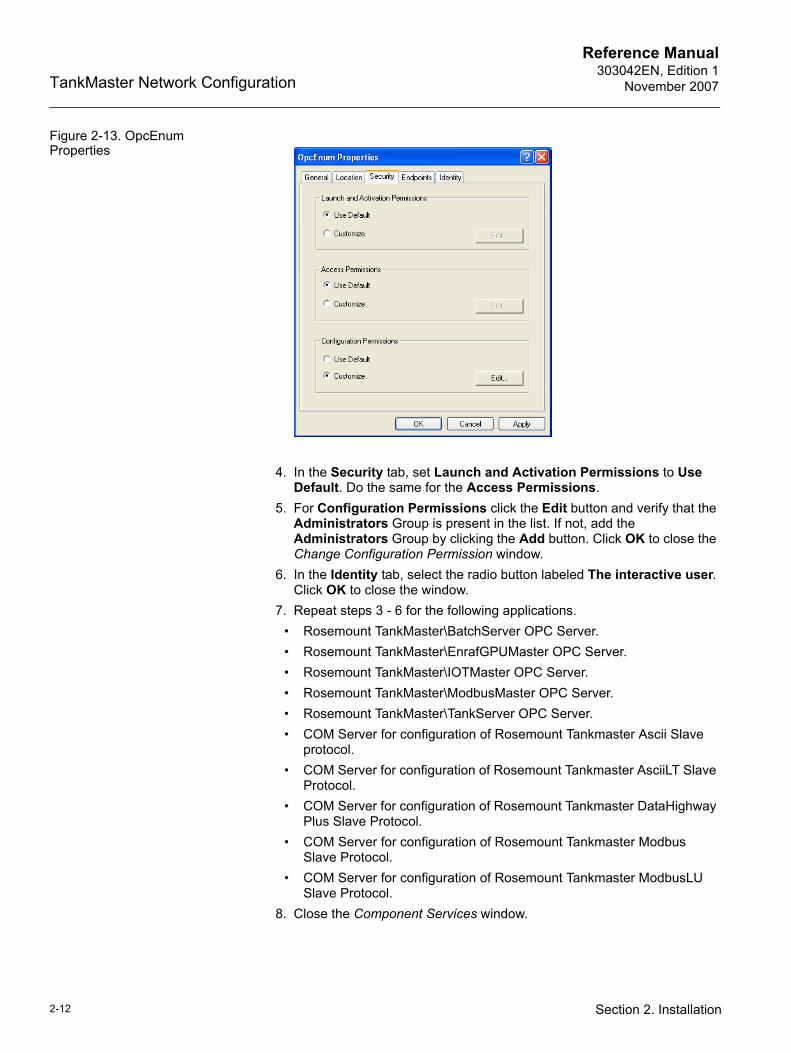
Figure 2-13. OpcEnum Properties
4. In the Security tab, set Launch and Activation Permissions to Use Default. Do the same for the Access Permissions.
5. For Configuration Permissions click the Edit button and verify that the Administrators Group is present in the list. If not, add the Administrators Group by clicking the Add button. Click OK to close the Change Configuration Permission window.
6. In the Identity tab, select the radio button labeled The interactive user. Click OK to close the window.
7. Repeat steps 3 - 6 for the following applications.• Rosemount TankMaster\BatchServer OPC Server.• Rosemount TankMaster\EnrafGPUMaster OPC Server.• Rosemount TankMaster\IOTMaster OPC Server.• Rosemount TankMaster\ModbusMaster OPC Server.• Rosemount TankMaster\TankServer OPC Server.• COM Server for configuration of Rosemount Tankmaster Ascii Slave
protocol.• COM Server for configuration of Rosemount Tankmaster AsciiLT Slave
Protocol.• COM Server for configuration of Rosemount Tankmaster DataHighway
Plus Slave Protocol.• COM Server for configuration of Rosemount Tankmaster Modbus
Slave Protocol.• COM Server for configuration of Rosemount Tankmaster ModbusLU
Slave Protocol.8. Close the Component Services window.
2-12 Section 2. Installation

Reference Manual 303042EN, Edition 1November 2007 TankMaster Network Configuration
2.1.6 Enable shared folder TM
Due to a bug in Windows, the C:\Program Files\Rosemount folder is shown in Explorer as a shared folder, but when trying to access it via the network an error message is presented.
The procedure to share this folder differs depending on if the computer is connected to a domain or a workgroup.
To apply sharing of this folder, browse to C:\Program Files\ and right click on the Rosemount folder. From the popup menu choose Sharing and Security.
Workgroup
To enable the shared folder TM for a workgroup, perform the following steps:
1. In the Sharing tab, select Share this folder on the network to un-check the check box. Click the Apply button.
Figure 2-14. Share folder properties for a workgroup
2. Select the Share this folder on the network check box again, and type TM in the Share name field.
3. Click the OK button to close the Rosemount Properties window.
Share this folder on the network
2-13Section 2. Installation
Reference Manual303042EN, Edition 1
November 2007TankMaster Network Configuration
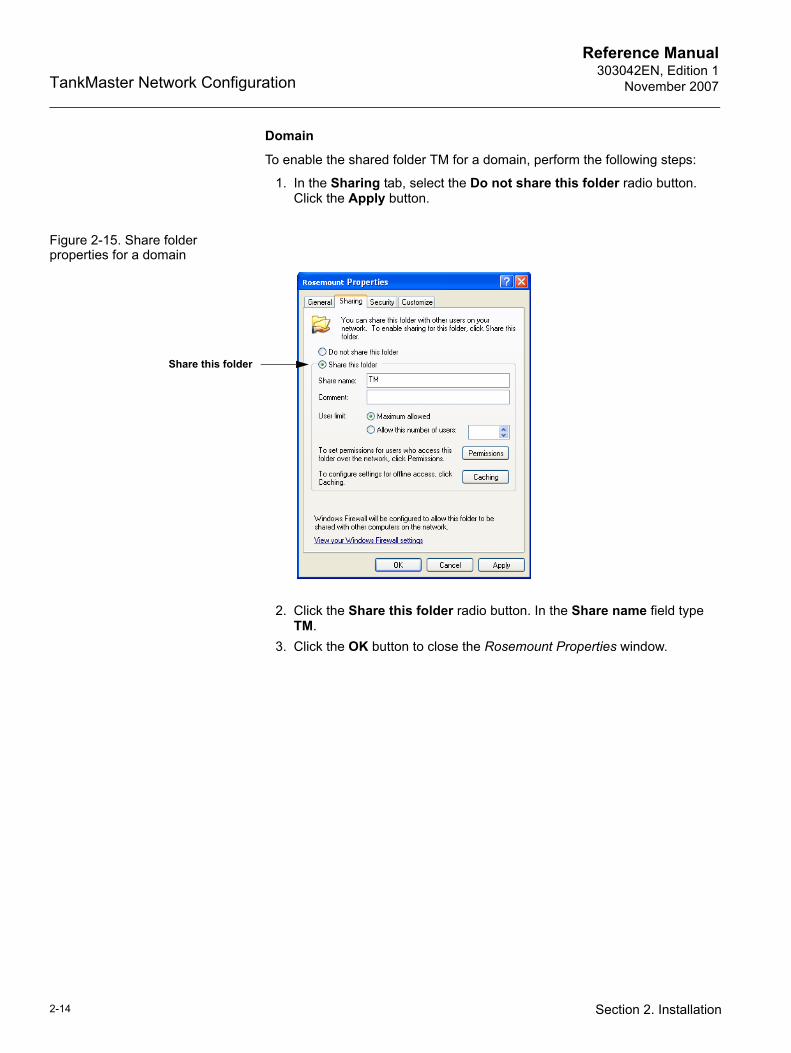
Domain
To enable the shared folder TM for a domain, perform the following steps:
1. In the Sharing tab, select the Do not share this folder radio button. Click the Apply button.
Figure 2-15. Share folder properties for a domain
2. Click the Share this folder radio button. In the Share name field type TM.
3. Click the OK button to close the Rosemount Properties window.
Share this folder
2-14 Section 2. Installation

Reference Manual 303042EN, Edition 1November 2007 TankMaster Network Configuration
2.1.7 Access permission on shared folder TM
The procedure to grant access to this folder differs depending on if the computer is connected to a domain or a workgroup.
Workgroup
To verify the access permission on the TM folder:
1. Browse via Windows Explorer to C:\Program Files\ and right click on the Rosemount folder.
2. Choose Sharing and Security from the popup menu.
Figure 2-16. Write permission for the TM folder
3. In the Sharing tab verify that the check box Allow network users to change my files is checked.
Allow network users...
2-15Section 2. Installation
Reference Manual303042EN, Edition 1
November 2007TankMaster Network Configuration
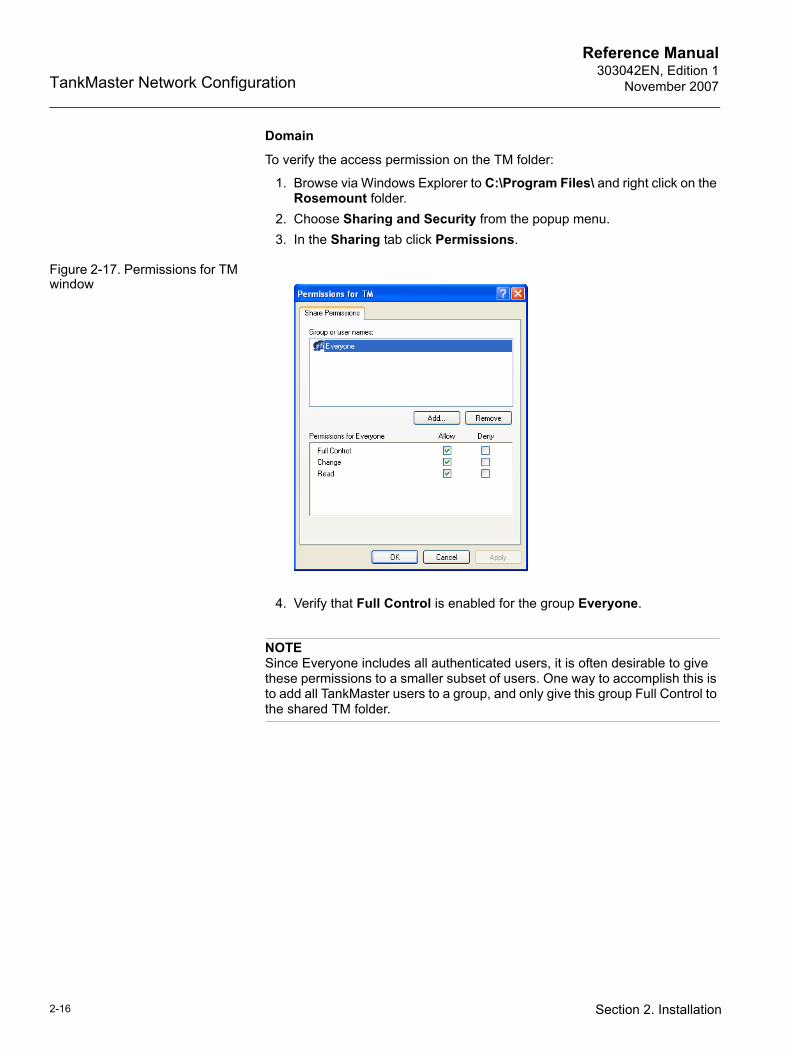
Domain
To verify the access permission on the TM folder:
1. Browse via Windows Explorer to C:\Program Files\ and right click on the Rosemount folder.
2. Choose Sharing and Security from the popup menu.3. In the Sharing tab click Permissions.
Figure 2-17. Permissions for TM window
4. Verify that Full Control is enabled for the group Everyone.
NOTESince Everyone includes all authenticated users, it is often desirable to give these permissions to a smaller subset of users. One way to accomplish this is to add all TankMaster users to a group, and only give this group Full Control to the shared TM folder.
2-16 Section 2. Installation
Reference Manual 303042EN, Edition 1November 2007 TankMaster Network Configuration
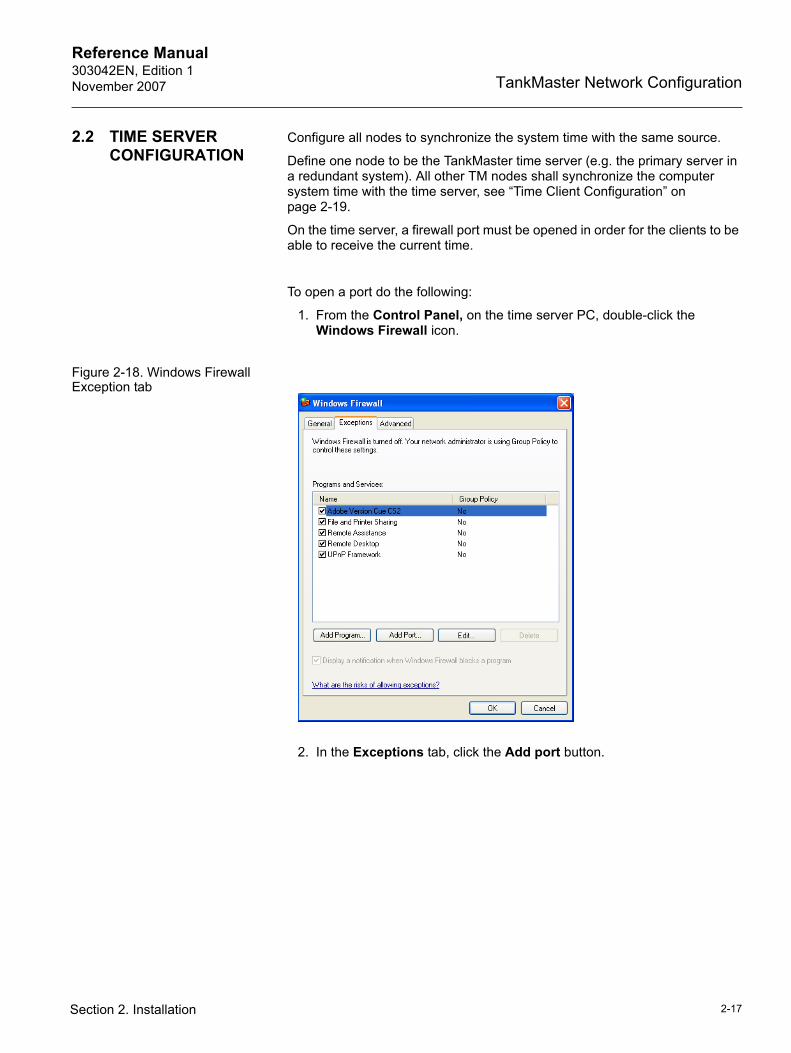
2.2 TIME SERVER CONFIGURATION
Configure all nodes to synchronize the system time with the same source.
Define one node to be the TankMaster time server (e.g. the primary server in a redundant system). All other TM nodes shall synchronize the computer system time with the time server, see “Time Client Configuration” on page 2-19.
On the time server, a firewall port must be opened in order for the clients to be able to receive the current time.
To open a port do the following:
1. From the Control Panel, on the time server PC, double-click the Windows Firewall icon.
Figure 2-18. Windows Firewall Exception tab
2. In the Exceptions tab, click the Add port button.
2-17Section 2. Installation
Reference Manual303042EN, Edition 1
November 2007TankMaster Network Configuration
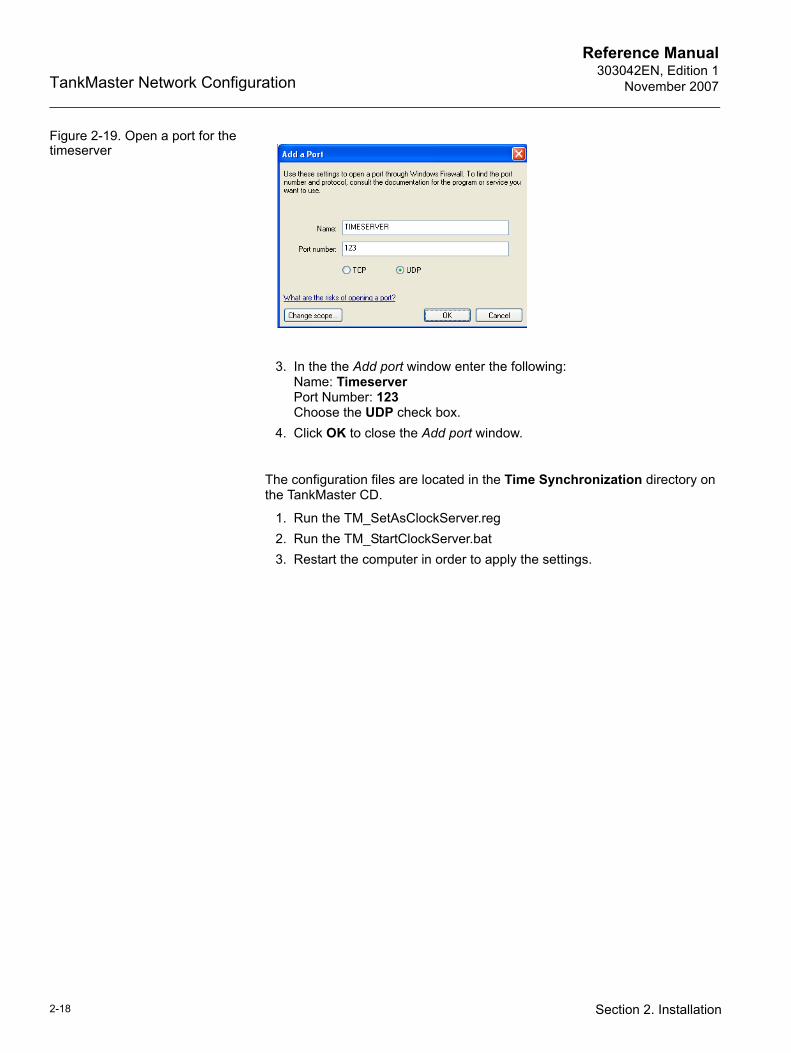
Figure 2-19. Open a port for the timeserver
3. In the the Add port window enter the following:Name: TimeserverPort Number: 123Choose the UDP check box.
4. Click OK to close the Add port window.
The configuration files are located in the Time Synchronization directory on the TankMaster CD.
1. Run the TM_SetAsClockServer.reg2. Run the TM_StartClockServer.bat3. Restart the computer in order to apply the settings.
2-18 Section 2. Installation
Reference Manual 303042EN, Edition 1November 2007 TankMaster Network Configuration
2.3 TIME CLIENT CONFIGURATION
To configure the Windows time synchronization client do the following:
1. Copy the following files from the TankMaster CD to the Rosemount directory (C:\Program Files\Rosemount):• TM_SetAsClockClient.reg • TM_StartAndSyncClockClient.bat.
2. Open the file TM_SetAsClockClient.reg with Notepad. 3. Find the following line:
“NtpServer”=”TM_MASTER_CLOCK_NODE,0x1”. Change TM_MASTER_CLOCK_NODE to the TankMaster time server node name.Example: "NtpServer"="SERVER-A,0x1"
4. Find the following line: “0”=”TM_MASTER_CLOCK_NODE”. Change TM_MASTER_CLOCK_NODE to the TankMaster time server node name.Example: “0“=”SERVER-A”
5. Save the file.6. Run the TM_SetAsClockClient.reg by double clicking the file.7. Run the TM_startAndSyncClockClient.bat by double clicking the file.8. Restart the computer in order to apply the settings.
On all other TM client nodes, browse via the network to the first client node where the modified file is located and repeat steps 6 and 7. This will enable the time client on the local computer.
2-19Section 2. Installation

Reference Manual303042EN, Edition 1
November 2007TankMaster Network Configuration
2.4 CONNECT WINOPI TO THE TANK SERVER
To connect TankMaster WinOpi to the Tank Server do the following:
1. Open the WinOpi Workspace on the client. 2. Select the Plants view.
Figure 2-20. Create new connection
3. Right-click the Plants icon and select New connection.
Figure 2-21. The New Connection window
4. Click Browse and select the computer where the Tank Server is located. Type the desired Plant name to appear in the WinOpi workspace. Alias designates the name that will be used for the Tank Server in the WinOpi workspace. Click OK when finished.
2-20 Section 2. Installation

Reference Manual 303042EN, Edition 1November 2007 TankMaster Network Configuration
Section 3 Troubleshooting
3.1 DCOM error messages . . . . . . . . . . . . . . . . . . . . . . . page 3-13.2 Other . . . . . . . . . . . . . . . . . . . . . . . . . . . . . . . . . . . . . page 3-1
3.1 DCOM ERROR MESSAGES
If the problem is DCOM related, look in the Windows Event Viewer for error messages. Check both the client and the servers Event viewer. The Event Viewer is located in the Control Panel under Administrative Tools.
3.1.1 Server not available
This message means that the remote computer is down. The connection time-out can be up to 140 - 150 seconds depending on the current network setup.
3.1.2 Access is denied This message points to improper configuration of the DCOM settings.
The message will be presented with no time delay to the user.
3.1.3 Server execution failed
The message “Server execution failed” is presented in case no user is logged on.
The message will be presented with no time delay to the user.
3.1.4 System message about protocol servers ...
If the message is regarding protocol servers on remote stations verify all necessary steps when configuring DCOM, see “Configuring DCOM settings” on page 2-8.
3.1.5 The object exporter specified was not found
The computer has no IP address. This may be shown as error code 0x80070776 returned from a failed connection.
3.1.6 The object has disconnected from it´s clients
DCOM clients ping the server object. In case these pings are undetected by the server, during approximately 6 minutes, the server disconnects from these clients. Normally, WinOpi clients will detect this error before and try to re-establish the connection to the server.
3.2 OTHER
3.2.1 Unable to connect to shared folder TM
When trying to access the shared folder TM, an access denied message is presented. Verify that the user TMSystem has logged in on all computers. If the problem still exists, try to un-share the TM folder and then re-share it again, see “Enable shared folder TM” on page 2-13.
www.rosemount-tg.com

Reference Manual303042EN, Edition 1
November 2007TankMaster Network Configuration
3-2 Section 3. Troubleshooting
Reference Manual 303042EN, Edition 1November 2007 TankMaster Network Configuration
Index
AAccess permission . . . . . . . . . 2-15Add a Port window . . . . . . . . . . 2-6CComponent Service . . . . . . . . 2-11Configure
DCOM settings . . . . . . . . . 2-8language settings . . . . . . . 2-5regional settings . . . . . . . . 2-5Time Server . . . . . . . . . . . 2-17Windows network . . . . . . . 2-3WinOpi . . . . . . . . . . . . . . . 2-19
ConnectTank Server . . . . . . . . . . . 2-20WinOpi . . . . . . . . . . . . . . . 2-20
DDCOM settings . . . . . . . . . . . . . 2-8Domain
access permission . . . . . . 2-16auto logon . . . . . . . . . . . . . 2-5shared folder . . . . . . . . . . 2-13
FFirewall . . . . . . . . . . . . . . . . . . . 2-6
NNetwork . . . . . . . . . . . . . . . . . . 1-2Network requirement . . . . . . . . 1-2
RRegional and language settings 2-5
SShared folder . . . . . . . . . . . . . 2-13System requirements . . . . . . . . 1-1
TTankMaster permissions . . . . 2-11Time Server . . . . . . . . . . . . . . 2-17Time synchronization client . . 2-19Troubleshooting . . . . . . . . . . . . 3-1
WWindows
DCOM . . . . . . . . . . . . . . . . 2-8firewall . . . . . . . . . . . . . . . . 2-6network . . . . . . . . . . . . . . . 2-3
Workgroupaccess permission . . . . . . 2-15auto logon . . . . . . . . . . . . . 2-4shared folder . . . . . . . . . . 2-13
www.rosemount-tg.com

TankMaster Network ConfigurationReference Manual
303042EN, Edition 1November 2007
Index-2


Reference Manual 303042EN, Edition 1November 2007 TankMaster Network Configuration
Emerson Process Management
© 2007 Rosemount Tank Radar AB. All rights reserved.
Rosemount and the Rosemount logotype are registered trademarks of Rosemount Inc.HART is a registered trademark of the HART Communication Foundation.Modbus is a registered trademark of Modicon.Pentium is a registered trademark of Intel Corporation.Windows XP is a registered trademark of Microsoft Corporation.All other marks are the property of their respective owners.
Rosemount Tank GaugingBox 130 45SE-402 51 GöteborgSWEDENTel (International): +46 31 337 00 00Fax (International): +46 31 25 30 22E-mail: [email protected]