romfor international ltd. - contract drillingedcromfor.com/wp-content/uploads/bestpractices/trip out...
TRANSCRIPT

Romfor International Ltd.
TRIP OUT OF
HOLE
TRIP OUT OF
HOLE
TR
IP
OU
T O
F H
OL
E
Backup HandBackup Hand

Romfor International Ltd.
BEFORE ANY TRIP OR AFTER ANY CHANGE
OF OPERATIONS DURING THE TRIP:
100% TIE-OFF VERIFICATION OF THE
DERRICKMAN
ALL MEMBERS OF THE CREW ARE TO VERIFY
THAT THE DERRICKMAN IS PROPERLY TIED-
OFF AND READY TO WORK BEFORE THE
BLOCKS ARE MOVED.
VERIFY THAT TWO-WAY COMMUNICATION IS
ESTABLISHED BETWEEN THE DRILLER AND
THE DERRICKMAN.
PRACTICE: TRIPPING IN OR OUT OF THE HOLE
POSITION: UPDATE FOR ALL POSITIONS
DR
IL
L C
OL
LA
RS

Romfor International Ltd.
TRIP OUT OF
HOLE
TRIP OUT OF
HOLE
Backup HandBackup Hand
TO
P D
RIV
E
DR
IL
L P
IP
E
TOP DRIVE
DRILL PIPE
TOP DRIVE
DRILL PIPE

Romfor International Ltd. Backup Hand
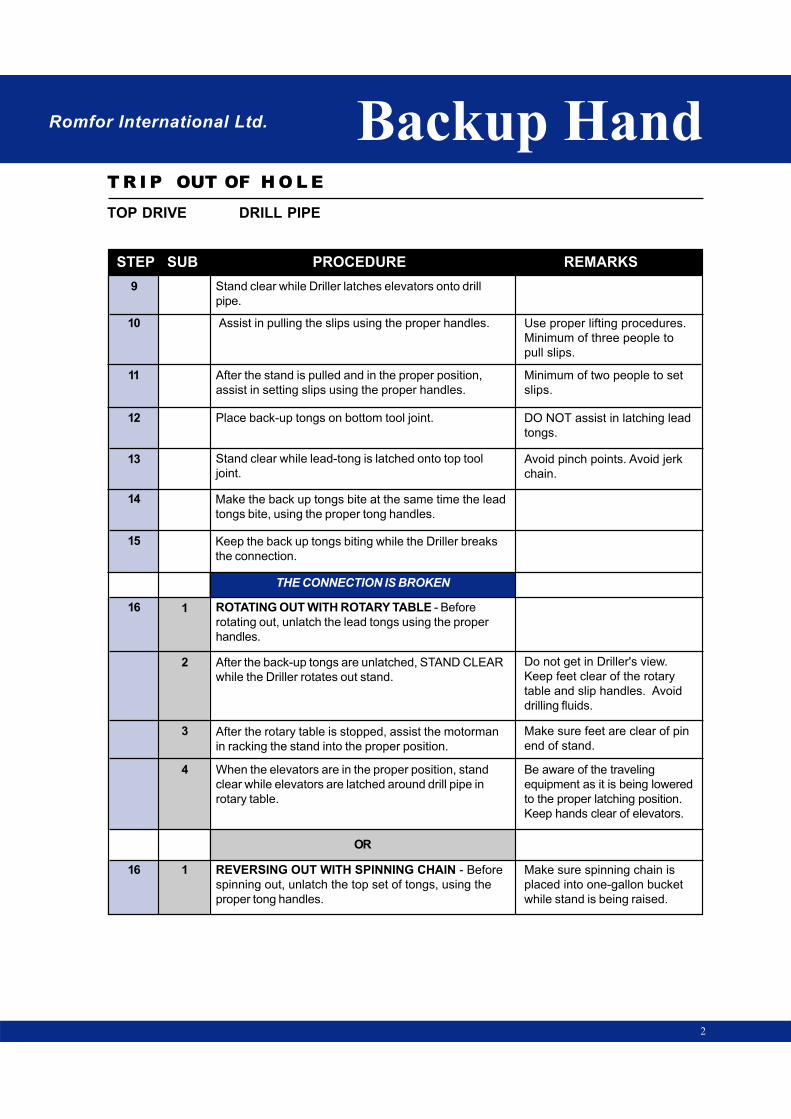
STEP SUB PROCEDURE REMARKS
TOP DRIVE DRILL PIPE
T R I P OUT OF H O L E
1
0 1
1
2
2
3
4
5
6
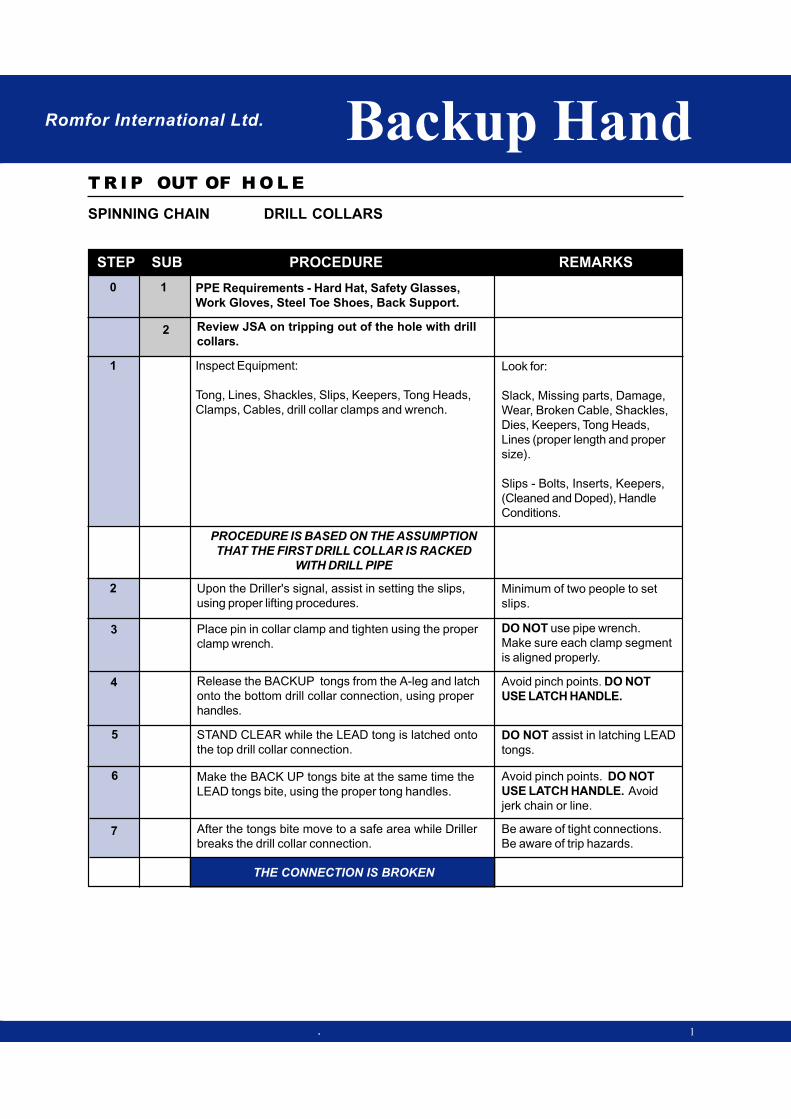
PPE Requirements - Hard Hat, Safety Glasses, Work
Gloves, Steel Toe Shoes, Back Support.
Review JSA for tripping out of hole with drill pipe.
Inspect Equipment:
Tongs, Lines, Shackles, Slips, dies, keepers, tong
heads, clamps.
Upon the Driller's signal, assist in setting the slips
when the top drive is in the breakout position and
elevators are latched.
Stand clear while Driller latches elevators, breaks out
top drive, and picks up elevators against tool joint.
After releasing the back-up tongs from the A-leg place
tongs on the bottom tool joint, using proper handles.
Stand clear while lead-tong is latched onto top tool
joint.
Make the back up tongs bite at the same time the lead
tongs bite, using the proper tong handles.
Keep the back-up tongs biting while the Driller breaks
the connection.
After connection is broken, unlatch lead tongs, using
proper handles.
Look for:
Slack, Missing parts, Damage,
Wear, Broken cables, Shackles,
Dies, Keepers, tong heads,
Lines (proper length and proper
size).
Slips - Bolts, Inserts, Keepers
(Cleaned and Doped), and
Handle Conditions.
Minimum of two people to set
slips.
Avoid drilling fluids.
DO NOT assist in latching lead
tongs.
Avoid pinch points. Avoid jerk
chain.
7
Assist in installing pipe wiper based on
operating procedures or hole conditions as
directed by the Driller.
READY FOR TRIP OUT OF THE HOLE
8
STEP SUB PROCEDURE REMARKS
Backup Hand
TOP DRIVE DRILL PIPE
T R I P OUT OF H O L E
Romfor International Ltd.
1
2
3
4
2
1
When the elevators are in the proper position, stand
clear while elevators are latched around drill pipe in
rotary table.
OR
REVERSING OUT WITH SPINNING CHAIN - Before
spinning out, unlatch the top set of tongs, using the
proper tong handles.
Stand clear while Driller latches elevators onto drill
pipe.
Assist in pulling the slips using the proper handles.
After the stand is pulled and in the proper position,
assist in setting slips using the proper handles.
Place back-up tongs on bottom tool joint.
Make the back up tongs bite at the same time the lead
tongs bite, using the proper tong handles.
Stand clear while lead-tong is latched onto top tool
joint.
Keep the back up tongs biting while the Driller breaks
the connection.
THE CONNECTION IS BROKEN
Use proper lifting procedures.
Minimum of three people to
pull slips.
Minimum of two people to set
slips.
DO NOT assist in latching lead
tongs.
Avoid pinch points. Avoid jerk
chain.
9
10
11
12
Do not get in Driller's view.
Keep feet clear of the rotary
table and slip handles. Avoid
drilling fluids.
13
14
15
16 ROTATING OUT WITH ROTARY TABLE - Before
rotating out, unlatch the lead tongs using the proper
handles.
Make sure feet are clear of pin
end of stand.
After the back-up tongs are unlatched, STAND CLEAR
while the Driller rotates out stand.
Be aware of the traveling
equipment as it is being lowered
to the proper latching position.
Keep hands clear of elevators.
16
After the rotary table is stopped, assist the motorman
in racking the stand into the proper position.
Make sure spinning chain is
placed into one-gallon bucket
while stand is being raised.

Romfor International Ltd. Backup Hand
STEP SUB PROCEDURE REMARKS
TOP DRIVE DRILL PIPE
T R I P OUT OF H O L E
3
Wrap chain, clockwise, around stand of drill pipe.
While Driller is pulling on chain, make sure your hands
and fingers are in proper position. Control spinning
chain, especially tail, while reversing out stand of drill
pipe.
AFTER STAND STOPS TURNING, remove excess
chain from stand.
After Lead Tong Hand unlatches back-up tongs,
remove tongs from pipe in rotary.
Make sure not to cross chain
wraps.
Make sure to hold proper tension
on chain.
STAND CLEAR while the Driller picks up stand.
Assist the motorman in racking the stand into the
proper position.
While the traveling equipment is being lowered to the
floor, place the spinning chain into the bucket.
Avoid drilling fluids.
Make sure feet are clear of pin
end of stand.
When the elevators are in the proper position, stand
clear while Driller latches drill pipe.
OR
Do not get in Driller's view.
DO NOT assist in latching pipe
spinner onto drill pipe.
SPINNING OUT WITH PIPE SPINNER - Before
spinning out, unlatch the top set of tongs, using the
proper tong handles.
After Lead Tong Hand unlatches back-up tongs,
remove tongs from pipe in rotary.
Do not get in Driller's view.
Make sure feet are clear of pin
end of stand.
2
3
4
5
16
6
7
8
9
1
2
3
4
Stand clear while the stand is spun out with pipe
spinner and Driller picks up on stand.
Assist the Motorman in racking the stand into the
proper position.

STEP SUB PROCEDURE REMARKS
Backup Hand
TOP DRIVE DRILL PIPE
T R I P OUT OF H O L E
Romfor International Ltd.
4
While the traveling equipment is being lowered to the
floor, stand clear of Driller's view.
When the elevators are in the proper position, stand
clear while Driller latches onto pipe.
Be aware of the traveling
equipment as it is being lowered
to the proper latching position.
Keep hands clear of elevators.
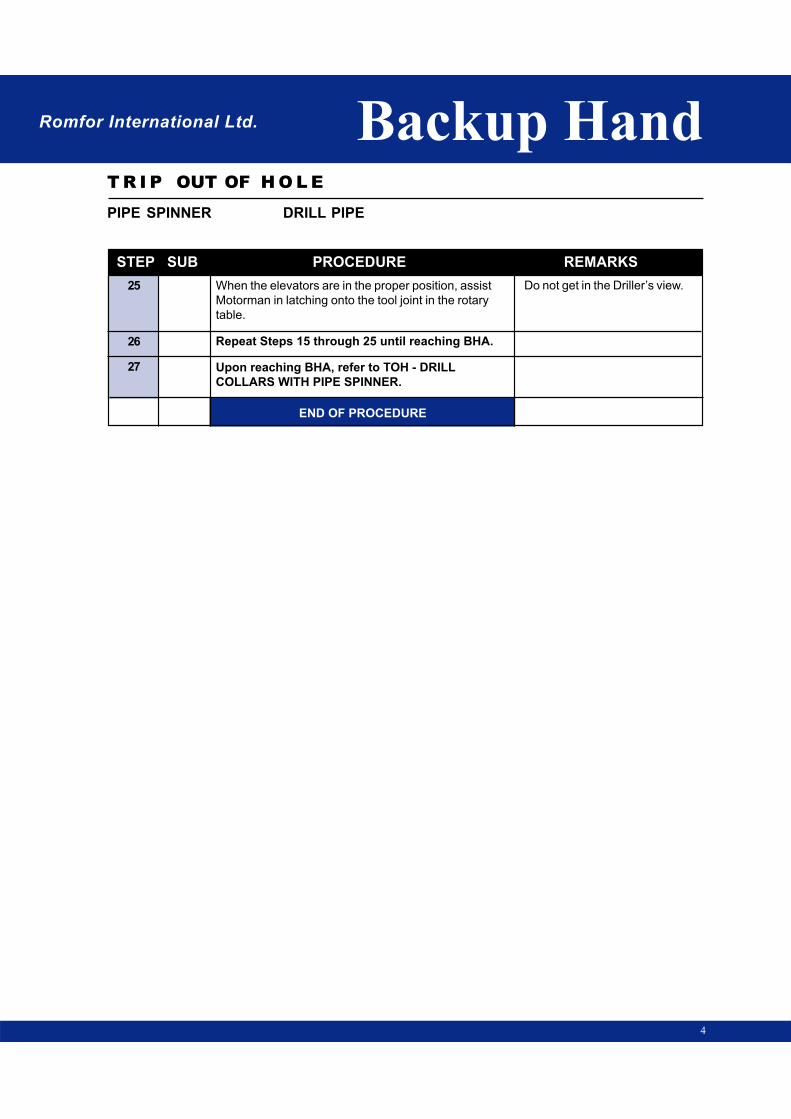
Repeat Steps 8 through 16 until reaching BHA.
Do not get in Driller's view.
Upon reaching BHA, refer to TOH - DRILL COLLARS
WITH TOP DRIVE.
END OF PROCEDURE
17
18
5
6

Romfor International Ltd.
TRIP OUT OF
HOLE
TRIP OUT OF
HOLE
Backup HandBackup Hand
TO
P D
RIV
E
DR
IL
L C
OL
LA
R
TOP DRIVE
DRILL COLLAR
TOP DRIVE
DRILL COLLAR

Romfor International Ltd. Backup Hand
STEP SUB PROCEDURE REMARKS
TOP DRIVE DRILL COLLARS
T R I P OUT OF H O L E
1
0 1
1
2
2
3
4
5
6
PPE Requirements - Hard Hat, Safety Glasses,
Work Gloves, Steel Toe Shoes, Back Support.
Review JSA on tripping out of the hole with drill
collars.
Inspect Equipment:
Tong, Lines, Shackles, Slips, Keepers, Tong Heads,
Clamps, Cables, drill collar clamps and wrench.
PROCEDURE IS BASED ON THE ASSUMPTION
THAT THE FIRST DRILL COLLAR IS RACKED
WITH DRILL PIPE.
Upon the Driller's signal, assist in setting the slips,
using proper lifting procedures.
Place pin in collar clamp and tighten using the proper
clamp wrench.
Release the BACKUP tongs from the A-leg and latch
onto the bottom drill collar connection, using proper
handles.
STAND CLEAR while the LEAD tong is latched onto
the top drill collar connection.
Make the BACK UP tongs bite at the same time the
LEAD tongs bite, using the proper tong handles.
After the tongs bite move to a safe area while Driller
breaks the drill collar connection.
Look for:
Slack, Missing parts, Damage,
Wear, Broken Cable, Shackles,
Dies, Keepers, Tong Heads,
Lines (proper length and proper
size).
Slips - Bolts, Inserts, Keepers,
(Cleaned and Doped), Handle
Conditions.
Minimum of two people to set
slips.
DO NOT use pipe wrench.
Make sure each clamp segment
is aligned properly.
Avoid pinch points. DO NOT
USE LATCH HANDLE.
DO NOT assist in latching LEAD
tongs.
Avoid pinch points. DO NOT
USE LATCH HANDLE. Avoid
jerk chain or line.
Be aware of tight connections.
Be aware of trip hazards.
7
THE CONNECTION IS BROKEN

STEP SUB PROCEDURE REMARKS
Backup Hand
TOP DRIVE DRILL COLLARS
T R I P OUT OF H O L E
Romfor International Ltd.
1
2
3
4
5
6
7
2
ROTATING OUT WITH ROTARY TABLE:
After Lead tong hand unlatches backup tongs, secure
tongs to A-leg.
STAND CLEAR while the Driller rotates out and picks
up on stand.
After the rotary table stops, assist the Motorman in
racking the stand into the proper position.
OR
Do not secure tongs to A-leg.
REVERSING OUT WITH SPINNING CHAIN:
Unlatch LEAD tongs and remove BACKUP tongs after
Lead Tong Hand unlatches.
Wrap chain, clockwise, around stand of drill collars.
While Driller is pulling on chain, make sure your hands
and fingers are in proper position. Control chain,
especially tail, while spinning out stand.
Do not get in Driller's view.
Make sure feet are clear of
rotary table and slip handles.
Avoid drilling fluids.
Do not get in the Drillers view.
Make sure feet are clear of pin
end of stand.
Using the proper tong handles.
BE AWARE of Tong Position at
all times.
Make sure not to cross chain
wraps.
8
8
Make sure to hold proper
tension on chain.
AFTER STAND STOPS TURNING, remove the
excess chain from drill collars.
Avoid drilling fluids.STAND CLEAR while Driller picks up on stand.
Do not get in the Drillers view.
Make sure feet are clear of pin
end of stand.
1
2
3
Assist in racking the stand into the proper position.

Romfor International Ltd. Backup Hand
STEP SUB PROCEDURE REMARKS
TOP DRIVE DRILL COLLARS
T R I P OUT OF H O L E
3
OR
Secure tongs to A-leg.
STAND CLEAR while the stand is spun out with pipe
spinner and Driller picks up on stand.
Assist in racking the stand into the proper position.
SPINNING OUT WITH PIPE SPINNER:
Unlatch LEAD tongs and remove BACKUP tongs
after Lead Tong Hand unlatches, using the proper
tong handles.
8
9
10
11
Avoid drilling fluids.
Using air Hoist with proper sling, tie onto lift sub and
tail into place.
Assist in stabbing drill collar lift sub and make-up
hand tight. Remove sling and secure air hoist line out
the way of traveling equipment.
STAND CLEAR while driller lowers elevators for latching.
12
Do not get in the Drillers view.
Make sure feet are clear of pin
end of stand.
Keep fingers out of threads while
tightening by hand.
After elevators are latched onto lift sub STAND
CLEAR while LEAD tongs are latched onto drill collar
connection in rotary.
Be aware of the traveling
equipment as it is being lowered
to the proper latching position.
Do not get into Drillers View.
Do not assist in latching LEAD
tongs.
Release BACKUP tongs from A-leg and latch onto lift
sub connection, using the proper handles.
Make BACKUP tongs bite at the same time the LEAD
tongs bite, using the proper handles until the connec-
tion is tightened.
Avoid pinch points and do not
use latch handles.
1
2
3
4
13
14

STEP SUB PROCEDURE REMARKS
Backup Hand
TOP DRIVE DRILL COLLARS
T R I P OUT OF H O L E
Romfor International Ltd.
4
19
LIFT SUB CONNECTION IS TIGHTENED
Unlatch LEAD tongs using the proper handles.
After LEAD Tong Hand unlatches BACKUP tongs,
secure tongs to A-leg.
After Driller raises stand to proper height, assist in
removing the drill collar clamp by loosening nut and
pulling pin. Use the proper clamp wrench.
DO NOT hold the bottom of the
clamp with hands or knees.
Assist in pulling the slips using proper handles. Keep
track of the number of drill collars coming through the
rotary table.
Minimum of two people to pull
slips.
Repeat Steps 2 through 18 for remaining drill
collars.
END OF PROCEDURE
18
15
16
17
Romfor International Ltd.
TRIP OUT OF
HOLE
TRIP OUT OF
HOLE
Backup HandBackup Hand
PIPE SPINNER
DRILL PIPE
PIPE SPINNER
DRILL PIPE
PIP
E S
PIN
NE
R
DR
IL
L P
IP
E

Romfor International Ltd. Backup Hand
STEP SUB PROCEDURE REMARKS
PIPE SPINNER DRILL PIPE
T R I P OUT OF H O L E
1
0 1
1
2
2
3
4
5
6
PPE Requirements - Hard Hat, Safety Glasses,
Work Gloves, Steel Toe Shoes, Back Support.
Review JSA for tripping out of hole with Drill Pipe.
Inspect Equipment:
Tongs, Lines, Shackles, Slips, dies, keepers, tong
heads, clamps.
Upon the Driller's signal, assist in setting the slips,
using proper lifting procedures.
After releasing the Back-up tongs from the A-leg place
tongs on the bottom tool joint, using proper handles.
Stand clear while lead-tong is latched onto Kelly saver
sub.
Make the back up tongs bite at the same time the lead
tongs bite, using the proper tong handles.
Keep the back-up tongs biting while the Driller breaks
the Kelly connection, using proper handles.
KELLY CONNECTION IS BROKEN
ROTATING KELLY OUT WITH KELLY SPINNER -
Before spinning out, unlatch top set of tongs, using
proper tong handles.
Look for:
Slack, Missing parts, Damage,
Wear, Broken cables, Shackles,
Dies, Keepers, tong heads,
Lines (proper length and proper
size).
Slips - Bolts, Inserts, Keepers
(Cleaned and Doped), and
Handle Conditions.
Minimum of two people to set
slips.
DO NOT assist in latching lead
tongs.
Avoid pinch points. Avoid jerk
chain.
7
Make back-up tongs bite on joint in rotary table, using
proper tong handles, while Driller reverses out Kelly
with Kelly spinner.
AFTER KELLY STOPS TURNING, Lead Tong Hand
unlatches bottom set of tongs.
1
2
3

STEP SUB PROCEDURE REMARKS
Backup Hand
PIPE SPINNER DRILL PIPE
T R I P OUT OF H O L E
Romfor International Ltd.
3
4
5
2
OR
ROTATING KELLY OUT WITH SPINNING CHAIN -
Before spinning out with chain, unlatch top set of tongs
using proper tong handles.
Wrap chain, clockwise, around Kelly saver sub.
While Driller is pulling on chain, make sure your
hands and fingers are in proper position. Control
chain, especially tail, while reversing out Kelly.
STAND CLEAR while Driller picks up on Kelly, secure
back-up tongs to A-leg and prepare to assist setting
Kelly back.
AFTER KELLY STOPS TURNING, remove the excess
chain from Kelly.
SET BACK THE KELLY
Secure pull back line to Kelly.
Make sure spinning chain is
placed in one-gallon bucket
while Kelly is being raised.
Make sure not to cross chain
wraps.
Make sure to hold proper
tension on chain.
Avoid drilling fluids.
Insure the pull-back line is
properly secured to Kelly for
pull-back.
7
DO NOT get in Drillers' view.
Keep out of area between Driller
and Kelly Shuck.
8
9
10
11
Stand clear while the Driller slacks-off stabbing the
Kelly into the Kelly Shuck.
After the Kelly is stabbed into the Kelly Shuck and
traveling equipment is stopped (air hoist is slacked-off)
remove pull-back cable from Kelly.
Assist Lead-Tong Hand, if
required.
12
13
1
2
Once the Kelly is fully in the Kelly Shuck, tie off
Elevators to pull-back cable.
Stand clear while the traveling equipment is unlatched
from the Swivel.
Once the traveling equipment is in the proper position,
stopped and the air hoist is slacked-off, remove pull-
back cable.
Assist Motorman in positioning elevators to proper trip-
out position.
Keep hands clear of elevators.14

Romfor International Ltd. Backup Hand
STEP SUB PROCEDURE REMARKS
PIPE SPINNER DRILL PIPE
T R I P OUT OF H O L E
. 3
19
READY FOR TRIP OUT OF THE HOLE
Assist in pulling the slips using the proper handles. If
required, keep track of the number of joints being
pulled through the rotary table.
Assist in installing pipe wiper based on operat-
ing procedures or hole conditions as directed
by the Driller.
15
16
17
18
After the stand is pulled and in the proper position,
assist in setting slips using the proper handles.
After releasing the back-up tongs from the A-leg, place
tongs on bottom tool joint, using proper handles.
Stand clear while lead-tong is latched onto top tool
joint.
20
Minimum of three people to pull
slips. Use proper lifting proce-
dures. As required, hose off
mud from pipe.
Minimum of two people to set
slips.
Make the back up tongs bite at the same time the
lead tongs bite, using the proper tong handles.
Keep the back up tongs biting while the Driller breaks
the connection.
DO NOT assist in latching lead
tongs.
Avoid pinch points. Avoid jerk
chain.
THE CONNECTION IS BROKEN
Before spinning out, unlatch the top set tongs, using
the proper tong handles.
DO NOT assist in latching pipe
spinner onto drill pipe.21
22 Stand clear while the stand is spun out with pipe
spinner and Driller picks up on stand.
Assist the Motorman in racking the stand into the
proper position.
While the traveling equipment is being lowered to the
floor, stand clear of Driller’s view.
Do not get in Driller's view.
Make sure feet are clear of pin
end of stand.
Be aware of the traveling equip-
ment as it is being lowered to
the proper latching position.
Keep hands clear of elevators
until at proper latching position.
23
24
STEP SUB PROCEDURE REMARKS
Backup Hand
PIPE SPINNER DRILL PIPE
T R I P OUT OF H O L E
Romfor International Ltd.
4
When the elevators are in the proper position, assist
Motorman in latching onto the tool joint in the rotary
table.
Do not get in the Driller’s view.
Repeat Steps 15 through 25 until reaching BHA.
Upon reaching BHA, refer to TOH - DRILL
COLLARS WITH PIPE SPINNER.
END OF PROCEDURE
25
26
27

Romfor International Ltd.
TRIP OUT OF
HOLE
TRIP OUT OF
HOLE
Backup HandBackup Hand
PIP
E S
PIN
NE
R
DR
IL
L C
OL
LA
R
PIPE SPINNER
DRILL COLLAR
PIPE SPINNER
DRILL COLLAR

Romfor International Ltd. Backup Hand
STEP SUB PROCEDURE REMARKS
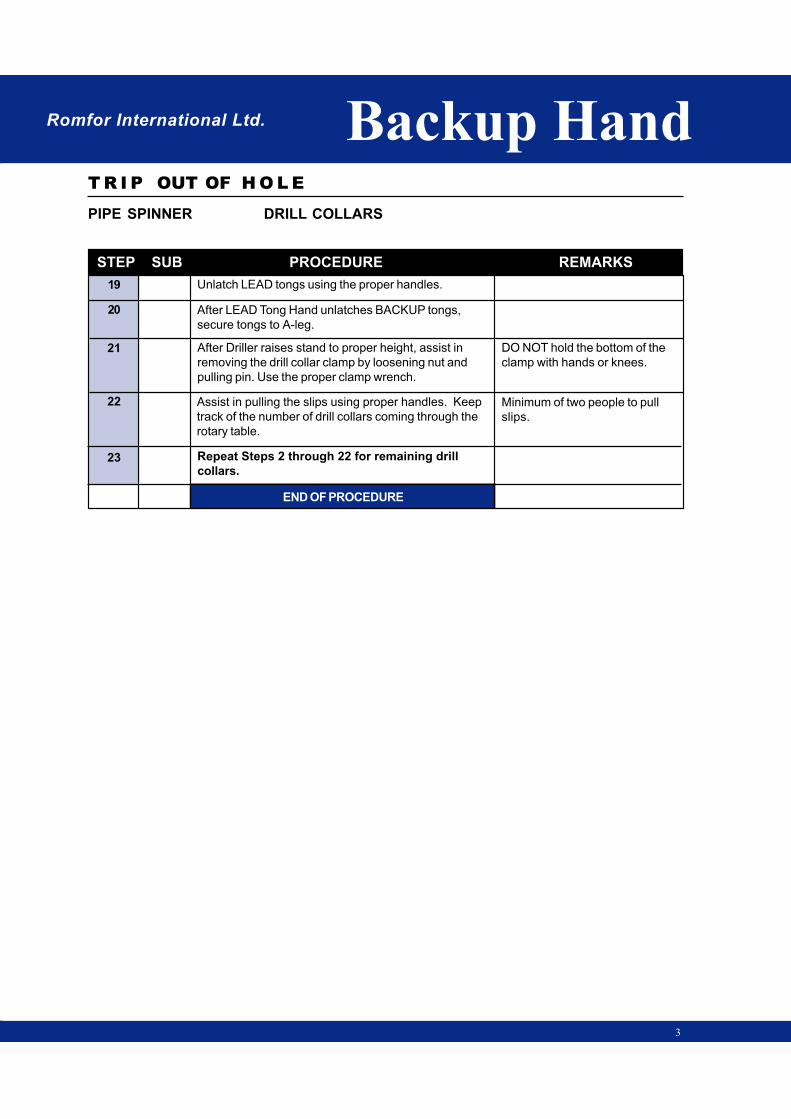
PIPE SPINNER DRILL COLLARS
T R I P OUT OF H O L E
. 1
0 1
1
2
2
3
4
5
6
PPE Requirements - Hard Hat, Safety Glasses,
Work Gloves, Steel Toe Shoes, Back Support.
Review JSA on tripping out of the hole with drill
collars.
Inspect Equipment:
Tong, Lines, Shackles, Slips, Keepers, Tong Heads,
Clamps, Cables, Drill Collar Clamps and Wrench.
PROCEDURE IS BASED ON THE ASSUMPTION
THAT THE FIRST DRILL COLLAR IS RACKED
WITH DRILL PIPE
Upon the Driller's signal, assist in setting the slips,
using proper lifting procedures.
Place pin in collar clamp and tighten using the proper
clamp wrench.
Release the BACKUP tongs from the A-leg and latch
onto the bottom drill collar connection, using proper
handles.
STAND CLEAR while the LEAD tong is latched onto
the top drill collar connection.
Make the BACK UP tongs bite at the same time the
LEAD tongs bite, using the proper tong handles.
After the tongs bite move to a safe area while Driller
breaks the drill collar connection.
Look for:
Slack, Missing parts, Damage,
Wear, Broken Cable, Shackles,
Dies, Keepers, Tong Heads,
Lines (proper length and proper
size).
Slips - Bolts, Inserts, Keepers,
(Cleaned and Doped), Handle
Conditions.
Minimum of two people to set
slips.
DO NOT use pipe wrench.
Make sure each clamp
segment is aligned properly.
Avoid pinch points. DO NOT
USE LATCH HANDLE.
DO NOT assist in latching
LEAD tongs.
Avoid pinch points. DO NOT
USE LATCH HANDLE. Avoid
jerk chain or line.
Be aware of tight connections.
Be aware of trip hazards.
7
THE CONNECTION IS BROKEN

STEP SUB PROCEDURE REMARKS
Backup Hand
PIPE SPINNER DRILL COLLARS
T R I P OUT OF H O L E
Romfor International Ltd.
. 2
Before spinning out, unlatch LEAD tongs and remove
BACKUP tongs after Lead Tong Hand unlatches, using
the proper tong handles.
STAND CLEAR while the stand is spun out with pipe
spinner and Driller picks up on stand.
Assist in racking the stand into the proper position.
Using air Hoist with proper sling, tie onto lift sub and
tail into place.
Assist in stabbing drill collar lift sub and make-up hand
tight. Remove sling and secure air hoist line out the
way of traveling equipment.
When the elevators are in the proper position, assist
Motorman in latching onto the lift sub.
STAND CLEAR while driller lowers elevators for
latching.
After elevators are latched onto lift sub STAND CLEAR
while LEAD tongs are latched onto drill collar connec-
tion in rotary.
Release BACKUP tongs from A-leg and latch onto lift
sub connection, using the proper handles.
Secure tongs to A-leg.
Avoid drilling fluids.
Do not get in the Drillers view.
Make sure feet are clear of pin
end of stand.
Keep fingers out of threads
while tightening by hand.
Be aware of the traveling
equipment as it is being lowered
to the proper latching position.
Keep hands clear of elevators
until at proper latching position.
Do not get into Drillers View.
Do not assist in latching LEAD
tongs.
8
9
10
11
12
13
14
16
17
18
15
Avoid pinch points and do not
use latch handles.
Make BACKUP tongs bite at the same time the LEAD
tongs bite, using the proper handles until the connec-
tion is tightened.
Romfor International Ltd. Backup Hand
STEP SUB PROCEDURE REMARKS
PIPE SPINNER DRILL COLLARS
T R I P OUT OF H O L E
3
23
Unlatch LEAD tongs using the proper handles.
After Driller raises stand to proper height, assist in
removing the drill collar clamp by loosening nut and
pulling pin. Use the proper clamp wrench.
Assist in pulling the slips using proper handles. Keep
track of the number of drill collars coming through the
rotary table.
Repeat Steps 2 through 22 for remaining drill
collars.
END OF PROCEDURE
After LEAD Tong Hand unlatches BACKUP tongs,
secure tongs to A-leg.
DO NOT hold the bottom of the
clamp with hands or knees.
Minimum of two people to pull
slips.
19
20
21
22
Romfor International Ltd.
TRIP OUT OF
HOLE
TRIP OUT OF
HOLE
Backup HandBackup Hand
SP
INN
ING
CH
AIN
DR
IL
L P
IP
E
SPINNING CHAIN
DRILL PIPE
SPINNING CHAIN
DRILL PIPE
Romfor International Ltd. Backup Hand
STEP SUB PROCEDURE REMARKS
SPINNING CHAIN DRILL PIPE
T R I P OUT OF H O L E
1
0 1
1
2
2
3
4
5
6
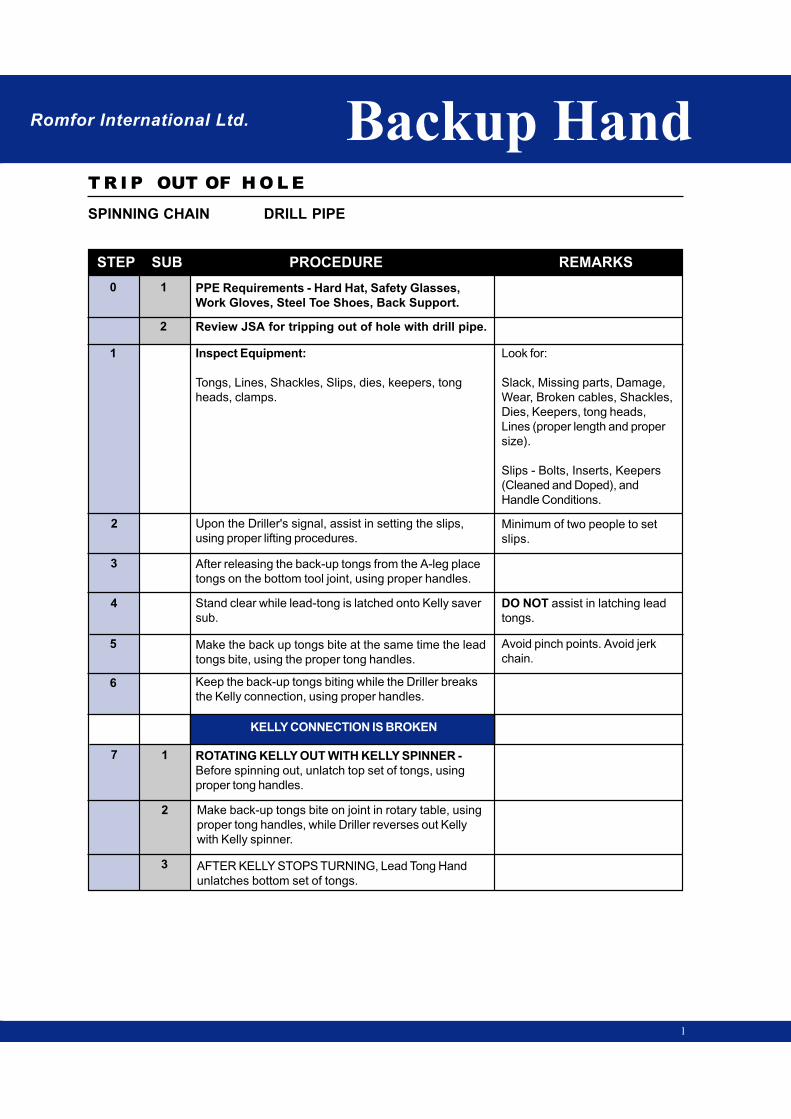
PPE Requirements - Hard Hat, Safety Glasses,
Work Gloves, Steel Toe Shoes, Back Support.
Review JSA for tripping out of hole with drill pipe.
Inspect Equipment:
Tongs, Lines, Shackles, Slips, dies, keepers, tong
heads, clamps.
Upon the Driller's signal, assist in setting the slips,
using proper lifting procedures.
After releasing the back-up tongs from the A-leg place
tongs on the bottom tool joint, using proper handles.
Stand clear while lead-tong is latched onto Kelly saver
sub.
Make the back up tongs bite at the same time the lead
tongs bite, using the proper tong handles.
Keep the back-up tongs biting while the Driller breaks
the Kelly connection, using proper handles.
KELLY CONNECTION IS BROKEN
ROTATING KELLY OUT WITH KELLY SPINNER -
Before spinning out, unlatch top set of tongs, using
proper tong handles.
Look for:
Slack, Missing parts, Damage,
Wear, Broken cables, Shackles,
Dies, Keepers, tong heads,
Lines (proper length and proper
size).
Slips - Bolts, Inserts, Keepers
(Cleaned and Doped), and
Handle Conditions.
Minimum of two people to set
slips.
DO NOT assist in latching lead
tongs.
Avoid pinch points. Avoid jerk
chain.
7
Make back-up tongs bite on joint in rotary table, using
proper tong handles, while Driller reverses out Kelly
with Kelly spinner.
AFTER KELLY STOPS TURNING, Lead Tong Hand
unlatches bottom set of tongs.
1
2
3
STEP SUB PROCEDURE REMARKS
Backup Hand
SPINNING CHAIN DRILL PIPE
T R I P OUT OF H O L E
Romfor International Ltd.
3
4
5
2
OR
ROTATING KELLY OUT WITH SPINNING CHAIN -
Before spinning out with chain, unlatch top set of tongs
using proper tong handles.
Wrap chain, clockwise, around Kelly saver sub.
While Driller is pulling on chain, make sure your hands
and finger are in proper position. Control chain,
especially tail, while reversing out Kelly.
STAND CLEAR while Driller picks up on Kelly, secure
back-up tongs to A-leg and prepare to assist setting
Kelly back.
AFTER KELLY STOPS TURNING, remove the excess
chain from Kelly.
SET BACK THE KELLY
Secure pull back line to Kelly.
Make sure spinning chain is
placed in one-gallon bucket
while Kelly is being raised.
Make sure not to cross chain
wraps.
Make sure to hold proper
tension on chain.
Avoid drilling fluids.
Insure the pull-back line is
properly secured to Kelly for
pulled-back.
7
DO NOT get in Drillers' view.
Keep out of area between Driller
and Kelly Shuck.
8
9
10
11
Stand clear while the Driller slacks-off stabbing the
Kelly into the Kelly Shuck.
Assist Lead-Tong Hand if
required.
After the Kelly is stabbed into the Kelly Shuck and
traveling equipment is stopped (air hoist is slacked-off)
remove pull-back cable from Kelly.
12
13
1
2
Once the Kelly is fully in the Kelly Shuck, tie off
Elevators to pull-back cable.
Stand clear while the traveling equipment is unlatched
from the Swivel.
Once the traveling equipment is in the proper position,
stopped and the air hoist is slacked-off, remove pull-
back cable.
Assist Motorman in positioning elevators to proper trip-
out position.
Keep hands clear of elevators.
14
Romfor International Ltd. Backup Hand
STEP SUB PROCEDURE REMARKS
SPINNING CHAIN DRILL PIPE
T R I P OUT OF H O L E
. 3
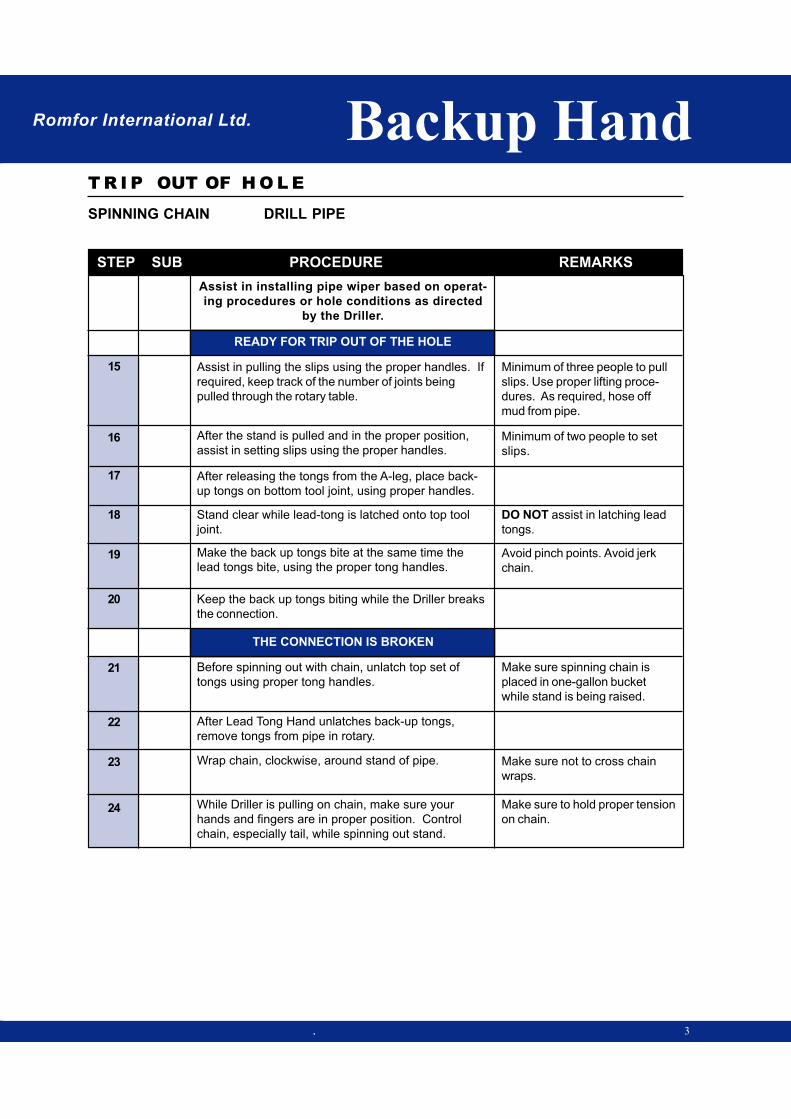
19
READY FOR TRIP OUT OF THE HOLE
Assist in pulling the slips using the proper handles. If
required, keep track of the number of joints being
pulled through the rotary table.
Assist in installing pipe wiper based on operat-
ing procedures or hole conditions as directed
by the Driller.
15
16
17
18
After the stand is pulled and in the proper position,
assist in setting slips using the proper handles.
After releasing the tongs from the A-leg, place back-
up tongs on bottom tool joint, using proper handles.
Stand clear while lead-tong is latched onto top tool
joint.
20
Minimum of three people to pull
slips. Use proper lifting proce-
dures. As required, hose off
mud from pipe.
Minimum of two people to set
slips.
Make the back up tongs bite at the same time the
lead tongs bite, using the proper tong handles.
Keep the back up tongs biting while the Driller breaks
the connection.
DO NOT assist in latching lead
tongs.
Avoid pinch points. Avoid jerk
chain.
THE CONNECTION IS BROKEN
Before spinning out with chain, unlatch top set of
tongs using proper tong handles.
Make sure spinning chain is
placed in one-gallon bucket
while stand is being raised.
21
22 After Lead Tong Hand unlatches back-up tongs,
remove tongs from pipe in rotary.
Wrap chain, clockwise, around stand of pipe.
While Driller is pulling on chain, make sure your
hands and fingers are in proper position. Control
chain, especially tail, while spinning out stand.
Make sure not to cross chain
wraps.
Make sure to hold proper tension
on chain.
23
24

STEP SUB PROCEDURE REMARKS
Backup Hand
SPINNING CHAIN DRILL PIPE
T R I P OUT OF H O L E
Romfor International Ltd.
4
28
29
30
31
AFTER STAND STOPS TURNING, remove the excess
chain from drill pipe.
STAND CLEAR while Driller picks up on stand of drill
pipe, secure back-up tongs to A-leg.
Assist the motorman in racking the stand into the
proper position.
While the traveling equipment is being lowered to the
floor, stand clear of Driller's view.
25
26
27
Avoid drilling fluids.
Do not get in Driller's view.
Make sure feet are clear of pin
end of stand.
Be aware of the traveling
equipment as it is being lowered
to the proper latching position.
Keep hands clear of elevators
until at proper latching position.
When the elevators are in the proper position, assist
Motorman in latching onto the tool joint in the rotary
table.
Repeat Steps 17 through 29 until reaching BHA.
Upon reaching BHA, refer to TOH - DRILL
COLLARS WITH SPINNING CHAIN.
END OF PROCEDURE
Do not get in Driller's view.

Romfor International Ltd.
TRIP OUT OF
HOLE
TRIP OUT OF
HOLE
Backup HandBackup Hand
SP
INN
ING
CH
AIN
DR
IL
L C
OL
LA
R
SPINNING CHAIN
DRILL COLLAR
SPINNING CHAIN
DRILL COLLAR
Romfor International Ltd. Backup Hand
STEP SUB PROCEDURE REMARKS
SPINNING CHAIN DRILL COLLARS
T R I P OUT OF H O L E
. 1
0 1
1
2
2
3
4
5
6
PPE Requirements - Hard Hat, Safety Glasses,
Work Gloves, Steel Toe Shoes, Back Support.
Review JSA on tripping out of the hole with drill
collars.
Inspect Equipment:
Tong, Lines, Shackles, Slips, Keepers, Tong Heads,
Clamps, Cables, drill collar clamps and wrench.
PROCEDURE IS BASED ON THE ASSUMPTION
THAT THE FIRST DRILL COLLAR IS RACKED
WITH DRILL PIPE
Upon the Driller's signal, assist in setting the slips,
using proper lifting procedures.
Place pin in collar clamp and tighten using the proper
clamp wrench.
Release the BACKUP tongs from the A-leg and latch
onto the bottom drill collar connection, using proper
handles.
STAND CLEAR while the LEAD tong is latched onto
the top drill collar connection.
Make the BACK UP tongs bite at the same time the
LEAD tongs bite, using the proper tong handles.
After the tongs bite move to a safe area while Driller
breaks the drill collar connection.
Look for:
Slack, Missing parts, Damage,
Wear, Broken Cable, Shackles,
Dies, Keepers, Tong Heads,
Lines (proper length and proper
size).
Slips - Bolts, Inserts, Keepers,
(Cleaned and Doped), Handle
Conditions.
Minimum of two people to set
slips.
DO NOT use pipe wrench.
Make sure each clamp segment
is aligned properly.
Avoid pinch points. DO NOT
USE LATCH HANDLE.
DO NOT assist in latching LEAD
tongs.
Avoid pinch points. DO NOT
USE LATCH HANDLE. Avoid
jerk chain or line.
Be aware of tight connections.
Be aware of trip hazards.7
THE CONNECTION IS BROKEN

STEP SUB PROCEDURE REMARKS
Backup Hand
SPINNING CHAIN DRILL COLLARS
T R I P OUT OF H O L E
Romfor International Ltd.
. 2
Before spinning out, unlatch LEAD tongs and remove
BACKUP tongs after Lead Tong Hand unlatches, using
the proper tong handles.
Wrap chain, clockwise, around stand of drill collars.
While Driller is pulling on chain, make sure your
hands and fingers are in proper position. Control
chain, especially tail, while spinning out stand.
AFTER STAND STOPS TURNING, remove the
excess chain from drill collars.
Assist in racking the stand into the proper position.
STAND CLEAR while Driller picks up on stand.
Using air hoist with proper sling, tie onto lift sub and
tail into place.
Assist in stabbing drill collar lift sub and make-up
hand tight. Remove sling and secure air hoist line
out the way of traveling equipment.
DO NOT secure tongs to A-leg.
Make sure not to cross chain
wraps. BE AWARE of Tong
Position.
Make sure to hold proper
tension on chain.
Avoid drilling fluids.
Do not get in the Drillers view.
Make sure feet are clear of pin
end of stand.
8
9
10
11
12
13
Keep fingers out of threads
while tightening by hand.
STAND CLEAR while Driller lowers elevators for
latching.
14
15
16
17
When the elevators are in the proper position, assist
Motorman in latching onto the lift sub.Be aware of the traveling
equipment as it is being lowered
to the proper latching position.
Keep hands clear of elevators
until at proper latching position.
After elevators are latched onto lift sub STAND
CLEAR while LEAD tongs are latched onto drill collar
connection in rotary.
Do not get into Drillers View.
Do not assist in latching LEAD
tongs.
18
19
BE AWARE of Tong Position.
Romfor International Ltd. Backup Hand
STEP SUB PROCEDURE REMARKS
SPINNING CHAIN DRILL COLLARS
T R I P OUT OF H O L E
3
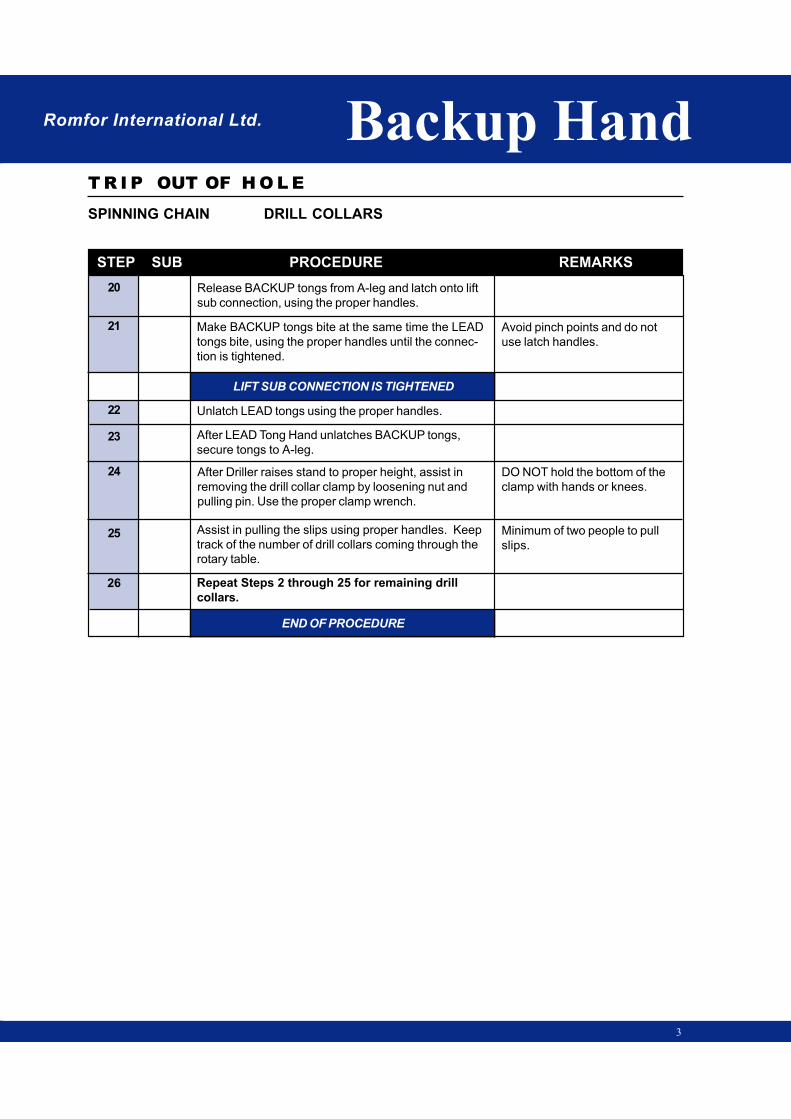
24
Release BACKUP tongs from A-leg and latch onto lift
sub connection, using the proper handles.
LIFT SUB CONNECTION IS TIGHTENED
Unlatch LEAD tongs using the proper handles.
After LEAD Tong Hand unlatches BACKUP tongs,
secure tongs to A-leg.
After Driller raises stand to proper height, assist in
removing the drill collar clamp by loosening nut and
pulling pin. Use the proper clamp wrench.
Make BACKUP tongs bite at the same time the LEAD
tongs bite, using the proper handles until the connec-
tion is tightened.
Avoid pinch points and do not
use latch handles.
20
21
22
23
Assist in pulling the slips using proper handles. Keep
track of the number of drill collars coming through the
rotary table.
Repeat Steps 2 through 25 for remaining drill
collars.
END OF PROCEDURE
25
DO NOT hold the bottom of the
clamp with hands or knees.
Minimum of two people to pull
slips.
26
Romfor International Ltd.
TRIP OUT OF
HOLE
TRIP OUT OF
HOLE
Backup HandBackup Hand
RO
TA
RY
TA
BL
E
DR
IL
L P
IP
E
ROTARY TABLE
DRILL PIPE
ROTARY TABLE
DRILL PIPE

Romfor International Ltd. Backup Hand
STEP SUB PROCEDURE REMARKS
ROTARY TABLE DRILL PIPE
T R I P OUT OF H O L E
1
SET BACK THE KELLY
0 1
1
2
2
3
4
5
6
PPE Requirements - Hard Hat, Safety Glasses,
Work Gloves, Steel Toe Shoes, Back Support.
Review JSA for tripping out of hole with drill pipe.
Inspect Equipment:
Tongs, Lines, Shackles, Slips, dies, keepers, tong
heads, clamps.
Upon the Driller's signal, assist in setting the slips,
using proper lifting procedures.
After releasing the back-up tongs from the A-leg place
tongs on the bottom tool joint, using proper handles.
Stand clear while lead-tong is latched onto Kelly saver
sub.
Make the back up tongs bite at the same time the lead
tongs bite, using the proper tong handles.
Keep the back-up tongs biting while the Driller breaks
the Kelly connection, using proper handles.
After Kelly connection is broken, and back-up tongs
are unlatched by Lead Tong Hand, remove tongs from
pipe and secure to A-leg.
Stand clear while the Driller rotates out.
Look for:
Slack, Missing parts, Damage,
Wear, Broken cables, Shackles,
Dies, Keepers, tong heads,
Lines (proper length and proper
size).
Slips - Bolts, Inserts, Keepers
(Cleaned and Doped), and
Handle Conditions.
Minimum of two people to set
slips.
DO NOT assist in latching lead
tongs.
Avoid pinch points. Avoid jerk
chain.
7
AFTER ROTARY STOPS, unlatch lead tongs, using
proper tong handles.
Stand clear and prepare to assist setting Kelly back
while Driller picks up Kelly.
Avoid drilling fluids.
8
9
10
STEP SUB PROCEDURE REMARKS
Backup Hand
ROTARY TABLE DRILL PIPE
T R I P OUT OF H O L E
Romfor International Ltd.
2
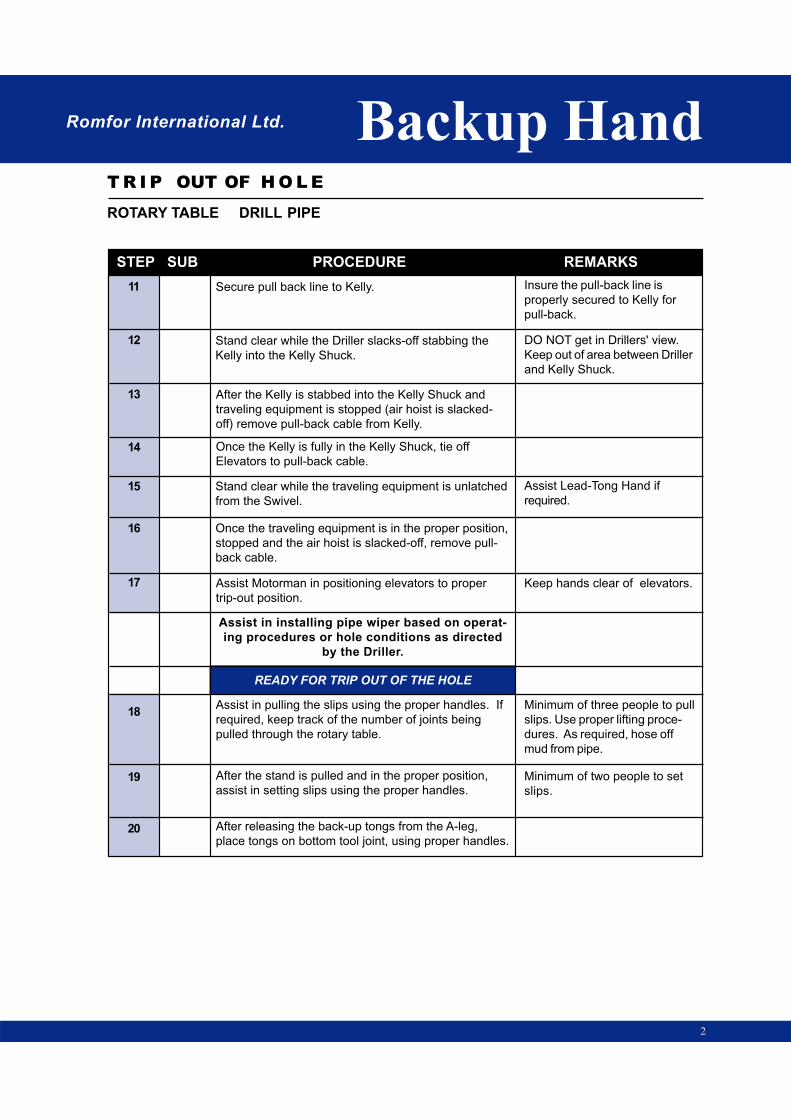
Secure pull back line to Kelly.
Stand clear while the Driller slacks-off stabbing the
Kelly into the Kelly Shuck.
After the Kelly is stabbed into the Kelly Shuck and
traveling equipment is stopped (air hoist is slacked-
off) remove pull-back cable from Kelly.
Stand clear while the traveling equipment is unlatched
from the Swivel.
Once the Kelly is fully in the Kelly Shuck, tie off
Elevators to pull-back cable.
Once the traveling equipment is in the proper position,
stopped and the air hoist is slacked-off, remove pull-
back cable.
Insure the pull-back line is
properly secured to Kelly for
pull-back.
DO NOT get in Drillers' view.
Keep out of area between Driller
and Kelly Shuck.
Assist Lead-Tong Hand if
required.
11
Keep hands clear of elevators.
12
13
14
15
Assist Motorman in positioning elevators to proper
trip-out position.
Assist in installing pipe wiper based on operat-
ing procedures or hole conditions as directed
by the Driller.
Minimum of three people to pull
slips. Use proper lifting proce-
dures. As required, hose off
mud from pipe.
16
17
READY FOR TRIP OUT OF THE HOLE
Assist in pulling the slips using the proper handles. If
required, keep track of the number of joints being
pulled through the rotary table.
After the stand is pulled and in the proper position,
assist in setting slips using the proper handles.
After releasing the back-up tongs from the A-leg,
place tongs on bottom tool joint, using proper handles.
Minimum of two people to set
slips.
18
19
20
Romfor International Ltd. Backup Hand
STEP SUB PROCEDURE REMARKS
ROTARY TABLE DRILL PIPE
T R I P OUT OF H O L E
3
25
Make the back up tongs bite at the same time the lead
tongs bite, using the proper tong handles.
Keep the back up tongs biting while the Driller breaks
the connection.
Stand clear while lead-tong is latched onto top tool
joint.
DO NOT assist in latching lead
tongs.
21
22
23
24
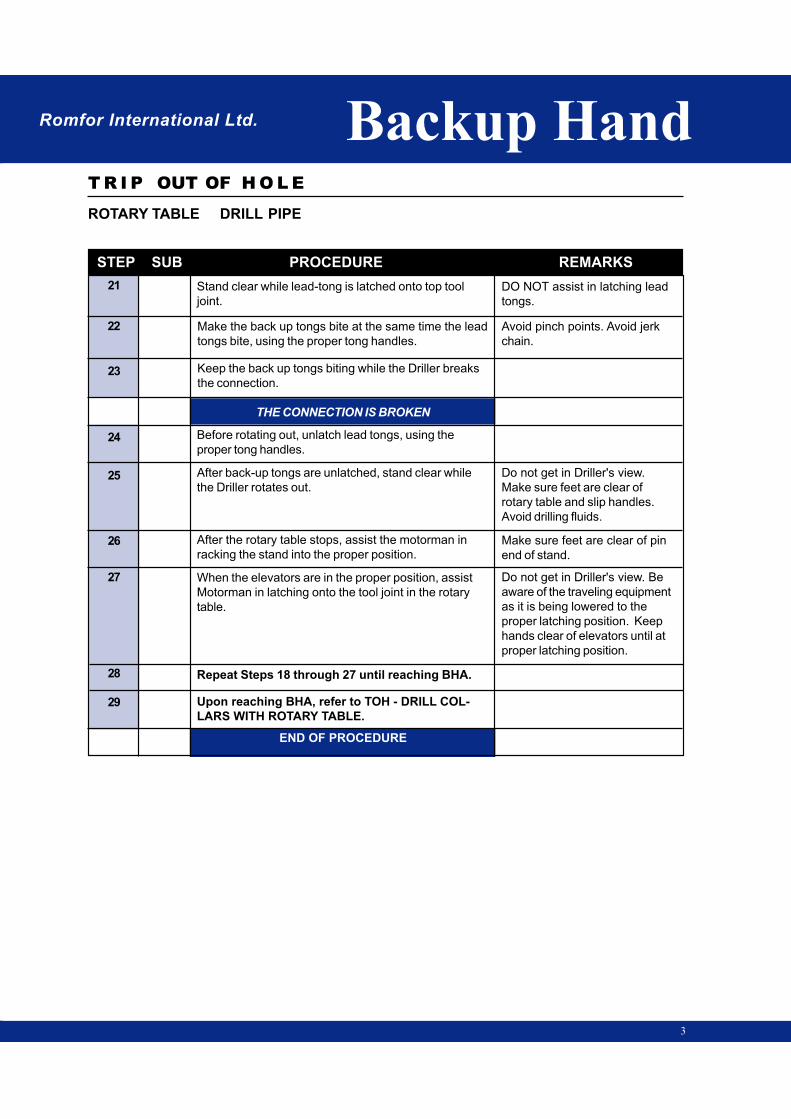
THE CONNECTION IS BROKEN
Before rotating out, unlatch lead tongs, using the
proper tong handles.
After back-up tongs are unlatched, stand clear while
the Driller rotates out.
26
Avoid pinch points. Avoid jerk
chain.
After the rotary table stops, assist the motorman in
racking the stand into the proper position.
When the elevators are in the proper position, assist
Motorman in latching onto the tool joint in the rotary
table.
Do not get in Driller's view.
Make sure feet are clear of
rotary table and slip handles.
Avoid drilling fluids.
Make sure feet are clear of pin
end of stand.
Do not get in Driller's view. Be
aware of the traveling equipment
as it is being lowered to the
proper latching position. Keep
hands clear of elevators until at
proper latching position.
Repeat Steps 18 through 27 until reaching BHA.
27
28
Upon reaching BHA, refer to TOH - DRILL COL-
LARS WITH ROTARY TABLE.
END OF PROCEDURE
29

Romfor International Ltd.
TRIP OUT OF
HOLE
TRIP OUT OF
HOLE
Backup HandBackup Hand
RO
TA
RY
TA
BL
E
DR
IL
L C
OL
LA
R
ROTARY TABLE
DRILL COLLAR
ROTARY TABLE
DRILL COLLAR

Romfor International Ltd. Backup Hand
STEP SUB PROCEDURE REMARKS
ROTARY TABLE DRILL COLLARS
T R I P OUT OF H O L E
. 1
0 1
1
2
2
3
4
5
6
PPE Requirements - Hard Hat, Safety Glasses,
Work Gloves, Steel Toe Shoes, Back Support.
Review JSA on tripping out of the hole with drill
collars.
Inspect Equipment:
Tong, Lines, Shackles, Slips, Keepers, Tong Heads,
Clamps, Cables, drill collar clamps and wrench.
PROCEDURE IS BASED ON THE ASSUMPTION
THAT THE FIRST DRILL COLLAR IS RACKED
WITH DRILL PIPE
Upon the Driller's signal, assist in setting the slips,
using proper lifting procedures.
Place pin in collar clamp and tighten using the proper
clamp wrench.
Release the BACKUP tongs from the A-leg and latch
onto the bottom drill collar connections, using proper
handles.
STAND CLEAR while the LEAD tong is latched onto
the top drill collar connection.
Make the BACK UP tongs bite at the same time the
LEAD tongs bite, using the proper tong handles.
After the tongs bite move to a safe area while Driller
breaks the drill collar connection.
Look for:
Slack, Missing parts, Damage,
Wear, Broken Cable, Shackles,
Dies, Keepers, Tong Heads,
Lines (proper length and proper
size).
Slips - Bolts, Inserts, Keepers,
(Cleaned and Doped), Handle
Conditions.
Minimum of two people to set
slips.
DO NOT use pipe wrench.
Make sure each clamp segment
is aligned properly.
Avoid pinch points. DO NOT
USE LATCH HANDLE.
DO NOT assist in latching LEAD
tongs.
Avoid pinch points. DO NOT
USE LATCH HANDLE. Avoid
jerk chain or line.
Be aware of tight connections.
Be aware of trip hazards.7
THE CONNECTION IS BROKEN
STEP SUB PROCEDURE REMARKS
Backup Hand
ROTARY TABLE DRILL COLLARS
T R I P OUT OF H O L E
Romfor International Ltd.
2
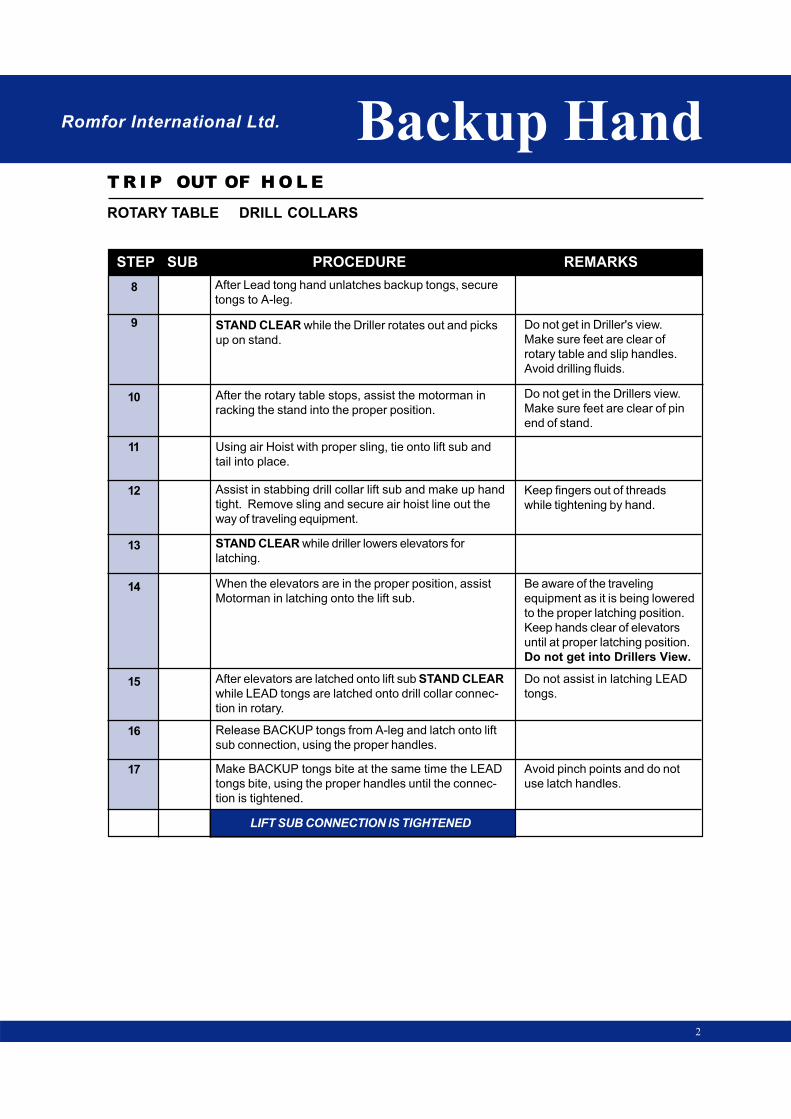
After Lead tong hand unlatches backup tongs, secure
tongs to A-leg.
After the rotary table stops, assist the motorman in
racking the stand into the proper position.
Using air Hoist with proper sling, tie onto lift sub and
tail into place.
Assist in stabbing drill collar lift sub and make up hand
tight. Remove sling and secure air hoist line out the
way of traveling equipment.
When the elevators are in the proper position, assist
Motorman in latching onto the lift sub.
STAND CLEAR while driller lowers elevators for
latching.
After elevators are latched onto lift sub STAND CLEAR
while LEAD tongs are latched onto drill collar connec-
tion in rotary.
Release BACKUP tongs from A-leg and latch onto lift
sub connection, using the proper handles.
STAND CLEAR while the Driller rotates out and picks
up on stand.
Do not get in Driller's view.
Make sure feet are clear of
rotary table and slip handles.
Avoid drilling fluids.
Do not get in the Drillers view.
Make sure feet are clear of pin
end of stand.
Keep fingers out of threads
while tightening by hand.
Be aware of the traveling
equipment as it is being lowered
to the proper latching position.
Keep hands clear of elevators
until at proper latching position.
Do not get into Drillers View.
Do not assist in latching LEAD
tongs.
8
9
10
11
12
13
Make BACKUP tongs bite at the same time the LEAD
tongs bite, using the proper handles until the connec-
tion is tightened.
Avoid pinch points and do not
use latch handles.
14
15
16
17
LIFT SUB CONNECTION IS TIGHTENED

Romfor International Ltd. Backup Hand
STEP SUB PROCEDURE REMARKS
ROTARY TABLE DRILL COLLARS
T R I P OUT OF H O L E
3
Unlatch LEAD tongs using the proper handles.
After Driller raises stand to proper height, assist in
removing the drill collar clamp by loosening nut and
pulling pin. Use the proper clamp wrench.
Assist in pulling the slips using proper handles. Keep
track of the number of drill collars coming through the
rotary table.
Repeat Steps 2 through 21 for remaining drill
collars.
END OF PROCEDURE
After LEAD Tong Hand unlatches BACKUP tongs,
secure tongs to A-leg.
DO NOT hold the bottom of the
clamp with hands or knees.
Minimum of two people to pull
slips.
18
19
20
21
22

Romfor International Ltd.
TRIP OUT OF
HOLE
TRIP OUT OF
HOLE
TR
IP
OU
T O
F H
OL
E
DerrickmanDerrickman

Romfor International Ltd.
DerrickmanDerrickman
TRIP OUT OF
HOLE
TRIP OUT OF
HOLE
TO
P D
RIV
E
DR
IL
L P
IP
E
TOP DRIVE
DRILL PIPE
TOP DRIVE
DRILL PIPE
Romfor International Ltd. Derrickman
STEP SUB PROCEDURE REMARKS
TOP DRIVE DRILL PIPE
T R I P OUT OF H O L E
. 1
0 1
1
2
3
4
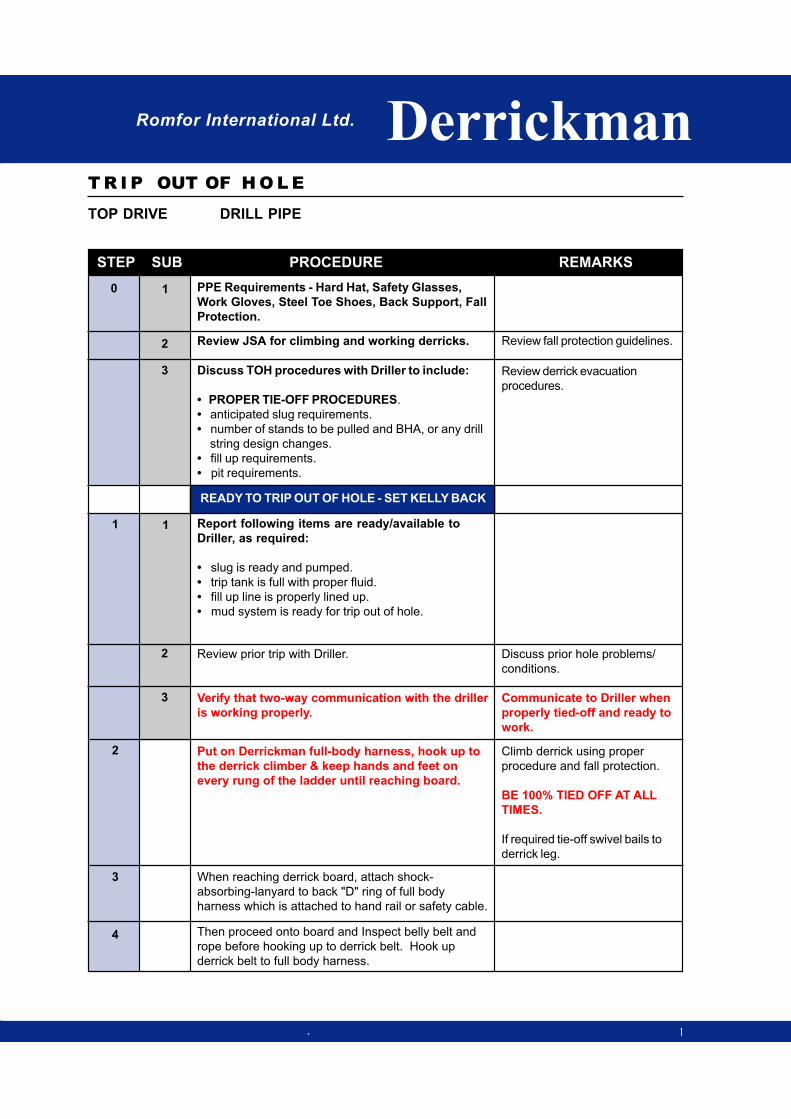
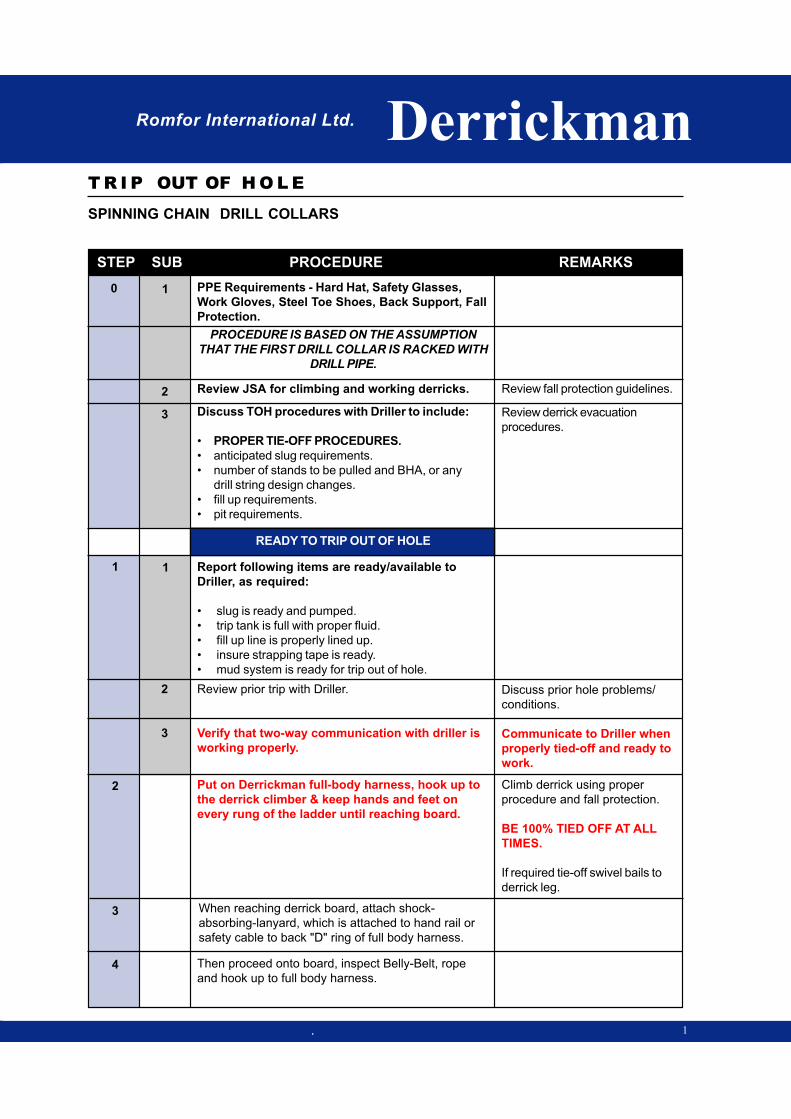
PPE Requirements - Hard Hat, Safety Glasses,
Work Gloves, Steel Toe Shoes, Back Support, Fall
Protection.
Review JSA for climbing and working derricks.
Discuss TOH procedures with Driller to include:
• PROPER TIE-OFF PROCEDURES.
• anticipated slug requirements.
• number of stands to be pulled and BHA, or any drill
string design changes.
• fill up requirements.
• pit requirements.
READY TO TRIP OUT OF HOLE - SET KELLY BACK
Report following items are ready/available to
Driller, as required:
• slug is ready and pumped.
• trip tank is full with proper fluid.
• fill up line is properly lined up.
• mud system is ready for trip out of hole.
Review prior trip with Driller.
Verify that two-way communication with the driller
is working properly.
Put on Derrickman full-body harness, hook up to
the derrick climber & keep hands and feet on
every rung of the ladder until reaching board.
When reaching derrick board, attach shock-
absorbing-lanyard to back "D" ring of full body
harness which is attached to hand rail or safety cable.
Review fall protection guidelines.
Review derrick evacuation
procedures.
Discuss prior hole problems/
conditions.
Communicate to Driller when
properly tied-off and ready to
work.
Climb derrick using proper
procedure and fall protection.
BE 100% TIED OFF AT ALL
TIMES.
If required tie-off swivel bails to
derrick leg.
2
Then proceed onto board and Inspect belly belt and
rope before hooking up to derrick belt. Hook up
derrick belt to full body harness.
3
1
2
3

STEP SUB PROCEDURE REMARKS
Derrickman
TOP DRIVE DRILL PIPE
T R I P OUT OF H O L E
Romfor International Ltd.
2
Inspect pull back rope and adjust the length of belly
rope and pull back rope. Inspect fingers & diving
board.
After the stand is broke out, ready for set back and
elevators are extended; place rope around stand for
pull back.
When the stand is being lowered to the racking board,
keep rope positioned for un-latching elevators.
After unlatching the elevators, keep pulling on the rope
until the stand is clear of the traveling equipment.
Using the rope, guide the stand to the proper finger for
racking.
After the stand is racked, secure with no. 10 or larger
sash-cord as required.
Repeat Steps 7 through 10 until reaching BHA.
Upon reaching BHA, refer to TOH - DRILL COL-
LARS WITH TOP DRIVE.
END OF PROCEDURE
READY TO PULL BACK PIPE
Position Pull Back Rope At
Corner Of Board.
Use Half wrap.
Keep moving rope and keep
hand clear of the elevators.
Beware of elevators hanging-
up on tool joints. Beware of
problems with short stands.
Beware of slippery racking
fingers.
Replace worn sash-cord as
required.
5
6
7
8
9
10
11
12

Romfor International Ltd.
DerrickmanDerrickman
TRIP OUT OF
HOLE
TRIP OUT OF
HOLE
TO
P D
RIV
E
DR
IL
L C
OL
LA
R
TOP DRIVE
DRILL COLLAR
TOP DRIVE
DRILL COLLAR

Romfor International Ltd. Derrickman
STEP SUB PROCEDURE REMARKS
TOP DRIVE DRILL COLLARS
T R I P OUT OF H O L E
. 1
0 1
1
2
3
4
PPE Requirements - Hard Hat, Safety Glasses,
Work Gloves, Steel Toe Shoes, Back Support, Fall
Protection
PROCEDURE IS BASED ON THE ASSUMPTION
THAT THE FIRST DRILL COLLAR IS RACKED WITH
DRILL PIPE.
Review JSA for climbing and working derricks.
Discuss TOH procedures with Driller to include:
• PROPER TIE-OFF PROCEDURES
• anticipated slug requirements.
• number of stands to be pulled and BHA, or any drill
string design changes
• fill up requirements.
• pit requirements
READY TO TRIP OUT OF HOLE
Report following items are ready/available to
Driller, as required:
• slug is ready and pumped.
• trip tank is full with proper fluid.
• fill up line is properly lined up.
• insure strapping tape is ready.
• mud system is ready for trip out of hole.
Review prior trip with Driller.
Verify that two way communication with the driller
is working properly.
Put on Derrickman full-body harness, hook up to
the derrick climber & keep hands and feet on
every rung of the ladder until reaching board.
When reaching derrick board, attach shock-
absorbing-lanyard, which is attached to hand rail or
safety cable to back "D" ring of full body harness.
Review fall protection guidelines.
Review derrick evacuation
procedures.
Discuss prior hole problems/
conditions.
Communicate to Driller when
properly tied-off and ready to
work.
Climb derrick using proper
procedure and fall protection.
BE 100% TIED OFF AT ALL
TIMES.
If required tie-off swivel bails to
derrick leg.
2
Then proceed onto board, inspect Belly-Belt, rope
and hook up to full body harness.
3
1
2
3

STEP SUB PROCEDURE REMARKS
Derrickman
TOP DRIVE DRILL COLLARS
T R I P OUT OF H O L E
Romfor International Ltd.
2
Inspect pull back and drill collar rope (or mechanical
Derrickman assist) and adjust the length of belly rope
and pull back rope. Inspect fingers & diving board.
When the elevators reach the proper position and
Floor Hands set slips and installed drill collar clamp,
place the pull-back-rope (or mechanical Derrickman
assist) around stand of drill collars keeping the collar
centered for proper spin out.
When the stand is being lowered slide rope or assist
line up to proper unlatching position for the elevators.
While the stand is lowered to the rig floor racking
board, and elevators are extended, keep tension on
assist line or pull back rope.
When the stand, elevators and assist line are in proper
position and completely stopped, unlatch elevators.
Secure stand of drill collars, as required.
Move drill collars into proper tie-off position with
assist line or pull back rope.
Repeat Steps 7 through 12 for remaining drill collars.
END OF PROCEDURE
READY TO PULL BACK COLLARS
Position Pull Back Rope At
Corner Of Board.
Use only half-wrap and watch
elevators while being lowered.
After the stand is rotated-out, be
aware of driller picking up on the
stand before lowering.
Be aware of elevators moving
down on lift sub and elevator
ropes.
For tall stands use rope that is
tied through elevator latch
handle for unlatching.
5
6
7
8
9
10
11
12
Watch for finger pinch points.
Use proper tie-off procedures.

Romfor International Ltd.
DerrickmanDerrickman
TRIP OUT OF
HOLE
TRIP OUT OF
HOLE
PIPE SPINNER
DRILL PIPE
PIPE SPINNER
DRILL PIPE
PIP
E S
PIN
NE
R
DR
IL
L P
IP
E

Romfor International Ltd. Derrickman
STEP SUB PROCEDURE REMARKS
PIPE SPINNER DRILL PIPE
T R I P OUT OF H O L E
. 1
0 1
1
2
3
4
PPE Requirements - Hard Hat, Safety Glasses,
Work Gloves, Steel Toe Shoes, Back Support, Fall
Protection.
Review JSA for climbing and working derricks.
Discuss TOH procedures with Driller to include:
• PROPER TIE-OFF PROCEDURES.
• anticipated slug requirements.
• number of stands to be pulled and BHA, or any drill
string design changes.
• fill up requirements.
• pit requirements.
READY TO TRIP OUT OF HOLE - SET KELLY BACK
Report following items are ready/available to
Driller, as required:
• slug is ready and pumped.
• trip tank is full with proper fluid.
• fill up line is properly lined up.
• insure strapping tape is ready.
• mud system is ready for trip out of hole.
Review prior trip with Driller.
Verify that two way communication with the driller
is working properly.
Put on Derrickman full-body harness, hook up to
the derrick climber & keep hands and feet on
every rung of the ladder until reaching board.
When reaching derrick board, attach shock-
absorbing-lanyard, which is attached to hand rail or
safety cable to back "D" ring of full body harness.
Review fall protection guide-
lines. Review derrick evacuation
procedures.
Discuss prior hole problems/
conditions.
Communicate to Driller when
properly tied-off and ready to
work.
Climb derrick using proper
procedure and fall protection.
BE 100% TIED OFF AT ALL
TIMES.
If required tie-off swivel bails to
derrick leg.
2
Then proceed onto board and Inspect Belly-Belt and
rope before hooking up to derrick belt. Hook up
derrick belt to full body harness.
3
1
2
3

STEP SUB PROCEDURE REMARKS
Derrickman
PIPE SPINNER DRILL PIPE
T R I P OUT OF H O L E
Romfor International Ltd.
2
Inspect pull back rope (or mechanical Derrickman
assist) and adjust the length of belly rope and pull
back rope. Inspect fingers & diving board.
When the elevators reach the proper position and
Floor Hands set slips, place the pull-back-rope (or
mechanical Derrickman assist) around stand of drill
pipe keeping the pipe centered for proper spin out.
When the stand is being lowered to the racking
board, keep rope positioned for un-latching elevators.
After un-latching the elevators, keep pulling on the rope
until the stand is clear of the traveling equipment.
Using the rope, guide the stand to the proper finger
for racking.
Repeat Steps 7 through 10 until reaching BHA.
After the stand is racked, secure with no. 10 or larger
sash-cord as required.
Upon reaching BHA, refer to TOH - DRILL
COLLARS WITH PIPE SPINNERS.
END OF PROCEDURE
READY TO PULL BACK PIPE
Position Pull Back Rope At
Corner Of Board.
Use only half-wrap and watch
elevators while being lowered.
After the stand is spun-out, be
aware of driller picking up on the
stand before lowering.
Keep moving rope and keep
hand clear of the elevators.
Beware of elevator hanging-up
on tool joints. Beware of prob-
lems with short stands.
Beware of slippery racking
fingers.
5
6
7
8
9
10
11
12
Replace worn sash-cord as
required.

Romfor International Ltd.
DerrickmanDerrickman
TRIP OUT OF
HOLE
TRIP OUT OF
HOLE
PIP
E S
PIN
NE
R
DR
IL
L C
OL
LA
R
PIPE SPINNER
DRILL COLLAR
PIPE SPINNER
DRILL COLLAR

Romfor International Ltd. Derrickman
STEP SUB PROCEDURE REMARKS
PIPE SPINNER DRILL COLLARS
T R I P OUT OF H O L E
1
1
0 1
1
2
3
4
PPE Requirements - Hard Hat, Safety Glasses,
Work Gloves, Steel Toe Shoes, Back Support, Fall
Protection.
PROCEDURE IS BASED ON THE ASSUMPTION
THAT THE FIRST DRILL COLLAR IS RACKED
WITH DRILL PIPE.
Review JSA for climbing and working derricks.
Discuss TOH procedures with Driller to include:
• PROPER TIE-OFF PROCEDURES
• anticipated slug requirements.
• number of stands to be pulled and BHA, or any
drill string design changes.
• fill up requirements.
• pit requirements.
READY TO TRIP OUT OF HOLE
Report following items are ready/available to
Driller, as required:
• anticipated slug requirements.
• number of stands to be pulled and BHA, or any
drill string design changes.
• fill up requirements.
• pit requirements.
Review prior trip with Driller.
Verify that two-way communication with the driller
is working properly
Put on Derrickman full-body harness, hook up to
the derrick climber & keep hands and feet on
every rung of the ladder until reaching board.
When reaching derrick board, attach shock-
absorbing-lanyard, which is attached to hand rail or
safety cable to back "D" ring of full body harness.
Review fall protection guidelines.
Review derrick evacuation
procedures.
Discuss prior hole problems/
conditions.
Communicate to Driller when
properly tied-off and ready to
work.
Climb derrick using proper
procedure and fall protection.
BE 100% TIED OFF AT ALL
TIMES.
If required tie-off swivel bails to
derrick leg.
2
Then proceed onto board, inspect Belly-Belt, rope
and hook up to full body harness.
3
1
2
3

Derrickman
PIPE SPINNER DRILL COLLARS
T R I P OUT OF H O L E
Romfor International Ltd.
STEP SUB PROCEDURE REMARKS
2
Derrickman will then inspect pull back and drill collar
rope (or mechanical Derrickman assist) and adjust the
length of belly rope and pull back rope. Inspect fingers
& diving board.
READY TO PULL BACK COLLARS
When the elevators reach the proper position and Floor
Hands set slips and has installed drill collar clamp, the
Derrickman should place the pull-back-rope (or me-
chanical Derrickman assist) around stand of drill collars
keeping the collar centered for proper spin out.
When the stand is being lowered slide rope or assist
line up to proper unlatching position for the elevators.
While the stand is lowered to the rig floor racking
board, keep tension on assist line or pull back rope.
When the stand, elevators and assist line; are in
proper position and completely stopped, unlatch
elevators.
Move drill collars into proper tie-off position with
assist line or pull back rope.
Secure stand of drill collars, as required.
Repeat Steps 7 through 11 for remaining drill
collars.
END OF PROCEDURE
Position Pull Back Rope At
Corner Of Board.
Use only half-wrap and watch
elevators while being lowered.
After the stand is spun-out, be
aware of driller picking up on the
stand before lowering.
Be aware of elevators moving
down on lift sub and elevator
ropes.
For tall stands use rope that is
tied through elevator latch
handle for unlatching.
Watch for finger pinch points.
Use proper tie-off procedures.
5
6
7
8
9
10
11
12

Romfor International Ltd.
DerrickmanDerrickman
TRIP OUT OF
HOLE
TRIP OUT OF
HOLE
SP
INN
ING
CH
AIN
DR
IL
L P
IP
E
SPINNING CHAIN
DRILL PIPE
SPINNING CHAIN
DRILL PIPE
Romfor International Ltd. Derrickman
STEP SUB PROCEDURE REMARKS
SPINNING CHAIN DRILL PIPE
T R I P OUT OF H O L E
. 1
0 1
1
2
3
4
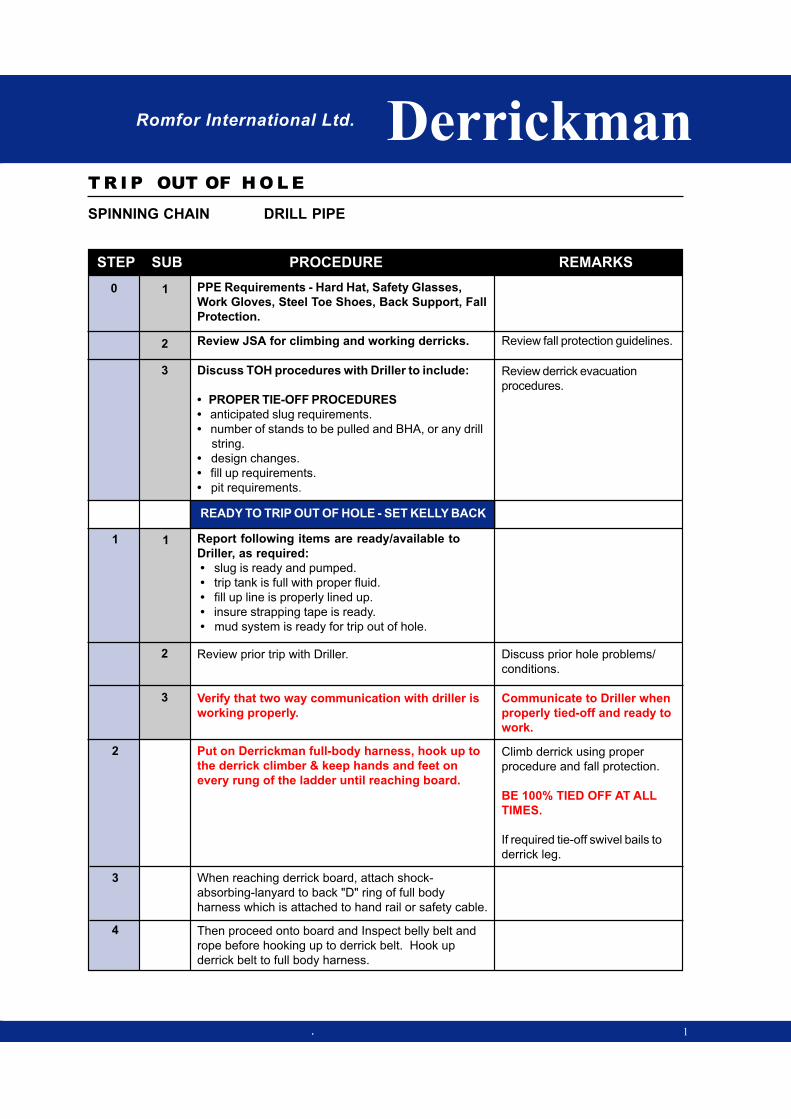
PPE Requirements - Hard Hat, Safety Glasses,
Work Gloves, Steel Toe Shoes, Back Support, Fall
Protection.
Review JSA for climbing and working derricks.
Discuss TOH procedures with Driller to include:
• PROPER TIE-OFF PROCEDURES
• anticipated slug requirements.
• number of stands to be pulled and BHA, or any drill
string.
• design changes.
• fill up requirements.
• pit requirements.
READY TO TRIP OUT OF HOLE - SET KELLY BACK
Report following items are ready/available to
Driller, as required:
• slug is ready and pumped.
• trip tank is full with proper fluid.
• fill up line is properly lined up.
• insure strapping tape is ready.
• mud system is ready for trip out of hole.
Review prior trip with Driller.
Verify that two way communication with driller is
working properly.
Put on Derrickman full-body harness, hook up to
the derrick climber & keep hands and feet on
every rung of the ladder until reaching board.
When reaching derrick board, attach shock-
absorbing-lanyard to back "D" ring of full body
harness which is attached to hand rail or safety cable.
Review fall protection guidelines.
Review derrick evacuation
procedures.
Discuss prior hole problems/
conditions.
Communicate to Driller when
properly tied-off and ready to
work.
Climb derrick using proper
procedure and fall protection.
BE 100% TIED OFF AT ALL
TIMES.
If required tie-off swivel bails to
derrick leg.
2
Then proceed onto board and Inspect belly belt and
rope before hooking up to derrick belt. Hook up
derrick belt to full body harness.
3
1
2
3

STEP SUB PROCEDURE REMARKS
Derrickman
SPINNING CHAIN DRILL PIPE
T R I P OUT OF H O L E
Romfor International Ltd.
Inspect pull back rope (or mechanical Derrickman
assist) and adjust the length of belly rope and pull
back rope. Inspect fingers & diving board.
When the elevators reach the proper position and
Floor Hands set slips, place the pull-back-rope (or
mechanical Derrickman assist) around stand of drill
pipe keeping the pipe centered for proper spin out.
When the stand is being lowered to the racking
board, keep rope positioned for unlatching elevators.
After unlatching the elevators, keep pulling on the rope
until the stand is clear of the traveling equipment.
Using the rope, guide the stand to the proper finger
for racking.
Repeat Steps 7 through 10 until reaching BHA.
After the stand is racked, secure with no. 10 or larger
sash-cord as required.
Upon reaching BHA, refer to TOH - DRILL
COLLARS WITH SPINNING CHAIN.
END OF PROCEDURE
READY TO PULL BACK PIPE
Position Pull Back Rope At
Corner Of Board
Use only half wrap and watch
elevators while being lowered.
After the stand is spun-out, be
aware of driller picking up on the
stand before lowering.
Keep moving rope and keep
hand clear of the elevators.
Beware of elevators hanging-
up on tool joints. Beware of
problems with short stands.
Beware of slippery racking
fingers.
5
6
7
8
9
10
11
12
Replace worn sash-cord as
required.
2

Romfor International Ltd.
DerrickmanDerrickman
TRIP OUT OF
HOLE
TRIP OUT OF
HOLE
SP
INN
ING
CH
AIN
DR
IL
L C
OL
LA
R
SPINNING CHAIN
DRILL COLLAR
SPINNING CHAIN
DRILL COLLAR
Romfor International Ltd. Derrickman
STEP SUB PROCEDURE REMARKS
SPINNING CHAIN DRILL COLLARS
T R I P OUT OF H O L E
. 1
0 1
1
2
3
4
PPE Requirements - Hard Hat, Safety Glasses,
Work Gloves, Steel Toe Shoes, Back Support, Fall
Protection.
PROCEDURE IS BASED ON THE ASSUMPTION
THAT THE FIRST DRILL COLLAR IS RACKED WITH
DRILL PIPE.
Review JSA for climbing and working derricks.
Discuss TOH procedures with Driller to include:
• PROPER TIE-OFF PROCEDURES.
• anticipated slug requirements.
• number of stands to be pulled and BHA, or any
drill string design changes.
• fill up requirements.
• pit requirements.
READY TO TRIP OUT OF HOLE
Report following items are ready/available to
Driller, as required:
• slug is ready and pumped.
• trip tank is full with proper fluid.
• fill up line is properly lined up.
• insure strapping tape is ready.
• mud system is ready for trip out of hole.
Review prior trip with Driller.
Verify that two-way communication with driller is
working properly.
Put on Derrickman full-body harness, hook up to
the derrick climber & keep hands and feet on
every rung of the ladder until reaching board.
When reaching derrick board, attach shock-
absorbing-lanyard, which is attached to hand rail or
safety cable to back "D" ring of full body harness.
Review fall protection guidelines.
Review derrick evacuation
procedures.
Discuss prior hole problems/
conditions.
Communicate to Driller when
properly tied-off and ready to
work.
Climb derrick using proper
procedure and fall protection.
BE 100% TIED OFF AT ALL
TIMES.
If required tie-off swivel bails to
derrick leg.
2
Then proceed onto board, inspect Belly-Belt, rope
and hook up to full body harness.
3
1
2
3

STEP SUB PROCEDURE REMARKS
Derrickman
SPINNING CHAIN DRILL COLLARS
T R I P OUT OF H O L E
Romfor International Ltd.
2
Inspect pull back and drill collar rope (or mechanical
Derrickman assist). Adjust the length of belly rope
and pull back rope. Inspect fingers & diving board.
When the elevators reach the proper position, place
the pull-back-rope (or mechanical Derrickman assist)
around stand of drill collars keeping the collar centered
for proper spin out.
When the stand is being lowered slide rope or assist
line up to proper unlatching position for the elevators.
While the stand is lowered to the rig floor racking
board, keep tension on assist line or pull back rope.
When the stand, elevators and assist line are in proper
position and completely stopped, unlatch elevators.
Secure stand of drill collars, as required.
Move drill collars into proper tie-off position with
assist line or pull back rope.
Repeat Steps 7 through 11 for remaining drill
collars.
END OF PROCEDURE
READY TO PULL BACK COLLARS
Position Pull Back Rope At
Corner Of Board.
Use only half-wrap and watch
elevators while being lowered.
After the stand is spun-out, be
aware of driller picking up on the
stand before lowering.
Be aware of elevators moving
down on lift sub and elevator
ropes.
For tall stands use rope that is
tied through elevator latch
handle for unlatching.
Watch for finger pinch points.
Use proper tie-off procedures.
5
6
7
8
9
10
11
12

Romfor International Ltd.
DerrickmanDerrickman
TRIP OUT OF
HOLE
TRIP OUT OF
HOLE
RO
TA
RY
TA
BL
E
DR
IL
L P
IP
E
ROTARY TABLE
DRILL PIPE
ROTARY TABLE
DRILL PIPE

Romfor International Ltd. Derrickman
STEP SUB PROCEDURE REMARKS
ROTARY TABLE DRILL PIPE
T R I P OUT OF H O L E
. 1
0 1
1
2
3
4
PPE Requirements - Hard Hat, Safety Glasses,
Work Gloves, Steel Toe Shoes, Back Support, Fall
Protection.
Review JSA for climbing and working derricks.
Discuss TOH procedures with Driller to include:
• PROPER TIE-OFF PROCEDURES.
• anticipated slug requirements.
• number of stands to be pulled and BHA, or any drill
string design changes.
• fill up requirements.
• pit requirements.
READY TO TRIP OUT OF HOLE - SET KELLY BACK
Report following items are ready/available to
Driller, as required:
• slug is ready and pumped.
• trip tank is full with proper fluid.
• fill up line is properly lined up.
• insure strapping tape is ready.
• mud system is ready for trip out of hole.
Review prior trip with Driller.
Verify that two-way communication with the driller
is working properly.
Put on Derrickman full-body harness, hook up to
the derrick climber & keep hands and feet on
every rung of the ladder until reaching board.
When reaching derrick board, attach shock-
absorbing-lanyard, which is attached to hand rail or
safety cable to back "D" ring of full body harness.
Review fall protection guidelines.
Review derrick evacuation
procedures.
Discuss prior hole problems/
conditions.
Communicate to Driller when
properly tied-off and ready to
work.
Climb derrick using proper
procedure and fall protection.
BE 100% TIED OFF AT ALL
TIMES.
If required tie-off swivel bails to
derrick leg.
2
Then proceed onto board, inspect Belly-Belt, rope
and hook up to full body harness.
3
1
2
3

STEP SUB PROCEDURE REMARKS
Derrickman
ROTARY TABLE DRILL PIPE
T R I P OUT OF H O L E
Romfor International Ltd.
2
Then proceed onto board and Inspect belly belt and
rope before hooking up to derrick belt. Hook up
derrick belt to full body harness.
READY TO PULL BACK PIPE
When the elevators reach the proper position and Floor
Hands set slips, place the pull-back-rope (or mechani-
cal Derrickman assist) around stand of drill pipe.
When the stand is being lowered to the racking
board, keep rope positioned for unlatching elevators.
After un-latching the elevators, keep pulling on the rope
until the stand is clear of the traveling equipment.
After the stand is racked, secure with no. 10 or larger
sash-cord as required.
Using the rope, guide the stand to the proper finger
for racking.
Repeat Steps 7 through 11 until reaching BHA.
Upon reaching BHA, refer to TOH - DRILL COL-
LARS W/ROTARY TABLE.
Inspect pull back rope (or mechanical Derrickman
assist) and adjust the length of Belly-Rope and pull
back rope. Inspect fingers & diving board.
Position Pull Back Rope At
Corner Of Board
Use only half- wrap.
Keep moving rope and keep
hand clear of the elevators.
Beware of elevators hanging-up
on tool joints. Beware of prob-
lems with short stands.
5
6
7
8
9
10
11
12
Beware of slippery racking
fingers.
Replace worn sash-cord as
required.
END OF PROCEDURE
13

Romfor International Ltd.
DerrickmanDerrickman
TRIP OUT OF
HOLE
TRIP OUT OF
HOLE
RO
TA
RY
TA
BL
E
DR
IL
L C
OL
LA
R
ROTARY TABLE
DRILL COLLAR
ROTARY TABLE
DRILL COLLAR

Romfor International Ltd. Derrickman
STEP SUB PROCEDURE REMARKS
ROTARY TABLE DRILL COLLARS
T R I P OUT OF H O L E
1
0
1
2
3
4
1
2
3
1
2
3
PPE Requirements - Hard Hat, Safety Glasses,Work Gloves, Steel Toe Shoes, Back Support, FallProtection.
PROCEDURE IS BASED ON THE ASSUMPTION
THAT THE FIRST DRILL COLLAR IS RACKED WITH
DRILL PIPE.
Review JSA for climbing and working derricks.
Discuss TOH procedures with Driller to include:
• PROPER TIE-OFF PROCEDURES• anticipated slug requirements.• number of stands to be pulled and BHA, or any
drill string design changes.• fill up requirements.• pit requirements.
READY TO TRIP OUT OF HOLE
Report following items are ready/available toDriller, as required:
• anticipated slug requirements.• number of stands to be pulled and BHA, or any
drill string design changes.• fill up requirements.• pit requirements.
Review prior trip with Driller.
Verify that two-way communication wih the driller
is working properly.
Put on Derrickman full-body harness, hook up tothe derrick climber & keep hands and feet onevery rung of the ladder until reaching board.
When reaching derrick board, attach shock-absorbing-lanyard, which is attached to hand rail or safety cableto back "D" ring of full body harness.
Then proceed onto board, inspect Belly-Belt, ropeand hook up to full body harness.
Review fall protection guidelines.Review derrick evacuationprocedures.
Discuss prior hole problems/conditions.
Communicate to Driller when
properly tied-off and ready to
work.
Climb derrick using properprocedure and fall protection.
BE 100% TIED OFF AT ALLTIMES.
If required tie-off swivel bails toderrick leg.
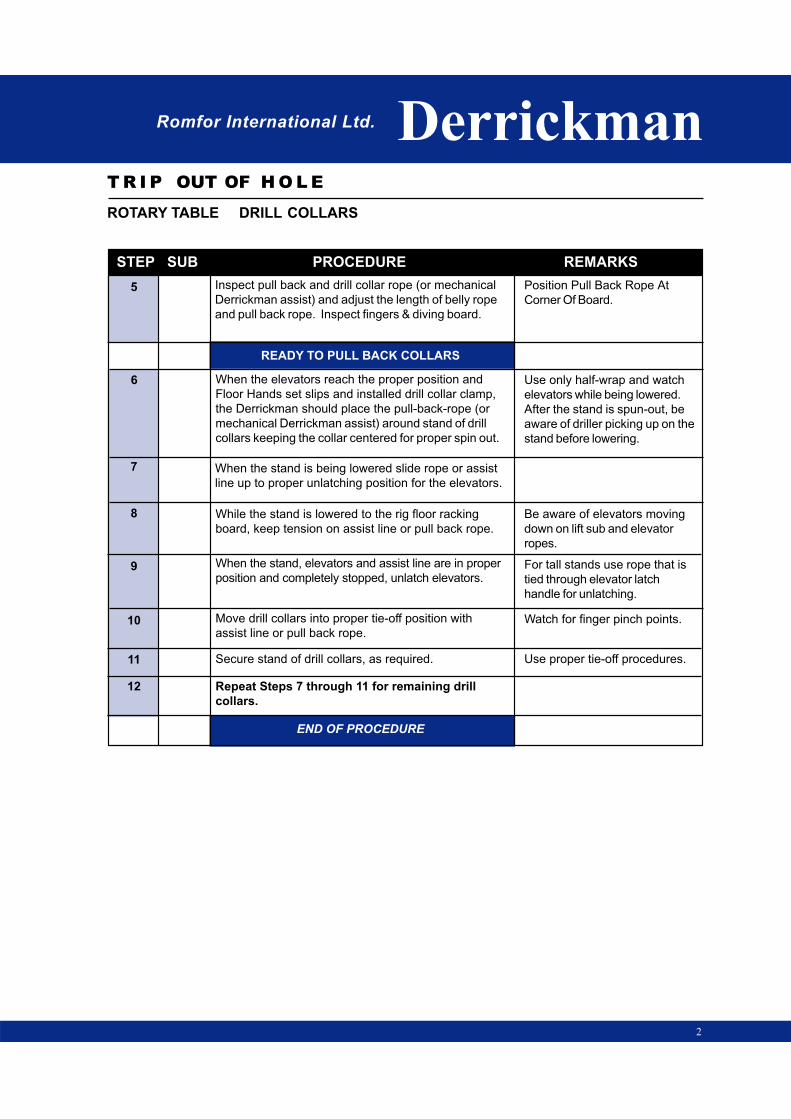
STEP SUB PROCEDURE REMARKS
Derrickman
ROTARY TABLE DRILL COLLARS
T R I P OUT OF H O L E
Romfor International Ltd.
Inspect pull back and drill collar rope (or mechanical
Derrickman assist) and adjust the length of belly rope
and pull back rope. Inspect fingers & diving board.
When the elevators reach the proper position and
Floor Hands set slips and installed drill collar clamp,
the Derrickman should place the pull-back-rope (or
mechanical Derrickman assist) around stand of drill
collars keeping the collar centered for proper spin out.
When the stand is being lowered slide rope or assist
line up to proper unlatching position for the elevators.
While the stand is lowered to the rig floor racking
board, keep tension on assist line or pull back rope.
When the stand, elevators and assist line are in proper
position and completely stopped, unlatch elevators.
Secure stand of drill collars, as required.
Move drill collars into proper tie-off position with
assist line or pull back rope.
Repeat Steps 7 through 11 for remaining drill
collars.
END OF PROCEDURE
READY TO PULL BACK COLLARS
Position Pull Back Rope At
Corner Of Board.
Use only half-wrap and watch
elevators while being lowered.
After the stand is spun-out, be
aware of driller picking up on the
stand before lowering.
Be aware of elevators moving
down on lift sub and elevator
ropes.
For tall stands use rope that is
tied through elevator latch
handle for unlatching.
Watch for finger pinch points.
Use proper tie-off procedures.
5
6
7
8
9
10
11
12
2

Romfor International Ltd.
TRIP OUT OF
HOLE
TRIP OUT OF
HOLE
TR
IP
OU
T O
F H
OL
E
DrillerDriller
Romfor International Ltd.
TRIP OUT OF
HOLE
TRIP OUT OF
HOLE
DrillerDriller
TO
P D
RIV
E
DR
IL
L P
IP
E
TOP DRIVE
DRILL PIPE
TOP DRIVE
DRILL PIPE
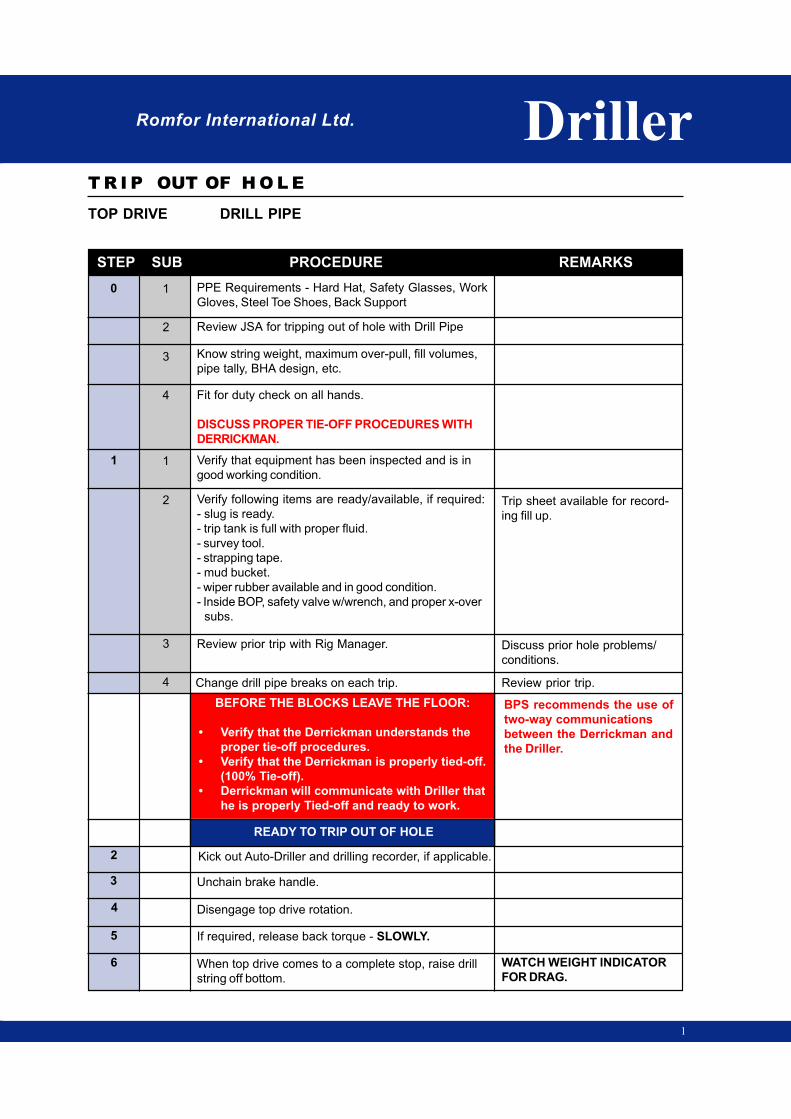
Romfor International Ltd. Driller
STEP SUB PROCEDURE REMARKS
TOP DRIVE DRILL PIPE
T R I P OUT OF H O L E
1
BEFORE THE BLOCKS LEAVE THE FLOOR:
• Verify that the Derrickman understands the
proper tie-off procedures.
• Verify that the Derrickman is properly tied-off.
(100% Tie-off).
• Derrickman will communicate with Driller that
he is properly Tied-off and ready to work.
BPS recommends the use of
two-way communications
between the Derrickman and
the Driller.
0 1
1
2
2
3
4
5
6
PPE Requirements - Hard Hat, Safety Glasses, Work
Gloves, Steel Toe Shoes, Back Support
Review JSA for tripping out of hole with Drill Pipe
Know string weight, maximum over-pull, fill volumes,
pipe tally, BHA design, etc.
Fit for duty check on all hands.
DISCUSS PROPER TIE-OFF PROCEDURES WITH
DERRICKMAN.
Verify that equipment has been inspected and is in
good working condition.
Verify following items are ready/available, if required:
- slug is ready.
- trip tank is full with proper fluid.
- survey tool.
- strapping tape.
- mud bucket.
- wiper rubber available and in good condition.
- Inside BOP, safety valve w/wrench, and proper x-over
subs.
Review prior trip with Rig Manager.
Change drill pipe breaks on each trip.
READY TO TRIP OUT OF HOLE
Kick out Auto-Driller and drilling recorder, if applicable.
Trip sheet available for record-
ing fill up.
Discuss prior hole problems/
conditions.
3
Unchain brake handle.
Disengage top drive rotation.
Review prior trip.
4
1
2
3
4
If required, release back torque - SLOWLY.
When top drive comes to a complete stop, raise drill
string off bottom.
WATCH WEIGHT INDICATOR
FOR DRAG.

STEP SUB PROCEDURE REMARKS
Driller
TOP DRIVE DRILL PIPE
T R I P OUT OF H O L E
Romfor International Ltd.
2
Depending upon hole condition, ream if necessary.
Raise drill string off bottom.
Pump slug according to hole conditions.
WHEN DRILL STRING IS IN PROPER POSITION,
and slug is displaced, kick out pumps.
Raise drill string to set back position (usually one
stand) and latch elevators around drill pipe.
Instruct hands to set slips.
Instruct hands to watch lines and proper clearance
of Top Drive assembly in derrick during raising and
lowering procedures.
Slack off on drill string, paying close attention to
weight indicator.
Check pump gauge for zero pressure and close Top
Drive Safety Valve (remote).
Discuss with Rig Manager.
CHECK FOR FLOW BEFORE
PUMPING SLUG
DO NOT EXCEED TOP DRIVE
ASSEMBLY WEIGHT.
7
8
RE-CHECK GAUGE FOR
TRAPPED PRESSURE. Make
sure Top Drive handler is
properly locked.
9
10
11
12
Close gripper around tool joint.
Engage torque boost to break connection 1/2 round.
13
14
Disengage torque boost after connection is broke.
THE CONNECTION IS BROKEN (TOP DRIVE)
REVERSE OUT WITH THE TOP DRIVE.
Release gripper.
15
16
17
18
19

Romfor International Ltd. Driller
STEP SUB PROCEDURE REMARKS
TOP DRIVE DRILL PIPE
T R I P OUT OF H O L E
3
22
When tongs, and crew members, are in proper break
out position, engage break out cat head pulling lead
tongs and breaking connection.
THE CONNECTION IS BROKEN (FLOOR LEVEL)
Raise Top Drive to engage elevators at tool joint.20
21
22
22
ROTATING OUT WITH THE ROTARY TABLE - After
bottom tongs are removed and clear, engage rotary -
SLOWLY- rotating out drill string. BE AWARE OF
BACK TORQUE.
AFTER ROTARY STOPS - Verify tongs and crew
members are in proper position.
OR
BE AWARE OF TIGHT CON-
NECTIONS.
Make sure crew members feet
are clear of the rotary table and
slip handles.
Check Crown-O-Matic on first
stand.
ROTATING OUT WITH PIPE SPINNER - Lower
blocks to clear elevators of tool joint.
After tongs are removed and cleared, wait on crew to
reverse out stand with pipe spinner.
Make sure elevators are not
stuck on tool joint.
OR
ROTATING OUT WITH SPINNING CHAIN - Lower
blocks to clear elevators of tool joint.
Make sure elevators are not
stuck on tool joint.
Make sure all employees are in
proper position, especially
hands, before engaging cat
head.
After top tongs are removed and cleared and spinning
chain is wrapped, clockwise, above pin end of stand -
SLOWLY ENGAGE MAKE UP CATHEAD, reversing
the stand out - SLOWLY.
If required, work pipe until survey tool has ad-
equate time to reach bottom. Continue to work
pipe until allotted time has been reached for
survey.
Allow adequate time for survey
tool to go off (take picture).
1
2
1
2
1
2

STEP SUB PROCEDURE REMARKS
Driller
TOP DRIVE DRILL PIPE
T R I P OUT OF H O L E
Romfor International Ltd.
4
Raise stand of drill pipe to proper height.
Lower drill pipe as crew guides stand to proper
racking position, engage link-tilt to position elevators
for Derrickman to unlatch.
Once pin end is set on racking board, continue
lowering blocks (SLOWLY) as Derrickman unlatches
elevators and pulls pipe clear.
Retract link-tilt to float position as Top Drive is being
lowered.
23
24
25
Lower blocks to proper position to latch elevators
onto drill pipe using link-tilt.
Return link-tilt to float position once elevators are
latched.
Raise drill string allowing crew members to pull slips.
Raise drill string to proper height (stand of pipe).
Lower the drill string to the position needed to set the
slips.
Instruct hands to set slips.
Slack off on drill string, paying close attention to
weight indicator.
When tongs, and crew members, are in proper break
out position, engage break out cat head pulling lead
tongs and breaking connection.
MAKE SURE CREW
MEMBERS ARE CLEAR OF
PIN END OF STAND.
Watch Derrickman until
stand is clear of Top Drive
assembly.
Minimum of three people to pull
slips.
WATCH WEIGHT INDICATOR
FOR DRAG.
WATCH WEIGHT INDICATOR
FOR DRAG.
Minimum of two people to set
slips.
DO NOT EXCEED TOP DRIVE
ASSEMBLY WEIGHT.
BE AWARE OF TIGHT
CONNECTIONS.
26
27
28
29
30
31
32
33
34

Romfor International Ltd. Driller
STEP SUB PROCEDURE REMARKS
TOP DRIVE DRILL PIPE
T R I P OUT OF H O L E
5
IInstall wiper rubber when hole condition allows
or according to operator requirements.
Repeat Steps 22 through 35 until reaching BHA.
Upon reaching BHA, refer to TOH - DRILL
COLLARS W/TOP DRIVE.
END OF PROCEDURE
Fill hole properly EVERY FIVE
STANDS and record on Trip
Sheet.
35
36
37
Romfor International Ltd.
TRIP OUT OF
HOLE
TRIP OUT OF
HOLE
DrillerDriller
TO
P D
RIV
E
DR
IL
L C
OL
LA
R
TOP DRIVE
DRILL COLLAR
TOP DRIVE
DRILL COLLAR
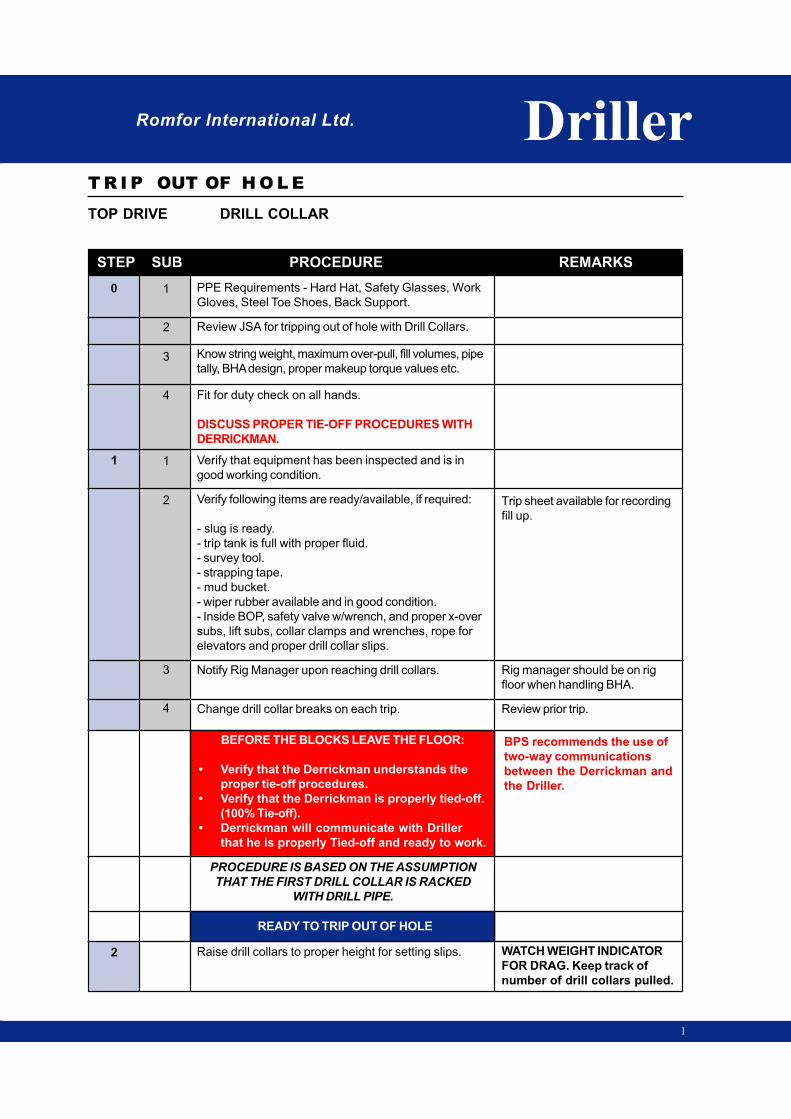
Romfor International Ltd. Driller
STEP SUB PROCEDURE REMARKS
TOP DRIVE DRILL COLLAR
T R I P OUT OF H O L E
1
BEFORE THE BLOCKS LEAVE THE FLOOR:
• Verify that the Derrickman understands the
proper tie-off procedures.
• Verify that the Derrickman is properly tied-off.
(100% Tie-off).
• Derrickman will communicate with Driller
that he is properly Tied-off and ready to work.
BPS recommends the use of
two-way communications
between the Derrickman and
the Driller.
0 1
1
2
2
PPE Requirements - Hard Hat, Safety Glasses, Work
Gloves, Steel Toe Shoes, Back Support.
Review JSA for tripping out of hole with Drill Collars.
Know string weight, maximum over-pull, fill volumes, pipe
tally, BHA design, proper makeup torque values etc.
Fit for duty check on all hands.
DISCUSS PROPER TIE-OFF PROCEDURES WITH
DERRICKMAN.
Verify that equipment has been inspected and is in
good working condition.
Verify following items are ready/available, if required:
- slug is ready.
- trip tank is full with proper fluid.
- survey tool.
- strapping tape.
- mud bucket.
- wiper rubber available and in good condition.
- Inside BOP, safety valve w/wrench, and proper x-over
subs, lift subs, collar clamps and wrenches, rope for
elevators and proper drill collar slips.
Notify Rig Manager upon reaching drill collars.
Change drill collar breaks on each trip.
PROCEDURE IS BASED ON THE ASSUMPTION
THAT THE FIRST DRILL COLLAR IS RACKED
WITH DRILL PIPE.
READY TO TRIP OUT OF HOLE
Trip sheet available for recording
fill up.
Rig manager should be on rig
floor when handling BHA.
3
Raise drill collars to proper height for setting slips.
Review prior trip.
4
1
2
3
4
WATCH WEIGHT INDICATOR
FOR DRAG. Keep track of
number of drill collars pulled.

STEP SUB PROCEDURE REMARKS
Driller
TOP DRIVE DRILL COLLAR
T R I P OUT OF H O L E
Romfor International Ltd.
2
Driller is to verify proper setting and working condition of
the Crown-O-Matic at the beginning of trip. Driller is to
acknowledge Crown-O-Matic check in the IADC Tour
Book.
Lower the drill string to the position needed to set the
slips.
Instruct hands to set slips.
Slack off on drill string only enough weight to set slips.
Pay close attention to weight indicator.
Insure Hands Install drill collar clamp according to
proper procedures.
When tongs, and crew members, are in proper break
out position, engage break out cat head pulling lead
tongs and break connection.
Slack off drill string weight onto slips, clearing elevators
from lift sub.
THE CONNECTION IS BROKEN
ROTATING OUT WITH PIPE SPINNER - After tongs
are removed and cleared, wait on crew to reverse out
stand with pipe spinner.
Make sure slips are set below
hard band.
DO NOT EXCEED TRAVELING
BLOCK ASSEMBLY WEIGHT.
Make sure Derrickhand is in
proper position.
Instruct hands to move to a
safe area while breaking
connection.
3
4
5
6
7
8
Raise stand of drill collars out of tool joint in rotary
table.
OR
9
10
Raise stand of drill collars out of tool joint in rotary
table.
OR
ROTATING OUT WITH ROTARY TABLE - After bottom
tongs are removed and cleared; instruct Lead Tong
Hand to keep tongs biting in proper position. Engage
rotary - SLOWLY- rotating out drill collars. BE AWARE
OF BACK TORQUE.
10
10
1
2
Make sure all employees are in
proper position, especially their
hands, before engaging cat
head.
1
2
1
ROTATING OUT WITH SPINNING CHAIN - After top
tongs are removed, cleared and spinning chain is
wrapped, clockwise, above pin end of stand. -
SLOWLY ENGAGE MAKE UP CATHEAD, reversing
the stand out - SLOWLY.

Romfor International Ltd. Driller
STEP SUB PROCEDURE REMARKS
TOP DRIVE DRILL COLLAR
T R I P OUT OF H O L E
3
Lower stand of drill collars as crew guides stand to
proper racking position.
AFTER ROTARY STOPS - Verify tongs and crew
members are in proper position, pick up on stand of
collars out of tool joint.
Make sure drill collar connection
is completely rotated out before
picking up.
11
12
13
14
Once pin end is set on racking board, verify
Derrickman is ready for elevators to be lowered to
position for unlatching.
Lower elevators to clear lift sub and stop while
Derrickman unlatches elevators.
After Derrickman unlatches elevators and stand of drill
collars is cleared, instruct Floorhands to install lift sub.
Insure drill collar assist is used
properly, if required. MAKE
SURE CREW MEMBERS FEET
ARE CLEAR OF PIN END OF
STAND.
Watch Derrickman until stand is
cleared of traveling equipment.
Lower traveling equipment to proper position allowing
Floorhands to latch elevators onto lift sub.
Be aware of traveling
equipment's position.
When tongs and crew members are in proper makeup
position, engage makeup cathead, tightening lift sub
connection to proper torque.
After tongs are removed, raise drill string allowing crew
members to remove drill collar clamp.
Verify crew members are
using proper procedures in
removing drill collar clamp.
WATCH WEIGHT INDICATOR
FOR DRAG. Minimum two
people to pull slips.
Instruct Floorhands to pull drill collar slips using proper
handles.
Repeat Steps 2 through 19 for remaining drill
collars.Fill hole properly EVERY STAND
and record on Trip Sheet.
2
END OF PROCEDURE
16
17
18
19
15

Romfor International Ltd.
TRIP OUT OF
HOLE
TRIP OUT OF
HOLE
DrillerDriller
PIPE SPINNER
DRILL PIPE
PIPE SPINNER
DRILL PIPE
PIP
E S
PIN
NE
R
DR
IL
L P
IP
E

Romfor International Ltd. Driller
STEP SUB PROCEDURE REMARKS
PIPE SPINNER DRILL PIPE
T R I P OUT OF H O L E
1
BEFORE THE BLOCKS LEAVE THE FLOOR:
• Verify that the Derrickman understands the
proper tie-off procedures.
• Verify that the Derrickman is properly tied-off.
(100% Tie-off).
• Derrickman will communicate with Driller that
he is properly Tied-off and ready to work.
BPS recommends the use of
two-way communications
between the Derrickman and
the Driller.
0 1
1
2
2
3
PPE Requirements - Hard Hat, Safety Glasses, Work
Gloves, Steel Toe Shoes, Back Support
Review JSA for tripping out of hole with Drill Pipe
Know string weight, maximum over-pull, fill volumes,
pipe tally, BHA design, etc.
Fit for duty check on all hands.
DISCUSS PROPER TIE-OFF PROCEDURES WITH
DERRICKMAN.
Verify that equipment has been inspected and is in
good working condition.
Verify following items are ready/available, if required:
- slug is ready.
- trip tank is full with proper fluid.
- survey tool.
- strapping tape.
- mud bucket.
- wiper rubber available and in good condition.
- Inside BOP, safety valve w/wrench, and proper x-over
subs.
Review prior trip with Rig Manager.
Change drill pipe breaks on each trip.
READY TO TRIP OUT OF HOLE - SET KELLY BACK
Kick out Auto-Driller and drilling recorder, if applicable.
Trip sheet available for recording
fill up.
Discuss prior hole problems/
conditions.
3
Unchain brake handle.
Kick out rotary table.
Review prior trip.
4
1
2
3
4
If required, release back torque - SLOWLY.
When rotary comes to a complete stop, raise drill
string off bottom.
4
5
6 WATCH WEIGHT INDICATOR
FOR DRAG.
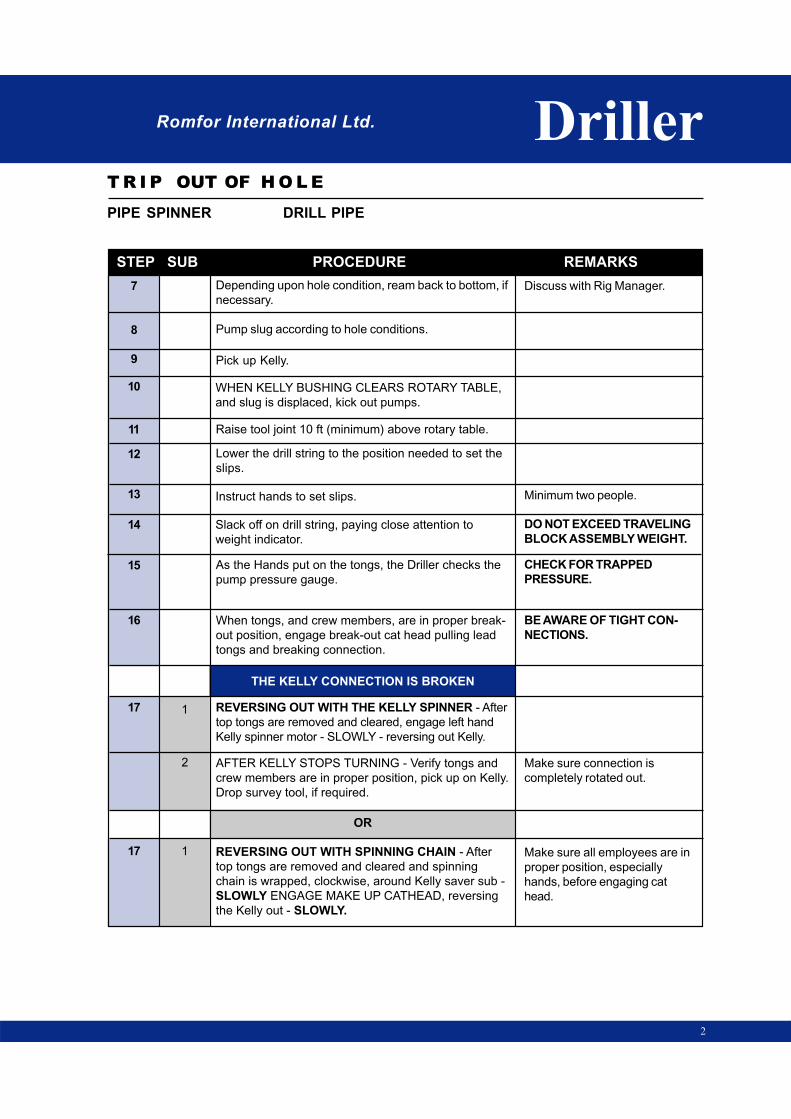
STEP SUB PROCEDURE REMARKS
Driller
PIPE SPINNER DRILL PIPE
T R I P OUT OF H O L E
Romfor International Ltd.
2
Depending upon hole condition, ream back to bottom, if
necessary.
Pump slug according to hole conditions.
Pick up Kelly.
WHEN KELLY BUSHING CLEARS ROTARY TABLE,
and slug is displaced, kick out pumps.
Raise tool joint 10 ft (minimum) above rotary table.
Instruct hands to set slips.
Lower the drill string to the position needed to set the
slips.
Slack off on drill string, paying close attention to
weight indicator.
As the Hands put on the tongs, the Driller checks the
pump pressure gauge.
Discuss with Rig Manager.7
8
Minimum two people.
9
10
11
12
When tongs, and crew members, are in proper break-
out position, engage break-out cat head pulling lead
tongs and breaking connection.
13
14
THE KELLY CONNECTION IS BROKEN
REVERSING OUT WITH THE KELLY SPINNER - After
top tongs are removed and cleared, engage left hand
Kelly spinner motor - SLOWLY - reversing out Kelly.
AFTER KELLY STOPS TURNING - Verify tongs and
crew members are in proper position, pick up on Kelly.
Drop survey tool, if required.
OR
15
16
DO NOT EXCEED TRAVELING
BLOCK ASSEMBLY WEIGHT.
CHECK FOR TRAPPED
PRESSURE.
BE AWARE OF TIGHT CON-
NECTIONS.
1
2
1
Make sure connection is
completely rotated out.
REVERSING OUT WITH SPINNING CHAIN - After
top tongs are removed and cleared and spinning
chain is wrapped, clockwise, around Kelly saver sub -
SLOWLY ENGAGE MAKE UP CATHEAD, reversing
the Kelly out - SLOWLY.
Make sure all employees are in
proper position, especially
hands, before engaging cat
head.
17
17

Romfor International Ltd. Driller
STEP SUB PROCEDURE REMARKS
PIPE SPINNER DRILL PIPE
T R I P OUT OF H O L E
3
Wait for crew to attach pull back cable to Kelly.
AFTER KELLY STOPS TURNING - Verify tongs,
spinning chain, and crew -members are in proper
position, pick up on Kelly. Drop survey tool, if required.
Make sure Kelly connection is
completely reversed out before
picking up.
18
19
20
21
When crew pulls Kelly into proper position, lower Kelly
into shuck, SLOWLY. Once Kelly has started into
shuck, STOP and wait for crew to remove cable, then
continue lowering.
Once Kelly is lowered into shuck, lower traveling
block to proper position to unlatch swivel from hook.
Wait on crew to secure elevators with air hoist line, if
required.
As Kelly lowers into shuck, pay
close attention to hoses and
lines for hang ups in derrick.
Watch swinging blocks & Kelly
hose.
Once crew unlatches from swivel, lower blocks
SLOWLY to proper position to allow crew to position
elevators for TOH.
Install wiper rubber when hole condition allows or
according to operator requirements.
Lower blocks to proper position to allow crew to latch
elevators onto drill pipe in rotary table.
Make sure hook is locked in
proper position. Tie back swivel
bail, if needed.
Raise drill string allowing crew members to pull slips.
If required, work pipe until survey tool has adequate
time to reach bottom. Continue to work pipe until
allotted time has been reached for survey.
Close off vernier needle.
2
READY TO TRIP OUT OF HOLE
23
24
25
26
22
WATCH WEIGHT INDICATOR
FOR DRAG.
Allow adequate time for survey
tool to go off (take picture).
WATCH WEIGHT INDICATOR
FOR DRAG.
Raise drill string to proper height (stand of pipe).
Driller is to verify proper setting and working
condition of the Crown-O-Matic at the beginning
of trip. Driller is to acknowledge Crown-O-Matic
check in the IADC Tour Book.
27

STEP SUB PROCEDURE REMARKS
Driller
PIPE SPINNER DRILL PIPE
T R I P OUT OF H O L E
Romfor International Ltd.
4
Lower the drill string to the position needed to set the
slips.
Instruct hands to set slips.
Slack off on drill string, paying close attention to weight
indicator.
When tongs, and crew members, are in proper break
out position, engage break out cat head pulling lead
tongs and breaking connection.
THE CONNECTION IS BROKEN
Lower blocks to clear elevators of tool joint.
After tongs are removed and cleared, wait on crew to
reverse out stand with pipe spinner.
Raise stand of drill pipe out of tool joint in rotary table.
Lower drill pipe as crew guides stand to proper racking
position.
Once pin end is set on racking board, continue lowering
blocks (slowly) as Derrickman unlatches elevators and
pulls pipe clear.
Lower blocks to proper position to allow crew to latch
elevators onto drill pipe in rotary table.
Raise drill string allowing crew members to pull slips.
Repeat Steps 28 through 38 until reaching BHA.
Upon reaching BHA, refer to TOH - DRILL
COLLARS W/PIPE SPINNER.
END OF PROCEDURE
DO NOT EXCEED TRAVELING
BLOCK ASSEMBLY WEIGHT.
BE AWARE OF TIGHT
CONNECTIONS.
Make sure elevators are not
stuck on tool joint.
MAKE SURE CREW
MEMBERS FEET ARE CLEAR
OF PIN END OF STAND.
Watch Derrickman until stand is
cleared of traveling equipment.
WATCH WEIGHT INDICATOR
FOR DRAG. Minimum three
people to pull slips.
Fill hole properly EVERY FIVE
STANDS and record on Trip
Sheet.
28
29
30
31
32
33
34
35
36
37
38
39
40

Romfor International Ltd.
TRIP OUT OF
HOLE
TRIP OUT OF
HOLE
DrillerDriller
PIP
E S
PIN
NE
R
DR
IL
L C
OL
LA
R
PIPE SPINNER
DRILL COLLAR
PIPE SPINNER
DRILL COLLAR

Romfor International Ltd. Driller
STEP SUB PROCEDURE REMARKS
PIPE SPINNER DRILL COLLAR
T R I P OUT OF H O L E
1
BEFORE THE BLOCKS LEAVE THE FLOOR:
• Verify that the Derrickman understands the
proper tie-off procedures.
• Verify that the Derrickman is properly tied-off.
(100% Tie-off).
• Derrickman will communicate with Driller
that he is properly Tied-off and ready to work.
BPS recommends the use of
two-way communications
between the Derrickman and
the Driller.
0 1
1
2
2
PPE Requirements - Hard Hat, Safety Glasses, Work
Gloves, Steel Toe Shoes, Back Support.
Review JSA for tripping out of hole with Drill Collars.
Know string weight, maximum over-pull, fill volumes,
pipe tally, BHA design, proper makeup torque values
etc.
Fit for duty check on all hands.
DISCUSS PROPER TIE-OFF PROCEDURES WITH
DERRICKMAN.
Verify that equipment has been inspected and is in
good working condition.
Verify following items are ready/available, if required:
- slug is ready.
- trip tank is full with proper fluid.
- survey tool.
- strapping tape.
- mud bucket.
- wiper rubber available and in good condition.
- Inside BOP, safety valve w/wrench, and proper x-over
subs, lift subs, collar clamps and wrenches, rope for
elevators and proper drill collar slips.
Notify Rig Manager upon reaching drill collars.
Change drill collar breaks on each trip.
PROCEDURE IS BASED ON THE ASSUMPTION
THAT THE FIRST DRILL COLLAR IS RACKED
WITH DRILL PIPE.
READY TO TRIP OUT OF HOLE
Trip sheet available for recording
fill up.
Rig manager should be on rig
floor when handling BHA.
3
Raise drill collars to proper height for setting slips.
Review prior trip.
4
1
2
3
4
WATCH WEIGHT INDICATOR
FOR DRAG. Keep track of
number of drill collars pulled.

STEP SUB PROCEDURE REMARKS
Driller
PIPE SPINNER DRILL COLLAR
T R I P OUT OF H O L E
Romfor International Ltd.
2
Driller is to verify proper setting and working condition of
the Crown-O-Matic at the beginning of trip. Driller is to
acknowledge Crown-O-Matic check in the IADC Tour
Book.
Lower the drill string to the position needed to set the
slips.
Instruct hands to set slips.
Insure Hands Install drill collar clamp according to
proper procedures.
Slack off on drill string only enough weight to set slips.
Pay close attention to weight indicator.
Slack off drill string weight onto slips, clearing elevators
from lift sub.
When tongs and crew members are in proper break out
position, engage break out cat head pulling lead tongs
and break connection.
Make sure slips are set below
hard band.
DO NOT EXCEED TRAVELING
BLOCK ASSEMBLY WEIGHT.
3
4
5
6
THE CONNECTION IS BROKEN
After tongs are removed and cleared, wait on crew to
reverse out stand with pipe spinner.
7
8
Raise stand of drill collars out of tool joint in rotary
table.
Lower stand of drill collars as crew guides stand to
proper racking position.
Once pin end is set on racking board, verify Derrickman
is ready for elevators to be lowered to position for
unlatching.
Lower elevators to clear lift sub and stop while
Derrickman unlatches elevators.
9
10
Make sure Derrickhand is in
proper position.
Instruct hands to move to a
safe area while breaking
connection.
11
12
13
14
Insure drill collar assist is used
properly, if required. MAKE
SURE CREW MEMBERS FEET
ARE CLEAR OF PIN END OF
STAND.
Watch Derrickman until stand is
cleared of traveling equipment.
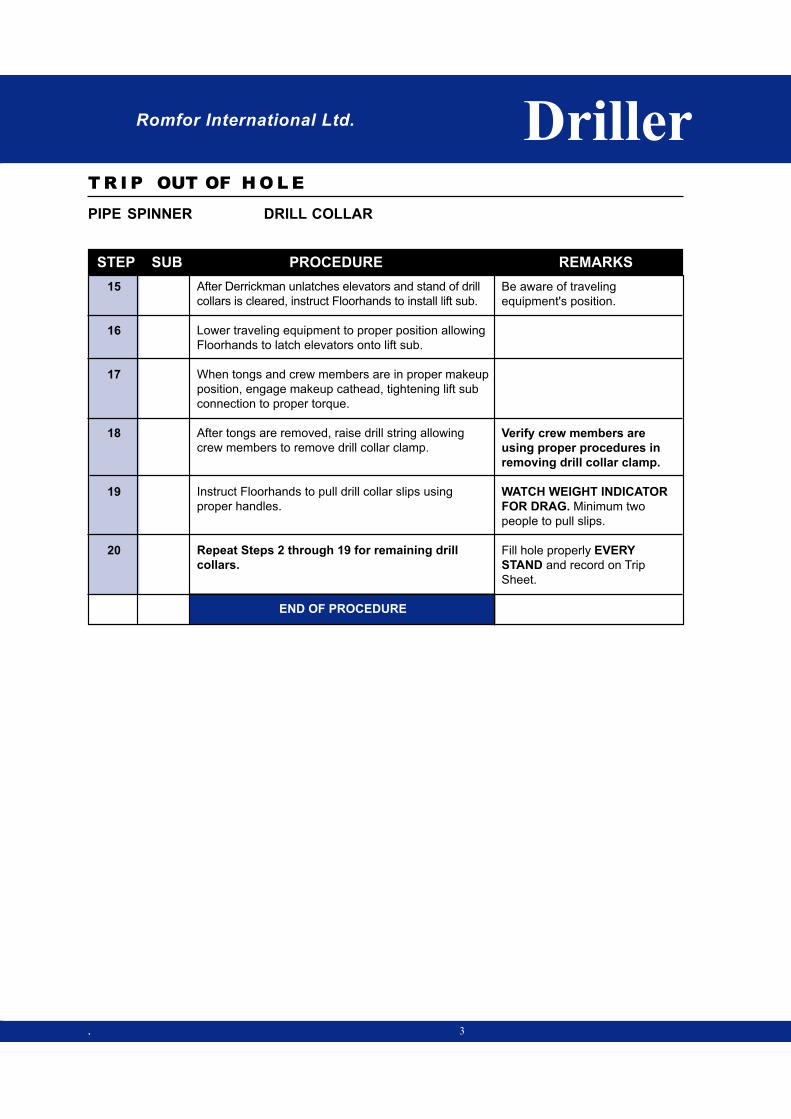
Romfor International Ltd. Driller
STEP SUB PROCEDURE REMARKS
PIPE SPINNER DRILL COLLAR
T R I P OUT OF H O L E
. 3
After Derrickman unlatches elevators and stand of drill
collars is cleared, instruct Floorhands to install lift sub.
Lower traveling equipment to proper position allowing
Floorhands to latch elevators onto lift sub.
When tongs and crew members are in proper makeup
position, engage makeup cathead, tightening lift sub
connection to proper torque.
After tongs are removed, raise drill string allowing
crew members to remove drill collar clamp.
Instruct Floorhands to pull drill collar slips using
proper handles.
Repeat Steps 2 through 19 for remaining drill
collars.
END OF PROCEDURE
Be aware of traveling
equipment's position.
Verify crew members are
using proper procedures in
removing drill collar clamp.
WATCH WEIGHT INDICATOR
FOR DRAG. Minimum two
people to pull slips.
Fill hole properly EVERY
STAND and record on Trip
Sheet.
15
16
17
18
19
20

Romfor International Ltd.
TRIP OUT OF
HOLE
TRIP OUT OF
HOLE
DrillerDriller
SP
INN
ING
CH
AIN
DR
IL
L P
IP
E
SPINNING CHAIN
DRILL PIPE
SPINNING CHAIN
DRILL PIPE
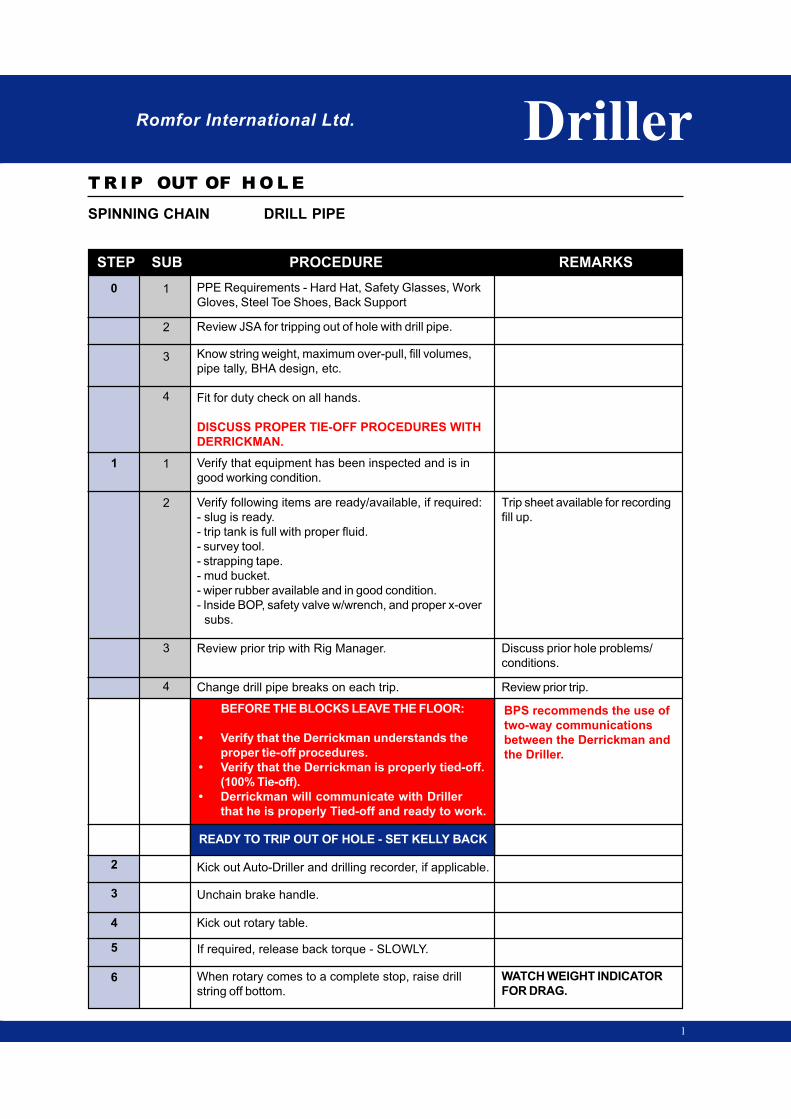
Romfor International Ltd. Driller
STEP SUB PROCEDURE REMARKS
SPINNING CHAIN DRILL PIPE
T R I P OUT OF H O L E
1
BEFORE THE BLOCKS LEAVE THE FLOOR:
• Verify that the Derrickman understands the
proper tie-off procedures.
• Verify that the Derrickman is properly tied-off.
(100% Tie-off).
• Derrickman will communicate with Driller
that he is properly Tied-off and ready to work.
BPS recommends the use of
two-way communications
between the Derrickman and
the Driller.
0 1
1
2
2
PPE Requirements - Hard Hat, Safety Glasses, Work
Gloves, Steel Toe Shoes, Back Support
Review JSA for tripping out of hole with drill pipe.
Know string weight, maximum over-pull, fill volumes,
pipe tally, BHA design, etc.
Fit for duty check on all hands.
DISCUSS PROPER TIE-OFF PROCEDURES WITH
DERRICKMAN.
Verify that equipment has been inspected and is in
good working condition.
Verify following items are ready/available, if required:
- slug is ready.
- trip tank is full with proper fluid.
- survey tool.
- strapping tape.
- mud bucket.
- wiper rubber available and in good condition.
- Inside BOP, safety valve w/wrench, and proper x-over
subs.
Review prior trip with Rig Manager.
Change drill pipe breaks on each trip.
READY TO TRIP OUT OF HOLE - SET KELLY BACK
Kick out Auto-Driller and drilling recorder, if applicable.
Trip sheet available for recording
fill up.
Discuss prior hole problems/
conditions.
3
Unchain brake handle.
Review prior trip.
4
1
2
3
4
Kick out rotary table.
If required, release back torque - SLOWLY.
When rotary comes to a complete stop, raise drill
string off bottom.
WATCH WEIGHT INDICATOR
FOR DRAG.
3
4
5
6

STEP SUB PROCEDURE REMARKS
Driller
SPINNING CHAIN DRILL PIPE
T R I P OUT OF H O L E
Romfor International Ltd.
2
Depending upon hole condition, ream back to bottom, if
necessary.
Pump slug according to hole conditions.
Pick up Kelly.
WHEN KELLY BUSHING CLEARS ROTARY TABLE,
and slug is displaced, kick out pumps.
Lower the drill string to the position needed to set the
slips.
Raise tool joint 10 ft (minimum) above rotary table.
Instruct hands to set slips.
Slack off on drill string, paying close attention to weight
indicator.
Discuss with Rig Manager.7
8
9
10
11
As the Hands put on the tongs, the Driller checks the
pump pressure gauge.
When tongs, and crew members, are in proper break
out position, engage break out cat head pulling lead
tongs and breaking connection.
12
13
THE KELLY CONNECTION IS BROKEN
REVERSING OUT WITH THE KELLY SPINNER - After
top tongs are removed and cleared, engage left hand
Kelly spinner motor - SLOWLY - reversing out Kelly.
AFTER KELLY STOPS TURNING - Verify tongs and
crew members are in proper position, pick up on Kelly.
Drop survey tool, if required.
OR
14
15
Minimum of two people to set
slips.
DO NOT EXCEED TRAVELING
BLOCK ASSEMBLY WEIGHT.
CHECK FOR TRAPPED
PRESSURE.
16
17
17
BE AWARE OF TIGHT CON-
NECTIONS.
Make sure connection is
completely rotated out.
Make sure all employees are in
proper position, especially
hands, before engaging cat
head.
REVERSING OUT WITH SPINNING CHAIN - After
top tongs are removed and cleared and spinning
chain is wrapped, clockwise, around Kelly saver sub -
SLOWLY ENGAGE MAKE UP CATHEAD, reversing
the Kelly out - SLOWLY.
1
2
1
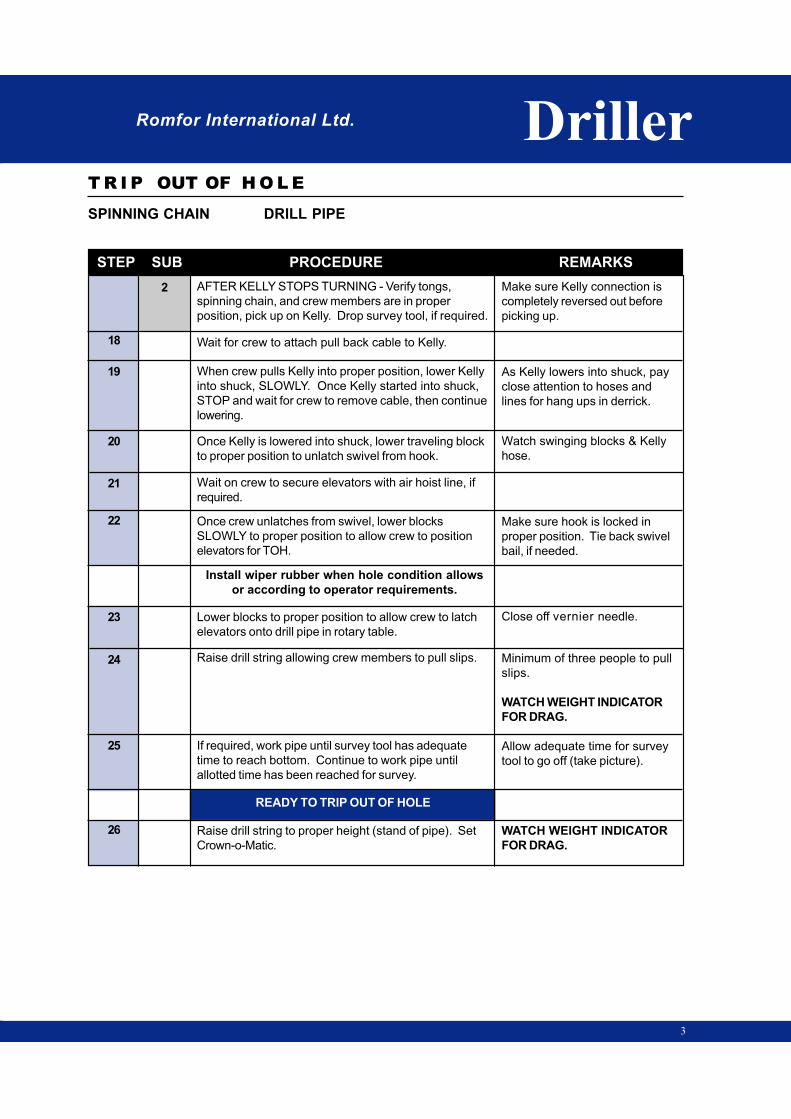
Romfor International Ltd. Driller
STEP SUB PROCEDURE REMARKS
SPINNING CHAIN DRILL PIPE
T R I P OUT OF H O L E
3
Wait for crew to attach pull back cable to Kelly.
AFTER KELLY STOPS TURNING - Verify tongs,
spinning chain, and crew members are in proper
position, pick up on Kelly. Drop survey tool, if required.
Make sure Kelly connection is
completely reversed out before
picking up.
18
19
20
21
When crew pulls Kelly into proper position, lower Kelly
into shuck, SLOWLY. Once Kelly started into shuck,
STOP and wait for crew to remove cable, then continue
lowering.
Once Kelly is lowered into shuck, lower traveling block
to proper position to unlatch swivel from hook.
Wait on crew to secure elevators with air hoist line, if
required.
As Kelly lowers into shuck, pay
close attention to hoses and
lines for hang ups in derrick.
Watch swinging blocks & Kelly
hose.
Once crew unlatches from swivel, lower blocks
SLOWLY to proper position to allow crew to position
elevators for TOH.
Make sure hook is locked in
proper position. Tie back swivel
bail, if needed.
Install wiper rubber when hole condition allows
or according to operator requirements.
Lower blocks to proper position to allow crew to latch
elevators onto drill pipe in rotary table.
Close off vernier needle.
Minimum of three people to pull
slips.
WATCH WEIGHT INDICATOR
FOR DRAG.
Raise drill string allowing crew members to pull slips.
If required, work pipe until survey tool has adequate
time to reach bottom. Continue to work pipe until
allotted time has been reached for survey.
Allow adequate time for survey
tool to go off (take picture).
2
READY TO TRIP OUT OF HOLE
23
24
25
26
22
Raise drill string to proper height (stand of pipe). Set
Crown-o-Matic.
WATCH WEIGHT INDICATOR
FOR DRAG.
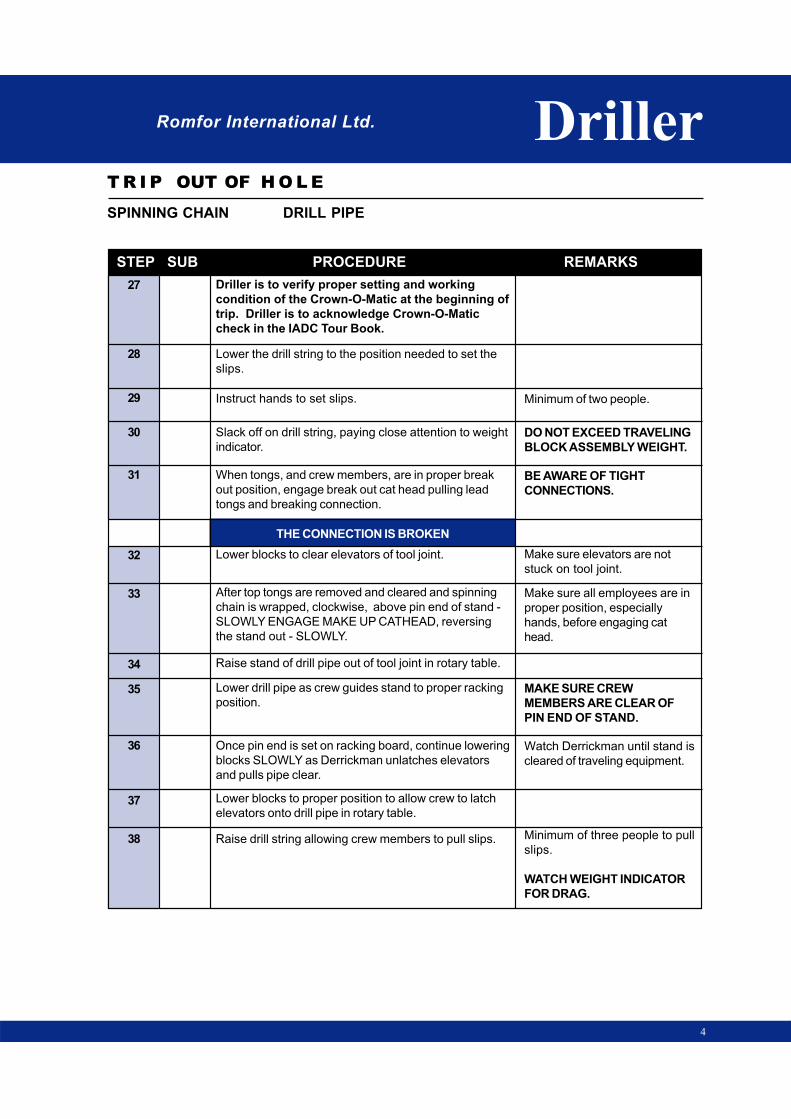
STEP SUB PROCEDURE REMARKS
Driller
SPINNING CHAIN DRILL PIPE
T R I P OUT OF H O L E
Romfor International Ltd.
4
Driller is to verify proper setting and working
condition of the Crown-O-Matic at the beginning of
trip. Driller is to acknowledge Crown-O-Matic
check in the IADC Tour Book.
Lower the drill string to the position needed to set the
slips.
Instruct hands to set slips. Minimum of two people.
Slack off on drill string, paying close attention to weight
indicator.
DO NOT EXCEED TRAVELING
BLOCK ASSEMBLY WEIGHT.
When tongs, and crew members, are in proper break
out position, engage break out cat head pulling lead
tongs and breaking connection.
BE AWARE OF TIGHT
CONNECTIONS.
THE CONNECTION IS BROKEN
Make sure elevators are not
stuck on tool joint.
Lower blocks to clear elevators of tool joint.
Make sure all employees are in
proper position, especially
hands, before engaging cat
head.
After top tongs are removed and cleared and spinning
chain is wrapped, clockwise, above pin end of stand -
SLOWLY ENGAGE MAKE UP CATHEAD, reversing
the stand out - SLOWLY.
MAKE SURE CREW
MEMBERS ARE CLEAR OF
PIN END OF STAND.
Raise stand of drill pipe out of tool joint in rotary table.
Watch Derrickman until stand is
cleared of traveling equipment.
Lower drill pipe as crew guides stand to proper racking
position.
Once pin end is set on racking board, continue lowering
blocks SLOWLY as Derrickman unlatches elevators
and pulls pipe clear.
Lower blocks to proper position to allow crew to latch
elevators onto drill pipe in rotary table.
Minimum of three people to pull
slips.
WATCH WEIGHT INDICATOR
FOR DRAG.
Raise drill string allowing crew members to pull slips.
27
28
29
30
31
32
33
34
35
36
37
38

Romfor International Ltd. Driller
STEP SUB PROCEDURE REMARKS
SPINNING CHAIN DRILL PIPE
T R I P OUT OF H O L E
5
Repeat Steps 28 through 38 until reaching BHA. Fill hole properly EVERY FIVE
STANDS and record on Trip
Sheet.
Upon reaching BHA, refer to TOH - DRILL
COLLARS W/SPINNING CHAIN.
39
40
END OF PROCEDURE
Romfor International Ltd.
TRIP OUT OF
HOLE
TRIP OUT OF
HOLE
DrillerDriller
SP
INN
ING
CH
AIN
DR
IL
L C
OL
LA
R
SPINNING CHAIN
DRILL COLLAR
SPINNING CHAIN
DRILL COLLAR

Romfor International Ltd. Driller
STEP SUB PROCEDURE REMARKS
SPINNING CHAIN DRILL COLLAR
T R I P OUT OF H O L E
1
BEFORE THE BLOCKS LEAVE THE FLOOR:
• Verify that the Derrickman understands the
proper tie-off procedures.
• Verify that the Derrickman is properly tied-off.
(100% Tie-off).
• Derrickman will communicate with Driller
that he is properly Tied-off and ready to work.
BPS recommends the use of
two-way communications
between the Derrickman and
the Driller.
0 1
1
2
2
PPE Requirements - Hard Hat, Safety Glasses, Work
Gloves, Steel Toe Shoes, Back Support.
Review JSA for tripping out of hole with Drill Collars.
Know string weight, maximum over-pull, fill volumes,
pipe tally, BHA design, proper makeup torque values
etc.
Fit for duty check on all hands.
DISCUSS PROPER TIE-OFF PROCEDURES WITH
DERRICKMAN.
Verify that equipment has been inspected and is in
good working condition.
Verify following items are ready/available, if required:
- slug is ready.
- trip tank is full with proper fluid.
- survey tool.
- strapping tape.
- mud bucket.
- wiper rubber available and in good condition.
- Inside BOP, safety valve w/wrench, and proper x-over
subs, lift subs, collar clamps and wrenches, rope for
elevators and proper drill collar slips.
Notify Rig Manager upon reaching drill collars.
Change drill collar breaks on each trip.
PROCEDURE IS BASED ON THE ASSUMPTION
THAT THE FIRST DRILL COLLAR IS RACKED
WITH DRILL PIPE.
READY TO TRIP OUT OF HOLE
Trip sheet available for recording
fill up.
Rig manager should be on rig
floor when handling BHA.
3
Raise drill collars to proper height for setting slips.
Review prior trip.
4
1
2
3
4
WATCH WEIGHT INDICATOR
FOR DRAG. Keep track of
number of drill collars pulled.
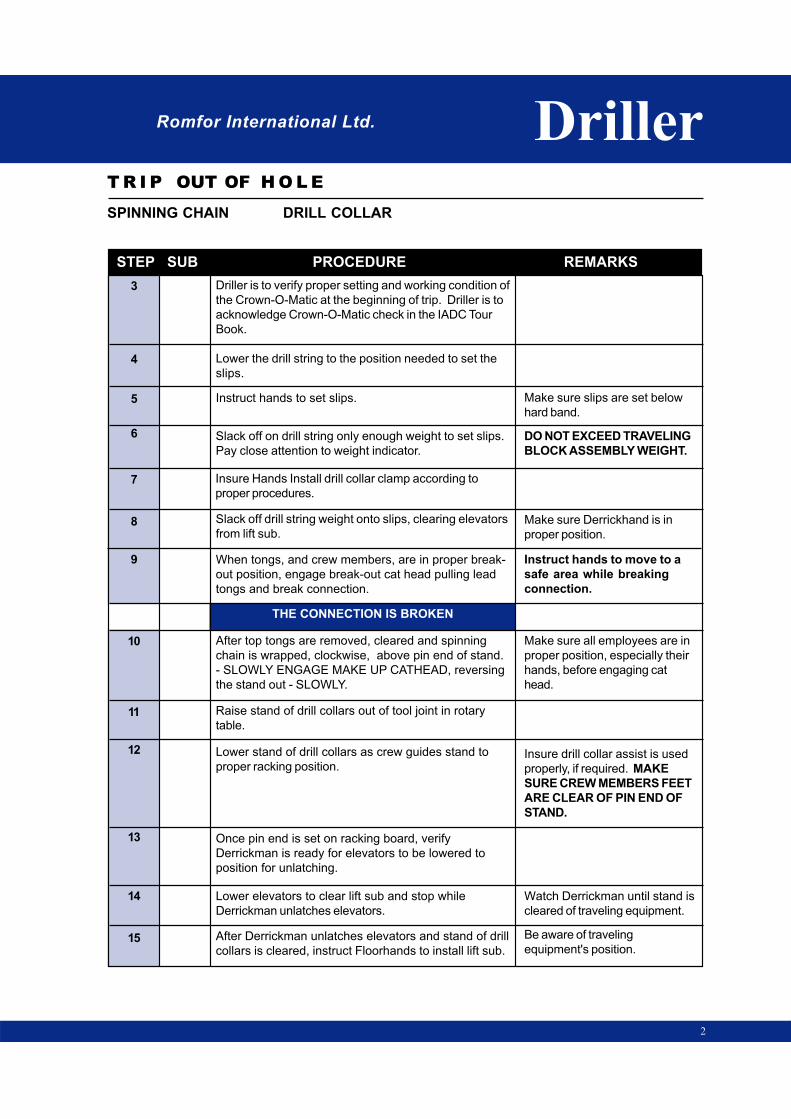
STEP SUB PROCEDURE REMARKS
Driller
SPINNING CHAIN DRILL COLLAR
T R I P OUT OF H O L E
Romfor International Ltd.
2
Driller is to verify proper setting and working condition of
the Crown-O-Matic at the beginning of trip. Driller is to
acknowledge Crown-O-Matic check in the IADC Tour
Book.
Lower the drill string to the position needed to set the
slips.
Instruct hands to set slips.
Insure Hands Install drill collar clamp according to
proper procedures.
Slack off on drill string only enough weight to set slips.
Pay close attention to weight indicator.
Slack off drill string weight onto slips, clearing elevators
from lift sub.
Make sure slips are set below
hard band.
DO NOT EXCEED TRAVELING
BLOCK ASSEMBLY WEIGHT.
3
4
5
6
7
When tongs, and crew members, are in proper break-
out position, engage break-out cat head pulling lead
tongs and break connection.
THE CONNECTION IS BROKEN
8
9
After top tongs are removed, cleared and spinning
chain is wrapped, clockwise, above pin end of stand.
- SLOWLY ENGAGE MAKE UP CATHEAD, reversing
the stand out - SLOWLY.
Raise stand of drill collars out of tool joint in rotary
table.
Lower stand of drill collars as crew guides stand to
proper racking position.
Once pin end is set on racking board, verify
Derrickman is ready for elevators to be lowered to
position for unlatching.
10
11
Make sure Derrickhand is in
proper position.
Instruct hands to move to a
safe area while breaking
connection.
12
13
Make sure all employees are in
proper position, especially their
hands, before engaging cat
head.
Insure drill collar assist is used
properly, if required. MAKE
SURE CREW MEMBERS FEET
ARE CLEAR OF PIN END OF
STAND.
Watch Derrickman until stand is
cleared of traveling equipment.
Lower elevators to clear lift sub and stop while
Derrickman unlatches elevators.
After Derrickman unlatches elevators and stand of drill
collars is cleared, instruct Floorhands to install lift sub.
Be aware of traveling
equipment's position.
14
15

Romfor International Ltd. Driller
STEP SUB PROCEDURE REMARKS
SPINNING CHAIN DRILL COLLAR
T R I P OUT OF H O L E
3
When tongs and crew members are in proper makeup
position, engage makeup cathead, tightening lift sub
connection to proper torque.
Lower traveling equipment to proper position allowing
Floorhands to latch elevators onto lift sub.16
17
18
19
After tongs are removed, raise drill string allowing crew
members to remove drill collar clamp.
Instruct Floorhands to pull drill collar slips using proper
handles.
Verify crew members are
using proper procedures in
removing drill collar clamp.
WATCH WEIGHT INDICATOR
FOR DRAG. Minimum two
people to pull slips.
Fill hole properly EVERY STAND
and record on Trip Sheet.
Repeat Steps 2 through 19 for remaining drill
collars.
END OF PROCEDURE
20

Romfor International Ltd.
TRIP OUT OF
HOLE
TRIP OUT OF
HOLE
DrillerDriller
RO
TA
RY
TA
BL
E
DR
IL
L P
IP
E
ROTARY TABLE
DRILL PIPE
ROTARY TABLE
DRILL PIPE

Romfor International Ltd. Driller
STEP SUB PROCEDURE REMARKS
ROTARY TABLE DRILL PIPE
T R I P OUT OF H O L E
1
BEFORE THE BLOCKS LEAVE THE FLOOR:
• Verify that the Derrickman understands the
proper tie-off procedures.
• Verify that the Derrickman is properly tied-off.
(100% Tie-off).
• Derrickman will communicate with Driller
that he is properly Tied-off and ready to work.
BPS recommends the use of
two-way communications
between the Derrickman and
the Driller.
0 1
1
2
2
PPE Requirements - Hard Hat, Safety Glasses, Work
Gloves, Steel Toe Shoes, Back Support
Review JSA for tripping out of hole with drill pipe.
Know string weight, maximum over-pull, fill volumes,
pipe tally, BHA design, etc.
Fit for duty check on all hands.
DISCUSS PROPER TIE-OFF PROCEDURES WITH
DERRICKMAN.
Verify that equipment has been inspected and is in
good working condition.
Verify following items are ready/available, if required:
- slug is ready.
- trip tank is full with proper fluid.
- survey tool.
- strapping tape.
- mud bucket.
- wiper rubber available and in good condition.
- Inside BOP, safety valve w/wrench, and proper x-over
subs.
Review prior trip with Rig Manager.
Change drill pipe breaks on each trip.
READY TO TRIP OUT OF HOLE - SET KELLY BACK
Kick out Auto-Driller and drilling recorder, if applicable.
Trip sheet available for recording
fill up.
Discuss prior hole problems/
conditions.
3
Unchain brake handle.
Review prior trip.
4
1
2
3
4
Kick out rotary table.
3
If required, release back torque - SLOWLY.
4
5
6 When rotary comes to a complete stop, raise drill
string off bottom.WATCH WEIGHT INDICATOR
FOR DRAG.

STEP SUB PROCEDURE REMARKS
Driller
ROTARY TABLE DRILL PIPE
T R I P OUT OF H O L E
Romfor International Ltd.
2
Depending upon hole condition, ream back to bottom, if
necessary.
Pump slug according to hole conditions.
WHEN KELLY BUSHING CLEARS ROTARY TABLE,
and slug is displaced, kick out pumps.
Pick up Kelly.
Raise tool joint 10 ft (minimum) above rotary table.
Discuss with Rig Manager.
Lower the drill string to the position needed to set the
slips.
Instruct hands to set slips.
Slack off on drill string, paying close attention to weight
indicator.
As the Hands put on the tongs, the Driller checks the
pump pressure gauge.
When tongs, and crew members, are in proper break-
out position, engage break-out cat head pulling lead
tongs and breaking connection.
THE KELLY CONNECTION IS BROKEN
Minimum two people.
DO NOT EXCEED TRAVELING
BLOCK ASSEMBLY WEIGHT.
CHECK FOR TRAPPED
PRESSURE.
BE AWARE OF TIGHT CON-
NECTIONS.
ROTATING OUT WITH THE ROTARY TABLE - After
bottom tongs are removed and clear, engage rotary -
SLOWLY- rotating out drill string. BE AWARE OF
BACK TORQUE.
AFTER ROTARY STOPS - Verify tongs and crew
members are in proper position, pick up on Kelly.
Make sure crew members feet
are clear of the rotary table and
slip handles.
Wait for crew to attach pull back cable to Kelly.
Make sure Kelly connection is
completely rotated out before
picking up.
When crew pulls Kelly into proper position, lower Kelly
into shuck, SLOWLY. Once Kelly started into shuck,
STOP and wait for crew to remove cable.
As Kelly lowers into shuck, pay
close attention to hoses and
lines for hang ups in derrick.
7
8
9
10
11
12
13
14
15
16
17
18
19
20
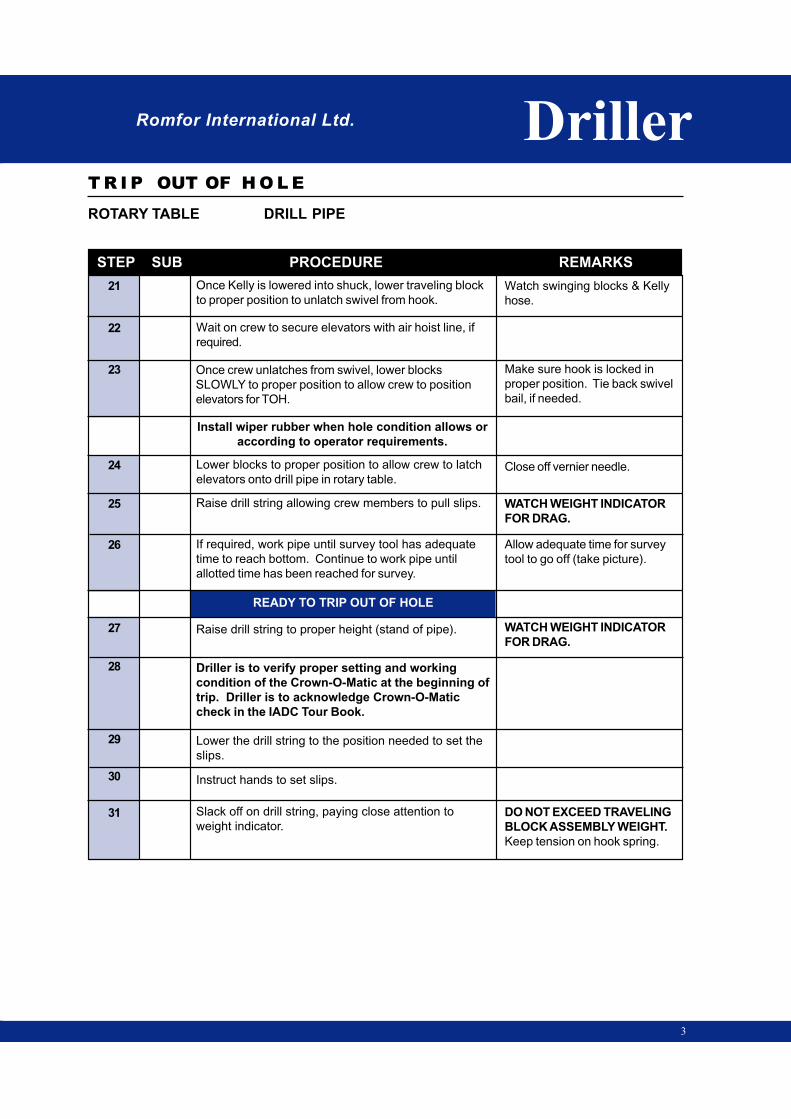
Romfor International Ltd. Driller
STEP SUB PROCEDURE REMARKS
ROTARY TABLE DRILL PIPE
T R I P OUT OF H O L E
3
Once Kelly is lowered into shuck, lower traveling block
to proper position to unlatch swivel from hook.
Once crew unlatches from swivel, lower blocks
SLOWLY to proper position to allow crew to position
elevators for TOH.
Wait on crew to secure elevators with air hoist line, if
required.
Install wiper rubber when hole condition allows or
according to operator requirements.
Watch swinging blocks & Kelly
hose.
21
Make sure hook is locked in
proper position. Tie back swivel
bail, if needed.
22
23
Lower blocks to proper position to allow crew to latch
elevators onto drill pipe in rotary table.
Raise drill string allowing crew members to pull slips.
24
25
If required, work pipe until survey tool has adequate
time to reach bottom. Continue to work pipe until
allotted time has been reached for survey.
READY TO TRIP OUT OF HOLE
Raise drill string to proper height (stand of pipe).
Driller is to verify proper setting and working
condition of the Crown-O-Matic at the beginning of
trip. Driller is to acknowledge Crown-O-Matic
check in the IADC Tour Book.
26
27
Close off vernier needle.
28
29
WATCH WEIGHT INDICATOR
FOR DRAG.
Allow adequate time for survey
tool to go off (take picture).
WATCH WEIGHT INDICATOR
FOR DRAG.
Lower the drill string to the position needed to set the
slips.
Instruct hands to set slips.30
31 Slack off on drill string, paying close attention to
weight indicator.DO NOT EXCEED TRAVELING
BLOCK ASSEMBLY WEIGHT.
Keep tension on hook spring.
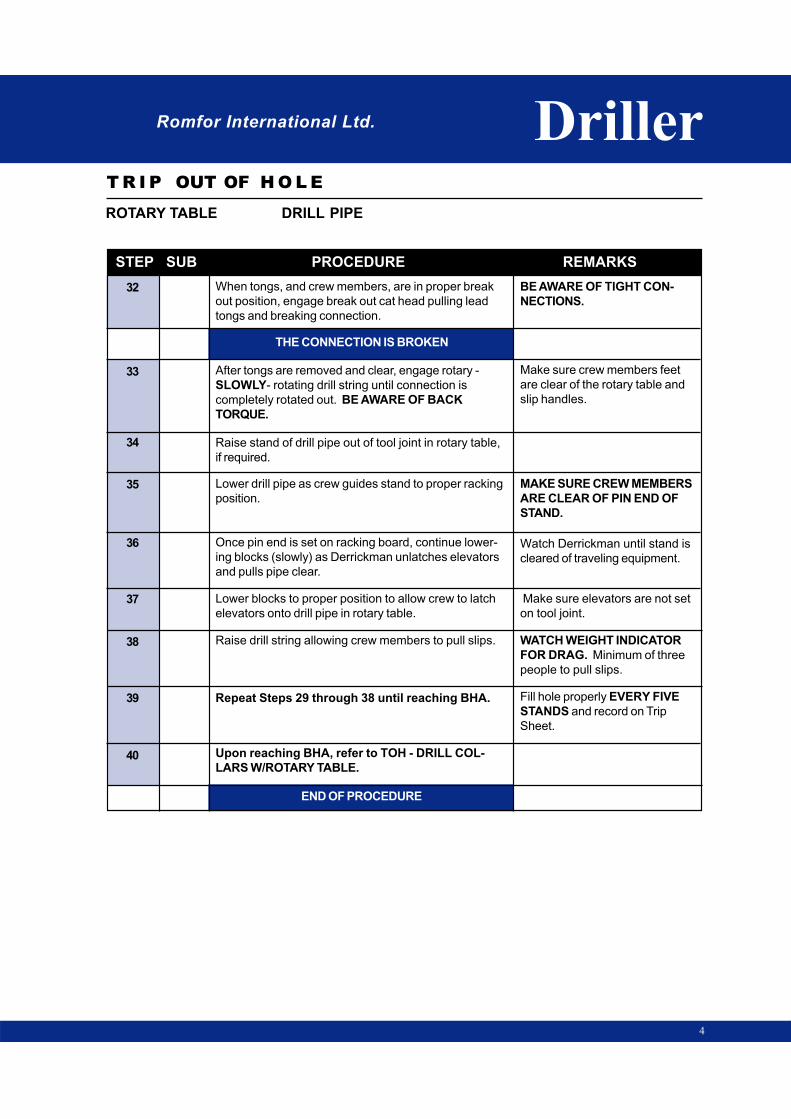
STEP SUB PROCEDURE REMARKS
Driller
ROTARY TABLE DRILL PIPE
T R I P OUT OF H O L E
Romfor International Ltd.
4
Repeat Steps 29 through 38 until reaching BHA.
THE CONNECTION IS BROKEN
When tongs, and crew members, are in proper break
out position, engage break out cat head pulling lead
tongs and breaking connection.
BE AWARE OF TIGHT CON-
NECTIONS.32
33
34
35
After tongs are removed and clear, engage rotary -
SLOWLY- rotating drill string until connection is
completely rotated out. BE AWARE OF BACK
TORQUE.
Raise stand of drill pipe out of tool joint in rotary table,
if required.
Make sure crew members feet
are clear of the rotary table and
slip handles.
MAKE SURE CREW MEMBERS
ARE CLEAR OF PIN END OF
STAND.
Lower drill pipe as crew guides stand to proper racking
position.
Once pin end is set on racking board, continue lower-
ing blocks (slowly) as Derrickman unlatches elevators
and pulls pipe clear.
36
Lower blocks to proper position to allow crew to latch
elevators onto drill pipe in rotary table.
Raise drill string allowing crew members to pull slips.
Watch Derrickman until stand is
cleared of traveling equipment.
Make sure elevators are not set
on tool joint.
WATCH WEIGHT INDICATOR
FOR DRAG. Minimum of three
people to pull slips.
Upon reaching BHA, refer to TOH - DRILL COL-
LARS W/ROTARY TABLE.
END OF PROCEDURE
Fill hole properly EVERY FIVE
STANDS and record on Trip
Sheet.
37
38
39
40

Romfor International Ltd.
TRIP OUT OF
HOLE
TRIP OUT OF
HOLE
DrillerDriller
RO
TA
RY
TA
BL
E
DR
IL
L C
OL
LA
R
ROTARY TABLE
DRILL COLLAR
ROTARY TABLE
DRILL COLLAR

Romfor International Ltd. Driller
STEP SUB PROCEDURE REMARKS
ROTARY TABLE DRILL COLLAR
T R I P OUT OF H O L E
1
BEFORE THE BLOCKS LEAVE THE FLOOR:
• Verify that the Derrickman understands the
proper tie-off procedures.
• Verify that the Derrickman is properly tied-off.
(100% Tie-off).
• Derrickman will communicate with Driller
that he is properly Tied-off and ready to work.
BPS recommends the use of
two-way communications
between the Derrickman and
the Driller.
0 1
1
2
2
PPE Requirements - Hard Hat, Safety Glasses, Work
Gloves, Steel Toe Shoes, Back Support.
Review JSA for tripping out of hole with Drill Collars.
Know string weight, maximum over-pull, fill volumes,
pipe tally, BHA design, proper makeup torque values
etc.
Fit for duty check on all hands.
DISCUSS PROPER TIEOFF PROCEDURES WITH
DERRICKMAN.
Verify that equipment has been inspected and is in
good working condition.
Verify following items are ready/available, if required:
- slug is ready.
- trip tank is full with proper fluid.
- survey tool.
- strapping tape.
- mud bucket.
- wiper rubber available and in good condition.
- Inside BOP, safety valve w/wrench, and proper x-over
subs, lift subs, collar clamps and wrenches, rope for
elevators and proper drill collar slips.
Notify Rig Manager upon reaching drill collars.
Change drill collar breaks on each trip.
PROCEDURE IS BASED ON THE ASSUMPTION
THAT THE FIRST DRILL COLLAR IS RACKED
WITH DRILL PIPE.
READY TO TRIP OUT OF HOLE
Trip sheet available for recording
fill up.
Rig manager should be on rig
floor when handling BHA.
3
Raise drill collars to proper height for setting slips.
Review prior trip.
4
1
2
3
4
WATCH WEIGHT INDICATOR
FOR DRAG. Keep track of
number of drill collars pulled.

STEP SUB PROCEDURE REMARKS
Driller
ROTARY TABLE DRILL COLLAR
T R I P OUT OF H O L E
Romfor International Ltd.
2
Lower the drill string to the position needed to set the
slips.
Driller is to verify proper setting and working
condition of the Crown-O-Matic at the beginning of
trip. Driller is to acknowledge Crown-O-Matic
check in the IADC Tour Book.
Instruct hands to set slips.
Insure Hands Install drill collar clamp according to
proper procedures.
Slack off on drill string only enough weight to set slips.
Pay close attention to weight indicator.
Slack off drill string weight onto slips, clearing elevators
from lift sub.
Make sure slips are set below
hard band.
DO NOT EXCEED TRAVELING
BLOCK ASSEMBLY WEIGHT.
3
4
5
6
7
When tongs, and crew members, are in proper break-
out position, engage break-out cat head pulling lead
tongs and break connection.
THE CONNECTION IS BROKEN
8
9
After bottom tongs are removed and clear, instruct
Lead Tong Hand to keep tongs biting in proper position.
Engage rotary - SLOWLY- rotating out drill collars. BE
AWARE OF BACK TORQUE.
AFTER ROTARY STOPS - Verify tongs and crew
members are in proper position, pick up on stand of
collars out of tool joint.
Lower stand of drill collars as crew guides stand to
proper racking position.
Once pin end is set on racking board, verify
Derrickman is ready for elevators to be lowered to
position for unlatching.
10
11
Make sure Derrickhand is in
proper position.
Instruct hands to move to a safe
area while breaking connection.
12
13
Make sure crew members feet
are clear of the rotary table and
slip handles.
Make sure drill collar connection
is completely rotated out before
picking up.
Insure drill collar assist is used
properly, if required. MAKE
SURE CREW MEMBERS FEET
ARE CLEAR OF PIN END OF
STAND.
Watch Derrickman until stand is
cleared of traveling equipment.
Lower elevators to clear lift sub and stop while
Derrickman unlatches elevators.
14

Romfor International Ltd. Driller
STEP SUB PROCEDURE REMARKS
ROTARY TABLE DRILL COLLAR
T R I P OUT OF H O L E
3
Lower traveling equipment to proper position allowing
Floorhands to latch elevators onto lift sub.
After Derrickman unlatches elevators and stand of drill
collars is cleared, instruct Floorhands to install lift sub.
Be aware of traveling
equipment's position.15
16
17
18
When tongs and crew members are in proper makeup
position, engage makeup cathead, tightening lift sub
connection to proper torque.
After tongs are removed, raise drill string allowing crew
members to remove drill collar clamp.
Verify crew members are
using proper procedures in
removing drill collar clamp.
WATCH WEIGHT INDICATOR
FOR DRAG. Minimum two
people to pull slips.
Instruct Floorhands to pull drill collar slips using proper
handles.
Repeat Steps 2 through 19 for remaining drill
collars.
19
20
END OF PROCEDURE
Fill hole properly EVERY
STAND and record on Trip
Sheet.

Romfor International Ltd.
TRIP OUT OF
HOLE
TRIP OUT OF
HOLE
TR
IP
OU
T O
F H
OL
E
Lead TongLead Tong

Romfor International Ltd.
TRIP OUT OF
HOLE
TRIP OUT OF
HOLE
Lead Tong
Hand
Lead Tong
Hand
TO
P D
RIV
E
DR
IL
L P
IP
E
TOP DRIVE
DRILL PIPE
TOP DRIVE
DRILL PIPE
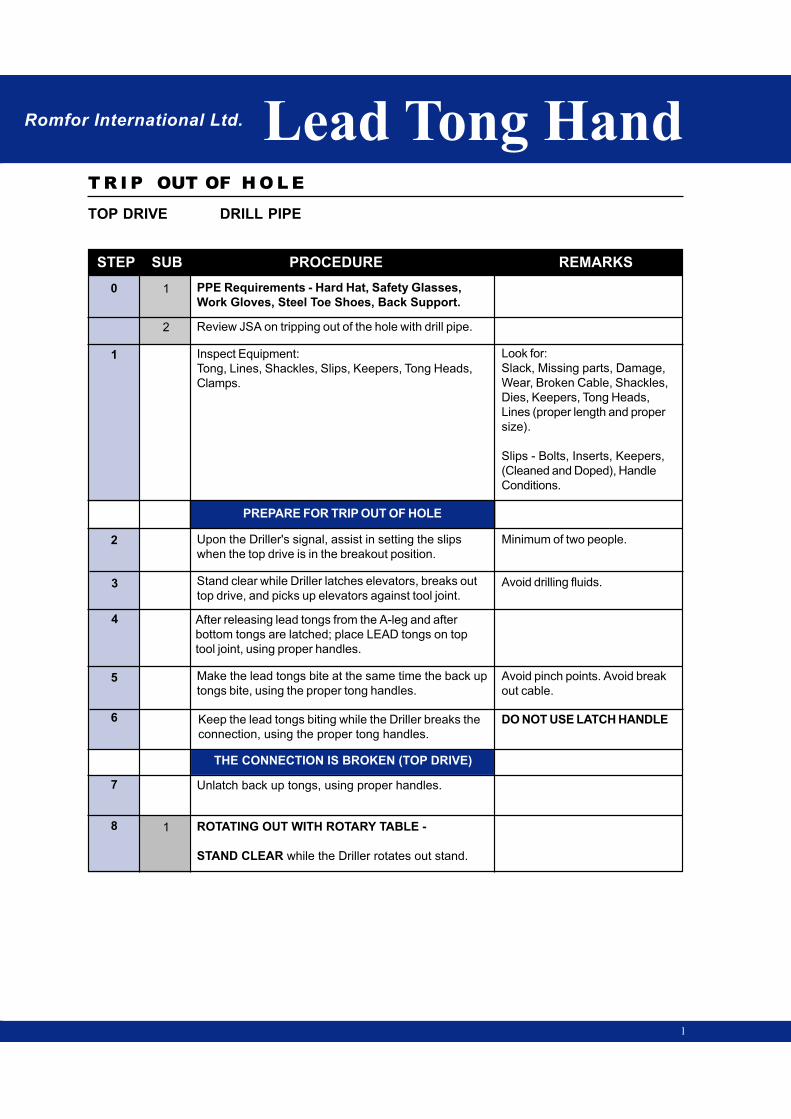
Romfor International Ltd. Lead Tong Hand
STEP SUB PROCEDURE REMARKS
TOP DRIVE DRILL PIPE
T R I P OUT OF H O L E
1
0 1
1
2
2
3
4
5
6
PPE Requirements - Hard Hat, Safety Glasses,
Work Gloves, Steel Toe Shoes, Back Support.
Review JSA on tripping out of the hole with drill pipe.
Inspect Equipment:
Tong, Lines, Shackles, Slips, Keepers, Tong Heads,
Clamps.
PREPARE FOR TRIP OUT OF HOLE
Upon the Driller's signal, assist in setting the slips
when the top drive is in the breakout position.
Stand clear while Driller latches elevators, breaks out
top drive, and picks up elevators against tool joint.
After releasing lead tongs from the A-leg and after
bottom tongs are latched; place LEAD tongs on top
tool joint, using proper handles.
Make the lead tongs bite at the same time the back up
tongs bite, using the proper tong handles.
Keep the lead tongs biting while the Driller breaks the
connection, using the proper tong handles.
Look for:
Slack, Missing parts, Damage,
Wear, Broken Cable, Shackles,
Dies, Keepers, Tong Heads,
Lines (proper length and proper
size).
Slips - Bolts, Inserts, Keepers,
(Cleaned and Doped), Handle
Conditions.
Minimum of two people.
Avoid drilling fluids.
7 Unlatch back up tongs, using proper handles.
ROTATING OUT WITH ROTARY TABLE -
STAND CLEAR while the Driller rotates out stand.
Avoid pinch points. Avoid break
out cable.
DO NOT USE LATCH HANDLE
8 1
THE CONNECTION IS BROKEN (TOP DRIVE)

STEP SUB PROCEDURE REMARKS
Lead Tong Hand
TOP DRIVE DRILL PIPE
T R I P OUT OF H O L E
Romfor International Ltd.
2
OR
REVERSING OUT WITH SPINNING CHAIN -
STAND CLEAR while the Driller rotates out stand.
OR
SPINNING OUT WITH PIPE SPINNER -
Secure tongs to A-leg. Assist in placing pipe spinner
on stand for spin out using proper handles.
STAND CLEAR while the Driller picks up on the stand.
STAND CLEAR while the Motorman spins out stand
with pipe spinner.
Inspect and dope tool joint while stand is being racked.
Assist in racking the stand into the proper position, if
other crewmembers are not available.
Assist in installing pipe wiper based on operating
procedures or hole conditions as directed by the
Driller.
Short ropes can be used on
handles.
Avoid drilling fluids.
PAY ATTENTION!
8
8
9
10
READY FOR TRIP OUT OF HOLE
STAND CLEAR while Driller lowers top drive and
latches onto pipe with elevators. Watch for any cable
and hose hang-ups.
11
12
Assist in pulling the slips using the proper handles.
After the stand is pulled and in the proper position,
assist in setting slips using the proper handles.
After releasing the tongs from the A-leg and after
bottom tongs are latched; place LEAD tongs on top
tool joint.
Make the LEAD tongs bite using the proper tong
handles.
13
14
15
Be aware of the traveling
equipment as it is being lowered
to the proper latching position.
Keep hands clear of elevators.
Use proper lifting procedures.
Minimum of three people to pull
slips.
Minimum of two people.
DO NOT USE LATCH HANDLE
1
1
2
16

Romfor International Ltd. Lead Tong Hand
STEP SUB PROCEDURE REMARKS
TOP DRIVE DRILL PIPE
T R I P OUT OF H O L E
3
THE CONNECTION IS BROKEN
ROTATING OUT WITH ROTARY TABLE:
Before rotating out, unlatch the BACKUP tongs using
the proper handles.
Keep the LEAD tongs biting while the Driller breaks the
connection, using the proper tong handles.
17
18
18
18
After the LEAD tongs are unlatched. Hold tongs clear
of rotary and stand clear while the Driller rotates out
stand.
After the rotary table is stopped, stay clear while stand
is racked. Inspect and dope tool joint box in the rotary.
OR
Keep feet clear of the rotary
table and slip handles.
Avoid drilling fluids.
Be aware of traveling equipment.
REVERSING OUT WITH SPINNING CHAIN:
Before spinning out, remove LEAD tongs and unlatch
BACKUP tongs using the proper tong handles.
Assist Chain Hand in wrapping chain by holding the
bottom wrap up.
Stand clear while Driller pulls on the chain.
STAND CLEAR while the Driller picks up stand. Avoid drilling fluids.
Inspect and dope tool joint box in the rotary. Assist in
racking the stand into the proper position, if other
crewmembers are not available.
OR
1
2
3
1
2
3
4
5
1 SPINNING OUT WITH PIPE SPINNER:
Before spinning out, remove LEAD tongs and unlatch
BACKUP tongs using the proper tong handles.

STEP SUB PROCEDURE REMARKS
Lead Tong Hand
TOP DRIVE DRILL PIPE
T R I P OUT OF H O L E
Romfor International Ltd.
4
Secure tongs to A-leg. Assist in placing pipe spinners
onto stand using the proper handles.
Short ropes can be used on
handles.
STAND CLEAR while the stand is spun out with pipe
spinner and Driller picks up on stand.
Inspect and dope tool joint box in the rotary. Assist in
racking the stand into the proper position, if other
crewmembers are not available.
Repeat Steps 8 through 18 until reaching BHA.19
20 Upon reaching BHA, refer to TOH - DRILL
COLLARS WITH TOP DRIVE.
END OF PROCEDURE
Avoid drilling fluids.
2
3
4
Romfor International Ltd.
TRIP OUT OF
HOLE
TRIP OUT OF
HOLE
Lead Tong
Hand
Lead Tong
Hand
TO
P D
RIV
E
DR
IL
L C
OL
LA
R
TOP DRIVE
DRILL COLLAR
TOP DRIVE
DRILL COLLAR
Romfor International Ltd. Lead Tong Hand
STEP SUB PROCEDURE REMARKS
TOP DRIVE DRILL COLLAR
T R I P OUT OF H O L E
1
0 1
1
2
2
3
4
5
6
PPE Requirements - Hard Hat, Safety Glasses,
Work Gloves, Steel Toe Shoes, Back Support.
Review JSA on tripping out of the hole with drill
collars.
Inspect Equipment:
Tong, Lines, Shackles, Slips, Keepers, Tong Heads,
Clamps, Cables, drill collar clamps and wrench.
PROCEDURE IS BASED ON THE ASSUMPTION
THAT THE FIRST DRILL COLLAR IS RACKED
WITH DRILL PIPE.
Upon the Driller's signal, assist in setting the slips,
using proper lifting procedures.
Upon the Driller's signal, place drill collar clamp
around drill collar above the hard band using the
proper handles.
After back up tong is latched onto the drill collar
connection, release the lead tongs from the A-leg.
Place lead tongs on the top of the drill collar
connections, using proper handles.
Make the lead tongs bite at the same time the back up
tongs bite, using the proper tong handles.
Look for:
Slack, Missing parts, Damage,
Wear, Broken Cable, Shackles,
Dies, Keepers, Tong Heads,
Lines (proper length and proper
size).
Slips - Bolts, Inserts, Keepers,
(Cleaned and Doped), Handle
Conditions.
Minimum of two people to set
slips.
DO NOT hold the bottom of the
clamp with hands or knees.
7
After the tongs bite, move to a safe area while Driller
breaks the drill collar connection.
THE CONNECTION IS BROKEN
DO NOT assist in latching back
up tongs.
Avoid pinch points. Avoid break
out line. DO NOT USE LATCH
HANDLE.
Be aware of tight connections.
Be aware of trip hazards.
1 Rotating out with Rotary Table -
Before rotating out, unlatch BACKUP tongs using the
proper tong handles.

STEP SUB PROCEDURE REMARKS
Lead Tong Hand
TOP DRIVE DRILL COLLAR
T R I P OUT OF H O L E
Romfor International Ltd.
2
After BACKUP tongs are removed, make LEAD tongs
bite, using proper handles while Driller rotates out the
drill collar connection.
After Backup Hand unlatches LEAD tongs, secure
tongs to A-leg.
STAND CLEAR while the Driller picks up on stand.
OR
Secure tongs to A-leg. Assist in placing pipe spinners
onto stand using the proper handles.
Rotating out with Pipe Spinner -
Before spinning out, remove LEAD tongs and unlatch
BACKUP tongs using the proper tong handles.
STAND CLEAR while the stand is spun out with pipe
spinner and Driller picks up on stand.
OR
Keep feet clear of rotary table
and slip handles.
Avoid drilling fluids.
Short ropes can be used.
Avoid drilling fluids.
7
7
8
9
Rotating out with Spinning Chain -
Before spinning out, remove LEAD tongs and unlatch
BACKUP tongs using the proper tong handles.
Secure tongs to A-leg.
10
Assist Chain Hand in wrapping chain by holding the
bottom wrap up.
STAND CLEAR while the stand is spun out with
spinning chain and while Driller picks up on stand.
If necessary, assist in racking the stand into the proper
position.
Assist in stabbing drill collar lift sub and make-up hand
tight.
Avoid drilling fluids.
Do not get in the Drillers view.
Make sure feet are clear of pin
end of stand.
2
3
4
STAND CLEAR while driller lowers elevators for
latching.
1
2
3
1
2
3
4
Keep fingers out of threads
while tightening by hand.
Romfor International Ltd. Lead Tong Hand
STEP SUB PROCEDURE REMARKS
TOP DRIVE DRILL COLLAR
T R I P OUT OF H O L E
3
19
STAND CLEAR while back-up tongs are latched on lift
sub connection.
Make lead tongs bite at the same time the back-up
tongs bite, using the proper handles until the connec-
tion is tightened.
After elevators are latched on to lift sub, release lead
tongs from A-leg and latch onto drill collar connection
in rotary table using the proper handles.
LIFT SUB CONNECTION IS TIGHTENED
Unlatch back-up tongs using the proper handles.
After Back-Up Hand unlatches lead tongs, secure
tongs to A-leg.
Do not assist in latching back-up
tongs.
Avoid pinch points and do not
use latch handles.
After Driller raises stand to proper height, assist in
removing the drill collar clamp. Hold the drill collar
clamp using proper handles while the nut is loosened
and pin is removed.
Place drill collar clamp in front of the Drawworks, away
from work area and get ready for the next stand.
DO NOT hold the bottom of the
clamp with hands or knees.
Assist in pulling the slips using proper handles. Keep
track of the number of drill collars coming through the
rotary table.
Repeat Steps 2 through 18 for remaining drill
collars.
Minimum of two people to pull
slips.
END OF PROCEDURE
11
12
13
14
15
16
17
18

Romfor International Ltd.
TRIP OUT OF
HOLE
TRIP OUT OF
HOLE
Lead Tong
Hand
Lead Tong
Hand
PIPE SPINNER
DRILL PIPE
PIPE SPINNER
DRILL PIPE
PIP
E S
PIN
NE
R
DR
IL
L P
IP
E

Romfor International Ltd. Lead Tong Hand
STEP SUB PROCEDURE REMARKS
PIPE SPINNER DRILL PIPE
T R I P OUT OF H O L E
1
0 1
1
2
2
3
4
5
6
PPE Requirements - Hard Hat, Safety Glasses,
Work Gloves, Steel Toe Shoes, Back Support.
Reviews JSA on tripping out of the hole with drill
pipe.
Inspect Equipment:
Tong, Lines, Shackles, Slips, Keepers, Tong Heads,
Clamps.
Upon the Driller's signal, assist in setting the slips,
using proper lifting procedures.
After back up tong is latched onto tool joint, release
the lead tongs from the A-leg. Place lead tongs on
the Kelly saver sub, using proper handles.
Make the lead tongs bite at the same time the back up
tongs bite, using the proper tong handles.
Keep the lead tongs biting while the Driller breaks the
Kelly connection, using proper handles.
KELLY CONNECTION IS BROKEN
Look for:
Slack, Missing parts, Damage,
Wear, Broken Cable, Shackles,
Dies, Keepers, Tong Heads,
Lines (proper length and proper
size).
Slips - Bolts, Inserts, Keepers,
(Cleaned and Doped), Handle
Conditions.
Minimum of two people to set
slips.
DO NOT assist in latching back
up tongs.
ROTATING KELLY OUT WITH KELLY SPINNER -
Remove lead tongs from Kelly saver sub, using
proper tong handles and secure to A-leg.
Stand clear while Driller reverses out Kelly with Kelly
Spinner.
Avoid pinch points. Avoid break
out line. DO NOT USE LATCH
HANDLE.
1
AFTER KELLY STOPS TURNING, unlatch bottom set
of tongs.
2
3

STEP SUB PROCEDURE REMARKS
Lead Tong Hand
PIPE SPINNER DRILL PIPE
T R I P OUT OF H O L E
Romfor International Ltd.
2
OR
ROTATING KELLY OUT WITH SPINNING CHAIN -
Before spinning out with chain, Remove lead tongs from
Kelly saver-sub, using proper tong handles and
secure to A-leg.
Assist Chain Hand in wrapping chain by holding the
bottom wrap up.
Stand clear while Driller pulls on the chain.
Unlatch back up tongs, using proper handles, and
STAND CLEAR while the Driller picks up Kelly.
STAND CLEAR UNTIL KELLY STOPS TURNING.
SET BACK THE KELLY
Assist in securing pull-back line to Kelly.
Avoid drilling fluids.
6
Stand clear while the Kelly is being pulled back to
Kelly Shuck and Driller slacks-off.
After the Kelly is stabbed into the Kelly Shuck and
traveling equipment is stopped (air hoist is slacked-off)
inspect and dope tool joint box in the rotary.
Once the Kelly is fully in the Kelly Shuck, retrieve
Kelly pole ("Shepherds Stick", "The Hook", etc.).
After traveling equipment is completely stopped and in
proper position, unlatch hook from the Swivel bail.
STAND CLEAR until traveling equipment is properly
positioned over rotary table.
Close hook and unlock blocks.
DO NOT get in Drillers' view.
Keep out of area between Driller
and Kelly Shuck.
If required, wait until pull-
back line is properly secured
to elevators.
1
2
3
Once blocks are properly positioned, lock blocks into
trip out position. Replace Kelly pole in storage
position.
4
5
Assist in installing pipe wiper based on operating
procedures or hole conditions as directed by the
Driller.
7
8
9
10
11
12
13
14
15

Romfor International Ltd. Lead Tong Hand
STEP SUB PROCEDURE REMARKS
PIPE SPINNER DRILL PIPE
T R I P OUT OF H O L E
3
READY FOR TRIP OUT OF THE HOLE
Assist in pulling the slips using the proper handles.
Keep track of the number of joints being pulled through
the rotary table.
Assist latching elevators onto pipe in rotary. KEEP HANDS CLEAR OF
PINCH POINTS!
After the stand is pulled and in the proper position,
assist in setting slips using the proper handles.
Release the tongs from the A-leg and AFTER back up
tongs are latched on bottom tool joint, latch lead tongs
on top tool joint (using proper handles).
Make the lead tongs bite at the same time the back up
tongs bite, using the proper tong handles.
Minimum of three people to pull
slips. Use proper lifting proce-
dures.
Minimum of two people to set
slips.
DO NOT assist in latching back
up tongs.
Keep the lead tongs biting while the Driller breaks the
connection, using the proper tong handles.
THE CONNECTION IS BROKEN
Avoid pinch points. Avoid break
out cable. DO NOT USE
LATCH HANDLE.
DO NOT USE LATCH HANDLE
SPINNING OUT WITH PIPE SPINNER - Before
spinning out, remove LEAD tongs and unlatch
BACKUP tongs using the proper tong handles.
Secure tongs to A-leg. Assist in placing pipe spinners
onto stand using the proper handles.
Stand clear while the stand is spun out with pipe
spinner and Driller picks up on stand.
16
17
18
19
20
21
22
23
Inspect and dope tool joint box in the rotary. Assist in
racking the stand into the proper position, if other
crewmembers are not available.
Repeat Steps 17 through 22 until reaching BHA.
Upon reaching BHA, refer to TOH - DRILL COLLARS
WITH PIPE SPINNER
END OF PROCEDURE
Avoid drilling fluids.
24
1
2
3
4

Romfor International Ltd.
TRIP OUT OF
HOLE
TRIP OUT OF
HOLE
Lead Tong
Hand
Lead Tong
Hand
PIP
E S
PIN
NE
R
DR
IL
L C
OL
LA
R
PIPE SPINNER
DRILL COLLAR
PIPE SPINNER
DRILL COLLAR

Romfor International Ltd. Lead Tong Hand
STEP SUB PROCEDURE REMARKS
PIPE SPINNER DRILL COLLAR
T R I P OUT OF H O L E
1
0 1
1
2
2
3
4
5
6
PPE Requirements - Hard Hat, Safety Glasses,
Work Gloves, Steel Toe Shoes, Back Support.
Review JSA on tripping out of the hole with drill
collars.
Inspect Equipment:
Tong, Lines, Shackles, Slips, Keepers, Tong Heads,
Clamps, Cables, drill collar clamps and wrench.
PROCEDURE IS BASED ON THE ASSUMPTION
THAT THE FIRST DRILL COLLAR IS RACKED
WITH DRILL PIPE.
Upon the Driller's signal, assist in setting the slips,
using proper lifting procedures.
Upon the Driller's signal, place drill collar clamp
around drill collar above the hard band using the
proper handles.
After back up tong is latched onto the drill collar
connection, release the lead tongs from the A-leg.
Place lead tongs on the top of the drill collar
connections, using proper handles.
Make the lead tongs bite at the same time the back up
tongs bite, using the proper tong handles.
Look for:
Slack, Missing parts, Damage,
Wear, Broken Cable, Shackles,
Dies, Keepers, Tong Heads,
Lines (proper length and proper
size).
Slips - Bolts, Inserts, Keepers,
(Cleaned and Doped), Handle
Conditions.
Minimum of two people to set
slips.
DO NOT hold the bottom of the
clamp with hands or knees.
7
After the tongs bite move to a safe area while Driller
breaks the drill collar connection.
THE CONNECTION IS BROKEN
DO NOT assist in latching back
up tongs.
Avoid pinch points. Avoid break
out line. DO NOT USE LATCH
HANDLE.
Be aware of tight connections.
Be aware of trip hazards.
Before spinning out, remove LEAD tongs and unlatch
BACKUP tongs using the proper tong handles.
Secure tongs to A-leg. Assist in placing pipe spinners
onto stand using the proper handles.
Short ropes can be used.8

STEP SUB PROCEDURE REMARKS
Lead Tong Hand
PIPE SPINNER DRILL COLLAR
T R I P OUT OF H O L E
Romfor International Ltd.
2
21
STAND CLEAR while the stand is spun out with pipe
spinner and Driller picks up on stand.
If necessary, assist in racking the stand into the proper
position.
Assist in stabbing drill collar lift sub and make-up hand
tight.
STAND CLEAR while driller lowers elevators for
latching.
Stand clear while back-up tongs are latched on lift sub
connection.
After elevators are latched on to lift sub, release lead
tongs from A-leg and latch onto drill collar connection in
rotary table using the proper handles.
Make lead tongs bite at the same time the back-up
tongs bite, using the proper handles until the connec-
tion is tightened.
LIFT SUB CONNECTION IS TIGHTENED
Avoid drilling fluids.
Do not get in the Drillers view.
Make sure feet are clear of pin
end of stand.
Keep fingers out of threads
while tightening by hand.
Do not assist in latching back-
up tongs.
Avoid pinch points and do not
use latch handles.
Unlatch back-up tongs using the proper handles.
After Back-Up Hand unlatched lead tongs, secure
tongs to A-leg.
After Driller raises stand to proper height, assist in
removing the drill collar clamp. Hold the drill collar
clamp using proper handles while the nut is loosened
and pin is removed.
Place drill collar clamp in front of the Drawworks, away
from work area and get ready for the next stand.
Assist in pulling the slips using proper handles. Keep
track of the number of drill collars coming through the
rotary table.
Repeat Steps 2 through 20 for remaining drill
collars.
DO NOT hold the bottom of the
clamp with hands or knees.
Minimum of two people to pull
slips.
9
10
11
END OF PROCEDURE
12
13
14
15
16
17
18
19
20
Romfor International Ltd.
TRIP OUT OF
HOLE
TRIP OUT OF
HOLE
Lead Tong
Hand
Lead Tong
Hand
SP
INN
ING
CH
AIN
DR
IL
L P
IP
E
SPINNING CHAIN
DRILL PIPE
SPINNING CHAIN
DRILL PIPE
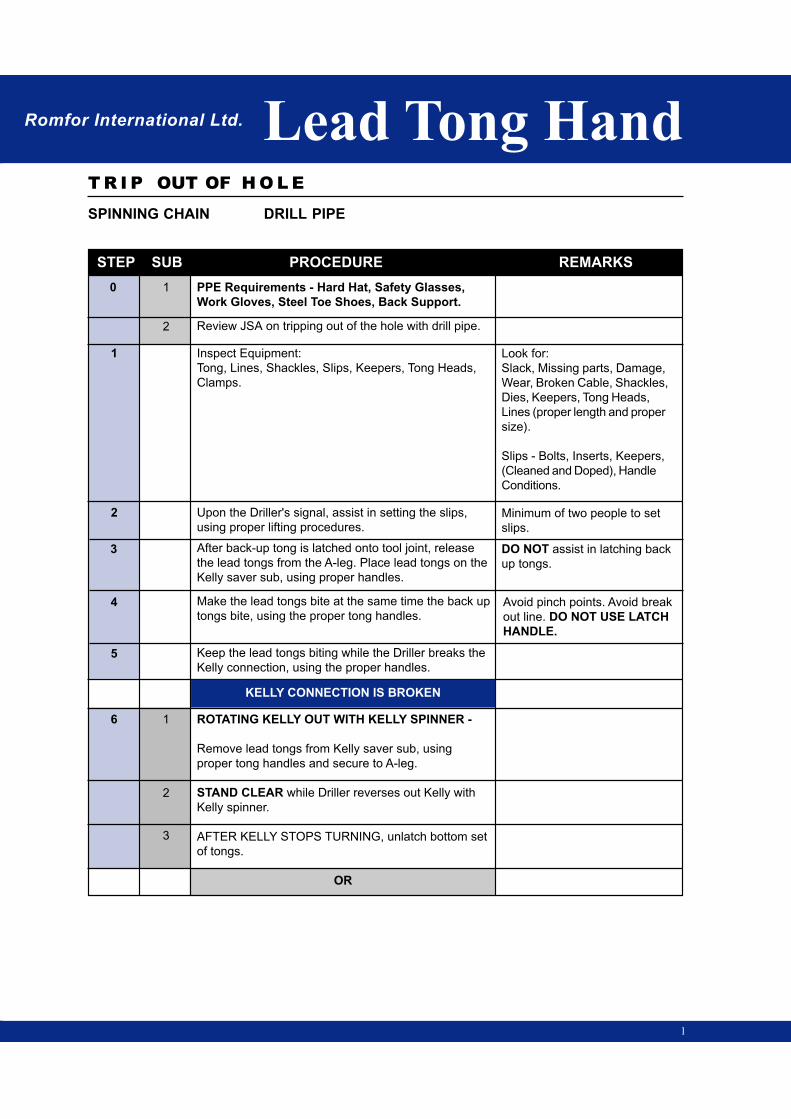
Romfor International Ltd. Lead Tong Hand
STEP SUB PROCEDURE REMARKS
SPINNING CHAIN DRILL PIPE
T R I P OUT OF H O L E
1
0 1
1
2
2
3
4
5
PPE Requirements - Hard Hat, Safety Glasses,
Work Gloves, Steel Toe Shoes, Back Support.
Review JSA on tripping out of the hole with drill pipe.
Inspect Equipment:
Tong, Lines, Shackles, Slips, Keepers, Tong Heads,
Clamps.
Upon the Driller's signal, assist in setting the slips,
using proper lifting procedures.
After back-up tong is latched onto tool joint, release
the lead tongs from the A-leg. Place lead tongs on the
Kelly saver sub, using proper handles.
Make the lead tongs bite at the same time the back up
tongs bite, using the proper tong handles.
Keep the lead tongs biting while the Driller breaks the
Kelly connection, using the proper handles.
Look for:
Slack, Missing parts, Damage,
Wear, Broken Cable, Shackles,
Dies, Keepers, Tong Heads,
Lines (proper length and proper
size).
Slips - Bolts, Inserts, Keepers,
(Cleaned and Doped), Handle
Conditions.
Minimum of two people to set
slips.
DO NOT assist in latching back
up tongs.
ROTATING KELLY OUT WITH KELLY SPINNER -
Remove lead tongs from Kelly saver sub, using
proper tong handles and secure to A-leg.
STAND CLEAR while Driller reverses out Kelly with
Kelly spinner.
AFTER KELLY STOPS TURNING, unlatch bottom set
of tongs.
OR
Avoid pinch points. Avoid break
out line. DO NOT USE LATCH
HANDLE.
6 1
KELLY CONNECTION IS BROKEN
2
3
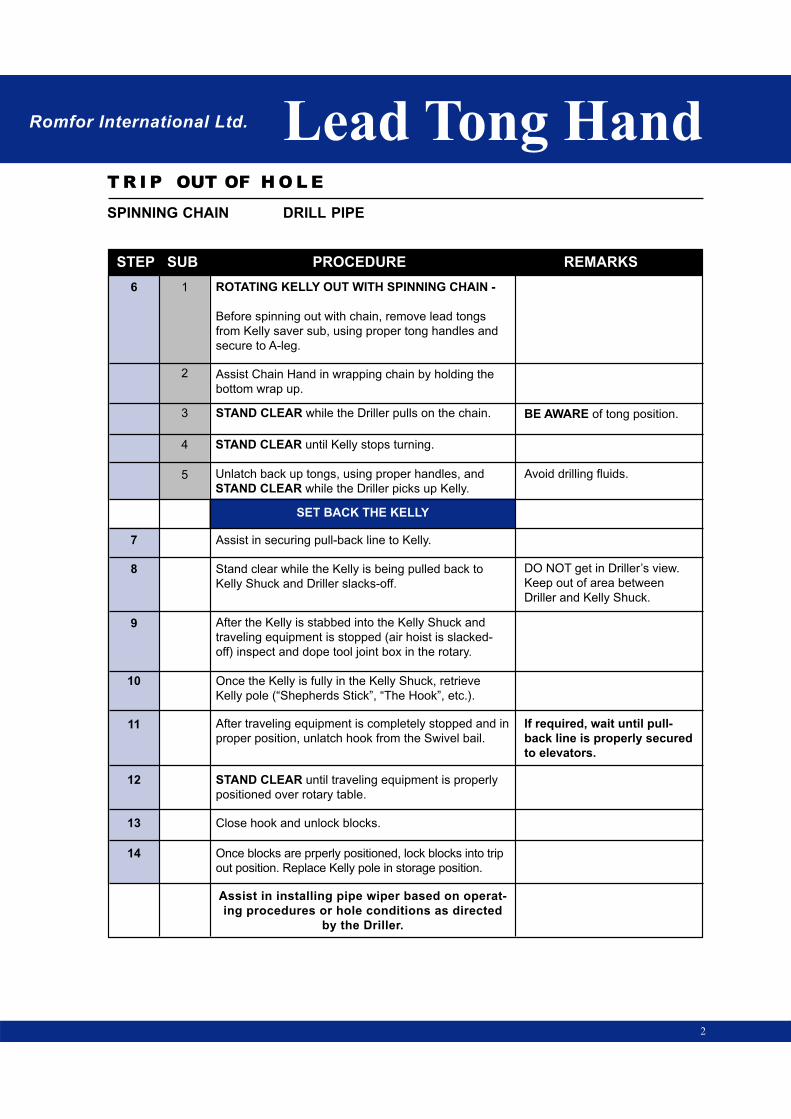
STEP SUB PROCEDURE REMARKS
Lead Tong Hand
SPINNING CHAIN DRILL PIPE
T R I P OUT OF H O L E
Romfor International Ltd.
2
ROTATING KELLY OUT WITH SPINNING CHAIN -
Before spinning out with chain, remove lead tongs
from Kelly saver sub, using proper tong handles and
secure to A-leg.
Assist Chain Hand in wrapping chain by holding the
bottom wrap up.
STAND CLEAR until Kelly stops turning.
STAND CLEAR while the Driller pulls on the chain.
Unlatch back up tongs, using proper handles, and
STAND CLEAR while the Driller picks up Kelly.
BE AWARE of tong position.
Avoid drilling fluids.
6
SET BACK THE KELLY
Assist in securing pull-back line to Kelly.7
8 Stand clear while the Kelly is being pulled back to
Kelly Shuck and Driller slacks-off.
After the Kelly is stabbed into the Kelly Shuck and
traveling equipment is stopped (air hoist is slacked-
off) inspect and dope tool joint box in the rotary.
Once the Kelly is fully in the Kelly Shuck, retrieve
Kelly pole (“Shepherds Stick”, “The Hook”, etc.).
After traveling equipment is completely stopped and in
proper position, unlatch hook from the Swivel bail.
9
10
11
DO NOT get in Driller’s view.
Keep out of area between
Driller and Kelly Shuck.
If required, wait until pull-
back line is properly secured
to elevators.
1
2
3
4
5
STAND CLEAR until traveling equipment is properly
positioned over rotary table.
12
Close hook and unlock blocks.13
Once blocks are prperly positioned, lock blocks into trip
out position. Replace Kelly pole in storage position.
14
Assist in installing pipe wiper based on operat-
ing procedures or hole conditions as directed
by the Driller.

Romfor International Ltd. Lead Tong Hand
STEP SUB PROCEDURE REMARKS
SPINNING CHAIN DRILL PIPE
T R I P OUT OF H O L E
3
Assist latching elevators onto pipe in rotary.
READY FOR TRIP OUT OF THE HOLE
Assist in pulling the slips using the proper handles.
Keep track of the number of joints being pulled
through the rotary table.
After the stand is pulled and in the proper position,
assist in setting slips using the proper handles.
Release the tongs from the A-leg and AFTER back up
tongs are latched on bottom tool join, latch lead tongs
on top tool joint (using proper handles).
Make the lead tongs bite at the same time the back
up tongs bite, using the proper tong handles.
Keep the lead tongs biting while the Driller breaks the
connection, using the proper tong handles.
THE CONNECTION IS BROKEN
Before spinning out, remove LEAD tongs and unlatch
BACKUP tongs using the proper tong handles.
Assist Chain Hand in wrapping chain by holding the
bottom wrap up.
Stand clear while Driller pulls on the chain.
STAND CLEAR while the Driller picks up stand.
Inspect and dope tool joint box in the rotary. Assist in
racking the stand into the proper position, if other
crewmembers are not available.
Repeat Steps 17 through 25 until reaching BHA.
Upon reaching BHA, refer to TOH - DRILL
COLLARS WITH SPINNING CHAIN.
END OF PROCEDURE
KEEP HANDS CLEAR OF
PINCH POINTS!
Minimum of three people to pull
slips. Use proper lifting proce-
dures.
Minimum of two people to set
slips.
DO NOT assist in latching back
up tongs.
Avoid pinch points. Avoid break
out cable. DO NOT USE
LATCH HANDLE.
DO NOT USE LATCH HANDLE
Avoid drilling fluid.
15
16
17
18
19
20
21
22
23
24
25
26
27

Romfor International Ltd.
TRIP OUT OF
HOLE
TRIP OUT OF
HOLE
Lead Tong
Hand
Lead Tong
Hand
SP
INN
ING
CH
AIN
DR
IL
L C
OL
LA
R
SPINNING CHAIN
DRILL COLLAR
SPINNING CHAIN
DRILL COLLAR

Romfor International Ltd. Lead Tong Hand
STEP SUB PROCEDURE REMARKS
SPINNING CHAIN DRILL COLLAR
T R I P OUT OF H O L E
1
0 1
1
2
2
3
4
5
6
PPE Requirements - Hard Hat, Safety Glasses,
Work Gloves, Steel Toe Shoes, Back Support.
Review JSA on tripping out of the hole with drill
collars.
Inspect Equipment:
Tong, Lines, Shackles, Slips, Keepers, Tong Heads,
Clamps, Cables, drill collar clamps and wrench.
PROCEDURE IS BASED ON THE ASSUMPTION
THAT THE FIRST DRILL COLLAR IS RACKED
WITH DRILL PIPE.
Upon the Driller's signal, assist in setting the slips,
using proper lifting procedures.
Upon the Driller's signal, place drill collar clamp
around drill collar above the hard band using the
proper handles.
After back up tong is latched onto the drill collar
connection, release the lead tongs from the A-leg place
lead tongs on the top of the drill collar connections,
using proper handles.
Make the lead tongs bite at the same time the back up
tongs bite, using the proper tong handles.
Look for:
Slack, Missing parts, Damage,
Wear, Broken Cable, Shackles,
Dies, Keepers, Tong Heads,
Lines (proper length and proper
size).
Slips - Bolts, Inserts, Keepers,
(Cleaned and Doped), Handle
Conditions.
Minimum of two people to set
slips.
DO NOT hold the bottom of the
clamp with hands or knees.
7
After the tongs bite move to a safe area while Driller
breaks the drill collar connection.
THE CONNECTION IS BROKEN
DO NOT assist in latching back
up tongs.
Avoid pinch points. Avoid break
out line. DO NOT USE LATCH
HANDLE.
Beware of tight connections.
Beware of trip hazards.
Before spinning out, remove LEAD tongs and unlatch
BACKUP tongs using the proper tong handles.
Secure tongs to A-leg.8

STEP SUB PROCEDURE REMARKS
Lead Tong Hand
SPINNING CHAIN DRILL COLLAR
T R I P OUT OF H O L E
Romfor International Ltd.
2
Assist Chain Hand in wrapping chain by holding the
bottom wrap up.
STAND CLEAR while the stand is spun out with
spinning chain and while Driller picks up on stand.
If necessary, assist in racking the stand into the proper
position, if other crewmembers are not available.
Assist in stabbing drill collar lift sub and make-up hand
tight.
After elevators are latched on to lift sub, release lead
tongs from A-leg and latch onto drill collar connection in
rotary table using the proper handles.
STAND CLEAR while driller lowers elevators for latching.
STAND CLEAR while back-up tongs are latched on lift
sub connection.
Make lead tongs bite at the same time the back-up
tongs bite, using the proper handles until the connec-
tion is tightened.
Avoid drilling fluids.
Do not get in the Drillers view.
Make sure feet are clear of pin
end of stand.
Keep fingers out of threads
while tightening by hand.
Do not assist in latching back-
up tongs.
LIFT SUB CONNECTION IS TIGHTENED
Unlatch back-up tongs using the proper handles.
After Back-Up Hand unlatches lead tongs, secure
tongs to A-leg.
After Driller raises stand to proper height, assist in
removing the drill collar clamp. Hold the drill collar
clamp using proper handles while the nut is loosened
and pin is removed.
Place drill collar clamp in front of the Drawworks, away
from work area and get ready for the next stand.
Assist in pulling the slips using proper handles. Keep
track of the number of drill collars coming through the
rotary table.
Avoid pinch points and do not
use latch handles.
DO NOT hold the bottom of the
clamp with hands or knees.
9
10
11
Repeat Steps 2 through 21 for remaining drill
collars.
12
13
14
15
16
17
18
19
20
21 Minimum of two people to pull
slips.
END OF PROCEDURE
22

Romfor International Ltd.
TRIP OUT OF
HOLE
TRIP OUT OF
HOLE
Lead Tong
Hand
Lead Tong
Hand
RO
TA
RY
TA
BL
E
DR
IL
L P
IP
E
ROTARY TABLE
DRILL PIPE
ROTARY TABLE
DRILL PIPE
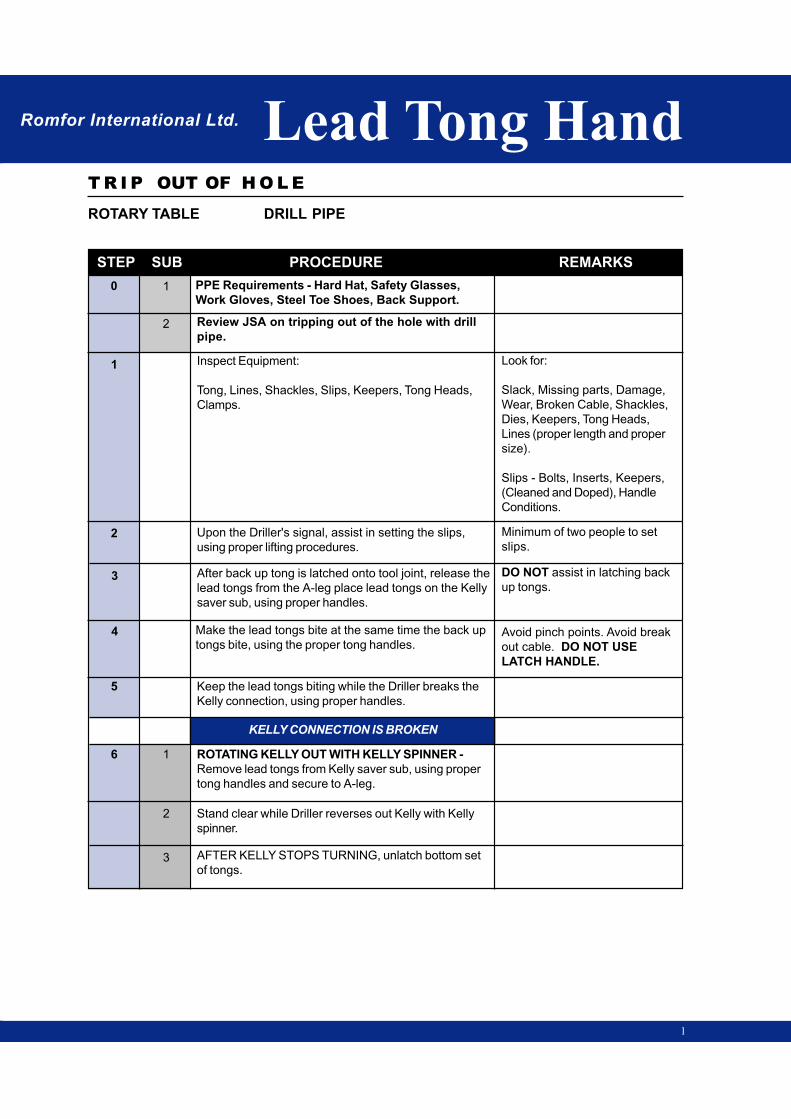
Romfor International Ltd. Lead Tong Hand
STEP SUB PROCEDURE REMARKS
ROTARY TABLE DRILL PIPE
T R I P OUT OF H O L E
1
0 1
1
2
2
3
4
5
6
PPE Requirements - Hard Hat, Safety Glasses,
Work Gloves, Steel Toe Shoes, Back Support.
Review JSA on tripping out of the hole with drill
pipe.
Inspect Equipment:
Tong, Lines, Shackles, Slips, Keepers, Tong Heads,
Clamps.
Upon the Driller's signal, assist in setting the slips,
using proper lifting procedures.
After back up tong is latched onto tool joint, release the
lead tongs from the A-leg place lead tongs on the Kelly
saver sub, using proper handles.
Make the lead tongs bite at the same time the back up
tongs bite, using the proper tong handles.
Keep the lead tongs biting while the Driller breaks the
Kelly connection, using proper handles.
KELLY CONNECTION IS BROKEN
Look for:
Slack, Missing parts, Damage,
Wear, Broken Cable, Shackles,
Dies, Keepers, Tong Heads,
Lines (proper length and proper
size).
Slips - Bolts, Inserts, Keepers,
(Cleaned and Doped), Handle
Conditions.
Minimum of two people to set
slips.
DO NOT assist in latching back
up tongs.
ROTATING KELLY OUT WITH KELLY SPINNER -
Remove lead tongs from Kelly saver sub, using proper
tong handles and secure to A-leg.
Stand clear while Driller reverses out Kelly with Kelly
spinner.
Avoid pinch points. Avoid break
out cable. DO NOT USE
LATCH HANDLE.
1
AFTER KELLY STOPS TURNING, unlatch bottom set
of tongs.
2
3
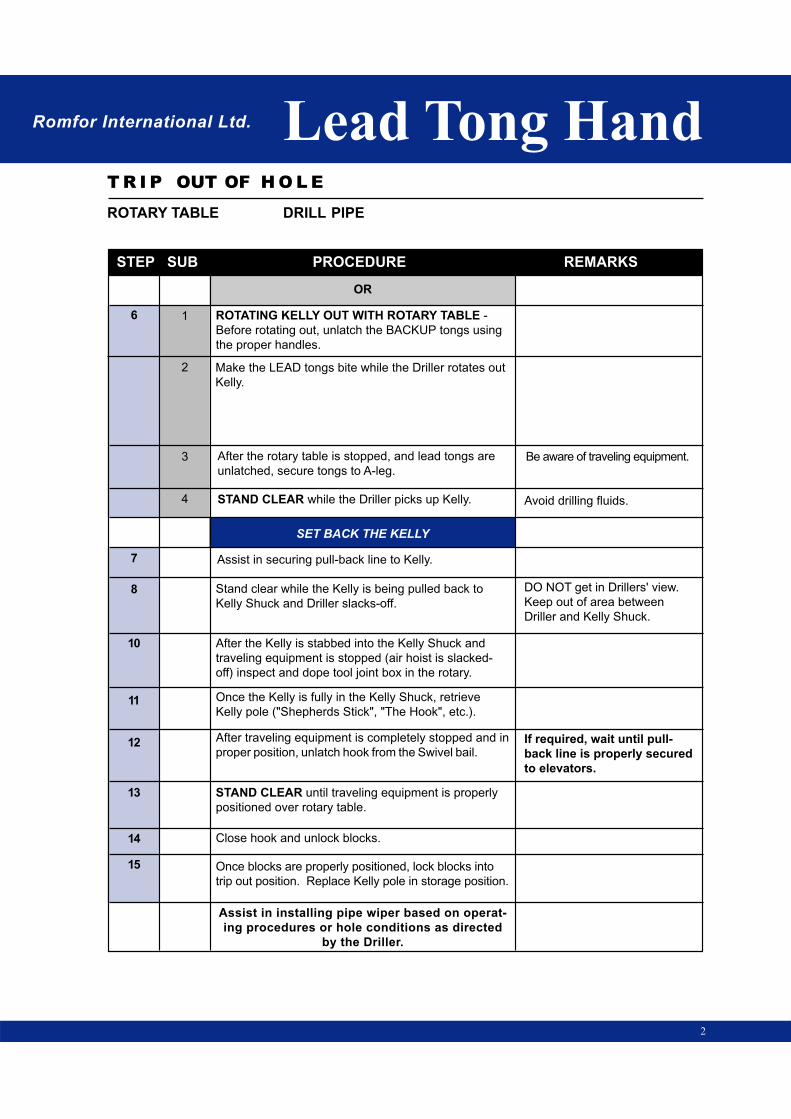
STEP SUB PROCEDURE REMARKS
Lead Tong Hand
ROTARY TABLE DRILL PIPE
T R I P OUT OF H O L E
Romfor International Ltd.
2
OR
ROTATING KELLY OUT WITH ROTARY TABLE -
Before rotating out, unlatch the BACKUP tongs using
the proper handles.
Make the LEAD tongs bite while the Driller rotates out
Kelly.
After the rotary table is stopped, and lead tongs are
unlatched, secure tongs to A-leg.
SET BACK THE KELLY
STAND CLEAR while the Driller picks up Kelly.
Assist in securing pull-back line to Kelly.
Stand clear while the Kelly is being pulled back to
Kelly Shuck and Driller slacks-off.
Be aware of traveling equipment.
Avoid drilling fluids.
6
After the Kelly is stabbed into the Kelly Shuck and
traveling equipment is stopped (air hoist is slacked-
off) inspect and dope tool joint box in the rotary.
Once the Kelly is fully in the Kelly Shuck, retrieve
Kelly pole ("Shepherds Stick", "The Hook", etc.).
After traveling equipment is completely stopped and in
proper position, unlatch hook from the Swivel bail.
STAND CLEAR until traveling equipment is properly
positioned over rotary table.
Close hook and unlock blocks.
Once blocks are properly positioned, lock blocks into
trip out position. Replace Kelly pole in storage position.
DO NOT get in Drillers' view.
Keep out of area between
Driller and Kelly Shuck.
If required, wait until pull-
back line is properly secured
to elevators.
1
2
3
Assist in installing pipe wiper based on operat-
ing procedures or hole conditions as directed
by the Driller.
4
7
8
10
11
12
13
14
15
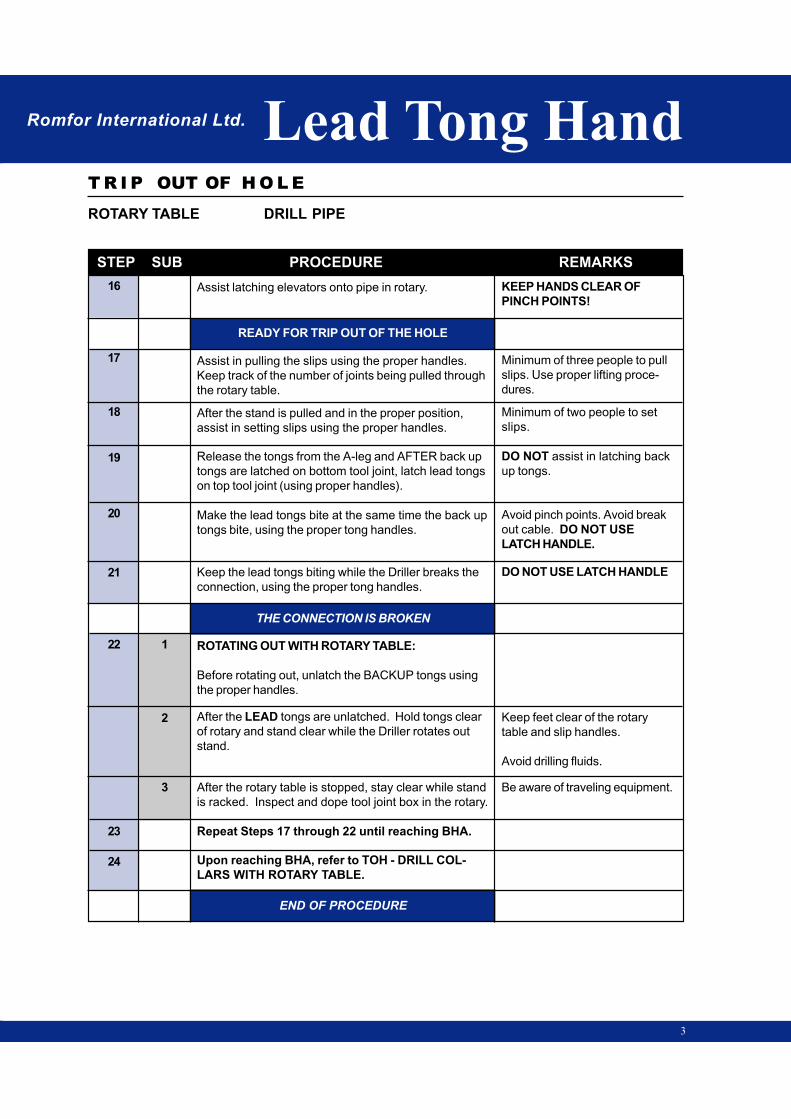
Romfor International Ltd. Lead Tong Hand
STEP SUB PROCEDURE REMARKS
ROTARY TABLE DRILL PIPE
T R I P OUT OF H O L E
3
READY FOR TRIP OUT OF THE HOLE
Assist in pulling the slips using the proper handles.
Keep track of the number of joints being pulled through
the rotary table.
Assist latching elevators onto pipe in rotary. KEEP HANDS CLEAR OF
PINCH POINTS!
After the stand is pulled and in the proper position,
assist in setting slips using the proper handles.
Release the tongs from the A-leg and AFTER back up
tongs are latched on bottom tool joint, latch lead tongs
on top tool joint (using proper handles).
Make the lead tongs bite at the same time the back up
tongs bite, using the proper tong handles.
Minimum of three people to pull
slips. Use proper lifting proce-
dures.
Minimum of two people to set
slips.
DO NOT assist in latching back
up tongs.
Keep the lead tongs biting while the Driller breaks the
connection, using the proper tong handles.
THE CONNECTION IS BROKEN
Avoid pinch points. Avoid break
out cable. DO NOT USE
LATCH HANDLE.
DO NOT USE LATCH HANDLE
ROTATING OUT WITH ROTARY TABLE:
Before rotating out, unlatch the BACKUP tongs using
the proper handles.
After the LEAD tongs are unlatched. Hold tongs clear
of rotary and stand clear while the Driller rotates out
stand.
After the rotary table is stopped, stay clear while stand
is racked. Inspect and dope tool joint box in the rotary.
16
17
18
19
20
21
22
23 Repeat Steps 17 through 22 until reaching BHA.
Upon reaching BHA, refer to TOH - DRILL COL-
LARS WITH ROTARY TABLE.
END OF PROCEDURE
Keep feet clear of the rotary
table and slip handles.
Avoid drilling fluids.
Be aware of traveling equipment.
24
1
2
3

Romfor International Ltd.
TRIP OUT OF
HOLE
TRIP OUT OF
HOLE
Lead Tong
Hand
Lead Tong
Hand
RO
TA
RY
TA
BL
E
DR
IL
L C
OL
LA
R
ROTARY TABLE
DRILL COLLAR
ROTARY TABLE
DRILL COLLAR

Romfor International Ltd. Lead Tong Hand
STEP SUB PROCEDURE REMARKS
ROTARY TABLE DRILL COLLAR
T R I P OUT OF H O L E
1
0 1
1
2
2
3
4
5
6
PPE Requirements - Hard Hat, Safety Glasses,
Work Gloves, Steel Toe Shoes, Back Support.
Review JSA on tripping out of the hole with drill
collars.
Inspect Equipment:
Tong, Lines, Shackles, Slips, Keepers, Tong Heads,
Clamps, Cables, drill collar clamps and wrench.
PROCEDURE IS BASED ON THE ASSUMPTION
THAT THE FIRST DRILL COLLAR IS RACKED
WITH DRILL PIPE.
Upon the Driller's signal, assist in setting the slips,
using proper lifting procedures.
Upon the Driller's signal, place drill collar clamp
around drill collar above the hard band using the
proper handles.
After back up tong is latched onto the drill collar
connection, release the lead tongs from the A-leg.
Place lead tongs on the top of the drill collar
connections, using proper handles.
Make the lead tongs bite at the same time the back up
tongs bite, using the proper tong handles.
Look for:
Slack, Missing parts, Damage,
Wear, Broken Cable, Shackles,
Dies, Keepers, Tong Heads,
Lines (proper length and proper
size).
Slips - Bolts, Inserts, Keepers,
(Cleaned and Doped), Handle
Conditions.
Minimum of two people to set
slips.
DO NOT hold the bottom of the
clamp with hands or knees.
7
After the tongs bite move to a safe area while Driller
breaks the drill collar connection.
THE CONNECTION IS BROKEN
DO NOT assist in latching back
up tongs.
Avoid pinch points. Avoid break
out line. DO NOT USE LATCH
HANDLE.
Be aware of tight connections.
Be aware of trip hazards.
Before rotating out, unlatch BACKUP tongs using the
proper tong handles.
After BACKUP tongs are removed, make LEAD tongs
bite, using proper handles while Driller rotates out the
drill collar connection.
Keep feet clear of rotary table
and slip handles.
8

STEP SUB PROCEDURE REMARKS
Lead Tong Hand
ROTARY TABLE DRILL COLLAR
T R I P OUT OF H O L E
Romfor International Ltd.
2
After Backup Hand unlatches LEAD tongs, secure
tongs to A-leg.
STAND CLEAR while the Driller picks up on stand.
If necessary, assist in racking the stand into the proper
position.
Assist in stabbing drill collar lift sub and make-up hand
tight.
After elevators are latched on to lift sub, release lead
tongs from A-leg and latch onto drill collar connection in
rotary table using the proper handles.
STAND CLEAR while driller lowers elevators for latching.
STAND CLEAR while back-up tongs are latched on lift
sub connection.
Make lead tongs bite at the same time the back-up
tongs bite, using the proper handles until the connec-
tion is tightened.
Avoid drilling fluids.
Do not get in the Drillers view.
Make sure feet are clear of pin
end of stand.
Keep fingers out of threads
while tightening by hand.
LIFT SUB CONNECTION IS TIGHTENED
Unlatch back-up tongs using the proper handles.
After Back-Up Hand unlatches lead tongs, secure
tongs to A-leg.
After Driller raises stand to proper height, assist in
removing the drill collar clamp. Hold the drill collar
clamp using proper handles while the nut is loosened
and pin is removed.
Do not assist in latching back-
up tongs.
Avoid pinch points and do not
use latch handles.
DO NOT hold the bottom of the
clamp with hands or knees.
9
10
11
12
13
14
15
16
17
18
19

Romfor International Ltd. Lead Tong Hand
STEP SUB PROCEDURE REMARKS
ROTARY TABLE DRILL COLLAR
T R I P OUT OF H O L E
3
Place drill collar clamp in front of the Drawworks, away
from work area and get ready for the next stand.
Assist in pulling the slips using proper handles. Keep
track of the number of drill collars coming through the
rotary table.
Repeat Steps 2 through 21 for remaining drill
collars.
END OF PROCEDURE
Minimum of two people to pull
slips.
20
21
22

Romfor International Ltd.
TRIP OUT OF
HOLE
TRIP OUT OF
HOLE
TR
IP
OU
T O
F H
OL
E
MotormanMotorman

Romfor International Ltd.
TRIP OUT OF
HOLE
TRIP OUT OF
HOLE
MotormanMotorman
TO
P D
RIV
E
DR
IL
L P
IP
E
TOP DRIVE
DRILL PIPE
TOP DRIVE
DRILL PIPE
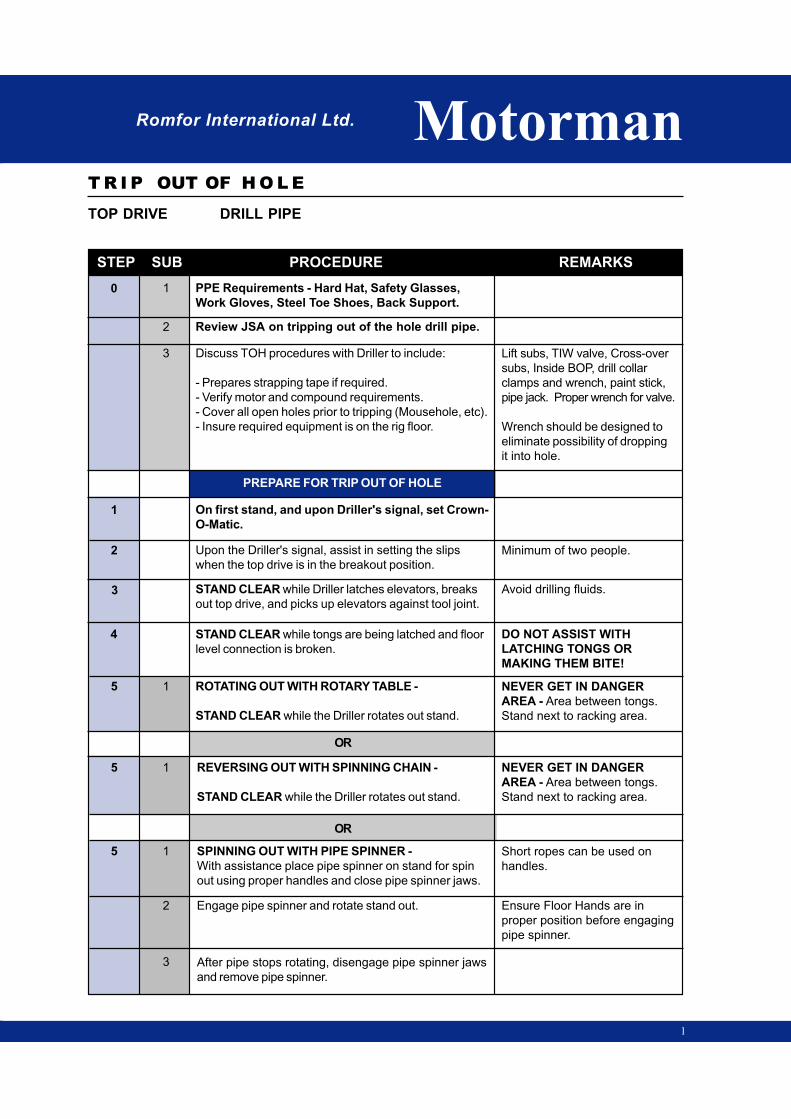
Romfor International Ltd. Motorman
STEP SUB PROCEDURE REMARKS
TOP DRIVE DRILL PIPE
T R I P OUT OF H O L E
1
0 1
1
2
2
3
4
5
5
PPE Requirements - Hard Hat, Safety Glasses,
Work Gloves, Steel Toe Shoes, Back Support.
Review JSA on tripping out of the hole drill pipe.
Discuss TOH procedures with Driller to include:
- Prepares strapping tape if required.
- Verify motor and compound requirements.
- Cover all open holes prior to tripping (Mousehole, etc).
- Insure required equipment is on the rig floor.
PREPARE FOR TRIP OUT OF HOLE
On first stand, and upon Driller's signal, set Crown-
O-Matic.
Upon the Driller's signal, assist in setting the slips
when the top drive is in the breakout position.
STAND CLEAR while Driller latches elevators, breaks
out top drive, and picks up elevators against tool joint.
STAND CLEAR while tongs are being latched and floor
level connection is broken.
ROTATING OUT WITH ROTARY TABLE -
STAND CLEAR while the Driller rotates out stand.
Lift subs, TIW valve, Cross-over
subs, Inside BOP, drill collar
clamps and wrench, paint stick,
pipe jack. Proper wrench for valve.
Wrench should be designed to
eliminate possibility of dropping
it into hole.
Minimum of two people.
5
3
OR
REVERSING OUT WITH SPINNING CHAIN -
STAND CLEAR while the Driller rotates out stand.
Avoid drilling fluids.
DO NOT ASSIST WITH
LATCHING TONGS OR
MAKING THEM BITE!
NEVER GET IN DANGER
AREA - Area between tongs.
Stand next to racking area.
1
OR
SPINNING OUT WITH PIPE SPINNER -
With assistance place pipe spinner on stand for spin
out using proper handles and close pipe spinner jaws.
Engage pipe spinner and rotate stand out.
NEVER GET IN DANGER
AREA - Area between tongs.
Stand next to racking area.
Short ropes can be used on
handles.
After pipe stops rotating, disengage pipe spinner jaws
and remove pipe spinner.
Ensure Floor Hands are in
proper position before engaging
pipe spinner.
1
1
2
3

STEP SUB PROCEDURE REMARKS
Motorman
TOP DRIVE DRILL PIPE
T R I P OUT OF H O L E
Romfor International Ltd.
2
STAND CLEAR while the Driller picks up on the stand.
With Floor Hand's help, guide stand to proper racking
position.
Write the proper number on the stand being racked.
Assist in installing pipe wiper based on operating
procedures or hole conditions as directed by the
Driller. Operate air hoist, if required, to pull
bushings.
STAND CLEAR while Driller lowers top drive and
latches onto pipe with elevators. Watch for any cable
and hose hang-ups.
READY FOR TRIP OUT OF HOLE
Verify elevators are properly latched.
Assist in pulling the slips using the proper handles.
Avoid drilling fluids.
Make sure feet are clear of pin
end of stand.
DO NOT REACH FOR ELEVA-
TORS UNTIL NOTIFIED BY
DRILLER.
6
7
8
9
Keep track of the number of joints being pulled through
the rotary table.
After the stand is pulled and in the proper position,
assist in setting slips using the proper handles.
10
11
STAND CLEAR while tongs are being latched and
connection is broken.
THE CONNECTON IS BROKEN
ROTATING OUT WITH ROTARY TABLE -
STAND CLEAR while the Driller rotates out stand.
OR
12
13
14
Use proper lifting procedures.
Minimum of three people to pull
slips.
As required, hose off mud from
pipe.
Minimum of two people.
DO NOT ASSIST WITH
LATCHING TONGS OR MAK-
ING THEM BITE!
NEVER GET IN DANGER
AREA - Area between tongs.
Stand next to racking area.
15
15 REVERSING OUT WITH SPINNING CHAIN -
STAND CLEAR while the Driller rotates out stand.
NEVER GET IN DANGER
AREA - Area between tongs.
Stand next to racking area.
1
1

Romfor International Ltd. Motorman
STEP SUB PROCEDURE REMARKS
TOP DRIVE DRILL PIPE
T R I P OUT OF H O L E
3
SPINNING OUT WITH PIPE SPINNER -
Assist in placing pipe spinner on stand for spin out
using proper handles and close pipe spinner jaws.
Engage pipe spinner and rotate stand out.
OR
Short ropes can be used on
handles.
15
16
17
After pipe stops rotating, dis-engage pipe spinner jaws
and remove pipe spinner.
STAND CLEAR while the Driller picks up on the stand.
With Floor Hand's help, guide stand to proper racking
position.
Ensure Floor Hands are in
proper position before engaging
pipe spinner.
Avoid drilling fluids.
Write the proper number on the stand being racked.
Repeat Steps 9 through 18 until reaching BHA.
Make sure feet are clear of pin
end of stand.
Upon reaching BHA, refer to TOH - DRILL COL-
LARS WITH TOP DRIVE.
END OF PROCEDURE
1
2
3
18
19
20

Romfor International Ltd.
TRIP OUT OF
HOLE
TRIP OUT OF
HOLE
MotormanMotorman
TO
P D
RIV
E
DR
IL
L C
OL
LA
R
TOP DRIVE
DRILL COLLAR
TOP DRIVE
DRILL COLLAR
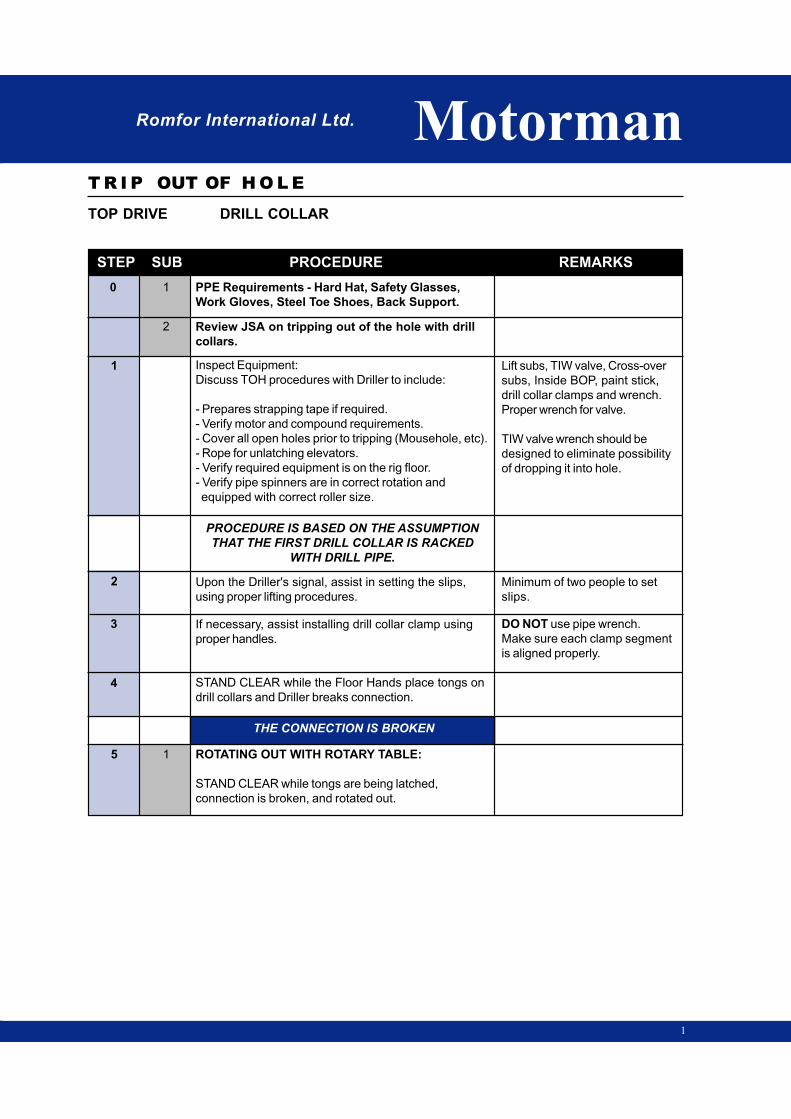
Romfor International Ltd. Motorman
STEP SUB PROCEDURE REMARKS
TOP DRIVE DRILL COLLAR
T R I P OUT OF H O L E
1
0 1
1
2
2
3
4
5
PPE Requirements - Hard Hat, Safety Glasses,
Work Gloves, Steel Toe Shoes, Back Support.
Review JSA on tripping out of the hole with drill
collars.
Inspect Equipment:
Discuss TOH procedures with Driller to include:
- Prepares strapping tape if required.
- Verify motor and compound requirements.
- Cover all open holes prior to tripping (Mousehole, etc).
- Rope for unlatching elevators.
- Verify required equipment is on the rig floor.
- Verify pipe spinners are in correct rotation and
equipped with correct roller size.
PROCEDURE IS BASED ON THE ASSUMPTION
THAT THE FIRST DRILL COLLAR IS RACKED
WITH DRILL PIPE.
Upon the Driller's signal, assist in setting the slips,
using proper lifting procedures.
If necessary, assist installing drill collar clamp using
proper handles.
STAND CLEAR while the Floor Hands place tongs on
drill collars and Driller breaks connection.
THE CONNECTION IS BROKEN
ROTATING OUT WITH ROTARY TABLE:
STAND CLEAR while tongs are being latched,
connection is broken, and rotated out.
Lift subs, TIW valve, Cross-over
subs, Inside BOP, paint stick,
drill collar clamps and wrench.
Proper wrench for valve.
TIW valve wrench should be
designed to eliminate possibility
of dropping it into hole.
Minimum of two people to set
slips.
DO NOT use pipe wrench.
Make sure each clamp segment
is aligned properly.
1

STEP SUB PROCEDURE REMARKS
Motorman
TOP DRIVE DRILL COLLAR
T R I P OUT OF H O L E
Romfor International Ltd.
2
OR
ROTATING OUT WITH SPINNING CHAIN:
STAND CLEAR while tongs are being latched,
connection is broken, and spun out with spinning chain.
OR
SPINNING OUT WITH PIPE SPINNER:
After tongs are removed, assist in placing pipe spinner
on upper drill collar connection.
Verify that pipe spinner control is in the back-out
position and spin stand of drill collar out of connection
in the rotary table.
Close pipe spinner jaws around upper drill collar
connection.
When stand is completely spun out, release pipe
spinner from stand of drill collars.
If required, assist in securing pipe spinner to A-leg or
out of the way.
Short ropes can be used on
handles.
Keep eye on Floor Hands to
verify that no one is in harm's
way.
SLOWLY operate control lever
until stand is rotating.
5
5
6
7
STAND CLEAR while Driller picks up on stand of drill
collars.
If applicable, operate air hoist using the "mule line"
(operated off air hoist) to rack the stand of drill collars.
If a mechanical assist ("Willy Winch") is used, rack
the stand of drill collars with the assistance of the Floor
Hands.
Operate air hoist while Floor Hands install lift sub into
drill collar.
Avoid drilling fluids.
Keep feet clear of pin end of
stand. Keep Drillers view
unobstructed.
Watch Floor Hands signals for
directions. BE AWARE of
possible entanglement between
air hoist line and other Top
Drive lines.
8
1
1
2
3
4
5
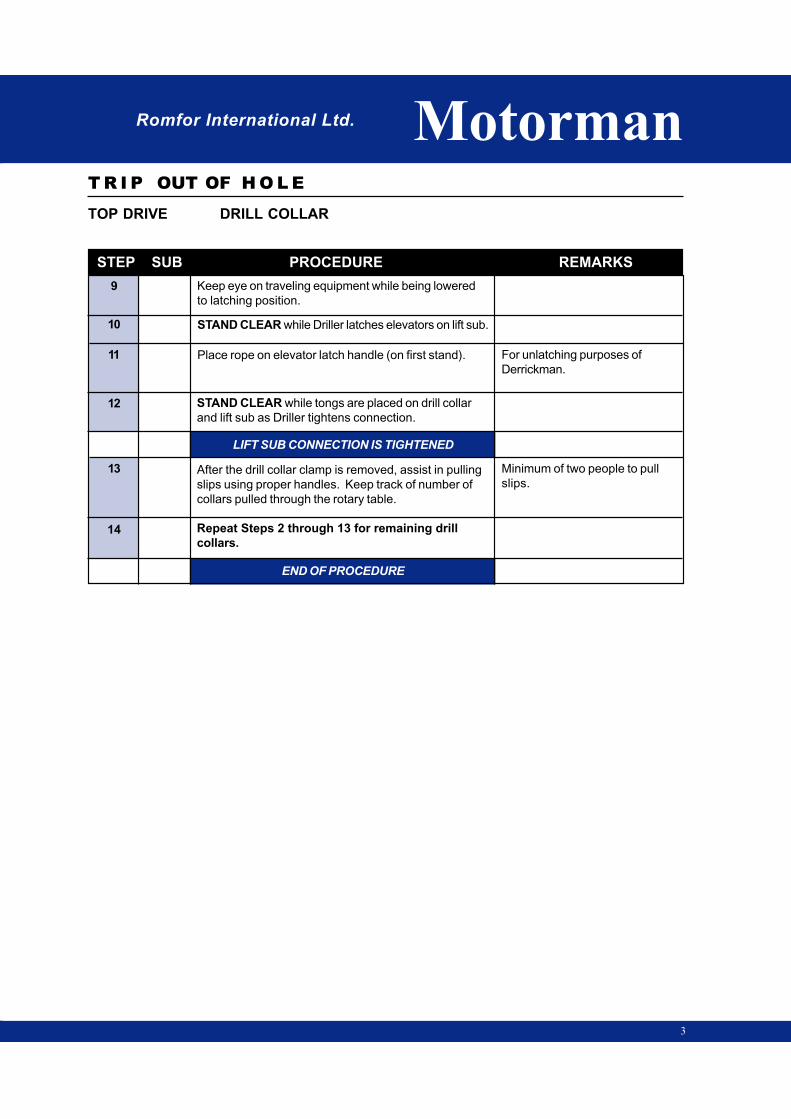
Romfor International Ltd. Motorman
STEP SUB PROCEDURE REMARKS
TOP DRIVE DRILL COLLAR
T R I P OUT OF H O L E
3
STAND CLEAR while Driller latches elevators on lift sub.
Place rope on elevator latch handle (on first stand).
Keep eye on traveling equipment while being lowered
to latching position.
9
10
11
STAND CLEAR while tongs are placed on drill collar
and lift sub as Driller tightens connection.
LIFT SUB CONNECTION IS TIGHTENED
After the drill collar clamp is removed, assist in pulling
slips using proper handles. Keep track of number of
collars pulled through the rotary table.
For unlatching purposes of
Derrickman.
Repeat Steps 2 through 13 for remaining drill
collars.
END OF PROCEDURE
Minimum of two people to pull
slips.
12
13
14

Romfor International Ltd.
TRIP OUT OF
HOLE
TRIP OUT OF
HOLE
MotormanMotorman
PIPE SPINNER
DRILL PIPE
PIPE SPINNER
DRILL PIPE
PIP
E S
PIN
NE
R
DR
IL
L P
IP
E
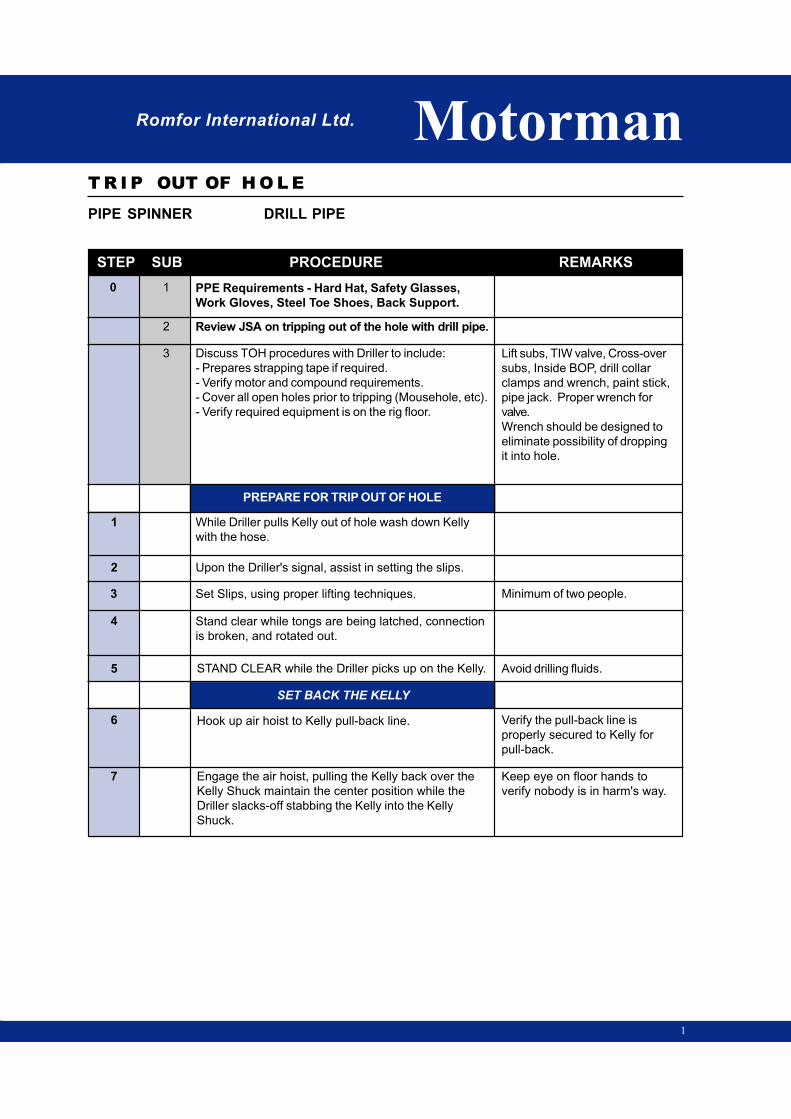
Romfor International Ltd. Motorman
STEP SUB PROCEDURE REMARKS
PIPE SPINNER DRILL PIPE
T R I P OUT OF H O L E
1
0 1
1
2
2
3
4
5
PPE Requirements - Hard Hat, Safety Glasses,
Work Gloves, Steel Toe Shoes, Back Support.
Review JSA on tripping out of the hole with drill pipe.
Discuss TOH procedures with Driller to include:
- Prepares strapping tape if required.
- Verify motor and compound requirements.
- Cover all open holes prior to tripping (Mousehole, etc).
- Verify required equipment is on the rig floor.
PREPARE FOR TRIP OUT OF HOLE
While Driller pulls Kelly out of hole wash down Kelly
with the hose.
Upon the Driller's signal, assist in setting the slips.
Set Slips, using proper lifting techniques.
Stand clear while tongs are being latched, connection
is broken, and rotated out.
Lift subs, TIW valve, Cross-over
subs, Inside BOP, drill collar
clamps and wrench, paint stick,
pipe jack. Proper wrench for
valve.
Wrench should be designed to
eliminate possibility of dropping
it into hole.
6
3
STAND CLEAR while the Driller picks up on the Kelly.
SET BACK THE KELLY
Minimum of two people.
Hook up air hoist to Kelly pull-back line.
Engage the air hoist, pulling the Kelly back over the
Kelly Shuck maintain the center position while the
Driller slacks-off stabbing the Kelly into the Kelly
Shuck.
Avoid drilling fluids.
Verify the pull-back line is
properly secured to Kelly for
pull-back.
Keep eye on floor hands to
verify nobody is in harm's way.
7
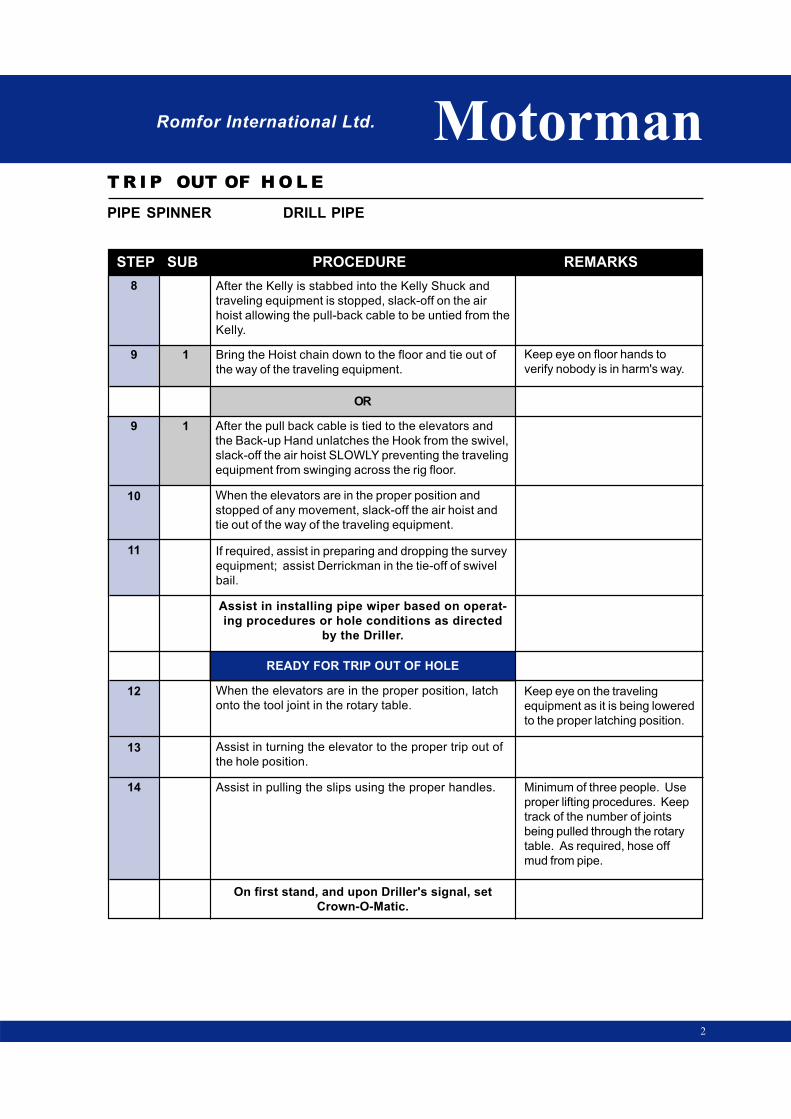
STEP SUB PROCEDURE REMARKS
Motorman
PIPE SPINNER DRILL PIPE
T R I P OUT OF H O L E
Romfor International Ltd.
2
After the Kelly is stabbed into the Kelly Shuck and
traveling equipment is stopped, slack-off on the air
hoist allowing the pull-back cable to be untied from the
Kelly.
Bring the Hoist chain down to the floor and tie out of
the way of the traveling equipment.
After the pull back cable is tied to the elevators and
the Back-up Hand unlatches the Hook from the swivel,
slack-off the air hoist SLOWLY preventing the traveling
equipment from swinging across the rig floor.
OR
When the elevators are in the proper position and
stopped of any movement, slack-off the air hoist and
tie out of the way of the traveling equipment.
If required, assist in preparing and dropping the survey
equipment; assist Derrickman in the tie-off of swivel
bail.
Keep eye on floor hands to
verify nobody is in harm's way.
8
9
9
10
Assist in installing pipe wiper based on operat-
ing procedures or hole conditions as directed
by the Driller.
READY FOR TRIP OUT OF HOLE
11
When the elevators are in the proper position, latch
onto the tool joint in the rotary table.
Assist in turning the elevator to the proper trip out of
the hole position.
Assist in pulling the slips using the proper handles.
On first stand, and upon Driller's signal, set
Crown-O-Matic.
12
13
Keep eye on the traveling
equipment as it is being lowered
to the proper latching position.
Minimum of three people. Use
proper lifting procedures. Keep
track of the number of joints
being pulled through the rotary
table. As required, hose off
mud from pipe.
14
1
1

Romfor International Ltd. Motorman
STEP SUB PROCEDURE REMARKS
PIPE SPINNER DRILL PIPE
T R I P OUT OF H O L E
3
Stand clear while tongs are being latched, connection
is broken.
With assistance place pipe spinner on stand for spin
out using proper handles and close pipe spinner jaws.
After the stand is pulled and in the proper position,
assist in setting slips using the proper handles.Minimum two people to set
slips.
15
16
17
Engage pipe spinner and rotate stand out.
After pipe stops rotating, disengage pipe spinner jaws
and remove pipe spinner. Secure Pipe Spinners.
STAND CLEAR while the Driller picks up on the stand.
Short ropes can be used on
handles.
Verify Floor Hands are in proper
position before engaging pipe
spinner.
Rack the stand into the proper position while assisted
by the Floor Hand.
Write proper number on stand.
18
19
20
21
Avoid drilling fluids.
Make sure feet are clear of pin
end of stand.
Repeat Steps 12 through 22 until reaching BHA.
Upon reaching BHA, refer to TOH - DRILL COL-
LARS WITH PIPE SPINNER.
END OF PROCEDURE
22
24
23

Romfor International Ltd.
TRIP OUT OF
HOLE
TRIP OUT OF
HOLE
MotormanMotorman
PIP
E S
PIN
NE
R
DR
IL
L C
OL
LA
R
PIPE SPINNER
DRILL COLLAR
PIPE SPINNER
DRILL COLLAR
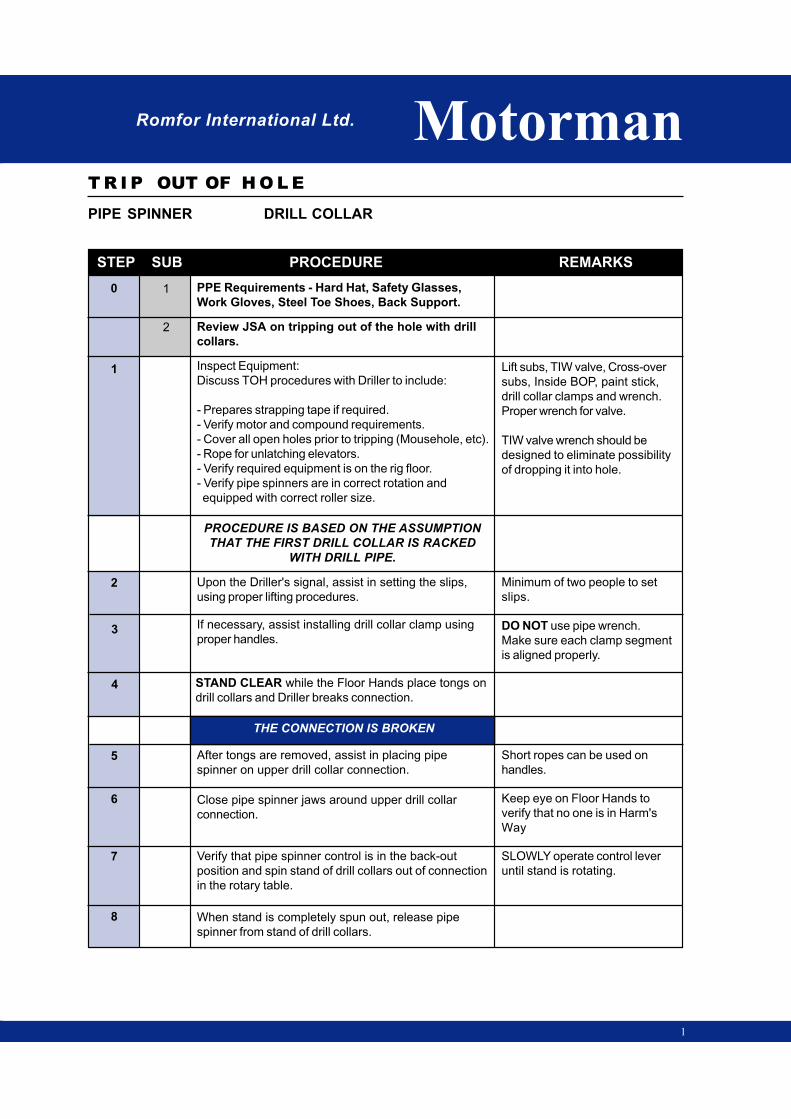
Romfor International Ltd. Motorman
STEP SUB PROCEDURE REMARKS
PIPE SPINNER DRILL COLLAR
T R I P OUT OF H O L E
1
0 1
1
2
2
3
4
5
PPE Requirements - Hard Hat, Safety Glasses,
Work Gloves, Steel Toe Shoes, Back Support.
Review JSA on tripping out of the hole with drill
collars.
Inspect Equipment:
Discuss TOH procedures with Driller to include:
- Prepares strapping tape if required.
- Verify motor and compound requirements.
- Cover all open holes prior to tripping (Mousehole, etc).
- Rope for unlatching elevators.
- Verify required equipment is on the rig floor.
- Verify pipe spinners are in correct rotation and
equipped with correct roller size.
PROCEDURE IS BASED ON THE ASSUMPTION
THAT THE FIRST DRILL COLLAR IS RACKED
WITH DRILL PIPE.
Upon the Driller's signal, assist in setting the slips,
using proper lifting procedures.
If necessary, assist installing drill collar clamp using
proper handles.
STAND CLEAR while the Floor Hands place tongs on
drill collars and Driller breaks connection.
THE CONNECTION IS BROKEN
After tongs are removed, assist in placing pipe
spinner on upper drill collar connection.
Lift subs, TIW valve, Cross-over
subs, Inside BOP, paint stick,
drill collar clamps and wrench.
Proper wrench for valve.
TIW valve wrench should be
designed to eliminate possibility
of dropping it into hole.
Minimum of two people to set
slips.
DO NOT use pipe wrench.
Make sure each clamp segment
is aligned properly.
Close pipe spinner jaws around upper drill collar
connection.
Verify that pipe spinner control is in the back-out
position and spin stand of drill collars out of connection
in the rotary table.
When stand is completely spun out, release pipe
spinner from stand of drill collars.
Short ropes can be used on
handles.
Keep eye on Floor Hands to
verify that no one is in Harm's
Way
SLOWLY operate control lever
until stand is rotating.
6
7
8

STEP SUB PROCEDURE REMARKS
Motorman
PIPE SPINNER DRILL COLLAR
T R I P OUT OF H O L E
Romfor International Ltd.
2
If required, assist in securing pipe spinner to A-leg or
out of the way.
STAND CLEAR while Driller picks up on stand of drill
collars.
If applicable, operate air hoist using the "mule line"
(operated off air hoist) to rack the stand of drill collars.
If a mechanical assist ("Willy Winch") is used, rack
the stand of drill collars with the assistance of the Floor
Hands.
Operate air hoist while Floor Hands install lift sub into
drill collar.
When the elevators are stopped and in proper position,
latch elevators around lift sub.
Keep eye on traveling equipment while being lowered to
latching position.
Place rope on elevator latch handle (on first stand).
STAND CLEAR while tongs are placed on drill collar
and lift sub as Driller tightens connection.
Avoid drilling fluids.
Keep feet clear of pin end of
stand. Keep Drillers view
unobstructed.
Watch Floor Hands signals for
directions.
9
10
11
12
LIFT SUB CONNECTION IS TIGHTENED
After the drill collar clamp is removed, assist in pulling
slips using proper handles. Keep track of number of
collars pulled through the rotary table.
Repeat Steps 2 through 17 for remaining drill
collars.
For unlatching purposes of
Derrickman.
Minimum of two people to pull
slips.
13
END OF PROCEDURE
14
16
17
15
18

Romfor International Ltd.
TRIP OUT OF
HOLE
TRIP OUT OF
HOLE
MotormanMotorman
SP
INN
ING
CH
AIN
DR
IL
L P
IP
E
SPINNING CHAIN
DRILL PIPE
SPINNING CHAIN
DRILL PIPE

Romfor International Ltd. Motorman
STEP SUB PROCEDURE REMARKS
SPINNING CHAIN DRILL PIPE
T R I P OUT OF H O L E
0 1
1
2
2
3
4
5
PPE Requirements - Hard Hat, Safety Glasses,
Work Gloves, Steel Toe Shoes, Back Support
Review JSA on tripping out of the hole drill pipe.
Discuss TOH procedures with Driller to include:
- Prepares strapping tape if required.
- Verify motor and compound requirements.
- Cover all open holes prior to tripping (Mousehole, etc).
- Verify required equipment is on the rig floor.
PREPARE FOR TRIP OUT OF HOLE
While Driller pulls Kelly out-of-hole, wash down Kelly
with water hose.
Upon the Driller's signal, assist in setting the slips.
Set Slips, using proper lifting techniques.
Stand clear while tongs are being latched, connection
is broken, and rotated out.
Lift subs, TIW valve, Cross-over
subs, Inside BOP, drill collar
clamps and wrench, paint stick,
pipe jack. Proper wrench for
valve.
Wrench should be designed to
eliminate possibility of dropping
it into hole.
6
3
STAND CLEAR while the Driller picks up on the Kelly.
SET BACK THE KELLY
Minimum of two people.
Hook up air hoist to Kelly pull-back line.
Engage the air hoist, pulling the Kelly back over the
Kelly Shuck maintain the center position while the
Driller slacks-off stabbing the Kelly into the Kelly
Shuck.
Avoid drilling fluids.
Verify the pull-back line is
properly secured to Kelly for
pull-back.
Keep eye on floor hands to
verify nobody is in harm's way.
7
1

STEP SUB PROCEDURE REMARKS
Motorman
SPINNING CHAIN DRILL PIPE
T R I P OUT OF H O L E
Romfor International Ltd.
2
After the Kelly is stabbed into the Kelly Shuck and
traveling equipment is stopped, slack-off on the air hoist
allowing the pull-back cable to be un-tied from the
Kelly.
Bring the Hoist chain down to the floor and tie out of
the way of the traveling equipment.
After the pull back cable is tied to the elevators and the
Back-up Hand unlatches the Hook from the swivel,
slack-off the air hoist SLOWLY preventing the traveling
equipment from swinging across the rig floor.
OR
When the elevators are in the proper position and
stopped of any movement, slack-off the air hoist and tie
out of the way of the traveling equipment.
If required, assist in preparing and dropping the
survey equipment; assist Derrickman in the tie-off
of swivel bail.
Keep eye on floor hands to
verify nobody is in harm's way.
8
9
9
10
Assist in installing pipe wiper based on operat-
ing procedures or hole conditions as directed
by the Driller.
READY FOR TRIP OUT OF HOLE
11
When the elevators are in the proper position, latch
onto the tool joint in the rotary table.
Assist in turning the elevator to the proper trip out of
the hole position.
Assist in pulling the slips using the proper handles.
On first stand, and upon Driller's signal, set
Crown-O-Matic.
12
13
Keep eye on the traveling
equipment as it is being lowered
to the proper latching position.
Minimum of three people. Use
proper lifting procedures. Keep
track of the number of joints
being pulled through the rotary
table. As required, hose off
mud from pipe.
14
1
1

Romfor International Ltd. Motorman
STEP SUB PROCEDURE REMARKS
SPINNING CHAIN DRILL PIPE
T R I P OUT OF H O L E
3
STAND CLEAR while tongs are being latched, connec-
tion is broken, and spun out with spinning chain.
STAND CLEAR while the Driller picks up on the stand.
After the stand is pulled and in the proper position,
assist in setting slips using the proper handles.
Minimum two people to set
slips.15
16
17
Racking the stand into the proper position while
assisted by the Floor Hand.
Write proper number on stand.
Repeat Steps 12 through 19 until reaching BHA.
Avoid drilling fluids.
Make sure feet are clear of pin
end of stand.
Upon reaching BHA, refer to TOH - DRILL COL-
LARS WITH SPINNING CHAIN.
END OF PROCEDURE
18
19
20
21
Romfor International Ltd.
TRIP OUT OF
HOLE
TRIP OUT OF
HOLE
MotormanMotorman
SP
INN
ING
CH
AIN
DR
IL
L C
OL
LA
R
SPINNING CHAIN
DRILL COLLAR
SPINNING CHAIN
DRILL COLLAR
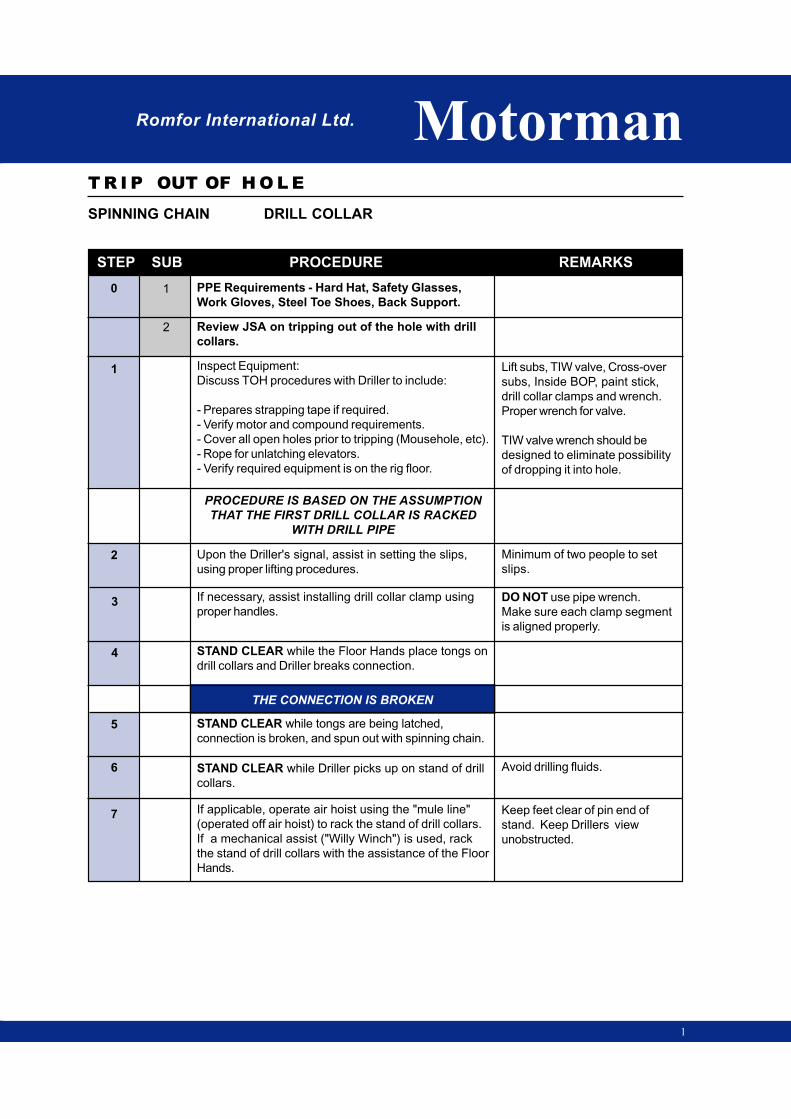
Romfor International Ltd. Motorman
STEP SUB PROCEDURE REMARKS
SPINNING CHAIN DRILL COLLAR
T R I P OUT OF H O L E
1
0 1
1
2
2
3
4
5
PPE Requirements - Hard Hat, Safety Glasses,
Work Gloves, Steel Toe Shoes, Back Support.
Review JSA on tripping out of the hole with drill
collars.
Inspect Equipment:
Discuss TOH procedures with Driller to include:
- Prepares strapping tape if required.
- Verify motor and compound requirements.
- Cover all open holes prior to tripping (Mousehole, etc).
- Rope for unlatching elevators.
- Verify required equipment is on the rig floor.
PROCEDURE IS BASED ON THE ASSUMPTION
THAT THE FIRST DRILL COLLAR IS RACKED
WITH DRILL PIPE
Upon the Driller's signal, assist in setting the slips,
using proper lifting procedures.
If necessary, assist installing drill collar clamp using
proper handles.
STAND CLEAR while the Floor Hands place tongs on
drill collars and Driller breaks connection.
THE CONNECTION IS BROKEN
STAND CLEAR while tongs are being latched,
connection is broken, and spun out with spinning chain.
Lift subs, TIW valve, Cross-over
subs, Inside BOP, paint stick,
drill collar clamps and wrench.
Proper wrench for valve.
TIW valve wrench should be
designed to eliminate possibility
of dropping it into hole.
Minimum of two people to set
slips.
DO NOT use pipe wrench.
Make sure each clamp segment
is aligned properly.
STAND CLEAR while Driller picks up on stand of drill
collars.
If applicable, operate air hoist using the "mule line"
(operated off air hoist) to rack the stand of drill collars.
If a mechanical assist ("Willy Winch") is used, rack
the stand of drill collars with the assistance of the Floor
Hands.
Avoid drilling fluids.
Keep feet clear of pin end of
stand. Keep Drillers view
unobstructed.
6
7

STEP SUB PROCEDURE REMARKS
Motorman
SPINNING CHAIN DRILL COLLAR
T R I P OUT OF H O L E
Romfor International Ltd.
2
Operate air hoist while Floor Hands install lift sub into
drill collar.
Keep eye on traveling equipment while being lowered to
latching position.
When the elevators are stopped and in proper position,
latch elevators around lift sub.
Place rope on elevator latch handle (on first stand), if
required.
LIFT SUB CONNECTION IS TIGHTENED
STAND CLEAR while tongs are placed on drill collar
and lift-sub as Driller tightens connection.
Watch Floor Hands signals for
directions.
For unlatching purposes of
Derrickman.
Minimum of two people to pull
slips.
8
9
10
11
12
13 After the drill collar clamp is removed, assist in pulling
slips using proper handles. Keep track of number of
collars pulled through the rotary table.
Repeat Steps 2 through 13 for remaining drill collars.
END OF PROCEDURE
14

Romfor International Ltd.
TRIP OUT OF
HOLE
TRIP OUT OF
HOLE
MotormanMotorman
RO
TA
RY
TA
BL
E
DR
IL
L P
IP
E
ROTARY TABLE
DRILL PIPE
ROTARY TABLE
DRILL PIPE

Romfor International Ltd. Motorman
STEP SUB PROCEDURE REMARKS
ROTARY TABLE DRILL PIPE
T R I P OUT OF H O L E
1
0 1
1
2
2
3
4
5
PPE Requirements - Hard Hat, Safety Glasses, Work
Gloves, Steel Toe Shoes, Back Support
Review JSA on tripping out of the hole with drill pipe.
Discuss TOH procedures with Driller to include:
- Prepares strapping tape if required.
- Verify motor and compound requirements.
- Cover all open holes prior to tripping (Mousehole, etc).
- Verify required equipment is on the rig floor.
PREPARE FOR TRIP OUT OF HOLE
While Driller pulls Kelly out of hole wash down Kelly
with the water hose.
Upon the Driller's signal, assist in setting the slips.
Set Slips, using proper lifting techniques.
Stand clear while tongs are being latched, connection
is broken, and rotated out.
Lift subs, TIW valve, Cross-over
subs, Inside BOP, drill collar
clamps and wrench, paint stick,
pipe jack. Proper wrench for
valve.
Wrench should be designed to
eliminate possibility of dropping
it into hole.
6
3
STAND CLEAR while the Driller picks up on the Kelly.
SET BACK THE KELLY
Minimum of two people.
Hook up air hoist to Kelly pull-back line.
Engage the air hoist, pulling the Kelly back over the
Kelly Shuck maintain the center position while the
Driller slacks-off stabbing the Kelly into the Kelly
Shuck.
Avoid drilling fluids.
Verify the pull-back line is
properly secured to Kelly for
pull-back.
Keep eye on floor hands to
verify nobody is in harm's way.
7

STEP SUB PROCEDURE REMARKS
Motorman
ROTARY TABLE DRILL PIPE
T R I P OUT OF H O L E
Romfor International Ltd.
2
After the Kelly is stabbed into the Kelly Shuck and
traveling equipment is stopped, slack-off on the air
hoist allowing the pull-back cable to be untied from the
Kelly.
Bring the Hoist chain down to the floor and tie out of
the way of the traveling equipment.
After the pull back cable is tied to the elevators and the
Back-up Hand unlatches the Hook from the swivel,
slack-off the air hoist SLOWLY preventing the traveling
equipment from swinging across the rig floor.
OR
When the elevators are in the proper position and
stopped of any movement, slack-off the air hoist and tie
out of the way of the traveling equipment.
If required, assist in preparing and dropping the survey
equipment; assist Derrickman in the tie-off of swivel
bail.
Keep eye on floor hands to
verify nobody is in harm's way.
8
9
9
10
Assist in installing pipe wiper based on operat-
ing procedures or hole conditions as directed
by the Driller.
READY FOR TRIP OUT OF HOLE
11
When the elevators are in the proper position, latch
onto the tool joint in the rotary table.
Assist in turning the elevator to the proper trip out of
the hole position.
Assist in pulling the slips using the proper handles.
On first stand, and upon Driller's signal, set
Crown-O-Matic.
12
13
Keep eye on the traveling
equipment as it is being lowered
to the proper latching position.
Minimum of three people. Use
proper lifting procedures. Keep
track of the number of joints
being pulled through the rotary
table. As required, hose off
mud from pipe.
14
1
1
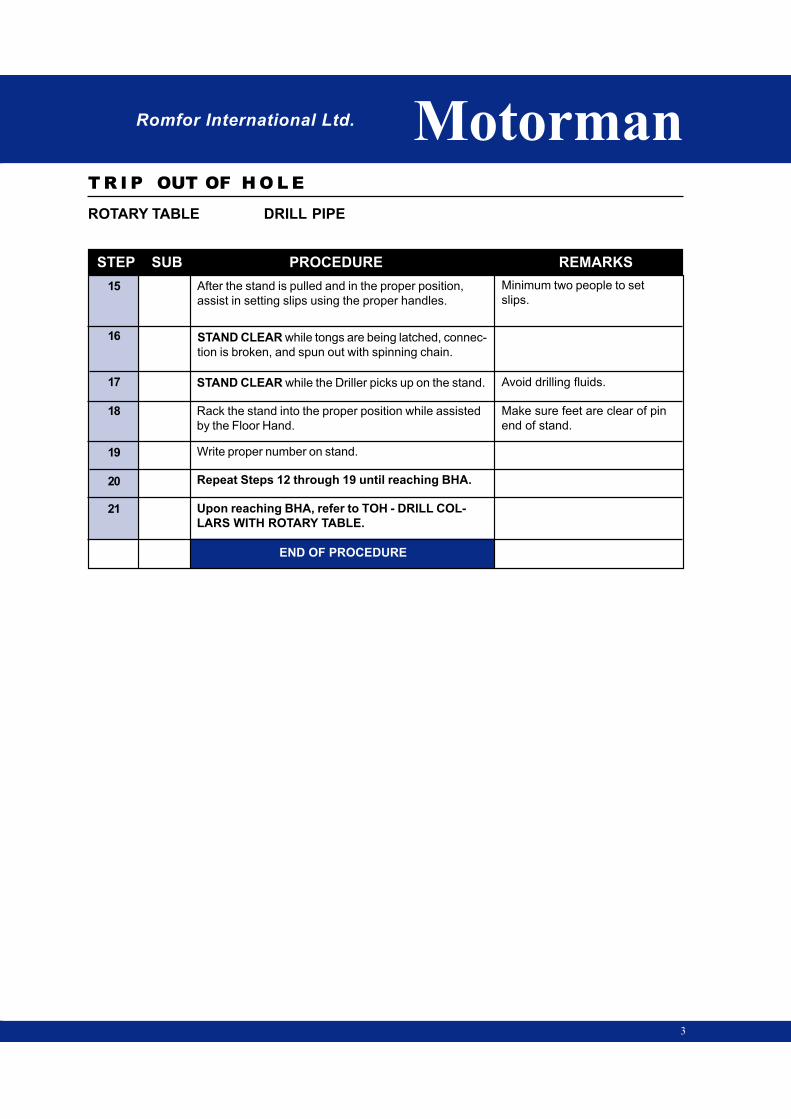
Romfor International Ltd. Motorman
STEP SUB PROCEDURE REMARKS
ROTARY TABLE DRILL PIPE
T R I P OUT OF H O L E
3
STAND CLEAR while tongs are being latched, connec-
tion is broken, and spun out with spinning chain.
STAND CLEAR while the Driller picks up on the stand.
After the stand is pulled and in the proper position,
assist in setting slips using the proper handles.
Minimum two people to set
slips.15
16
17
Rack the stand into the proper position while assisted
by the Floor Hand.
Write proper number on stand.
Repeat Steps 12 through 19 until reaching BHA.
Avoid drilling fluids.
Make sure feet are clear of pin
end of stand.
Upon reaching BHA, refer to TOH - DRILL COL-
LARS WITH ROTARY TABLE.
END OF PROCEDURE
18
19
20
21

Romfor International Ltd.
TRIP OUT OF
HOLE
TRIP OUT OF
HOLE
MotormanMotorman
RO
TA
RY
TA
BL
E
DR
IL
L C
OL
LA
R
ROTARY TABLE
DRILL COLLAR
ROTARY TABLE
DRILL COLLAR
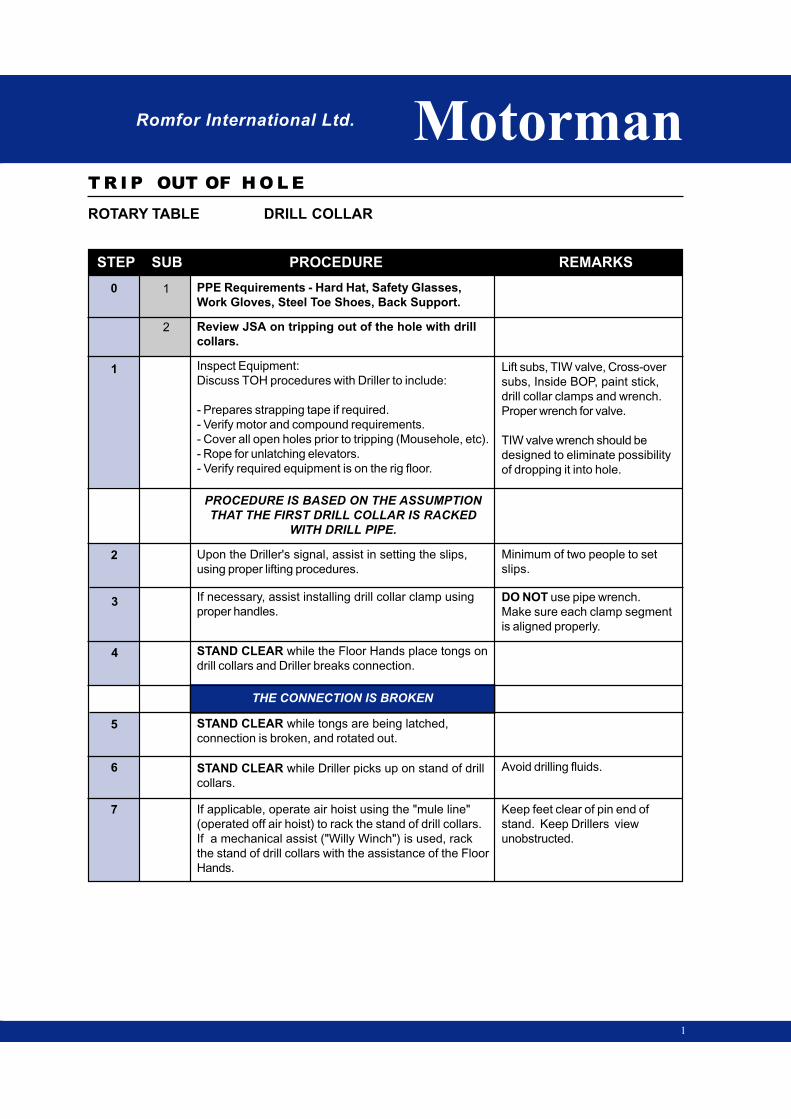
Romfor International Ltd. Motorman
STEP SUB PROCEDURE REMARKS
ROTARY TABLE DRILL COLLAR
T R I P OUT OF H O L E
1
0 1
1
2
2
3
4
5
PPE Requirements - Hard Hat, Safety Glasses,
Work Gloves, Steel Toe Shoes, Back Support.
Review JSA on tripping out of the hole with drill
collars.
Inspect Equipment:
Discuss TOH procedures with Driller to include:
- Prepares strapping tape if required.
- Verify motor and compound requirements.
- Cover all open holes prior to tripping (Mousehole, etc).
- Rope for unlatching elevators.
- Verify required equipment is on the rig floor.
PROCEDURE IS BASED ON THE ASSUMPTION
THAT THE FIRST DRILL COLLAR IS RACKED
WITH DRILL PIPE.
Upon the Driller's signal, assist in setting the slips,
using proper lifting procedures.
If necessary, assist installing drill collar clamp using
proper handles.
STAND CLEAR while the Floor Hands place tongs on
drill collars and Driller breaks connection.
THE CONNECTION IS BROKEN
STAND CLEAR while tongs are being latched,
connection is broken, and rotated out.
Lift subs, TIW valve, Cross-over
subs, Inside BOP, paint stick,
drill collar clamps and wrench.
Proper wrench for valve.
TIW valve wrench should be
designed to eliminate possibility
of dropping it into hole.
Minimum of two people to set
slips.
DO NOT use pipe wrench.
Make sure each clamp segment
is aligned properly.
STAND CLEAR while Driller picks up on stand of drill
collars.
If applicable, operate air hoist using the "mule line"
(operated off air hoist) to rack the stand of drill collars.
If a mechanical assist ("Willy Winch") is used, rack
the stand of drill collars with the assistance of the Floor
Hands.
Avoid drilling fluids.
Keep feet clear of pin end of
stand. Keep Drillers view
unobstructed.
6
7

STEP SUB PROCEDURE REMARKS
Motorman
ROTARY TABLE DRILL COLLAR
T R I P OUT OF H O L E
Romfor International Ltd.
2
Operate air hoist while Floor Hands install lift sub into
drill collar.
Keep eye on traveling equipment while being lowered to
latching position.
When the elevators are stopped and in proper position,
latch elevators around lift sub.
Place rope on elevator latch handle (on first stand).
LIFT SUB CONNECTION IS TIGHTENED
STAND CLEAR while tongs are placed on drill collar
and lift sub as Driller tightens connection.
Watch Floor Hands signals for
directions.
For unlatching purposes of
Derrickman.
Minimum of two people to pull
slips.
8
9
10
11
12
13 After the drill collar clamp is removed, assist in pulling
slips using proper handles. Keep track of number of
collars pulled through the rotary table.
Repeat Steps 2 through 13 for remaining drill collars.
END OF PROCEDURE
14