roland ep-70 manual
DESCRIPTION
Roland Ep-70 Digital Piano ManualTRANSCRIPT

USING THE UNIT SAFELY ...................................................................... 2IMPORTANT NOTES ............................................................................. 4
Main Features of the ep-90/70 ................................................. 5Button Descriptions................................................................... 6Getting Ready .......................................................................... 8
1. Connecting the Power Cord .................................................................................82. Securing the Cord ...................................................................................................83. Connecting the Pedal .............................................................................................94. Turning the Power On and Off ............................................................................95. Adjusting the Volume .........................................................................................106. Setting the Music Stand .......................................................................................107. Connecting Headphones (Sold Separately) ......................................................10
Listening to the Demo Songs ................................................... 11
Playing/Stopping the Demo Songs........................................................................11Selecting a Song for Playback..................................................................................12About the Demo Songs.............................................................................................13
Playing the Keyboard............................................................. 14
Selecting the Instrumental Sound You Wish to Play ...........................................14Layering Two Instrument Sounds—Dual Play ....................................................14Adding Reverberation to the Sound—Reverb Effect...........................................15Adding Breadth to the Sound—Chorus Effect .....................................................16Sounding the Metronome ........................................................................................17
Try Recording Your Performance ............................................ 19
Recording ...................................................................................................................19Listening to the Recorded Performance.................................................................21Deleting Recorded Songs .........................................................................................21
Convenient Functions......................................................................... 22
Disabling Buttons—Panel Lock .............................................................................22Transposing without Changing Your Fingering—Key Transpose ...................22Adjusting the Pitch of the Sound—Master Tuning .............................................23
Connecting to Audio Equipment ......................................................... 24
About the Jacks .........................................................................................................24Making the Connections .........................................................................................24
Connecting to MIDI Devices................................................................ 25
About the MIDI Connectors ...................................................................................25Making the Connections .........................................................................................25Cautions when Connecting an External MIDI Device(Local On/Off and Omni On/Off) ........................................................................26Set the MIDI Channel ..............................................................................................27Transmitting/Receiving Sound Selection Data—Program Change .................28Turning Transmission and Reception of Control Changes On/Off .................29Transmitting Performance Data from MIDI Out .................................................29
Troubleshooting ................................................................................ 30Functions Assigned to the Keyboard .................................................. 31MIDI Implementation Chart................................................................ 32Specifications .................................................................................... 33Index ............................................................................................... 34
DIGITAL PIANO
Copyright © 1999 ROLAND CORPORATIONAll rights reserved. No part of this publication may be reproduced in any form
without the written permission of ROLAND CORPORATION.
Before using this unit, carefully read the sections entitled: “USING THE UNIT SAFELY” (p. 2)and “IMPORTANT NOTES” (p. 4). These sections provide important information concerningthe proper operation of the unit. Additionally, in order to feel assured that you have gained agood grasp of every feature provided by your new unit, Owner’s manual should be read in itsentirety. The manual should be saved and kept on hand as a convenient reference.
Owner’s Manual
USING THE UNIT SAFELY
001• Before using this unit, make sure to read the
instructions below, and the Owner’s Manual.
..........................................................................................................002c• Do not open (or modify in any way) the unit or its
AC adaptor.
..........................................................................................................003• Do not attempt to repair the unit, or replace parts
within it (except when this manual provides specific instructions directing you to do so). Refer all servicing to your retailer, the nearest Roland Service Center, or an authorized Roland distributor, as listed on the “Information” page.
..........................................................................................................004• Never use or store the unit in places that are:
• Subject to temperature extremes (e.g., direct sunlight in an enclosed vehicle, near a heating duct, on top of heat-generating equipment); or are
• Damp (e.g., baths, washrooms, on wet floors); or are
• Humid; or are
• Exposed to rain; or are
• Dusty; or are
• Subject to high levels of vibration...........................................................................................................007• Make sure you always have the unit placed so it is
level and sure to remain stable. Never place it on stands that could wobble, or on inclined surfaces.
..........................................................................................................008c• Be sure to use only the AC adaptor supplied with
the unit. Also, make sure the line voltage at the installation matches the input voltage specified on the AC adaptor’s body. Other AC adaptors may use a different polarity, or be designed for a different voltage, so their use could result in damage, malfunction, or electric shock.
..........................................................................................................
008e• Use only the attached power-supply cord.
..........................................................................................................009• Do not excessively twist or bend the power cord,
nor place heavy objects on it. Doing so can damage the cord, producing severed elements and short circuits. Damaged cords are fire and shock hazards!
..........................................................................................................010• This unit, either alone or in combination with an
amplifier and headphones or speakers, may be capable of producing sound levels that could cause permanent hearing loss. Do not operate for a long period of time at a high volume level, or at a level that is uncomfortable. If you experience any hearing loss or ringing in the ears, you should immediately stop using the unit, and consult an audiologist.
..........................................................................................................011• Do not allow any objects (e.g., flammable material,
coins, pins); or liquids of any kind (water, soft drinks, etc.) to penetrate the unit.
..........................................................................................................012b• Immediately turn the power off, remove the AC
adaptor from the outlet, and request servicing by your retailer, the nearest Roland Service Center, or an authorized Roland distributor, as listed on the “Information” page when:
• The AC adaptor, the power-supply cord, or the plug has been damaged; or
• If smoke or unusual odor occurs
• Objects have fallen into, or liquid has been spilled onto the unit; or
• The unit has been exposed to rain (or otherwise has become wet); or
• The unit does not appear to operate normally or exhibits a marked change in performance.
..........................................................................................................
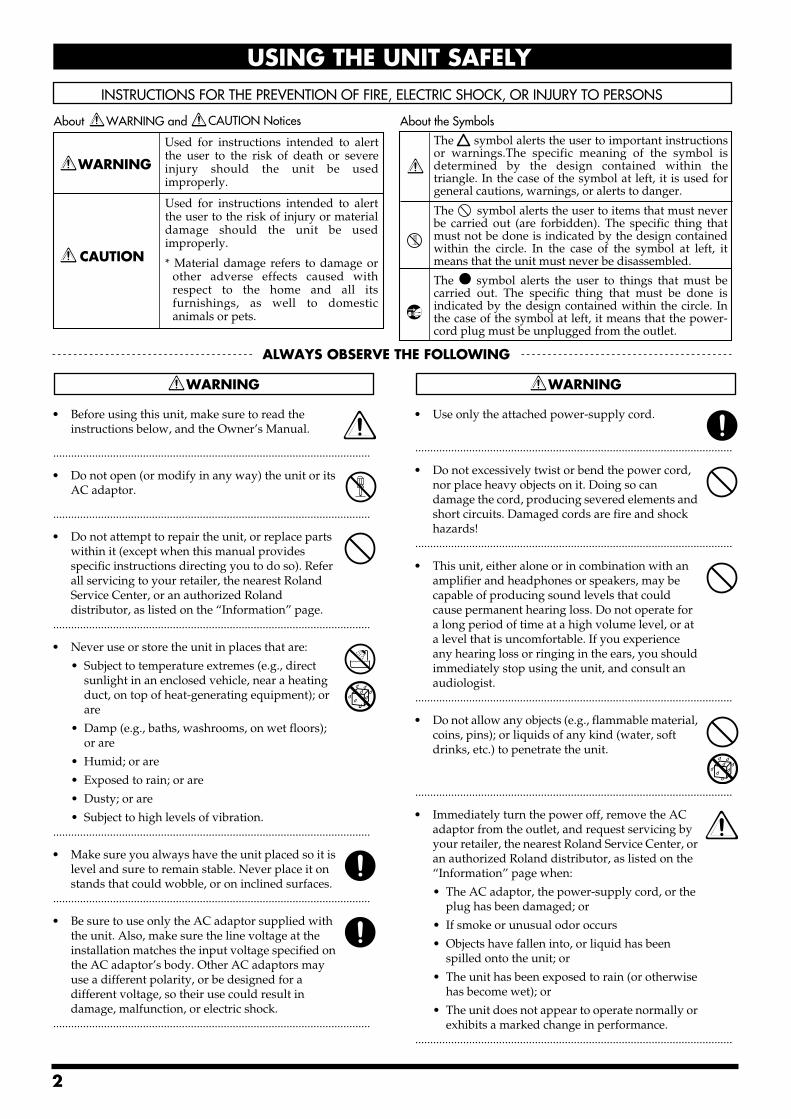
Used for instructions intended to alert the user to the risk of injury or material damage should the unit be used improperly.
* Material damage refers to damage or other adverse effects caused with respect to the home and all its furnishings, as well to domestic animals or pets.
Used for instructions intended to alert the user to the risk of death or severe injury should the unit be used improperly.
The ● symbol alerts the user to things that must be carried out. The specific thing that must be done is indicated by the design contained within the circle. In the case of the symbol at left, it means that the power-cord plug must be unplugged from the outlet.
The symbol alerts the user to important instructions or warnings.The specific meaning of the symbol is determined by the design contained within the triangle. In the case of the symbol at left, it is used for general cautions, warnings, or alerts to danger.
The symbol alerts the user to items that must never be carried out (are forbidden). The specific thing that must not be done is indicated by the design contained within the circle. In the case of the symbol at left, it means that the unit must never be disassembled.
2

013• In households with small children, an adult
should provide supervision until the child is capable of following all the rules essential for the safe operation of the unit.
..........................................................................................................014• Protect the unit from strong impact. (Do not drop it!)
..........................................................................................................015• Do not force the unit’s power-supply cord to share
an outlet with an unreasonable number of other devices. Be especially careful when using extension cords—the total power used by all devices you have connected to the extension cord’s outlet must never exceed the power rating (watts/amperes) for the extension cord. Excessive loads can cause the insulation on the cord to heat up and eventually melt through.
..........................................................................................................016• Before using the unit in a foreign country, consult
with your retailer, the nearest Roland Service Center, or an authorized Roland distributor, as listed on the “Information” page.
101b• The unit and the AC adaptor should be located so
their location or position does not interfere with their proper ventilation.
..........................................................................................................102c• Always grasp only the plug on the AC adaptor
cord when plugging into, or unplugging from, an outlet or this unit.
..........................................................................................................103b• At regular intervals, you should unplug the AC
adaptor and clean it by using a dry cloth to wipe all dust and other accumulations away from its prongs. Also, disconnect the power plug from the power outlet whenever the unit is to remain unused for an extended period of time. Any accumulation of dust between the power plug and the power outlet can result in poor insulation and lead to fire.
..........................................................................................................104• Try to prevent cords and cables from becoming
entangled. Also, all cords and cables should be placed so they are out of the reach of children.
..........................................................................................................106• Never climb on top of, nor place heavy objects on
the unit.
..........................................................................................................107c• Never handle the AC adaptor or its plugs with
wet hands when plugging into, or unplugging from, an outlet or this unit.
..........................................................................................................
108d: Selection• If you need to move the instrument, take note of
the precautions listed below. At least two persons are required to safely lift and move the unit. It should be handled carefully, all the while keeping it level. Make sure to have a firm grip, to protect yourself from injury and the instrument from damage.
1
• Check to make sure the knob bolt securing the unit to the stand have not become loose. Fasten them again securely whenever you notice any loosening.
• Disconnect the power cord.
• Disconnect all cords coming from external devices.
• Remove the music stand...........................................................................................................109b• Before cleaning the unit, turn off the power and
unplug the AC adaptor from the outlet (p. 8).
..........................................................................................................110b• Whenever you suspect the possibility of lightning
in your area, disconnect the AC adaptor from the outlet.
..........................................................................................................
3

IMPORTANT NOTES
291a
In addition to the items listed under “USING THE UNIT SAFELY” on page 2 and 3, please read and observe the following:
Power Supply301• Do not use this unit on the same power circuit with any
device that will generate line noise (such as an electric motor or variable lighting system).
302• The AC adaptor will begin to generate heat after long
hours of consecutive use. This is normal, and is not a cause for concern.
307• Before connecting this unit to other devices, turn off the
power to all units. This will help prevent malfunctions and/or damage to speakers or other devices.
Placement351• Using the unit near power amplifiers (or other equipment
containing large power transformers) may induce hum. To alleviate the problem, change the orientation of this unit; or move it farther away from the source of inter-ference.
352a• This device may interfere with radio and television
reception. Do not use this device in the vicinity of such receivers.
352b• Noise may be produced if wireless communications
devices, such as cell phones, are operated in the vicinity of this unit. Such noise could occur when receiving or initi-ating a call, or while conversing. Should you experience such problems, you should relocate such wireless devices so they are at a greater distance from this unit, or switch them off.
354a• Do not expose the unit to direct sunlight, place it near
devices that radiate heat, leave it inside an enclosed vehicle, or otherwise subject it to temperature extremes. Excessive heat can deform or discolor the unit.
355b• When moved from one location to another where the
temperature and/or humidity is very different, water droplets (condensation) may form inside the unit. Damage or malfunction may result if you attempt to use the unit in this condition. Therefore, before using the unit, you must allow it to stand for several hours, until the condensation has completely evaporated.
358• Do not allow objects to remain on top of the keyboard.
This can be the cause of malfunction, such as keys ceasing to produce sound.
Maintenance401a• For everyday cleaning wipe the unit with a soft, dry cloth
or one that has been slightly dampened with water. To remove stubborn dirt, use a cloth impregnated with a mild, non-abrasive detergent. Afterwards, be sure to wipe the unit thoroughly with a soft, dry cloth.
402• Never use benzine, thinners, alcohol or solvents of any
kind, to avoid the possibility of discoloration and/or deformation.
Additional Precautions553• Use a reasonable amount of care when using the unit’s
buttons, sliders, or other controls; and when using its jacks and connectors. Rough handling can lead to malfunctions.
556• When connecting / disconnecting all cables, grasp the
connector itself—never pull on the cable. This way you will avoid causing shorts, or damage to the cable’s internal elements.
558a• To avoid disturbing your neighbors, try to keep the unit’s
volume at reasonable levels. You may prefer to use headphones, so you do not need to be concerned about those around you (especially when it is late at night).
559a• When you need to transport the unit, package it in the box
(including padding) that it came in, if possible. Otherwise, you will need to use equivalent packaging materials.
560• Do not apply undue force to the music stand while it is in
use.
562• Use a cable from Roland to make the connection. If using
some other make of connection cable, please note the following precautions.
• Some connection cables contain resistors. Do not use cables that incorporate resistors for connecting to this unit. The use of such cables can cause the sound level to be extremely low, or impossible to hear. For infor-mation on cable specifications, contact the manufac-turer of the cable.
220* All product names mentioned in this document are trademarks
or registered trademarks of their respective owners.
4
Main Features of the ep-90/70
Authentic piano performancesHigh-quality concert grand piano sounds, and a keyboard that’s a true pleasure to play assure an even more realistic piano-playing experience.
• Captures the brilliant resonanceThe sound of a grand piano has a more brilliant timbre than that of an upright piano. This is because the sound of a grand piano contains a greater amount of high-frequency components. The piano sounds of the ep-90/70 reproduce this characteristic of the grand piano.
• Reproduces the extended high-frequency responseOne of the features of the acoustic piano is that for the approximately one and a half octaves at the top of the range, there is no damper to restrict the vibration of the strings. This allows the vibration of the string to continue whether or not the damper pedal is pressed. Since this also allows these strings to vibrate sympathetically with other strings, they can sometimes be heard sounding independently from the low and middle-register strings.The ep-90/70 faithfully simulates these characteristics of the acoustic piano.
Eight Tones for use in a wide variety of musical genresThe ep-90/70 features not only piano tones, but eight different internal tones that you can use in a variety of musical genres.
Three Metronome soundsThe ep-90/70 provides a metronome that lets you use three different sounds. You can easily adjust the tempo and time.
Record your own performancesThe ep-90/70 makes it easy to record your own performances.
5
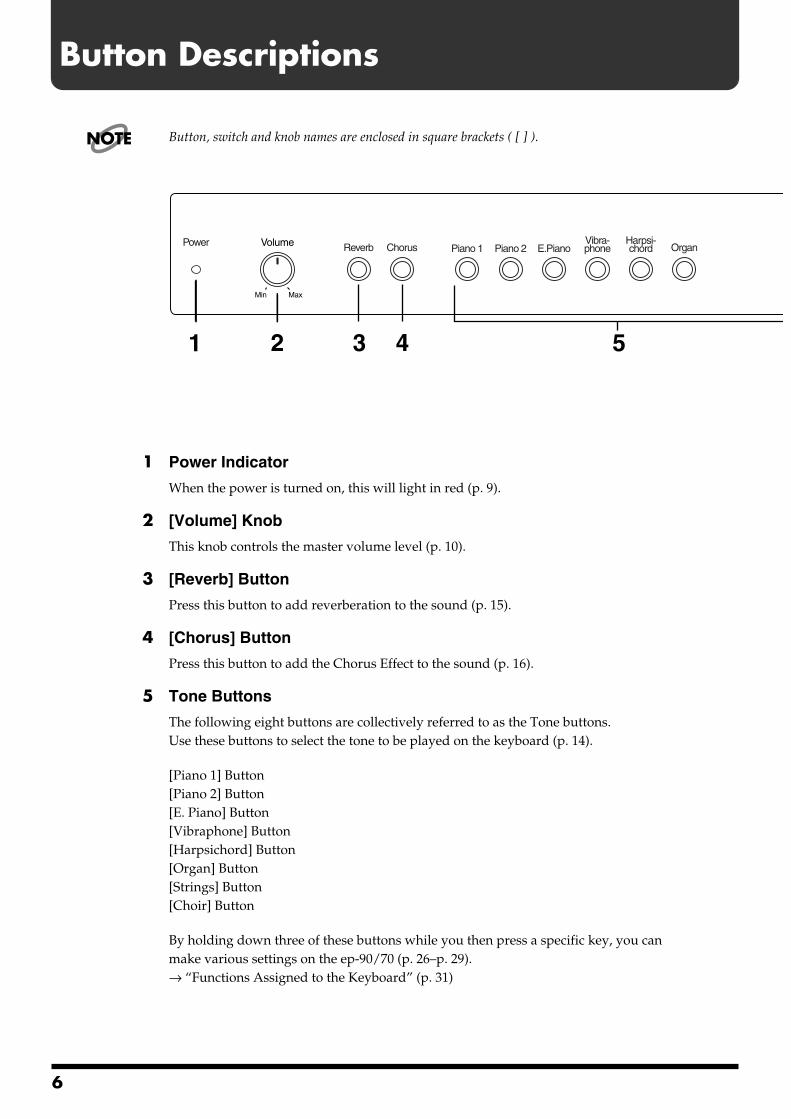
Button Descriptions
Button, switch and knob names are enclosed in square brackets ( [ ] ).
fig.2-01-L
1 Power Indicator
When the power is turned on, this will light in red (p. 9).
2 [Volume] Knob
This knob controls the master volume level (p. 10).
3 [Reverb] Button
Press this button to add reverberation to the sound (p. 15).
4 [Chorus] Button
Press this button to add the Chorus Effect to the sound (p. 16).
5 Tone Buttons
The following eight buttons are collectively referred to as the Tone buttons.Use these buttons to select the tone to be played on the keyboard (p. 14).
[Piano 1] Button[Piano 2] Button[E. Piano] Button[Vibraphone] Button[Harpsichord] Button[Organ] Button[Strings] Button[Choir] Button
By holding down three of these buttons while you then press a specific key, you can make various settings on the ep-90/70 (p. 26–p. 29).→ “Functions Assigned to the Keyboard” (p. 31)
NOTE
51 2 3 4
ChorusReverbPower OrganE.PianoPiano 2Piano 1Vibra-phone
Harpsi-chord
MaxMin
Volume
6

Button Descriptions
fig.2-01-R
6 [Tempo] Knob
Use this knob to adjust the tempo of the metronome (p. 18).
7 [Beat] Knob
Use this knob to select the time of the metronome (p. 18).
8 [Sound] Button
Press this button to change the metronome sound (p. 18).
9 [On/Off] Button
Press this button to switch on or off the metronome (p. 17).
10 [Play] Button
Press this button to play or stop the demo songs, or a recorded performance (p. 11, p. 21).It also is used to start/stop recording (p. 19).
11 [Rec] Button
Press this button to put the instrument in recording standby (p. 19).
12 [Demo] Button
Press this button to access the demo songs (p. 11).By holding down this button while you then press a specific key, you can make various settings on the ep-90/70 (p. 22, p. 23).→ “Functions Assigned to the Keyboard” (p. 31)
Play
6 7 8 9 10 11 12
DemoChoirStrings RecOn/OffSound6
Metronome
42 3
0 6
BeatTempo
120
144
60
80
96 108
40
168192
208
42 3
0 6
7
Getting Ready
NOTE
To prevent malfunction and/or damage to speakers or other devices,
always turn down the volume, and turn off the power on all devices
before making any connections.
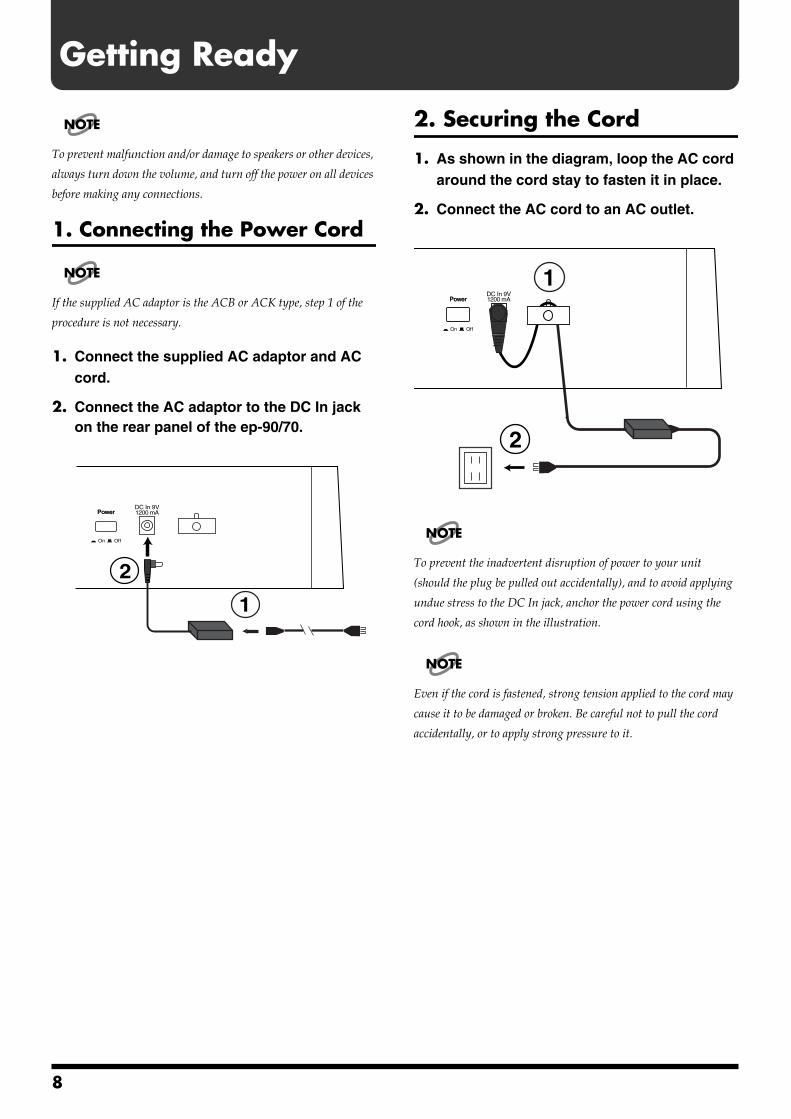
1. Connecting the Power Cord
NOTE
If the supplied AC adaptor is the ACB or ACK type, step 1 of the
procedure is not necessary.
1. Connect the supplied AC adaptor and AC cord.
2. Connect the AC adaptor to the DC In jack on the rear panel of the ep-90/70.
fig.3-01
2. Securing the Cord
1. As shown in the diagram, loop the AC cord around the cord stay to fasten it in place.
2. Connect the AC cord to an AC outlet.
fig.3-02
NOTE
To prevent the inadvertent disruption of power to your unit
(should the plug be pulled out accidentally), and to avoid applying
undue stress to the DC In jack, anchor the power cord using the
cord hook, as shown in the illustration.
NOTE
Even if the cord is fastened, strong tension applied to the cord may
cause it to be damaged or broken. Be careful not to pull the cord
accidentally, or to apply strong pressure to it.
2
1
DC In 9V1200 mAPowerPower
On Off
2
1Power
DC In 9V1200 mAPower
On Off
8
Getting Ready
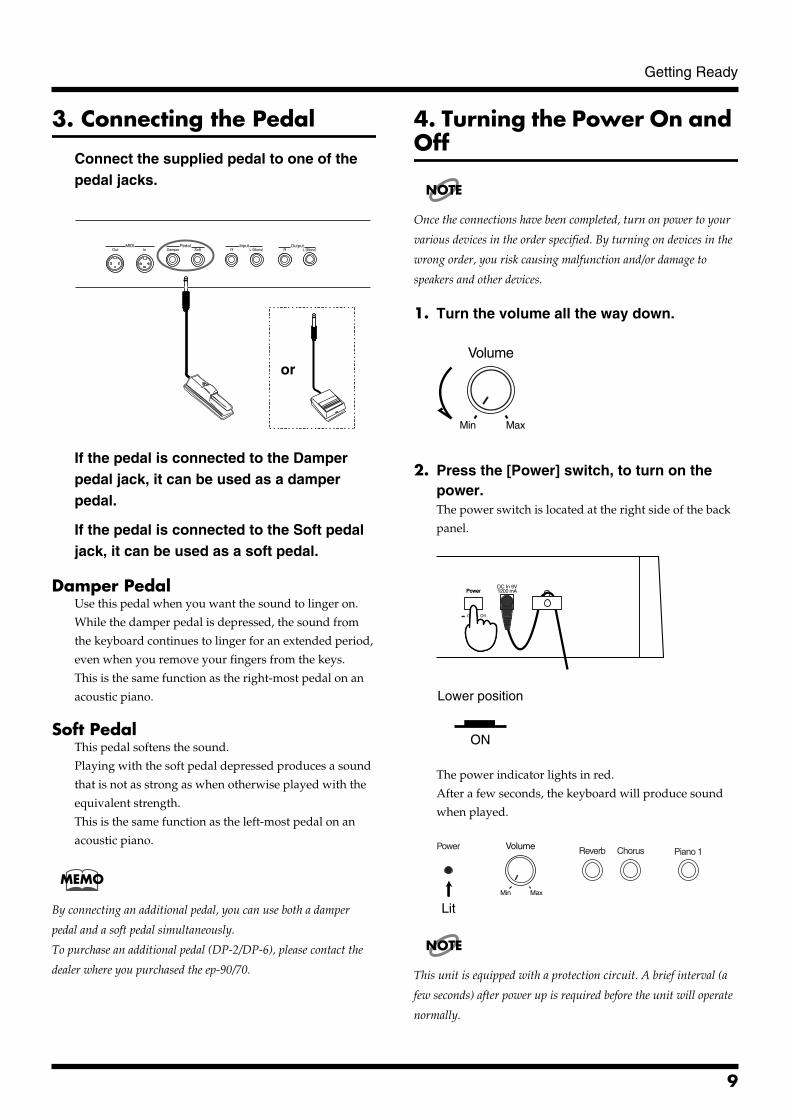
3. Connecting the Pedal
Connect the supplied pedal to one of the pedal jacks.
fig.3-03
If the pedal is connected to the Damper pedal jack, it can be used as a damper pedal.
If the pedal is connected to the Soft pedal jack, it can be used as a soft pedal.
Damper PedalUse this pedal when you want the sound to linger on.
While the damper pedal is depressed, the sound from
the keyboard continues to linger for an extended period,
even when you remove your fingers from the keys.
This is the same function as the right-most pedal on an
acoustic piano.
Soft PedalThis pedal softens the sound.
Playing with the soft pedal depressed produces a sound
that is not as strong as when otherwise played with the
equivalent strength.
This is the same function as the left-most pedal on an
acoustic piano.
MEMO
By connecting an additional pedal, you can use both a damper
pedal and a soft pedal simultaneously.
To purchase an additional pedal (DP-2/DP-6), please contact the
dealer where you purchased the ep-90/70.
4. Turning the Power On and Off
NOTE
Once the connections have been completed, turn on power to your
various devices in the order specified. By turning on devices in the
wrong order, you risk causing malfunction and/or damage to
speakers and other devices.
1. Turn the volume all the way down.fig.3-04
2. Press the [Power] switch, to turn on the power.The power switch is located at the right side of the back
panel.fig.3-05
fig.3-06.e
The power indicator lights in red.
After a few seconds, the keyboard will produce sound
when played.fig.3-07.e
NOTE
This unit is equipped with a protection circuit. A brief interval (a
few seconds) after power up is required before the unit will operate
normally.
or
MIDIOut In
OutputInputPedalDamper R RSoft L (Mono) L (Mono)
MaxMin
Volume
PowerDC In 9V1200 mAPower
On Off
ON
Lower position
ChorusReverbPowerPiano 1
MaxMin
Volume
Lit
9

Getting Ready
■ Turning Off the Power1. Turn the volume all the way down.fig.3-04
2. Press the [Power] switch to turn off the power.The power switch is located at the right side of the back
panel.
The Power indicator goes out.fig.3-08.e
5. Adjusting the Volume
Use the [Volume] knob to adjust the volume.
fig.3-09.e
6. Setting the Music Stand
Assemble the music stand as shown in the diagram.
fig.2-02
NOTE
Before moving the ep-90/70, be sure to remove the music stand as a
safety precaution.
7. Connecting Headphones (Sold Separately)
The ep-90/70 features two headphone jacks. This allows two
people to listen through headphones simultaneously, making
it very useful for lessons and when performing piano pieces
for four hands. Additionally, this allows you to play without
having to worry about bothering others around you, even at
night.fig.2-03
1. Turn the volume all the way down.
2. Connect the headphones to either of the headphone jacks.
3. Adjust the volume.Sound will no longer be heard from the ep-90/70’s
speakers. Sound will be heard only through the
headphones.
NOTE
Please use stereo headphones.
MaxMin
Volume
OFF
Upper position
MaxMin
Volume
1
2PHONES
10
Listening to the Demo Songs
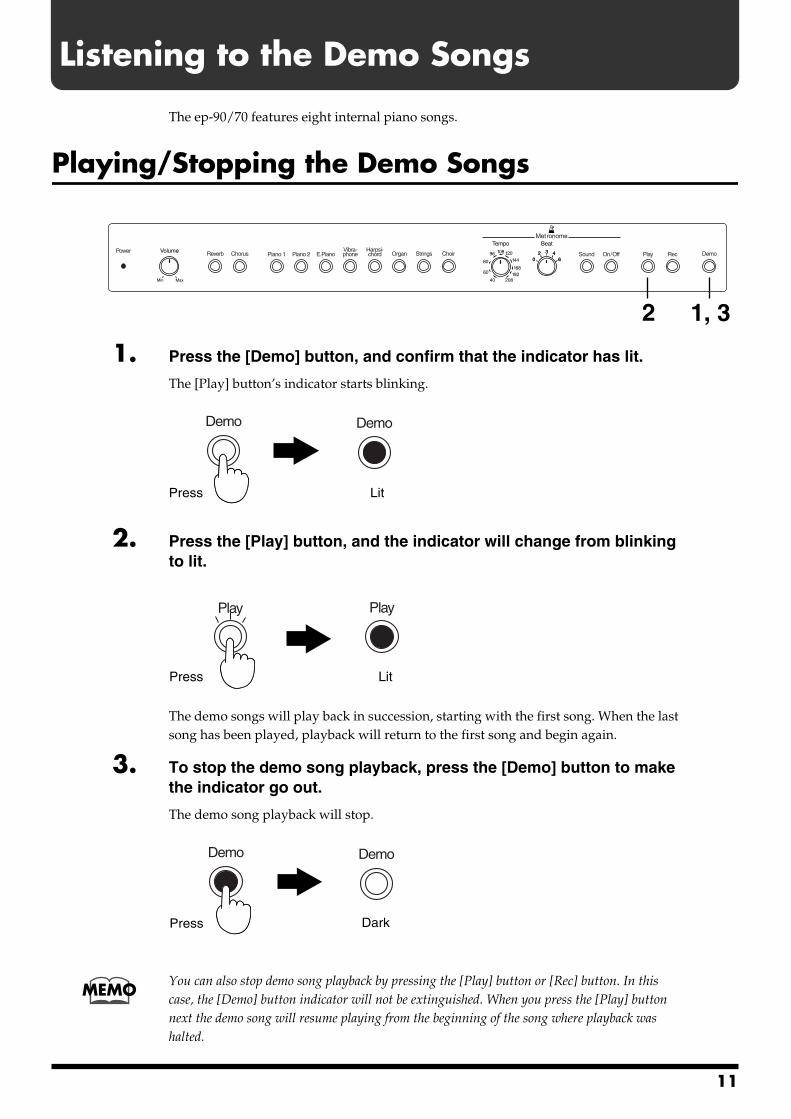
The ep-90/70 features eight internal piano songs.
Playing/Stopping the Demo Songsfig.4-01
1. Press the [Demo] button, and confirm that the indicator has lit.
The [Play] button’s indicator starts blinking.fig.4-02.e
2. Press the [Play] button, and the indicator will change from blinking to lit.
fig.4-03.e
The demo songs will play back in succession, starting with the first song. When the last song has been played, playback will return to the first song and begin again.
3. To stop the demo song playback, press the [Demo] button to make the indicator go out.
The demo song playback will stop.fig.4-04.e
You can also stop demo song playback by pressing the [Play] button or [Rec] button. In this case, the [Demo] button indicator will not be extinguished. When you press the [Play] button next the demo song will resume playing from the beginning of the song where playback was halted.
1, 32
DemoChorusReverbPower ChoirStringsOrganE.PianoPiano 2Piano 1 PlayOn/OffSound RecVibra-phone
Harpsi-chord
Metronome
MaxMin
Volume 42 3
0 6
BeatTempo
120
144
60
80
96 108
40
168192
208
42 3
0 6
Demo Demo
Press Lit
Play Play
Press Lit
Demo Demo
Press Dark
MEMO
11
Listening to the Demo Songs
It is not possible to change the tempo of a demo song.
If you press the [Demo] button while the metronome is sounding (p. 17), the metronome will stop sounding. It is not possible to sound the metronome while a demo song is playing.
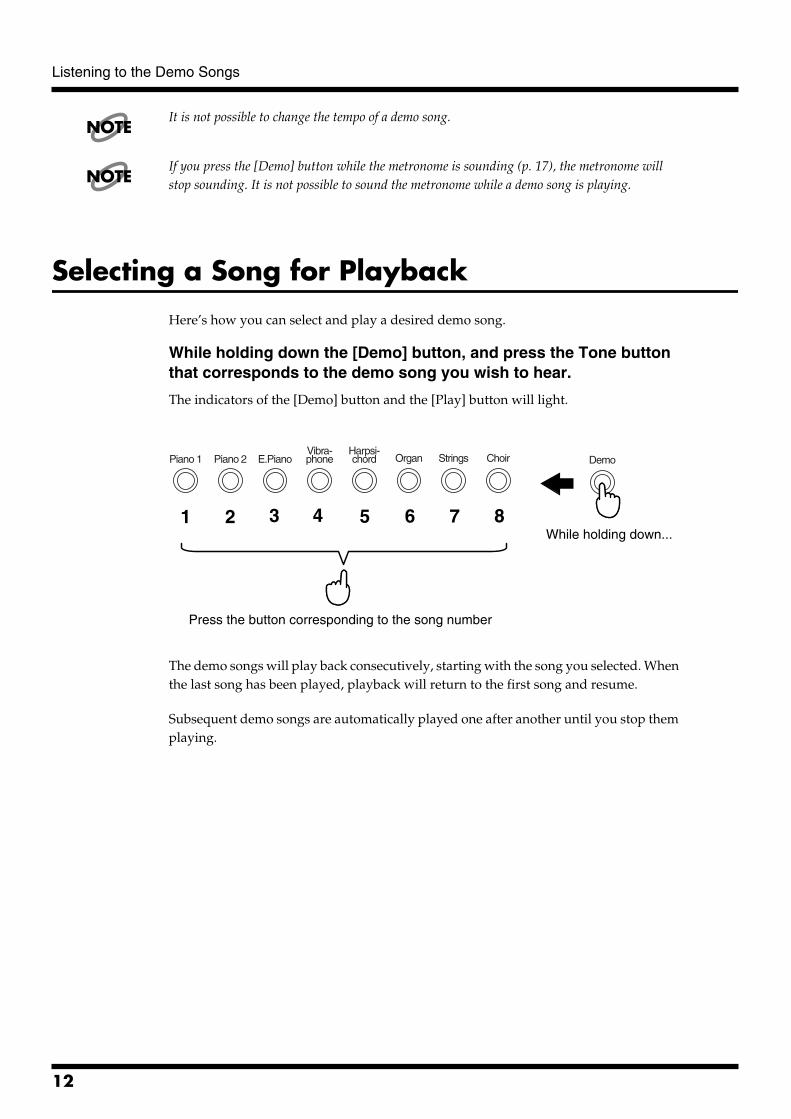
Selecting a Song for Playback
Here’s how you can select and play a desired demo song.
While holding down the [Demo] button, and press the Tone button that corresponds to the demo song you wish to hear.
The indicators of the [Demo] button and the [Play] button will light.
fig.4-05.e(Press the button corresponding to the song number)
The demo songs will play back consecutively, starting with the song you selected. When the last song has been played, playback will return to the first song and resume.
Subsequent demo songs are automatically played one after another until you stop them playing.
NOTE
NOTE
1 2 3 4 5 6 7 8
DemoChoirStringsOrganE.PianoPiano 2Piano 1Vibra-phone
Harpsi-chord
While holding down...
Press the button corresponding to the song number
12

Listening to the Demo Songs
About the Demo Songs
No. Title Composer Copyright
1 Little White Room Scott Wilkie ©1998 Scott Wilkie Media (ASCAP)
2 Valse No. 1 in E-flat Major, Op. 18 “Grand Valse Brillante”Frederic Chopin ©1998 Roland Corporation
3 “From Foreign Lands And People” from “Scenes From Childhood” Op. 15Robert Schumann ©1998 Roland Corporation
4 Nocturne No. 2 in E-flat Major, Op. 9-2 Frederic Chopin ©1998 Roland Corporation
5 Rhapsody No. 2, Op. 79 J. Brahms ©1998 Roland Corporation
6 Slavonic Dance No. 10, Op. 72-2 A. Dvoˇrák ©1998 Roland Corporation
7 Etude Op. 25-1 in A-flat Major “The Shepherd Boy”Frederic Chopin ©1998 Roland Corporation
8 Fly Free John Maul ©1998 Roland Corporation
All rights reserved. Unauthorized use of this material for purposes other than private, personal enjoyment is a violation of applicable laws.
No data for the music that is played will be output from MIDI Out.
■ Profiles of ComposersScott Wilkie
Scott Wilkie is a contemporary jazz recording artist, based in southern California. He tours frequently with his own band, and also appears as an artist for Roland in the U.S., Japan, Europe and South America. His debut solo album, Boundless, was released worldwide in 1999 on Narada/Virgin Records. You can find him on-line at www.scottwilkie.com.
John MaulJohn Maul is a musician, composer and arranger having graduated from the Royal Academy of Music in London. John’s work encompasses studio recordings and live performances, including work with top UK Jazz artists.His writing credits include commercial music for BBC radio and television, as well as scoring jazz and classical works. Having been a product specialist for Roland U.K., John is now actively involved in music software composing/programming for both Roland Japan and various music publishers. Quite recently his “Musical Picture Book,” a volume of original piano music encompassing all standards of musical ability, which included the piano and orchestral accompaniment data in SMF format, was published and printed.
NOTE
NOTE
13

Playing the Keyboard
Selecting the Instrumental Sound You Wish to Play
The ep-90/70 allows you to play using eight different sounds including piano.The ep-90/70’s sounds are called “Tones.”Use the eight Tone buttons to select tones.When the ep-90/70 is turned on, the tone is reset to “Piano 1”.
fig.5-01.e
Press any Tone button.
When you play the keyboard, the selected tone is played.
Tone Name Description
Piano 1 bright piano soundPiano 2 mellow piano soundE. (Electric) Piano electric piano soundVibraphone vibraphone soundHarpsichord harpsichord soundOrgan pipe organ soundStrings the sound of a string instrument ensembleChoir the sound of a vocal ensemble
Layering Two Instrument Sounds—Dual Play
Playing with two different tones on the keyboard simultaneously is called “Dual Play.”fig.5-02.e
1. While holding down the [Piano 1] button, press the [Strings] button.
When you play the keyboard, both the Piano 1 and Strings tones are layered.In this way, you can hold down one Tone button and press another Tone button to layer two sounds for playing together.
2. To cancel the Dual Play, press any Tone button.
When you play the keyboard, only the sound of the button you pressed will be heard.
Tone Buttons
DemoChorusReverbPower ChoirStringsOrganE.PianoPiano 2Piano 1 PlayOn/OffSound RecVibra-phone
Harpsi-chord
Metronome
MaxMin
Volume 42 3
0 6
BeatTempo
120
144
60
80
96 108
40
168192
208
42 3
0 6
ChoirStringsOrganE.PianoPiano 2Piano 1Vibra-phone
Harpsi-chord
While holding down Press
14
Playing the Keyboard
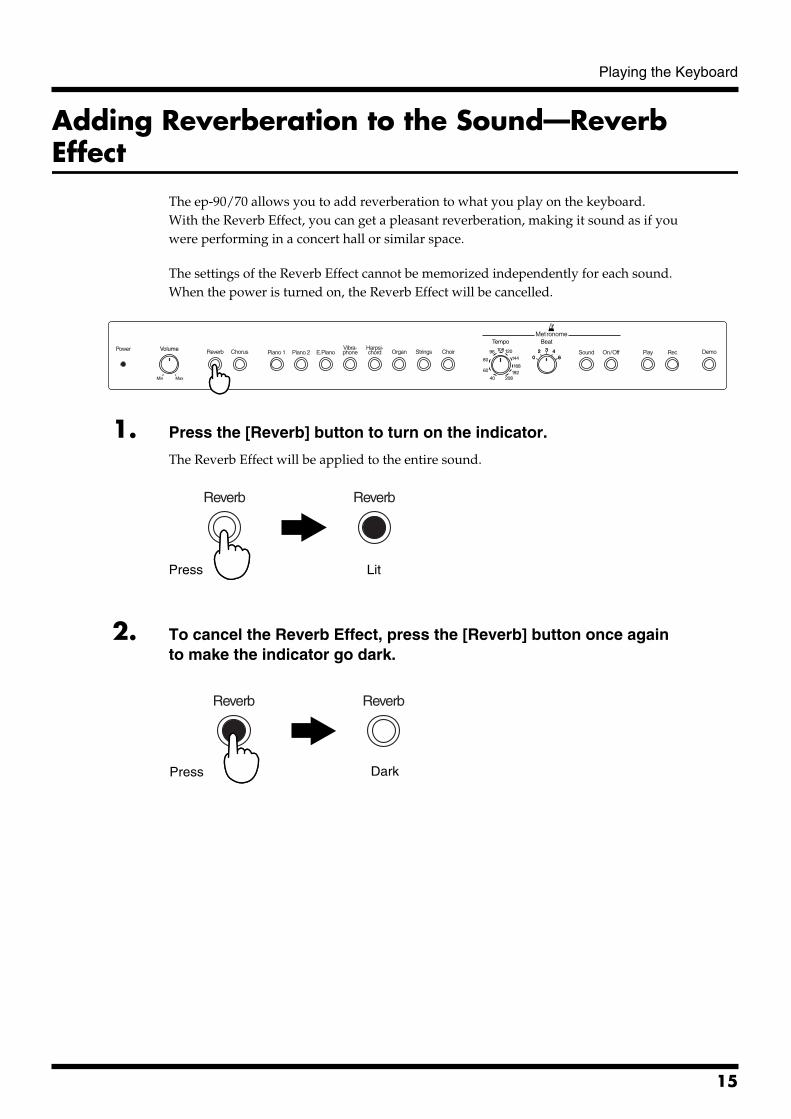
Adding Reverberation to the Sound—Reverb Effect
The ep-90/70 allows you to add reverberation to what you play on the keyboard.With the Reverb Effect, you can get a pleasant reverberation, making it sound as if you were performing in a concert hall or similar space.
The settings of the Reverb Effect cannot be memorized independently for each sound.When the power is turned on, the Reverb Effect will be cancelled.
fig.5-03
1. Press the [Reverb] button to turn on the indicator.
The Reverb Effect will be applied to the entire sound.fig.5-05.e
2. To cancel the Reverb Effect, press the [Reverb] button once again to make the indicator go dark.
fig.5-04.e
DemoChorusReverbPower ChoirStringsOrganE.PianoPiano 2Piano 1 PlayOn/OffSound RecVibra-phone
Harpsi-chord
Metronome
MaxMin
Volume 42 3
0 6
BeatTempo
120
144
60
80
96 108
40
168192
208
42 3
0 6
ReverbReverb
Press Lit
ReverbReverb
Press Dark
15
Playing the Keyboard
Adding Breadth to the Sound—Chorus Effect
The ep-90/70 allows you to add chorus to what you play on the keyboard.By adding the Chorus Effect, you can give the sound greater dimension, with more fatness and breadth. The settings of the Chorus Effect are memorized independently for each sound.When the power is turned on, the Chorus Effect will be applied to the “E.Piano” and “Vibraphone” sounds. The Chorus Effect will be turned off for the other sounds.
fig.5-06
1. Press the [Chorus] button to turn on the indicator.
The Chorus Effect will be applied to the currently selected sound.fig.5-07.e
When you select a sound for which the Chorus Effect has not been turned on, the [Chorus] button indicator will go dark.
2. To cancel the Chorus Effect, press the [Chorus] button once again to make the indicator go dark.
fig.5-08.e
When playing in Dual Play mode (p. 14), turning the [Chorus] button indicator on/off will switch the Chorus Effect on/off for both sounds. When you cancel Dual Play mode, you will return to the Chorus Effect setting that was stored for each sound.When playing in Dual Play mode, the on/off status of the [Chorus] button is not stored in memory.
Switching [Chorus] on/off will affect only the music you play on the ep-90/70’s keyboard. If you press the [Chorus] button during playback of a demo song or a recorded performance, it has no effect.
DemoChorusReverbPower ChoirStringsOrganE.PianoPiano 2Piano 1 PlayOn/OffSound RecVibra-phone
Harpsi-chord
Metronome
MaxMin
Volume 42 3
0 6
BeatTempo
120
144
60
80
96 108
40
168192
208
42 3
0 6
Chorus Chorus
Press Lit
Chorus Chorus
Press Dark
MEMO
MEMO
16

Playing the Keyboard
Sounding the Metronome
You can start or stop the metronome with a single button.In addition to adjusting the tempo and time, you can also change the sound and volume of the metronome.
fig.5-09
1. Press the [On/Off] button, and the metronome will begin sounding.
fig.5-10.e
The [On/Off] button indicator will blink in red and green in time with the currently selected time. It will blink in red on the downbeats, and in green on the upbeats. If the [Beat] knob is in the “0” position, the indicator will blink in green.
2. When you press the [On/Off] button once again to make the indicator go dark, the metronome will stop sounding.
fig.5-11.e
■ Adjusting the Metronome VolumeThe metronome volume can be adjusted in 8 levels.The metronome volume is set to “4” when the keyboard is turned on.
While holding down the [On/Off] button, also press any Tone button.
fig.5-12.e
DemoChorusReverbPower ChoirStringsOrganE.PianoPiano 2Piano 1 PlayOn/OffSound RecVibra-phone
Harpsi-chord
Metronome
MaxMin
Volume 42 3
0 6
BeatTempo
120
144
60
80
96 108
40
168192
208
42 3
0 6
On/Off On/Off
Press Blinks alternatelyin red and green
On/Off On/Off
Press Dark
ChoirStringsOrganE.PianoPiano 2Piano 1Vibra-phone
Harpsi-chord On/Off
PressWhile holding down...
Increase the volumeDecrease the volume1 2 3 4 5 6 7 8
17

Playing the Keyboard
■ Changing the Metronome Tempo
The metronome tempo is adjusted by the [Tempo] knob.
You can select a tempo in the range of 40–208.fig.5-13.e (Tempo becomes slower/Tempo becomes faster)
■ Changing the Time of the Metronome
Use the [Beat] knob to select the time of the metronome.
You can select from the following five types: 0 (only upbeat sounds), 2 (2-beat), 3 (3-beat), 4 (4-beat), 6 (6-beat).
fig.5-14
■ Changing the Metronome SoundYou can select from three types of metronome sound: “conventional metronome sound,” “electronic metronome sound,” and “dog and cat sounds.”“Conventional metronome sound” is the power-on default for the metronome sound.
1. Press the [On/Off] button to sound the Metronome.
2. Press the [Sound] button.
Each time you press the button, the metronome sound will change to the next choice available, either “conventional metronome sound,” “electronic metronome sound,” or “dog and cat sounds.”
fig.5-15
On/OffSound
Metronome
42 3
0 6
BeatTempo
120
144
60
80
96 108
40
168192
208
42 3
0 6
On/OffSound
Metronome
42 3
0 6
BeatTempo
120
144
60
80
96 108
40
168192
208
42 3
0 6
On/OffSound
Metronome
42 3
0 6
BeatTempo
120
144
60
80
96 108
40
168192
208
42 3
0 6
18
Try Recording Your Performance
You can record what you play on your piano.
When you record, pay attention to the setting of the [Tempo] knob. Be sure to set it to the tempo at which you wish to record.
Only one song can be recorded on the ep-90/70. If a previously recorded performance exists, it will be erased the moment you begin recording another performance.
The performance data that you recorded will disappear when the power of the ep-90/70 is turned off.
After approximately 5,000 notes have been recorded, the [Play] button’s and [Rec] button’s indicators will go out, and recording will end automatically.
Recordingfig.6-01
1. Use the Tone buttons to select the sound with which you wish to perform (p. 14).
You can changes the tones during the recording of the song.
2. Press the [On/Off] button to turn on the indicator.
The metronome will sound.fig.5-10.e
While listening to the metronome, select the tempo and time of the song that you wish to record.
3. Use the [Tempo] knob to select the basic tempo for the song.
Moving the [Tempo] knob after recording has begun will not change the tempo.fig.6-03
MEMO
NOTE
NOTE
NOTE
1 23 4 7 5
DemoChorusReverbPower ChoirStringsOrganE.PianoPiano 2Piano 1 PlayOn/OffSound RecVibra-phone
Harpsi-chord
Metronome
MaxMin
Volume 42 3
0 6
BeatTempo
120
144
60
80
96 108
40
168192
208
42 3
0 6
On/Off On/Off
Press Blinks alternatelyin red and green
Tempo
120
144
60
80
96 108
40
168192
208
19
Try Recording Your Performance
4. Use the [Beat] knob to select the time for the song.
The time of the song cannot be changed during or after recording.fig.6-04
5. Press the [Rec] button to turn on the indicator.
The keyboard is put in record standby mode.The [Play] button’s indicator flashes.
fig.6-05.e
If you want to cancel the recording, then press the [Rec] button once more to make the indicator dark.
If you wish to stop the metronome, press the [On/Off] button to make the indicator go dark.
In the beginning it is probably a good idea to listen to the metronome as you record.The sound of the metronome is not recorded.
6. Recording will begin when you play a note on the keyboard.
The [Play] button indicator will change from blinking to lit.Listen to the metronome, and play along with the tempo.
fig.6-06
Instead of playing the keyboard, you can also begin recording by pressing the [Play] button to make the indicator light. In this case, you will hear a two-measure count before recording begins.
7. When you are finished recording, press the [Play] button to make the indicator go dark.
fig.6-07.e
42 3
0 6
Beat
42 3
0 6
RecRec
Press Lit
PlayPlay
Press Dark
20

Try Recording Your Performance
You can use the following methods to save the recorded performance on the external devices.- Connect an audio device to the ep-90/70, and record your performance on a cassette tape or
other media (p. 24).- Connect a MIDI sequencer, and record the performance on the sequencer (p. 25).
Listening to the Recorded Performance
Listen to the performance you recorded.
1. Press the [Play] button to make the indicator light.
The performance you recorded will play back. When the recorded performance ends, the [Play] button indicator will go dark, and playback will stop.
fig.6-08.e
2. If you wish to stop playback during the performance, press the [Play] button to make the indicator go dark.
fig.6-07.e
If the metronome is sounding while the performance plays back, the playback will begin after a two-measure count.
Deleting Recorded Songs
You can delete recorded songs in their entirety.
1. While pressing the [Play] button, also press the [Rec] button.
This deletes the recorded song.fig.6-10.e
MEMO
PlayPlay
Press Lit
PlayPlay
Press Dark
MEMO
Play Rec
While holding down... Press
21
Convenient Functions
Disabling Buttons—Panel Lock
By using the Panel Lock function, you can disable the buttons
with the exception of certain operations. This is a convenient
way to prevent buttons from being pressed inadvertently,
changing the settings.
When the panel is locked, the following operations can be
performed.
- Play using the piano sound
- Key Transpose
- Master Tuning (p. 23)
1. Before switching the power on, turn the volume all the way down.
fig.7-01
2. While holding down the [Piano 1] button, press the [Power] switch.
fig.7-02.e
3. Adjust the volume.Playing the keyboard now produces a Piano 1 sound.
It will not be possible to switch to another sound.
4. Switching the power off and back on again releases the panel lock and returns the ep-90/70 to its usual state.
MEMO
If you turn on the power while holding down the Metronome [On/
Off] button, it will also be possible to sound the metronome. You
will also be able to adjust the metronome tempo, time, volume, and
sound.
Transposing without Changing Your Fingering—Key Transpose
You can play in a different key—without changing the keys
you are playing.
When playing in a difficult key with many (sharps) or
(flats), you can transpose the keyboard to play in an easier
key.
Key transpositions remain in effect until the keyboard’s
power is turned off.
■ <Ex.>Using the C Major Keys to Play a Song in E Major
1. While holding down the [Demo] button, press the tonic (root) of the key to which you want to transpose. Use the C2–B2 notes to select the key.
→ For the notes that correspond to each setting, refer to “Functions Assigned to the Keyboard” (p. 31).
Here, press the E2 key.fig.7-03.e
2. To return to the previous condition, while holding down the [Demo] button, press the C2 key.
fig.7-04.e
NOTE
The transposition setting is effective only on sounds performed on the ep-90/70’s keyboard. This setting is not effective on tones from external MIDI messages played on the ep-90/70.
MaxMin
Volume
PowerPiano 1
While holding down ONE2
C2 B2
Demo
While holding downPress
C2
Demo
While holding downPress
22

Convenient Functions
Adjusting the Pitch of the Sound—Master Tuning
In situations such as when playing in ensemble with other
instruments, you can adjust the ep-90/70’s reference pitch to
that of another instrument.
Middle A is generally used as the standard reference pitch
for tuning instruments.
When playing in ensemble with other instruments, set each
instrument to the same reference pitch to ensure that you
will be in tune with each other. This tuning of all the
instruments to a reference pitch is called “Master Tuning.”
“440.0 Hz” is the power-on default for the reference pitch.
MEMO
By holding down the [Demo] and [Sound] buttons, and pressing
the corresponding note, you can hear a reference tone (Middle A) as
you adjust the pitch.
■ Lowering/ raising the Reference PitchWhile holding down the [Demo] button, press the “C4” note to lower the reference pitch, or the “D4” note to raise it.
→ For the notes that correspond to each setting, refer to
“Functions Assigned to the Keyboard” (p. 31).fig.7-05.e
Each time you press the “C4” key, the pitch will fall by
0.1 Hz. If you continue holding the key, the pitch will
continue falling.
Each time you press the “D4” key, the pitch will rise by
0.1 Hz. If you continue holding the key, the pitch will
continue rising.
■ Setting the Reference Pitch to 440.0 HzWhile holding down the [Demo] button, press the “C#4” key on the keyboard.
→ For the notes that correspond to each setting, refer to
“Functions Assigned to the Keyboard” (p. 31).fig.7-05.e
The reference pitch will be set to 440.0 Hz. This is the
most commonly used setting. The A4 (Middle A) key
will sound at 440.0 Hz.
■ Setting the Reference Pitch to 442.0 HzWhile holding down the [Demo] button, press the “D#4” key on the keyboard.
→ For the notes that correspond to each setting, refer to
“Functions Assigned to the Keyboard” (p. 31).fig.7-05.e
The standard pitch will be set to 442.0 Hz. This setting is
often used for concert pianos. The A4 (Middle A) key
will sound at 442.0 Hz.
C4 D4
Demo
While holding down
Press
Lowerthe pitch
Raisethe pitch
C#4
Demo
While holding down Press
D#4
Demo
While holding down Press
23

Connecting to Audio Equipment
Read this chapter if you wish to connect the ep-90/70 to an
audio device.
By connecting the ep-90/70 with an audio device, you can
listen to the sound of the ep-90/70 through the speakers of
the audio device, or record your performance onto a cassette
tape or other recording media.
About the Jacksfig.8-01
Output JacksUse audio cables (sold separately) to connect the ep-90/70 to
an audio device so that the sound of the ep-90/70 can be hear
from the speakers of the audio device, or so that your
performance can be recorded on a cassette tape or other
recording media.
Input JacksYou can use audio cables (sold separately) to connect another
audio producing device to the ep-90/70, and hear its sound
through the speakers of the ep-90/70.
Making the Connections
NOTE
To prevent malfunction and/or damage to speakers or other devices, always turn down the volume, and turn off the power on all devices before making any connections.
1. Turn the volume down completely on all equipment.
2. Turn off the ep-90/70 and any other devices to be connected.
3. Use audio cables (sold separately) to connect the other device to the ep-90/70.
NOTE
If the device you are connecting is monaural, connect it to the L (Mono) jack. In this case, do not connect the R jack of the ep-90/70.
NOTE
Use a cable from Roland to make the connection. If using some other make of connection cable, please note the following precautions.Some connection cables contain resistors. Do not use cables that incorporate resistors for connecting to this unit. The use of such cables can cause the sound level to be extremely low, or impossible
to hear. For information on cable specifications, contact the manufacturer of the cable.
NOTE
Once the connections have been completed, turn on power to your various devices in the order specified. By turning on devices in the wrong order, you risk causing malfunction and/or damage to speakers and other devices.
■ Listening to the ep-90/70 through the speakers of an audio device, or recording a performance onto a cassette tape or other media
fig.8-02
1. Turn on the power to the ep-90/70.
2. Turn on the power to the connected equipment.
3. Adjust the volume.
Recording procedure1. Connect the ep-90/70 and the audio device.
2. Start recording on the connected audio device.
3. Begin playing on the ep-90/70.
4. When you finish playing, stop recording.
■ Listening to the sound of an audio device through the speakers of the ep-90/70
fig.8-03
1. Turn on the power to the connected equipment.
2. Turn on the power to the ep-90/70.
3. Adjust the volume.
MIDIOut In
OutputInputPedalDamper R RSoft L (Mono) L (Mono)
ep-90/70
Input R/L(Line In, Aux In)
MIDIOut In
OutputInputPedalDamper R RSoft L (Mono) L (Mono)
ep-90/70
Output R/L(Line Out)
MIDIOut In
OutputInputPedalDamper R RSoft L (Mono) L (Mono)
24
Connecting to MIDI Devices
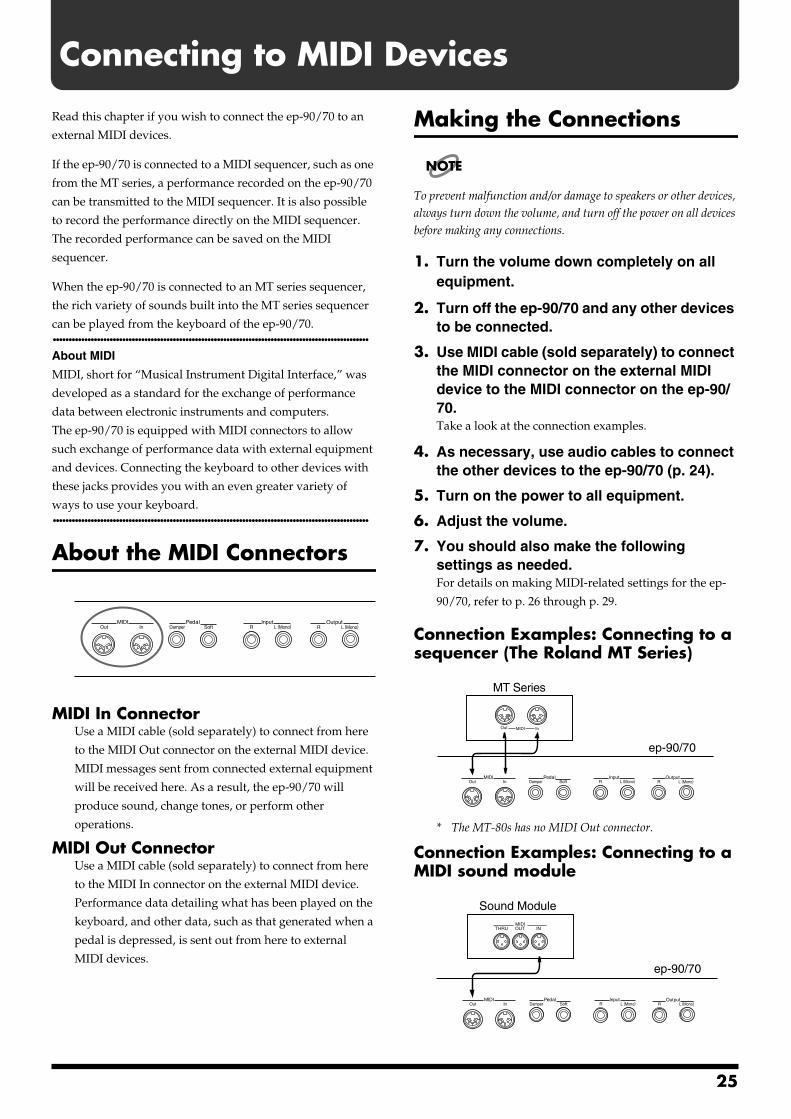
Read this chapter if you wish to connect the ep-90/70 to an
external MIDI devices.
If the ep-90/70 is connected to a MIDI sequencer, such as one
from the MT series, a performance recorded on the ep-90/70
can be transmitted to the MIDI sequencer. It is also possible
to record the performance directly on the MIDI sequencer.
The recorded performance can be saved on the MIDI
sequencer.
When the ep-90/70 is connected to an MT series sequencer,
the rich variety of sounds built into the MT series sequencer
can be played from the keyboard of the ep-90/70.●●●●●●●●●●●●●●●●●●●●●●●●●●●●●●●●●●●●●●●●●●●●●●●●●●●●●●●●●●●●●●●●●●●●●●●●●●●●●●●●●●●●●●●●●●●●●●●●●●●●
About MIDI
MIDI, short for “Musical Instrument Digital Interface,” was
developed as a standard for the exchange of performance
data between electronic instruments and computers.
The ep-90/70 is equipped with MIDI connectors to allow
such exchange of performance data with external equipment
and devices. Connecting the keyboard to other devices with
these jacks provides you with an even greater variety of
ways to use your keyboard.●●●●●●●●●●●●●●●●●●●●●●●●●●●●●●●●●●●●●●●●●●●●●●●●●●●●●●●●●●●●●●●●●●●●●●●●●●●●●●●●●●●●●●●●●●●●●●●●●●●●
About the MIDI Connectorsfig.9-01
MIDI In ConnectorUse a MIDI cable (sold separately) to connect from here
to the MIDI Out connector on the external MIDI device.
MIDI messages sent from connected external equipment
will be received here. As a result, the ep-90/70 will
produce sound, change tones, or perform other
operations.
MIDI Out ConnectorUse a MIDI cable (sold separately) to connect from here
to the MIDI In connector on the external MIDI device.
Performance data detailing what has been played on the
keyboard, and other data, such as that generated when a
pedal is depressed, is sent out from here to external
MIDI devices.
Making the Connections
NOTE
To prevent malfunction and/or damage to speakers or other devices, always turn down the volume, and turn off the power on all devices before making any connections.
1. Turn the volume down completely on all equipment.
2. Turn off the ep-90/70 and any other devices to be connected.
3. Use MIDI cable (sold separately) to connect the MIDI connector on the external MIDI device to the MIDI connector on the ep-90/70.Take a look at the connection examples.
4. As necessary, use audio cables to connect the other devices to the ep-90/70 (p. 24).
5. Turn on the power to all equipment.
6. Adjust the volume.
7. You should also make the following settings as needed.For details on making MIDI-related settings for the ep-
90/70, refer to p. 26 through p. 29.
Connection Examples: Connecting to a sequencer (The Roland MT Series)fig.9-02.e
* The MT-80s has no MIDI Out connector.
Connection Examples: Connecting to a MIDI sound modulefig.9-03.e
MIDIOut In
OutputInputPedalDamper R RSoft L (Mono) L (Mono)
InOut MIDI
ep-90/70
MT Series
MIDIOut In
OutputInputPedalDamper R RSoft L (Mono) L (Mono)
ep-90/70
OUTTHRU INMIDI
Sound Module
MIDIOut In
OutputInputPedalDamper R RSoft L (Mono) L (Mono)
25
Connecting to MIDI Devices
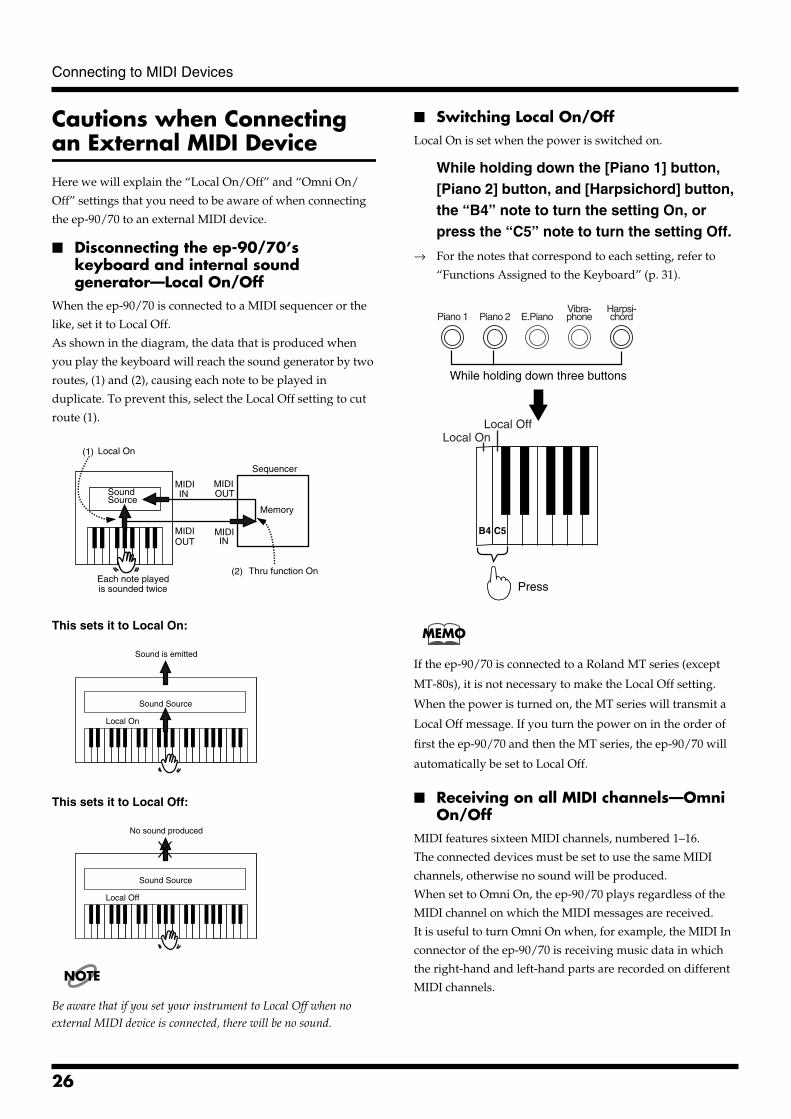
Cautions when Connecting an External MIDI Device
Here we will explain the “Local On/Off” and “Omni On/
Off” settings that you need to be aware of when connecting
the ep-90/70 to an external MIDI device.
■ Disconnecting the ep-90/70’s keyboard and internal sound generator—Local On/Off
When the ep-90/70 is connected to a MIDI sequencer or the
like, set it to Local Off.
As shown in the diagram, the data that is produced when
you play the keyboard will reach the sound generator by two
routes, (1) and (2), causing each note to be played in
duplicate. To prevent this, select the Local Off setting to cut
route (1).fig.9-04.e
This sets it to Local On: fig.9-05.e
This sets it to Local Off: fig.9-06.e
NOTE
Be aware that if you set your instrument to Local Off when no external MIDI device is connected, there will be no sound.
■ Switching Local On/OffLocal On is set when the power is switched on.
While holding down the [Piano 1] button, [Piano 2] button, and [Harpsichord] button, the “B4” note to turn the setting On, or press the “C5” note to turn the setting Off.
→ For the notes that correspond to each setting, refer to
“Functions Assigned to the Keyboard” (p. 31).fig.9-07.e (While holding down three buttons)
MEMO
If the ep-90/70 is connected to a Roland MT series (except
MT-80s), it is not necessary to make the Local Off setting.
When the power is turned on, the MT series will transmit a
Local Off message. If you turn the power on in the order of
first the ep-90/70 and then the MT series, the ep-90/70 will
automatically be set to Local Off.
■ Receiving on all MIDI channels—Omni On/Off
MIDI features sixteen MIDI channels, numbered 1–16.
The connected devices must be set to use the same MIDI
channels, otherwise no sound will be produced.
When set to Omni On, the ep-90/70 plays regardless of the
MIDI channel on which the MIDI messages are received.
It is useful to turn Omni On when, for example, the MIDI In
connector of the ep-90/70 is receiving music data in which
the right-hand and left-hand parts are recorded on different
MIDI channels.
(1)
MIDI
MIDIMIDI
MIDI
(2)
IN
IN OUT
OUT
Sequencer
Memory
SoundSource
Each note playedis sounded twice
Thru function On
Local On
Local On
Sound is emitted
Sound Source
Local Off
No sound produced
Sound Source
B4 C5
E.PianoPiano 2Piano 1Vibra-phone
Harpsi-chord
While holding down three buttons
Press
Local OnLocal Off
26

Connecting to MIDI Devices
■ Switching Omni On/OffOmni Off is automatically set when the power is switched
on.
Hold down the [Piano 1] button, the [Piano 2] button, and the [Harpsichord] button, and press the “F4” note to turn the setting On, or the “G4” note to turn the setting Off.
→ For the notes that correspond to each setting, refer to
“Functions Assigned to the Keyboard” (p. 31).fig.9-08.e
Set the MIDI Channel
MIDI features sixteen MIDI channels, numbered 1–16.
The connected devices must be set to use the same MIDI
channels, otherwise no sound will be produced.
- In a setup where you wish to play the ep-90/70 and also
have another MIDI-equipped instrument or sound
module play the same notes, you should first set the
channel used for reception on your external device to the
same channel that you have the ep-90/70 set to use for
transmission.
- If using another MIDI keyboard as a master instrument,
and you wish to have the ep-90/70 played by it, you
would need to set the channel used for reception on the
ep-90/70 to the same channel that the master keyboard
will be transmitting on.
- When wishing to have a sequencer play the ep-90/70, you
need to set the channel used or reception on the ep-90/70
to the same channel that the recorded MIDI data is set to
use.
When the ep-90/70 is turned on, Channel “1” is selected.
While holding down the [Piano 1], [Piano 2], and [Harpsichord] buttons, press the appropriate key on the keyboard.The MIDI transmit channel and receive channel will
switch to the number that corresponds to the note you
pressed.
→ For the notes that correspond to each setting, refer to
“Functions Assigned to the Keyboard” (p. 31).fig.9-09.e
F4 G4
E.PianoPiano 2Piano 1Vibra-phone
Harpsi-chord
While holding down three buttons
Press
Omni OnOmni Off
C2 D4C3 C4
1 2 3 4 5 6 7 8 9 10 11 12 13 14 15 16
E.PianoPiano 2Piano 1Vibra-phone
Harpsi-chord
While holding down three buttons
Press
27
Connecting to MIDI Devices
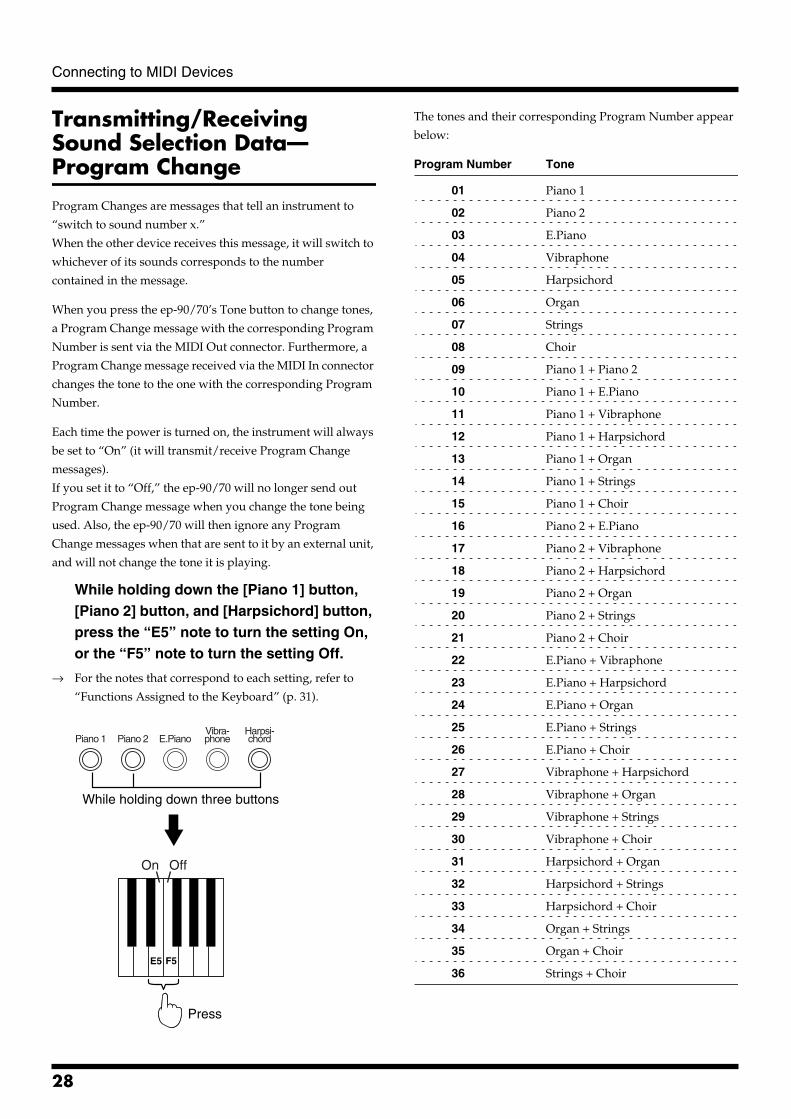
Transmitting/Receiving Sound Selection Data—Program Change
Program Changes are messages that tell an instrument to
“switch to sound number x.”
When the other device receives this message, it will switch to
whichever of its sounds corresponds to the number
contained in the message.
When you press the ep-90/70’s Tone button to change tones,
a Program Change message with the corresponding Program
Number is sent via the MIDI Out connector. Furthermore, a
Program Change message received via the MIDI In connector
changes the tone to the one with the corresponding Program
Number.
Each time the power is turned on, the instrument will always
be set to “On” (it will transmit/receive Program Change
messages).
If you set it to “Off,” the ep-90/70 will no longer send out
Program Change message when you change the tone being
used. Also, the ep-90/70 will then ignore any Program
Change messages when that are sent to it by an external unit,
and will not change the tone it is playing.
While holding down the [Piano 1] button, [Piano 2] button, and [Harpsichord] button, press the “E5” note to turn the setting On, or the “F5” note to turn the setting Off.
→ For the notes that correspond to each setting, refer to
“Functions Assigned to the Keyboard” (p. 31).fig.9-11.e
The tones and their corresponding Program Number appear
below:
Program Number Tone
01 Piano 1
02 Piano 2
03 E.Piano
04 Vibraphone
05 Harpsichord
06 Organ
07 Strings
08 Choir
09 Piano 1 + Piano 2
10 Piano 1 + E.Piano
11 Piano 1 + Vibraphone
12 Piano 1 + Harpsichord
13 Piano 1 + Organ
14 Piano 1 + Strings
15 Piano 1 + Choir
16 Piano 2 + E.Piano
17 Piano 2 + Vibraphone
18 Piano 2 + Harpsichord
19 Piano 2 + Organ
20 Piano 2 + Strings
21 Piano 2 + Choir
22 E.Piano + Vibraphone
23 E.Piano + Harpsichord
24 E.Piano + Organ
25 E.Piano + Strings
26 E.Piano + Choir
27 Vibraphone + Harpsichord
28 Vibraphone + Organ
29 Vibraphone + Strings
30 Vibraphone + Choir
31 Harpsichord + Organ
32 Harpsichord + Strings
33 Harpsichord + Choir
34 Organ + Strings
35 Organ + Choir
36 Strings + ChoirF5E5
E.PianoPiano 2Piano 1Vibra-phone
Harpsi-chord
While holding down three buttons
Press
On Off
28
Connecting to MIDI Devices
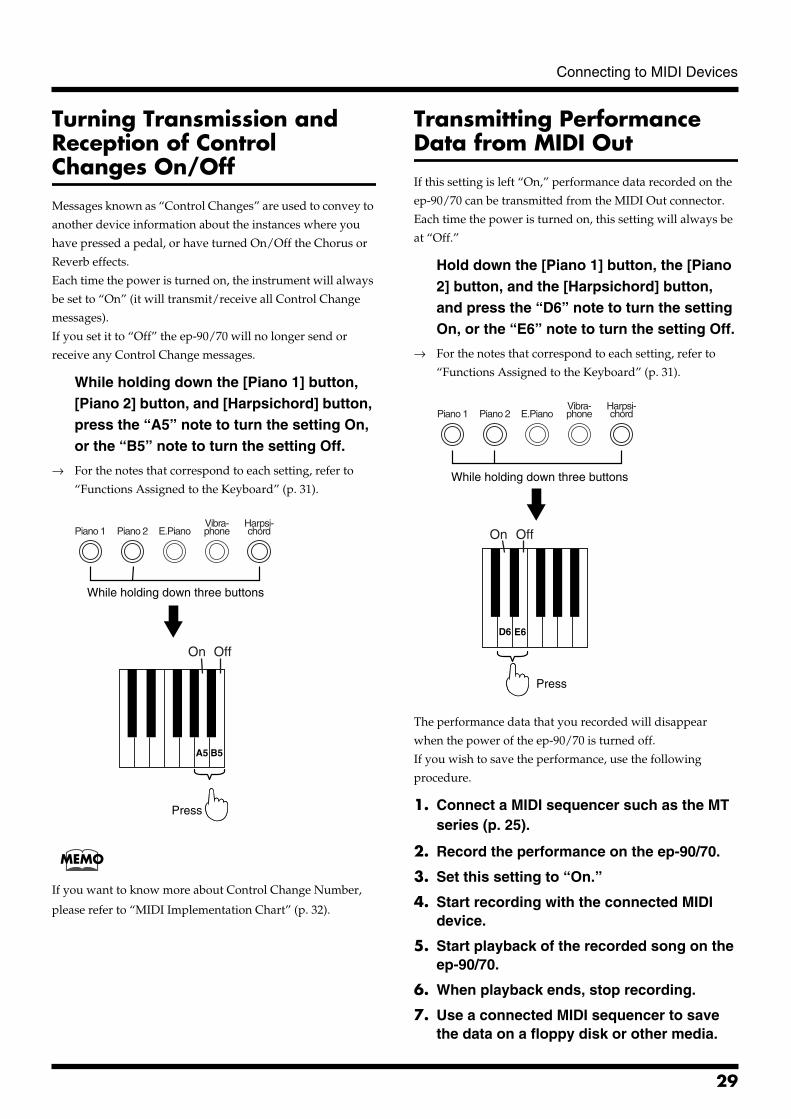
Turning Transmission and Reception of Control Changes On/Off
Messages known as “Control Changes” are used to convey to
another device information about the instances where you
have pressed a pedal, or have turned On/Off the Chorus or
Reverb effects.
Each time the power is turned on, the instrument will always
be set to “On” (it will transmit/receive all Control Change
messages).
If you set it to “Off” the ep-90/70 will no longer send or
receive any Control Change messages.
While holding down the [Piano 1] button, [Piano 2] button, and [Harpsichord] button, press the “A5” note to turn the setting On, or the “B5” note to turn the setting Off.
→ For the notes that correspond to each setting, refer to
“Functions Assigned to the Keyboard” (p. 31).fig.9-12.e
MEMO
If you want to know more about Control Change Number,
please refer to “MIDI Implementation Chart” (p. 32).
Transmitting Performance Data from MIDI Out
If this setting is left “On,” performance data recorded on the
ep-90/70 can be transmitted from the MIDI Out connector.
Each time the power is turned on, this setting will always be
at “Off.”
Hold down the [Piano 1] button, the [Piano 2] button, and the [Harpsichord] button, and press the “D6” note to turn the setting On, or the “E6” note to turn the setting Off.
→ For the notes that correspond to each setting, refer to
“Functions Assigned to the Keyboard” (p. 31).fig.9-13.e
The performance data that you recorded will disappear
when the power of the ep-90/70 is turned off.
If you wish to save the performance, use the following
procedure.
1. Connect a MIDI sequencer such as the MT series (p. 25).
2. Record the performance on the ep-90/70.
3. Set this setting to “On.”
4. Start recording with the connected MIDI device.
5. Start playback of the recorded song on the ep-90/70.
6. When playback ends, stop recording.
7. Use a connected MIDI sequencer to save the data on a floppy disk or other media.
A5 B5
E.PianoPiano 2Piano 1Vibra-phone
Harpsi-chord
While holding down three buttons
Press
On Off
D6 E6
E.PianoPiano 2Piano 1Vibra-phone
Harpsi-chord
While holding down three buttons
Press
On Off
29
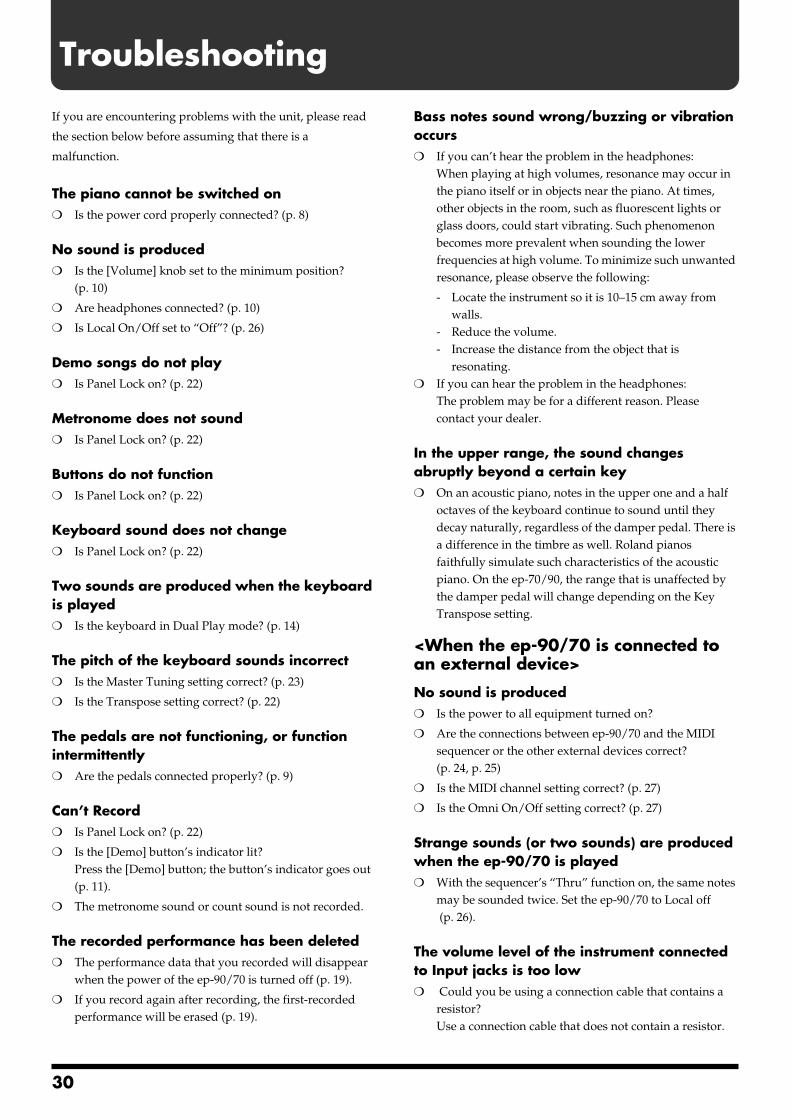
Troubleshooting
If you are encountering problems with the unit, please read
the section below before assuming that there is a
malfunction.
The piano cannot be switched on❍ Is the power cord properly connected? (p. 8)
No sound is produced❍ Is the [Volume] knob set to the minimum position?
(p. 10)
❍ Are headphones connected? (p. 10)
❍ Is Local On/Off set to “Off”? (p. 26)
Demo songs do not play❍ Is Panel Lock on? (p. 22)
Metronome does not sound❍ Is Panel Lock on? (p. 22)
Buttons do not function❍ Is Panel Lock on? (p. 22)
Keyboard sound does not change❍ Is Panel Lock on? (p. 22)
Two sounds are produced when the keyboard is played❍ Is the keyboard in Dual Play mode? (p. 14)
The pitch of the keyboard sounds incorrect❍ Is the Master Tuning setting correct? (p. 23)
❍ Is the Transpose setting correct? (p. 22)
The pedals are not functioning, or function intermittently❍ Are the pedals connected properly? (p. 9)
Can’t Record❍ Is Panel Lock on? (p. 22)
❍ Is the [Demo] button’s indicator lit?Press the [Demo] button; the button’s indicator goes out (p. 11).
❍ The metronome sound or count sound is not recorded.
The recorded performance has been deleted❍ The performance data that you recorded will disappear
when the power of the ep-90/70 is turned off (p. 19).
❍ If you record again after recording, the first-recorded performance will be erased (p. 19).
Bass notes sound wrong/buzzing or vibration occurs❍ If you can’t hear the problem in the headphones:
When playing at high volumes, resonance may occur in the piano itself or in objects near the piano. At times, other objects in the room, such as fluorescent lights or glass doors, could start vibrating. Such phenomenon becomes more prevalent when sounding the lower frequencies at high volume. To minimize such unwanted resonance, please observe the following:
- Locate the instrument so it is 10–15 cm away from walls.
- Reduce the volume.- Increase the distance from the object that is
resonating.❍ If you can hear the problem in the headphones:
The problem may be for a different reason. Please contact your dealer.
In the upper range, the sound changes abruptly beyond a certain key❍ On an acoustic piano, notes in the upper one and a half
octaves of the keyboard continue to sound until they decay naturally, regardless of the damper pedal. There is a difference in the timbre as well. Roland pianos faithfully simulate such characteristics of the acoustic piano. On the ep-70/90, the range that is unaffected by the damper pedal will change depending on the Key Transpose setting.
<When the ep-90/70 is connected to an external device>
No sound is produced❍ Is the power to all equipment turned on?
❍ Are the connections between ep-90/70 and the MIDI sequencer or the other external devices correct?(p. 24, p. 25)
❍ Is the MIDI channel setting correct? (p. 27)
❍ Is the Omni On/Off setting correct? (p. 27)
Strange sounds (or two sounds) are produced when the ep-90/70 is played❍ With the sequencer’s “Thru” function on, the same notes
may be sounded twice. Set the ep-90/70 to Local off (p. 26).
The volume level of the instrument connected to Input jacks is too low❍ Could you be using a connection cable that contains a
resistor?Use a connection cable that does not contain a resistor.
30
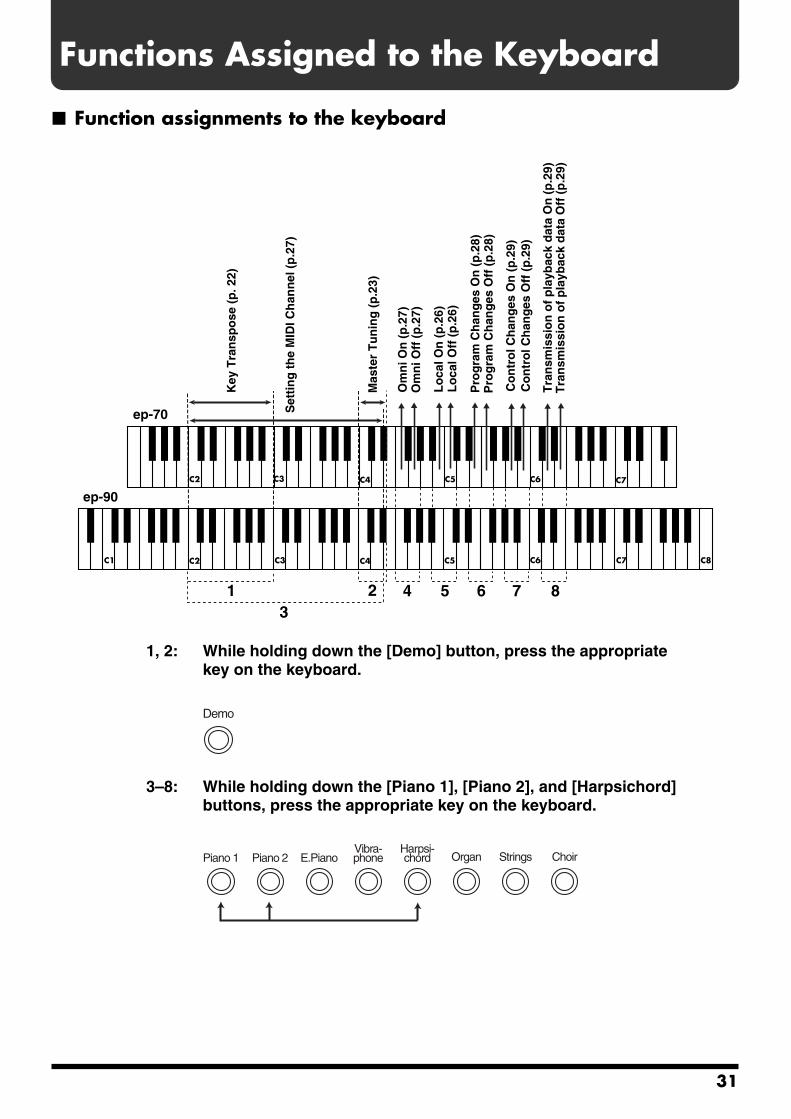
Functions Assigned to the Keyboard
■ Function assignments to the keyboardfig.11-00.e
1, 2: While holding down the [Demo] button, press the appropriate key on the keyboard.
fig.11-01
3–8: While holding down the [Piano 1], [Piano 2], and [Harpsichord] buttons, press the appropriate key on the keyboard.
fig.11-02
ep-70 Set
tin
g t
he
MID
I Ch
ann
el (
p.2
7)
Om
ni O
n (
p.2
7)
Key
Tra
nsp
ose
(p
. 22)
Mas
ter
Tu
nin
g (
p.2
3)
Lo
cal O
n (
p.2
6)
Pro
gra
m C
han
ges
On
(p
.28)
Co
ntr
ol C
han
ges
On
(p
.29)
Tra
nsm
issi
on
of
pla
ybac
k d
ata
On
(p
.29)
Om
ni O
ff (
p.2
7)
Lo
cal O
ff (
p.2
6)
Pro
gra
m C
han
ges
Off
(p
.28)
Co
ntr
ol C
han
ges
Off
(p
.29)
Tra
nsm
issi
on
of
pla
ybac
k d
ata
Off
(p
.29)
C1 C2 C3 C4 C5 C6 C8C7
ep-90C2 C3 C4 C5 C6 C7
1 23
4 5 6 7 8
Demo
ChoirStringsOrganE.PianoPiano 2Piano 1Vibra-phone
Harpsi-chord
31

32
* A separate publication titled “MIDI Implementation” is also available. It provides complete details concerning the way MIDI has been implemented on this unit. If you should require this publication (such as when you intend to carry out byte-level programming), please contact the nearest Roland Service Center or authorized Roland distributor.
Function...
BasicChannel
Mode
Note
Number :
Velocity
AfterTouch
Pitch Bend
ControlChange
ProgChange
System Exclusive
SystemCommon
SystemReal Time
AuxMessage
Notes
Transmitted Recognized Remarks
DefaultChanged
DefaultMessagesAltered
True Voice
Note ONNote OFF
Key'sCh's
6, 387
116466679193
100, 101
: True #
: Song Pos: Song Sel: Tune
: Clock: Commands
: All sound off: Reset all controllers: Local Control: All Notes OFF: Active Sense: Reset
11–16
Mode 3x
O x 8n v=64
15–113 *122–108 *2
xx
xx
x
O *3xxO *3xO *3O *3O *3O *3
O *3O *3 *4O *3 *4O *3 *4 O *3 *4O *3 *4O *3O *3O *3
O (0–35) *3 **************
O
xxx
xx
xxxxOx
11–16
Mode 3OMNI ON/OFF
Ox
0–127
15–113
x
O (0–127) *30–35
O
xxx
xx
xO OO (123–127)Ox
Data entryVolumeExpression Hold 1SostenutoSoftEffect1 depth (Reverb)Effect3 depth (Chorus)RPN LSB, MSB
*3 O x is selectable.
*4 These message can affect only MIDI notes.
DIGITAL PIANO
Model ep-70/90
Date : May. 1, 1999
Version : 1.00MIDI Implementation Chart
**************
**************
Mode 1 : OMNI ON, POLY
Mode 3 : OMNI OFF, POLY
Mode 2 : OMNI ON, MONO
Mode 4 : OMNI OFF, MONO
O : Yes
X : No
*1 ep-90*2 ep-70

Specifications
ep-90/70 : Roland Digital Piano
<Keyboard>
● Keyboardep-70: 76 weighted keys with touch-sensitivity
ep-90: 88 weighted keys with touch-sensitivity
● Keyboard ModeWhole
Dual
< Sound Generator>
● Maximum Polyphony64 voices
● Tones8 (Piano 1, Piano 2, Electric Piano, Vibraphone,
Harpsichord, Organ, Strings, Choir)
● Master Tuning415.3 Hz to 466.2 Hz (0.1 Hz Steps)
● EffectsChorus (On/Off), Reverb (On/Off)
● Key Transposition-6 to +5 (Semitone steps)
<Composer>
● Metronome Beat: 0, 2, 3, 4, 6
Volume: 8 levels
Sounds: 3 types
● Track1 track
● Songs1 song
● Note StorageApprox. 5,000 notes
● TempoQuarter note = 40 to 208
● Resolution96 ticks per quarter note
● ControlPlay/Stop, Rec, Tempo
<Others>
● Rated Power Output5 W x 2
● Speakers12 cm x 2
● ConnectorsOutput Jacks (L/Mono, R)
Input Jacks (L/Mono, R)
Headphones Jack (stereo) x 2
Pedal Connectors (Damper, Soft)
MIDI Connectors (In, Out)
● Power SupplyDC 9 V (AC Adaptor)
● Power Consumption1,200 mA
● Dimensions (without music stand)ep-90: 1302 (W) x 339 (D) x 108 (H) mm
51-5/16 (W) x 13-3/8 (D) x 4-1/4 (H) inches
When the stand (KS-90*) is used:
1308 (W) x370 (D) x 767 (H) mm
51-1/2 (W) x 14-5/8 (D) x 30-1/4 (H) inches
* KS-90: stand for ep-90
ep-70: 1138 (W) x 339 (D) x 108 (H) mm
44-13/16 (W) x 13-3/8 (D) x 4-1/4 (H) inches
When the stand (KS-70*) is used:
1144 (W) x370(D) x 767(H) mm
45-1/16 (W) x 14-5/8 (D) x 30-1/4 (H) inches
* KS-70: stand for ep-70
● Weight (without music stand)ep-90: 12.5 kg / 27 lbs 9 oz
Including Stand (KS-90*): 21.2 kg / 46 lbs 12 oz
* KS-90: stand for ep-90
ep-70: 11 kg / 24 lbs 5 oz
Including Stand (KS-70*): 19.4 kg / 42 lbs 13 oz
* KS-70: stand for ep-70
● AccessoriesAC Adaptor (PSB, ACK, or ACB type)
AC Cord (Not supplied with ACK or ACB type
adaptors.)
Music Stand
Owner’s Manual
Pedal Switch
* In the interest of product improvement, the specifications and/or
appearance of this unit are subject to change without prior
notice.
33
Index
BBeat ....................................................................................18
CChorus...............................................................................16Control Change ...............................................................29
DDelete ................................................................................21Damper Pedal ....................................................................9Demo Song .................................................................11–13Dual Play ..........................................................................14
HHeadphones .....................................................................10
IInput R/L Connector......................................................24
KKey Transpose .................................................................22
LLocal On/Off ...................................................................26
MMaster Tuning .................................................................23Metronome.......................................................................17
Sound ..........................................................................18Tempo .........................................................................18Time.............................................................................18Volume........................................................................17
MIDI Channel ..................................................................27MIDI Connector...............................................................25Music Stand......................................................................10
OOmni On/Off ...................................................................26Output R/L Connector...................................................24
PPanel Lock ........................................................................22Pedal....................................................................................9Playing
Demo Song..................................................................11Performance Song......................................................21
Program Change..............................................................28
RRecording .........................................................................19Reference Pitch ................................................................23Reverb ...............................................................................15
SSoft Pedal ............................................................................9Song Delete.......................................................................21
TTempo ...............................................................................18Time...................................................................................18Tone
Keyboard.....................................................................14Metronome .................................................................18
VVolume
Keyboard.....................................................................10Metronome .................................................................17
34
InformationWhen you need repair service, call your nearest Roland Service Center or authorized Roland distributor in your country as shown below.
As of April 1, 2003 (Roland)
ARGENTINAInstrumentos Musicales S.A.Av.Santa Fe 2055 (1123) Buenos AiresARGENTINATEL: (011) 4508-2700 BRAZILRoland Brasil LtdaRua San Jose, 780 Sala BParque Industrial San JoseCotia - Sao Paulo - SP, BRAZILTEL: (011) 4615 5666
MEXICOCasa Veerkamp, s.a. de c.v.Av. Toluca No. 323, Col. Olivar de los Padres 01780 Mexico D.F. MEXICOTEL: (55) 5668-6699
PANAMASUPRO MUNDIAL, S.A.Boulevard Andrews, Albrook, Panama City, REP. DE PANAMATEL: 315-0101
U. S. A. Roland Corporation U.S.5100 S. Eastern AvenueLos Angeles, CA 90040-2938,U. S. A.TEL: (323) 890 3700
VENEZUELAMusicland Digital C.A.Av. Francisco de Miranda,Centro Parque de Cristal, Nivel C2 Local 20 CaracasVENEZUELATEL: (212) 285-8586
AUSTRALIA Roland Corporation Australia Pty., Ltd. 38 Campbell Avenue Dee Why West. NSW 2099 AUSTRALIA TEL: (02) 9982 8266 NEW ZEALAND Roland Corporation Ltd.32 Shaddock Street, Mount Eden, Auckland, NEW ZEALAND TEL: (09) 3098 715
HONG KONGTom Lee Music Co., Ltd. Service Division22-32 Pun Shan Street, Tsuen Wan, New Territories, HONG KONGTEL: 2415 0911 INDIARivera Digitec (India) Pvt. Ltd.409, Nirman Kendra Mahalaxmi Flats Compound Off. Dr. Edwin Moses Road, Mumbai-400011, INDIATEL: (022) 2493 9051 INDONESIAPT Citra IntiRamaJ1. Cideng Timur No. 15J-150 Jakarta PusatINDONESIATEL: (021) 6324170
MALAYSIABENTLEY MUSIC SDN BHD140 & 142, Jalan Bukit Bintang 55100 Kuala Lumpur,MALAYSIATEL: (03) 2144-3333
PHILIPPINESG.A. Yupangco & Co. Inc.339 Gil J. Puyat AvenueMakati, Metro Manila 1200,PHILIPPINESTEL: (02) 899 9801
SINGAPORESwee Lee Company150 Sims Drive,SINGAPORE 387381TEL: 6846-3676
TAIWANROLAND TAIWAN ENTERPRISE CO., LTD.Room 5, 9fl. No. 112 Chung Shan N.Road Sec.2, Taipei, TAIWAN, R.O.C.TEL: (02) 2561 3339 THAILANDTheera Music Co. , Ltd.330 Verng NakornKasem, Soi 2, Bangkok 10100, THAILANDTEL: (02) 2248821
BAHRAINMoon StoresNo.16, Bab Al Bahrain Avenue, P.O.Box 247, Manama 304, State of BAHRAINTEL: 211 005
VIETNAMSaigon Music138 Tran Quang Khai St., District 1Ho Chi Minh CityVIETNAMTEL: (08) 844-4068
JORDANAMMAN Trading Agency 245 Prince Mohammad St., Amman 1118, JORDANTEL: (06) 464-1200
KUWAITEasa Husain Al Yousifi Est.Abdullah Salem Street,Safat, KUWAITTEL: 243-6399 LEBANONChahine S.A.L.Gerge Zeidan St., Chahine Bldg., Achrafieh, P.O.Box: 16-5857Beirut, LEBANONTEL: (01) 20-1441
QATARAl Emadi Co. (Badie Studio & Stores)P.O. Box 62, Doha, QATARTEL: 4423-554 SAUDI ARABIAaDawliah Universal Electronics APLCorniche Road, Aldossary Bldg., 1st Floor, Alkhobar,SAUDI ARABIA
P.O.Box 2154, Alkhobar 31952SAUDI ARABIA TEL: (03) 898 2081
TURKEY Barkat muzik aletleri ithalat ve ihracat Ltd StiSiraselviler Caddesi Siraselviler Pasaji No:74/20 Taksim - Istanbul, TURKEYTEL: (0212) 2499324 U.A.E.Zak Electronics & Musical Instruments Co. L.L.C.Zabeel Road, Al Sherooq Bldg., No. 14, Grand Floor, Dubai, U.A.E.TEL: (04) 3360715
EGYPTAl Fanny Trading Office9, EBN Hagar A1 Askalany Street,ARD E1 Golf, Heliopolis, Cairo 11341, EGYPTTEL: 20-2-417-1828 REUNIONMaison FO - YAM Marcel25 Rue Jules Hermann,Chaudron - BP79 97 491Ste Clotilde Cedex,REUNION ISLANDTEL: (0262) 218-429
SOUTH AFRICAThat Other Music Shop (PTY) Ltd.11 Melle St., Braamfontein, Johannesbourg, SOUTH AFRICA
P.O.Box 32918, Braamfontein 2017 Johannesbourg, SOUTH AFRICATEL: (011) 403 4105
Paul Bothner (PTY) Ltd.17 Werdmuller Centre, Main Road, Claremont 7708SOUTH AFRICA
P.O.BOX 23032, Claremont 7735, SOUTH AFRICATEL: (021) 674 4030
CYPRUSRadex Sound Equipment Ltd.17, Diagorou Street, Nicosia, CYPRUSTEL: (022) 66-9426
DENMARK Roland Scandinavia A/SNordhavnsvej 7, Postbox 880,DK-2100 CopenhagenDENMARK TEL: 3916 6200 FRANCERoland France SA4, Rue Paul Henri SPAAK, Parc de l'Esplanade, F 77 462 St. Thibault, Lagny Cedex FRANCETEL: 01 600 73 500 FINLANDRoland Scandinavia As, Filial FinlandElannontie 5FIN-01510 Vantaa, FINLANDTEL: (0)9 68 24 020 GERMANY Roland Elektronische Musikinstrumente HmbH.Oststrasse 96, 22844 Norderstedt, GERMANY TEL: (040) 52 60090
GREECESTOLLAS S.A.Music Sound Light155, New National RoadPatras 26442, GREECETEL: 2610 435400 HUNGARYRoland East Europe Ltd.Warehouse Area ‘DEPO’ Pf.83H-2046 Torokbalint, HUNGARYTEL: (23) 511011 IRELANDRoland IrelandAudio House, Belmont Court,Donnybrook, Dublin 4.Republic of IRELANDTEL: (01) 2603501
ITALYRoland Italy S. p. A. Viale delle Industrie 8, 20020 Arese, Milano, ITALYTEL: (02) 937-78300 NORWAYRoland Scandinavia Avd. Kontor NorgeLilleakerveien 2 Postboks 95 Lilleaker N-0216 Oslo NORWAYTEL: 2273 0074 POLANDP. P. H. BrzostowiczUL. Gibraltarska 4.PL-03664 Warszawa POLANDTEL: (022) 679 44 19 PORTUGALTecnologias Musica e Audio, Roland Portugal, S.A.Cais Das Pedras, 8/9-1 Dto4050-465 PORTOPORTUGALTEL: (022) 608 00 60
RUSSIAMuTek3-Bogatyrskaya Str. 1.k.l107 564 Moscow, RUSSIA TEL: (095) 169 5043
SPAINRoland Electronics de España, S. A. Calle Bolivia 239, 08020 Barcelona, SPAINTEL: (93) 308 1000
SWITZERLANDRoland (Switzerland) AG Landstrasse 5, Postfach,CH-4452 Itingen, SWITZERLANDTEL: (061) 927-8383
SWEDEN Roland Scandinavia A/S SWEDISH SALES OFFICEDanvik Center 28, 2 tr. S-131 30 Nacka SWEDEN TEL: (0)8 702 00 20
UKRAINETIC-TACMira Str. 19/108P.O. Box 180 295400 Munkachevo, UKRAINETEL: (03131) 414-40 UNITED KINGDOM Roland (U.K.) Ltd.Atlantic Close, Swansea Enterprise Park, SWANSEASA7 9FJ, UNITED KINGDOMTEL: (01792) 702701
KOREACosmos Corporation1461-9, Seocho-Dong,Seocho Ku, Seoul, KOREATEL: (02) 3486-8855
AUSTRIARoland Austria GES.M.B.H.Siemensstrasse 4, P.O. Box 74,A-6063 RUM, AUSTRIATEL: (0512) 26 44 260 BELGIUM/HOLLAND/LUXEMBOURGRoland Benelux N. V.Houtstraat 3, B-2260, Oevel (Westerlo) BELGIUMTEL: (014) 575811
AFRICA
CHILEComercial Fancy S.A.Rut.: 96.919.420-1Nataniel Cox #739, 4th FloorSantiago - Centro, CHILETEL: (02) 688-9540
URUGUAYTodo Musica S.A.Francisco Acuna de Figueroa 1771C.P.: 11.800 Montevideo, URUGUAYTEL: (02) 924-2335
EUROPE
AUSTRALIA/NEW ZEALAND
ASIA
CENTRAL/LATINAMERICA
NORTH AMERICA
MIDDLE EAST
AFRICA
EL SALVADOROMNI MUSIC75 Avenida Norte y Final Alameda Juan Pablo , Edificio No.4010 San Salvador, EL SALVADORTEL: 262-0788
ROMANIAFBS LINESPiata Libertatii 1,RO-4200 GheorghehiTEL: (095) 169-5043
PARAGUAYDistribuidora De Instrumentos MusicalesJ.E. Olear y ESQ. Manduvira Asuncion PARAGUAYTEL: (021) 492-124
COSTA RICAJUAN Bansbach Instrumentos MusicalesAve.1. Calle 11, Apartado 10237,San Jose, COSTA RICATEL: 258-0211
CRISTOFORI MUSIC PTE LTDBlk 3014, Bedok Industrial Park E, #02-2148, SINGAPORE 489980TEL: 6243-9555
IRANMOCO, INC.No.41 Nike St., Dr.Shariyati Ave.,Roberoye Cerahe MirdamadTehran, IRANTEL: (021) 285-4169
ISRAELHalilit P. Greenspoon & Sons Ltd.8 Retzif Ha'aliya Hashnya St.Tel-Aviv-Yafo ISRAELTEL: (03) 6823666
SYRIATechnical Light & Sound CenterKhaled Ebn Al Walid St.Bldg. No. 47, P.O.BOX 13520, Damascus, SYRIATEL: (011) 223-5384
CANADA Roland Canada Music Ltd.(Head Office)5480 Parkwood Way Richmond B. C., V6V 2M4 CANADA TEL: (604) 270 6626
Roland Canada Music Ltd.(Toronto Office)170 Admiral BoulevardMississauga On L5T 2N6 CANADA TEL: (905) 362 9707
CHINARoland Shanghai Electronics Co.,Ltd.5F. No.1500 Pingliang Road Shanghai, CHINATEL: (021) 5580-0800
Roland Shanghai Electronics Co.,Ltd.(BEIJING OFFICE)10F. No.18 AnhuaxiliChaoyang District, Beijing, CHINATEL: (010) 6426-5050
01898523 ’03-4-5TP
For the USA
FEDERAL COMMUNICATIONS COMMISSIONRADIO FREQUENCY INTERFERENCE STATEMENT
This equipment has been tested and found to comply with the limits for a Class B digital device, pursuant to Part 15 of the FCC Rules. These limits are designed to provide reasonable protection against harmful interference in a residential installation. This equipment generates, uses, and can radiate radio frequency energy and, if not installed and used in accordance with the instructions, may cause harmful interference to radio communications. However, there is no guarantee that interference will not occur in a particular installation. If this equipment does cause harmful interference to radio or television reception, which can be determined by turning the equipment off and on, the user is encouraged to try to correct the interference by one or more of the following measures:
– Reorient or relocate the receiving antenna.– Increase the separation between the equipment and receiver.– Connect the equipment into an outlet on a circuit different from that to which the receiver is connected.– Consult the dealer or an experienced radio/TV technician for help.
Unauthorized changes or modification to this system can void the users authority to operate this equipment.This equipment requires shielded interface cables in order to meet FCC class B Limit.
IMPORTANT: THE WIRES IN THIS MAINS LEAD ARE COLOURED IN ACCORDANCE WITH THE FOLLOWING CODE.
BLUE: BROWN:
As the colours of the wires in the mains lead of this apparatus may not correspond with the coloured markings identifying the terminals in your plug, proceed as follows:The wire which is coloured BLUE must be connected to the terminal which is marked with the letter N or coloured BLACK.The wire which is coloured BROWN must be connected to the terminal which is marked with the letter L or coloured RED.Under no circumstances must either of the above wires be connected to the earth terminal of a three pin plug.
NEUTRALLIVE
For the U.K.
This product complies with the requirements of European Directive 89/336/EEC.
For EU Countries
For Canada
This Class B digital apparatus meets all requirements of the Canadian Interference-Causing Equipment Regulations.
Cet appareil numérique de la classe B respecte toutes les exigences du Règlement sur le matériel brouilleur du Canada.
NOTICE
AVIS