rocket 88 user manual - soundleisure.com · the jukebox has the facility to connect to external...
TRANSCRIPT

ROCKET 88 USER MANUALV2 February 2014 - Series 2

22
Contents
1) Introduction Pg 3
2) Taking Delivery / Transit Mode Pg 5
3) Inserting title cards and compact discs Pg 8
4) Playing the jukebox Pg 10
5) Connecting external audio devices Pg 12
6) Adding additional speakers Pg 14
7) Adjusting amplifier settings Pg 15
8) Moving the Jukebox pg 17
10)Bluetooth Accessory (Optional) Pg 18
11)iPod Dock Accessory (Optional) Pg 20
12)Troubleshooting Pg 21
12)Contact Information Pg 22

3
1. Introduction
Thank you for purchasing a Classic Jukebox from Sound Leisure, the world’s premier
jukebox manufacturer. This product has been designed and built to give you many years
of enjoyment and trouble free use.
This owner’s guide provides all the information you will need to install and operate the
jukebox safely.
Important Safety Instructions1. Read these instructions.
2. Keep these instructions.
3. Heed all warnings.
4. Follow all instructions.
5. Do not use this apparatus near water.
6. Clean only with a dry cloth.
7. Do not block any ventilation openings. Install in accordance with the
manufacturers instructions.
8. Do not install near any heat sources such as radiators, heat registers, stoves
or other apparatus (including amplifiers) that produce heat.
9. Do not defeat the safety purpose of the polarized or grounding-type plug.
A polarized plug has 2 blades with one wider than the other. A grounding type plug
has two blades and a third grounding prong. The wide blade or the third prong are
provided for your safety. If the provided plug does not fit into your outlet, consult
an electrician for replacement of the obsolete outlet.
10. Protect the power cord from being walked on or pinched particularly at plugs,
convenience receptacles, and the point where they exit from the apparatus.
11. Only use attachments/accessories specified by the manufacturer.
12. Use only the cart, stand, bracket or table specified by the manufacturer, or
sold with the apparatus. When a cart is used, use caution when moving the
cart/apparatus combination to avoid injury from tip-over.
13. Unplug this apparatus during lightning storms or when unused for long periods of
time.
14. Refer all servicing to qualified service personnel. Servicing is required when the
apparatus has been damaged in any way, such as if a power-supply cord or plug is
damaged, liquid has been spilled or objects have fallen into the apparatus, the
apparatus has been exposed to rain or moisture, does not operate normally or has
been dropped.

4
Additionally
This jukebox contains high voltage & high temperature parts. Do not attempt to carry out
any work that is not specifically instructed in this manual. If the jukebox fails to operate
correctly, switch off and consult the trouble shooting guide at the end of this manual. No
user serviceable parts inside.
This jukebox is heavy. DO NOT attempt to lift the unit.
This appliance must be connected to a mains socket with a protective earth connection.
The mains plug is the designated ‘disconnection device’ and as such should be readily
operable.
‘WARNING’ To reduce the risk of fire or electric shock, do not expose this apparatus to
rain or moisture.
Fuses should be replaced like for like at all times.
Terminals marked with the symbol below are considered hazardous live and external wiring
connected to these terminals requires installation by an instructed person or the use of
ready made contact leads.
Bubble Tubes
The bubble tubes in the top & side pilasters must only be handled by trained personnel.
They contain small amounts of the harmful chemical DCM (dichloromethane). In the event
of accidental leakage the chemical will generally evaporate. However please take the
following precautions. Ventilate the room immediately by opening doors & windows. Vacate
the room until any residual odour disperses. Extinguish any source of ignition. Avoid
breathing vapours & contact with skin. If skin contact occurs wash immediately with soapy
water, remove contaminated clothing & wash before reuse.

5
2. Taking Delivery / Transit ModeOnce the jukebox has been positioned in its designated space the following instructions
will allow you to prepare it for use. The keys to open the jukebox will be found attached
to the rear of the cabinet. The keys will open the side locks and the rear cabinet lock.
See below (FIG 1) The key will also open the cash box located on the side of the
jukebox.
LOCK LOCATIONS
MAIN CABINET
LOCKS. Please
note there is a
lock on both the
left and right of
the jukebox.
CASH BOX
LOCK
REAR CABINET
DOOR
MAINS POWER
SWITCH
FIG 1
6
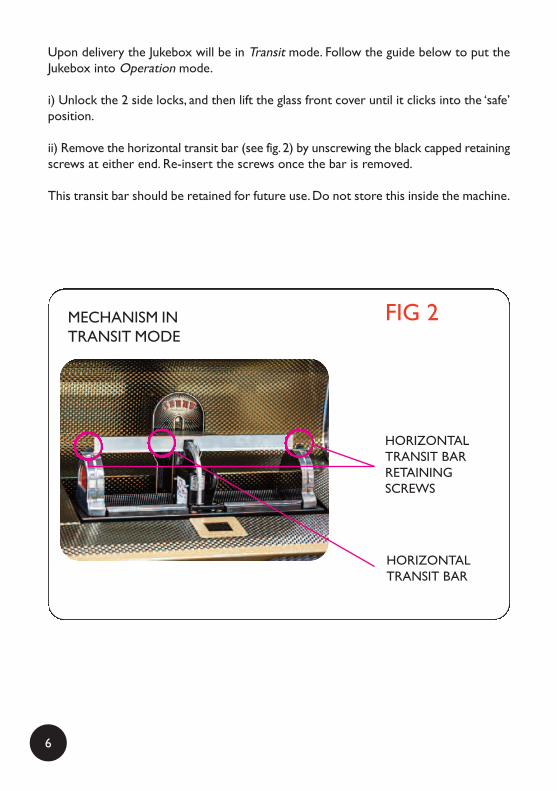
Upon delivery the Jukebox will be in Transit mode. Follow the guide below to put the
Jukebox into Operation mode.
i) Unlock the 2 side locks, and then lift the glass front cover until it clicks into the ‘safe’
position.
ii) Remove the horizontal transit bar (see fig. 2) by unscrewing the black capped retaining
screws at either end. Re-insert the screws once the bar is removed.
This transit bar should be retained for future use. Do not store this inside the machine.
MECHANISM IN
TRANSIT MODE
HORIZONTAL
TRANSIT BAR
RETAINING
SCREWS
HORIZONTAL
TRANSIT BAR
FIG 2

7
iv) Open the rear cabinet door. (location shown in Fig 1 on page 5)
v) Locate the 4 wing nuts underneath the CD mechanism. (see below fig. 3) Unscrew
the wing nuts until they spin freely, (this helps the mechanism ‘float’, for optimum
performance).
vi) Plug the jukebox in and switch the power switch on. (location of power switch is
shown in Fig 1 on page 5) The front display will show “TRANSIT”.
vii) Locate the transit switch in the rear of the Jukebox. (see fig.3) Switch to Operatemode, the CD lifting mechanism will traverse to the left, and then return to its central
position
viii) Close and lock both cabinet doors.
The jukebox is now ready to play.
VIEW OF LOCATION OF MECHANISM RETAINING SCREWS AND
TRANSIT SWITCH IN THE REAR OF THE JUKEBOX.
Wing nuts x 4. loosen
to allow mechanism
“floating”
Blutooth device Transit switch
FIG 3

8
3) Inserting title cards and compact discs
Title cards
Blank CD title cards and a software CD are provided with your jukebox. This will
assist you in printing title cards without having to type each song individually or
handwrite the cards. Additional cards are available to purchase through our webiste
at www.classicjukeboxes.co.uk/Title-Cards/
Please note:
The CD software is unable to read home produced compilation albums.
The title cards start at selection no. 100 and finish at 179.
The cards need to be inserted into the holders so that the small plastic tabs hold
them in place. (see above fig. 4).
The displayed cards are flipped over left/right using the arrowed < ⁄ > keys on the
jukebox keyboard.
WARNING : DO NOT FLIP THE TITLE RACK PAGES BY HAND AS THIS CAN
DAMAGE THE MOTOR OR SNAP THE PAGE ASSEMBLY! ONLY TURN THE PAGES
USING THE RED BUTTONS SITUATED ON THE FAR RIGHT HAND SIDE OF THE
BUTTON BANK.
FIG 4

9
Compact Discs
The rack that holds the CDs is numbered to correspond with the title selection
cards.
Slot 00 = title card 100
Slot 01 = title card 101
Slot 02 = title card 102 etc.
Insert the CDs with the CD label facing to the right, (see fig 6).
Fig 6 : Note the CD’s are facing with their labels to the RIGHT
The mechanism holds 80CDs.
PLEASE ENSURE THAT THE CDs ARE INSERTED ABSOLUTELY STRAIGHT.
Failure to do so can result in the mechanism mishandling the CD’s which can cause
damage to the CD’s or the mechanism.
If the jukebox is moved for any reason, please check again that all the CDs are aligned
correctly, and none have been displaced.
FIG 6

10
4) Playing the jukebox
Making Selections
When the discs and labels are installed, selections can be made using the keyboard at the
front of the jukebox or via the remote control.
To “flip” the title rack pages press the red buttons located on the far right hand side of
the button bank.
To play a track, select the 3 digit number for the disc, and then the 2 digit number of the
individual track. These numbers will show up on the display as they are entered.
To play the whole of an album, without keying all the tracks individualy, select the 3 digit
disc number then enter the 2 digit track number as ‘00’.
To eject an entire disc press ‘EJECT DISC’ on the infra red remote.
To reject a single track press ‘EJECT TRACK’ on the infra red remote.
If you make a mistake while entering a selection press ‘KYBRD CANCEL’ on the infra red
remote to re-start the selection process, or press “C” on the jukebox button bank.
For continuous random play, press ‘SHUFFLE ON’ on the remote, the display will briefly
show ‘SH On’ and a small dot will appear in the bottom right corner of the LED display.
To turn off this function, press ‘SHUFFLE OFF’, the display will briefly show ‘SH OFF’ and
the dot in the bottom right corner will clear.
Please note: If the front glass is opened while the jukebox is playing, the CD will reject
and the CD mechanism will return to its central position.
Adjusting Volume
As a precaution against overloading the speakers when switching the jukebox on, the
volume is preset to a low level. To raise the volume to the preferred level, select a track,
wait until the CD is playing, then adjust the volume using the ‘Channel 1/2’ volume keys
on the remote control unit (See fig 7 opposite for remote control layout - the volume
adjustment buttons are shown highlighted in blue).
The display will briefly show the volume level as ‘L -’. The number will vary dependant on
the volume level with 0 for off and 50 for full volume.
The ‘Channel 3/4’ volume keys (on the remote) are used to adjust the volume of the
spare amplifier channels, please refer to section 6 “Adding additional speakers”.
Pressing the ‘MUTE’ key on the remote, will instantly mute the amplifier and the display
will show ‘L —‘, to return the volume to the previous level press any of the volume keys.

11
FIG 7
DIAMOND
PACK LIGHTING
See section on
Diamond Pack
lighting
Please note the
standby button is
not yet
implimented.
INFRA RED REMOTE CONTROL
CHANNEL 1/2
(stereo pair)
jukebox
speakers
CHANNEL 3/4
(stereo pair)
external
speakers

12
5) Connecting external audio devices
The Jukebox has the facility to connect to external audio devices.
Audio sources, such as DAB radios or MP3 players can be connected to the auxiliary
inputs to allow them to play through the Jukebox speakers.
An audio output is provided to allow the Jukebox to play through another amplifier,
such as Surround Sound or Multi-room audio system. Connect a stereo phono lead
to the audio output on the break-out connections located on the rear of the jukebox
(fig 9). The audio level is approximately 2Vp-p but will vary depending upon the audio
being played.
To play an external audio source through the jukebox, simply connect its output leads
to one of the AUX inputs on the D4 amplifier. (see Fig 8)
By default the amplifier is in automatic switch over mode, this means the 3 audio
inputs are prioritised.
If a CD is playing on the Jukebox, this has highest priority and the display will show
‘Ch 1’.
If a CD is not playing the amplifier will prioritise ‘AUX 1 INPUT’, if audio is detected
on this input for 10 seconds, this input will become active and the display will show
‘Ch 2’
If a CD is not playing and no audio is detected on ‘AUX 1 INPUT’, ‘AUX 2 INPUT is
prioritised, if audio is detected on this input for 10 seconds, this input will become
active and the display will show ‘Ch 3’.
Please note:
It is recommended that the audio output level of the connected device is kept at
between ¾ and full and the volume is adjusted using the volume control of the
Jukebox.
The connected device should be connected in stereo. Although 2 AUX inputs are
available, one of these will be used by any accessories such as the Bluetooth receiver
or iPod dock.
It is possible to manually switch the audio inputs using the F1, F2, F3 keys on the
remote, if you would like to do this please contact Sound Leisure.

13
Amplifier breakout box
located on the rear of
the jukebox
VIEW OF D4 DIGITAL AMPLIFIER
Auxilary inputs x 2 pairs.
(Aux 1 left and right /
Aux 2 left and right)
Phono
Digital Amp menu
selection buttons.
Menu down,
Menu up, - minus,
+ plus
Jukebox Reset Button
Amplifier Audio Out
sockets
phono
Microphone Input
6.35mm Jack
FIG 8
FIG 9

14
6) Adding additional speakers
The D4 Digital Amplifier has 4 independent outputs, configured as 2 stereo pairs.
2 outputs are used to drive the Jukebox’s internal speakers (Shown on amplifier as
Channel 1) leaving 2 outputs (left and right) free for the connection of additional
speakers (Shown on amplifier as Channel 3).
Please note that if you have a D2 Amplifier Channels 3/4 are unavailable.
In the rear of the Jukebox is the ‘Speaker Matching Pad’ (Fig 10 above) Additional
speakers should ideally be set-up in a stereo configuration where the left speaker is
connected to CH3 and the right speaker is connected to CH4.
The volume for these speakers is controlled using the ‘Channel 3/4’ volume keys on the
remote control. These keys are the VOL buttons on the RIGHT hand side of the
control. The keys on the left hand side control Channels 1/2. (see fig 7 on page 13) All
volume controls are highlighted in blue on the diagram.
The additional speakers should not present a load lower than 4 Ohms to each amplifier
channel, please contact Sound Leisure if you are unsure which speakers are suitable or
would like a different speaker set-up to the one described above.
FIG 10. (Shown with internal speakers connected)

15
7) Adjusting amplifier settings
It is possible to adjust the audio equalisation of the amplifier to suit a specific
environment or taste. There are separate settings for the internal Jukebox speakers
(Channel 1/2) and any additional speakers that may be connected (Channel 3/4).
Pressing the ‘MENU UP’ or ‘MENU DOWN’ buttons on the D4 amplifier will cycle
through the available menus. Pressing the ‘+’ or ‘-‘ buttons will increment or
decrement the value of the current menu. Any changes will be automatically saved.
(The location of these buttons is shown in Fig 8 on page 13) If no buttons are
pressed for 1 minute, the amplifier will revert back to its default display mode.
Below is a description of the available menus:
Channel 1 Stereo / Mono Switch
This menu is used to set the amplifier in Stereo or 2 channel Mono
This should be left as ‘Stereo’.
Channel 1 Master
This menu sets the maximum volume level that can be achieved with the remote and
should be used to set a maximum level for the Jukebox speakers.
Channel 1 Bass
This menu sets the bass level of the Jukebox speakers.
It can provide a cut or boost of 15dB.
Channel 1 Middle
This menu sets the middle level of the Jukebox speakers.
It can provide a cut or boost of 15dB.
Channel 1 Treble
This menu sets the treble level of the Jukebox speakers.
It can provide a cut or boost of 15dB.
Channel 1 Microphone Volume
If you wish to use a microphone we recommend a wired low impedence mic. If you
wish to use a wireless microphone please contact Sound Leisure.

16
Aux Input 1
This Menu sets the master volume level for Auxiliary Input 1.
This allows the volume of the Auxiliary input to be balanced against the volume of
the CD mechanism.
Aux Input 2
This Menu sets the master volume level for Auxiliary Input 2.
See Aux Input 1 for description.
Aux Input Auto/Manual
Changes from auto input selection to manual input selection.
Contact Sound Leisure for more information.
Aux Input Time
This menu sets the time that an auxiliary input must be present before the amplifier
will make it active and is defaulted to 10 seconds.
The value can be set between 2 and 60 seconds.
Microphone Voiceover / Karaoke
If karaoke is selected the music and microphone will be heard together.
If voiceover is selected whenever the microphone is used the music will be muted,
the music will un-mute when the microphone is no longer being used.
Microphone Bass
This menu sets the Bass level of the microphone input.
It can provide a cut or boost of 15dB.
Microphone Middle
This menu sets the Middle level of the microphone input.
It can provide a cut or boost of 15dB.
Microphone Treble
This menu sets the Treble level of the microphone input.
It can provide a cut or boost of 15dB.
Line Out Master
This menu sets the volume level of the Audio Output.

17
Line Out Microphone Volume
This menu sets the volume of the microphone sent to the Line Output.
Line Out Voiceover / Karaoke
If karaoke is selected the Line Out music and microphone will be heard together.
If voiceover is selected, whenever the microphone is used the Line Out music will be
muted, the music will un-mute when the microphone is no longer being used.
Loudness
When switched on the loudness control will provide a dynamic boost to the bass and
treble when the Jukebox is used at low volume, the lower the volume the higher the
boost. This is a subtle effect that adds clarity to music at low volumes.
Please note: The amplifier supports many more features that are not covered in this
Jukebox user guide, if more information is required please contact Sound Leisure for
the dedicated D4 amplifier manual.
Please note that if you have a D2 Amplifier Channels 3/4 are unavailable.
Moving the Jukebox
If you are moving the Jukebox over a distance or intend tipping the machine, it is
recommended that it is placed back in Transit mode. There is no need to remove CD’s
as the horizontal transit bar will hold them in position. Follow the guide below to put
the Jukebox back into Transit mode.
i) Open the front and rear doors while the Jukebox is switched on.
ii) Put the transit switch back into the Transit position.
iii) The lifting mechanism will return to the central position
iv) Re-tighten the mechanism securing wing nuts and, ensuring the display is
now showing TRANSIT, re-attach the two transit bars.
v) Switch off the Jukebox and close the doors.
The Jukebox is now safe to move.

18
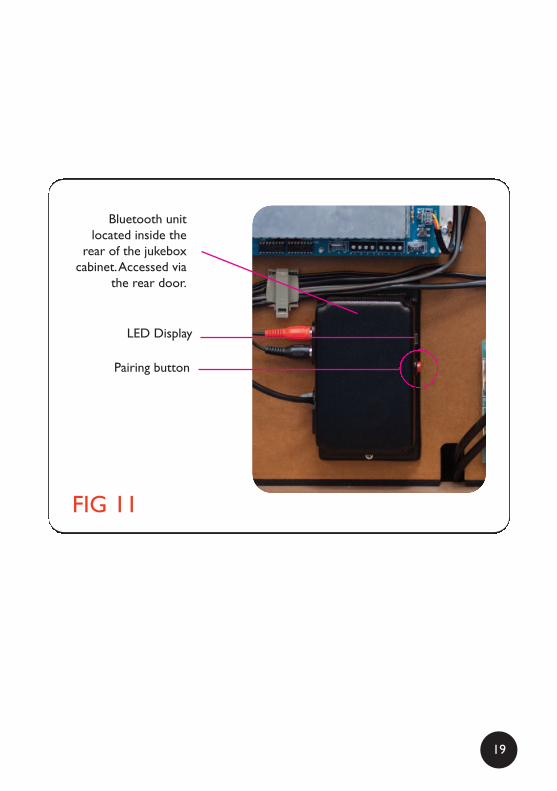
9) Bluetooth (Optional)
Please note: This is an optional accessory and will not be fitted to your Jukebox unless
specified at the time of order.
The Bluetooth accessory allows most Bluetooth enabled devices to wirelessly stream
audio directly to the Jukebox.
To pair an audio device to the Bluetooth accessory:
1 Ensure the LED on the front of the Bluetooth accessory is solid red.
If the LED is not solid red, press the button on the front of the accessory to
enter pairing mode.
2. Turn on the Bluetooth connection on your audio device and begin searching for
devices (refer to your audio device manual for instruction on how to do this).
3. From the list of found devices, select ‘SoundLeisureJB’.
If your audio device asks for a confirmation, press ok
If your audio device asks for a password, enter ‘1234’.
4. Once pairing is complete, the LED on the front of the Bluetooth accessory will
begin to flash green.
5. The LED will change to solid green, when audio is being played on your audio
device.
To pair to a new device:
Press the button on the front of the Bluetooth accessory to unpair your connected
device or unpair using your audio device (refer to your audio device manual for
instruction on how to do this).
The LED on the front of the Bluetooth accessory will change to solid red when
unpaired.
To connect to a new device repeat the pairing procedure above.
19
FIG 11
Bluetooth unit
located inside the
rear of the jukebox
cabinet. Accessed via
the rear door.
Pairing button
LED Display

10) iPod Dock Accessory (Optional)
Please note: This is an optional accessory and will not be fitted to your Jukebox unless
specified at the time of order.
The iPod Dock accessory can play audio and charge a connected iPod.
The iPod dock used in the Jukebox is an official Apple product and as such the retail
packaging and different dock base adaptors are provided. Please ensure the correct
base adaptor is fitted into the dock to correctly support your iPod. Failure to do so
will reduce the life of the docking connector.
To listen to audio from a docked iPod:
i) Start the iPod playing and set the volume between ¾ and full.
ii) Ensure the Jukebox is not playing a CD and wait 10 seconds.
iii) The Jukebox display should show ‘Ch 2’ to indicate the amplifier has
switched over to the iPod dock accessory input.
iv) Use the Jukebox remote control to set the required play volume.
Should you encounter problems with the iPod Dock accessory, please contact Sound
Leisure.
20

11) Trouble shooting
Should the Jukebox fail to operate correctly, please refer to the following trouble
shooting section.
If the fault you have is not covered below or occurs repeatedly please contact Sound
Leisure.
Fault : CD mechanism stuck or vibrating
Solution : Possible CD obstruction, switch off the Jukebox and remove CD’s around
the CD lift arm. Switch the Jukebox back on using the reset procedure outlined on
the next page.
Fault : Display showing multiple digits along the top line of the LED display and
selections cannot be made.
Solution : Jukebox door switch is open, close the front door of the Jukebox.
Fault : Intermittent remote control
Solution : Ensure new batteries are used.
If only certain keys are not working correctly, such as the volume keys which get the
most use, contact Sound Leisure to obtain a replacement.
21

Reset Procedure
Occasionally if the machine has not been used for a long period of time or has
experienced voltage spikes or CD mechanism jams, it may be necessary to reset the
Jukebox. The reset procedure re-synchronises the various electronic parts of the
Jukebox and will clear any data corruption that may have occurred.
To reset the Jukebox:
i) Switch off the Jukebox and ensure the front door is closed and locked.
ii) Hold down the Reset button on the back of the machine (fig 9 - page 13).
iii) Switch the Jukebox back on while holding the reset button down.
iv) Wait 10 seconds then release the button.
If the reset has been successful the display will flash 179 and then 30. The CD
mechanism should be parked over position 100 (far left side).
Please note: This procedure will completely reset the CD mechanism, please remove
any CD’s that have been left on the Laser Player before making any further selections.
22

23

For any further information or technical support please call soundleisure :Sound Leisure LimitedSandleas WayLeedsLS15 8AR
T: +44 (0) 113 232 1700F: +44 (0) 113 232 1701E: sales@classicjukeboxes.co.ukwww.classicjukeboxes.co.ukwww.soundleisure.com
Twitter : @classicjukeboxFacebook.com/classicjukeboxes