robotics programming in not exactly c and...
TRANSCRIPT

1
Robotics Programming in
Not eXactly C and RobotC using the Lego Mindstorms NXT 2.0
Draft 6
by Carson Kirkpatrick
4/24/2014
2
Table of Contents
1 Introduction 1.1 Not eXactly C 1.2 RobotC
2 Getting Started with NXC 2.1 Installing Bricx Command Center on Windows 2.2 Connecting to the NXT Brick 2.3 Running a Test Program
3 Basic Programming in NXC 3.1 Hello World! 3.2 Motors 3.3 Sensors
3.3.1 Touch Sensor 3.3.2 Ultrasonic Sensor 3.3.3 Sound Sensor
4 Advanced Programming in NXC 4.1 The Path Runner Program
5 Getting Started with RobotC 5.1 Installing RobotC on Windows 5.2 Connecting to the NXT Brick 5.3 Running a Test Program
6 Basic Programming in RobotC 6.1 Hello World! 6.2 Motors 6.3 Sensors
6.3.1 Touch Sensor

3
6.3.2 Ultrasonic Sensor 6.3.3 Sound Sensor
7 Advanced Programming in RobotC 7.1 The Path Runner Program
8 RobotNinja 8.1 Setting Up RobotNinja
4
1. Introduction
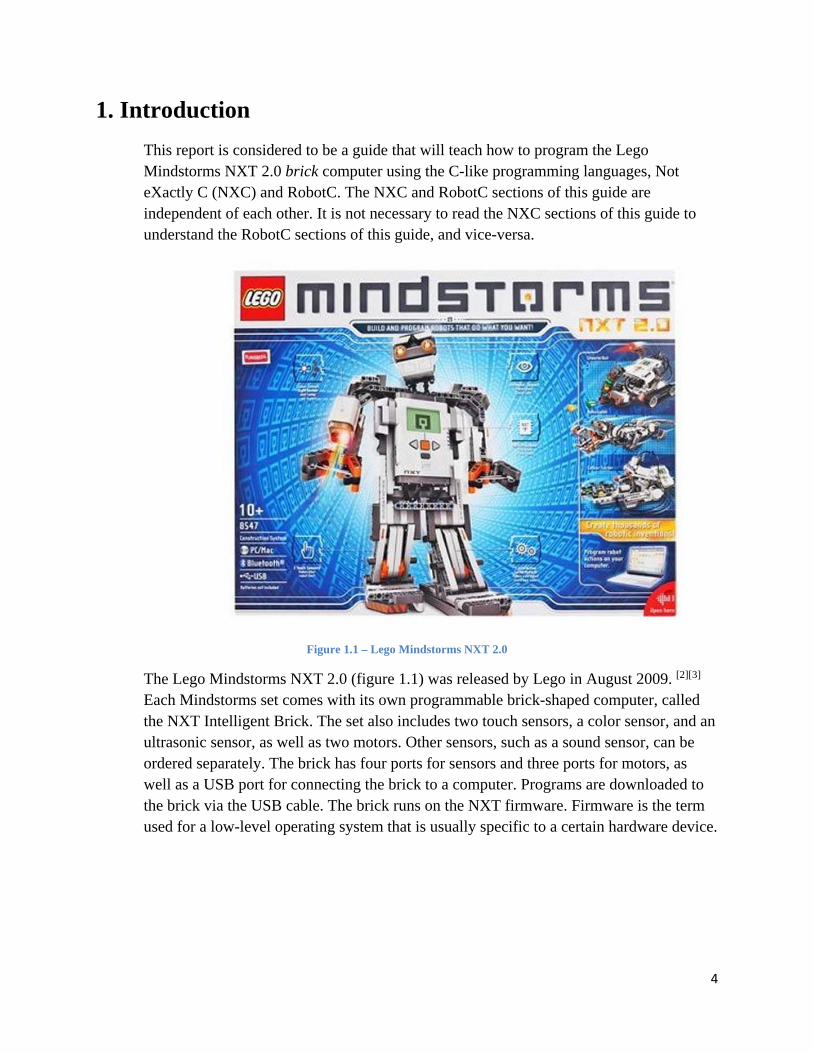
This report is considered to be a guide that will teach how to program the Lego Mindstorms NXT 2.0 brick computer using the C-like programming languages, Not eXactly C (NXC) and RobotC. The NXC and RobotC sections of this guide are independent of each other. It is not necessary to read the NXC sections of this guide to understand the RobotC sections of this guide, and vice-versa.
Figure 1.1 – Lego Mindstorms NXT 2.0
The Lego Mindstorms NXT 2.0 (figure 1.1) was released by Lego in August 2009. [2][3] Each Mindstorms set comes with its own programmable brick-shaped computer, called the NXT Intelligent Brick. The set also includes two touch sensors, a color sensor, and an ultrasonic sensor, as well as two motors. Other sensors, such as a sound sensor, can be ordered separately. The brick has four ports for sensors and three ports for motors, as well as a USB port for connecting the brick to a computer. Programs are downloaded to the brick via the USB cable. The brick runs on the NXT firmware. Firmware is the term used for a low-level operating system that is usually specific to a certain hardware device.

5
1.1 – Not eXactly C
Not eXactly C, or NXC, is based on the assembly language, Next Byte Codes (NBC) [4]. Its syntax is very similar to the C programming language. NXC was developed by John C. Hanson, who also developed NBC, as well as the Bricx Command Center. Like the majority of other programming languages, it has a syntax, and must be compiled before it can be run.[1]
1.2 - RobotC
“ROBOTC is a powerful C-based programming language with a Windows environment for writing and debugging programs, and the only programming language at this level that offers a comprehensive, real-time debugger. ROBOTC is a cross-platform solution that allows students to learn the type of c-based programming used in advanced education and professional applications.” [5]
–from robotc.net
The RobotC language and the RobotC IDE are developed by the Robo Matter Corporation. NXC and RobotC are similar because both are based on the C programming language. The main difference between the two languages is the names of the functions that control the robot.

6
2 – Getting Started with NXC
Before doing any programming, some preparation needs to be done. The rest of this section describes the respective step.
2.1 – Installing Bricx Command Center on Windows
The Bricx Command Center (BricxCC) will be used to write and run NXC programs. BricxCC is an Integrated Development Environment (IDE) that was developed by John C. Hanson, the same person who developed NXC. Follow the steps below to install and set up BricxCC.
1) Go to the website http://bricxcc.sourceforge.net and click on “BricxCC latest version” in the Downloading section (circled in red in figure 2.1). This links to the downloads page which has the latest version of BricxCC as well as all of its older versions.
Figure 2.1 – The Bricx Command Center Homepage

7
2) At the top of the list, there will be the latest version, “bricxcc 3.3.8.9”. Click the link circled in red in figure 2.2 to download that version.
Figure 2.2 – BricxCC’s Sourceforge Download Page
3) Run the .exe file that was just downloaded to start the setup. 4) It is recommended not to change anything and just install everything with
the default settings. 5) Open the program from the start menu and a screen asking for information
on the NXT brick will pop up. Move on to the next section for directions on how to connect to the NXT brick.

8
2.2 – Connecting to the NXT Brick
When BricxCC is first opened, the screen in figure 2.3 should pop up. Follow the steps below to connect the brick to a computer for use with BricxCC.
Figure 2.3 – The BricxCC Find Brick Menu
1) Turn the NXT brick on by pressing the orange button in the center. Then take the brick and connect it to a USB port on a computer with the USB cable included with the set. Refer to figure 2.4 to see how the brick connects to a computer.
Figure 2.4 – The NXT Brick Connected to a Laptop

9
2) In the dropdown box under Port, select “usb”, and for Brick type, select “NXT”. Keep the firmware as “Standard”, and then hit OK.
3) BricxCC should now connect to the brick, and BricxCC will open. To make sure everything is working right, a simple test program will be run as described in the next section.
2.3 – Running a Test Program
For the first program, a standard “Hello World!” type program will be used. The “Hello World!” program is usually one of the most basic example programs in the majority of programming languages.
To open a new file, in the top menu, click on File, and then click “New”. Type the code shown in figure 2.5 into the text editor of BricxCC. Make sure it is typed exactly as shown.
Figure 2.5 – A Hello World Program in BricxCC
This program will simply have the LCD screen of the NXT brick display “Hello World!” for 10 seconds. To save this program, go to File->Save, or just hit the save button or Ctrl+S.
The program needs to be compiled before it can run. To compile the program, go to Compile->Compile in the top menu, of just hit F5. If there are no errors, the program will compile correctly. If there are errors, they will be shown by the compiler at the bottom of the text editor.
To download the program to the brick, go to Compile->Download or just hit F6. The NXT brick will make a “beep” sound to confirm that a program has been

10
downloaded to it. To run the program, go to Compile->Run, or just hit F7. The NXT should now display “Hello World!” on its screen.
BricxCC has now been successfully set up for use with the Lego Mindstorms NXT brick. Section 3 of this guide will go over basic programming, starting by explaining how the program that was just run works.

11
3 – Basic Programming in NXC
To get started with programming, this guide will begin with some simple NXC examples and go over each part of program, step-by-step.
3.1 – Hello World!
Figure 3.1 – A Simple Hello World Program in NXC
The program in figure 3.1 is the same hello world program that was used used in section 2.3. This section will go over each part of this program and explain what it does in NXC.
The first line of the program is task main(). task is a keyword that denotes a task to be performed. An NXC program must always have a task named main, as that is where the program begins execution. A set of parentheses always comes after a task name, and these can be used for parameters, also called arguments, which will be explained in more detail later. The code that is part of a task is always surrounded by a pair of brackets. The first bracket is placed after the task name and the second is place after the last line of code that is part of that task.
The third line of the program TextOut(0, LCD_LINE1, “Hello World!”); is what outputs “Hello World!” to the screen. TextOut() is a function that writes text to the NXT screen. The elements in the parentheses are the function’s arguments. Each argument except for the last must have a comma after it to separate it from the other arguments. “0” and “LCD_LINE1” define where the line will start on the screen. Think of “0” as the x-coordinate and ‘LCD_LINE1” as the y-coordinate. “LCD_LINE1” is a predefined constant that evaluates as the “first line” of the LCD screen. The third argument, “Hello World!” is the text to be written to the screen. Whenever there is a line of text in a program (usually called a string), it needs to be surrounded by quotation marks “ ” so the compiler understands that it is a line of text. The line ends with a semicolon “;”. A semicolon tells the compiler that a statement has ended. Forgetting to put a semicolon after a statement will result in a compiler error. This is one of the most common mistakes for beginners to make in programming. Always remember to check for missing semicolons.

12
The fourth line of the program, Wait(10000); tells the program to wait 10 seconds. The wait function basically does what the name says it does; it makes the program wait for a certain amount of time in milliseconds until the next line of the program is to be executed. The amount of time that the program is to wait is decided by its argument. The reason the number is 10000 is because 10000 milliseconds = 10 seconds. It was chosen that the program should wait for 10 seconds because the program will end immediately after this line. Without this line, “Hello World!” would instantly appear and disappear from the screen. In other words, it was arbitrarily chosen that the program would wait for 10 seconds. It could be 1 second or 1,000,000 seconds! After the program runs out of lines to run, it ends its execution.
3.2 – Motors
Figure 3.2 – An NXT Motor
For the next step, this section will use some of the robot parts that came with the NXT set, starting with the simplest, yet one of the most useful parts, the motors. Hook the motor (figure 3.2) into the port labeled “B” at the top of the NXT brick.
Figure 3.3 – A Program that Controls the Motors
The program in figure 3.3 makes the motor connected to port B run forward for 5 seconds at 100% power and then in reverse at 50% power for 5 seconds. The functions that control the motors are OnFwd and OnRev. The first argument is the

13
port the motor is connected to and the second argument is the % power the motor should run at, ranging from 0 to 100.
3.3 – Sensors
The NXT set comes with multiple sensors that are used to get input from the robot’s environment. The NXT brick can be programmed to do certain things based on this input.
3.3.1 – Touch Sensor
Figure 3.4 – Lego Mindstorms Touch Sensor
The touch sensor, pictured in figure 3.4, is a sensor that returns an integer value of “1” if the sensor is pushed down, and if it is not being pushed down, it returns “0”.
Figure 3.5 – An NXC Program Using the Touch Sensor
The program in figure 3.5 makes the motors B and C run until the touch sensor is pushed down. The line “SetSensor(IN_1, SENSOR_TOUCH)” tells the program that port 1 is taking input from the touch sensor. The NXT brick has 4 ports, which are defined as IN_1, IN_2, IN_3, IN_4. The first argument of SetSensor() is the port the sensor is plugged into and the second argument is the type of sensor. The motors plugged into port B and C are started by OnFwd(OUT_BC, 50). The line “until (SENSOR_1 == 1);” will have the program wait until the value returned by the touch sensor is “1”. The touch sensor returns a value of “1” when it is pressed down and “0” when it is not. So essentially, the motors will run until the
14
touch sensor is pressed. The line “Off(OUT_BC);” is what turns the motors off.
3.3.2 – Ultrasonic Sensor
Figure 3.6 – The Ultrasonic Sensor
The ultrasonic sensor, pictured in figure 3.6, works like sonar. It sends out ultrasonic waves that bounce back to the sensor. The sensor measures the time it takes for the waves to return and calculates the distance to the object based on this time.
Figure 3.7 – An NXC program Using the Ultrasonic Sensor
The program in figure 3.7 makes the NXT move forward until it senses there is an object within 20 cm in front of it. When it finds an obstacle, it stops the B motor and puts the C motor in reverse to turn the robot to the right (assuming motor B is on the left and motor C is on the right). The robot will continue turning until the object is no longer in front of it. The robot will then continue moving forward until it detects another object where it will repeat the same process again. The robot continues running because the program uses what is called a loop in programming.
The while statement is what is used to create loops in NXC. Its syntax is as follows:
15
while (condition) { statements; } As the loop starts it checks the condition to see if it is true or false. If it is true, then the statements in the brackets are executed. If it is false, then the loop is broken and the program continues on after the closing bracket. After the statements are executed, the program again checks the condition to see if it is true or false. If it is true the statements are executed again and if it is false, the loop is broken. Hence the program will continue to loop until the condition is false.
In the program in figure 3.7, the condition for the while loop is whether the value the ultrasonic sensor is returning is less than 20. “SensorUS(IN_4)” returns the value normalized for the ultrasonic sensor, given the port that sensor is plugged into. The value represents the distance to an object in centimeters. So “while(SensorUS(IN_4) < 20)” will make the statements in the loop repeat until the object is 20 centimeters or more away.
The entire program is within a “while(true)” loop which is a loop that loops indefinitely. So when the loop that causes the robot to turn is broken, the program will go back to the beginning.
3.3.3 – Sound Sensor
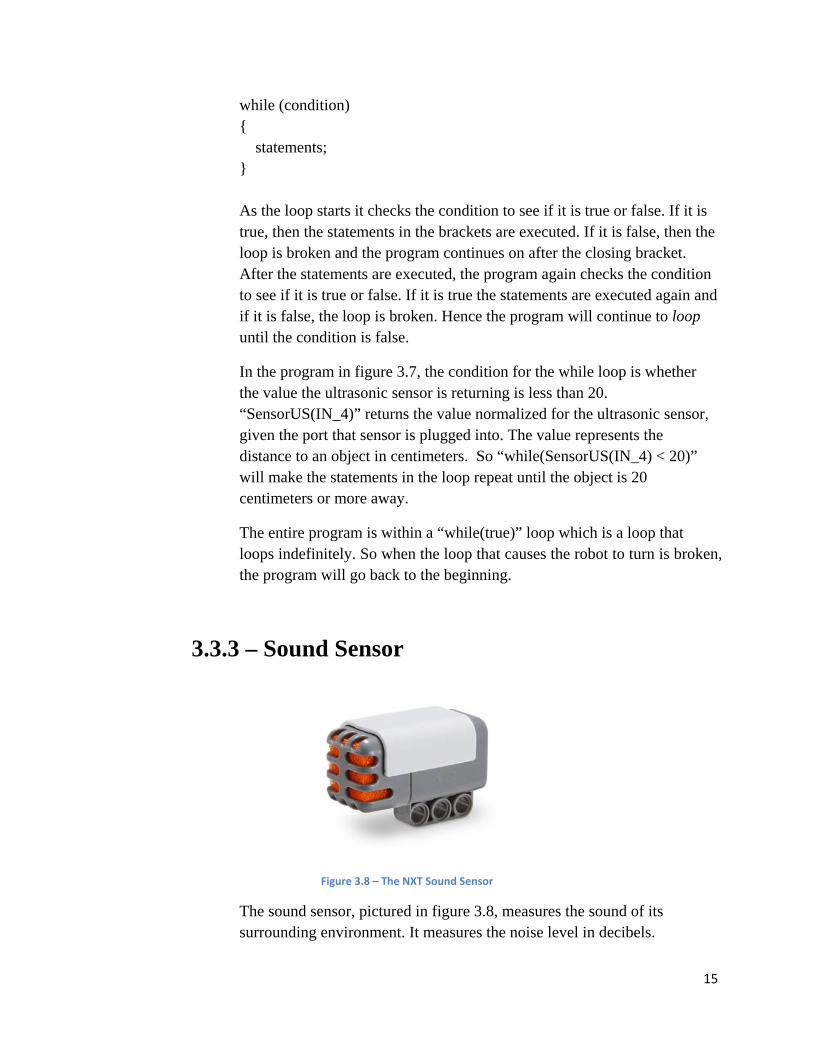
Figure 3.8 – The NXT Sound Sensor
The sound sensor, pictured in figure 3.8, measures the sound of its surrounding environment. It measures the noise level in decibels.
16
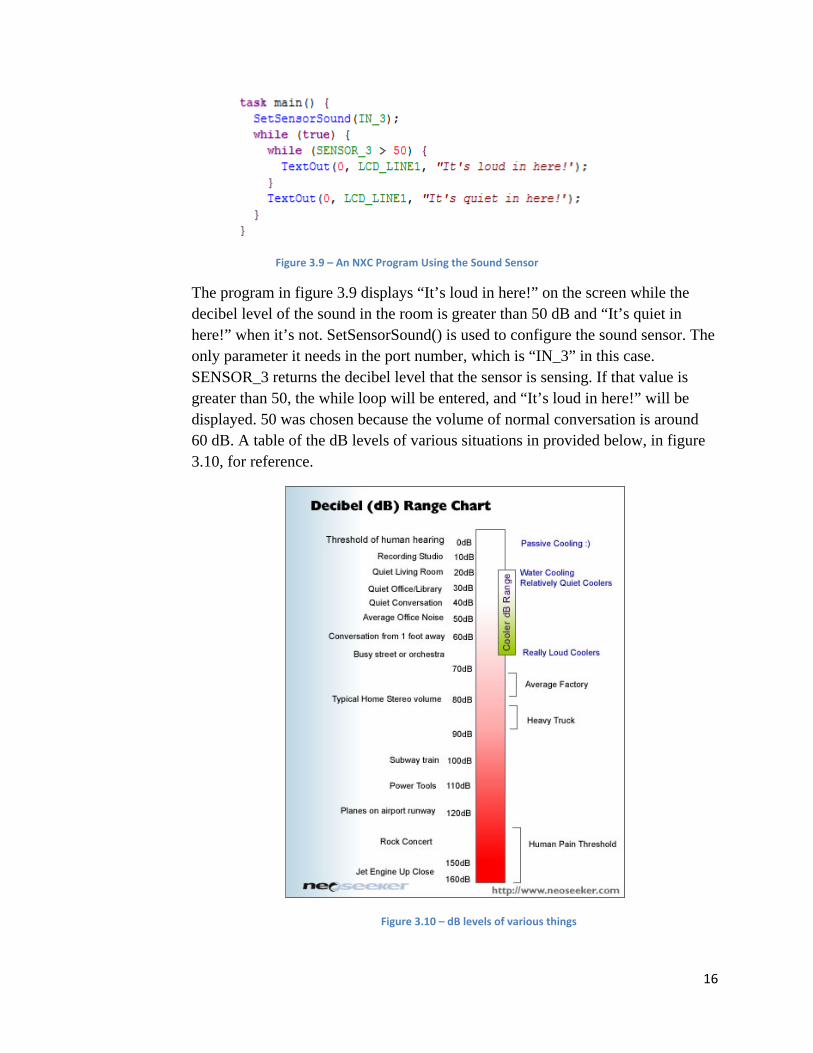
Figure 3.9 – An NXC Program Using the Sound Sensor
The program in figure 3.9 displays “It’s loud in here!” on the screen while the decibel level of the sound in the room is greater than 50 dB and “It’s quiet in here!” when it’s not. SetSensorSound() is used to configure the sound sensor. The only parameter it needs in the port number, which is “IN_3” in this case. SENSOR_3 returns the decibel level that the sensor is sensing. If that value is greater than 50, the while loop will be entered, and “It’s loud in here!” will be displayed. 50 was chosen because the volume of normal conversation is around 60 dB. A table of the dB levels of various situations in provided below, in figure 3.10, for reference.
Figure 3.10 – dB levels of various things

17
4 – Advanced Programming with NXC
This section will cover advanced programming with the NXC language. It is intended for programmers who are experienced with control structures, user-defined functions, and other advanced programming concepts.
4.1 – The Path Runner Program
Figure 4.1 – The setup used for testing the Path Runner program

18

19

20
Figure 4.2 – The Path Runner Program
The program in figure 4.2 is a path running program that will have the NXT move travel along a path that uses walls as boundaries. It mainly uses the ultrasonic sensor to detect objects in front of it, but it also has the touch sensor as a backup. It stop if a loud noise is made (greater than 95 dB), which is detected by the sound sensor.
There are some requirements for the path due to the limitations of the program. The turns in the path must be 90 degree turns because the robot turns by reversing one motor for a set amount of time, that time being the amount of time it takes to turn 90 degrees. That time will also vary based on the surface the robot is running on, and of course, the speed the motors are running. The robot has only one ultrasonic sensor, so if a path opens up to its left or right, there must be a wall in front of it so that it knows to turn.
The reason the touch sensor is used as a backup is because, through testing, the ultrasonic sensor has shown that it is not 100% reliable. When the touch sensor is pressed, the program does the same thing that it does if the ultrasonic sensor detects something.
And now to how the program actually works. First of all, the program keeps track of the direction the robot is moving through the “direction” variable. The variable can be numbers 0 to 3. 0 means “north”, 1 means “east”, 2 means “south”, and 3 means “west”.
The program begins by running the runPath() function. This function starts with an infinite loop that first sets the motors to the speed specified by the “speed” variable. The loop then checks the sensor values one at a time using if and while statements. If an object is detected by the ultrasonic sensor (less than 20 cm in front of the robot), then the robot is turned to the right, it then checks if “direction” is equal to “lastDirection”. lastDirection is a variable used to keep track of the direction the robot was coming from. If the robot ends up doing a 180° turn (as it will in the case of a left turn), then the robot should not travel back the way it

21
came, but should instead do another right turn to complete a “left turn” (three right turns). Therefore, if “direction” is equal to the opposite of “lastDirection”, then the program has the robot turn right again.
After the program is done checking if it needs to turn, “lastDirection” will be set equal to “direction” if more than 1 second has passed since the robot has turned. This is check by subtracting the current program running time from the time of the last turn, which is stored in the variable “timeOfLastTurn” and is reset after every turn. The reason for waiting for 1 second to pass is because after robot turns right, it may need to move forward slightly before detecting the wall that is directly to its right (this will happen in most cases where a left turn is needed). This way, the “lastDirection” variable will keep the correct value.
Finally, if the ultrasonic and touch sensors fail and the robot needs to be stopped, the program checks the sound sensor to see if it is reading a value greater than 95 dB. If a sound is made that is louder than 95 dB, the robot will display a message telling the user what caused the robot to stop for 5 seconds, and then the program will break the loop, which will end the program. The reason a dB level as high as 95 was chosen was because sometimes the dB level of the NXT motors will reach over 90 dB (most likely because they are so close together).
There is also a condition in the if statement for the sound sensor that requires the running time of the program to be greater than 1 second. This exists is because, due to reasons unknown, the sound sensor will return unusually high values immediately after the program starts running. When this happened, the program would end as soon as it began. This workaround was added to solve this problem.

22
5 – Getting Started with RobotC
As with NXC, RobotC also needs to be setup before it can be used.
5.1 – Installing RobotC on Windows
The RobotC for Lego Mindstorms IDE (Integrated Development Environment) will be used to write and run RobotC programs. The free trial version will be used for this guide. Follow the steps below to install and set up RobotC.
1) Go to the website http://robotc.net/download/nxt/ and click on the link circled in red in figure 5.1 to begin downloading the trial version of RobotC for Lego Mindstorms.
Figure 5.1 – The RobotC for Mindstorms Download Page
2) Once the download has finished, run the .exe file that was just downloaded to start the setup.
3) Install everything with the default settings and then open the RobotC program.
5.2 – Connecting to the NXT Brick
Once the RobotC IDE is opened, follow the next steps to connect to the NXT brick.
1) Turn the NXT brick on by pressing the orange button in the center. Then take the brick and connect it to a USB port on the computer with the USB
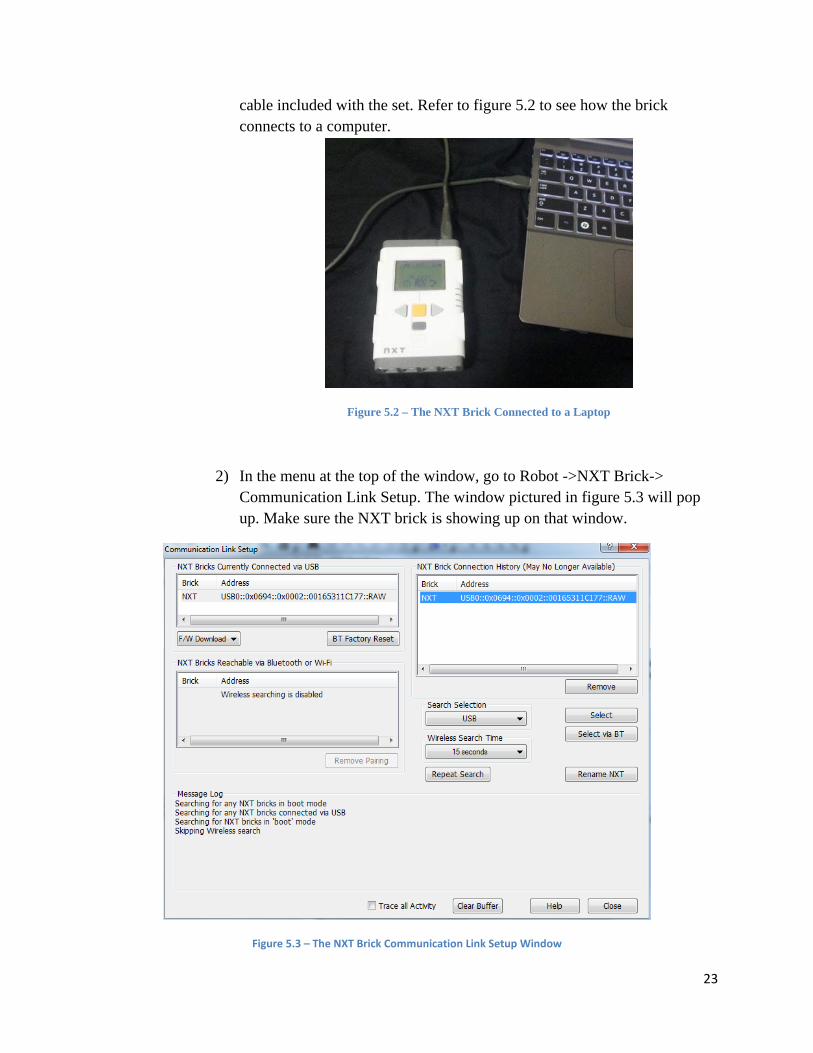
23
cable included with the set. Refer to figure 5.2 to see how the brick connects to a computer.
Figure 5.2 – The NXT Brick Connected to a Laptop
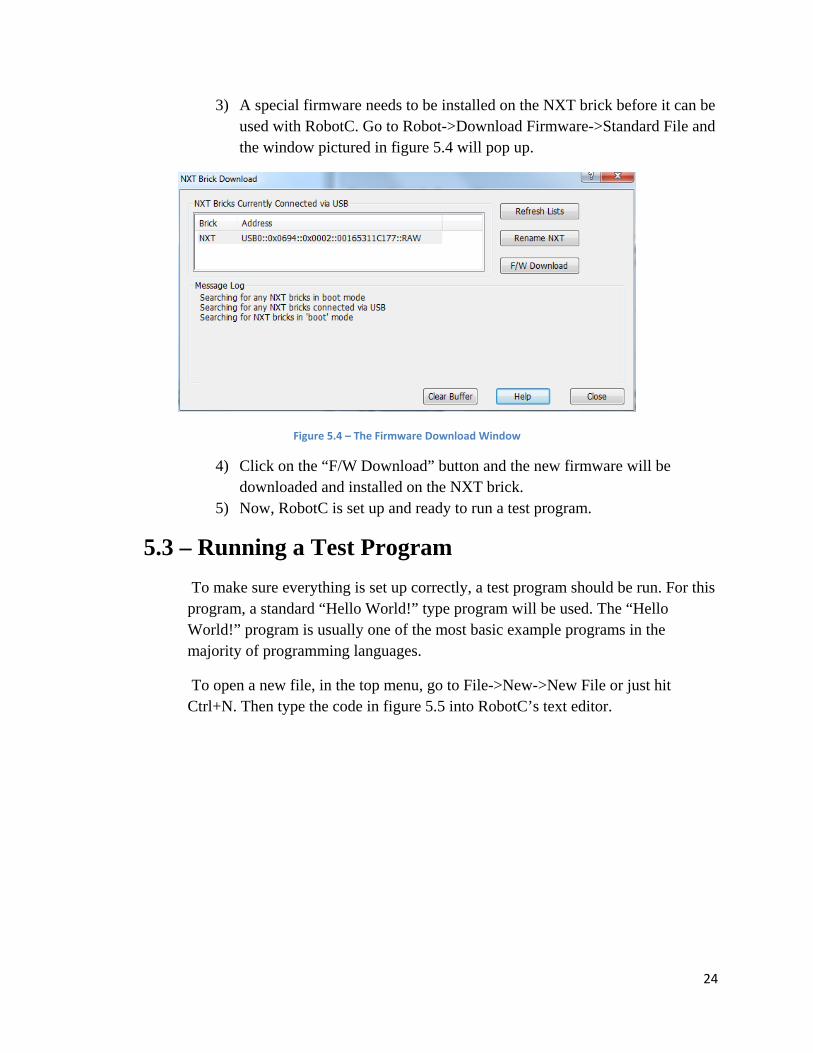
2) In the menu at the top of the window, go to Robot ->NXT Brick-> Communication Link Setup. The window pictured in figure 5.3 will pop up. Make sure the NXT brick is showing up on that window.
Figure 5.3 – The NXT Brick Communication Link Setup Window
24
3) A special firmware needs to be installed on the NXT brick before it can be used with RobotC. Go to Robot->Download Firmware->Standard File and the window pictured in figure 5.4 will pop up.
Figure 5.4 – The Firmware Download Window
4) Click on the “F/W Download” button and the new firmware will be downloaded and installed on the NXT brick.
5) Now, RobotC is set up and ready to run a test program.
5.3 – Running a Test Program
To make sure everything is set up correctly, a test program should be run. For this program, a standard “Hello World!” type program will be used. The “Hello World!” program is usually one of the most basic example programs in the majority of programming languages.
To open a new file, in the top menu, go to File->New->New File or just hit Ctrl+N. Then type the code in figure 5.5 into RobotC’s text editor.

25
Figure 5.5 – The RobotC IDE
This program will simply have the LCD screen of the NXT brick display “Hello World!” for 10 seconds. To save this program, go to File->Save, or just hit the save button or Ctrl+S.
The program needs to be compiled before it can run. To compile the program, go to Robot->Compile Program in the top menu, of just hit F7. If there are no errors, the program will compile correctly. If there are errors, they will be shown by the compiler at the bottom of the text editor.
To compile and download the program to the brick, go to Robot->Compile and Download Program or just hit F5. The window shown in figure 5.6 should now pop up on the screen. This is the debugger window. Hit the “start” button to run the program. The NXT should now display “Hello World!” on its screen.
Figure 5.6 – The Debugger Window

26
RobotC has now been successfully set up for use with the Lego Mindstorms NXT brick. Section 6 of this guide will go over basic programming, starting by explaining how the program that was just run works.

27
6 – Basic Programming in RobotC
This section will go over basic programming in RobotC, which is similar to NXC, but has many differences as well.
6.1 – Hello World!
Figure 6.1 – A Simple Hello Program in RobotC
The program in figure 6.1 is the same hello world program that was used in section 5.5. This section will go over each part of this program and explain what it does in RobotC.
The first line of the program is task main(). task is a keyword that denotes a task to be performed. A RobotC program must always have a task named main, as that is where the program begins execution. A set of parentheses always comes after a task name, and these can be used for parameters, also called arguments, which will be explained in more detail later. The code that is part of a task is always surrounded by a pair of brackets. The first bracket is placed after the task name and the second is place after the last line of code that is part of that task.
The third line of the program nxtDispalyString(1, “Hello World!”); is what outputs “Hello World!” to the NXT brick’s screen. nxtDisplayString() is a function that writes a string (a line of text) to the screen. The elements in the parentheses are the function’s arguments. Each argument except for the last must have a comma after it to separate it from the other arguments. The first argument of nxtDisplayString() is the line number of the NXT screen that the text should be displayed on. The second argument, “Hello World!” is the text to be written to the screen. In most programming languages, RobotC being one of them, being surrounded by quotation marks “ ” is what tells the compiler that a line of text is a string. The line ends with a semicolon “;”. A semicolon tells the compiler that a statement has ended. Forgetting to put a semicolon after a statement will result in a compiler error. This is one of the most common mistakes for beginners to make in programming.
The fourth line of the program, Sleep(10000); tells the program to wait 10 seconds. The Sleep function stops a program’s execution of the specified amount of time in milliseconds. After that time has passed, the program will resume
28
execution. The amount of time that the program is to wait is decided by its argument. The reason the number is 10000 is because 10000 milliseconds = 10 seconds. It was chosen that the program should wait for 10 seconds because the program will end immediately after this line. Without this line, “Hello World!” would instantly appear and disappear from the screen. In other words, it was arbitrarily chosen that the program would wait for 10 seconds. After the program runs out of lines to run, it ends its execution.
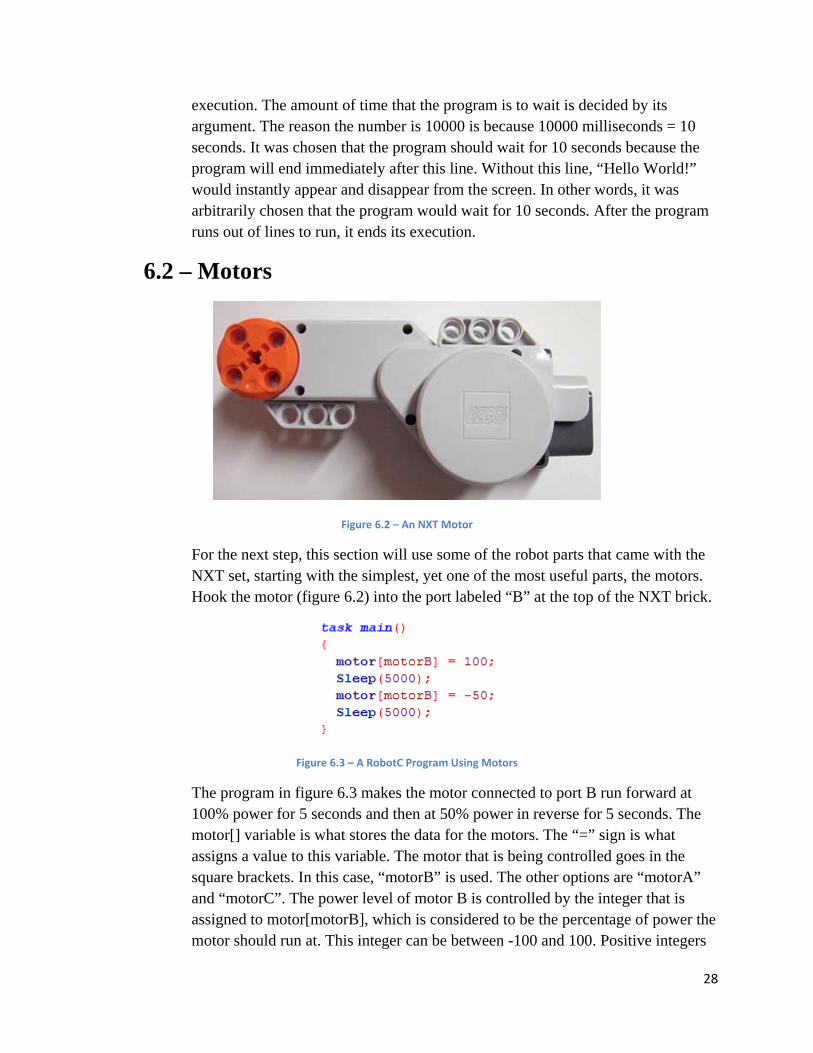
6.2 – Motors
Figure 6.2 – An NXT Motor
For the next step, this section will use some of the robot parts that came with the NXT set, starting with the simplest, yet one of the most useful parts, the motors. Hook the motor (figure 6.2) into the port labeled “B” at the top of the NXT brick.
Figure 6.3 – A RobotC Program Using Motors
The program in figure 6.3 makes the motor connected to port B run forward at 100% power for 5 seconds and then at 50% power in reverse for 5 seconds. The motor[] variable is what stores the data for the motors. The “=” sign is what assigns a value to this variable. The motor that is being controlled goes in the square brackets. In this case, “motorB” is used. The other options are “motorA” and “motorC”. The power level of motor B is controlled by the integer that is assigned to motor[motorB], which is considered to be the percentage of power the motor should run at. This integer can be between -100 and 100. Positive integers

29
will make the motor run in its forward direction, and negative integer will make it run in reverse. 0 will make the motor stop. The Sleep(5000) is what makes the motor wait 5 seconds before assigning the new integer to motor B.
6.3 – Sensors
The NXT set comes with multiple sensors that are used to get input from the robot’s environment. The NXT brick can be programmed to do certain things based on this input.
6.3.1 – Touch Sensor
Figure 6.4 – Lego Mindstorms Touch Sensor
The touch sensor, pictured in figure 6.4, is a sensor that returns a integer value of “1” if the sensor is pushed down, and if it is not being pushed down, it returns “0”.
Figure 6.5 – A RobotC Program Using the Touch Sensor
The program in figure 6.5 has motor B and C run at 50% power until the touch sensor is pushed down. The first line of this program is the most important. #pragma is what is called a preprocessor and is used to define something “before” a program begins its execution. What is being defined in this case is the touch sensor. The function config is used to configure sensors and has four arguments. The first argument is “Sensor” and tells

30
the function that it is configuring a sensor. The second argument is the port the sensor is plugged into. It can be S1, S2, S3, S4. The third argument is the name of the sensor which will be how the sensor is referred to in the program. It can be named anything the user would like, but it is generally good to name it in a way that it is easy to identify what it is. The fourth argument is the sensor’s type. This is the most important part because it tells the program how the sensor’s data should be normalized so that it can be used properly. There are multiple type sensors that the NXT can used such as “sensorTouch”, “sensorSONAR”, “sensorLight”, and “sensorSoundDB”.
A while statement is what is called a loop in programming. Its syntax is as follows: while (condition) { statements; } As the loop starts it checks the condition to see if it is true or false. If it is true, then the statements in the brackets are executed. If it is false, then the loop is broken and the program continues on after the closing bracket. After the statements are executed, the program again checks the condition to see if it is true or false. If it is true the statements are executed again and if it is false, the loop is broken. Hence the program will continue to loop until the condition is false.
In the program in figure 6.5, the condition for the while loop is whether the value the touch sensor is returning is equal to 0 or not. “SensorValue[]” returns the value of sensor given its name as defined by sensor(). The touch sensor can only return a value of 1 or 0, 1 meaning the sensor is pushed down and 0 meaning the sensor is not pushed down. So “while(SensorValue[touchSensor] == 0)” will make the statements in the loop repeat until the touch sensor is pressed down. When the touch sensor is pressed down, the value will be 1, thus the condition will be false, and the loop will break.

31
6.3.2 – Ultrasonic Sensor
Figure 6.6 – The Ultrasonic Sensor
The ultrasonic sensor, pictured in figure 6.6, works like sonar. It sends out ultrasonic waves that bounce back to the sensor. The sensor measures the time it takes for the waves to return and calculates the distance to the object based on this time.
Figure 6.7 – A RobotC Program Using the Ultrasonic Sensor
The program in figure 6.7 makes the NXT move forward until it senses there is an object within 20 cm in front of it. When it finds an obstacle, it stops the B motor and puts the C motor in reverse to turn the robot to the right (assuming motor B is on the left and motor C is on the right). The robot will continue turning until the object is no longer in front of it. The robot will then continue moving forward until it detects another object where it will repeat the same process again. The robot continues running because the program is in a “while(true)” loop, which runs indefinitely.
In the program in figure 5.7, the condition for the while loop is whether the value the ultrasonic sensor is returning is less than 20. “SensorValue[sonarSensor]” returns the value normalized for the

32
ultrasonic sensor, given the sensor’s name as defined by sensor(). The value represents the distance to an object in centimeters. So “while(SensorValue[sonarSensor] < 20)” will make the statements in the loop repeat until the object is 20 centimeters or more away.
The entire program is within a “while(true)” loop which is a loop that loops indefinitely. So when the loop that causes the robot to turn is broken, the program will go back to the beginning.
6.3.3 – Sound Sensor
Figure 6.8 – The NXT Sound Sensor
The sound sensor, pictured in figure 6.8, measures the sound of its surrounding environment. It measures the noise level in decibels.
The program in figure 6.9 displays “It’s loud in here!” on the screen while the decibel level of the sound in the room is greater than 50 dB and “It’s quiet in here!” when it’s not. Configuring the sound sensor is the same as configuring other sensors. config() needs “Sensor”, the port, a name, and the sensor type. For the sensor type, the sound sensor uses “sensorSoundDB”. Make sure that the “DB” is at the end; otherwise, the program will not work. SensorValue[soundSensor] returns the decibel

33
level that the sensor is sensing. If that value is greater than 50, the while loop will be entered, and “It’s loud in here!” will be displayed. 50 was chosen because the volume of normal conversation is around 60 dB. A table of the dB levels of various situations in provided below, in figure 5.10, for reference.
Figure 6.10 – dB levels of various situations

34
7 – Advanced Programming with RobotC
This section will cover advanced programming with the RobotC language. It is intended for programmers who are experienced with control structures, user-defined functions, and other advanced programming concepts.
7.1 – Path Runner
Figure 4.1 – The setup used for testing the Path Runner program

35
36

37
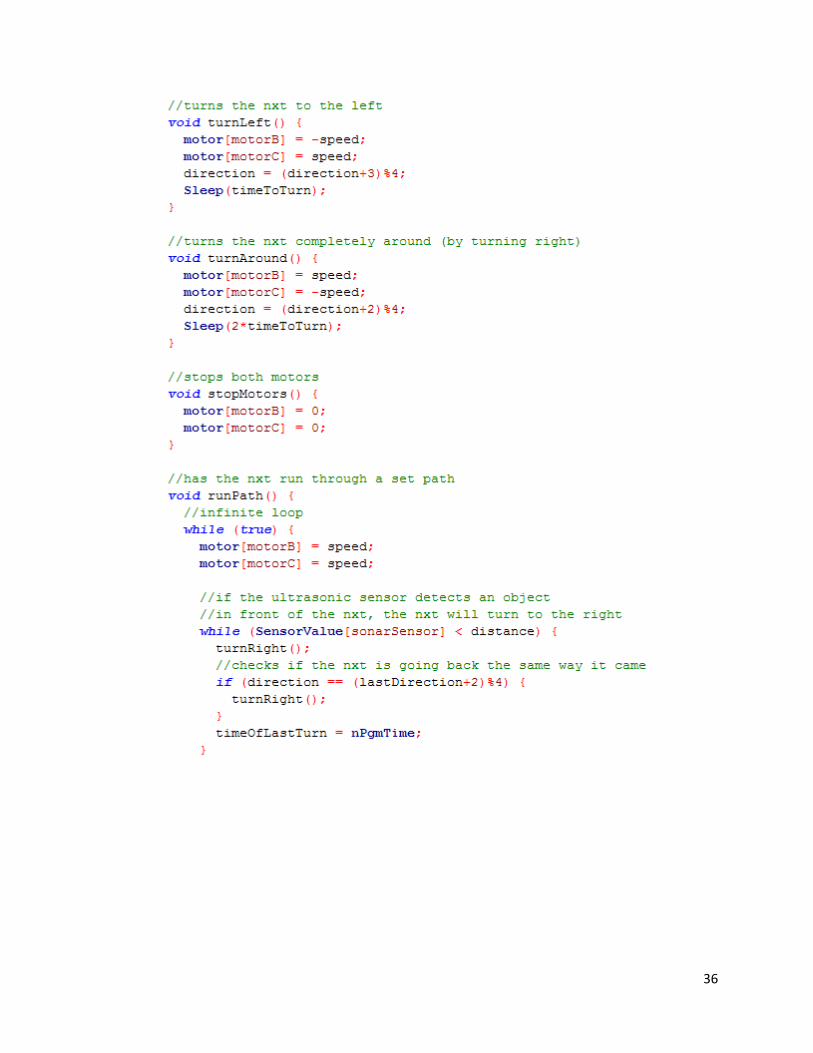
Figure 7.2 – The Path Runner Program
The program in figure 7.2 is a path running program that will have the NXT move travel along a path that uses walls as boundaries. It mainly uses the ultrasonic sensor to detect objects in front of it, but it also has the touch sensor as a backup. It stop if a loud noise is made (greater than 95 dB), which is detected by the sound sensor.

38
There are some requirements for the path due to the limitations of the program. The turns in the path must be 90 degree turns because the robot turns by reversing one motor for a set amount of time, that time being the amount of time it takes to turn 90 degrees. That time will also vary based on the surface the robot is running on, and of course, the speed the motors are running. The robot has only one ultrasonic sensor, so if a path opens up to its left or right, there must be a wall in front of it so that it knows to turn.
The reason the touch sensor is used as a backup is because, through testing, the ultrasonic sensor has shown that it is not 100% reliable. When the touch sensor is pressed, the program does the same thing that it does if the ultrasonic sensor detects something.
And now to how the program actually works. First of all, the program keeps track of the direction the robot is moving through the “direction” variable. The variable can be numbers 0 to 3. 0 means “north”, 1 means “east”, 2 means “south”, and 3 means “west”.
The program begins by running the runPath() function. This function starts with an infinite loop that first sets the motors to the speed specified by the “speed” variable. The loop then checks the sensor values one at a time using if and while statements. If an object is detected by the ultrasonic sensor (less than 20 cm in front of the robot), then the robot is turned to the right, it then checks if “direction” is equal to “lastDirection”. lastDirection is a variable used to keep track of the direction the robot was coming from. If the robot ends up doing a 180° turn (as it will in the case of a left turn), then the robot should not travel back the way it came, but should instead do another right turn to complete a “left turn” (three right turns). Therefore, if “direction” is equal to the opposite of “lastDirection”, then the program has the robot turn right again.
After the program is done checking if it needs to turn, “lastDirection” will be set equal to “direction” if more than 1 second has passed since the robot has turned. This is check by subtracting the current program running time from the time of the last turn, which is stored in the variable “timeOfLastTurn” and is reset after every turn. The reason for waiting for 1 second to pass is because after robot turns right, it may need to move forward slightly before detecting the wall that is directly to its right (this will happen in most cases where a left turn is needed). This way, the “lastDirection” variable will keep the correct value.
Finally, if the ultrasonic and touch sensors fail and the robot needs to be stopped, the program checks the sound sensor to see if it is reading a value greater than 95 dB. If a sound is made that is louder than 95 dB, the robot will display a message

39
telling the user what caused the robot to stop for 5 seconds, and then the program will break the loop, which will end the program. The reason a dB level as high as 95 was chosen was because sometimes the dB level of the NXT motors will reach over 90 dB (most likely because they are so close together).
There is also a condition in the if statement for the sound sensor that requires the running time of the program to be greater than 1 second. This exists is because, due to reasons unknown, the sound sensor will return unusually high values immediately after the program starts running. When this happened, the program would end as soon as it began. This workaround was added to solve this problem.
40
7 – RobotNinja
RobotNinja is a Google Code based project that is written in Java. It is a web-based control for the Lego Mindstorms NXT robot.
“ This is a software system that provides a user Internet access to an autonomous soft realtime robot in a remote location. The entire project has three main parts: Client - The web-based frontend that allows the user to control the robot. Server/application - Mediator between the client and the robot. Robot - A Lego MindStorms NXT based robot. It should handle events like
collision with objects in its environment and loss of communication contact with the server without user interaction.
”[6]
-from the RobotNinja main page
The client side of the system is used to display the video feed, display the user interface, and send commands to the server. The server side of the system is used for image processing, to recieve coommands from the client, to translate commands, and to send commands to the robot. The robot part of the system is used for recieving commands, executing commands, backtracking, and collision detection.
7.1 – Setting Up RobotNinja
RobotNinja does not have an executable program, so it must be run directly from the source code. To download the source code, go to https://code.google.com/p/robotninja/source/browse/. Open the directories listed on the left and go to svn->trunk. You should see three directories: application, client, and robot. In each of these directories, there should be a “trunk” directory. Open this directory and download all the .java files in the directory. If there is a “src” directory within the trunk directory the .java files will be in there.
The source code uses libraries from leJOS and Java Media Framework. leJOS is a Java library for controlling the NXT robot. The Java Media Framework library is used for the video features of RobotNinja. Both libraries need to be downloaded and installed.
To download leJOS, go to http://sourceforge.net/projects/lejos/files/lejos-NXJ/0.9.1beta/ and download leJOS_NXJ_0.9.1beta-3_win32_setup.exe near the top of the list. Run through the setup to install the leJOS library.

41
To download the Java Media Framework, go to http://www.oracle.com/technetwork/java/javasebusiness/downloads/java-archive-downloads-java-client-419417.html#7372-jmf-2.1.1e-oth-JPR. The page should automatically scroll to the Java Media Framework (JMF) 2.1.1e section. Click on the “accept license agreement” button and download the “Windows Performance Pack” file. Run the setup to install the JMF library.

42
References
1. Hanson, John C. Lego Mindstorms NXT Power Programming. 2nd ed. Winnipeg: Varient Press, 2009. Print.
2. Wikipedia - http://en.wikipedia.org/wiki/Lego_Mindstorms_NXT 3. Wikipedia - http://en.wikipedia.org/wiki/Lego_Mindstorms_NXT_2.0 4. Bricx Command Center - http://bricxcc.sourceforge.net/ 5. RobotC - http://www.robotc.net/download/nxt/ 6. RobotNinja - https://code.google.com/p/robotninja/