robot minions assembly instructions page 1ravensblight.com/robotminionsinst.pdf · robot...
TRANSCRIPT
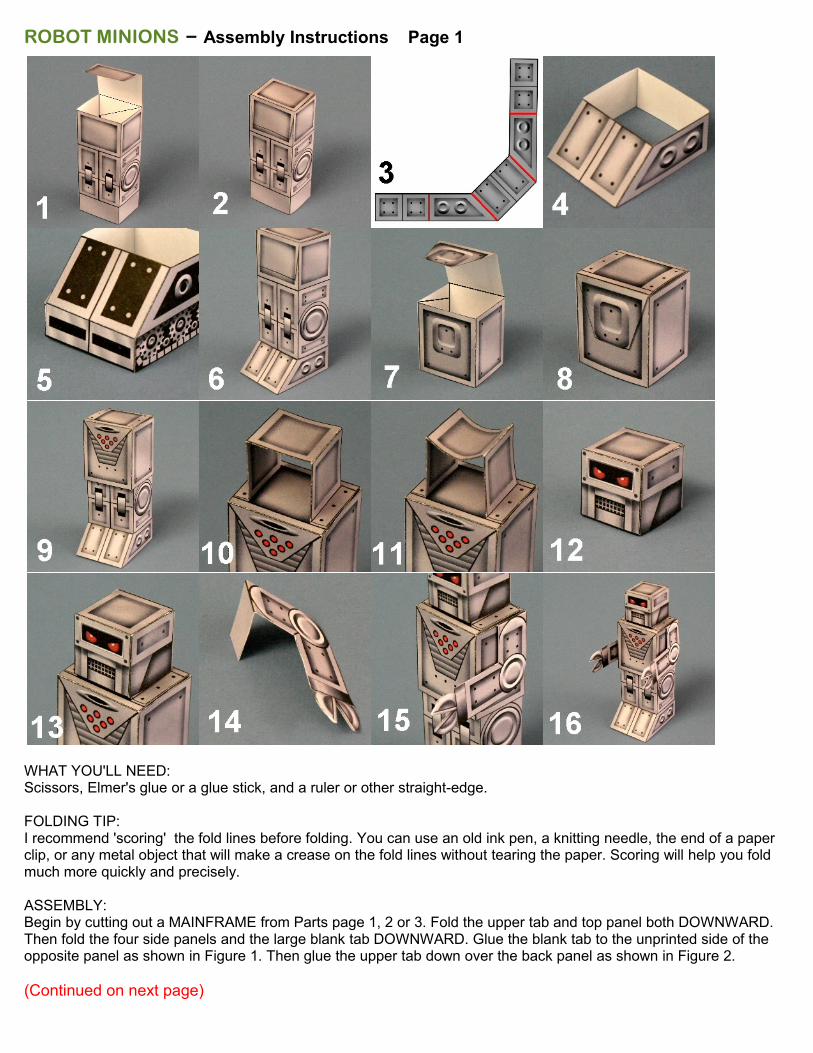
ROBOT MINIONS - Assembly Instructions Page 1
WHAT YOU'LL NEED: Scissors, Elmer's glue or a glue stick, and a ruler or other straight-edge.
FOLDING TIP: I recommend 'scoring' the fold lines before folding. You can use an old ink pen, a knitting needle, the end of a paper clip, or any metal object that will make a crease on the fold lines without tearing the paper. Scoring will help you fold much more quickly and precisely.
ASSEMBLY: Begin by cutting out a MAINFRAME from Parts page 1, 2 or 3. Fold the upper tab and top panel both DOWNWARD. Then fold the four side panels and the large blank tab DOWNWARD. Glue the blank tab to the unprinted side of the opposite panel as shown in Figure 1. Then glue the upper tab down over the back panel as shown in Figure 2.
(Continued on next page)
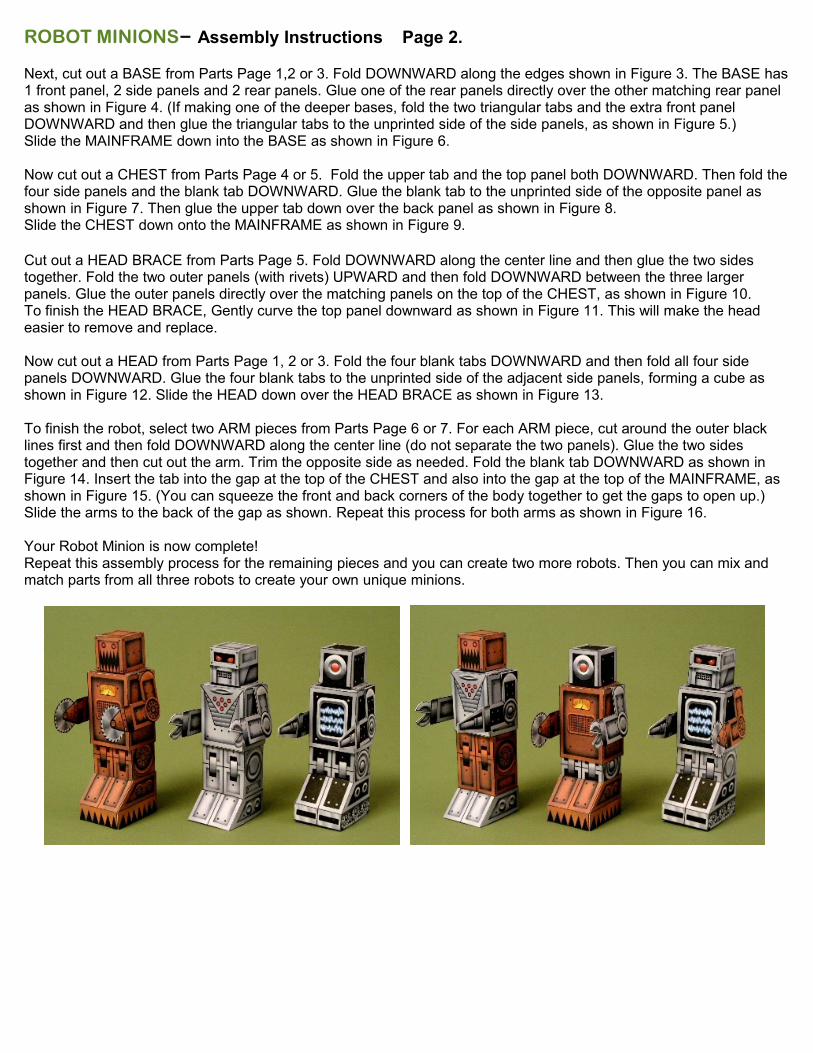
ROBOT MINIONS - Assembly Instructions Page 2.
Next, cut out a BASE from Parts Page 1,2 or 3. Fold DOWNWARD along the edges shown in Figure 3. The BASE has 1 front panel, 2 side panels and 2 rear panels. Glue one of the rear panels directly over the other matching rear panel as shown in Figure 4. (If making one of the deeper bases, fold the two triangular tabs and the extra front panel DOWNWARD and then glue the triangular tabs to the unprinted side of the side panels, as shown in Figure 5.)Slide the MAINFRAME down into the BASE as shown in Figure 6.
Now cut out a CHEST from Parts Page 4 or 5. Fold the upper tab and the top panel both DOWNWARD. Then fold the four side panels and the blank tab DOWNWARD. Glue the blank tab to the unprinted side of the opposite panel as shown in Figure 7. Then glue the upper tab down over the back panel as shown in Figure 8.Slide the CHEST down onto the MAINFRAME as shown in Figure 9.
Cut out a HEAD BRACE from Parts Page 5. Fold DOWNWARD along the center line and then glue the two sides together. Fold the two outer panels (with rivets) UPWARD and then fold DOWNWARD between the three larger panels. Glue the outer panels directly over the matching panels on the top of the CHEST, as shown in Figure 10.To finish the HEAD BRACE, Gently curve the top panel downward as shown in Figure 11. This will make the head easier to remove and replace.
Now cut out a HEAD from Parts Page 1, 2 or 3. Fold the four blank tabs DOWNWARD and then fold all four side panels DOWNWARD. Glue the four blank tabs to the unprinted side of the adjacent side panels, forming a cube as shown in Figure 12. Slide the HEAD down over the HEAD BRACE as shown in Figure 13.
To finish the robot, select two ARM pieces from Parts Page 6 or 7. For each ARM piece, cut around the outer black lines first and then fold DOWNWARD along the center line (do not separate the two panels). Glue the two sides together and then cut out the arm. Trim the opposite side as needed. Fold the blank tab DOWNWARD as shown in Figure 14. Insert the tab into the gap at the top of the CHEST and also into the gap at the top of the MAINFRAME, as shown in Figure 15. (You can squeeze the front and back corners of the body together to get the gaps to open up.) Slide the arms to the back of the gap as shown. Repeat this process for both arms as shown in Figure 16.
Your Robot Minion is now complete! Repeat this assembly process for the remaining pieces and you can create two more robots. Then you can mix and match parts from all three robots to create your own unique minions.