robix software, part i: quick start tutorial software tutorials.pdf · robix software, part i:...
TRANSCRIPT

Robix Software, Part I: Quick Start TutorialThis document may be copied or printed as desired.
Feedback: [email protected]. Home: www.robix.com Last mod: 2005-02-1
(Note: For the Tutorial on the LPT -connected Controller, See “Help” in that software)
Here's the Usbor servo controller. Connect 6 servos to positions 1-6 on connector 'A'.Make sure to have the yellow/orange wire on 'top', as shown in the All Cables thisOrientation legend, below right.
Page 1 of 19
Install the Robix SoftwareInstall the Robix software according to the instructions on the CD that accompanies it. Ifyou don't have the CD, you can download the software from www.robix.com by clickingon the download section and following the instructions there. Note that you may need toinstall the Java SDK if you don't have it already.
Plug in Power and USBOnce the software is installed, plug the power supply into the USB servo controller (calledthe “Usbor” for short) and use the USB cable to plug the controller into the computer.
Start the Software: Two ProgramsNext, start two programs, called Nexus and Nexway. You can start them in either order.
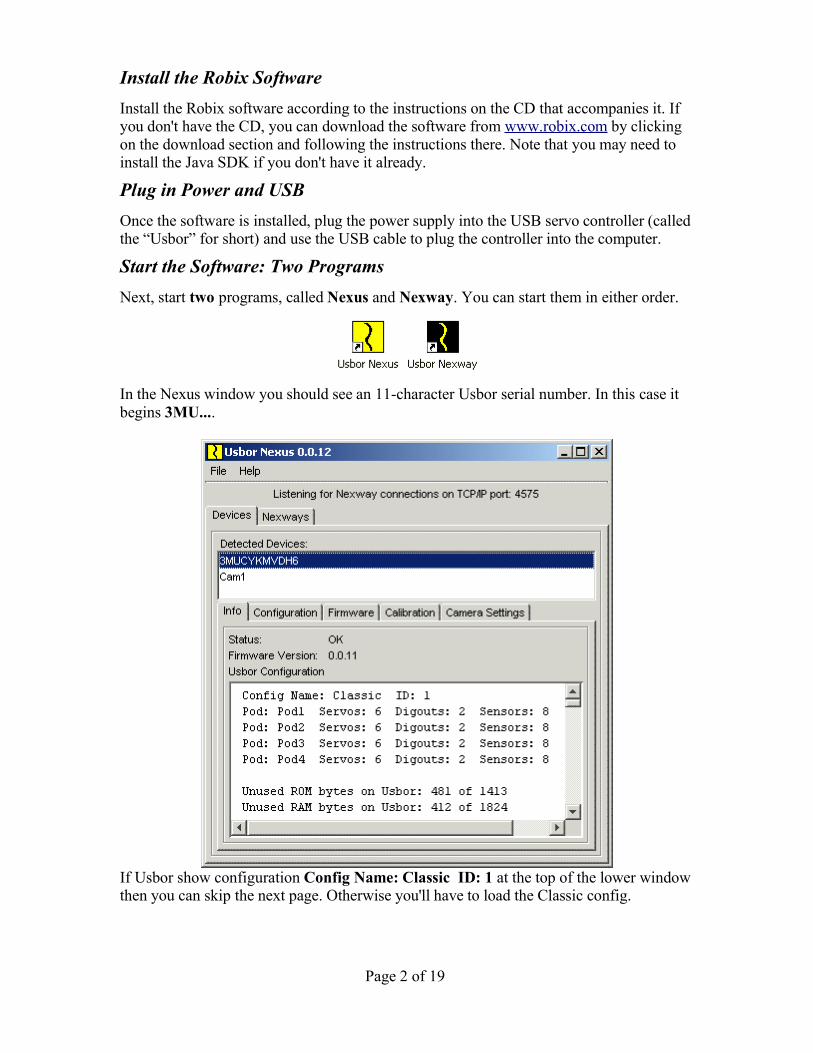
In the Nexus window you should see an 11-character Usbor serial number. In this case itbegins 3MU....
If Usbor show configuration Config Name: Classic ID: 1 at the top of the lower windowthen you can skip the next page. Otherwise you'll have to load the Classic config.
Page 2 of 19

If Needed: Loading the Classic Configuration into the UsborIn the Nexus, click on the Configuration tab. Click on the Select Configuration Filebutton and in the file dialog that follows you should see Classic.rbxUsborConfig listed.
If you do not see Classic.rbxUsborConfig listed then create it as follows:Close the file dialog if still open, then click Open Usbor ConfigurationEditor. Click File | New Configuration | 'Classic'. Then click File | SaveConfiguration and in the file dialog click Save (the filename Classicshould already be filled in for you in the file dialog). Close the UsborConfiguration Editor. Now you can return to the top of this page and againfollow the instructions there.
Open Classic.rbxUsborConfig to see:
Click the Download Configuration to Usbor button and the configuration is re-loadedinto the Usbor. The process will take a few seconds.
Page 3 of 19

The Nexway, first time StartingWhen you open the Nexway for the very first time, you see a blank window: (If this is notthe first time the Nexway has been opened then you'll skip the rest of this page and thenext one.
If your Nexway is blank, click on the New Nexus Connection button to see:
Since we are working locally, that is, with the Nexway and Nexus on the samecomputer, we select the default of localhost by clicking OK.Next we click on 3MU... (or whatever your Usbor's serial number is) and we see:
Page 4 of 19

The NexwayClick on the + signs to open the folders to see:
The Pod's Graphical User Interface (GUI)Click on pod1 in the Nexway to open that pod's gui (“gooey”).
Page 5 of 19

Adjusting the Pod GUIRight click anywhere in the Servo Properties panel and select Split This Pane and then▼Down. Then right click in the new panel and select Replace With and then Sensors, Now right click again in the Servo Properties panel and select Split This Panel and then►Right. Then right click in the new panel and select Replace With and then Digouts.
Click Gui in the menu and save as default.
Page 6 of 19

Your First ScriptIf you don't have links or at least link horns on the 6 servos you plugged in at thebeginning of this tutorial, add them now so that servo motion is readily visible.Stretch the pod gui vertically to increase the size of the blue scripting panel. Then type inthese two lines.move all to -1000; wait 5; digout 1 on, 2 off; wait 5move all to 1000; wait 5; digout 1 off, 2 on; wait 5
Now run the script by clicking the 'run' button at upper left.
Click again to run the script again. Notice that the servos move back and forth, the posvalues change, and the digouts change color as they are turned on and off..
Page 7 of 19

Your First MacroStretch the pod gui vertically to make more room in the scripting area. Then turn the twoscript lines into a script macro named osc by altering the script to this form:
Note that the osc 4 line could also have come after the macro definition instead of beforeit.
Run this script as before ( ) and see that osc runs 4 times. If you change the 4 to 0 andrun the script, you'll see that osc runs indefinitely. After osc has repeated several times,stop the script by clicking anywhere in the script area, or by clicking on the red stopbutton .Note that in general, you can have multiple commands on single line separated by ;'s. A ;is allowed at the end of a line but is not required. Commands may not 'span' lines; that is, acommand needs to start and end on the same line.
A script may contain any number of macros, and macros can call other macros.
Page 8 of 19

Servo Current and TorqueNow apply gentle rotational pressure on the output shaft of servo 1 and watch the absivalue of servo 1 increase as the servo draws more current to oppose the force you areexerting. The absi value is the absolute value of the short-term (~.1 second) average of theservo current. This value, in general, indicates the torque being exerted by the servo andare approximately equal to the milliamps being drawn by the servo.
Remember: Don't leave servos straining with absi over about 500-600 for more than acouple of minutes at a time; otherwise your servos can overheat, shortening their lives.
Teach ModeNext, position the text cursor on the word 'end' at the end of the macro and open theTeach Window by clicking on the teach button ' '. You should notice an arrow, '->',appear in a new blank line above 'end'. In addition, the teach window will appear:
While the Teach Window has focus your keyboard is acting as a teach pendant. That is,holding down various keys, as indicated in the Teach Window , will move thecorresponding servo by coarse or fine increments in the positive or negative direction. Youwill see the position servos move and their pos values change in the pod gui.After you have moved the pod's servos to new positions, click on the 'Add to Script' buttonin the Teach window, and a move command will be inserted on the line with the '->'arrow and the arrow will move down a line. Repeat these steps to add several new lines tothe osc macro, then run the script again to see your added move commands in action.
Page 9 of 19

Robix Software, Part II: Tutorial in DepthWhy Two Programs?
Why two programs? Because the Robix software has the advancedcapability to run robots remotely, over a network, or even over the internet.But if two machines are involved then they each need to be running aprogram. One program, the Nexus, “talks” directly to the Usbor via USB.The second program (the Nexway) talks over the network to the Nexus,sending commands and receiving continual status reports.In the case when you're running “locally”, that is, on just one machine, thenthe Nexus and Nexway run on that one machine.And what's so valuable about operating robots remotely? To begin with, itallows two or even more student groups on separate but adjacent computersto share the same Usbor controller, reducing expenses:. The controller canrun 32 servos at once, and these can be divided between the groups or whatwe call “pods”.In addition, and at least as important, remote monitoring and control ofrobots reflects the reality of today's factory floors.
The Nexus, continuedThe word “nexus” is generally defined as “a means of connection”. The Nexus in ourcase connects hardware such as Usbor controllers and their servos, and webcams used inthe V-1.0 vision system to user interfaces and user programs. The Nexus is neededbecause, as mentioned, the user interfaces and programs may be running on othercomputers on a network or on the internet.
In case you're wondering, the Nexus communicates to these other programsusing TCP/IP, the primary protocol(s) of the internet.
The Nexway, continuedThe Nexway (think “Gateway to Nexus”) is the last link in the chain joining the userinterface (and user programs) through the Nexus to the Usbor and its pods and finally tothe pods' servos, digouts (digital outputs) and sensors.
Page 10 of 19

Summary So Far...To sum up, here's a diagram so far of the software and hardware. We contrast aconventional program (a word processor) with our remote robotic software:
Page 11 of 19
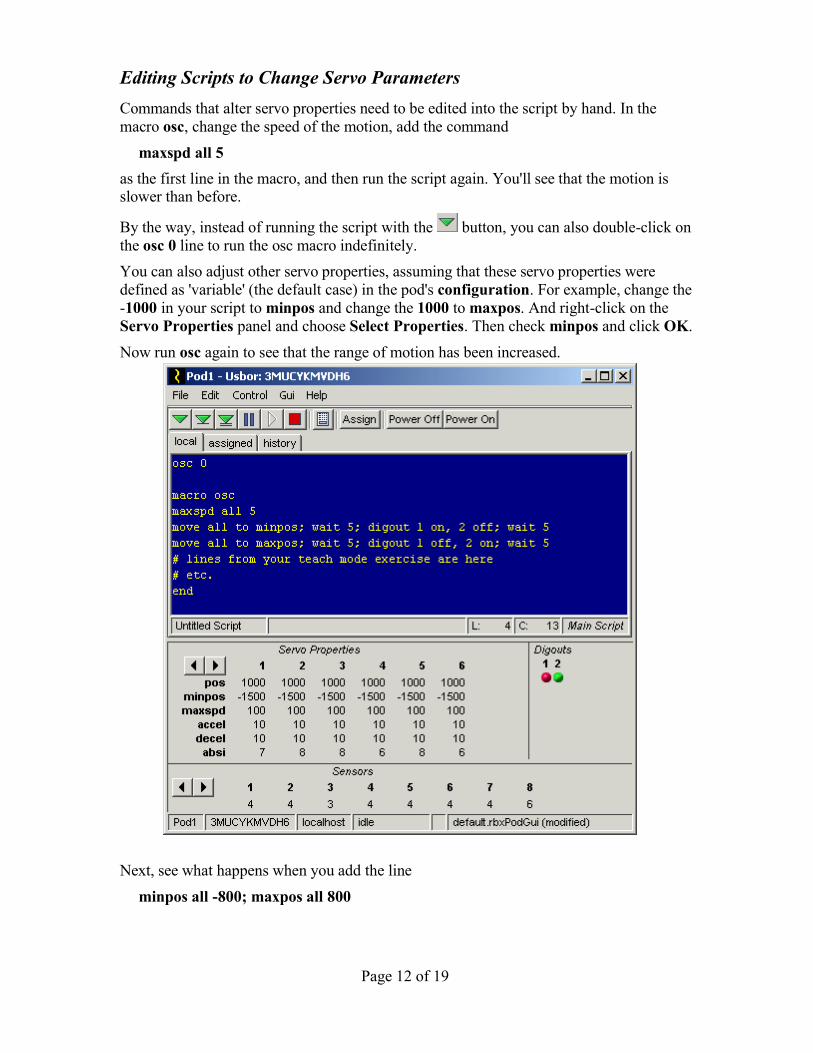
Editing Scripts to Change Servo ParametersCommands that alter servo properties need to be edited into the script by hand. In themacro osc, change the speed of the motion, add the command
maxspd all 5as the first line in the macro, and then run the script again. You'll see that the motion isslower than before.
By the way, instead of running the script with the button, you can also double-click onthe osc 0 line to run the osc macro indefinitely.You can also adjust other servo properties, assuming that these servo properties weredefined as 'variable' (the default case) in the pod's configuration. For example, change the-1000 in your script to minpos and change the 1000 to maxpos. And right-click on theServo Properties panel and choose Select Properties. Then check minpos and click OK.
Now run osc again to see that the range of motion has been increased.
Next, see what happens when you add the line
minpos all -800; maxpos all 800
Page 12 of 19

to the top of the macro osc and then run the macro again. Now the motion is morerestricted.Finally, change this last line added to
minpos all default; maxpos all defaultto return the values to their defaults of -1400 and 1400.For a listing of all script commands and their usage go to
http://www.robix.com/Robix Scripting Reference.pdf
Page 13 of 19

Understanding the Usbor ConfigurationThe Usbor configuration is stored in the flash memory of the Usbor itself and is retainedeven when power is removed. The configuration defines how the 32 servo outputs (each ofwhich can alternately be a digital output or 'digout') and the 32 analog inputs are assignedto various pods in the Usbor.
Page 14 of 19

Creating Your First Configuration and Loading it into the UsborIn this example we will use 18 of the 32 servos, and make three pods of 10, 5 and 3 servoseach. We begin by clicking the Configuration Tab on the Nexus.
Next click Open Usbor Configuration Editor and get
Page 15 of 19

Now we click Configuration and float over New and we see
We will be making new pods (with Ctrl+Shift+P) and adding servos ( withCtrl+Shift+S) to the pods.
We're using VT (velocity trapezoid) servos which give smooth motion.Jump servos save configuration memory but can only execute jumpcommands which result in sharp, uncoordinated motions.
Let's add the pod with 10 servos first. It's very quick and easy. Press Ctrl+Shift+P once tostart a new pod. Press Ctrl+Shift+S 10 times to add 10 servos. That's it!
Page 16 of 19

And if you make a mistake, just delete the pod (s) and start over.Now add another pod and 5 servos and finally a third pod and 3 servos. This gives us:
Now we need to give this configuration a name. We'll call it 10-5-3. Click on File / Saveand save our configuration with that name.
Finally, we have to download this configuration to the Usbor. Click Download. Then select your Usbor (if you have more than one connected) for thedownload.When complete you can close the download selector and the configuration editor.
Page 17 of 19

Take a look at the gui for pod1. It has automatically detected the change to its pod andadjust its contents accordingly. Since there are no digital outputs or sensors in this pod wehave removed the digout and sensor windows (by right clicking and selecting RemoveThis Panel)Select Gui from the menu and click Save. Then save the gui layout as default. Any otherpod gui's that you open will now have this layout. You could also have saved this guiunder some other name. This would enable you to switch layouts easily by selecting Guiagain and then Open Pod Gui....
Run the script again. Note the error Number is out of range – 1 and that the “1” indigout 1 is highlighted. This is because the pod now has no digital outputs. Removedigout 1 on, 2 off and digout 1 off, 2 on and run again. This time execution shouldproceed without error.
Page 18 of 19

Special Subject: Setting InitposWhen servos first power up and “come to attention” they immediately track as quickly aspossible to their Initpos (initial position) which is 0 by default, or about at the middle oftheir travel. This can cause problems depending on what's in the way.Consider the situation where you have prepared a “work cell”, that is, some fixturessurrounding your robot with which it will interact. However, when the robot starts up itsmacks into your fixtures and dislodges them. This problem can be addressed in theconfiguration editor by changing the Initpos of some or all of the servos in your robot.First use teach mode to move the robot to the desired starting position. Then open theconfiguration editor and for each servo whose initial position needs to be adjusted clickthe appropriate servo in the configuration list and change its Initpos radio buttons fromInherit and Var to Override and Const. Then note the Pos value of the servo in the podgui and copy this value into the text area to the right of Const. Below we have changedInitpos of Servo5 on Pod1 to -355.When you're done, save and download the configuration. The robot will relax for amoment during reset then come to attention at the desired initial position.
Setting Other Servo ParametersExcept for Initpos it is rarely necessary to preset servo parameters. In the unusual casewhere the configuration you choose is too large to fit the Usbor controller's memory youcan save a few bytes by changing some addition parameters to Const from Var. Otherwisethere is little reason to make any adjustments.
Page 19 of 19