riiwhs204d - safety.oktedi.com
TRANSCRIPT

July, 2018 — J/N 12060-3 — © www.pertrain.com.au Page i
Table of Contents
RIIWHS204D Work Safely at Heights

Safety PromptsSymbols are used throughout this module to highlight specific points, particularly those that involve safety. The symbols and their meaning are shown below.
DANGER This prompt is used when there is an immediate hazard that IS LIKELY TO result in severe personal injury or death if proper procedures are not followed.
CAUTION This prompt is used to warn against potentially unsafe practices that COULD result in personal injury or death and/or property damage if correct procedures are not followed.
NOTE This prompt is used when an operation, condition, or information is of sufficient importance to warrant highlighting.
KEY CONTROL This prompt is used to indicate where a Key Control has been identified in the training material.

July, 2018 — J/N 12060-3 — © www.pertrain.com.au Page iii
Table of Contents
WORKING SAFELY AT HEIGHTS
Contents1. Operator Obligations ........................................................................................................................... 2
1.1 Comply with Legislation and Site Procedures ....................................................................... 2
2. Plan and Prepare for Operations ........................................................................................................ 4
2.1 Obtain Information ................................................................................................................. 4
2.1.1 Job Requirements ................................................................................................... 4
2.1.2 Site and Task Procedures ........................................................................................ 4
2.1.3 Authority to Work System ......................................................................................... 4
2.1.4 Associated Clearance Certificates ........................................................................... 5
3. Identify and Control Hazards ............................................................................................................... 6
3.1 Hazard Identification ............................................................................................................. 6
3.1.1 Site Inspection .......................................................................................................... 7
3.1.2 Types of Hazards ..................................................................................................... 7
3.1.3 Hazard Report .......................................................................................................... 7
3.2 Risk Assessment ................................................................................................................... 8
3.2.1 Work at Height Risk Assessment Checklist.............................................................. 8
3.2.2 JSA ........................................................................................................................... 8
3.3 Hazard Control Options ......................................................................................................... 9
3.3.1 Personal Protective Equipment (PPE) ................................................................... 10
3.3.2 Fall Protection Systems ........................................................................................ 10
3.3.3 Rescue Plan ........................................................................................................... 14
3.3.4 Minimise the Risk of Climbing Falls ....................................................................... 14
3.3.5 Minimise the Risk of Falling Objects ..................................................................... 15
4. Select and Inspect Equipment .......................................................................................................... 15
4.1 Perform Equipment Checks and Inspections ..................................................................... 16
5. Install and Use Equipment ................................................................................................................ 16
5.1 Checks Before Starting Work at Height .............................................................................. 16
5.2 Basic Equipment ................................................................................................................. 17
5.2.1 Signage ................................................................................................................. 17
5.2.2 Barricades ............................................................................................................. 17
5.2.3 Scaffolding.............................................................................................................. 18
5.2.4 Ladders .................................................................................................................. 18
5.3 Specialised Equipment ........................................................................................................ 20
5.3.1 EWP ....................................................................................................................... 20
5.3.2 Mobile Scaffold/Work Platform ............................................................................... 22

© www.pertrain.com.au — J/N 12060-3 — July, 2018Page iv
Work Safely at Heights
5.4 Edge Protection ................................................................................................................... 23
5.4.1 Toe Board ............................................................................................................... 23
5.5 Catch Platforms and Safety Nets ........................................................................................ 23
6. Working Safely at Heights ................................................................................................................. 24
6.1 General Safety Requirements ............................................................................................. 24
6.2 Specific Requirements for Working at Heights .................................................................... 24
6.3 Workplace Access ............................................................................................................... 28
6.4 Equipment Transport ........................................................................................................... 28
6.5 Tool Management ................................................................................................................ 28
6.6 Manual Handling .............................................................................................................. 29
7. Monitor Controls and Safety Measures ............................................................................................. 29
8. Post Operational Tasks ..................................................................................................................... 30
8.1 ATW Sign-off ....................................................................................................................... 30
8.2 Maintenance and Inspection of Equipment ......................................................................... 30
8.2.1 Fall Protection Equipment ...................................................................................... 31
8.3 Storing Tools and Equipment .............................................................................................. 31
8.4 Work Area Clean-up ............................................................................................................ 32
8.4.1 Waste Management ............................................................................................... 32
8.5 Work Reports ...................................................................................................................... 32
9. Summary ........................................................................................................................................... 33
10. Terms and Acronyms ......................................................................................................................... 33
11. Appendix - Work at Height Forms ..................................................................................................... 35
12. Key Controls Index ............................................................................................................................ 46

July, 2018 — J12060-3 — © www.pertrain.com.au Page 1
IntroductionWork at height takes place in any location when there is potential:
• To fall more than 1.8m
• To be seriously injured in a fall less than 1.8m
• To fall from one level to another as a result of working within 2m of an open edge, and
• For materials to fall on to people working or travelling below.
Work at height includes working on a roof, working near the edge of a pit or trench or anywhere that there is a risk of a fall. Examples include:
• Work from fixed, single or extension ladders where both hands are required to operate any required tools (fixed ladders include fixed ladders on mobile plant)
• Work from a single or extension ladder where it is not possible to tie off and secure the top of the ladder
• Work from all ladders at heights in excess of 1.8 metres
• All work on roofs, including buildings, storage sheds, tanks, silos, etc
• All work on mining faces, waste rock/ore/gravel/soil stockpiles (or similar surfaces) with a slope of more than 45°
• Elevated Work Platform (EWP) work including scissor lift work
• Work in excavations and confined spaces.
This resource contains information that will assist you to:
• plan and prepare for work
• select and install the correct equipment according to work requirements
• comply with work procedures and authorisations
• identify and control hazards
• perform work at height
• perform post operational tasks.
NOTE This training resource is a guide only. Always follow your site procedures when performing your work.

© www.pertrain.com.au — J12060-3 — July, 2018Page 2
RIIWHS204D Work Safely at Height
1. OPERATOR OBLIGATIONSAll workers have an obligation to ensure the safety and health of themselves and others and to protect the environment in which they work.
The following actions will help you to do this.
• Ensure that you are physically and mentally fit for work before starting any job.
• Comply with your organisation's Code of Conduct on how you interact with others, for example, no bullying, discrimination, unethical or unsafe behaviour.
• Do not attempt any task unless you are trained and authorised to perform the task in a safe manner, e.g. do not work at height, or wear a harness, without holding an OTML Authority to Operate for Work at Height, or with approval to work in a restricted capacity by the area Executive Manager or General Manager.
• Select, check and use the correct personal protective equipment (PPE). Make sure that the PPE fits properly and is suitable for the task.
• Report unsafe conditions, activities, incidents or near misses to your supervisor or safety representative.
• Report damaged or defective equipment for repair.
• Operate equipment within manufacturer specifications and limitations and according to site procedures.
• Use your site lock and tag system.
• Adhere to site environmental guidelines to prevent damage to the natural environment and designated heritage sites.
1.1 COMPLY WITH LEGISLATION AND SITE PROCEDURESDuring your general and site specific inductions you would have been familiarised with organisational and site policies and procedures. These have been developed in accordance with legislation and are designed to ensure that work is undertaken safely.
Under safety legislation, all sites must develop and put in place a Safety and Health Management System that includes risk management and site procedures for activities on site.
Procedures are documented ways of doing a job. Procedures are developed from the risk analysis process (e.g. JSA) and after consultation with workers. They are monitored and amended as required. You must be familiar with procedures that apply to all employees, as well as task specific procedures. Activities covered by site procedures include:
• selection and use of PPE
• first aid
• using fall protection
• manual handling.
HERE‛S TO A SAFEDAY‛S WORK !
©w
ww.
pertr
ain.c
om.au
©www.pertr
ain.
com
.au

July, 2018 — J12060-3 — © www.pertrain.com.au Page 3
The general hierarchy of compliance documentation is shown in the following table.G
OVE
RN
MEN
T
ACTS OF PARLIAMENT (ACTS)
Written laws passed by government to set out the general obligations that employers and employees have in relation to each other and themselves. Acts vary across states and territories.
EXAMPLE: Mining (Safety) Act
REGULATIONS Lawful requirements that provide additional details about how to comply with the Acts.
EXAMPLE: Mining (Safety) Regulations
IND
UST
RY
CODES OF PRACTICE
Developed by industry to provide practical guidance for complying with Acts and Regulations.
EXAMPLE: Code of Practice for Managing the Risk of Falls at Workplaces (Australia)
STANDARDS
(National and International)
Documents that detail practical guidelines, which when followed will ensure that a minimum quality benchmark standard is achieved for a product, service or process. Standards are established by a recognised body such as government or an industry regulator. They cover all industry types including construction, business, and energy and water utilities.
EXAMPLE: AS/NZS 1891.4 Industrial Fall-arrest Systems and Devices - Selection, use and maintenance
OR
GA
NIS
ATIO
N
MANAGEMENT SYSTEMS
Developed by management to comply with legislation. Management systems provide overarching governance for all site activities including safety, human resources, finances, environment and community engagement.
EXAMPLE: Risk Management System, Authority to Work (ATW) System
POLICIES Broad statements of the overall intent and direction of a specific activity or interrelated group of activities. Policies ensure that management plans are implemented and that everyone's roles, responsibilities and obligations are clearly defined.
EXAMPLE: Fit for Work Policy, Environmental Policy
PROCEDURES Easy to understand, step-by-step instructions for carrying our tasks safely and in an environmentally sustainable way.
EXAMPLE: Safe Work Procedures
NOTE You must comply with applicable government legislation and site requirements. If you do not know how to access the relevant information, ask your trainer or supervisor.

© www.pertrain.com.au — J12060-3 — July, 2018Page 4
RIIWHS204D Work Safely at Height
2. PLAN AND PREPARE FOR OPERATIONSPrepare for work at height by gathering the required information and planning the job. You must identify the work requirements and equipment resources for the task.
2.1 OBTAIN INFORMATIONThe information you gather will help to ensure that your work complies with the task requirements. Depending on the work site and task, you may need to obtain:
• Job requirements
• Site and task procedures
• Authority to Work (ATW).
2.1.1 JOB REQUIREMENTS
Your supervisor will give you the work plan and other information, this may include quality requirements, site plans, equipment specifications and ATW requirements.
2.1.2 SITE AND TASK PROCEDURES
Once you know what your task requires, you will need to obtain all relevant site and task specific procedures. This may include instructions for PPE, isolations, ATWs and procedures on how to conduct your task. Most of these will be discussed during the shift briefing. You will need to obtain the information if it is not provided during the brief. Never start any task without all of the required information.
NOTE A documented and approved Job Safety Analysis (JSA) and Procedure is required for all work at height.
2.1.3 AUTHORITY TO WORK SYSTEM
An authority to work (ATW) system is a formal system used to plan, control and complete work in accordance with safe work practices. The ATW system requires communication and coordination from management, supervisors, ATW issuing officers and those who complete the task. A risk assessment is conducted prior to issuing an ATW.
All persons involved with the ATW must sign on and off the ATW.
The ATW system applies to tasks such as:
• working in confined spaces
• working at heights
• hot work
• digging or excavation
• land/vegetation clearance
• high voltage work.
WORKINSTRUCTIONS
© www.pertrain.com.au

July, 2018 — J12060-3 — © www.pertrain.com.au Page 5
2.1.4 ASSOCIATED CLEARANCE CERTIFICATES
Clearance Certificates identify the hazards and list the controls that must be applied to ensure that specific high risk work can be performed safely.
Work at Height requires a Work At Height Clearance Certificate that will typically include the following information:
• work location
• hazards
• controls
• job steps
• post fall recovery plan
• checks and inspections
• personnel
• ATW holder
• authorisation
• authorisation closure and sign off.
Where there is a change in the task risk, the person in control of the work at height will identify the hazards, assess the risks and update JSA for the task. They may need to cancel the existing ATW and/or clearance certificate and arrange for new authorisations before the task can proceed.
Authority To Work Form ATW: 00000
Checked by: Brian Lesley/Geoff Atkinson Authorised by: Kedi Ilimbit Next Review: Doc ID.: 2.06-001 (b) Rev No.: 1.0 Date of Review: 01/12/2016 Date Printed 14/12/2016 Page 1 of 2
A
Lockbox #: Work Order #: ATW Lock #: Department: Start Date: Work Area: Expected Completion Date: Equipment Name:
B SCOPE OF WORK
C
ISOLATIONS If isolations are required for the work detailed in Section B, is there an approved Isolation Schedule attached to the lockbox? Yes No
If No, cease the issuing of the ATW and request the ATW Recipient to provide an approved Isolation Schedule. ATW Recipient has inspected the isolations and confirm that they are secure and appropriate for the work as detailed in Section B of this ATW. ATW Recipient Name: Signature: Date:
D
CLEARANCE CERTIFICATES Certificate Type Y/N # Certificate Type Y/N #
Work At Heights High Voltage Confined Space Radiation Hot Work Excavation
E
DIRECT CONTROL Does Direct Control form part of the Scope of Work as detailed in Section B? Yes No If Yes, has there been a JSA developed and approved specifically for the Direct Control activities? Yes No
If No, cease the issuing of the ATW and request the ATW Recipient to provide an approved JSA.
F
SIMULTANEOUS OPERATIONS This section is to be completed on the day of the Issuing of this ATW by way of inspection of the work site by the ATW Issuer and ATW Recipient immediately prior to issuing the ATW.
G
ATW ISSUE I the undersigned ATW Issuer declare that the work detailed in Section B of and is safe to proceed under the supervision of the undersigned Recipient. ATW Issuer Name: ATW Issuer Signature: Date Issued: Time Issued: : AM / PM I the undersigned Recipient declare that I have discussed the work detailed in Section B with the Issuer and ensure that all work will be carried out safely. ATW Recipient Name: ATW Recipient Signature:
H
ATW CLOSURE I the undersigned ATW Recipient declare that work detailed in Section B of this ATW has been completed and has been inspected by an ATW Issuer prior to closure of this ATW. ATW Recipient Name: ATW Recipient Signature:
Date Issued: Time Issued: : AM / PM I the undersigned ATW Issuer declare that I have inspected the work area and verify that the work detailed in Section B of this PTW has been completed prior to closure of this ATW. ATW Issuer Name: ATW Issuer Signature:
Distribution: White Original – Lockbox Yellow Copy – Work Group Blue Copy – Remains in Book

© www.pertrain.com.au — J12060-3 — July, 2018Page 6
RIIWHS204D Work Safely at Height
3. IDENTIFY AND CONTROL HAZARDSAs part of the risk management process, managers will ensure that:
• Work at height tasks are risk assessed to determine their potential to cause injury to any person associated with the task
• All identified risks and controls are included in the Risk Register.
All employees should be aware of the hazards that could be associated with Work at Height operations (e.g. falling objects and/or equipment) and the risk they pose to people, equipment, the community, environment or the organisation. Some hazards have high risk potential. The presence of any hazard will require appropriate control measures to be implemented.
Personnel who are exposed to the risk of falling must:
• Participate in the risk assessment of the work
• Know and understand the control measures for falls and falling object prevention
• Be competent and authorised in the correct use and application of control measures
• Inform their supervisor if they have any medical condition (permanent of temporary that may adversely affect their ability to work safely at heights.
Hazard Risk
A hazard is a condition or situation that has the potential to cause injury, damage or loss to personnel and/or equipment.
A risk is the likelihood that a harmful consequence may result from exposure to a hazard.
Before undertaking work, you must perform a hazard identification and risk analysis process following your site procedures. Learn to recognise the difference between a hazard and a risk.
3.1 HAZARD IDENTIFICATIONHazards must be identified and managed to avoid an incident or emergency.
The general process for managing hazards is:
• stop
• think about what you need to do
• identify hazards
• plan and implement controls to minimise the risks associated with each hazard
• proceed with the task, and monitor the effectiveness of the controls.
The Task The Hazard The Risk
© w
ww
.per
train
.com
.au
1. Stop
2. Think
3. Identify
4. Plan
5. Proceed

July, 2018 — J12060-3 — © www.pertrain.com.au Page 7
3.1.1 SITE INSPECTION
Start by conducting a site safety inspection in and around the work area using a personal hazard ID tool, e.g. Take 5. Look for potential hazards that could result in falls from height, or that could result from working at height, such as:
• Work area layout, e.g. other personnel or equipment in area, overhead powerlines
• Inadequate lighting
• Uneven, or unstable ground conditions
• Ground not able to support equipment
• Physical condition and safety of surfaces, such as:
- wet, polished or icy floors - dirty or greasy handrails, rungs or steps - uneven or sloping work surfaces
• Change in levels, exposing a worker to fall from one level to another
• Instability of temporary or permanent structures
• Blocked or limited entry to and exit from the work area
• Missing edge protection, e.g. guards for holes, openings and excavations
• Adverse weather conditions, e.g. rain, wind, lightning.
Conducting a site inspection before starting work, will help you to identify if conditions are suitable for you to work safely.
3.1.2 TYPES OF HAZARDS
Working at heights includes climbing up or entering a structure as well as working close to edges.
Hazards associated with working at heights, that have the potential to cause injury of harm, include:
• falls from height including into a pit or excavation
• dropped objects striking a person
• contact with overhead powerlines
• suspension trauma
• changing weather conditions
• poor manual handling technique
• untrained, inexperienced, unauthorised personnel completing the task or entering the work area.
3.1.3 HAZARD REPORT
A hazard report provides a means of communicating information about an identified hazard to your supervisor and management. The purpose of reporting the hazard is to prevent an unsafe condition or behaviour from causing an incident or an emergency. Controls can then be put in place to reduce or eliminate the hazard.
©wwwpertrain.com.au

© www.pertrain.com.au — J12060-3 — July, 2018Page 8
RIIWHS204D Work Safely at Height
3.2 RISK ASSESSMENT
3.2.1 WORK AT HEIGHT RISK ASSESSMENT CHECKLIST
Use the Work at Height Risk Assessment Checklist to identify hazards and document control measures. The checklist includes hazard/risk examples The Work at Height Risk Assessment Checklist can be used to create a JSA if required.
3.2.2 JSA
A Job Safety Analysis (JSA) is a tool used by a work team to identify job steps and control hazards for a task. Conduct a JSA if:
• there are uncontrolled hazards
• there is no written Safe Work Procedure for a complex task
• ATW or clearance is required, for example working at heights
• a procedure needs to be changed
• equipment brought to the site creates a hazard
• an incident has occurred during operations.
A JSA is developed by one or more people who know the job well and have been trained in the development of JSAs. The JSA must be reviewed by at least two other people and the Supervisor before being signed and used.
Every person who takes part in the JSA must read and understand the information before signing the JSA form and commencing work.
NOTE If you do not understand the JSA, disagree with the contents, or feel that the task is not safe to do, talk to your supervisor.
If conditions change during the job, the work must stop while the JSA is reviewed and updated. The Supervisor must review the revised JSA before authorising it. Once authorised personnel involved in the task must again read and understand the information and sign onto the form before resuming work.
Title Sponsor Issued Last Review Next Review Page
OHS Standard 5-31 Work at Height Nigel Parker 12/11/2007 02/12/2009 01/01/2013 12 of 20
Attachment 3 Work at height risk assessment checklist
Hazard checklist Examples of the Hazard / Risk Y/N
Control measures (using Hierarchy of
Controls)
1. Is there potential for people working below to be injured as a result of your activities?
Falling tools, materials, equipment?
Falling objects bouncing off pipes etc?
Hot slag/sparks falling onto others?
2. Correct work design Pendulum affect Incorrect choice, use of
harnesses/ lanyards
3. Portable or movable elevated work platform & cages.
Unqualified personnel operating EWP?
Could the EWP move unexpectedly?
Could mobile plant collide with EWP?
4. Portable ladders Is a ladder the best choice for the task (used mainly for access, not suitable for lengthy or heavy work)?
Has the right type of ladder been selected for this task (fibreglass/electrical, extension, step etc)?
Has the ladder been inspected and found to be in good working order?
5. Exiting from an EWP Have all other options been considered?
Can the EWP be landed on the structure or secured to an appropriate anchor?
Is the structure capable of supporting the EWP basket, persons and intended load?
Is there a designated anchor point for attachment of the fall protection equipment?
Can the base controls be tagged to prevent unauthorised interference?
Is there an equivalent EWP available to rescue, or a contingency rescue plan in place?
Has the EWP logbook been filled out and the pre-start check completed?
6. Repeated detaching & reattaching the lanyard?
Potential to be disconnected from anchor point?
Is a dual lanyard system required to ensure 100% attachment at all times?

July, 2018 — J12060-3 — © www.pertrain.com.au Page 9
3.3 HAZARD CONTROL OPTIONSControl measures are any actions taken to eliminate a hazard or reduce the risk for personnel, equipment and the environment to an acceptable level. The control measures should be selected using the principles of the hierarchy of controls, from most effective to least effective.
Control methods for working at heights vary depending on the task to be done. If the hazard can not be eliminated, a combination of controls may have to be used.
Title Sponsor Issued Last Review Next Review Page
OHS Standard 5-31 Work at Height Nigel Parker 12/11/2007 02/12/2009 01/01/2013 7 of 20
6.7 Controlling work at height risk
STEP 1 Avoid work at height
STEP 2 LAST RESORT: Minimize risk if work at height
is unavoidable
PHYSICAL CONTROLS (PPE HIERARCHY of
CONTROL)
ADMINISTRATIVE CONTROLS
HAZARD ID & RISK ASSESSMENT
Identify the hazards (eg. a fall) and assess the likelihood and consequence of each risk (eg.
injury or death). Identify controls.
ELIMINATION Eliminate the need to access the fall-risk area (eg. by locating or
relocating items requiring inspection, maintenance or other
attention, elsewhere).
SUBSTITUTION Provide other means of access
that avoid a fall-risk eg. walkways.
ISOLATION Barricade or enclose the fall-risk
so it can’t be reached.
STEP 2
1 - FALL RESTRAINT Allow access without fall-
risk by limiting movement.
2 - WORK POSITIONING Enclose operators in
work positioning devices like EWPs to minimise
fall-risk.
3 - LIMITED FREE-FALL ARREST
RESTRAINED FALL-ARREST
Provide personal fall-arrest PPE that limits
distance and severity of a fall.
4 - FALL ARREST Provide personal fall
arrest PPE to minimise risk of injury in a fall.
(Last Resort - Requires Managers Approval)
EXCLUSION AREA Red Zones, barriers and barricades to highlight
fall-risk
SAFE SYSTEMS OF WORK
Competent and authorised users only
Risk assessment
Work at Height Permit
JSA/SWP
RESCUE PROVISION Rescue plan

© www.pertrain.com.au — J12060-3 — July, 2018Page 10
RIIWHS204D Work Safely at Height
3.3.1 PERSONAL PROTECTIVE EQUIPMENT (PPE)
Working at heights requires the use of both basic and specialised safety equipment. All equipment must comply with approved design standards, e.g. AS 1891.4, and be used in accordance with the manufacturer and site specifications.
Mandatory PPE on site includes:
• Non slip, steel capped boots, or gum boots in wet conditions
• Eye protection, e.g. safety glasses
• Gloves
• High visibility protective clothing, e.g. high vis stripes or vest
• Safety helmet (with cap lamp for underground)
All personnel working at heights must wear a fall protection harness attached to an approved anchor point. Other PPE that is mandatory for your specific task will be listed in the work plan and/or discussed at the work briefing. Work at Height PPE will not be issued from a store without an authorised ATW.
PPE must be clean, in good condition and properly fitted and adjusted before it is used. Work at height PPE must be entered into a Work at Height PPE register, securely stored in each line area and formally inspected on a quarterly basis.
• Users shall inspect PPE before each use using the PPE checklist.
• PPE shall be inspected 6 monthly by a competent work at height person as required by AS 1891.
Regular inspections will identify defects at an early stage, before they become a significant problem that may cause injury and equipment or environmental damage.
3.3.2 FALL PROTECTION SYSTEMS
A personal fall protection system secures you to the anchor point of a work platform, building or structure. Personal fall protection equipment includes:
• restraint devices that prevent a person falling e.g. industrial rope access systems and fall-prevention systems
• fall arrest systems that arrest or catch a person who has fallen e.g. fall-arrest full harness with lanyard assembly.
Always work with another trained person. One person should act as spotter/safety monitor to initiate rescue procedures if necessary.
Personal fall protection equipment must be used:
• whenever there is inadequate fall prevention
• when working from an elevated work platform
• when safety nets or fixed platforms are being used
• when guardrails are not in place.
NOTE Follow site safety procedure when using personal fall protection equipment.

July, 2018 — J12060-3 — © www.pertrain.com.au Page 11
RESTRAINT DEVICES
Any device that attaches you to an approved anchorage point is a restraint. A fall restraint restricts your movement to stop you from walking or falling off an unprotected edge. A restraint device is made up of a safety harness, a fixed length lifeline and an anchor. The length of the lifeline is calculated so that the worker cannot go past the unprotected edge of the work area.
The devices that are part of the restraint system include:
• restraint belt or work positioning harness protect a worker on an elevated surface so that the worker can use both hands and move the body as required to work safely
• fall restraint line is a line attached to both the worker and the anchorage point
• fall-prevention static line (to which the restraint line is attached)
• self-locking triple action hooks or karabiners at all attachments and at anchorage points
• lifeline anchorage points, capable of withstanding body weight and momentum.
FALL ARREST SYSTEMS
Personal Fall Arrest equipment is designed to stop you or catch you in a fall from a working level. There are three critical factors of a fall arrest system.
1. The equipment should reduce the free fall distance as much as possible.
2. All possible obstructions to the free fall should be removed.
3. The person caught by the arrest system should be removed immediately to avoid suspension trauma.
The illustration shows the different components of a fall arrest system. Components must be compatible.
Components Purpose
Full body safety harness Supports the worker in the event of a fall.
Lanyard Connects the safety harness to the anchorage point or static line.
Anchorage point Secure point to which a lifeline is attached. Anchorage points must be designed and maintained to a relevant standard (e.g. AS 1891), approved and labelled with the safe working load limit.
Fall arrester/deceleration device
“Grabs” the lifeline and holds firmly when vertical movement occurs.
Shock absorber/personal energy absorber
Absorbs kinetic energy as the worker is stopped and limits force on the body. Part of the lanyard assembly.
Lifeline Flexible line attached to both the anchor point and other components attached to the worker.
Fall Arrest System
Horizontal Lifeline
Fall Arrestor
Full Body Harness
Shock-absorber
Lanyard
Anchorage
© w
ww
.per
train
.com
.au

© www.pertrain.com.au — J12060-3 — July, 2018Page 12
RIIWHS204D Work Safely at Height
CAUTION The fall arrest system must support your full weight as well as any tools or equipment.
If the work method requires you to detach yourself and re-attach yourself at heights, then a dual line system must be used. In this way, you will always have at least one connection point at all times.
SAFETY HARNESS
Safety equipment must meet the requirements of Australian Standard 1891.
A safety harness consists of adjustable shoulder and leg straps and belts with an attachment point for a lanyard.
Make sure that your harness fits correctly. You should be able to slide your flat hand between the harness and your body. If all adjustable straps are as tight as they can be, and you can fit more than a flat hand between your body and the straps, you need a smaller harness.
The harness is susceptible to wear and tear. Site management is responsible for regular inspections of this equipment and for recording these inspections and relevant details on the site register.
Inspect harness before and after each use. Do not use the harness if it is frayed, split or there are any other obvious signs of damage to any part of the harness. Inspect the:
• webbing/straps – for cuts, tears, corrosive damage and deterioration
• snap hooks/connectors – for broken or weak springs and free movement
• buckles and adjusters – for wear and tear or damage
• straps – for damage or weakening of sewing threads through mildew or heat.
If your harness or any other fall protection equipment is excessively worn, or is damaged, tag it out immediately.
Safety harnesses are labelled and you should check the label for the date of last inspection or expiry date and identification numbers. If you cannot read the harness expiry date on the label, do not use it until it has been inspected by a qualified and authorised person.
CAUTION Notify your supervisor immediately if you find any damaged equipment and tag out or dispose of equipment as per site procedures.
Safety Harness
Snap Hook
D-ring
Webbing
Sewing
Buckles and Adjusters

July, 2018 — J12060-3 — © www.pertrain.com.au Page 13
ANCHOR POINTS
An anchor point is a fixed point that a fall-arrest system is connected to, that can hold the weight of a falling person and withstand a static load of 15 kN (1500 kg). Anchor points must be labelled with the safe working load limit.
Authorised personnel e.g. a structural engineer or a working at heights specialist, will determine and test anchorage points before use.
Anchor points must be located as high as possible to minimise the free fall distance should the person fall.
A secondary anchorage point and lanyard or line can eliminate the pendulum effect. The pendulum effect is a potential hazard in using fall arrest systems. The person falling goes into a horizontal swing motion.
If a dedicated anchorage point is not available, or it is not practical to install dedicated anchor points, use an engineered point such as a structural beam above the head of the worker. A site risk assessment analysis must be completed and approved by a competent person before work starts.
DANGER Do not tamper with anchor points. Do not use the handrail of a walkway for anchorage, always consult with the relevant personnel to determine anchor points.
SUSPENSION TRAUMA
Suspension trauma can occur with a fall arrest system when a person has an arrested fall and is suspended in an upright, vertical position with the harness straps causing pressure on the leg veins and arteries.
The lower legs have the capacity to store large amounts of blood, which reduces the return of blood to the heart. Slowing heart rate can cause the person to faint. This can also lead to renal failure and eventually death. It is vital to rescue person suspended in a full body harness as soon as possible.
DANGER If you are involved in the rescue you must not put yourself at risk. Persons working at height as well as emergency response personnel must be trained in the rescue procedures
Pendulum Effect
© w
ww
.per
train
.com
.au

© www.pertrain.com.au — J12060-3 — July, 2018Page 14
RIIWHS204D Work Safely at Height
Preventing Suspension Trauma
To prevent suspension trauma ensure that:
• you never work alone when using fall protection
• the harness allows your legs to be kept horizontal
• you are trained to do the following when hanging in a harness
- where possible, move legs in the harness - where possible, move your legs as high as possible and your head as horizontal as possible.
3.3.3 RESCUE PLAN
A Work at Height Rescue Plan must:
• be capable of rescuing unconscious or injured persons from any part of the site
• specifically address the rescue of a person suspended from a fall arrest harness where fall arrest is used as a control
• be reviewed by the work party as part of the JSA process before the start of work
• be physically tested by a qualified person if a risk assessment deems it necessary.
You must participate in the development of a rescue plan when fall arrest PPE is being used as a control device. The plan must detail how persons will be safely retrieved in the event of a fall.
NOTE Check with your supervisor to ensure that anchorage points, fall protection and associated equipment are correctly fitted and adjusted.
3.3.4 MINIMISE THE RISK OF CLIMBING FALLS
Climbing falls can be prevented by using the correct climbing technique when entering or leaving a scaffold. Prevent climbing injuries by observing the following points.
• Use nonslip steps and hand holds provided to enter or leave the elevated work area.
NOTE Do not use scaffold framework to access the work at height.
• Inspect, clean and where necessary have steps and hand-holds repaired before use.
• Face towards ladders when climbing up and down.
• Always maintain three point contact with steps and handrails (two feet and one hand or one foot and two hands).
• Do not climb a ladder or stairs with your hands full. Clip hand tools to your toolbelt and have materials and heavy tools raised onto the work area using ropes, a gin wheel or materials hoist.
• Never jump onto or off an elevated work area.
WE NEED A WORK AT HEIGHTS
RESCUE PLAN
© www.pertrain.com.au
Title Sponsor Issued Last Review Next Review Page
OHS Standard 5-31 Work at Height Nigel Parker 12/11/2007 02/12/2009 01/01/2013 15 of 20
BARRICADE PLAN
1. Do you need permanent, semi permanent or temporary barricading? 2. Where‟s the safest entry route (through the barricading)? 3. Account for possibility of falling objects bouncing off beams & infrastructure 4. Ensure vehicular traffic is kept away from scaffolding 5. Ensure adequate signage and tagging is in place
RESCUE PLAN
1.
Means of Rescue
Self Rescue? Rope Rescue? Elevated Work Platform? Other?
Resources Required: Identify the People, ERC, Equipment required
2.
Readiness of Rescue Resources
Have all the people mentioned in the rescue plan confirmed
that they are available in the event of an emergency? Do they know the nature & location of the possible rescue? Is the nominated equipment readily available and accessible?
Yes or
No?
3.
Have all these people read and understood their role in the rescue plan?
Work Team Members? Sentry? Rescue Personnel?
Yes or
No?
© w
ww
.per
trai
n.c
om
.au

July, 2018 — J12060-3 — © www.pertrain.com.au Page 15
3.3.5 MINIMISE THE RISK OF FALLING OBJECTS
An incident involving objects falling from heights can result in serious injury, death, equipment damage and lost production due to work stoppages and investigations.
NOTE Report any fallen or dropped object immediately to your supervisor.
Minimise the risk caused by falling objects with the following control measures.
• Secure tools to your tool belt using a suitable lanyard.
• Place rubber matting on the floor of the work platform to cover the mesh and prevent items falling through.
• Place tools and other equipment neatly away from the edges, or install edge protection.
• Secure unused objects and materials to the work platform and remove them from the work area as soon as practicable.
• Good housekeeping. Keep the work platform tidy. Do not leave debris on work platforms.
• Do not balance tools and parts on the platform control console (if applicable).
• Create a restricted drop zone using signs and barricades.
• Install overhead protection and safety nets to protect personnel below the work area.
• Securely fasten all objects being raised or lowered in a bag/box or by tying off. Make sure that lines used to raise and lower items are within the Working Load Limit (WLL).
• Never throw objects to or from an elevated work area.
DANGER Never stand under a load being lifted or lowered from an elevated work area.
4. SELECT AND INSPECT EQUIPMENTConsult with your supervisor to select the materials, tools and equipment to carry out the job safely and efficiently. Consider the following points.
• Equipment must be suitable for the task and the conditions. Consult with authorised personnel, e.g. scaffolder, working at heights specialist, supervisor and the manufacturer instructions to confirm equipment suitability.
• Using the wrong equipment is not only unsafe, but it adds to work costs through machine and equipment wear and damage.
• Only operate equipment that you are competent and authorised to use.
Inform your supervisor if you believe that the equipment assigned to you is damaged, out of date or cannot do the job safely and efficiently.
Elevated Work Platform
©w
ww
.pertrain.com.au

© www.pertrain.com.au — J12060-3 — July, 2018Page 16
RIIWHS204D Work Safely at Height
4.1 PERFORM EQUIPMENT CHECKS AND INSPECTIONS Check tools, equipment and plant for serviceability before and after using them on site. Do not use any equipment that is in an unsafe condition.
• Check work at height equipment for:
- test and inspection tags currency - damage, wear, corrosion or distortion - clear labelling for safe working loads.
• Complete detailed and accurate defect / maintenance reports.
• Use tools and equipment in a safe manner within the limits recommended by the manufacturer.
• Keep equipment clean (dirt can hide defects)
• Ensure required 3rd party inspections (e.g. for fall protection equipment) and regular maintenance has been carried out.
Consult with the appropriate personnel to arrange maintenance or repairs and to access replacement material.
• Request the stores or safety department to replace faulty or damaged lanyards.
• Check with workshop personnel to arrange maintenance of equipment such as an elevating work platform.
• Refer to an authorised and licensed scaffolder on any scaffolding issue.
Rectify any faults that you are authorised to fix in accordance with site procedures and the manufacturer guidelines. Isolate any defective equipment and attach an Out of Service tag to the item. Report all damaged or defective equipment according to site procedures.
NOTE Always advise your supervisor of any faults or damaged materials, tools or equipment that will affect the task.
5. INSTALL AND USE EQUIPMENTWorking at heights requires the use both of basic and specialised safety equipment. All equipment must comply with approved design standards and be used in accordance with the manufacturer and site specifications.
5.1 CHECKS BEFORE STARTING WORK AT HEIGHTBefore starting work at height you and your team should perform the following checks.
• Check that the authorisation for the job is complete.
• All personnel are qualified and authorised to perform the task.
• Read safe work procedures/instructions carefully.
• If an Elevated Work Platform is required, check that the Safe Working Load is sufficient. (Calculate the combined weight of personnel and equipment.)
• Check that correct equipment is available and that it is not defective.
• Ensure there is sufficient lighting. Have a lighting plant installed if necessary.

July, 2018 — J12060-3 — © www.pertrain.com.au Page 17
• Secure equipment items and tools on the work surface or in a container.
• Check the condition of PPE and safety restraints.
• Organise a spotter/sentry to observe from the ground and ensure that the person understands his/her role and responsibilities.
• Work out signal procedures to be used with other personnel involved in the task including hand signals for raising and lowering.
5.2 BASIC EQUIPMENT
5.2.1 SIGNAGE
Safety signs draw attention to any object or situation that could cause harm. Place signs as close as possible to hazardous areas, such as elevated work areas.
Do not move safety signs unless you have been authorised to do so.
Conditions can change during the course of the work. Monitor the work area to ensure that the risk control measures you have put in place are still practical.
NOTE Report or replace any damaged signs.
5.2.2 BARRICADES
A Barricade Plan must be prepared as part of the ATW for work at height. Barricades limit access into areas that contain holes, excavations, openings, high traffic or areas in which there is a danger from falling objects. Anyone who creates a hole, opening or is working at height is responsible for erecting a barricade in line with site requirements.
Barricades should be:
• at least 1 metre high
• square, erect and level
• at least 2 metres back from the elevated area
• display signage on each side of the barrier stating the nature of the enclosed hazard.
If the work at height area is to be extended, the barricade must also be extended.
DANGER Do not enter a barricaded area without authorisation.
Signage and Barricade

© www.pertrain.com.au — J12060-3 — July, 2018Page 18
RIIWHS204D Work Safely at Height
WARNING BARRICADES
Warning barricades may be erected around the 'Red Zone' to call attention to a hazard, but offer no physical protection. The red zone is an exclusion area demarcated within two metres of an unprotected edge where there is a work at height fall danger.
PROTECTIVE BARRICADES
Protective barricades provide physical protection. This type of barricade consists of posts and rails or chains, or other physical barrier to entry. Protective barricades must be erected before work begins. An entrance, opening or gate should be placed where practical to allow access to and from the barricaded area.
5.2.3 SCAFFOLDING
Australian Standards required that scaffolds be erected by a qualified and authorised scaffolder. Your supervisor or management personnel will organise scaffolding requirements.
Signage and barricades must be installed around scaffolding to prevent access during and after construction.
You must not interfere in any way with the construction of the scaffolding. Changes to the structure can be made only by an authorised scaffolder. If scaffolding is left on the job site for a period of time, then it must be inspected regularly by a qualified and authorised person.
5.2.4 LADDERS
Ladder design and usage are governed by Australian Standards. Ladders used include fixed ladders or portable ladders. Ladders should only be used to carry out lightweight work of short duration following site procedures.
FIXED LADDERS
Typically, fixed ladders are single rung vertical or near vertical ladders permanently attached to buildings. To work on a fixed ladder safely, you must have three points of your body in contact with the ladder at all times.
If a series of ladders is positioned against the structure, then ladder cages or platforms must be provided every six metres. A ladder cage is a barrier and does not provide complete fall protection and therefore must be used in conjunction with a full body harness and lanyard.
Hazard Colour Codes
YELLOW AND BLACK
Danger: no access allowed
Caution: area may be entered but use caution
or
RED AND WHITE
© w
ww
.per
train
.com
.au
© www.pertrain.com.au

July, 2018 — J12060-3 — © www.pertrain.com.au Page 19
PORTABLE LADDERS
The two kinds of portable ladders (step ladders and extension ladders) used for working at height are similar to those used in domestic situations. Accidents happen if ladders are not used correctly in any context. On the work site, follow site safety procedures when using portable ladders.
Always inspect a ladder for damage before using it. Any ladder that has broken or missing rungs, or splintered or broken side rails is unsafe and should be tagged and taken out of service following site procedures. All ladders should have non-slip rungs.
STEP LADDERS • Ensure that the correct length ladder is used.
• Place the step ladder on a level, firm surface so that it will not wobble, slip or sink.
• Use only in the fully opened position.
• Make sure the ladder spreaders are tight.
• Do not use a defective ladder, even for a small job. Replace a defective ladder immediately.
• Never lean out past the confines of the ladder.
• Never stand higher than the third step from the top.
STRAIGHT AND EXTENSION LADDERS
When placing a ladder against a structure, the distance between the base of the ladder and the wall should be 1/4 of its vertical height. This should make the ladder slope approximately 65°.
• Use a ladder that is long enough to protrude at least one metre above the step off point.
• Do not use metal ladders or timber ladders with metal reinforcing where electrical hazards exist.
• Place the ladder away from access areas and swinging doors.
• Place on a firm, level, uncluttered, non-slip surface.
• Do not use ladders on working platforms to gain extra height.
• Overlap extension ladders by a minimum of three rungs.
• Ensure the ladder is secured against movement at the top.
• Wear a safety harness.
• Face the ladder when climbing up and down.
• Maintain three point contact.
• Place your hands on the rungs, not on the sides of the ladder.
• Do not carry tools or equipment in your hands when ascending or descending a ladder. Carry tools in a shoulder or belt pouch, or raise in a container using a rope.
Step Ladder Safety
Do not stand higher than the 3rd rung
from the top.
Step ladder must be fully spread
Check for loose or damaged hinges
Check for loose or damaged steps
© w
ww
.per
train
.com
.au
© w
ww.pertrain.com
.au

© www.pertrain.com.au — J12060-3 — July, 2018Page 20
RIIWHS204D Work Safely at Height
• Only one person at a time is permitted on a ladder.
• Keep ladder rungs clean.
DANGER Falling equipment can cause serious injury - secure all equipment.
5.3 SPECIALISED EQUIPMENTA work platform is a working space that is elevated above the surrounding floor or ground. There are two types of work platform, including the:
• elevating work platforms (e.g. scissor lift, boom lift crane workbox, forklift workbox)
• mobile work platform or scaffold.
5.3.1 EWP
Elevating Work Platforms (EWP) include equipment such as aerial platforms, boom lifts and scissor lifts. EWPs require transportation between work sites. They can be towed, pushed, self-propelled or vehicle-mounted. The drive mechanism that lifts and lowers the platform is powered by hydraulics or pneumatics. Lifting is done by means of a telescoping device, scissor action or other means, from a base support.
Conduct EWP activities following site procedures, using the following points as a guide.
• Enter and exit the EWP only when it has been lowered to the ground.
• Check that the barricade around the base of the EWP is secure and positioned to protect people on the ground from falling objects.
• Keep the area around the EWP clear of obstructions.
• Monitor the work area to ensure traffic and other services do not impact on the job.
• Secure all material on the EWP while working.
• Work with only one other person in the EWP.
• Do not allow your body to protrude from the platform.
• Clean up material spills immediately.
• Do not work in the EWP in windy or stormy conditions.
• Conduct a JSA and site hazard analysis on the task if the workplace conditions change.
NOTE Only qualified and authorised operators can operate an EWP and all personnel inside the basket MUST wear an appropriate fall arrest device connected to a dedicated anchor point in the basket.
Fall Arrest Device
Fall Arrest Device

July, 2018 — J12060-3 — © www.pertrain.com.au Page 21
ELEVATING WORK PLATFORM HAZARDS
Carefully assess the risk level of using EWPs. Tipping or overloading an EWP could cause an accident. Adopt the following safety points.
• Stabilise the work platform. The ground supporting the base must be hard and reliable.
• Make sure the load does not exceed the SWL of the machine.
• Locate materials and equipment within the basket so that they are safely secured and evenly distributed. Secure electrical cords, air cords or hydraulic lines to the guardrails.
• Identify emergency stop button locations on the platform.
• Only climb into the basket when it is on the ground.
• Check that the risk control measures cover contingencies such as vehicle and pedestrian traffic.
• Check the distance of your work from overhead power lines. Keep to the Exclusion Zone limits.
NOTE An EWP should be left in a properly stowed configuration whenever it is unattended. It should not be left extended as it will make the unit unstable.
Electrical Hazards
Contact with overhead power lines is the principal electrical hazard when operating an EWP. Working in the vicinity of power lines is dangerous, as electric current can jump the gap (arc) between the conductor and the platform. A spotter is required if the platform is placed within 8 to 10 metres of power line towers, and 3 to 6.4 metres of subsidiary lines.
NOTE Follow state and site regulations regarding distances and no go zones when working near overhead power lines.
3m 3m
3m
Open Area
Outside 6.4m
of Power Lines
Spotter Required Between 3 - 6.4m
of Power Lines
Spotter Required Between 3 - 6.4m
of Power Lines
Open Area
Outside 6.4m
of Power Lines
NO GO ZONEAnywhere Above
Power Line and
Within 3m Each Side See Special Provisions
Open Area
Outside 10m of
Power Lines
Spotter Required Between 8 - 10m
of Power Lines
Spotter Required Between 8 - 10m
of Power Lines
Open Area
Outside 10m of
Power Lines
NO GO ZONEAnywhere Above
Power Line and
Within 8m Each Side See Special Provisions
8m 8m
8m
Overhead Power Lines on Poles Overhead Power Lines on Towers
© w
ww
.per
train
.com
.au

© www.pertrain.com.au — J12060-3 — July, 2018Page 22
RIIWHS204D Work Safely at Height
5.3.2 MOBILE SCAFFOLD/WORK PLATFORM
A mobile scaffold is an independent scaffold that is freestanding and mounted on castors. Mobile scaffolds must be provided with information regarding safe use and erection, and erected in accordance with manufacturer specifications.
• The height of a mobile scaffold, from the bottom of the scaffold to the working surface, should be no greater than three times the minimum base dimension, unless otherwise specified by the manufacturer, supplier or designer. Some mobile scaffolds (for example, aluminium) may not be stable at a 3 to 1 height ratio.
NOTE Mobile scaffolds must be erected by a qualified and authorised scaffolder.
Implement the following control measures when working with mobile scaffolds:
• Check that the appropriate size and capacity castors are fitted to support the total mass of the scaffold.
• Castors with adjustable legs should be used and adjusted to keep the platform level.
• Confirm that no other activities in the area will impact on or be affected by your work.
• Place a barricade around the base of the platform as both a warning and protection.
• Familiarise yourself with the rescue plan.
• Check that the platform is fitted with appropriate guardrails and has safe access.
• Use a secure internal ladder with a protected opening (for example, a hinged trap door) for access to the scaffold.
• Ensure that there are no slip or trip hazards.
• Latch the access cover before commencing work.
• Lock brakes on castors at all times (unless moving the scaffold).
• Before moving mobile scaffolds conduct a JSA and site hazard analysis to check that:
- there are no power lines or other overhead obstructions - the ground is firm and level - no person is on the scaffold - no equipment and material can be dislodged from the platform - the ground is free of obstructions (a small obstruction may cause a mobile scaffold to
overturn) - electrical equipment and leads can not be tangled, cut or run over.
• Never move the scaffold in adverse conditions.
• Never use vehicles to push or pull the mobile scaffold.
CAUTION Any platform, scaffold or ladder must have clearance from overhead electrical power lines.

July, 2018 — J12060-3 — © www.pertrain.com.au Page 23
5.4 EDGE PROTECTIONThe edge of a working surface at heights must be protected. This is done by using a barrier such as a guard rail system. The edge protection system must be strong enough to stop a worker from falling through. Guard rails should be used on the edges of:
• walkways
• ramps
• landings
• stairways
• work platforms.
The edge protection must be at least 900mm high and erected parallel to the working surface.
The guard rail system has a rail between the top guard rail and the working surface to ensure that if a worker fell against the barrier, it will withstand the person’s weight.
5.4.1 TOE BOARD
A toe board is a low, protective barrier around the platform that prevents material and equipment slipping off the edge and falling to lower levels. The toe board will also minimise the risk of workers’ feet slipping over the edge. The toe board should be at least 150 mm high to be effective.
5.5 CATCH PLATFORMS AND SAFETY NETSIf it is not possible to use control measures such as personal fall arrest equipment, then physical barriers can be used as fall arrest measures.
A catch platform can be erected below a work area as a temporary construction designed to take the impact of a falling worker. This should be positioned to minimise the distance of a fall.
A safety net has a similar purpose. The net can be attached to a scaffold, under a structure or adjacent to a work area.
Guard Rail and Toe Board
Safety Net

© www.pertrain.com.au — J12060-3 — July, 2018Page 24
RIIWHS204D Work Safely at Height
6. WORKING SAFELY AT HEIGHTS
6.1 GENERAL SAFETY REQUIREMENTSApply the following general safety requirements for working at heights.
• Secure hard hats by a chin strap.
• Inspect all components and equipment to perform work at height before use, throughout the task at frequent intervals, and at the completion of the task. Do not use faulty or damaged equipment.
• Identify and barricade a drop zone to protect people and prevent them from walking below the work area.
• Use tool lanyards, drop nets, tool bags, buckets and matting (where necessary) to secure loose items and tools.
• Anchor points must be approved and clearly labelled with the point’s maximum rating and the number of people who can attach to that point.
• You must know your work area and recognise changing conditions. Adjust your operating technique to suit (e.g. install lighting) or discuss with your supervisor whether to suspend work until conditions improve.
• Obtain and/or refer to the appropriate documentation for the task, such as:
- ATW and work clearances - Procedures and work instructions - Hazard identification, e.g. Take 5 and JSA.
• Display ATW and work clearances at the work site during the task.
• Check with the authorised personnel to ensure that all safety systems, including fall protection and fall arrest equipment, are installed correctly.
6.2 SPECIFIC REQUIREMENTS FOR WORKING AT HEIGHTSEach site will have their own additional requirements for working safely at heights. The table highlights some examples of these requirements.
NOTE If you are unsure about the site's specific requirements for working safely at heights, do not do the task. Talk to your supervisor immediately.
PPE with Hard Hat Secured

July, 2018 — J12060-3 — © www.pertrain.com.au Page 25
TYPE OF WORK AT HEIGHT EXAMPLES - SPECIFIC REQUIREMENTS
Permanent Platforms and Handrails
• Must be designed, engineered and installed by trained, qualified and competent personnel
• Kick/toe boards installed• Top rails installed 900 - 1100mm from
platform• One or more mid rails installed between
top rail and platform• Handrails must not be used as anchor
points for working at heights PPE
Elevated Work Platforms (EWP)
• Risk assessment must be conducted before use of EWP and consider:
- Overhead hazards - Drop zones - Slew radius - Safe Work Load (SWL)
• Must not be used when wind conditions exceed the limits specified by the equipment manufacturer (see manufacturers manual)
• A pre-start inspection must be completed before use
• SWL must be displayed and not exceeded
• A fully compliant anchor point must be fitted
• A full body harness must be worn and lanyard system attached to the anchor point at all times
• Only trained, competent and authorised personnel can operate the EWP

© www.pertrain.com.au — J12060-3 — July, 2018Page 26
RIIWHS204D Work Safely at Height
Scaffolding • All assembly, dismantling or modification of scaffolding over 4m must be conducted by licenced/ certified scaffolder
• Climbing outside of scaffolding is prohibited
• Must only access via approved stairways or properly installed ladders
• Top rail, mid rail and kick boards installed
• Inspected, approved and tagged by a competent person
• Scaffold tag or ‘Scaff Tag’ displayed stating:
- SWL - Date of last inspection - Name of person who conducted
inspection• Scaffold without a ‘Scaff Tag’ is
considered unsafe and not for use
Mobile Scaffolding • Same requirements as Scaffolding• Must never be moved or relocated when
people are in it• Castor wheels must be locked in place
before using scaffolding
Workboxes (Suspended from crane)
• Must be approved and registered for use by appropriate authority, with a compliance plate attached
• SWL must be displayed and not exceeded
• Fully compliant anchor point required• Full body harness must be worn and
attached to the anchor point at all times• Not to be used when the wind speed
exceeds the limits specified by the equipment manufacturer (see manufacturer's manual)
• A licensed and certified crane driver must operate the crane
• The crane must remain stationary while personnel are in the workbox
• A minimum of two people must be in the workbox, one of whom must be a licensed dogman

July, 2018 — J12060-3 — © www.pertrain.com.au Page 27
Ladders • Industrial rated ladders only (including step ladders) to be used on site
• Must be inspected before use• Ladders should be used to provide
access to a work area - if work is to be performed from a ladder, a safety line and harness must be used
• Metal and metal reinforced ladders must not be used in the vicinity of electrical supplies
• Ladders must be secured and the base on firm, level ground
• Do not stand/work above the third rung from the top of the ladder
• A drop zone must be established around the ladder
• Keep hands free by using a tool belt or lanyard to carry tools
Fall Restraint (Worker uses PPE to provide tension to prevent a fall)
• Preferred option for fall protection, as the person cannot reach a fall position
• All anchor points must be rated to a 15kN load
• Full body harness must be worn• Restraint attachment mechanism must
be at least double action or double locking
• Personnel must never work alone
Fall Arrest (PPE is used to catch the worker in the event of a fall)
• Must have a Rescue Plan in place for immediate rescue
• Personnel must never work alone and a sentry must be in place
• All personnel required to use fall arrest systems must be trained and competent in their use
• Consists of full body harness, lanyard and anchor point

© www.pertrain.com.au — J12060-3 — July, 2018Page 28
RIIWHS204D Work Safely at Height
6.3 WORKPLACE ACCESSBefore moving equipment and personnel to an elevated workplace, check that access from the ground to the work area above is safe. Access requirements should take into account mechanical lifting aids for any tools and equipment that may be required.
• Check that ladders are securely fastened at the top of the working surface, placed at the correct angle out from the wall and secure at both the base and top.
• Clear all obstructions from walkways and steps.
• Provide adequate lighting to ensure visibility.
• Check that steps and handrails are clean and secure.
• Check for slip and trip hazards especially if conditions are wet.
• Check that guardrails and toe boards are secure and conform to requirements.
• Barricade unauthorised or unsafe access.
6.4 EQUIPMENT TRANSPORTBefore you can start work, the equipment may need to be transported to the work site. Mobile plant, such as EWPs and work platforms, are self-powered. You must be qualified and authorised to drive the plant. Conduct a walkaround inspection of the plant according to your site procedures and observe all safety requirements while travelling to the work site. Park the machine correctly at the work site and isolate the machine according to your site procedures.
Equipment that is not mobile, including tools, ladders, scaffolding, fall protection equipment, and barricades, must be transported to the work site. Ensure that your work instruction or supervisor identifies the required method and allocates the transport vehicle.
• Inspect the transport route for hazards before relocating the equipment.
• Ensure that the ground conditions are suitable.
• Check that there is adequate overhead clearance.
6.5 TOOL MANAGEMENTAll equipment, materials and tools required at the work area should be lifted and lowered using a safe method as identified by the site risk assessment tool or JSA. To prevent or minimise the risk of tools or materials falling onto plant or personnel below, observe these precautions.
• Carry tools in a tool belt or side pouch or use a rope to raise the tools in a container.
• Do not climb or descend a ladder while carrying tools.
• If you are using an EWP, secure the tools and equipment before raising the platform.
© w
ww
.per
trai
n.c
om
.au
© w
ww.
pertr
ain.
com
.au
© w
ww.
pertr
ain.
com
.au

July, 2018 — J12060-3 — © www.pertrain.com.au Page 29
6.6 MANUAL HANDLING Incorrect lifting and handling of heavy or awkward materials is one of the most frequent causes of workplace injury. To avoid injury to your spine or limbs, use the proper technique.
Before lifting, think LITE.
L Load • Consider the nature of the load - is it heavy, bulky, hard to hold?• Think about the weight, shape and stability of the load.• Is the load awkward, will it come apart as you move it?
I Individual Capability
• Age, strength, level of skill and experience all affect how much a person can safely handle.
• An existing health problem can increase the risk. • Using kinetic (the motion of moving) handling techniques can minimise
the amount of stress on the body during a lift.
T Task • How much reaching, bending, stretching and twisting is involved.• The position of the load relative to the handler is important in
determining the degree of control and effort required (holding the load closer to the body will give greater control, picking up a load from waist height requires less effort than picking up the same load from the ground).
• Increased frequency and duration of the handling increases the risk.
E Environment • Is the path clear of trip hazards, flat and straight? Carrying items on slopes requires greater effort than carrying on flat ground.
• Awkward posture (e.g. in confined or restricted spaces) increases the degree of control and effort needed and increases the risk of injury.
• Working at height adds another hazard to an already hazardous task.• Weather conditions must be considered, e.g. carrying sheet materials in
windy conditions will make the task more difficult.
NOTE If you are in any doubt about your ability to safely lift of move a load, DO NOT do it. Get help or find another way to move the load.
7. MONITOR CONTROLS AND SAFETY MEASURESDuring the work, follow the safe work practices. Monitor the controls and safety measures that have been applied and adjust them to changing circumstances. Maintain workplace safety by observing the following precautions.
• Ensure that access and egress is clear and remains safe throughout the job.
• Ensure that all personnel use the appropriate fall protection equipment throughout the task.
• Adjust the fall protection equipment as required to allow for required movement during the job.
• Ensure that the spotter remains on stand by throughout the job in case of emergency.
• Place the tools and equipment on the platform to minimise or eliminate the risk of items falling.
• Operate the tools and equipment safely.
• Check that the ground below is clear before moving any materials at height.

© www.pertrain.com.au — J12060-3 — July, 2018Page 30
RIIWHS204D Work Safely at Height
• Use the recommended access methods for people, tools and equipment.
• Ensure that all parts installed during the work are secure and operational before returning to the ground.
• Check controls and safety measures regularly to ensure that they are still appropriate and comply with site procedures. Ensure that:
- barricades and signage are visible and in good condition.
- protective devices such as guard rails, hand rails, foot walks and toe boards remain effective
- lifting equipment has not been altered.• Reassess and adjust or amend the controls to suit the changed conditions if required. Changed
conditions may include changes in the:
- weather
- work place environment
- job priorities.
8. POST OPERATIONAL TASKSOnce you have finished the work at height, check your work instructions to make sure everything has been done. When the work is finished, dismantle any safety systems that are no longer needed according to site procedures and the manufacturer’s instructions.
Other post operational tasks include:
• signing off on the ATW
• cleaning, inspecting, maintaining and storing tools and equipment
• cleaning up the work area
• completing work reports and records
• attending a shift handover meeting as required.
8.1 ATW SIGN-OFFWhen you have finished the working at height task you must sign off on the ATW to indicate that you have left the site safely. Sign the form and record the date and time.
The competent person in charge of the job must ensure that all workers have signed off and that the ATW is closed and filed according to site procedures.
8.2 MAINTENANCE AND INSPECTION OF EQUIPMENTInspect and clean tools, equipment and materials before returning them to their correct containers and storage areas.
If preventive maintenance is required on hand and power tools, perform the work if you are authorised or report it following site procedures. If the defective item has the potential to cause harm, follow site isolation procedures to prevent the item from being used, e.g. cut ropes before disposing of, so that they can not be used by mistake.

July, 2018 — J12060-3 — © www.pertrain.com.au Page 31
All tools on site must undergo regular testing and servicing. You can assist in this process by:
• ensuring tools are clean and ready for scheduled servicing
• delivering tools to the maintenance area when required
• collecting tools from maintenance as soon as servicing is complete
• notifying your supervisor if servicing does not occur.
8.2.1 FALL PROTECTION EQUIPMENT
NOTE All fall prevention equipment must be checked for stress, defects or damage and reported and replaced if defects are found.
Even though fall protection equipment is inspected regularly, you are still responsible for inspecting the equipment before returning it to the storage area. If any defect is found, you must immediately withdraw the piece of equipment from service. Tag the item and report the problem to your supervisor.
DANGER Failure to perform your post-work check of fall arrest equipment could cause injury or death.
8.3 STORING TOOLS AND EQUIPMENTCorrect storage increases equipment life, and is an important part of general site housekeeping. Store equipment in the designated areas so that the equipment items can be easily retrieved. The equipment must be clean and stored according to manufacturer recommendations.
Do not store defective or damaged equipment. It is your responsibility to notify your supervisor if the equipment requires repairing or needs replenishment.
In general, all tools, plant and equipment should be stored under cover in a cool dry place.
Typical Tool Storage Area
Inspect Harness Before and After Use

© www.pertrain.com.au — J12060-3 — July, 2018Page 32
RIIWHS204D Work Safely at Height
8.4 WORK AREA CLEAN-UPWhen you have completed the job according to the work plan, or at the end of your shift, clean-up the work area and return it to a safe state. Follow these guidelines.
• Clear the site of debris, rocks and spillages as required.
• Remove signs and barricades as approved by your supervisor.
• Ensure that there is adequate access into the work site for the next crew.
• Dispose of, or recycle, materials according to site procedures.
• Before leaving the work site, check that there are no hazards and that the area is safe.
8.4.1 WASTE MANAGEMENT
Most work sites use the concept of reduce, reuse and recycle to minimise the amount of waste requiring disposal. The following are some ideas to help you to manage waste.
• Identify and separate recyclable materials.
• Recycle waste products such as paper, glass, aluminium, cardboard, concrete and steel.
• Waste receptacles should be clearly marked for the type of waste they contain.
• Waste controls should be inspected, documented and reviewed regularly.
• Storage must be appropriate to the type of waste, for example bunding and containers provided away from watercourses.
8.5 WORK REPORTSFill out log books, daily activity sheets or timesheets and submit a full report on the work performed. Where required also report the condition of the machine. This will help to prevent breakdowns and rectify safety issues. Prepare the report as soon as possible so that all facts are clear. Follow the site reporting procedures when submitting the report. A work report or shift handover should be comprehensive and include some or all of the following information:
• machine defects and maintenance requirements
• faults such as:
- power supply stoppages and connection problems - water supply problems - ground problems
• environmental issues
• location of tools and other equipment
• summary of work done and deviations to the work plan.
Separate Recyclables from General Waste

July, 2018 — J12060-3 — © www.pertrain.com.au Page 33
9. SUMMARYThis training resource has provided information on your obligations for working safely at heights. Ensure that you are well prepared for conducting your duties, and follow the site safe work procedures and manufacturer instructions when carrying out tasks involving working at heights.
10. TERMS AND ACRONYMSThe following are terms commonly used on some sites. Space is provided for you to add terms and acronyms common to your site.
Term Meaning
Anchor Point (Anchorage)
An engineered addition to or existing part of a building or structure to which a person is connected during fall arrest, work positioning or fall restraint, that has appropriate strength and position to protect the person in the event of a fall or against a fall occurring, including a static line.
Certified Work at Height Person
A person who has successfully completed a competency-based training program in work at height.
Edge Protection A barrier to prevent a person falling that is erected along the edge of a building or structure, around an opening or around a raised platform.
Fall Arrest Person works with no protection against a fall. A device or system (harness connected to an anchor point directly or via a lanyard) designed to arrest a fall when it occurs.
Fall Restraint Person works with restraint protection. The device or system (harness connected to an anchor point directly or via a fixed-length or adjustable-length lanyard) designed to prevent movement to a point where a fall can occur.
Fragile or Brittle Roof
Any building roof material that if tested would fail an impact resistance level test. Ceiling material is considered fragile.
Job Safety Analysis (JSA)
A risk management process that focuses on job tasks to identify hazards before they occur, assess the risk of the hazards and determine suitable controls to manage the risks.
Mobile Elevated Work Platform (EWP)
A telescopic device or other articulated device used to position people, materials and equipment above or below the base support surface (includes scissor lift, cherry picker, integrated tool carrier basket, boom lifts, travel tower).
Man Box (Lift Box, Man Cage)
A light-duty work stage, connected to a crane hook by slings, designed to carry people to work at a remote location.
Authority to Work (ATW)
An Authority to Work is required for certain jobs that have exceptionally high risk potential, such as hot work, digging/excavating/penetrating, working in a confined space or at height.

© www.pertrain.com.au — J12060-3 — July, 2018Page 34
RIIWHS204D Work Safely at Height
Term Meaning
Qualified and Authorised Person
A person who has successfully completed a competency based training program workplace competence assessment.
Red Zone An exclusion area demarcated within 2 metres of an unprotected edge where there is a work at height fall danger.
Scaffold (Temporary Platform)
A fabricated platform of structural steel or aluminium involving tubes, couplers, frames and modules, which may be attached to a building or structure or free-standing.
Safe Work Procedures (SWP)
Safe Work Procedures (SWP) are a legal requirement and outline the workplace method and processes for carrying out tasks safely and in an environmentally sustainable way. They are easy to understand, step-by-step instructions on how to perform the task.
Work at Height Work at height involves potential for a person to fall 1.8m or more metres or for a fall of less than 1.8 metres to cause serious injury, including work within 2 metres of an edge where a fall could occur. Work that is fully protected by standard platforms, handrails, building structure or other approved edge protection is not 'work at height'.

July, 2018 — J12060-3 — © www.pertrain.com.au Page 35
Title
Spon
sor
Issue
d La
st Re
view
Next
Revie
w Pa
ge
OHS
Stan
dard
5-31
W
ork a
t Heig
ht
Nige
l Par
ker
12/11
/200
7 02
/12/20
09
01/01
/2013
10
of 2
0
A
ttach
men
t 1
A
ncho
r poi
nts
regi
ster
Anc
hor p
oint
s re
gist
er
Dep
artm
ent
Are
a A
ncho
r po
int
num
ber
Loca
tion
Cer
tific
atio
n nu
mbe
r C
ertif
icat
ion
date
N
ext
cert
ifica
tion
date
JSA
re
fere
nce
num
ber
OH
S Sa
fety
su
ppor
t AP
N -
001
Roo
f-tru
ss in
saf
ety
train
ing
room
C
N –
BR
0111
07
1/11
/07
1/11
/08
OH
S - 0
01
11. APPENDIX - WORK AT HEIGHT FORMS

© www.pertrain.com.au — J12060-3 — July, 2018Page 36
RIIWHS204D Work Safely at Height
Title
Spon
sor
Issue
d La
st Re
view
Next
Revie
w Pa
ge
OHS
Stan
dard
5-31
W
ork a
t Heig
ht
Nige
l Par
ker
12/1
1/200
7 02
/12/20
09
01/01
/2013
11
of 2
0
A
ttach
men
t 2
W
ork
at h
eigh
t per
mit
Pe
rmit
No
- 00
0000
00
Wor
k O
rder
N
o
Perm
it R
aise
d B
y (N
ame)
Loca
tion
of
Wor
k
Pe
rmit
Valid
Fr
om
Pe
rmit
Valid
To
1. I
S A
PER
MIT
REQ
UIR
ED?
(All
boxe
s in
this
sec
tion
mus
t be
mar
ked
„YES
‟ to
proc
eed)
Y
es
4.
WO
RK
AT H
EIG
HT –
FAL
L AR
RES
T (
the
appr
opria
te b
ox)
Cou
ld a
n in
jury
occ
ur a
s a
resu
lt of
a p
erso
n fa
lling,
or f
rom
fa
lling
obj
ects
?
Con
tinue
if th
e an
swer
is
“YES
” to
any
of t
hese
qu
estio
ns
A W
ork
at H
eigh
t Sen
try is
requ
ired
– ha
s a
sent
ry b
een
arra
nged
for t
he d
urat
ion
of th
e w
ork?
Y
es
N
o
Is a
per
son
requ
ired
to w
ork
whe
re th
ere
is a
risk
of f
allin
g 2
met
res
or m
ore
from
one
leve
l to
anot
her?
The
sent
ry m
ust h
old
an O
TML
Aut
horit
y to
Ope
rate
for W
ork
at H
eigh
t
Is a
per
son
requ
ired
to w
ork
with
in 2
met
res
of a
voi
d or
op
enin
g w
here
they
can
fall
2 m
etre
s or
mor
e?
Fa
ll ar
rest
app
rove
d by
M
anag
er
S
igna
ture
Is W
ork
at H
eigh
t PPE
the
mai
n m
eans
of p
rote
ctio
n?
Full
nam
e (p
leas
e pr
int)
Is a
per
son
usin
g or
exi
ting
an E
WP
or M
an C
age?
5. A
DD
ITIO
NAL
SPE
CIFI
C C
ONT
RO
LS (I
s st
andb
y eq
uipm
ent r
equi
red,
com
mun
icat
ions
, etc
?)
Doe
s a
writ
ten
JSA
or S
WP
exis
t for
this
task
?
If YE
S, e
nsur
e cu
rren
cy
(rev
iew
/upd
ate)
If
NO
T, c
ompl
ete
a JS
A/S
WP.
In
sert
refe
renc
e nu
mbe
r be
low
Yes
No:
____
____
____
____
____
_ N
o 6.
PER
MIT
APP
RO
VAL
Has
the
high
est p
ract
ical
leve
l of c
ontro
l bee
n ch
osen
to
cont
rol t
he ri
sks?
R
efer
to th
e H
iera
rchy
of
Con
trols
YES
Te
am le
ader
(per
son
in d
irect
con
trol o
f the
wor
k)
I h
ave
read
and
und
erst
ood
the
requ
irem
ents
for t
his
task
and
sha
ll en
sure
that
any
per
son(
s) w
orki
ng u
nder
th
is p
erm
it w
ill m
eet a
ll th
e re
quire
men
ts a
s st
ated
on
the
JSA
/SW
P an
d/or
risk
ass
essm
ent.
2. W
HAT
IS T
HE
WO
RK
AT
HEI
GHT
RIS
K?
( th
e ap
prop
riate
box
es)
Sca
ffold
ing
E
xitin
g fro
m a
n EW
P
Th
e fo
llow
ing
requ
irem
ents
are
in p
lace
( th
e ap
prop
riate
box
es)
Yes
N
o
Cre
atin
g a
hole
or o
peni
ng
EW
P w
ork
Sen
try
R
oof w
ork
/ Fra
gile
sur
face
Fixe
d pl
ant (
non
EWP
)
R
escu
e pl
an
M
obile
pla
nt
M
inin
g re
late
d (d
umps
, ben
ches
, sto
ckpi
les)
B
arric
ade
plan
Por
tabl
e la
dder
(If w
orki
ng a
bove
2m
)
Oth
er
JSA
/SW
P
3.
SCO
PE O
F W
OR
K (
No
wor
k ou
tsid
e th
is s
cope
may
be
perfo
rmed
und
er th
is p
erm
it)
Oth
er p
erm
its
Ta
ke 5
I aut
horis
e th
e ta
sk to
com
men
ce s
ubje
ct to
the
cond
ition
s an
d pr
ecau
tions
of t
he J
SA
/SW
P an
d as
indi
cate
d on
th
is p
erm
it.
Full
nam
e (p
leas
e pr
int)
S
igna
ture
Dat
e
7. W
OR
K C
REW
SIG
N O
N
As
a m
embe
r of t
his
wor
k cr
ew I
have
read
, und
erst
ood
and
will
com
ply
with
my
dutie
s as
list
ed o
n th
is p
erm
it an
d at
tach
men
ts (e
.g. r
isk
asse
ssm
ent,
JSA/
SWP
, che
cklis
t etc
) N
ame
Com
pany
Si
gn-o
n Ti
me
Sign
-off
Tim
e N
ame
Com
pany
Si
gn-o
n Ti
me
Sign
-off
Tim
e 1.
6.
2.
7.
3.
8.
4.
9.
5.
10.
8
A. A
PPR
OVA
L TO
WO
RK
IN A
RES
TRIC
TED
CAP
ACIT
Y -
8
B. A
ppro
val b
y G
ener
al M
anag
er /
Exec
utiv
e M
anag
er
Wor
k C
rew
Ass
esse
d as
com
pete
nt t
o w
ear h
arne
ss
and
in u
sing
atta
chm
ents
as
per t
he S
WP
for t
he ta
sk
□ Y
es
Nam
e:
Sign
atur
e:
Nam
e Si
gnat
ure:
9. R
ECO
RD
KEE
PIN
G
Orig
inal
To
be
kept
with
the
JSA
/SW
P at
the
wor
k si
te u
ntil
the
job
has
been
com
plet
ed a
nd th
e pe
rmit
clos
ed.
Onc
e th
is is
don
e th
e or
igin
al p
erm
it m
ay b
e di
spos
ed o
f. C
opy
To re
mai
n in
the
perm
it bo
ok.

July, 2018 — J12060-3 — © www.pertrain.com.au Page 37
Title Sponsor Issued Last Review Next Review Page
OHS Standard 5-31 Work at Height Nigel Parker 12/11/2007 02/12/2009 01/01/2013 12 of 20
Attachment 3 Work at height risk assessment checklist
Hazard checklist Examples of the Hazard / Risk Y/N
Control measures (using Hierarchy of
Controls)
1. Is there potential for people working below to be injured as a result of your activities?
Falling tools, materials, equipment?
Falling objects bouncing off pipes etc?
Hot slag/sparks falling onto others?
2. Correct work design Pendulum affect Incorrect choice, use of
harnesses/ lanyards
3. Portable or movable elevated work platform & cages.
Unqualified personnel operating EWP?
Could the EWP move unexpectedly?
Could mobile plant collide with EWP?
4. Portable ladders Is a ladder the best choice for the task (used mainly for access, not suitable for lengthy or heavy work)?
Has the right type of ladder been selected for this task (fibreglass/electrical, extension, step etc)?
Has the ladder been inspected and found to be in good working order?
5. Exiting from an EWP Have all other options been considered?
Can the EWP be landed on the structure or secured to an appropriate anchor?
Is the structure capable of supporting the EWP basket, persons and intended load?
Is there a designated anchor point for attachment of the fall protection equipment?
Can the base controls be tagged to prevent unauthorised interference?
Is there an equivalent EWP available to rescue, or a contingency rescue plan in place?
Has the EWP logbook been filled out and the pre-start check completed?
6. Repeated detaching & reattaching the lanyard?
Potential to be disconnected from anchor point?
Is a dual lanyard system required to ensure 100% attachment at all times?

© www.pertrain.com.au — J12060-3 — July, 2018Page 38
RIIWHS204D Work Safely at Height
Title Sponsor Issued Last Review Next Review Page
OHS Standard 5-31 Work at Height Nigel Parker 12/11/2007 02/12/2009 01/01/2013 13 of 20
Hazard checklist Examples of the Hazard / Risk Y/N
Control measures (using Hierarchy of
Controls)
7. Fall restraint & fall arrest:- Ineffective Rescue
Is there an emergency rescue plan in place? (attach)
Does the sentry know what to do? Ineffective, non existent
communications between the sentry, worker & ERC
Nominated rescue people & equipment not readily available/accessible?
8. Fall restraint & fall arrest:- Equipment
Have all other levels in the Hierarchy of Controls been considered?
Is working in a restraint / arrest mode the most practical way of completing the task?
Has the work method included a safe means of access / egress for the work location?
Has the equipment to be used been inspected (tag in date)?
Is the free-fall clearance distance adequate (minimum 6.6m for a 2m lanyard)?
9. Harness/Lanyard use, fall restraint & fall arrest:- Anchor point failure
Is there a suitable anchor point for this work (location, strength etc)?
Lack structural integrity Damaged anchor point Poor selection of anchor point
10. Hazards associated with gaining access to the work area.
Is there risk of slips, trips or falls? Is there risk of emergency
response crews being unduly delayed in an emergency
11. Tools & Equipment What are the hazards associated with introducing tools and equipment into the work area?
12. Manual handling What are the hazards associated with manual handling equipment/materials into the work area?
13. Scaffolding hazards:- Lack of structural integrity for the required load
Is the scaffold in the correct place for the task?
Is the scafftag in place? Is the scafftag current? (max 28
days between inspections) Has a Barricading Plan been
completed & followed? What duty is the scaffolding
required to be (light, medium, heavy)?
Do the scaffolders have the appropriate certification?
The scope is confirmed and will not change, potentially overloading the scaffold?

July, 2018 — J12060-3 — © www.pertrain.com.au Page 39
Title Sponsor Issued Last Review Next Review Page
OHS Standard 5-31 Work at Height Nigel Parker 12/11/2007 02/12/2009 01/01/2013 14 of 20
Hazard checklist Examples of the Hazard / Risk Y/N
Control measures (using Hierarchy of
Controls)
14. What hazards have been identified if Working on Roofs?
Brittle, unsound roof? Steep roof? Poor access? Have warning signs and
barricades been erected at every entrance below the work area?
Have fragile areas been identified and warning signs/barricades put in place?
If possible, have fragile areas been safety meshed/covered?
Has the structural integrity of the roof/fragile surface been confirmed by the Responsible Engineer?
Have other options been considered that negate having to work over the fragile surface/roof?
If possible, can persons be prevented from entering a fragile area (e.g. fall restraint equipment)?
15. Falling objects Has the risk of falling tools/equipment been assessed and preventative measures put in place (lanyards, tool belts etc)?
Is the area below appropriately barricaded off and sing posted “Men Working Above”?
Is the area above appropriately barricaded off and sign posted “Men Working Below”?
16. Creating an Opening/Hole (removing flooring or guardrails)
Has access by other people been considered and controlled (barricades, signage etc)?
Is suitable restraint equipment and anchor points available?
Is a suitable temporary cover with a sign required for the hole?
17. Exposure to extreme weather conditions?
Sunlight & heat? Strong or gusty winds and or
dust? Rain? Strong glare? Lightning?
18. Removal/Installing Floor panelling (check plate and or grid mesh panels)
Is there potential for people unaware of hazard to gain access to area and fall through gaps or unfastened floor panelling?
Is the potential for persons installing/removing flooring to fall?
Is there potential for objects or equipment to fall and injure others or damage equipment?

© www.pertrain.com.au — J12060-3 — July, 2018Page 40
RIIWHS204D Work Safely at Height
Title Sponsor Issued Last Review Next Review Page
OHS Standard 5-31 Work at Height Nigel Parker 12/11/2007 02/12/2009 01/01/2013 15 of 20
BARRICADE PLAN
1. Do you need permanent, semi permanent or temporary barricading? 2. Where‟s the safest entry route (through the barricading)? 3. Account for possibility of falling objects bouncing off beams & infrastructure 4. Ensure vehicular traffic is kept away from scaffolding 5. Ensure adequate signage and tagging is in place
RESCUE PLAN
1.
Means of Rescue
Self Rescue? Rope Rescue? Elevated Work Platform? Other?
Resources Required: Identify the People, ERC, Equipment required
2.
Readiness of Rescue Resources
Have all the people mentioned in the rescue plan confirmed
that they are available in the event of an emergency? Do they know the nature & location of the possible rescue? Is the nominated equipment readily available and accessible?
Yes or
No?
3.
Have all these people read and understood their role in the rescue plan?
Work Team Members? Sentry? Rescue Personnel?
Yes or
No?

July, 2018 — J12060-3 — © www.pertrain.com.au Page 41
Title
Spon
sor
Issue
d La
st Re
view
Next
Revie
w Pa
ge
OHS
Stan
dard
5-31
W
ork a
t Heig
ht
Nige
l Par
ker
12/11
/200
7 02
/12/20
09
01/01
/2013
16
of 2
0
Atta
chm
ent 4
Wor
k at
hei
ght s
entr
y ch
eckl
ist a
nd d
utie
s
Wor
k at
Hei
ght S
entr
y C
heck
list a
nd D
utie
s To
be
com
plet
ed b
y th
e se
ntry
prio
r to
assu
min
g re
spon
sibi
lity
as th
e W
ork
at H
eigh
t Sen
try.
I hav
e re
ad a
nd u
nder
stoo
d:
Wor
k at
Hei
ght P
erm
it
R
isk
Asse
ssm
ent
Job
Safe
ty A
naly
sis
/ Saf
e W
ork
Proc
edur
e
Ho
t Wor
k or
oth
er re
leva
nt p
erm
its (w
here
ap
plic
able
) I h
ave
read
and
fully
und
erst
and
the
Resc
ue P
lan
My
mea
ns o
f com
mun
icat
ion
are
____
____
____
____
____
___
The
emer
genc
y ph
one
num
ber i
s __
____
____
____
____
____
_
Th
e em
erge
ncy
radi
o ch
anne
l is
____
____
____
____
____
____
Th
e sa
fest
ent
ry ro
ute
for t
he E
mer
genc
y R
espo
nse
team
is v
ia
____
____
____
____
____
____
____
____
____
____
___
____
____
____
____
____
____
____
____
____
____
___
____
____
__
I hav
e ch
ecke
d th
e fo
llow
ing
equi
pmen
t prio
r to
task
sta
rting
.
C
omm
unic
atio
ns fo
r the
task
are
in p
lace
and
w
orki
ng.
All
sign
s an
d ba
rrica
des
are
in p
lace
.
I am
fam
iliar w
ith m
y du
ties
and
will
ensu
re th
e fo
llow
ing
are
in p
lace
(ti
ck to
sho
w c
ompl
ianc
e).
I hol
d a
valid
cur
rent
OTM
L Au
thor
ity to
Ope
rate
– W
ork
at
Hei
ght c
ard.
I w
ill st
op w
ork
at a
ny ti
me
if ne
cess
ary
whe
n sa
fety
is a
t ris
k.
I will
unde
rsta
nd a
nd e
xecu
te m
y ro
le in
the
resc
ue p
lan.
I w
ill re
stric
t any
act
ivity
that
may
affe
ct th
e he
alth
and
saf
ety
of th
e pe
ople
wor
king
at h
eigh
t.
N
o pe
rson
sha
ll w
ork
at h
eigh
ts w
ithou
t com
plyi
ng w
ith a
nd
sign
ing
onto
the
o
Wor
k at
Hei
ght P
erm
it o
Job
Saf
ety
Anal
ysis
o
Any
oth
er re
quire
d pe
rmits
eg
hot w
ork.
o
Com
plet
ing
a Ta
ke 5
I w
ill re
mai
n in
com
mun
icat
ion
with
thos
e w
orki
ng a
t hei
ght.
I will
mon
itor a
ll eq
uipm
ent,
whe
re p
ract
ical
, bei
ng u
sed
by
thos
e w
orki
ng a
t hei
ght.
I will
not l
eave
the
sent
ry p
ositi
on u
nles
s re
lieve
d by
a
com
pete
nt p
erso
n w
ho h
as c
ompl
eted
thei
r che
cklis
t and
un
ders
tand
s th
e cu
rrent
requ
irem
ents
.
I w
ill en
sure
that
the
barri
cade
s, if
requ
ired,
are
kep
t in
plac
e w
hene
ver p
eopl
e ar
e w
orki
ng a
t hei
ght.
In th
e ev
ent o
f an
emer
genc
y I w
ill re
mai
n at
my
post
unt
il re
lieve
d.
Sig
natu
re:
Wor
k at
Hei
ght S
entry
Dat
e
Sig
natu
re:
Team
Lea
der
D
ate
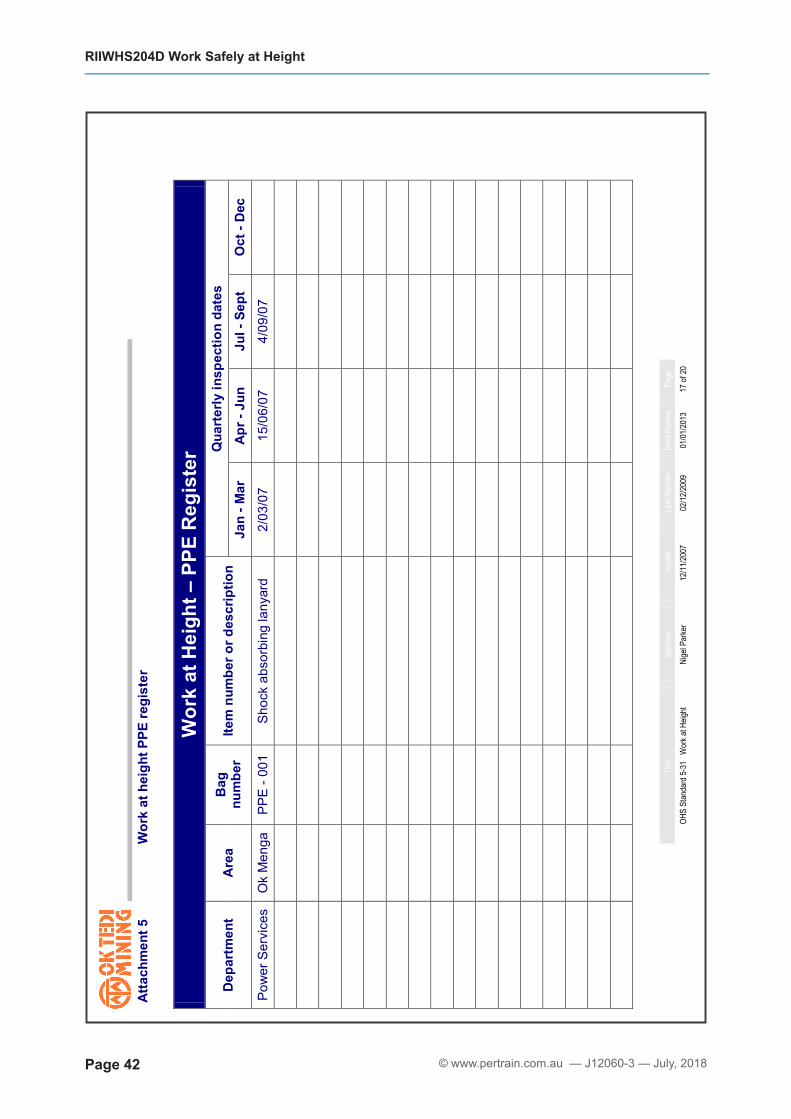
© www.pertrain.com.au — J12060-3 — July, 2018Page 42
RIIWHS204D Work Safely at Height
Title
Spon
sor
Issue
d La
st Re
view
Next
Revie
w Pa
ge
OHS
Stan
dard
5-31
W
ork a
t Heig
ht
Nige
l Par
ker
12/11
/200
7 02
/12/20
09
01/01
/2013
17
of 2
0
A
ttach
men
t 5
W
ork
at h
eigh
t PPE
regi
ster
Wor
k at
Hei
ght –
PPE
Reg
iste
r
Dep
artm
ent
Are
a B
ag
num
ber
Item
num
ber o
r des
crip
tion
Qua
rter
ly in
spec
tion
date
s Ja
n - M
ar
Apr
- Ju
n Ju
l - S
ept
Oct
- D
ec
Pow
er S
ervi
ces
Ok
Men
ga
PPE
- 001
Sh
ock
abso
rbin
g la
nyar
d 2/
03/0
7 15
/06/
07
4/09
/07

July, 2018 — J12060-3 — © www.pertrain.com.au Page 43
Title Sponsor Issued Last Review Next Review Page
OHS Standard 5-31 Work at Height Nigel Parker 12/11/2007 02/12/2009 01/01/2013 18 of 20
Attachment 6 Work at Height PPE Inspection form
Work at Height PPE inspection Department PPE bag number
Area Date
A = Acceptable U = Unacceptable N/A = Not applicable
Component Condition / Fault to be checked (Please ) A U N/A
Rope and webbing
Cuts or tears Abrasion or fraying UV damage Loose stitching Stretching Damage due to contact with heat, corrosives, or solvents
Hooks, Karabiners and Rope Grabs
Distortion of hook or latch Cracks or forging folds Wear at swivels and latch pivot pin. Free movement of the latch over its full travel Broken, weak or misplaced latch springs Corrosion Gate and screw closes fully and freely
Sewing
Broken, cut or worn threads Damage or weakening of threads due to contact with heat, solvents or corrosives
Abrasion damage Unauthorised repairs/modifications Deterioration due to ultraviolet exposure
Terminations Thimble eyes intact Excessive movement of thimble eyes
Buckles and Adjusters
Cracks and forging laps Bent tongues (Distortion) Corrosion Open rollers
Labelling
Date of Manufacture visible Australian Standards Serial/Batch No visible Manufacturer Name visible Designation/type of device visible
Energy Absorber Energy Absorber intact
Comments
Lanyard fit for use Yes No
Equipment not fit for use shall be removed from service
Inspector‟s name Signature
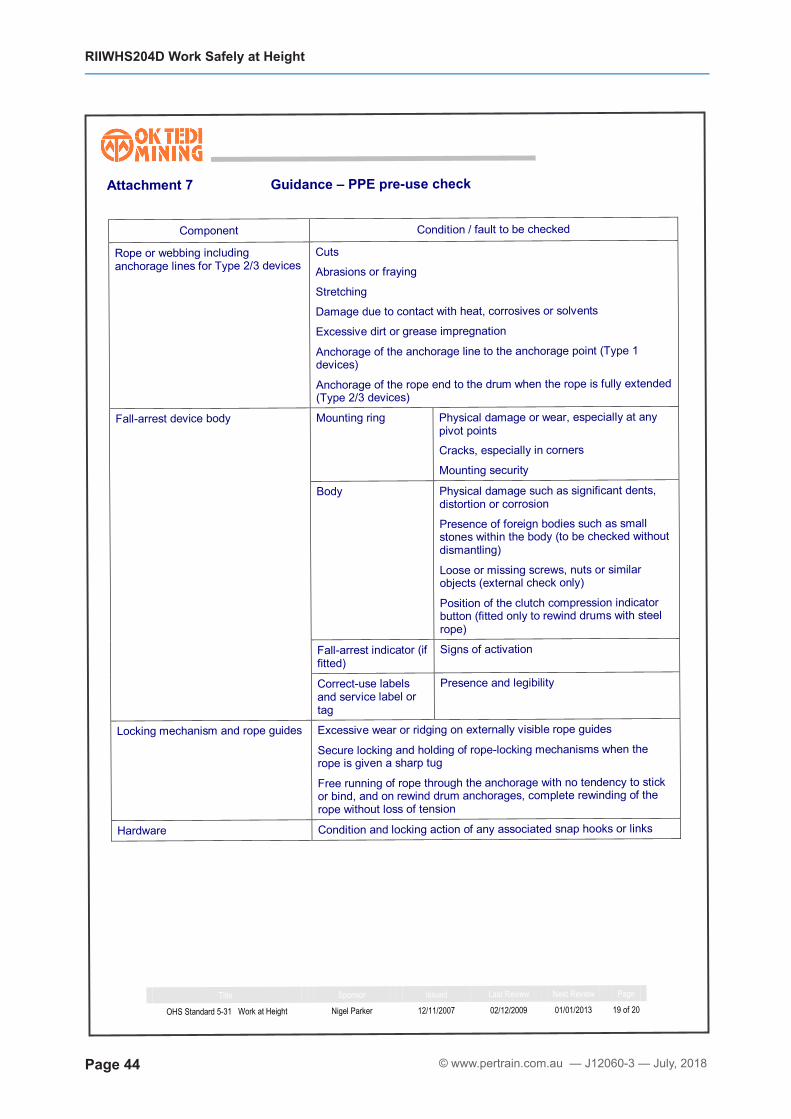
© www.pertrain.com.au — J12060-3 — July, 2018Page 44
RIIWHS204D Work Safely at Height
Title Sponsor Issued Last Review Next Review Page
OHS Standard 5-31 Work at Height Nigel Parker 12/11/2007 02/12/2009 01/01/2013 19 of 20
Attachment 7 Guidance – PPE pre-use check
Component Condition / fault to be checked
Rope or webbing including anchorage lines for Type 2/3 devices
Cuts
Abrasions or fraying
Stretching
Damage due to contact with heat, corrosives or solvents
Excessive dirt or grease impregnation
Anchorage of the anchorage line to the anchorage point (Type 1 devices)
Anchorage of the rope end to the drum when the rope is fully extended (Type 2/3 devices)
Fall-arrest device body Mounting ring Physical damage or wear, especially at any pivot points
Cracks, especially in corners
Mounting security
Body Physical damage such as significant dents, distortion or corrosion
Presence of foreign bodies such as small stones within the body (to be checked without dismantling)
Loose or missing screws, nuts or similar objects (external check only)
Position of the clutch compression indicator button (fitted only to rewind drums with steel rope)
Fall-arrest indicator (if fitted)
Signs of activation
Correct-use labels and service label or tag
Presence and legibility
Locking mechanism and rope guides Excessive wear or ridging on externally visible rope guides
Secure locking and holding of rope-locking mechanisms when the rope is given a sharp tug
Free running of rope through the anchorage with no tendency to stick or bind, and on rewind drum anchorages, complete rewinding of the rope without loss of tension
Hardware Condition and locking action of any associated snap hooks or links

July, 2018 — J12060-3 — © www.pertrain.com.au Page 45
Title Sponsor Issued Last Review Next Review Page
OHS Standard 5-31 Work at Height Nigel Parker 12/11/2007 02/12/2009 01/01/2013 20 of 20
Webbing Cuts or tears
Abrasion damage especially where there is contact with hardware
Excessive stretching
Damage due to contact with heat, corrosives or solvents
Deterioration due to rotting, mildew or ultraviolet exposure
Snap hooks and karabiners Distortion of hook or latch
Cracks or forging folds
Wear at swivels and latch pivot pin
Open rollers
Free movement of the latch over its full travel
Broken, weak or misplaced latch springs (compare if possible with a new snap hook)
Free from dirt or other obstructions, e.g. rust
D-rings Excessive “vertical” movement of the straight portion of the D-ring at its attachment point on to the belt, so that the corners between the straight and curved sections of the D become completely exposed
NOTE: Excessive vertical movement of the ring in its mounting can allow the nose of larger snap hooks to become lodged behind the straight portion of the D, in which position the snap hook can often accidentally “roll out” of the D under load
Cracks, especially at the intersection of the straight and curved portions
Distortions or other physical damage of the D-ring
Excessive loss of cross-section due to wear
Buckles and adjusters Distortion of other physical damage
Cracks and forging laps where applicable
Bent tongues
Open rollers
Sewing Broken, cut or worn threads
Damage or weakening of threads due to contact with heat, corrosives, solvents or mildew
Ropes Cuts
Abrasions or fraying
Stretching
Damage due to contact with hear, corrosives, solvents etc
Deterioration due to ultraviolet light or mildew
Chains Physical damage
Security of attachments to snap hooks, rings and similar components

© www.pertrain.com.au — J12060-3 — July, 2018Page 46
RIIWHS204D Work Safely at Height
12. KEY CONTROLS INDEXAAnchor Points 13Authority to Work System 4
BBarricades 17
CCatch Platforms 23
EEdge Protection 23Equipment Checks and Inspections 16
HHousekeeping 15
IInspect Equipment 16 Inspect Work Area 7
JJob Planning
Plan and prepare for operations 4
LLadders 18
Face towards ladder 14Three point contact 14
Lighting 16
PPPE
Fall protection systems 10Mandatory PPE 10
ProceduresSite and task procedures 4
RRescue Plan 14
SSafety Nets 23Scaffolding 18Signage 17Specialised Equipment 20
EWP 20Mobile Scaffold/Work Platform 22
Spotter/safety monitor 10
TTrained and Authorised 2

