riflescope +hairs home repair preliminaries
TRANSCRIPT

RIFLESCOPE +HAIRS
HOME REPAIR P. J. Smith.
PRELIMINARIES
For some reason, adding or replacing + Hairs in a riflescope seems to be regarded as a job for the professional.
This is simply not so - it is very easy to make a simple, robust, and very clear +.
I seem to repeat this description so often that simple directions are given here with some photographs.
I am not about to detail types and qualities of scopes - rather give general information. You will need to adapt this to your need.
The hardest thing is to dissassemble the scope without damage. They are all different, and some really are not meant to be dismantled and repaired.
The + hair is about 1 inch in front of the eyepiece assembly which must be removed. This is done by fully unscrewing at the eyepiece focus.
Many have an internal retaining ring which must be removed first. To get at this, the narrower outer part of the eyepiece ring must be held firmly and unscrewed first. Hidden underneath - and not easy to access - will be found a lock ring. You may need to make a special tool by grinding a flat sheet of metal to fit
into the slots.
I suggest this lock ring not be replaced.
Grasping the narrow outer eyepiece end securely may be difficult. One trick is to grasp in a lathe chuck gently and unscrew by hand. The part may be wrapped in copper foil or even wet and dry paper for a
better grip.
Revealed when the entire eyepiece focus assembly is removed is an inner tube. The + hairs are mounted on a small collar that is somehow attached (screwed in usually) to its end.
This is best removed - unfortunately it is often glued in. Do not worry about wrecking the + because a new one is easy, but you are on your own as to dissassembly.
Many Gun shops have a rack of junked riflescopes. If you get to know them, they may give you a few to practice on.
TYPEThe only sensible type for home repairs are simple threads. This limits the graticule to simple lines and,

if you wish to push the envelope, to selected beads.
The result is in no way inferior to commercial + hairs, in fact I prefer a thread based + to all others for clarity. When a cone of light backlights the fibers they appear dead black.
Unlike glass graticules, single fibers do not show dust in the focal plane which is almost impossible to eliminate without a cleanroom.
Light synthetic fibers are also extremely resistant to shock. Of course, careless handling will poke them out easily but a replacement is easy.
The first thing to do is to make a few simple crosses to prove that you can do it successfully. Once this is mastered, you will then have the confidence to try some beading. Be aware that beading will in many
cases ruin an otherwise excellent cross. This is why you should gain confidence in whipping up a simple cross in a routine way.
The thread material needs to be strong, uniform, straight, very light, and not crinkled as from a braided or twist laid string.
You may expect that thin wires would be best - they are in fact about the worst thing to use. Since they have little elasticity, they cannot be pulled straight and will either break when tightened or sag and be
crooked. Their higher mass makes then far more susceptible to recoil forces.
Fortunately, Dental Floss serves this purpose extremely well. It must be dewaxed with a solvent first (I use clear priming fluid as used by plumbers for PVC pipe joining. This is MEK (Methyl Ethyl Ketone) ).
Do this so an air current takes away the fumes. Turpentine will probably work.
After dewaxing about 6 inches of dental floss by drawing it between solvent laced cloth a few times, some fibers must be teased apart. Single fibers are easily visible in a good light but be careful you do not
have a small bunch of 2 or 3.
Here is what can be done with simple fibers and small beads of glue. A single bead is easy but precise spacing of beads is very difficult. I will not expand on this apart from showing that it is possible. A
single bead can be placed at the centre as a final step with a small loop of wire holding the glue.
This photograph was taken of a local Shire Hall from about 2 miles with a homemade scope.
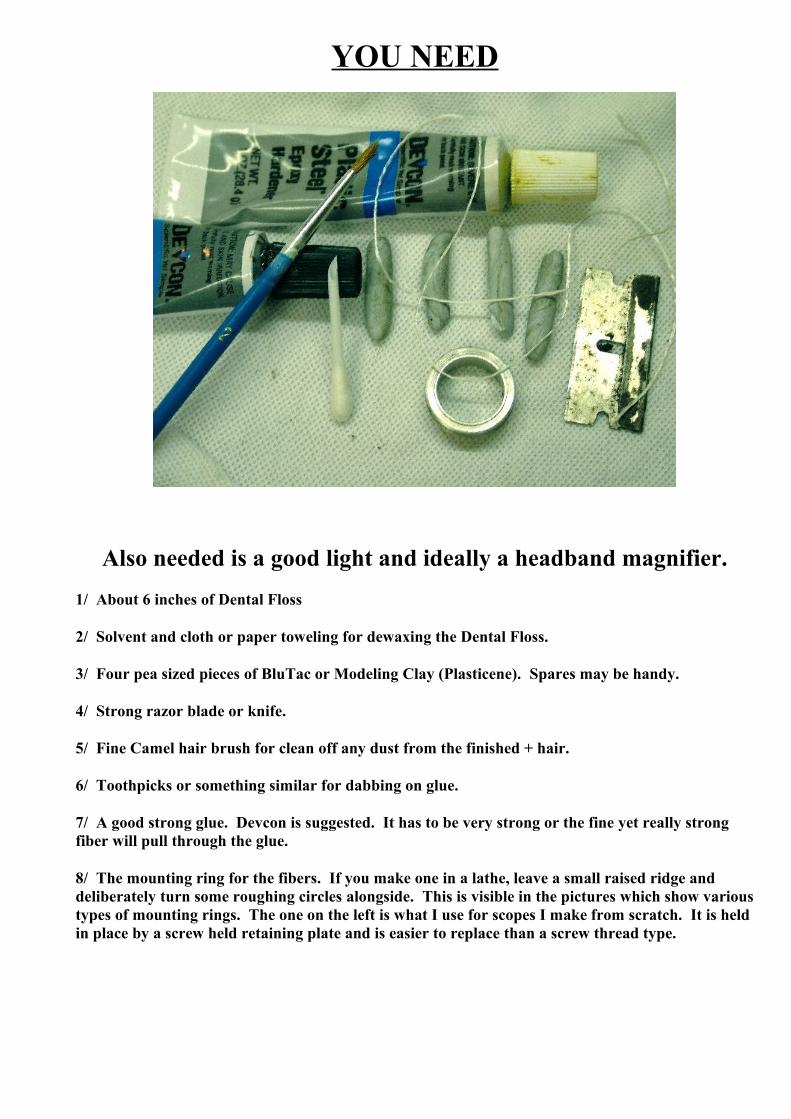
YOU NEED
Also needed is a good light and ideally a headband magnifier.1/ About 6 inches of Dental Floss
2/ Solvent and cloth or paper toweling for dewaxing the Dental Floss.
3/ Four pea sized pieces of BluTac or Modeling Clay (Plasticene). Spares may be handy.
4/ Strong razor blade or knife.
5/ Fine Camel hair brush for clean off any dust from the finished + hair.
6/ Toothpicks or something similar for dabbing on glue.
7/ A good strong glue. Devcon is suggested. It has to be very strong or the fine yet really strong fiber will pull through the glue.
8/ The mounting ring for the fibers. If you make one in a lathe, leave a small raised ridge and deliberately turn some roughing circles alongside. This is visible in the pictures which show various types of mounting rings. The one on the left is what I use for scopes I make from scratch. It is held in place by a screw held retaining plate and is easier to replace than a screw thread type.
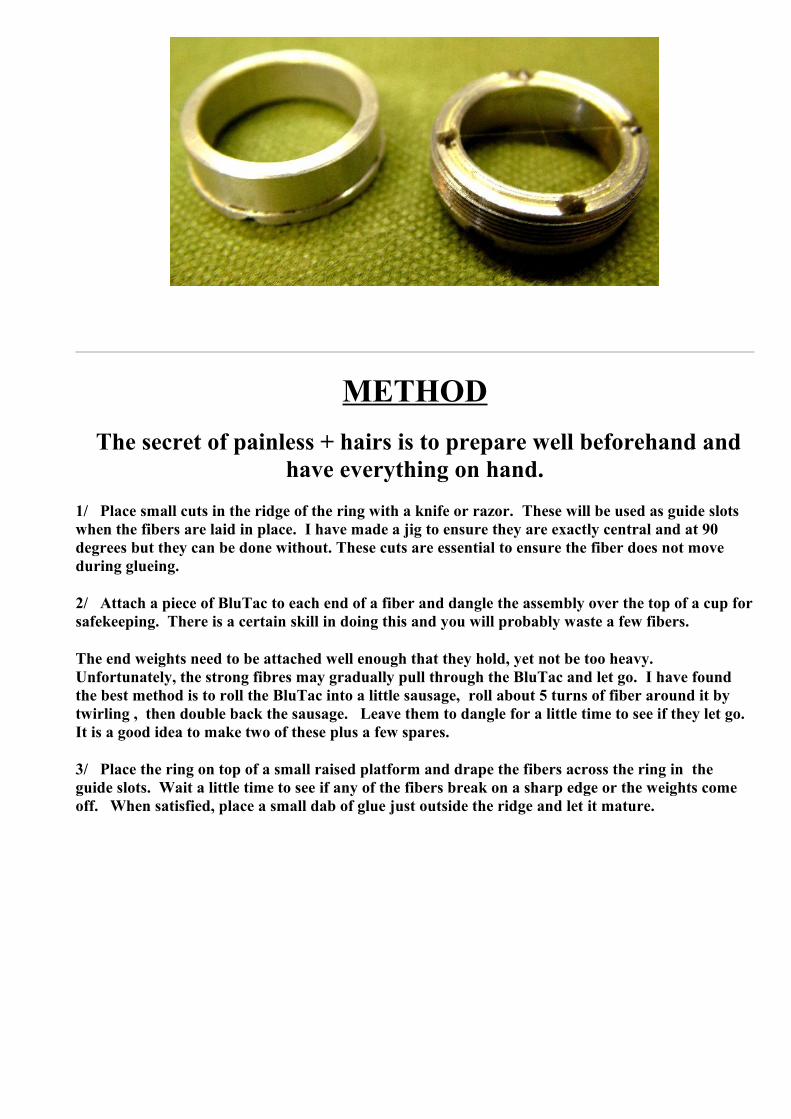
METHOD The secret of painless + hairs is to prepare well beforehand and
have everything on hand.1/ Place small cuts in the ridge of the ring with a knife or razor. These will be used as guide slots when the fibers are laid in place. I have made a jig to ensure they are exactly central and at 90 degrees but they can be done without. These cuts are essential to ensure the fiber does not move during glueing.
2/ Attach a piece of BluTac to each end of a fiber and dangle the assembly over the top of a cup for safekeeping. There is a certain skill in doing this and you will probably waste a few fibers.
The end weights need to be attached well enough that they hold, yet not be too heavy. Unfortunately, the strong fibres may gradually pull through the BluTac and let go. I have found the best method is to roll the BluTac into a little sausage, roll about 5 turns of fiber around it by twirling , then double back the sausage. Leave them to dangle for a little time to see if they let go. It is a good idea to make two of these plus a few spares.
3/ Place the ring on top of a small raised platform and drape the fibers across the ring in the guide slots. Wait a little time to see if any of the fibers break on a sharp edge or the weights come off. When satisfied, place a small dab of glue just outside the ridge and let it mature.

This jig is unnecessary. Any suitable raised platform works.
It is used to ensure cuts are exactly midway and perpendicular.
Adding a dab of glue.
Visible is the alignment slot made with a knife, and a dab of glue holding the fiber.
Be very careful to leave the glue to fully set, and carefully cut off the unwanted end with good scissors.
If you pull the unwanted end it will most likely tear through the glue because Dental Floss fibers are stronger than the glue itself.
4/ If necessary, use a Camel hair brush to gently remove any pieces of dust from fibers. A small

amount of solvent may be used.