rfid label design and encoding management pro user’s guide ...s_guide-rfid... · rfid label...
TRANSCRIPT

RFID Label Design and Encoding
Management Pro
March 2017 Version 1.30
User’s Guide
A698HL6BT-E-U-0130
Manual Input

-i- Copyright© FUJITSU LIMITED 2017
Preface This document explains how to use the Manual Input (hereafter referred to as “this application”) of
RFID Label Design and Encoding Management Pro (hereafter referred to as "this tool"). Be sure to
read this document before using this application.
Please read the First Step Guide first.
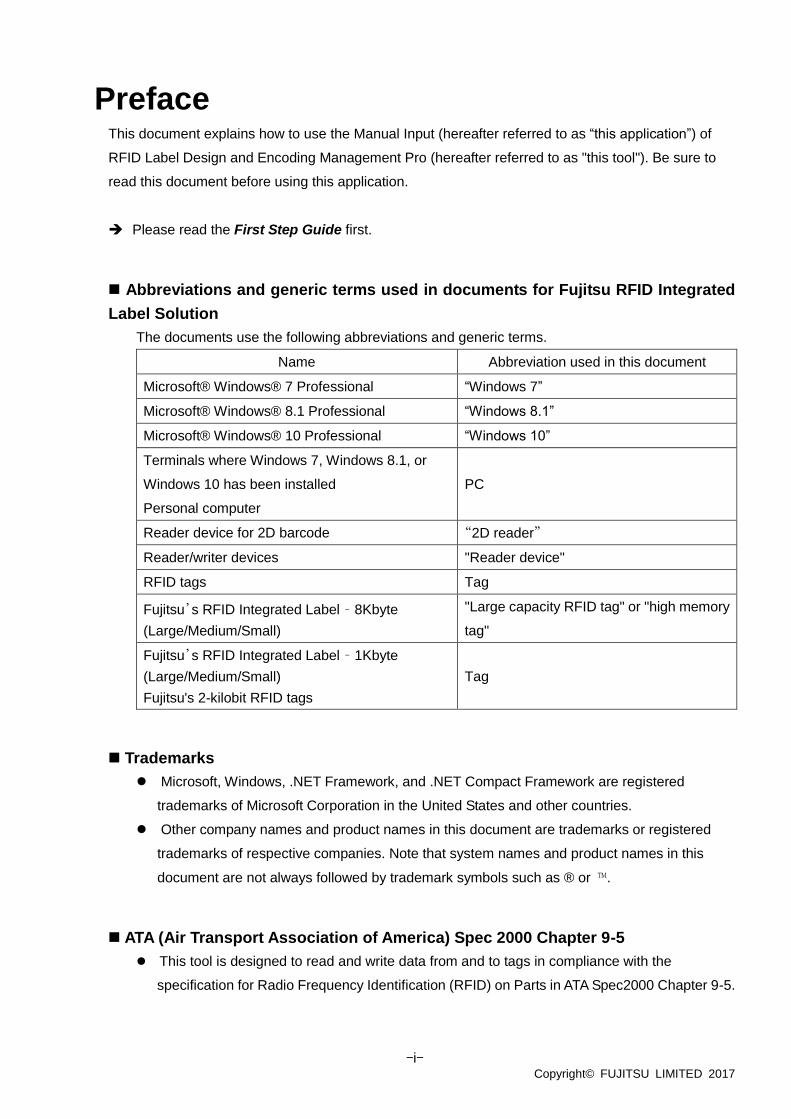
Abbreviations and generic terms used in documents for Fujitsu RFID Integrated
Label Solution
The documents use the following abbreviations and generic terms.
Name Abbreviation used in this document
Microsoft® Windows® 7 Professional “Windows 7”
Microsoft® Windows® 8.1 Professional “Windows 8.1”
Microsoft® Windows® 10 Professional “Windows 10”
Terminals where Windows 7, Windows 8.1, or
Windows 10 has been installed
Personal computer
PC
Reader device for 2D barcode “2D reader”
Reader/writer devices "Reader device"
RFID tags Tag
Fujitsu’s RFID Integrated Label – 8Kbyte
(Large/Medium/Small)
"Large capacity RFID tag" or "high memory
tag"
Fujitsu’s RFID Integrated Label – 1Kbyte
(Large/Medium/Small)
Fujitsu's 2-kilobit RFID tags
Tag
Trademarks
Microsoft, Windows, .NET Framework, and .NET Compact Framework are registered
trademarks of Microsoft Corporation in the United States and other countries.
Other company names and product names in this document are trademarks or registered
trademarks of respective companies. Note that system names and product names in this
document are not always followed by trademark symbols such as ® or ™.
ATA (Air Transport Association of America) Spec 2000 Chapter 9-5
This tool is designed to read and write data from and to tags in compliance with the
specification for Radio Frequency Identification (RFID) on Parts in ATA Spec2000 Chapter 9-5.

-ii- Copyright© FUJITSU LIMITED 2017
High Risk Activity
This product is designed and manufactured as contemplated for general use, including
without limitation, general office use, personal use and household use, but is not designed and
manufactured as contemplated for use accompanying fatal risks or dangers that, unless
extremely high safety is secured, could lead directly to death, personal injury, severe physical
damage or other loss (hereinafter called "High Safety Required Use"), including without
limitation, nuclear reaction control, aircraft flight control, air traffic control, mass transport
control, life support, and weapon launch control . The customer shall not use this product
without securing the sufficient safety required for the High Safety Required Use.
Notes on export procedures
When exporting or providing this product and this document, check the regulations under the
Foreign Exchange and Foreign Trade Law and the laws and regulations relating to US export
control, and complete the necessary procedures.
Screenshots and illustrations
The screenshots and illustrations in this document are only examples, and the actual screens
may be slightly different depending on the environment that you are using.
The screenshots used in the explanations in this document are from a Windows 7
environment.
Other Notes
No part of this document may be reproduced or reused for other purposes without the
express written permission of Fujitsu Limited.
The content of this document may change without prior notice.

-iii- Copyright© FUJITSU LIMITED 2017
Revision history
Edition Date issued Changes
Version 1.00 October 2014 First version released.
Version 1.10 March 2015 Support for Windows 8.1
Version 1.20 September 2015 Add Commissioning from 2D and Batch Commissioning
Version 1.21 October 2015 Small changes.
Version 1.22 April 2016 Changed the screen transition on startup
Version 1.23 October 2016 For the first enhancement in 2016
Version 1.30 March 31 2017 For Windows 10 support

-iv- Copyright© FUJITSU LIMITED 2017
CONTENTS
1 Function Overview of RFID Label Design and Encoding Management
Pro ................................................................................................................. 1
1.1 Overview ................................................................................................................... 1
1.2 Function List ............................................................................................................ 1
1.3 Suite of User Manuals ............................................................................................. 2
1.4 Messages .................................................................................................................. 2
2 RFID Label Design and Encoding Management Pro Manual Input ........ 3
2.1 Overview ................................................................................................................... 3
2.2 Functions .................................................................................................................. 3
2.3 Function Overview ................................................................................................... 4
2.4 Screen Transitions ................................................................................................... 5
2.5 Start and Stop the Application ................................................................................ 6
2.5.1 Start the Application ................................................................................................................... 6
2.5.2 Stop the Application ................................................................................................................... 8
2.6 Use RFID Label Design and Encoding Management Pro Manual Input ............ 10
2.6.1 Select an Initialization Definition File ....................................................................................... 10
2.6.2 Enter EPC Information ............................................................................................................. 14
2.6.3 Select a Record Input Method ................................................................................................. 15
2.6.4 Enter Birth Record .................................................................................................................... 26
2.6.5 Confirmation and Execution..................................................................................................... 33

-1- Copyright© FUJITSU LIMITED 2017
1 Function Overview of RFID Label Design and Encoding Management Pro
1.1 Overview
This application can initialize RFID tags in the ATA formats specified in ATA Spec2000 Chapter 9-5
and print the label on RFID tags by RFID printer.
1.2 Function List
This following table lists the functions of this application.
Name Overview
RFID Label Design and
Encoding Management
Pro
This application initializes RFID tags in compliance with the ATA formats
specified in ATA Spec2000 Chapter 9-5 based on the data inputted by
manual or CSV/XML files, and prints the labels on RFID tags by RFID
printer.

-2- Copyright© FUJITSU LIMITED 2017
1.3 Suite of User Manuals
The user manuals for this tool are organized as follows:
Manual title Description
RFID Label Design and
Encoding Management Pro
User's Guide (Manual Input)
• This document.
• Explains how to use the Manual Input function
of “RFID Label Design and Encoding
Management Pro”.
RFID Label Design and
Encoding Management Pro
User's Guide
(Commissioning from 2D)
• Explains how to use the Commissioning from
2D function of “RFID Label Design and
Encoding Management Pro”.
RFID Label Design and
Encoding Management Pro
User's Guide (Batch
Commissioning)
• Explains how to use the Batch Commissioning
function of “RFID Label Design and Encoding
Management Pro”.
RFID Data Management Pro
& RFID Label Design and
Encoding Management Pro
User's Guide (Appendixes)
• Explains the usage methods and provides
additional information about the “RFID Data
Management Pro” and “RFID Label Design and
Encoding Management Pro”
1.4 Messages
Messages may be displayed in popup dialog boxes, depending on conditions encountered during
processing.
When an error is displayed, the normal processing is suspended.
Refer to the RFID Data Management Pro & RFID Label Design and Encoding Management Pro
User's Guide (Appendixes) for information on the messages displayed in the pop-up dialog box, and
for guidance on how to eliminate the cause of the error.
If the cause of the error cannot be identified, please make an inquiry to Fujitsu Customer Support.

-3- Copyright© FUJITSU LIMITED 2017
2 RFID Label Design and Encoding Management Pro
Manual Input
2.1 Overview
This application makes it possible to initialize tags using an ATA format as defined in ATA Spec2000
Chapter 9-5, as well as to print a label on tags. There are three data entry forms. The hand input,
csv file input, and SAP AII (XML File) can be input.
2.2 Functions
The functions of this application is as follows:
RFID Label Design and Encoding Management Pro
Manual Input
Entering Birth Record data
Writing data to tag and Printing label on tag
Selecting a record input method
Entering EPC information
Selecting an initialization definition file

-4- Copyright© FUJITSU LIMITED 2017
2.3 Function Overview
This section provides an overview of the functions of this application.
Selecting an initialization definition file
This function is used to select an initialization definition file (XML) that defines such items as the
size of the ATA area to be initialized.
Automatic EPC generation
This function automatically generates an EPC based on the values entered in the EPC
information setup window and the values specified for the Birth Record TEIs.
Selecting an record input method
This function is used to select an input method for tag data. The user can select one of the
following methods: import from csv file, import from SAP AII (Auto-Id Infrastructure) Messages,
import from template file, or manual input.
Setting up Birth Record
This function sets up the Birth Record. The user can select either of the following two methods:
selecting a template file that defines the Birth Record, or entering the settings manually.
Writing data to tag and Printing a label on tag
This function initializes the tag and prints a label on tag using the selected definition files, the data
elements for each record and the printing layouts.
-5- Copyright© FUJITSU LIMITED 2017
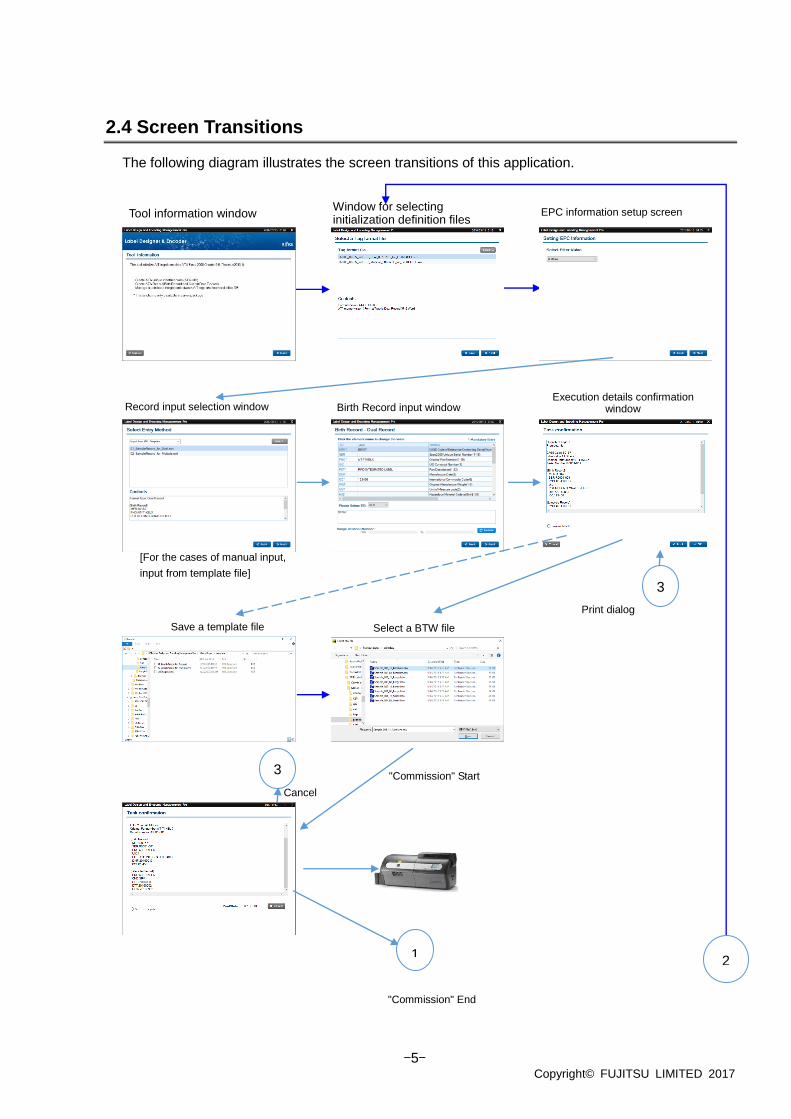
2.4 Screen Transitions
The following diagram illustrates the screen transitions of this application.
Tool information window Window for selecting initialization definition files
Record input selection window Birth Record input window Execution details confirmation
window
EPC information setup screen
[For the cases of manual input,
input from template file]
Save a template file Select a BTW file
Print dialog
1
"Commission" End
"Commission" Start
2
3
3
Cancel

-6- Copyright© FUJITSU LIMITED 2017
2.5 Start and Stop the Application
2.5.1 Start the Application
To start this application, click the icon of “RFID Label Design And Encoding Management Pro”
that has been placed on the computer desktop.
Click the Manual Input.
Execution result confirmation window
2
1

-7- Copyright© FUJITSU LIMITED 2017
Tool Information
This area displays the version of the ATA Spec and the application’s processing outline.
Cancel button
This button is used to close this application.
Next button
This button is used to display the next screen.
Operating procedure
(1) Confirm the Tool Information window.
(2) Click the Next button.
• The Select a Tag format file window (the window for selecting an initialization
definition file) will be displayed.
-8- Copyright© FUJITSU LIMITED 2017
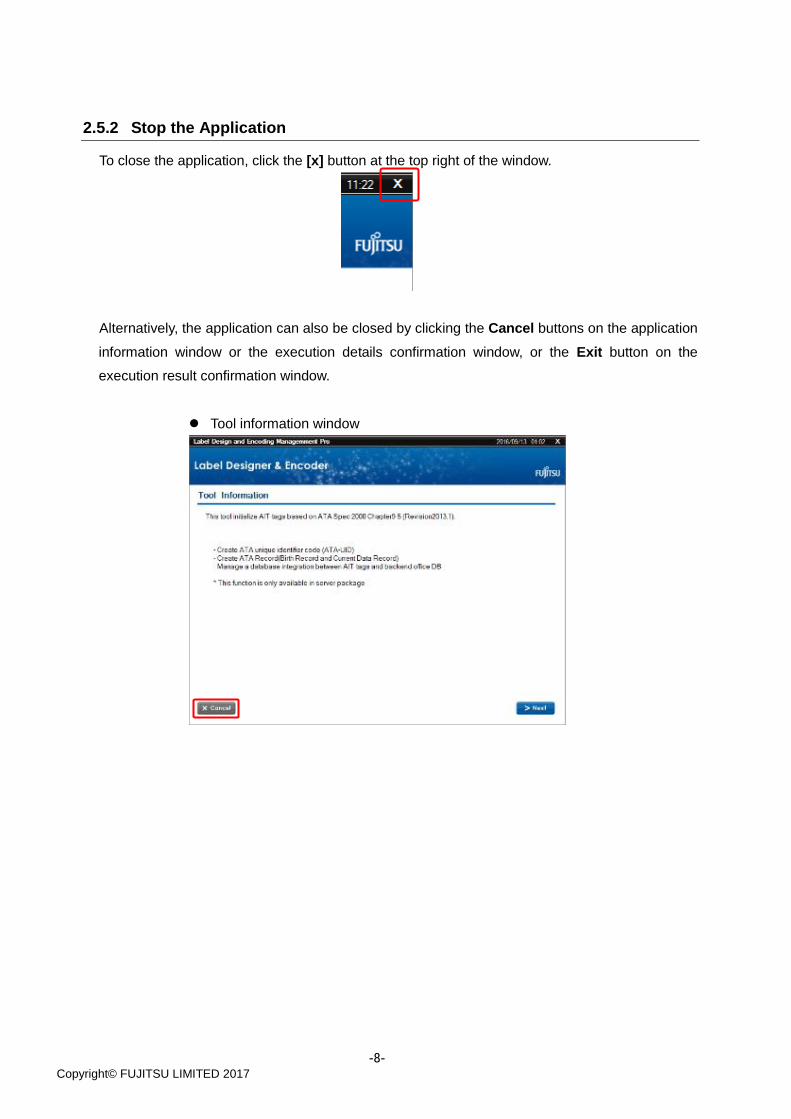
2.5.2 Stop the Application
To close the application, click the [x] button at the top right of the window.
Alternatively, the application can also be closed by clicking the Cancel buttons on the application
information window or the execution details confirmation window, or the Exit button on the
execution result confirmation window.
Tool information window

-9- Copyright© FUJITSU LIMITED 2017
Execution details confirmation window
Execution results confirmation window

-10- Copyright© FUJITSU LIMITED 2017
2.6 Use RFID Label Design and Encoding Management Pro Manual
Input
2.6.1 Select an Initialization Definition File
Select the initialization definition file to be used to initialize the tag.
Tag format file (list of initialization definition files)
This area displays a list of initialization definition files.
Clicking the Select button and selecting a folder displays a list of the XML files in the selected
folder.
The file list that is first displayed is based on the folder that was selected last time.
There are the following types of initialization definition files:
For the dual-record type Fujitsu’s RFID Integrated Label – 1Kbyte (Large/Medium/Small)
S2000_Ch9-5_v2013.1_Dual_01KBYTE_for_FJ1KLABEL.xml
Fujitsu’s the multi-record type of RFID Integrated Label – 8Kbyte (Large/Medium/Small)
S2000_Ch9-5_v2013.1_Multi_08KBYTE_for_FJ8KLABEL.xml
Contents
This area displays the content of the file selected in the initialization definition file list.
If the selected file cannot be recognized as an initialization definition file, an error message will
be displayed and the Contents area will be blank.
If this area is blank, the Next button will be grayed out.
Select button
This button displays the folder selection dialog box.
The XML files in the selected folder will be displayed in the initialization definition file list.

-11- Copyright© FUJITSU LIMITED 2017
Back button
This button is used to display the previous window.
Next button
This button is used to display the next window.
If the Contents area is blank, this button will be grayed out.
! Caution • If SizeofCurData is not set, the tag initialization will fail.
2.6.1.1 Initialization Definition File
Refer to the sample initialization definition file below.
Sample initialization definition file (example)
<?xml version='1.0' encoding='UTF-8'?>
<AITTag>
<InitInfo>
<VersionDesc>ATA-TOC-2013</VersionDesc>
<FlagTimeStamp>1</FlagTimeStamp>
<ATAFormatType>1</ATAFormatType>
<SizeofUserMem>2048</SizeofUserMem>
<SizeofCurData>255</SizeofCurData>
<SizeofMechanic>255</SizeofMechanic>
<SizeofBirth>200</SizeofBirth>
</InitInfo>
</AITTag>

-12- Copyright© FUJITSU LIMITED 2017
Reference • Do not change any of the items in the sample file, except for the
"SizeofUserMem" item.
For the "SizeofUserMem" item, specify the size (in words) of the area for
writing ATA records.
• Consider the type and capacity of the tag when selecting an initialization
definition file and setting a size for “SizeofUserMem”.
• With multi-record tags, only values that are multiples of 1024 between 1024
and 30720 can be specified as valid values. Specify a value between 1024
and 4096 as the size when using Fujitsu’s the multi-record type of RFID
Integrated Label – 8Kbyte.
• With dual-record tags, only 96 and values that are multiples of 256 between
512 and 2048 can be specified as valid values. Specify 512 or more as the
size when using Fujitsu’s the multi-record type of RFID Integrated Label –
1Kbyte.
Operating procedure
(1) Click the Select button.
(2) In the displayed dialog box, navigate to the folder containing the Tag Format files, and
then click the OK button.

-13- Copyright© FUJITSU LIMITED 2017
(3) A list of the XML files in the selected folder will be displayed.
(4) Select the target file and then click the Next button.
-14- Copyright© FUJITSU LIMITED 2017
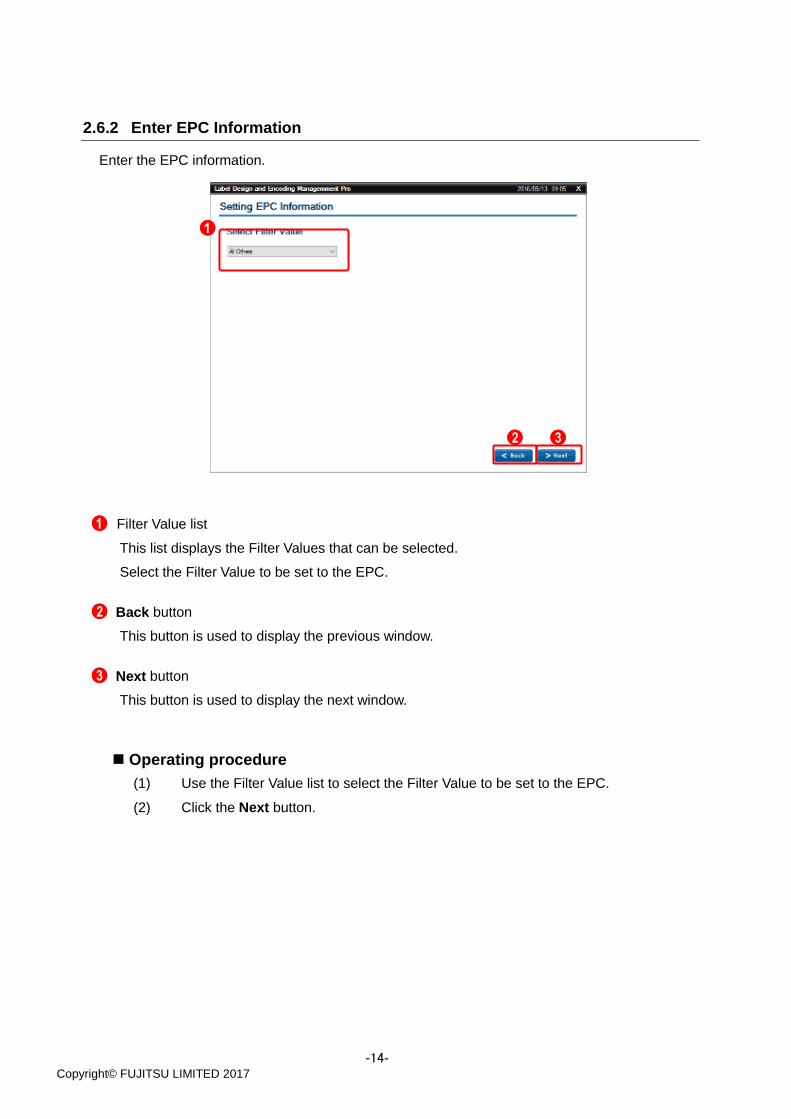
2.6.2 Enter EPC Information
Enter the EPC information.
Filter Value list
This list displays the Filter Values that can be selected.
Select the Filter Value to be set to the EPC.
Back button
This button is used to display the previous window.
Next button
This button is used to display the next window.
Operating procedure
(1) Use the Filter Value list to select the Filter Value to be set to the EPC.
(2) Click the Next button.

-15- Copyright© FUJITSU LIMITED 2017
2.6.3 Select a Record Input Method
Select a record input method.
If Enter Birth Record from templates has been selected, select a template file.
Select Entry Method
Select one of the following input methods for tag data:
・ Import from CSV File: import data from CSV file
・ Import from SAP AII (Auto-Id Infrastructure) Messages: import data from SAP-AII message
・ Import from XML Template: import data from template file
・ Manual Input: input data manually
When any option other than “Manual Input” is specified, the Select button is enabled.
File list
This area displays a list of files for importing data if the option other than “Manual Input” is
specified in the Select Entry Method dropdown.
Clicking the Select button and selecting a folder displays a list of the files in the selected folder.
Contents
This area displays the content of the file selected in the file list if the option other than “Manual
Input” is specified in the Select Entry Method dropdown.
If the selected file cannot be recognized as a tag data file, an error message will be displayed
and the Contents area will be blank.
If this area is blank, the Next button will be grayed out.

-16- Copyright© FUJITSU LIMITED 2017
Select button
This button displays the folder selection dialog box.
The XML files in the selected folder will be displayed in the template file list.
Back button
This button is used to display the previous window.
Next button
This button is used to display the next window.
This button will be disabled if the Enter Birth Record from templates radio button has been
selected but the Contents area is blank.
Procedure (when non-“Manual Input” has been selected)
(1) Select one option other than Manual Input in the Select Entry Method dropdown and
then click the Select button.
(2) In the displayed dialog box, navigate to the folder containing the template files, and then
click the OK button.

-17- Copyright© FUJITSU LIMITED 2017
(3) A list of the files in the selected folder will be displayed.
(4) Select the target file and then click the Next button.

-18- Copyright© FUJITSU LIMITED 2017
(5) The content of the file will be displayed.
In case of Import from XML Template
In case of Import from CSV File or Import from SAP AII Messages

-19- Copyright© FUJITSU LIMITED 2017
Procedure (when Manual Input has been selected)
(1) Select the Manual Input in the Select Entry Method dropdown and then click the Next
button.
(2) The Birth Record input window will be displayed.

-20- Copyright© FUJITSU LIMITED 2017
2.6.3.1 CSV File
This application is able to import CSV file with tag data. Each record on CSV file corresponds to
the data for a tag. The format of the CSV file is described as follows. TEIs (aka Item Name) are
used as column headers in the file.
No Item Name Detail
1~N [TEI Name] Set the TEI for Birth Record according to the format type
defined in ATA SPEC2000.
Mandatory TEI and the TEI corresponding to Spec 2000
Unique Serial Number (SER/SEQ/UCN) should be set. In
case of Dual Record, CND for Lifecycle Record should also
be set.
If a specific TEI appears multiple times, the Item name should
be defined in the format as [TEI Name]␣([Number]). For
example: HAZ (1), HAZ (2), HAZ (3).If a specific value of a
specific TEI need to be encoded to the tag, the value
should be set in corresponding row for that TEI.
Refer to the RFID Data Management Pro &
RFID Label Design and Encoding Management Pro User's
Guide (Appendixes)-Appendix C – TEI Input for information
about mandatory TEIs.
Sample CSV file (example)
MFR SER PNO PDT ICC
CAGEM B00001 PARTS64 A1234567890123456789012345678901 C12345
CAGEM B00002 PARTS64 A1234567890123456789012345678901 C12346
CAGEM B00003 PARTS64 A1234567890123456789012345678901 C12347

-21- Copyright© FUJITSU LIMITED 2017
! Caution • The delimiter character of the CSV file can be changed by editing the
following configuration files.
C:\Users\Public\RFID Label Design and Encoding Management Pro\Manual
Input\CSV\CSVSetting.xml
• The default value is a comma.
• After the value of “Output_Delimiter” is changed, it is necessary to update
the output CSV file (CommissionData.csv), modify the Delimitation setting
in the BTW file, and then, execute Refresh Field Names from Database
Connection Setup menu in the BTW file.
• CSVSetting.xml
<Input_Delimiter> sets the delimiter of the CSV file for the input (the delimiter
needs to be defined as single character).
When < Input_DoubleQuoteEnable > is set to true, each of values need to be
enclosed with double quotes.
<Output_Delimiter> sets the delimiter of the CSV file for the output (the
delimiter needs to be defined as single character).
When <Output_DoubleQuoteEnable> is set to true, each of values are
enclosed with double quotes.
<?xml version="1.0" encoding="utf-8" ?> <CSVSetting> <Input_Delimiter>,</Input_Delimiter> <Input_DoubleQuoteEnable>false</Input_DoubleQuoteEnable> <Output_Delimiter>,</Output_Delimiter> <Output_DoubleQuoteEnable>false</Output_DoubleQuoteEnable> </CSVSetting>

-22- Copyright© FUJITSU LIMITED 2017
2.6.3.2 SAP-AII (Auto-Id Infrastructure) Message
This application is able to import the Command message generated from SAP-AII in the form of
a xml file with tag data. Refer to SAP AII-DC 1.0 for the detail information of schema of
Command message (Command.xsd).
The elements and attributes in Command.xsd used by this application are described as follows.
Table. Elements, Attributes and Rules in Command.xsd
N
o Element Name Rule Detail
1
/Command/WriteTag
Data/Item
Minimum Occurrence: 1
The element contains the data to be written to the tag.
Each “Item” element corresponds to one tag.
To contain multiple tags’ data, “Item” should be defined in
multiple times.
2
/Command/WriteTag
Data/Item/FieldList/Fi
eld
Minimum Occurrence: 1
Unbounded Mandatory
Attribute: name
The element contains EPC value, TEI of Birth Record
corresponding to the format type defined in ATA SPEC2000
and the item name, item value to be printed on the label of
a tag. Each “Field” element corresponds to one of above
items.
The relation between the categories and the values of
these items, detail of rules are described in the table below.
3
/Command/WriteTag
Data/Item/FieldList
Minimum Occurrence: 1
Unbounded Optional
Attribute: format
This element is the parent element of “Field” element.
“format” attribute can be used to define the name of a label
layout which is used by RFID printer.

-23- Copyright© FUJITSU LIMITED 2017
Table. Relation between Tag Data, Label Data and Field Elements in Command Message N
o
Me
mo
ry B
an
k in
T
ag
It
em
Nam
e in
AT
A S
PE
C
De
fin
itio
n o
f N
am
e A
ttri
bu
te f
or
Fie
ld
Ele
me
nt
Va
lue
of
Fie
ld E
lem
en
t
Ma
nd
ato
ry /
Op
tio
na
l
De
tail
1
EP
C
-
EP
C
Hexa
decim
al valu
e o
f E
PC
Op
tio
nal
This item contains hexadecimal value of EPC data to be written to
the tag. (Business data only, not including PC bit)
Creation of EPC Data:
If this item is defined, the value contained in this item will be written
to EPC memory on the tag.
If this item is not defined, data be written to EPC memory on the tag
will be generated from “Filed” elements defined in the table below.
If “EPC_FilterValue” is not defined, however, the filter value selected
in “EPC information setup screen”.
Value of Name
Attribute
Item in EPC
EPC_FilterValue Filter Value
TEI_MFR or
TEI_SPL
Manager number
CAGE/DoDAAC
TEI_PNO Original Part Number(PNO)
TEI_SER or
TEI_SEQ or
TEI_UCN
Spec 2000 Unique Serial Number
(SER or SEQ or UCN)
2
EP
C
EP
C F
ilte
r
Va
lue
EP
C_F
ilte
r
Va
lue
Va
lue
of
Filt
er
Valu
e
Op
tio
nal
This item contains the value of Filter Value to be written to the EPC
memory on the tag.

-24- Copyright© FUJITSU LIMITED 2017
No
Me
mo
ry B
an
k in
T
ag
It
em
Nam
e in
AT
A S
PE
C
De
fin
itio
n o
f N
am
e A
ttri
bu
te f
or
Fie
ld
Ele
me
nt
Va
lue
of
Fie
ld E
lem
en
t
Ma
nd
ato
ry /
Op
tio
na
l
De
tail
3~
N
Bir
th R
eco
rd
[TE
INa
me]
TE
I_[T
EI
Nam
e]
Va
lue
of T
EI.
Co
mplia
nt
with
the
de
fin
itio
n in
ATA
SP
EC
20
00
Com
plia
nt
with
th
e d
efin
itio
n in A
TA
SP
EC
20
00
. S
pec 2
00
0
Uniq
ue
Se
rial N
um
be
r is
ma
nda
tory
. C
ND
in L
ife
cycle
Reco
rd is m
and
ato
ry in
ca
se o
f D
ua
l R
eco
rd.
This item contains TEI of Birth Record corresponding to the format
type defined in ATA SPEC2000. If a specific TEI appears multiple
times, the Item name should be defined in the format as TEI_[TEI
Name]_[Number]. For example: TEI_HAZ_1, TEI_HAZ_2,
TEI_HAZ_3.

-25- Copyright© FUJITSU LIMITED 2017
Sample SAP-AII Message 1 (Containing Value of EPC)
Sample SAP-AII Message 2 (Not Containing Value of EPC)
<?xml version="1.0" encoding="UTF-8" ?>
<Command xmlns:xsi="http://www.w3.org/2001/XMLSchema-instance" xsi:noNamespaceSchemaLocation="Command.xsd">
<WriteTagData readerID="Writer_Device">
<Item>
<FieldList format="FJ Label Large.BTW" jobName="ZXP7_Job" quantity="1">
<Field name="EPC_FilterValue">17</Field>
<Field name="TEI_MFR">S0167</Field>
<Field name="TEI_SER">SERABC123456789</Field>
<Field name="TEI_PNO">PN0ABC123456789</Field>
<Field name="TEI_PDT">PDTABCDEFGHIJKLMN1234567890_+?</Field>
<Field name="TEI_DMF">20001122</Field>
<Field name="TEI_ICC">123456</Field>
<Field name="TEI_HAZ_1">UN1122</Field>
<Field name="TEI_HAZ_2">UN3344</Field>
<Field name="TEI_HAZ_3">UN5566</Field>
</FieldList>
</Item>
</WriteTagData>
</Command>
<?xml version="1.0" encoding="UTF-8" ?>
<Command xmlns:xsi="http://www.w3.org/2001/XMLSchema-instance" xsi:noNamespaceSchemaLocation="Command.xsd">
<WriteTagData readerID="Writer_Device">
<Item>
<FieldList format="FJ Label Large.BTW" jobName="ZXP7_Job" quantity="1">
<Field name="EPC">3B4604F0C76DD03B00420F1CB3D35DB7E390131520420F1CB3D35DB7E3900000</Field>
<Field name="TEI_MFR">S0167</Field>
<Field name="TEI_SER">SERABC123456789</Field>
<Field name="TEI_PNO">PN0ABC123456789</Field>
<Field name="TEI_PDT">PDTABCDEFGHIJKLMN1234567890_+?</Field>
<Field name="TEI_DMF">20001122</Field>
<Field name="TEI_ICC">123456</Field>
<Field name="TEI_HAZ_1">UN1122</Field>
<Field name="TEI_HAZ_2">UN3344</Field>
<Field name="TEI_HAZ_3">UN5566</Field>
</FieldList>
</Item>
</WriteTagData>
</Command>

-26- Copyright© FUJITSU LIMITED 2017
2.6.4 Enter Birth Record
Enter a Birth Record.
If Import from XML Template has been selected
The content of the template will be displayed as the initial values.
If Manual Input has been selected
No initial values will be displayed.
TEI list
This list displays the TEI values and remarks explaining the TEI values.
TEI
This column displays TEIs.
Value
This column displays the value that has been specified for the TEI.
Remarks
This column displays a description of the TEI and the number of characters that can be
entered.
TEI description
This area displays the remark for the TEI selected in the TEI list, as well as whether the TEI is
mandatory.
Also select the TEI to be defined if necessary.

-27- Copyright© FUJITSU LIMITED 2017
Input area
This area displays the value of the TEI selected in the TEI list. The value can be changed if
necessary.
Update button
This button replaces the value in the Value column of the TEI that has been selected in the
TEI list with the content of the input area.
Back button
This button is used to display the previous window.
Next button
This button is used to display the next window.
From area
This area displays the Spec 2000 Unique Serial Number for the first tag if continuously
commissioning multiple tags. A blank will be displayed until a value of Spec 2000 Unique
Serial Number is input.
To area
This area displays the Spec 2000 Unique Serial Number for the last tag if continuously
commissioning multiple tags. Spec 2000 Unique Serial Number will be blank until a value is
input. A blank will be displayed until a value of Spec 2000 Unique Serial Number is input.
Reference: • The asterisk ("*") to the right of the TEI code for some data input fields
indicates that the item is a mandatory input item.
• To the right of each item an explanation of the TEI is displayed, along with
the maximum number of characters that can be entered.
For example, "1-5" means that 1 to 5 characters can be entered.

-28- Copyright© FUJITSU LIMITED 2017
• This application uses the information entered in the EPC information setup
window and the Birth Record input window to create an EPC to be written to
the tag. The following table shows the correspondence between the input
information and the EPC items.
Input item in this application EPC item
EPC information setup window
[Select Filter Value]
Filter Value
Birth Record input window
[MFR/SPL]
Manager number
CAGE/DoDAAC
Birth Record input window
[PNO]
Original Part Number(PNO)
Birth Record input window
[SER/SEQ/UCN]
Spec 2000 Unique Serial Number
(SER or SEQ or UCN)
! Caution • If a template file that comes with this application is selected, sample values
will be displayed in the Value column of the TEI list. These sample values
cannot be used as they are, so change them to the appropriate values.
• If the Next button is clicked without clicking the Update button, a message
will be displayed indicating that the Update button has not been clicked.
• For single-record and dual-record tags, the characters that can be entered
are the 6-bit characters defined in table A13-2, "ASCII Conversion Chart" in
Appendix 13,"6 Bit ASCII Encoding" of ATA Spec2000 Rev.2013.1. If
characters other than valid characters are entered, an error message will be
displayed and processing will be canceled. The following error message will
be displayed: "[ER015] Failed to write Birth Record to the tag. (Invalid
parameter)"
• It is possible to input CND in Lifecycle Record on the Birth Record input
screen.
When Value of Birth Record is not renewed and NEXT is pressed, the alert
message is displayed, and please press OK, and, next, advance when it is
not necessary to input it.

-29- Copyright© FUJITSU LIMITED 2017
Operating procedure (Items other than Spec 2000 Unique Serial Number)
(1) Select the TEI to be updated in the TEI list.
(6) Change the content displayed in the input area, and then click the Update button. An
error message will be displayed if there is an error with the value entered.

-30- Copyright© FUJITSU LIMITED 2017
(7) The value in the TEI list will be updated with the modified content.
(8) Repeat Steps (1) to (3) and then click the Next button when the data input is complete.

-31- Copyright© FUJITSU LIMITED 2017
Operating procedure (Items related to Spec 2000 Unique Serial Number)
(1) Select the SER in the TEI list.
(2) Change the content displayed in the input area, and then click the Update button. An
error message will be displayed if there is an error with the value entered.
Please Select TEI: Select a TEI.
Start from: Input the Serial Number for the first tag. However, the common suffix
existing in the data all tags should not be input.
Suffix: Input the common fixed value at the end of Serial Numbers for all tags.
Quantity: Input the quantity of tags to be commissioned. The default value is 1 if no
value is input.

-32- Copyright© FUJITSU LIMITED 2017
(3) The From area and To area displaying the range of Serial Number for all tags are
updated when clicking the Update button. The TEI and value of Serial Number in the
TEI list will be updated with the entered content for the first tag. An error message will
be displayed if there is an error with the value entered.
-33- Copyright© FUJITSU LIMITED 2017
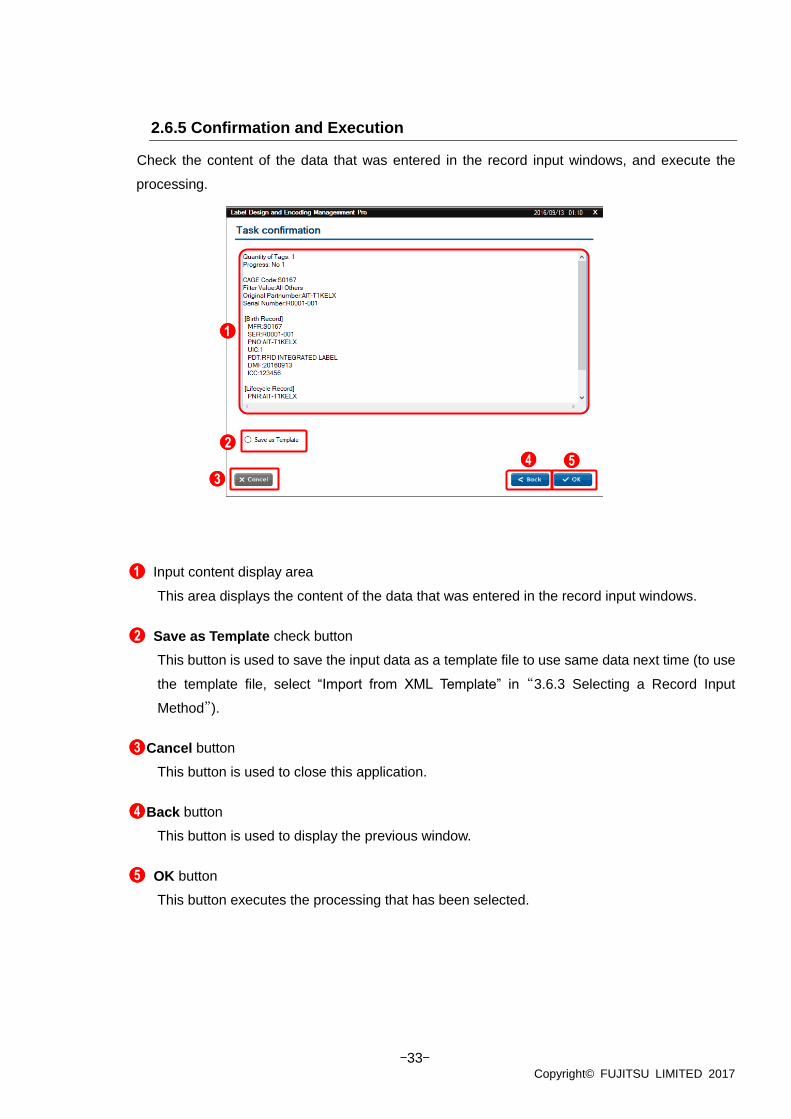
2.6.5 Confirmation and Execution
Check the content of the data that was entered in the record input windows, and execute the
processing.
Input content display area
This area displays the content of the data that was entered in the record input windows.
Save as Template check button
This button is used to save the input data as a template file to use same data next time (to use
the template file, select “Import from XML Template” in “3.6.3 Selecting a Record Input
Method”).
Cancel button
This button is used to close this application.
Back button
This button is used to display the previous window.
OK button
This button executes the processing that has been selected.

-34- Copyright© FUJITSU LIMITED 2017
Operating procedure
(1) Click the OK button to display Label Layout Selection window. (If the “Save as
Template” check button is checked, enter a file name in the save dialog and save it.)
An error message will be displayed on the Execution Result Confirmation window if it
fails to start BarTender or a validation error occurs on the input data.
(2) When the OK button is clicked on the Task confirmation screen, the screen shows the
folder where you selected the BTW file last time. Select the BTW File and then click the
Open button.
Reference: The print dialog is not displayed in this version of this application before
commissioning. Please confirm the printer settings such as the Card Settings
(Feeder or ATM Slot) in the Label Format File (.btw) before the above
operation.

-35- Copyright© FUJITSU LIMITED 2017
(3) The number of already commissioned tags and total number of tags in the operation are
displayed in "PrinterState". The print of the subsequent page is stopped when the
Cancel button is clicked with there no print job queue, and it returns on the previous
page.
(4) Click the Finish button to return to the window for selecting an initialization
definition file. When the Exit button is clicked, the application will be closed.
! Caution • This application automatically follows the printer settings in the BTW file. If
necessary to change the printer settings such as default printer or Card
Settings (ATM Slot or Feeder), please modify the BTW file with reference to
the BTW file Editing Guide for how to modify the settings in the BTW file.