retaining walls made easy - all day fencing, gates, fence ... · pdf fileretaining walls made...
TRANSCRIPT

Retaining
Walls
Made Easy

Retaining Walls Made Easy!
Contents Page 1 Contents Page 2 Foreword Page 3 Demolition Page 3 Removal Vegetation Page 3 Excavation Page 4 Reinforcement Steel Page 6 Concreting Page 6 Laying the Blocks Page 8 Corefilling Page 8 Drainage and Backfilling Page 9 Quick Guide

Retaining Walls Made Easy! Step by step guide to the construction of retaining walls. Foreword There are various options when choosing a design for a retaining wall, from treated pine logs, brickwork and concrete block to prefabricated fencing systems for larger jobs. When choosing a retaining wall design various factors should be taken into consideration. Firstly, and most importantly is to choose a suitable design for your particular situation. Obviously the higher the fence the more soil it has to contain and the greater the stresses placed upon it are. Another governing factor in selecting a suitable design is the foundation material that the wall will be sitting on. Generally the softer the soil the larger the footing should be. This is a decision that needs to be taken upon excavation of the footings, and will be discussed in more detail. Common retaining wall designs
For small retaining walls up to 800mm high, treated pine logs or sleepers may be suitably strong enough, but for higher walls or heavy loading, a concrete or similar strength structure should be considered. The design of the structure, and the drainage principles applied are of equal importance to the overall strength of the wall and the stress it will be able to withstand. There are many different designs and materials available for the construction of retaining walls, but for the purpose of this manual we examine the retaining system of sandstone faced interlocking concrete blocks. The basic principles applied here apply to most retaining wall designs.

Below is detailed a simple 8 step plan to designing and building a concrete block retaining wall. If you have any questions that are not addressed by this manual please don’t hesitate to contact All Day Fencing, www.alldayfencing.com.au Step 1
Firstly, remove any old structures. Old hardwood sleepers, fence posts and tree stumps must be removed to prevent the attraction of white ants. Set up a level string line at the position of the top of the wall. The string line should be in line with the front edge of the proposed retaining wall. Step 2 Measure the thickness of the blocks to be laid and excavate the soil to allow 150mm to 200mm clearance behind the new wall. Remove all tree stumps and roots that are within 200mm of the back of the proposed wall. Step 3 Footings for concrete block, stone or brick retaining walls need to be designed to withstand the loads and pressures involved. The size of the footing for a retaining wall is determined by the foundation material, the height of the wall and the soil to be retained. Some foundation materials such as sand may require formwork to hold the concrete in place during curing.
Sand 500mm x 400mm
Clay 400mm x 300mm
Sandstone 400mm x 200mm
Soil 400mm x 300mm
other Refer to engineer
Excavate a trench 400mm wide and 300mm deep for your footing. The front of the trench should start in line with the string line so that the blocks sit on the front of the footing not in the middle. This is extremely important as the soil pressure exerted on the back of the footing keeps the wall straight and stops it from leaning.

The diagram above shows the directional force exerted by soil pressure. The shape and position of the footing under the wall is the most important factor in combating soil pressure. The footing must form a ‘L’ shape and be directly bonded to the blocks above to resist movement. If the site is not level, the trench for the footings will have to be dug in level steps. This will form several steps in your footing. The depth of these steps once the concrete has been added, must be equal to the height of the blocks being used. (See diagram below)
Step 4 Concrete is strong in ‘compression’ and steel is strong in ‘expansion’. Combining the two provides a reinforced concrete footing strong enough to withstand the pressures required for most retaining wall construction. Two types of steel are required for the footings of a retaining wall. Firstly a trench mesh is used to bind the concrete footing together, and secondly, a vertical bar is used to bind the retaining wall blocks to the footing. The trench mesh 8TM (8mm trench mesh) comes in lengths of 6 metres and in various widths. The most common are 200mm, 300mm and 400mm wide. A gap of 50mm clearance is required between the steel and the edge of the concrete, (ie; a 300mm wide piece of trench mesh is required for a footing 400mm wide). Where the length of the footing exceeds 6 metres, the trench mesh must be overlapped by 450mm (minimum). For trenches with steps run the trench mesh under the depth of the steps - don’t cut the mesh at these steps as it can cause a weak point in the footing. Starter bars can be made from 12mm perforated bar. These bars come in lengths of 6 metres and should extend at least 600mm above the footing. Cut the bars to length and bend to form the ‘L’ shape as shown in the picture below. Bars can also be ordered from a steel supplier cut and bent to the shape you require.
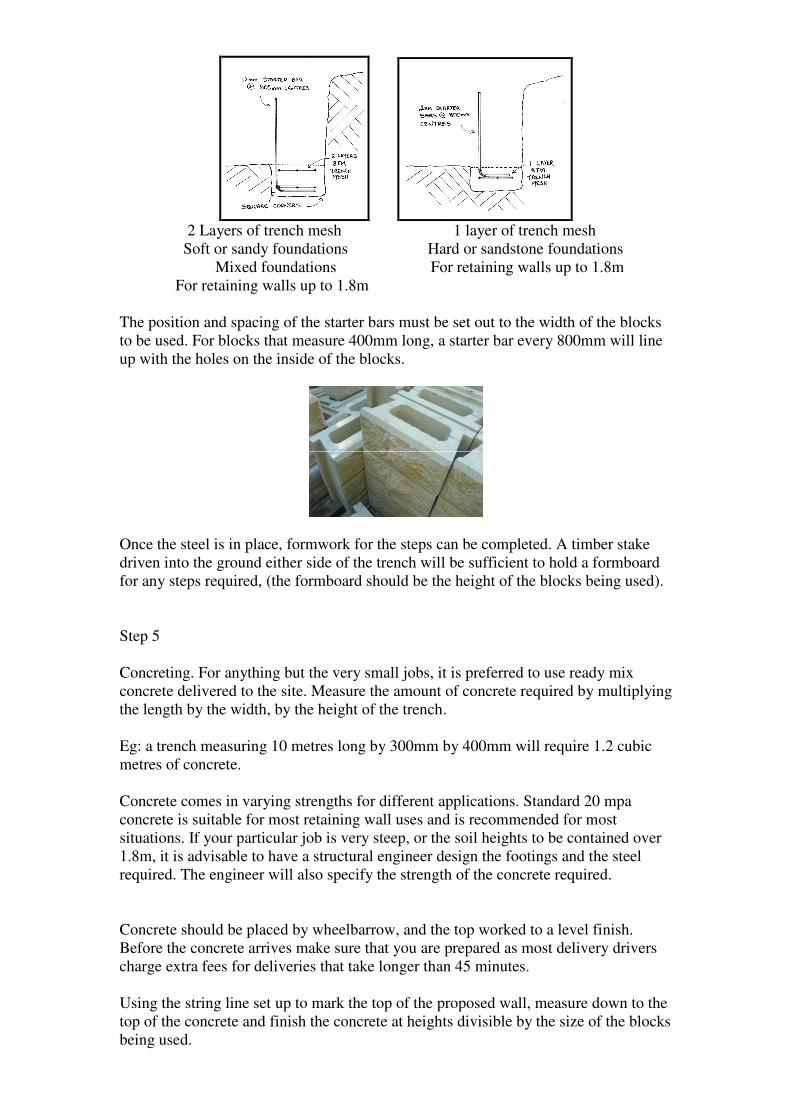
2 Layers of trench mesh 1 layer of trench mesh Soft or sandy foundations Hard or sandstone foundations Mixed foundations For retaining walls up to 1.8m For retaining walls up to 1.8m The position and spacing of the starter bars must be set out to the width of the blocks to be used. For blocks that measure 400mm long, a starter bar every 800mm will line up with the holes on the inside of the blocks.
Once the steel is in place, formwork for the steps can be completed. A timber stake driven into the ground either side of the trench will be sufficient to hold a formboard for any steps required, (the formboard should be the height of the blocks being used).
Step 5 Concreting. For anything but the very small jobs, it is preferred to use ready mix concrete delivered to the site. Measure the amount of concrete required by multiplying the length by the width, by the height of the trench. Eg: a trench measuring 10 metres long by 300mm by 400mm will require 1.2 cubic metres of concrete. Concrete comes in varying strengths for different applications. Standard 20 mpa concrete is suitable for most retaining wall uses and is recommended for most situations. If your particular job is very steep, or the soil heights to be contained over 1.8m, it is advisable to have a structural engineer design the footings and the steel required. The engineer will also specify the strength of the concrete required. Concrete should be placed by wheelbarrow, and the top worked to a level finish. Before the concrete arrives make sure that you are prepared as most delivery drivers charge extra fees for deliveries that take longer than 45 minutes. Using the string line set up to mark the top of the proposed wall, measure down to the top of the concrete and finish the concrete at heights divisible by the size of the blocks being used.

Footing poured - vertical steel rods and steps showing
This footing was excavated to 400mm wide x 300mm deep. Two layers of trench mesh (300mm8TM) was laid in the trench and the ‘starter bars’ (vertical steel rods) made from 12mm perforated bars were inserted at 800mm centers. (as the blocks measured 400mm long there is a bar for every second block).
Step 6 Laying the blocks. We have chosen sandstone look alike self locking concrete blocks. These are both good looking and quick to use as they do not require to be cemented together. Start from the corner stone on the lowest corner, lay a bed of cement (4 sand/1 cement) around 30mm thick. Thread the corner block over the starter bar and rest gently on the cement bed. Using your level and a rubber mallet tap the block into level in both directions. Once the corner block is in position, set up a level string line from the top front edge of the corner block to the first step, (level down from the string line marking the proposed top of the wall, to locate the position on the step. If your footing is level and has no steps, set up both corner blocks and stretch the string line across the top. Place a bed of mortar along the footing and lay the bottom line of blocks,
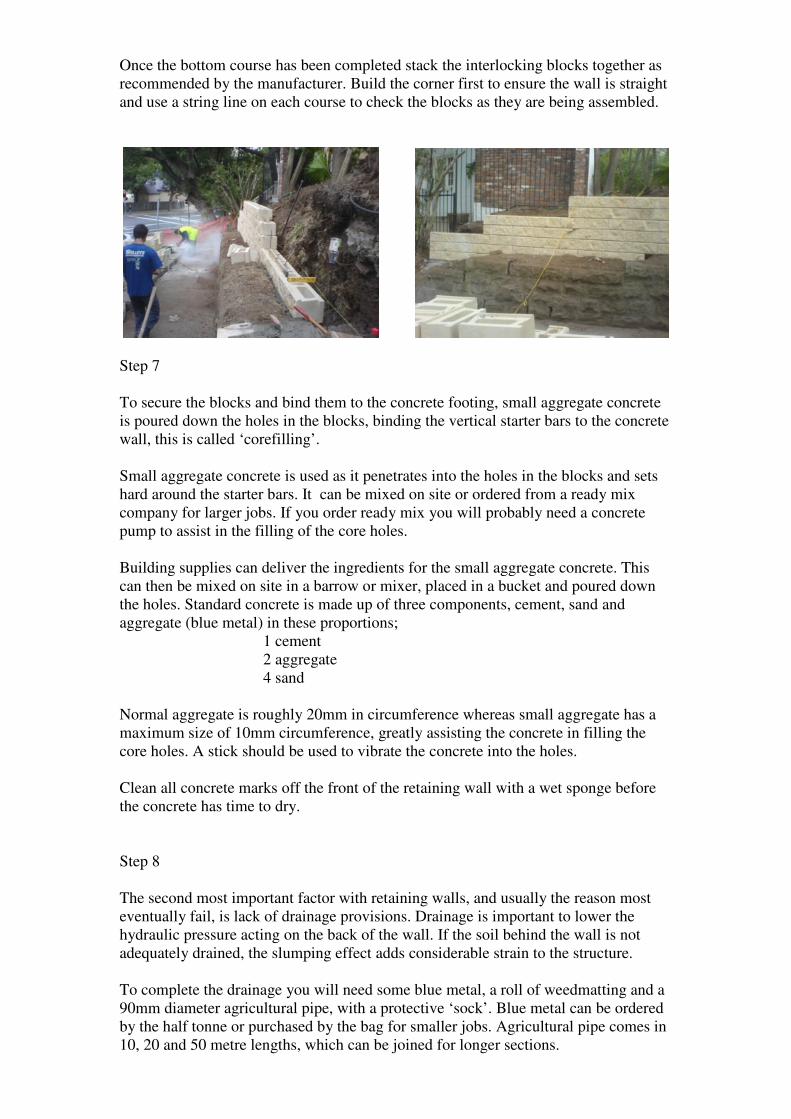
Once the bottom course has been completed stack the interlocking blocks together as recommended by the manufacturer. Build the corner first to ensure the wall is straight and use a string line on each course to check the blocks as they are being assembled.
Step 7 To secure the blocks and bind them to the concrete footing, small aggregate concrete is poured down the holes in the blocks, binding the vertical starter bars to the concrete wall, this is called ‘corefilling’. Small aggregate concrete is used as it penetrates into the holes in the blocks and sets hard around the starter bars. It can be mixed on site or ordered from a ready mix company for larger jobs. If you order ready mix you will probably need a concrete pump to assist in the filling of the core holes. Building supplies can deliver the ingredients for the small aggregate concrete. This can then be mixed on site in a barrow or mixer, placed in a bucket and poured down the holes. Standard concrete is made up of three components, cement, sand and aggregate (blue metal) in these proportions; 1 cement 2 aggregate 4 sand Normal aggregate is roughly 20mm in circumference whereas small aggregate has a maximum size of 10mm circumference, greatly assisting the concrete in filling the core holes. A stick should be used to vibrate the concrete into the holes. Clean all concrete marks off the front of the retaining wall with a wet sponge before the concrete has time to dry. Step 8 The second most important factor with retaining walls, and usually the reason most eventually fail, is lack of drainage provisions. Drainage is important to lower the hydraulic pressure acting on the back of the wall. If the soil behind the wall is not adequately drained, the slumping effect adds considerable strain to the structure. To complete the drainage you will need some blue metal, a roll of weedmatting and a 90mm diameter agricultural pipe, with a protective ‘sock’. Blue metal can be ordered by the half tonne or purchased by the bag for smaller jobs. Agricultural pipe comes in 10, 20 and 50 metre lengths, which can be joined for longer sections.
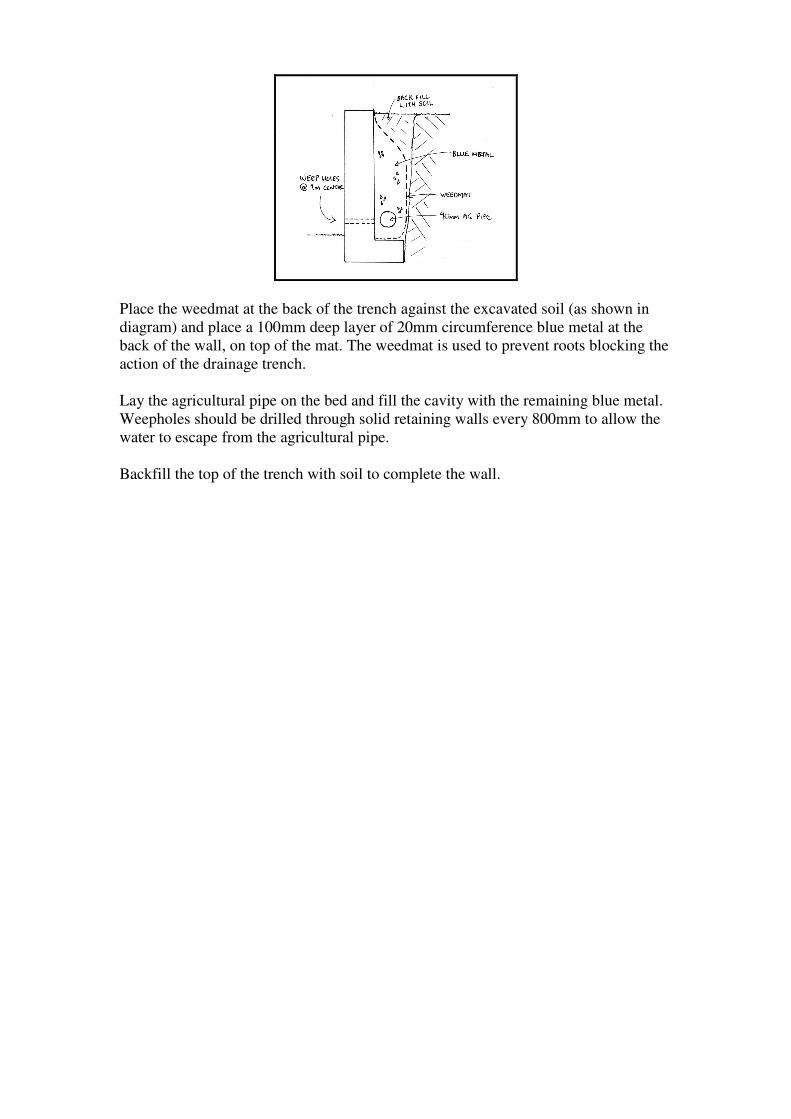
Place the weedmat at the back of the trench against the excavated soil (as shown in diagram) and place a 100mm deep layer of 20mm circumference blue metal at the back of the wall, on top of the mat. The weedmat is used to prevent roots blocking the action of the drainage trench. Lay the agricultural pipe on the bed and fill the cavity with the remaining blue metal. Weepholes should be drilled through solid retaining walls every 800mm to allow the water to escape from the agricultural pipe. Backfill the top of the trench with soil to complete the wall.
Easy Guide to Retaining Walls
Quick Guide
Step 1 Remove old wall Remove the old wall and any loose material. If the ground to be retained is loose, hoarding should be applied to help hold the soil back during construction.
Step 2 Excavate soil
Remove all vegetation, grind back and remove any tree stumps and excavate the soil to leave 200mm clearance to the back of the proposed wall
Step 3 Excavate the trench
Set up a level string line at the top of the proposed wall, excavate a level trench for the desired footing including steps if required.
Step 4 Reinforcement steel Place the trench mesh and starter bars in the trench. Make sure there is minimum 50mm clearance between the soil and the steel at any point.
Step 5 Concrete the footing Order 20mpa readymix concrete and install by hand using wheelbarrows or pour directly from truck if able.
Step 6 Laying the blocks Starting at the lowest corner, position the corner/s block first and establish a level string line to follow. Cement the bottom course level to the string line and allow to dry.
Step 7 Corefill the wall Using a small aggregate concrete mix fill the core holes in the retaining wall. Insert steel fence posts if required.
Step 8 Drainage and backfilling Lay a weedmat against the soil and insert an agricultural pipe surrounded by blue metal. Drill weep holes @ maximum 800mm centers.

Material Order and Priceguide
Estimated for 10m of 1.5m high wall sitting on a reinforced concrete footing 400mm x 300mm. Excavation (trench only) Sand 1.2m3 or Soil 1.45m3 or Mixed 1.62m3 or
Clay 2.4m3 Reinforcement Steel 8TM 2 @ 6.0 metres $ 48.00 12mm perforated bar 14 @ 1.0 metre $ 32.00 Concrete/Cement Readymix 20mpa 1.2m3 delivered $ 240.00 Readymix 10mm aggregate up to 1.3m3 $ 176.00 Mortar Mix 10/20kg bags $ 48.50 Blocks 400mm x 200mm concrete blocks 220 $ 1,870.00 Plus corner blocks if required Agricultural Pipe, 90mm 1 @ 10metres $ 62.00 Blue Metal (20mm aggregate) 1 tonne delivered $ 35.00 Weedmat 1 roll @ 10m $ 28.00 TOTAL $ 2,539.50

List of Suppliers Building Supplies
Eatons Building Supplies Forestville 9451 4522 Hardware and General Brookvale 9939 1188 Bunnings Hardware Artarmon 9439 3375
Belrose 9450 0799 Dural 9653 7500 Home Timber & H’ware Annandale 9660 5166 Asquith 9477 3355 Gladesville 9816 5999 Landscape Suppliers
Crystal Building Supplies Petersham 9569 4895 Brookvale Sand Co. Brookvale 9939 2077
Timber Suppliers Warringah Timbers Dee Why 9981 3733 Swadlings Timber Rosebery 9317 2299 Bankstown 9707 1200 North Shore Timber & H’ware Chatswood 9417 1306 Thornleigh 9481 9966 Waterloo 9699 6750 Warriewood 9999 5961 Waste Services DATS Skip Bins Sydney 1300 654334 Nursery Swane’s Nursery Galston 9651 1322